#easy sourdough pizza dough
Explore tagged Tumblr posts
Text
Sourdough Panzerotti (Pizza Pockets)
A fun twist from our friday pizza night! Easy and ohh so yummy homemade pizza pockets!

View On WordPress
#basic panzerotti#creative sourdough recipe#difference between a panzerotti and a calzone#Easy Sourdough#easy sourdough pizza#easy sourdough pizza dough#easy sourdough pizza dough recipe#easy sourdough pizza recipe#Easy Sourdough recipe#Easy Vegetarian Meal#healthy meals#healthy pizza toppings#homemade pizza dough#how to make a panzerotti#how to make sourdough panzerotti#how to make sourdough pizza#how to make sourdough pizza dough#Is sourdough complicated to make?#Is sourdough good for digestion?#is sourdough good for you#Is sourdough good for you?#Is sourdough hard to make#is sourdough healthy#is sourdough healthy for you#making pizza#nutrition facts of sourdough pizza#panzerotti#panzerotti filling#panzerotti vs calzone#panzerotti vs calzoner
0 notes
Text
Homemade Pizza Dough Recipe | Step by step guide
#artisan pizza dough#cauliflower pizza crust#classic pizza dough recipe#easy pizza dough recipe#gluten-free pizza dough#healthy pizza dough recipe#homemade pizza dough recipe#keto pizza crust#low-carb pizza base#naan bread pizza#Neapolitan pizza dough#pita bread pizza#pizza dough substitutes#pizza dough variations#quick pizza crust ideas#sourdough pizza dough#thin crust pizza dough#tortilla pizza base#traditional Italian pizza dough#whole wheat pizza dough
0 notes
Text
Sourdough Empanadas
Mastering my easy recipe for sourdough pizza dough opens opportunities to make everything from baked and grilled pizza to stuffed pastries like empanadas. Learn to make Sourdough Empanadas.
When I first started baking with a sourdough starter, I was eager to bake loaves of tangy fermented bread with a cracking crust and tender crumb. Since then, baking bread has become a habit that ensures I always have a fresh homemade loaf ready to slice. Yet I probably make Sourdough Pizza Dough even more frequently because it can be transformed in so many ways. As I share this week in my Twice…

View On WordPress
#best empanadas#easy empanadas#empanada dough#empanada recipe#favorite empanada#flathead beacon#food column#homemade empanadas#recipe#savory stuffed pastries#sourdough pizza dough
0 notes
Text

Amazing sourdough discard crackers recipe that I stole in the early pandemic from Makiko Itoh (Just Bento/Just Hungry)! These are incredible! And easy, and versatile. They also keep a surprisingly long time in the fridge, if you can refrain from eating them all.
Bring these to potlucks/picnics with red pepper hummus and/or baba ganoush. It's delicious, veggie friendly but everybody loves it, it can sit out safely, and it's snacky but also filling enough that if your friend says Thanksgiving dinner is at 3 but now it's going on 7 and the turkey’s still in the oven and everyone has been drinking since noon, you might actually save a life. Tips and variations behind the cut.
Flavorings: - Fresh rosemary and butter (the ultimate crackers of all time) - Garlic cayenne (equal parts) and olive oil. - Pizza: Add tomato sauce & parm, reduce fat & liquid. - Sesame seeds (and sesame oil? I have only used vegetable oil but it was still very good) - Everything bagel seasoning: How have I not done this yet??? - Za'atar seasoning: Same! - Nigella seeds: Trying today (by request of my mom!) - Chia seeds: Not worth it! Maybe try in combo with other seeds?
Technique: Before baking, I puncture the dough all over with a fork (which stops the crackers from puffing up) and cut it with a pizza cutter. (I always forget that the recipe says to score, not cut.) Also, I've started to roll the dough out in my pasta maker, which is quicker, and also makes them more even, which means they're harder to burn. Prettier edges too.
Liquid: I am not sure I've ever actually added any water? I don't know if my discard is unusually wet or what. But it's fine without water.
Temp./Timing: This probably does not apply if you have a real oven, but if you're cooking in batches in a small oven, be careful later on. The temperature builds up and you need to adjust the cooking time or later batches will burn.
22 notes
·
View notes
Text
Robby's Baking Therapy #10 Pineapple Ham Pizza

Hello, every birdie. Today is a recipe that I was a little bit afraid of, because of the fact that I am a little bit afraid of yeast. But I wanted to make dinner for my parents on their 41st wedding anniversary. And because we were doing a luau-themed party, we had to go with a controversial topping, Pineapple.

I knew that mom and dad liked pineapple on pizza so it wasn’t like one of them liked it and the other hated it.
This was the first time I had ever really worked with yeast by myself. I have helped my mom in the past make Runzas. Which is a cabbage, hamburger inside of a homemade yeast roll.

However, I did not make this pizza by myself. My younger brother, David, helped me out. He was also learning for the first time how to make the pizza crust.
The recipe that we are going to be following is the Betty Crocker Cookbook. The measurements and the recipe itself will be in the description down below.
You will want to preheat your oven to 475℉. And grease two rounds or if you are doubling it as we did, we greased 2 round pizza pans and 2 baking pans.

The ingredients that you will need are:
Flour
Sugar
Salt
Yeast
Olive or vegetable oil
Warm water
In a large bowl, you are going to mix together your flour, sugar, salt, and yeast.

Next, add 3 tablespoons of oil and water. Beat with an electric mixer on medium speed for about 3 minutes. Scraping the bowl frequently.
Stir in enough of the remaining flour until the dough is soft and leaves the side of the bowl. Being that this was my first time making pizza crust, I did have to have my mom show me how the pizza crust was supposed to look. My first attempt was good, but it didn’t have enough flour and it was a little gritty. Thankfully I didn’t have to start all over. I just put the pizza crust back in the bowl and added a little bit more flour.

While the crust was being shaped onto the pans, we made the toppings. We had a bbq sauce. Deli ham slices, and of course the pineapple. I know that some of you are disgusted because I put pineapple on my pizza. And for that I am sorry.

We cooked the pizzas in the oven, for 10 minutes on one rack. And then 10 minutes on the other rack. And no I wasn’t just doing 2 pizzas in the oven at a time. I put 2 pizza’s on the top rack and 2 pizza’s on the bottom rack.

This recipe was really easy. And I was glad that my mom was able to show me how it was supposed to look. Because that is how I learn the best. By watching someone, and by working with my hands. That is how I learned how to make my mom’s Sugar Cookies. I would watch her and help her. So that when I am an adult I almost have that recipe memorized (which is crazy to think about because sometimes I can’t even remember what I had for breakfast the day before).

This recipe was also really fun because it helped me gain a memory with David. We were just both new to this whole pizza-making business and we were saying that if we messed it up then it was going to be both of our faults. And on the other hand, if it succeeded then it was going to be because of both of our hard work.

I hope that you liked this recipe. I had so much fun with this simple little recipe. And I am concerned about one of my fears. YEAST! I will eventually make a yeast beard, but it is scary. I applaud anyone who has attempted sourdough bread during quarantine. Because I am afraid of yeast bread, I am terrified of sourdough bread. Does this mean that I won’t eventually make yeast bread or sourdough bread? No, I will probably eventually make one. When I get enough courage. Feel free to check out the recipe in the description down below. See you in the next recipe. Thank you
Show the original author some 💖💖💖 Betty Crocker
Here is a printable version of this recipe: on the blog
Please help me get a phone: by supporting me on Kofi / Patreon
#baking#baking therapy#recipe sharing#sweets#dessert#baking adventures#baking recipes#baking blog#recipes#baker#baked goods#bakeblr#pizza#pineapple#ham#pineapple pizza
14 notes
·
View notes
Text
sourdough propaganda is lying to u dont listen to them
hey. hey. do not throw away the discard of your sourdough. it is free bread. just put it in your mixing vessel of choice and add flour until that thirsty runny starter has eaten it all up (also a pinch of salt), until you got a ball of dough that is combined and smooth and doesn't stick to your hands too much when you touch it. rest it for 10 mins while you clean up a little and prep your toppings. choose some fancy eggs. maybe get some cheese. idk. whatever you have on toast usually. roll out the dough, you can use a pin or a wine bottle or the heel of your palm. u will have enough for one big disk or two thinner disks, whatever suits!
here is where the fun starts!! you can bake it. air fry it. i like to pan fry mine: go heat up your frying pan to medium-high. your choice of neutral oil, fry the dough on both sides. it will be easy to flip because its not a runny ass pancake. you now have flatbread. breakfast pizza. it will have a bit of complex flavour from the starter.
today i had mine with 3 small eggs, smothered in balsamic glaze and za'atar and sriracha. with a side of kimchi. and some english breakfast tea. tomorrow i might have it cut into strips and grilled with cheese and dipped into jammy boiled eggs. the next day i might do nutella and banana. the next day i might do maple sourcream and blueberries. life is so beautiful do NOT listen to sourdough discard propaganda!!!!!!!!!!!
11 notes
·
View notes
Note
See, I know to ask you these questions after dinner because last time I got hungry, lmao. You had me at thick, crusty bread to sop up sauce with. That's a winning description, right there. Just yum.
Breakfast is absolutely the superior meal. You are 100% right and congrats on winning!
I'm a big wuss about baking bread. My mom bakes amazing bread and will sometimes send some my way, I know I'm spoiled. The closest I've gotten was making my own pizza dough recently and it was a great success. I love baking things to have with "tea". In my culture, we say tea, but mean your hot drink of choice. So lately, it's been shortbread bars. Unrepentant sweet tooth here.
- snack anon
yeah the closest i came to making bread was focaccia. which was really easy and fun, but i tried to make like...crusty bread, but i didn't know anything about sourdough, so i just tried to make like a simple one with just yeast, but it did not come out right );
it was so dense and chewy. not what i wanted lol.
i am a morning coffee drinker <3 i love coffee. i also have an insane sweet tooth.
3 notes
·
View notes
Text
Frequently Asked Questions About Bread Machines
In recent years, bread machines have become increasingly popular among home bakers. These small kitchen appliances make it easy to bake fresh, homemade bread without all the time and effort of traditional methods. But with this rise in popularity comes a rise in questions from those who are new to using bread machines. In this post, we will address some of the most frequently asked questions about bread machines to help you become a more informed and confident baker.

What exactly is a bread machine?
A bread machine, also known as a bread maker, is an electric kitchen appliance designed specifically for making bread. It typically consists of a mixing bowl, kneading paddle(s), and heating element. The user adds the ingredients into the bread pan, selects the desired settings, and the machine takes care of the mixing, kneading, rising, and baking process.
Our socials:
https://www.facebook.com/bestbreadmakerforglutenfreebread/
https://twitter.com/bestglutenbread
https://www.pinterest.com/breadmakerforglutenfreebread/
https://www.youtube.com/@bestglutenbreadmaker
https://www.tiktok.com/@breadmakerforgluten
Can I use a bread machine to make other types of baked goods?
While its primary purpose is for making bread, many modern bread machines come equipped with settings for making dough or even jam. This allows you to easily make homemade pizza dough, rolls, bagels, and more. Some machines even have a gluten-free setting for those with dietary restrictions.
Is it worth investing in a bread machine?
This is a common question among those new to using bread machines. The answer really depends on your personal preferences and baking habits. If you enjoy making fresh, homemade bread but don't have the time or energy to do it by hand, then a bread machine is definitely worth the investment. It also allows you to control the ingredients and customize your bread to suit your taste.
Can I use regular flour in a bread machine?
Yes, you can use all-purpose or bread flour in a bread machine. However, it's important to note that different types of flour have different protein contents which affect how the dough rises and the texture of the final product. Bread flour typically has a higher protein content and is better for making bread in a bread machine, but all-purpose flour can also be used with good results.
Do I have to use yeast in a bread machine?
Yes, yeast is an essential ingredient in making bread. It's what causes the dough to rise and gives bread its airy texture. Most bread machines come with a recipe book that includes instructions on how to use yeast, so even if you've never used it before, the machine will guide you through the process.
How long does it take to make bread in a bread machine?
The time varies depending on the type of bread you are making, but most recipes take anywhere from 2-4 hours. Some machines also have a delay timer option, allowing you to set it up in the evening and wake up to fresh bread in the morning. It's important to note that the overall time includes rising and baking, so you don't have to actively be involved in every step.
Do I need any special ingredients for making bread in a bread machine?
No, most bread machine recipes use common pantry staples such as flour, yeast, sugar, and salt. Some recipes may call for additional ingredients like milk or butter, but these can easily be substituted with dairy-free options if needed.
Can I make different sizes and types of bread in a bread machine?
Most bread machines come with multiple size options to choose from. You can typically make a 1-pound, 1.5-pound, or 2-pound loaf depending on your needs. You can also experiment with different types of bread, such as whole wheat, sourdough, or even cinnamon raisin. The possibilities are endless!
Conclusion
Using a bread machine may seem intimidating at first, but with the right information and practice, it can become a valuable tool in your kitchen. We hope this post helped answer some of your burning questions about bread machines.
2 notes
·
View notes
Text
Pizza Sandwich

All the usual pizza toppings sandwiched between two slices of pizza crust - delicious but very messy to eat!
This is essentially a meatball sub with a twist. I got 8 decent sized sandwiches and you can absolutely cut corners with premade crust and meatballs.
Ingredients
Pizza dough (I used this NYT one here)
1 container of pizza sauce
3/4 c mozzarella
pizza toppings like green bell pepper and mushrooms (your call)
pepperonis
1 lb ground beef
1/2 lb ground pork or sausage
1/2 an onion
3 cloves garlic
1/3 c bread crumbs
1 egg
1 tsp herbs
1/4 c shredded Parmesan
splash of milk, lemon juice, or tomato paste
1 tsp salt
1 tsp pepper
Recipe
In a food processor, puree onions, garlic, egg, meats, bread crumbs, Parmesan, salt, herbs, pepper, and splash of liquid of your choice. If it is wet, add some more breadcrumbs.
Roll into small meatballs and bake at 425*F until cooked. 30-45 minutes.
Cook pizza dough into 2 small rounds. Maybe like a 10 inch diameter. If using large premade crust, cut it in half. Bake for 12 to 15 minutes at 350*F
Sauté your toppings in a skillet until softened.
Switch your oven to broil and begin to assemble your sandwich. Put sauce on one side of both doughs. Top one with the meatballs, followed by the toppings, then the mozzarella, and finally the pepperonis.
Broil the pizza until the cheese melts.
Slap on that other crust and use a serrated knife to gently saw the pizza into portions. It makes a lot.
Shitty Picture:
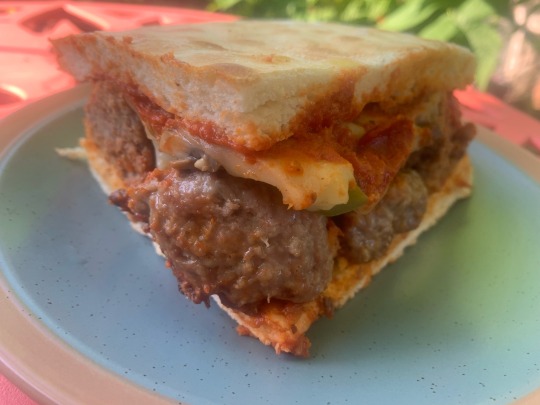
Way better with pizza crust than a sourdough roll! Plus, 8 extremely filling sandwiches that didn’t get soggy made prepping lunch the next couple of days easy for us. Would definitely make again.
7 notes
·
View notes
Text
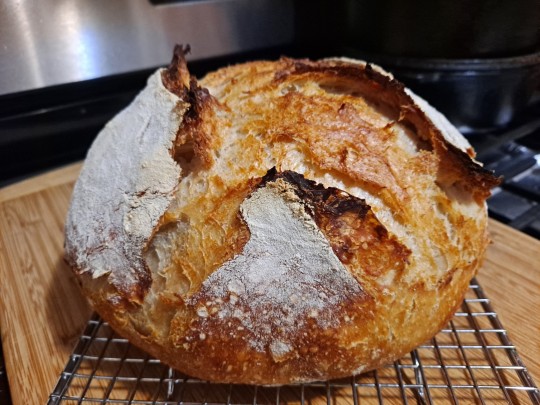
Experiment number 550,000 million is completed... 🤣🤣🤣 With most of the rise/proof "wait time" being while I was sleeping... 💤😴 What am I trying to prove? That baking sourdough bread is NOT an EXACT science. It is not that difficult and should not require all these "rules" that people want to make about baking SOURDOUGH... I have pretty much broken every single rule there is... And done exactly what works for me... in the time frame that works for me... I don't use a scale to measure my ingredients for my bread dough... I don't use a scale to weigh the measurements of ingredients that are going to go into my starter... I don't use heating pads or other contraptions or keep my house at a higher temperature so my sourdough starter or dough can stay warm or cold... I do not use filtered water. I use water straight from the tap despite the caution that it might kill the wild yeast. I don't worry about all this exactness with bulk ferment time... cold ferment time yadda yadda yadda...
Newest experiment... Can I make a decent sourdough loaf with minimal Hands-On time... With most of the wait time being while I'm sleeping... And how will it turn out if I use the "cold baked" method... Avoiding the excessive preheat times which to me is an absolute waste of our natural resources....
Came home from work yesterday and at 3:00 p.m. fed my cold straight from the fridge starter. I didn't think I was going to have enough starter for the two loaves I plan on baking today... so I added one full cup of flour and a half a cup of warm water.... (Normally I only do a half a cup of flour and a quarter cup of water but I gave it extra because I need extra starter today...)
By 8:00 p.m. the starter had at least doubled...
To a large Rubbermaid container I added:
1 full cup starter
3.5 cups white flour
1.5 cups wheat flour
1.5 cups water
Mix quickly just to get all the flour mostly incorporated... And Let shaggy dough sit with lid on for 30 minutes. After the 30 minute wait... I added another 1/4 cup water and 2 teaspoons salt... And immediately began stretch and folds every 30 minutes at 8:30 p.m. At 10:30 p.m. I moved the dough to a glass pyrex bowl with a lid. I was going to stop my stretch and folds there but thought better of it and 30 minutes later I did one more stretch and fold.
I left the bowl on the dining room table from 11 P.M. until I woke up at 5:00 a.m.
At 5 A.M. I gently plopped the dough onto the floured counter... And gently floured and formed my dough round to get a little more tension but also trying not to deflate the dough very much...
Placed that onto a piece of parchment paper... Scored the top with one slice down the center and plopped the whole thing into my cold cast iron Dutch oven. I did not have high hopes of this rising as well as it did that's why I only did one score down the center. I wish I had taken a picture but it was definitely much smaller than any of my other ready to bake forms.
As suggested I baked using the "cold bake" method for the first time.
Put oven on 450°. And placed the cold Dutch oven into the cold... But now preheating oven... immediately.
Baked at 450° for 50 minutes.
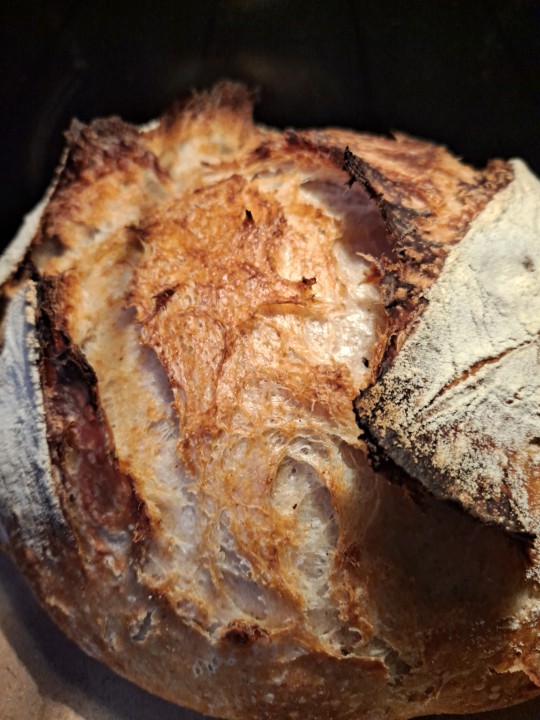
Removed the lid... And I was surprised to see that it definitely got a good oven spring... Continued baking with lid off for another 10 minutes.
Took temperature of the loaf it was 195°.
Took the loaf out of the Dutch oven and placed directly onto my pizza stone that was already in the oven.
Baked for another 10 minutes until bread reached a temperature of 205 and was more golden brown in color.
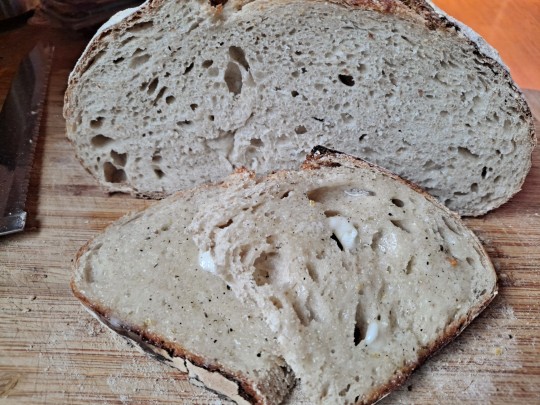
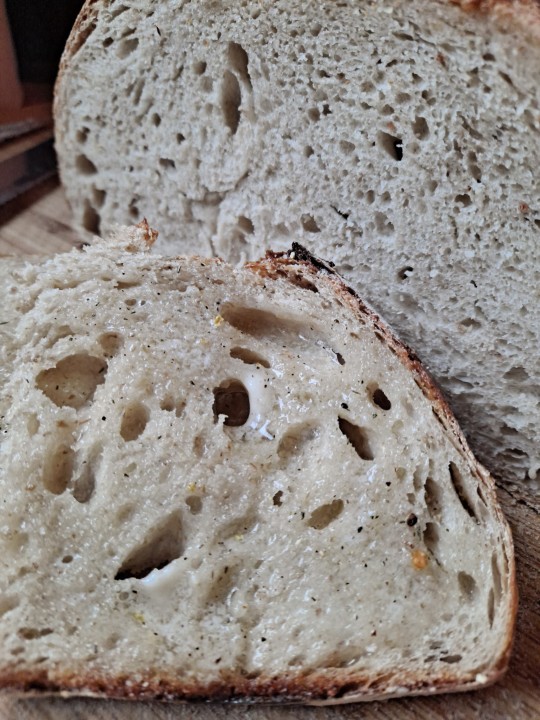
I don't know what the inside looks like but I'm not really concerned about that. It looks and smells terrific.
And it was EASY PEASY! Barely any hands on time at all... No fuss... No stress...
Experiment was a success! Total time... From starter initial feed at 3 p.m. to completed bake @ 6:40 a.m. = 16 hours... Hands on time equals approx a measly 20 minutes... 🤣
Note: Image of the starter is actually AFTER a 2nd feeding at 8 P.M. (I forgot to move the time band)... I added another full cup of flour to my remaining starter and another half a cup of water... It more than doubled by the time I got up this morning.




3 notes
·
View notes
Text
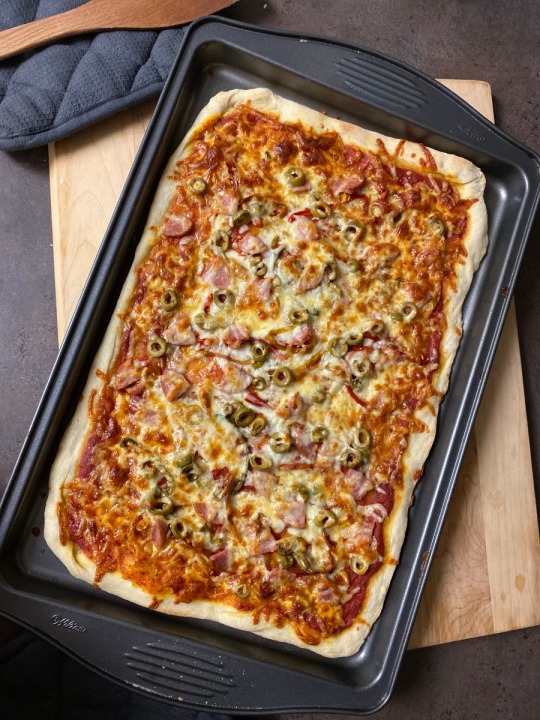
Sourdough pizza
This is our Friday night tradition: Homemade Sourdough Pizza and a family movie!
View On WordPress
#Cheese#Easy#Easy Sourdough#easy sourdough pizza#easy sourdough pizza dough#easy sourdough pizza dough recipe#easy sourdough pizza recipe#Healthy#healthy pizza toppings#Homemade#homemade pizza#homemade pizza dough#how to make sourdough pizza#how to make sourdough pizza dough#how to spend less on pizza toppings#how to use dehydrated mushrooms on pizza#how to use dehydrated peppers on pizza#Is sourdough good for you?#is sourdough healthy#making pizza#Nutrafarms Bacon#nutrition facts of sourdough pizza#Nutritious#pizza topping#pizza topping ideas#Recipe#Recipes#sougdough entree ideas#Sourdough#sourdough baking ideas
0 notes
Text

The first step of some pizza dough using that Nerd Cider Yeast Starter is underway! This is basically a quick sponge with the starter and some of the flours. That starter hasn't gone very sour yet, but it should hopefully be a good flavor.
Being the person I am, I'm not following that recipe very closely. But, I thought I would share it because I do really like their flexible approach to ingredients--which is not far off what I ended up working out myself from experience. (I definitely do not claim to be any kind of super baker, but I've had 15+ years to figure out what seems to work.) Only, they describe and explain better.
The different categories of flours/starches commonly used in gluten free baking are a very useful thing, focusing on their main function in a recipe. That would be roughly why I do tend to balance wholegrain flours with ones that they're putting into the "binding" and "starchy" categories here. The commercial GF blends I've been getting tend to consist entirely (or almost) of binding/starch ingredients, plus usually some psyllium powder and/or gums. You could use that on its own for certain applications like cakes and cookies, but it would most likely not make a very appealing bread used alone. No matter what they show on the package. 😒
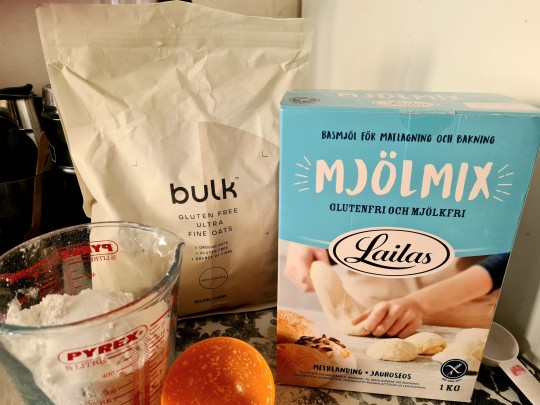
For this pizza crust, I'm using a combo of oat flour and this Laila's nearly all starch white blend in with the mix of sorghum, buckwheat, and psyllium that are already working with the yeast starter.
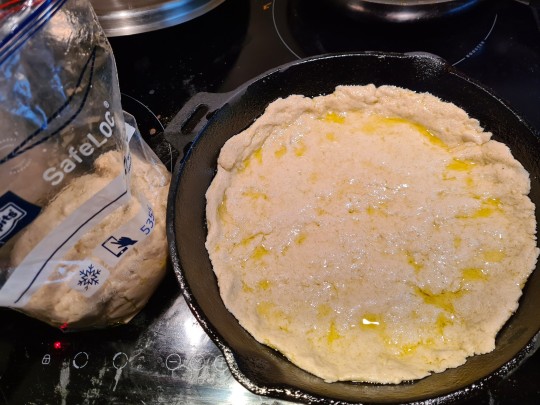
Haven't had anything like that in ages, so I decided to make this as a pan pizza in my trusty smallish cast iron skillet. It's also extra easy that way. The common Swedish style pizza crust is pretty good, but all I've had in a couple of years is one basic style of thin crust. Time to mix it up some!
(Though, unlike that person's wheat flour pan pizza through the link, I am planning to play it safe and prebake this some before topping it. Is that a good idea? We'll find out.)
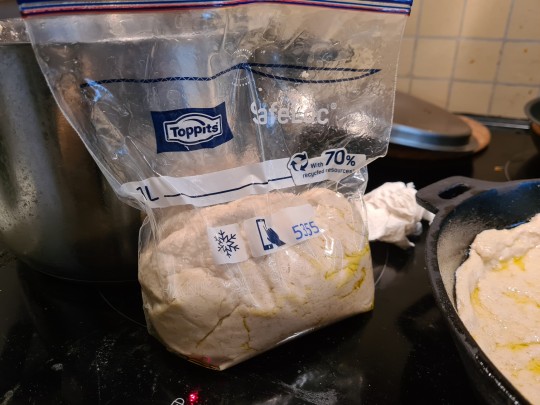
The well-oiled other half of the dough went into an also oiled Ziploc, to save in the fridge for later. This is definitely a two individual pizza recipe, or one really big pizza. Tempting as it may be, with just me here tonight? One skillet load of thick crust pizza should be plenty plus some.
Why all the emphasis on oil, btw? A lot of GF bread doughs tend to be sticky as hell from the psyllium/gums standing in for gluten, and also softer/wetter than wheat doughs. You WILL want plenty of some type of grease on the outside of the dough itself and your hands before trying to work with the stuff.

Unless you want this kind of situation in your kitchen--except it's bread dough, your hands, and anything else it or they touch.
Anyway, that crust is now proofing in the oven. ⏰😩 Maybe the mixing pot bowl has soaked long enough now to clean it out in the meantime.
5 notes
·
View notes
Text
Pizza isn't terrible! It's how it's made. Some pizza, yes, is unhealthy. But it's amounts and portions that really make a difference. Tons of cheese isn't as good as adding some veggies, for example; bacon isn't as healthy as grilled chicken, but, again, how much is probably more important.
So whole wheat pizza dough: It's great! There's a few things you have to keep in mind, though-- any time you're altering a recipe for something you bake, you have to be very cautious. But I have done this; the results justify the effort and the experimenting.
So: Whole-grain pizza dough. I'm not going to give you a single recipe, but instead tell you how I'd change things, and why:
Pizza flour is a high-protein flour, like bread flour. Whole wheat flour has less protein per unit of weight; this translates to less gluten. This means dramatically inferior pizza stretchiness. The easiest solution to this is to just add vital wheat gluten directly; don't be shy about it. (Trying to minimize gluten? You're going to wind up needing a thin, more cracker-like crust, which is fine if that's okay with you, but it's a very different process, so we're not going to get into that choice here.) So add gluten directly. It's not evil. Unless you have an allergy or sensitivity, it's just another protein that your body can metabolize. All those low-gluten diets are actually low-carb diets with a new name to renew the hype; don't let gluten bother you. (You could also use some white flour, but that's taking the easy way out!)
If you aren't using a wheat flour, you've got a heck of a job ahead of you, and if you want pizza dough that acts like pizza dough, you will probably need to increase the gluten even more.
Whole-grain flour is thirsty; you will need to increase the amount of liquid in your recipe. The last time I did this, my final version increased the liquid percentage by about 20%, but your own recipe will probably need to be fine-tuned.
Increased rise time is good in a lot of applications when using whole-grain flours, but if you're making a classic pizza dough recipe, you probably want it rising at a could temperature for hours, so it won't matter much. If you want to use it right away (and I don't really recommend this for pizza dough for a variety of reasons-- it's just not going to be ready that quickly), give it more time.
Whole grain flours go rancid *MUCH* faster than white flours; this is true with any product, and it's due to the oils in the flour that white flours just don't have much of. Make sure the whole grain flour isn't too old. (You also should be using the dough within maybe 72 hours, but that's true no matter what kind of flour you use. If you don't bake it, the gluten structure will break down as the yeast does its job, and you'll notice a distinct sourdough smell and flavor. There's a window to use; use it.)
Whole grain flours also taste more bitter than white flours. You can actually solve several problems at once by substituting honey for the sugar; the honey is sweeter, it adds liquid, and it's a preservative that might help your whole-grain dough last just a little bit longer, but don't rely on that last detail too much!
I've done this; the results were great! Just be sure to test your altered recipe in small batches at first until you get that perfect result!

71K notes
·
View notes
Text
INGREDIENTS
Sourdough pizza crust
scant ½ cup (100 g) sourdough starter discard
2 teaspoons (10 g) fine sea salt
2 tablespoons (30 g) olive oil
⅓ cup + 1 tablespoon (50 g) whole wheat flour
3 ¾ cups (450 g) all-purpose flour
1 ⅓ cups + 2 tablespoons (350 g) water (see notes)
Pizza toppings
pizza sauce
homemade pesto
your choice of toppings
WANT TO SAVE THIS RECIPE?
Enter your email below & we'll send it straight to your inbox.SEND Subscribe to get great new recipes from us every week!
INSTRUCTIONS
The night before
Add the pizza crust ingredients to a large mixing bowl and use your hands to mix until they are fully incorporated. Cover the bowl and allow the dough to ferment at room temperature overnight.
The next morning
Perform a set of stretch and folds. Wet your hand with water to prevent the dough from sticking. While the dough is still in the bowl, gently pull one side of the dough up and over itself. Turn the bowl and repeat this on all sides of the dough until you turned the bowl full circle.
Cover the bowl and place in the fridge, up to 36 hours until ready to bake. (The dough can be used at this point to make your pizza, the cold ferment is optional.)
That night
Remove the dough and let rest on the counter for 30 minutes to come to room temperature.
Divide the dough into 4 equal pieces and on a generously floured work surface, shape each portion into ball shape. Cover the mounds with a tea towel let rest 30 minutes.
Turn on your oven's broiler and heat a cast iron skillet over medium to medium-high heat. While the skillet is preheating, use your hands to press a ball of dough into an 8" circle on a floured surface. Use more flour as needed to prevent sticking. (If you find the dough difficult to shape into a pizza crust, let it to rest on the counter for 15 minutes in order for the gluten to relax.)
When the skillet is hot, lay the circle of dough onto the skillet. Immediately place the sauce and toppings on the crust and cook for 5-6 minutes or until the bottom of the crust is starting to char.
Once the bottom has turned brown and charred, transfer the cast iron skillet to the broiler to finish baking the top of the pizza 2-4 minutes. Remove, slice and serve hot.
1 note
·
View note
Text
Price: [price_with_discount] (as of [price_update_date] - Details) [ad_1] Upgrade your baking experience with our Multifunctional Effortless Stainless Steel Dough Mixer, the perfect addition to your kitchen tools and baking accessories. Designed for home kitchens, this durable mixing stick is ideal for effortlessly mixing dough, beating eggs, and more. The stainless steel construction ensures long-lasting performance and rust resistance, while the ergonomic handle provides a comfortable grip for easy mixing. Featuring a convenient hanging hole, this mixer can be easily stored, saving space in your kitchen. Whether you’re a professional baker or a home cooking enthusiast, this time-saving tool is perfect for mixing dough, whisking eggs, and blending batters. Its versatile design makes it a must-have for any kitchen. 𝐒𝐔𝐏𝐄𝐑𝐈𝐎𝐑 𝐐𝐔𝐀𝐋𝐈𝐓𝐘: Always keep your whisk ready! With our dough whisk made of high-quality 430 stainless steel, you can mix your dough at any time. The long handle provides leverage that is perfect for mixing and folding and makes melting your ingredients easier. 𝐏𝐑𝐎𝐅𝐄𝐒𝐒𝐈𝐎𝐍𝐀𝐋 𝐁𝐀𝐊𝐈𝐍𝐆 𝐓𝐎𝐎𝐋𝐒:Lightweight, efficient and high quality Dutch broom is just perfect for mixing bread dough, cookie dough, pizza dough, pastries, sourdough bread, quick bread, ciabatta bread, corn bread, pancakes, French bread, biscuits and dessert 𝐄𝐀𝐒𝐘 𝐓𝐎 𝐂𝐋𝐄𝐀𝐍:clean up in seconds! Simply swing your whisk in warm soapy water, rinse and dry. 𝐋𝐎𝐍𝐆 𝐇𝐀𝐍𝐃𝐋𝐄 𝐃𝐄𝐒𝐈𝐆𝐍:With our Dutch Bread Dough Whisk, you can mix dough at any time as long as the whisk is in your hand. 3 times faster than conventional plastic spatulas and wooden spoons. 𝐆𝐑𝐄𝐀𝐓 𝐆𝐈𝐅𝐓:Perfect for holidays, weddings, birthdays, Christmas and any anniversary as a gift. Prevent hands from getting stuck with flour or anything else. Basically, it is an alternative to everything you have in your drawer and what did not work perfectly with bread dough, dough and mixtures. [ad_2]
0 notes
Text
sourdough pizza in Bengaluru
Discover the Best Neapolitan Pizza in Bengaluru: A Taste of Italy in the Heart of the City
Are you craving a slice of authentic Italian pizza right here in Bengaluru? Look no further! At this amazing pizza destination, we bring the rich traditions of Italy to your table, focusing on creating mouth-watering Neapolitan pizzas, artisan sourdough pizzas, and more. Whether you’re in HSR or anywhere in Bengaluru, our pizzas are made with the finest Italian ingredients, offering a true taste of Italy.
What Makes Neapolitan Pizza Special?
Neapolitan pizza is a traditional style originating from Naples, Italy. Known for its soft, chewy crust, simple ingredients, and quick baking process, it’s a pizza that embodies the essence of Italian cuisine. The secret lies in the dough, which is made with just four basic ingredients: flour, water, salt, and yeast. Our Neapolitan pizzas are baked in a wood-fired oven at a high temperature, resulting in a perfect crust that’s crisp on the outside and soft on the inside.
At our pizzeria, we follow the authentic Neapolitan pizza-making process to the letter, ensuring that every slice is a true representation of this Italian classic.
Artisan Sourdough Pizza: The Healthy Alternative
For those looking for a healthier option without compromising on taste, our artisan sourdough pizzas are the perfect choice. Sourdough has gained popularity not just for its unique tangy flavor but also for its health benefits. Made through a natural fermentation process, sourdough pizza is easier to digest and contains beneficial probiotics that are good for your gut.
Our sourdough pizzas in Bengaluru are handcrafted with love, using organic, whole ingredients. From the dough to the toppings, we focus on delivering a pizza experience that is not only delicious but also nutritious.
Authentic Italian Ingredients: The Key to Our Pizzas
We believe that the key to a great pizza lies in the quality of its ingredients. That’s why we source authentic Italian ingredients to ensure you get the most genuine pizza experience. From San Marzano tomatoes, known for their rich flavor and sweetness, to fresh mozzarella di bufala and extra virgin olive oil, each ingredient is selected with care.
The use of authentic Italian ingredients elevates the flavor profile of our pizzas, making every bite a celebration of Italy’s culinary heritage.
Healthy Ingredient Pizza: Guilt-Free Indulgence
Looking for a pizza that’s both healthy and indulgent? Our healthy ingredient pizzas are just what you need. Using fresh vegetables, lean proteins, and high-quality Italian ingredients, we create pizzas that cater to health-conscious foodies without sacrificing flavor.
Whether you’re trying to cut back on carbs or looking for gluten-free or vegan options, we’ve got you covered. Our menu includes pizzas topped with nutritious ingredients like spinach, arugula, and sun-dried tomatoes, all while maintaining that authentic Italian taste.
Why Choose Us for Your Pizza Experience in Bengaluru?
Authentic Neapolitan Pizza: Traditional recipes, wood-fired oven, and the finest Italian ingredients.
Sourdough Pizza: A healthy, artisanal alternative that’s full of flavor.
Healthy Options: Guilt-free pizzas made with fresh, wholesome ingredients.
Convenient Location: Located in HSR and serving the greater Bengaluru area, we make it easy to get a slice of Italy.
So, if you’re in the mood for a slice of Italy, come visit our pizzeria and indulge in the best Neapolitan and sourdough pizzas in Bengaluru. Your taste buds will thank you!
Contect:
2712, 31st Main Rd, PWD Quarters, 1st Sector, HSR Layout, Bengaluru, Karnataka 560102
0 notes