#whole wheat pizza dough
Explore tagged Tumblr posts
Visit Tumblr Blog
Explore Tumblr blogs with no restrictions, modern design and the best experience.
Last Seen Tumblr Blogs


Fun Fact
Tumblr Inc. is funded by 13 investors.
Text
Homemade Pizza Dough Recipe | Step by step guide
#artisan pizza dough#cauliflower pizza crust#classic pizza dough recipe#easy pizza dough recipe#gluten-free pizza dough#healthy pizza dough recipe#homemade pizza dough recipe#keto pizza crust#low-carb pizza base#naan bread pizza#Neapolitan pizza dough#pita bread pizza#pizza dough substitutes#pizza dough variations#quick pizza crust ideas#sourdough pizza dough#thin crust pizza dough#tortilla pizza base#traditional Italian pizza dough#whole wheat pizza dough
0 notes

Text
Yeast Bread - Pizza Dough

This pizza dough recipe is made with both bread flour and whole-wheat flour for a chewy and flavorful crust. The three-crust yield means you can freeze some for later use.
0 notes
Text
Pizza - Reuben Pizza Recipe

This pizza-style Reuben sandwich features sliced corned beef, sauerkraut, Swiss cheese, and dill pickles for a tasty take on the traditional sandwich.
0 notes
Photo

White Bread - Pizza Dough This pizza dough recipe is made with both bread flour and whole-wheat flour for a chewy and flavorful crust. The three-crust yield means you can freeze some for later use.
0 notes
Text
I’ve been looking for some recipes to share that’s good for dietary restrictions. “Why?” You may ask.
Well, it’s because I’ve been thinking about potlucks. Neighborhood block parties. About people coming together and feeding each other and enjoying each other companies and having fun.
But anywho, I’m thinking of putting them all on one post. Except for this particular article because unfortunately America Test Kitchen has 2 free articles per month for people who don’t subscribe to them. So while I’ll still post the link, I’m also having the article underneath the cut. Enjoy the food ideas to share with others!
Recently, I hosted a four-day gathering for nine people with 10 different dietary restrictions. To say I was worried would be a vast understatement.
We had everything: no gluten, no meat, no dairy, no mushrooms, and much more. All had varying degrees of importance from “just a preference” to “just in case, do we know where the closest hospital is?”
Many restaurants are aware and accommodating of dietary issues, but it can be difficult when this problem arises at home. You can’t make different dinners for everyone.
We’ve compiled a list of suggested meals and preparation styles to cook for a crowd where everyone—including the host—enjoys the dinner, feels included, and stays healthy.
(But first, an important disclaimer: There's more to cooking for people with special diets than just choosing a recipe. If you're cooking for someone with severe allergies, make sure they're comfortable with your serving setup.)
Spread-Style Meals That Offer Ultimate Flexibility
My coworkers are food lovers and problem solvers. When I asked them what they would serve in this scenario, they all had the same answer: DIY-style meals offer the most flexibility for the diners and the least amount of stress for the cook.
Build-it-yourself meals allow people to select what foods work for them and avoid the ones that don't, without putting the responsibility on you.
For tackling this kind of meal, we suggest taking inventory of all guests' allergies (and the level of cross-contamination they allow) and then creating a themed dinner with choose-your-own elements. Make sure each person has at least one option at every step.
Here are a few of our favorites:
1. Build-Your-Own Bowls
Bring Sweetgreen home by making a couple plain bases, a few simple proteins, and some roasted veggies, and ending it all with a topping and sauce bar.
Bases: Everyday White Rice, Foolproof Oven-Baked Brown Rice, Quinoa Pilaf with Herbs and Lemon, Basic Farro Pilaf
Proteins: Pan-Seared Chicken Breasts, Garlicky Broiled Shrimp, Teriyaki Tofu, tempeh steaks, sautéed eggplant with plant-based meat
Veggies: Skillet-Roasted Carrots and Parsnips; Skillet-Roasted Broccoli; Kale with Garlic, Red Pepper Flakes, and Lemon; Roasted Sweet Potatoes
Sauces: Hummus with Smoked Paprika, dairy-free green goddess dressing, Roasted Garlic Chimichurri, Lemon Aioli, Tzatziki Sauce, Red Pepper–Almond Sauce
Toppings: Microwave-Fried Shallots, shichimi togarashi, Microwave Cheese Crisps, Gim, Chili Crisp
2. Make-Your-Own Pizza
Whether you have an indoor or outdoor pizza oven or you simply make them on the grill or in your oven, making your own pizza is one of the easiest DIY meals because it mostly just requires the host to chop toppings and stretch dough.
Almost all ingredients can be store-bought, but if you feel like elevating the experience with a few homemade options, we have some suggestions.
Dough: Classic Pizza Dough, gluten-free pizza dough, thin-crust whole-wheat pizza
Sauce: No-Cook Pizza Sauce, Basic Pizza Sauce, Perfect Pesto, alfredo sauce
Toppings: Caramelized Onions, pepperoni, roasted vegetables, anchovies, Spicy Honey, dollops of homemade ricotta
3. Burrito/Taco Bar
For this simple spread, make a variety of proteins and vegetables, buy any additions, have a few homemade salsas on hand, and let your guests decide whether or not to use flour, corn, or other types of GF or dietary-specific tortillas.
Fillings: Plant-based chorizo, shredded chicken, sweet and spicy fried fish, grilled steak, bean and vegetable
Salsas: Fresh Tomato, Roasted Tomato–Lime, Salsa Roja, Quick Tomatillo, Mango-Mint, fresh corn and avocado
Additions: Tangy Apple-Cabbage Slaw, Bell Pepper Slaw, Chipotle and Pepita Guacamole
Single Recipes for Multiple Dietary Requirements
When you don’t want to prepare an entire spread and instead just feel like making one dish that has several dietary accommodations baked in, we have some options for you.
I asked my coworkers: Whether vegan, vegetarian, soy-free, nut-free, gluten-free, or peanut-free, what do you make when trying to accommodate multiple diets?
1. Japchae
This was my go-to meal when cooking for my large, dietary-restricted crowd and it was a hit. The base noodles, Korean sweet potato noodles, are naturally gluten-free and hold onto sauce really well. To keep the dish gluten-free, I used tamari instead of soy sauce which generally contains wheat. To accommodate a pescatarian and someone with a mushroom allergy, I just cooked these elements separately and left them on the side for people to sprinkle onto their own plates.
Who It’s Good For: Those following dairy-free, gluten-free, peanut-free, tree nut–free, soy-free (using tamari), vegetarian, and vegan diets.
2. Breakfast Casserole
Essentially a crustless quiche in a baking dish, a breakfast casserole is great for a varied crowd because you can swap any protein, vegetable, or spice in or out depending upon your group's dietary needs. One of our members raved, “One of us is dairy-free, the other has celiac, so this was perfect to please everyone."
Who It’s Good For: Those following dairy-free, gluten-free, soy-free, peanut-free, tree nut–free, or vegetarian (provided they eat eggs) diets.
3. Red Lentil Soup
This soup is spiced, rich, and nourishing because of the thick texture and nutrients that simmered red lentils bring. To make this a complete meal, pair it with a hearty salad and serve dressings on the side.
Who It’s Good For: Those following gluten-free, dairy-free, peanut-free, nut-free, soy-free, vegetarian or vegan (if you use vegetable broth instead of chicken broth) diets.
4. Vegan Barbecue Tempeh, Mushroom, and Bell Pepper Skewers
Tempeh is an awesome, naturally gluten-free (most often; check your brands) vegetarian protein for grilled skewers. You can add any vegetables, or even fruit, to your skewers and the same glaze can be used for any meat skewers you make separately.
Who It’s Good For: Those following gluten-free, dairy-free, peanut-free, nut-free, soy-free, vegetarian or vegan diets.
5. Walkaway Ratatouille
Most ratatouille recipes call for labor- and time-intensive treatments like salting and/or pressing to remove excess moisture from the vegetables. Not only is this meal largely hands off and fuss-free, but it's also ready in under an hour, and it’s chock-full of vegetables while accommodating some of the most common dietary restrictions.
Who It’s Good For: Those following dairy-free, gluten-free, peanut-free, tree nut-free, soy-free, vegetarian, and vegan diets.
6. Falafel
Like a cross between a spread meal and a single dish, making falafel the centerpiece of your dinner allows you to provide lots of pita, sauces, and toppings on the side for people to choose from while you only have to cook one main element. Though this recipe uses all-purpose flour, an equal amount of chickpea flour can be substituted for a gluten-free version. To accommodate this substitution, we increase the water.
Who It’s Good For: Those following dairy-free, gluten-free, peanut-free, tree nut-free, soy-free, vegetarian, and vegan diets.
7. Chili-Spiced Chicken Thighs and Potatoes
This recipe is a great example of a jazzed-up protein that is still widely applicable to different dietary needs without sacrificing flavor. It can serve as a complete meal as is, or for a vegetable element you can add some simply dressed greens on the side.
Who It’s Good For: Those following dairy-free, gluten-free, peanut-free, tree nut-free, and soy-free diets.
8. Best Prime Rib
Provided your guests eat meat, you’re in luck. Though this is technically a plain protein, there is nothing plain about a centerpiece-worthy prime rib. Serve it with any vegetable sides, salads, or potatoes to round out the meal.
Who It’s Good For: Those following dairy-free, gluten-free, peanut-free, tree nut-free, and soy-free diets.
9. Chicken Shawarma
Instead of going out for shawarma, we were able to create a home version by using the broiler and boneless chicken thighs. Chicken shawarma allows guests to assemble their own pita pockets with as much or as little sauce and vegetables as they desire. To accommodate more diets, make roasted tofu as a vegetarian option and provide gluten-free pita.
Who It’s Good For: Those following gluten-free, peanut-free, tree nut-free, and soy-free diets.
Allergy-Friendly Swaps We Love
Sometimes a recipe is so close to fitting your restrictions but doesn't quite work because of an ingredient or two. We have a few standby swaps that are typically fine in small amounts without significantly altering the overall recipe.
* Swap tamari for soy sauce when you need to be gluten-free.
* Swap sunflower seed butter for peanut butter when you need a peanut- or tree nut–free alternative.
* Swap vegan, non-dairy milks for cow’s milk. We like oat milk when baking due to its higher sugar content and almond milk in savory applications because it is more neutral.
* Swap garlic or onions for garlic oil when alliums can cause an issue, such as with the Low FODMAP diet.
#Solarpunk#food#recipes#dietary restrictions#block party#potluck#vegan#vegetarian#food allergies#gluten free#peanut allergy#party#meal#website articles#cooking
9 notes
·
View notes
Text
@allhallowsthemepark @shaydystheshadowqueen
Ideas for the Ghoul City food court
Frankenburger menu
Frankenburger: the signature dish of this 50s diner inspired joint, consisting of an 8oz angus beef patty, flame grilled and topped with sharp cheddar cheese, iceberg lettuce, tomato, purple onions, ketchup, Dijon mustard, and butter pickles. Put in between 2 fluffy brioche buns with sesame seeds on top. Served with crinkle cut fries and a fountain drink.
Bride of Frankenburger: instead of cheddar, there’s Gouda,and bacon instead of tomato. Served with fries and a drink.
The Doc’s Mini Sliders: kids can create their own miniature monster of meat with this option! Choices for cheese include American, Havarti, and Baby Swiss. They even come with little toothpicks shaped like electric pylons!
Jiangshi Midnight Wok menu
Jiangshi noodles: basic Chinese Lo mein with all the vegetables and meat that come with it.
White Tiger Fried Rice: Fried rice with Chicken, Beef, and Shrimp.
Phoenix curry: super spicy chicken curry served with white rice, not for the faint of heart.
Sun Wukong Peach custard Bao: named for the legendary sage of heaven from Journey to the west, these sweet treats are modeled after the peaches enjoyed by the Monkey king and his subjects on Flower Fruit Mountain. Peach custard wrapped in sweet rice dough and steamed in a bamboo basket.
Spucci’s Pizza menu
Pizza Margherita
Pepperoni pizza
Cheese Pizza
Spucci’s Spicy Special: topped with spicy Italian sausage, Red Peppers and Pepperjack cheese, this firey dish will slash your tastebuds like teenagers at abandoned summer camps.
Kraken Seafood Shack: located on Gilman Municipal Beach, this restaurant offers fresh seafood.
Kraken’s Salty special: beer and bread battered flounder deep fried with a side of tartar sauce, onion rings, and a small salad.
Frightful Fish Filet: Breaded deep fried Whitefish put in between two slices of whole wheat bread and dotted with mayonnaise and red slaw.
Sunken Shrimp: Cocktail shrimp with a sauce mixing traditional cocktail sauce with mayo and pineapple juice. Covered in shredded coconut.
Just don’t ask for Calamari here, the boss is very sensitive about that.
9 notes
·
View notes
Text
Well too bad, here’s a list anyways
Chocolate set
White chocolate battle bun (our main good boy!)
Dark chocolate rouge
Coconut cream cleric
Red velvet ranger
Bittersweet shield bearer
Milk chocolate monk
Orange cream soldier
Hazelnut chip healer
Sea salt strategist
White chocolate wizard (the long lost sister and reward for completing the set)!
Fruity set: it was an artists special set
Very berry ventriloquist
Strawberry singer
Watermelon writer
Apple artist
Peachy painter
Dragonfruit dancer
Mango model
Banana braider
Coconut crocheter
Kiwi knitter
Bread bun set:
Rye bread rouge
Whole wheat wizard
White bread warlock
Sourdough sharpshooter
Cinnamon raisin captain
Pizza dough paladin
Herby bread hustler
Blueberry bagel barbarian
Pretzel pirate (a fan favorite for nearly 3 years in a row).
Garlic bread brawler
Meat bun set: a small set of you gain doing a crazily long side quest
Sweet Pork bun party animal
Teriyaki beef bun traveler
Spicy chicken bun information broker
Sesame seafood bun sneak
Cookies galore set:
Snickerdoodle sage
Chocolate chip crook
Peanut butter priest
Oatmeal raisin ogre
Jam cookie genie
Sugar cookie saint
Gingerbread gangster (another fan favorite and is heavily shipped with the gingerbread man from shrek lol)
Biscotti beast tamer
Fortune cookie fortune teller
Oreo overlord (a bun that’s also the final boss of the cookie bun storyline)
Fine wine and terrific tea set: made to celebrate ebotts 5th year of independence. The set was a free gift to any players who logged in on Independence Day
Goldenflower king bun
Echo flower queen bun
Elderberry wine priest
Dry red princess
White wine prince
Flower honey set: entirely magicians
Lavender dreams witch bun (and the leader)
Sunflower sap sorcerer bun
Rose roulette trickster bun
Dear daisy Druid bun
Watchful wisteria wizard bun
Specialty crossovers:
Baconator bun (Wendy’s)
Hersheys coco bun (Hersheys obv)
McFlurry bun (McDonald’s)
Pepperoni priest bun (Pizza Hut)
Spooky spice bun (spirit Halloween lol)
Mellow marshmallow bun (of course there’s a mellow mart bun, Marcello would not sleep on this)
Jelly brick bun (a Lego based level reward!)
7 notes
·
View notes
Text
Dylan Hollis Baking Quotes Without Context Part 5
"Come to think of it I’ve never really thought about what’s in ranch, perhaps out of fear."
"You know I once watched a friend of mine eat a whole bottle of ranch with his pizza." “Yeah he’s in prison now,"
"Forsaken by parsley,"
"I’m serious, don’t disrespect the Irish, they can be mean."
"And half a cup of wheat germ, oh no."
"The wheat germ just needs to swell up like an infection, soaks up the butter and everyone's happiness."
"These taste like a damp park bench."
"I’ve been told to keep this in the fridge so it stays disgusting for longer."
"So these were a part of America’s K rations, think of them as dystopian lunch boxes."
"Why would someone put bread crumbs in cookie dough? It could be because of like illicit substances, psychiatric disturbances, being held at gun point, these types of things."
"So I’ve actually already taken a dump in this kitchen before."
"Today 's dump requires the use of a can opener, rather painful condition."
"Ow, ow! It’s got ranged attacks!"
"What, you never put cereal into a blender before? Call yourself a chef?"
"Now if you’ve never had a prune, good, best not to engage with the enemy."
"Uncooked whips such as these were very popular in the twenties, alongside dysentery."
"I’ll tell you cheese makes everything better, except car accidents. Trust me I’ve tried, the police got very mad."
"I’m going to hemorrhage."
"I don’t know what a firm ball is but they should probably see a doctor."
"Last instruction is a simple one but a little bit barbaric." slams hammer on counter
"So if you’re allergic to peanuts it’s hell of a way to go out."
"Get some rolos," drops them "throw them on the floor."
"Thank you, I would hate to have an uneven disaster"
"Thank you dead lady,"
"Haven't a clue of what this is, it could be spoons made of bread or bread made of spoons."
"What do we bake this in, I have no idea, it could be a shoe for all I know."
"I’m baking soup."
"Tastes like itchy milk."
"I can feel my teeth falling out of my face right now."
"This tastes like a scented candle,"
"I know people taste test these things, do taste testers eat candles?"
36 notes
·
View notes
Text
Easy Homemade Dog Treats!

All it takes is banana, peanut butter, and oats and you can make these cute cookies for your pup, or for a doggy friend of yours. Not only are these easy to make, but they are so much more affordable than store-bought treats and dogs LOVE them!


Easy Homemade Dog Treats!
Servings: 40 (Makes about 40 treats depending on the cookie cutter size)
Ingredients
2 cups oats (old fashioned, 1-minute oats, or instant) plus more if needed- see step 3
2 medium ripe bananas
½ cup natural peanut butter
Instructions
Preheat your oven to 300F (150C). Line a baking sheet with parchment paper.
Add the oats to a food processor and grind until they reach a fine powder. (If you do not have a food processor, see the recipe notes for other options). Add the bananas and peanut butter and blend until a sticky dough is formed.
Remove from the food processor and roll out on a lightly floured surface. (Use whole wheat flour, more ground oats, or another dog-safe flour that you have on hand). I used a heart cookie cutter to cut out the treats but you could use any cookie cutter, or just cut them into squares with a knife or pizza cutter.
Lay the treats on the prepared baking sheet and bake for 25 to 30 minutes, until the treats are puffed up a bit, dry and dark brown on the bottoms, (they will still feel soft when first removed from the oven). The treats will get a bit more firm once they are cool but will still be a slightly softer dog treat. Let cool before giving one to your pup.
Store in an air-tight container at room temperature for up to 1 week, in the fridge for up to 2 weeks, or I like to store them in my freezer which makes them firmer and makes them stay fresh a long time.
Notes
If you do not have a food processor, you can still make these treats. Grind the oats up in a blender or coffee grinder, then add the ground oats to a bowl with the peanut butter and mashed banana and mix to make a dough. Or you could buy oat flour and use that instead. You will need less oat flour as it is denser, so start with 1 cup and add more as needed.
#healthy dog treats#dog peanut butter treats#dog treat recipes#dog snack recipes#homemade dog treats#homemade dog snacks
15 notes
·
View notes
Text
I've made 8 jim lahey-style no knead loaves of bread, and 2 kneaded pizza crusts. Did way better on the second crust. Finally got a dough hook to fit my mixer off of ebay and today I'm trying a brioche 😬 I hope it doesn't suck!
I also did a whole wheat loaf to take camping but it didn't rise correctly and ended up super dense and weird (though not dry somehow?). Bfr got indignant after I called it a fail loaf and insisted on eating as much of it as they could stomach and cradling it in their arms every time I threatened to throw it away. I finally trashed it after they stopped paying attention.
#breadposting#bfr#for the no knead loaves i did an italian herb variation and a cinnamon raisin variation#both were ok! i am learning constantly!#i wanna do an asiago loaf and bagels and foccacia and challah and cinnamon rolls#bread is such a good and cheap hobby lmao
11 notes
·
View notes
Text
Delicious Vegan Gluten-Free Back-to-School Lunchbox Snacks
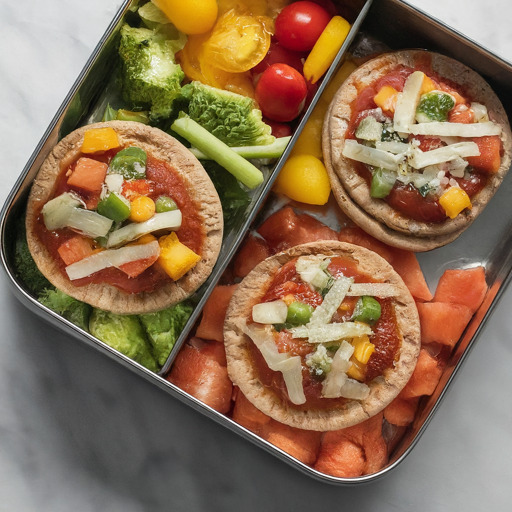
Back-to-school season is upon us, and that means it's time to start thinking about lunchbox snacks. But what if your child has dietary restrictions, like being vegan or gluten-free? Don't worry, I've got you covered! In this post, I'm sharing 5 delicious and nutritious vegan gluten-free lunchbox snacks that your kids will love.
**1. Energy Balls**
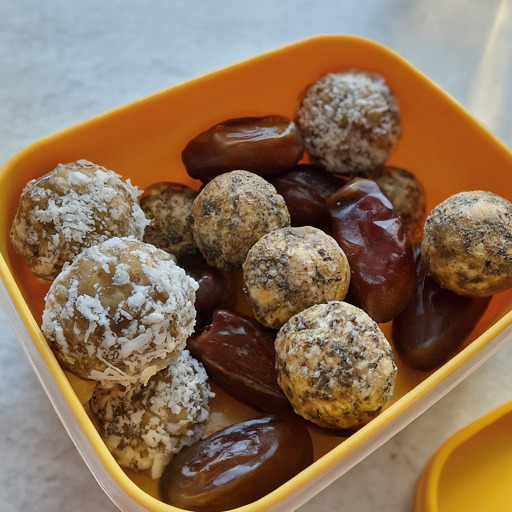
These energy balls are the perfect way to start the day or refuel after a long morning of learning. They're packed with protein, fiber, and healthy fats to keep your kids energized throughout the day.
**Ingredients:**
* 1 cup pitted dates, soaked in hot water for 10 minutes
* 1/2 cup almond butter or other nut butter
* 1/4 cup rolled oats
* 1/4 cup shredded coconut
* 1/4 cup chia seeds
* 1/4 cup ground flaxseed
* 1/4 teaspoon vanilla extract
* Pinch of salt
**Instructions:**
1. Drain the dates and add them to a food processor along with the almond butter, oats, coconut, chia seeds, flaxseed, vanilla extract, and salt.
2. Pulse until the mixture forms a sticky dough.
3. Roll the dough into 1-inch balls and store in the refrigerator for at least 30 minutes before serving.
**2. Mini Veggie Pizzas**
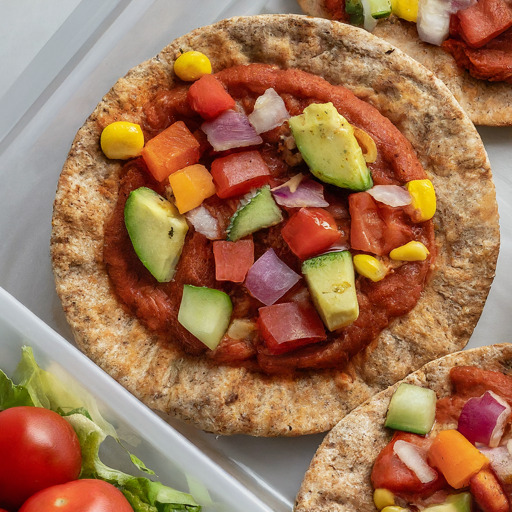
These mini pizzas are a fun and healthy way to get your kids to eat their veggies. They're also a great way to use up leftover veggies from the fridge.
**Ingredients:**
* 1 whole-wheat pita bread, cut into 4 wedges
* 1/4 cup marinara sauce
* 1/4 cup shredded vegan mozzarella cheese
* 1/4 cup chopped vegetables (such as broccoli, carrots, bell peppers, and onions)
**Instructions:**
1. Preheat the oven to 350 degrees F (175 degrees C).
2. Spread a thin layer of marinara sauce on each pita wedge.
3. Top with shredded vegan mozzarella cheese and chopped vegetables.
4. Bake for 10-12 minutes, or until the cheese is melted and bubbly.
**3. Fruit and Nut Bars**

These fruit and nut bars are a delicious and portable snack that's perfect for on-the-go. They're also a great way to get your kids to eat their fruits and nuts.
**Ingredients:**
* 1 cup dried fruit (such as raisins, cranberries, and apricots)
* 1/2 cup chopped nuts (such as almonds, walnuts, and cashews)
* 1/4 cup chia seeds
* 1/4 cup maple syrup
* 1 tablespoon coconut oil, melted
**Instructions:**
1. Combine all ingredients in a food processor and pulse until the mixture forms a sticky dough.
2. Spread the dough into a rectangular pan lined with parchment paper.
3. Refrigerate for at least 30 minutes before cutting into bars.
**4. Hummus and Veggie Sticks**
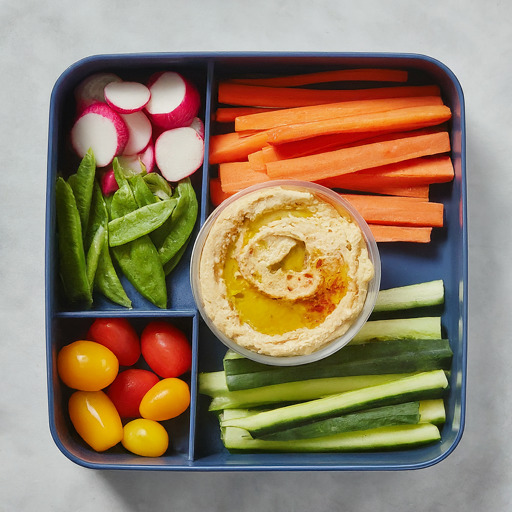
Hummus is a delicious and versatile dip that's perfect for pairing with veggie sticks. This snack is packed with protein and fiber, and it's a great way to get your kids to eat their veggies.
**Ingredients:**
* 1 cup chickpeas, rinsed and drained
* 1/4 cup tahini
* 2 tablespoons lemon juice
* 2 tablespoons olive oil
* 1 clove garlic, minced
* 1/4 teaspoon cumin
* Pinch of salt
* 1 cup chopped vegetables (such as carrots, celery, and cucumber)
**Instructions:**
1. Combine all ingredients in a food processor and blend until smooth.
2. Serve with veggie sticks.
**5. Yogurt Parfaits**
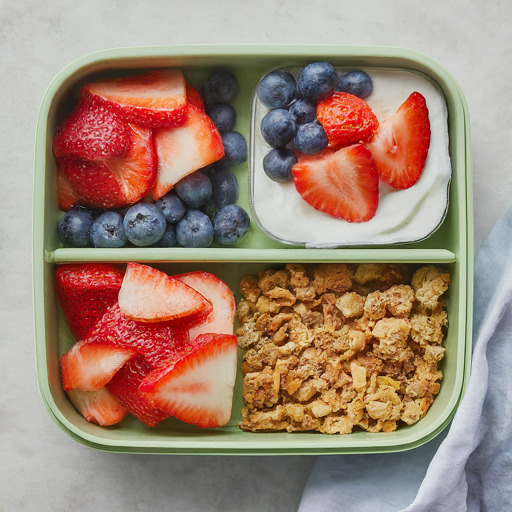
Yogurt parfaits are a classic lunchbox snack that's both healthy and delicious. This vegan version is made with plant-based yogurt and is packed with protein and probiotics.
**Ingredients:**
* 1 cup plant-based yogurt
* 1/2 cup granola
* 1/4 cup fresh fruit (such as berries, bananas, or mangoes)
**Instructions:**
1. Layer the yogurt, granola, and fruit in a reusable container.
2. Enjoy!
These are just a few ideas for vegan gluten-free lunchbox snacks. With a little creativity, you can come up with endless possibilities!
Comment below which one you will be trying out

#vegan gluten-freesnacks#lunchbox#lunch snacks#snacks#back to school#healthy snack#snacktime#school lunch#recipes#foodblogger#delicious#kids food
6 notes
·
View notes
Text
Chilean Towa
Batch 3 baby!
yippie! :)

Lucho Trucho = Fake Peppino
Lucho is the owner a Quiosco (Chilean minimarket) he sells Anticuchos (Meat Keebabs) and Sopaipillas (Fried dough) to the college students that study... Wait a sec... i don’t think this is the actual Lucho Anticucho we know...
Trucho: Fake or Phony
Mr. “Saboya” Salinas = Mr. Sticks
Santiago “Saboya” Salinas, a banker, buisness man and Lucho’s landlord, Nicknamed Samoya due to the spiky, wheat-like hair he used to have (really bad hair genes took a toll on his hair)
Saboya: Common name for Holcus lanatus (Chilean grass)
Spoilers for the ending of Pizza tower past this point!

Cara de Sopaipa = Pizza Face
Sopaipa is well... a giant sentient Sopaipilla, topped with cheese and butter, He threaten Lucho to blow up Lucho’s Quiosco, when you are to close to him, you can hear a clock-like sound.....huh...weird
Sopaipa: Sopaipilla
El Compa Sopaipilla = PizzaHead
The man behind it all... a Sopaipilla topped with cheese and pebre, who’s name is Cristián and he’s obsessed with Lucho and Huasos, he made the whole tower fiasco and builded both the Sopaipilla Tower and Sopaipa, his right-hand man
Come on Lucho...IT TIME FOR THE FINAL SHOW!!!!
Sopaipilla: A fried dough made with chilean pumpkin and flour
Pebre: Chilean sauce made with Tomatoes, coriander, onion, garlic and green peppers
Part 1: https://gl1tchy-4rt.tumblr.com/post/720509947508670464/i-did-a-thing
Part 2: https://gl1tchy-4rt.tumblr.com/post/720776573770448896/sopaipa-towel-part-2
That’s all for now!
Bye buddies :)
#pizza tower#pizza tower au#pizza tower fake peppino#fake peppino#pizza tower mr stick#mr stick#pizza tower pizzaface#pizzaface#pizza tower pizzahead#pizzahead#Sopaipilla Tower
30 notes
·
View notes
Note
👀 i gotta hear about your homemade pizza
It began as the basic Betty Crocker recipe for dough because I wanted pizza and was too broke to order it. And then I started to play with the proportions. And then I got pretty good at that. So I've spent the last 20+ years doing it. Now we rarely order out for delivery if I've got the ingredients to just make it. It has become a party favorite, a special gift, a treat, a comfort food.
I've made all kinds. This most basic recipe, whole wheat, mixed rye. I've made it super thin so it comes out really crunchy, or thick enough to hold a bazillion toppings. I've made the dough with whey leftover from cheesemaking instead of water. I have dedicated sheet pans specifically for making it. In three sizes. It's a bit of a labor of love for me these days, since it takes a fair amount of energy and I'm short on that a lot. But from what everyone who's had it tells me, it's worth every moment of pain.
A visual for you:

And because I am generous, recipe and instructions under the cut.
This is for the basic dough. It doubles very well, but tripling it leads to some necessary tweaking. And unfortunately, I can't tell you what that tweaking will be because it's case specific (usually the flour to water ratio, which will be totally dependent on your current humidity). In general, I consider that this recipe never comes out quite the same way twice. If you want something smaller, water to flour ratio is essentially 1:2. In the case of halving it, the same amount of yeast won't be too much, but cut back on the oil and salt. It also freezes well, if you're careful about thawing it so it has room to rise. It gets an interesting texture when it's been frozen. Crispier, but also more airy.
1.5 cups hot water (~110-115 F, ~45 C) 2.25 teaspoons yeast (or 1 packet) 1/4 cup extra virgin olive oil (the EV part isn't necessary, but adds nice flavor) 1/2 teaspoon salt ~3 cups flour (unbleached all-purpose is best)
Prep time: ~ten minutes. Rising: at least 20 minutes. Baking: 20-25 minutes (dependent on toppings, more wet stuff means longer cook time).
Bloom the yeast in the water, about five minutes. Add first cup of flour, oil and salt. Mix until there are no lumps (I use a plain old dinner fork with a sturdy handle). Add second cup of flour and mix. You should now have a loose, shaggy mess, not quite strong enough to hold itself together. Third cup should go into the mix in stages, because you may not need all of it. Or you may need more. You should have a soft mass of dough that's a little too much for a fork to mix it. It should be moderately sticky. If it's gooey, more flour. If it's not sticky...well, it won't be as elastic but it's not the end of the world. Don't add any more.
🌟This part is very important🌟. Pizza dough is delicate. This is the kneading part, but you want to be gentle. I do it right in the mixing bowl (remember that bowl must be big enough to account for rising). I only scoop and press for about a minute, or until all the flour is thoroughly mixed in and there are few to no lumps. It shouldn't be sticking to you anymore. If it is, more flour. A dusting at a time. Knead it again. Done? Form a ball in the bottom of the bowl.
Dust the dough with a little extra flour, cover with plastic wrap. Let it rise. This is an excellent time to get your oven pre-heating. For this style of pizza that will be 425 F (218 C), no convection. Don't worry if the oven is ready before the dough is, a fully pre-heated oven will hold its temp better anyhow, and most ovens will say they're ready before they actually are.
When the dough has doubled, or your oven is ready, whichever is last, punch it down, separate into two balls. This dough will make two 10x18 sheets. Coat the sheet pan (and your hands) lightly with olive oil, spread the dough out slowly and carefully so it doesn't tear. It will spring back on you. Get it most of the way there, go prep your toppings (or wait about five minutes), come back and finish it. Make sure it's even and pressed into the corners. Remember, delicate!
Top as you please. My usual is tomato, garlic and onion sauce spread with the back of a wooden spoon. I like part skim, low moisture mozzarella*. And then whatever you want. Favorites in this house are just plain with pepperoni, or pepperoni, bacon and onion. Bake on the lowest rack setting. I do mine for ten minutes, turn the sheet around 180 degrees, then another ten minutes. Cheese should be toasted lightly, edges of the crust should be crispy. It won't get that dark. 🌟In an electric oven, it might take less than 20 minutes! So keep an eye on it.🌟
*I've never made it vegan, so I don't know how that changes times and temps.
When it's done, sprinkle it with grated parmesan or romano if you'd like, but let it rest for a few minutes so it's not molten. Slice and enjoy!
Reheats beautifully in a toaster oven, I don't recommend microwaving it. Eaten cold is always acceptable.
Thanks for the ask. 💕 Have fun with it! And you may never want to order pizza again.
#asks#Lamb's Homemade Pan Pizza#this is also a great project/dinner to make with kids#Lamb the Younger has been able to help me with it since she was five
10 notes
·
View notes
Text
Frequently Asked Questions About Bread Machines
In recent years, bread machines have become increasingly popular among home bakers. These small kitchen appliances make it easy to bake fresh, homemade bread without all the time and effort of traditional methods. But with this rise in popularity comes a rise in questions from those who are new to using bread machines. In this post, we will address some of the most frequently asked questions about bread machines to help you become a more informed and confident baker.

What exactly is a bread machine?
A bread machine, also known as a bread maker, is an electric kitchen appliance designed specifically for making bread. It typically consists of a mixing bowl, kneading paddle(s), and heating element. The user adds the ingredients into the bread pan, selects the desired settings, and the machine takes care of the mixing, kneading, rising, and baking process.
Our socials:
https://www.facebook.com/bestbreadmakerforglutenfreebread/
https://twitter.com/bestglutenbread
https://www.pinterest.com/breadmakerforglutenfreebread/
https://www.youtube.com/@bestglutenbreadmaker
https://www.tiktok.com/@breadmakerforgluten
Can I use a bread machine to make other types of baked goods?
While its primary purpose is for making bread, many modern bread machines come equipped with settings for making dough or even jam. This allows you to easily make homemade pizza dough, rolls, bagels, and more. Some machines even have a gluten-free setting for those with dietary restrictions.
Is it worth investing in a bread machine?
This is a common question among those new to using bread machines. The answer really depends on your personal preferences and baking habits. If you enjoy making fresh, homemade bread but don't have the time or energy to do it by hand, then a bread machine is definitely worth the investment. It also allows you to control the ingredients and customize your bread to suit your taste.
Can I use regular flour in a bread machine?
Yes, you can use all-purpose or bread flour in a bread machine. However, it's important to note that different types of flour have different protein contents which affect how the dough rises and the texture of the final product. Bread flour typically has a higher protein content and is better for making bread in a bread machine, but all-purpose flour can also be used with good results.
Do I have to use yeast in a bread machine?
Yes, yeast is an essential ingredient in making bread. It's what causes the dough to rise and gives bread its airy texture. Most bread machines come with a recipe book that includes instructions on how to use yeast, so even if you've never used it before, the machine will guide you through the process.
How long does it take to make bread in a bread machine?
The time varies depending on the type of bread you are making, but most recipes take anywhere from 2-4 hours. Some machines also have a delay timer option, allowing you to set it up in the evening and wake up to fresh bread in the morning. It's important to note that the overall time includes rising and baking, so you don't have to actively be involved in every step.
Do I need any special ingredients for making bread in a bread machine?
No, most bread machine recipes use common pantry staples such as flour, yeast, sugar, and salt. Some recipes may call for additional ingredients like milk or butter, but these can easily be substituted with dairy-free options if needed.
Can I make different sizes and types of bread in a bread machine?
Most bread machines come with multiple size options to choose from. You can typically make a 1-pound, 1.5-pound, or 2-pound loaf depending on your needs. You can also experiment with different types of bread, such as whole wheat, sourdough, or even cinnamon raisin. The possibilities are endless!
Conclusion
Using a bread machine may seem intimidating at first, but with the right information and practice, it can become a valuable tool in your kitchen. We hope this post helped answer some of your burning questions about bread machines.
3 notes
·
View notes
Text
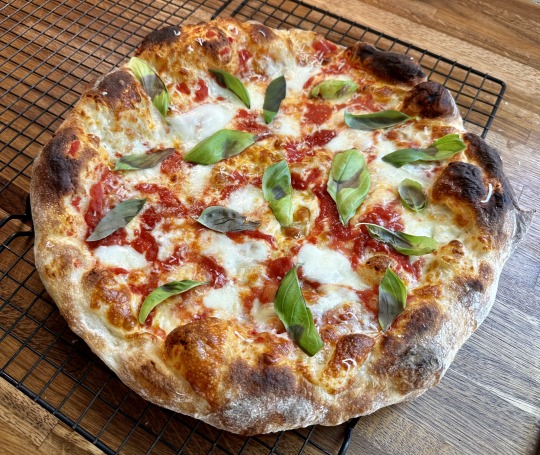
The best home-oven pizza
I like dozens of different pizza styles—sometimes it's nice to mix things up, other times a particular style fits your circumstances best. I most commonly make sourdough pizza, mixed with a stand mixer, fermented in the fridge for a few days, and baked in an Ooni Koda.
But what if I don't have access to a mixer; I want to eat pizza the next day; and it's too wet and windy outside to fire up the Ooni? Thanks to my friend Adam who originally developed this dough recipe, I also have the makings of an incredible indoor-oven pizza in my back pocket. It's bubbly, light, and crunchy.
The best home-oven Pizza
Servings: two 14” pizzas. Time: 3 hours (mix and proof) + 1 to 2 days (fridge-ferment) + 4 hours (final proof) + 10 to 20 minutes (shape, top, and bake)
INGREDIENTS:
400 g white flour (high-gluten, bread-, or all-purpose flour)
20 g (5%) whole wheat or rye flour (or any flour, really)
12 g (3%) salt
.85 g (1/4 tsp, .2%) instant yeast
320 g (76%) water
DIRECTIONS:
Put the flours and the salt into a large mixing bowl. Stir with a spatula or fork to mix evenly. Add the yeast and stir again. Pour in the water and stir with a spatula, scraping down the sides and the bottom of the bowl. After 30-60 s of this, you should have a cohesive, shaggy mass of dough in the middle of the bowl. You're not looking for a smooth ball; you just want to work in all the dry flour. Gently knead this ball for a minute with your hands, folding and turning it to make it just a little more even; it'll still be a bit of a mess, which is fine.
Pick up the dough and spray or wipe a tiny bit of oil into the bowl, then put the dough back in. Cover with a shower cap, a large plate, or a tea towel and let the dough rest in a warm spot (70–74°F?) for 3 hours. Every 30 minutes or so, perform a stretch-and-fold. This video shows the process; it uses a different dough, but the principle is the same.
youtube
Stretching and folding every 30 minutes is ideal, but the timeline is forgiving. Just try to give it at least 3 folds during the 3 hours of proof time. By the end, you should have a fairly smooth and uniform dough.
After the 3 hours are up, cover the bowl again and pop it in the back of the fridge for 1-3 days. If you go past a day and a half, check to make sure the dough isn't overproofing and exploding out of the bowl.
The day you plan to make pizza, remove the dough from the fridge 3-4 hours before baking. (3 hours on a hot day, 4 on a cold one.) Cut into two pieces of the same size and roll each one into a ball.
Note that this is high-hydration dough, so it'll feel pretty loose and lively. Balling it up when cold will make that easier. Here's a video showing how to ball:
youtube
Grab two deep, round bowls or containers and oil them lightly. Place one dough ball in each, smooth side up, and cover. If the containers have well-fitting lids that won't crush the expanding dough, use them. Rest for 3-4 hours as described above.
1 hour before baking, get your home oven ready. Pop a baking stone or baking steel or upside-down pan on a rack 6-8" from the top broiler. Crank it up to 550ºF (or however high your oven goes) and leave it there.
To stretch the dough: hold the container upside down and wiggle the dough out of it gently; dont worry about whether it stays a perfect ball. Place it directly into a shallow, wide bowl of flour, and make sure the wet end and the sides get some flour (not too much) on them. Place the dough ball on your wooden peel with the dry (previously the top) side down and press gently around the inside of the rim to make a little ringed pizza-prototype. Drape the disc over your knuckles, then rotate around gently, letting gravity droop the dough to grow it. There should be no need to tug and stretch it with your fingers. Here's a video again:
youtube
My topping strategy for a standard cheese pizza: layer the dough with sliced mozzarella cheese, then add dabs of sauce, then your toppings (including torn fresh mozzarella). Now gently tug under the rim all around to stretch to 14″; the weight of the toppings will help prevent pullback.
Redistribute the toppings if needed. Shimmy again. Expertly slide onto the steel/stone/pan in the oven.
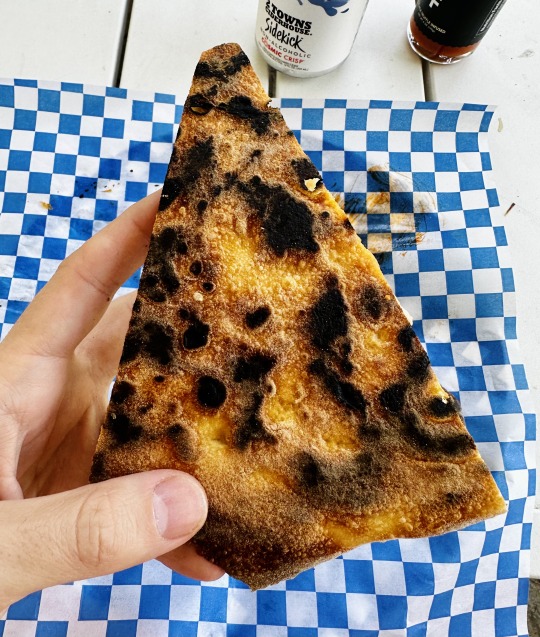
Once the pizza is in, set a timer for 3 minutes. Then, open the oven door and check the underside of your pizza. Rotate the pizza 180º to get even baking from back to front. Set a timer for another 3 minutes. During that time, rotate the pie 90º every 30 seconds or so. If it looks done after the total 6 minutes of bake time, pull it out; it might still need 1-2 minutes more.
You may need to shift between "bake" (bottom heat) and "broil" modes of your oven. Every oven is different, so use your judgment, checking to see if it's the top or the bottom of your pie that need more heat.
When the pizza is gorgeous, slide it out with a metal pizza peel or a large flat spatula or a cookie sheet or whatever. (Don’t use your wooden peel—that’s for shaping and launching only.) Rest it on a cooling rack for 1-2 minutes to dry out the bottom. Then move to a cutting board or plate and slice. (Please don't slice on your wooden peel.)

Since we're making two pizzas with this recipe, you'll need to repeat the process now. It's best to give your baking surface 5-7 minutes to recover the lost heat; don't forget to set it bake to "bake" mode during this time.
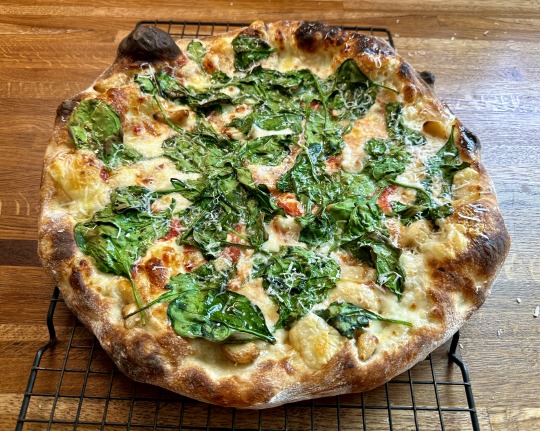
And there you go—tremendous pizza, made in your regular-ass home oven. It's possible, and it's delicious.
P.S. I have a bunch more pizza recipes on my website. Even if you don't plan to make any of the other styles, they could be instructive, as every recipe has helpful steps and notes of its own.
9 notes
·
View notes