#done with tutorial
Explore tagged Tumblr posts
Visit Tumblr Blog
Explore Tumblr blogs with no restrictions, modern design and the best experience.
Last Seen Tumblr Blogs


Fun Fact
Tumblr’s website traffic is steadily declining.
Text

"karasu search how 2 cheer human up"
"karasu search difference between sad human and zoning out human"
"karasu search how long is it safe for humans to zone out for?"
(+ a longer look at each scene:)

#art#gif#obey me#this was meant to be a quick test. it was not quick. i think this is was the longest i've spent on drawing something since rolling ik#for some reason procreate keeps fucking up the colours on export and i'm too tired to figure out how to make it stop#can you tell that satan and lucifer were animated first?#funnily enough satan showing ik his book was pretty simple but lucifer walking was like. impossible. he kept turning out fucked up#i was so worn out by the end of it that everyone else's animations are way simpler#(the walk still doesn't look right but i've made peace with that.... i should've done some tutorials or smth first)#(such is my hubris: when i try to do new art things it's mainly by brute-forcing my way through it and hoping it works)#jtta ik#obey me lucifer#obey me mammon#obey me leviathan#obey me satan#obey me asmodeus#obey me beelzebub#obey me belphegor#anyway i'd like to experiment more with trying to animate things in future so!! look forward to that?
6K notes
·
View notes
Text
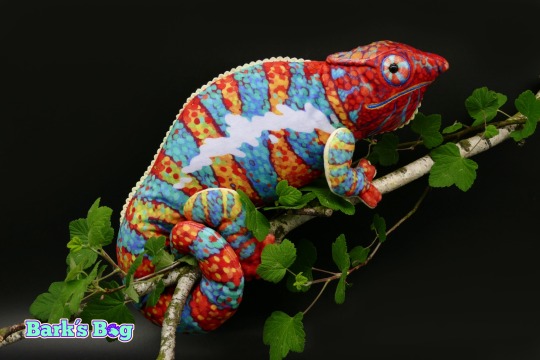
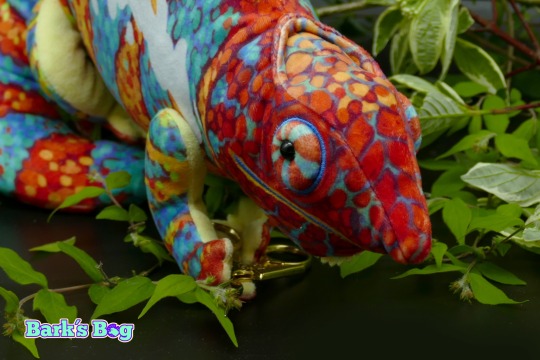

panther chameleon plushies!!!
based on the Amilobe locality of Furcifer pardalis
magnetic little hands for to grab things
soft
funny eyes
doesn´t need high humidty or complex care!
teddy joints for to move their little legs
---
adopt one from my bog
barks-bog.com
#i´m honestly really proud of these#the eyes are quite complex and i didn´t think i could pull them off but i did!!! i will post a quick tutorial later how they are done#also thanks to palaeoplushies for letting me steal her idea of using trim for little spikes#the paint job is one the more complex ones i´ve done and i hope people like it because i would love to do more like this#plush#plushies#plushblr#chameleon#panther chameleon#furcifer pardalis amilobe#handmade
4K notes
·
View notes
Text


i got it!
(og panels below!!)
HAPPY BIRTHDAY SIFFRIN!!! <- i say, scheduling this to post at midnight september 2nd. it’s his birthday somewhere!! and also loops birthday but look i had a deadline here. don’t ask why This of all things is their birthday art. i make normal choices!!!
also. somehow this entire thing only took 4 and a half hours??? insanity. i literally started this Today. thats how it Gets Me i suppose. anyways!!!! here’s the og panels!! no colored version this time, i didn’t think it’d fit the scene. also i didn’t want to render 3 colored panels.


#marshdoodles#isat#in stars and time#isat spoilers#shoutout to the 2 people on discord who immediately wished to be the tutorial sadness when i posted this#honestly . i get it.#we were out all day today and i STILL managed to get this done somehow#i dont think i can call myself a slow artist anymore#part of me wanted to make a happy birthday edit of this in the same vein as the merry christmas edit but#it is. 10pm. and i am sleepy#no cake for him
2K notes
·
View notes
Note
Your art is extremely inspiring. Do you by chance have any tips for creating reflective highlights and their placement? It’s something I’ve been trying to figure out for so long and it’s just not computing in my brain. 🫠
First of all, thank you! Ahh I'm not as descriptive with words, so let me give you a quick rundown.
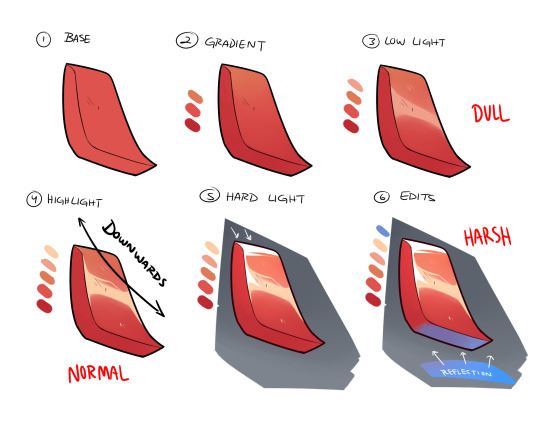
Once you have your base and all is good to go, you create the gradient in the direction of where your light source is (up -> down in the image). The direction will always depend on angle or 'curve' of the metal/material you're trying to work with. Up top, I did a downwards reflection since my shape is more diagonal, rather than uniform and straight. There are times you'll have a round shape, in where this time you'll go ahead and create the highlight at the apex of it. Next, you have to decide what KIND of highlight you'll be using. I usually work with multiple lighting layers, but for this example I'll only show 3. The DULL lighting is just regular low lights that show the texture as reflective, but is most likely AWAY from a light source and/or is reflecting off something that doesn't have much shine. The NORMAL is your regular highlights that is usually just a lighter shade than your base. Since most if the time it just follows your low light(think of it as the intensity of the reflective light source), you can just place it on top of the DULL lighting. The HARSH lights are only portion that are directly in front of the light source OR are the most intense parts of it. Think of it as extreme sunlight etc, and it goes apart from your regular highlights. Lastly, you can add more color to you material by taking in other reflective surfaces, specially those with different color. I added the blue as an example and just color the panel that directly faces it.
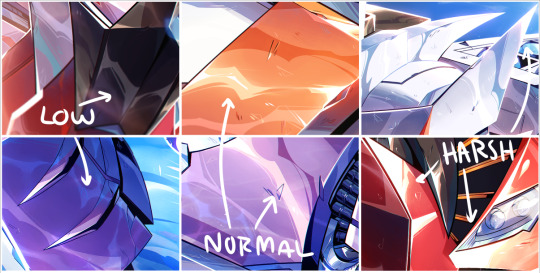
I added a few example of lighting from my works so you can kinda see what I'm talking about. They might not seem as different at first, but the placement really makes a difference once you start finishing your rendering. I'm not great at explaining sorry, but I'll try to do another stream and walk people step by step? Would that be ok? Hope this helps a little!
3K notes
·
View notes
Note
Any tips on learning to make buttonholes? I've been putting it off for.... *checks notes* like three years.... but better late than never and all that. I don't have any fancy machines so I gotta do it by hand but that seems right up your alley.
Thanks!
It IS up my alley, yes, I do most of my buttonholes by hand!
I'm actually part way through filming an 18th century buttonhole tutorial, but I expect it'll be a few more weeks before I finish that and put it on the youtubes, so in the meantime here's the very very short version. (The long version is looking like it'll probably be about 40 minutes maybe, judging by how much script I've written compared to my last video?)
Mark your line, a bit longer than your button is wide. I usually use a graphite mechanical pencil on light fabrics, and a light coloured pencil crayon on dark ones. (I have fabric pencils too, but they're much softer and leave a thicker line.) You may want to baste the layers together around all the marked buttonholes if you're working on something big and the layers are shifty and slippery. I'm not basting here because this is just a pants placket.

Do a little running stitch (or perhaps a running backstitch) in fine thread around the line at the width you want the finished buttonhole to be. This holds the layers of fabric together and acts as a nice little guide for when you do the buttonhole stitches.

Cut along the marked line using a buttonhole cutter, or a woodworking chisel. Glossy magazines are the best surface to put underneath your work as you push down, and you can give it a little tap with a rubber mallet if it's not going through all the way.

I'm aware that there are some people who cut their buttonholes open using seam rippers, and if any of them are reading this please know that that is abhorrent behaviour and I need you to stop it immediately. Stop it.
Go get a buttonhole cutter for 10 bucks and your life will be better for it. Or go to the nearest hardware store and get a little woodworking chisel. This includes machine buttonholes, use the buttonhole cutter on them too. If you continue to cut open buttonholes with a seam ripper after reading this you are personally responsible for at least 3 of the grey hairs on my head.
Do a whipstitch around the cut edges, to help prevent fraying while you work and to keep all those threads out of the way. (For my everyday shirts I usually do a machine buttonhole instead of this step, and then just hand stitch over it, because it's a bit faster and a lot sturdier on the thin fabrics.)

I like to mark out my button locations at this point, because I can mark them through the holes without the buttonhole stitches getting in the way.
For the actual buttonhole stitches it's really nice if you have silk buttonhole twist, but I usually use those little balls of DMC cotton pearl/perle because it's cheap and a good weight. NOT stranded embroidery floss, no separate strands! It's got to be one smooth twisted thing!
Here's a comparison pic between silk buttonhole twist (left) and cotton pearl (right). Both can make nice looking buttonholes, but the silk is a bit nicer to work with and the knots line up more smoothly.

I've actually only used the silk for one garment ever, but am going to try to do it more often on my nicer things. I find the cotton holds up well enough to daily wear though, despite being not ideal. The buttonholes are never the first part of my garments to wear out.
I cut a piece of about one arm's length more or less, depending on the size of buttonhole. For any hole longer than about 4cm I use 2 threads, one to do each side, because the end gets very frayed and scruffy by the time you've put it through the fabric that many times.
I wax about 2cm of the tip (Not the entire thread. I wax the outlining/overcasting thread but not the buttonhole thread itself.) to make it stick in the fabric better when I start off the thread. I don't tend to tie it, I just do a couple of stabstitches or backstitches and it holds well. (I'm generally very thorough with tying off my threads when it comes to hand sewing, but a buttonhole is basically a long row of knots, so it's pretty sturdy.)

Put the needle through underneath, with the tip coming up right along that little outline you sewed earlier. And I personally like to take the ends that are already in my hand and wrap them around the tip of the needle like so, but a lot of people loop the other end up around the other way, so here's a link to a buttonhole video with that method. Try both and see which one you prefer, the resulting knot is the same either way.


Sometimes I can pull the thread from the end near the needle and have the stitch look nice, but often I grab it closer to the base and give it a little wiggle to nestle it into place. This is more necessary with the cotton than it is with the silk.
The knot should be on top of the cut edge of the fabric, not in front of it.

You can put your stitches further apart than I do if you want, they'll still work if they've got little gaps in between them.
Keep going up that edge and when you get to the end you can either flip immediately to the other side and start back down again, or you can do a bar tack. (You can also fan out the stitches around the end if you want, but I don't like to anymore because I think the rectangular ends look nicer.)
Here's a bar tack vs. no bar tack sample. They just make it look more sharp, and they reinforce the ends.

For a bar tack do a few long stitches across the entire end.

And then do buttonhole stitches on top of those long stitches. I also like to snag a tiny bit of the fabric underneath.

Then stick the needle down into the fabric right where you ended that last stitch on the corner of the bar tack, so you don't pull that corner out of shape, and then just go back to making buttonhole stitches down the other side.
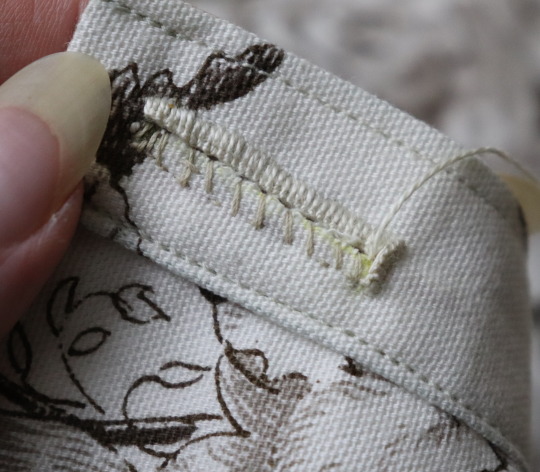
Then do the second bar tack once you get back to the end.

To finish off my thread I make it sticky with a bit more beeswax, waxing it as close to the fabric as I can get, and then bring it through to the back and pull it underneath the stitches down one side and trim it off.


In my experience it stays put perfectly well this way without tying it off.
Voila! An beautiful buttonholes!


If you want keyhole ones you can clip or punch a little rounded bit at one end of the cut and fan your stitches out around that and only do the bar tack at one end, like I did on my 1830's dressing gown.

(I won't do that style in my video though, because they're not 18th century.)
Do samples before doing them on a garment! Do as many practice ones as you need to, it takes a while for them to get good! Mine did not look this nice 10 years ago.
Your first one will probably look pretty bad, but your hundredth will be much better!
Edit: Video finished!
youtube
And here's the blog post, which is mostly a slightly longer version of this post.
#ask#buttonholes#sewing#hand sewing#sewing tutorial#I've been procrastinating on the video this week#I want it done! I don't want to work on it I want new projects! I want to cut out more gloves!#currently forcing myself to do the last few buttonholes on these pants and then maybe I can cut out new gloves? as a treat?#but I hope I get some filming done tomorrow too
4K notes
·
View notes
Text
Drawing Likeness: with Tem!
okaay since a few people actually showed interest in me sharing a bit of what I've been doing to figure out how to really capture likeness, specifically Temuera Morrison, I figured id do my best to write it out
I am also going to entice you with some of my recent clone art! (oooh some of it is unreleaaasedd)


I am putting the whole thing under the cut because I have a feeling its going to be long:
Read more!!!
a couple disclaimers before we start
-This is not some definite post about how everyone should be drawing clones, nor is it in any way claiming that this is the right way. This is just my musings as I stare at a mans face for way too long and try to replicate it
-I am inexperienced. As kind as you all are to me, drawing real people is relatively new to me, capturing a persons identity through their features is difficult for anybody, and I am no different. I have watched many a video on likeness and had my share of classes, but If im being honest, i rarely put it into practice successfully. So there'll probably be errors in this post or things i will come back to in a few months and wish I had said/done differently
ANYWAYs you guys get my vibe im just here to ramble and today we are rambling about mr copy paste. I am doing this for Law, my clone boy, because I plan on delving further into oc fanart and I want to put effort into representing him correctly!
SO LETS BEGIN
Before even deciding what specific pose of a person I want to draw, I tend to grab a bunch of references and compile them like so

(all of these can be found on my pinterest)
Why so many? Well, we are about to delve into facial features, so when we are dealing with photos we have to take into account that there are an abundance of circumstances that will influence how a persons face will appear, some of these include:
focal length: All of these are taken on different devices, and focal length can play a big part in distorting faces
age will play a part, your face changes a bunch throughout your life!
lighting, while not as major, can muddy the waters and make it difficult to interpret facial planes and features
SO, to make sure we get a proper grasp of what's really going on, I like to make sure we have lots of options to compare and contrast with.
Next up! What I like to do is block out the main facial features with colour on different layers, the features I block out usually are the general face shape, eyebrows, eyes, nose and lips. But what you are looking for is the defining features of a person, so that could include other things! Maybe a scar, or some particularly prominent cheekbones.

I dont have any rhyme or reason when it comes to picking my colours, all that matters is you can see all the shapes clearly.
Now I may be biased, because Ive been staring at these for 4 hours, but notice how it still looks like Tem? :D
Anyways, now we can break these parts down, and you'll see what I mean about compare and contrast:

We'll start with isolating the facial shape, putting all these next to eachother you'll notice they arent exactly the same (partly because of my shoddy work) But the distinguishing features run through each shape! Namely the very soft rectangular shape I sketched out in the bottom right there. Along with his soft, wide jaw structure.
I did the same for the rest of his features!


You'll notice I highlight the prominent shapes and ratios,
When drawing anything, it is important to start from the very base shapes and build up.
When drawing something you want to look like someone, those shapes relative to other shapes is what makes it look like them.

I didnt use the same technique with his eyes and lips, but I wrote out some helpful info for them! More importantly for his eyes.
When drawing eyes, I find the most important part is where exactly I draw the creases, (along with the overall shape of the eye itself) it is important to understand where those will present themselves with hooded eyes.
NOW, with an understanding of his facial features in place, lets take a detour to colours:
before I start, a couple things to note:
-Temuera morrison versus the clone troopers in the animated shows:
While I love the animated shows they don't exactly stay close to their source material. Im going to link here to an excellent post discussing whitewashing specifically in relation to the clones.
Temuera is Māori, of Te Arawa (Ngāti Whakaue) and Tainui (Ngāti Maniapoto, Ngāti Rarua) whakapapa, and also has Scottish and Irish ancestry.
The Māori people are the indigenous Polynesian people of mainland New Zealand (Aotearoa). Māori originated with settlers from East Polynesia. Māori people often vary in skin tone, Skin colour doesn't determine ethnicity. There's often a correlation but it's not a requirement.
But that is a tangent! What we are aiming for is to stay true to Temuera.

Bringing back my reference photos from before, Ive colour picked a buncha values and theyre all over the place. Why doesnt this work?
Similarly to earlier, you have to take into account the photos themselves. Many things like lighting, colour grading (when it comes to filmography) and makeup, can alter how a skin colour presents in photo.

You can attempt to get true to life by swatching from certain places on the face. Here I've tried to pick some photos with good lighting, and I've also tried to avoid overly lit/shaded areas.
Tem has a very warm, tan skin tone, Instead of colour picking I tend to try and replicate it myself, but I do often bring in references to make sure Im staying true to the source!

a brief intermission to talk about colour theory, something I myself struggle with alot. Often, when putting in flat colours without a background, I will forget to make sure the colours i intend to use will work with the skin tone i have picked! (something that is apparent in older works of mine, not just in relation to clones, but in general, the colours I end up with stray largely from their original sources and it is something I am doing my best to keep in mind and improve in! Although I don't think i am nearly experienced enough in the topic to say I have succeeded yet lol.)
anyways back to Tem :))

Now we can put all of that into practice! Things to keep in mind when drawing out a piece next to a reference like this:
the distance between the eyebrows? how far down his face does his nose go? Basically just, in relation to eachother, where do all those shapes we found earlier, sit?
The screenshot above is from before I did it myself, but instead of directly tracing from the reference, a handy trick I use it to complete your sketch first, and then overlay a traced version to see where your inconsistencies are! Alternatively, you could move your sketch over the image, but I didnt do it that way so!! uh!! im sure it works exactly the same!!!!
When it comes to a final illustration, or any sketch that isnt a direct study, of course you can push and pull and stylise! You'll see below that I'm not exactly 1:1 to my reference photo either.
The important thing with stylisation, or at least my own personal understanding of stylisation is that you need to thoroughly understand the thing you are stylizing! "You need to know the rules to break them" and all that. While shapes, lines and rendering can change, when it comes to drawing someone, and making it look like them, you have to make sure to keep their core features true to source. Caricature can capture a persons vibe whilst drastically exaggerating features, but it will only look like them if you KEEP THOSE FEATURES!!!! SHAPES!!! AHHH!!
But that is just my perspective on the discussion of style versus realism, please dont take is as Law, I dont know what Im on about half the time!!
anyways, after fixing your sketch, add local colours!

I rexified him because why tf not! But this is where you can go crazy with that clone personalization!

And then here is a very very barely rendered version (if you guys want me to explain how i RENDER that would need to be a completely different post, and I havent had anyone ask about it yet so who knows! maybe one day) But I digress, hopefully you learnt something new through my ramblings! It has certainly helped me organize my thoughts and I have also found some areas I would like to focus more on in the future to improve my own art!
TLDR: In order to understand an object, be it a face or a building or literally anything, you have to break it down to its simplest forms, understanding LARGER shapes will help you immensely in the long run
If you guys like this sorta content do let me know! I'd be down to do similar things for armor/anything really, I am very anti gatekeep so really anything at all you want to know! Send me an ask :))
also if you see a spelling mistake.. i don’t know how that got there
#can you tell im nervous#i’ve never done anything like this BEFORE SPARE ME PLEASE#star wars#star wars fanart#digital art#my art <3#digital aritst#the clone wars#clone trooper#temuera morrison#tutorial#soulars yaps#soulars tutorial
481 notes
·
View notes
Note
Not sure if it can be done but a tutorial on glasses (like with Azul) would be fantastic. Also one on the nightmare that is Azul's hair. Please and thank you in advance.
One tuto for glasses!
I will do Azul's hair in another post :3
Warning: I don't have the vocabulary for glasses at all. I did my best to make it understandable but don't hesitate to ask for clarifications if you need TwT

Here's our two glass boys. I looked for mostly similar glasses online to use as reference.
Azul has thin frames, rectangle glasses. Trey has heavy frames, square glasses with rounded edges.
Glasses have a LOT of different shapes. Don't hesitate to look online for references on round/oval/etc glasses to help yourself. Website that sell them tend to have pics of the glasses under several angles, which is very practical when you draw anything that isn't front facing.

Step 1: drawing zone
The most important thing to figure is where to place your glasses. Anything else can be yolo-ed and still work, but badly placed glasses will make everything look weird (though it can be used for comedic effect).
Simply put: the higher part of your glasses should reach right below your eyebrows (on realistic proportions). Otherwise, use your eyelids as ref. Place your frames a bit above your eyelids. The sides of the glasses will (usually) reach the sides of the face. That's the case for both Azul and Trey.
The bottom part is where you get to choose the size of your glasses. That's where you decide to elongate them to get square/round glasses instead of rectangle ones.

Step 2: Tracing the glasses
Within the drawing zone, simply draw the general shape of the glasses. A rectangle, a square, a circle. Keep about a finger-width size gap between your two glasses.

Step 3: Details
Draw your main shape first (rectangle, square, oval). Then remove space for your nose. The glasses will tend to leave a triangular zone free in most shapes to make space for the nose (except on round glasses). Here you can add the bridge and where the arms of your glasses connect with the actual glasses.

Step 4: Frames width
Now that you have your elements placed, you only need to draw the actual frames. In most glasses the upper side will be slightly wider than the rest. Don't hesitate to only draw one side and simply copy paste and flip it to get the other side. Glasses are symmetrical so it can be a hassle.
Once there you can decide to add the thingies that keep the glasses secured on the bridge of the nose. This step can be optional if you don't go for hyper realistic glasses.

3/4 and side view
3/4: The same steps from before can be used here. Put your drawing zone first, upper frames right under the eyebrows. The side farthest from us should reach the bridge of the eyebrow (for realistic proportions). Otherwise, leave about a finger-wide space between the face and the glasses. The side closest to us will depend on how much the character looks to the side. On regular 3/4 views you can place it right on the side of the eye. For the center part, follow your nose and place the triangular hole on top of it. Part of your glasses will be hidden by the nose.
You can decide to draw your glasses in front view on another layer first to get the symmetry right, and then to move and stretch your layer until it fit in front of the eyes. It's a perfectly valid strategy!
Side view: Here the only thing you need to draw is the side of the frames and the arm reaching to the ear. You can place the arm first, mostly parallel to the ground. The frames should be put right in front of the eyebrow bridge and at least cover the whole size of the eye. For bigger glasses, add volume on the bottom.
And that is mostly that? Glasses are mostly about where you put them and giving the illusion of symmetry.
After that you can have fun with the shapes (personally I love drawing round glasses), the size, you can decide to draw the thingies that hug the nosebridge or not, you can decide to draw the arms or not, you can add accessories, etc.
You can even decide not to draw parts of the glasses to keep a clear view on your eyes. Yana has a note for Azul and Trey that the glasses should always be full even if they hide the eyes. For me it depends on my mood and what is most important in the current art.

As you might see here, I tend to add a white edge to give actual presence to the lenses and separate the eyes (or hair) from the frames. It's your choice whether you want to erase anything to make things clearer or to keep it all as is to make it realistic.
And I guess the last thing I have to say is... look at refs online. I think that's how I finish most of my tutos lol
#hopefully that's not too messy#I haven't done tutos in a while I forgot how hard it was to explain things properly in another language#mello's drawings#twisted wonderland#twst#azul ashengrotto#trey clover#original characters#glasses#tuto#step by step#tutorial#art tips#drawing tutorial#ask me anything
297 notes
·
View notes
Text

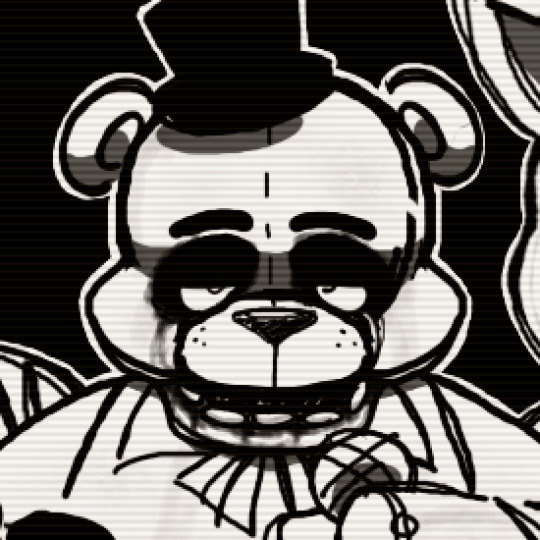
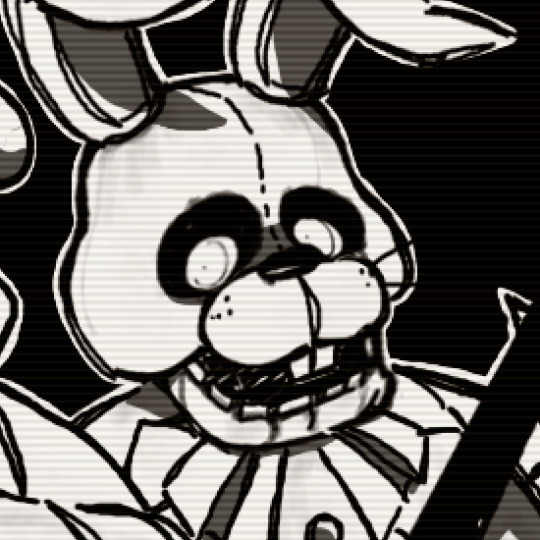
we've waited all 8 years, to fi~na~lly bring true our fears; newcomers to watch us play, & veterans rejoice - it's our day! 🎉
#uwu art#Five Nights at Freddy's#Five Nights at Freddys#FNaF#Five Nights at Freddy's movie#FNaF movie#Five Nights at Freddys movie#Freddy Fazbear#Chica the Chicken#Bonnie the Bunny#SHOUTOUT TO EVERY BLUE MOON WHERE I DRAW FNAF#& the one time ever ( today ) i actually post it#FNAF MOVIE WAITERS MERRY CHRISTMAS#this was done WAY back before the movie even got finalized iirc but hey today's a good day to polish & post it#artstyle based off of those silly big headed keychains as well as those old dragoart tutorial things#because GOD we don't get fnaf art like that anymore#i WILL be the change i want to see in the world#ANYWAY
2K notes
·
View notes
Text
is this anything
#hi rtc fandom please accept me as one of your own#someone has probably done this before but oh well#i've been teaching myself how to use capcut by editing the rtc slime tutorial#and come to the conclusion that i will never use capcut again#ride the cyclone#rtc#ocean o'connell rosenberg#noel gruber#bagel thoughts
929 notes
·
View notes
Note
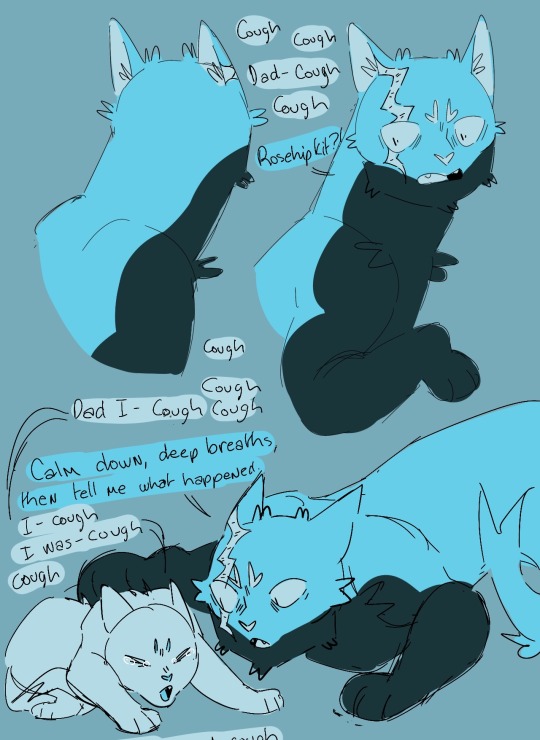
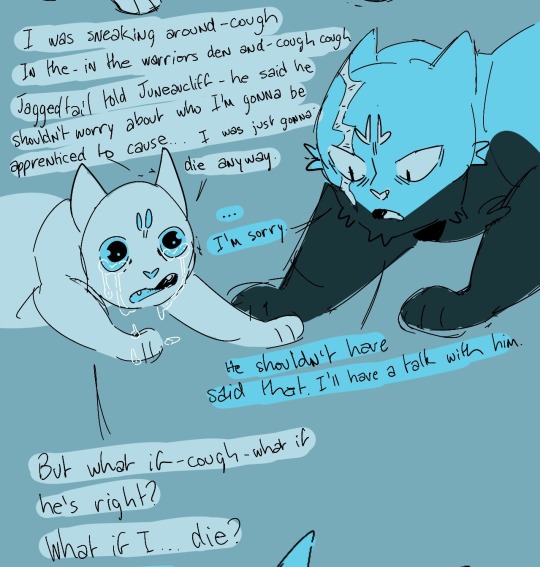
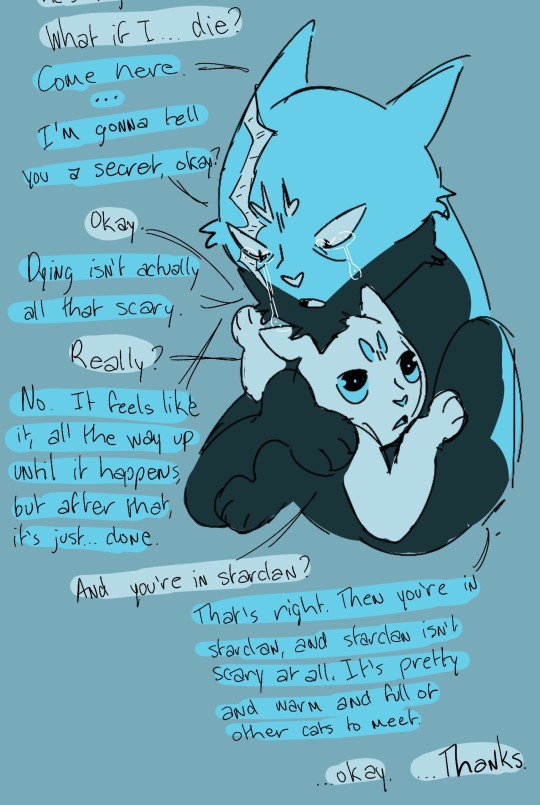
Thinking abt how the kits would have absolutely zero grasp on the concept of mortality and death and how they'd be really confused on why their parents are upset and where Mothtree wen't :^)
Hi friend, I don’t want to be like a major downer but… Rosehipkit is VERY sick. She and Dogwood, more than any other kits, absolutely understand the concept of mortality and death in a way that they should not have to.
#loudclan#loudclanasks#cw discussion of death#cw death#cw death mention#cw afterlife#cw discussion of afterlife#cw sad#kinda a downer sorry#I know this one is messy but I am terribly tired and I have so many asks in my inbox#I promise the next moon is in process.#sketch done#just trying to balance drawing asks and drawing the moon#also anon who asked about a drawing tutorial I’m working on it!#will probably be a while but I haven’t forgotten
317 notes
·
View notes
Note
I would love insight into how you animate so smoothly in gmod
hi!! so i use the ragdoll mover and the stop motion helper add-ons :D

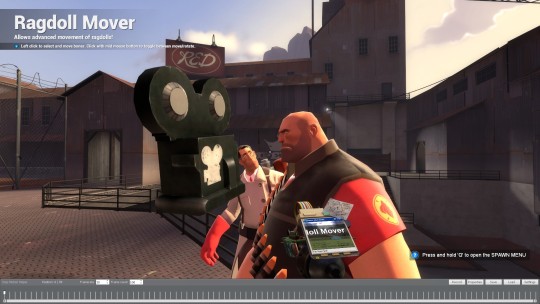
you use the timeline seen on the bottom of the screenshot to create your key frames and everything else in between ☝️ now i am no pro animator and what little i know ive picked up from various tutorial videos over the years....
stop motion helper has a great video tutorial for the very basics of how to use it! as for the process of animation itself well ummm i can really only link the 12 principles of animation, as i've mentioned that im no expert on the topic.
here's a video i made for the occasion--and i hope you don't mind, but i borrowed bolts for this demonstration ^_^ (i recognize the irony of using a robot to demonstrate fluid movements, but if other animators can use mannequins...)
youtube
had to put the video (unlisted ofc) on yt cause it got longer than i expected it to >_>
see the finished product below the cut!! had 2 mega compress it bc of tumblr's 10mb gif limit grrr but you can see it more clearly in the video anyway

#asks#tf2#team fortress 2#gmod#garry's mod#animation#my art#ANYWAY I HOPE THIS HELPS..#i havent done an art tutorial in a dogs age#also i had to mega compress the gif bc it was originally 119 mb...bolts too big for the post#i love ur robot guys btw i hope that much is clear hehe#edit: ik bolts is the boss type soldier bot but i. i needed him smaller so i didnt have to stand on a box while animating him LOL
97 notes
·
View notes
Note
Sending this as anon bc I'm shyyyy but hi!!! Ive been following you for a while and I LOVE the way you draw Yuji so so so much. Adore him even. He's my baby and I love him. You draw him so GOOD I go emotionally feral every time you draw a new Yuji thats how much I love him I was wondering if you have any tips when it comes to rendering his hair??? I've been drawing him for months now and I still struggle every single time I draw his hair and it's beginning to annoy me so much. I really really love the way you render his so I was sort of wondering how you go about doing it??? If thats not a bother of course. I can't stress this enough but I love your art and you've been a big artistic inspiration for me for the past few months!!! Hope you're doing well :)

hi anon!!! ik your question was about hair specifically but i got carried away and ended up with a timelapse of the whole render ..but i figured it's been a while so consider it a bonus! I'll go into a few specifics under the cut in case i get Also carried away rambling :'> it's a lot easier to Do than to explain but I hope u can still take something away from this <3
i'm on a painting kick so that means i mainly work by taking big swatches of colour blocks and then going in and refining them. u can see in the beginning of the video i start by just throwing down approximate colours and values according to where i want my light source to be before cleaning everything up. I use a combination of a hard angled chisel for flats, a chalky/textured oil brush to blur edges, and a textured tapered brush pen for detail.
rn the way i draw hair uses a lot of Big shapes that i try to separate into somewhat believable layered hairstyles by using small, high contrast shadows to give the illusion of depth. speaking of shadows, smth i play around with when it comes to yuuji specifically is shading his hair with colours that border on either brown or grey--depends on th piece ofc, there are times when i saturate this boy to hell and back, but i find using neutral shadows Grounds the pink a lot
honestly a good rule of thumb when rendering layers is light on top dark underneath fshdsdh a lot of the time hair rendering is just one big convoluted gradient. i break up the monotony with thin sharp lines around the edges where colours meet to imply individual strands, but lately i'm trying to cut back with how many strands i render in detail. i don't think this video is the best example of it (or maybe yuuji's hair in general doesn't lend itself well to what i'm trying to achieve), but ideally I'd like wider swaths of colour with fewer interrupting fine lines. megumi is a lot more forgiving w this i find
in a similar vein , i think in general it's rly hard working with hair like yuuji's which in official art is just . a nondescript spiky puff on top of an undercut... if u want to be more faithful to his design be my guest but i personally try to rectify his hairstyle by picking a few points of origin for the hair chunks in order to make the growth direction and volume make sense. since i draw yuuji's hair a lot longer than it is in canon, for reference i tend to look at a lot of women's undercut/pixie cut styles to get a better idea of how to layer everything. i like making his hair swoopy and fwippy rather than Spiky, if that makes sense
those r just some things i do, but honestly i wouldn't worry abt being terribly precious with it. hair is rly forgiving in that there are a million ways to make it look good , i think that the most important thing is being aware of your light source and adjusting your values accordingly. play around, see what works, have fun with it! and don't resist it if u find yourself being led in a completely different direction lmao ik i just went over my current process but i think i've brought up before how hair is often the most volatile of all the features i draw and i change up how i approach it A Lot .
i'll shut up now bc ive Already been talking too long but thank u so much for your kind words and I hope u found something abt this helpful!!!
#answered#art advice#my art#timelapse#jujutsu kaisen#jjk#jjk fanart#yuji itadori#this was sitting in my inbox staring at me and i could not focus knowing it was there so i dropped everything fr a timelapse#i thought abt recording myself when i got to yuuji's hair on my current piece but yuuji in that one is a. too small and b. facing away#wld not have made a good tutorial subject lmao#also this is the fastest ive finished a render in Months my hand hurts lmao im out of practice#im always so insecure abt the quality of the advice i offer i RLY hope im not just spewing bs here#the thing about drawing for over 2 decades is that eventually u forget how you draw#ANYWAY now this is done surely NOW the universe will let me work on megumi uninterrupted.....
108 notes
·
View notes
Text


prompt: something for the silly ol' rat man? [template tutorial insp] [fan vids: ♡ ♡ ♡]
#the band ghost#ghost#ghostedit#dailymusicians#blogmusicdaily#usergif#musicgifs#usermusic#tobias forge#copia#papa emeritus iv#cardinal copia#bandsedit#musicedit#batslook#*papaseries#*gfx#~#id in alt#wanted to do this since i saw the template go up! so fun and simple to follow the tutorial too#needed something new to learn today so i broke my content ban just this once#prays no one has already done this and i was unaware orz
309 notes
·
View notes
Text
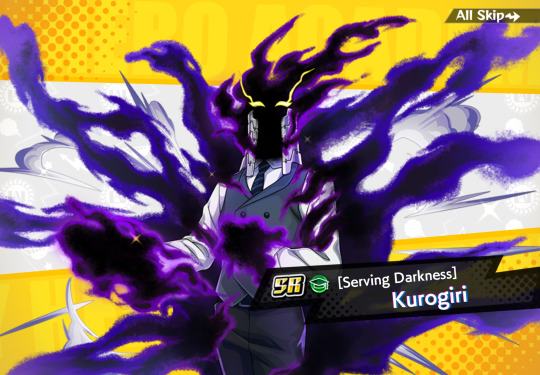
so I finally downloaded mhui and as predicted I am sooo confused, however I did also immediately read this as Kurogiri serving 💁♀️ darkness
#'what do you do at the bar' 'i like… serve'#happy weekend i am lost#i don't know if this is typical for mobile games but there are so many numbers and icons on my screen#and i have no idea what any of them mean#what is going on with the gray and yellow numbers with the arrows#also what are guests. who are they. are they out there?#do they know they're accompanying me on these quests#… are they mad at me#if present mic had done the tutorial we wouldn't have this problem#sorry all might he's just better at explaining things that's why he's the narrator#also this is such a great kurogiri#mhui#kurogiri#liza blather#mha#bnha
62 notes
·
View notes
Text
TRADITIONAL ARTISTS! i wanted to make sure you guys know about erasable pens- not because pencils dont exist but because they ERASE WITH HEAT! so if you do a sketch in purple and ink it over in nice contrasting black so you're sure you got every line, you can hit that puppy with a heat gun for like 10 seconds and the sketch instantly vanishes
rebog to save a life etc 🙏
#art tips#artblr#drawing tutorial#drawing traditional#drawing tips#from ellie#ive been doing this and ive done so many drawings today for the first time in AGES#its so much more gentle on my joints to not scrub it with eraser and it only cost me $2 to get my purple pen
829 notes
·
View notes
Note
I just wanna start out with oh my god I love ur art. It’s genuinely like so pretty, and being both a pizza tower and AntonBlast enjoyer myself it’s just great to see fantastic drawings being made by a great artist!!!!!
I wanna ask, do u have any tutorials on drawing hands? Either a reference sheet u have or just a point in the right direction would be great :,]
hands are the downfall of my art and idk I love ur art style and would love some advice 😭
Thank you!! Thats incredibly kind of you :"")
as for hands heres a real rough, quick guide how I usually go about it:
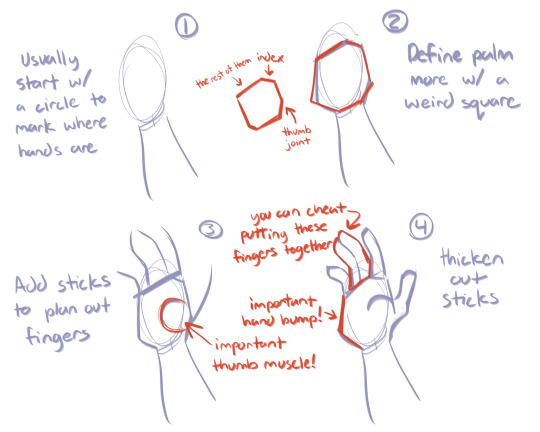
as for refs I use, honestly I'm constantly looking for new ones cause I struggle a lot with hands too ^^" but for refs I DO have/used, this is a nice study on knuckle and compression lines used in animation, adding flow and breaking the hand into shapes, this awesome website called posemaniacs that has a whole hand library to practice with
Not to mention youtube has many MANY videos that can break it down much better than I can

and lastly, on days im having a REALLY rough time with it, sometimes I trace over a photo of a hand to understand the shapes then try to draw it on my own (I promise you wont be crucified for tracing for learning purposes)
Sorry I personally couldn't give a detailed explanation I'm very much still a student but I hope this at least helps pointing you in the right direction ^^
#also theres MANY hand tutorials artists have done on this very website#Im honored when someone comes to me for art advice alas Im constantly learning too#also sorry I took so long to answer!! Im in a bit of a creative rut rn :'')
55 notes
·
View notes