#costume fabrication
Text
Engagement Challenge: Finding Project Brief.
As part of my Engagement Challenge project, I was tasked with finding a client and working on a brief for them. This involved me searching online for potential professional clients. Ideally, a professional animation studio or a charity I could make a short animation for. In addition to this we were given presentations by various third year students, currently working on their final projects, who are looking for aditional support with various tasks.

After the 3rd year presentations, I reached out to one, Ty Darcy on instagram. I said I would be interested in the costume fabrication project.


While I'm grateful for the opportunity to work with Ty on this project, the work they need completing is not suffcient for my current module project. I will need something bigger to do for my project brief.
0 notes
Text
Last night was my company Holiday Party, and we're doing really well, so it was held at the Museum of Fine Arts (Boston)
I was so happy that also included the Styled by Sargent exhibit, of John Singer Sargent paintings and the actual articles of clothing alongside them.
Now, you have probably seen this painting of Lady Macbeth

But have you seen the costume she's wearing??

It's gorgeous, obviously.
But that texture! It's *crochet*
And some knitting
Really simple crochet too; just a chain and single crochet lattice with beads and metallic thread added for this chain mail effect.
Despite John Singer Sargent being an expert painter of fabric (no, really, just look at it), I never knew Lady Macbeth's costume had to be *hand crocheted* for that texture in the painting.
Anyway I'm gonna be making myself some faux-chainmail by crocheting it for the next Renn Faire
#art#not my art#john singer sargent#lady macbeth#costume#costuming#shakespeare#macbeth#crochet#knitting#painting#fabric
11K notes
·
View notes
Text
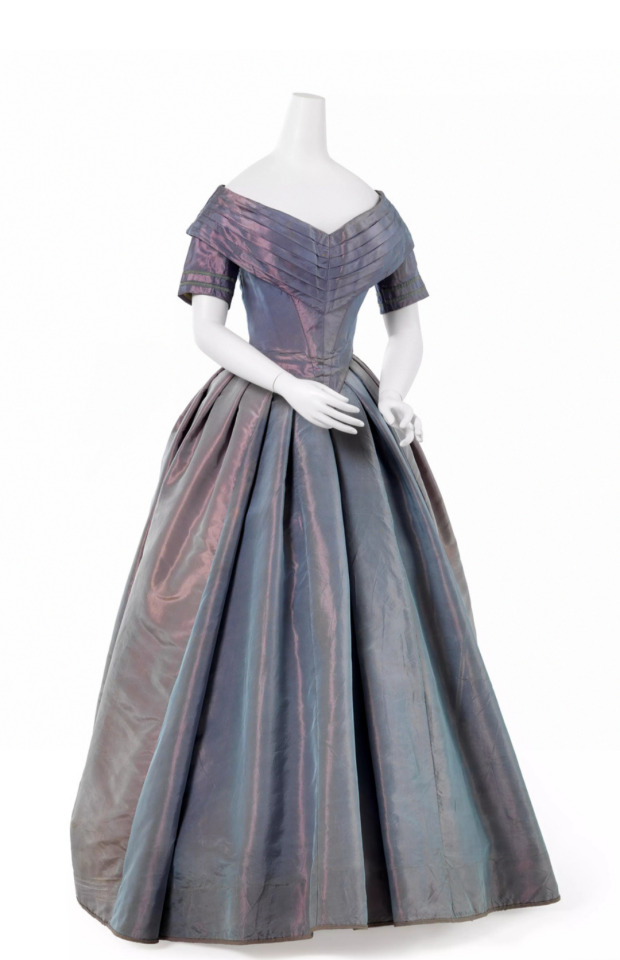
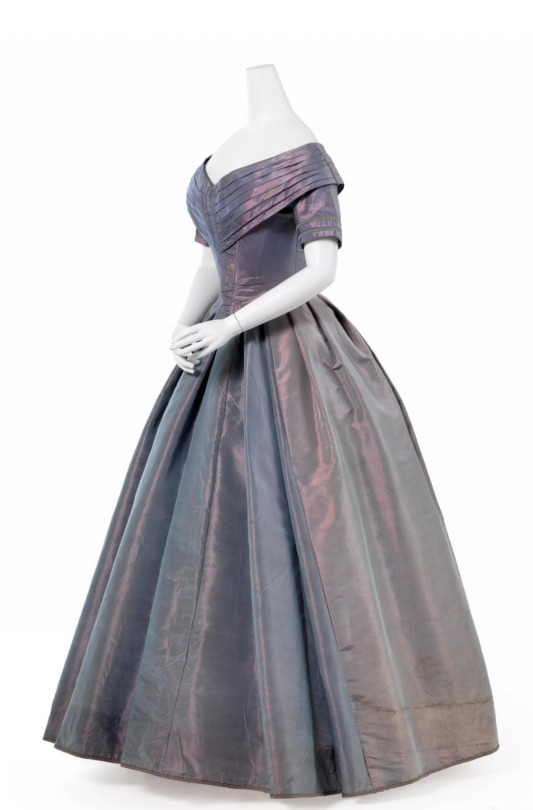
Ball gown, 1840-41
Maker: Unknown
From the collection of Wien Museum
#That's the most beautiful fabric I've ever seen#dress#clothing#historical dress#historical fashion#1840s#19th century fashion#ballgown#garments#costuming#historical costuming#victorian era#victorian fashion#19th century#my post#fashion#period fashion#historical clothing#fashion history#old fashion#iridescent#iridesence#fairy aesthetic#fairycore#light academia aesthetic#light academia
17K notes
·
View notes
Text
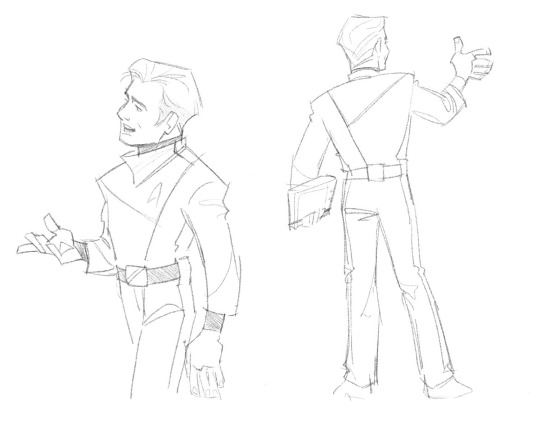

i knwo a lot of people like the aos cadet and dress uniforms but i do Not and am actively trying to think up alternatives…… with tos kirk though lmao sorry
#anyways. tos kirk thiugh#ive never tried to draw this man younger until now. hm#star trek#captain kirk#james t kirk#also the into darkness grey ones theyre actually way worse than 2009#like if we’re gonna stick with modern/current common cuts why not at least do something a little more different with the paneling or#color blocking or whatever#theres a tiny bit of interest w the paneling but over all just looks like if you took a japanese school uniform and westernized it and#made it worse#the all red is fun though ill give it that#the grey ones from into darkness have absolutely nothing going for them though#anyways of course costuming will always depend on the time period that it is made. but it looks sooo 2010 i mean this in a bad way#also whatever fabric was chosen for ghe red ones pisses me off idk#anyways i dunno anything about fashion. im just drawing things
446 notes
·
View notes
Text
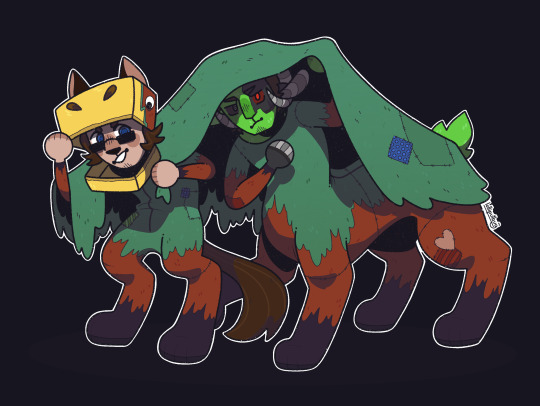
A perfectly normal Sniffer, nothing to see here!
#Ren cobbled this costume together with fabric scraps and cardboard and glue#hermitcraft fanart#hermitcraft season 9#hermitcraft s9#rendog fanart#renthedog fanart#docm fanart#docm77 fanart#docm77#rendog#lolliputbug art
844 notes
·
View notes
Photo

Yennefer of Vengerberg, alternate Thanedd gown.
#yennefer of vengerberg#trailer for season 3#the witcher#has dropped#and I have many thoughts about costumes#fan art#my art#love the concept#wish they’d picked a different style/fabric
910 notes
·
View notes
Text
"These magnet clothes are expensive."
"I know, it's a pain. But they'll make your full moons so much easier, trust me."
"But none of these are even fun."
"Look, sweetie, it's very new accessibility clothing. They're working on it, alright? This is mostly being marketed towards adult humans still."
"This is stupid. I'm getting along fine with stretchy pants and snaps."
"It won't be long before you'll start getting full transformations. A little stretch won't be enough when you stop being bipedal. And snaps are better than buttons and zippers, but they're very difficult with claws."
"Heidi's clothes have velcro."
"If you want to spend every waxing moon cleaning your own fur out of every single patch of velcro on your clothes, knock yourself our, honey."
"...do they at least have something in black?"
"If they don't I'll dye them for you."
#werewolf#werewolves#urban fantasy#that post where I talk about werewolves using magnetic fastening on clothes?#based on real accessible clothes. I didn't invent that#some costumes use them too for quick changes etc#also velcro on fine fabrics is a pain and animal hair getting stuck in it to make it stop working is an even bigger pain#laura drabbles#family
352 notes
·
View notes
Text
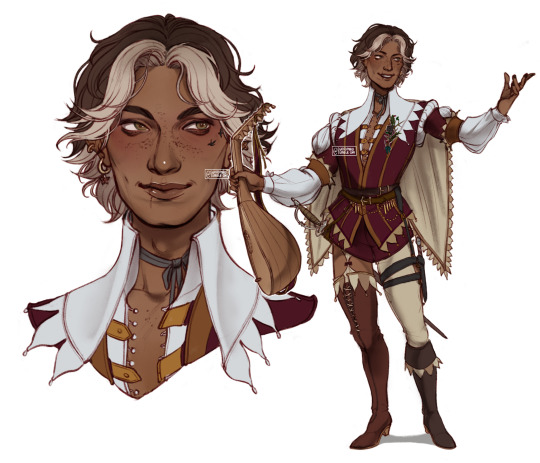
wren 🪶 ・ entertainer ・ bard/fae warlock ・ absolutely mid at everything 👍
his lore is linked to yves (he’s her dream guardian!!!)
#mine.#dnd oc#oc: wren.#actually I really love his costume LOL it’s supposed to be handmade that’s why he has that trim on everything#and he ran out of fabric to make his other legging so he just made it like a sexy stocking situation#and mismatched boots!!!!!! he’s missing the other pair#in terms of personality he’s like book howl + ouran tamaki but more cowardly and pathetic and he runs away when there’s conflict#and he’s constantly plagued with guilt 👍 especially over yves 👍#also he’s a hoe in theory but not in practice as in someone flirts with him and hits him with the haha and then what he actually doesn’tm#know what to do next he’s like 🧍#also MUCH to say abt his relationship with his patron but for now part of his pact is that he’s required to carry that branch ^ around#and it’s like this thorny branch with yew tree leaves….the shrike to your sharp and glorious thorn real!!#I like this format tho I want to do this w my other gworls
68 notes
·
View notes
Text
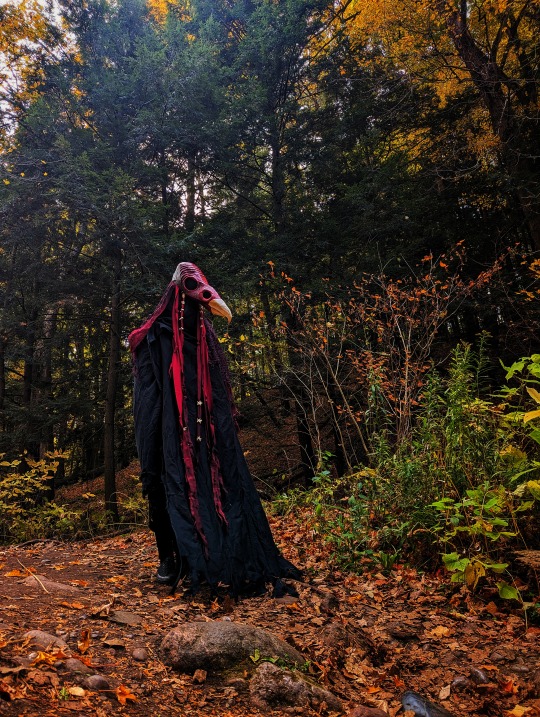
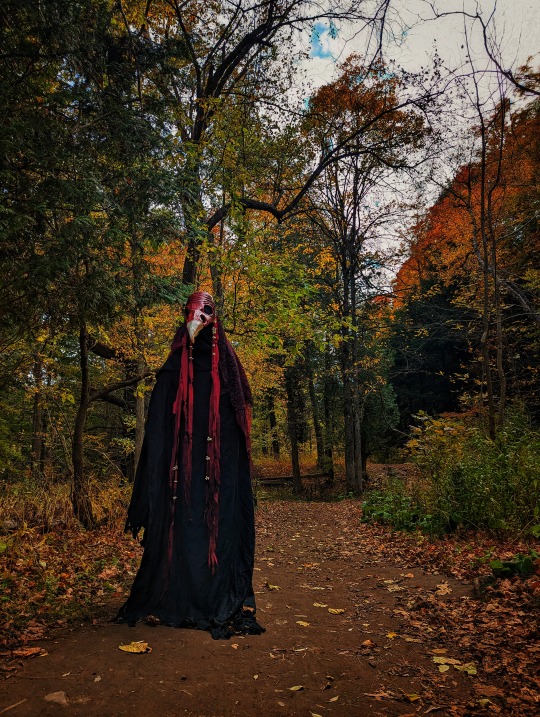
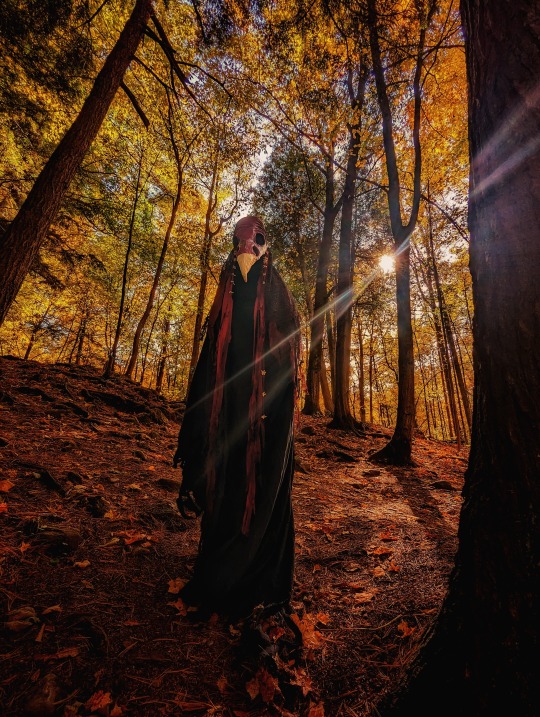
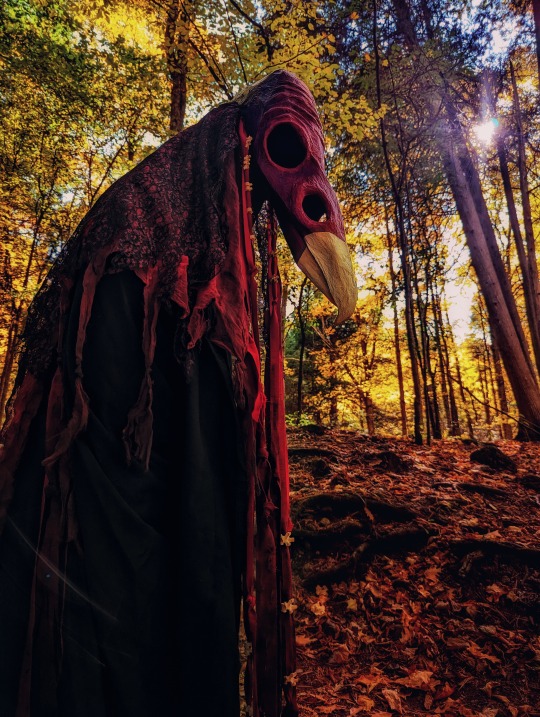


Vulture Cleric
I made this mask and costume over two years and I am so excited to finally have pictures of it thanks to a close friend who took these amazing shots! <3
This costume and images have been sitting in my brain so long I'm so happy to have them out in the world~
(whoops Image ID's are added now in alt text)
#halloween#vulture culture#vulture#turkey vulture#halloween costumes#halloween 2023#the mask is literally a cereal box#newspaper- painters tape- paper mache- and acrylic paint#with some thin black fabric hot glued in the eye sockets so i can see out#but tbh i look thu the nostrils mostly cause they are hollow and its much easier
240 notes
·
View notes
Text

I'm addicted to their 1827 outfits
Reblogs are appreciated <3
#fanart#good omens#good omens fanart#crowley#aziraphale#aziracrow#go2#ineffable husbands#1827 crowley#1827 aziraphale#i just love these costumes so much !!!#i want to make all of them for myself#i already have a jacquard for Crowley's coat and fabric to make shirts but i'm missing everything else#the basket weave read fabric for his waistcoat is particularly hard to fine#if you find it please tell me#if you have the perfect fabric for any of these pieces i will literally buy them from you i need them
164 notes
·
View notes
Text
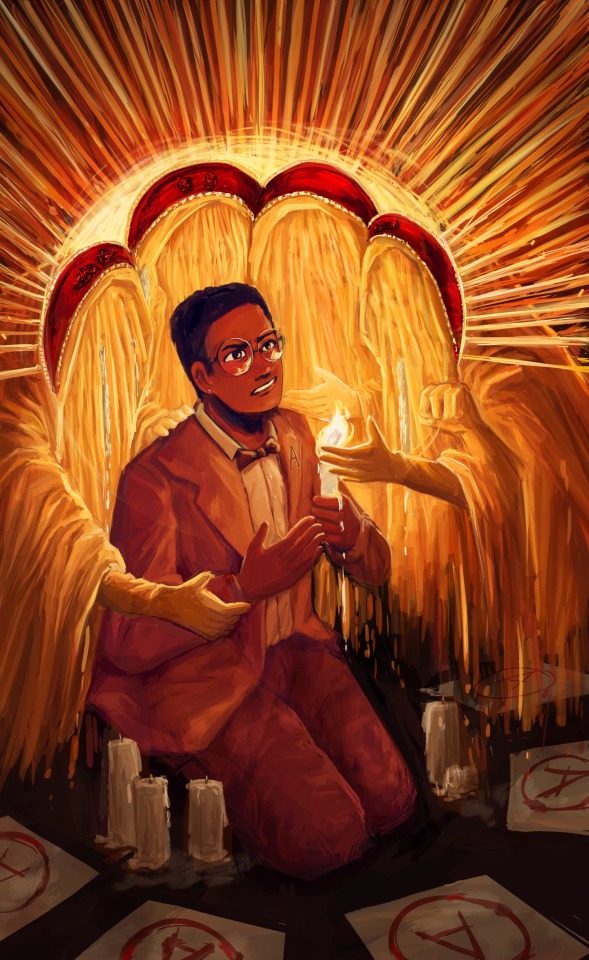
litany of the martyrs (click for better resolution!)
#at some point i wanted to make an illustration for each character but in retrospect maybe each is multiple song-coded..#drew the sketch for a quincy thing after a chat with a mutual reminded me this song existed dfsghjkl and then spent weeks rendering this#quincy cynthius martin#adamandi#i'm finally done with this! the saints especially were joys to paint and the halo a menace.... this has been the most ambitious one so far.#but it also took quite long because i only worked on it <engages with quincy> when mentally okay to deal with the themes. i'm not religious#but i do identify with the irrational(?ish) guilt + family legacy + academic achievement + disregard for self. also more complex thoughts#about love [but depsite quincent being a large part of quincy's character this piece deals with mostly the Rest of it. so another time..]#anyways! in the original sketch- the saints had heads bent towards quincy so the halo spikes pointed at him. but this worked better! halos#of the saints implying/creating one for quincy was a concept from the start though. in the show they don't touch him directly here but#differences in mediums i think- i don't have time in an image to craft a narrative so everything has to be happening. also artistic liberty#misc inspiration for this includes stained glass windows. i might have maybe misinterpreted the saint costume but i think i logic-ed it out#as the cloth part following a nun's habit w the hood. and then halo above. the material is also more transparent originally but i had. um.#too much fun painting fabric folds.. if you look closely you can see the basis of faces though behind the cloth; but only the vague shapes#because smth obscurity + inhumanness// cassian is the only one i gave a mouth though. that stems from melliot's post about the saints and#st cassian as spokesperson (<- did research teehee!) that's also how i found out which costume = which saint. speaking of which.#left to right: 'st lucy take my hand' // 'st lawrence give me strength' (presses quincy forward; but hand on shoulder connotates guidance)#/'st cassian help me smile' (quincy's mouth is btwn a grimace and a smile; tilts up at side. also no direct touch bc added insidiousness.)#//'st jude [...] i hope your causes burn' (jude's hand is in two places to show movement- nearing the flame and then snatching back; burnt)#other notes: at the midst of the flame the core is shaped like a human heart /the saints and their wax are all melting like the candle for#fun visual effect and also this way they are even less tangible <real>. perks of painting as a medium i guess. // also insp from icarus?#wax and burning imagery; looking at the halo and rays as parallel to sun that burns. too close to the sun; melting; hurting; hurtling //#candles at bottom are a nod to the frankly gorgeous set// also the entire composition kind of stems from the lyric <what use is a candle if#both ends aren't burning>; the two sides between the concepts of catholic guilt and academic perfection that spur quincy#the halo above (saints and guilt; litanyofthemartyrs) and the 'halo' below (academic papers; insp from choreo for perfect at school)#the papers were originally supposed to be more glowy. but i like the idea of it now being a reflection of how quincy's priorities shift#also of note is that <candle> in centre = quincy; w burning candle + aforementioned heart in flame -> most human; idea of love + passion#last thoughts: kneeling + hands close tgt = prayer //wax dripping onto the red As make an effect that looks like blood. because i like#hiding that within the adamandi pieces :OO continuity!! // i've run out of tags but yeah! had fun with this one! every so often i go a#little insane in making art and the final result astounds even me. ngl i'm quite proud of this one. pretty colours <3333
240 notes
·
View notes
Text
How to draw clothing material folds, creases, tension points and depth
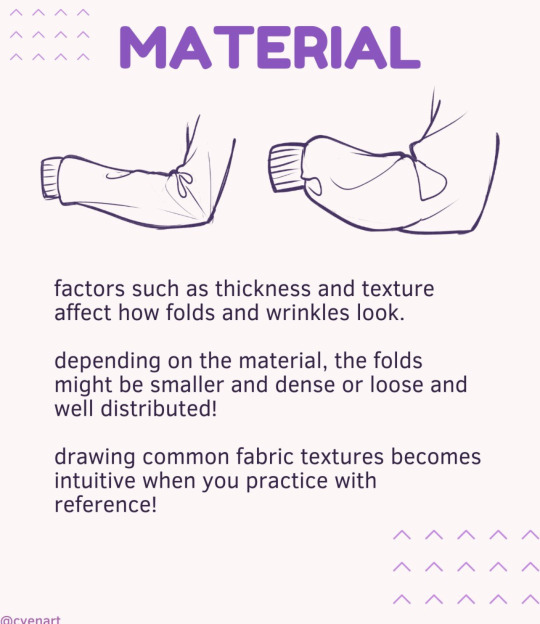
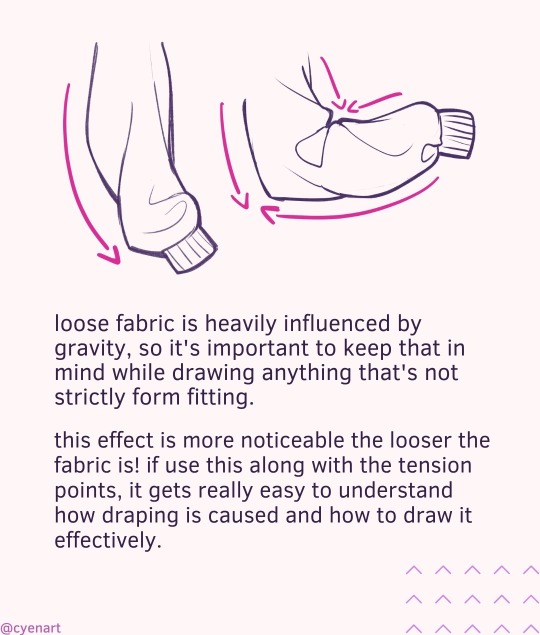
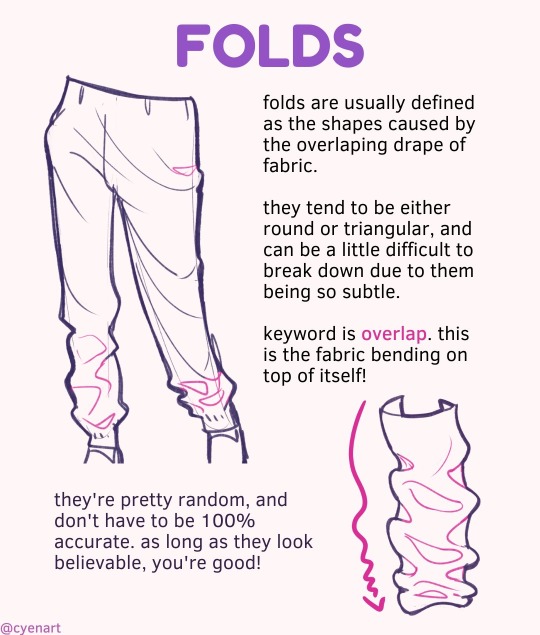
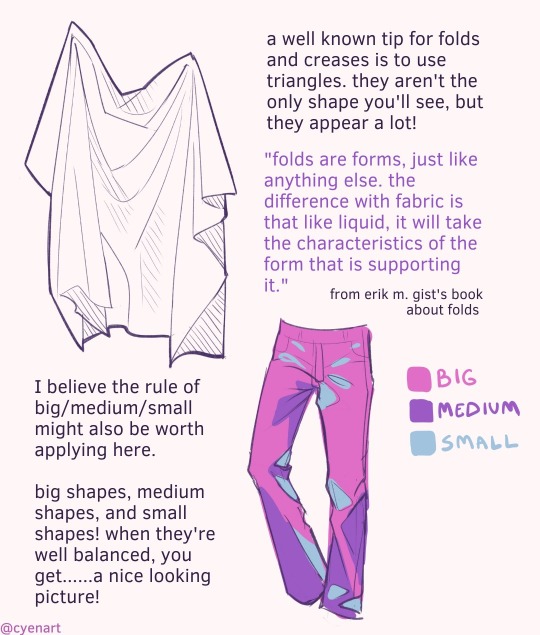
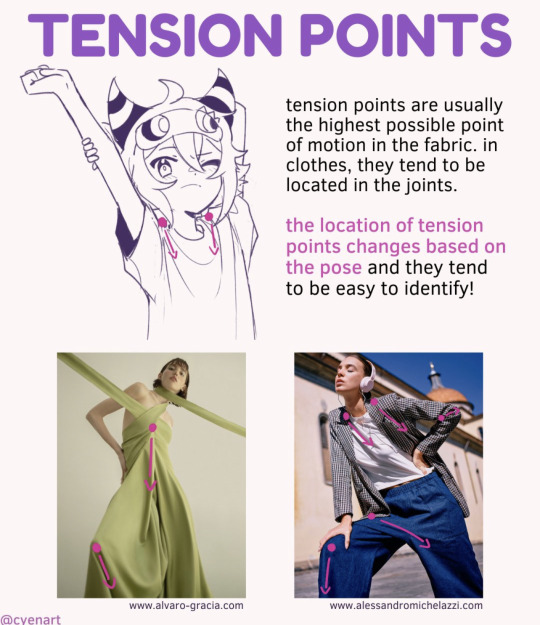

Credit: Cvenart
#random tip#random tips#tip#clothing#cloth#material#fabric#folds#creases#tension#top#shirt#pants#costume#accessories#art tutorial#art tip#drawing tip#art tips#art tutorials#drawing#drawing tips#drawing tutorial#drawing tutorials#art#clothes#outfit
510 notes
·
View notes
Text

It is Sunday morning, the rain is cooling everything down nicely and I'm going to turn a halfmade half failed Victorian chemise into a half lenght Italian 17th century chemise
#i did the neat Victorian gathers#and then i realised i wanted a rounded shape#the tutorial in roughly following in the link#just for fun I'm doing the long seams on my treadle machine#and all the finishing by hand#everything is cut from scraps and leftovers#there were holes in this fabric#so I'm doing some piecing to get around that#a talia original#talia's adventures in dressmaking#excerpts from my life#sewing progress#Italian 17th century chemise#historical costuming#historical underpinnings
45 notes
·
View notes
Photo

Workin to make up a more personalized warrior armor for Hilda
(as i did Leonie n Lorenz)
Happy with most of the shape elements P: >
still stuck on colours tho n whether i want it;
1) more in the direction of her unique post timeskip outfits.
2) more aligned to her 3Hopes warrior pallet.
#fe3h#hilda valentine goneril#fire emblem 3 houses#Mostly looked at her wyvern rider tcg art and combined it with main shapes of the existing warrior costume#while adding some notes of her 3Hopes unique look#also maybe add the goneril crest somewhere#all i know is the green + torn frayed fabrics was not really doing it#warrior#doodles#fanart
1K notes
·
View notes
Text
sick and tired of seeing people use zip ties for boning. listen to me i am a costume designer stop using plastic which does not hold your shape (the whole point of boning) you do not need to buy proper coiled boning or anything: go to a hardware store and find flat metal tension spring (google tells me that's what it's called, unfortunately i also don't know what its used for in hardware store related things so i cant describe it if that isnt the correct translation, soz) you can get a roll of 15m x 4mm tension spring for about 15 euros where i live and then you just have to cut it with metal shears (you can use a regular cutting pliers probably but if you have metal shears you will be happier) then either file down the edges a bit if you're genuinely gonna wear it a lot, or you just wind some tape around the edges to make sure putting them in the channels isn't gonna rip your fabric and anyway now you have an actually functional boned garment. go to a hardware store and show them this pic btw:
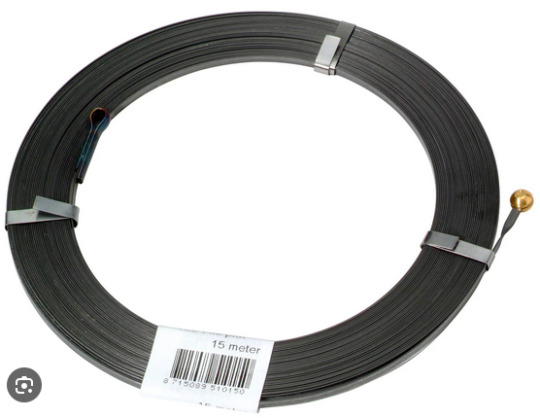
^ this is what you want. also bc this is 4mm wide around stress points like closures you want to make 2 channels right alongside each other and put in 2 pieces of tension spring for stability
#seriously zip ties are so bad for anything you want to do with boning and like i get why people use them and i DO get that most ppl dont#actually want a corset in terms of shape restriction but then im just like. use a different fabric that's stiff and is gonna look structure#just by the fact of it being a thicker fabric and you putting a bunch of seams in it#and if you want it for underwear USE TENSION SPRING BONING ANYWAY its just better in every way than plastic nonsense !!!#costuming#cosplay#sewing#historical costuming#idk dude im not on costuming tumblr just. stop it. i hate that im writing 'listen up tumblypoos' posts but like#i just got an instagram reel with ziptie boning and its like. a) if you dont know about zip ties by now its too late and b) use tension spr#-ng. this was like some dude also who thinks himself a fashion designer like baby girl i know you are not actually designing with zipties#ok. tumblypoospost over
139 notes
·
View notes
Text
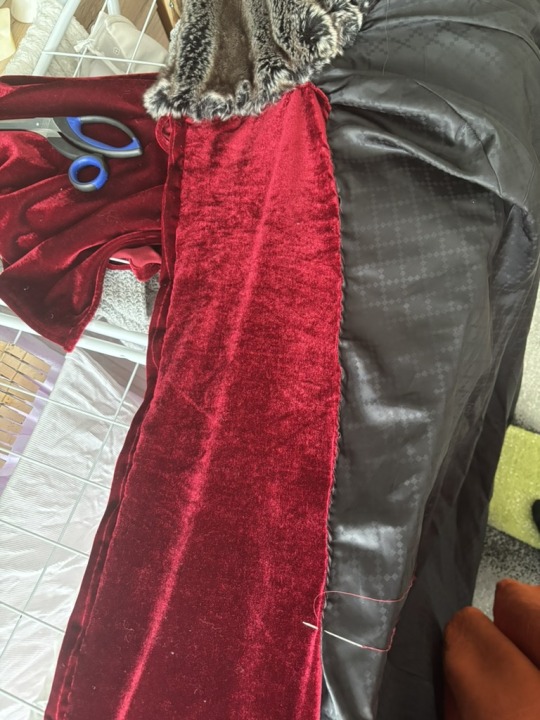
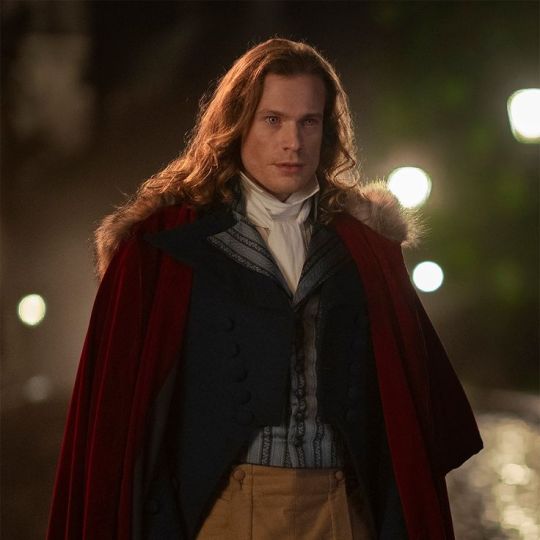
The Wolfkiller Cloak

So I have this thing where sometimes I see something on screen and my brain just short-circuits. It scratches my brain just right, I need to have this, I need to make this. And that’s what happened in nearly every episode of Interview with the Vampire, but especially in season 2 episode 3 “No Pain”.


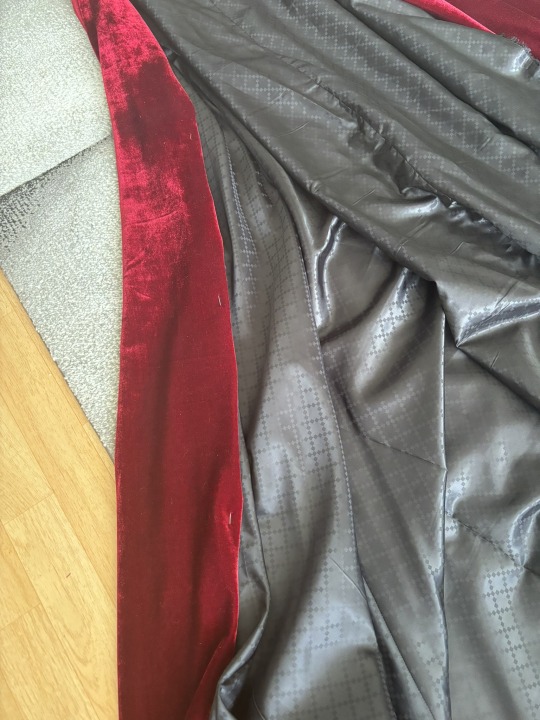
This cloak has seared itself into my brain. The soft shine, the drape, the movement of the fabric (as Lestat is dragged across the floor and smashed against the wall) had bewitched me, body and mind. So I went out researching and decided to make one for myself, based on this pattern for a hooded cloak.
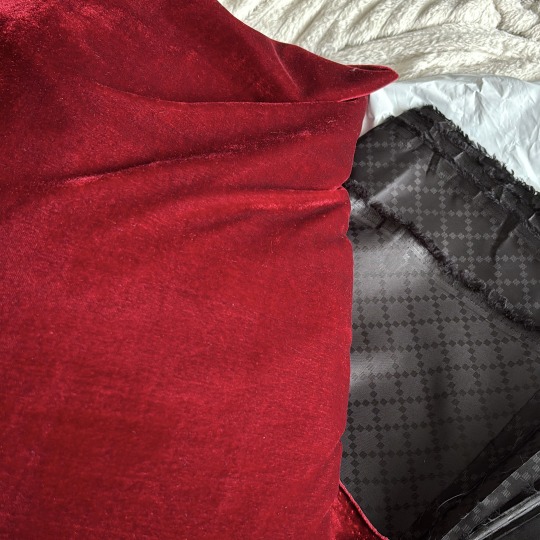
The fabric I used was stretchy velvet (for budget reasons, 6m) and a black lining fabric with a small diamond print (for fun, 4m). The pattern I used doesn't include a lining and I did think about leaving it out but in the behind the scenes footage (and when Armand smashes him against the wall, thank you for that) you could clearly see that there clearly is a dark lining on the inside of the cloak and my brain decided leaving it out just wasn't an option. So I just cut out the front and back piece twice, one velvet and one lining.
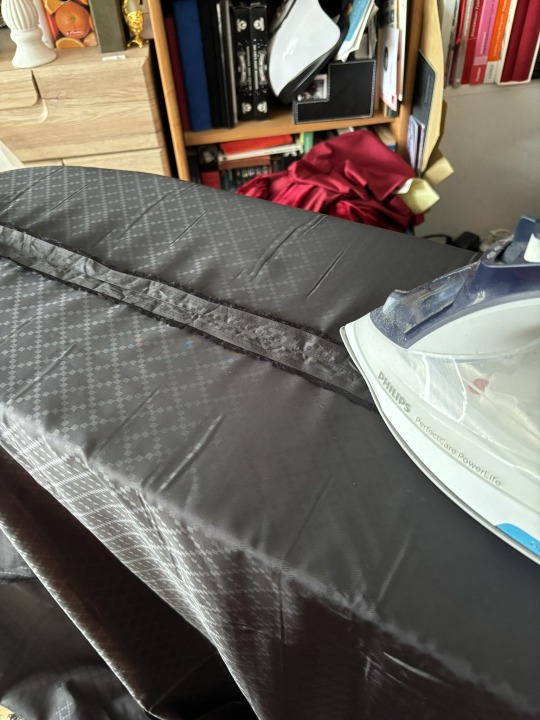
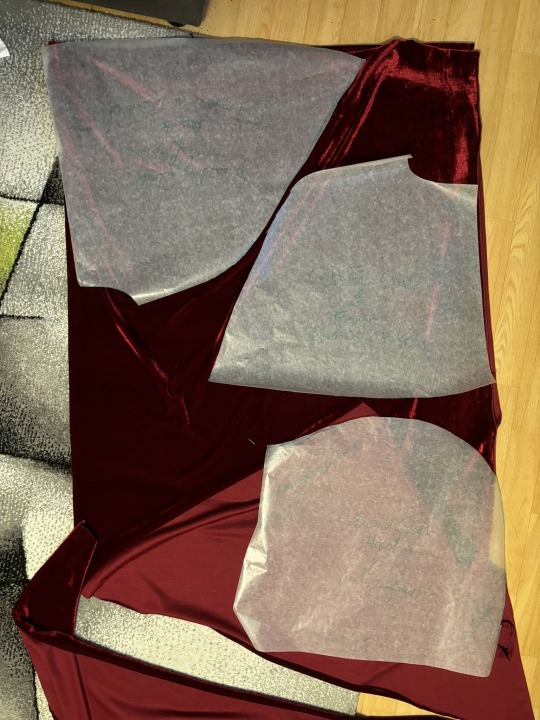
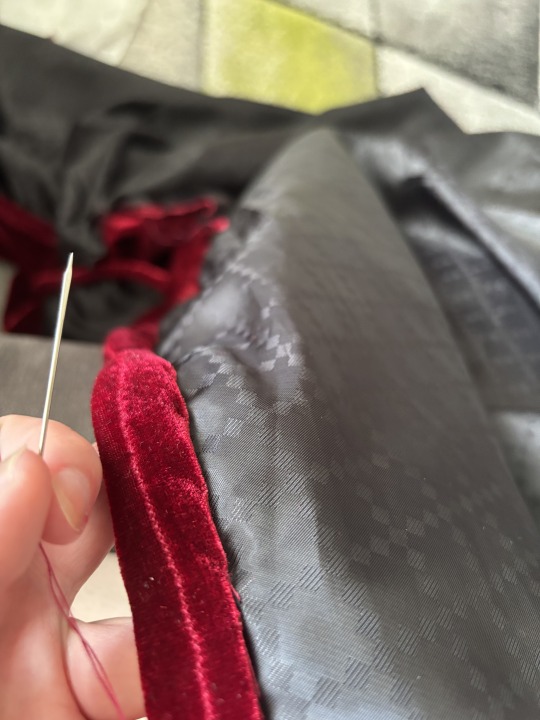
It might be 35°C and sunny outside, but you gotta press those seams. At least for the lining fabric. Then we can pin the lining to the the velvet, sew them together at the collar and start hemming the sides. Be warned. It's a lot of fabric, so you're gonna need a lot of space. I would also recommend (if you're using a stretchy fabric like me) to pin and, if you're able, even sew the hems while it's hanging on a hanger. Yes, I handstitched the sides and bottom hem. Ever since I started looking into historical reconstructions, I have kind of fallen in love with the lack of visible seams. Not to mention that hand stitching has also become something of a favorite pastime of mine while rewatching IWTV.
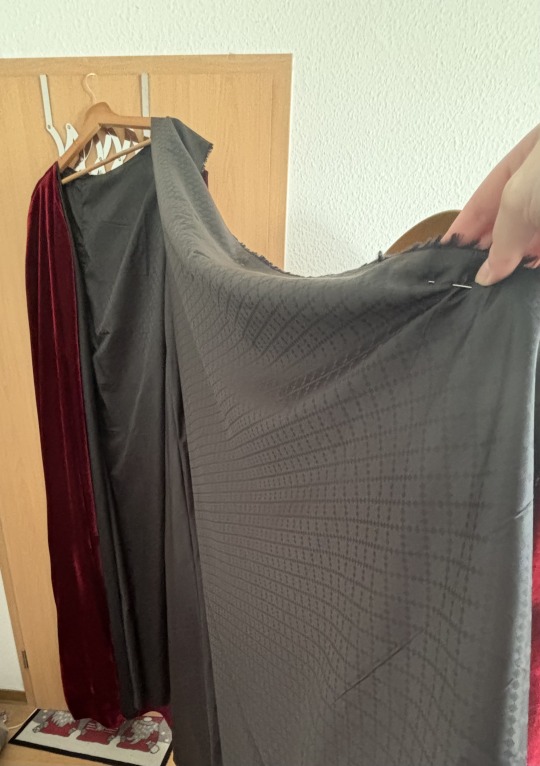
Now I shortened it, which was quite hard to do simply because it's so much fabric and I don't have a mannequin. So I hung it up, pinned where I wanted to cut it, tried it on, took a video, so I could see the where the cut would be and went from there. Took me a few tries, but I'm quite happy with how it turned out.
Now that that's done, we can attach the shorter layer and the hood. My biggest issue was finding some fur, but lucky for me, I was cat-sitting for my downstairs neighbor who has been working as a theater seamstress for 40 year and who was out of town for the weekend, visiting her son who, unbeknownst to me, also worked for a big theater company. And both of them had made it their personal mission to find me some faux fur. And they did. This incredible faux fur was everything I wanted it to be. A wolf-gray with a red shimmer and some darker spots. I was over the moon.

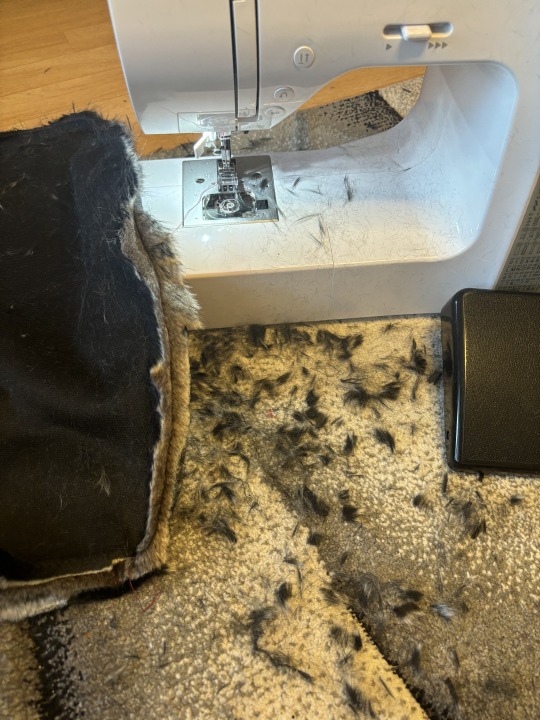
And it was totally worth coughing up hairballs for the rest of the evening. In the original pattern there actually is a hood lining, but I just replaced that with the fur. I would absolutely recommend stitching the fur and the hood together, as the pattern instructions say. Do as I say, not as I do.
The other issue I had was the fur on the hood. I had ordered a faux fur hood attachment for a winter jacket, but the look and the feel just wasn't the same. So I went on ebay, as I so often do late at night, and kind of hit the jackpot. A fox fur stole, not one person bidding on it, 3 days left to go. Yup, I got it. 30 bucks plus shipping.

I mean, come on. What a difference.
The last issue, the final problem so to speak, was the fact that there was a big border of velvet on the inside of the cloak. Now I tried attaching a long piece of velvet fabric, but it just wouldn't sit right and after the 3rd time attaching and reattaching and getting increasingly frustrated I simply took the easy way out. I cut out a triangular piece of velvet and attached it right where the cloak would open. Sue me.

And there you have it.


And because it's summer rn and I don't have the energy to head outside at night to take some actual pics, I decided to whip something up in photoshop.

#amc iwtv#iwtv#interview with the vampire#iwtv amc#interview with the vampire amc#amc lestat#lestat#iwtv cosplay#iwtv costume design#cosplay#cosplayer#cosplaying#cosplay costumes#my cosplay#sam reid lestat#lestat de lioncourt#the vampire lestat#iwtv lestat#iwtv s2#iwtv season 2#sewing project#sewing#fabric#cosplay diy#diy
40 notes
·
View notes
Last Seen Blogs

prettylittleskitty
Body Talk

bbbcnnie
ramble on

theebikiniandtheswimsuit
swimmingly


dinniehadyanie99
Untitled