#blender tutorials
Explore tagged Tumblr posts
Visit Tumblr Blog
Explore Tumblr blogs with no restrictions, modern design and the best experience.
Last Seen Tumblr Blogs


Fun Fact
There are dozens of funny blogs to kill time on Tumblr.
Text
Today's endeavor was to learn something new in Blender, and I came across this neat tutorial on how to create clay animation. Although it was a node-heavy tutorial, I found it surprisingly easy to follow, thanks in large part to the author's clear explanation of the process.
After achieving the neat effect I was aiming for, I felt inspired to animate it! I stumbled upon a video about mouth animation and learned about Visemes, which involve the study of lip reading and mouth movements in animation. I did purchase a mouth pack for $5, but the video also detailed how to create your own mouth animation pack. It was incredibly informative and added a lot of value to my learning experience.
Tomorrow I want to animate this so keep posted ^_^
youtube
youtube
#blender tutorials#claymation tutorial#claymation#my art#3d#3d animation#blender#3d model#3d art#Youtube
34 notes
·
View notes
Text
God. This. This was all I needed to fucking find. I had to filter through so many fucking articles and bullshit videos just find out how to simply draw fucking mesh for sculpting in Blender so I could make a fucking bow and some curvy hair without killing myself for hours and this shit took way too long to fucking find with how much garbage and other shit is just posted out there for doing something like this. This video is 51 seconds long and it should've been on the top of the fucking results list. Honestly just use the fucking bezier curve like this and then when you're done transform it into a mesh so you can sculpt on it and make the mirror modifier part of it as an object and this all you fucking need.
youtube
3 notes
·
View notes
Text

I am Scaly Tail, and I will be writing Blender tutorials for you! Congratulations for finding me! I like hot girls and wish my dead rats were stil alive!
2 notes
·
View notes
Text
@blogquantumreality (and anyone else who wants Blender tutorials)
CG Cookie is who you want to hit up first for the barest bones basics of how to use Blender. I'm talking how to navigate, "what does this button do," some basic terminology, things like that. They also have a lot of paid tutorials but I haven't tried those yet.
Blender Guru is the quintessential Blender Tutorial guy, he's very famous in the Blender community for his donut tutorial which is where almost everyone starts (including me)
Ryan King Art is the guy who does all the tutorials I follow to make my materials, and he did the tutorials I'm following for the river scene I'm working on right now, plus a ton others. I recommend setting him at, like, half speed on YouTube, though, he goes very fast lol
CG Fast Track has a free YouTube tutorial but their main strength is their paid tutorials, which are very comprehensive and come with a step-by-step guide to accompany the videos. The paid tutorials are expensive, so if you're interested in them keep an eye out for sales. The good news is that right now it's a lifetime membership, so once you pay the full fee you get everything they've already put out plus any new tutorials coming out in the future. They are going to be switching to a subscription model in the future but if you've already got the lifetime membership you'll be grandfathered in. Totally understandable if you don't want to do the paid route, though. The free tutorial they have up on YouTube is still great!
So yeah! Hopefully this is a good start! :) You can also search for "b3d tutorial" on YouTube to find more, these are just the channels I've found most useful for where I'm at in learning this beast of a program lol
1 note
·
View note
Text
Bea timelapse 💙 🎬
#night in the woods#animal crossing#animal crosing new horizons#nintendo#nintendo switch#3ds#retro#lowpoly#3dmodel#b3d#3dart#animation#art#blender#artwork#gamecube#pixelart#pixel art#pixel aesthetic#video games#nitw gregg#gregg lee#angus delaney#3d#3d art#3d modelling#low poly#tutorial#timelapse#art process
1K notes
·
View notes
Text
experimenting and learning new techniques✨
more art can be found on:
instagram
pinterest
#graphic design#logo design#my art style#tattoo art#digital art#my art#blender#3d artwork#outer space#japanese art student#3d art#3d artist#artist on tumblr#blender 3d#blender beginner#blender tutorials#aliencore#dream journal
1 note
·
View note
Text
sneak peak+ ramblings below<33 also links to a bunch of tutorials i found helpful

probably all very noob ish things but i want to babble on for a minute bcs i'm actually pretty proud!! i tried a bunch of new things today, the first being the moon which i made (tutorial+tutorial)!! then also i found another tutorial for making skin look a little more realistic (tutorial) AND also finally i figured out how to work hdri textures (tutorial) !
when i first set them up they were just really blank, like i could see the overall colours etc but not any detail, but i then realised i could adjust the scale and BOOM immediate difference

here's my settings + also the hdri i used (2k ver)<33
another tutorial i love is this one on how to get better eevee renders, it was pretty helpful when i first tried it out!
here's the tutorial i used to first learn rendering + also another one which was super helpful!

my precious
#cloudychats#blender stuff#sim;nurani#take a shot everytime you read the word tutorial lol#srry i just wanted to link the stuff i used incase anyone wanted to know!!#tutorials#blender tutorials#feel free to reblog#i'm still not done there's a few other things i want to try but#i'm happy with it so far!
35 notes
·
View notes
Text


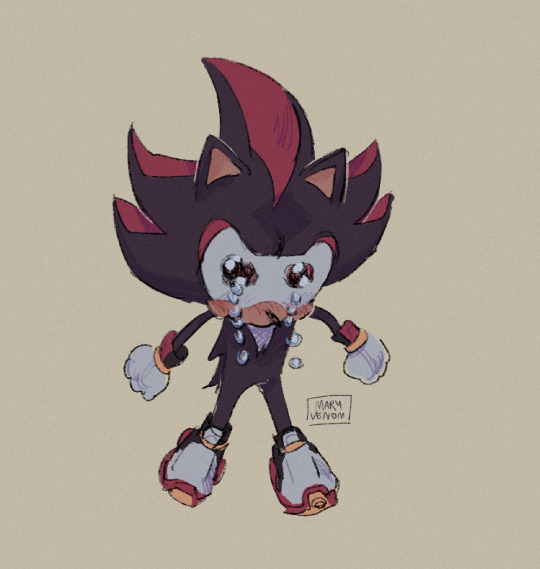
extremely happy to have enough blender skill now to make this shit
#shadow the hedgehog#blender#3d model#sonic the hedgehog#3d#3d art#his extremely fucked up anatomy i love him#btw this isnt the thing i was doing retopology on this is so poorly made i wouldnt know where to fucking begin#i just got sick of that other thing and decided to make something for myself for once#i am very sick of tutorials
3K notes
·
View notes
Text
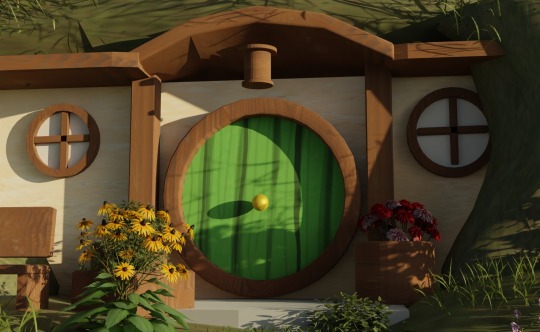
A lot of people have asked me for my Secret to painting background art—- so I put together this short one-minute video on how I combine Blender 3D models with 2D illustrations!
Especially for the latest chapter of my Hobbit Comic I’ve posted over on @retellingthehobbit , I always use a 3D model as a base for more elaborate backgrounds— but the main place where I differ from other artists is that I also use 3D models as a reference for lighting and color. I do a little bit more work upfront in the 3D modeling phase so I have less to do in the Photoshop painting phase. It’s a workflow I really recommend if you have access to Blender! And if anyone wants any more tips, I’m happy to share.
#artists on tumblr#the hobbit#lotr#art#art tips#art tutorial#art process#lord of the rings#digital art#blender#face reveal …. sorta#face reveal if you’re not following me on tiktok
198 notes
·
View notes
Text
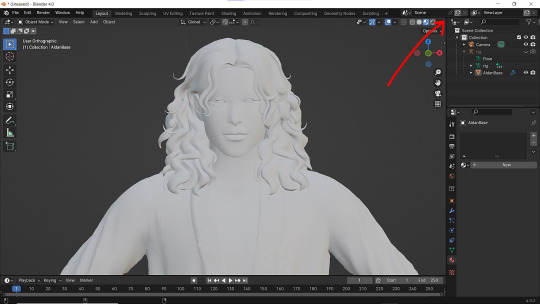
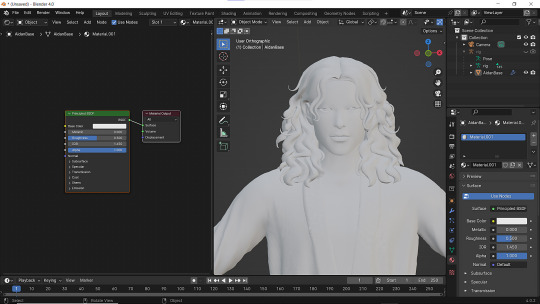
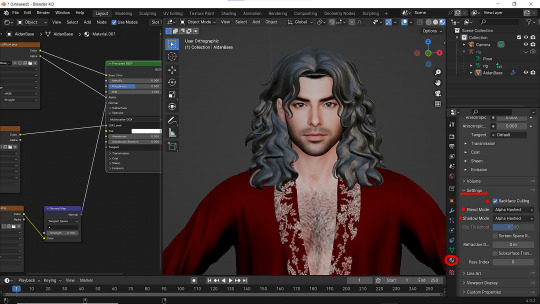
How to apply textures in Blender 4.0 For newbies (´。• ᵕ •。) ♡
So you imported your lovely doll into Blender 4.0, but the textures are messed or missing, here's how to apply base simple textures from the scratch!
I'm using Blender 4.0.2 (Sorry 4.3, but your EEVEE is currently nothing but tears for me) and my lovely Aidan is here to assist me. SO! Seat your bum comfortable and let's begin!
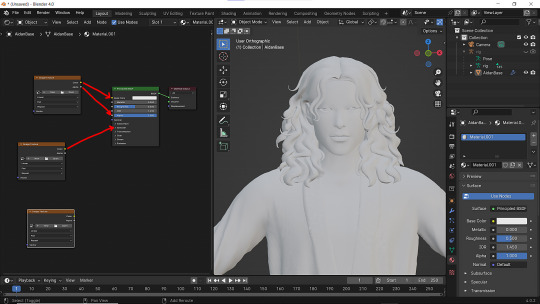
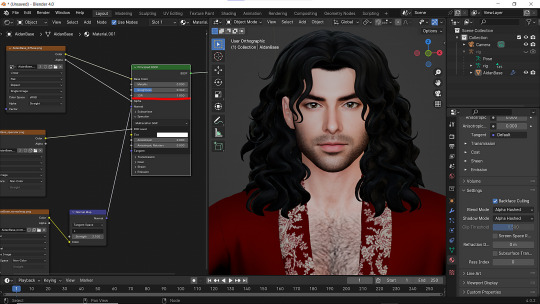
1 - Split your working space by pulling the corner of the screen:
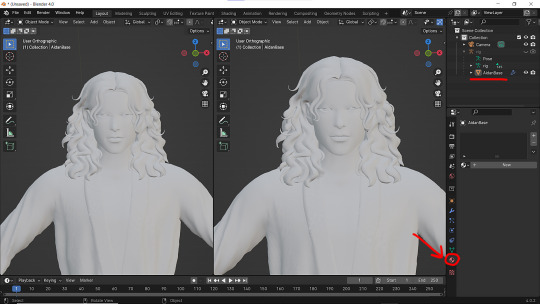
2 - Then click on Material with your mesh selected.
3 - Pick Shader Editor on the left part of the screen and hit New in the Material on the right. You'll get something like this:

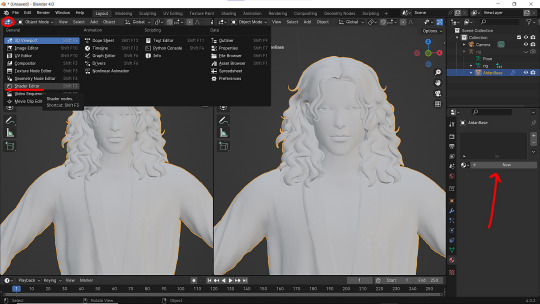
4 - On the left choose Add - Texture - Image Texture. We need three of them at very least :D
5 - First Image texture: Connect Color to the Base Color and Alpha to Alpha. Second Image texture connect to Specular IOR Level. Don't forget to upload your textures! Color - is well... color pics. Specular looks like Black/White pics and Normal is purple!
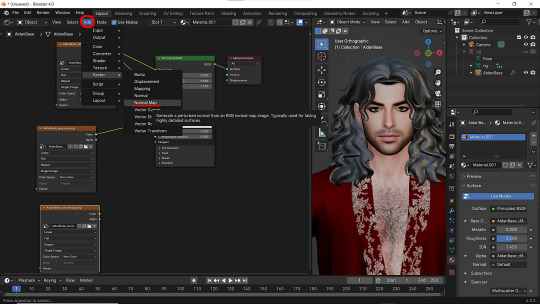
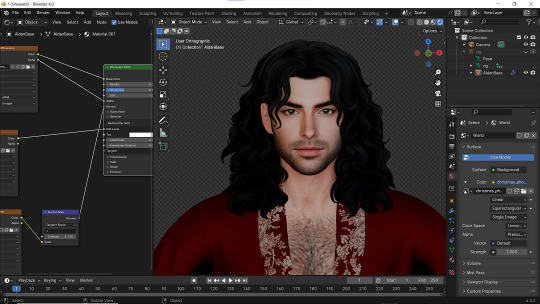
6 - Now add Normal Map. And connect it like on the picture below:
7 - Specular and Normal maps should be NON - COLOR in the Image Texture - Color Space
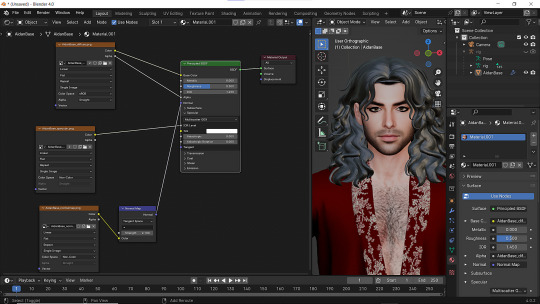
8 - Turn on the alpha. In Material - Settings - Blend Mode/Shadow Mode change on Alpha Hashed + You can check Backface Culling. In some cases it's vital :D
9 - Change the Specular settings in case of weird shining by changing IOR and Roughness parameters.
10 - You did it! (ノ◕ヮ◕)ノ:・゚✧
#WistfulTutorialSims4#the sims 4 blender#sims 4 blender render#blender 4.0#blender eevee#sims 4 tutorials#blender tutorial#sims 4 blender render tutorial#blender render
203 notes
·
View notes
Text
Transferring animations between rigs (e.g. adult to child)
The steps below describe how to transfer an animation from an adult rig to a child rig but the method should be applicable for any transfer between human rigs.
However, I haven't tested other constellations. Let me know if you have any other tips, suggestions, corrections or run into any issues.
Many thanks to thepancake1 for helping figuring out the details that are not obvious at all 💛
I posted this little guide in Creator Musings for someone wondering about it but sharing it here as well.

Step 1)
Export the adult sim animation you want to transfer (=your source) to Blender.
Open a blend file with a child rig (=your target).
Append the adult rig with the animation to the child rig in Blender (File > Append > Select the blend file > folder "Object" > select rig and mesh there)
Select the animation from the adult rig for the child rig (select the child rig in the Outliner menu > select the scene tab in the properties panel below > in "S4S AnimationTools" select the adult animation as the "active animation")
This will get the job mostly done, but the animation will be offset and jumping around, as you see below. To correct for that you will need to set up several constraints as described in step 2.


Step 2)
As you see below the height of the ROOT_bind of the adult sim and child sim differ by about a factor of 0,7:

You can check the exact location in edit mode:
The ROOT_bind of the child rig is located at 0.6920, the ROOT_bind of the adult rig at 1.0112 on the Z axis, which gives a factor of 0.6920/1.0112=0.6843354430379747

With that information you now need to do the following (see image below for comparison, I also uploaded my blend file with the set up here):
In the Dope Sheet menu, select "Action Editor" and press "New Action" there to make a copy of the selected animation.
In the Dope Sheet Summary uncheck ROOT_bind (thus disabling the animation on the root bind for the child rig). Update/Correction: However, the rotation channels need to stay enabled (this only matters if the ROOT_bind is rotated in an animation). The setting should look like this:

In the Transform menu type in -0,6920 on the X axis for ROOT_bind (thus resetting its position to 0 in the animation; can't properly explain why X axis is chosen here instead of Y but it has sth to do with how local rotations of a bone are determined according to pancake)
Create a "Copy Location" constraint for ROOT_bind of the child rig targetting it to the ROOT_bind of the adult rig (this is done in the Properties panel > Bone Constraints), set Influence to 0.6843354430379747 (factor calculated above), deselect "Z"
Create a second "Copy Location" constraint for ROOT_bind in the same way but this time deselect "X" and "Y" and instead select "Z" and check "Offset".

The animation will now play as expected:

Step 3)
All you need to do now is bake the animation (thus applying all the constraints you set up). Select Pose > Animation > "Bake Action...", then check "Visual Keying" and "Clear Constraints" in the pop up. The animation will now work stand alone and you can delete the adult rig.
Alternatively, if you use Pancakes animation tools, you just need to export the clips, the constraints will be applied automatically.
275 notes
·
View notes
Text
💧✨based off of this illustration by @passionpeachy!✨💧
video compression muted the colors, so here are a few stills under the cut


tiny bonus: happy pride!

#3d#blender#npr#video#passionpeachy#i actually finished and rendered this out at 2 am but i will schedule this for the morning 😴#thank you azul for letting me use your art!! it made me feel very smart figuring out how to replicate the black shading of the bubble#it's not perfect but it's my first model that wasn't made following a tutorial! so that is to be expected. very fun very charming :]
510 notes
·
View notes
Text
the demons won

#IDK WHAT IM DOING!!!! BUT IM DOING IT!!!!#funny how i have maya installed for university but my dumbass decided to hop in blender to do this#i get so irritated w blender tutorials cause i just want to learn a specific thing nO I DONT WANT TO MAKE A DONUT!!!#txt
242 notes
·
View notes
Text
CC Creation Tutorial: Smooth Seams in Blender

In this tutorial, I will show you how to make your mesh seams smooth inside Blender (no Milkshape required!) and walk you through the process step by step. We will make a perfectly smooth mesh and transfer the normal data from that mesh to our main mesh using the Data Transfer modifier.
I am using Blender 3.6 in this tutorial (though you should be able to follow along using other versions as well)
You do not need to have much previous knowledge to follow this tutorial, but I assume you know some basics in Blender like how to select, things, navigate around, etc, and know how to import the meshes and put them into Blender.
For this tutorial, I exported the Sims 3 afbodyEP4DressPromBigBow mesh with TSR Workshop. You can use any clothing mesh you like though, and works on any meshes, not just Sims 3 ones.

This is our mesh. You can already tell that it has the dreaded seams on the neck and the rest of the body.

First, we need to make a copy of the mesh (in Object mode, select the mesh and hit Ctrl+D Shift+D to duplicate it, then hit Esc to stop it from moving around).
Rename the mesh (I added Seamless to the mesh name).
Make sure the original mesh is hidden (click the eye symbol) and select the Seamless mesh.
Press the Tab key to go into Edit Mode.

Now we select the parts that we want to have smooth seams. Let's select everything that is skin (you can select a litte piece of the mesh and then press Ctrl+L to select the entire piece)!

Now, press M and in the menu, choose By Distance. (in older versions, this is called Remove Doubles).
This will remove all double vertices at the seams on the selection we made.

It will show you how many vertices it removed. The skin looks nice and smooth!
Let's switch back to our original mesh: Make sure you deactivate the eye on the Seamless mesh and activate the eye again on the main mesh. Then, select the main mesh.

Now, let's add a data modifier to our main mesh. Click the blue wrench icon in the vertical list of the properties panel and then onto Add Modifier, then choose Data Transfer from the list.

As the source, we choose our Seamless mesh.

Also toggle on Face Corner Data and click the Custom Normals button.
Hold on, there is a message saying that we should enable Auto Smooth in Object Data Properties. Let's do that next! (if the message does not appear for you, maybe Auto Smooth is already on).

Click the green inverted triangle button and in the Normals section, toggle on Auto Smooth.

Now we can switch back to the modifier tab by clicking the blue wrench icon again.
But hang on, what happened to our mesh? There are now black spots over the dress and shadows on the legs!

This is due to the Data transfer modifier's Mapping setting. If we change it to Topology, our mesh goes back to normal again. Phew!

Now that the normals look good, we can start the transfer of our new smooth normals from the seamless mesh to our main mesh. To do that, we hit the Generate Data Layers button. This button works destructively, so you cannot undo what it did, just FYI.

Note: On newer versions of Blender, Generate Data Layers may not be enough to transfer the normals and you may need to apply the modifier instead.
You can toggle the modifier's visuals on and off with the little screen icon to see the results after you click Generate Data Layers to see if it stuck. If it did not (and you see the seams of your base mesh when toggling it off), try to apply it instead.

I switched from textured to solid shading because the differences are just more noticeable in this mode. This is how our mesh looks now with the modifier turned off.
Because we clicked the transfer button, the normals have been permanently applied to our mesh. The skin is smooth now, and so is the dress (even though we did not smooth that one, hmm...)

If we toggle the modifier back on, suddenly the dress has seams again! What's going on there? I'm not exactly sure why, but Auto Smooth seems to be doing some smoothing on the dress mesh as well.
I am not sure if this is normal behavior or not, but let's pretend that this did not happen and the modifier in fact did not smooth the dress.
Maybe we just forgot to smooth some areas on the Seamless mesh that we noticed only later on. That's no problem. We simply modify our Seamless mesh again!

So let's swap back to the seamless mesh and select it (remember to click the eye icons so only the Seamless mesh is visible).

Let's select the main dress parts and press M -> merge by distance on them. We cannot smooth the whole dress all at once, because then that would remove some seams that we want (like those for the backfaces and the middle section of the dress where the bow is attached).
If we remove the wrong seams, we ruin our normals and will have black splotches.

Now, let's select the backfaces and areas we left out before and repeat this process: M -> merge by distance.

Look at how perfect our Seamless mesh is looking now! Now, let's transfer those beautiful normals to our main mesh.
Select the main mesh and toggle the eye icons again, to hide our Seamless mesh and reveal our main mesh.

Once again, we will use the Generate Data Layers button in our Data Transfer modifier. If you have previously applied the modifier, just add the modifier again to the main mesh and use the settings shown here.
And that's it, you are done! You have a perfectly smoothed mesh that you can export now.

Final Note: it is best to transfer the normals at the very end of your meshing process because any action that recalculates the normals can reset our custom-made smooth normals again.
Of course, you can simply use the Generate Data Layers button again to re-add them, but it saves you time to only do this step at the end.
I almost forgot to say: You still have to use Mesh Toolkit to fix the seams on the edges of your mesh and do the usual shenanigans.
162 notes
·
View notes
Text

It's BIG.
It's BLUE.
It's UPDATED.
Hiya Simblr, it has been a while. I have a big update today- it's one of my oldest guides on MTS, but new and blue! The changelog is in the MTS comments- but the short and sweet is that two years of learning Blender has been squeezed in there for your convenience, complete with graphics and GIF examples.
ModTheSims tutorial Google Docs tutorial Blender Templates

#on a mission to become a human tutorial hub#i follow predominantly ts2 blogs and feel like an infiltrator posting about simcethri#simblr#ts3#the sims 3#ts3 cc#ts3 tutorial#ts3 blender
183 notes
·
View notes
Text
Angus timelapse 🎬
#night in the woods#animal crossing#nintendo#nintendo switch#3ds#retro#lowpoly#3dmodel#b3d#3dart#animation#art#blender#artwork#gamecube#pixelart#pixel art#pixel aesthetic#video games#angus delaney#animal crosing new horizons#blender3d#3d modeling#tutorial#art tutorial#timelapse
397 notes
·
View notes