#WistfulTutorialSims4
Explore tagged Tumblr posts
Visit Tumblr Blog
Explore Tumblr blogs with no restrictions, modern design and the best experience.
Last Seen Tumblr Blogs


Fun Fact
Tumblr was named as a finalist in Lead411’s New York City Hot 125 in Aug 2010.
Text
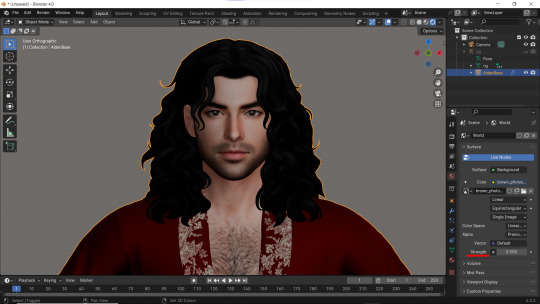
How to apply textures in Blender 4.0 For newbies (´。• ᵕ •。) ♡
So you imported your lovely doll into Blender 4.0, but the textures are messed or missing, here's how to apply base simple textures from the scratch!
I'm using Blender 4.0.2 (Sorry 4.3, but your EEVEE is currently nothing but tears for me) and my lovely Aidan is here to assist me. SO! Seat your bum comfortable and let's begin!
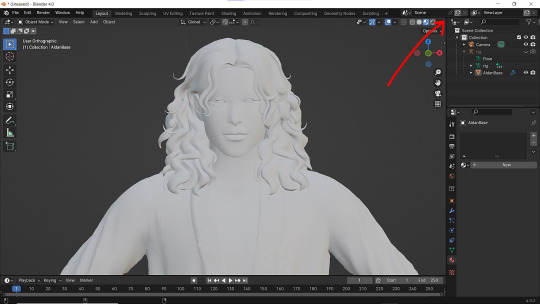
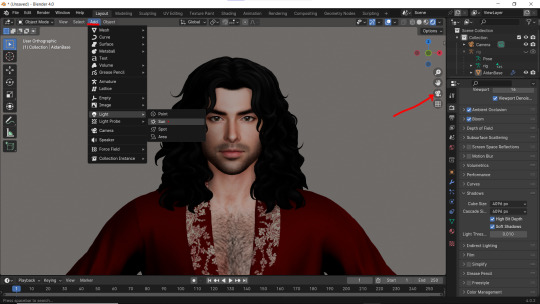
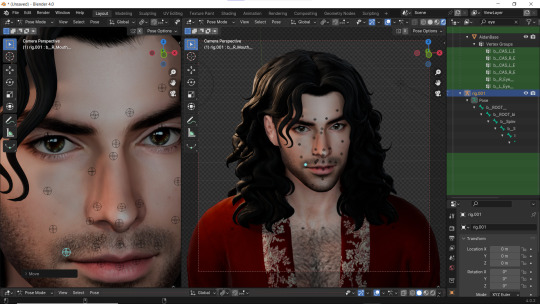
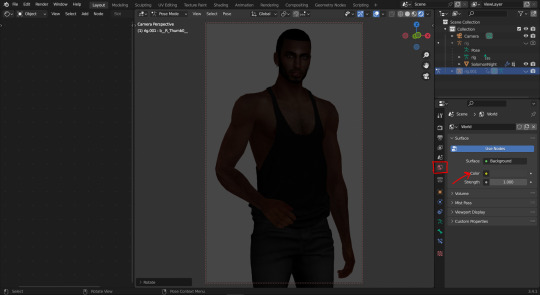
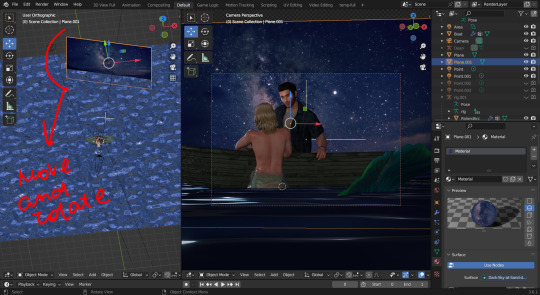
1 - Split your working space by pulling the corner of the screen:
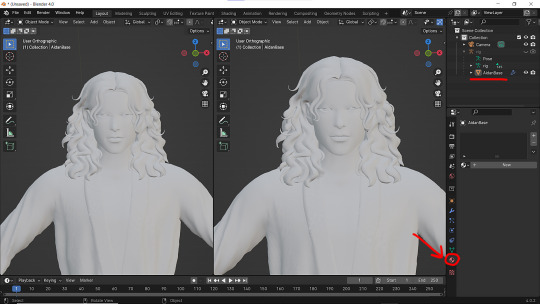
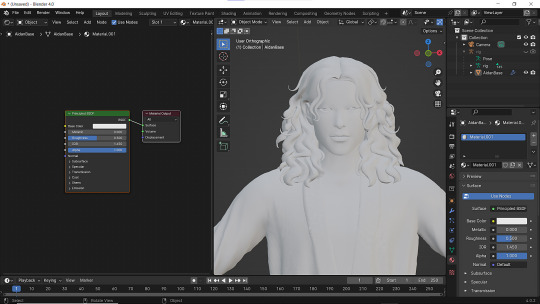
2 - Then click on Material with your mesh selected.
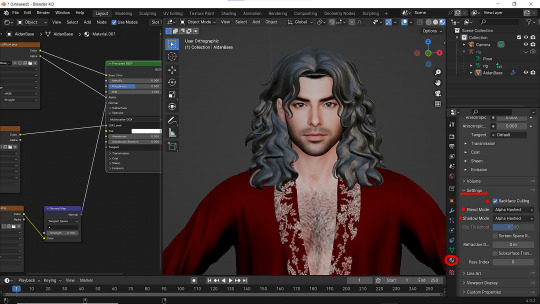
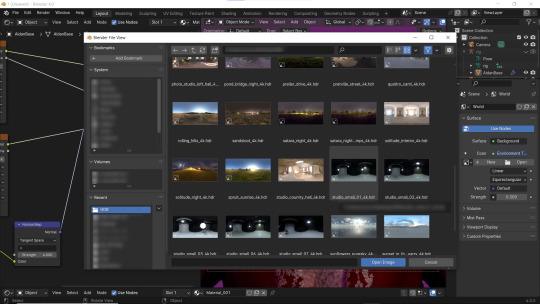
3 - Pick Shader Editor on the left part of the screen and hit New in the Material on the right. You'll get something like this:

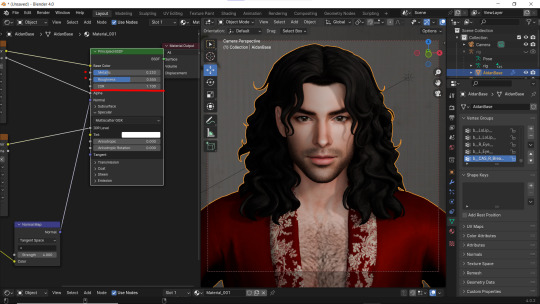
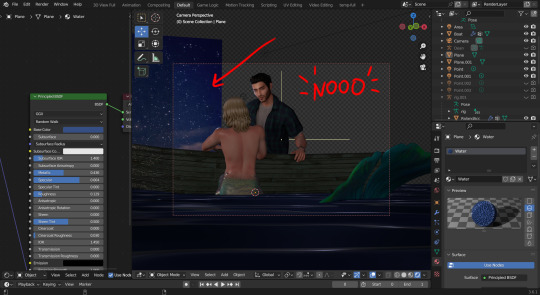
4 - On the left choose Add - Texture - Image Texture. We need three of them at very least :D
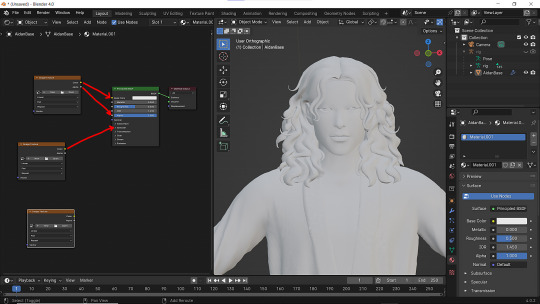
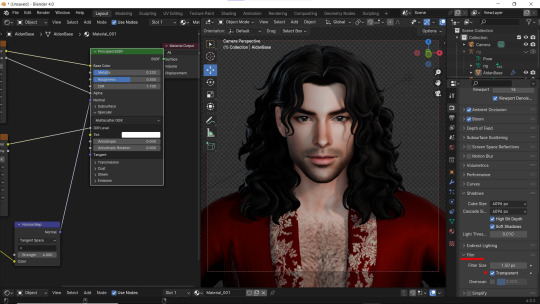
5 - First Image texture: Connect Color to the Base Color and Alpha to Alpha. Second Image texture connect to Specular IOR Level. Don't forget to upload your textures! Color - is well... color pics. Specular looks like Black/White pics and Normal is purple!
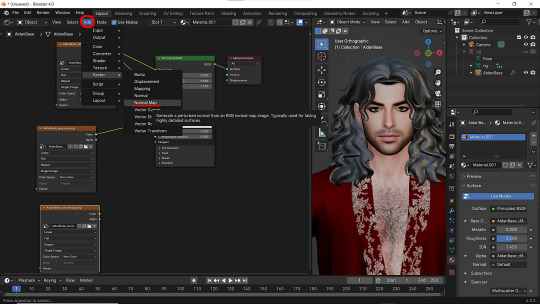
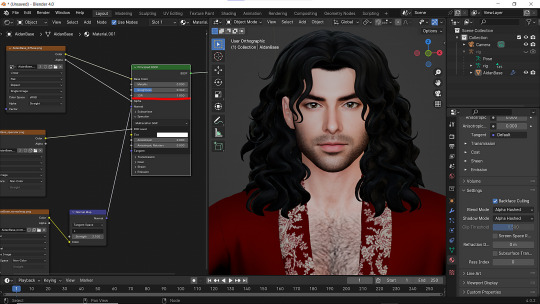
6 - Now add Normal Map. And connect it like on the picture below:
7 - Specular and Normal maps should be NON - COLOR in the Image Texture - Color Space
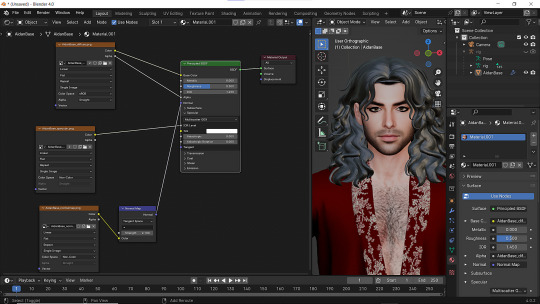
8 - Turn on the alpha. In Material - Settings - Blend Mode/Shadow Mode change on Alpha Hashed + You can check Backface Culling. In some cases it's vital :D
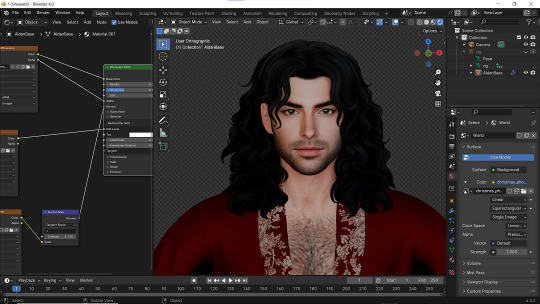
9 - Change the Specular settings in case of weird shining by changing IOR and Roughness parameters.
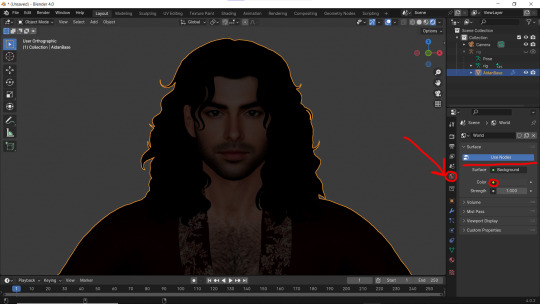
10 - You did it! (ノ◕ヮ◕)ノ:・゚✧
#WistfulTutorialSims4#the sims 4 blender#sims 4 blender render#blender 4.0#blender eevee#sims 4 tutorials#blender tutorial#sims 4 blender render tutorial#blender render
212 notes
·
View notes
Text
How I do my lighting in EEVEE for Blender 4.0 (´。• ᵕ •。) ♡
Are you running your Blender on a toaster? Don't wanna spend much time on rendering in Cycles? Here's some EEVEE tips for you!
1 - Let's put some HDR lighting on! Go to the Worlds, choose Use Notes and hit that little yellow dot next to the Color.
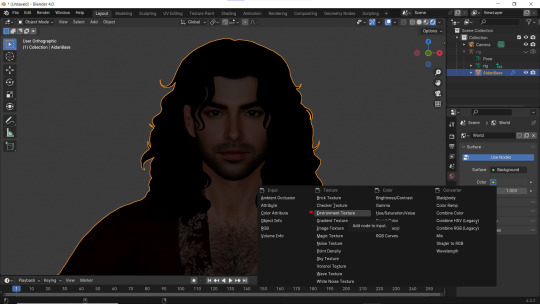
2 - Pick 'Environment Textures'
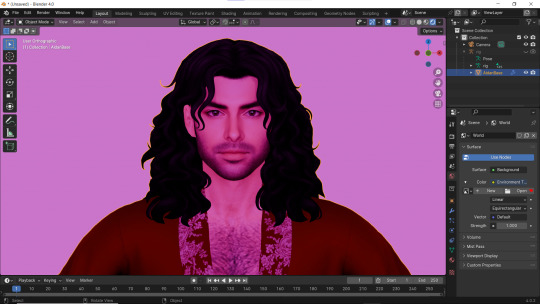
3 - You'll see everything in purple. But worry not! It's just bc you haven't applied any textures yet! Just go on and hit Open.
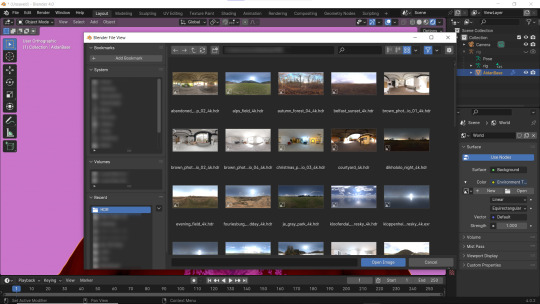
4 - You can find plenty of free, high resolution HDRI textures on Poly Haven. I have almost all of them! Go get some for yourself too and navigate to their location. Pick any you like!
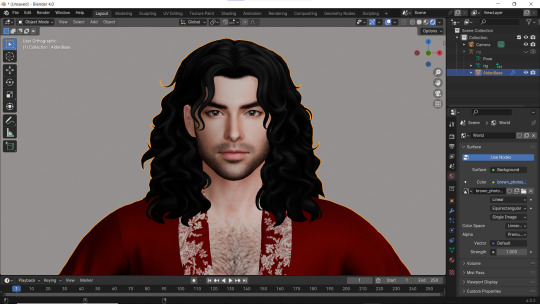
Well... It doesn't look good yet :D
5 - Lower the Strength of the light.

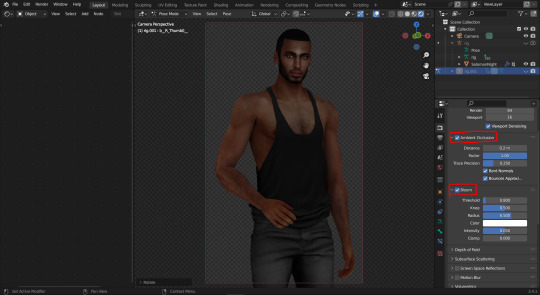
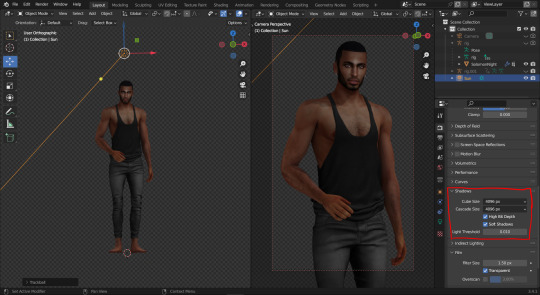
6 - Now. Let's go to the Render Properties and check Ambient Occlusion and Bloom (you can play with it's parameters and see which fits you better). THEN... Go to Shadows and increase the resolution to the max. High Bit Depth and Soft Shadows must be checked too!
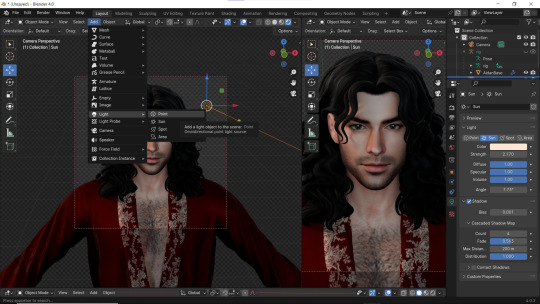
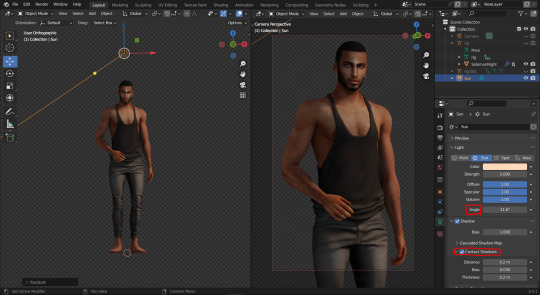
7 - Let's Add our very first light (The Sun)! And go to the Camera Mode.

8 - In the Sun Shadow settings: Soften the light by increasing the Angle; Lower Bias to the max.
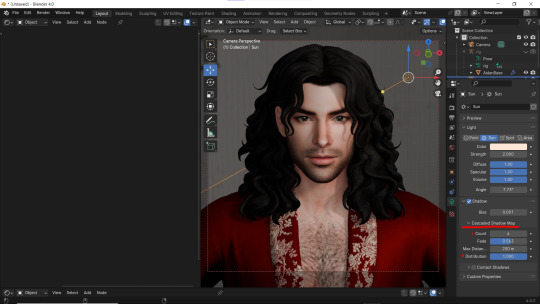
9 - Change the parameters of Cascade Shadow Map the way it looks better for you.
10 - Also don't forget to fix the specular appearance of your model ;3
Now. I don't hate it. But I don't like it much either... So I played and tried several Environment textures for better result.
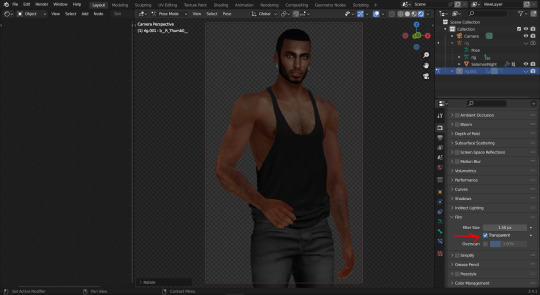
11 - Looks way better! Now let's go to the Render Properties once again and remove the background in the Film category (in case you don't want one)
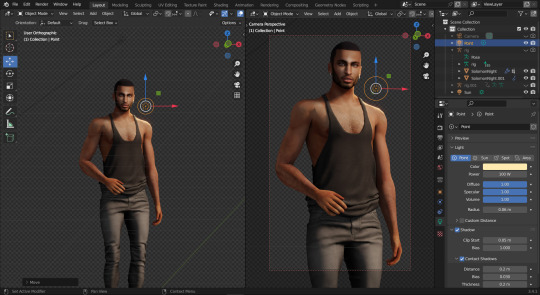
12 - It's time to add another light source!
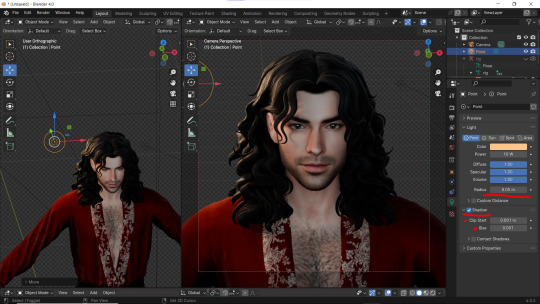
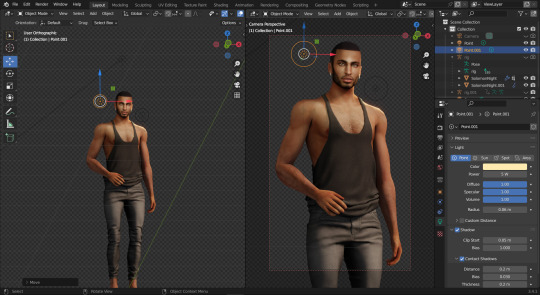
13 - Settings for the new light are quite similar. I made them softer, lowered Bias, changed color, etc.
14 - Preparing for the shoot. ▓▒░(°◡°)░▒▓
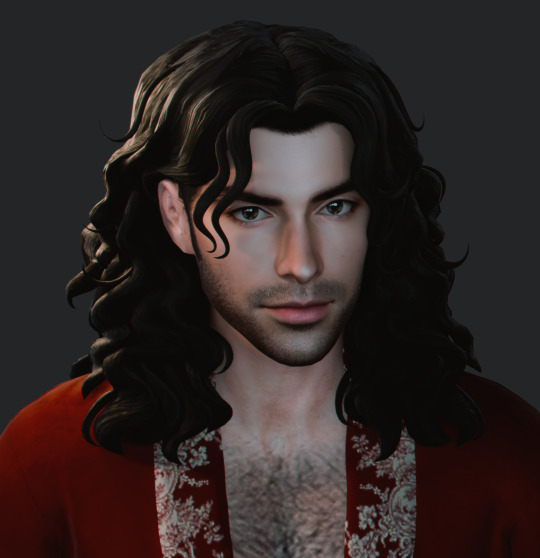
15 - You did it! (ノ◕ヮ◕)ノ:・゚✧
#WistfulTutorialSims4#the sims 4 blender#sims 4 blender render#blender 4.0#blender eevee#sims 4 tutorials#blender tutorial#sims 4 blender render tutorial#blender render#blender eevee lighting#blender environment textures#sims 4 blender#blender render eevee#blender light#blender light eevee#eevee#blender#simblr#the sims 4#my sims
116 notes
·
View notes
Text
How to make poses for Luumia Height Slider! (Tall Sim)
I promised this tutorial to @aniraklova, so here you go, sunshine! (I also meant this tutorial to pose makers, so they would created more poses for me:D)
You'll need:
+ Base knowledge in making poses for Sims 4 (this isn't a tutorial about how to make poses for Sims 4, so it will be perfect for someone who already created/creates poses for the Sims 4)
+ Base knowledge in Sim Ripper (Again this isn't a tutorial about how to Rip the Sim, but we will use Sims 4 Ripper)
+ Sims 4 Ripper
+ Sims 4 Studio
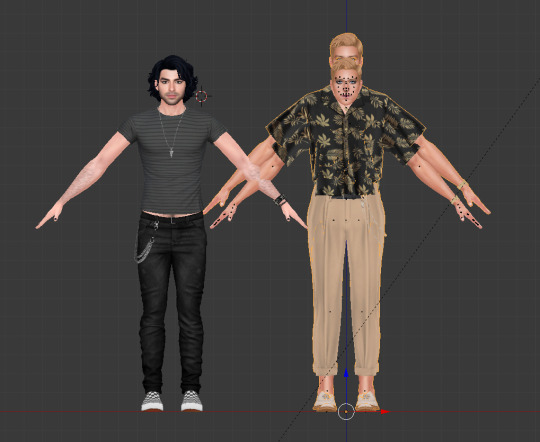
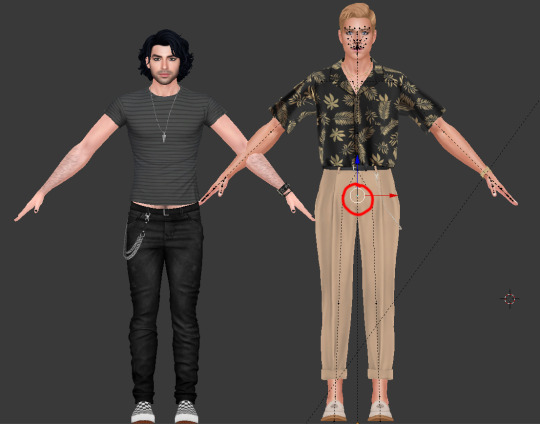
+ 3 sims. Sim with average height, sim with tall height (Arwin here has the max height) and his double with average height.
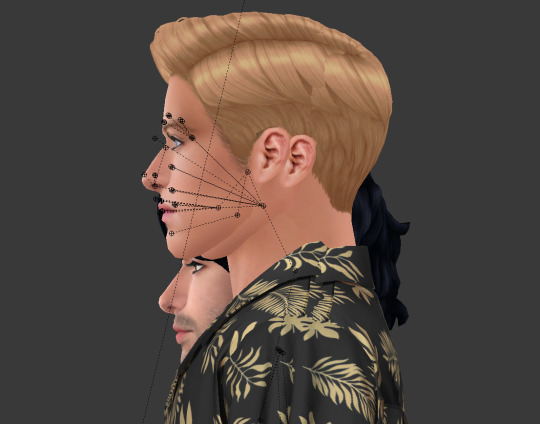
1. Rip 3 these sims and import them into Blender where you already prepared 2 rigs for your couple poses.
2. Select b__ROOT_bind__ bone on the average height clone of your tall sim, then scale it and move it up to fit the size of the tall sim.
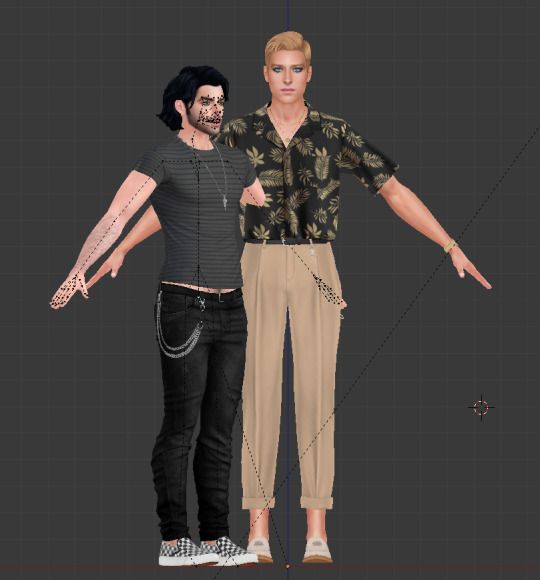
3. Fit it the best you can (up or down), but DON'T move it back or forward. Yeah, there will be a weird gap (tall version of your sim will be more moved back) that may cause some problems in the future, but... just don't think about it for now.
4. Now you're ready to make poses! NOTE THAT ONLY AVERAGE HEIGHT SIM CAN MOVE AROUND. It's imortant for b__ROOT_bind__ bone of the tall sim stay as it is. You can only rotate it, but once you fit it up into your tall sim, don't move it anymore up or down.
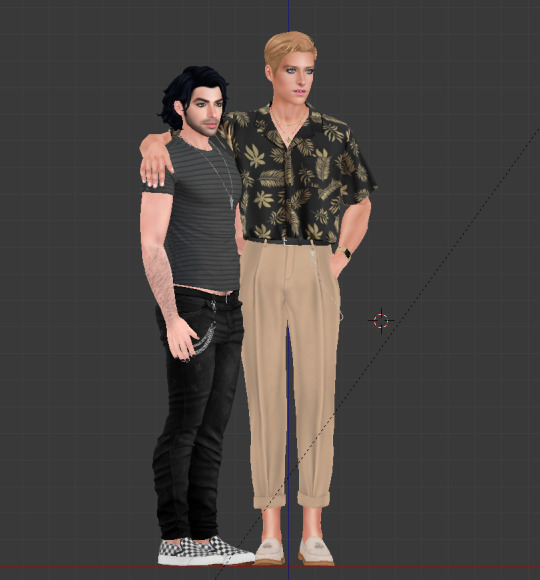
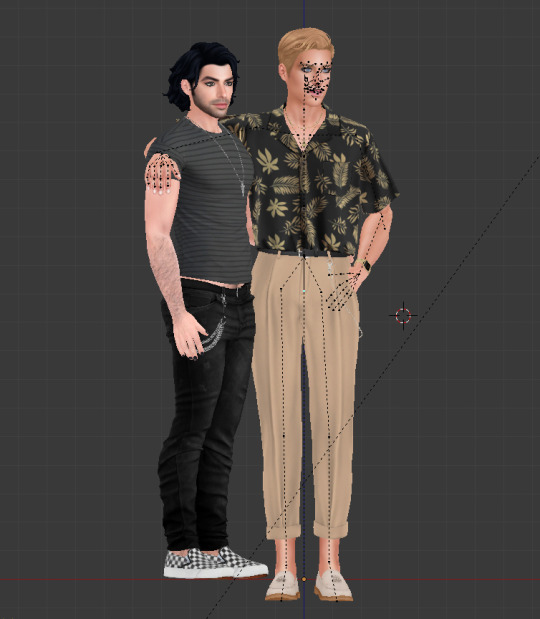
5. Ok. The pose is done!
6. Before you saved it, select b__ROOT_bind__ bone of your tall sim, click Pose, choose Clear Transform, click Location.
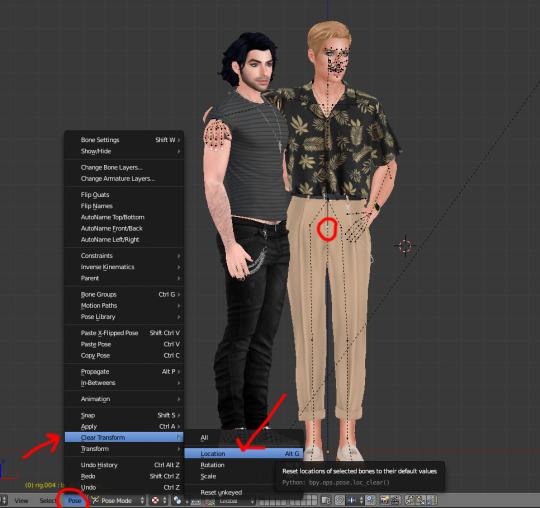
7. Now your tall sim will be slightly sinking down to the ground. It's important to let him to!:D
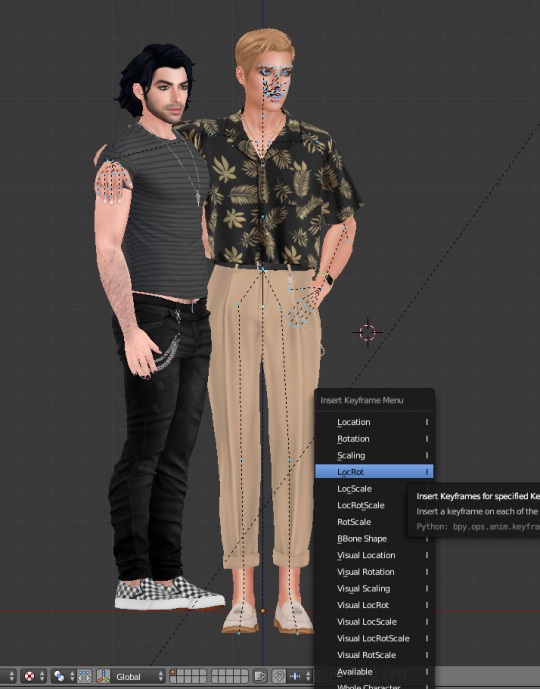
8. Then Select all bones and LocRot it. LOCROT.
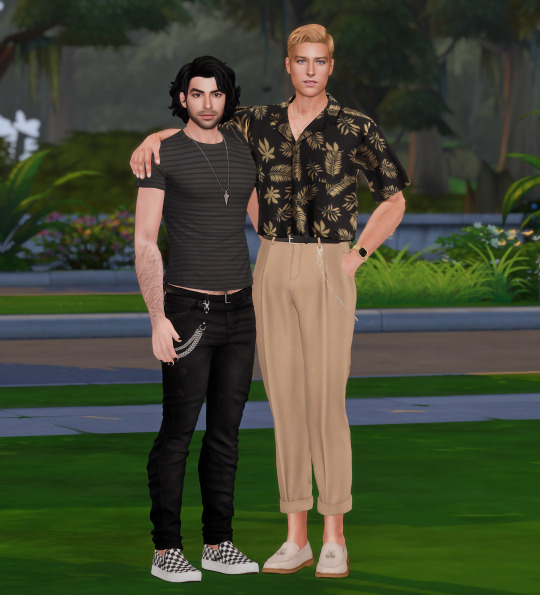
9. Now you can save your poses and import it to the game!
Not bad, huh? It's still a tricky little poo, I know. Mb someone knows or will find better way - that would be awesome! But so far it's the only way I know.
It's not necessarily to be one tall sim, you can pick lots of Sims with different height, just remember to move down (or up if they're small) their b__ROOT_bind__ bones once you've done posing.
Hope it was helpful!
Have fun!
#WistfulTutorialSims4#sims 4 tutorials#sims 4 poses tutorial#sims 4 pose tutorial#sims 4 height poses tutorial#sims 4 height slider#sims 4 height slider poses#sims 4 height poses#the sims 4#sims 4#sims 4 poses
256 notes
·
View notes
Note
Hii, I love ur cc, it's truly amazing!!
I'm also in love with the lightning in ur renders, how do u do it?? Im new in blender and o would like to learn new things :) 🖤
Aww, thank you! I'm pretty much new to blender-render too, so I don't know if I can tell something new about it :D But okay, I'll show what I do. I use Eevee render in Blender. Cos I'm poor and can't afford myself cool Cycles that demands powerful PC. Cos it's... easier.
First thing is environment light. Depending on your idea you can change it into more dark, more light or really any color (or even environment texture!)
Let's change it to lighter color ;3

Next, set transparent background.
I like soft light in pictures with bloom like in 80-90s movies :D So I always add Bloom + Ambient Occlusion because in Eevee it's vital.
In most cases I add Sun light first. And set up Shadow quality, cos... again, shadow quality in Eevee is vital:D
Change softness, power, color for the sun light and also add Contact Shadows. (Cos it's vital?:D)
Add back light. I LOOOOVE when the light is shining from behind the model. Makes me *___*, so yes. Back light must be rally hard and powerful to make the trick.
I also love my model's faces, so I usually try to lit it up with extra light to make it clear and well seen ;3
Then add more back light. MORE!
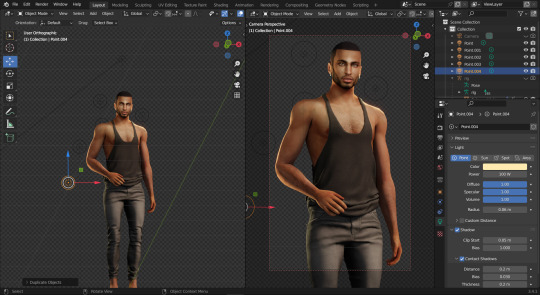
Make some pose/light changes if needed, add some simple Ps edit and that's it! You have this:

Hope it was helpful. Have fun!
#sims 4 tutorials#sims 4 blender tutorial#the sims 4 blender render#sims 4 blender render process#sims 4 blender#how I set up light in blender#blender light#sims 4 blender light#sims 4 blender light tutorial#the sims 4#sims 4 blender render#blender eevee#WistfulTutorialSims4
499 notes
·
View notes
Text
Lazy Background for render in Blender
So I’ve been asked about my backgrounds for render in Blender. Do I create sky simulation or environment simulation for my renders? Although there’s a splendid tutorial on How to setup an hdri environment background:
youtube
I use the laziest way ever! :D
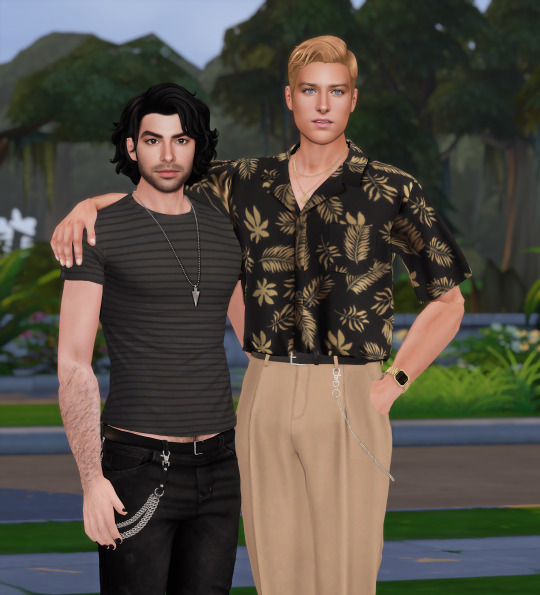
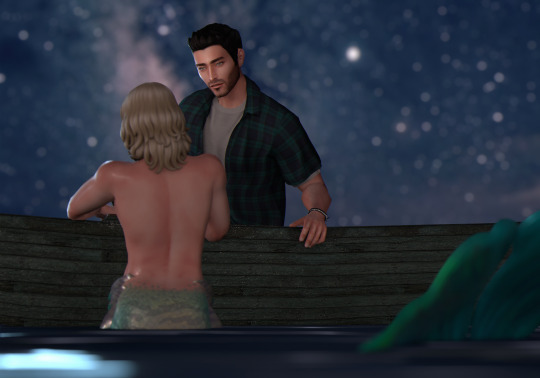
So here’s my blender scene form this post (my lovely siren fish-boy and his werewolf^^).
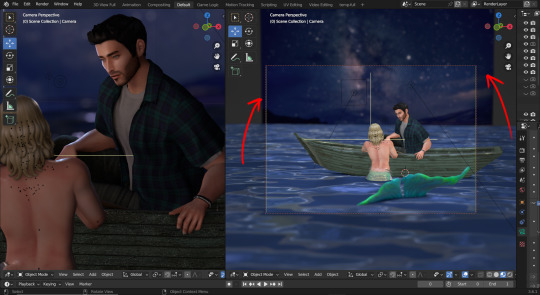
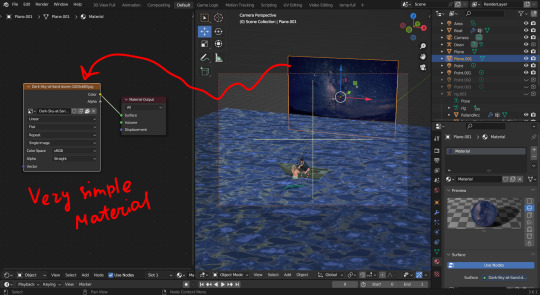
As you can see the background is just a simple plane over there.
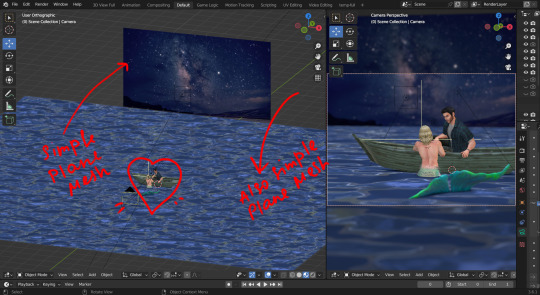
With even... simpler material :D it’s important for this material not to have any specular or other characteristics.
So, for example, I want my picture under this angle. What should I do?
Well! Move and rotate of course! (Scale if needed :D)
Then add Depth of Field...

And. Tada! The picture is done:D
Thank you, @glammoose for appreciating my work ^^. I doubt you’ll discover something new here, but who knows!
#sims 4 tutorials#sims 4 blender render#sims 4 blender tutorial#blender background for render#lazy background for render in blender#blender render#the sims 4 blender#sims 4 blender#blender#blender tutorial#how i set up background for my renders#render background in blender#TS4#WistfulTutorialSims4
155 notes
·
View notes
Text
How to fix ReShade MXAO, DOF issues
Hey, guys! Recently I moved from GShade to ReShade and faced quite unpleasant issue with MXAO and DOF shaders. I was ready to give up on having any ReShade in my game when finally found a solution from @pictureamoebae. Well, it was rather a hint on the solution in the comments, but nevertheless! Thanks to @pictureamoebae for giving me the right direction!^^ After updating my ReShade I faced the same problem again and decided to make this mini tutorial:3
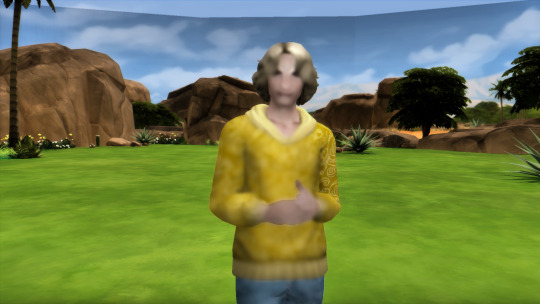
SO! If you’re *lucky* as I am and after installing (or updating/reinstalling) your ReShade, using MXAO or any DOF you see your game looking like this:
Then, here’s how you can fix it! Open your ReShade, find “Edit global processor definitions” and click on it. RESHADE_DEPTH_INPUT_IS_REVERSED most likely would have 1 annoying cupcake next to it.
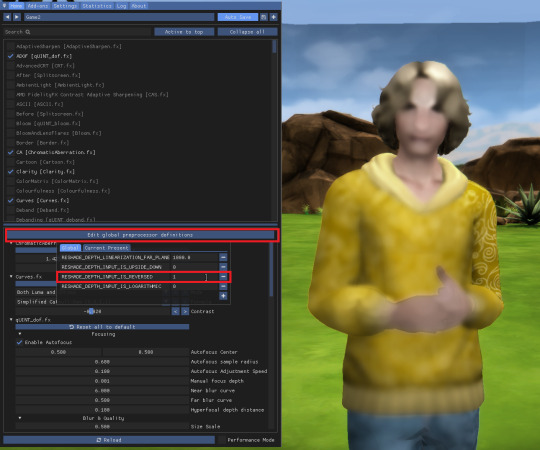
CHANGE IT TO 0! No cupcakes for this line. Not a single one!
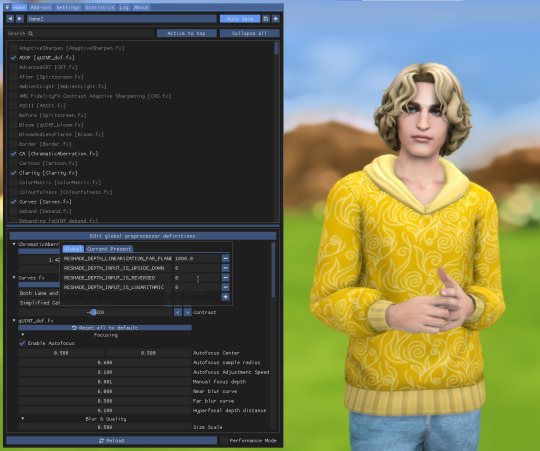
TADA!

#sims 4 tutorials#sims 4 reshade#sims 4 reshade issues#sims 4 reshade issues fixed#reshade fixed mxao#reshade fixed dof#sims 4 mxao issues#sims 4 dof issues#sims 4 reshade mxao issues#sims 4 reshade dof issues#sims 4 reshade the picture looks dark#sims 4 reshade dof doesn't work#sims 4 reshade doesn't work#sims 4 reshade fix#wistfultutorialsims4
231 notes
·
View notes