#sims 4 pose tutorial
Explore tagged Tumblr posts
Text
How to make poses for Luumia Height Slider! (Tall Sim)
I promised this tutorial to @aniraklova, so here you go, sunshine! (I also meant this tutorial to pose makers, so they would created more poses for me:D)
You'll need:
+ Base knowledge in making poses for Sims 4 (this isn't a tutorial about how to make poses for Sims 4, so it will be perfect for someone who already created/creates poses for the Sims 4)
+ Base knowledge in Sim Ripper (Again this isn't a tutorial about how to Rip the Sim, but we will use Sims 4 Ripper)
+ Sims 4 Ripper
+ Sims 4 Studio
+ 3 sims. Sim with average height, sim with tall height (Arwin here has the max height) and his double with average height.
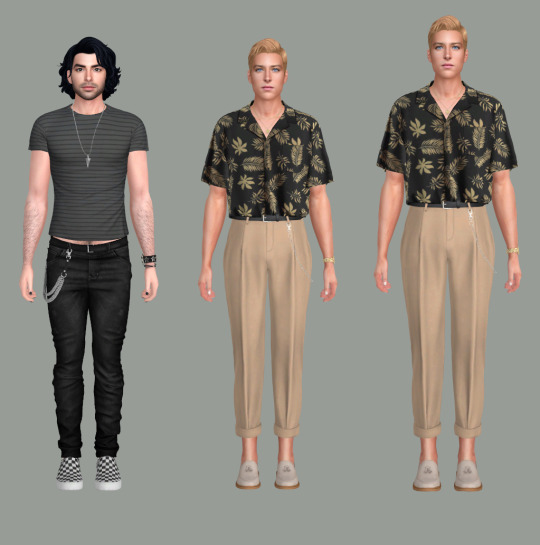
1. Rip 3 these sims and import them into Blender where you already prepared 2 rigs for your couple poses.
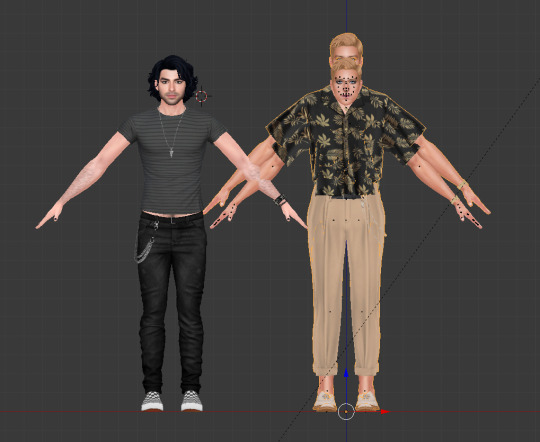
2. Select b__ROOT_bind__ bone on the average height clone of your tall sim, then scale it and move it up to fit the size of the tall sim.
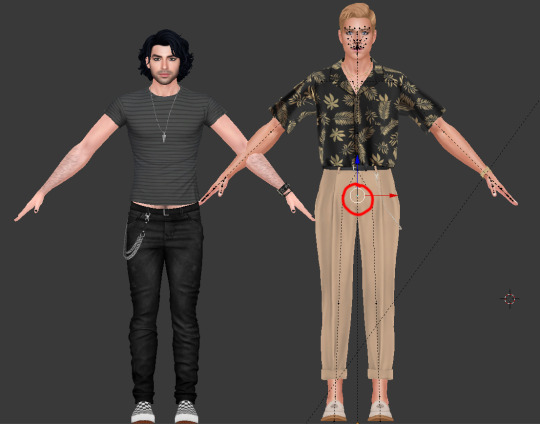
3. Fit it the best you can (up or down), but DON'T move it back or forward. Yeah, there will be a weird gap (tall version of your sim will be more moved back) that may cause some problems in the future, but... just don't think about it for now.
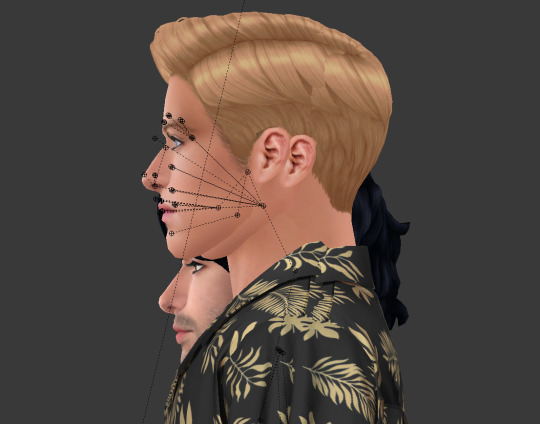
4. Now you're ready to make poses! NOTE THAT ONLY AVERAGE HEIGHT SIM CAN MOVE AROUND. It's imortant for b__ROOT_bind__ bone of the tall sim stay as it is. You can only rotate it, but once you fit it up into your tall sim, don't move it anymore up or down.
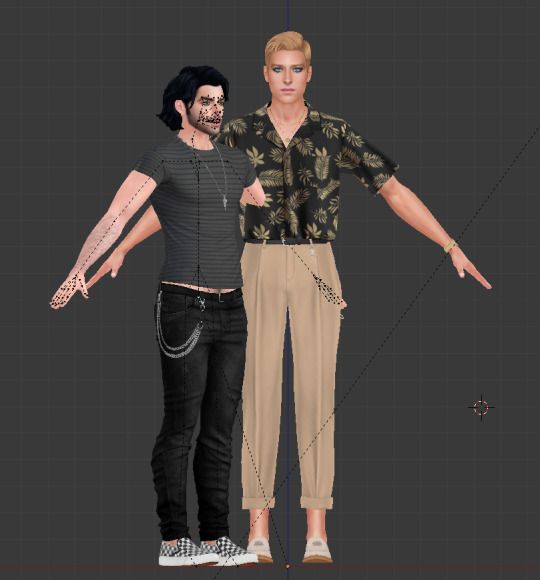
5. Ok. The pose is done!
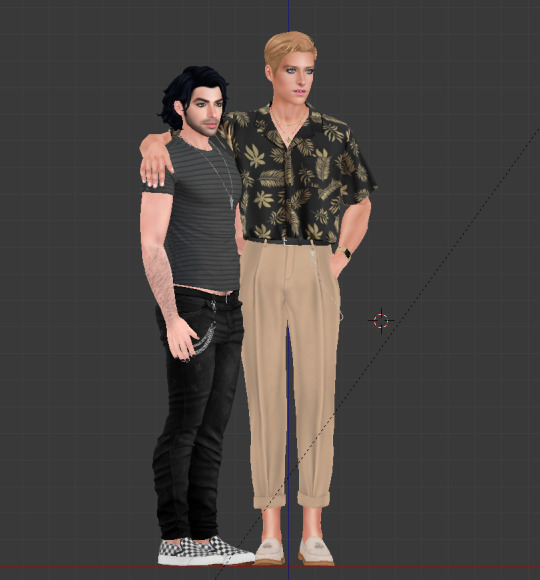
6. Before you saved it, select b__ROOT_bind__ bone of your tall sim, click Pose, choose Clear Transform, click Location.
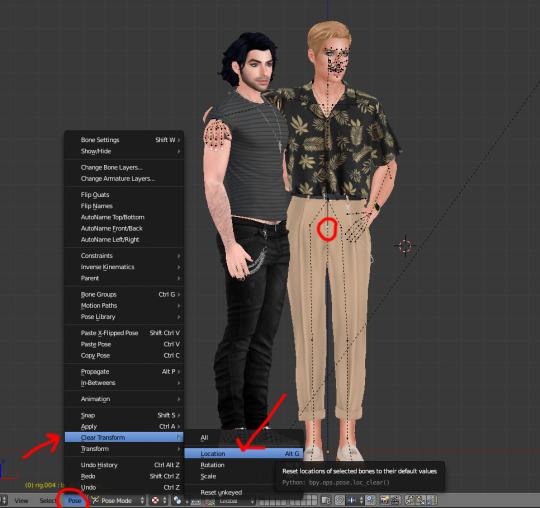
7. Now your tall sim will be slightly sinking down to the ground. It's important to let him to!:D
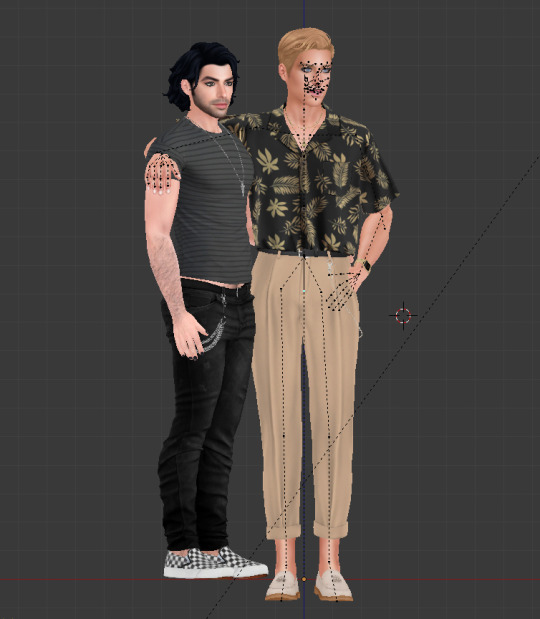
8. Then Select all bones and LocRot it. LOCROT.
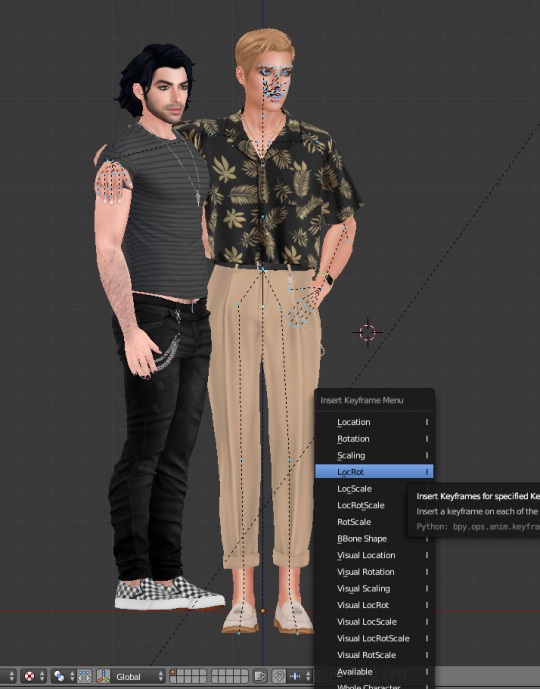
9. Now you can save your poses and import it to the game!
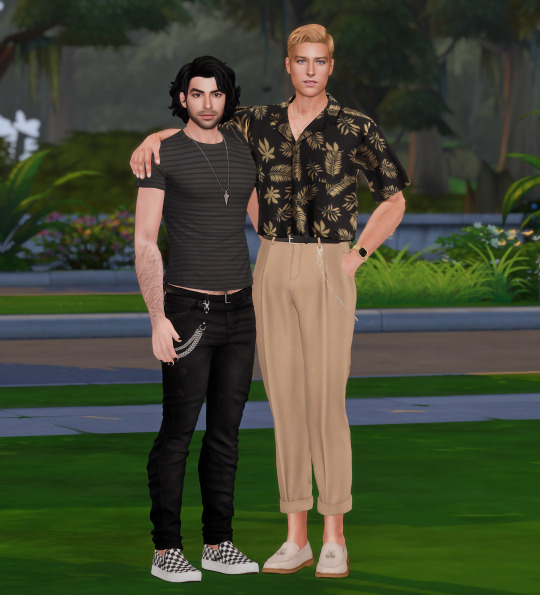
Not bad, huh? It's still a tricky little poo, I know. Mb someone knows or will find better way - that would be awesome! But so far it's the only way I know.
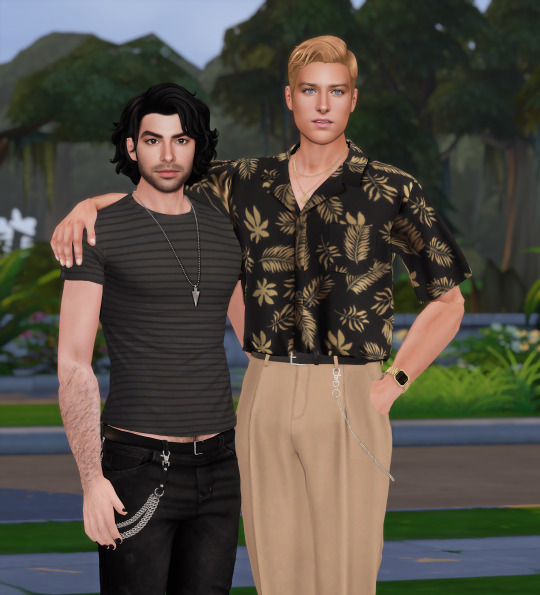
It's not necessarily to be one tall sim, you can pick lots of Sims with different height, just remember to move down (or up if they're small) their b__ROOT_bind__ bones once you've done posing.
Hope it was helpful!
Have fun!
#WistfulTutorialSims4#sims 4 tutorials#sims 4 poses tutorial#sims 4 pose tutorial#sims 4 height poses tutorial#sims 4 height slider#sims 4 height slider poses#sims 4 height poses#the sims 4#sims 4#sims 4 poses
256 notes
·
View notes
Text
how to pose sims for photoshoots - tutorial
MODS & CC USED:
teleport any sims
pose player
mc command center
iso love photos – full control camera (optional)
photographic memory (optional)
wicked whims | wonderful whims (optional)
backdrops 1 & 2
@ts4-poses
some of my favorite pose creators: ssiat | acha | dearkim
484 notes
·
View notes
Text
Making dynamic poses/animations that adjust to a sims body with Animation Tools by thepancake1
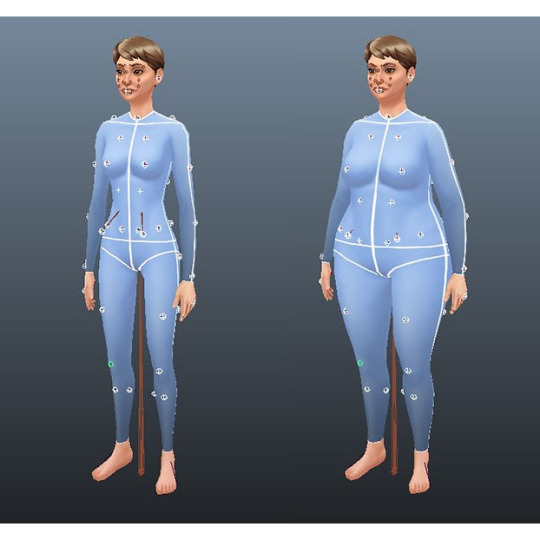
Made this short guide after talking to thepancake1. I haven't seen many people use this feature yet and felt like it might be worth sharing? There are some limitations to be aware of, but I think it's a useful option (for poses as well as animations) 😊
Many thanks to thepancake1 for the tools and for the helpful explanations he provided for this guide.
1. Background and in-game mechanics
The way TS4 handles different body shapes and clothes in animations (for example, in order to avoid clipping) is basically by putting markers (“slots”) on the surface of a sims body that can be then used as (IK) targets with the in-game IK system.
As you probably know, IK (Inverse Kinematics) – as opposed to the default FK (Forward Kinematics) – is a set-up where bones in a chain are influenced backwards. So, for example, when you move a hand, the arm will follow.
In a similar way, what in-game IK does, is assigning a bone or slot to animate relative to. For example, if your sim is posed with hands on the hips, you can assign the hands to the hips slot and the game will then process the pose/animation and perform IK in real time to change the position of the arms and hands relative to the hips.
Note that there are limitations to this system, though, as only hands, feet and the root bind can procedurally target other bones/slots.
Hereby, feet targets and root target are mainly used in interactions with objects, in particular in sitting animations (where, for example, the root is targeting a chair slot).
Hand targets are mainly used for adjusting a pose/animation to a sims body shape and clothes.
The in-game IK always influences the complete arm/leg (chain: foot-calf-thigh/hand-forearm-upperarm).
You can find an article that provides some background information here: https://simsvip.com/2014/08/20/community-blog-the-sims-4-animations/
2. Using the feature in custom poses/animations
Per default, when you make custom poses/animations with Blender and S4S, the relevant information that the game requires to apply in-game IK is not included. And so, you will notice that while a pose might look good with the base rig in Blender, it might not fit other sims with a different shape in game, in particular causing clipping.
You can use TS4 SimRipper to fine-tune a pose for a certain sim, but this might not be the solution you’re looking for, if you share your poses and/or want them to be compatible with different kinds of sims.
The animation tools now include a feature that makes it possible to use in-game IK with custom poses/animation as described in part 1.
Disclaimer:
The animation tools are in development and subject to change.
Currently TS4 SimRipper sims are not properly supported. (Although, imo for the purpose of the task, it doesn't make much sense to use them as models.)
As you can see in the comparison below, there might be some accuracy loss for the flexibility gained. (The position of the arms in the version without IK targets matches exactly the pose I made in Blender but doesn't work at all for the heavier sim causing extreme clipping. At the same time, the version with IK targets deviates a bit from the pose I made, but works for any sim.)
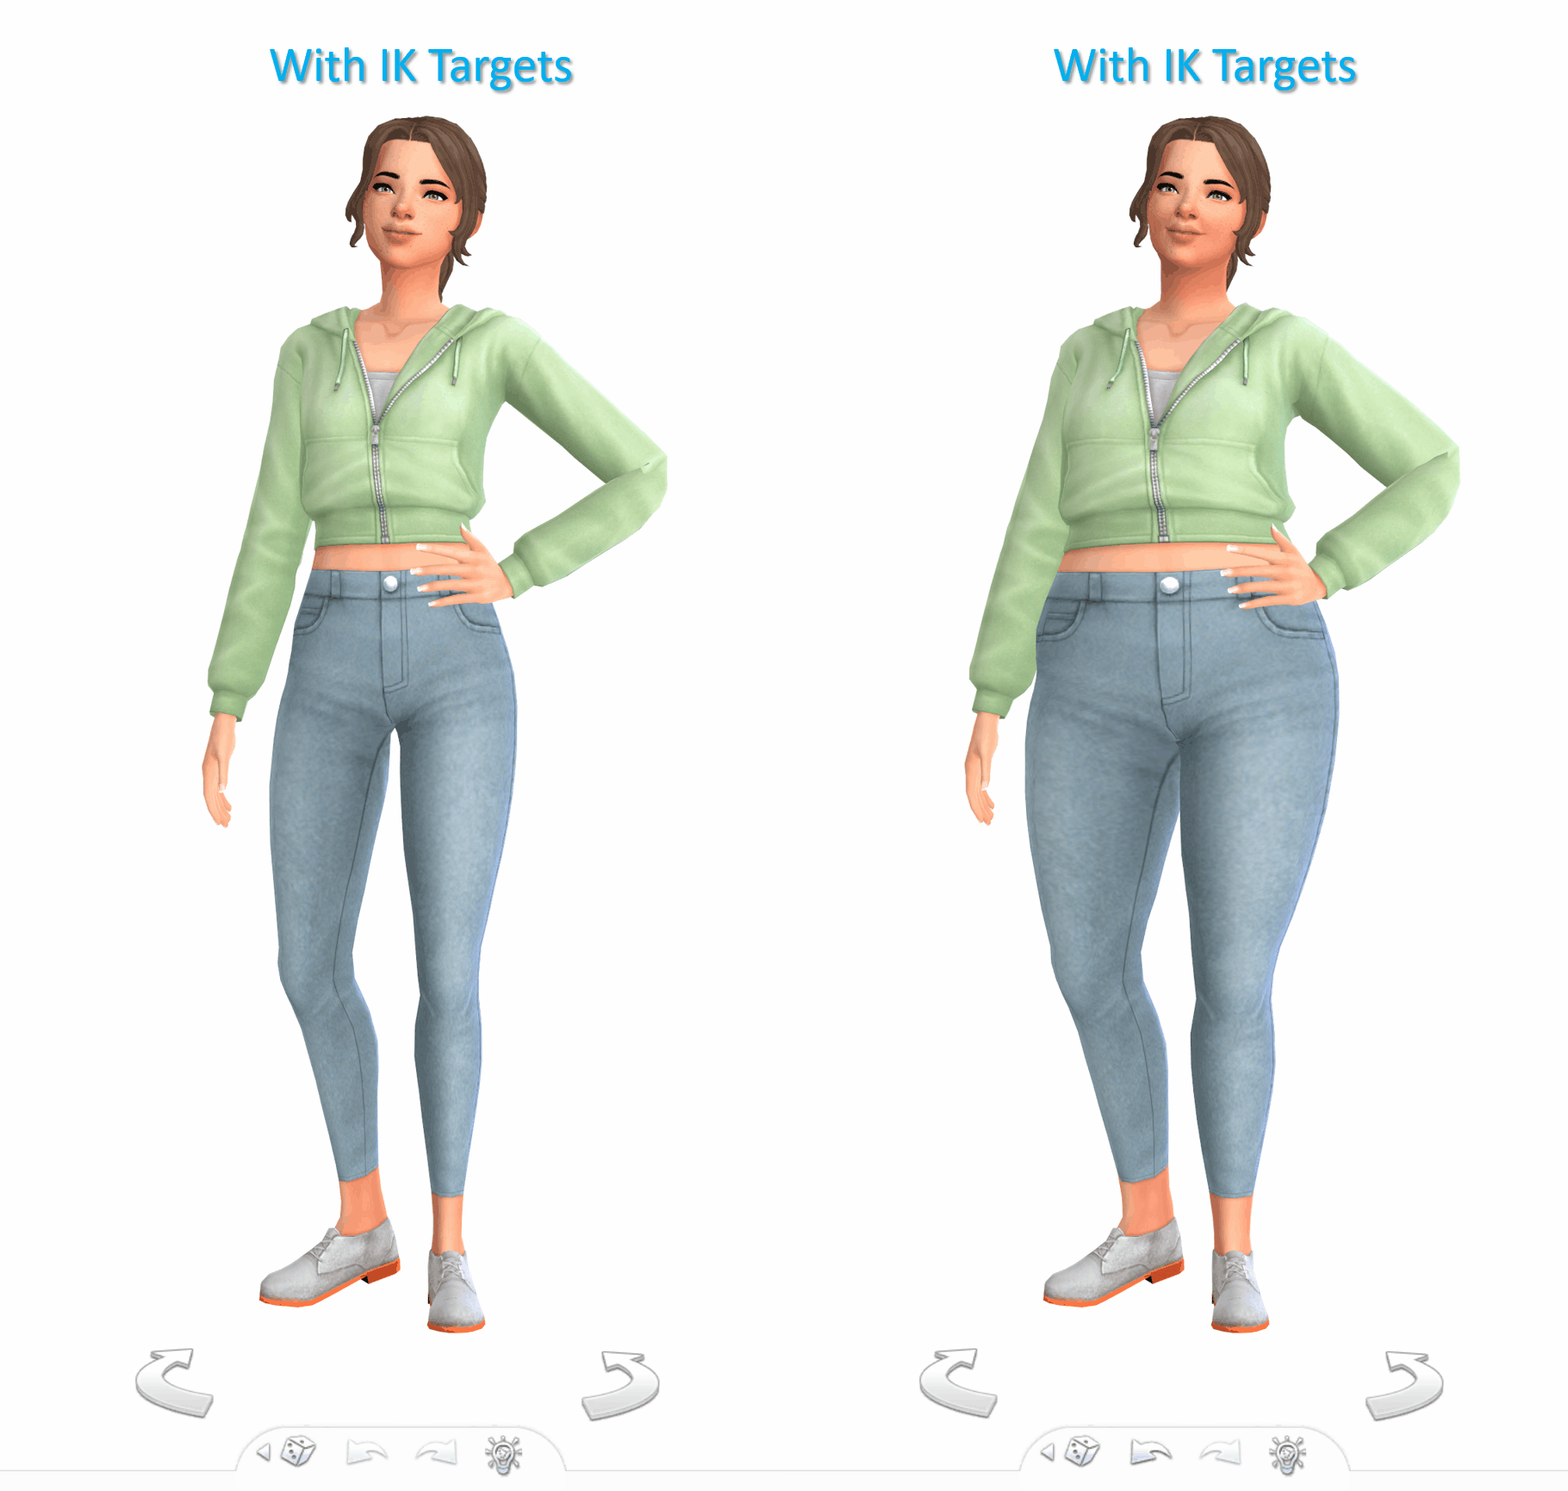

Below a short guide on how to set it up with the example pose I made.
1) You can download the tools HERE. Make sure to check the installation guide and tutorials in the wiki tab for the basics. (Note: The tools were originally made for Blender 3.0 but also support newer versions, in particular Blender 3.3.)
Some additional tips for poses in another post of mine HERE.
After you set up the tools in Blender and have made your pose:
2) Go to the S4AnimTools panel. Fill out rig name, clip splits and clip name as described in the tutorials linked above (also make sure to select “Allow Jaw Animation”).
3) Find & click “Create World IK channels”.

This will create 5 IK channels for the afore mentioned hands, feet and b_ROOT_bind bone. You can also add channels either by cloning the existing ones or clicking “Create World IK channels” again. To get rid of unwanted channels click “Delete”.
4) Set up the targeted bones/slots based on the type of pose you made.
In my example, I created a pose where a sim has the left hand on the hip, and the right hand close to the thigh. Therefore, I added IK channels targeting the “b__L_frontBellyTarget_slot” and “b__R_ThighFrontTarget_slot”.
The slots are marked blue in the picture below. Some notes:
The slots are hidden by default, I made them visible for the picture. You can unhide all bones/slots available by pressing Alt+H. But I recommend doing this on a separate rig/in another blend file or undo it directly afterwards if you don't want all the (unneccessary) bones/slots blocking your view.
The selected slots worked well enough for my example, but you should figure out what is suitable for you. (Fo example, the HandDangle slots seem to be commonly used when the arms are hanging near the body.)
As orientation you can also look up clip files for EA poses/animations via the S4S Game File Cruiser and see what bones/slots are used as targets ("Warehouse" tab -> "SlotAssignments"; IKChainIndex: 0 - left hand / 1 - right hand / 2 - left foot / 3 - right foot /4 - root). On that note: The Clip Pack export loses/resets the slot data, but you can use it to find an animation and check its Instance ID to then search for in the Game File Cruiser. (If you know the name of an animation you can also determine its Instance ID by converting the name with the S4S Hash Generator.)
5) To ensure an animation works properly and, in particular, blends with other animations in game, each IK channel should (also) target b_ROOT of the rig.
The bones are marked green in the picture below. This set up was recommened to me by pancake. Another experienced creator mentioned though that it's only necessary to target b_ROOT at the start and end of an animation, in his experience.
Also note that this seems to be a restriction for animations that are made as in-game interactions and might not be necessary for poses or animations used with Andrews Pose player.
6) The start and end frame is set according to the length of the pose/animation (I want to use the pose as a CAS trait pose and set the duration to 150 frames = 5 seconds), except for the b_ROOT target for hands where the end frame is set to 0 in my example, since they are also targeting the slots “b__L_frontBellyTarget_slot” and “b__R_ThighFrontTarget_slot” during the animation.
Note: My example is a static pose. In animations, however, you can also target different slots at different times by setting up multiple IK channels and specifying the start frame and end frame respectively.
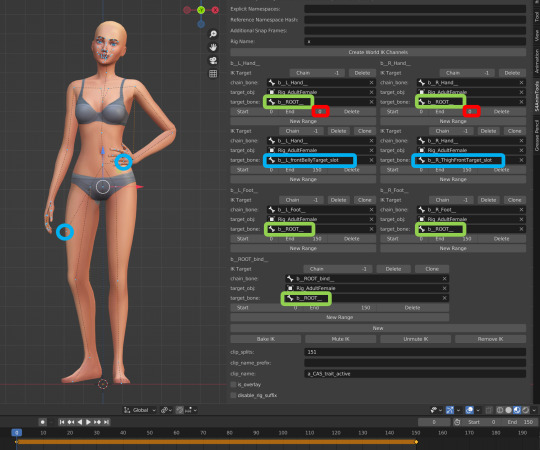
7) Bake the animation by pressing “Bake IK”.
8) Export the clip and create a package with your pose/animation as described in the linked tutorials above.
@ts4-poses @thefoxburyinstitute
747 notes
·
View notes
Text
how to create Sims 4 custom poses
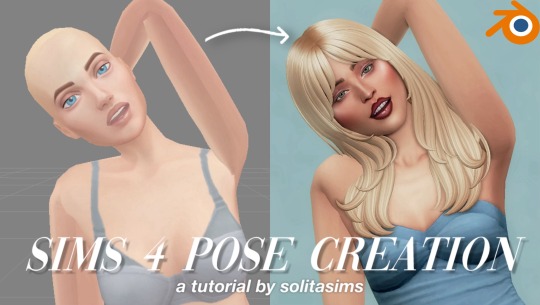
hello all! I’ve just released a new YouTube video on how to create custom Sims 4 poses in the Sims 4 with Blender & Sims4Studio. you can watch the video here if you’re interested.
if you're interested in downloading the Sabrina Carpenter "Espresso" Poses I created in this video, you can download them here.
down below is a list of all the programs needed for this tutorial. thanks for your support always!
Blender 2.70
Sims4Studio
Teleport Any Sim
Pose Player Mod
Sabrina Carpenter Sim (optional)
#solitasims#solitasims4#sims 4#the sims 4#thesims4#ts4 simblr#the sims#solita sims#sims 4 pose pack#sims 4 pose packs#sims 4 poses#sims 4 cc#sims 4 custom content#sims 4 pose creation#sims 4 tutorial#sims 4 blender#solitas poses
56 notes
·
View notes
Text
(Pro?) Posing tips
It doesn’t matter if you are a beginner or if you already have made your way into blender. As a posemaker myself, I know how hard it is to make a realistic pose - here a few tips you have to think of when making poses, to get your pose to the next level.
(I use shibuisims sunflower rigs for my poses, but in base they work the same as the rigs you export from sims4studio, they only have some handy IK controls)
At first: take your time for details. The base of my poses are mostly done very quickly, but it’s all in the details. Fingers, face, mouth, hips. Take your time for the details. Details can make or fail a pose.
Simripper double textures If you make poses for your own story or edit, you mostly make them with your own textures (through simripper) right? But if you want to also send them to the community to download and use, don’t get rid of the original rig textures bij importing your own sim textures. By toggling off and on the textures under your rig in the scene menu, you can see how poses look on your own sims, but also on the ‘default sim rig texture’.
Elbows and shoulders and relaxation. I think I can best show this in pictures. If holding something we almost never raise our elbows unnatural high. They mostly are more ‘relaxed’ to our body. Lower the elbows! (It’s always good to have a little space for thicker sims ofcourse).


Can you see the difference? Hands I think these are the hardest to do. I still struggle with them sometimes. But the best thing to get the best hands is to have a reference OR make the hand yourself in relaxing state. I see it mostly in a pose in an ‘idle’ state that hands are cramped or straightened. Unless you want this in your pose, try to make a hand in relaxed state.
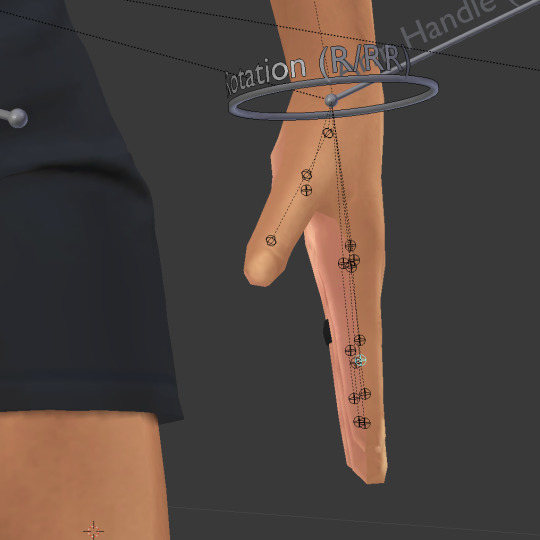
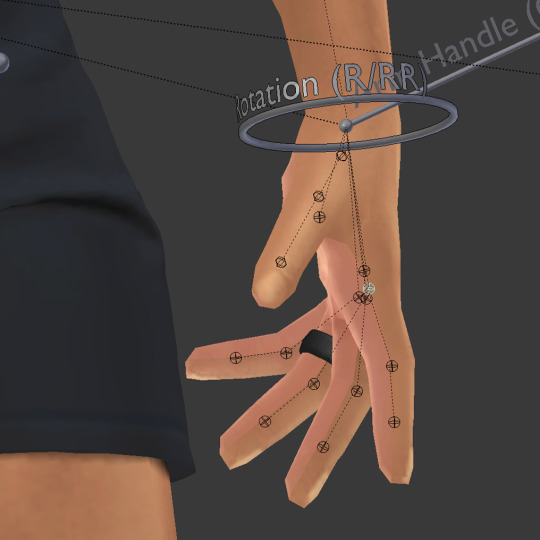

Straightened, cramped or relaxed?
Shoulders I hope every posemaker that makes poses for already a while know this, but I think it's the most important step in starting making poses. Please, start your arm movements (mostly if you want to raise the arms) in the b_R_clavicle or b_L_clavicle joints.


Shoulders are important!
Weight It’s so important in realistic poses to add our gravity. I think this mostly checks out for holding other sims, piggyback poses etc. If you take someone on your back, your back struggles too right? It's heavy! Try to lower that b_ROOT_bind just a little more as what you expect to do in a pose. Don’t forget gravity always pulls us down!

Only a very small distance from the ground is needed sometimes.


Gravity holds our arms down too in 'relaxed' state.
Stiffnes Maybe we can add this to weight aswell, but as humans ourselves, if we are standing ‘idle’. We never stand right up with a straight back, feet perfectly straight next to each other. It’s the same if we sit on a chair, most of us hang a little to the back or to the front. Try to add that in your pose, if you do that - it’s immediately a less stiff pose!
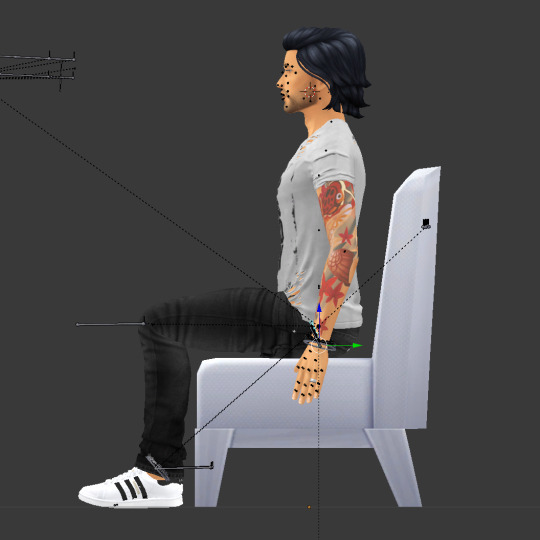

It's only a slight bend in the back joints, but it already looks more natural.
Just remember, you learn by doing and watching. So I hope I can add some more insights to you, as a posemaker for a few years now, to make your poses even better and more realistic. Ofcourse, sims rigs have their limitations, but that's what makes them sims, right? You can find some more simmireen tips on posepack consistency for sharing your poses here
@ts4-poses
#sims4#sims4tutorial#sims 4 poses#ts4poses#ts4 poses#thesims4#ts4cc#simmireen#ts4-poses#posemaker#sims4poses#posepack#ts4#tutorial#posemakingtutorial
356 notes
·
View notes
Text
Speed edit #1
Make sure to follow my Pinterest and Instagram for more content
What app did I use?
App | Procreate
What cc did I use ?
Cc | @complex-sims @xxblacksims
Heyy y’all I’ve made this page just for reblogging only but here’s a quick edit I did in December 🥲
#the black simmer#thesimmerkmamas#simblr#the sims 4#my sims#ts4 gameplay#sims 4 urban cc#sims 4 fashion#ts4 edit#simblog#procreate#my edit#urban sims#kikovanitysimmer#sims 4 poses#ts4 poses#simstagram#sims 4 help#black sims#sims blender#sims 4 editing#sims 4 tutorial
66 notes
·
View notes
Text
youtube
Pose Tutorial | CAS & InGame
Today I share with you a quick tutorial for how to use poses in create a sim and in game. I hope this helps, let me know if you have any questions!
#my sims#simblr#sims 4#the sims#the sims 4#sims 4 screenshots#sims 4 cc#sims 4 build#sims 4 custom content#sims 4 mods#sims 4 tutorial#sims 4 poses#Youtube
37 notes
·
View notes
Text


The Love family hosts their second annual Family Reunion at the San Sequoia lake!
A tutorial video is in the works on How to host the perfect family gathering in the sims 4, more specifically the perfect family reunion! Stay tuned by following here on simblr and subscribing to my YT��

#sims4#sims 4 gameplay#sims community#simblr#my sims#sims 4 challenge#sims 4 custom content#sims 4 cc#sims 4 cas#sims 4 mods#sims 4 build#sims 4 screenshots#the sims community#the sims#sims 4#sims 4 clothes#sims 4 poses#the sims 4#sims 4 tutorial#how to sims 4#ts4 legacy#sims 4 story#ts4 gameplay#sims 4 family#thesims4#do the sim thing legacy challenge sims 4
18 notes
·
View notes
Text

💚 -- Open me -- 💚
Hey everyone!! 💚 I have a New Video online!
In these special videos, I show how I create poses and the steps I take. In this sped-up video, I present an upcoming PosePack for which I will make two poses.
This is a sped-up video, so there’s no additional explanation. A detailed explanation will come later, but not in this video.
Note: This is my technique; this is what I am used to and what I enjoy working with. It doesn't mean that you will have the same experience.
There will also be things that are not perfect, and that’s okay because no one is perfect, and there is always something new to learn.
------------------------------------------------------------------------------
💚 -- Which website(s) were used? -- 💚
Blender (2.76)
If you have any questions or ideas about what I can create for you, I'd love to hear from you!
------------------------------------------------------------------------------
💚 -- You can find me on these platforms -- 💚
Instagram
Pinterest
Patreon
Tumblr
------------------------------------------------------------------------------
💚 -- PLAYLIST -- 💚
💚 Tutorials With Simmisstrait
💚 The Procress With Simmisstrait
2 notes
·
View notes
Video
youtube
Tutorial: Posing Sims and Taking Photos In Game: The Sims 4
#youtube#sims#sims 4#sims 4 gameplay#sims tumblr#sims tutorial#sims 4 tutorial#sims 4 tumblr#the sims 4#the sims 4 poses
3 notes
·
View notes
Text
youtube
Tutorial completo de como usar o Pose Player e Teleport Any Sim. Não deixe de se inscrever no canal !!
2 notes
·
View notes
Text
Updates to add recommendation and link to TwistedMexi's Searchable Pose Player mod. Its a life saver. Also updated to add a note and a link about an existing list of in game animation names for those who want to use them with Andrew's Pose Player "Pose by Name" function.
Let's Talk About Posing
A Sims 4 posing tutorial

Providing a written tutorial with images to help you learn basic posing in The Sims 4 and also various mods and tricks you can use to help your posing experience. I know there are more tricks on this out in the wild, so I don’t dare call it a complete tutorial. It will, however, get you started.
Updated: August 2024
Mods I’m going to talk about:
Andrew’s Pose Player and Scumbumbos Teleport Any Sim
MC Command Center
TwistedMexi’s T.O.O.L.
TwistedMexi’s Searchable Pose Player
Lot 51’s Fashion Authority
Wicked Whims or Wonderful Whims
This is a long tutorial, but it should help you with using all of the above mentioned mods to have a better posing experience in The Sims 4.
Read More–
Keep reading
#posing tutorial#ts4#sims 4#ts4 posing#updated the original post so no need to reblog but I want to make sure you guys know about these things!
1K notes
·
View notes
Text
I really wanna learn how to make poses, anyone have any good tutorials for them?
#preferably for blender 3.4 (i think thats the most recent Sims studio handles)#i wanna use that version bc the 2 whatever version literally will not work on my pc j watched a whole tutorial and everything#and the posing would not work its a nightmare#sims#ts4#simblr#sims 4#text
1 note
·
View note
Text

As storytellers, realism and continuity are important to us, and they're sometimes hard to achieve within the confines of the game. I’m personally a big fan of posing Sims in open doorways, and unless you want to be limited to the CC options that exist, you’re stuck having to make some poor Sim walk in and out and pausing at just the right moment for the desired effect. But it’s actually very easy to edit a door in Blender to make your own open version!
I initially learned about "posing" objects from surelysims' Wicked Whims posing tutorial, which I highly recommend as a whole. However, it might be a little overwhelming to learn a whole new posing system for the sake of a screenshot or two, which is where this tutorial is meant to come in. Some of my explanations might seem overly simplistic, but I wanted it to be approachable even for beginners. I am far from an authority on using Blender or making CC, and I'm sure there are flaws in this process or easier ways to achieve certain things, but it works well enough for my purposes and I hope it will work for yours too. 💗
Now, onto the tutorial...
Figure out what door or gate you want to create an open version of. If it’s from the vanilla game, all you need to do is make note of its name. If it’s CC, find the package in your mods folder, make a copy, and paste it into My Documents > Sims 4 Studio > Mods. This will allow you to find it in S4S in the next step!
Open S4S. On the main screen, make sure “Standalone Recolor” is checked under the “Object” button, then click the button.

A new window should pop up (if it’s your first time doing this, it may take a while to load). At first, it will show every single object in the game. If you know the name of the object you’re looking for, you can use the search bar to find it. You can also use the filtering options to narrow the selection down by category, game pack, and whether it’s vanilla or custom content. Here, I’ve filtered the search to only base game doors. Once I find the door I want to adjust, I click on it and hit “Next.”

This will pop up a window prompting you to save a new file. Place it somewhere you know you’ll be able to find it easily later and name it accordingly. This file will ultimately contain your mesh edit, so you don’t want to lose it! I suggest placing it in a dedicated folder, on your desktop, or in your Mods folder directly.

On the next screen, you’ll be looking at the contents of the package itself. For this tutorial, you don’t need to worry about grabbing anything but the mesh. Click on the “Meshes” tab and then “Export Mesh.” You’ll again be prompted to save.

Open the mesh file you just saved in Blender. (If the view is funky to start, I recommend hitting 1 on your keyboard’s number pad to get a forward-facing view.) [It should also be noted I’m using Blender 3.6, so my screenshots and the location of certain settings may be different than in earlier or newer versions.]
You’ll see that there are actually multiple meshes involved (and the number can vary from object to object). Right now, we’re only concerned with the “rig.” If you’re familiar with posing, you’ll know that all Sims have a rig that is used to move different parts of their bodies around. Objects also have a rig, and objects that can open will have “bones” that control their moving parts. So click on “rig” and then change “Object Mode” in the bottom corner to “Pose Mode.”


Now, if you hit A on the keyboard, it will select all bones and you can see where they’re located. As far as I can tell, all doors have two bones that control their swinging movement. They both do essentially the same thing. I tend to stick with the top bone, which is called something like “bind_doorSwing.”

Pro-tip: If you’re having trouble seeing or selecting the rig's bones, you can change the view on the right side of the screen to “dope sheet.” Then when you save the position of the bones, just like when posing a Sim, by selecting all with A then clicking I and selecting “Location & Rotation,” the list of available bones will pop up there.


Rotate the door open using this bone or bones, if it’s a double door. On double doors, I recommend rotating each side individually rather than trying to rotate them together, as you may get unexpected results. You can use the R+Z combo on the keyboard to limit the direction of movement. (You can also use this in combo with numbers to swing them more precisely. For example, if you want a 45 degree swing, you can press R+Z+45.) Specifying the Z axis allows you to only swing the doors open and closed while restricting their movement in other directions.

Once you’ve got the doors swung open to where you want them, hit A to select all bones, then hit I and select “Location & Rotation” to save the position. (If you’re a poser, this maneuver is already familiar to you - and you know how important it is! If you skip it, the new position won’t save and the doors will revert back to closed.)

That’s it! You don’t have to do anything else to the mesh. Save your file in Blender. If you want to keep it separate from the original door mesh, save as instead and name it something different. (This is why you may want a dedicated folder, since the number of files does add up!)
Reopen the package you made earlier in S4S (or simply return to it if you’ve kept it open). From the same place you exported the mesh, you will now import the edited mesh. Hit “Import Mesh,” navigate to your edited Blender file, and you should now see your edited door replace the original. Since it’s the same mesh, all the swatches will still work perfectly with it.

You’ll notice that you’ve only replaced the “LOD 0 (High)” version of the mesh. When you click the drop-down menu, you’ll see that there are also medium and low detail versions, as well as shadow meshes at all levels of detail. If you’re only making an object for personal use, you don’t have to worry too much about LODs. You can probably just import the same mesh into LOD 1 and LOD 2 and be fine (so long as your computer isn't a potato). And if this is just for you, I honestly wouldn't even touch the shadow LODs.
The only other thing you might do is go back to the “Catalog” tab and alter the object name so you can find it easily in the game catalog. You can also edit the description, price, etc. if you so desire. Hit “Save.”

Test in game! If the package isn’t already in your Mods folder, move it there. As long as you didn’t mess with any of the tags, it should still be in the door section of build mode and work perfectly as a functional door. The door swinging animation will look different, and you could probably get rid of it if you wanted, but that’s above my current skill level and I don’t think it’s really necessary for our purposes. If all you need is an open version of a very specific door for storytelling purposes, it gets the job done.


(First screenshot: doors swung open as intended, second screenshot: doors swinging in the opposite direction as they’re walked through)
These steps can also potentially be used to create open versions of other in-game objects like gates, books, chests/boxes, etc. I’m only just beginning to experiment with minor mesh edits, but once you get the hang of it they can often be faster and easier than trying to line up the best circumstances to get the perfect shot in-game. I might make more tutorials for small edits like this that help with storytelling realism and continuity in the future!
#ts4#sims 4#ts4 storytelling#ts4 tutorial#sims 4 storytelling#sims 4 tutorial#this is the first tutorial i've written so do let me know if anything's confusing!!!
230 notes
·
View notes
Text
i need this later
Small guide on CAS Poses
Last updated: 25. July 23
This will be a tutorial on how you can organize your CAS poses. I will give you an overview of which traits have which animations and I will show you how you can change the trait the CAS pose replaces.
━━━━━━ ・❪ ☾ ❫ ・ ━━━━━━
Q: What are CAS poses? A: CAS poses are used to take pretty screenshots in CAS. They replace the normal animations that play when you select any trait. This works for all ages of Sims and also pets, but it does not work for occult forms, as you cannot change traits while in occult form.
Pose by @catsblob

Which CAS traits use which animations
First I will be listing all CAS traits with the name of their animation from Sims4 Studio. Some traits share the same animation, therefore you can't have animations for all of them.
You can find the Google spreadsheet here: https://docs.google.com/spreadsheets/d/1eYwZzo_tBA-vhxFXz4ANd0n075Ls_cEbfiQlaM0QNtU/edit?usp=sharing
━━━━━━ ・❪ ☾ ❫ ・ ━━━━━━
How to organize your CAS poses
I wrote down the name of the CAS traits in front to make sure i don't use the same ones multiple times and kept the original name of the CC.
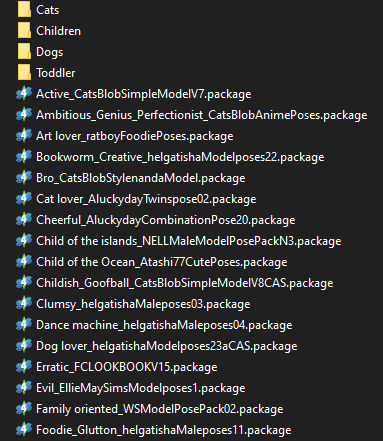
It's also nice to write down which traits you still can use for CAS poses (I crossed the traits out as I don't own the packs yet):

━━━━━━ ・❪ ☾ ❫ ・ ━━━━━━
How to change which CAS trait poses use
Most pose creators offer 1 or 2 CAS traits for their CAS poses, but if you already have poses installed for those, you can easily change that to any other CAS trait.
Requirements:
S4 Studio
The CAS pose you want
The trait you want to use
1. Download and install S4 Studio 2. Download the poses you want
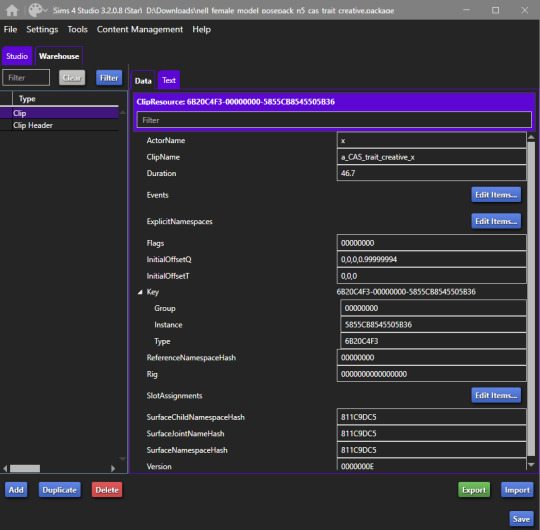
3. Open up your downloaded pose and go into the warehouse tab.
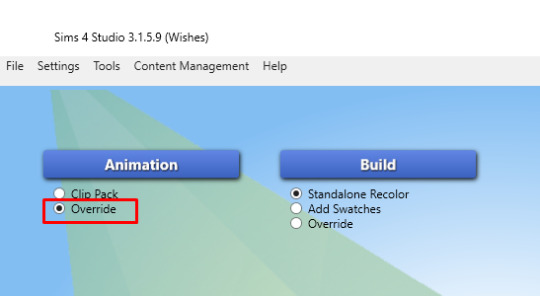
4. Open a second S4 Studio, select “Override” under “Animation” in the main menu.
5. Select the animation name according to the spreadsheet of which trait you want to replace. I will just use the trait "Proper" for adults, so I select "a_CAS_trait_proper_x"
6. Save the file as whatever, you only need it for values and not the file itself. This is your Source. Then also go into the warehouse tab.
7. Now you need to copy over the values in "ClipName" and "Key-Instance" from the source file to the animation you want to change the traits in. They text after "Key" will change automatically later.
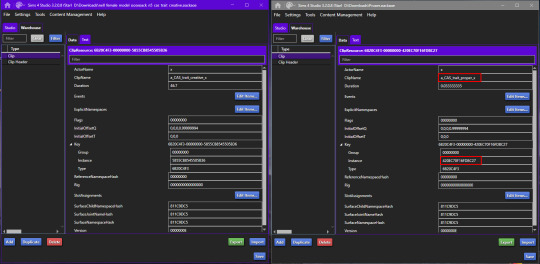
8. Now do that for both Types "Clip" and "Clip Header".
9. The Warehouse should now look exactly the same for both files.
10. Rename the animation files to however you organize your animations. I will add "Proper_" as a prefix for my package (see "How to organize your CAS poses" above).
11. Done!
━━━━━━ ・❪ ☾ ❫ ・ ━━━━━━
Bonus: My favorite CAS pose creators
@catsblob @helgatisha @nell-le @ratboysims @roselipaofficial @a-luckyday
━━━━━━ ・❪ ☾ ❫ ・ ━━━━━━
@maxismatchccworld @sssvitlanz @emilyccfinds
#sims 4#s4 studio#sims 4 tutorial#sims 4 cas poses#sims 4 cas poses tutorial#s4tutorial#s4guide#sims4#ts4#s4#sims tutorial#yorututorials
347 notes
·
View notes
Text
STICKY POST: ULTIMATE(ISH) GUIDE(S) TO SIMS 4 CC-MAKING; OR, A COMPREHENSIVE COMPENDIUM OF TUTORIALS, INSTRUCTIONAL MATERIALS, & FELLOW COMPILATIONS OF A LIKEWISE NATURE
In which I list a fuckton of tutorials, guides, and lists of such, each written, curated, and crafted by people far more talented than I.
More will be added as I find them.
---
@teanmoon's CC Guides - Includes tutorials on cloning, uv_1, weights, bump and specular maps, bi-color hair, and a Blender Cheat Sheet. High poly 'creators' have little excuse to churn out high poly, non-optimized garbage when they can lean on bump maps. (I know those can only do so much for more complex meshes, but for objects, texture maps can do SO much heavy-lifting).
@vintagesimstress's CC Guides - Includes tutorials on using Blender to create objects and clothing, especially for people who are just getting started.
@eliavah's uv-1 adjustment tutorial. Haven't tried this myself yet, but after glancing through it, it's something I will surely want to keep bookmarked.
@simlaughlove's CC Tutorials List - Includes many tutorials handily laid out by category on everything from object texturing to CAS morphs.
@thefoxburyinstitute's Nav Page - This blog is nonstop Sims 4 resources for e v e r y t h i n g. READ THIS POST FIRST as a guide on how to actually... nav.
@simsresourcehub's Tags List - What it says on the tin.
Transferring Weights in Blender 3.3.1 - Over at Sims4Studio forums.
@trillyke's List of Tutorials - Good ones!
@sims4tutorials - *GRAND GESTURES*
@katverse's Huge List of Tutorials - Tutorials on eeeverything.
@thatsimslady's Massive List of Tutorials - 31 pages????? Damn.
@kouukie's Sims 4 CAS with Marvelous Designer Tutorial - YouTube video!
@rusticottage's Gifmaking Tutorial - I love Sims gifs tbh.
@cowplant-pizza' Boes' Editing Masterlist - Includes stuff for Reshade, PSDs, PS Actions, and how to use them.
@melonsloth's Deco Sim Tutorial - Using SimRipper
@depthofpixels's Deco Sim Tutorial - Using SimRipper
@azuhrasims' Guide to Posing Sims - Includes how to pose sims, and handy workarounds! Super great for beginners and longtime users.
@radioactivedotcom's Guide to Posing - Includes additional posing resources. NOT for beginners.
@madameriasims4's Add a Flame to Your Basegame Candle - Great for mood lighting and historical gameplay!
@syboubou's Making a Lamp Start to Finish - a video tutorial
MORE BELOW:
Adding Lit DST to Fireplace
New image ref for default overrides
Make an RGB Spec for Objects
Bake a shadow onto your object in Blender
Linking all bedding to a single frame
Cutouts for Doors/Windows/Archways
Making objects see-through/glass
Making lamps light correctly
Give an object transparency (add an alpha)
Make a candle w/ multiple flames
Change LOD viewing distance
708 notes
·
View notes