#sims 4 cas poses tutorial
Explore tagged Tumblr posts
Text
i need this later
Small guide on CAS Poses
Last updated: 25. July 23
This will be a tutorial on how you can organize your CAS poses. I will give you an overview of which traits have which animations and I will show you how you can change the trait the CAS pose replaces.
━━━━━━ ・❪ ☾ ❫ ・ ━━━━━━
Q: What are CAS poses? A: CAS poses are used to take pretty screenshots in CAS. They replace the normal animations that play when you select any trait. This works for all ages of Sims and also pets, but it does not work for occult forms, as you cannot change traits while in occult form.
Pose by @catsblob

Which CAS traits use which animations
First I will be listing all CAS traits with the name of their animation from Sims4 Studio. Some traits share the same animation, therefore you can't have animations for all of them.
You can find the Google spreadsheet here: https://docs.google.com/spreadsheets/d/1eYwZzo_tBA-vhxFXz4ANd0n075Ls_cEbfiQlaM0QNtU/edit?usp=sharing
━━━━━━ ・❪ ☾ ❫ ・ ━━━━━━
How to organize your CAS poses
I wrote down the name of the CAS traits in front to make sure i don't use the same ones multiple times and kept the original name of the CC.
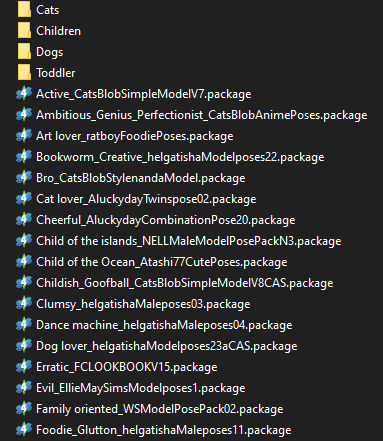
It's also nice to write down which traits you still can use for CAS poses (I crossed the traits out as I don't own the packs yet):

━━━━━━ ・❪ ☾ ❫ ・ ━━━━━━
How to change which CAS trait poses use
Most pose creators offer 1 or 2 CAS traits for their CAS poses, but if you already have poses installed for those, you can easily change that to any other CAS trait.
Requirements:
S4 Studio
The CAS pose you want
The trait you want to use
1. Download and install S4 Studio 2. Download the poses you want
3. Open up your downloaded pose and go into the warehouse tab.
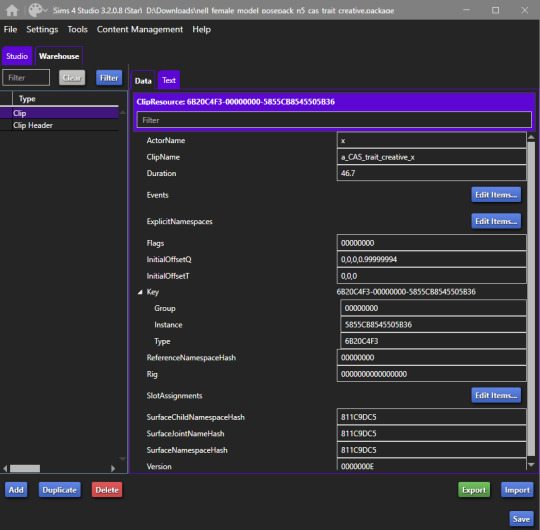
4. Open a second S4 Studio, select “Override” under “Animation” in the main menu.
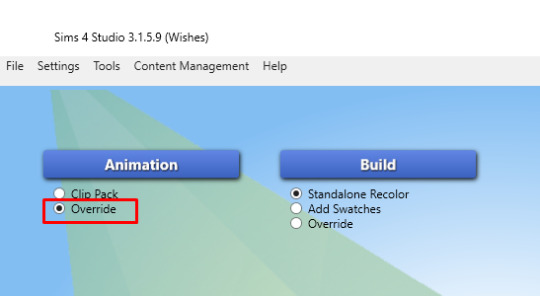
5. Select the animation name according to the spreadsheet of which trait you want to replace. I will just use the trait "Proper" for adults, so I select "a_CAS_trait_proper_x"
6. Save the file as whatever, you only need it for values and not the file itself. This is your Source. Then also go into the warehouse tab.
7. Now you need to copy over the values in "ClipName" and "Key-Instance" from the source file to the animation you want to change the traits in. They text after "Key" will change automatically later.
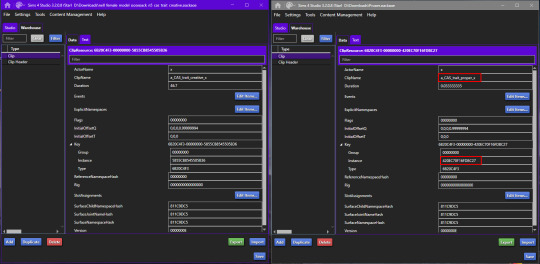
8. Now do that for both Types "Clip" and "Clip Header".
9. The Warehouse should now look exactly the same for both files.
10. Rename the animation files to however you organize your animations. I will add "Proper_" as a prefix for my package (see "How to organize your CAS poses" above).
11. Done!
━━━━━━ ・❪ ☾ ❫ ・ ━━━━━━
Bonus: My favorite CAS pose creators
@catsblob @helgatisha @nell-le @ratboysims @roselipaofficial @a-luckyday
━━━━━━ ・❪ ☾ ❫ ・ ━━━━━━
@maxismatchccworld @sssvitlanz @emilyccfinds
#sims 4#s4 studio#sims 4 tutorial#sims 4 cas poses#sims 4 cas poses tutorial#s4tutorial#s4guide#sims4#ts4#s4#sims tutorial#yorututorials
347 notes
·
View notes
Text

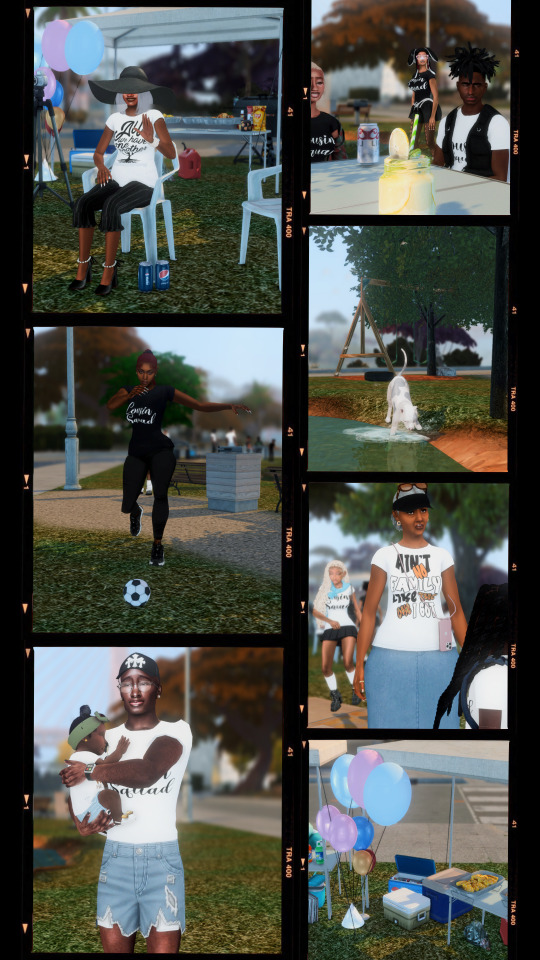

The Love family hosts their second annual Family Reunion at the San Sequoia lake!
A tutorial video is in the works on How to host the perfect family gathering in the sims 4, more specifically the perfect family reunion! Stay tuned by following here on simblr and subscribing to my YT✨

#sims4#sims 4 gameplay#sims community#simblr#my sims#sims 4 challenge#sims 4 custom content#sims 4 cc#sims 4 cas#sims 4 mods#sims 4 build#sims 4 screenshots#the sims community#the sims#sims 4#sims 4 clothes#sims 4 poses#the sims 4#sims 4 tutorial#how to sims 4#ts4 legacy#sims 4 story#ts4 gameplay#sims 4 family#thesims4#do the sim thing legacy challenge sims 4
18 notes
·
View notes
Text
STICKY POST: ULTIMATE(ISH) GUIDE(S) TO SIMS 4 CC-MAKING; OR, A COMPREHENSIVE COMPENDIUM OF TUTORIALS, INSTRUCTIONAL MATERIALS, & FELLOW COMPILATIONS OF A LIKEWISE NATURE
In which I list a fuckton of tutorials, guides, and lists of such, each written, curated, and crafted by people far more talented than I.
More will be added as I find them.
---
@teanmoon's CC Guides - Includes tutorials on cloning, uv_1, weights, bump and specular maps, bi-color hair, and a Blender Cheat Sheet. High poly 'creators' have little excuse to churn out high poly, non-optimized garbage when they can lean on bump maps. (I know those can only do so much for more complex meshes, but for objects, texture maps can do SO much heavy-lifting).
@vintagesimstress's CC Guides - Includes tutorials on using Blender to create objects and clothing, especially for people who are just getting started.
@eliavah's uv-1 adjustment tutorial. Haven't tried this myself yet, but after glancing through it, it's something I will surely want to keep bookmarked.
@simlaughlove's CC Tutorials List - Includes many tutorials handily laid out by category on everything from object texturing to CAS morphs.
@thefoxburyinstitute's Nav Page - This blog is nonstop Sims 4 resources for e v e r y t h i n g. READ THIS POST FIRST as a guide on how to actually... nav.
@simsresourcehub's Tags List - What it says on the tin.
Transferring Weights in Blender 3.3.1 - Over at Sims4Studio forums.
@trillyke's List of Tutorials - Good ones!
@sims4tutorials - *GRAND GESTURES*
@katverse's Huge List of Tutorials - Tutorials on eeeverything.
@thatsimslady's Massive List of Tutorials - 31 pages????? Damn.
@kouukie's Sims 4 CAS with Marvelous Designer Tutorial - YouTube video!
@rusticottage's Gifmaking Tutorial - I love Sims gifs tbh.
@cowplant-pizza' Boes' Editing Masterlist - Includes stuff for Reshade, PSDs, PS Actions, and how to use them.
@melonsloth's Deco Sim Tutorial - Using SimRipper
@depthofpixels's Deco Sim Tutorial - Using SimRipper
@azuhrasims' Guide to Posing Sims - Includes how to pose sims, and handy workarounds! Super great for beginners and longtime users.
@radioactivedotcom's Guide to Posing - Includes additional posing resources. NOT for beginners.
@madameriasims4's Add a Flame to Your Basegame Candle - Great for mood lighting and historical gameplay!
@syboubou's Making a Lamp Start to Finish - a video tutorial
MORE BELOW:
Adding Lit DST to Fireplace
New image ref for default overrides
Make an RGB Spec for Objects
Bake a shadow onto your object in Blender
Linking all bedding to a single frame
Cutouts for Doors/Windows/Archways
Making objects see-through/glass
Making lamps light correctly
Give an object transparency (add an alpha)
Make a candle w/ multiple flames
Change LOD viewing distance
708 notes
·
View notes
Text

PROVENCE 3D CAS background
Hello. This is my very first CC and first CAS background. It was inspired by France and french interiors.
D O W N L O A D
You can use ONLY ONE CAS background in game.
Place in your (Documents\Electronic Arts\The Sims 4\Mods) Folder
I followed @thatonegreenleaf tutorial on how to create the room https://www.youtube.com/watch?v=h1AflLg8cCc
TERMS OF USE
Please Do not reupload / paywall / include my meshes in downloads (please link back to my original download)
CC used: most of the furniture my recolours of EA items. joyceisfox, syb, felixandre items were used as interior elements. Pose by @nell-le. Hair by @valley-tulya, dress by @joyceisfox, socks by marigold, flower basket by @learxflaire, flats by @mysteriousoo
Hope you will enjoy it
#the sims 4#sims 4#ts4#cas room#cas backgrounds#cas background#ts4 cas room#ts4 cas background#mine#maxis match#ts4 cc
403 notes
·
View notes
Text
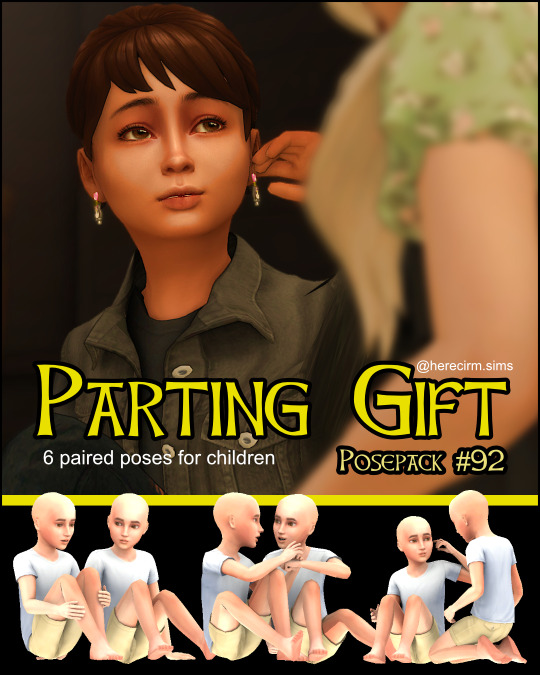
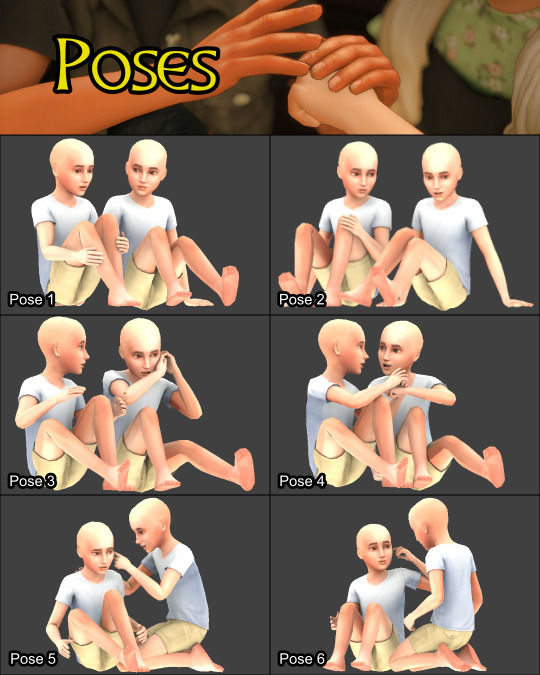
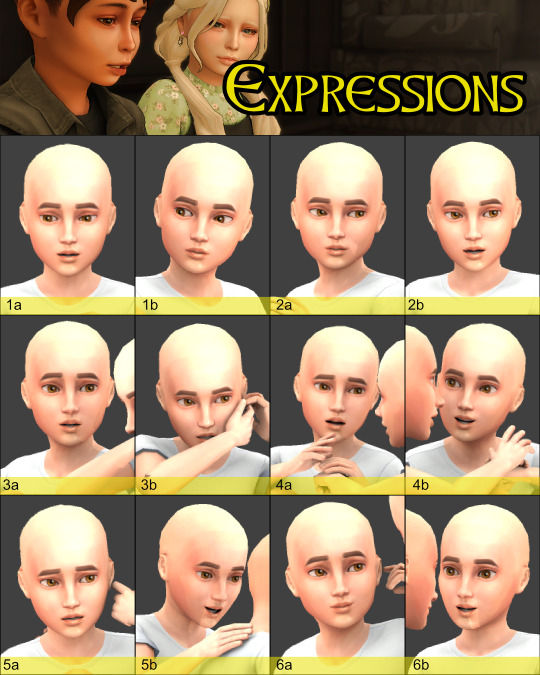
Parting Gift
Today's posepack is another set I made for my story. It was intended for a scene where one kid gives another her earrings, but of course you can use them for any scene you like. There are no accessories required - if you don't know about using the extra outfit slots and MCCC to add/remove CAS assets, I've included a very quick tutorial below the cut.
You will need: - Pose Player - Teleport Any Sim (place two teleporters in the same spot)
Download here (SFS)
TOU: please don't redistribute, claim as your own, or paywall.
You can view my other posepacks easily via my Ko-Fi gallery
Got a pose request? You can drop a prompt in my Padlet. These are for pose inspo only - I'm not currently taking detailed requests.
@ts4-poses @alwaysfreecc
Tutorial for using MCCC to switch between outfit options: 👇
If you don't already have MCCC, you can get it here.
This is very simple, but it was a lifesaver when I was shown how to do this, and maybe there are new storytellers/Simmers out there who would also benefit - so:
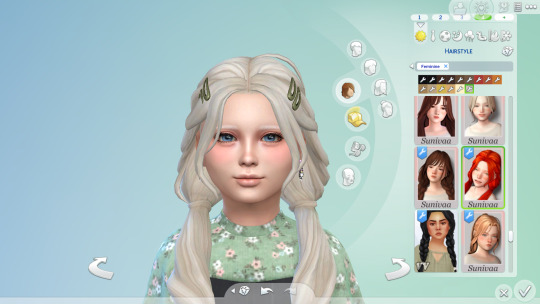
Go into CAS and create your outfit (yes, I know the More CAS Columns mod exists lmao). Then hit the + button on the top right of the screen - it will copy your entire outfit to another slot. With that outfit, you can add/remove your change whether it's giving the Sim an accessory, changing their hairstyle, adding some magical eye effects, etc. In my case, I just gave both kids a version of themselves with the earrings and without. Save and go back into game.
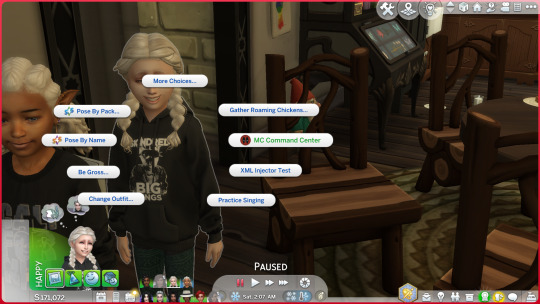
2. When you want to switch outfits, left click on the Sim and bring up the MCCC menu.
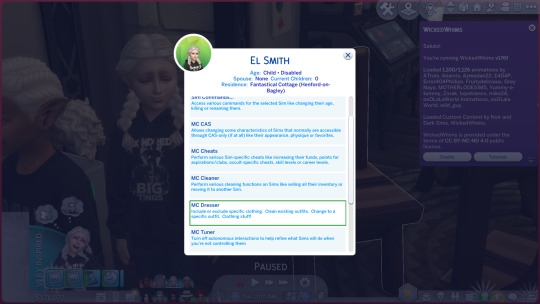
3. Select the MC Dresser option
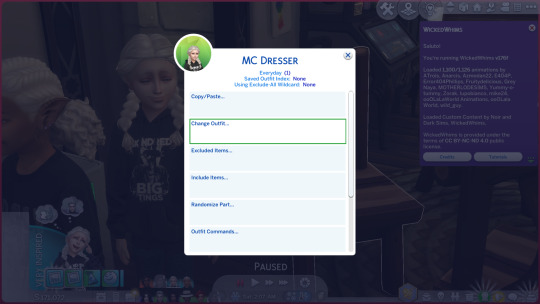
4. Select Change Outfit
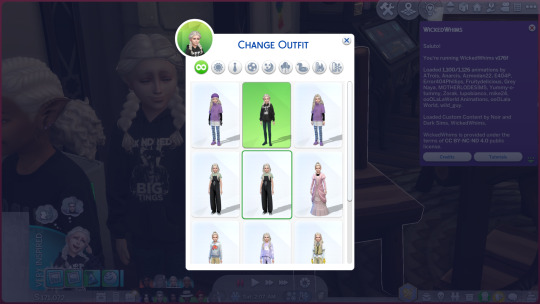
5. Select the new outfit from the list. You can do this mid pose without bumping your Sims out of pose to do it, which is what I find useful. Changing outfits this way also means you don't add to your laundry load which I also find useful in a storytelling save haha.
#ts4-poses#ts4 poses#ts4 posepack#sims 4 poses#sims 4 posepack#sims 4 storytelling#sims 4 storytelling poses#herecirmposes
254 notes
·
View notes
Text
Mods/cc List
Hey everyone, (updated 12/1/23)
I am in the process of making a mods/cc list I use the most in my game. If you are just starting out, here are a few just to help get you started :).
*Download at your own risk*
House Builds/ Loading Screens-
Bonnie.TheSimmer | Creating Sims CC Homes & Loading Screens | Patreon
MODS-
Car Mod | waronkcc | creating the sims 4 cc | Patreon
Twisted Mexi- Better Build/Better Exception/TOOL and all of their mods | TwistedMexi's Sims 4 Cheats & Mods
RPO - Relationship & Pregnancy overhaul- [Mod] Relationship & Pregnancy Overhaul, ALL-FILES-IN-ONE-CLICK - Sims 4 | Patreon
Baby Daddy/ Suga baby/ Self Care - plumlace | mods and CC for TS4 | Patreon
Realistic Personality Mods- REALISTIC ZODIAC SIGNS - DOWNLOAD | Patreon
MC Comand Center- Downloads | MC Command Center (deaderpool-mccc.com)
UI CHEATS- UI Cheats Extension v1.39 | Patreon
More columns Mod (CHOOSE 1) - More Columns in CAS v1.30 | Patreon
18years or older!!!- Basemental Drugs - Basemental Mods (basementalcc.com)
More Careers- Career – Welcome to KiaraSims4Mods!
For Poses
Teleport any sims - Andrew's Studio | Sims 4 Studio
Poses – Katverse
Cookbooks and Food |
Insimnia | Creating Sims 4 Custom Content | Patreon
Somik and Severinka| Cookbook S&S [Update 26.07] | Patreon
Stirring the Pot-[6/9/23 UPDATE] Stirring the Pot v8 | Patreon
Child Birthing Mod| PandaSama | Creating Custom Content and Mods For The Sims4 | Patreon
Map Replacements:
20th Century Plumbob | creating Content for The Sims 4 | Patreon |
__________________________________________________
Bags - PlatinumLuxeSims | Creating Luxury Inspired Sims 4 CC & 3D Models | Patreon - Saks Sims | creating Digital Content for Games | Patreon
Body Presets|
hi-land | creating sims 4 custom content | Patreon | Honey Body Preset | Patreon |
CC-Food/Nail/Artwork-
PinkGlacierz | ♡ Creating Functional Foods, Nails x Blender Tingsss ♡ | Patreon
Clothing CC-
Rimmings-RIMINGS | Creating Sims 4 Costume Content 🔮💜 | Patreon
Sentate-
Sentate | Creating Custom Content for The Sims 4 | Patreon
Camuflaje- Camuflaje | creating The Sims 4 Custom Content | Patreon
Darte77-Darte77 | Creating 3d Clothes | Patreon
Eyelashes:
3D LASHES VER. 6 | Patreon
Hair:
Alpha Hair- | XxBlacksims | creating ts4 custom content | Patreon | LeahLillith | creating 3D | Patreon | Home | My Site (brandysimswebsite.wixsite.com)| HOME | Kiegross (kiegrosssims.wixsite.com) |Simtury | creating Custom Content For The Sims 4 | Patreon | Sims 4 Ethnic Custom Content | EbonixSims
Maxis Hair- |Sheila Hair - New colors added! | Patreon |Commissioned by @bellagothhasdiedonanotherlot !! | Patreon|
JellyPaws | creating Custom Content | Patreon |
Simstrouble - simstrouble | Creating CC Hairstyles for The Sims 4 | Patreon |
Dogsill-dogsill | creating custom content | Patreon
Furniture |
House of Harlix
Madlen Home | Ase | Patreon
Cowbuild (tumblr.com) |
Servinka - The Sims Resource - Severinka_ |
Sundays - sundays | creating custom content for the sims 4 | Patreon
Taurus Designs - Taurus Design | creating The Sims 4 Custom Contents | Patreon |
Platinum LuxeSims - PlatinumLuxeSims | Creating Luxury Inspired Sims 4 CC & 3D Models | Patreon
Reshade tutorial - HOW TO INSTALL RESHADE TUTORIAL 2023 FOR THE SIMS 4 & MAKE GSHADE COMPATIBLE | My RADIANCE Preset✨ - YouTube
Skin Detail|
Pralinesims | bietet Sims 4 Custom Content | Patreon |
northern siberia winds | creating custom content and mods for the sims 4 | Patreon |
TWISTEDCAT (tumblr.com) (HAIR and SKIN) |
The Sims Resource - Tender Skin Overlay (Female) |sims3melancholic | creating custom content for The Sims 4 | Patreon
*Please be safe while downloading*
#sims4cc #sims4mods #thesims
186 notes
·
View notes
Text
Welcome to the Wistful Castle!
Tour guide around:
My Art
Arwin and Aidan
Roland and Dean
Sherlock and Jon
Konan
All
My CC and Sims:
sim for download
accessories
hairstyles
furniture
genetics
clothes
tattoos
poses
MY OLD CC
My Stories:
The Plumber Of Hill House
Sherlock in Sims 4 Universe
Luigi Can’t Help
My Tutorials Gameplay!
Simmers Art Reblog CC Build Reblog CC CAS Reblog
Where else can you find me:
Patreon | Pinterest | Instagram | Bluesky
Help and donate to Ukraine:
- Come Back Alive foundation (military aid) - Leleka Foundation (medical aid + humanitarian) - Hospitalliers (medical aid) - United24 (military + humanitarian aid, organised by our government)
Thank you for supporting me and my country! (づᴗ _ᴗ)づ♡
151 notes
·
View notes
Text
THIS POST WILL BE REBLOGGABLE ONCE THE PICTURES ARE ADDED IN. FOR NOW, IT IS INCOMPLETE.

REQUIRED PROGRAMS: The Sims 4, SimRipper, Sims 4 Studio, & Blender 3.6 or higher.
Whether you want to make a brand new sim or use one you’ve already made, load up TS4 and make a new save. If you’re using a sim you’ve already made, then make sure you have them saved to your library beforehand. This save can be solely for ripping sims from. In my own experience, I’ve found that they eventually get corrupted over time. So, dress your sim up in CAS and make sure their first everyday outfit is the one you want to render.
Place your sim on a lot. Save the game and label the save as “Sim Ripper”. Anything along the lines that will remind you that save is only for ripping sims.
Open up SimRipper and select the NinjaRipper save. It may take a little while to load depending on how much cc you have in your game and the number of households. Once the list of townies loads, click your sim’s name.
Once they’ve loaded in, export them as a DAE file. Make sure you put it somewhere you’ll remember. It’s best to have a folder just for Blender content. Once they’ve been exported successfully, close out SimRipper.
Open up Blender. Click ‘general’. For this tutorial, I’m using Blender 3.6. Click ‘general’, then delete all the objects on the screen. (the lamp, cube, and camera). You can do this by left clicking and dragging a box around all the objects. Once they’re all selected, right click and click ‘delete’ or just press ‘X’. OR if you’re using a scene that you’ve downloaded, then just head to ‘file’, then open the scene you’ve downloaded. Most scenes come with a collection that say ‘DAE’, so click that and when you import your sim, it goes there.
Now, let’s import your sim! Head up to file, drop down to import and select ‘Collada (.dae)’. Head to the location where you saved your sim’s dae file from SimRipper. Double click it and it’ll open in Blender.
Let’s change the view, because everything’s gray right now. You wanna make sure your texture files imported properly too. Head to the top right of the Blender scene window and click this circle for viewport shading. Now, you can see your sim in all its glory. You may notice that they’re shiny or if they have on alpha cc, then their hair or lashed may be blocky. We can fix that by editing the nodes.
In the top left, pull the window over to open a new window. To the left of ‘Object Mode’ click editor type and go to ‘Shader Editor’. In the window your sim is in, click on your sim. In the shader editor window beside it, some stuff should pop up that looks like this:
Now, we just have to connect some nodes and add a few in. On the specular window, drag and drop the yellow circle to the ‘Specular’ section in the ‘Principled BSDF’ window. Now, your sim isn’t shiny anymore!
Let’s add in a ‘Mix Shader’ next. Press ‘Shift +A’, go to ‘Shader’, and click ‘Mix Shader’. Drag it in between the ‘Principled BSDF’ window and the ‘Material Output’ window, it should auto connect.
Click ‘Shift + A’ again, go to ‘Shader’, and then select ‘Transparent BSDF’. Connect the green BSDF node to the first ‘Shader’ node on the Mix Shader. It should take the place of the node connect from the Principled BSDF window. Then connect the Principled BSDF to the bottom ‘Shader’ node.
Last thing you have to do is drag the ‘Alpha’ node from the Base Color window and connect it to the ‘FAC’ on the Mix Shader window. Your final product should look something like this:
Now, let’s head to the Material section on the right hand side of the screen. Click it and under ‘Settings’ you’ll see blend and shadow mode. For both of those sections, click them and select ‘Alpha Hashed’. Now your sims is all set to pose!
Let’s change the Editor type from ‘Shader’ to ‘Non-linear Animation’. Now, on the right hand side of the screen click your rig. All the points on them should light up orange. Next click ‘I’ on your keyboard and then select ‘Rotation, Location, & Scale’.
Back in the Nonlinear Animation window, Click the pink box next to ‘Rig Action’. Click the orange track next to it, right click, and select ‘Delete’. It’s already clear, but this is good practice to do every time you render so your poses or animations won’t be wonky.
Now, let’s add in a pose. Open up Sims 4 Studio. Where it says ‘My Projects’ open up the pose pack you want to use. Select ‘Clips’ and then the pose you want to use. Now, you wanna export it. Don’t change any of the settings and just click export. Name it as something that describes the pose, so you can easily identify it. Then close out S4S.
Back in Blender, head to ‘File’ and click ‘Append’. Locate the blender file of the pose you just saved. Click it, then click ‘Action’, and select that file. Now, the action is in the Blender program so you just have to add it to your rig.
Click ‘Rig Action’ again and then click ‘Add’. Select ‘Add Action Strip’ and your pose should be there. Click it and voila! Your sim should be posing now!
All that’s left to do now is finish the scene, so you can render an image. Change the editor type again to ‘3D Viewport’. Now, click ‘Shift + A’ and add in a camera. You can click the camera and move it around using “G” or these the color arrows that show up. To adjust the size of the camera, you can click output, and change the dimension sizes to your liking. You can also change the camera perspective. For this tutorial, I’ll be using the ‘Orthographic Camera’. OR if you’re using a scene that already has cameras, drag your rig over to one of those and set them up. Make sure to click I on your keyboard again after moving them and click ‘Location, Rotation, & Scale’. That saves their position.
Once you’ve got your camera added in select it, then in the left window click ‘view’, ‘cameras’ and ‘set object as active camera’. That way you’ll be able to see exactly what the camera sees. If you’d like to change the resolution, then go to ‘output’ on the right hand side. There you can change the X and Y resolutions to your liking. Remember larger photos take longer to render, but the quality tends to be better.
Now, let’s change the shading again. In the window with the camera view change the viewport shading to the fourth ‘viewport shading’ circle. This allows you to see how your scene will looks rendered with all the lights included.
If you’re using a premade scene, then the lighting should already be set up. If you’re making your own, you’ll have to add in lights. Click ‘Shift + A’ again and go to lights. From there you can add in any of these, but for this tutorial I chose ‘area’. You can play around with each of these to see which ones you like best. You can adjust their settings in the data section and move the lights around the scene. If you’d like to add in shadows from the light, go to ‘data’ on the right hand hand side, then click ‘shadow’ and ‘contact shadow’.
Once your scene is lit, your sim is posed, it’s time to render the scene. I typically use Eevee to render instead of Cycles. Cycles takes longer and has a more realistic feel. You can render with whichever you like. Head to ‘render’ on the right hand side. Change the render engine to ‘Cycles’ or leave it on ‘Eevee’. You can click ‘ambient occlusion’ and ‘bloom’ if you’d like. I always use AO. Sometimes I use bloom. Also check ‘Screen Space Reflections’.
Once that’s done, go to the output section. It’s right below the render camera icon on the right hand side. Scroll down to output. Click the folder icon to change your render location from temporary files to whenever you’d like to put them. You can put them in a folder, on your desktop, or whenever. Next to ‘image sequence’ uncheck ‘overwrite’. If you’re rendering multiple images from a scene, then you don’t want them to overwrite each other. You can also change the color size and compression depth. Personally, I change compression size to 0 and color depth to 16, but be wary this makes your file larger. It also increases rendering time.
Once all that is complete, it’s time to render your image! In the top left click ‘render’, then ‘render image’. After however long it takes your PC to render the image, you’re all done! Lastly, click ‘image’ in the top left, then ‘save as’. Save your rendered image to wherever you’ve decided to put your files and then you’re all done!
53 notes
·
View notes
Text

Mini Blender Tutorial: Appending Hair & Clothes onto Posed Sims
I'm so sorry this has taken me so long.
Quite a while ago, @baobeisims requested this tutorial, and I'm sorry it's taken an age but I'm in the final stretch of planning before my wedding and it's got me stressed up to my eyeballs.
But without further ado, let's go!
Step 1: Import your sim into blender and pose
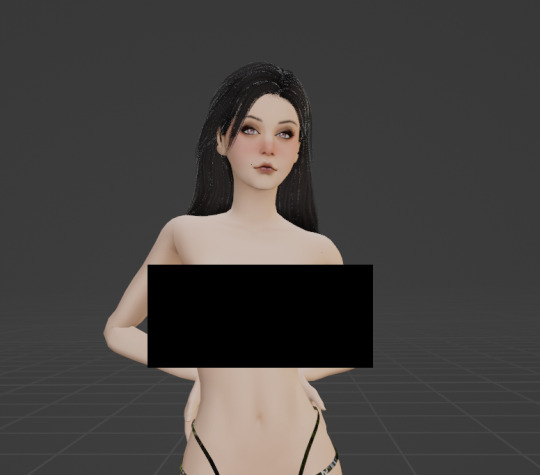
For this tutorial, I'm going to use my lovely Lilith! When appending clothing, it's best to use a mostly naked/fully naked sim. It can be hella weird having nude ripped sims on your computer but trust me, it'll make this process SO MUCH EASIER and your end results better if you don't have clothing on your sims. Why is this? Any clothing applied to your sim in game is permanently attached to their mesh in blender. Meaning you cannot delete off any piece of clothing that's already there. Because of this, I recommend fully nude sims free of any clothing, jewelry or other accessories. However, fully nude sims aren't Tumblr friendly so I'm using a topless, underwear-d Lilith 🤣
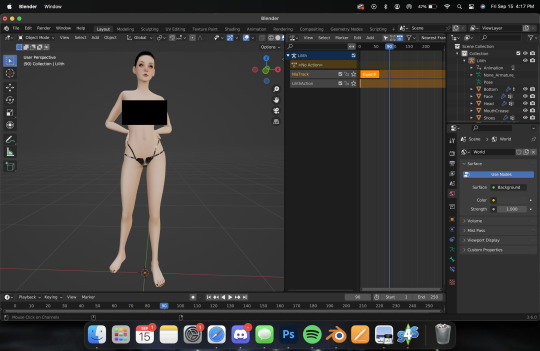
Here's Lilith, imported, nodes adjusted, and posed. I won't cover how to do this here, as I already have in THIS TUTORIAL (3 parts, all linked). So let's get on to the fun
Step Two: Adding Hair
Adding hair and clothing works the exact same way as appending a prop to your sim, with a few additional steps. Like with props, export the mesh and texture for your hair, then append them in blender. For this tutorial, I'm using Lamz' Katrina hair. Just like with anything else, append all of the studio meshes:

Once you import them, it'll look a bit messy.

But that's ok we're going to fix it! Like with any appended object, delete the bone_bone_shape and the rig, so. you're only left with your sim and the studio meshes. Add in your texture nodes and adjust like we do with any object. It should look like this:

Link the materials and join the meshes into one, and you should have something like this:
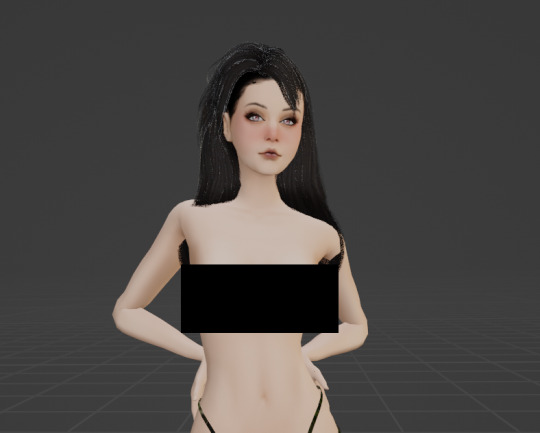
But as you can see, the hair isn't aligned. To fix this, navigate to the Modifiers tab (like we did with jewelry/props) and set the object to your sim, like this:
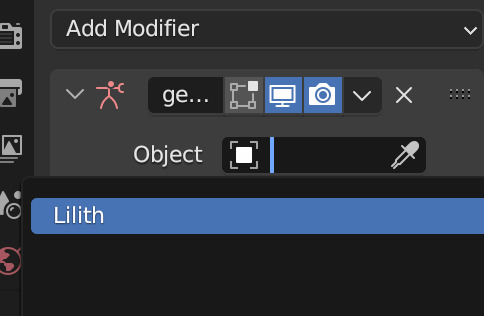
Now her hair should be... actually on her head! 😂
Let's add some clothing then I'll show you some handy tricks I use to achieve more realism in my renders. I'm going to use the same dress I used in her render here to keep things simple. It's Evellsims' Trapped Dress.
Step Three: Adding Clothing
We'll follow the exact same steps we did with the hair. Export the mesh and texture from Sims 4 Studio and append in blender.

Just like before, it's not in line and needs the nodes adjusted. Follow the same exact steps, adjust the nodes, link materials, join, and append. After following all those steps you should have something like this:

You might be wondering why I still have a censor bar here... That's because appending clothing doesn't automatically take the same shape as your sim's body like it does in cas. (I can't show it cause Tumblr but... her tits are out 🤣 just trust me) Different framed sims will require more or less work depending on their body shape. Curvy sims will require a lot, whereas petite ones like Lilith may only require a little bit of manipulation. Additionally, some poses and clothing aren't as compatible as you'd hope. Fabric can do some weird things, so sometimes you'll have to do more or less manipulation and it's a bit of a tossup. This makes appending clothing in blender a massive job, but for certain projects it works way better than dressing your sim in cas, particularly when you want to manipulate the clothing in some way (by mimicking a breeze, or gravity, etc) or if you're a masochist like me and you want to always do more work.
Step Four: Sculpting Hair & Clothes
By far my favorite part of the render process (even though it's tedious as fuck and takes an age) is sculpting. I use sculpting to fix clothing and hair and mimic gravity and weather. Here are a few examples of what sculpting can do (other than simply making clothes fit):

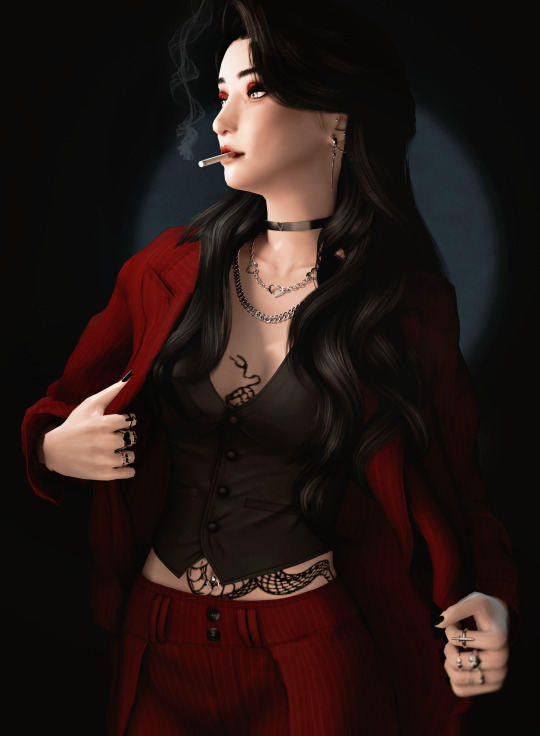

To use the sculpt tool, select from this dropdown:
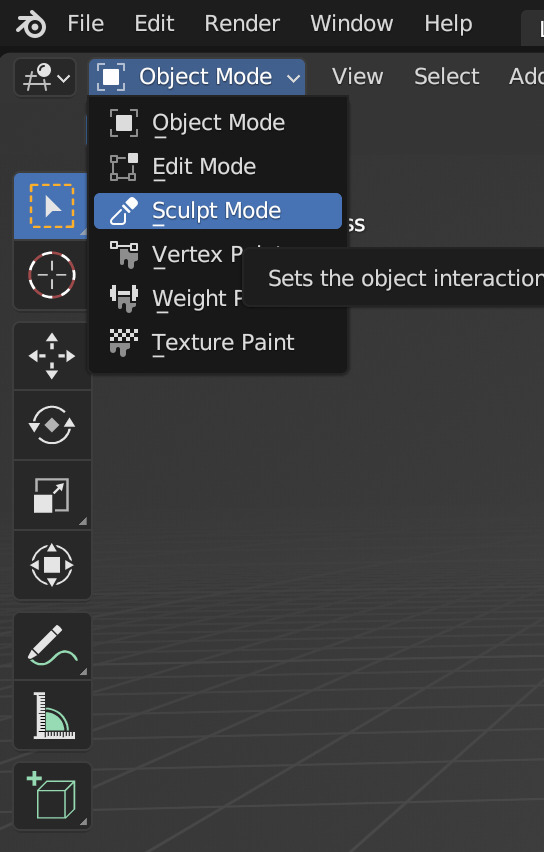
From the new sidebar tools, select Elastic Deform, here:

I've covered the Tumblr-sensitive bits so you can see what you'll be working with. It's not unusual to have gaps in the clothing that need filling or adjusting, like this:
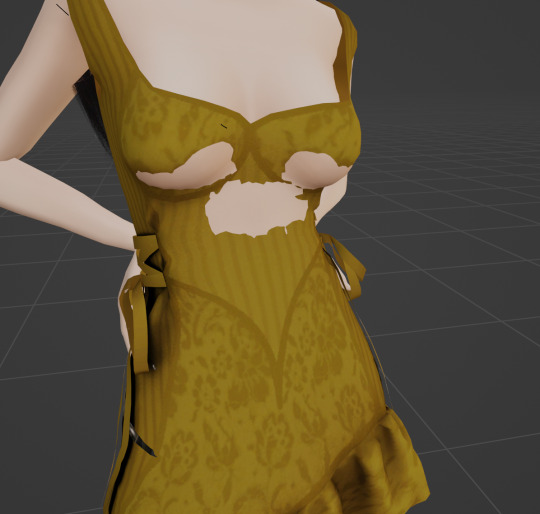
Using the sculpting tool set to elastic deform, you just have to click and drag the fabric to where you want it. Be sure you're editing the clothing mesh and not your sims body! Always select the mesh you want to sculpt from your outliner panel so you don't accidentally click and drag your sims skin! Here's a before and after, make sure you're putting your cursor against the right angles.
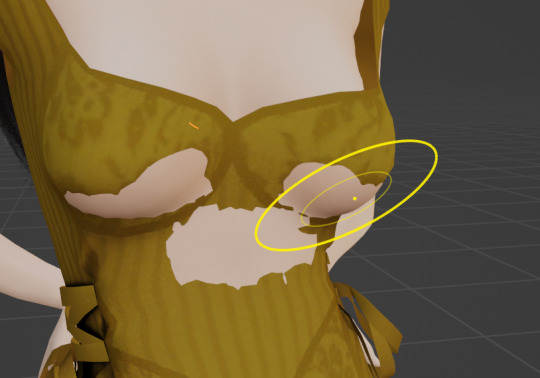
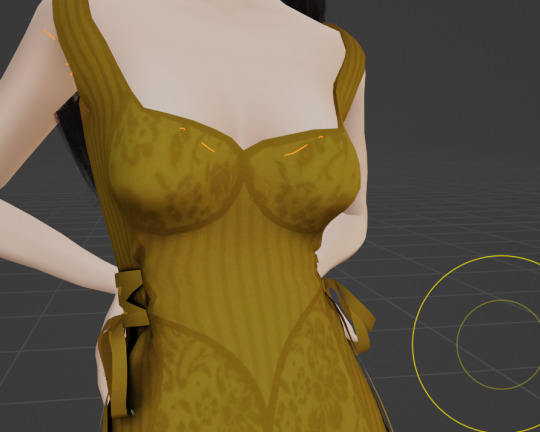
There are a few gaps on the back of her dress too. Here they are before and after sculpting:

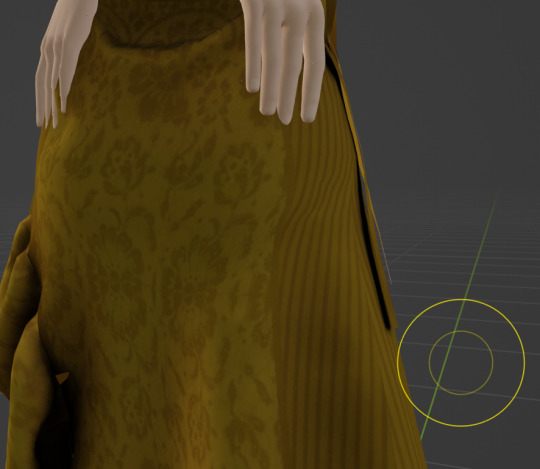
It takes some time and practice to get good at this, but once you do there's no limit to what you can accomplish! There are other methods that yield similar results (like shrink-wrap, but I've never gotten it to work for me) but this is my favorite and what I'm most used to. You can sculpt any mesh, so go wild!
That's all I have for today.
Homework:
Your homework is to append hair and clothing in blender and post the final result! Tag me in it too I'd love to see! & As always if you have any questions please feel free to send them through to me either with an ask or the help desk!
#salemsims tutorial#render school tutorial#sims 4 render tutorial#sims 4 blender tutorial#render tutorial#blender tutorial#tutorial
58 notes
·
View notes
Note
Hi! How can I convert shoes without having sims 4?

For TS4, you can find a tutorial here (start from page 2) on how to use the TS4 CAS Toolkit. I believe that should work 🤔 You will have to reference other tutorials within the meshing section of this blog on how to add bones, etc. but you'd at least have the mesh.
Sims 3 has its own SimPE and a tutorial was written on how to convert TS3 CAS items here - this also would work for TS4 when it comes to bone assignments and t-posing.
If anyone has other tutorials, references, tips, please share in the comments 😁
8 notes
·
View notes
Note
how do you take pictures of ur lookbooks ??? can u pls share the process
sure! so i basically just press c in cas to screenshot when zoomed out to show a given sim's full outfit. to find these screenshots (i'm on mac) i go to finder > documents > electronic arts > the sims 4 > screenshots. if i'm using poses i'll take a few different shots to figure out which i like best for each outfit, but lately i haven't been doing that as much because i'm lazy lol. for poses in cas, you can download cc that shows up in the traits section so when you select a certain trait the sim will pose accordingly. found a good tutorial here.
i crop the screenshots and then use a solid color cas background like this so that i don't have to make the individual figures in the screenshots transparent and can just stick the screenshots next to each other and the transition between figures will appear seamless. to put all the screenshots together i use photopea which is a free in-browser editing software that operates like photoshop. i export the file at around 300 dpi, and then use picmonkey to edit the image with filters and film grain and the like. to avoid paying for picmonkey (you do have to make an account to use it) i just screenshot the final image instead of using the download option - and then upload here! that's pretty much it. :^D hope this was helpful.
6 notes
·
View notes
Note
hihi! this is a general question that I wonder a lot, do you use blender for sim posts to have a good background? Or do you do it in cas? Whenever you use a gshade preset, it's always hard to see my sims face zoomed out, plus the arrows are in the way. sorry if this confusing ^^;;; any tips? 😄 https://www.tumblr.com/mirtylebuns/768271605410529280/some-lost-oc-in-my-archives
hi!! so, i take my screens at the own cas; blender is very heavy to my pc, but i use some things to make this "studio effect".
always i use a sober color background, a cas lightning mod, srwe (generally for cas i use the 4:5/1920x2400), reshade with pluggins, photoshop edit, cas poses etc...
if you wanted for something, can check my resources page. there you have almost everything you might like or need! bc in fact, the photo is an entire process to get that way and it depends a lot on the style I want at that moment lol :P
(who knows someday i can do a tutorial, maybe?)
2 notes
·
View notes
Note
can i ask how you do your lookbooks? i've been wanting to do the same thing (obvi going to credit you unless me using this idea makes you uncomfy so i just wont copy the lookbook layout) but i havent been able to figure out your getting all the outfits side by side
hi!! doesn't bother me at all, i am far from the only person who formats lookbooks the ways i do and i was of course also inspired by many other simblrs when i started making them!
i have a couple different things i'm happy to share, though i'm afraid none are very scientific. note that i use photoshop for all my editing and most of this advice assumes basic photo editing knowledge:
now, i almost always take outfit screenshots with a transparent background in gshade. i take pictures of every outfit in different poses. this way, i can simply drag the full body outfit pictures onto my photoshop canvas. i play the sizing by ear every time and crop as needed, if you want a starting place with spacing feel free to save one of my lookbooks as an image to your computer and cover my sims with yours. once all my outfits are in place i just add a solid color background, merge the layers, and edit as usual.
before i used this method, i used to just take screenshots of all my outfits that included my cas background and crop them. most of the time it doesn't have to be neat, just erase the extra space around your sim and place all the pics next to each other. if you add a solid color background the same color as your cas background it looks the same. this way also doesn't require gshade.
as far as spacing, like i said i'm always winging it to make sure the sim always looks the same size. i often will turn down the opacity on one pic and place it on top of another to make sure the face and body are about the same for every pic.
i can't tell from your question if you realize that every outfit is a different pic i merge together, i'm not displaying them all side by side until i put them all on the same photoshop canvas.
i hope this made sense/helps somewhat, if you have no idea what i'm talking about it is very basic photoshop, if i managed to learn it by myself truly anyone can lmao. i watched sims 4 editing tutorials on youtube just to get familiar with the basic terminology, i'm def not the best person to explain that.
60 notes
·
View notes
Note
Hi! I’ve been able to easily find tutorials for converting a build/buy object into a pose accessory, but I haven’t been able to find a tutorial for converting a pose accessory into a build/buy object. Do you know if there’s a tutorial out there? Thank you!
ah sorry i missed this! you can use this tutorial
export out your mesh as you normally would
follow this tutorial
and part 2
the only difference is
1 - you must make your new texture 256x256 or 512x512 or 1024x1024 (ie it has to be a square)
2 - you have to change the uv map name to uv_0
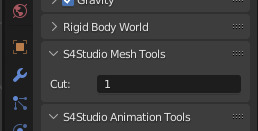
3 - you can remove the geom 0000 (which cas accessories have) and add a cut of 1
15 notes
·
View notes
Text
Retired CC Creator (Deleted my whole Tumblr account by accident)
I accidentally deleted my whole Tumblr account instead of just my unused CC finds account because I'm a dumbass. PLEASE do not follow this account, there won't be any new custom content. I will not be very active anymore, this website is getting more and more unusable in terms of user interface and such.
See the bottom of this post for CC links. Terms of Use regarding CC


Check out my Sims 4 story, written in a longform, narrative style. It takes place during the story universe's witch-hunts and covers all corners of the conflict, with multiple POVs including a questionable stupidly-rich physician, a determined herbalist from abroad, a Peteran priest with many secrets and an enigmatic creature of the night. Features vampires, werewolves, witches, and more.
-----------LORE | CHARACTERS | START READING------------------

Please remember to keep Palestine, Congo and Sudan in your thoughts. Donate to fundraisers where you can, and whilst Palestine's ceasefire is good news, temporary or permanent and I hope permanent - they will still need our help.

All of my Custom Content is still available:
Patreon - Most of my CC is on here Tutorials blog Most of my MediaFire links on reblogged CC posts still work SimFileShare - Poses , Old poses , Build-Buy, CAS, Simblreen 2024 , GShade Mega Collection , UI Emotions Pose Override
Unfortunately I do not remember who made the bunnies divider, but it was not me.
3 notes
·
View notes
Note
Hii! I was stalking and found this post: /simsdoll/764002658394734592/%E0%AD%A8%E0%AD%A7 and i was wondering how you get your photos to be so crisp and HQ!! I use gshade and my photos tend to come out blurry, especially when it’s a full body. i’m trying to start my simblr and i would love tips! <3 TYSM!! :)
(also what reshade/gshade do you use?)
sorry for a million questions i’m just new to the community! :D THANKS!! <3
Hii! For CAS posts it's easy peasy to get really crisp screenshots, here's my process: 1. choosing poses first I choose the poses I want to use, when you're using SRWE you can't see most of your sim so I pick a pose set in advance.
2. taking the screenshots with SRWE and gshade. then I scroll all the way out if I'm doing full body shots, I double check my game is in windowed mode and I change my sims 4 ui to the smallest possible (just to make the arrows at the bottom etc smaller and easier to crop out).
then I open up SRWE. here is an amazing tutorial that I used to learn SRWE. for CAS I use 3000x3000. once my screen is resized and completely massive, I make sure my gshade preset is the way I want it, then I click the trait with the poses and start screenshotting. it's really as simple as that.
picture amoebae has a ton of helpful resources about using SRWE here, and I'm also willing to help answer any questions about it.
I don't use the HQ mod, SRWE does all of the work
3. editing I don't edit very much, for that post I cut all my individual photos out in photoshop and placed them together. then I merged them and used the sharpen option in photoshop (p.s. I love the 'smart sharpen' option now, but I didn't use it in that post). I might've also messed around with brightness/contrast.
and that's it! I've tried to cover everything to make this as beginner friendly as possible. gshade: for my CAS photos I used an edited version of my edited version of sumahama.. if that makes sense. so I tweaked my gameplay preset to make it suitable for CAS. I'm not using that anymore though and I use this one in CAS, though I've tweaked it a bit to my liking. I'd also recommend getting a CAS lighting if you don't have one already.
also welcome to the community!!!!! it's great to have you here ^0^. don't worry about asking questions, I don't mind at all & I love helping people out. I'd like to give you a follow once you're ready :p
0 notes