#background is an edited screenshot from the show
Explore tagged Tumblr posts
Visit Tumblr Blog
Explore Tumblr blogs with no restrictions, modern design and the best experience.
Last Seen Tumblr Blogs


Fun Fact
69% of Tumblr users are millennials.
Text
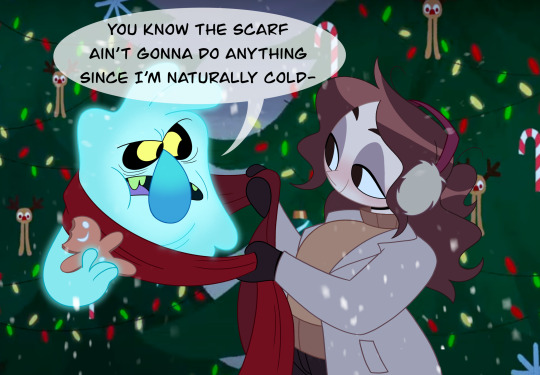
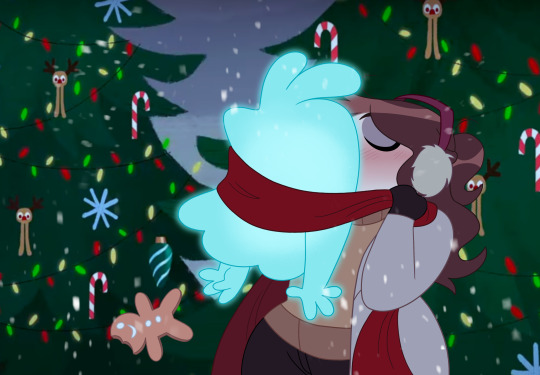
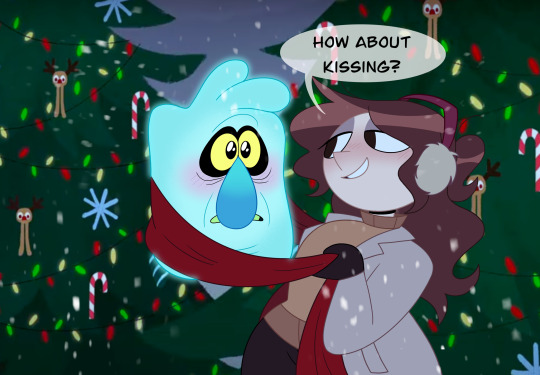
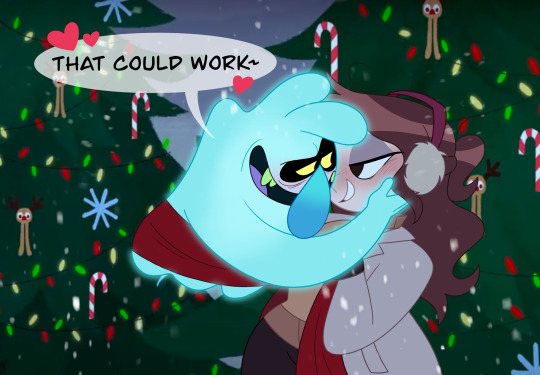
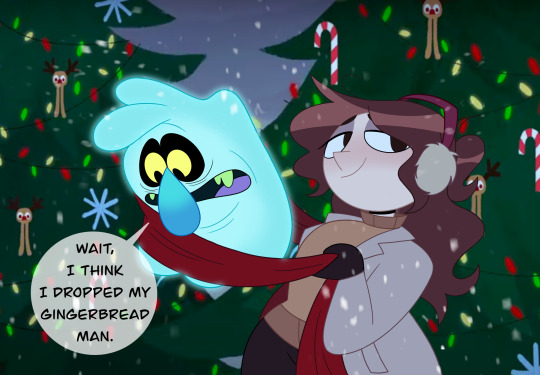
HAPPY HOLIDAYS!!!
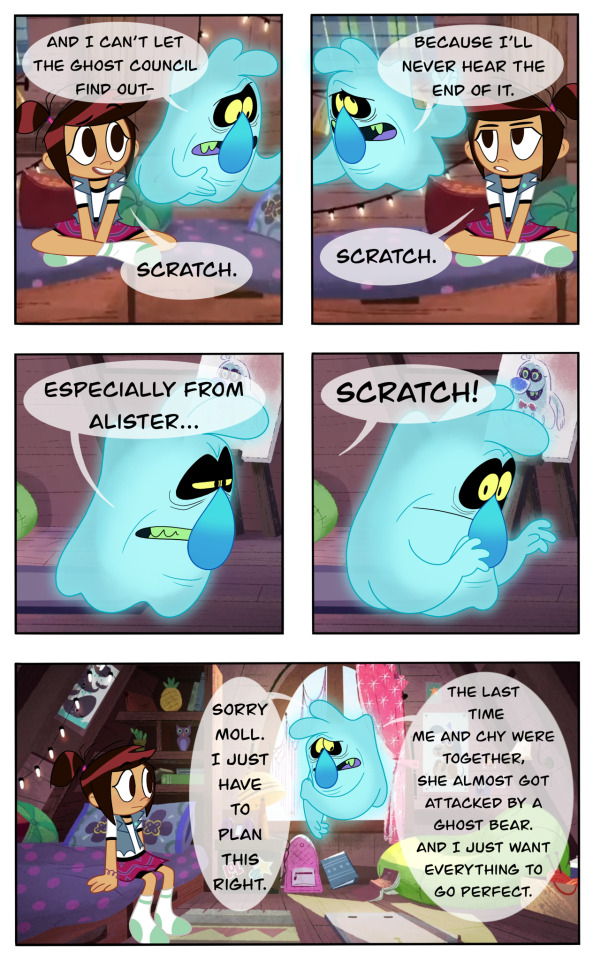
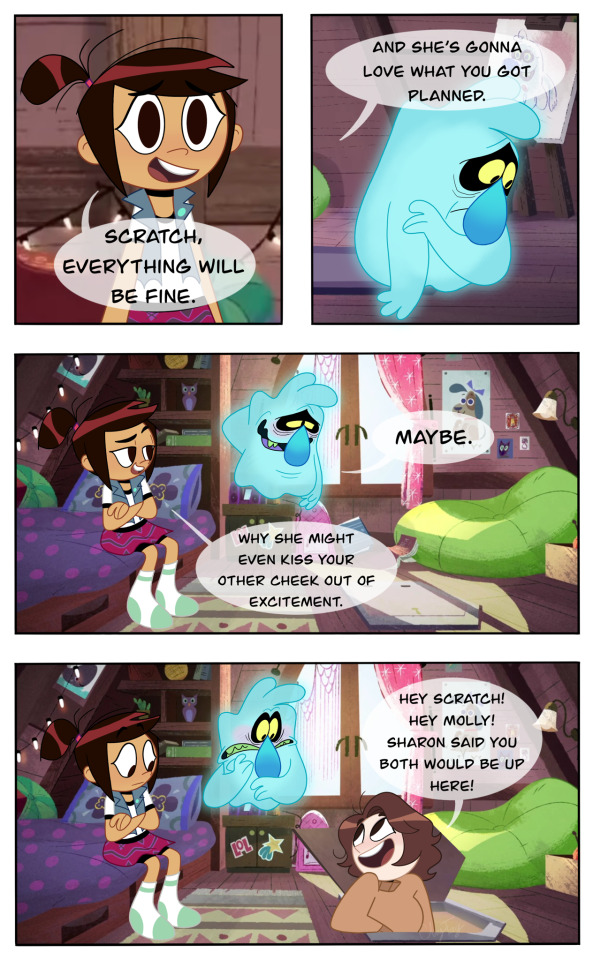
#posting this a little early lol#background is an edited screenshot from the show#still working on that CoralBob comic but hope everyone’s rest of the year goes smoothly and the new years is brighter!#❤️ scratchyenne ❤️#self ship#self insert#self shipping#canon x self insert#🎨 chy creations 🎨
425 notes
·
View notes
Text

Mutual damage (a WIP)
#zutara#atla#avatar the last airbender#zuko#katara#atla fanart#prince zuko#atla art#zutara au#zutara art#zutara fanart#wip#katara fanart#katara of the southern water tribe#katara x zuko#zuko x katara#This one should be ready tomorrow!#Don't trust me tho. I've let you all down before.#In the meantime you get a ZK cuddle#Actually#THE ZK cuddle#Fluff and stuff#Also don't look too much at the backgrounds#I'm working on a different comic that is about 70% background and it's driving me insane.#So. No backgrounds for this one.#(Instead you get somewhat blurred and edited screenshots from the show. You're welcome future me.)#*insert evil cackle*
896 notes
·
View notes
Text

ATA3 #2: The Great King Azymondias
Adult Zym to follow teenage Zym. I'm not used to painting so IDK what I did here, I like it enough tho! I tried to do a mix of Avizandum and Zubeia while keeping Zym's current features.
#artway to arc 3#azymondias#zym#dragons#the dragon prince#tdp#tdp fanart#tategaminu art#continue the saga#give us the saga#i edited an screenshot from the show to use as background btw#I have the evil headcanon that Zym became really depressed after the passing of Ezran and company :D#he went to live a solitary life in the storm spire#until the descendants of rayllum and ezran went to bring him back#i dont want to think about dead rayla and company so im not saying more lol#illustration
107 notes
·
View notes
Text
Gravity falls ocposting yet again


Click for Quality!
#they’re being silly together <3#curly q#aria draws#digital art#digital drawing#fanart#shitpost#oc#oc art#gravity falls#gravity falls fanart#gravity Falls oc#gf oc#gruncle stan#grunkle stan#stan pines#stanley pines#the background is an edited screenshot from the show I���m sorry my ass did NOT wanna draw all that
132 notes
·
View notes
Text


The first meeting of the trio aka Erik, you've got a big storm coming :'D
#WfM fan AU#OCs#OC George Davis#OC Erik Bielek#OC Marleen Keeton/N°3#Marleen had a front row seat to the whole enemies to friends deal the two of them had from the start hah#Erik embodying the woman yelling at cat meme#the backgrounds are edited screenshots from the show because I'm lazy
14 notes
·
View notes
Text

NOTE: THE ABOVE IMAGE IS AN EDIT BY ME, NOT A SCREENSHOT OF THE SCENE
Crisis on Infinite Mirths - PPG Creator, Craig McCracken asked development team if the original Bubbles could beat up the "New One"
At the recent San Diego Comic Con showing of the new Jellystone special, one of the writers spoke to fans. Saying that they often communicated with the original creators of the series they used for the crossover, including Powerpuff Girl Creator, Craig McCracken.
On stage he said that in a note given to them by Craig, "Can you please have the original Bubbles beating up the new Bubbles somewhere?" To which they cheerfully agreed. In a chaotic fight scene, in the background they hid a part where 1998 Bubbles whacks 2016 Bubbles on the head.
Since the CN Latin America commercial, this is the 2nd time the 2016 series has been depicted in a negative light by official CN content. This time specifically requested by the series creator himself. It's understandable, a large part of why 2016 was the way it was, was because Cartoon Network didn't want to wait for Craig's contract with Disney over Wander Over Yonder to end. Going ahead without him. Craig didn't make 2016, and it's reasonable to believe that he may harbor some sour feelings for how CN handled his brainchild.
Unfortunately no clip of the scene is available online at the moment, as the only clips we have right now come from the Comic Con showing. We will likely have to wait until Jellystone: Crisis on Infinite Mirths releases on tv and streaming services to get a clip of the scene.
Reminder, I am not a news source, but did my best to report on this and source what I could
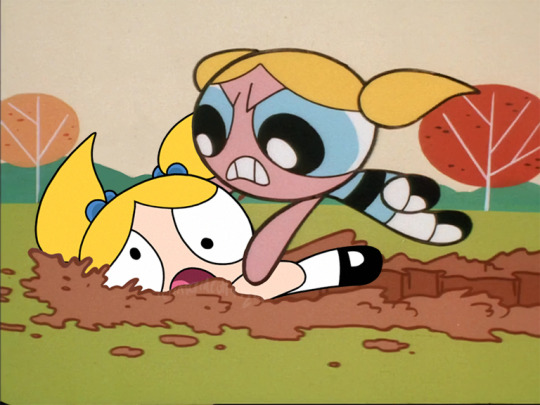
No effects version of the image

Original screenshot
#ppg#powerpuff girls#bubbles#mun talks#ppg bubbles#ppg 1998#ppg 2016#craig mccracken#Jellystone#Jellystone Crisis on Infinite Mirths
433 notes
·
View notes
Text


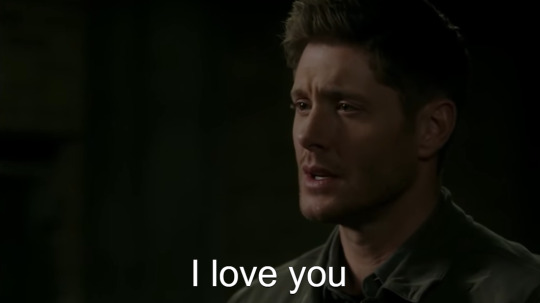
[Image ID: There are three images. The first one is similar to a title card and shows a screenshot froom the show supernatural. Dean and Castiel stand facing each other. The screenshot is faded and superimposed with a blue background from a news show. In the front is a logo which says 'Destiel News Channel'. The second is a screenshot of Castiel from the same confession scene. At the bottom is a newsticker. The headline says 'There's much to be said about Destiel'. The subline says 'Did Ben Edlund just break the next seal of Destiel canon events?'. The third image is a screenshot of Dean from the same scene edited so that a text looking like subtitles spells out 'I love you'. /End ID]
656 notes
·
View notes
Text
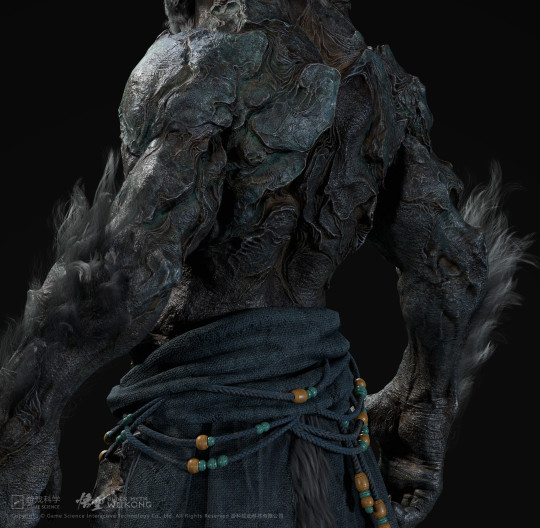
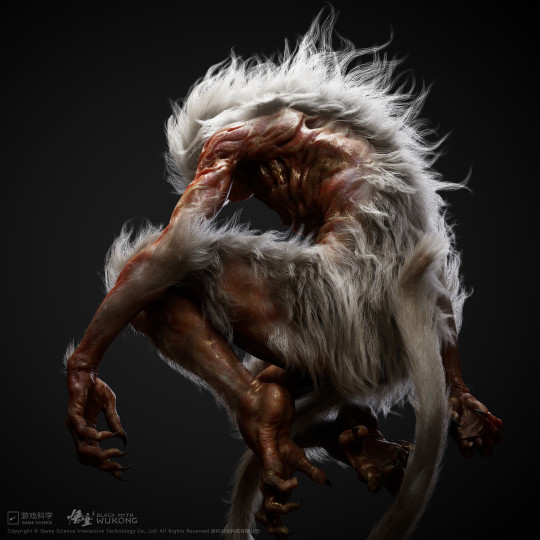
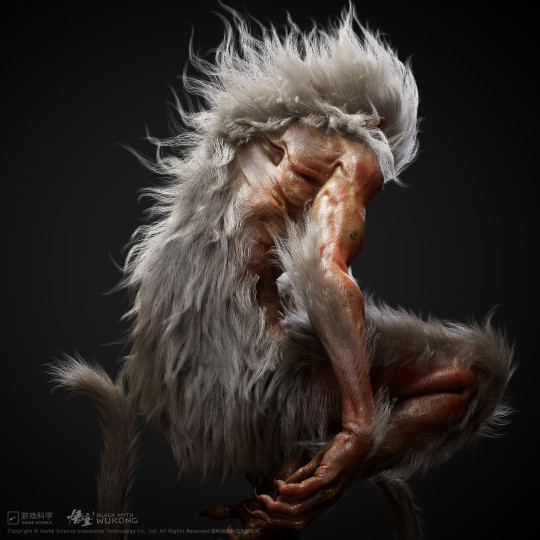
The Shape of Monkey
EDIT 22/01/2025 @blackknight-kai has made some additional interesting observation about the shape of monkey and their fur placement with things that I previously missed, please check out her post for the details
xxx
Some of my friends were talking about the monkey design in Black Myth Wukong, in terms of how much of monkey features the DO/SWK has, and how we wished they devs added a bit more "monkey" ness to the DO, which then made me realize, the devs did do that, but just not for the "normal" game model that we use to play.
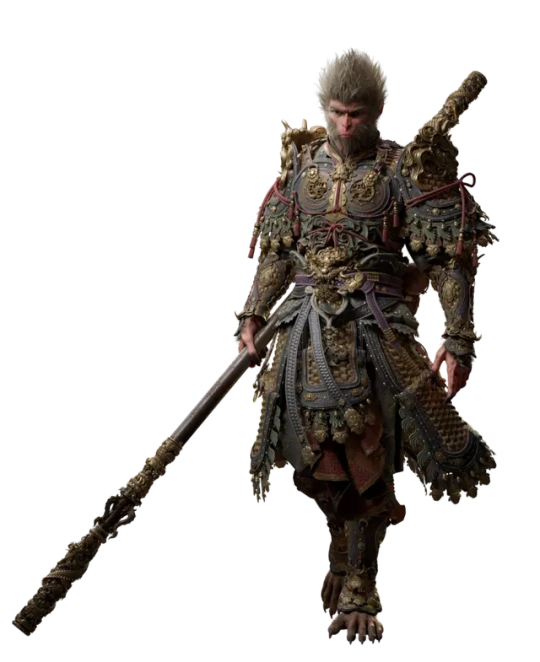
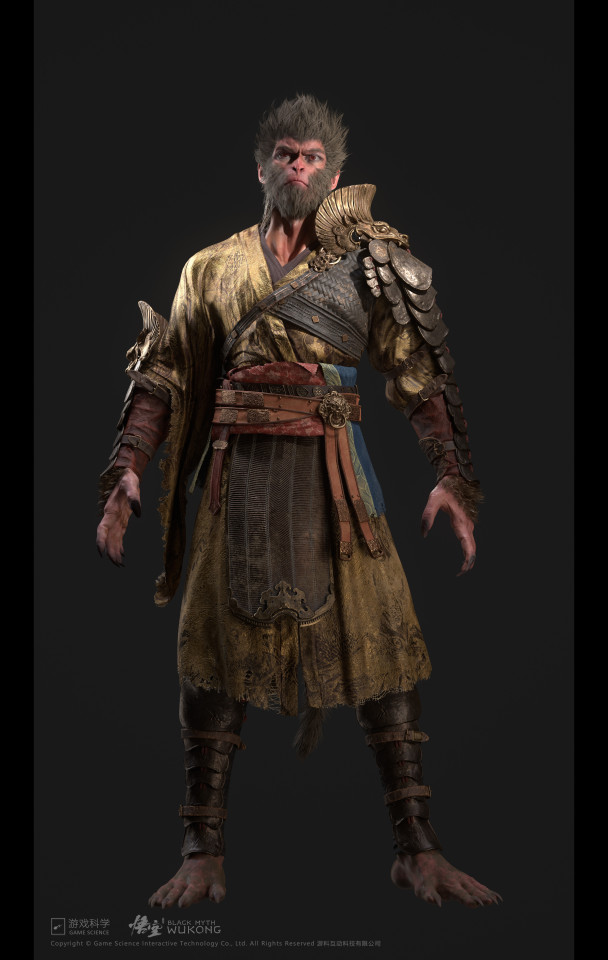
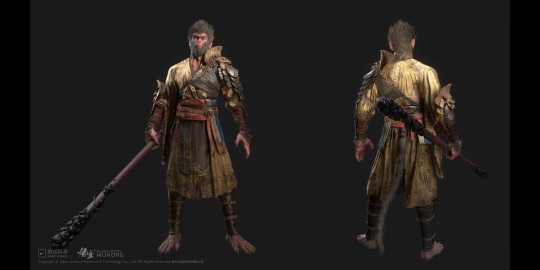
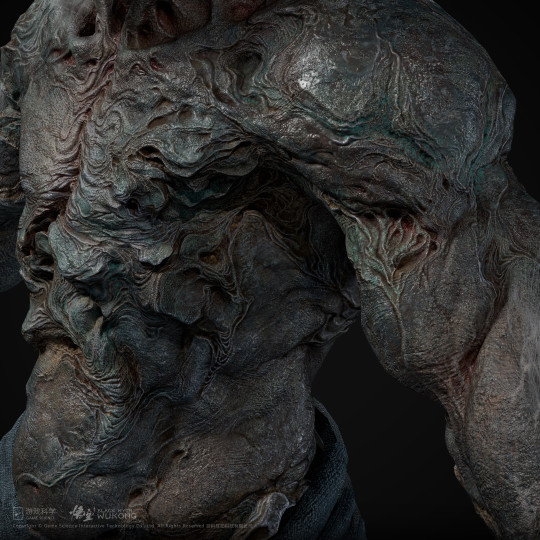
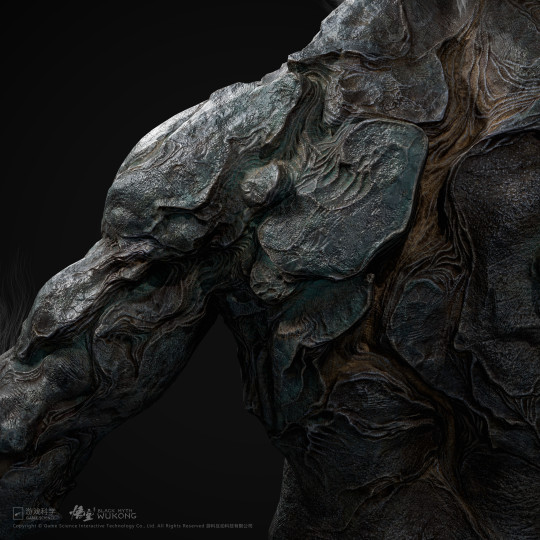
The anatomy here is pretty much very normal, the only few traits pointing at him being a monkey are his feet, tail, his face and his fur.
My friend (who doesn't even play BMW or knows about JTTW but is a certified monster fucker) said she doesn't count him as a monster because his shape is too human LOL
This is how he looks in Chapter 5 ending animation:


very human shaped.
which brings me back to the monkey that looks more like a monkey in the game
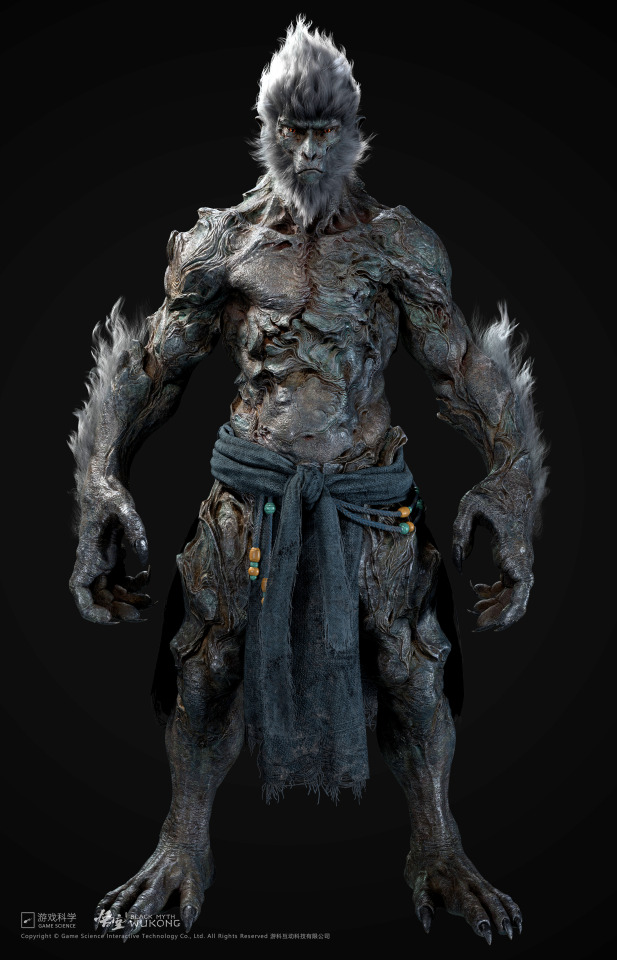
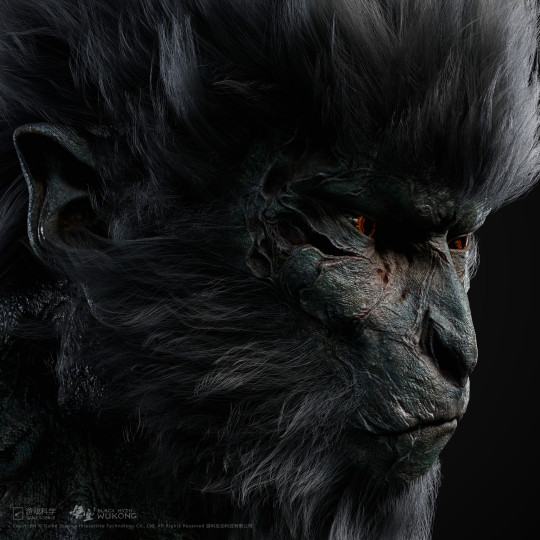

The Stone Monkey is a two phase we fight in the final boss battle, after we defeat him he breaks and out comes the Broken Shell of the Great Sage
After you finish the first playthrough, you get the Stone Monkey as a transformation, called the Azure Dome.
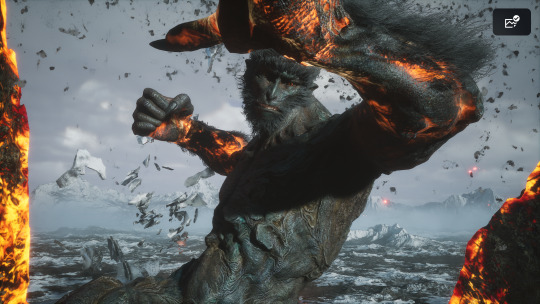
If you do the True Ending, you transform into the Azure Dome for the first time towering over monkeys and beat the shit out of the four heavenly kings and Erlang. Great fight 10/10

proprotionally speaking, his arms seems a bit longer, or least looks like it due to his big hands. His tails is also longer (don't have a screenshot of that unfortunately), and his ears are pointed. I also think that his mouth structure is a lot more monkey like with it being more pointed forward than his normal model.
Canonly, SWK can change his size into very big or very small, but I don't think in JTTW it was ever described that he had a Stone Monkey form. He is a stone monkey, or monkey born from stone.
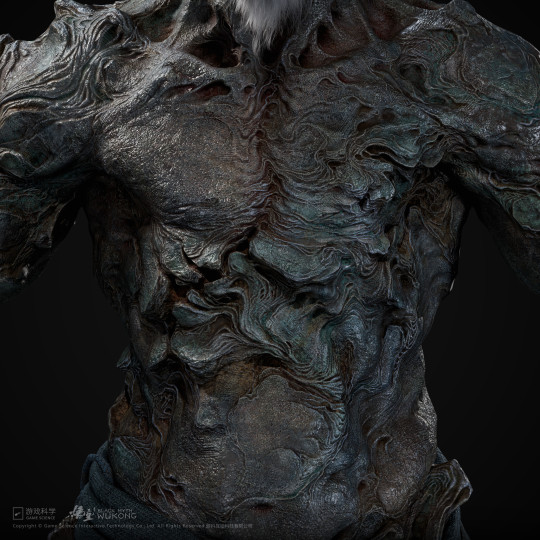
I really love that the devs took it literal and created a form and transformation that looks like a monkey and you can see from his tecture that he is supposed to be made from stone
He punches people and also when he dodges he walks on all four. So I guess that is the closest to a monkey we will get from DO/SWK
Chapter 6 ending animation also goes with a more "monkey" like anatomy for Wukong's design
point ears, longer limbs, shorter legs. I love that they added the red face blush here too. His tail is never shown in the animation, but looking at his pilgrim outfit set and the pulge in his pants (no not that one), he probably hides his tail inside his pants. it's kind of a cute detail
The Old Monkey we see also has more human like proportions:


all the other monkeys in the background (beside DO) are more monkey.
Here are the models I pulled from the game


I also love that each monkey has a different fur "pattern", gives them more variety

This one we only see when you reach the normal ending, when the DO did not break the cycle and the headband is put back onto his head, we see this monkey in the fetal position and then it zooms out to the stone egg and sad credit song plays. You can watch the clip here.
I think it's clear that the devs are trying to show an unbron monkey still in the womb, the stone egg/birth stone being the womb in this case, waiting for the next DO to come and finish SWK's revival.
I guess the stages of growth could be like this:
Why did Game Science went for a more human-like approach for the Monkey in terms of design?
We don't know the answer, it was never mentioned anything in the game about it and I have not come across any interviews about it yet.
I do think that the choice to make the Stone Monkey more monkey like and the "normal" monkey more human like was a deliberate choice by the devs.
For the animation, I believe the Game science gave the studio some references on "hey this is how our monkey looks like" and then let the studio do its own thing style-wise, hence why in Ch. 5 animation monkey has a more human like anatomy but ch. 6 comes with more monkey like anatomy
My personal HC is that SWK has a more human-like anatomy to show that he has a high level of cultivation maybe? We have seen in the game there are few yaoguais that are able to take on human appearances, such as the Pingping and the 5th spider sister. And yes, I also hc that SWK does have a monkey-form too that he can transform into.
I'm really begging for Game Science to release an artbook with concept art and background info on why they did this and that
#black myth rambling#black myth wukong#sun wukong#destined one#I think it goes without saying that I am a Certified Stone Monkey Fudger#the things I would do to the Stone Monkey form#game science made the monkey hot#w hat for seriously#so we can fantasize about him???
225 notes
·
View notes
Text

[ID: A digital drawing of the Sphere from the 2007 Flatland film in a humanoid form wearing a dark suit and gold tie, against a neon red background, first in the background holding a deck of cards and with a speech bubble showing a graph in X, Y, and Z directions, then in the foreground laughing, "Ha! A fourth dimension does not exist!!". End ID]
kinda cringe but the foreground one looks so funny

[ID: a cut out screenshot of the Sphere from the film, edited to be sitting at a table with food, his mouth open and leaning back, and a caption reading, "Eat yo food bitch damn! Fuck you lookin crazy for!" End ID.]
249 notes
·
View notes
Text

TLK: The Circle is Broken
You know, after giving the trailer a few rewatches, I realize now that the shot where Kiros is saying "There will be one Lion King" doesn't really sync up with his lips, it made me realize that he probably wasn't actually saying that in that shot. Possibly just a really spliced-up trailer trick to keep the viewers in mystery of how the full scene's gonna go.
Either way, I absolutely loved this shot of Kiros and am so happy to see him so clearly for the first time (and hearing him for the first time, I did not expect Madds Mikkelsen to do such a raspy voice. Made me wonder if just about anyone could've done his voice but Disney just wanted to score celebrity casting points by recycling their Marvel/Star Wars actors like they always do in their remakes lol).
I'm not sure if he's snarling or smirking in the screenshot, but just I drew the first thing that jumped at me, so I went with a conceited smirk bordering on a slasher smile. Also just a good excuse to show off my 2D Universe design for him.
I was gonna try and give him scruffy, pointed cheeks (I think the original movies made that feature so commonplace in male characters to represent that light part of the mane that grows on a lion's jaw), but his original realistic design influenced me so much that I just stuck with the barren cheeks. I'm gonna justify it by saying that it at least alludes to his voice actor's appearance (Madds Mikkelsen has kinda gaunt cheekbones I think)
Also, if the lioness in the background looks like a certain someone, it's because she reminded me of a certain someone. A lot of people (myself included) have been getting massive Zira vibes from this fierce lioness that pursues Mufasa and Taka in several scenes shown in the trailer, so I based a few of her features on Zira. I'm excited to know more about this white lioness, whoever she is. I mean, she appears to have some speaking lines if the shot where everyone is in the snow is anything to go off of.
(EDIT: Gave the lioness blue sclerae, felt like they'd make her stand out more)
144 notes
·
View notes
Text


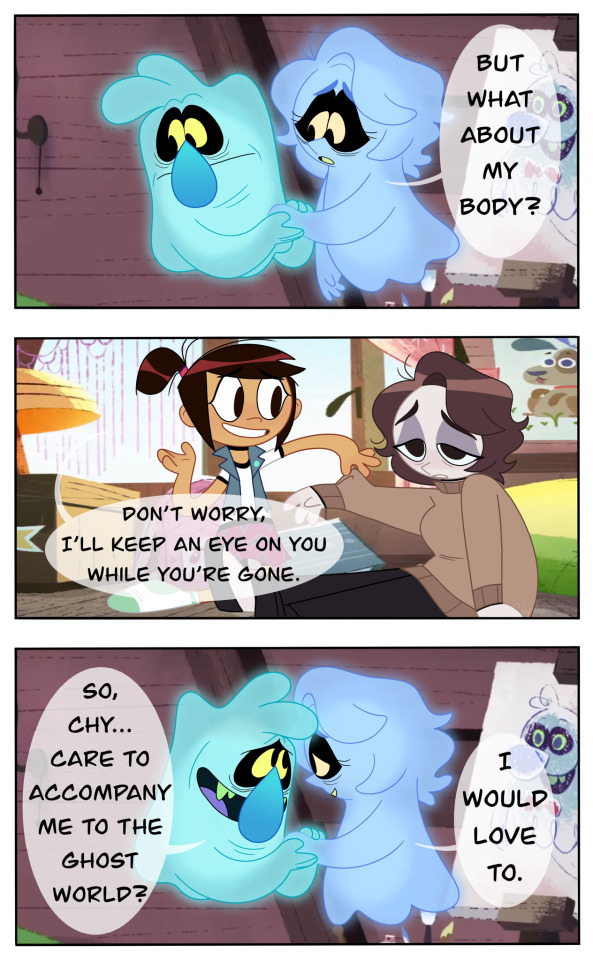

First | Previous | Next
#so I’m back home :3#this took longer than it should have#mostly because I had to redraw my sona’s hair like two times#but also burnout kicked my ass for a bit#i think I’m getting the hang at drawing Molly like I still need practice but I’m getting there#and once again a reminder that the backgrounds are edited screenshots from the show#but now adventures into the ghost world!!! >:D#❤️ scratchyenne ❤️#self insert#self ship#🎨 chy creations 🎨#comic#self insert x canon#eye contact tw
264 notes
·
View notes
Text
[ReShade 5.1+] Hide CAS UI & More
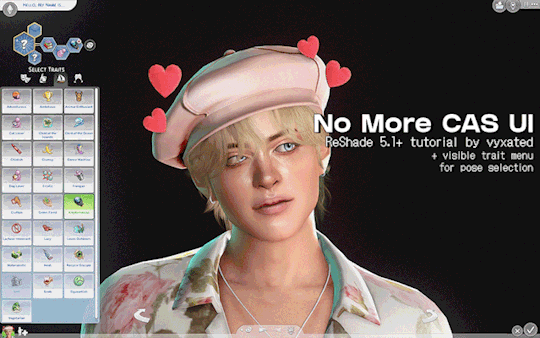
Unlike build mode & live mode, there's no shortcut to hide CAS UI, which is much needed for taking screenshots with Reshade. With this ShaderToggler add-on (made by Frans Bouma/Otis_inf), you can easily hide the UI! This guide will cover how to install the add-on and showcase its features.
If you find this useful, do share the word around! All I ask is that you link back here if you want to share outside of tumblr :-)
📌 UPDATE 19/09/2024: updated both DX9 and DX11 files to fix the hide CAS BG & mirror toggles. Please redownload.

How it works:
One of the features of this add-on is the ability to toggle on/off in-game shaders: UI, geometry, post-processing effects, and more (not reshade shaders). You do that by putting certain shaders together into a group which you can then toggle on/off. This is quite useful for CAS shots as you can't hide the UI when you use ReShade/GShade (unlike build/live mode where you can simply press tab).
This add-on is made by Frans Bouma/Otis_inf so huge credit to him as without this add-on this wouldn’t be possible.
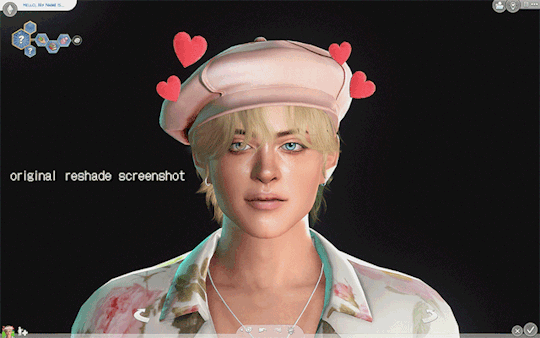
Keep in mind that this add-on doesn’t prevent shaders (bloom/dof/mxao) from affecting the UI, it just hides the UI shader from view. This, along with a shader like ChromaKey/DepthAlpha that allows for transparent backgrounds, makes a great duo! No more cropping to exclude the arrows and editing out the background manually 🙌 (unfortunately alpha hair suffers a bit from it.)
What you’ll get by the end of this post:
A ShaderToggler.ini file that will hide CAS UI elements with the option to either leave the sim/trait icons and trait selections intact for posing your sims, or hide everything except for your sim. Great for taking close-up shots.
There'll also be a toggle to hide infant pillow in CAS, hide CAS BGs & mirrors, and hide camera UI when your sim is taking a selfie/picture in-game.
// ReShade/GShade requirement:
For Reshade users: tested on Reshade 5.8.0 (w/ full add-on support), but it should be compatible with ReShade 5.1+.
For GShade users:
To check if your GShade supports add-ons: check the ReShade version it's based on in the shader notification at startup, similar to the menu here (GShade x.x based on ReShade x.x). You can also check in the reshade panel and see if there's a menu for add-ons.

📂 DOWNLOAD .ini file:
SimFileShare / Google Drive
🆕 DX9 & DX11 support
ShaderToggler.ini : DX9 version
ShaderToggler_DX11.ini : DX11 version

// Installation:
First, make sure that you have the correct ReShade with full add-on support!
Grab the add-on from this github release. For non-legacy players, grab _v121.zip. For legacy players, grab _x86_101.zip
Extract the ShaderToggler.addon file into the game’s \Bin folder where your TS4.exe/TS4_64.exe is (where you had also installed ReShade/GShade).
Still in the \Bin folder, drop the ShaderToggler.ini file you downloaded. You’ll end up with both ShaderToggler.addon and ShaderToggler.ini in the same folder as TS4.exe/Reshade.ini.
The .ini file should be named ShaderToggler.ini for the add-on to recognize it and the toggle groups to show up. If you downloaded the DX11 version, remove the _DX11 suffix.
If you’re a GShade user: there’s a folder called gshade-addons; this is where you should place the ShaderToggler.addon file. Just move the add-on from the \Bin folder to the folder mentioned and you’re good. If this doesn't work, keep it in the \Bin folder.
Open up your game. If you see the add-on & list of toggle groups in the Add-ons tab, then you’ve successfully installed the add-on & settings! Restart if needed.
// Shortcuts (Updated):
Toggle main CAS UI (traits & trait selections excluded): Ctrl+ ]
Toggle sim/trait icons & trait selections: Ctrl + [
Toggle pillow for infants: Ctrl + ; (semicolon)
Toggle camera UI when sim is taking pic/selfie: Ctrl+ ' (apostrophe)
Toggle CAS BG mesh: Alt + ]
Toggle mirrors: Alt + [
Previews:
in CAS:
Hide CAS BG & mirror reflections:

in Live mode (for Camera):
note: you can use the hide pillow toggle to hide the phone object.
🆕 in Build/Buy mode, use caps lock to hide the lot outlines:

// FAQ
Issue: add-on works, but the list of toggle groups doesn't show up.
This is likely caused by my config (.ini) file not being installed correctly. Put the .ini file where the TS4.exe file is, which is under the /Bin folder.
Issue: Add-on failed to load with error code 193.
This is caused by downloading the incorrect addon file. If you're a non-legacy (x64) player and downloaded the x86 addon file, you will encounter the error. Download the right version (_v121.zip) and that should fix the error.
Issue: everything shows up & are installed correctly, but the toggle groups don't have any effect/hide the UI.
This issue only happens if you installed Reshade/Gshade and selected Vulkan/DXVK. You need to select DirectX 9 or DirectX 11 instead for it to work.
tagging @thefoxburyinstitute :-)
#ts4 tutorial#ts4 resources#ts4 reshade#ts4 cas#the sims 4#tutorial#t: shader toggler#reshade tutorial#t: reshade add-ons#hide cas ui#sims 4#vyx.resources
2K notes
·
View notes
Text


I was so so so excited about the release of Blackout UI by @simstate recently! I've been wanting a dark-mode modern UI in my game for the longest time and they finally came thru with their mod tysm angel <3<3
With this exciting new release, I needed to rework a few of my Gameplay PSDs to fit in better with this mod - and I've made them available for download here if anyone else would like to switch!
What's In The Folder:
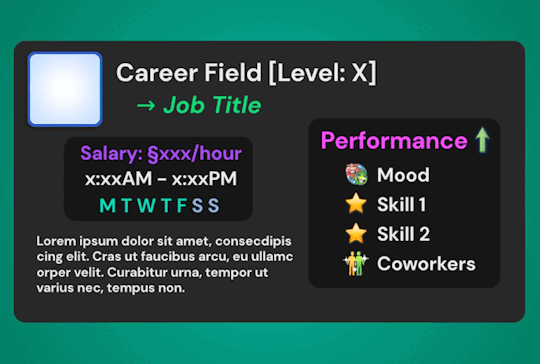
💫 Wish Template: → 3 frame colour options: Black, Green & Grey
🥶 Moodlet Template: → 4 frame / mood effect colour options: Neutral, Positive, Negative & Plain Grey
💼 Career Template: → 3 frame colour options: Black, Blue, Green & Grey → Career icons from BG to All EPs included → Extra mood icons for the 'Performance' section included
Extra: Transparent background alternative included for all templates!
Terms of Use: Please don’t claim as your own or reupload without my permission, I’d love to see you use them in your game if you do choose to tag me - but that’s totally optional I'm just nosey haha :P Feel free to alter and customize the templates literally however you want, but pls link back to my blog if you’re gonna reupload a downloadable variation :)
Download Here (Simfileshare, .psd files)
The font used in all templates is DM Sans, it can be found in all variations here - I only used ‘bold’ & 'bold italic’
Instructions:
These are supposed to be opened in a photo editing software like Adobe Photoshop, I personally recommend Photopea / Gimp as free alternatives - you can probs use any other editing software as long as it can handle .psd files - lmk if you have any problems in other programs, I have only tested these in Photopea!
I also intended for these to be used alongside game icon collections, here are some suggestions for those: TS2 Icons / TS3 Icons + Extras / TS4 Icons
Just edit the text, hide & unhide the layers / folders and place the icons to get your desired outcome, then save as a .png and plop the final image over your gameplay screenshots :)
For any PSDs I create in the future I hope to create both light-mode & dark-mode versions so you can take your pick - I’m also open to requests so if you have anything you’d like to see as a psd lmk 😊💞
Finally, thanks again to SimState for their wonderful mod - the UI is absolutely gorgeous and I will be exclusively using it from now on! Pls go show them some love if you haven't already 🫶
#Blackout UI#download#simblr#psd template#sims template#sims psd#my resources#sims resources#resources
54 notes
·
View notes
Text
Fantasy Getaway!
Nicola arrived in Paris for Paris Fashion Week on Sunday night to magic... perhaps she'll leave having experienced even more magic!
This is a complete and total fantasy post based on a few things I've observed these past few of days. Would I like it to be true? Absolutely! Given what I'll share here, is it possible? Why yes; yes it is. Tell me if you'd like this to be true too 🤍

From what I understand (video footage), after arriving on Sunday evening and attending the Dior Couture show on Monday, Nicola checked out of her Paris hotel on Tuesday afternoon. I suppose it could be assumed that she was returning to London and Luke.
Or perhaps she has made her way to a lovely French chateau outside of Paris for a couples' getaway!
What? Why do you suggest a couples' - as in more than one couple - getaway?!
Take a look at these two screenshots, grabbed from the second recording of Nicola's magic trick - this one from a different perspective - that circulated Monday. As I was watching the background (okay... I was looking for signs of Luke, as we Lukola shippers do!) In the left-side image you can see that Nicola's sister Clodagh is being helped out of the van by a man wearing a ball cap and a parka. Then, in the right-side image you can see that the man has her snugged up close to him. I asked myself, "Why is Clodagh's partner** in Paris with her and Nicola?!" And my brain answered: "Because it's a couples' trip, that's why!"
**see edit at end of post


My fantasy theory is that Luke was already booked into the hotel when the three arrived. Then while Nicola and her sister were away at the Dior show, Luke and Clodagh's partner (let's call him "Calum" because that's a good Irish name [if someone knows his name, post in comments and I'll change it here]) spent the day in Paris while the women were busy. Having been to Paris a few times before, Luke knows all the places to take "Calum" to... especially the best place to pick up the yummiest sweet patisseries for late-night steam sessions with their respective lovers 😜
Paris is the city for lovers, oui?
Let's make this couples' getaway even more fun!
On Monday, Amber Anderson - Luke's co-lead in the play The Shape of Things - posted images on her IG grid that showed that she too was in Paris for PFW... and Luke liked her post. Luke, Nicola, Amber and her husband Conner Swindells (William Tell, btw) are good friends. Maybe they too were joining the couples group?!

Before Nicola left the hotel around 1:30pm on Tuesday afternoon, Luke and "Calum" were already out of the hotel and booking them into a lovely chateau outside of Paris. All they had to do was wait for Nicola, Clodagh, Amber and Conner to arrive... and then it was fun, socializing, relaxing, wandering the chateau grounds, eating good food, visiting a quaint local French village... all the good things a group of friends, couples, can enjoy in the French countryside! 🤍
Magic!!
What do you think of my Fantastic Fantasy Couples' Getaway?! Could it possibly have happened? YES because many of the players were in play in Paris!
Note that Conner was posting in London on Tuesday, so in my fantasy he arrived a little late to the party 😄
**Edit - It turns out that my "Calum" is actually Neil Young, Nicola's make-up artist. Le sigh (as they say in France 🤣). I will say this though... snuggling up to good friends must run in Nicola's family!!
58 notes
·
View notes
Text
Tutorial: Manga Banners
Basic Manga Text Change/Coloring/GIF creation in PS
Hey, so as promised making a very basic tutorial for making banner gifs in photoshop for fics/drabbles/layouts, etc.
I'm going to keep things super simple here for beginners.
END RESULTS↴

(NOTE: This gif I made will be used for an unreleased story of mine so please don't use this exact gif/images but you are free to follow the tutorial to create your own).
All I ask is if you find this helpful to REBLOG! :) No need to credit me.
For this tutorial you will need ↴
Photoshop
At least 2 manga panel images (non-transparent*)
Optional: Manga fonts. I mostly use CC Wild words (speech bubbles) & Manga Temple (narrator boxes)
Basic knowledge of photoshop layout/where tools are.
*this tutorial is essentially the same if working with transparency but if you do work with transparency you will need to have knowledge of clipping masks which i do not cover here.
Tutorial ↴
(optional) Prepwork: so i didn't think to include this do this but you are going to need to crop and resize your image. make sure the width is either 540 or 1080px. This is the recommended width for pictures in tumblr. Height can be what you want it to be. This is done image > image size (make sure the link-chain is pressed for aspect ratio)
Step 1
This is what you want your setup to look similar to. Delete locked background layer.

Steps 2 & 3
Make a new layer. It might be helpful for beginners to re-name all their layers so instead of "Layer 2" you might name this ⇢ "White fill layer or Text cover up". (doubletap layer name to change it).
Use rectangular marquee to select text you want to change. If you are just replacing a word or two you dont need to white out everything. But you could choose to cover up all if you wish. I just wanted to remove "senpai".

Steps 4 & 5
Use Paint Bucket Tool to fill in selection area with white (make sure the new layer you made is selected when you do this).
Select Text Tool. There is no need to make a new layer as once you are done typing it will become a text layer. I used CC Wild Words bold font for this for emphasis. If you do multiple lines of text use a new text layer for each line.

Step 6 - Optional Step - Highly recommended if you did multiple lines of text.
Rasterize Type by right clicking the layer. This is an optional step. I tend to do it out of habit and rasterizing lets you use the move tool to give you exact px distances between other rasterized elements but nothing we are doing requires this tbh and if you do decide to do it you can't go back and edit text.
If you did multiple text layers you cause space them out evenly using the move tool (zoom into 200%-400% if necessary to get exact pixel distances). Tip: Manga text is centered in the bubble and leaves a good distance away from the edge.
When you are done ctrl/cmd to select all text layers then right click and merge the layers. This is so incase you have to move the text layer for whatever reason they are all on one layer now, evenly spaced and you won't accidentally mess that up.

Step 7
Create an exposure layer (half filled in circle in layer bar for menu). This is important as it can lighten/darken image to make the colors we will add later pop by playing with the sliders for each setting.

Step 8
Apply exposure settings. On the right-hand side there will be 3 slider bars. The screenshot shows my settings but your settings will vary depending on the image. The one that gives the biggest benefit for manga is Gamma Correction which affects the midtones to make them lighter/darker and adds better contrast to the image so it doesn't look as muddy, often in black and white images it is easy for midtones to look muddy. Offset affects mid to dark tones of an image. Exposure affects midtones to highlights to make brighter or darker, overall use this the least. TIP: If you want to make an image brighter or darker you usually want this to apply equally to the overall image so then you would create a brightness/contrast layer instead. most manga images skew muddy and need a midtone and dark adjustment rather than highlights. the better the manga scan images the less adjustments you will need.

Step 9 - Optional
Apply a gradient map (half filled in circle in layer bar for menu). This is optional. a Gradient map adds gradient but preserves the shading in the image so essentially adds a gradient to the shading. I do this in black and white. But if you are happy with how it came out in the exposure phase you don't need to.

Step 10 & 11 -
Apply a gradient (half filled in circle in layer bar for menu). So when you add a gradient there are a ton of preset color combos you can use or you can create your own. I think this one is a preset but can't remember. I like a diagonal gradient from light to dark depending on where the light source on the image is but it is completely up to you. I tend to set the gradient angles near these 4 settings: -145, -45, 45, 145 depending on what corner I want the lighter part in.
One thing to note is brighter colors work better with a darker background. Lighter backgrounds can get washed out. One you add this as you can see it will be solid color.
*note* once this layer is applied any edits such as moving text, etc. around you want to do to the lower layers beneath it click the "eye" button to hide the gradient (same for the map) or there's a good chance it will move the gradient layers around and not the layer you want.
Change layer blending mode. By default it's set to "normal". You can play around with these. Depending on the effect you want and whether the image has darker or lighter colors will decide the blending mode. My typical blending modes are screen, overlay, hard light, vivid light or pin light. You can duplicate this gradient layer and play around with multiple settings and opacities to create something you like.

Step 12 - Optional
Add a Brightness/Contrast layer (half filled in circle in layer bar for menu). Brightness/Contrast on this step will look wildly different than if you added it right after the exposure step. It's not necessary but if you want more overall contrast or brightness then you can add it.
You can see my settings below on the sliders on the right-hand side.

Step 13
Create new layer for highlights. (also good check point to see how your layers are organized).

Step 14
Select the brush tool and ensure brush settings are a soft round brush with a hardness of 0% for the highlight effect. (if you click the brush image you can see my settings better)


Step 15
Select the dropper tool and pick a color from the gradient image. I usually pick the darkest colors available as it will have the best dodge effect for highlights. Since this is pink/redish I only have one highlight color but if you were doing a green/blue gradient you would pick the darkest from both. (ignore the purple here its not being used)


Step 16
Create highlights with brush tool. Do a few tests placements randomly around the image for positioning and then swap the blend mode to either color dodge or linear dodge. I usually do color dodge. You will get awesome highlights like below. You can play with the sizing of the brushes and opacity to decrease the effect.

Step 17 & 18
Export as PNG. Do this even if you want to make a gif as I always recommend a clean canvas for gif making. If you want to be done here and don't want a gif thats fine too. File > Export > Quick Export as PNG (do not save as jpeg/gif you will lose image quality).
Repeat for second image. You don't need to open a new file unless it helps you to not get confused. You can just make a new layer and paste your new image into that layer (if you just right click copy the file in the window/finder folder you can directly paste it into a layer in PS) and use the transform tool to resize. However you can totally just open the image in PS. The benefit of same canvas is you save yourself some time as you can just duplicate gradient layers/adjustment layers and move them. But this is kinda more advanced so if you aren't comfortable with photoshop just make a new image.

Step 18-19
Create new file/open one of the PNG in PS (more advanced can just create new layer, select image, then copy > copy merged and paste on new file for each. Otherwise open one file, create a new layer then copy the other file. The bottom later will be the first image in the gif.
Create Frame Animation on the timeline window. (if the timeline window does not appear then window > timeline) *note* if this is your first time working with the window it may be set to "create video timeline", if that's the case create it then from the frame menu (in step 23 theres an example of where this is) select "convert to frame animation".
If done correctly your setup should look like the below with two images. One for each layer and one for each frame.
MAKE SURE PROPAGATE FRAME ONE BOX IS CHECKED IN THE LAYERS WINDOW.
lmao, not to be dramatic but this ensures most effects you would add to frame 1 (which corresponds to layer 1) is applied to all frames. I'm not too sure its super vital for this super basic gif I'm showing you but its better to get in the habit of always having it checked. otherwise it will fuck you over later down the line in my next tutorial where I show how to add frames to gifs.

Step 20
Select both layers, then select both frames (ctrl/cmd) and finally select tween from the timeline window. It is the multi-faded dot option on the bar below.

Step 21
Add Frames to Tween. Tween is the fading effect adding more frames is the longer the fading effect is. I added 20 for this step, you can play around and add more or less.
Once you do that you can see 20 new frames being added onto the timeline. This will not automatically add new layers, this is fine. Frames and layers don't need to be a 1-to-1. (Another reason why propagate frame 1 needs to be checked as you can still adjust those layerless frames by adjusting frame 1's layer)

Step 22
Adding delays. Automatically the delay on every frame is at zero. But especially if you have text you want people to be able to read that so you need to add in a delay. Your delays can be in increments of 1/10th of a second. I add a 1 second delay to the first frame only.

Step 23
Select and Copy the first frame and then select the last frame and Paste. A paste window will appear in this case we want to paste after selection. I circled where the menu for frames are. (sorry used a different gif as an example so ignore everything but the circled menu)


Step 24
Adding additional delays. I add a 1 second delay to the last two frames.

Step 25
Add more Tween I added 5 frames this time as we want the transition to be much quicker to reset the image. You can see frame 23 in the previous step are now frame 28.
You can add more images in than 2 and follow these steps to add tweening.

DONE! Now to save.
Step 26
Export your gif. File > Export > Save for Web (Legacy) and the screen below should pop up. Here are the settings I use for gifs. You can play around with it but I really wouldn't lol. (again ignore image size, this is from a different gif) it will also tell you how big in file weight your gif is. This isn't something you have to worry about for something simple but the bigger the image size and the more transitions/images you use the more frames you will have. Reducing image size (make sure chain link is on like in the below) will take off more sizing then removing frames will and I would recommend that. But tumblr allows 10MB MAX per gif so just something to keep in mind.

Let me know how this was! If you have questions just drop me an ask. ❤
#✩𝓀𝒾𝓏𝓏𝒶𝓉•𝔱𝔲𝔱𝔬𝔯𝔦𝔞𝔩𝔰#✩𝓀𝒾𝓏𝓏𝒶𝓉•𝕘𝕗𝕩#gfx#fic banners#tutorials#resources#photoshop tutorial#manga edit#edits#fan fic writing#fic writing#anime edits#manga edits
119 notes
·
View notes
Text
I don’t have much energy (on account of still being sick :/) but I still wanted to do something so dug up an old unfinished screenshot edit that I did a while ago but never finished until now

But yeah this is from the au’s version of Eclipse Lake, which happens a bit later down the timeline than the original.
It’s set just before Hollow mind instead and I’ll explain the timeline differences in much better detail in a different post but it’s basically because Luz isn’t focusing on going home like in the og so she is seeking on ways of getting revenge on Belos and saving Pip and Eda.
But Amity has been wanting to cheer up her awesome girlfriend so she’s been secretly researching ways to create a portal door as a surprise, so Amity was the one who found out about the titan veins through the echo mouse instead and went to go find some titan blood without telling Luz.
If you’re probably wondering where Hunter is…He’s actually taking an extremely well deserved break :0 (lmao, just kidding he’s still apart of the Eclipse lake events) as Pip is surprisingly extremely efficient at sorting out tasks (normal Pip could never, this is all the brainwashing tea lmao) and so Hunter has unwilling ended up getting all his work done by Pip…
Hunter doesn’t want to admit it but he is happy about finally getting a break because he’s getting to do normal teen stuff and play with flapjack more often but he does feel like he’s getting replaced so there is complicated feelings there (it also doesn’t help that Pip is now getting all the attention from Belos and is on top of that able to do magic so Hunter is switching between “I’ve got to do as much as I can so I don’t get replaced” to “it’s kinda nice not being in mortal danger every five seconds and being able to hang out with Willow”)
But yeah onto the episode; Much to the displeasure and horror of Kiki she’s having to be supervised by Pip during the titan’s vein assignment so she’s extra cautious and paranoid about not ruining the assignment especially when in front of the Prince…
Hunter wanted to go with Pip but was then explicitly told by Belos to take a break as Pip was handling an extremely special assignment but Hunter immediately flipped into panic mode because after getting kinda jealous of Pip and he wanted to show his worth again to Belos so he ended up secretly following along as a scout in order to be the first to find the titans blood.
Belos obviously already knew that the vein was already decayed and full of Fools blood from when he went there years ago, so the assignment Kiki is on was actually just a wild goose chase created in order for Pip to secretly assassinate Kiki (who’s fucked up one too many times and knows too much about the actual day of unity plans so she’s obviously got to go.)
Amity and Hunter end up working together after stumbling onto each other searching for titans blood, though they’re bickering and fighting each other the entire way but aren’t as antagonistic with each other as Hunter has slowly mellowed out after hanging out with the emerald entrails more often so they do actually end up properly bonding :)
Uh until they accidentally stumble onto Pip’s attempt on Kiki’s life…
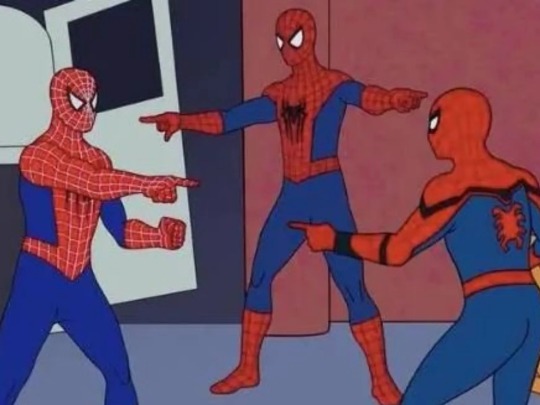
I’m personally imagining the spiderman meme with Pip, Amity and Hunter happening and then Kiki scampering away at full speed in the background.
So yeah Amity is just majorly confused on the fact that she’s just randomly found Pip in the weirdest situation and place possible after months of no contact or communication…
It gets weirder for Amity as Luz never actually told anybody where Pip was and just vaguely said he was staying with family when asked as it wasn’t technically lying (Luz really didn’t want to break Pip’s promise on not telling anyone who he actually is so this is her guilt free way of avoiding questions on where he is)
Pip doesn’t even let Hunter or Amity think about the implications of this whole situation before running off to go catch Kiki and attempt to go for round two… Amity stops him mid way by grabbing his arm which wasn’t the smartest idea.
Because of the brainwashing tea and all the meddling Belos did with his memories, it genuinely makes Pips brain hurt when trying to recognise who Amity or anyone from when he lived in the owl house and so he usually gets really frustrated/aggressive when seeing someone from his past… so Amity interrupting his assignment genuinely made him kinda loose it and try to kill her instead.
The image is the aftermath but they both hit a draw because Hunter does manage to deescalate the situation by reminding Pip to focus on his actual mission instead.
I’ll probably continue this explanation through either a comic or text post :p
#the owl house#toh#toh au#art#golden heir au#original character#the owl house au#owl house au#oc#oc stuff#the golden heir au#amity blight#amity toh#the owl house amity#hunter wittebane#hunter the golden guard#grimwalker oc#grimwalker#philip wittebane
75 notes
·
View notes