#and then blend potatoes without a blender
Explore tagged Tumblr posts
Text
Sarcificed my humanity for a good soup. Worth it *bleeding thumbs up*
#had to go to the shops buy the ingredients then cook it#except my soup maker broke so I had to work out how to cook it with a pan that was too small and a wok#and then blend potatoes without a blender#and I stood up way too much during it despite making an active effort to use a chair#but the soup is really fucking good#despite my energy levels and joints being shot to shit
1 note
·
View note
Text
Kitchen Sink Soup: The Ultimate Comfort Dish for Using Up Veggies 🥕🫑🍅

Got a fridge full of random vegetables you’re not sure how to use? Soup is a usual answer! It’s a great way to clean out your veggie drawer while creating a delicious meal.
I’m a super picky eater when it comes to veggies. So this recipe is a wonderful way to get picky eaters to eat all the nutrients. I put all of the veggies into a food processor before cooking to finely chop them for easier cooking!
The Base Recipe: Kitchen Sink Soup
This recipe makes different servings depending on how many and what veggies you throw in.
Ingredients
• 1 large onion (I used red but use what you have)
• 3-4 minced garlic (measure with your heart)
• 2-3 celery stalks
• 2 bell peppers (again I used yellow and green but use what you have)
• 3-4 carrots
• 1 large sweet potato, peeled
• 5-6 small sweet peppers
• 5 fresh tomatoes (or canned)
• 2 small jalapeños (optional, for heat)
• 2 tbsp olive oil or butter
• 3-4 cups broth (whatever you have on hand)
• 1 tbsp tomato paste (optional, for richness)
Seasonings
I don’t measure my seasonings. I just pour until I feel like it. I base it on smell a lot of times. These are guesstimates
• 1 tbsp paprika
• 2 tsp cumin
• 2 tsp ground ginger
• 1 tsp ground jalapeño and chili powered
• 1 tbsp powdered garlic
• 2 tsp dried parsley
• 2 tsp each of sage, rosemary, and thyme
• 2 tsp Salt and white and black pepper
Instructions
1. Prep the Veggies
• Place all vegetables (onion, garlic, celery, bell peppers, carrots, sweet potato, sweet peppers, tomatoes, and jalapeño) into a food processor. Pulse until finely chopped.
2. Sauté the Veggies
• Heat olive oil or butter in a large pot over medium heat. Add the finely chopped vegetables to the pot and cook for 5-7 minutes, stirring occasionally, until softened and fragrant.
3. Season and Build the Soup
• Stir in the tomato paste (if using), followed by all the seasonings: paprika, cumin, ground ginger, ground jalapeño, powdered garlic, parsley, sage, rosemary, thyme, salt, and pepper. Mix well to coat the veggies.
4. Simmer
• Pour in the broth, ensuring the vegetables are just covered. Bring to a boil, then reduce the heat and let it simmer for 20-25 minutes, or until the vegetables are fully tender.
5. Blend
• Use an immersion blender to puree the soup until smooth and creamy. (No immersion blender? Let the soup cool slightly, then carefully blend it in batches using a countertop blender.)
6. Finish with a splash of heavy cream
• Stir in the heavy cream. Taste and adjust seasonings
Serving Suggestions
This soup is versatile and pairs beautifully with:
• Grilled Cheese: A golden, melty sandwich is perfect for dunking.
• Angel Hair Pasta: Toss the soup with cooked angel hair pasta for a hearty and filling twist.
• Naan or Crusty Bread: Because no soup is complete without some bread for scooping. It’s very similar to a curry.
Good for whether you’re trying to use up leftovers or just want a comforting meal.
What veggies are you throwing into your version? Let me know—I’d love to see how you make it your own! 🍅🍆🫛🥒🌶️🫑🌽🥕🧄🧅🥔🍠🫚
#witchblr#baby witch#green witch#kitchen witch#witchcraft#witch#self care#kitchen witchcraft#kitchen magic#recipes#picky eater#vegetable soup#vegetarian#witchcore#cottage witch#green witchcraft#kitchen witch recipe#kitchen witch recipes#kitchen witchery#witch aesthetic#witch community#witch tips#witches of tumblr#witchy traditions#witchythings#pagan witch
49 notes
·
View notes
Text
COOKING LESSONS (an alecody oneshot)
I wrote this during school lalalalalala
Alejandro sighed as he stood in the kitchen, faced with a clueless Cody.
"You know nothing of how to cook, really?" He raised an eyebrow at the shorter boy, who shrugged in response.
"Great." Alejandro said flatly. "What will you do if I am not home to make you food?"
"I dunno, probably just make some instant noodles or order takeout."
"You cannot be living off of fast food, Cody."
"I know." Cody sighed.
"Which is why I am going to teach you how to cook."
"But cooking is hard." Cody whined.
"No it is not, we will start with something easy."
"Like?"
"Soup."
"Really, soup? You know I don't like certain soups and like, the texture and stuff."
"I will let you pick the ingredients."
"Ooh!" Cody clapped his hands.
"Now, shall we get started?" Cody nodded eagerly.
Alejandro began to gather the equipment while Cody scribbled the ingredients he wanted on a post-it note.
"Have you made your decision?"
"Mhm!" Cody enthusiastically waved the paper in front of Alejandro's face.
Alejandro chuckled. "Hold it still so I can read it, remember?"
Cody nodded sheepishly and handed Alejandro the list he had comprised.
Alejandro smiled. "This looks good, we can work with this, now can you get the ingredients?"
"Of course I can!" Cody grinned confidently before accidentally walking into the fridge door, which won a giggle out of Alejandro before he went to check if Cody was okay.
"Are you alright?" He cupped Cody's face.
"I'm fine." Cody smirked. Alejandro smiled back.
Soon they had gathered the ingredients and had the pot of boiling water on the stove, Alejandro gently squeezed Cody's side, who laughed.
"Alright, time to chop the vegetables. Watch me do it first, okay?"
"I can do it without a demonstration, you know."
"Alright, I will watch you, though."
Cody grinned as he grabbed a carrot and placed it on top of the wooden chopping board before grabbing a knife and starting to (very shabbily) chop up the carrot. Alejandro winced when Cody finished.
"What?"
"Your chopping skills have... Character."
"What's that supposed to mean?"
"They could be better."
"Oh."
"Watch me, okay?"
Cody obliged and watched as Alejandro quickly cut a potato into neat cubes.
"Woah..."
Alejandro laughed. "Impressed?"
"Yeah!"
"Do you want me to guide your hands?"
Cody blushed slightly at the idea of Alejandro holding his hands and guiding him but nodded.
Alejandro stood behind Cody at the chopping board and took his hands in his own, he gently guided Cody as he cut up an onion, as well as carefully wiping Cody's watery eyes.
"Good job!" Alejandro grinned, ruffling Cody's hair, which made the other boy laugh.
"You think?"
"I know."
Cody felt his face flush again, god, Alejandro was... Well perfect, really. He sometimes found it hard to believe that Alejandro even liked him.
Soon, they had put all the vegetables (and two stock cubes) into the pot and were waiting for it to boil. Cody leaned back against the counter, getting a good view of Alejandro from where he was standing. Alejandro glanced down at Cody and noticed him staring. He smiled down at him and brushed away some of Cody's fringe that was covering his eyes, Cody sneezed in response, getting Alejandro to laugh.
"You really are cute, Cody."
"Maybe a little."
"More than a little bit."
Cody grinned. "Yeah?"
"Mhm."
Alejandro opened up the lid a few minutes later and peered into the pot.
"It is almost ready."
Cody - who was drumming his fingers on the countertop - grinned and rushed up to look.
"I just need to blend it, but we can take turns if you want?"
"Great!"
Alejandro smiled and grabbed the handheld blender.
Cody watched as Alejandro blended the soup, mesmerized by him, Alejandro noticed and chuckled.
"Cody. It is your turn." He handed Cody the blender and Cody grinned.
"Awesome!" Cody switched on the blender and started blending the soup, which started spraying EVERYWHERE.
"Oh shit."
Alejandro laughed and took the blender from him, turning it off and setting it to the side.
"I think it is blended enough, hm?" Cody nodded, his face flushed with embarrassment.
Finally the soup had finished cooling down and Alejandro poured it into two bowls, Cody almost immediately started scarfing it down.
"Good?"
"Very." Cody grinned and Alejandro chuckled before wiping the soup off of his face.
"I am glad you like it, now you know you can make something when I am gone."
"Yeah! Maybe you can teach me other recipes too?"
"Of course." Alejandro ruffled Cody's hair and Cody laughed.
"This was fun."
"It was." Alejandro kissed Cody's cheek and the latter leaned against him.
----------------------
Hope you guys liked this one!!! It might be a little bad cause I haven't written in a while but alas.
#total drama#td cody#cody tdi#td alejandro#alejandro tdi#alecody#alejandro x cody#cody x alejandro#pen man writes
40 notes
·
View notes
Text
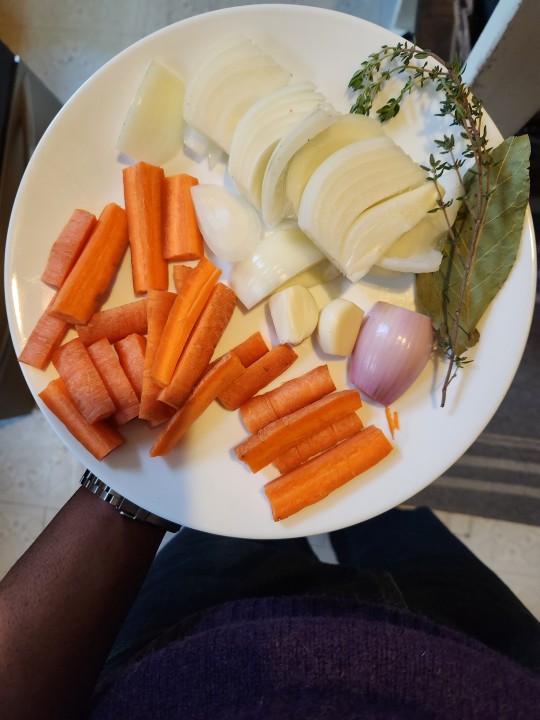
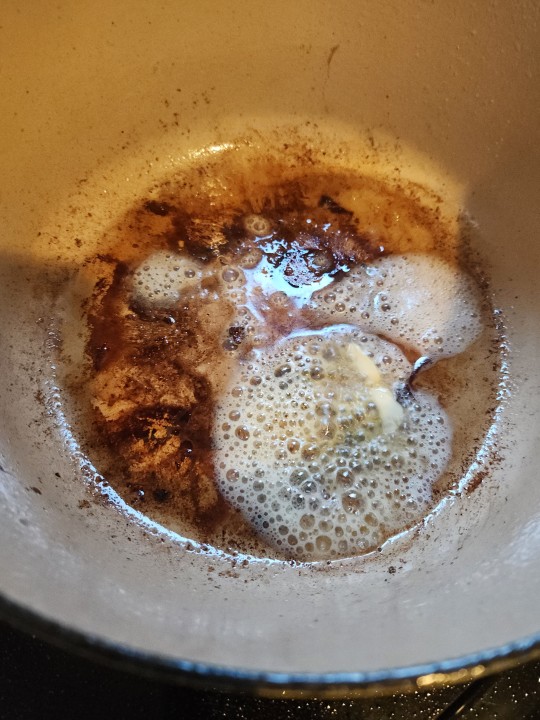
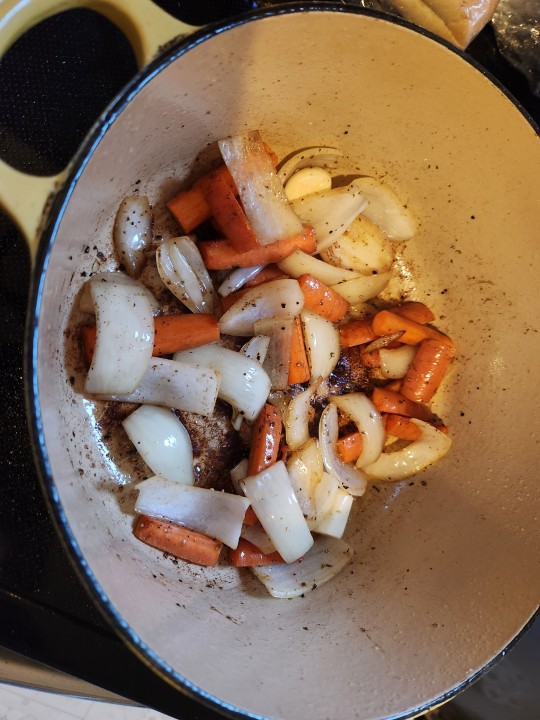


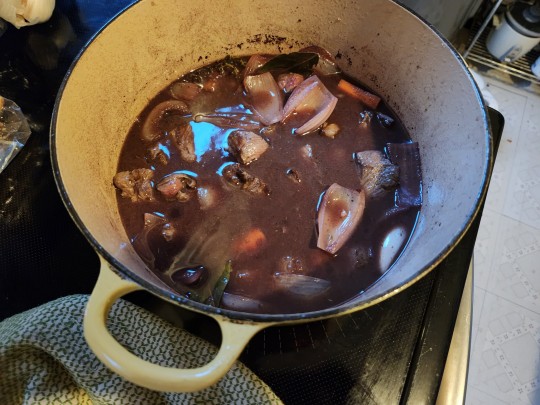


@fetusdeletustotalus I actually happened to take pictures the most recent time I made beef burgundy, which is very handy here. What I usually make is basically an extremely simplified, totally stove-top version of the dish. I don't necessarily reference a specific recipe, but ATK has a version called Modern Beef Burgundy that's similar, though theirs is much more complex and probably, resultingly, better. I find that using fairly few ingredients works perfectly well for me, and allows me to cook this routinely without any fuss and without needing a special trip to the grocery store for anything other than a shallot if I'm out or some fresh thyme. I rely on method to build flavor, and it works for me.
Basically, for one pot:
1 lb or more of chunks of high connective tissue beef- I usually just buy what is labelled "stew beef" by the grocery store
As many carrots as I want (about twice the amount pictured), half cut into circles and half cut into quartered chunks
One onion, half cut into big chunks and half diced
A tablespoonish of butter
1 shallot, half quartered and half sliced
As much garlic as I'd like
As many potatoes as I'd like, cut to roughly similar sizes and then submerged in cold water to keep them fresh in the fridhe while everything else works. This recent batch featured maybe too many potatoes even for me, an extreme lover of potatoes
1 bay leaf
A few sprigs of thyme
3ish cups of chicken broth (not beef broth, because the storebought stuff just isn't good ime, though I've been meaning to experiment with better than bouillon beef since the chicken is so good)
3ish cups of red wine, ideally something drinkable and robust
Corn starch dissolved into a little bit of cold water- more than I, at least, initially guessed I would need
S&P
Prep all your items, and you can spend almost no time touching anything after the first few minutes.
Steps post prep:
Sear beef over medium high heat in a generousish amount of oil, just enough to get sufficient color on all chunks. I salt in the pan, and cook in batches. The reason I do this is to prevent crowding the dutch oven/steaming the meat rather than frying it. Once a chunk is ready, set it aside on a plate, etc, working in batches. You will need to monitor heat, and likely lower it at some point in this process to prevent oil smoking or anything burning. This is the only step that's trickyish.
Lower heat to medium low. Add a tablespoonish of butter. I do this for yumminess reasons and because it helps to prevent the oil/beef fat in the pan from burning. Add in the roughly chopped half of the carrots and alliums. S&P in pan. Cook until everything has some light charring. Then, add in chicken stock, wine, the bay leaf, and maybe 2 sprigs of fresh thyme. Salt again. The reason that I do this is basically to make a richer beef stock- the flavor from these carrots and onions is part of the stock, and these will eventually become mush. These are not to be eaten as pieces.
Bring to a low/moderate boil and let it reduce a little. I let it reduce until I no longer really strongly smell wine. At that point, add in beef chunks, submerging them as much as possible in liquid. Reduce to a simmer. Walk away and forget the stew for a minimum of 2 hours.
Pull beef chunks, set aside. Pour the stew liquid into a bowl through a strainer. You will be left with very mushy vegetables and your herbs in the strainer, and basically finished stew stock in the bowl. Toss the bay leaf and thyme. I personally mash the vegetables up as much as possible, then add them to the stew and stir as much as possible. If I were being sophisticated, I might immersion blend the veggies in for texture uniformity. But it's stew, and I don't have an immersion blender and this sure isn't worth using a standard blender for me. The only reason I don't just mash the vegetables in the dutch oven is that I use a potato masher and don't like using metal in my dutch oven. Otherwise, I'd just mash it in the pan directly after removing the beef.
Put everything back into the pot, and add your more nicely cut carrots, onions, and potatoes. Simmer for another 30 minutes minimum.
Prep corn starch. Once added to the stew, bring it to a boil for a minute minimum to allow the corn starch to set up.
Profit
Basically, once the veg is cut and the meat is seared, you're doing very little. This is definitely not the most classic or involved beef burgundy, it's just how I personally choose to make beef stew when I make it. Some people like to remove the fat from the broth, and there is a special measuring cup sort of device you can purchase cheaply for that purpose, or you can use an ice and ladle trick that I've heard works well. Or you can do what I do and just leave it.
56 notes
·
View notes
Text
Watching the H5N1 stuff get worse and worse--I'm hoping we have until late next year before it goes reliably human-human, but it wouldn't surprise me if it was this winter--and not being able to do much makes me anxious, so I've been composing lists of stuff to do. I keep thinking, if this were August, 2019, and I knew covid was coming, what would I prepare? If this one goes off like the scientists think it might, it'll be much worse than covid.
Right now, I'm concentrating on food. My plan is to have enough hunker down supplies by mid-September that if things go bad in the normally-scheduled October-February flu season, we'll be okay simply not leaving the house at all. There are only two of us here now, and if things go bad there may be as many as four (as I have two separate friends I'd push hard to come stay here with us), so I need to make sure we have 4 meals x howevermany days I choose. I'm building up to six months, but I'm beginning the plan at three. While a lot of Serious Prepper lists have pretty generous caloric allowances, the MFH and I eat pretty light, and we're both smaller than the average adult human, which does give us even more squeak room here.
We started out with dry staples--bread flour, AP flour, semolina, rice, beans, pasta, lentils, powdered milk--though I have still to get powdered eggs (I'll dehydrate those myself), more dry beans (I'm going to use up a lot of what we have when I do my canning run for the winter, and so far I haven't been able to get my hands on kidney beans in any decent amounts), quinoa, and one more kind of pasta. Right now we have about 2/3 of what I'd want; we'll be holding things at this level, replacing staples as we use them, and if things look more serious we'll do another big shop and give ourselves additional stock of the AP flour, the bread flour, the rice (which we already buy in 40-50 lb bags anyway, we're Asian), the dry milk.

Then there's the perishable stuff; yesterday, the MFH and I took advantage of some very nice sales and got seventy pounds of meat for two hundred and twelve dollars. Beef brisket for stew, pork butt for sweet molasses chili, ground beef for hotter chili, pork loin for white bean soup. Still have to get chicken (which was pretty much sold out at our bulk place) for chicken soup (to be pressure canned), chicken and mushroom cream soup (to be vacuum-packed and frozen).

Very very soon it'll be time to harvest my leeks and my butternut squashes, for leek and potato soup (either finished with cream, blended to a smooth-ish consistency and frozen, or *not* blended down, and just socked away in pressure-canned Ball jars without the cream added; will it take me longer to thaw it, or to take my immersion blender to the hot individual meals later on?) and canned butternut for baking with or making soup or chili or making pasta sauce.
I might can a bunch of just potatoes, too, to keep 'em shelf stable (plus that front-loads a lot of the work of producing a meal later).

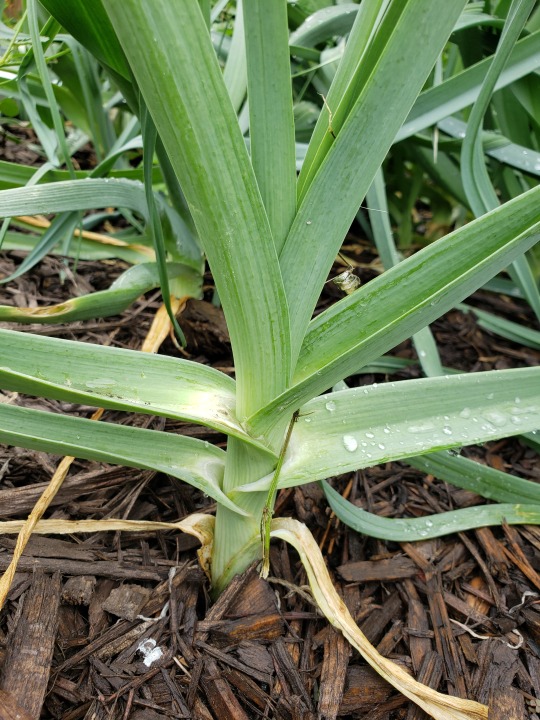
So I need to buy onions and carrots and potatoes and celery and garlic and mushrooms and corn, cream, red wine, tomato paste (because my vines got blight this year, sigh--I've managed to can one single run of tomato sauce and that's IT), ten dozen fresh eggs to dehydrate and powder and store in the fridge in case of egg shortages, several pounds of beans to be thrown into the chilis and...hm...fifteen pounds more, twenty pounds more, to have on hand? And then for non-canning purposes we'll need butter, oil, white vinegar (I've used a lot of it for pickles this year), various Asian food staples like black and rice vinegars, oyster sauce, black mushrooms and so on. As for pre-made, mass-produced foods, I'll probably make another post about them later.
While this is more than I'd generally stock in a single season, I do generally put about 100 quarts of home-canned food by a year, and I never keep less than 75-100lb of flour on hand anyway because of how frequently I make bread. So though it sounds like a lot up front, it's not hoarder level; everything I stock will be eaten, some of it pretty much immediately (the beef stew is so good). And putting it all by now means that we'll be less of a burden on our community safety net, if push comes to shove. When the covid pandemic hit I had dozens of jars of food on the shelf already, which gave me a little peace when things were looking scary. We were able to share some of our stores with people who hadn't had the great privilege of long afternoons spent seeing to the personal stores. That's a better option, to my mind, than needing to panic-shop right as things start getting a little wild.
Basically, if things go bad, we'll have food for a while. And if things don't go bad, we'll have food for a while. It's win-win. And it keeps the floor under my feet when I'm feeling unsteady, to be able to sneak down into the cool, still basement and look at row on row of gently gleaming jars of food security.
#real world prepping#still not time to freak out#this is not cottagecore#my actual life#magical flying husband#h5n1#h5n1 prep
15 notes
·
View notes
Text
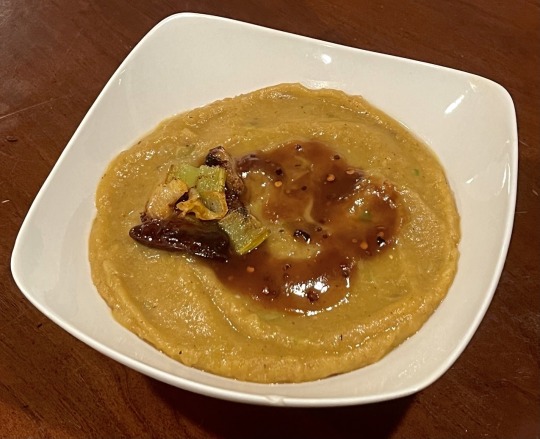
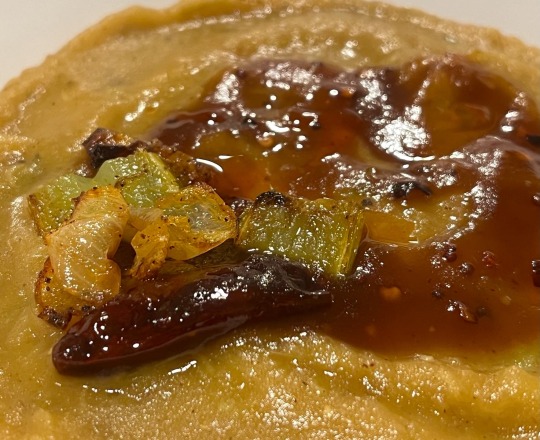
Roasted celery and potato soup
This soup is a great way to use up limp celery! It combines a base of roasted and puréed garlic, celery, and potatoes with a sweet, sour, and spicy tempering of chili, tamarind, jaggery, and lime. The result is an exploration of sour, citrusy, and nutty spices (mustard, annatto, fenugreek, coriander)—an earthy and savoury depth of flavor with a bright kick.
Recipe under the cut!
Patreon | Tip jar
Ingredients
For the soup:
1 head of celery (about 10 stalks)
4 medium yukon gold potatoes (800g)
1/2 head of garlic
About 1/4 cup of extra virgin olive oil
1/2 tsp black mustard seeds
1/2 tsp yellow mustard seeds
1/4 tsp annatto seeds
1/4 tsp fenugreek seeds
1/2 tsp black peppercorns
1/4 tsp coriander seeds
1/4 tsp ground ginger
Salt, to taste
4-5 cups (950 to 1000mL) vegetable stock
For the tempering:
1 Tbsp non-dairy margarine
1 dried red chili, broken in half
1/2 tsp black mustard seeds
2-3 Tbsp jaggery or brown sugar, to taste
3 Tbsp tamarind purée
1 Tbsp freshly-squeezed lime juice
1/4 tsp light Cantonese soy sauce (or substitute any other soy sauce)
1/2 tsp red pepper flakes, or chili oil
To replace the tempering, you could use anything sour, sweet and savoury—try vegeterian Worchestershire sauce, or usata sosu.
Tamarind purée, often in jars or cans labeled "tamarind concentrate," can be found at east, southeast, and east Asian grocery stores. Blocks of dried tamarind pulp can also be purchased, seed-in or seedless. Break off about a tablespoon of tamarind pulp; soak it in a couple tablespoons of just-boiled water for about 30 minutes; palpate the pulp with your fingers and remove any tough seeds that you feel; blend the pulp and water together in a blender; then pass the resulting liquid through a sieve to remove any stringy bits or seed fragments.
Instructions:
1. In a small, dry skillet on medium heat, toast the coriander seeds, black peppercorns, and fenugreek seeds until spices are fragrant and fenugreek is a couple shades darker. Remove. Toast black and yellow mustard seeds for a minute or so until fragrant. Grind all spices (including the ginger) in a mortar and pestle or spice mill (I would recommend the latter—annatto is tough to pulverize).
2. Cut off the base of the head of celery to divide celery into stalks, then wash and drain. Cut each one into halves or thirds. Include some of the leaves, if you have them; optionally, reserve some for a garnish.
3. Cut onion in half lengthwise (through the root), then cut each half into fourths or sixths. Halve a head of garlic; cut off the very top of it to expose each clove; drizzle about a teaspoon of olive oil over the exposed cloves; and wrap the whole in aluminum foil. This will allow the garlic to slowly roast without drying out.
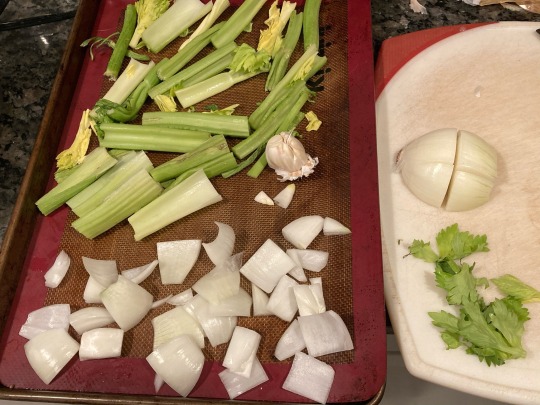
4. Coat celery and onions with a few tablespoons olive oil and about half of the spice mixture. Roast celery, onions, and garlic at 385 °F (196 °C) for 20-30 minutes, until onions are deeply golden. Stir and flip over every 10 minutes or so during roasting to ensure even cooking.
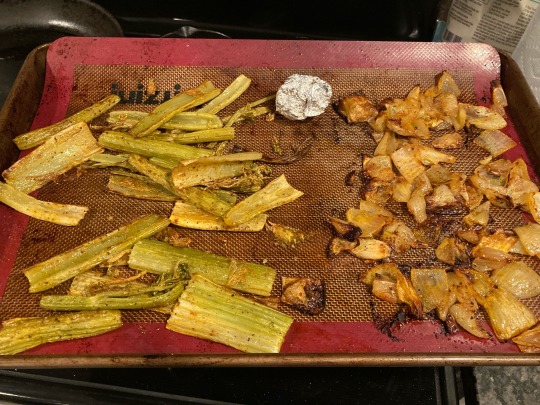
5. Peel and cube potatoes and coat with a couple tablespoons of olive oil and most of the remaining spice mixture. Bake in a shallow roasting pan at 425 °F (218 °C) for about 25 minutes, until browned.
If you don't have a second oven, or don't have time to wait until the celery and onions are finished roasting: dice your potatoes, heat olive oil on medium in a large pot, and add potatoes and spices. Fry, stirring every five minutes or so, until potatoes are golden brown on the surface, then continue with the steps below.
6. In a large pot, combine roasted celery, onions, and potatoes with salt to taste and enough stock to cover. Squeeze the roasted head of garlic to remove the garlic from the peels, and add the garlic to the pot. Add remaining spice mixture.
7. Raise heat to high to bring to a boil, then lower heat to simmer, uncovered, for about 20 minutes. Blend using an immersion blender, or in sections in a conventional blender. Taste and adjust spices and salt. Cover to keep warm.
For the tempering:
1. Heat margarine in a small skillet on medium until sizzling. Add chili and fry for a couple minutes, flipping occasionally, until fragrant. Add mustard seeds and fry for another minute or so, until popping.
2. Add jaggery or brown sugar and allow it to melt. Add tamarind, soy sauce, and pepper flakes or chili oil, and continue to heat until mixture returns to a slow boil. Remove from heat and stir in lime juice.
3. Divide soup into bowls and garnish with a spoonful of tempering sauce, celery leaves, sliced roasted celery, additional spice mixture or pepper flakes, etc.
#amongst all the research I do to recreate dishes it was fun to simply make something up!#though of course 're-creation' is never just re-creation and does always involve curation and decision-making#soup#cooking#US American#I guess?
74 notes
·
View notes
Text
Paneer and Vegetable Korma
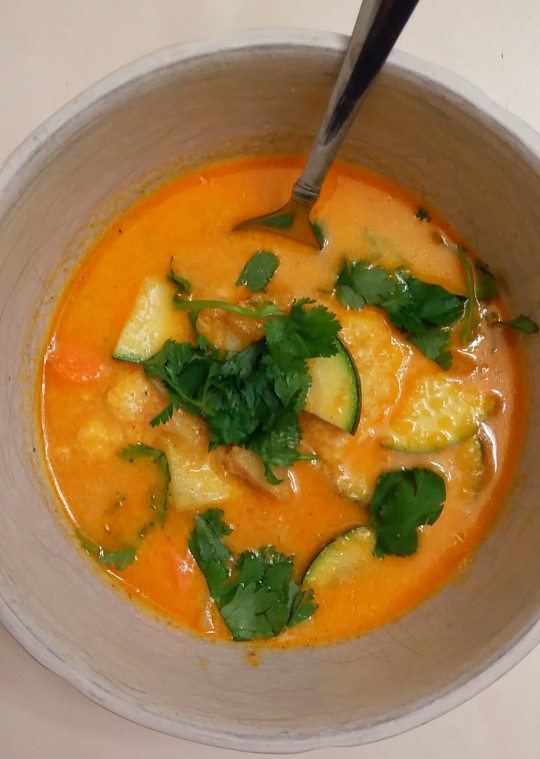
Usually korma is made with chicken, but I wanted to try something vegetarian. I'm getting a little sick of chicken! My brother absolutely refuses to eat anything without meat in it, but he liked this just fine. Finally a reprieve from chicken!
Ingredients
♡ 1/4 cup olive or coconut oil
♡ 1 large onion, diced
♡ 4 cloves garlic, minced
♡ 1 tsp ginger paste
♡ 1 small tomato, diced (optional)
♡ 3/4 cup greek yogurt
♡ Bay leaf
♡ 1 tsp ground cumin
♡ 1/4 tsp ground coriander
♡ 1/4 tsp ground cardamon
♡ 1/8 tsp black pepper
♡ 1/8 tsp ground cloves
♡ 1/8 tsp ground cinnamon
♡ 1/2 tsp chili powder
♡ 1/2 tsp turmeric
♡ 1/2 tsp paprika
♡ 1 tsp garam masala
♡ salt, to taste
♡ 1/2 cup carrots, diced
♡ 1 cup potatoes, diced
♡ 1 large zucchini, sliced
♡ Paneer or tofu
♡ 1/2 cup to 3/4 cup water
♡ Cilantro to top
Inatructions
☆ Heat oil in large pan at medium heat. Add onions and stir
☆ Heat onions until almost translucent, then add garlic and ginger paste
☆ Once all items from pan are cooked, transfer them to a food processor or blender
☆ Add tomato and yogurt to the food processor and blend until smooth
☆ Add the blended mixture back into the pan an stir in spices. Saute until mixture reaches a simmer
☆ Add in vegetables and paneer/tofu. Let simmer for 10-12 minutes
☆ Add 1/2 to 3/4 cup water, depending on your desired consistency. Stir and let simmer for 2 to 3 minutes.
☆ Serve topped with cilantro
#gluten free#my recipe#my recipes#gluten free recipe#gluten free recipes#vegetarian#gluten free indian food#indian food#nut free#egg free#celiac#curry
33 notes
·
View notes
Text
I asked ChatGPT to suggest a meal recipe I could make with corn that would go with my diet plans. I enjoyed it and would make it again. I failed to take a picture
Here’s a heart-healthy, low-cholesterol corn soup recipe that aligns with your diet goals. It’s creamy, flavorful, and packed with fiber without heavy cream or butter.
Creamy Vegan Corn Soup (Cholesterol-Friendly)
✅ Dairy-free, heart-healthy, and low in saturated fat
✅ High in fiber from corn and veggies
✅ Can be made ahead and stored for the week
Ingredients (4 servings)
• 2 cups fresh or frozen corn kernels
• 1 small yellow onion, chopped
• 2 cloves garlic, minced
• 1 small potato, peeled and diced (adds creaminess)
• 2 cups low-sodium vegetable broth
• 1 cup unsweetened almond milk (or oat milk)
• ½ teaspoon ground turmeric (anti-inflammatory)
• ½ teaspoon ground cumin (adds depth)
• ¼ teaspoon black pepper
• ½ teaspoon salt (optional or to taste)
• 1 teaspoon olive oil
• 1 tablespoon nutritional yeast (optional, for a cheesy flavor)
• Chopped green onions or cilantro for garnish
Instructions
1. Sauté Aromatics – In a pot, heat 1 teaspoon olive oil over medium heat. Add chopped onion and garlic. Sauté for 2-3 minutes until fragrant.
2. Cook the Base – Add diced potato, corn, turmeric, cumin, black pepper, and salt. Stir well.
3. Simmer – Pour in vegetable broth. Cover and simmer for 15 minutes until the potato is tender.
4. Blend – Use an immersion blender (or carefully transfer to a blender) and blend until smooth. If you like it chunkier, blend only half the soup.
5. Add Almond Milk – Stir in almond milk and nutritional yeast. Simmer for 2 more minutes.
6. Serve – Garnish with green onions or cilantro and enjoy!
Nutrition per Serving (~1 cup)
• Calories: ~150
• Fat: ~4g (healthy fats from olive oil)
• Saturated Fat: <0.5g
• Carbs: ~25g (good fiber from corn and potatoes)
• Protein: ~4g
• Cholesterol: 0mg
Serving Suggestions
✔ With a side salad – Add leafy greens for extra fiber.
✔ With whole-grain toast – A slice of sprouted grain bread pairs well.
✔ Topped with avocado – For extra healthy fats.
4 notes
·
View notes
Text

[Anna and Bernhard Blume]
* * * *
RUSTIC POTATO LEEK SOUP
DESCRIPTION
This Rustic Potato Leek Soup recipe is kept nice and chunky, it’s naturally gluten-free and vegan (no cream), and it’s full of the coziest, comforting, simple flavors.
INGREDIENTS
2 tablespoons olive oil (or butter) 1 medium white onion, peeled and diced 3 leeks, sliced into 1/2-inch half moons (white and light green parts only) 1 rib celery, thinly sliced 5 cloves garlic, minced 1/2 cup dry white wine 1 1/4 pounds Yukon Gold potatoes, cut into bite-sized chunks 6 cups vegetable stock 4 sprigs fresh thyme 2 bay leaves 1/4 teaspoon cayenne (or less, if you prefer) fine sea salt and freshly-cracked black pepper optional toppings: homemade croutons, grated Parmesan, chopped fresh chives
INSTRUCTIONS
Sauté the veggies. Heat olive oil (or butter) in a large stockpot over medium-high heat. Add the onion and sauté for 5 minutes, stirring occasionally. Add the leeks, celery and garlic and sauté for 3 minutes, stirring frequently.
[Note: I reserved about 1/3 of the soup and blended the rest with an immersion blender, adding back in the potato and leek. Tasted great, creamy texture without cream.]
Serve. Serve warm, garnished with whatever toppings sound good, and enjoy!
[my food and recipe blog: Continual Feasts]
#recipes#Continual Feasts#recipe#potatoes#Potato and Leek Soup#soup#main dish soups#Anna and Bernhard Blume
9 notes
·
View notes
Note
Ratatouille soup :00 that sounds so good!! I've always wanted to try ratatouille but put it off bc I don't like the texture of most cooked veggies
Could we get a recipe mayhaps? 👀👀
Oh definitely!!
I don't really have measurements, but I'll try my best! I always cook a little more, and freeze the rest. I have about four days of food with these ingredients.. I also eat fairly small portions though, so keep that in mind!
Without further ado, let's get to making the ratatouille!
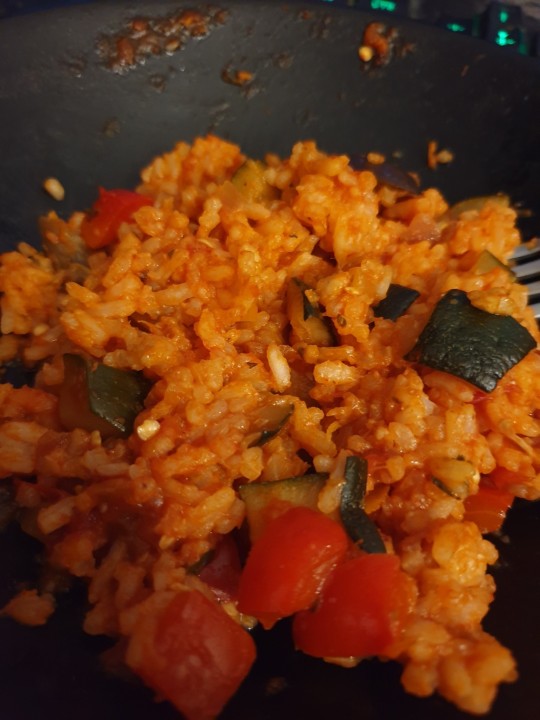
For the ratatouille you need:
1 aubergine
1 courgette
1 red bell pepper
1 yellow bell pepper
1 green bell pepper
1 to two red onions
1 can of peeled and diced tomatos
1 teaspoon of sugar
Salt, pepper to your liking
Herbs & spices of your choice (I use salt, pepper, rosemary, parsley and tumeric.)
Half a tube of tomato paste
And technically garlic, but I hate that stuff so I leave it out lol (about one to two cloves should be enough, the garlic should be minced)
Maybe rice, pasta or potatoes to eat it with. (I'll follow up on that later in this post)
for the ratatouille you gotta:
Clean and dice the aubergine
Put the aubergine dices in a bowl with salt and shake it up - cover up the bowl and put it aside.
Next clean and cut the courgette and onions. (& the garlic if you choose to add it). - Put all those in one bowl.
Now clean and dice the bell peppers and place those in a separate bowl.
Take the aubergine out and tap it dry with a paper towel & clean out the bowl - put it back in the bowl clean bowl for now.
Heat oil in a pan (any oil works but olive oil tastes best)
First add the courgette, onion (& garlic) in the pan and cook them until the onions are slightly see through.
When that's done add the bell peppers.
After those are integrated through stirring, add the aubergine.
Let the veggies cook for 5 minutes - keep stirring.
After 5 minutes add the tomatoes, tomato paste, the sugar and whatever seasoning and herbs you want. (I add salt, pepper, rosemary, parsley and tumeric.)
Cook the ratatouille for about 20 minutes on middle heat - don't forget to stirr it every once in a while.
Ratatouille pairs great with:
Rice, pasta or potatoes (I prefer rice).
Simply cook one of these in the 20 minutes the ratatouille needs to fully cook. - Keep it in separate containers, otherwise the add INS suck up all the moisture.
Also, Pasta & Rice Arend good to freeze & it doesn't work with the soup!
If you don't like the texture of cooked veggies, blending them into a soup could be the perfect solution. A friend of mine also has a sensory problem with those textures and she loves this soup. I have the same issue with mushrooms, so I also only eat them in cream soup form.
Sensory issues are way more common than most people think, it's nothing to be ashamed of! <3
So, without further ado, let's get to making the soup!
For the soup you need:
The Ratatouille (without rice, pasta or potatoes)
1 bunch of Parsley
1 Parsley root
1,5 Leeks
1 cup of Cooking cream (250 ml)
I also like to add 2 - 3 carrots, it's not a must though. - That just makes it taste a little different than ratatouille, and I prefer to not have the same tasting food two days in a row! (If you just want to make ratatouille soup right from the start, there's no need to add them at all)
What you gotta do:
Clean and cut/ dice the parsley, parsley root, leeks (& carrots)
While you do that, bring about two and a half cups ow tater to the boiling point.
Add vegetable broth, pepper and the veggies.
Cook until the carrots and parsley root are soft enough to easily poke them with a fork/ toothpick.
Take it off heat and add the ratatouille. [If you youse previously frozen ratatouille leftovers, keep it on heat until it fully unfreezes and heats up too.]
Leave it to cool off a bit before pouring it into a blender to blend it up. - otherwise the blender might leak/ the lid may pop off. [If you use a stick blender, you don't need to let it cool first & can just blend it in the pod you're cooking in.]
After it's pureed to your liking, pour it back into the pot and add the cooking cream (or vegan substitute) and cook under constant stirring, until it begins so simmer.
And now to the toping & side:
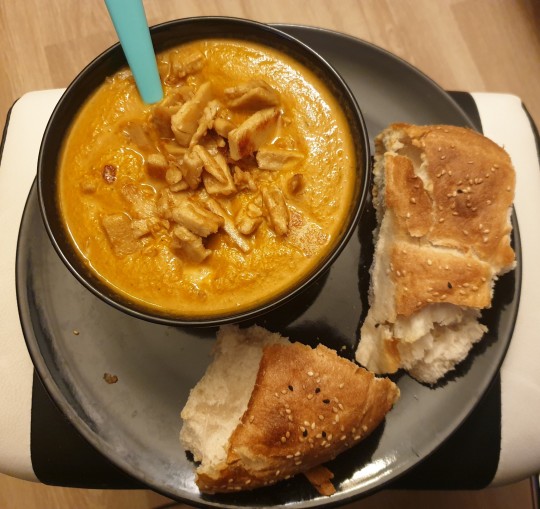
I highly recommend to top it with shredded chicken / shredded chicken substitute. - just fry it in a frying pan until it's golden brown. - Make sure to use the same oil you did for the onions & courgette in the ratatouille!
And flatbread with sesame seeds & poppy seeds is amazing to dip it in the soup. - simply heat it in the oven until it's nice and crunchy outside and fluffy inside (ca. 10 - 15 min at 150°C - that's 302°F)
And that's that!
I hope the receipt is easy to follow, if you have any questions just ask in the comments or DMs!
I'd love to see your results if you choose to cook it too! <3
Have fun and good luck cooking!!
#nates foods#nates recipes#recipe#i love soup#soup season#ratatouille#ratatouille soup#sfw interaction only#sfw#sfw agere#age regression#agere
8 notes
·
View notes
Text
A curry base you can use for anything
I know that's a big claim. But as long as you're making a curry with a base of tomato, onion, ginger, and garlic, this base will serve you well. You can use it for chicken, rajma, chole, paneer, pav bhaji, etc.
And it's only $1 per serving. In Toronto.
I'm a busy woman and I make a lot of curry. I make a double batch of this recipe and freeze it in an ice cube tray then dump the cubes into a freezer bag to use later as needed. I use it in various curries throughout the week. And no, they don't all taste the same. How? Because this curry base doesn't have spices. You're just taking the most time-consuming part of curry (browning the onions, simmering and reducing the tomatoes, etc) and doing that ahead of time.
Here's my recipe (makes 6-8 servings):
1 can Tomatoes (without calcium chloride) or 1.5kg (3 pounds) fresh. (See my post about canned tomatoes and why they're better)
750g (1.5 pounds) Red Onion
1 head garlic, peeled
4 small spoonfuls ginger paste, or 1" fresh (see my post on how to make and preserve your own ginger paste to save money)
Ghee or oil
Peel and slice your onions. You could chop them roughly if you'd like, because later we will be blending it. However, I like slicing them thin, to give the onion more surface area for browning. More browning gives more flavor.
Heat a pot or saucepan on medium heat and add ghee or oil, about 1/4-1/2 cup (50-100mL). I prefer a pot as it prevents those splatters from getting all over the stove, but a saucepan will do fine.
Add your onions and stir frequently
While the onions are browning, peel your garlic. If using fresh ginger, remove the skin and cut into smaller pieces.
Once onions are nicely browned, add your garlic and ginger. Continue cooking for a few more minutes, stirring frequently, until garlic is lightly browned. Do not burn.
Add the whole can of tomatoes. If using fresh tomatoes instead, roughly cut first and remove the stem. Use a potato masher to break up the tomatoes a bit and release all the juices.
Once the mixture starts to bubble, reduce the heat to low and simmer. Allow to cook until very thick, up to an hour or possibly more. Stir regularly to prevent burning.
Once fully thickened, transfer to a blender or food processor. Blend until smooth.
Transfer to an ice tray. Freeze for at least 8 hours before transferring to a freezer bag.
To use your curry base:
Simply add when you're supposed to add your tomatoes in a curry recipe, along with water as needed for the correct consistency. Use to replace onions, ginger, garlic, and tomatoes. You may need to add additional onions, garlic, etc depending on the exact recipe, but usually you don't.
Here's an example recipe for rajma. You can use the same process for other legumes, just alter the spices. For meat/paneer/soya you can either follow the same process, or you can first marinate and fry the meat/paneer/soya separately before adding it to your finished tadka. For pav bhaji, I recommend first boiling and mashing the veggies separately before adding it to the curry. I also recommend adding some extra garlic paste for pav bhaji. Aside from that, just use your imagination! The possibilities are endless.
Rajma (makes 2-3 servings)
In an Indian pressure cooker on medium heat, add: a large spoonful of ghee, 1 cinnamon stick, 1 black cardamom, 2-3 green cardamom, and 1/2 tsp mustard seeds
Add 2tsp fennelseed powder, 1/2tsp tumeric, 2tsp coriander powder, 1/4tsp chili powder, 1/2tsp ground cumin, a pinch of hing, and salt to taste.
Quickly, before the spices burn, add a handful of frozen curry base cubes, and a splash of water. Let the cubes melt completely, then add more water to adjust the thickness. If it's too thick it will burn while cooking the beans.
Add red kidney beans. If canned, drain and rinse first. Close the pressure cooker and cook 20 minutes.
Release the pressure, open, and give the beans a slight mash with a potato masher. Adjust the thickness if needed with water. If too thin, simmer until reduced.
Finish with 1/2tsp garam masala. Taste and add any other spices as needed.
2 notes
·
View notes
Text
A soup without solids is usually a broth. Unless it's a blended soup that's made by taking a solid and blitzing it with a blender and making it smooth.
Soup can contain solids.
A stew is a soup that has many chunks but the broth has been thickened by something other than cream, usually flour or cornstarch until it has a gravy like consistency. Usually stews have starchy veg in them (potatoes!) already so it's less common to serve them with another starch (tho sometimes folks will throw egg noodles in, or serve over rice).
the soup poll AKA where are the chunks?
occasionally when discussing lunches and dinners and other such wonders i get the feeling when i say "Soup" i mean another persons definition of "Stew", and our communication is somewhat skewed. please tell me how you identify your wet meals
if you so desire, detail your decision With the place you grew up/learned your distinction in the tags
#I tend to say it's a soup unless its thick enough to be served on a plate#but that's not true in every instance
14K notes
·
View notes
Text
"potato" soup principles: a laissez-faire framework for soupmaking
core ingredience: the non-negotiables but read the list because it's kindof whatever
1 package southern style diced hash browns (32oz) or just cut up any old potatoes and fill most of whatever pot you got.
1 carton chicken or vegetable broth. or a can of any broth or like powder broth/extra ramen packet/etc if smaller batch.
seasonings to taste - salt, pepper, bay leaves good; i often do thyme, basil, tumeric, ginger, or whatever i feel like. curry powder fucks in this if you want something warming.
additional ingredience: generally these will improve your soup if you have them but get creative with it and experiment! or just don't add any because you're depressed/are having a soup crisis/other circumstances. whatever your situation is.
1 can of condensed "cream of" soup - i prefer cream of potato, but chicken or celery or whatever work just fine it's a thickener so you could even do a roux from scratch but if that's what you're into you're probably not needing this recipe
other chopped veggies to preference - diced or shredded carrot is great and can even be higher % than potatoes (curried carrot soup using this method is great); some diced celery, a yellow/white onion, diced, or other root/etc veggies for filler (esp. if blending). if doing a thinner soup, something like cannelini beans can also work great
1 pkg cream cheese OR some quantity of heavy/whipping cream, whichever you have on hand. or skip it. what ever
Instruction: works great in a slow cooker on low all day but can be cooked in shorter time stovetop. whatever works for you
sautee veggies if using onion or anything that needs sauteed.
put entire frozen potato bag in pot, then can of cream of whatever if you have it & want something thicker. and softened cream cheese, if that's your dairy. add the broth at the end and it will help disperse the
add seasonings as you feel like - you can mix them in a little bowl ahead of time and taste that if you dislike seasoning to taste.
cook for a good length of time til potatoes(/veggies) are all soft.
add heavy cream at the end. or at the beginning idgaf but i always forget and it doesn't need to melt like cream cheese does. if you forget the cream cheese microwave it on low for 15s at a time and incorporate slowly at end.
blend or mash if you prefer that texture. immersion blenders are shockingly cheap but i make it both blended and not regularly. cubed ham is best added just at the end if not blended, but you could put it in after blending too. or before if you're crazy. i dont judge
top with cheese, or sour cream. or dont. voila
almost all of this recipe is technically optional; skipping the cream of (or whatever thickener you prefer) makes a thinner soup. blending can simulate more thickness if you are root veggie heavy, though without a thickener/cream it may be a little grainy/coarse. ive been desperate enough to do this and it was just fine. root veggies are honestly kinda interchangeable in this way bc of the starch content that makes this not-a-real-recipe cohere despite the variables.
adding dairy, especially heavy cream or cream cheese, will mellow the flavor and compliment thicker soups well. this can be paired with curry powder, curry roux cubes, garam masala, or other similar spices for an indulgent, warm soup.
you can skip dairy & thickeners and lean into more savory flavors, such as stewing the potatoes & veggies in e.g. soy sauce and some gochujang. you could probably get away with cream of [x] soup here too but i haven't tried it. or lean more toward chicken soup & pair with egg noodles, white/cannelini beans, etc. because honestly you can just put potatoes in chicken soup if you want it's just vegetables and chicken and broth and shit. don't sweat it
0 notes
Text

You can treat yourself without feeling bad with this healthy and creamy vegan cheese sauce. This sauce is full of healthy foods like cashews, potatoes, and carrots, so it tastes great and doesn't have any extra fat. It tastes great drizzled over your favorite foods or used as a dip for snacks.
Ingredients: 1 cup raw cashews. 1 cup peeled and diced potato. 1/2 cup peeled and diced carrots. 1/4 cup nutritional yeast. 1/4 cup lemon juice. 1/2 teaspoon garlic powder. 1/2 teaspoon onion powder. 1 teaspoon salt. 1/2 teaspoon paprika. 2 cups water.
Instructions: Chop up some potatoes and carrots and put them in a medium-sized saucepan. Put water on top and boil it. About 10 to 15 minutes, or until the vegetables are soft. The cashews, potato, and carrots should be drained and put into a blender. You can blend water, lemon juice, garlic powder, onion powder, nutritional yeast, and salt. If you need to, add more water to get the consistency you want. Blend until smooth and creamy. Right away, pour it over pasta, steamed vegetables, or use it as a dip.
Prep Time: 10 minutes
Cook Time: 15 minutes
ProtechZone
0 notes
Text
Potato Leek Soup

With few ingredients and little time you can make this delicious, creamy, and comforting Potato Leek Soup!
There are an infinite number of potato leek soup recipes, ( a French classic) on the internet, of which there are many similarities. Some have added extra ingredients, and there are an array of different garnishes for serving.
After looking through numerous recipes I decided on this one from the blog Once upon a Chef for its simplicity and relatively short cooking time.
The resulting soup is smooth, flavorful , and very satisfying .
I have made it often. Garnish it simply with some chopped chives, or for more texture garnish with bacon, fried leeks, diced veggies, or your favorite fresh herbs.
Here's the recipe...
Potato Leek Soup (Once Upon a Chef, with Jenn Segal)
Ingredients
3 tablespoons unsalted butter
4 large leeks, white and light green parts only, roughly chopped (about 5 cups)
3 cloves garlic, peeled and smashed
2 pounds Yukon Gold potatoes, peeled and roughly chopped into 1/2-inch pieces
7 cups chicken or vegetable broth
2 bay leaves
3 sprigs fresh thyme
1 teaspoon salt
1/4 teaspoon ground black pepper
1 cup heavy cream
Chives, finely chopped for serving
Instructions
1 . Melt the butter over medium heat in a large soup pot. Add the leeks and garlic and cook, stirring regularly, until soft and wilted, about 10 minutes. Adjust the heat as necessary so as not to brown.
2 , Add the potatoes, broth, bay leaves, thyme, salt and pepper to pot and bring to a boil. Cover and turn the heat down to low. Simmer for 15 minutes, or until the potatoes are very soft.

3 .Fish out the thyme sprig and bay leaves, then puree the soup with a hand-held immersion blender until smooth. (Alternately, use a standard blender to puree the soup in batches; see note.)

Add the heavy cream and bring to a simmer. Taste and adjust seasoning with salt and pepper. If soup is too thin, simmer until thickened. If too thick, add water or stock to thin it out. Garnish with fresh herbs or other garnishes mentioned above.


Note; If using a standard blender to puree the soup; be sure not to fill the jar more than halfway; leave the hole in the lid open and cover loosely with a dishtowel to allow the heat to escape; and pour the blended soup into a clean pot.
Freezer Friendly Instructions; the soup can be frozen, without the cream, for up to 3 months. Defrost the soup in the refrigerator for 12 hours and then reheat it on the stovetop over medium heat til hot. Once heated through, add the cream and bring to a simmer before serving.
0 notes
Text

This dairy-free broccoli and sweet potato soup is a hearty and healthy meal that's great for a cold night. It's gluten-free, Paleo, and Whole30-friendly, so it can fit a lot of different diets. The texture is rich and creamy without any dairy because of the sweet potatoes and broccoli. This soup is easy to make, tastes great, and is very satisfying. It has warm spices like cumin and ginger in it.
Ingredients: 1 large sweet potato, peeled and diced. 2 cups broccoli florets. 1 onion, chopped. 3 cloves garlic, minced. 4 cups chicken or vegetable broth. 2 tablespoons olive oil. 1 teaspoon ground cumin. 1/2 teaspoon ground ginger. Salt and pepper to taste. Optional: chopped fresh parsley or cilantro for garnish.
Instructions: Put olive oil in a big pot and heat it over medium-low heat. Add the minced garlic and chopped onion and saut until the onions are fragrant and clear. Dice the sweet potato and broccoli florets and add them to the pan. Season with salt and pepper. Add the chicken or vegetable broth and bring it to a boil. Then lower the heat and let it simmer for about 15 to 20 minutes, or until the vegetables are soft. Blend the soup until it is smooth and creamy with a regular blender or an immersion blender. If you need to, change the seasoning. If you want, you can serve it hot with chopped fresh parsley or cilantro on top.
Prep Time: 15 minutes
Cook Time: 20 minutes
Davis
0 notes