#age regression crafts
Explore tagged Tumblr posts
Text
Dolly’s Crafts Pt. 2!!
My beautiful little baby angel made the cutest little snowman oh my goodness!! Look how lovely <33 We absolutely must hang it in the tree!! My pretty little fairy loves to make art and crafts, I adore how creative he is and i cherish every single one of these cute little ornaments and decorations <33
Later on I may post the crafts that my little princess made back when it was Halloween time or beforehand even though they’re not in season anymore :P Halloween is all year round in our hearts though! We love all things spooky and scary, my little kiddo is such a brave baby! Just don’t mention herobrine to him :P
Just like the ornament crafts before, these are super duper easy to make and thankfully there’s no hot ovens involved this time! In the next section I’ll give more info!
Here’s the cutest little snowman craft my baby made!!


For this DIY you will need…
🍼) Baker’s Twine
🍼) Wood Beads!!
🍼) Tape
🍼) Paint!! (Or Makers!)
🍼) Ribbon
🍼) Scissors!
These are called Wood Bead Ornaments and just like in part 1 I will link a post that goes more into detail on to how make these step by step!

I love making posts where I talk about my little one! It makes me feel like such a proud dad being able to show off the beautiful things my special little kiddo makes and being able to talk about his accomplishments and how far he’s come, I’m truly proud of you, Dolly <3
Merry Christmas to all little ones and carer’s out there who are trying their very best! And like always Dolly and I would love to know if any of you try to make these yourselves!!


#agere crafts#agere activities#age regression activities#age regression crafts#little space crafts#little space activities#agere#age regression caregiver#agere caregi#agere caregiver#agere cg#caregiver#caregiver blog#sfw agere#sfw caregiver#age regression#little space community#agere safe space#age regression community#sfw agedre#safe agere#sfw littlespace#agere blog#agere christmas#christmas#christmas crafts#rider dad posts#rider is dad posting#dolly and dad posts#Dolly’s crafts
7 notes
·
View notes
Text


#age regression crafts#agere crafts#agere craft#agere diy#agere diys#agere dolls#dolls#doll diy#doll craft#doll crafts
8 notes
·
View notes
Text


here are some snacks that aren't pre-packaged snack cakes for my fellow regressors who prefer more 'healthy' options!! :D

Yogurt Cups
Peanut Butter and Apple Slices
Granola Bars
Dried Fruit Crisps
Sliced Fruit
Cheese and Crackers
Trail Mix
Baby Carrots, Celery, etc. and Dip
Apple Sauce (+ cinnamon)
Cheese Sticks
Pretzels and Peanut Butter
Fruit Cups
Crackers (Pita, Ritz, etc.)
Ants on a Log
Cashews
Veggie Sticks/Straws
Yogurt Bites
Orange Slices
String Cheese
Nuts
Kale Chips
Unsalted/Organic Popcorn

#agere resources#agere food#agere recipes#agere blog#agere community#sfw agere#age regression#age regressor#safe agere#sfw agere community#sfw interaction only#age regressive#🍫 ; beau crafted
410 notes
·
View notes
Text


new versions of my bluey healing/recovery userboxes . . . ♪
♡ with easier to read text/colors !
free to use . . credit only if you repost ♪

#︶︶ ˚ crafts#sfw agere#age regression#agere#sfw age regression#age regressor#noncom agere#agere blog#sfw littlespace#agereg#sfw agereg#age re safe space#inner child healing#inner child#recovery journey#mental health#agedre#sfw agedre#age regression sfw#age regression blog#age regressive#age re#safe agere
954 notes
·
View notes
Text
Pls interaction if your a active sfw agere/petre blog :D
new blog and I want more friends to follow :3
#age regression#petre caregiver#kitty petre#bunny petre#cat petre#noncom petre#agere community#safe agere#sfw agere#age regressor#fandom agere#agerespace#agere positivity#agere little#agere#age regressive#agere blog#agere art#agere classroom#agere caregiver#agere daycare#agere stimboard#agere school#agere crafts#agere diy#agere moodboard#petre art#fandom petre#petre moodboard#petre stimboard
347 notes
·
View notes
Text
Arts and Crafts Themed Dividers 🎨🧶


#agere#age regressor#age regression#agere dividers#age dreaming#arts and crafts#free to use#credit appreciated
231 notes
·
View notes
Text
Snailsagere's 30 days of agere moodboards ★´ˎ˗
︶︶︶ Day 13: Favorite agere activity


#arts and crafts obviously!!!#agere#sfw agere#agere sfw#age regression#age regressor#agere blog#sfw agere blog#sfw regression#sfw regressor#agere aesthetic#sfw agere moodboard#agere moodboard#age regression moodboard#blankiefort ★´ˎ˗#kitty boardees ★´ˎ˗
309 notes
·
View notes
Text

⊹₊⟡⋆ The Very Hungry Caterpillar Outfit!!
gift for @boypaci!! I found a hungry caterpillar plush and just had to make a board for it, and figured you'd like it too!! :D
⊹₊⟡⋆ do not repost/claim as your own!!

#⊹₊⟡⋆ 🦴 ) crafted by the sea#agere outfits#sfw agereg#agere community#noncom agere#sfw agere community#sfw interaction only#age regression#agere blog#age regressive#age regressor#sfw agere#sfw agere moodboard#agere moodboard#toddler regression
309 notes
·
View notes
Text


#koda talks 🎀#kodaswrld#agere class#agere classroom#agere daycare#agere school#agere#age regression#sfw agere#sfw littlespace#age regressor#sfw age regression#agereg#age dreaming#sfw little blog#agere blog#Ciao lovelies#Agere diys#Agere diy#Agere craft#Agere crafts#safe agere#sfw regression#agere post#agere community#agere caregiver#ageregression#age regressive#caregiver agere#sfw caregiver
280 notes
·
View notes
Text
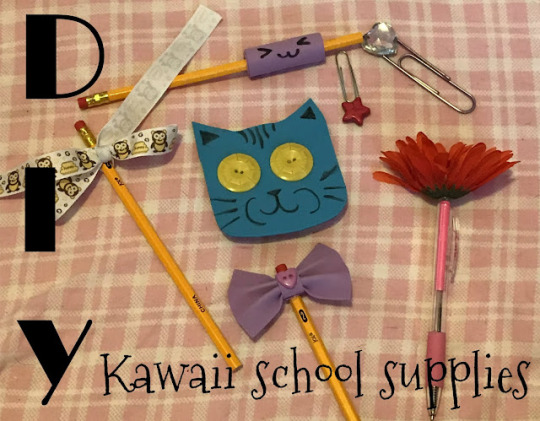
DIY Kawaii: School Supplies!
originally posted to www.onlyfunthings.org on June 13, 2017

Ciao lovelies! Today, we’re making DIY kawaii school supplies!
Part one of this series is DIY Kawaii Accessories, HERE. Today though, we’re making a batch of kawaii school accessories, including kawaii pencils, pens, paperclips, and even a cute cat notebook! Let’s go!
To start, you’ll need your bases. We need a few #2 pencils, a pen, some paper clips, and a post-it note pad.

#1- Ribbon Pencil
For this kawaii diy, simply: glue the pencil to the middle of the ribbon. Tie the ribbon in a bow around the pencil, double knot for security! And you have a kawaii pen with a ribbon bow!

#2- Kawaii Face Pencil Grip
For this DIY, we need some craft foam and a sharpie. Cut a rectangle of foam as wide as you want the pencil grip. Wrap it around the pencil, gluing occasionally to secure. Glue the end down and draw a kawaii face on it with sharpie! You’re done!

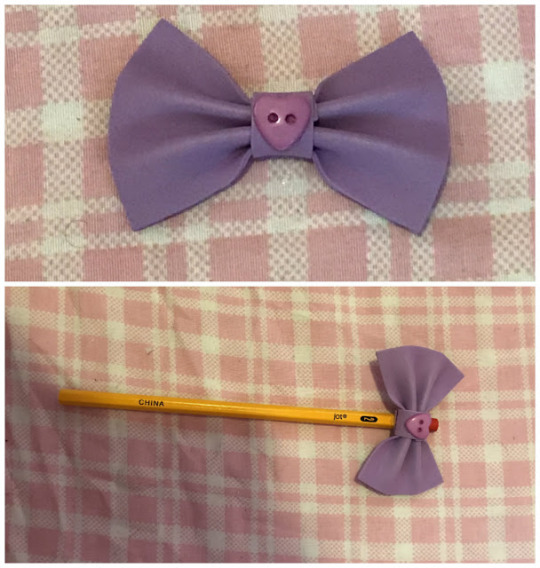
#3- Bow Pencil
For this pencil, we need some craft foam, a charm, and some glue (And of course a pencil). Make a bow in the same way we made the one from PART 1 but smaller. Add a charm, and then glue to the pencil! Done!

#4- Cat Notepad
Take your post it notepad and trim the corners and top to make a cat face. Trace it onto craft foam and cut it out. Glue it at the top to the top of the post it notes. Decorate the face and now you have a cute cat notepad!

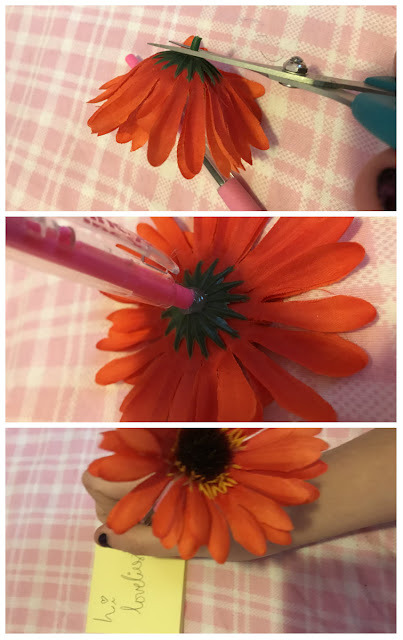
#5- Flower Power Pen
Take a fake flower of your choice and cut off the stem. Then glue it onto the end of your pen for an easy DIY flower pen!

#6- Decorated Paper Clips
These are great because you can double use them as book marks! Cut small squares in craft foam and lay the squares under the ends of the paper clips. Glue desired charms onto the paper clips and foam. And you’re done!

Thanks for reading! See you in our next post! Stay lovely!
Remember to stay awesome and love yourself :)

#agere class#agere classroom#agere daycare#agere school#agere#age regression#sfw agere#sfw littlespace#age regressor#sfw age regression#agereg#age dreaming#sfw little blog#agere blog#Ciao lovelies#agere diys#agere diy#agere craft#age regression crafts#craft ideas#crafts#kawaii crafts#agere crafts#sfw little
7 notes
·
View notes
Text
How to Make a LEGO Rattle! (With Pictures)
step 1: gather the pieces you'll need!

here I have:
12 2x2 bricks
6 1x1 round plates
8 1x2 bricks
4 1x1 bricks (can be replaced by 1x2s but i ran out lol!)
2 1x2 tiles
1 2x4 tile
4 2x2 inverted slope bricks
step 2: the handle!

stack all the 2x2 bricks into a tower. I chose to make a double rainbow with my colours, but you can use whatever colours you want or have!
step 3: the base!

take 2 of the inverted slope bricks and place them on the top of the tower, 1x2 side down

then, take the 1x1 bricks and put them on the parts reaching off of the tower, to create a sort of C shape on the top


put the other 2 inverted slopes perpendicular to the first 2, in between the 1x1s from earlier. it should look like a plus sign (+) when viewed from the top
step 4: the sides!


put 2 1x2 bricks on top of each other, on the ends of 3 of the slopes, to begin to close in the center
step 5: the top!

the 2x4 goes across the top, from one 1x2 to the other
step 6: the filling!

the round plates go inside the center
step 7: close it!


the last 1x2 bricks go on top of each other on the open edge
step 8: finishing touches!

the 1x2 plates go on top, on the bricks that are still uncovered, to make it look nice
the finished product should look something like this:

now enjoy your rattle!
#agere#age regression#sfw agere#sfw age regression#age regressor#age regression sfw#agere blog#agereg#agere boy#agere sfw#agere activities#safe age regression#agere community#agere diy#agere crafts#agere gear#diy agere gear
236 notes
·
View notes
Text

ʚ 🐉 ) Dragons!! >:)
Dragon kiddo, that's me!!

#agere outfits#sfw interaction only#agere blog#agere community#sfw agere#age regression#age regressor#safe agere#sfw agere community#age regressive#sfw agere moodboard#agere moodboard#masc agere#boyre#boy regression#boy regressor#🍫 ; beau crafted
304 notes
·
View notes
Text


Age Regression Moodboard Pt.3 Crafts
Requests are open check pinned post

#moodboard request#age regression moodboard#agere moodboard#moodboard#crafts#crafting#crayon#crayola#coloring#chalk art#sidewalk chalk#agere#agere blog#sfw agere
202 notes
·
View notes
Text
Homemade sensory bottles!
This is an extremely easy and cheap way to make sensory bottles!


what you need:
an empty plastic bottle
glitter, charms, and any add ins you want
water!
paper towel or napkin
markers
Glue (optional, but for slower glitter fall.)
How to make it!
in a seperate cup, pour water into it
then, use a marker, color the napkin with as much ink as you can, and place it in the water cup, and watch the color flow!!
Stir the napkin until the water is fully colored, and remove the napkin.
Pour the colored water into the plastic bottle. keep doing so until you've filled the desired bottle.
Now the fun part! Add all the glitters and charms, screw the bottle tight, and shake!
Congrats! now you have a sensory bottle!

#agere#sfw agere#agere caregiver#agere imagine#age regression#agere sfw#agere crafts#agere game#crafts#kids crafts#diy
123 notes
·
View notes
Text


♡ age regression flag pfp frames o(^—^)o ♪ made by me
... agere flag, permaregression flag, age dreamer flag, boyre flag ♡
... these are free to use ! ( ˶ᵔ ᵔ)

#︶︶ ˚ crafts#sfw agere#age regression#agere#sfw age regression#age regressor#noncom agere#agere blog#sfw littlespace#agereg#sfw agereg#age dreaming#sfw age dreaming#sfw age dreamer#age dreamer#agedre#sfw agedre#permaregressor#permaregression#agere community#boyre#boy regression#boy regressor#sfw boyre#agere boy#agere png#agere edit#agere icons#frames
160 notes
·
View notes
Text


⊹₊⟡⋆ Comfort Bear Regressor Stimboard!!
with lots of yummy dessert stims for myself because ive been feeling down lately <3
Trying out making stimboards to see how I like it/if I wanna make a whole nother blog for them :)
credits: x | x | x | x | x | x | x | x

#⊹₊⟡⋆ 🦴 ) crafted by the sea#bear regressor#bear regression#agere stimboard#sfw petre#safe petre#sfw petre community#petre community#pet regression#petre blog#petre stimboard#sfw agereg#agere community#sfw agere community#sfw interaction only#noncom agere#agere blog#age regression#age regressive#age regressor#sfw agere
257 notes
·
View notes