#Snacks Recipe
Explore tagged Tumblr posts
Visit Tumblr Blog
Explore Tumblr blogs with no restrictions, modern design and the best experience.
Last Seen Tumblr Blogs


Fun Fact
Tumblr has a 66 index score for customer satisfaction in the US.
Text

Pizza Grilled Cheese
#Pizza Grilled Cheese#pizza#pepperoni#cheese#cheesey#sandwich#grilled cheese#toasted bread#lunch recipes#lunchtime#lunch#dinner#fast food#comfort food#toya's tales#style#toyastales#toyas tales#november#munchies#snacktime#snack#game day#game night#super bowl#food porn#food photography#foodporn#food pics#foodie
7K notes
·
View notes
Text

Cinnamon Swirl Quick Bread
#cinnamon swirl#cinnamon#quick bread#bread#baking#recipe#brown sugar#loaf#kids#breakfast#dessert#tea time#snack#buttermilk#insanelygoodrecipes
2K notes
·
View notes
Text


Spicy Argentinian beef empanadas
#empanadas#beef#spicy#ground beef#food#fried food#hand pies#snacks#appetizer#beef empanadas#empanada#guacamole#tasty#foodporn#delicious#cooking#food photography#foodgasm#recipes#foodie
1K notes
·
View notes
Text
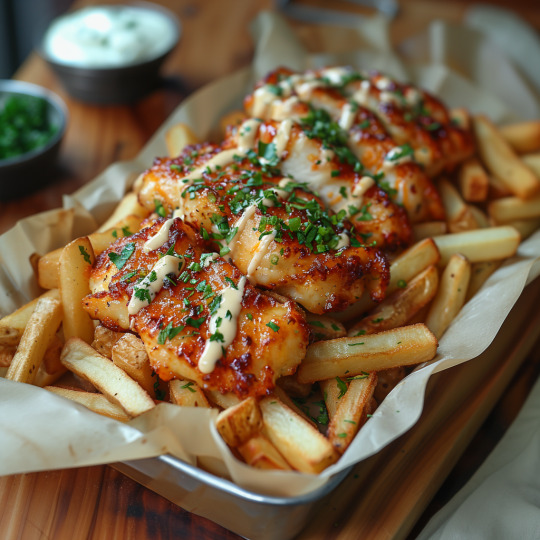
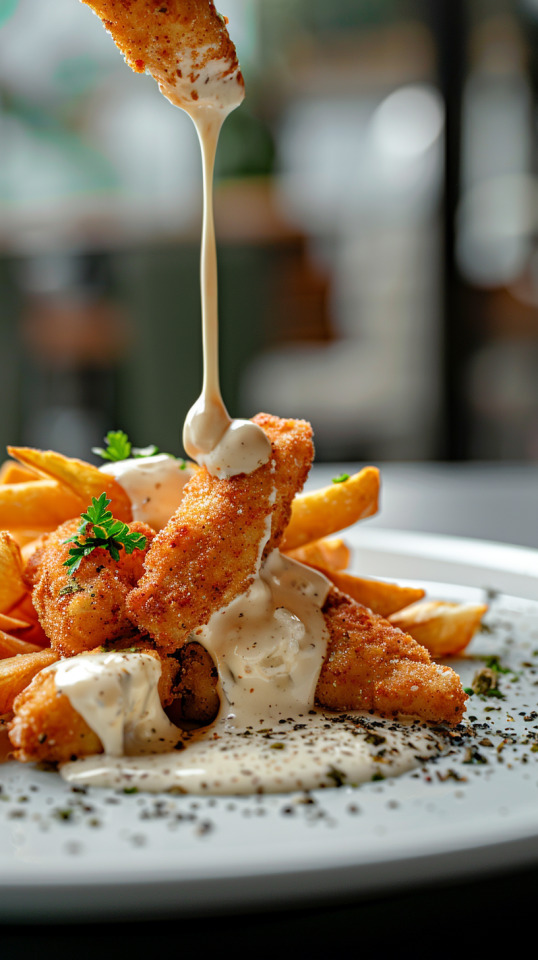
Crispy Chicken Tenders with Béchamel Sauce
Ingredients:
Chicken Tenders:
1 pound chicken tenders
1 cup all-purpose flour
2 eggs, beaten
1 cup breadcrumbs or panko
1 teaspoon garlic powder
1 teaspoon paprika
Salt and pepper to taste
Oil for frying
Seasoned French Fries:
2 large russet potatoes, cut into fries
1 tablespoon olive oil
1/2 teaspoon garlic powder
1/2 teaspoon paprika
Salt and pepper to taste
Béchamel Sauce:
2 tablespoons unsalted butter
2 tablespoons all-purpose flour
1 cup milk
Salt and pepper to taste
A pinch of nutmeg (optional)
Instructions:
Prepare the Chicken Tenders:
In one bowl, place the flour seasoned with garlic powder, paprika, salt, and pepper.
In a second bowl, have the beaten eggs.
In a third bowl, have the breadcrumbs.
Dredge each chicken tender first in the flour, then dip in the egg, and finally coat with breadcrumbs.
Heat oil in a large frying pan over medium heat and fry the chicken tenders until golden brown and cooked through, about 4-5 minutes per side. Drain on paper towels.
Bake the French Fries:
Preheat your oven to 425°F (220°C).
Toss the cut fries with olive oil, garlic powder, paprika, salt, and pepper.
Spread out the fries in a single layer on a baking sheet lined with parchment paper.
Bake for 25-30 minutes or until crispy, flipping halfway through.
Make the Béchamel Sauce:
In a saucepan, melt the butter over medium heat.
Stir in the flour and cook for about 2 minutes until the mixture is pale yellow and bubbly.
Gradually whisk in the milk, and continue to cook, whisking constantly until the sauce thickens, about 5-7 minutes.
Season with salt, pepper, and nutmeg (if using). Cook for an additional minute and remove from heat.
Serve:
Arrange the chicken tenders and French fries on a plate.
Drizzle the béchamel sauce generously over the chicken tenders.
Optionally, garnish with parsley and ground black pepper.
#recipe#chicken#crispy chicken#gourmet#french fries#fries#food blogs#delicious#food#food pics#homemade#foodshow#cheese#bacon#snacks#dinner#bon appetit#elegant food#natural light#small plate#fast food
1K notes
·
View notes
Text
#food#delicious#tasty#morning#breakfast#cinnamon rolls#cinnamon buns#baking#recipe#dessert#treat#snack#icing#cinnamon#1k
4K notes
·
View notes
Text
#snacks recipe#easy snack ideas#quick snacks#delicious snacks#snack recipes#healthy snacks#homemade snacks#tasty snacks#simple snacks#snack inspiration#recipe#chocolate
1 note
·
View note
Text

Frosted Circus Animal Cookies
#frosted cookies#cookies#sweets#snacks#sprinkles#dessert#pink and white#pink food#foodcore#cute food#nostalgiacore#kidcore#recipe#alt text
323 notes
·
View notes
Text
Raspberry Cloud Dessert 🌸
103cals / serving (165g)
*Makes 2 servings ♥️*
So delicious!! This is mine and my boyfriend’s new favourite dessert!
Recipe below ⬇️
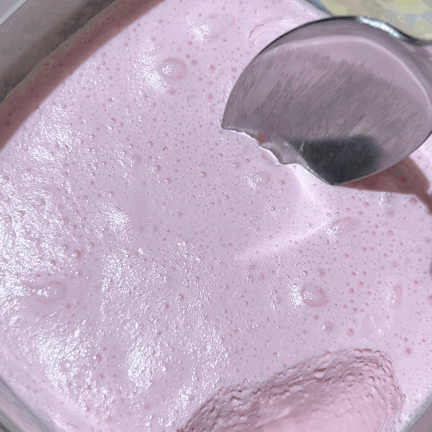
Raspberry Cloud Dessert - 103cals (Eat as is, or as a delicious fruit dip!)
Sugar free raspberry jell-o mix - 5g - 8c
Boiling water - 125ml
Cold water - 125ml
Co-op brand Light whipped topping ( or light Cool Whip) - 85g - 198c
Mix jell-o powder with boiling water and whisk until dissolved. Add cold water and whisk well. Add in cool whip and whisk until well combined. Pour mixture equally into two dishes (should be 165g in each serving) and cover. Refrigerate for a few hours to set, & enjoy!! 😊
*This recipe is 206cals total, but I split it into 2 servings, each being 103cals*
*You can make any flavour of this dessert, use any flavour of sugar free jell-o mix that you like! Use the same amount (5g)*
#i need to lose so much weight#i wanna be tiny#i wanna lose weight#low cal restriction#th1gh g@p#th1n$pø#th1nsp1ration#th1nspø#thinspø#tw ed but not sheeran#low cal ideas#low cal dessert#low cal recipes#low cal snacks#low cal meal#low cal food#low calorie meals#low cal diet#caloric deficit#calories#calorie deficit diet#caloric intake#pr0ana diet#diet#weight loss diet#3d diet#ed dieta
790 notes
·
View notes
Text


ORIGINAL TOLL HOUSE CHOCOLATE CHIP COOKIES (1938)
Since I won't be home for the holidays this Christmas (we are going to Australia to spend a summery Christmas with my in-laws), I went home to Canada a little early for a quick trip - most importantly to meet my new, adorable niece! Surrounded by childhood favourites and nostalgia, I thought it would be a great idea to make a classic Tasting History treat with my mom: the Original Toll House Chocolate Chip Cookies. This first ever chocolate chip cookie recipe, originally called Chocolate Crunch Cookies (a later newspaper typo created its now-common name), was created by Ruth Wakefield and her head pastry chef Sue Brides at The Toll House Inn in Whittman, MA in 1938. The restaurant was already quite popular among locals and food critics, and Ruth finally decided to share the recipe for these star cookies with the public. It was printed in newspapers, and the popularity of the chocolate chip cookie grew even further when Nestlé printed it on the back of their packaging. In the original recipe, Nestlé's chocolate is mentioned by name, and the growing popularity of the cookie recipe led to a 500% increase in profits for the company. Their chocolate bars originally had to be chopped up into 'pea-sized' pieces by hand until Nestlé began selling scored bars with the correct size, and eventually chocolate chips - created especially for making chocolate chip cookies. Interestingly enough, the original chocolate chip cookie recipe is very close to the one that is still on packages today. I have very fond memories of making chocolate chip cookies with my mother as I was growing up, and I thought, what better way to compare the two recipes than to also make this original chocolate chip cookie recipe with her! See Max’s video on how to make this dish here or see the ingredients and process at the end of this post, sourced from his website.
My experience making it:
Finally in my natural element in Canada, with easier to find ingredients that I recognized and could more predictably bake with, I was able to follow the recipe exactly. The one major change I made was to omit the chopped nuts completely, mostly because I'm not a fan of nuts in baked goods.
Because this recipe requires an overnight element, my mom and I began preparing the cookie dough the day before we wanted to bake and eat them. My mom began by beating the eggs, then creaming the butter with a hand mixer while I portioned out the other ingredients. She added in the sugars, eggs, baking soda dissolved in water, and vanilla and mixed them until combined. I then slowly sprinkled in the flour and salt mixture into the mixing bowl while she mixed, until that, too, was combined. I was worried the dough was looking a little too dry and dense, but my mom assured me it still looked right - I totally trust her baking instincts! We then folded the chocolate chips into the dough with a spatula, then covered it with Saran wrap and let it sit in the fridge overnight. The next evening, we preheated the oven, took our dough out (which had really hardened up!), and began portioning it out into little balls of dough. My mom had to use a fork and a bit of force to portion it, since it was so cold and solid! We used a weigh scale to determine the 14 oz. size of ball, but honestly, we did end up going up to 20 oz. or so at some points - it would have taken a long time to weigh every ball. On a lined baking sheet, we fit about 14 balls of dough, spaced about 2 inches apart. After pressing down on each just a little bit, we tossed the first batch in the oven. It smelled so good, and the bits of raw cookie dough I snuck while waiting for the cookies to bake were heavenly! When we took them out, we transferred them onto cooling racks. I think we baked about 5 trays of cookies overall, leaving us with an absolute plethora of chocolate chip cookies by the end! They looked small, but classic - almost like the chocolate chip cookies you can buy in a store. Very photogenic, in my opinion.
My experience tasting it:
Of course, our patience got the best of us, and we did not wait for the cookies to cool before trying them. No regrets! They tasted wonderful - crisp on the bottom and edges, but soft and a little melty in the middle. Really ideal, this kind of cookie could please everyone. My mom likes her cookies on the crispier side, and I like mine on the soft and gooey side, yet we both were very happy with how this recipe turned out. So was my dad, sister, my brother-in-law, and my aunt! In fact, these cookies didn't taste much different from my mom's chocolate chip cookie recipe (as I remembered it). She claims she also got her recipe from a newspaper, so it may have also had the same origin as this one. The flavour of these cookies was sweet, but balanced by the salt and rich brown sugar. They were so tasty, I think this could even become my main chocolate chip cookie recipe, although I will probably make each cookie even bigger in order to get a large volume of soft gooeyness. And I will definitely halve the recipe! 100 cookies or so, as tasty as they are, is an awful lot to get through and would definitely become noticeable on the waist. Otherwise, I agree with Max that there is a reason this recipe has lasted so many decades in its nearly-original form - it really is a crowd-pleaser. I was happy I was able to take some cookies with me back to Germany so I can share some with my husband! If you end up making this dish, if you liked it, or if you changed anything from the original recipe, do let me know!
Original Toll House Chocolate Chip Cookies original recipe (1938)
Sourced from Ruth Wakefield’s Toll House Tried and True Recipes by Ruth Wakefield (1938).
Toll House Chocolate Crunch Cookies Cream 1 cup butter, add 3/4 cup brown sugar, 3/4 cup granulated sugar, and 2 eggs beaten whole. Dissolve 1 tsp soda in 1 tsp hot water, and mix alternately with 2 1/4 cups flour sifted with 1 tsp salt. Lastly add 1 cup chopped nuts and 2 bars (7 oz.) Nestle’s yellow label chocolate, semi-sweet, which has been cut in pieces the size of a pea. Flavor with 1 tsp. vanilla and drop half teaspoons on a greased cookie sheet. Bake 10 to 12 minutes in 375° oven. Makes 100 cookies.
Modern Recipe
Based on the recipe from Ruth Wakefield’s Toll House Tried and True Recipes by Ruth Wakefield (1938) and Max Miller’s version in his Tasting History video.
Ingredients:
1 cup butter
3/4 cup brown sugar
3/4 cup granulated sugar
2 beaten eggs
1 tsp baking soda, dissolved in 1 tsp hot water
1 tsp vanilla
2 1/4 cups flour
1 tsp salt
1 cup chopped nuts
14 oz. chocolate chips
Method:
Cream the butter until smooth. Mix in the brown sugar, granulated sugar, eggs, baking soda water, and vanilla until combined.
Whisk together the flour and salt. Add this to the butter mixture and mix until just combined.
Stir in the nuts and chocolate chips just until evenly distributed.
Cover and chill the dough overnight.
Preheat the oven to 375°F (190° C).
Scoop dough into balls, about 14 grams each. A half a teaspoon is way too small of a measurement, so I found weighing the dough to be the best way. Place them on lined baking sheets, leaving about 2 inches between each cookie. Press the cookie dough down a bit.
Bake for about 8 minutes, or until golden brown.
Take them out of the oven and let them cool on the baking sheet for 5 minutes, then transfer to a wire rack to cool completely.
Serve them forth!
#max miller#tasting history#tasting history with max miller#cooking#keepers#historical cooking#20th century#baking#cookies#desserts#1930s#Toll House Chocolate Chip Cookies#american recipes#americas#usa#vegetarian recipes#chocolate#massachusetts#chocolate chip cookies#Ruth Wakefield#Ruth Wakefield's Toll House Tried and True Recipes#snacks
217 notes
·
View notes
Text
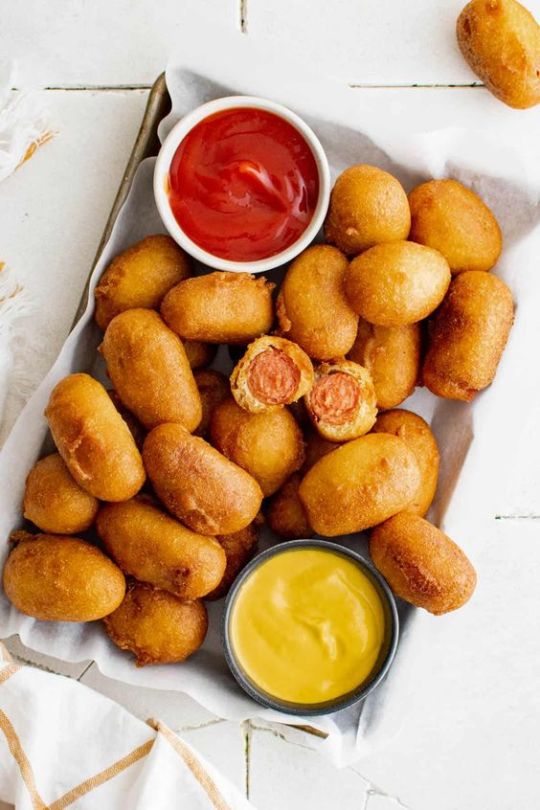
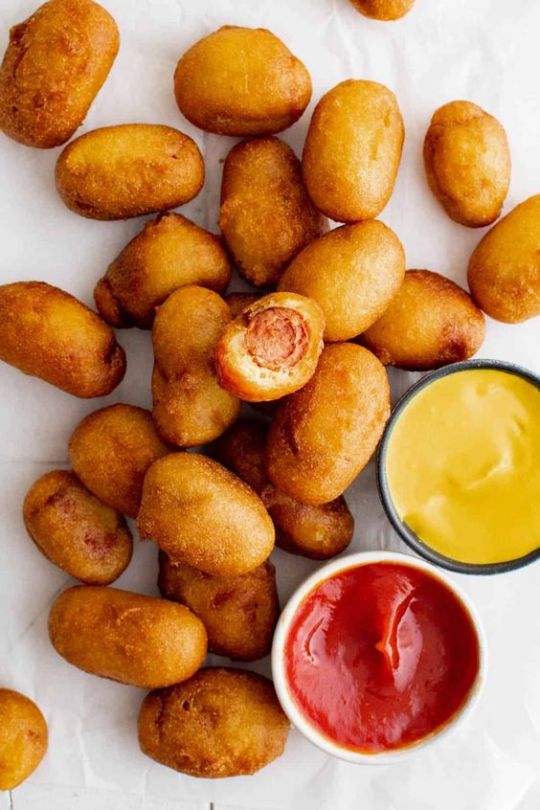
Mini Corn Dogs
1K notes
·
View notes
Text

Gooey Garlic Cheese Bread
#Gooey Garlic Cheese Bread#cheese bread#garlic bread#bread#appetizer#snack#munchies#dining and entertaining#party food#holiday party#game day#game night#super bowl#fall recipes#november#toya's tales#style#toyastales#toyas tales#food photography#food pics#food porn#foodporn#foodie#foodpics#fast food#food#comfort food#brunch#baking
4K notes
·
View notes
Text

Bakery Style Blueberry Muffins
#bakery style#blueberry#muffins#food#breakfast#snack#dessert#kids#berries#fruit#summer#recipe#spring#sour cream#buttermilk#cambreabakes
2K notes
·
View notes
Text

Mozzarella & Idaho potato croquettes
#potatoes#potato#cheese#croquettes#food#appetizer#mozzarella#cheesy#potato croquettes#dinner#snack#mashed potatoes#croquetas#tasty#foodporn#delicious#cooking#food photography#foodgasm#recipes
716 notes
·
View notes
Text
Hais
(13th century)
“Take fine dry bread, or biscuit, and grind up well. Take a ratl of this, and three quarters of a ratl of fresh or preserved dates with the stones removed, together with three uqiya of ground almonds and pistachios. Knead all together very well with the hands. Refine two uqiya of sesame-oil, and pour over, working with the hand until it is mixed in. Make into cabobs, and dust with fine-ground sugar. If desired, instead of sesame-oil use butter. This is excellent for travellers.”
2 2/3 c bread crumbs 2 c (about one lb) pitted dates 1/3 c ground almonds 1/3 c ground pistachios 7 T melted butter or sesame oil enough sugar
“We usually mix dates, bread crumbs, and nuts in a food processor or blender. For "cabobs," roll into one inch balls. Good as caravan food (or for taking to wars). They last forever if you do not eat them, but you do so they don't.”
Source: Cariadoc's Miscallany

#(all the text is from Cariadoc but the photo is mine)#recipe#food#cooking#snacks#medieval reenactment#medieval food#historical food#13th century#reenactment#history#sca#medieval#i’ll be on my merry way now
207 notes
·
View notes
Text
Oh boy time for a recipe that’ll probably be thrown into the forgotten depths
Chocolate lemon cupcakes
Chocolate cupcakes
* 1 cup (130g) all-purpose flour
* 1 cup (207g) sugar
* 6 tbsp (43g) unsweetened cocoa powder
* 1 tsp baking soda
* 1/2 tsp salt
* 1 large egg
* 1/2 cup (120ml) buttermilk
* 1/2 cup (120ml) vegetable oil (I used a majority of olive oil and used about 1/4 cup vegetable oil, I didn’t specify any better because fuck you and I don’t wanna)
* 1 tsp vanilla extract
* 1cup (120ml) hot coffee
Lemon Curd:
* 4 large eggs
* 1 cup granulated sugar
* 1/2 cup lemon juice fresh squeezed, from one large lemon
* 1 Tbsp lemon zest from one large lemon
* 6 Tbsp unsalted butter cubed
Frosting
* 1 cup (240 ml) heavy cream, cold
* 2 tablespoons (16 g) powdered sugar
* 1 teaspoon (3 g) cornstarch
* 1 teaspoon (2.5 ml) vanilla extract
For the cupcakes
1. Preheat oven to 300°F (148°C) and prepare a cupcake pan with liners.
2. Add the flour, sugar, cocoa powder, baking soda and salt to a large mixing bowl and combine. Set aside.
3. Add the egg, milk, vegetable oil and vanilla extract to another medium sized bowl and whisk together to combine.
4. Add the wet ingredients to the dry ingredients and mix until well combined.
5. Add the water to the batter and mix until well combined. The batter will be very thin.
6. Fill the cupcake liners about half way and bake for 18-23 minutes, or until a toothpick comes out with a few moist crumbs. (I have a shitty oven so I added ten more minutes to the bake time after I checked if it was fully cooked, just start off with 5 minute increments, if you want to be more cautious)
7. Remove the cupcakes from oven and allow to cool for 2 minutes, then remove to a cooling rack to finish cooling.
Lemon Curd:
* Place eggs and sugar into a small pot, whisk to combine. Add lemon juice, zest, and butter. Cook over medium-low heat whisking constantly until mixture thickens and coats the back of a spoon.
* Transfer to a glass bowl and lay plastic wrap directly on the surface to prevent a skin from forming. Chill for 1 hours to almost set.
Frosting
1. Chill the Bowl and Whisk: Begin by chilling your mixing bowl and whisk (or whisk attachment) in the freezer for at least 15 minutes. This helps the cream whip up faster and increases volume.
2. Combine Dry Ingredients: Mix powdered sugar and cornstarch in a small bowl. This ensures even distribution of the cornstarch in the whipped cream.
3. Whip the Cream: Pour the cold heavy cream into the chilled bowl. Using an electric mixer, start whipping the cream at a low speed, gradually increasing to medium-high as it thickens.
4. Add Sugar and Cornstarch: Once the cream starts forming soft peaks, gradually add the sugar and cornstarch mixture, continuing to whip.
5. Add Vanilla Extract: As the mixture thickens to stiff peaks, add the vanilla extract and continue to whip until well incorporated and the cream holds stiff peaks. (Probably make the frosting after the cupcakes have fully set)
Assembly
1. Remove the core of the cupcakes with a knife or a cupcake corer, you need a hole
2. Put almost solid curd in the center of the cupcakes, preferably with a piping tip.
3. Let curd set fully in the cupcakes for 1 hour more
4. Pipe on frosting, and serve
**note that this is posted on the same day is was baked, I can’t say how well the whipped cream frosting will hold up.
**a large cookie scoop helps with filling the cupcake liners. I used 2 scoops of the largest one I had
**normally you’re supposed to fluff your flour, but I was worried it would be too liquidy so I just scooped the flour from the container, like a heathen.
** I know I should half the recipe for the lemon curd, because there was a little left and it was overflowing out of the cupcakes a little, but it could be the fact the cupcake holes weren’t big enough. It wasn’t that much plus, you could mix the cake that’s left over from the removal of the middles with it, so idk.
I suppose I should put a useless story like all other blogs.
It was my possible step brother’s birthday and there was a mix up with the 2 cakes. Instead of chocolate raspberry and vanilla lemon cake, the bakery mixed up the flavors and reversed it. And me being weird I kinda liked it. So here’s a recipe that basically makes that cake. Why are these so long? Like that story was simple and easy. You could easily just say “my mom made this a lot when I was a kid.” Like I’m pretty good at writing a whole essay about something that doesn’t matter, evidence and an explanation, everything you could need. Would anyone even read this? It’s a recipe on tumblr, if I posted this on Pinterest maybe but even then most people I know don’t like citrus and chocolate. I offered some cupcakes to my grandma but I actively left out that the custard is lemon flavored, because I knew she’d make a virtual face at it. I want to show my creations but I can’t do that when no one is willing to try it. My mom was easy to convince because sugar. This is long because that’s the whole joke, for this whole piece about a simple story to be far too long when people just want the recipe. Would this bit even work? It’s all at the end, not at the beginning like every other blog does but I understand how frustrating that shit is. And like since I’m dragging it out it’ll only be more of a nuisance to the people wanting to see the recipe. Should I just half the lemon curd recipe? Do people even read the notes about the recipe? I sure don’t also. I also should’ve put proportions sizes but I don’t wanna put effort in remembering or counting. 8+6+1…. Uhhhh 15 cupcakes that I made. How likely is it that government secrets are put in these long bullshit paragraphs? I hope I get some criticism on this recipe there was a fair amount of research and rewriting. I forgot the name for cupcake liners btw, I had to ask my mom what they were called so that was a little awkward because I was making some more notes on the recipe while doing so. I wonder how I’m going to transport those cupcakes, I mean my grandma’s house isn’t that far of a walk but also it’s kinda hot and I don’t have any boxes also it’s night. Is this paragraph long enough that the joke gets hammered in? I don’t think it’s long enough but I could be wrong, I suppose I should write some more nonsense to add to the word count. Anbdndjdjelskxnjskwjsjzjksnsbsjkwksbhsjsksnsbsjkwndnzjsknwnsjsksks. Space. Ajkdndjoelndkkpl high ndkskskskndjjdksksnnsjsk. I got my cats some new toys recently, they’re touch activated and they make noises and move around. Of course I think they primarily like them because of the cat nip. I think I’m going to stop writing this, I’m getting bored and I don’t have much to say rn.………………………………………………………………………………………… I hope I don’t explode after this…………………………………….. my phone is spacing out this out weirdly, idk what that’s about…………………………………………………………………..do you think aliens are real?………………………………………are ghosts real?……………………………………………………………………. How do food bloggers end these anyways? I’ve never read the paragraphs but they have to at some point, right? ……………………………………………………………………..I think half the reason why food bloggers have such long paragraphs is because we’re encouraged to make a whole essay whenever we’re writing something. I know I am…………………………I’m probably wrong……………………. It probably forces more ads onto the screen at once………………….aaaaaaaaaaaaaaaaaaaaaaaaaaaaaaaaaaaaaaaaaaaAAaaaaaaaaaaaaaaaaaaaaaaaaaaaaaaaaaaaaaaa…………… I know it doesn’t matter but I wonder how the tumblr algorithm works, like do they prefer to show longer or shorter posts? Of course it could be our decreasing attention spans. I like spam, it’s not that bad, of course I’m probably a couple of sprinkles of salt away from death……………..I’m tired……………………… I think it’s time to stop typing, I think my space button is starting to die.
#home cooking#cooking#baking#bakery#baked goods#cupcakes#cakes#cake#birthday cake#cake decorating#snack cake#chocolate cake#cake post#useless thoughts#recipes#tokyo debunker x reader#creepypasta x reader#tokyo debunker#art#artists on tumblr#cat#cats#traditional art#writing#shitpost#funny shit#random shit#depressing shit#twisted wonderland#twisted wonderland x reader
214 notes
·
View notes
Text


spooky black velvet halloween cake
#food#delicious#tasty#dessert#snack#treat#cake#recipe#baking#black velvet#halloween#blackberry#skull#chocolate#halloween baking
357 notes
·
View notes