#I've never used Linux before
Explore tagged Tumblr posts
Visit Tumblr Blog
Explore Tumblr blogs with no restrictions, modern design and the best experience.
Last Seen Tumblr Blogs


Fun Fact
70% of Tumblr users say the Dashboard is their favorite place to spend time online.
Text
My ADD Medication Journey - Dec 30, 2023
Forgot to post this yesterday because I was wrapped up in a personal project.
12/30/2023 – Saturday
Had another somewhat unsatisfying night's sleep
Combination of noise from outside and mind kind of refusing to stop processing
Nothing intrusive or unpleasant, things like "I should do this and this and this tomorrow"
Decided to lounge in bed later than usual to offset
Morning does taken at 10 am
Lazy day, relaxed to recoup from a very busy week
Didn't notice any serious uptick in tremors
Appetite was suppressed but managed to remember to eat around 2pm or so
Purchased some computer equipment to finally tackle a project I've been waiting on
Spent the evening working on this project—learning curve
Ate dinner around 6:30 – 7 pm
Stayed up later than I should have trying to get past the learning curve on the project
#ADD#ADHD#Attention Deficit Disorder#Attention Deficit Hyperactive Disorder#Medication#Journal#Smokey's ADD Meds Journey#Days off are nice#I can afford to buy the stuff for my project#Plex server upgrade#I've never used Linux before#Thankfully it has its own graphical interface I can kind of intuit my way through#Oh my god moving so much media takes SO LONG
3 notes
·
View notes
Text
I'm sure I've said this before but while Linux does have some sharp edges and obtuse metaphors, the biggest reason why it's hard is that you've never used it and you're 20 or 30 years old and you have stuff you want to do and you have 10 or 20 years of experience with Windows where you already know how to do things. Computers don't naturally do anything.
2K notes
·
View notes
Text
On Multitasking
Sharing a Computer with Friends
The Motorola 68030 was a decently powerful microprocessor for its day. It is a fully 32-bit processor with 16 general-purpose registers, separate instruction & data caches, memory management unit, 18 addressing modes, over 100 instructions, pipelined architecture, and was available rated up to 50MHz. It was used in computers by Apple, Amiga, NeXT, Sun, Atari, and saw further life embedded in devices such as printers, oscilloscopes, and network switches. It was the kind of microprocessor used for desktop publishing, 3D CAD & animation, photo & video editing, etc.
In short, the 68030 is a microprocessor that can do some serious work. That's part of why I like it so much. It's a real workhorse chip but as far as 32-bit microprocessors go, it's dead simple to build with.
But running a single quick & simple BASIC program hardly seems like an adequate exercise for such a capable chip.
There is a prevailing claim that the 68000 architecture was heavily inspired by that of the PDP-11 or VAX minicomputers — powerhouses of the previous generation of computing. These machines ran entire businesses, at times servicing many simultaneous users. Surely the 68030 with similar capabilities but significantly faster instruction throughput than the decade-older machines would be more than capable of handling such a workload.
As I've mentioned before, one of my end goals for my 68030 projects is to run a proper operating system. Something like System V, BSD, or Linux; a true multi-user system befitting of the 68k's architectural heritage. My programming skills are limited, and getting such a complex project running is still outside my reach. But I am learning, and slowly inching myself closer to that goal.
Recently I built an expansion card for my Wrap030 project to add another four serial ports to it. In the context of the old minicomputers, another serial port means another terminal, which means the ability to serve one more user. My new 4-port serial card should give me the ability to add four new user terminals.
If only I had software capable of doing so.
Excluding symmetric multiprocessing and today's multi-core behemoths, supporting multiple user processes on a single computer processor means dividing time between them. The computer will run one user's program for a little while, then stop and run another user's program for a little while. Do this fast enough and neither user might ever notice that the computer is paying attention to someone else — especially since the computer spends much of its time just waiting for user input.
There are a few ways to accomplish this, but the simplest is to just make sure that every user program is written to cooperate with the others and periodically yield to the next user program ("Cooperative Multitasking"). A good time to do this is whenever the program needs to wait for input from the user or wait for a device to be ready to accept output.
Enhanced BASIC (68k EhBASIC), which I have been running on all of my 68k computer builds, was written in such a way that lends itself well to this sort of cooperative multitasking. It runs a tight loop when waiting for input or output, and while running a BASIC program, it stops at the end of each line to see if the user has pressed Ctrl-C to stop the program. This means that EhBASIC never goes too long without needing to check in with slow I/O devices. All that would needed is a simple kernel to set things up and switch to another user's processes whenever each time one of them is waiting for I/O.
So I set about creating such a minimal multi-user kernel. On startup, it initializes hardware, sets up some data tables for keeping track of what each user program is doing, loads BASIC into RAM, then starts running BASIC for that first user. Whenever a user process needs to read data from or write data to its terminal, it asks the kernel to handle that I/O task for it. The kernel will save the state of the user program to the data table it set up in the beginning, then switch to the next user to let it run until it too asks for assistance with an I/O task.
The kernel works through all user processes round-robin until it loops back around to the first user. After restoring the state of the user's process the kernel will service the I/O task that user process had originally requested, and return to let that user process run for a little while again. So all of the other user processes get their chance to run while one is waiting on data, and each process makes sure to allow the others a chance to run for a while when they are in the middle of running their own program.
I was able to throw together a quick proof of concept using the EASy68K simulator. What followed was days of catching all of the tiny mistakes I made, such as saving register A0 to the memory location reserved for register A1, overwriting the value previously saved for A1 and effectively losing both in the process — an error which resulted in BASIC printing only the first three characters of its startup header followed by a long string of null characters.

Debugging was tricky. I was starting from the bottom. No standard library, no existing structure or frameworks to rely on. The kernel process relied on the very same registers the user programs were using. Any changes to register contents by the kernel would affect the user processes. I ended up adding assembly macros to print short statements and register contents to the kernel console to try to get some insight into what was happening. I was able to track when registers came out of the user context save/restore process different than when they went in to find where I had bugs in that process.
This was a challenging project resulting in nearly a thousand lines of very low-level 68k assembly code, all of which I wrote and rewrote multiple times before figuring everything out. I've written small pieces of assembly code over the years, but none which required such deep dives into the CPU documentation to discern fine details of how the chip operates. I got there eventually though and now I have an 8MHz 68030 homebrew computer with 2MB of RAM that can run four BASIC programs simultaneously.
I'm going to need more terminals.
#homebrew computer#mc68030#assembly language programming#wrap030#retrocomputing#vintage computing#minicomputer#cooperative multitasking#pdp-11
157 notes
·
View notes
Text
Windows 11 and the Last Straw
Bit of a rant coming up. TL;DR I'm tired of Microsoft, so I'm moving to Linux. After Microsoft's announcement of "Recall" and their plans to further push Copilot as some kind of defining feature of the OS, I'm finally done. I feel like that frog in the boiling water analogy, but I'm noticing the bubbles starting to form and it's time to hop out.
The corporate tech sector recently has been such a disaster full of blind bandwagon hopping (NFTs, ethically dubious "AI" datasets trained on artwork scraped off the net, and creative apps trying to incorporate features that feed off of those datasets). Each and every time it feels like insult to injury toward the arts in general. The out of touch CEOs and tech billionaires behind all this don't understand art, they don't value art, and they never will.
Thankfully, I have a choice. I don't have to let Microsoft feature-creep corporate spyware into my PC. I don't have to let them waste space and CPU cycles on a glorified chatbot that wants me to press the "make art" button. I'm moving to Linux, and I've been inadvertently prepping myself to do it for over a decade now.
I like testing out software: operating systems, web apps, anything really, but especially art programs. Over the years, the open-source community has passionately and tirelessly developed projects like Krita, Inkscape, and Blender into powerhouses that can actually compete in their spaces. All for free, for artists who just want to make things. These are people, real human beings, that care about art and creativity. And every step of the way while Microsoft et al began rotting from the inside, FOSS flourished and only got better. They've more than earned trust from me.
I'm not announcing my move to Linux just to be dramatic and stick it to the man (although it does feel cathartic, haha). I'm going to be using Krita, Inkscape, GIMP, and Blender for all my art once I make the leap, and I'm going to share my experiences here! Maybe it'll help other artists in the long run! I'm honestly excited about it. I worked on the most recent page of Everblue entirely in Krita, and it was a dream how well it worked for me.
Addendum: I'm aware that Microsoft says things like, "Copilot is optional," "Recall is offline, it doesn't upload or harvest your data," "You can turn all these things off." Uh-huh. All that is only true until it isn't. One day Microsoft will take the user's choice away like they've done so many times before. Fool me once, etc.
106 notes
·
View notes
Text

☆ UPSCALING LOW QUALITY FOOTAGE
what i used: • 2021 macbook pro with m1 chip (390/500gb storage used she's hanging in there) • photoshop 2020 • mpv (for screencaps but this isn't needed!) • handbrake (available for linux, mac and windows here) • video source to gif
what is handbrake? basically its a software that helps you change the format of videos, such as for certain devices or screens, or in the case that we're going to utilise, quality and frame rate!
disclaimer: handbrake is super easy to use and very beginner friendly for this procedure and it can make a video go from 30fps to 60fps however it does not replace the quality of true 4k/blue/master-pro res files. in the gif below, this is the level of detail in a master pro-res file.

getting started it's easiest first to note the timestamps of the video you want to encode, and keep in mind that unless your computer is incredibly powerful, i wouldn't try to encode an hour worth of footage in one run! my laptop could handle about 30 seconds in one go before she started toasting.
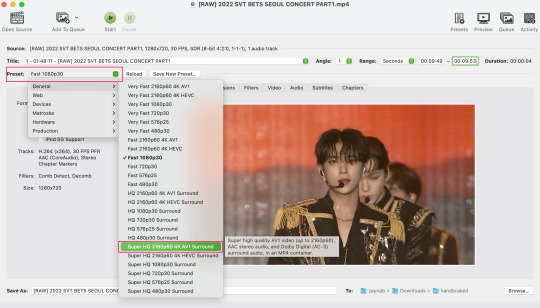
using handbrake: once you've downloaded the software, open the software and it will come up with a pop up window asking you to open the video source (that is presumably saved within your folders) and go ahead and do so!
in the range section, use the drop down button to navigate to seconds and enter your timestamp. the duration on the side will show how long of the footage you're gonna encode is!

then go down to the save as, and give your footage 'to be snipped' a name. this isn't necessary but useful because if you're planning to say, encode 3 or 4 small parts of footage in one sitting, each encoding instance will overwrite the previous one. so i just call mine 'cut 1', 'cut 2' and so on.

next go to preset, and there you'll see such a wide variety of options that you can play around with, with differing qualities, frame rates, sound options, and so on. for the sake of this tutorial, i'm using 'superhq 2160p60 4k av1 surround' and i've used the drop down menu to select it! then go ahead and press start! the time taken to complete depends on the duration of footage that you sent to encode! you'll find your encoded video as an .mp4 file in your designated folder (which you can change via browse at the bottom)
what next? • if you prefer to open footage directly into photoshop (my ps can't handle it), then go for it! • if you screencap as i do, then just use mpv or whatever screencapping program you prefer to make the screencaps and open in ps in your usual manner. • you can use the timestamps to further process the video through vapoursynth to denoise, but i've yet to try that!
the results for this first set of example footage, i used footage from the be the sun concert file, which is almost 2 hours in length and 4gb in file size.


you can see the difference in the smooth frame rate of the footage, as well as the quality of the sharpening!
and to utilise the bane of gifmaking, a gose episode, notorious for dodgy pixelated frames and less hd quality in 1080p on youtube, i ran it through the same settings!


these are the exact same files, downloaded using 4k video downloader and with the same sharpening, but see how on the original file, the sharpening looks a bit more harsh and 'outlined' while it seems to sit softer on the encoded 4k version!
so i mainly use handbrake for dvd files, or not-so-hd 1080p youtube videos or videos that seem a bit clunkier but i had never tried them on a tv/film file so take a look below! i used a 1gb (so not very good quality) of a show (as compared to its 4gb files).


as i said at the start in the disclaimer, handbrake can't replicate true file quality, as you'd expect to see in a proper hd bluray/t*rrent file of a show but there's an interesting difference in the frame rate. personally it's not something i would utilise much there but its all up to individual preference on how someone prefers to have their gifs <3
this is a very basic run-through of how i used handbrake, as i haven't really explored all its features and i use this as a quick process when i'm running through seventeen dvd/dl files but i feel like it would work well on general youtube videos (such as interviews, episodes, behind the scenes) and feel free to send an ask/message for any help/clarification! <33
#ps help#usergif#gif tutorial#kpop gif tutorial#seventeen#completeresources#2605#userace#niniblr#emification#usershreyu#heymax#arieslofi#tusermlee#userbloomingwarrior#uservivaldi#userzil#userfanni#userrozza#usermoonchild#userraffa#tuserjen#usernik
353 notes
·
View notes
Text
hey fam how we feeling about my setup

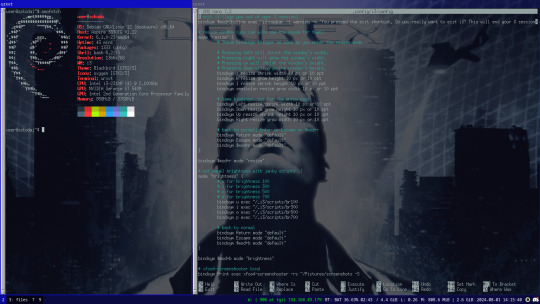
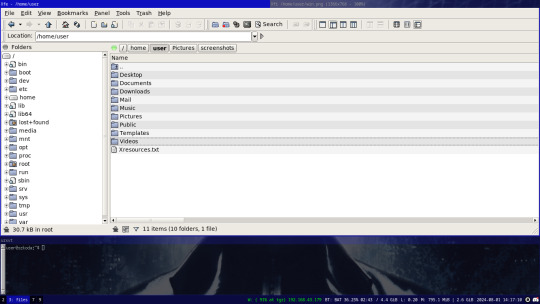
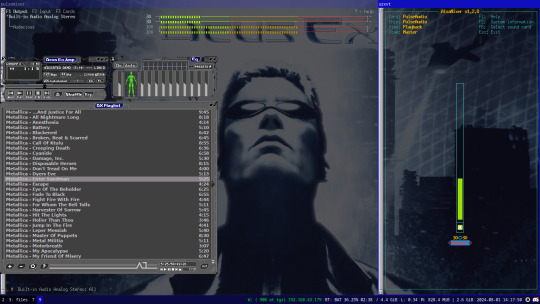
settled in to a setup on a temporary installation on my laptop before i get a new machine. it feels so so good to finally abandon windows, having never even touched win10 (this laptop has been running WIN7 for as long as i've had it, i would genuinely rather rip an arm off over using win10 on a personal machine)
Debain 12 running X11 with i3-wm, with feh for a background and picom compositor for transparent terminals, 4th screenshot has audacious using a winamp skin lol, i know i don't need both pulsemixer and alsa-mixer at the same time but i find it funny having them both open.
going to probably replicate this setup on my new machine with a secondary floating window manager like fluxbox or something for when i need it, overall really happy with this setup and i'm surprised how fast i managed to get comfortable with i3 after installing it (1 day, just 1 day and it felt like home) i love linux
ask me questions about my setup :D i'd love to talk with other linux users more
#linux#how do i tag this#oh well i can just dump some shit here lol#debian#i3#i3wm#urxvt#pulsemixer#alsa-mixer#audacious#deus ex#deus ex 2000#dx1#JC Denton#sorry deus ex fans for tagging something loosely related#(i'm a deus ex fan but have like never interacted with any other deus ex fans)
53 notes
·
View notes
Note
What is considered both a reasonable and maximum polycount for custom content hair and other types of custom content in The Sims 2 and does it depend on gaming specs? Also your work is great!
Thank you for taking the time to read it.
I, personally, use hair that is under 25K polys unless it's unique and cute. Anything over that is overboard and should get decimated. Any furniture or clothing over 10K is extreme for me.
As for specs, I'm inclined to believe that it's a game limitation, how powerful your computer specs are, and a secret third and fourth thing, your OS, and if you're a laptop user.
This OS talk is a side tangent, so bear with me:
Big disclaimer that this is all my opinion, not a factual piece. Don't take this as gospel and I'm far from an expert on operating softwares, computers, and CC for that matter. I went a little bit insane with the OS talk because you mentioned specs and this has been on my mind for a while 🥴
Every single time I've heard that someone installed TS2 on Linux, they are able to play on maximum settings with a BUNCH of CC for a long time and experience no pink soup or pink soup related crashing. I want to do my own research and play the same heavily detailed lot for the same amount of time on Windows and Linux and compare the differences as well as compare how they use resources differently. If I already did not have an attachment to Photoshop CC 2017, I would have made the switch by now.
Okay so Windows... I've played TS2 on my Asus laptop from 2020 and on my new desktop. Here's the spec difference
Laptop: Intel Core i7-9750H 6 Core Processor, 8 GB RAM, NVIDIA GeForce GTX 1650 (Windows 10)
Desktop: AMD Ryzen 5 2600X Six-Core Processor, 16 GB RAM, NVIDIA GeForce GTX 1080 Ti (Windows 11)
My laptop was really good for it's time (I bought it in March 2020), but it was pink soup galore for any cluttered CC lot, even with all of the fixes and GRM edits. My current setup is a mish mosh of my bf's and ex's computer parts and it runs perfectly fine, but I do not play long enough to encounter pink soup. (I have a job and I mainly play to get CC previews these days.) If you noticed, both my CPU and GPU were made before my laptop was sold, and yet it still performs way better. Laptops with top of the line hardware will never be more powerful than PCs with even mid to high level hardware from 5 years ago. Don't forget that laptops will throttle performance to protect itself from overheating and causing damage.
There is also no difference between installing and playing the game on Windows 10 and Windows 11, except that you should absolutely uninstall OneDrive if you haven't already. There might be some issue if you install with discs, but I don't own the discs.
And as for Mac, I truly believe that Mac is the worst way to experience Sims 2. Between the Super Collection crap, not being able to use third party tools (SimPE, Hair Binner, any other .exe files made to run for Windows), and the file limit that really hits you hard if you download a bunch of CC that you can't merge anyway because CCMerger can't run on Mac. I should say I have never played Sims 2 on a Mac, but this is my opinion after reading about the struggles of other MacOS users online.
The point of this OS tangent? None, really. I'm not trying to persuade you to use Linux or stop using Mac, this is simply what I've noticed and my opinions on the matter. There's millions of variables I did not cover such as DXVK, texture sizes, difference in specs between each OS and user and many other things I am forgetting.
Feel free to correct, add on, extrapolate or whatever. If you have any thoughts, please comment, add it in reblogs, or tag me in your post. I'm very interested in the current topics about high polys, pink soup and big textures for this game.
#spell.txt#cc discussions#my opinion on macs wont change though#sorry mac users#only thing im qualified for in this discussion is my photoshop certificate lmao
17 notes
·
View notes
Text
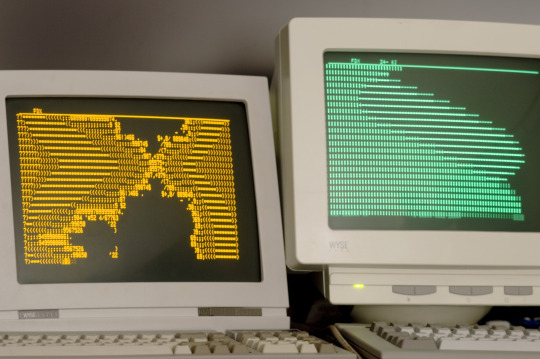
What makes a good boot sequence?
A while ago, I had my first truly viral post on Mastodon. It was this:
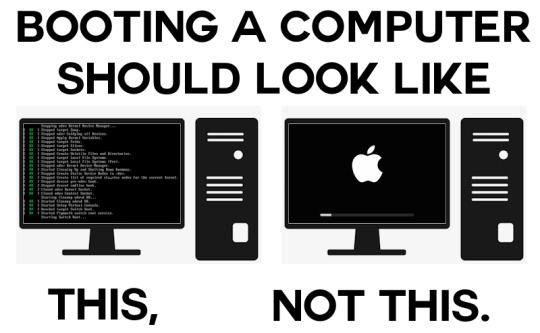
You might've seen it. It got almost four hundred boosts and reached beyond Mastodon to reddit and even 4chan. I even saw an edit with a spinning frog on the left screen. I knew the post would go down well with tech.lgbt but I never expected it to blow up the way it did.
I tried my best to express succinctly exactly what it is I miss about BIOS motherboards in the age of UEFI in this picture. I think looking at a logo and spinner/loading bar is boring compared to seeing a bunch of status messages scroll up the screen indicating hardware being activated, services being started up and tasks being run. It takes the soul out of a computer when it hides its computeriness.
I think a lot of people misunderstood my post as expressing a practical preference over an aesthetic one, and there was at least a few thinking this was a Linux fanboy post, which it certainly is not. So here's the long version of a meme I made lol.
Stages
I remember using two family desktop computers before moving over a family laptop. One ran Windows XP and the other ran Windows 7. Both were of the BIOS era, which meant that when booting, they displayed some status information in white on black with a blinking cursor before loading the operating system. On the XP machine, I spent longer in this liminal space because it dual-booted. I needed to select Windows XP from a list of Linux distros when booting it.
I've always liked this. Even as a very little kid I had some sense that what I was seeing was a look back into the history of computing. It felt like a look "behind the scenes" of the main GUI-based operating system into something more primitive. This made computers even more interesting than they already were, to me.
Sequences
The way old computers booted was appealing to my love of all kinds of fixed, repeating sequences. I never skip the intros to TV shows and I get annoyed when my local cinema forgets to show the BBFC ratings card immediately before the film, even though doing so is totally pointless and it's kinda strange that they do that in the first place. Can you tell I'm autistic?
Booting the windows 7 computer would involve this sequence of distinct stages: BIOS white text -> Windows 7 logo with "starting windows" below in the wrong aspect ratio -> switch to correct resolution with loading spinner on the screen -> login screen.
Skipping any would feel wrong to me because it's missing a step in one of those fixed sequences I love so much. And every computer that doesn't start with BIOS diagnostic messages is sadly missing that step to my brain, and feels off.
Low-level magic
I am extremely curious about how things work and always have been, so little reminders when using a computer that it has all sorts of complex inner workings and background processes going on are very interesting to me, so I prefer boot sequences that expose the low-level magic going on and build up to the GUI. Starting in the GUI immediately presents it as fundamental, as if it's not just a pile of abstractions on top of one another. It feels deceptive.
There may actually be some educational and practical value in computers booting in verbose mode by default. Kids using computers for the first time get to see that there's a lot more to their computer than the parts they interact with (sparking curiosity!), and if a boot fails, technicians are better able to diagnose the problem over a phone call with a non-technical person.
Absolute boot sequence perfection
There's still one last thing missing from my family computer's boot sequence, and that's a brief flicker of garbage on screen as VRAM is cleared out. Can't have everything I guess. Slo-mo example from The 8-Bit Guy here:
171 notes
·
View notes
Text
Next semester we'll have to do a project of our own choosing and I've already got a couple of ideas for things I could do.
1. A music player app using the ampache protocol. There's already one app on fdroid called "power ampache 2" which is pretty alright tho I don't like the UI that much and I would instead make it more similar to "metro" which is the player I'm currently still using. The prof I'm going try to do that for has already shown interest in media playback solutions before so he'll probably like it, and it's also something I just want for myself.
2. Making a Linux distro with a wayfire config. I've previously stated my intent of making a pretty extensive config before, and things like styling and 3d modelling for the cube skybox would also be pretty interesting from a media production standpoint, so I could probably also do that with a media professor, or another prof that has modules about usability and UI design.
3. A website offering "PowerPoint karaoke". It's an improv game where you're given a presentation you've never seen before and you have to improvise as you go along. Presentations are usually purpose-made to be funny and have some setups for jokes. Offerings are currently pretty sparse and some cost money to even access. I would make them with reveal.js and of course under some sort of copyleft licence that opens up not just the content of the presentations but also whatever server I'd make that handles the selection of presentations and stuff.
4. A selection of hosted Webservices. I've found blahaj.land and I would probably create something similar to that. It would include concepts of UI design, software security, and system administration
6 notes
·
View notes
Note
Hi! I'm so sorry if this has been asked before, but I'm completely clueless on computers, but I want to learn about them. Any places you'd recommend starting for bare bones beginners? I'm also interested in early-mid 90's tech particularly too. I'm guessing I have to figure out the basics before I can move onto specific tech though, right?
You're really knowledgeable and nice so I figured I'd just ask. Any help at all would be appreciated. Thank you! :]
That's an excellent question, I don't think I've been asked it before in such a general sense. I was raised with the benefit of being immersed in computers regularly, so providing a solid answer may be a bit difficult since for the basics, I never had to think about it.
I had computer classes of various types throughout my school years. We learned how to use a mouse, typing, word processing, programming -- and that was all before middle school. We got proper typing, html, and general purpose computer science courses in middle and high school, and you can bet I took those too. I also have the benefit of a bachelors of science in computer science, so you'll forgive me if my answer sounds incredibly skewed with 30+ years of bias.
The biggest suggestion I can give you is simply to find a device and play with it. Whatever you can get your hands on, even if its not that old, as long as it's considered past its prime, and nobody will get upset of you accidentally break something (physically or in software). Learning about things with computers in general tends to have some degree of trial and error, be it programming, administrating, or whatever -- try, learn, and start over if things don't work out as expected the first time. Professionals do it all the time (I know I do, and nobody's fired me for it yet).
Some cast-off 90s or early 00's surplus office desktop computer running Windows would be a good start, just explore it and its settings. Start digging into folders, see what's installed, see what works and more importantly what doesn't work right. Try to find comparable software, and install it. Even the basics like old copies of Microsoft Office, or whatever.
I recommend looking through the available software on winworld as it's an excellent treasure trove of operating systems, applications, games, and other useful software of the time period. I'd link it directly, but tumblr hates links to external sites and will bury this post if I do. If you're a mac fan, and you can find an old G3 or Performa, there is the Macintosh Garden's repository of software, but I'm not the right person to ask about that.
Some of you might be like "oh, oh! Raspberry Pi! say Raspberry Pi!" but I can't really recommend those as a starting point, even if they are cheap for an older model. Those require a bit of setup, and even the most common linux can be obtuse as hell for newcomers if you don't have someone to guide you.
If you don't have real hardware to muck about with, emulation is also your friend. DOSBox was my weapon of choice for a long time, but I think other things like 86Box have supplanted it. I have the luxury of the real hardware in most cases, so I haven't emulated much in the past decade. Tech Tangents on youtube has a new video explaining the subject well, I highly recommend it. There are plenty of other methods too, but most are far more sophisticated to get started with, if you ask me.
For getting a glimpse into the world of the 90s tech, if you haven't already discovered LGR on youtube, I've been watching his content for well over a decade now. He covers both the common and esoteric, both hardware and software, and is pretty honest about the whole thing, rather than caricaturish in his presentation style. It might be a good jumping off point to find proverbial rabbits to chase.
I guess the trick is to a find a specific thing you're really interested in, and then start following that thread, researching on wikipedia and finding old enthusiast websites to read through. I'm sure there are a few good books on more general history of 90s computing and the coming internet, but I'm not an avid reader of the genre. Flipping through tech magazines of the era (PC Magazine comes to mind, check archive dot org for that) can provide a good historical perspective. Watching old episodes of the Computer Chronicles (youtube or archive dot org) can provide this too, but it also had demonstrations and explanations of the emerging technologies as they happened.
There are so many approaches here, I'm sure I've missed some good suggestions though. I also realized I waffle a bit between the modern and vintage, but I find many computing troubleshooting skillsets transcend eras. What works now can apply to 10, 20, 30, or sometimes even 40+ years ago, because it's all about mindset of "this computer/program is dumb, and only follows the instructions its given" . Sometimes those instructions are poorly thought out on the part of the folks who designed them. And those failures are not necessarily your fault, so you gotta push through until you figure out how to do the thing you're trying to do. Reading the documentation you can find will only take you so far, sometimes things are just dumb, and experimentation (and failures) will teach you so much more about the hard and fast rules of computers than anything else. I'm rambling at this point...
So, let's throw the question to the crowd, and ask a few other folks in the Retrotech Crew.
@ms-dos5 @virescent-phosphor @teckheck @jhavard @techav @regretsretrotech @airconditionedcomputingnightmare @aperture-in-the-multiverse -- anything big I missed?
18 notes
·
View notes
Note
Do you have any tips or guides on how to make gifs?
I do! Firstly, this guide here is probably the best guide I've seen for gif making. It's concise and easy to follow, and it's what I used to learn myself. They have a lot of resources as far as programs go, but I'll list what I use below. As always, never download and install anything from unknown sources without doing your own due diligence. Run everything through your antivirus and/or virustotal before installing always always always!
This is kinda long, so imma put it under the cut lol. Also note that I use windows (Win10), so things may not work the same way for mac or linux
Before you can actually make the gifs, you need a way to download high quality videos! I like jdownloader 2 because I find the interface to be user friendly, it gives you the option to download multiple elements (like srt files), and it works with more websites than lots of other video downloaders (and their user support is leagues better as well). My second choice is yt-dlp, which isn't necessarily more complex but might look a little more intimidating. Both are great programs, but a quick note about jd2: DO NOT download it from anywhere else but the link above. The developers package adware in all their installers EXCEPT for that one (I hate it too, and I think it's fundamentally unethical, but at least they're up front about it and they have an adware free version). Both methods automatically download the highest quality video available in your source link, so you don't have to worry about fiddling with that.
Now on to extracting frames! My method of choice is ffmpeg. It looks more intimidating than it is, and it's honestly the best way to extract frames imo. Like yt-dlp, it uses your computer's command console, which means you'll need the relevant command lines to run it. This tutorial is great to get you started, and it includes a command line for if you only want to extract frames from a specific part of your video. If you want to extract every frame from the entire video, you can either input the start and end times of the video into that command line, or you can use this version (I use both depending on what I'm doing):
ffmpeg -i "file path" "out-%05d.png"
Always make sure you're working with png files. To make quality gifs you have to start with quality images, and png files, unlike jpg, are lightweight and lossless, meaning you won't end up with compression artifacts and fuzziness
To get the file path for your video, select the file, then in the upper left hand corner of your window select home > copy path. It will copy the path in quotes, so replace the entire section "file path" with the path you just copied. Then copy and paste the entire line into your command console. The tutorial above says this as well, but be sure to create a folder for your frames, go into that folder and click the file path bar at the top of the window, then type "cmd" to open the console. This will ensure your files are dumped in that folder
So now you need a way to actually MAKE the gif. This is... a little more tricky. You can use gimp, I think, though it's certainly not my program of choice. You could buy PS but like... ew. OR you could do what I did and arr it. I use a portable version of CS6 that I downloaded literally a decade ago, and unfortunately the website I got it from isn't up anymore. I did a quick search and found this on reddit, but again, do your due diligence before downloading and installing anything!
Now I'll talk a little bit about my actual process. The actual process of making frames into layers into a gif I got from that first tutorial I linked. I took that process and made an action on PS so that I never have to do it manually again because I'm lazy and my memory is dogshit and I didn't want to have to consult a guide every time I wanted to do something lol. Everything else I learned through experimenting and my own experience as a photographer, so I encourage you to play around with everything to see what you like and what works for you
For coloring, I fiddle with levels, brightness/contrast, and color balance adjustment layers until I'm happy with how it looks. You can use curves instead of levels if you want finer control (or if you want to produce effects like matte), but levels works just as well and has a histogram right there in the panel, which makes it easier to adjust the exposure based on the image's actual data
For sharpening, I have a couple of custom actions I use. Here's what they look like:

The first one (bound to the F2 key) gives a smoother appearance, and I like to use it for kpop gifs where the subjects are already airbrushed and smooth without much texture, or wide shots where detail isn't super important
The second one (bound to the F3 key) is the one I use when I want to preserve texture in the image. Closeups of people where you can see their skin texture, or busy images with lots of detail benefit most from this one
The basic gist of it is, the "sharpen" filter does exactly what it says on the tin and it's usually all the sharpening an image needs, and the "surface blur" filter erases or dampens artifacting created by the sharpening filter. Sometimes I'll run the action twice, or use them both in combination to get the effect I want. Here's what the difference looks like in practice, featuring two very cute dudes:
F2 sharpening action


F3 sharpening action


You'll notice in the first two gifs, there's not much in the way of texture to preserve. Yoongi's skin is smooth and airbrushed, and the scenery is all metal and concrete shot with a wide aperture, which makes the background nice and blurry and smooth. In the second set, Jesse has facial hair and stubbly texture on his throat that I wanted to preserve, so I used the action with the lighter surface blur
My advice on all of this though, again, is to play around with it and see what you like! And if you have any more questions, feel free to ask! I'm by no means an expert, but I'll do what I can to help!
edit: oh, a quick note about speed! The tutorial I linked above mentions changing the delay to 0.05, and that's great for full speed gifs! But if you want them slow like my gifs above, I set the delay to 0.08. Sometimes I'll slow them down even more by setting the delay to 0.09 or 0.1, but any higher and you start to lose some of that smoothness
14 notes
·
View notes
Text
Quest 2 arrived, got to fiddle with some existing apps because the previous owner had not logged out. Didn't feel like being mean so I've reset it now but it handles pretty solidly! They have Firefox for VR headsets now! You can just install ublock origin and it works perfectly. Going to find out what the Linux VR ecosystem looks like, it seems... fraught but manageable.
I am interested in playing with LÖVR sometime, I made a lot of quick little game sketches with LÖVE in high school and I really liked the fast and easy development lifecycle.
I have used the Quest 2 before, some friends bought one and I spent some time fiddling with it, fortunately my VR sickness only really occurs on older systems. The first time I used VR was in 2016 at a convention and I had a great time poking around and then I took off the headset, walked around the corner, and threw up in a dustbin. That's never happened since but I also don't do VR a lot.
The previous owner bought a few facepieces and the hard headstrap so that's nice, much more sturdy than the stock fabric setup. Also my spare glasses fit nicely in here so I don't have to get the lens add-in just yet.
There's a video player app that can access DLNA servers so I was able to open some movies directly over the network which is neat.
The avatar system does not give me weird embodiment things like some other systems have, they're too simple, which I guess is probably why Facebook made them like that. It feels like I'm looking at a video game character who looks vaguely like me. I'll have to poke at VRChat at some point.
Very interested to try a primitives based modeller that runs in VR. One of my big issues with primitives modelling is struggling to translate 2D input movements to 3D vertex movements, I suspect a good VR vertex editor would let me get around that. The reason I grok parametric CAD is because it relies heavily on constraints systems to limit degrees of freedom.
16 notes
·
View notes
Text
Revisiting Wrap030 Disk Access
I have more ideas for projects than time or budget to work on them. Already this year I've gone completely through the design process for two new large homebrew projects that are currently too large for my project budget, plus a few small ones I never got around to ordering. So rather than spend more than I should taking on a new project, I decided to revisit an existing one.
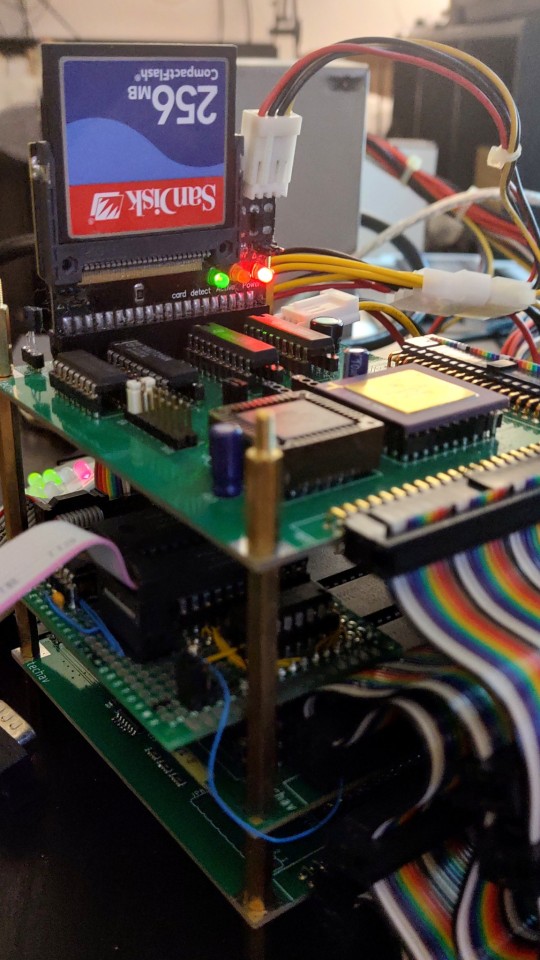
It's been over a year since I last worked on the original Wrap030 project — my old stack-of-boards MC68030 system. Its current configuration includes the main board with CPU, ROM, RAM, UART, & glue logic; a hand-wired breakout board to add a second UART; a custom video output board; and a mezzanine board with FPU and provision for an IDE disk that is not yet working. It has been functional in this configuration since last February.
My goal for this project from the beginning was to build something capable of running a proper operating system, like Unix System V or Linux. To do that though, I'm going to need to get disk access working.
I had started on disk access, but didn't quite have it functional when I turned my focus to integrating all of boards into the single Wrap030-ATX motherboard. I had added IDE cycles to the CPLD on the mezzanine board, and had added a few rough drafts of disk functions to my ROM. I set the project aside when I realized my function for checking dish presence was reporting a disk was present when there wasn't one.
I have worked with IDE before — my original 68000 project had an IDE port on it. I had gotten that project to the point where I could read a sector of data from the disk, but never could wrap my head around how to actually navigate even a simple file system like FAT16. It was this code that I had adapted for Wrap030, so when it didn't work, I assumed it was a problem with my logic.
Turns out I had just inadvertently clobbered a register in the disk check function. The logic worked just fine. I was able to write a couple quick BASIC programs to read a sector of data and even run code from the boot sector.

My assembly function for reading data from disk however was still not working.
I tried rewriting it.
I tried rewriting it in C instead of assembly.
I tried again, and again, and again. I added delays and loops and print statements and everything I could think of. I scoured datasheets, read though all the different release versions of the ATA specification, ported code from other projects, looked at every example of reading from an IDE disk I could find.
No matter what I did, I always got the same result.
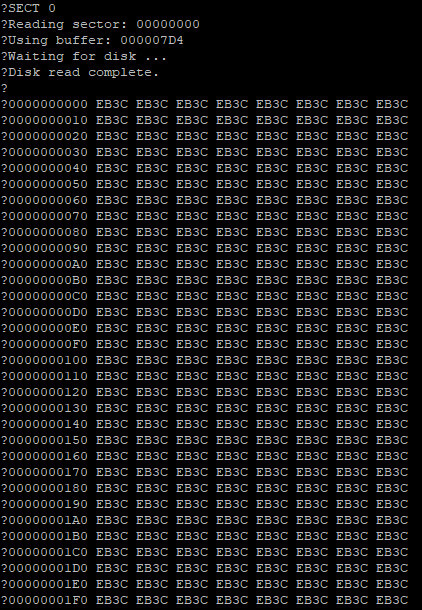
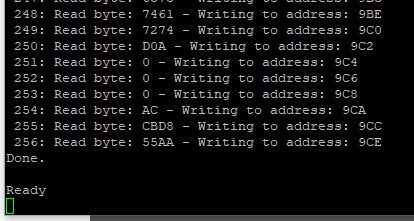
This did not make any sense. Reading from an IDE disk involves setting up the sector address, the number of sectors to transfer, sending a read command, and then reading the IDE data port 256 times per sector. Each time the data port is read, the disk will give another 16-bit word of data. But for some reason, all I was getting was the first word of data returned 256 times.
There is nothing in the specification to explain this.
I knew there was nothing wrong with my logic, because I could read the data just fine with my BASIC program or by manually poking the right addresses using the monitor. Maybe there was some edge case affecting timing when running in assembly, but even adding delay loops and print statements didn't have any effect.
I reached out for help. I got great feedback on my read functions and my timing and how IDE and CompactFlash cards worked, but still could not solve this problem.
But then @ZephyrZ80 noticed something —
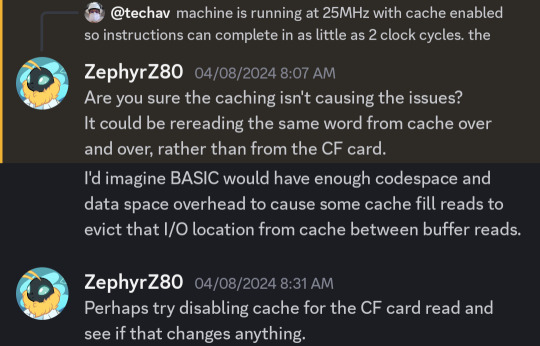
I had shared my code and was explaining that I had added some extra NOP instructions to enforce minimum time between IDE access cycles in PIO-0 mode. At 25MHz with cache enabled, the 68030 can complete an instruction in as little as 80ns, so a few NOPs would ensure enough time elapsed between cycles.
With cache enabled.
… cache enabled.
… cache.
The 68030 has 256 bytes of data cache. My disk read function is running in a tight loop that only really hits a few addresses; not nearly enough to invalidate and flush the entire 256 bytes of cache. The CPU does have a cache inhibit signal to use with peripherals that return new data on subsequent access to the same address, but it turns out I was only asserting it when accessing the UART on the main board.
It's a simple enough hypothesis to test. When I initially added support in my ROM for enabling cache at startup, I included user functions for enabling and disabling cache.
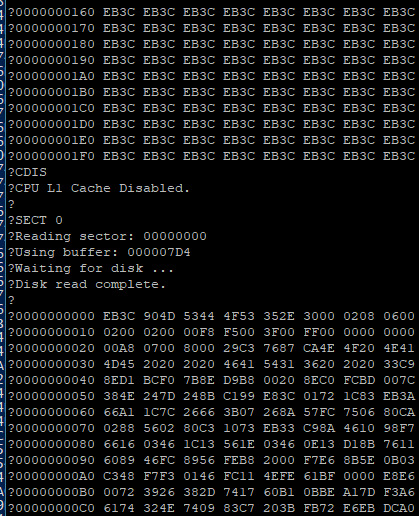
… It was cache all along.
Now I need to add some way to inhibit cache while accessing the IDE port, and then I can move on to trying to use the disk for loading programs.
41 notes
·
View notes
Note
as someone who doesn't have any knowledge of coding and has used windows their whole life, how would the transition be to going to linux?
you don't need to know how to code to use linux. what I would do is install virtualbox, download an ubuntu disc image, and install that in a new virtual machine. look up guides on how to do this. spend a weekend installing it, clicking around, installing new software from their app store, and seeing how it works for you. if you think it will work for you, then perhaps consider doing a dual boot (I've never done this before really, I just go balls deep immediately) - there are guides out there to do this too. I think the general rule is to install linux *second* so that windows doesn't take over the whole boot sector, I don't know how true this is anymore.
I think it is entirely possible to switch over from windows to linux, it is a bigger transition and there may be unfamiliar errors that you might run into, but a lot of the baseline knowledge is the same. generally you will not have to ever open the terminal unless you're doing something really weird or custom.
good luck.
7 notes
·
View notes
Text
Switching to Linux 🐧
Over the past couple years Windows 10 has been giving me progressively more asinine problems to deal with, from desktop issues and bloatware, to automatically installing out of date drivers to replace the ones I've manually installed.
Before you ask, I attempted using Windows 11 when it came out and I refuse to acknowledge its existence after the hell it put me through.
Most recently Windows 10 has seemingly made a point of making ASIO and all audio devices and software I use functionally useless, causing ridiculous amounts of crackling audio. No rollbacks fixed it, no re-installs fixed it, not even Reloading Windows fixed it. The reason for using ASIO is that Windows default audio protocol, WDM, has too much latency for live real-time use. This issue not only makes things like live-streaming basically impossible but it also outright made my Digital Audio Workstation and Video Editing Software incapable of processing audio for longer than a second without hanging. Both Mixcraft and DaVinci Resolve became useless on Windows 10, and OBS was barely holding it together. When I tell you I did everything to resolve this, I mean I spent an entire Month troubleshooting this. The only solution I could find was to abandon Windows all together.
I've been meaning to switch my Setup to Mint Cinnamon for a while as I've been testing it out in Virtual box for a year or so, and after this nonsense I got a new NMVe basically immediately to run Mint on, and after switching properly I have to say I'm likely to never use Windows as my Host OS again. And yes I tested Windows on the NMVe. The issue persisted there aswell. And testing Mint via Virtual Box on Windows with Hardware Exposed via PAE and AMD-V showed the issue was entirely on Windows.
For reference this is my current rig: Everything is the same as when using Windows 10
GPU: Nvidia RTX a4500 20gb
CPU: AMD Ryzen 5 5600g
Ram: 16GB 3200mhz
DAC: PreSonus Audiobox iTwo
Capture Card: AverMedia HD Mini GC311
The Results:
Not only does Mint Cinnamon not have any of the issues I've had with Windows over the past Decade, which still persist to this day, but literally every single device I have just works.
Basically everything is Plug-n-Play with <20ms of latency on the Capture Card, which on Windows had a minimum of 600ms delay using drivers required for the card to even be detected. My Audio interface also works even better than before, with neither my DAC or Capture Card requiring manual driver installs, as their protocols are Native to the Linux Kernel.
Proton lets you play any Windows game on Steam that doesn't have explicit Linux Support, with Wine available for desktop applications. Both run better than a Native Windows install due to Mints lack of Bloatware.
Windows 10 has so much built-in Overhead that Mint can Emulate it through Virtual Box faster than if Win10 were the Host OS.
In Short: Fuck Windows. :) Also this is how my desktop looks currently:


You can make custom start menus. :)
#Windows 10#Linux#Mint#Mint Cinnamon#Linux Debian#Steam#Proton#Windows 10 fail#Windows 10 pro#Debian#Audio Issues#Stream issues#Chahleybros#OBS#ASIO#Switching to Linux
8 notes
·
View notes
Text
yt-dlp: An Installation and Use Guide
This guide specifically walks through how to download and use yt-dlp on Windows, but if you have a Mac, you should still be able to follow along. Just make sure to download the Mac version of software whenever the option comes up. I'm also going to be assuming that you have a 64-bit Windows system. The standard today tends to be 64-bit for PCs, but if you're not sure and you want to double check then go to Settings -> System -> About -> Device Specifications -> System Type.
This guide also focuses on the command line version of yt-dlp (accessed on Windows by typing cd in the search bar). If you prefer to access the program through a GUI, you'll need to download additional software. Here's a link to help you get started. (LINK)
If you have any specific questions that you can't find an answer to within the linked resources, feel free to reach out and I'll do my best. Also, as someone who can be incredibly computer illiterate at times, I'm writing this guide in a way that explains a bunch of things I used to be confused about, so sorry if it goes over something in too much detail.
Resources:
These are just some handy links in case you run into a problem.
The yt-dlp GitHub page (has literally everything you might need)
The r/youtubedl wiki, includes a list of common errors and FAQs
Installing:
Click on this link. It will take you directly to the section on the yt-dlp GitHub page where you can download the program.
Feel free to download whichever version works best for you, but I recommend scrolling down to RELEASE FILES and downloading the version that works for your system from the Recommended section. I've included a picture below.
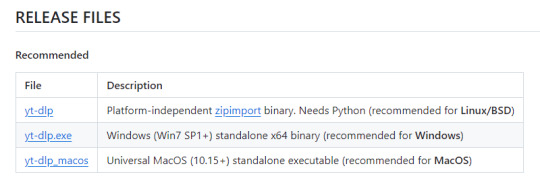
Once you've clicked on your version (yt-dlp.exe for Windows users), yt-dlp will download automatically. It should show up in your Downloads folder.
FFmpeg:
To merge video and audio files (which helps you get the best quality from youtube possible), you also need to download FFmpeg.
Scroll down even more to the DEPENDENCIES section.
Click on that first link. It will take you to the FFmpeg webpage. Clicking on Download in the sidebar will take you to a page full of different versions of FFmpeg. DO NOT CLICK on the big green button in the middle of the page. What we need is a version that is already compiled.
Find the section that looks like this (titled Get packages & executable files):

If you're Mac, pick accordingly. If you're Windows or even Linux, I actually recommend you download from this webpage. It contains the same versions as the Windows builds by BtbN but is instead managed by the developers of yt-dlp.
Find the one titled "ffmpeg-master-latest-win64-gpl.zip" (I've included a highlighted picture below for reference).

That will download and go into your Downloads folder too.
Setting up a Folder:
The easiest way to use yt-dlp is by placing it and FFmpeg into a folder. You can store the folder wherever you want, but you will need to remember (and type out) the path to the folder every time you want to use yt-dlp, so I recommend not making it too deep.
What I did was make a folder titled "yt-dlp" within my Desktop folder.

Move the yt-dlp application from your downloads folder to your new yt-dlp folder.
IMPORTANT: Assuming you also placed the yt-dlp folder into your Desktop folder (and assuming you are a Windows user), then the full path to your new yt-dlp folder should be C:\Users\YOUR_USERNAME\Desktop\yt-dlp. Fill YOUR_USERNAME in with whatever your profile is called on your PC.
For the FFmpeg zip you downloaded, extract the zip file into your new yt-dlp folder by clicking the zip, clicking Extract all from the tool bar, and then entering the path to your yt-dlp folder. Everything within the zip is already stored into a folder, so you don't need to create a new folder just for FFmpeg.
Now you're ready to go!
Using:
This section is going to be almost exclusively Windows-focused because I've never used a Mac before and I don't know how the Mac command line varies from the Windows one. I'm also not going to go into any details. If you want more info or to explore the options, I recommend checking out the links in the Resources section.
Type cd and then press enter into the Windows search bar to bring up the command line. If you've never used the command line before, this is what it looks like:
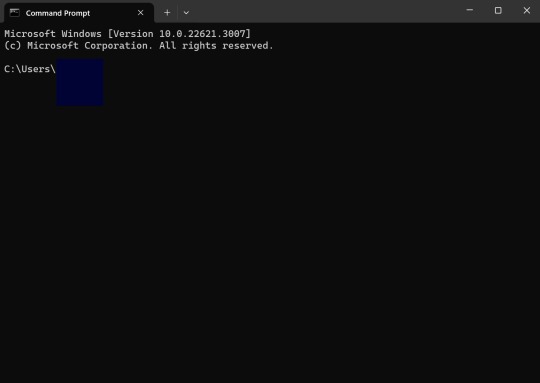
I covered up my username with that blue square.
Type the following into the command line:
cd Desktop cd yt-dlp
This will take you to the same place where your yt-dlp application is stored. You must cd into the appropriate folders every time you want to use yt-dlp.
YouTube, Twitch, and Most Websites:
Find a link to whatever YouTube or Twitch video that you want.
Into the command line, type yt-dlp followed by the link you want to use. This is what it should look like (the red is what you type):
C:\Users\YOUR_USERNAME\Desktop\yt-dlp> yt-dlp https://www.youtube.com/watch?v=hECaXfk2Wo4
Press enter and viola! Your video should download! It will automatically go into your yt-dlp folder.
Twitter:
Twitter forces you to log into an account to view a video, so you have to give yt-dlp your account information if you want to download anything. I understand being wary of doing this.
The easiest way of going about this is by typing:
yt-dlp https://www.youtube.com/watch?v=hECaXfk2Wo4 -u YOUR_TWITTER_USERNAME -p YOUR_TWITTER_PASSWORD
And then your video should download as normal.
Alternatively, you can use your browser cookies as explained here.
Updating:
Here is the section on the GitHub that explains updating. Basically, type yt-dlp as if you want to download a video, but instead of also adding the link, add -U at the end.
Uploading:
If you want to upload a video or clip to tumblr and it's not working, my number one advice is to rename the video file to something simple and add .mp4 at the end. If that doesn't work, try converting it (either with yt-dlp itself or an online website). Sometimes you just have to fiddle with things before they work the way you want. Good luck!
#yt-dlp#youtube-dl#speaking#i generalized this but i use yt-dlp almost 99% for various clips which is why I'm putting this post here for you guys
13 notes
·
View notes