Statistics
We looked inside some of the posts by techav and here's what we found interesting.
Average Info
Notes Per Post
872
Likes Per Post
579
Reblog Per Post
292
Reply Per Post
1
Time Between Posts
6 days
Number of Posts By Type
Text
17
Last Seen Tumblr Blogs


Fun Fact
25% of US internet users with an annual income of $80-100K use Tumblr.
Text

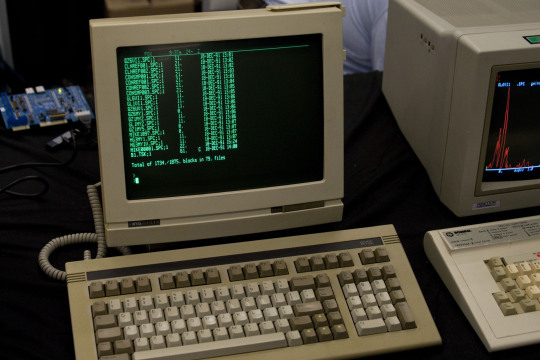
Lights & Switches at VCF Southwest 2025
Front panel computers were well represented at VCFSW this year.
There was this mini S-100 system featuring the [Don Caprio] IMSAI front panel replica and a reproduction Cromemco Dazzler video card.


This miniature PiDP-11/70 got to sit on display next to its full-size PDP-11/05 brethren (which was itself featuring a UniBone peripheral emulator).


This SCELBI-8B reproduction was waiting for anyone to try their hand at bootstrapping a computer using just a handful of switches.


Blinking lights of the Altair 8800 could be found all across the show floor in the form of an 8800 Mini, a proper vintage 8800b, an 8800a clone running on a Raspberry Pi, and an 8800 Clone.


There was also this beautiful HP 5036A Microprocessor Lab, an 8085A CPU trainer that had nothing to hide.

In all, it was a great year for toggling switches and watching blinkenlights!
#vcfsw2025#vcfsw 2025#vcf southwest#vcf#vcf southwest 2025#vintage computer festival southwest 2025#vintage computer festival southwest#vintage computer festival#vintage computing#retrocomputing#altair#HP#S-100#blinkenlights#early home computers#front panel computer
17 notes
·
View notes
Text

Usagi Electric, Forgotten Machines, & Nevets at VCF Southwest 2025
[Usagi Electric], [Forgotten Machines], and [Nevets01] collaborated on a massive exhibit of unique old hardware.
[Usagi Electric] had an interactive exhibit with his recently rebuilt PDP 11/73 running examples of spectroscopy analysis using a Bomem vector processor. [Usagi] also demonstrated a Data General Nova 1210 running BASIC.


[Forgotten Machines] had a variety of old terminals, computers, and peripherals on display. He was on-hand throughout the show to help anyone image and preserve their old magnetic media.


[Nevets] had an interactive exhibit with a Data General Nova 1200 running BASIC alongside a (sadly non-functional) Digital Computer Controls D-116, a clone of the Nova 1200.

#vcfsw2025#vcfsw 2025#vcf southwest#vcf#vcf southwest 2025#vintage computer festival southwest 2025#vintage computer festival southwest#vintage computer festival#vintage computing#data general#digital computer controls#usagi electric#forgotten machines#digital equipment corporation#PDP-11#minicomputer
44 notes
·
View notes
Text

Commodore Computers at VCFSW 2025


#vcfsw2025#vcfsw 2025#vcf southwest#vcf#vcf southwest 2025#vintage computer festival southwest 2025#vintage computer festival southwest#vintage computer festival#vintage computing#commodore#commodore pet#commodore 64#commodore vic-20#vic 20#commodore amiga
202 notes
·
View notes
Text

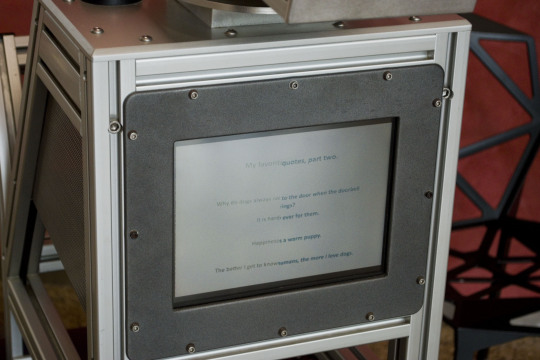
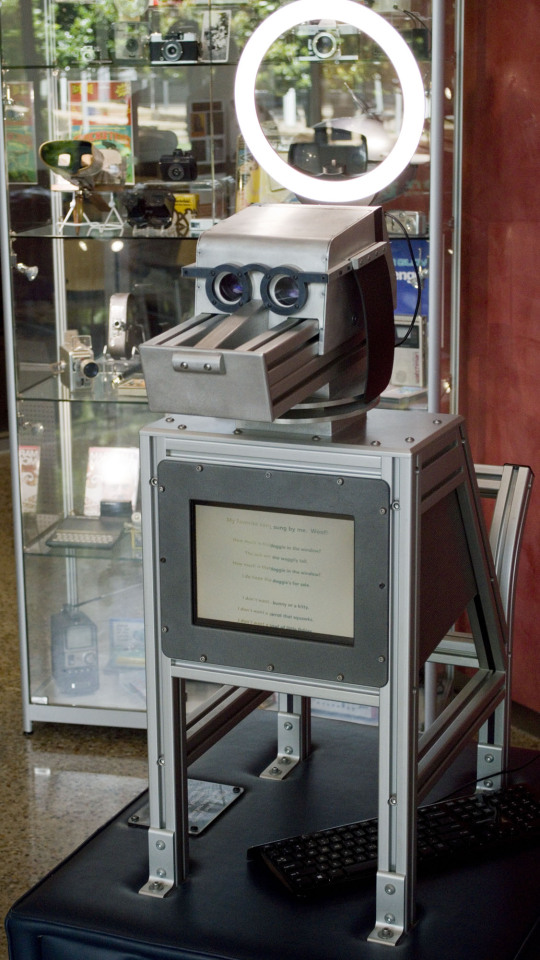
REDog at VCFSW 2025
REDog is a prototype accessibility aid that can take a picture of a document and read aloud the text on that document. It has been on display outside the UT Dallas Media Archeology Lab at the past two VCFSW shows, but always with a sad note about it no longer being functional. This year REDog was on display and reading again!

Dr. Anne Balsamo, Arts and Humanities Distinguished Chair at University of Texas at Dallas, shared the following about REDog to the Vintage Computer Festival Southwest group on Facebook:
I’m so proud of Media Archaeology Lab undergraduate research assistant, [Strayer], who was recognized with an award yesterday at the VCF Southwest!
Strayer has only been a part of the Lab SINCE August 2024! From the moment he joined the lab, he took the initiative to work on restoring the READING EYE DOG, who we call REDog.
If you’re still at VCF Southwest today (Sunday, June 22) please find Strayer and REDog near the Media Archaelogy Lab in the ATC building for a demo!
In the rest of this post, I’m going to piggyback on this moment to present the backstory of “REDog and Me,” and how we ended up at UTD and VCF Southwest this year.
DEFINITELY…. TOO LONG, read later!
The backstory is also part of my professional history in the loosely defined “computer industry.”
REDog has been my avatar for my transformation as a researcher and innovator in cultural and creative technologies!
REDog was originally created by a research lab at XEROX PARC in 1999; right around the time I joined the lab as a Principal Research Scientist. (How I got there is an even longer story; I’ll try to stick to the relevant bits for this context.)
The research lab was itself called RED, led by the brilliant PARC researcher Rich Gold. The RED lab was a stand-alone research unit supported by Xerox Chief Scientist, John Seely Brown, and Xerox Chief Technologist, Mark Weiser, names I assume are familiar to this community.
RED’s mission was to prototype the technologies of (what was then) the imagined future of ubiquitous computing. My role in the Lab was to create the stories about the plausible future cultures that would take shape around these technologies.
REDog was one of 13 speculative reading machines created by our Lab based on the bench computer science going on in other PARC labs during the 1990s.
These speculative devices became part of an exhibit called “Experiments in the Future of Reading” that toured science/tech museums throughout the U.S. and Mexico from 2000-2004.
Fast forward:
The Dot.com bust ignited the first researcher lay-offs at PARC during its 30-year history. Sixty research scientists of the 300 then on staff at PARC were let go, including all 7 of us in the RED Lab.
As was common in the Valley during that age, three of us launched a start-up to commercialize some of the RED@PARC reading devices.
As part of my severance package I negotiated a no-fee license, into perpetuity, to reproduce and further develop the devices.
Fast-forward again:
The work of RED, and then of our start-up (Onomy Labs) prefigured use-cases for the IBM touch table (aka The Surface) and the proliferation of glyph bar codes (aka the QRC). Our interactive museum exhibits demonstrated a new approach to the design of public interactives in sci/tech cultural institutions.
WHAT didn’t take root was the charming and evocative REDog. 😔
Although my start-up colleagues created versions of the REDog for Epcot and museums in Singapore and Mexico, REDog, to this day, remains a one-off marvel of the fusion of culture and (what was then) cutting edge integrated compute systems research.
I left the start-up when it became evident that I was never going to make ends meet as it struggled to fund the ongoing efforts of commercialization and research. The giant computer companies of the time had more resources of course.
After five years as a researcher and entrepreneur in Silicon Valley, I returned to academia to head a different sort of research unit at Univ of Southern California. When the start-up closed its space in Menlo Park in 2008, I officially adopted REDog.
For the past 17-years, the 75+lb dog and its hassock has been with me as I relocated from LA, to NYC, and then, in 2016 to Dallas.
During that span, its technology has been obsolesced and its CULTURAL significance has morphed from an example of speculative computing, to an emerging technology, to now an object of research in media archeology.
To return then to Stayer’s recognition at VCF yesterday, it was so well deserved.
He brings an academic background in software engineering to his current major in Art, Technology and Emergibg Communication; this biography distinguishes him from many other comp sci students.
He has the rare gift and grit required to make the vintage and obsolseced come back to (our) life. I will brag that this is characteristic of each of the five undergrad research assistants in the Lab.
(blatant pitch: they all graduate next Spring, and will be looking for jobs in the field / industry!)
More personally, last evening was also a magic moment for me!
His work on “TEACHING AN OLD DOG NEW TRICKS” as a research assistant in my UTD Media Archaeology Lab makes me proud (of course), and reminds me again of the importance of efforts such as this VCF Southwest event to keep alive the tangible histories of our technology pasts, and to provide opportunities for really smart young people to find a community that groks them!
And, it probably goes without saying, this is one of small joys of being a teacher!
#vcfsw2025#vcfsw 2025#vcf southwest#vcf#vintage computer festival southwest 2025#vintage computer festival southwest#vintage computer festival#vintage computing
19 notes
·
View notes
Text

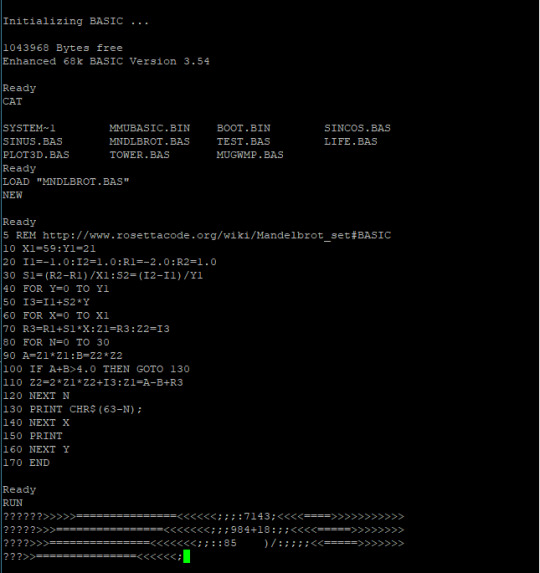
Wrap030 at VCFSW 2025

For VCF Southwest this year, I brought Wrap030, my 68030 homebrew computer running Multibasic, my minimal multi-user operating system. I paired it with three glass terminals, two classic Macs I recruited to serve as terminals via ZTerm, plus a pair of modems. In all, I had seven of eight total user consoles available.
I had a few demo programs prepared. A Mandelbrot fractal renderer, a few sin/cosine visualization programs, Conway's Game of Life, Hunt the Wumpus, a checkers game, and Eliza. I also made signs to help visitors get started with writing BASIC programs.
Eliza turned out to be a great choice for a demo. Eliza is an early example of natural language processing that in a way is an ancestor of contemporary LLM chatbots. That's part of what's great about VCF — it gives us the opportunity to demonstrate how modern computers and software got to the point they're at now. But beyond that, it was also approachable for attendees who otherwise might not have been interested.
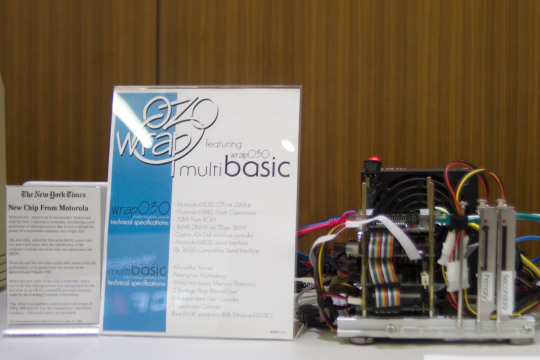

During the show I got the opportunity to dial into Wrap030 from terminals exhibited elsewhere in the show. It was fun to be able to write, load, and run BASIC programs on my computer from remote terminals.


Overall, response to my exhibit was excellent. I feel like I hit both ends of the best reactions and exhibitor can receive at a show like this — I got to watch an elderly gentleman's face light up seeing hardware he hadn't used in many years; and I got to see children excited to see their first BASIC program run successfully. I also had some great discussions with attendees and fellow exhibitors about the technical details of my project.
The show was a lot of fun, and it was great to see such a positive reaction to all the hard work I have put into the project over the past few months.
#vcfsw#vcfsw2025#vcfsw 2025#vintage computer festival#vintage computer festival southwest#vintage computer festival software 2025#vintage computing#homebrew computing#wrap030#homebrew computer
9 notes
·
View notes
Text
VCF Southwest 2025 was a tremendous success! Turnout was incredible and there were so many great exhibits. As event staff and an exhibitor, it was an absolutely exhausting weekend, but so much fun.
I am still mentally processing all the things I saw and the great conversations I had with both guests and fellow exhibitors. I have hundreds of photos I took that will take me hours to sort through.
For now, here are a couple quick pictures I took of my Wrap030 exhibit:


And a few of the main exhibit hall on Saturday:


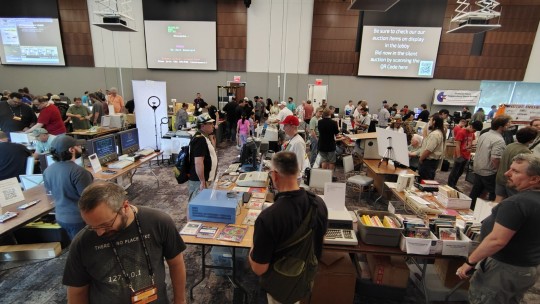

I will be sharing more pictures from the show as I get them sorted.
If you weren't able to make it this year, video recordings of the presentations and discussions have already started going live on the VCFSW YouTube channel.
#vcf southwest#vcf#vcfsw2025#vcfsw#vcfsw 2025#vintage computer festival#vintage computer festival southwest 2025#retrotech#vintage computing#vintage computer festival southwest
24 notes
·
View notes
Text
VCF Southwest 2025
Starts tomorrow!
Friday, June 20th through Sunday, June 22nd, 2025 at the UT Dallas Davidson-Gundy Alumni Center in Richardson, Texas. This year is bigger than ever with over 90 exhibitors and two dozen talks, presentations, & workshops
I will be there both as staff and exhibiting my Wrap030 homebrew computer project running Multibasic, a minimal multiuser BASIC kernel.
If you're in the area come check it out; it's going to be a great show!
#vcf#vcfsw#vcfsw2025#vcf southwest#vintage computer festival southwest 2025#vintage computer festival#vintage computing#retro computing#retrotech
9 notes
·
View notes
Text

On Incremental Improvement:
With VCF Southwest almost here, and having run into a dead end on getting NetBSD running on my 68030 homebrew computer, Wrap030, I decided to circle back to my multi-user BASIC kernel. There are some important features the system is needing to get it ready for running as an exhibit for all three days of the show.
Memory Protection
There's a fun couple fairly standard BASIC commands, PEEK and POKE. The former will read a byte of memory from a specified address, and the latter will write a byte. These were commonly used in the 8-bit era to manipulate hardware registers. For instance, POKE 53280,1 on the Commodore 64 would set the screen frame color to white by writing 1 to the address 53280.
While there were ways to cause problems by writing bad values to the wrong address, on a single-user home computer the impact was only to the one user. On a multi-user system however, PEEK could be used maliciously to look at private data from other users. An errant POKE command could overwrite user data, kernel data, even code being run by users.
A good multi-user system needs some way to prevent one user from accessing memory used by another user, and to prevent users from overwriting shared code. The Motorola 68030 has a couple tools to solve this problem: separate supervisor & user states, and a built-in Memory Management Unit (MMU).
The supervisor state has access to all instructions and registers in the CPU. The user state is blocked from running certain instructions that would change system state or CPU configuration. I was already using supervisor state for my kernel and user state for BASIC programs, but it doesn't prevent users from accessing memory that doesn't belong to them.
That's what the the MMU is for.
The MMU takes the memory address the CPU is outputting (the Logical Address) and uses a table to remap it to a new address (the Physical Address). That table can hold additional information about how a particular region of memory can be used, and can be configured by the kernel at any time.
So we can, for instance, set up the table to mark the program code for BASIC as read-only when the CPU is in the user state. Or remap the memory allocated to each user so that it always starts at logical address zero. In fact, there's also nothing that requires the entirety of physical memory to be mapped — so as far as one user program is concerned, the other users' memory doesn't even exist.
Adding MMU support to my Multibasic kernel has been a goal from the beginning. It's a challenge though. The 68k MMU is a very capable, very complex beast. It supports tables that are up to four levels deep, supports page sizes from 256B to 32kB, and can use separate data and code tables for both supervisor and user states. It's something I've struggled to understand, but my work with NetBSD helped show me how to use it.
I decided to use 32kB pages and only map the 16MB of actual RAM I have installed. This allowed me to use a single-level table with 512 entries. During startup, the kernel initializes the supervisor table and a table for each user. When switching users, only the Root Pointer register in the MMU needs to be updated point to that user's table.
I was able to get the table initialization running after a few rewrites. And then realized I had forgotten to update the user initialization routines to point to their new logical addresses. And I was using the wrong table entry marker for the user tables, so the MMU was expecting more table entries instead of reading page descriptors. This got me to the point of the kernel running with the MMU enabled and I could even run a user program or two in BASIC, but if I tried to run three user programs, things got ... weird.
Overlapping exceptions is never a good sign. Or, it usually isn't. In this case I was trying to print out some debugging data for exceptions which takes a relatively long time. Longer than my timer interrupt, in fact … I had forgotten to disable the timer at the start of an exception handler. My timer was doing exactly what it was supposed to, I just needed to stop it when handling exceptions. That fixed the overlapping exceptions, but I still couldn't run more than two programs at a time.
This one had me stuck for a while, but I finally decided to review the NetBSD source to see what I was doing differently. All of my initialization and task switching code looked similar; there was just one thing that stood out to me as being different — NetBSD was clearing CPU cache on task switch and I wasn't. The 68030 doesn't have a large cache, surely that's not the probl…
It was the CPU cache.
Once I added the single instruction to clear cache when switching users, everything ran smoothly no matter how many programs I ran.
Loading from Disk
Having to enter programs by hand each time you want to run one is no fun. It's tedious and error-prone. Sure, it was common four decades ago for books and magazines to publish listings of BASIC programs. But after taking the time to carefully enter in hundreds of lines of code, most people are going to want to save the program to disk so it can be quickly reloaded later.
In my case, I would like to have a few demos, games, and interactive programs available for my exhibit. I do not want to have to type them in by hand every morning. It's time I finally sit down and figure out how to add file loading to EhBASIC.
The EASy68k applications page has a link to an archive of EhBASIC that supports the EASy68k simulator's I/O traps. This was the perfect starting point. All I needed was to add new system calls to my kernel for similar file open, read, and close operations, then update the EhBASIC file handling routines to use them.
I started by copying the Elm-Chan FAT filesystem library I had used for my bootloader into my kernel. It's a great minimal C library for FAT-formatted disks that doesn't take much to get up and running. I was able to write wrapper functions for its f_open(), f_read(), and f_close() functions that worked with my existing system call format.
This went surprisingly well. I found that EhBASIC was trying to re-open the file after each line, so I did have to update my code to keep track of whether it had reached the end of the file yet. That got me to the point where it would read the entire program and echo it to the terminal, but it couldn't run anything. It turns out EhBASIC was using address refused A0 for a line pointer; gcc C convention treats A0 as a scratch register that doesn't normally need to be saved. I just had to be sure to save the register contents to memory before calling the filesystem library functions.

Finally, I can load programs from disk instead of having to type them in manually every time!
Printing Disk Contents
It would be really helpful to be able to see what programs are on the disk. Loading a program requires entering the LOAD command followed by the filename. That's hard to do without knowing what programs are available.
Luckily, the Elm-Chan FatFs library also has functions for reading directory contents. I just needed to add three new system calls for the directory counterparts to the previous file operations.
EhBASIC didn't already have a command for printing directory contents though, I would have to add one. I wrote the function and was able to use the built-in CALL command to run it by the compiled address of the function, but CALL $100178 is not the easiest to remember.
I tried adding a new command, CAT (short for Catalog, a common directory listing command for early BASIC systems), to the command tables. All it would give me was a Syntax Error, however. I eventually stumbled onto the answer for this one — when parsing a line of code, EhBASIC will check if the token for a given keyword is greater or less than the token for the TAB keyword. Keywords less than TAB are treated as commands that can be executed at the beginning of a line; keywords greater than TAB must follow another statement such as PRINT. All I needed to do was move my new CAT command above TAB in the table.
On Incremental Improvement
These three new features go a long way towards making the system something robust enough and usable enough that I feel good about running it as an interactive exhibit for VCFSW this year.
But more than that, these new features bring my little Multibasic kernel just that much closer to a "proper" operating system — it is now a preemptive multiuser kernel with hardware memory protection and the ability to load programs from disk.
It currently does not support saving files to disk (intentionally omitted for now), doesn't support dynamic memory allocation, and can't run any processes other than the eight instances of BASIC. But it is starting to look the part. And I am definitely proud of the work that I have managed to do on this project.
If you would like to see Wrap030 running Multibasic in person, I will be exhibiting it June 20-22, 2025 at VCF Southwest in Richardson, Texas. This will be the third annual VCFSW since it was rebooted after a decade-long hiatus, and the third year in a row that I have had the opportunity to exhibit and volunteer for the show. This year is bigger than ever with over 90 exhibitors & vendors and a full schedule of workshops, talks, & presentations. If you're in the area, I highly recommend attending!
#wrap030#mc68030#motorola 68k#motorola 68030#debugging#vcfsw#vcf southwest#retrotech#homebrew computing#homebrew computer#retro computing#vintage computing#vintage computer festival#vintage computer festival southwest 2025#os development#operating systems#basic programming
15 notes
·
View notes
Text
I would like to thank to [Usagi Electric] for the awesome shout-out in his most recent video! I am looking forward to watching progress on his TMS9900 homebrew computer, and I am happy that my own homebrew work could provide some inspiration. The 9900 is a quirky little chip that I have always wanted to experiment with, so this should be a fun series.
youtube
#usagi electric#homebrew computing#homebrew computer#tms9900#wrap030#retrocomputing#retro computing#Youtube
17 notes
·
View notes
Text
On Accepting Victories Where They Come
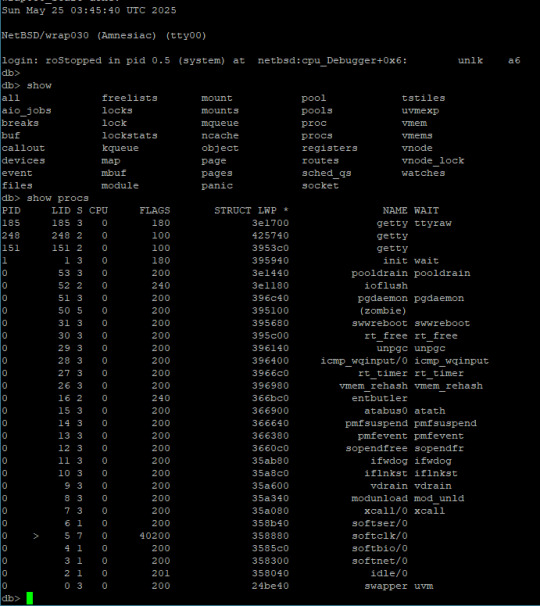
At the end of my last post on getting NetBSD running on my 68030 homebrew computer, I had a (mostly) working root shell prompt in single-user mode.
Well here we are a week or so later and I have ... a (mostly) working root shell prompt in single-user mode.
It turns out bringing up a modern operating system is hard.
The first problem was the default collection of init scripts. There are a ton of scripts in /etc/rc.d that are run at startup to finish bringing up the system after the kernel is loaded but before users can log in. These scripts do things like check filesystem integrity, mount disks, initialize networking, etc. Most of the scripts are not relevant to my specific hardware, but I wasn't even getting far enough along for that to matter. I was getting stuck early on in two steps in particular: filesystem checks and initializing /dev/random.
The latter issue there's not really anything I can do about. I can copy a pre-populated entropy file from an existing system, but I don't have the hardware support for random number generation. Frankly I don't need it either, if I'm not doing anything with cryptography like using TLS certificates. So remove that script.
I can check and repair the filesystem much faster on my host machine, so remove that script for now also.
And remove all of those networking-related scripts since I don't have the hardware for networking either.
…
It turns out init scripts have declared dependencies on other scripts. So removing one, especially an early important one like checking filesystem, means editing others to continue without it. It's dependency hell.
So for the sake of just getting things running, I removed everything and wrote my own. There were just a few things I really needed, like mounting the root filesystem as writeable and initializing TTYs.
It took a few tries to get it right, but my init script did eventually run without stalling. This was it, time for it to initialize the terminals and print the login prompt …
init: can't add utmpx record for 'tty01': Bad file descriptor
… That's not a login prompt. That's not a login prompt at all. What does that even mean? What on earth is utmpx?
The error message itself is printed by init. UTMPX keeps record of logged-in users, and it does so using a file, /var/run/utmpx. But is the bad file descriptor error relating to that file or to /dev/tty01?
I was stuck here for a while. I tried everything I could think of to make sure my tty devices were created properly and with the right major/minor numbers and permissions. I finally realized that I didn't get the error if the utmpx file didn't exist. So something was wrong with writing the file, possibly due to never being able to properly shut down and close out the file & filesystem any time it got created. But it's easy enough to just make sure it's deleted by the init script before getting to that point.
It's at this point where I went down a rabbit hole of trying to create a RAM disk for root just to eliminate the possibility of lingering problems with the ATA driver or similar. This proved to be a dead end because the system would only boot single-user from a RAM disk, and I also got stuck in dependency hell trying to get it to compile a RAM disk image that included the actual login binary.
After some more experimentation, I learned that if I had no extra terminals defined in /dev/ttys, then it would at least show the login prompt on the root console, but would never actually log in. Kernel debugger & SIGINFO would show that login was stuck waiting for something. If I did have multiple terminals defined, I would never see a login prompt and it would show that getty, which spawns the terminals, was sleeping, waiting for something.
And that's where I'm stuck. I have no idea what these programs are waiting on, and don't really have any way to check. I suspect it's possible they need those hardware interrupts I don't have, but since I can see activity on the UART chip select lines, I don't think that's the case.
So for now, facing a looming deadline and burnout setting in after a solid month of working on this, I've decided to accept the victory I have and admit defeat where I must. I have a computer that I built myself which can load and run a modern operating system up to the point of a root shell prompt. That is a remarkable accomplishment and I will absolutely accept that victory. There is already so much the machine is capable of just getting to that point. And going from knowing nothing about porting an OS to a new machine to having a running shell in under a month is a victory all on its own.
But, I was not able to get it fully running in multi-user mode on all of my terminals. I will happily accept that defeat in light of the major victory of getting as far as I have.
So, with VCFSW coming up very soon, I've decided to turn my attention back to my multi-user BASIC system. I have a few refinements and new features in mind that I would love to have ready by the show.
#homebrew computing#mc68030#motorola 68k#motorola 68030#debugging#vcfsw#wrap030#vcf#Retrocomputing#NetBSD#homebrew computer
32 notes
·
View notes
Text
On Major Milestones
I left off previously with init immediately crashing when trying to run NetBSD on Wrap030, my 68030 homebrew computer. I was completely lost and didn't know where to start looking. The error code it gave, 11, didn't tell me much.
Until now, most error codes I've gotten have been defined in kernel errno.h, which has 11 defined as:
EDEADLK 11 /* Resource deadlock avoided */
That … also isn't helpful. I'm still not entirely sure what that means, but since this is process 1 we're dealing with, I didn't think it was relevant.
Finally, I was able to find someone who had encountered the same error six years ago. Helpful soul [Martin] explained the exact cause of the error, how to fix it, and why the kernel errno didn't line up:

I'm running a NetBSD live disk on a laptop as a test host, so I mounted my disk on it and spent some time with mknod adding the essential device nodes, referencing the "majors" file for my arch. Sure enough, on next boot it skipped right past the point it had been panicking. It worked for a bit then finally printed on the console:
Enter pathname o
Enter pathname of what? The machine appeared frozen. Nothing further printed, and it responded to no input.
I was afraid this would happen. That string is 16 characters. The 16C55x UART chips I'm using have a 16-byte buffer. The system is hung up waiting for the UART to interrupt to indicate it has finished transmitting everything in its buffer.
There's just one problem — I don't have any serial interrupts wired.
I have a confession to make. Until a few weeks ago when I got my timer working, I hadn't really worked with hardware interrupts before. So between a limited understanding of how to use them effectively and limited board space, I had omitted the interrupt signals from my 8-port serial card. This was now a Problem, and I was going to have to find a solution.
I had a few options:
Force the com driver to 8250 mode so it doesn't try to use the buffers
Use my timer interrupt to check status bits on the UARTs and fake the interrupts
Deadbug an interrupt handler onto my serial card
Respin the serial card
Option 4 would've been expensive and risked passing my deadline. I wasn't sure option 1 would even help. And option 3 would have been difficult and error-prone. I decided option 2 would be the way to go so I set about researching how to accomplish it
I spent a few hours digging through the com driver. In the process I found softintr(9), a native NetBSD software interrupt process that looked like just the thing I needed. Digging in a little deeper, I realized that the com driver was already using softintr. And then I realized all it needed to do polled mode serial ports instead of interrupt-driven was to set a single variable, sc_poll_ticks, before initializing the driver. It's such a simple thing, but it's not really documented anywhere I could find, so the only way to know it was even an option was to spend hours studying the code.
With that in place, I recompiled my kernel and tried again.

It was asking for a shell. This is promising. I accepted the default shell, /bin/sh, and waited a moment. It printed a single #.
I had a shell prompt.

I typed in the first thing that came to mind, echo "hellorld" (thanks, [Usagi]). It responded:
hellorld
and printed another # prompt.
I had a working shell.

This is a major milestone. I have a modern operating system kernel loaded and running on my homebrew computer, and I have a functional root shell. I can navigate disk directories and run commands and programs.
But only as root, and only on this one console. I have seven other serial ports I want terminals on, and I certainly don't want them all running as root.
What it's running here is single-user mode. It is just the kernel and a few core services, somewhat analogous to Safe Mode in Windows. It's a fall-back for setting up or repairing a system. It's not quite the full operating system just yet.
Getting the rest of the operating system up and running is going to be a significant task, on par with getting just the kernel running. Setting up a working Unix system from scratch is not easy. It requires a lot of detailed knowledge of the various programs and libraries and config files scattered across the disk. For a sense of scale, the AT&T Unix System V manual was over 1100 pages, plus an 800 page programmer's guide and a handful of other manuals … and that was 40 years ago. That's a lot of specialized knowledge that I don't really have.
But still, this is something I've wanted to do for years and after countless hours of work, I finally have a glimpse of what it can look like. I have a lot to learn and a lot of work to do yet, but I'm certain I can figure it out.
I'm still hoping I can get this running multi-user on all those terminals in time for VCF Southwest in June. The show is just a few weeks away and I have a lot of work to do.
#mc68030#motorola 68k#motorola 68030#debugging#wrap030#retrotech#troubleshooting#netbsd#at&t unix#unix#unixporn#operating systems#os development#retro computing#retrocomputing#homebrew computer#homebrew computing#usagi electric#vcfsw#vcf southwest
20 notes
·
View notes
Text
On Not Knowing Where to Start
I have made tremendous progress on getting NetBSD to run on Wrap030, my 68030 homebrew computer.
I learned I had completely misunderstood how NetBSD sets up hardware devices (the tag is just a machine-dependent structure to help identify the bus properties the device is attaching to, and the handle is the actual device base address).
I learned how to set up my timer interrupt for use by the kernel for delay() statements & the like, which turned out to be a missing piece in getting serial devices set up (since the driver calls delay() at several points).
I got stuck for days trying to understand why the kernel couldn't mount my disk (endian-swapping strikes again).
Then finally, the kernel prompted me to enter the path for init, the "mother of all processes" as the code calls it.

... which promptly crashed.
and it crashed again. and again. and again.
I am finally out of the kernel. I have reached process 1. The machine is officially running userland code.
And I am completely lost.
I've spent weeks learning how to customize, build, and troubleshoot the kernel; but I am no longer dealing with the kernel.
I caught some bugs in how I was setting up virtual memory space for user processes (invalid stack address that overlapped I/O space). I swapped out some suspicious RAM. I found that the kernel would die in unexpected ways if it got too large (still don't know the cause, but it seems fine if I just keep it small). Still, init just dies with no insight into what it's doing or how far it's getting into its process.
But I'm in unknown territory here, and I'm finding myself quite lost and unsure where to turn next. I'm sure I'll figure out though. I just have to keep hammering away at it. I've come too far to give up now.
I have a looming deadline I've set for myself. VCFSW 2025 is in just a few weeks and I would love to have this system running in time for the show. It's a long shot — this project is something I've wanted to do for 25 years, and something I've been working towards for 10. I remain cautiously optimistic, knowing full well the scale of what remains.
But look how far I've come.
#mc68030#motorola 68k#motorola 68030#debugging#vcfsw#wrap030#retrotech#vcf#homebrew computer#homebrew computing#retro computing#netbsd#unix#Retrocomputing
17 notes
·
View notes
Text
I wish I could have been there to see it in person. Y'all did a great job!

Start Me Up: 30 years of Windows 95 - @commodorez and @ms-dos5
Okay, last batch of photos from our exhibit, and I wanted to highlight a few details because so much planning and preparation went into making this the ultimate Windows 95 exhibit. And now you all have to hear about it.
You'll note software boxes from both major versions of Windows 95 RTM (Release To Manufacturing, the original version from August 24, 1995): the standalone version "for PCs without Windows", and the Upgrade version "for users of Windows". We used both versions when setting up the machines you see here to show the variety of install types people performed. My grandpa's original set of install floppies was displayed in a little shadowbox, next to a CD version, and a TI 486DX2-66 microprocessor emblazoned with "Designed for Microsoft Windows 95".

The machines on display, from left to right include:
Chicago Beta 73g on a custom Pentium 1 baby AT tower
Windows 95 RTM on an AST Bravo LC 4/66d desktop
Windows 95 RTM on a (broken) Compaq LTE Elite 4/75cx laptop
Windows 95 OSR 1 on an Intertel Pentium 1 tower
Windows 95 OSR 1 on a VTEL Pentium 1 desktop
Windows 95 OSR 2 on a Toshiba Satellite T1960CT laptop
Windows 95 OSR 2 on a Toshiba Libretto 70CT subnotebook
Windows 95 OSR 2 on an IBM Thinkpad 760E laptop
Windows 95 OSR 2.5 on a custom Pentium II tower (Vega)

That's alot of machines that had to be prepared for the exhibit, so for all of them to work (minus the Compaq) was a relief. Something about the trip to NJ rendered the Compaq unstable, and it refused to boot consistently. I have no idea what happened because it failed in like 5 different steps of the process.
The SMC TigerHub TP6 nestled between the Intertel and VTEL served as the network backbone for the exhibit, allowing 6 machines to be connected over twisted pair with all the multicolored network cables. However, problems with PCMCIA drivers on the Thinkpad, and the Compaq being on the blink meant only 5 machines were networked. Vega was sporting a CanoScan FS2710 film scanner connected via SCSI, which I demonstrated like 9 times over the course of the weekend -- including to LGR!
Game controllers were attached to computers where possible, and everything with a sound card had a set of era-appropriate speakers. We even picked out a slew of mid-90s mouse pads, some of which were specifically Windows 95 themed. We had Zip disks, floppy disks, CDs full of software, and basically no extra room on the tables. Almost every machine had a different screensaver, desktop wallpaper, sound scheme, and UI theme, showing just how much was user customizable.
@ms-dos5 made a point to have a variety of versions of Microsoft Office products on the machines present, meaning we had everything from stand-alone copies of Word 95 and Excel 95, thru complete MS Office 95 packages (standard & professional), MS Office 97 (standard & professional), Publisher, Frontpage, & Encarta.
We brought a bunch of important books about 95 too:
The Windows Interface Guidelines for Software Design
Microsoft Windows 95 Resource Kit
Hardware Design Guide for Windows 95
Inside Windows 95 by Adrian King
Just off to the right, stacked on top of some boxes was an Epson LX-300+II dot matrix printer, which we used to create all of the decorative banners, and the computer description cards next to each machine. Fun fact -- those were designed to mimic the format and style of 95's printer test page! We also printed off drawings for a number of visitors, and ended up having more paper jams with the tractor feed mechanism than we had Blue Screen of Death instances.

In fact, we only had 3 BSOD's total, all weekend, one of which was expected, and another was intentional on the part of an attendee.

We also had one guy install some shovelware/garbageware on the AST, which caused all sorts of errors, that was funny!
Thanks for coming along on this ride, both @ms-dos5 and I appreciate everyone taking the time to enjoy our exhibit.

It's now safe to turn off your computer.
VCF East XX
#reblog#commodorez#vcfexx#vcf east xx#vintage computer festival east xx#windows 95#microsoft windows 95
310 notes
·
View notes
Text
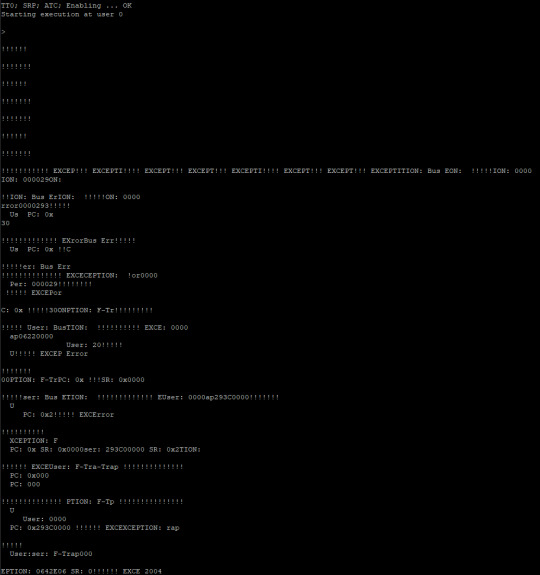
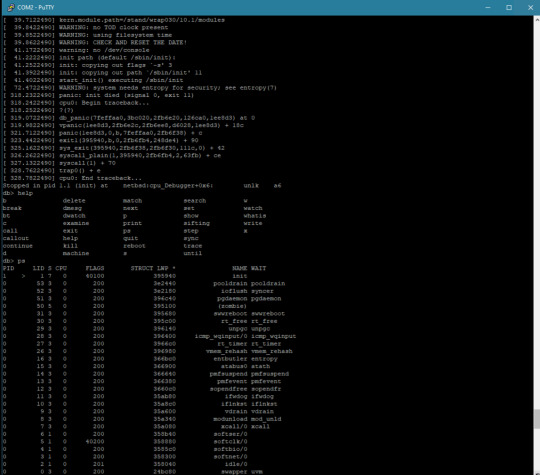
On Celebrating Errors

Isn't it beautiful? The lovely formatted tables of register and stack contents, the trace of function addresses and parameters, the error message ... it's the most beautiful kernel panic I have ever seen.
Why on earth would I be so excited to see a computer crash? What could possibly be beautiful about a kernel panic?
This kernel panic is well-earned. I fought hard to get it.
This kernel panic came from a current NetBSD kernel, freshly compiled and running on Wrap030, my 68030 homebrew computer. It is the result of hours upon hours of work reading through existing code, scattered documentation and notes, writing and rewriting, and endless compiling.
And it's just the start.
As I've said before, a goal of this project has always been to build something capable of running some kind of Unix-like operating system. Now that I finally have all the necessary pieces of hardware, plus a good bootloader in ROM, it's time to give it a shot. I'm not that great with this type of programming, but I have been getting better. I might just be able to brute force my way through hacking together something functional.
It is hard.
There is some documentation available. The man(9) pages are useful, and NetBSD has a great guide to setting up the build environment for cross-compiling the kernel. There are some published papers on what some people went through to port NetBSD to this system or that. But there's nothing that really explains what all these source code files are, and which parts really need to be modified to run on a different system.
I had a few false starts, but ultimately found an existing 68k architecture, cesfic, which was a bare minimum configuration that could serve well as a foundation for my purposes. I copied the cesfic source directory, changed all instances of the name to wrap030, made sure it still compiled, then set about removing everything that I didn't need. It still compiled, so now it's was time to add in what I did need.
... how ... do I ... ?
This is where things get overwhelming very quickly. There is documentation on the core functions required for a new driver, there's documentation on the autoconf system that attaches drivers to devices in the tree, and there's plenty of drivers already to reference. But where to start?
I started by trying to add the com driver for the 16550 UARTs I'm using. It doesn't compile because I'm missing dependencies. The missing functions are missing because of a breaking change to bus.h at some point; the com driver expects the new format but the cesfic port still uses the old. So I needed to pull in the missing functions from another m68k arch. Which then required more missing functions and headers to be pulled in. Eventually it compiled without error again, but that doesn't mean it will actually run. I still needed to add support for my new programmable timer, customize the startup process, update hardware addresses, make sure it was targeting 68030 instead of 68040 ...
So many parts and pieces that need to be updated. Each one requiring searching for the original function or variable declaration to confirm expected types or implementation, then searching for existing usages to figure out what it needs ... which then requires searching for more functions and variable types.
But I got something that at least appeared to have all the right parts and compiled without error. It was time to throw it on a disk, load it up, and see what happened.
Nothing happened, of course. It crashed immediately.
I have no debugging workflow I can rely on here, and at this stage there isn't even a kernel console yet. All I could do was add little print macros to the locore startup code and see where it failed. Guess, test, and revise.
I spent a week debugging the MMU initialization. If the MMU isn't properly configured, everything comes to an abrupt halt. Ultimately, I replaced the cesfic machine-specific initialization code and pmap bootstrapping code with functions from yet another m68k arch. And spent another day debugging before realizing I had missed a section that had comments suggesting it wasn't for the 68030 CPU, but turned out to be critical for operation of kernel memory allocation.
Until this point, I was able to rely on the low-level exception handling built into my bootloader if my code caused a CPU exception. But with the MMU working, that code was no longer mapped.
So then came another few hours learning how to create a minimal early console driver. An early console is used by the kernel prior to the real console getting initialized. In this case, I'm using the MC6850 on my mainboard for the early console, since that's what my bootloader uses. And finally the kernel was able to speak for itself.
It printed its own panic.
The first thing the kernel does is initialize the console. Which requires that com driver and all the machine-specific code I had to write. The kernel is failing at its step #1.
But at least it can tell me that now. And given all the work necessary to get to this point, that kernel panic data printing to the terminal is absolutely beautiful.
#troubleshooting#coding#os development#netbsd#homebrew computer#homebrew computing#mc68030#motorola 68k#motorola 68030#debugging#wrap030#retro computing
69 notes
·
View notes
Text
On Keeping Time
To run a simple program, a computer needs some kind of storage, and some kind of input/output device. To run a simple operating system, a computer will also need some random-access memory for holding onto information temporarily. To run a sophisticated operating system that supports many users and programs reliably, a computer will also need some way to make sure one user doesn't hog resources and prevent other users' programs from running.
My Wrap030 homebrew computer currently has a flash ROM which holds a bootloader program from starting other programs from disk. It has 16MB of RAM. It has 9 total serial ports for I/O. It just needs that last thing to be able to run a sophisticated operating system.
I've written before about how computers can share a single processor between multiple users or programs. The simplest option is to have each program periodically yield control back to the system so that the next program can run for a little while. The problem with this approach is if a program malfunctions and never yields control back to the system, then no other program can run.
The solution is to have an external interrupt that can tell the CPU it's time to switch programs. Each program can be guaranteed to have its chance to run because if a program tries to run too long, that interrupt will come to force a switch to the next program.
The way this is typically accomplished is with a periodic timer — ticking clock that interrupts the CPU regardless of what it's doing.
And that's what my Wrap030 project is missing. I need a timer interrupt.
The catch is, my system has always been a little fragile. I have it running well right now with three expansion boards, but there's always a risk of it being very unhappy if I try to add another expansion board. If I could somehow pull a timer interrupt out of what I already have, that would be ideal.
Nearly all of the glue logic pulling this system together is programmable logic in the form of CPLDs. This gives me the flexibility to add new features without having to rework physical circuitry. As it happens, the logic running my DRAM card currently consumes under half of the resources available in the card's CPLD. It also has several spare I/O pins, and is wired to more of the CPU bus than any other chip in the system.
So I added a timer interrupt to my DRAM controller.
It is very minimal — just a 16-bit register that starts counting down every clock cycle as soon as it's loaded. When the timer gets to 1, it asserts one of those spare I/O pins to interrupt the CPU.
And all it took was a couple bodge wires and a little extra logic.

I put together a quick test program to check if the timer was running. The program would spin in a loop waiting to see if a specific address in memory changed. When it changed, it would print out that it had, and then go right back into the loop. Meanwhile, the interrupt service routine would change the same address in memory every time the timer expired.

This is great! It was the last significant piece of hardware I was missing to be able to run a proper operating system like Unix or Linux — which has always been a goal of the project. While I still have much to learn before I can attempt to get a proper OS running, I can still put this new timer to use.
I had previously built my Multibasic kernel to run cooperatively. Each user instance of BASIC would yield control whenever it needed to read or write to its terminal (which it does at every line while running a BASIC program, checking for the Ctrl-C stop sequence). This worked well enough, but a particularly complex BASIC program could still slow down other users' programs.
Converting my Multibasic kernel from Cooperative multitasking to Preemptive multitasking was actually fairly easy. I just needed to initialize the timer at startup, and add an interrupt service routine to switch to the next user.

(It's not really something that can be seen in a screenshot, but it's doing the thing, I promise.)
Now that I have all of the requisite hardware, I guess I need to dive into learning how to customize and build an operating system for a new machine. It's something I have always wanted to do.
35 notes
·
View notes
Text
On Making Progress
With my Wrap030 homebrew computer operational again, I could finally get back to the work I had been wanting to do with it in the first place. I was able to get it running my multi-user BASIC kernel from ROM with the main board, DRAM card, and 8-port serial card.
There's still more work I want to do with software, and pulling and burning the ROM for every little change is not a great way to develop software. It would be great if I could load programs from a disk instead. I did previously have disk access working, but that was with a different system configuration and a different ROM. There was also a limitation with my old code where files that spanned multiple clusters didn't load right.
So I needed to test the system with the FPU+IDE mezzanine board added to the stack, and I needed to add disk load functions to my ROM.
Adding the FPU board went better than expected. I added it to the stack and the system continued running as it had previously. I didn't even have to lower the clock speed to compensate for the new board.
So time to update that ROM. My previous disk load functions were written to work with the TSMON monitor program I had been using. I wanted something that could load my Multibasic system (or another OS) without intervention, so TSMON was not going to be a good fit. All I really needed was a simple bootloader — something that could load a file, BOOT.BIN, from the disk and run it.
Rather than try yet again to wrap my head around parsing FAT filesystem headers and how to traverse the allocation table, I decided to try using an existing library. The Elm-Chan FatFs library was just the thing I needed. It's written to be portable, needs only a few custom functions implemented by the host system for disk sector reads, and documented reasonably well. I was able to get it running in a weekend, including all the time it took for me to debug my own silly mistakes like reading only 510 bytes of each disk sector instead of 512 and accidentally swapping bytes when caching data read from the disk.
Getting Multibasic ready to run from disk instead of from ROM was actually fairly straightforward since it was already built to be loaded from ROM to RAM and then run from there. I just needed to make a few minor changes to the linker script and add a branch at the beginning of its vector table.
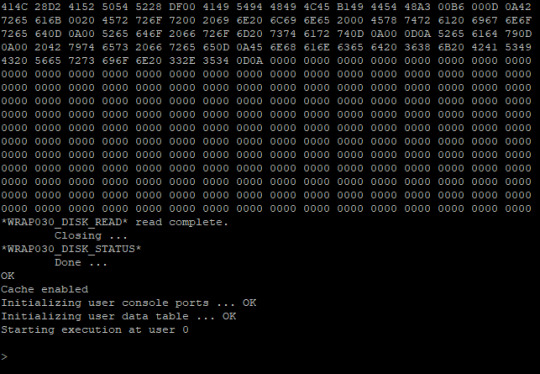
So after many hours of work, I am right back where I was at the start … but also miles ahead of where I started. If I need to make a change to the Multibasic kernel, I can just copy the new program to a CompactFlash card like any other file. If I want to load a new program I can do so easily. And swapping programs is as easy as swapping cards and hitting Reset.
#homebrew computing#homebrew computer#mc68030#motorola 68k#motorola 68030#debugging#wrap030#ide interface#retro computing
10 notes
·
View notes
Text
On Recovering From Disaster

Just before disaster struck with my 68030 homebrew, I had a plan to fork the project and take it in two directions in parallel.
The first would be my minimal Multibasic setup which was running great and was something I would be proud to exhibit at VCFSW '25.
Since that was working well, I didn't want to do anything that might make it not ready for the show. So I had assembled a second main board that I could use with other peripheral cards to continue development. My plan was to rework the memory map to move ROM and I/O addresses to the upper half of the 32-bit address space, which would allow me to use a DRAM card for up to 16MB of contiguous memory starting at address 0 — a perfect setup for running a proper OS
And then I burned up my good mainboard.
I had a spare CPLD on-hand, and I was able to get another 40MHz 68EC040 for cheap. But the 4Mbit SRAM chips are expensive, and I thought that if I was going to be paying for more SRAM, I should get the 12ns parts that would allow me to run RAM with no wait states at 50MHz. Which would require adapter boards, and more pin headers, and would have just driven the cost up even more.
Paralyzed by indecision and the rising cost, I decided to switch gears. I already have the DRAM board I built years ago, I just needed to get it working. And if I'm doing that, I may as well do the work on reorganizing my memory map.
So that's what I did. I made a new branch on my newly cleaned up repository, and set to work. I updated the mainboard bus controller logic to remove the no-longer-needed SRAM control, adjust the ROM address to start at 0x8000,0000, and move the 6850 UART address to 0x8008,0000. This freed up the entire 2GB space between 0x0000,0000 and 0x7FFF,FFFF for the DRAM card to use for main memory (my bus connector layout only allows for up to 16MB main memory, but that's plenty for my purpose).
Next, I needed to build the control logic for my DRAM board. I've done this once before on my Wrap030-ATX project a couple years ago, so I used that logic as a starting point. It … kind-of worked. Sometimes. Maybe.

I was getting random errors all over the place. Sometimes it was able to copy all of ROM into RAM and verify the copy without error, but it would fail when running code from RAM. Sometimes it wouldn't even pass the first two simple tests of writing a longword to RAM and reading it back.
Back to the data sheets to plan out the logic. I drew out a new timing diagram down to 1ns resolution, accounting for the specified propagation time for my CPLDs, and the measured signal delays for my CPU. This gave me the information I needed to build out a new state machine for the DRAM controller. In the process I also caught a few other bugs in my original logic, such as not ensuring the DRAM Write Enable strobe did not get asserted during refresh cycles.

The new state machine worked much better, but I got my timing off a bit. It worked reliably at 16MHz, but not at the intended 25MHz. At least it was working though; I can move forward with 16MHz.
The next thing to do was get my 8-port serial card working with this new setup. Every time the computer tried to access one of the 8 serial ports, it would get a bus error. This was a tough one that had me stuck for a while.
It looked like the serial card was getting addressed and asserting DSACK0# as expected, but I couldn't confirm the signal was making it back to the CPU. Every time I tried to measure the DSACK signals, the probes would increase the line capacitance (I think) too much and cause the whole computer to fail before it even got to the point of trying to address the serial ports.


I have the DSACK signals in a wired-or configuration. The logic on each card connects to the proper DSACK signal via an open-collector buffer, and is able to pull the signal low to signal that card acknowledging the bus cycle. The signal is then pulled back up to +5V by a 1kΩ resistor. This works well enough for small, slow systems, but with long bus wires or lots of chips on the bus, the extra capacitance means it can take a long time for that pull-up resistor to get the signal back up to +5V.
I made a change to my DRAM controller to actively drive the DSACK signals to +5V briefly at the end of a bus cycle before setting the pin to high-impedance. This helps ensure a fast rise time at the end of the cycle so it doesn't disrupt the next bus cycle.
It didn't fix the problem with the serial card, but it did allow me to actual probe the signals live to see what was happening — the Bus Error signal was getting asserted immediately after the CPU addressed the serial card. This didn't make much sense to me. My main board logic will assert Bus Error if no peripherals acknowledge a bus transaction within 64 clock cycles. Nothing should be asserting Bus Error so quickly.
Except … the main board bus controller. My original memory map used the lower half of the address space for the main board, and peripheral cards used the upper half. So my original main board logic was built to assert Bus Error immediately for an unused address in the lower half of the address space. I hadn't properly removed that bit of logic, so it was now asserting Bus Error for any accesses to the upper half of the address space that weren't used by the main board.
The challenges of working on a project after six years. I had forgotten that bit of logic was even there.
With that erroneous Bus Error assertation removed, the machine was finally able to properly load my Multibasic kernel and run BASIC for 8 users again.


At the moment it is running stable at 24MHz on my 25MHz-rated full 68030. It may not be the 50MHz high I was at, but after the frustration and disappointment of the past few weeks, I'm absolutely taking that as a win. 24MHz is incredible.
#mc68030#motorola 68k#motorola 68030#vcfsw#wrap030#retrotech#debugging#troubleshooting#homebrew computing#homebrew computer#retro computing
23 notes
·
View notes