#I was playing around with different shaders and then doing different things with the editing
Explore tagged Tumblr posts
Text

For my part I know nothing with any certainty,
But the sight of the stars makes me dream. ✨
~ Vincent Van Gogh
#ffxiv gpose#reshade#female lalafell#dunesfolk lalafell#hali aloke#oc: drops of jupiter#I was playing around with different shaders and then doing different things with the editing#and this is what i came up with#whatcha think?
56 notes
·
View notes
Text
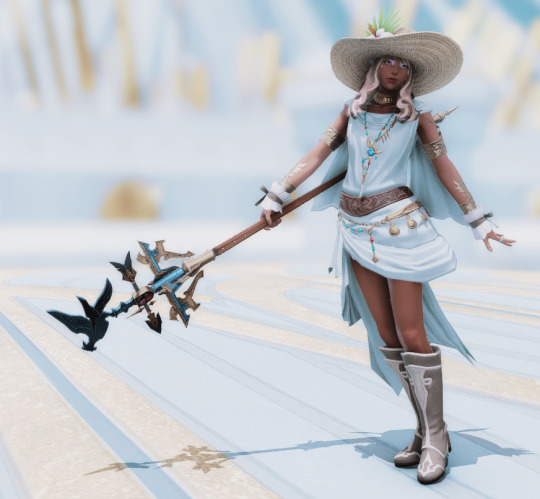
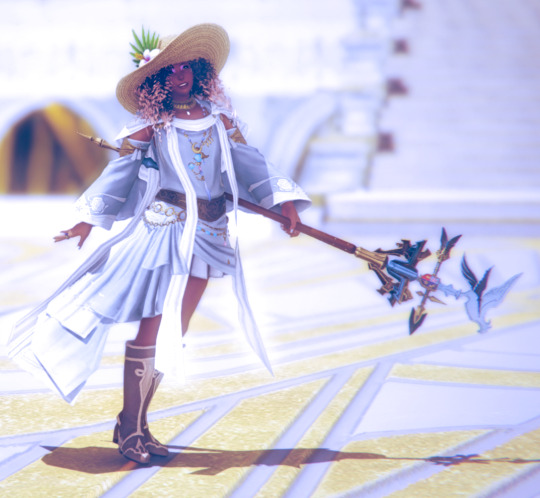
11/10/2022 ⌚THEN ---> NOW 🎐12/28/2024
While I started playing September 2021, those screenshots are from an older computer and since lost. I began learning about gpose mid-2022, but, frankly, crippling anxiety slowed me down a great deal. This was one of the earliest and most successful shoots - I used one from this day as Angeline's header for a while. Her visual changes are both crucial and cherished, but the most important change between then and now is how differently I feel and think about gposing.
Thank you @ubejamjar for tagging me into this. Getting a chance to reflect on this helped make my morning.
✨Angeline's combined necklace with emet-selch's pearl drop was a commission. I know how to do it myself now within a half an hour. This is now somewhat of a remnant from a previous version of what Angeline's arc would be - originally her romance with Emet-Selch would be much more centered, personal, reciprocal, even to the point that their final tryst would see Angeline pregnant during Endwalker. While that would make Endwalker a VERY wild ride, on further thought that's kind of at a filmi soapy level that's a little too ridiculous. Once Hippolyta being a dual figure with Angeline became the main Haunt thru the narrative I figured she had enough shit going on. All of that now only remains in the pearl drop necklace many of the outfits from this time have, though now Aymeric's necklace has become the go-to. 🎐The Anabaseios scarf accessory mod is the mod I learned how to item swap on. ✨The Faire Joi Sleeves and her french tip nails, baby's first upscale mod. Learned a great deal! 🎐Not visible: her Yuna earring, C+ adjustments to put some meat on her thighs, upper arms, and shoulders. ✨and her crown: her hair! Angeline's natural curls, the beloved IM~STRONG sim port, seen here as one of two hat compatible versions I made. I would have anxiety dreams about wanting this hair hat compatible and feeling so dumb that I didn't know how to do it myself, so when I was able to finally just buckle down and do it - well, the reason why I made such a big deal about it around my birthday was because it was a huge important thing for me! Her hair and her hats are integral to Angeline, so being able to Make Her Look Exactly Like Her has been like nothin else. 🎐I no longer have the shader I used in the first image, but I've since built a robust library of shaders specific to Angeline's character and how I want the camera to see her. I also know way way way more now about post-editing - I learned from the best!!! camera raw filter my beloved. ✨RIP in peace: the old catchlight eye system and her twinkle catchlight, and may you rise again Neopolitan Sculpts (not every project is a winner; after trying hard to tackle face sculpting I abandoned the idea because I couldn't recreate it exactly, and I was acclimatizing to her new vanilla face regardless)
Unfortunately, I've found myself with a great deal of habitual, chemical, thought-enforced anxiety - and I think very fast and a lot, so it's like trying to fight off a firehose. Channelling my neuroses has lead me to building a giant outfit repository, let me learn the inside and outs of Penumbra, Glamourer, Brio, Ktisis, Anamnesis, etc etc to the extent that I can really help others, and, glory of glories, I have a methodology to ensure that all the work I put into gposing gets saved. Camera angles, positionals, I'm not losing a project to crashing again!
Each of those things has lessened the anxiety greatly. One day I'll be free of it for good!
51 notes
·
View notes
Note
your post about ReLight is really interesting! I wanted to try it out but I understand nothing lol would you share some tips/tricks/little tutorial for dumbs like me on how to use it/setup for The Sims?
Hi anon!
It's not a massively involved shader, it's really simple, so a full tutorial would probably be a little over the top. Using it in TS4 is no different to using it in any other game.
The first thing I'd do is look at the preprocessor definition section at the bottom of the shader settings and change number of lights to 4 and hit enter. It'll reload and then you'll have 4 different lights to play with.
For the settings at the top, you want Use Smooth Normals turned on, and then all the boxes under Shadows ticked. For Shadow Mode you'll get the best quality with Trace All selected, and Ultra for Shadow Quality, but you can play around with these if your performance suffers (bear in mind I'm using a 980ti and hotsampling to larger resolutions and I'm fine with those settings).
Leave Shadow Sharpness at its default unless you want to go for a specific look, and you can keep Z Thickness at default too. You can play around with Z Thickness if shadows look like they're starting or ending in weird places. They're never going to be 100% accurate anyway, but you can sometimes coax them into not being truly awful.
One of the most important settings is down at the bottom: Visualize Light Position. Turn this on and it'll show you a round dot where your lights are positioned. This is really useful for lining them up exactly where you want them. Then, when you're done, you can turn them off (although they will disappear when you close the ReShade menu anyway, but this setting is useful for people like me who sometimes keep the ReShade menu open when taking screenshots so I can keep tweaking).
You'll see 4 sections that each start with a checkbox that says Active. Those are your 4 lights. Tick the ones you want to use. Then you can start moving them.
Next to Position there are 3 boxes, and they each represent respectively: left-right, up-down, backwards-forwards. Play around sliding each of them and see where your dot of light goes. You'll quickly get the hang of how to move the lights around using those position numbers.
Below that is Tint. It's easiest to click on the box of colour and colour pick than it is to manually change the RGB numbers. This controls the colour of your light.
Below that is Intensity. I think by default the lights are set up at the maximum level of 1.00 but that's super super bright, so bring that down considerably. You can use this to fine tune exactly how much illumination you want once you've set up the position.
And that's really it. You can use the lights to add more accurate light fall-off and shadows from in-game light sources like lamps, streetlights, windows, etc. You can also use it to just brighten a character's face a bit more for a clearer picture. Or you can really go to town and add completely fake and dramatic lights. It's up to you.
If you find that 4 lights isn't enough, you can't add more without editing the actual shader code. However, you can just duplicate the shader, so then you can have 8 lights, or 12, or 16, however many times you duplicate it.
To duplicate ReLight, create a copy of the shader in your shader folder, and give it a unique name (for example, qUINT_ReLight2.fx). Then, open it up in a text editor (I use Notepad++) and scroll all the way down to the bottom. You'll see a section that says
technique qUINT_ReLight
edit that so it matches the name you gave your copy, so in this case
technique qUINT_ReLight2
Then you can use them both alongside each other. I do start to experience a performance impact when using a second version, so bear that in mind.
I'm sure the better option would be to edit the shader code to add the ability for more lights directly in the first shader, but you'd need to be semi-knowledgeable about what to change. You're not often going to need more than 4 anyway, so it's overkill.
137 notes
·
View notes
Text
Critical Role INSP Pt2: C3 (Bells Hells CAS Set)

This set includes 32 recolorable CAS items for TS3, inspired by Campaign 3 of Critical Role: Bells Hells.
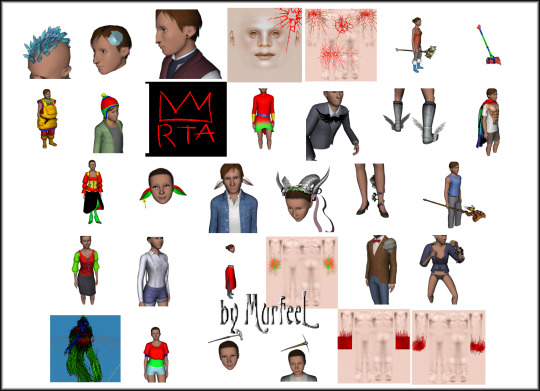
Crystals as Hair (HIGH POLY) V3 [BETA]
Cut Crystal as Head ACC V2 (found under Glasses)
Nails as Earrings
Cracked Rock or Glass BODY & FACE Tatts (REQ CmarNYC tatt mod)
DA2 Persuasion Maul as ACC (and Misc Decor)
TSM Blacksmith Vest SLEEVELESS [BETA]
ATS3 Female Beanie as ACC UNISEX (found under Glasses)
CR3 Chetney INSP RTA Tattoo
Danjaley/Dragon Valley Top RETEXTURED
CR3 Dorian INSP Chest Wings ACC (found under Necklaces)
CR3 Dorian INSP Boot Wings ACC (found under Socks)
CR3 Dorian INSP Gradient Cloak ACC (found under Bracelets)
TSM Corset Gathered Dress for Fauns (Frankenmesh) V3b
Deer Ears ACC 3 Tilted (with/without Flower) (found under Earrings)
Flowery Horns Frankenmesh ACC (found under Glasses)
Mitarasi Ankle Flowers ACC for TW3 Succubus Legs (found under Socks)
CR3 Fearne INSP Stave ACC (GLOWS) V2 (found under Rings)
4t3 Shanty Top REDONE SHEER V3
Suspenders Y/AF ACC (SN EP REQUIRED fit/fat morphs) (found under Necklaces)
Sheer Skirt ACC V2 (SN EP REQUIRED fit/fat morphs) (found under Garters)
Hand Veins as BODY Tattoo (REQ CmarNYC tatt mod)
Camkitty/Dragon Valley Pauldron LEFT ONLY as ACC (found under Necklaces)
Mitarasi Wrist Flowers LEFT ONLY as ACC V2 (found under Bracelets)
Gramsims Stylus Hair REDONE V2
EA Peasant Top REDONE V2
Hammer as Hairpin ACC (found under Glasses)
TSM to TS3 Pickaxe as Hairpin ACC (found under Glasses)
NA Bloody Hands as BODY Tatt 1 & 2 (REQ CmarNYC tatt mod)
FLAWS: The items marked as [BETA] have visible flaws (higher than my normal level of flaws, yes, shaddup) that I couldn't figure out how to fix or got too fed up to bother with anymore. Feel free to fix them or ditch them. Sorry I suck!
Enjoy!
Download set (package files) : Mediafire | Simfileshare
Descriptions & preview pics under the cut:
For in-game pics of most of this stuff, just consult my sims 3 Critical Role tag. All of it is pretty self explanatory, but I wanted to explain one thing or two, and point out exactly what FLAWS are present:
ASHTON
The Crystal Hair [BETA] was one of the hardest pieces of CC I've ever messed around with.
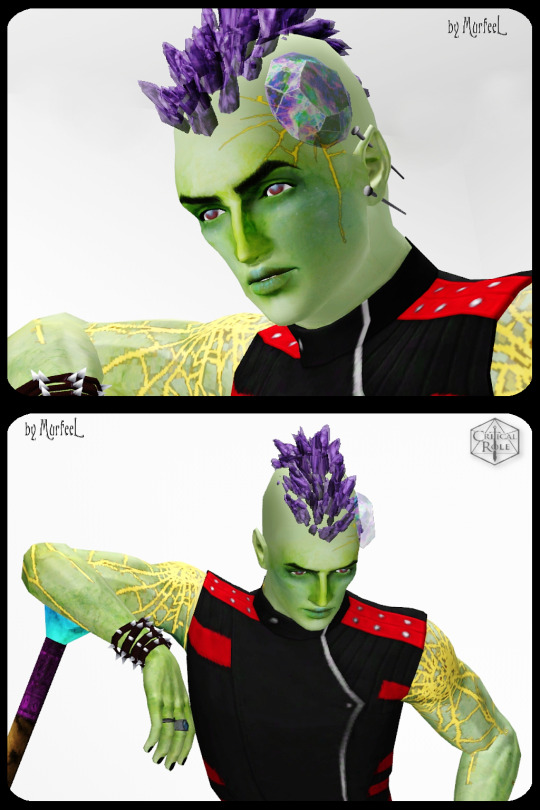
FLAWS: The mesh sits HELLA awkward on the head, and the clipping/floating through the skull in some areas is bad on some head shapes. Also, a weird texture glitch on the skull might randomly pop up in CAS, not Live Mode, and IDKY. *sigh* This is what I get for trying something different.
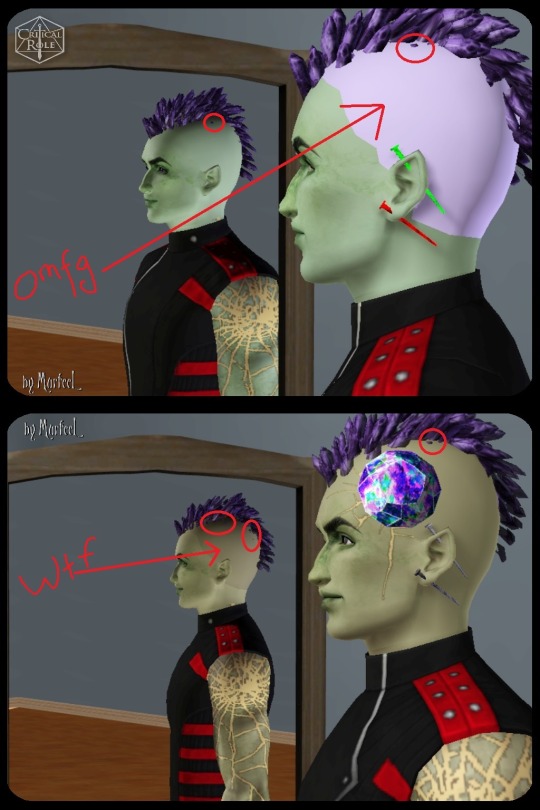
The Cut Crystal as Head ACC & DA2 Persuasion Maul as ACC (and Misc Decor) all have recolorable variations with a clear & opaque texture. The Nails as Earrings are self explanatory. The Cracked Rock or Glass BODY & FACE Tatts as usual REQUIRE CmarNYC's tatt mod at MTS.

CHETNEY
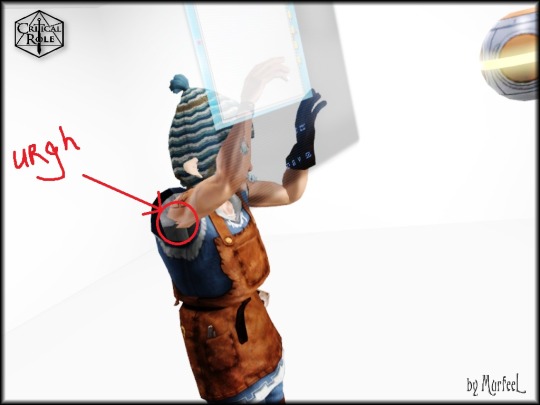
I made the ATS3 Female Beanie Unisex and tweaked the textures a bit. The CR3 Chetney INSP RTA Tattoo is a regular EA tattoo.

FLAWS: For the life of me, I CANNOT fix the janky bone joints under the armpits on the Blacksmith Outfit. So...avert your eyes (or just use the regular Blacksmith Outfit with the sleeves). U_U
DORIAN
I was surprised by how well the Chest & Boot Wing ACCs came out, considering those were my own meshes (for once).
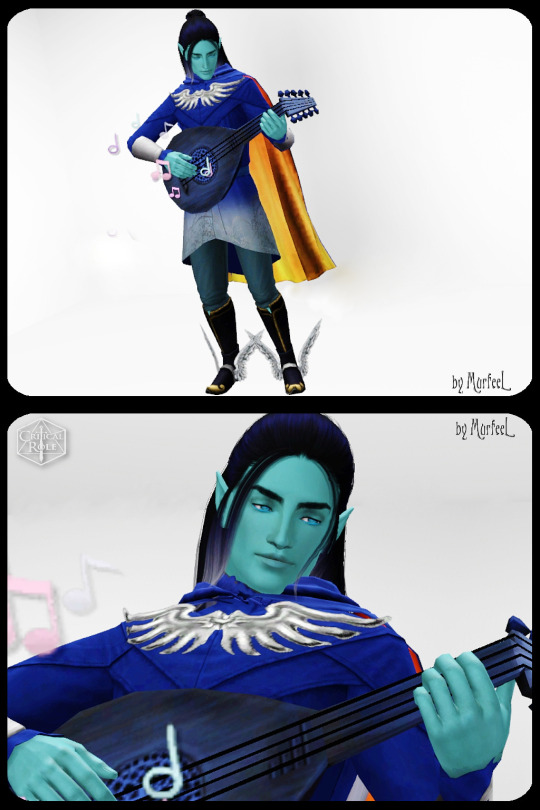
For the Dragon Valley Top I just retextured Danjaley's edit by tweaking the RGBY mask a bit. It's not great, but oh well. Neither is the Cape Accessory.

FEARNE
The Horns ACC is a mashup of X X X. The Stave ACC is a mashup of X X and I made the acorn glow with the ghost/plumbbot shader. IIRC the Horns and Ears ACCs have different sliders, one for the Hat Slider and one for Glasses sliders, but if I didn't do that...oops?
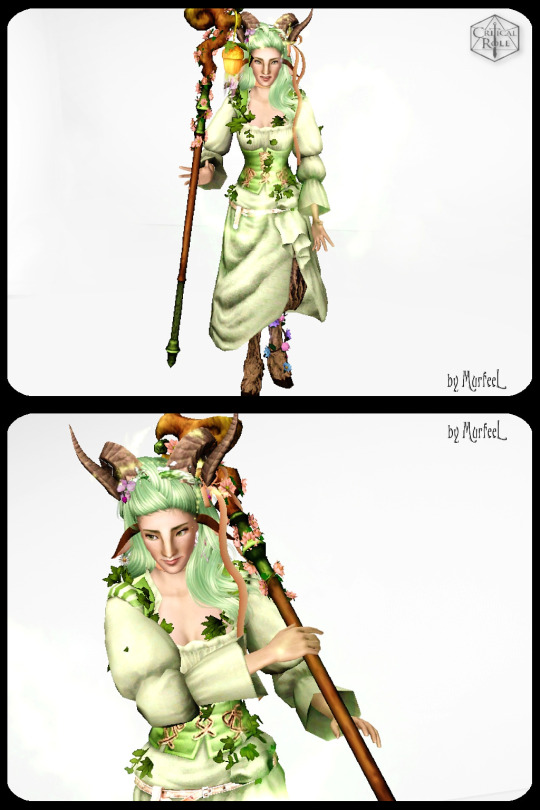
The Faun Outfit is a frankenmesh of the TSM corset dress @aprilrainsimblr converted and the TW3 Succubus outfit converted here. I added a few different RGB control variations as I was playing around with different options.
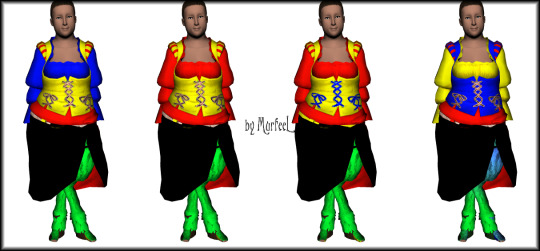
IMOGEN

I took the Shanty Top converted here and lowered the vest mesh as it sat too high on sims' waists, lightened the too-dark Multiplier, and made the sleeves sheer. The Suspenders and Skirt both REQUIRE the SN EP for the fat/fit morphs.
LAUDNA
I made @natalia-auditore's different accessory Bloody Hands as Body Tatts that REQUIRE CmarNYC's tatt mod at MTS, to reduce the amount of layered ACCs that cause texture blurring.
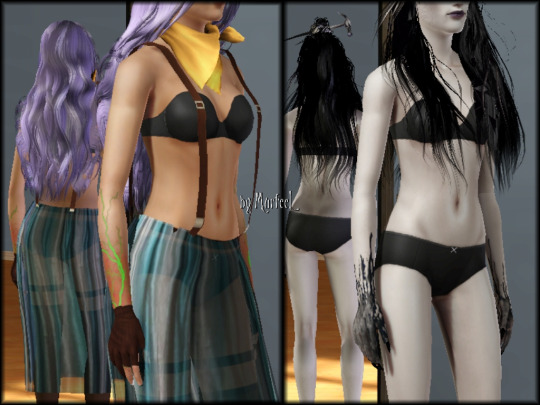
The Stylus Hair is an edit I did of Gramsims' Stylus hair (X), to add Laudna's signature white streak, fix the joints, and lower the polys a bit (it's still high though). (I used a hairline makeup for the baby hairs--IDER which one.) The Top is an edit from one of EA's, tweaking the waist mesh and changing the RBGY mask & overlays. I couldn't decide if I liked the Hammer or Pickaxe ACC, so I just threw in both.

Oryn
The Left Pauldron ACC is just the left side separated from the Dragon Valley top (Camkitty's mesh edit made my life easier), same with the Mitrasi Wrist Flower ACC.

___________________________________
And that's that!
Enjoy!
Download set (package files) : Mediafire | Simfileshare
#sims 3 cc#sims 3 conversion#sims 3 critical role#sims 3 clothes#sims 3 accessory#sims 3 tattoos#sims 3 hair#sims 3 fantasy
133 notes
·
View notes
Note
do you have any recommended gshade presets?
Almost all Reshade presets work with Gshade too! a little tip, with gshade you don't really need to worry about downloading anyone's recommended shaders, Gshade already has everything one needs in it. also if your game doesn't look like the reference photo's it's likely they edited them so don't let yourself get too frustrated. Any who, here are a couple of suggestions:
I would love it if y’all shared your suggestions in the comments, too! Ty💖
Ghibli waters and Comic-book are similar to my personal presets💖
here are some world overrides I also rec for more aesthetic: fluffy clouds / @apricotrush 's food & appliances are just lovely💕
︶︶︶︶︶︶︶︶︶︶︶︶︶︶︶︶︶︶︶︶
this is a little tutorial on a graphics overhaul, you don't need to do this!!! but I wanted to share this info incase some preset shaders don't show up quite right in somebody's game and/or someone wanted better graphics. big thanks to hazelminesims btw!
this page & link is in her recourses:
#I'm so sorry about all the tong clicks my mom was baking chocolate cake & it made my mouth salivate like a river!🙈#seyvia replies#anon ask#sims community#gshade#presets#simblr
34 notes
·
View notes
Note
also minecraft
[cracks knuckles as my eyes begin to glow]
an ode to everything i love about minecraft
I'm going to try and keep this essay away from stuff like "crafting table go brrr" autism mode stuff. I'm going to try and keep it relatable, tangible, and wholly positive
What drew me in first was the procedural generation. I don't think I really had ever encountered that in a video game before (I honestly wasn't even into playing video games to begin with, just like, some pokemon and animal crossing). Ever since day one one of my relaxing activities I do is load up a new seed, grab some empty maps, and just fly around filling out maps in creative, or just zoom around and look at the scenery. Even pre-caves and cliffs, I just really liked looking around caves and such. I found it so soothing and I was in awe of the fact that I'd probably never see the same thing twice. Every structure was surrounded by different things every time. Different biomes are up against each other. Its always so fascinating to just go around and look at.
When I started playing, I was playing on xbox 360 edition. I guess I had touched java edition a few years prior, but I didn't really 'get' it at the time, I think I had spawned on an empty island, or maybe I was playing classic or infdev? I don't remember. But when I started playing proper, I was playing on Xbox 360, the update right before woodland mansions were added. I found it so fun to follow an update cycle for a game, and have followed each one since then! I like how transparent Mojang is about their development, and I think that's something fans take for granted.
I like that there's a lot to memorize about it. Like yeah, that's a little to the autism go brr aspect but really, I like that there's an internal logic with easy flow to it. all numbers are factors of 2, usually. All wood goes into planks goes into wood objects. All tools follow the same upgrade pattern, etc. There's stuff to memorize with locations, mobs, potions, tactics, etc.
I love that there's a lot of flexibility in how you play the game! I prefer peaceful survival, but harder survival levels are also still fun in their own right! I like playing creative a lot too! I like that you can make superflat worlds, especially with like how the legacy editions let you make customizable superflats. I like that you can access game rules to fine tune things like daylight cycle or fire spreading. It is a sandbox game after all.
I think the voxel art style is consistent and charming! Everything feels like its at a good scale, and I actually really like the clunky animations that older mobs have (like the cow and pig). I think hostile mobs are scary based on the threat they pose, but not scary with how they look. Like it's not a horror game really. I think that's great! I like the updated textures but I do also understand the nostalgia for the old ones. I also like that you can try out different textures! i just like playing on vanilla but there's a lot of other really awesome ones, including the ones that work with RTX shaders and make the game look beautiful.
I'm always in awe of the things other people can do in the game. Map art, insane builds, redstone, farms, etc. I can usually understand the mechanics behind things, but I'm not really good at some of the more technical things, but I find them inspiring! I love that there's so much to the game that there's always something to find and use.
I like stuff the community does outside of just playing the game themselves! I like youtubers (mostly just hermitcraft), I like art people make (like clay dioramas or perler art or keychains or paintings), I like the board games! I like that it's such a popular game that it's usually a pretty universal conversational point with kids and young adults.
I like that Mojang has been working to distance themselves from the game's creator. I like that they've been branching out to using the game as more of an engine, or trying different game styles like Dungeons or Legends. I like the experimenting! I think its fun!
Lastly, I like that it's always there to go back to. Nothing about the game feels time sensitive, old worlds are just like you left them. There's always new updates coming out every 6 months or so, so even if it starts to feel stale, there's something new to try right around the corner.
I could go on but most of the time im like haha crafting bench like there's never cohesive thoughts about it
4 notes
·
View notes
Note
hey, I saw your tarot gpose and absolutely adore it <3. may i ask what shaders you use for those?
Hello @actxiisceneiv! Thank you so much for your kinds words and Im glad you enjoyed my tarot cards! To answer this, there will be a short and long answer!
Short answer: My tarots are pretty much all hand edited and there’s not really a shader for them other than the basic one I use for all of my gposes. (That shader is Kyren Cinematics The Nightingale)
Long answer: Each tarot I make is done by layering several different pictures, overlays, stock images for editing, etc…together in an art program (I use Clip Studio myself). Each card is individually designed and customized by myself. The shading I do by hand painting, as well as most of the lighting. As far as the outside border of the card specifically, that I got from a licensed subscription to a stock of editing photo site. I have personally photoshopped it to fit over my cards after they are finally layered.
Hopefully any of that made some sense…I know this probably isnt the answer anyone wants to hear, since its not always easy to have access to these programs. I do know that Windows paint recently added “layers” to their program, so it may be fun to try and play around with some beginning post processing if you are interested! I encourage anyone who want to keep pushing yourself to learn new things to expand your gpose abilities!
9 notes
·
View notes
Note
Hi Salem! I was looking at your (absurdly helpful) render tutorials, and I wondered if you had any advice on getting the shadows to look less... weird? Right now, my current blender scene has some very ugly-looking shadows that are way too harsh and sudden to be realistic. I'm using a point light at the ceiling (and I plan to add a couple of wall lights). Also, any advice on how to make a chandelier look decent lighting-wise if you want to fit it into frame? Thanks for answering, and thanks again for your tutorials!! They've definitely saved my ass these past couple renders! <3
Hey Morri!
The best advice I can give on lighting is to play around with it and move the lights around/adjust their brightness/color/etc until you get something you like (that removes the shadows).
Also keep in mind that lighting will behave differently in Eevee vs Cycles. I exclusively use cycles but I remember from my eevee days that the shadows were often really harsh for some reason? They took a lot more finicky adjustments to get right iirc When I first started, I tried to stick to only using "realistic" lighting, meaning I only used light sources inside sconces or chandeliers, but I quickly learned that this strategy doesn't always yield pretty results, so now I use realistic light sources as my "base" (windows, candles, chandeliers etc) and then usually add in point or spotlights off-camera (so they could believably be coming from something off-scene, and so they don't reflect in any mirrors or glass) to achieve more dynamic lighting and draw attention where I want it.
As for chandeliers, it depends on the chandelier itself but I'll do a few diff things:
I'll add in the chandelier like normal, add point lights "above" the bulb/candle flame (or in the space where it should be), then select the flames in photoshop and give them the proper glow effect This ofc requires the chandelier mesh to have a flame piece
If it doesn't, I'll create one (add in a uv sphere mesh and sculpt it to look like a candle flame) and then use blender's built in emission shaders plus point lights
This is wild and tedious but sometimes I'll edit the mesh to separate candles/flames from the chandelier, and use blender's built in emission settings plus a point light to achieve the right effect
I'll use a candle flame image and blender's emission to achieve the look I'm going for - this process is newer to me and will require its own tut post to explain fully 😅
Thanks for the ask and I hope this helps! I'm also so glad to hear that my tutorials are helpful! I'll be sure to add a more in-depth lighting tut to the list!
9 notes
·
View notes
Text
Ok I couldn't sleep so I tried to recreate some of the visual effects from this brick wizard animation. I'm gonna break this down into parts because 3d is complicated and even then I'm gonna be missing some of the parts, like the sharp pixely look that I don't have any experience with simulating. This is in Blender 3.6 btw, and I think that individual tutorials on modeling, shading, and physics will do a better job at walking somebody through the process than a sort of compilation post will, so I'm not going to go into excruciating detail on each step with like, explaining the various editing modes and such (unless somebody asks)
The Model
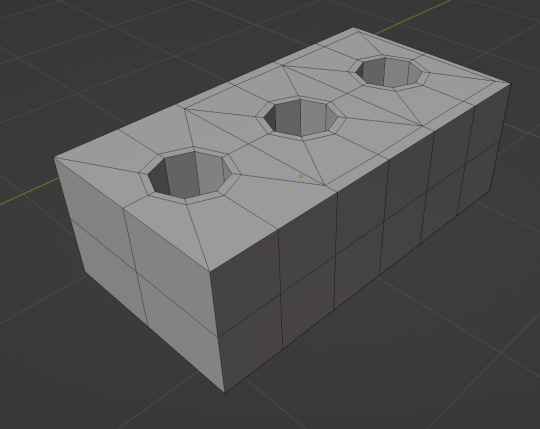
It's just a brick. I made a cube, scaled it to roughly brick sized, and then cut some holes into it by using an addon called Loop Tools that lets you make faces into circles from squares. I definitely fucked up the topology here, some of it is weirdly inconsistent, but it didn't affect the final result so we get to ignore the bad practices.
The Shader
This is the easy part, because if you want flat colors without bothering with shadows or reflections, you can just literally do this:
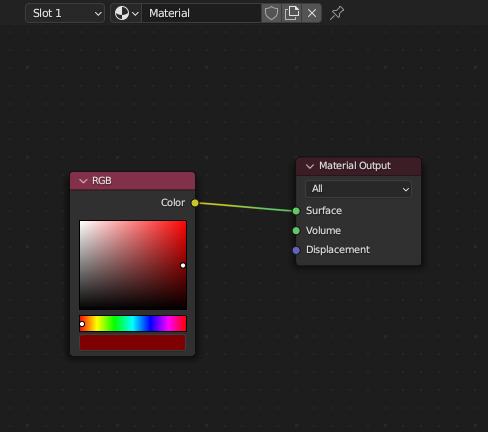
In the Shader Editor, if you hook up the RGB color input directly to the Surface output, the shader just says "I am red" and ignores everything else. You can definitely get more technical here if you want a toon shader, looking up blender cel shading can get you some really good free resources and files for stylish filters. After applying this, you get

because there's no lines on it, and no shadows to show any kind of depth.
The Line Art

Blender has presets for line art, you just make a grease pencil object, tell it to draw lines on the whole scene, and it'll have a pretty reasonable preset for a scene at standard meter scale (if your objects are real small, real big, or real complex, you'll definitely need to tweak settings to make it look normal)
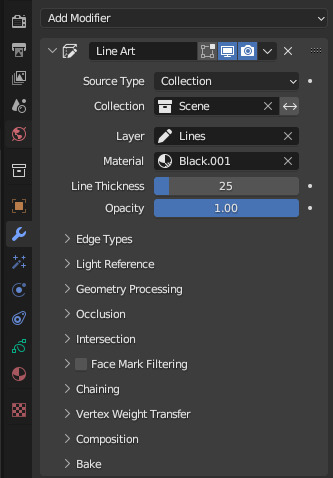
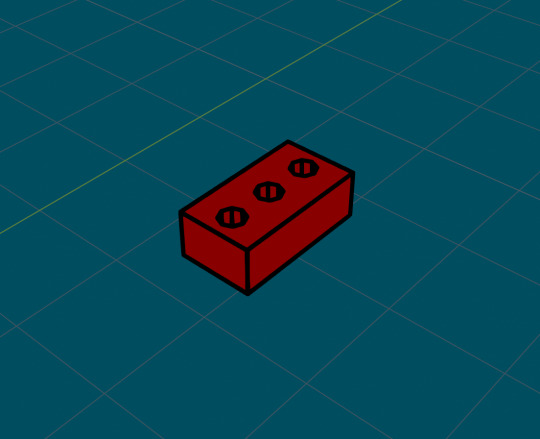
I didn't change anything and it looked good enough, so I just moved on because it is late
Also, grease pencils will draw based on the active camera, so if you have no camera, you get no lines, and if you do have a camera but you're not looking through it, they will look really weird
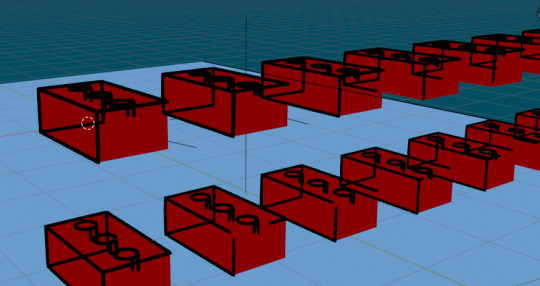
The Physics
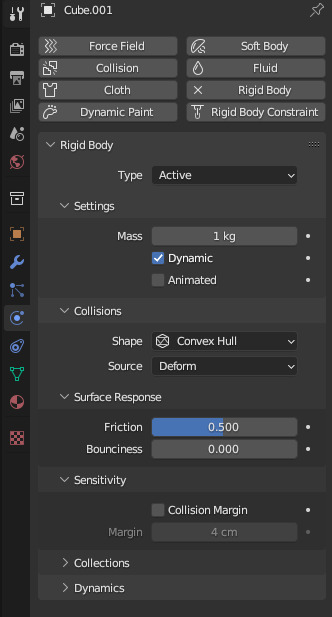
You just kind of turn on Rigid Body in the physics tab, and since it's a square you don't have to do anything else. If this was a weirder shape and I wanted it to be really accurate, I would change collisions from Convex Hull to Mesh in the dropdown.
I also made a big Plane object and scaled it up to serve as the floor, and did basically the same thing here
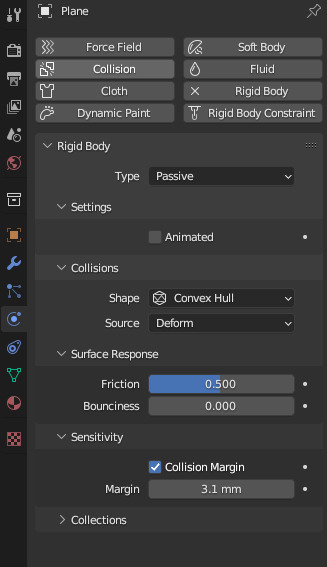
but I set it to Passive instead of Active so it wouldn't be affected by gravity or other forces.
More The Physics

To 'throw' the bricks, I made two Force Field objects, one set to Force, and one set to Turbulence. I then jacked up the strength on both while playing the animation until the force seemed right, and keyframed the Affect settings so that I could have them turn off before they hurled the bricks completely off into the distance.
I also upped the Noise setting on the Force object so that the bricks would move a little randomly. It's really fun to add and remove different force fields and mess with the sliders to see what they do, especially if you want to make, for instance, a Dracula Tornado (another thing I did at one point for unknown reasons)
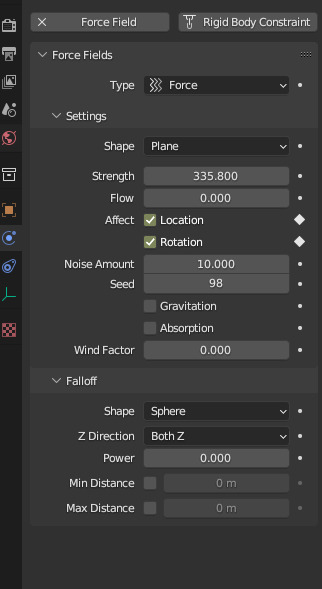
If you click the little circle at the right of a setting, it'll tell Blender when you want that setting to apply. So you go to frame 1 in the timeline, click the circles to make them into diamonds (which shows that they're keyframed) then go to the frame in which you want them to change, turn off the settings, and click the keyframe buttons again.

then, when the animation hits that frame, the setting will update accordingly. You can scoot these keyframes around to get things just right.
The Other Stuff that isn't in this
Other things I didn't do:
I didn't set a material that can have the brick drop shadows on it. It probably could've been really simple, but I already rendered the video so
I didn't get any further into cel shading effects, where you flatted the shadows and highlights into solid color blocks. If you're a little comfortable with blender, this site can just hand you a material that has all the options for a solid cel shader, it works pretty well.
My animation is also much higher res and lacks that nice looking pixel filter. I tried just rendering at a lower resolution but the default settings anti aliased it to hell so I'd have to learn how that was done, which is beyond me at this exact moment.
To be honest, it was surprisingly fun just typing this up, and a lot of this modeling stuff is something you kind of have to pick up from bits and pieces of other, more focused modeling tutorials, so if anybody that sees this wants to make lil' flat color low poly models, I'd be pretty happy to do something better considered and explained.
1 note
·
View note
Note
Your Morrowind graphics look sooo beautiful! Do you have a list of the mods you used? I'd really appreciate it if you could share it!
Sure! I'd be happy to share my setup =)
My modlist is cobbled together from various modding guides, suggestions by friends who've played Morrowind, and my own personal preferences as I've played and come across things I felt like changing (like the pond scum lol!).
I tried to leave out most mods that had zero to do with Graphics/changes you can see in the world, and I also tried to keep my descriptions short, though if you were only asking for a simple load order then I apologize, oops!
The Engine
MGE XE (this is absolutely vital for those distant views/awesome light and water shaders and other features!)
Morrowind Code Patch (needed for bump/reflection maps to look right!)
Meshes/Textures/Overhauls
Morrowind Optimization Patch (improves performance/fixes some mesh errors!)
Patch for Purists (squashes so many bugs while avoiding unnecessary changes!)
Intelligent Textures (full AI upscaled/hand-edited texture pack of the game, excellent as a base if you plan to add on more targeted replacers later!)
Enhanced Water Shader for MGE XE--OR--Krokantor's Enhanced Water Shader Updated: (depends on which version of MGE XE you're using; if 0.13.0 you'll want the Updated version, and if earlier you need the older one. 3 shades of water to choose from; improved caustics, foam, ripples, underwater effects; and no more weird immersion-breaking moment when you would previously tilt the camera just beneath the surface and it would suddenly be perfectly clear. Absolutely gorgeous water!)
Animation Compilation-Hand to Hand Improved Without Almalexia Spellcasting (idk if this counts, but it does fix the Visual of that weird vanilla running animation!)
Better Bodies and Westly's Pluginless Replacer (a friend told me to get Robert's bodies, but BB is also very good and seems to be the most widely used + many mods need it, like Julan!)
Pluginless Khajiit Head pack (prettier kitties!)
Improved Argonians (better looking lizard-friends!)
Children of Morrowind (adds realism by having kids running around your towns!)
Julan, Ashlander Companion [v3.0 at bottom of this page] (ok not a graphics mod, but will add much immersion to your game, so I will shill for him anyway!)
Vibrant Morrowind 3.0/4.0 (this one I actually don't have installed yet, but I love the way Vivec looks in the screenshots!)
abot Water Life (adds aquatic creatures/things like algae and coral to make Morrowind's waters more alive!)
Vurt's Corals (found on Vurt's Groundcover page; adds gorgeous corals and new water plants!)
Vurt's Ashlands Overhaul (can choose between gnarly trees or vanilla-style!)
Vurt's Groundcover (gorgeous animated grass and vegetation that differs for each region!)
Vurt's Solstheim Tree Replacer II (more realistic trees and snowy pines!)
Vurt's Bitter Coast Trees II (5 additional unique trees!)
Vurt's Bitter Coast Trees II Remastered (mesh fixes/optimizations for the trees!)
Vurt's Leafy West Gash II (more trees, and optional rope bridge texture!)
Vurt's Ascadian Isles Tree Replacer II (v10a recommended for better-sized trees without clipping issues; TREES!!)
Articus Bush Replacer for Vurt AI Trees II (new model for bush tree + bark retexture!)
Vurt's Grazeland Trees II (really cool palms and Baobab trees!)
Vurt's Mournhold Trees II (beautiful animated cherry blossom trees!)
I Lava Good Mesh Replacer (better lava mesh, has no flickering with effects like steam!)
Remiros' Minor Retextures - Mist (much nicer spooky mist in Ancestral Tombs!)
Unto Dust (adds atmospheric floating dust motes, kinda like in Skyrim barrows!)
Graphic Herbalism MWSE (improved meshes and Oblivion-style harvesting!)
Glow in the Dahrk (windows transition to glowing versions at night!)
Ashfall (super awesome and very configurable Camping/Survival/Cooking/Needs mod!)
Watch the Skies (dynamic weathers/weather changes inside/randomized clouds etc!)
Seasonal Weather of Vvardenfell (weather changes throughout the year!)
Taddeus' Foods of Tamriel (adds Ashfall compatible foods and ovens for baking!)
More Wells (add-on for Ashfall/more immersive since access to water is pretty important!)
Diverse Blood (because not everything should bleed Red when you poke it with a spear!)
Lived Towns - Seyda Neen (adds more containers/clutter to make it feel more lived-in!)
Better Waterfalls (adds splash effects/water spray, better running water texture!)
Waterfalls Tweaks (resized water splash to blend better!)
Dunmer Lanterns Replacer (smoother/more-detailed-yet-optimized lanterns + paper lanterns!)
Telvanni Lighthouse Tel Vos (fits in perfectly with Azura's Coast region!)
Telvanni Lighthouse Tel Branora (very atmospheric, works well with surroundings!)
Palace of Vehk (Vivec's Palace feels lived-in instead of sad and empty!)
Ships of the Imperial Navy (immersive addition to Imperial waterfront areas!)
Striderports (gives caravaners some shelter and comfort while standing there all day!)
Illuminated Palace of Vivec (decorates palace steps + shrines with devotion candles and flowers left by followers!)
Scum Retexture - Alternative 2 (better looking pond scum in Bitter Coast region!)
Full Dwemer Retexture (I went with Only Armor/Robots/Weapons; nice high quality retex!)
Blighted Animals Retextured (I chose Darknut's 1024; blighted animals have their own sickly textures now!
Vivec Expansion 3.1 Tweaked Reworked (adds a hostel/many wooden walkways to Vivec on the water!)
Atmospheric Plazas (Vivec's plazas now have weather/sunlight! Be sure to use MCP's Rain fix to keep it from pouring as if there's no roof!)
Gemini's Realistic Snowflakes (more organic texture with more depth!)
Severa Magia DB fix (makes hideout actually appropriate to Dark Brotherhood!)
Starfire's NPC Additions (more populated towns and settlements!)
Hold It (adds items for NPCs to hold and carry, based on their class; very immersive!)
Suran-The Pearl of the Ascadian Isles (I went with White Suran Complete package; stunning retexture that also adds docks/waterfront!)
Atmospheric Delights (a more fitting mood inside the House of Earthly Delights!)
Guars Replacer-Aendemika of Vvardenfell (pluginless makeover for our scaly friends!)
Silt Strider by Nwahs and Mushrooms Team (great new model+textures for these cool bug-buses!)
Skar Face (giant crab manor in Ald-ruhn gets claws and legs!)
Armor/Clothing
Redoran Founders Armor (Redoran councilors stand out in this cool set!)
Morag Tong Polished (bug fixes/Armor Replacer/restored cut content for the faction!)
Rubber's Weapons Pack (several unique weapons/shields get distinct models!)
Yet Another Guard Diversity (generic copypasta guards now have variation!)
Better Silver Armor (adds missing pieces of silver armor to make full set!)
Royal Guard Better Armor (pluginless armor replacer for the Royal Guards!)
RR Mod Series Better Silt Strider Armor (cooler bug men in your Ashlander camps!)
Armored Robes NPC Compilation (some Ordinators/Mabrigash/others will wear distinct robes of their station!)
Full Dragonscale Armor Set v1.3a (adds the missing pieces to make the set complete!)
Mage Robes (robes for every magic school, many MG members will wear their respective ones!)
Quorn Resource Integration (lore-friendly armor/creatures added to leveled lists to be encountered in game!)
Better Clothes (non-segmented clothing replacer to fit Better Bodies!)
More Better Clothes (additional shirts that were missed in the first one!)
Better Clothes Complete (fixes many problems and 1st person clipping issues for BC!)
Better Clothes Retextured (high-res retextures for nearly all base game clothes!)
Hirez Better Clothes (3 shirts retextured in high quality!)
Better Morrowind Armor (BB compatible armor replacer!)
Dark Brotherhood Armor Replacer (changes DB armor to look more like concept art!)
Bonemold Armor Replacer (much nicer-looking Bonemold armor!)
Westly's Fine Clothiers of Tamriel (very high quality clothes that you will see many NPCs wearing too!)
Orcish Retexture v1.2 (beautifully done armor retexture!)
Daedric Lord Armor (much improved Daedric set, very fierce!)
Ebony Mail Replacer (awesome new model+tex that changes it to actual chainmail!)
I use Wrye Mash to install my mods, though I think a lot of people use MO2. Haaa, now that I've made this list I have the strong urge to just run around Morrowind taking even more screenshots =)
26 notes
·
View notes
Text

Some Long Due Replies
Anonymous said:
Hi Criquette, I absolutely love your work. I have a question regarding the Rural Charm Roads, If one was to use a version with a sidewalk is there a way to make the road decoration pieces connect to the actual road instead of being placed underneath the sidewalk. And do the roads have a version for other terrain types? Thank you so much :)
Hello Anon! Thanks! Well, yes and no. You see, hood mode roads differ from lot mode roads in the way that hood roads float above the ground (Maxis was thinking about road/terrain z-fighting too much) so road pieces will always go under the sidewalk in neighborhood mode. But since lot skirt has a different approach to terrain/road mesh technique where road is actually a part of a lot skirt, all the road pieces appear to be visually above it. So asphalt pieces may actually connect to asphalt parts of the road, covering the sidewalk.
@jaomen1401 said:
Hello Criquette download your Fevervew neighborhood with everything indicated I played it yesterday and when I enter my game today the neighborhood is not there so I close the game and go into the neighborhood folder and the neighborhood if it is in the folder only happens to that neighborhood . Any suggestion?
Hi Jaomen! This is really weird. I'm not sure if it's Feverfew that causing this. I have this issue in my game sometimes, but that's because i'm on mac and have memory limits. Also this problem goes away when I restart my notebook and kill every unnecessary processes and applications via System Monitor.
@daydreamingdrawerette said:
Hi Criquette, do you have a tutorial on creating curved and diagonal roads while making them functional for lots?
+
Hi Criquette, do you have a version of your Rural Road charm without road markings?
Hello Aunty SimsGöttin! Well, in TS2 you can't create 'real' curved and diagonal roads that would actually work. There's a way to make lots visually connected to decorative lots and that implies the use of Lot Adjuster. As for the Rural Charm road without road markings – nope, I don't have such thing ^^
@m3rcaptan said:
Hi! Thanks for your amazing work! So, recently, I've been playing around (with considerable pain) with the idea of having a huge neighborhood decoration object that has the same(ish) shape as the neighborhood terrain, but with a cooler texture that can be seen from lot view. And it's currently a bit finnicky but one thing I thought about doing is using it with an "invisible" terrain default replacement. Is a an invisible terrain texture possible?
Hey M3rcaptan! Thank you ^^ Well, I might be wrong, but the material for the neighborhood terrain does not imply texture transparency as such. Making it invisible would require shader editing. I would suggest checking this amazing post from @lazyduchess for some clues. I've had no chance to learn everything about it myself yet, but it's definitely an outstanding concept with huge potential.
Anonymous said:
As wild as it sounds, Feverfew was I think the thing to finally push me to totally redo/clean up my downloads folder because I was like "I *have* to try out Feverfew, it is SO beautiful!" but I had so much cc and had been putting off sorting through/cleaning it. So! After a solid couple weeks (I am slow at stuff), I am finally downloading everything required for Feverfew and I am SO excited. Thank you for putting so much time and effort and making such a gorgeous 'hood!
Hello Nonnie! Ah, that's so sweet. Thank you so much! I hope this little town will make it up for you ^____^
Anonymous said:
Hellooo there, I hope you’re feeling good or at least okay? I have one question… would you consider to make an Italian (fishing) village/town as a neighborhood? I mean not even for download if you don’t want to do that, but as an inspiration? I’ve always thought as having one as the tropical vacation hood but I’m just not good at making neighborhoods. Only if you feeling inspired though, this is not a request 🤗
Hi Anon! Yes, I'm fine, thank you and I hope you're good too! There are so many places that inspire me to make neighborhoods based on! But life isn't getting slower and easier as it goes, and the main problem is always the same: lack of time. If I could make a living out of making neighborhoods, that would be the best work of my life, lol. Having said that, the only lifetime plan I have for making neighborhoogs is to make a Russian inspired neighborhood. Not just an average post-apocalyptic grungy stuff, but rather idyllic quiet place (like Feverfew).
Anonymous said:
hi Criquette, I recently installed the city of Feverfew (And by the way, it's great) but every time I go to a community lot it's giving an error, when I press "reset" my sim disappears and the game goes into build mode, what can it be?
Hello Anon! Thanks! Oh, I'm not sure if I get you right. There's a problem with doors in some lots (some of them are blocked by the decor that was placed on the same tile) but I'm not sure if it causes this. May be there are any GUID conflicts? The GUID database isn't working. I did my best to prevent this, but you never know.
Anonymous said:
Hi, Criquette! I'm a huge fan of your work! Thank you for all your contributions to sims 2, from cc to tutorials and the always impressive game pictures =) Do you have any plans to update your simple walkways, from mts, to lit up at night? And out of curiosity, have you always been so interested in the hood customizing aspect of sims 2, or is this something that gradually grew into you as you played live and build modes? Personally, you've been my biggest inspiration to start decorating my nhs.
Hello Nonnie! Thank you so much, most kind ^__^ Well, I don't have any plans to update simple walkways to make them lit up at night. Although I admit, it would be lovely thing to do, as well as adding lights to the trains, tramways and cruise ship set. But, as often happens, I only make things I'm obsessed with at the moment, so ¯\_(ツ)_/¯ As for my interest in hood decoration part of TS2, I'm a former SC player and modder since Simcity 2000. TS2 came out when Simcity 4 was extra popular but since it wasn't full 3D, Sims 2 had this amazing feature of being able to actually look at your 'city' from the ground level perspective. The lack of neighborhood decorations from Maxis got me going with making my own.
Anonymous said:
I finally did it. I achieved the level of hood building nerdiness required to apply your tutorial for moving single road tiles. Right now, you might as well be the only person in this world to whom I can say this, being sure I'll be fully understood: I NEVER FELT SO POWERFUL! I, the Terraformer, the Creator of Worlds, the Man Who's Been Minuciously Building This Save for Over a Year, but Has Not Played a Single Minute of Live Mode Yet, the Designer of Planets! Thank you for making this possible!

25 notes
·
View notes
Photo

late ass replies but this time i have so much stuff to reply to that i actually need to split things up into categories :))))
also i apologize if any of this is no longer relevant / i am of absolutely no help :)))
otherwise, if you’ve asked a reshade related question...uh... sometime between christmas and now LMAO then it’s probably here!
nonny :
Hello Mikayla, I hope you're having a lovely year so far. I just wanted to ask this about the dove preshade (1st question here) kindlespice/tumblr/com/post/632163463099269120/ft-reshade-questions-a-theme-question-nonny i'm having the same problem, i have a new computer and after installing the game and it's last 3 updates and then the reshade it's not looking the same and it sucks bc i know how it's supposed to look (1)
the shadows are not as noticeable, the transparency between the walls is not there and the blur is gone (i have miiko´s ghibli's cloud override but i had that on my old computer and the reshade still looked normal) idk if it's the game or the reshade but it sucks bc i love how the original looks like anyways it would be really helpfull if you could answer. Take care and stay safe :))!!! (2/2)
hi hi! thanks for the kind message and i hope your year is going well! if I had to take a guess, I would say that maybe some of your settings in-game have changed? I would double check and make sure you’ve got edge smoothing off, and you could try turning off post-processing as well (im not ACTUALLY sure if turning off post processing does anything but it’s worth a shot!) otherwise i would try removing the preset and redownloading it? maybe the settings of the preset got jacked up and you can fix it by re-installing. let me know if this helps! if not, then you can always dm me so i can see pics of your situation!
nonny:
Hi! Sorry if this is worded odd but I just downloaded your Leif reshade and have completed all the steps, however there is still this blur over the screen which isn't the best for game play. If you could help explain how to toggle it for gameplay/cas that would be great :)
hi hi! the blur is the DoF (depth-of-field). it’s used for taking screenshots and is supposed to make the background all blurry. to disable it, you can use the hotkey shift-2 or open the reshade menu and manually untick the DoF option!
nonny:
Hi, i just installed the latest version of the dove preset and my game is dark. It is the MXAO that is doing it but i don't have the preprocessor definitions box. How do i fix it?
hello! im assuming you have a 4.0 version of reshade if you can’t find the box. in this version, it’s a blue tab called “Edit Global Preprocessor Definitions” beneath all the toggleable effects. if you have an earlier version, it should be under the “settings” tab at the top though.
nonny:
Hello!! Thank you so much for your work! I have a really quick question - so I am trying to work with the reshade and got it all set but when I play around with it, my objects don’t look “rounded”. If that makes sense. Other people who use it, their objects look rounded and smooth and just different (I have an image for reference) but mine just looks like the normal objects just different colors. Is there something I’m missing or doing something wrong? I have all the settings correct. :)
hi hi! hmm, im not really sure what that could be... probably something to do with mxao bc it’s always something to do with mxao lol. I would double check to make sure you have this line in your preprocessor definitions: RESHADE_DEPTH_INPUT_IS_REVERSED = 0 this line should equal 0 for the mxao to work properly. that might give you the “rounded” look. if this doesn’t fix it for you then you should go ahead and dm me so i can see what the game looks like!
nonny:
Hey, I tried your Dove preset but my game just can't handle it, it's pretty old and I just have to uninstall the reshade (even though I really loved the effect) but I'm scared to do anything in the Game folder or delete anything. Could you please help me with what to remove? I'm scared to break my game if I delete something that souldn't be deleted :( I tried searching for this in your WCIF and reshade questions and couldn't find an answear. Please help
hello! sorry to hear that your game can’t handle the preset :( here’s to hoping you can get an upgrade in the future! anyhow, to uninstall; i believe you only need to remove
ReShade - config settings (it’ll have a little paper w/ gear next to it)
d3d9.dll - application extension (it’ll have a little paper w/ gears ON it)
d3d9 - text document (little paper w/ lines icon)
reshade-shaders - folder
your reshade presets - config settings (if you remove the files above first though, you won’t be able to use/see these in-game)
that should uninstall reshade from your game! and don’t worry, if you accidentally remove something you didn’t want to, you can “verify your game files” through origin and that should restore any missing files. unless you.. *ahem*... acquired your game through other means... in which case be careful XD
@maddybarbz
Omg I don't know if you are active or not but I'm having some problems. So I downloaded the 3.0.8 and it was going smoothly but I loaded the game it said that magic bloom had issues.
i don’t know if im active either. probably not tbh XD but im here now so here ya go! i would recommend deleting the shaders you’re having problems with and then putting back the 3.0.8 shaders you downloaded. it’s really easy for things to break / be incompatible during the install so your best bet is always to delete the ones giving you trouble and put the new ones in.
@kaiamikulka
hi! I’ve been jealously stalking your page for a while, because I’m in love with the dove preset, but I’m very confused about how to download it. My computer keeps marking it as a virus, so i was kinda scared to download it. and when i finally did, it didn’t show up in my game. could you walk me through how to download it?(i have a pc laptop)
Thank you so much,
Kaia☺️☺️❤️❤️❤️
hi hi! lol im flattered for the jealousy stalk! anyway im not sure why it wouldn’t be showing up in game? unless you were so excited that you forgot to install reshade with it? i have a video here explaining how to install a recent version of reshade and set up dove with it so you can check that out here !
@bojanastarcevic
Hello, I've been trying to fix the dove reshade for a long time, but the new version just doesn't support it, and the old version spoils the game and sometimes it won't even start ... Would you consider trying to make the same preset version for the latest reshade version? I'll be very grateful because your preset is the most beautiful I have ever seen?! 😘😂Don't know if you still play of work on your game but like I said if you have time to try make new one couse everyone was looking for it!!! 😉😘😘😘
hi hi! i totally understand not using the earlier versions--these later ones are soo much more user friendly!--but i’ve been able to get the preset to work with later versions (4.7.0 is the latest i’ve tried though) and it looks, if not the same, then very close to the original. I have a video here explaining how i did it if you’re really eager to have it
in the future i guess i could try to re-release the preset? i can’t give you an eta bc im lazy and i fall off the face of the earth regularly, but i do think it would help to have updated instructions right on the face of the download.
#i think i might make another reshade video#one that's not an hour long and is more put together LMAO#like#i should actually go IN GAME to show people how busted reshade really is#XDD#rereleasing dove is probably the play too...#god i really wish i had put a read more on that post#:((((#asks#reshade
13 notes
·
View notes
Note
Hi! Another reshade question- I've been having trouble with depth effects, so I checked display depth and got an all black screen. I did some looking around online but haven't found anything to help. It worked perfectly on my old computer (I'm now playing on a different computer, that's when the problem started) and I have all the same in-game graphics settings, shaders, and version (4.9) from before. Is there anything you'd suggest I try or how I should go about troubleshooting? Thank you!!
First thing to check is that Edge Smoothing is off in TS4’s graphics settings.
Next, in the ReShade menu open up ‘Edit global preprocessor definitions’ (it’s underneath the shader list) and check the line reshade_depth_input_is_reversed and see if it has a 0 or a 1 after it. If needs to be a 0, so change it to that if it’s a 1.
If those don’t work, go to the d3d9 tab at the top of the ReShade menu and try checking different combinations of the boxes in there.
Last thing to check is that laptop mode isn’t enabled in the graphics settings (this last one I’m not sure whether it affects the depth buffer in that way, but it’s worth a shot).
Actually, one last thing you can check is that your driver software doesn’t have MSAA enabled. Go into nvidia control panel (I don’t know what the equivalent is for amd) and go to the 3D application settings for TS4 and check that the various anti-aliasing options are turned off. I don’t have my PC on atm so I can’t check what the exact wording of the option you need to check is, so look at anything to do with MSAA or other anti-aliasing. MSAA frequently breaks the depth buffer (this is what the game’s edge smoothing is).
8 notes
·
View notes
Text
--MODS (ver. 1.16.4 ~ 5 only)--
EASY; OBVIOUS
better third person (TEST THIS 🚨)
wool to string wool tweaks is better ✅
tameable rabbits ✅
more flower bushes ✅ + custom mod for more small flowers 🔲
string lights ✅ (In-game book with recipes/tutorial?⚠️)
botany pots ✅ (learn recipes ⚠️)
invisible armor (actually 1 utility armor slot and 1 visible armor slot but same thing) ✅
NEW
added camels ✅
added chimneys ✅
bell noise when fish on fishing line ✅
can sleep slightly earlier (before stars show up) ✅
better caves, better mineshafts, and stronghold saver ✅
DID NOT add better portals because no they aren't ❌
supplementaries ✅ (hanging signs, notice boards, item shelves, fireflies, etc.; life is good)
added endermail (endermen will deliver packages for you) (do test this one 🚨 it's hard to do in creative)
added flower doubler ✅
added "kelp acts like bonemeal" ✅ (note: only one of either kelp or bonemeal will grow a vine and I forget which 🚨)
added "eggs hatch when they despawn (but only on hay bales and also only when there are fewer than X chickens around already)" ✅
added sleeping bags (skip night without setting spawn point) and hammocks (skip day) ✅
added ability to use banner pattern on bed ✅ (test this 🚨)
added tea ✅ (are the teapots and stuff placeable though..?? 🚨)
BIG DEAL; CONSIDERING
create ✅ (disabled ugly ores and custom stone types in worldgen; they aren't needed to make water wheels which are ALLLLL I care about 📝)
quark (some. mob variants, maybe vertical slabs, oddities for item pipes, etc) ✅
mcmmo 🔲 (pros: taming. cons: I don't actually even like mmos)
inventory tweaks quark has everything we need actually ✅
tree felling ✅ (serilum ver.) (it's so good) (NO AUTO-REPLANTING)
lava lamps ❌❓
ON THE LOOKOUT
one person sleeping makes night be over (check which version this became a thing in) QUARK HAS ✅ BUT TEST IT THOUGH 🚨
always show coordinates and ONLY coordinates (no F3 PLEASE) (Resource pack I got for this seems not to be working. Alt: serilum's gui compass. 🚨) 🔲
immortal neutral mobs (incl. bees) Does not appear possible with any currently existing mod. However, friendly fire prevents damage to pets and I have added passive endermen to prevent aggroing our very tall friends, which should mitigate this as much as possible. ✅ WATCH OUT for cats and rabbits though, that is very much still a massacre waiting to happen. CROSS-TEST WITH RABBIT TAMING 🚨
mooblooms & moolips ✅ CHARM HAS REALLY GOOD ONES
dog variants ✅ betterdogs. Con: to get specific dog type, name of type of dog must be in nametag name, which is mildly weird. Pro: fuck it !
legible signs. (editable signs also?) ✅ vanilla tweaks and quark, respectively.
feathers + leather without killing mobs ✅ charm "chickens drop feathers passively" rule, plus combination of "rotten flesh to leather" & all-paper books.
renewable saddles + name tags ✅ saddle recipe + nametagtweaks. (note: I think I actually have more than one thing installed that adds a nametag recipe but whatever. do test both of these though 🚨 also horse armor?)
more stars/more interesting night sky 🔲 (I hate texture packs. maybe I have to fucking make one)
candy colored texture packs and shaders 🔲 (I DUNNO, YOU GUYS)
BETTER STAINED GLASS? ?? also glass slabs, stairs, etc. might have to do this myself 🔲 (absent by design may add the shapes, as would glasscutter if it were ever updated to 1.16. try absent again now that optimization mods are working? the stained glass though, I do actually have to fucking do myself; nobody understands my aesthetic tastes apparently. CROSS-TEST ABSENT W/ QUARK'S FRAMED GLASS BLOCKS? 🚨)
GOING CONCERNS
proximity chat (found a voice chat mod that might work. to test. 🚨)
teach everyone how to screenshot
NEW PROBLEMS
"In Control!" does make mobs noticeably less lively if you're not within a couple dozen blocks of them. BUT the performance increase is VITAL... play with settings.
Charm (I think?) villager adjustments COMPLETELY fuck up the village near spawn. (Solution: maybe just turn them off... they're not that good. Also, may be able to get away with JUST turning off lumberjack and leaving beekeeper on. Test savanna and extreme hills villages with these rules.)
Better Caves fucks up the cool tunnel I wanted to make next to the ice spikes but I might just worldedit it into submission lol
Quark mob variants are OKAY. I do actually need to test 🚨 whether quark and charm can both have them enabled at the same time and have that like. work. Because charm's are slightly cuter in general but I like quark's purple cow hsjdjfjf
Chimney mod is cool but oh my god I have to 🔲 turn the amount of smoke particles it generates down
QUARK CANDLES ARE MADE FROM TALLOW AND NOT BEESWAX FOR SOME REASON... but charm's only come in one color. also neither of them cluster like the ones from 1.17!!! I HAVE COMPLAINTS 🔲 (solution: different mod OR custom mod OR crafttweaker)
also quark's blossom trees are a cute idea but they're ugly. fix? 🔲 AND fix the decorated paper wall and lantern.
related: macaw's doors has sliding paper doors. pros: MANY MORE DOORS, TRAPDOORS, WINDOWS. cons: choice paralysis? cluttered recipe book?
🔲 STILL DO HAVE TO PUT MORE FLOWERS.. IN IT..THE GAME.
wooden axe is the wand tool for worldedit and so does not work as an axe. I'm pretty sure there's a way around this but I think it's funnier to just ban the use of wooden axes specifically. unhinged server laws. also yes I want everyone to have access to worldedit. yes I will murder and kill them if they use it to be rude. we live in a society
the nether is still ugly. there's not really anything I can do about that though
🔲 Limiting factor on arrows is now flint, which is annoying to get, so maybe do something about that too.
🔲 also I totally have not found a good lead recipe so that too
🚨🔲🚨 and finally: this post is now way too long so I have to work on making a coherent file that lists included features, and another that lists stuff I'm still looking to add remove or change. NOT EVEN I WANT TO READ ALL THIS !!!
2 notes
·
View notes
Photo
Péguy
Hi everybody! In this news feed I've told you a few times about a project I named Péguy. Well today I dedicate a complete article to it to present it to you in more detail but also to show you the new features I brought to it at the beginning of the winter. It's not the priority project (right now it's TGCM Comics) but I needed a little break during the holidays and coding vector graphics and 3D, it's a little bit addictive like playing Lego. x) Let's go then!
Péguy, what is it?
It is a procedural generator of patterns, graphic effects and other scenery elements to speed up the realization of my drawings for my comics. Basically, I enter a few parameters, click on a button, and my program generates a more or less regular pattern on its own. The first lines of code were written in 2018 and since then, this tool has been constantly being enriched and helping me to work faster on my comics. :D This project is coded with web languages and generates vector patterns in the format SVG. In the beginning it was just small scripts that had to be modified directly to change the parameters and run individually for each effect or pattern generated.

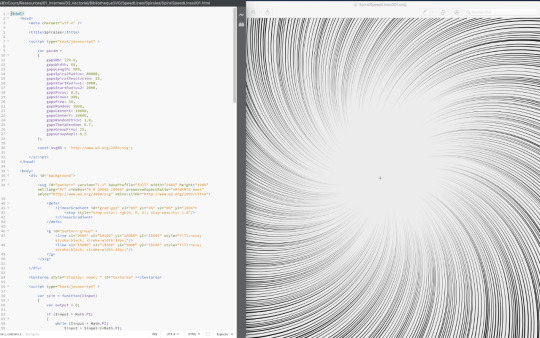
Not very user friendly, is it? :’D
This first version was used on episode 2 of Dragon Cat's Galaxia 1/2. During 2019 I thought it would be more practical to gather all these scripts and integrate them into a graphical user interface. Since then, I have enriched it with new features and improved its ergonomics to save more and more time. Here is a small sample of what can be produced with Péguy currently.
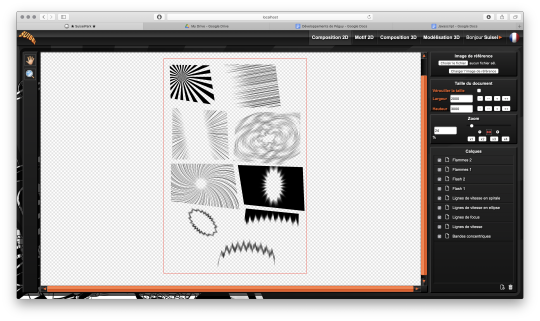
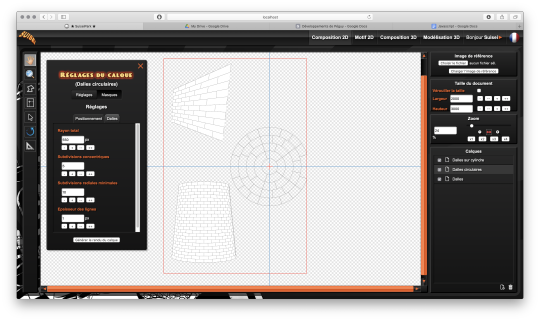
Graphic effects typical of manga and paving patterns in perspective or plated on a cylinder. All these features were used on Tarkhan and Gonakin. I plan to put this project online, but in order for it to be usable by others than me, I still need to fix a few ergonomy issues. For the moment, to recover the rendering, you still need to open the browser debugger to find and copy the HTML node that contains the SVG. In other words, if you don't know the HTML structure by heart, it's not practical. 8D
A 3D module!
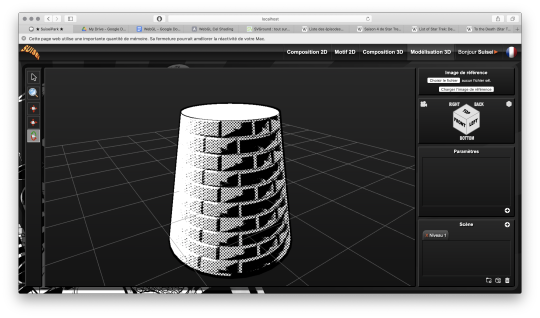
The 2020 new feature is that I started to develop a 3D module. The idea, in the long run, is to be able to build my comics backgrounds, at least the architectural ones, a bit like a Lego game. The interface is really still under development, a lot of things are missing, but basically it's going to look like this.
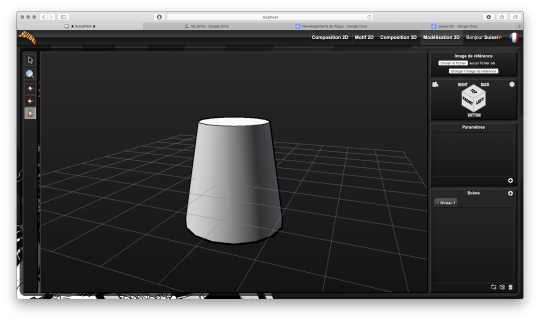
So there's no shortage of 3D modeling software, so why am I making one? What will make my project stand out from what already exists? First, navigation around the 3D workspace. In short, the movement of the camera. Well please excuse me, but in Blender, Maya, Sketchup and so on, to be able to frame according to your needs to get a rendering, it's just a pain in the ass! So I developed a more practical camera navigation system depending on whether you're modeling an object or placing it in a map. The idea is to take inspiration from the map editors in some video games (like Age of Empire). Secondly, I'm going to propose a small innovation. When you model an object in Blender or something else, it will always be frozen and if you use it several times in an environment, it will be strictly identical, which can be annoying for natural elements like trees for example. So I'm going to develop a kind of little "language" that will allow you to make an object customizable and incorporate random components. Thus, with a single definition for an object, we can obtain an infinite number of different instances, with random components for natural elements and variables such as the number of floors for a building. I had already developed a prototype of this system many years ago in Java. I'm going to retrieve it and adapt it to Javascript. And the last peculiarity will be in the proposed renderings. As this is about making comics (especially in black and white in my case), I'm developing a whole bunch of shaders to generate lines, screentones and other hatchings automatically with the possibility to use patterns generated in the existing vector module as textures! :D

What are shaders?
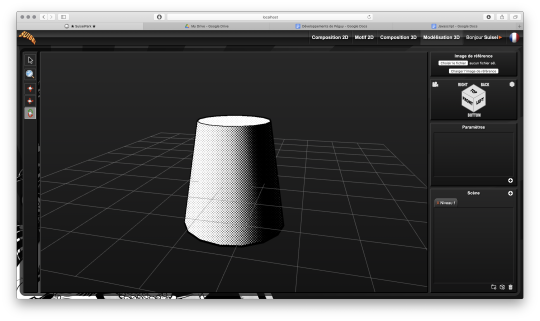
Well, you see the principle of post-production in cinema... (Editing, sound effects, various corrections, special effects... all the finishing work after shooting). Well, shaders are about the same principle. They are programs executed just after the calculation of the 3D object as it should appear on the screen. They allow to apply patches, deformations, effects, filters... As long as you are not angry with mathematics, there is only limit to your imagination! :D When you enter a normal vector in a color variable it gives funny results.
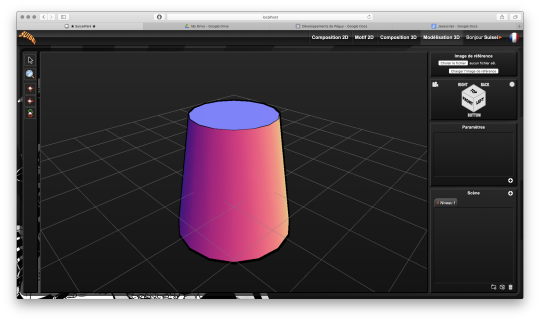
Yes! It's really with math that you can display all these things. :D Now when you hear a smart guy tell you that math is cold, it's the opposite of art or incompatible with art... it's dry toast, you'll know it's ignorance. :p Math is a tool just like the brush, it's all about knowing how to use it. :D In truth, science is a representation of reality in the same way as a painting. It is photorealistic in the extreme, but it is nevertheless a human construction used to describe nature. It remains an approximation of reality that continually escapes us and we try to fill in the margins of error over the centuries... Just like classical painting did. But by the way? Aren't there a bunch of great painters who were also scholars, mathematicians? Yes, there are! Look hard! The Renaissance is a good breeding ground. x) In short! Physics is a painting and mathematics is its brush. But in painting, we don't only do figurative, not only realism, we can give free rein to our inspiration to stylize our representation of the world or make it abstract. Well like any good brush, mathematics allows the same fantasy! All it takes is a little imagination for that. Hold, for example, the good old Spirograph from our childhood. We all had one! Well, these pretty patterns drawn with the bic are nothing else than... parametric equations that make the students of math sup/math spe suffer. 8D Even the famous celtic triskelion can be calculated from parametric equations. Well, I digress, I digress, but let's get back to our shaders. Since you can do whatever you want with it, I worked on typical manga effects. By combining the Dot Pattern Generator and the Hatch Generator but display them in white, I was able to simulate a scratch effect on screentones.

In the traditional way it is an effect that is obtained by scraping the screentones with a cutter or similar tool.
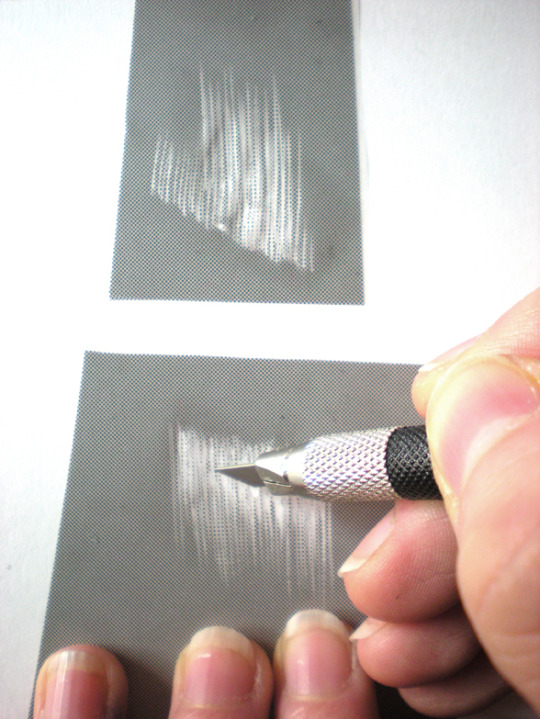
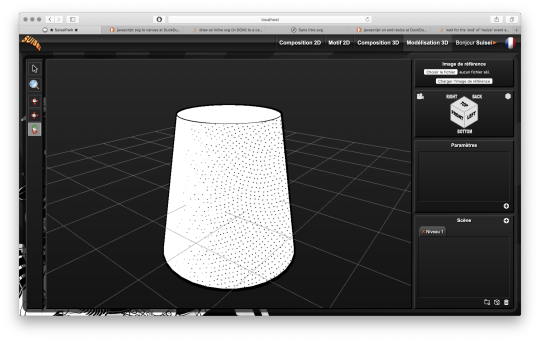
Péguy will therefore be able to calculate this effect alone on a 3D scene. :D I extended this effect with a pattern calculated in SVG. So it will be possible to use the patterns created in the vector module as textures for the 3D module! Here it is a pattern of dots distributed according to a Fibonacci spiral (I used a similar pattern in Tarkhan to make stone textures, very commonly used in manga).
Bump mapping
So this is where things get really interesting. We stay in the shaders but we're going to give an extra dimension to our rendering. Basically, bump mapping consists in creating a bas-relief effect from a high map. And it gives this kind of result.
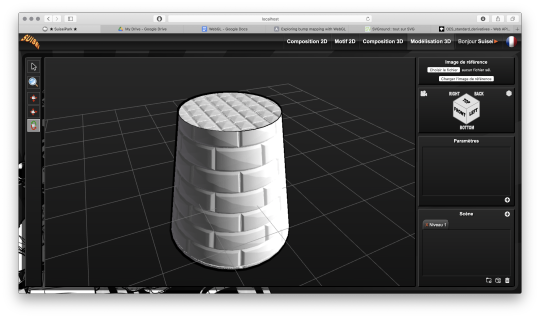
The defined object is always a simple cylinder (with 2 radii). It is the shaders that apply the pixel shift and recalculate the lighting thanks to the high map that looks like this.

This texture has also been calculated automatically in SVG. Thus we can dynamically set the number of bricks. Well, this bas-relief story is very nice, but here we have a relatively realistic lighting, and we would like it to look like a drawing. So by applying a threshold to have an area lit in white, a second threshold to have shadow areas in black, by applying the screentone pattern to the rest and by adding the hatching that simulates the scraped screentone, here is the result!

It's like a manga from the 80's! :D I tested this rendering with other screentone patterns: Fibonnacci spiral dots, parallel lines or lines that follow the shape of the object.

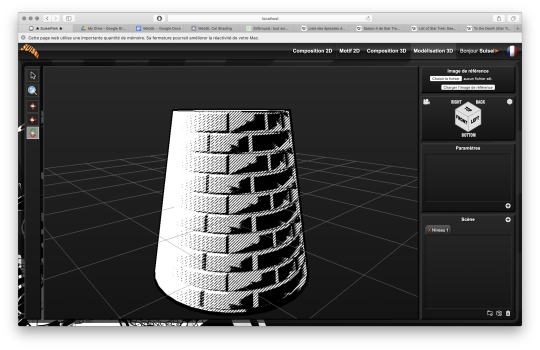
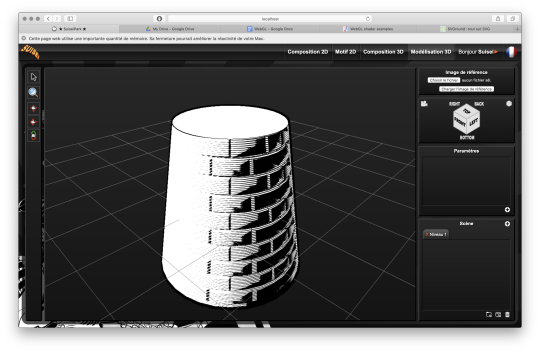
Now we know what Péguy can do. I think I can enrich this rendering a bit more with the shaders but the next time I work on this project the biggest part of the job will be to create what we call primitives, basic geometric objects. After that I can start assembling them. The concept of drawing while coding is so much fun that I'm starting to think about trying to make complete illustrations like this or making the backgrounds for some comic book projects only with Péguy just for the artistic process. Finding tricks to generate organic objects, especially plants should be fun too. That's all for today. Next time we'll talk about drawing! Have a nice week-end and see you soon! :D Suisei
P.S. If you want miss no news and if you haven't already done so, you can subscribe to the newsletter here : https://www.suiseipark.com/User/SubscribeNewsletter/language/english/
Source : https://www.suiseipark.com/News/Entry/id/302/
1 note
·
View note
Link

Famitsu has published the first interview with Tales of Arise producer Yuusuke Tomizawa following the game’s announcement, who shares new information on the upcoming revitalization of the series.
Here are the notable tidbits:
The Tales of Arise project started long before Tales of Vesperia: Definitive Edition, which was announced one year ago.
As you might be able to tell from the video, this is a considerably challenging title, and when creating it we first had to take some time to rethink what the Tales Of series is and what it should be.
Our goal was “succession and evolution” while also confronting the traditions of the series.
As we were analyzing the main appeals of the Tales Of series, there were many parts that needed to evolve for the future. In order to maintain and expand the brand from here on out, we need to also attract the attention of young players. That being said, we are challenging ourselves to present something that dares to step back from the traditional conventions of the series in order to attract more players.
There will probably be some fans who only watch the trailer and feel a sense of uneasiness, but we had discussions regarding fundamental appeal of the Tales Of series and the points to carry over, and decided and planned our points of evolution based upon that. We will explain the details for each element at some point in the future.
With Tales of Arise, we cast away the dedicated engine we have used thus far. In order to realize rich lighting and atmosphere accompanied with unique, watercolor-like graphics and approachable character models, we based the game on Unreal Engine 4 while developing our own completely original shaders and the like.
The theme is to hopefully offer “a highly immersive experience.” As one representation of that, we are further enhancing things such as the performance and actions of the characters in order to have players feel as if, “this character lives in this world.” With that approach, we’re combining fields and characters depicted in a watercolor style, as well as increasing the body size of characters to look more human. We’re putting a particular amount of effort into motions. Like even if you turn around, the character will not instantly rotate—it’s more realistic in that the character will first twist their body before turning around.
Minoru Iwamoto, who works at Bandai Namco Studios, is the main character designer and head of art direction. This is the first mothership title in the series where both of those roles are filled by a single person. But because of that, there is a sense of unity in the game’s art in various respects. For example, by simultaneously working on both the world and costume designs, we can have a sense of unification even up to the cultural level. This is also part of the plan to offer “a highly immersive experience,” which is again the theme of this game.
For areas related to performance, such as a character’s facial animations or the camera work, we’re aiming for a level of 3D anime comparable to television and theater.
While it may appear that 2D anime is unnecessary with the upgrade to 3D anime, 2D anime is an important element of the Tales Of series, and plays a part in the great balance that is “succession and evolution.” While looking for a more effective utilization, we are designing the drama to be more exciting on both ends.
Development is being handled entirely by Bandai Namco Studios. Among our ranks are staff from Tales of Berseria, and some of them even worked on Tales of Phantasia. We have staff both new and old who love the series and are working on the game while discussing the “succession and evolution of tradition.”
The composer is still a secret, but will be introduced at a later time. We will have a theme song.
The planet on which the protagonist lives is Dahna, and the planet that floats in the sky above it is Rena. Dahna is a naturally rich planet, but is equivalent to the Middle Ages in cultural level. Rena, on the other hand, is developed in science and magical arts, and invaded Dahna 300 years before the events of this game. With its overwhelming difference in power, Rena defeated and enslaved the people of Dahna. That has continued for 300 years, which is where our story begins.
The protagonist is from Dahna. How to over turn his people’s state of oppression is one direction the story takes. The protagonist’s armor and helmet are equipped due to his physical features. It should be noted that he has more than just his armor outfit, and will change to various costumes according to the situation.
The heroine is from Rena, and is a confident and attractive woman. With the power relationship between Dahna and Rena, she and the protagonist are not very good friends from the start. Their relationship begins in a setting where the people of Rena discriminate against the people of Dahna, and eventually leads to a great drama.
Battles are Tales-esque action battles against enemies and encounters. The theme here is to give new users the feeling of “an exhilarating battle.” We’re going for battles with more intuitive and speedier action that makes you think “this seems fun” just by looking at it.
In battle, you can unleash various actions according to the situation. There are also elements that raise skill level through long time use.
We’re upping the intimidation of enemy designs. This comes from the idea that “you should get a greater feeling of accomplishment from defeating an enemy.” While we also worry there some female players that dislike that, it is nevertheless important for RPG battles to evoke a sense of accomplishment when defeating an enemy.
That’s not to say that there won’t be cute-type enemies. It’s still a secret, but there is something like a mascot in this game.
The Tales Of series has many traditional elements, and the same can be said for action battles, but there are also dialogue scenes called skit and chat. Regarding those, we’re making each element while constantly having detailed discussions such as, “Why is that popular?” and “What kind of evolution do players want to see?”
We thought it was necessary to report on the team’s hard work and launched a blog to bring the series together. From here on we will communicate in detail via social media.
I can’t make any promises, but I would like to offer more opportunities to go hands-on with the game before release than we have before.
(Why did you choose the name Tales of Arise, when the “TOA” abbreviation is already attributed to Tales of the Abyss?) The code-name for this project was “Arise.” It is a word that came from the strong desire to revitalize to the series during development. After that, we discussed title ideas with our worldwide development and marketing staff, but everyone was in general agreement that “Arise,” the code-name that held our convictions, was the most appropriate title. So we decided that we should go with it to convey our enthusiasm for the series’ rebirth, even if we had to change the unspoken rule of the series’ abbreviation. Of course, it is also linked to the themes expressed in the story, and the word “Arise” adds to the sentiments of the protagonist and company who rise up to overturn their suppressive environment.
We want the abbreviation for this game to be “Arise” or “ToArise.”
I can’t say anything regarding the release date yet. While things are complete to a certain extent, there are still things that need to be brushed up, and there are many sections such as battles and drama parts that still need to be built.
Tales of Arise is due out for PlayStation 4, Xbox One, and PC in 2020.
#Tales of Arise#Tales of#Tales of Series#Tales Series#Bandai Namco#Gematsu#Don't read the site's comment section
27 notes
·
View notes