#relight faq
Explore tagged Tumblr posts
Text
USING RELIGHT FOR RESHADE - a tutorial by amoebae

[You can also find this tutorial over at imgur and patreon]
ReLight is a premium shader for ReShade made by Marty's Mods (Pascal Gilcher). It allows you to add four new lights to your scene that help illuminate, and create realism and drama. To download and use ReLight you need to subscribe to the Path Tracers tier on Gilcher's Patreon to get access to the iMMERSE Ultimate package of shaders. Once subscribed, you'll be prompted to link your Patreon account to discord, and then you'll be granted access to his discord server, and, most importantly, to the Path Tracers discussion channel and the Downloads Level 2 channel, which is where you will find ReLight (along with the other premium shaders included in that tier).
Be sure to also download the up-to-date free iMMERSE shader package, because you'll need the Launchpad shader and some of the other included files.
The following guide is for the older qUINT_relight.fx version of ReLight. The latest version of ReLight is MartysMods_RELIGHT.fx, released on 31st December 2023. Many of the settings have changed in the newer version, but you can still use this guide to help understand how to enable and position lights. The guide will be updated/rewritten once I've had time to properly play around with the new version. You can continue to use the older version if you'd prefer.

When you turn on ReLight in the ReShade menu you'll be greeted with these settings. Yours may look different because I've used it a lot and it remembers your last settings.
Take a look at the settings at the top.
Use Smooth Normals = On
Trace Shadows = On
Filter Shadows = On
Use Temporal Supersampling = On
Shadow Mode = Trace All
Shadow Quality = Ultra (change this if you get bad performance)
Shadow Sharpness = I have mine set around 0.65 but you can play around with whatever looks best
Z Thickness = Play around with this too. It controls how realistically shadows fall on and around objects
At the very bottom of the settings is Visualize Light Position. Turn this on so you can easily see where your lights are.

Now we can turn on one of our lights. Remember, it remembers your previous settings so yours will look different to mine the first time you use it.
Under Light 0 check the Active box.
You should see a big circle appear somewhere on the screen. If you have any object close enough to it, you should see them get brighter. If nothing is close to the circle you may not see any difference.
You can see a difference between this screenshot and the last - Shadowheart's face is brighter.

Now it's time to move the light where we want it and change it to a colour we like.
Under the Active box you'll see a row of 3 boxes containing numbers, next to the word Position. These control the coordinates of your circle of light in relation to the screen. You can place your mouse inside these boxes and move it while holding down left-click to change the value a little like a slider.
Left box = moves the circle left/right
Middle box = moves the circle up/down
Right box = moves the circle forward/back
In this shot I've moved the circle of light over to the right and a little further back so it better illuminates the front of Shadowheart's face.
Next you can choose the colour of your light.
In the row below Position you'll see it says Tint. Click on the coloured box next to Tint and it will bring up the colour picker you see in the screenshot. Choose your colour from here. Click anywhere in the main ReShade menu to close the colour picker.

I adjusted the position and the tint a little more until I had it exactly where I wanted it. You can see a darker circle now over in the top right of the screen (my mouse cursor is hovering over it to make it easier to see).
You can use the Intensity slider (directly below Tint) to control how bright the light should be.
You may need to go back and forth between the Position, Tint, and Intensity settings until you get just the right effect.

Here's a reminder of what the picture looks like without that added light. Compare it to the screenshot above to see how great our new little light has been at helping illuminate Shadowheart.
You can turn individual lights on and off whenever you want by checking or unchecking the Active box next to the light in question. It will save your settings.
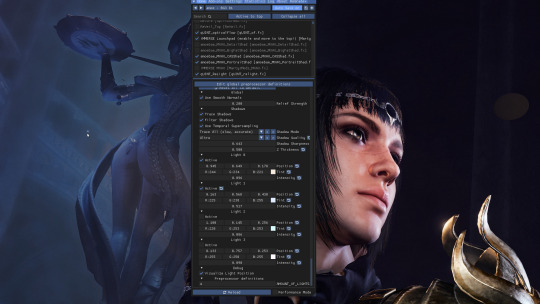
Now I want to add a second light. I've moved my ReShade window over a little so I can see what I'm doing.
I turned on the Active box under Light 1, and positioned my new light where I wanted it. Look over to the left of the statue in the background. You'll see my mouse cursor, and directly above it is a tiny blue circle. That's our second light!
The further you move the light away from the camera (using the right-hand box under Position) the smaller the circle gets, because it's further away!
I made this light blue, and I turned the intensity up quite high. This has helped illuminate the statue and added nice shadows that help give it some depth.

Here's a screenshot to remind you what everything looks like without any of the ReLight lights I added.

And here's a screenshot showing how everything looks with ReLight turned on and my two lights in action. I chose a subtle effect because I just wanted to draw attention to Shadowheart's face and to the statue behind her.
When you close the ReShade menu the circles that helped you know where your lights were will go away, but the light they cast will remain. Notice how you can't see the two circles in this shot?
You can also uncheck the Visualize Light Position box if you want to hide the circles while keeping the ReShade menu open. This can be helpful if they're obscuring parts of the scene that you need to see while you continue editing.
---
And that's it! You can add up to 4 lights and control them independently from one another. You can use them to just help illuminate a character for a portrait, to add drama with bold lighting, or to increase the realism of a scene with better shadows and light falling where you would expect it to. If you have a big fiery sword you can add a light to it that makes orange light cast onto the character who is holding it, which can look really cool. The only limit is your imagination.
(If I ever learn how to make videos I'll translate this tutorial into an easier format, but for now I hope this helps.)
885 notes
·
View notes
Note
hi! i was just curious how you got relight to work in ts3? hope you're having a good day 💕
haii! i'm not sure how i got it to work since initially i was trying to fix my dof/mxao flickering but by working on that it also got relight to work. i think what i did was edit the Global Preprocessor Definitions and adjust edge smoothing however relight doesn't work the same way it would in ts4 for me. a lot of the colors pull incorrectly and it can look somewhat muddy! with that being said, i'm also gonna leave picture amobae's relight faq! hopefully there's an answer lurking there <3
1 note
·
View note
Text
he/him │ temporarily wcif unfriendly │ 18+ │ eng/ger
lighting resources > reshade, preset (tweaked), relight addon > cas light, gentle cas lighting mod > ingame light, average dark editing resources > tutorials, 1 2 3 sims resources > skins, eyebrows made by me > eyes, blend between rosetid by loveryss + cerberus-cc’s eyes n12 by squea > eyelashes, 1 (tweaked textures) + 2 tags > #wcif, #ask, #ts4
faq > are you ever going to share the skin you use on _ sim? no, since they unfortunately don't work on every face preset > are you ever going to share _ sim? not publicly, but mutuals feel free to dm me! > do you take sim requests? I can't promise anything but feel free to hit me up with your idea and I'll let you know!
120 notes
·
View notes
Text
FAQ’s
Frequently asked questions to eeeaaasseee your mind :)
1. Can I recolour your CC?
Yes! Recolours and retextures are a-okay in my book, you don’t even have to ask first! Just please credit me and link to the original CC. My full TOU can be found here.
2. Is your CC free?
Yes! My stuff will ALWAY be free unless it is a commission. I sincerely doubt I will ever start a Patreon, although maybe one day I will have a Kofi donation page.
3. How do you start making a sim? What’s your process?
If it is a celebrity sim, or a sim of a fictional character like Arthur Morgan, I will always go CC shopping first! I usually start with the hair, then if the sim has particularly iconic outfits (e.g. Fran Fine) I will find as close as possible. Sometimes this is really easy, as with @plazasims RDR2 Outfits, but sometimes I have to be a little creative! Then, I always try to create the sim from Pinterest references first. I usually take a few hours away from it so I can see it again with fresh eyes, and it is usually at this point where I will introduce a photo overlay. Essentially, I will overlay an image onto The Sims 4 window and have my sim and the photo side by side. Laying the photo directly on top and ‘tracing’ is a BAD idea! You can’t see the real sim underneath! Usually looks WEIRD afterwards. If I’m feeling stuck, finding a reference on Pinterest at a 3/4 angle and editing my sim in that view helps a lot! It gives you a fresh perspective and often sorts out problems you didn’t even know you had.
4. What’s your main save?
My main save is (totally cliche, I know) actually my Simself in PlumbobKingdom’s save file! It’s INCREDIBLE, and makes the game so much more fun and interesting with the variety of locations, and everything just looks SO much nicer!
5. Who’s the favourite sim you’ve made so far?
I secretly LOVE my Maxwell Sheffield sim, I think he looks awesome. I love my Arthur Morgan Redux, too, and I’m really looking forward to making Bree Van De Kamp! Might develop it into a DH series if the response is positive enough :)
6. How do you edit your screenshots and/or do you render your sims in Blender?
I don’t render my sims in Blender, as I can’t use TS4 Sim Ripper! I am a Mac user. My photo editing process; taking screenshots in CAS using Trait poses, and photos in game using poses and @ravasheencc Full Control Camera. I then use Picsart on iOS to knock up the composition, Snapseed to clean up the photo (sharpen, colour balancing, glow, vignette etc) and Clipdrop Relight (online) for the lighting.
2 notes
·
View notes
Note
hi, can I ask you what programs do you use to take such beautiful photos?
Hi hi! Thank you so much! I use SRWE to increase the resolution size, gshade + relight and I edit them afterwards in GIMP. I have a more detailed explanation in my faq!
2 notes
·
View notes
Text
Key Signs Your Furnace Pilot Light Might Be Out
A well-functioning furnace is essential for maintaining a comfortable and cozy home, especially during the chilly months. One crucial component of a furnace is the pilot light. The pilot light is a small flame that ignites the gas burner, which then heats your home. However, if the pilot light goes out, your furnace won't be able to heat your home effectively. Recognizing the signs of a pilot light problem can prevent inconvenience and discomfort.
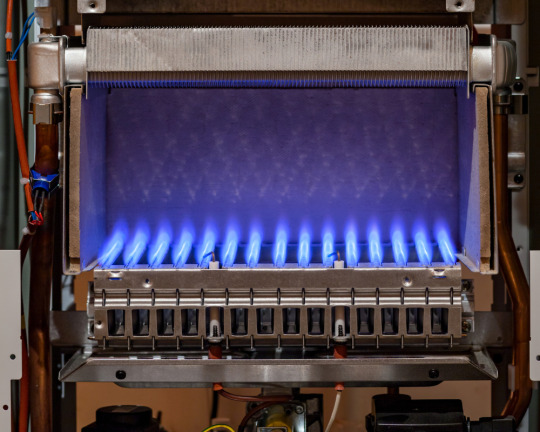
Here are some key signs to watch out for:
Lack of Heat: One of the most obvious signs that your furnace pilot light might be out is a lack of heat in your home. If you notice that your home isn't reaching the desired temperature despite the thermostat being set correctly, it could indicate a problem with the pilot light.
Strange Smells: A malfunctioning pilot light can sometimes produce unusual odors, such as a faint smell of gas. If you detect any strange smells coming from your furnace, it's essential to investigate the issue promptly to prevent potential safety hazards.
Visible Pilot Light Flame: In some cases, you might be able to visually inspect the pilot light flame to determine if it's functioning correctly. A healthy pilot light flame should burn steadily and be primarily blue in colour. If the flame appears weak, flickering, or has a different color, it could indicate a problem.
Frequent Cycling: If your furnace seems to be turning on and off more frequently than usual, it could be a sign of a pilot light issue. A malfunctioning pilot light may cause the furnace to cycle more regularly as it attempts to reignite the flame.
Unusual Sounds: A pilot light problem can sometimes result in strange sounds coming from your furnace, such as banging, popping, or rattling noises. These noises could indicate various issues, including a pilot light that's not igniting correctly.
If you notice any of these signs, it's essential to address the issue promptly to ensure your furnace continues to operate safely and efficiently. Relighting the pilot light may solve the problem. However, if you need more clarification or are uncomfortable performing this task yourself, it's best to contact a professional HVAC technician for assistance.
FAQs:
1: How do I relight the pilot light on my furnace?
Answer: Relighting the pilot light on your furnace typically involves locating the pilot light assembly, turning the gas valve to the "pilot" position, and using a long lighter or match to ignite the pilot light. However, it's essential to refer to your furnace's manufacturer's instructions for specific guidance. If you're unsure or uncomfortable relighting the pilot light yourself, it's best to contact a qualified HVAC technician for assistance.
2: Is a pilot light outage a safety concern?
Answer: While a pilot light outage itself isn't necessarily a safety concern, it can lead to other issues that may pose safety risks, such as gas leaks or carbon monoxide exposure. Suppose you suspect a problem with your furnace's pilot light. In that case, it's essential to address it promptly and, if necessary, seek professional assistance to ensure the safe operation of your heating system. Regular maintenance and inspections by qualified technicians can help prevent safety hazards associated with furnace malfunctions.
0 notes
Text
Temporary Solutions for Malfunctioning Water Heater

Introduction
Facing a malfunctioning water heater can be inconvenient, especially when it disrupts your access to hot water for bathing, cleaning, and other essential tasks. While it's crucial to address the underlying cause of the problem with professional repairs, there are temporary solutions you can try to restore hot water supply in the meantime. In this guide, we'll explore temporary fixes for a malfunctioning water heater and provide answers to frequently asked questions to help you troubleshoot common issues and maintain comfort in your home.
Temporary Solutions for Malfunctioning Water Heater
If your water heater is malfunctioning, consider trying the following temporary solutions to restore hot water supply: 1. Check Power Supply - Inspect Circuit Breaker: Check the circuit breaker or fuse box to ensure that power is being supplied to the water heater. If the breaker is tripped or the fuse is blown, reset or replace it accordingly. - Verify Pilot Light: For gas water heaters, check if the pilot light is lit. If not, follow the manufacturer's instructions to relight it safely. 2. Adjust Thermostat Settings - Temperature Adjustment: Verify that the thermostat on the water heater is set to the desired temperature. Adjust the thermostat as needed to ensure adequate heating of the water. - Wait for Heating Cycle: Allow the water heater sufficient time to heat the water to the set temperature. Depending on the size and type of heater, this may take several hours. 3. Flush the Tank - Turn Off Power: Switch off the power supply to the water heater at the circuit breaker or fuse box. - Drain Water: Connect a garden hose to the drain valve at the base of the water heater and open the valve to drain sediment and debris from the tank. - Flush and Refill: Flush the tank with clean water until it runs clear, then close the drain valve and refill the tank. 4. Inspect for Leaks - Visual Inspection: Check for any visible signs of leaks or water damage around the water heater, including dampness, corrosion, or puddles on the floor. - Tighten Connections: If you notice any loose or leaking connections, tighten them securely using a wrench or pliers.
FAQs
- Why is my water heater not producing hot water? Water heaters may fail to produce hot water due to various reasons, including a malfunctioning thermostat, pilot light issues (for gas heaters), sediment buildup in the tank, or electrical problems. Troubleshooting these issues can help identify the underlying cause. - Can I repair a water heater myself? While some minor water heater issues can be addressed with DIY solutions, complex problems or those involving gas or electrical components should be handled by trained professionals. Attempting repairs without proper knowledge or experience can be dangerous and may void warranties. - What should I do if I detect a gas leak near my water heater? If you smell gas or suspect a gas leak near your water heater, evacuate the premises immediately and contact your gas utility company or emergency services. Do not attempt to relight the pilot light or operate any electrical devices. - How often should I flush my water heater to prevent issues? Flushing the water heater tank annually is recommended to remove sediment and mineral deposits that can accumulate over time. However, in areas with hard water or high sediment levels, more frequent flushing may be necessary. - Is it safe to use a malfunctioning water heater? Using a malfunctioning water heater can pose safety risks, including the potential for scalding, electrical hazards, or gas leaks. It's best to address any issues promptly and avoid using the water heater until repairs have been completed by a qualified technician.
Conclusion
While a malfunctioning water heater can disrupt your daily routine, temporary fixes can help restore hot water supply until professional repairs can be made. By following the temporary solutions outlined in this guide and consulting the accompanying FAQs, you can troubleshoot common water heater issues and ensure comfort in your home while awaiting permanent repairs. Learn More from Plumbnerd Read the full article
0 notes
Text
Emergency Boiler Repairs in London: What to Do When Your Heating Fails
London's chilly winters can be unforgiving, and when your boiler suddenly stops working, it can be a real crisis. No one wants to be without heating in the midst of a cold snap. In this guide, we will walk you through the essential steps to take when faced with emergency boiler repairs in London.
When your boiler breaks down unexpectedly, it's crucial to act swiftly and efficiently. Here's what you need to do to ensure your home stays warm and comfortable.
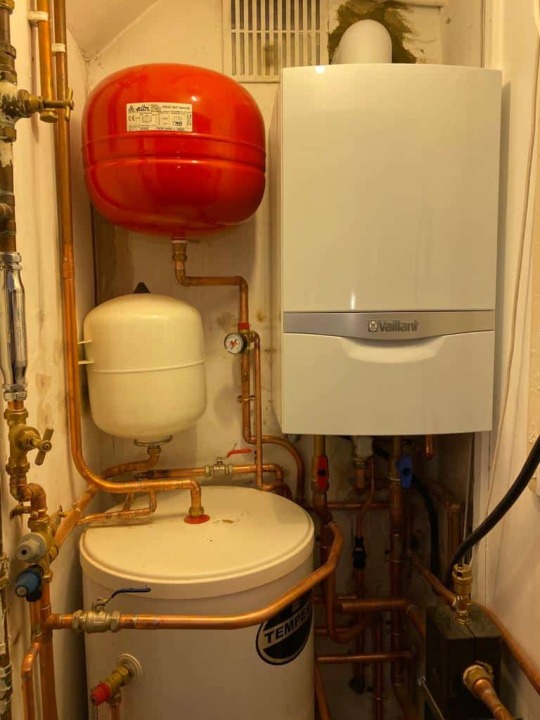
Safety First
Turn Off the Boiler
The first step in any emergency situation is safety. Turn off the boiler immediately to prevent any further damage or potential hazards.
Ventilate Your Home
While it's essential to stay warm, it's equally important to ensure proper ventilation. Open windows slightly to let in fresh air and prevent the buildup of harmful gases like carbon monoxide.
Check for Simple Solutions
Thermostat Settings
Ensure your thermostat is set to the desired temperature and is functioning correctly. Sometimes, the issue might be as simple as an incorrect setting.
Power Supply
Check that the boiler is receiving power. A blown fuse or tripped circuit breaker can easily cause a heating system failure.
Pilot Light
If you have a gas boiler, check the pilot light. If it's out, follow the manufacturer's instructions to relight it. If you're not comfortable doing this, wait for a professional.
Contact a Professional
Finding a Boiler Repair Expert
Research and find a reputable boiler repair expert in your area. Look for reviews and recommendations online or ask friends and family for referrals.
Describe the Problem
When you contact the professional, describe the issue as accurately as possible. This helps them prepare and ensure they have the necessary parts or tools for the repair.
Emergency Service
In an emergency, some boiler repair companies offer 24/7 services. If your heating fails during the night or on a weekend, don't hesitate to call for immediate assistance.
Stay Warm
Alternative Heating Sources
While waiting for the repair technician, consider using alternative heating sources such as electric heaters or a fireplace if available.
Dress Warmly
Layer up with warm clothing and blankets to stay comfortable until the boiler is fixed.
Preventing Future Emergencies
Regular Maintenance
To avoid future emergencies, schedule regular maintenance for your boiler. Annual servicing can identify and address potential issues before they lead to a breakdown.
Boiler Servicing
Investing in a boiler servicing plan can provide peace of mind. These plans often include regular check-ups and emergency repair services.
Conclusion
Facing an emergency boiler breakdown in London can be stressful, but by following these steps, you can minimize discomfort and inconvenience. Remember to prioritize safety, contact a professional, and consider preventive measures for a warmer and more comfortable home.
Don't let a heating emergency leave you out in the cold. With the right approach, you can swiftly address the issue and ensure your home stays cozy during London's chilly winters.
FAQs
1. What should I do if my boiler breaks down during the night or on a weekend?
In the event of a boiler breakdown during non-business hours, it's essential to contact a boiler repair company that offers 24/7 emergency services. They can dispatch a technician to address the issue promptly.
2. Is it safe to attempt to repair my boiler myself?
Boiler repairs should ideally be handled by qualified professionals. Attempting DIY repairs can be risky and may void your boiler's warranty. It's safer to turn off the boiler, ventilate your home, and wait for a professional technician.
3. How can I prevent boiler emergencies in the future?
To prevent future boiler emergencies, consider scheduling regular maintenance for your heating system. Annual servicing can catch potential issues early and ensure your boiler operates efficiently and safely.
4. What are the common causes of boiler breakdowns in London?
Common causes of boiler breakdowns in London include issues with the thermostat, power supply problems, pilot light failures (for gas boilers), and various component malfunctions. Regular maintenance can help identify and address these issues before they lead to a breakdown.
5. Can a boiler repair technician fix any brand or type of boiler?
Most boiler repair technicians are trained to work on a wide range of boiler brands and types. However, it's a good idea to inquire about their specific expertise and experience with your particular boiler model when hiring a professional.
0 notes
Text
Hot water heater repair
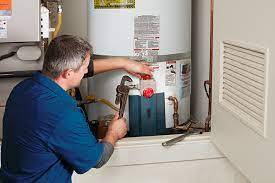
A malfunctioning hot water heater repair can be a major inconvenience, disrupting your daily routines and causing discomfort. Whether you're facing a leak, inadequate hot water supply, or other issues, understanding hot water heater repair can save you time and money. In this comprehensive guide, we'll walk you through troubleshooting common problems, offering both DIY solutions and expert advice for a seamless repair process.
Hot Water Heater Repair: Key Steps to Restore Functionality
When your hot water heater starts acting up, it's essential to diagnose the issue accurately and take appropriate action. Let's explore the steps you can take to troubleshoot and repair your hot water heater.
Insufficient Hot Water Supply
If you're experiencing a shortage of hot water, consider the following:
Thermostat Settings: Ensure the thermostat is set to the desired temperature. Adjust if necessary.
Sediment Buildup: Over time, sediment can accumulate at the bottom of the tank, affecting heating efficiency. Drain the tank to remove sediment.
Heating Element Issues: If only one element is heating, you might need to replace the faulty element.
Leaking Hot Water Heater
A leaking water heater can lead to water damage and mold growth. Here's what to do:
Turn Off Power: Before inspecting, turn off the power supply to the water heater.
Locate the Leak: Determine the source of the leak. It could be a faulty valve, loose connection, or a cracked tank.
Address Valve Issues: Tighten loose connections or replace faulty valves. For a cracked tank, consider replacing the unit.
No Hot Water at All
If your water heater isn't producing hot water, consider these troubleshooting steps:
Pilot Light: Gas water heaters have a pilot light. Ensure it's lit. If not, relight it following the manufacturer's instructions.
Tripped Breaker: Check if the circuit breaker for the water heater has tripped. Reset it if needed.
Burnt Out Element: Electric water heaters have heating elements. Test and replace any burnt-out elements.
Expert Insights for Complex Repairs
While some hot water heater issues can be resolved through DIY efforts, certain problems require the expertise of a professional plumber.
Tank Corrosion: Signs and Solutions
Corrosion in the tank can lead to leaks and the need for a replacement. Signs of corrosion include rust-colored water and a foul smell. Unfortunately, tank replacement is the only solution for extensive corrosion.
Strange Noises from the Tank: Causes and Fixes
Gurgling or popping sounds from the tank could indicate sediment buildup. A professional plumber can flush the tank to remove sediment and restore quiet operation.
Pressure Relief Valve Problems
If the pressure relief valve is constantly leaking, it might need replacement. This valve ensures the tank doesn't build up excess pressure. A faulty valve can lead to safety hazards.
Frequently Asked Questions (FAQs)
Can I repair a leaking water heater myself?
While minor leaks caused by loose connections can be fixed by homeowners, significant leaks and tank cracks require professional attention to prevent further damage.
Why is my water not getting hot enough?
Thermostat issues, sediment buildup, or a malfunctioning heating element could be causing this problem. Consider checking and addressing these factors.
How often should I drain my water heater?
Flushing your water heater once a year can help prevent sediment buildup, improve efficiency, and extend the appliance's lifespan.
Is it better to repair or replace a water heater?
If your water heater is old, frequently experiencing issues, or suffering from significant corrosion, replacement might be a more cost-effective long-term solution.
Can a water heater explode?
While rare, excessive pressure buildup in a water heater can potentially lead to an explosion. Regular maintenance and prompt repairs can mitigate this risk.
Are tankless water heaters more reliable?
Tankless water heaters are known for their energy efficiency and longer lifespan. However, they still require maintenance and occasional repairs.
Conclusion
A functioning hot water heater is essential for your daily comfort, and knowing how to troubleshoot and repair common issues can save you from unnecessary inconvenience and expenses. Whether you're tackling minor repairs or seeking expert assistance, addressing hot water heater problems promptly ensures a reliable supply of hot water in your home.
0 notes
Text
Hand-made Briar Poker Pipe
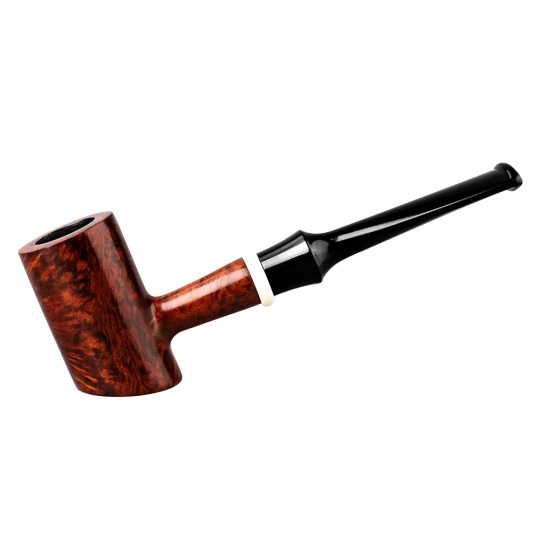
Product description of Poker Pipe This is a hand-made briar poker pipe. It's made from the finest quality Italian briar, and it has been specially selected for its unique grain pattern. The poker pipe comes with a silver band and is hand-cut, polished, and stained by our artisan craftsmen. It also has a removable bowl for easy cleaning. The briar poker pipe measures 5.75 inches in length with an approximate 1.22-inch diameter bowl. It’s the perfect gift for any tobacco enthusiast! It is one of our most popular pipes and provides cool, dry smoke. The mouthpiece and shank are made from acrylic. This beautiful briar tobacco pipe has a beautiful Gift Box Package design. It will definitely become one of your most satisfied briar pipes with its beautiful packaging and uniquely handmade. Briar pipes are the most comfortable for smoking because it allows them to keep their face closer to the flame at all times during smoking; this makes it easier to see what's happening inside your pipe's bowl while also making it easier for you to control how much air you're pulling through your tobacco blend when lighting or relighting your pipe between puffs. After placing the order now, we will also give away a variety of Pipe Accessories, including 1 pcs cotton bag and 1 pcs plastic high heel pipe rack, 2 pcs pipe rubber, 2 pcs pipe screen, All Natural Component Filter, 2 pcs cork knock 1 pcs 3in1 pipe knife,1 pcs pipe brush,10 pcs pipe cleaners, let you use your briar wood pipe more conveniently FAQS Read the full article
0 notes
Note
ok i have followed your tutorial on installing relight but I currently use reshade 6.1.1 and cannot get any of the files that I need to compile - I am not sure if I am installing it correctly or need to use an older version of relight but I even tried to use reshade 6.3.3 and it would not work for me.
also when I have reinstalled an older version of reshade - my ADOF file always works for a split second before it completely shuts off even with it still fully activated - is there any way to fix this ?
Hi anon, sorry to hear you're having problems.
Marty's most recent update to iMMERSE shaders (version 2412) requires ReShade 6.3.3 or above for the addons to work, but I believe the regular non-addon shaders should still work in older versions. Still, I'd recommend using the most recent version just to avoid any issues.
Are you using the addon version of ReShade? You need that specific version for the depth buffer to work correctly. You want the second option below that says 'with full add-on support'

What are the compiling errors you get with ReLight? If you hover over the red error at the top it will expand with more information.
One thing to check for if you're using the most recent ReLight version (the iMMERSE version, not the qUINT version) is that you don't also have the regular iMMERSE folder. You should only have the iMMERSE Ultimate folder. That contains everything that is also in the regular iMMERSE folder, so if you have them both you'll have duplicates that could mess things up.
When you install iMMERSE Ultimate the easiest thing to do to keep everything organised is:
remove your iMMERSE folder from reshade-shaders > Shaders
create a new folder called iMMERSE Ultimate in reshade-shaders > Shaders
create a new folder called iMMERSE Ultimate in reshade-shaders > Textures
copy all the files and the MartysMods folder that are inside the Shaders folder from his download and paste them into the iMMERSE Ultimate folder you created inside reshade-shaders > Shaders - be sure to leave this folder structure in tact - you should have a bunch of iMMERSE shaders and a MartysMods folder alongside them
copy all the files that are inside the Textures folder from his download and paste them into the iMMERSE Ultimate folder you created inside reshade-shaders > Textures
copy the addon files you need from the Addons folder from his download and paste them into your TS4 Bin folder
I know Marty was working hard for a long time to maintain dx9 compatibility for ReLight, largely because so many TS4 players use it, but now the game defaults to dx11 I'm not 100% certain whether he's maintained that compatibility or dropped it. Either way, you will get superior results from a lot of his shaders if you use the dx11 version of the game, so I recommend ensuring you're running that version to rule out any issues there.
18 notes
·
View notes
Text
Hand-made Briar Poker Pipe
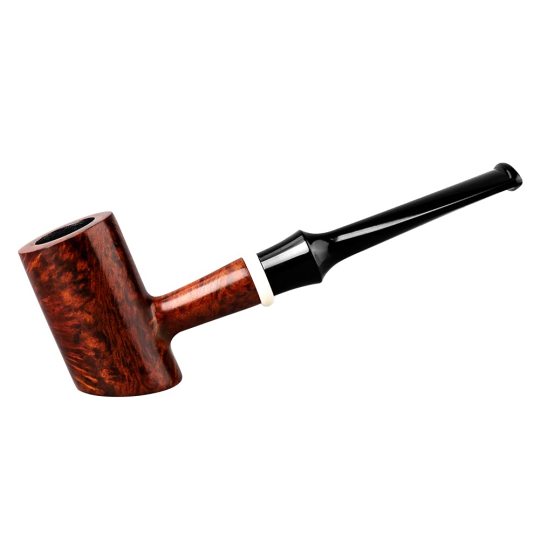
Product description of Poker Pipe This is a hand-made briar poker pipe. It's made from the finest quality Italian briar, and it has been specially selected for its unique grain pattern. The poker pipe comes with a silver band and is hand-cut, polished, and stained by our artisan craftsmen. It also has a removable bowl for easy cleaning. The briar poker pipe measures 5.75 inches in length with an approximate 1.22-inch diameter bowl. It’s the perfect gift for any tobacco enthusiast! It is one of our most popular pipes and provides cool, dry smoke. The mouthpiece and shank are made from acrylic. This beautiful briar tobacco pipe has a beautiful Gift Box Package design. It will definitely become one of your most satisfied briar pipes with its beautiful packaging and uniquely handmade. Briar pipes are the most comfortable for smoking because it allows them to keep their face closer to the flame at all times during smoking; this makes it easier to see what's happening inside your pipe's bowl while also making it easier for you to control how much air you're pulling through your tobacco blend when lighting or relighting your pipe between puffs. After placing the order now, we will also give away a variety of Pipe Accessories, including 1 pcs cotton bag and 1 pcs plastic high heel pipe rack, 2 pcs pipe rubber, 2 pcs pipe screen, All Natural Component Filter, 2 pcs cork knock 1 pcs 3in1 pipe knife,1 pcs pipe brush,10 pcs pipe cleaners, let you use your briar wood pipe more conveniently FAQS Read the full article
0 notes
Text
Hand-made Briar Poker Pipe
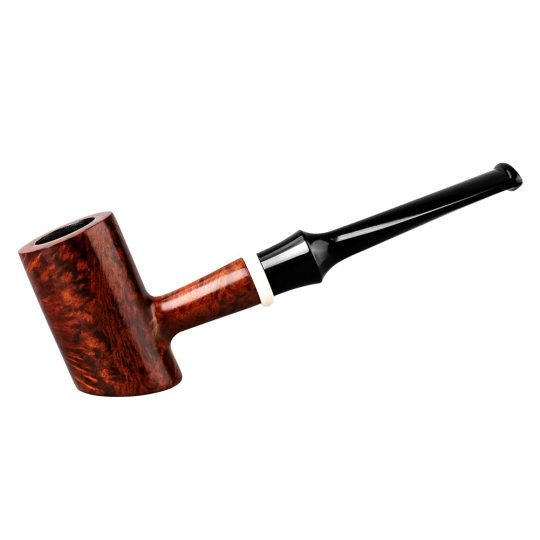
Product description of Poker Pipe This is a hand-made briar poker pipe. It's made from the finest quality Italian briar, and it has been specially selected for its unique grain pattern. The poker pipe comes with a silver band and is hand-cut, polished, and stained by our artisan craftsmen. It also has a removable bowl for easy cleaning. The briar poker pipe measures 5.75 inches in length with an approximate 1.22-inch diameter bowl. It’s the perfect gift for any tobacco enthusiast! It is one of our most popular pipes and provides cool, dry smoke. The mouthpiece and shank are made from acrylic. This beautiful briar tobacco pipe has a beautiful Gift Box Package design. It will definitely become one of your most satisfied briar pipes with its beautiful packaging and uniquely handmade. Briar pipes are the most comfortable for smoking because it allows them to keep their face closer to the flame at all times during smoking; this makes it easier to see what's happening inside your pipe's bowl while also making it easier for you to control how much air you're pulling through your tobacco blend when lighting or relighting your pipe between puffs. After placing the order now, we will also give away a variety of Pipe Accessories, including 1 pcs cotton bag and 1 pcs plastic high heel pipe rack, 2 pcs pipe rubber, 2 pcs pipe screen, All Natural Component Filter, 2 pcs cork knock 1 pcs 3in1 pipe knife,1 pcs pipe brush,10 pcs pipe cleaners, let you use your briar wood pipe more conveniently FAQS Read the full article
0 notes
Text
Hand-made Briar Poker Pipe
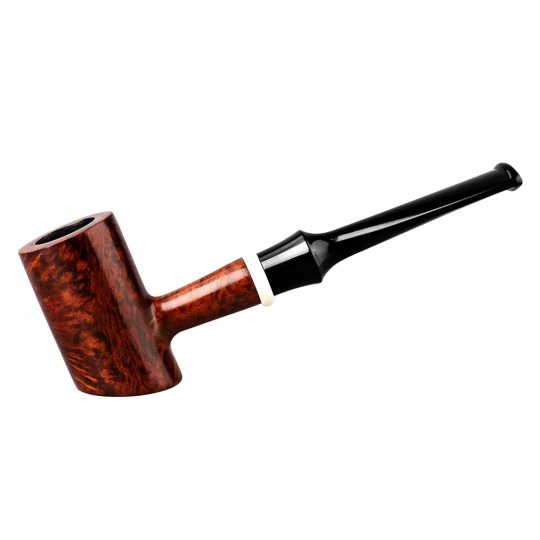
Product description of Poker Pipe This is a hand-made briar poker pipe. It's made from the finest quality Italian briar, and it has been specially selected for its unique grain pattern. The poker pipe comes with a silver band and is hand-cut, polished, and stained by our artisan craftsmen. It also has a removable bowl for easy cleaning. The briar poker pipe measures 5.75 inches in length with an approximate 1.22-inch diameter bowl. It’s the perfect gift for any tobacco enthusiast! It is one of our most popular pipes and provides cool, dry smoke. The mouthpiece and shank are made from acrylic. This beautiful briar tobacco pipe has a beautiful Gift Box Package design. It will definitely become one of your most satisfied briar pipes with its beautiful packaging and uniquely handmade. Briar pipes are the most comfortable for smoking because it allows them to keep their face closer to the flame at all times during smoking; this makes it easier to see what's happening inside your pipe's bowl while also making it easier for you to control how much air you're pulling through your tobacco blend when lighting or relighting your pipe between puffs. After placing the order now, we will also give away a variety of Pipe Accessories, including 1 pcs cotton bag and 1 pcs plastic high heel pipe rack, 2 pcs pipe rubber, 2 pcs pipe screen, All Natural Component Filter, 2 pcs cork knock 1 pcs 3in1 pipe knife,1 pcs pipe brush,10 pcs pipe cleaners, let you use your briar wood pipe more conveniently FAQS Read the full article
0 notes
Text
Hand-made Briar Poker Pipe
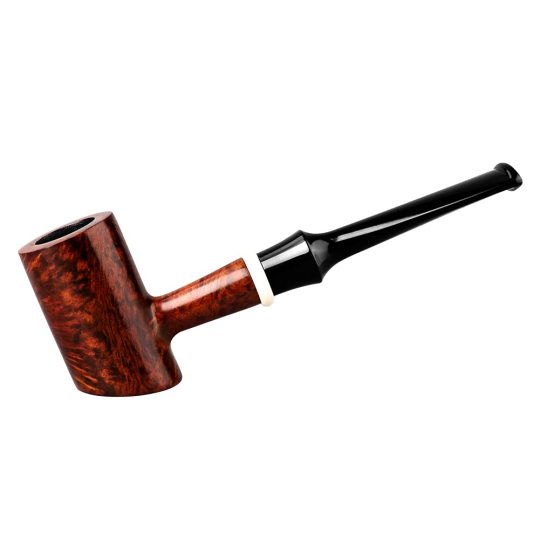
Product description of Poker Pipe This is a hand-made briar poker pipe. It's made from the finest quality Italian briar, and it has been specially selected for its unique grain pattern. The poker pipe comes with a silver band and is hand-cut, polished, and stained by our artisan craftsmen. It also has a removable bowl for easy cleaning. The briar poker pipe measures 5.75 inches in length with an approximate 1.22-inch diameter bowl. It’s the perfect gift for any tobacco enthusiast! It is one of our most popular pipes and provides cool, dry smoke. The mouthpiece and shank are made from acrylic. This beautiful briar tobacco pipe has a beautiful Gift Box Package design. It will definitely become one of your most satisfied briar pipes with its beautiful packaging and uniquely handmade. Briar pipes are the most comfortable for smoking because it allows them to keep their face closer to the flame at all times during smoking; this makes it easier to see what's happening inside your pipe's bowl while also making it easier for you to control how much air you're pulling through your tobacco blend when lighting or relighting your pipe between puffs. After placing the order now, we will also give away a variety of Pipe Accessories, including 1 pcs cotton bag and 1 pcs plastic high heel pipe rack, 2 pcs pipe rubber, 2 pcs pipe screen, All Natural Component Filter, 2 pcs cork knock 1 pcs 3in1 pipe knife,1 pcs pipe brush,10 pcs pipe cleaners, let you use your briar wood pipe more conveniently FAQS Read the full article
0 notes
Text
Hand-made Briar Poker Pipe
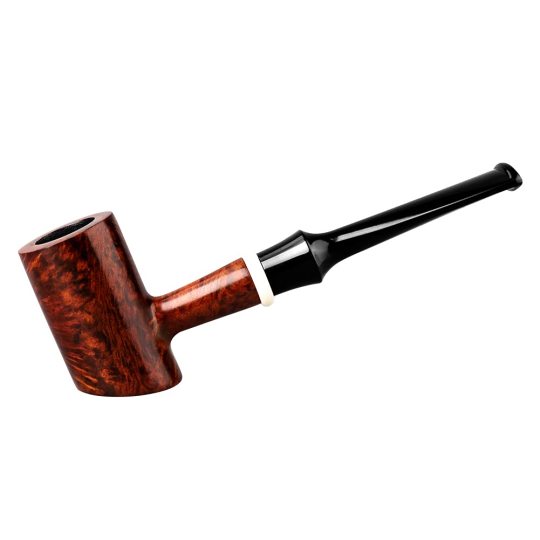
Product description of Poker Pipe This is a hand-made briar poker pipe. It's made from the finest quality Italian briar, and it has been specially selected for its unique grain pattern. The poker pipe comes with a silver band and is hand-cut, polished, and stained by our artisan craftsmen. It also has a removable bowl for easy cleaning. The briar poker pipe measures 5.75 inches in length with an approximate 1.22-inch diameter bowl. It’s the perfect gift for any tobacco enthusiast! It is one of our most popular pipes and provides cool, dry smoke. The mouthpiece and shank are made from acrylic. This beautiful briar tobacco pipe has a beautiful Gift Box Package design. It will definitely become one of your most satisfied briar pipes with its beautiful packaging and uniquely handmade. Briar pipes are the most comfortable for smoking because it allows them to keep their face closer to the flame at all times during smoking; this makes it easier to see what's happening inside your pipe's bowl while also making it easier for you to control how much air you're pulling through your tobacco blend when lighting or relighting your pipe between puffs. After placing the order now, we will also give away a variety of Pipe Accessories, including 1 pcs cotton bag and 1 pcs plastic high heel pipe rack, 2 pcs pipe rubber, 2 pcs pipe screen, All Natural Component Filter, 2 pcs cork knock 1 pcs 3in1 pipe knife,1 pcs pipe brush,10 pcs pipe cleaners, let you use your briar wood pipe more conveniently FAQS Read the full article
0 notes