#I might also either make my own tutorial or share a link for one I find
Explore tagged Tumblr posts
Note
Sorry if this is a bit out of left field since we’re moved on to the deciding the pattern part of the birthday quest, but I was curious if you had any patterns in mind for a messenger bag in the event that it won? I’ve always wanted a nice one, but I never thought of making one myself until I saw it in your poll
Hey! It's not out of left field at all, I love talking about patterns! I don't have a pattern for one yet, but I will be either sharing a link to one or just drafting one myself in the short-to-medium term, because I want to make my nieces some messenger bags for rock collecting. It'll depend on if I find a pattern I like or if I find my old denim messenger bag I drew all over that I think is still in my closet somewhere? I loved that thing, it's my personal default of what I think a messenger bag looks like
#ask away!#I might also either make my own tutorial or share a link for one I find#for converting a normal crossbody purse to one that can also be worn as a backpack#that one has to percolate a little longer before I figure out exactly what I want to do#but it's definitely a thing I want to do#oh hey wait I think I know how to do it#for my specific purse anyway it would just take two little loops#hm. I even have a rainbow canvas that matches the bag pretty well#wait my bag already HAS loops#they aren't for this but I bet I can use them for this#thank you nonny these tags just helped me figure out how to convert my purse into a backpack#with no sewing at all#that is not helpful for your question but I am leaving the tags in lol
6 notes
·
View notes
Note
sorry i couldn't find out how to ask on your other blog.
that book binding you posted is gorgeous btw !!
I noticed that in one of the photos you included the disclaimer that you also edited it. I just had a question about how you formatted the text.
one of my biggest gripes with AO3 is text formatting (i often feel like i'm reading a legal document vs a novel/story) . Did you change how it is formatted on AO3 compared to printed?
I feel like i'm in the 0.5% that hate AO3 formatting but i thought i might as well ask in case you have any tips for that. >,>
(also how do you decide on the page size, do you just choose a standard size for all your projects? or do you vary it depending on what you are binding?)
thanks so much for taking the time to answer and for sharing your projects :) !!!!!!!!!!!
hey anon! I have asks turned off for the sideblog, but happy to answer here. Thanks very much!
I'm taking this opportunity to info-dump and link a lot of resources. I think they're useful for people new to either typesetting or bookbinding, but not all are directly related to your queries. That said, hope this is of use!
one of my biggest gripes with AO3 is text formatting (i often feel like i'm reading a legal document vs a novel/story) . Did you change how it is formatted on AO3 compared to printed?
I do a fair bit of editing when I'm binding a fic; typesetting is often the longest part of the process. Your mileage will vary depending on your experience with using word processor software, particularly the paragraph style and page style settings. Another factor is how simple/complicated you want your typeset to look. Replicating a published novel in format is difficult but learnable for a complete beginner.
I'm not equipped to give a full tutorial on how to typeset, but I'll point you towards some useful resources for ficbinding then talk about my own process.
ArmouredSuperHeavy has a tutorial on how to make Ao3's HTML downloads into a printable book in Microsoft Word. I use LibreOffice Writer myself, so this adaptation of the same tutorial is what I follow. Both are very helpful to reference as you're learning the typesetting ropes.
Personally, I don't mess around with HTML. I find it easiest to start by doing a Ctrl+A copy of the Entire Work fic view on Ao3 then pasting that into my word processor. This video tutorial by Beautifully Bound runs through how to do this in Microsoft Word using an AO3 fic as an example, including the associated steps needed to make the fic look novel-like. This is probably the best tutorial to address your gripe with AO3 formatting. Other than that, I'd recommend looking into videos or tutorials about typesetting novels for print. Same idea, and you may get more hits than searching for fanbind/ficbind typesetting tutorials.
More under the cut! Once I start yapping, it's hard to shut me up 🤷♀️
As a point of comparison, here's one of my fics on Ao3 and the corresponding typeset side by side:


Beautifully Bound explains this in far better detail than I will, but off the top of my head, the steps involved:
making a new document and setting the default page size to whatever size I want the book's pages to be (A5 or A6 usually). You can also set the margins at this point, taking account of your printer settings.
CTRL+A and copying the entire work's text on AO3 then pasting it into the document.
removing all hyperlinks and AO3 frontmatter, things like the author tags, summary, notes, etc as well as any website text that got copied over alongside the fic.
(optional) running a spell check and ensuring grammar usage is consistent. For me that's substituting em dashes for hyphens between clauses, enforcing curly double quotation marks for dialogue, etc. LibreOffice Writer automates a lot of this with customisable settings, via Tools -> Auto-Correct. Here's also where to make sure character names are all spelled right, convert the text to or from US to UK English, etc.
picking out fonts for the body text, headers, page numbers, etc. This is where you'll want to use paragraph style settings. Page style settings also comes in clutch if, for example, you'd like different headers on alternating pages. I like having the author on the right, the fic title on the left.
setting the body text first line indent to whatever makes sense visually). This in particular helps make the fic feel more like a novel. You can also play around with line spacing and space between paragraphs at this stage. For this A6 typeset, I had a 0.75cm first line indent, 1.15 line spacing, and 0.15 spacing between paragraphs.
(optional) formatting the first line of the work to use small capitals and to add a drop caps to the first letter of the first word. Again, this is a convention in publishing which add a novel-like feeling to a printed fanwork.
Inserting page numbers, adding images, coming up with how I wanted the "copyright" page to look—optional for the most part, but these are details that make a fic appear more like a novel.
For multi-chapter works, there's extra work in formatting chapter titles as headings so that they're referenced correctly in the automatic table of contents word processors can generate.
Once you have a typeset you're happy with, and if you're considering printing and binding it as a book, then you'll need to look into how to create and print signatures. Personally, this is something I had to actually try (and mess up a bunch of times) before I got to grips with it. Understanding how both your printer and your PDF reader work, particularly printer margins and booklet print settings, is key.
I won't go into as much detail on this, but if it's something you have an interest in, I'd recommend starting with DAS Bookbinding's tutorial. DAS has tutorials for everything bookbinding related so when in doubt, check his channel! Plenty of other YouTubers also have good videos on making signatures.
This resource is extremely useful once you've got your head around how to print signatures manually, so here's a link for anyone in that space: GitHub Bookbinding Imposer. Essentially, this does the signature creation for you, removing the need for booklet print settings in your PDF reader.
also how do you decide on the page size, do you just choose a standard size for all your projects? or do you vary it depending on what you are binding?
I have access to both A4 and A5 sized paper and my printer can handle printing on either size. In bookbinding, normally two pages are printed per side of the paper (which are then folded in half as part of a signature). That is, when I print on A4 paper, it's to make an A5 sized book. Printing on A5 paper will yield an A6 sized book.
Before I begin typesetting, I'll usually know what paper I plan to use, so the typeset will be one size down from the paper. So far, I've made softcover pamphlets at A6 size and casebound books in A5. No real method of choice for me, it's whatever I feel most suits the project.
---
If you made it this far anon, thanks for reading! Here's links to a few general resources if bookbinding is something you'd like to explore more:
DAS Bookbinding (YouTube, bookbinding in all forms)
Sea Lemon DIY (YouTube, bookbinding and other crafts)
bitter melon bindery (YouTube, bookbinding, particularly beginner friendly!)
Jess Less (YouTube, demonstrations of fanbinding and re-binding existing novels)
Papercraft Panda (blog, lots of detailed tutorial on bookbinding)
Renegade Bookbinding Guild (collective and website, loads of fanbinding-specific resources from their members and they have a helpful Discord).
20 notes
·
View notes
Text
Yarny YouTube reccomendations
So I like watching yarncraft-y videos while I do my own yarny crafting (because if I watch them when I'm not crafting it'll just make me want to craft and procrastinate on work and that ain't good), and I kinda just wanted to give out some yarny channel reccomendations especially since some of these channels are on the smaller side and deserve more views
Now I want to give out a disclaimer that I really like watching videos about people making things, like, "I wanna make X item, come with me to make the thing and let's see what might go wrong". I'm not really into podcasts that much, nor am I into tutorials. There are great channels that do fantastic videos that fall into those two categories, but since they're not the kind of videos I personally enjoy watching, I'm not including them. These are my reccomendations based on my preferances, nothing objective etc
BTW I've linked the videos I'm reccomending on this video in the channel names so if you want to go watch the video immidiately, no need to go looking for them, already there
Michelle Jasek
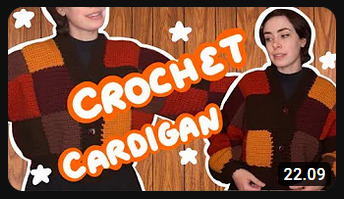
(Formerly known as Fancy Dinosaur Tea Party) Absolute Queen, has a funky vintage style that makes her crochet creations super interesting, and makes the exact type of videos I love. Her videos are the backbone of my crochet video needs.
She does also make thrifting and sewing videos and other content, and all of it is great, but man, those crochet videos just hit different
Kayla (Alt Knots)
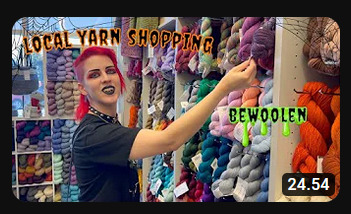
Kayla does a lot of haul-type videos, reviewing yarns and hooks and those are the videos I go to them for. They also do occassional DIY projects (with an alt twist for my fellow gothically inclined friends) and tutorials, just a lot of community content, like if you enjoy having crochet-alongs or watching movies or chatting streams or doing book clubs while crocheting, Kayla has you covered, they do a lot of content.
Also god damn I have never wanted an ergonomic crochet hook before but Kayla is going to singlehandedly convince to buy one from Furls sooner or later out of sheer FOMO
Retro Claude
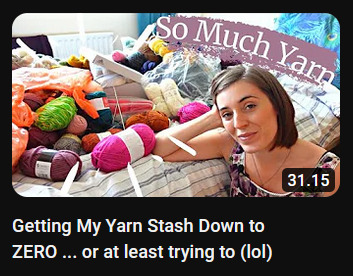
Around July of 2022, Claude uploaded this video of her sharing her yarn stash and what a Problem it had kind of become for her. In the video she goes deeper into the stash to figure out how much yarn she has and has since been uploading monthly videos in her Stash Busting series, where she tries to use up all the yarn she has.
Claude mainly does vintage knitting, some of her projects getting their own videos while others only get shown in the stash busting series. She also does (vintage) sewing and, what else can I say, her videos are great, go watch them
Shaiyeh - Witchy Knits Podcast

Like I mentioned before, I'm not a podcast person really, but Shaiyeh's knits tend to have a very whimsical twist to them that appeal to my gothic ass so I can't help but to be drawn to her yarn-videos. They're very chill and cozy so I really want you go check her videos out, they're painfully underrated and she deserves way more views than she gets
Engineering Knits

I'm not really a knitter but vintage knitting is just facinating and Engineering Knits does a lot of that, as well as other videos that're either knitting or vintage clothing related. Go check her out!
Wool Needles Hands

Wool Needles Hands does mainly podcasts but between her podcasts she often does either pattern reccomendations (mainly for knitting) or some wonderful, extremely informative videos about yarn-related subjects, and it's those informative videos (like the one I've linked above) that I always find myself looking forward to
TL Yarn Crafts

I'm sure you already know Tony, she is an Absolute Goddess and her tutorials are a godsend. But I'm not including her on this list because of her tutorials, no, she's on this list because I love watching her reviews, be it for yarn or gadgets, they're all great.
But also if you ever need any crochet tutorials, Tony has you covered, she is without a doubt the best crochet tutorial maker on YouTube and if you haven't watched her videos yet, you're missing out (which is why she's at the bottom of the list, because surely you already know her)
#Text post#Mine#Crochetblr#Yarnblr#Knitblr#I actually had this whole ass post ready in my drafts I just never got around to posting it#Mainly because I had to check it for typos lmao#Also I kinda just wanted to add more reccomendations but like? Honestly?#I'm just so picky I couldn't think of anyone else to reccomend#I mean there's Ixokun but she does mainly tutorials and I'm not really into those?#Tutorials aren't like entertainment (for me at least)#(Though hey if you wanted another crochet YT recc and like tutorials there's Ixokun)#(Her videos ARE very good and well made)#I would maybe reccomend Stringchronicity but she hasn't uploaded in two months#And I can't find any other online activity from her so I'm concerned if she might've quit?????????#I just want Rachel Maksy to get into crochet it'd be so much fun
8 notes
·
View notes
Note
I saw your longcharr plush and liked it! would you be able to share some tips for someone who wants to make a plush of their own? I don't know where to start and I don't know if it's also viable to embroider letters on something like that.
ofc! the one really big thing for beginners to keep in mind is that for your plush to have a 3D shape, you have to be able to work with multiple parts that add up to a certain shape. for example, if you were to draw a circle, you wouldn’t be able to cut two pieces of fabric in the circle shape to make a sphere, you’d more like sort of get a flat pillow in the shape of a circle. unfortunately i have no idea where i put the pattern i made that i used to make the long charr LOL but i found this pattern online which is pretty similar. i’ll try to link it at the end of this post, but i’m not too familiar with how adding links to asks work so i can dm you if it doesn’t work ahahahhaha
the most similar parts in the pattern i’d say are the body shape and the head! you can honestly experiment with the face, for my muzzle i just used a circular piece of fabric and attached it to the face, and you can use fabric glue to attack the smaller parts that can’t be easily sewed on. for the horns, i’m not sure how to make more complex shapes like the ram horns, but for most horns you should be able to cut 2 pieces fabric in the shape you’d like. however, one piece (the one facing the top is the one i’d recommend) could be using darts for a nice 3d shape. in the pattern, this is what the creator did with the head piece (step 3) when they sewed the folded pieces of the head together!
as for the ears, i just cut fabric in the shape of a diamond and folded it! you can sew two pieces of fabric together to get the inner ear color and outer ear color.
i’d recommend with starting with cheaper fabric (you can find some very cheap plastic fabric for under a dollar at the fabric store, so it’s easier and less expensive to remedy if you make a mistake). for this plush, it would also be helpful to look up video tutorials of blanket stitching, basting, and darts! they sound a bit overwhelming at first but they aren’t super difficult once you get the hang of it. luckily this project is a simpler shape so you can make your own very beautiful and maybe a bit messed up first long charr out of cheaper plastic and move onto the better quality fabrics once you start getting the hang of things.
as for embroidery, i’m not too experienced with it, but keep in mind that embroidery thread isn’t the same as the thread you want to be using to sew the pieces together. it’s doable but the text might be thin and difficult to see! however, i don’t see a reason why you wouldn’t be able to embroider text on the plush, so you should be good! actually i used regular sewing thread for the lines on the paws, but either works here.
i used polyester stuffing but you can use whatever you want to put inside it (including leftover fabric pieces that are too small to make anything else).
you can hide the stitches that attach the ears and the horns to the head by seeing them onto the head before sewing the head onto the body! also, i’d recommend not attaching the plush’s tummy and bottom of the head until you finish attaching the head to the body. you don’t have to follow these exact steps, but these were sort of the easiest for me to do:
1. cut the face piece and attach the muzzle (just a circle), eyes, nose, and mouth (you can put some polyester in the muzzle to give it a 3d shape)
2: sew the head dart
3. make your ear pieces and your horns
4. sew the horns and ears onto the back of the head
3. make the top half of the plush’s back (long part)
4. cut your tail and attach it to the butt of the long part
5. add your paws and feet to the plush and attach the mane, if yours has any (also before “closing” the plush up you’ll probably want to put your letters onto the plush at this step)
6. make your two bottom pieces (two flat pieces of fabric) and attach the head’s bottom piece first (this lets you establish how wide you want the body to be)
7. sew the long portion’s bottom piece onto the bottom head piece, and finally attach it to the body (leave a gap to put the stuffing in, then finish attaching the bottom part)
sorry for the long post, but i hope that it helps a little bit! there’s a lot to keep in mind but once you understand why it’s not super difficult, and if you take it slow and give yourself room to make mistakes you should be good! i’d be happy to answer anything else you might ask as far as i am capable of to help you with the process.
here’s the link to the pattern (whose head, body, and bottom parts are very similar to the shapes i used, you’ll just have to extend the length of the body portion to get such a longer shape LOL):
good luck! don’t give up!
1 note
·
View note
Text
Fanfiction Authors: HEADS UP
(Non-authors, please RB to signal boost to your author friends!)
An astute reader informed me this morning that one of my fics (Children of the Future Age) had been pirated and was being sold as a novel on Amazon:
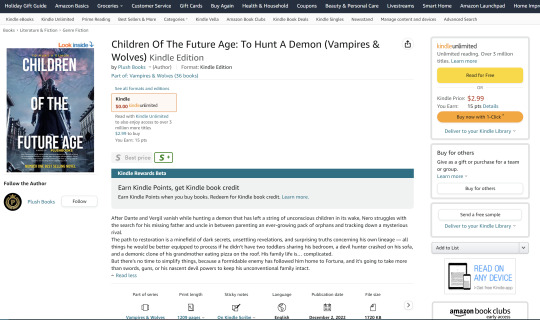
(And they weren't even creative with their cover design. If you're going to pirate something that I spent a full year of my life writing, at least give me a pretty screenshot to brag about later. Seriously.)
I promptly filed a DMCA complaint to have it removed, but I checked out the company that put it up -- Plush Books -- and it looks like A LOT of their books are pirated fic. They are by no means the only ones doing this, either -- the fact that """publishers""" can download stories from AO3 in ebook format and then reupload them to Amazon in just a few clicks makes fic piracy a common problem. There are a whole host of reasons why letting this continue is bad -- including actual legal risk to fanfiction archives -- but basically:
IF YOU ARE A FANFIC AUTHOR WITH LONG AND/OR POPULAR WORKS, PLEASE CHECK AMAZON TO SEE IF YOUR STORIES HAVE BEEN PIRATED.
You can search for your fics by title, or by text from the description (which is often just copied wholesale from AO3 as well). If you find that someone has stolen your work and is selling it as their own, you can lodge a DMCA complaint (Amazon.com/USA site; other countries have different systems). If you haven't done this before, it's easy! Here's a tutorial:
HOW TO FILE A COPYRIGHT COMPLAINT FOR STOLEN WORK ON AMAZON.COM:
First, go to this form. You'll need to be signed into your Amazon account.
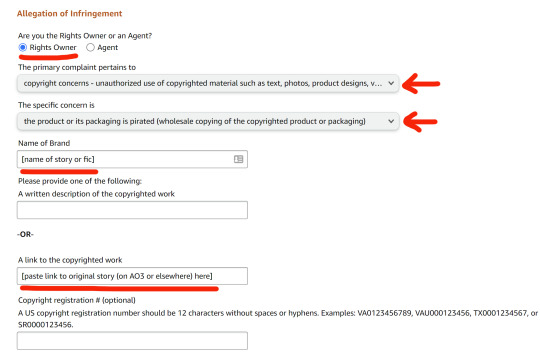
Select the radio buttons/dropdown options (shown below) to indicate that you are the legal Rights Owner, you have a copyright concern, and it is about a pirated product.
Enter the name of your story in the Name of Brand field.
In the Link to the Copyrighted Work box, enter a link to the story on AO3 or whatever site your work is posted on.
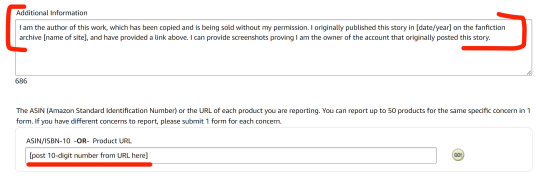
In the Additional Information box, explain that you are the author of the work and it is being sold without your permission. That's all you really need. If you want, you can include additional information that might be helpful in establishing the validity of your claim, but you don't have to go into great detail. You can simply write something like this:
I am the author of this work, which is being sold by [publisher] without my permission. I originally published this story in [date/year] on [name of site], and have provided a link to the original above. On request, I can provide documentation proving that I am the owner of the account that originally posted this story.
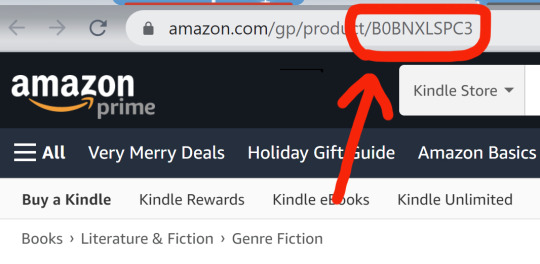
In the ASIN/ISBN-10 field, copy and paste the ID number from the pirated copy's URL. You'll find this ten-digit number in the Amazon URL after the word "product," as in the screenshot below. (If the URL extends beyond this number, you can ignore everything from the question mark on.) Once this number has been added, Amazon will pull the product information automatically and add it to the complaint form, so you can check the listing title and make sure it's correct.
Finally, add your contact information to the relevant fields, check the "I have read and accept the statements" box, and then click Submit. You should receive an email confirmation that Amazon has received the form.
Please share this information with your writer friends, keep an eye out for/report pirated works, and help us keep fanfiction free and legally protected!
NOTE: All of the above also applies to Amazon products featuring stolen artwork, etc., so fan artists should check too!
#fanfiction#ao3#piracy#dmca#pirated fanfic#please signal boost#i'm mad but also laughing that my dmc fanfic is now a 'number one best selling novel' lol#i'm also a traditionally-published author#so this is both hilarious and deeply insulting to me
88K notes
·
View notes
Photo
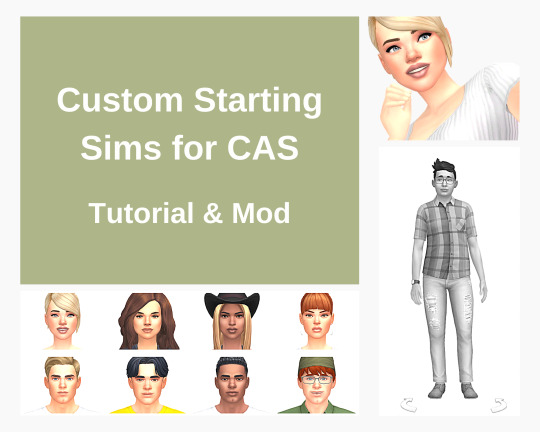
Custom Starting Sims for CAS (Tutorial & Mod)
Making my way through various CAS files, I found something that I thought might be interesting to at least someone?👀😊
You know, how when you go into CAS, one of EAs sims shows up as the starting sim? You can replace these sims with your own sims. Or, in case you have a certain sim style, you can make it so that only a certain sim, that you want to use as a base, shows up.
Below I show how to do it and share files that you can use as a base (as well as some examples with my own sims).
This is how it works:
There are 20 Sim Preset files with female sims and 20 Sim Preset files with male sims that the game picks from when you go into CAS.
Each Sim Preset file references a Sim Info file which, basically, has the information about how the sim looks.
And you can replace the referenced Sim Info files with Sim Info files of your own sim(s).
Here is how to do it (it’s basically a little trick I learned from @mizoreyukii ’s tutorial for Custom Styled Looks). I realize this looks like a lot but those are just a few simple steps :D:
Save the sim(s) you want to use to your Library. If you use different sims, make sure the sims have distinct names, since the ID of your Sim Info files is derived from your sims name and you don’t want the file names to overlap.
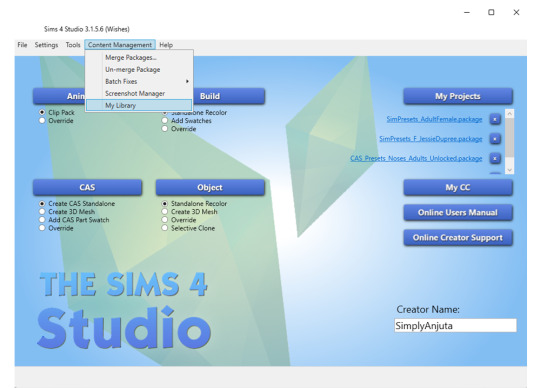
Next, open up Sims 4 Studio, go to the Tab “Content Management” and select “My Library”:
A window will pop up that shows the sims that are saved in your Library. [Note: There’s a little bug in S4S, when in case you changed your game language settings at some point (as I did), S4S will still navigate to the old Tray folder (even though the path to “Sims 4 Documents” is set correctly in the S4S settings). As a workaround, you can copy paste the files from your current Tray folder to the old one.]
From the overview select the household with your sim. Then, select the sim on the right panel, right click the sim and select “Export .SimInfo”. Save the file to a location of your choice.

Download the zip file I linked below and open the included package file with EAs sims (either male or female, depending on which sims you want to replace) in Sims 4 Studio. (If you set Sims 4 Studio as the standard program to open package files, you can just double click the package file to open it.)
Inside each file there’s a list with 20 sim presets. Each Sim Preset references a “SimInfoInstanceID”, as shown in the example below, that you will need to replace in the next step:
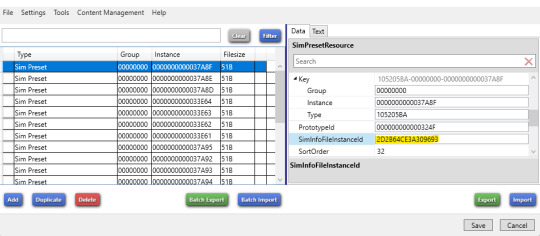
Hit “Batch Import” in order to add the Sim Info file that you previously exported from your Library.
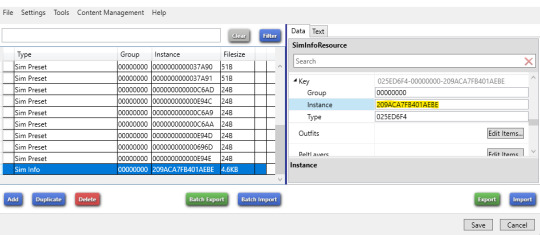
Copy the Instance ID from the Sim Info file. You can copy it from here:
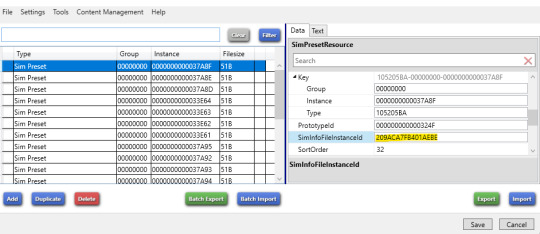
Paste this ID as the “SimInfoFileInstanceID” to the Sim Preset (replace the existing entry). If you want to use the same sim for all files, copy the same Sim Info ID as reference to all Sim Presets, otherwise add the other Sim Info files you wanna use the same way as described above and copy the different IDs to the different Sim Presets.
Save the package file and put it into your Mods folder.
And that’s it! 😊
DOWNLOAD
The download above is a zip file (you need to unzip it with a free program like WinRAR or 7-Zip) and includes the following package files (each for male and female sims):
Original Files with EAs sims (*)
Example with 1 male sim and 1 female sim
Example with 4 male sims and 4 female sims
Following basegame sims are included in my example files:
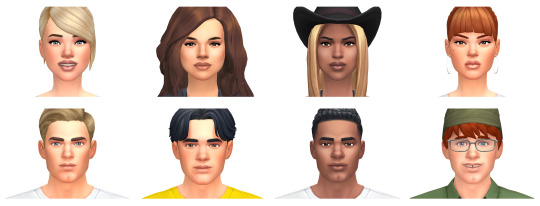
(*) Sidenote: In case other CAS sims are added to the game, you can also export the original files yourself via the S4S Game File Cruiser:

@thefoxburyinstitute
949 notes
·
View notes
Note
I'm not quite sure where this falls in your ask guidelines, so please ignore if you prefer!
I admire you as a creator and you always give very well-thought answers, so I was curious about your feelings engaging with the public? I'm writing my own interactive fiction but I'm conflicted about sharing it; on one hand, I love how transparent the process is and as a fan getting to participate has been really cool and it's led to some amazing communities, but on the other interacting as a creator just seems kind of daunting? Draining?? It just seems like a LOT I guess.
No worries at all, I’m happy to help!
Public engagement (and social media management in general) is an important part of being an independent creator. When your work is centred online, folks are only going to be interested if you build some kind of presence. How much time you invest in it will greatly depend on how much time you want to devote to it (because it does take a lot of time) and also how comfortable you are. Different creators will have different levels of comfort for interactions with fans.
For me, the social media management is one of the most fun parts of my job. I wouldn’t do it this way if I wasn’t having fun. I love hearing from players, I love seeing reactions to the game, especially as folks find new paths they didn’t think were there. But there are downsides, too: for every positive ask I get, there’s a negative one lurking around the corner. There are negative reviews and ratings on my itch.io page. I have folks dump criticism in my bug report form (that’s not what it’s for). I get repeat asks about things that I have already responded to public and documented clearly on my blog or the game page itself.
I have a few base rules for handling social media and interactions with the playerbase:
1. Set boundaries and stick to them. You might be tempted to respond to everything, but for the sake of your own mental health, set boundaries. Figure out what kind of questions you don’t want to answer and write it down. I have mine listed here (no NSFW asks, no RO react asks).
Don’t feel like you need to sort out everything right away; you can always update your ground rules. If you receive a message that crosses your boundaries, delete it.
2. Set aside time to do social media management and don’t answer anything outside that time. This one’s really important, otherwise you will get overwhelmed. Social media management is work. For me, some asks are really easy to answer; others take upwards of 30 minutes or an hour (advice, tutorials, etc). If you feel like you need to respond to something as soon as you receive it, you’re never going to have time for yourself.
3. Be selective about what social media apps you use. I primarily use tumblr and Discord because that’s where I’m comfortable. While I do have Twitter and Instagram, I post very infrequently there because I don’t particularly like them and I don’t have to time to figure out how to use them accordingly for my project. While I’m sure I could grow a Wayfarer community on either platform, I don’t have time to manage tumblr, Instagram, Twitter, and Discord*.
*If you're making a ChoiceScript game, I would consider your Choice of Games forum thread social media management.
4. Prepare for common questions. More than one person is going to have the same question. When this happens, prepare a post you can link the asker to so you don't need to type out the same answer every time.
This is why I have the Troubleshooting Game Launch & Save Errors post on my itch.io community forum.
Making a clear FAQ also helps with this; if in doubt, just link them the FAQ.
5. Get help managing your accounts. You won’t need this right away, but if you find you’re getting overwhelmed, ask for help. My development blog is a sideblog, which made it easy to add a friend to help me manage my inbox and queue. I also have a moderator team on Discord who handle the more intimidating interactions with members. I rarely do moderation myself because as a creator, it’s best I stay a few steps removed from the action; my view of what’s going on is always going to be biased in my favour.
6. Don’t answer when you’re angry or annoyed. You’re going to receive a lot of weird shit in your messages, especially if you accept anonymous asks on tumblr.
(You can always turn off anon. I like to keep anon on because my blog is the main way to contact me and I’d like to stay open for players who don’t have tumblr accounts or who are too shy to send a public ask.)
Most of the time, I delete messages that are genuinely upsetting. People who send hate asks are trolls looking to get a reaction out of you; I like to deny them the satisfaction of knowing they "got" to me.
But if I do need to respond, I usually give myself a few days to settle down before I reply. Sometimes I’m misinterpreting what the sender is saying, or I took it more negatively than it was intended. There’s always a genuine human being on the other end of an ask, and I don’t know what their life is like or what they’re going through. I try my best to treat them with grace (though sometimes this can be difficult and I'm snappier than I intend to be, especially if they're asking a question I've already answered, breaks my guidelines, or whose answer is easily available on my blog or game page).
7. It’s OK to delete and block, no matter the reason. If someone is harassing you, if they’re being particularly annoying with repeat asks, or if you’re getting messages that leave a bad taste in your mouth, delete it and block the sender. On tumblr, blocking an anonymous ask will block the sender’s IP address so they can’t send public or anon messages anymore*.
*Sometimes it glitches on desktop and I have to use mobile instead.
8. It’s OK not to answer everything. I struggled with this one the most when I first started my blog. I felt like to create a community, I had to answer everything, even the asks I wasn’t comfortable answering. But it’s not your responsibility to answer everyone all the time. An ask (or any social media message) is just a question, and it’s within your rights to decline to answer.
If you’re just starting out, most of the above is not going to apply right away. But a good rule of thumb to go by is to never do more than you’re comfortable.
If your game is new or you're just starting out, I have a few other pieces of advice that may be helpful:
1. It takes time to build a community. It takes a long time. I’ve had my blog since 2019 and it’s only in the past year that it’s started to really grow. Don’t rush it. Focus on your game first, then the playerbase.
2. Focus on your game above all else. You can’t build a community if you don’t have playable content. If you want folks to engage with you, you need to have an existing game. I made my dev blog before I had a working demo, but my dev blog floundered for about two years before I had enough publicly playable material for folks to start to take an interest. If I was doing this over again, I would make a sizable public demo* before starting a blog or any related social media.
*By sizable, I mean more than a prologue and a character creator. You want players to spend enough time playing your game so they have a good sense of your world and who their MC is. Ideally, you want your first public demo to fully set up your MC, the world, an initial companion character and/or characters, and also feel like a complete experience. Don’t have your demo just end because you’re rushing to get something out. You have one shot at making an impression; don’t leave players hanging on an awkward note. Your first demo should end with the completion of your game’s first major story beat. Give players something more significant to do than choosing what their MC looks like.
3. Character asks/prompts (RO react asks and related) are often a waste of time. While these types of asks can help generate interest in your game (especially in the interactive fiction tumblr sphere), they are usually a waste of time and reveal too much information, too soon. While it’s good to give players a taste of what’s to come and things to be excited about, in-depth character asks can spoil the experience of a character before that character is introduced in the game itself.
More importantly, if you find you’re spending more time doing social media management and answering character asks than working on your game, then you need to switch gears. More game content = more community building. Asks are secondary to that.
Don’t fall into the trap of wanting or needing engagement to be able to create.
4. Don’t do more than you’re comfortable. You don’t need social media to make a successful IF game. If you feel like it’s too much at any point, it’s OK to take a step back.
I’m not sure if this is what you were looking for, but I hope it helps! Good luck on your project. 💕
#wayfarer#wayfarer if#interactive fiction#interactive novel#writeblr#indie game#twine#twine game#coding in twine#on writing#answered
71 notes
·
View notes
Photo
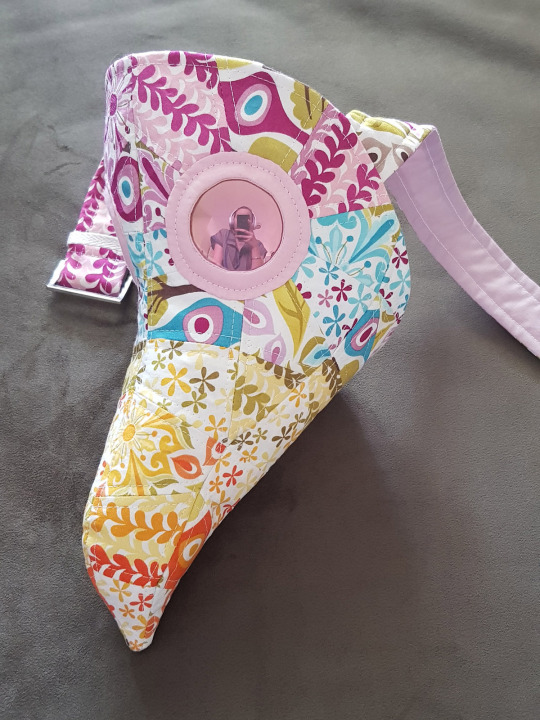
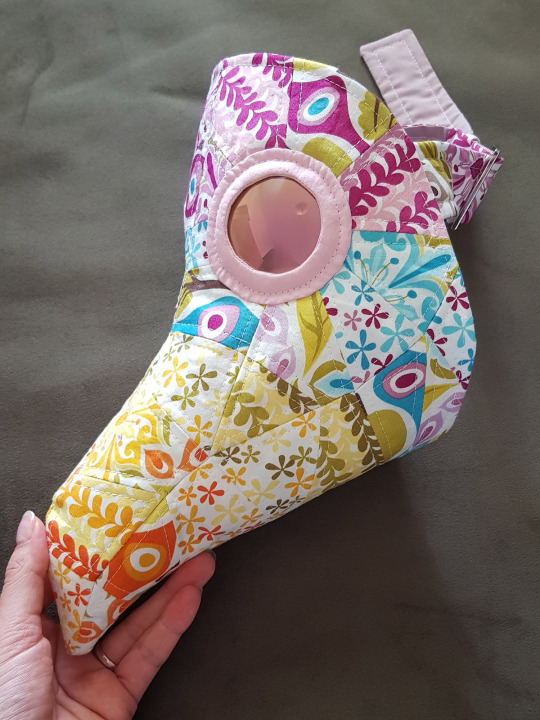
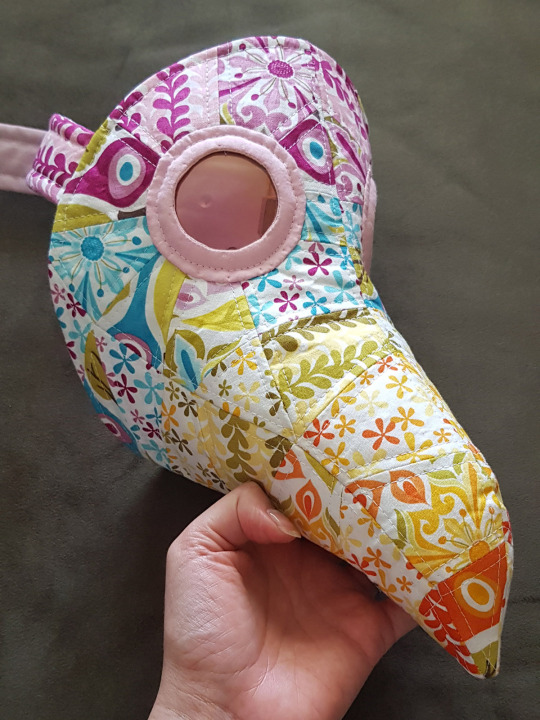
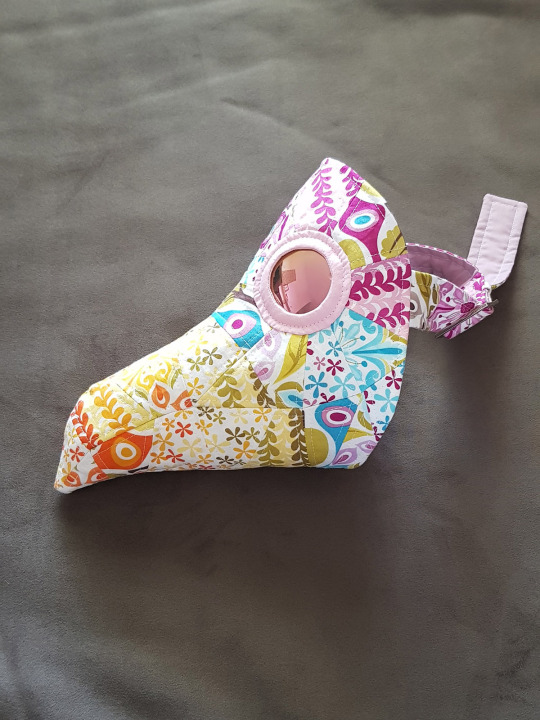
Here it is! The instructions to make a pieced and quilted plague doctor mask!
Just as a heads up, this pattern is not really recommended for beginners. There is not a whole lot of explanation of the basic techniques, and it requires a fair bit of precision, two types of fusible interfacing, and an assumption that you can keep a consistent seam allowance and do some hand sewing and know when to sew things right sides together and such.
I am not promising anything, different methods will yield different results, I have never made a pattern exactly as it was written and neither should you. If you want something the same as the next person, go to the shops.
Actually, nevermind, this is a quarantine craft, stay home.
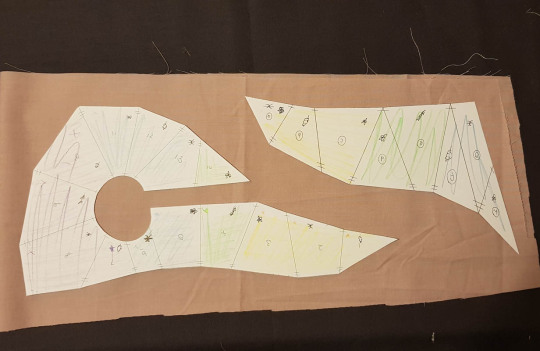
There are two ways to do the piecing for this project. The first is a quilting technique called English Paper Piecing, there are plenty of tutorials online, but it is done by hand and I do not have the patience for it. Still, if you have the time but not the machinery, it is probably your best option for a very good finish. Cut the pattern net out of card, glue the bits onto your fabric, sew them up, pull them out and add interfacing after. I sewed three hexies together once and got bored and gave up.
The method I actually used involves my favourite cheat for sewing: you can use an inkjet printer to print on non-woven fusible interfacing! There are ridiculously overpriced pre-cut packs available, but also you can just cut up some midweight to the right size. I just have a boring old Epson printer, and I can get away with just putting some scotch tape along the edge that feeds in for a bit of stability. Alternatively, depending on the brand, you can “fuse” it onto some non-stick baking paper, cut it to size, and then peel it off without losing too much adhesive. (My pictures look a little different because my original A4 version fits on the page differently than the shared version)
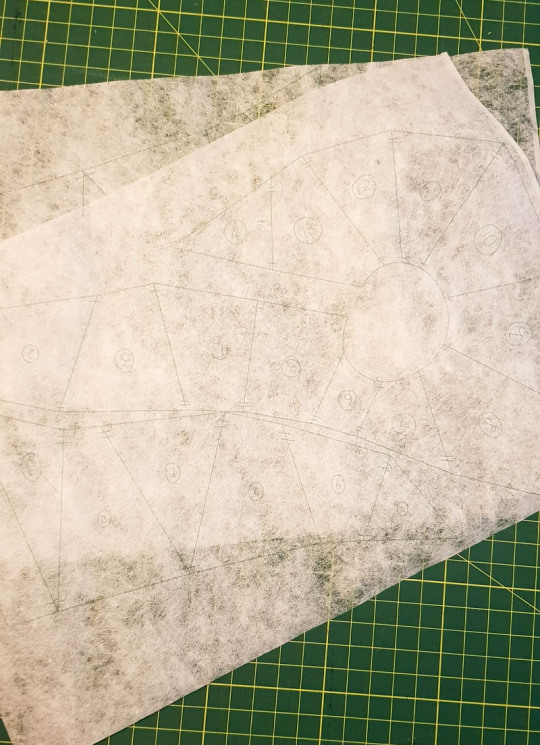
Printing onto interfacing means I know my dimensions are perfect, and I have the markings on the pieces so I know what joins to what. If you only have a laser printer, or your inkjet hates you and wont let you print on interfacing, I still recommend using fusible interfacing for structure and precision piecing. You will just need to keep a lot better track of what is what, because the pieces are all slightly different and they only go together one way.
The actual “pattern” for this project is a geometric net. I highly recommend making one in paper or cardstock first, because we all have different sized heads. As with most quilting projects, it will generally get to be a little bit smaller again once it is all sewn together, so keep that in mind.
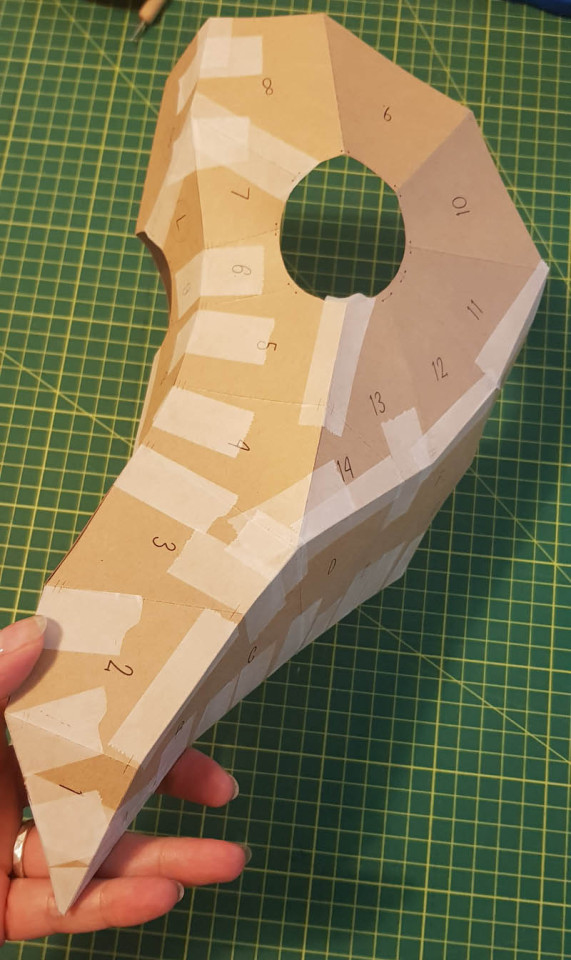
This is a link to the PDF on Google Drive. It is a 4 page document, for printing on US letter size. There is enough space around the pieces that it can also print onto A4 paper: the one inch square should measure 2.5cm. Similarly, the extra space means it can be scaled up a bit before any gets cut off, if you have a particularly large face.
(Edited to add: if you were going to make this in a single fabric rather than pieced together patchwork pieces, I have uploaded a simplified version of the pattern, which has more curved seams which are easier to match. The technique is otherwise the same, but note that these patterns do not have seam allowances - you will need to add them when you cut your fabric so that the pieces match.)
The body of the mask is made up of two mirrored (four total) pieced together bits, plus some circles to go around the lenses. There are two mirrored top pieces, and two mirrored bottom pieces. The top pieces are numbered 1-14, and are split over two pages and need to be joined together. The bottom pieces are lettered A-H. On one side of the pattern the numbers and letters are circled, so you know which side you are working on. There are also small dashes in the corners of the pieces; single dashes connect to single dashes, double dashes connect to double dashes. At the parts that become the edges of the eye holes, there are little dots at the end of the dashes.
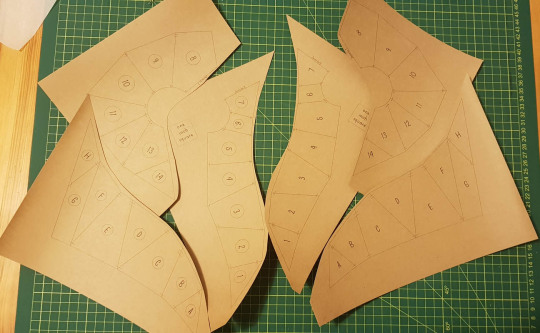
Even if you are printing onto interfacing, you will also need to do a paper printout, as it will be used later as a pattern to cut the batting and the lining. The paper printout can also be used to work out your fabric placement, if you are going for a certain look (again, this one was printed as an all in one A4 sheet, but it works the same).
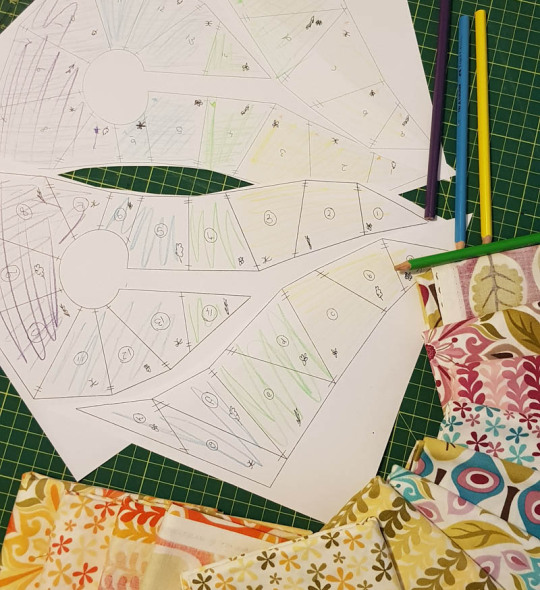
Cutting the Patchworked Outer
If you have managed to print onto fusible interfacing, all you need to do is cut the pieces. Otherwise, do what you need to trace the pieces onto interfacing, making notes of where they go and which sides align to what.
Once you have your interfacing pieces cut and organized, fuse them to your fabrics with at least enough room between and around them for seam allowances on each side.
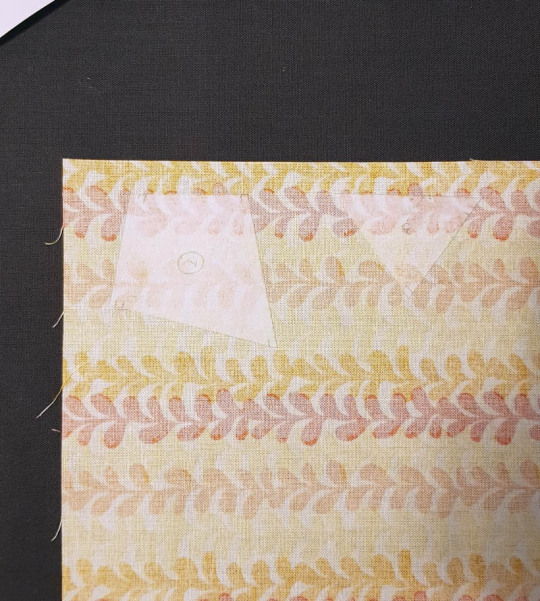
I use a 1cm seam allowance, but feel free to use a quarter or half inch if that is what you are used to.
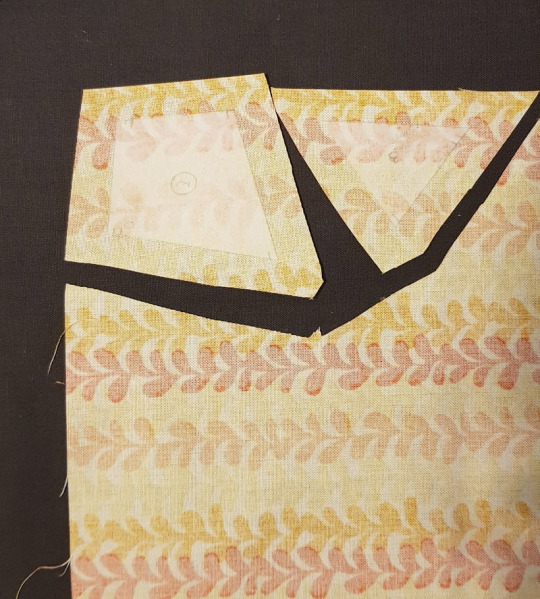
Trim all the pieces to have a consistent seam allowance.
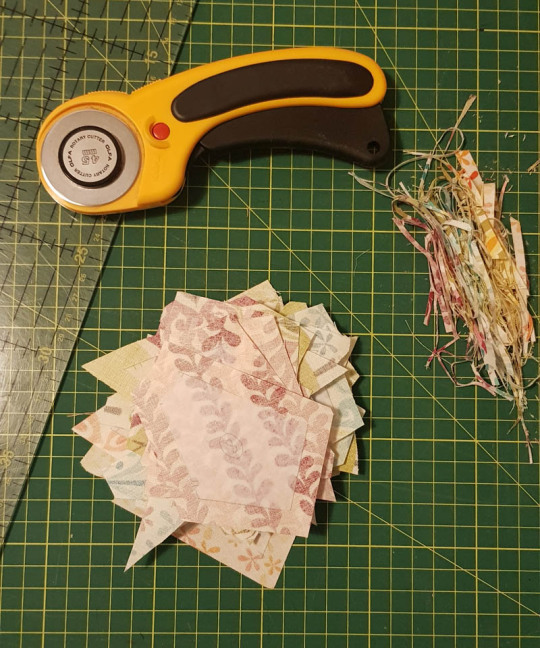
Lay the trimmed pieces out on the paper printouts. This will let you know if there are any pieces missing, or any parts where fabric duplicates might share a seam.
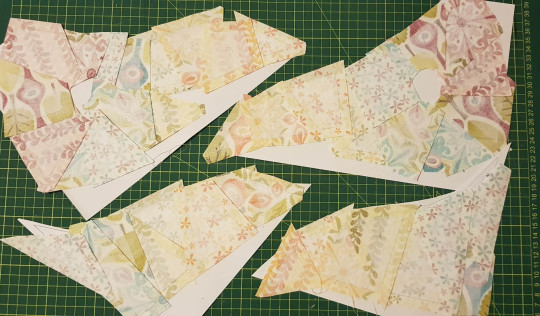
Piecing the Patchworked Outer
First, piece together the nets of the bottom pieces. Put a straight pin straight through at the corners of the interfacings of two neighboring pieces, so they are perfectly aligned. Then angle the pin on the right hand side so it comes back up along where the seam will go, and angle the one on the left so that it is going across.
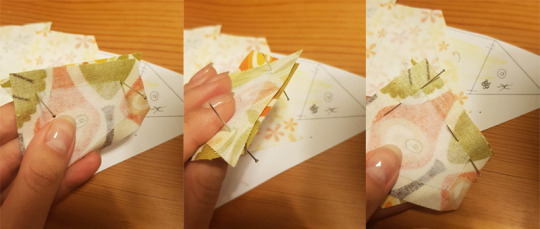
Sew along the edge of the interfacing, aiming for just alongside of it, not on it.
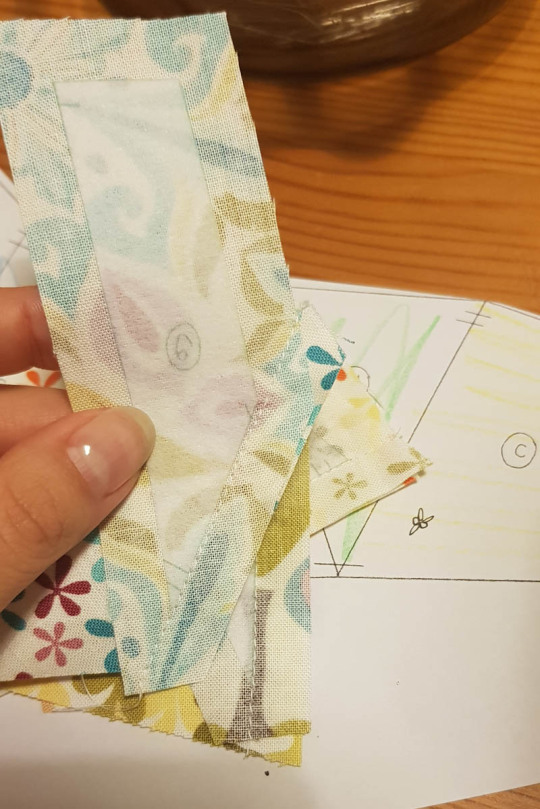
Finger press the seams open, then repeat until all the pieces are together.
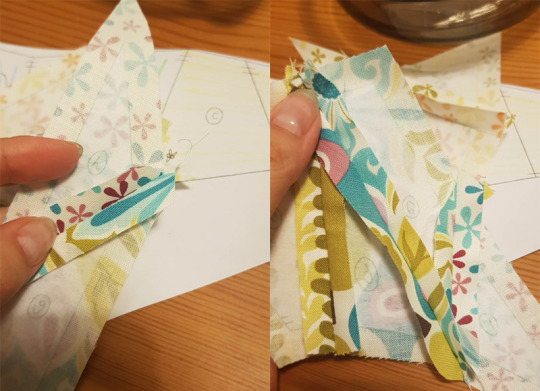
The technique for the top pieces is the same, but at any join which ends at an eyehole (marked on the pattern with a black dot on the ends of the dash), backstitch at the end of the interfacing, so that it won’t pull apart at the edge. The seam allowance at this part will be cut off, so it needs to be secured before that point to prevent it from pulling apart.
Batting and Quilting
Properly press all the pieces, with the seams open.
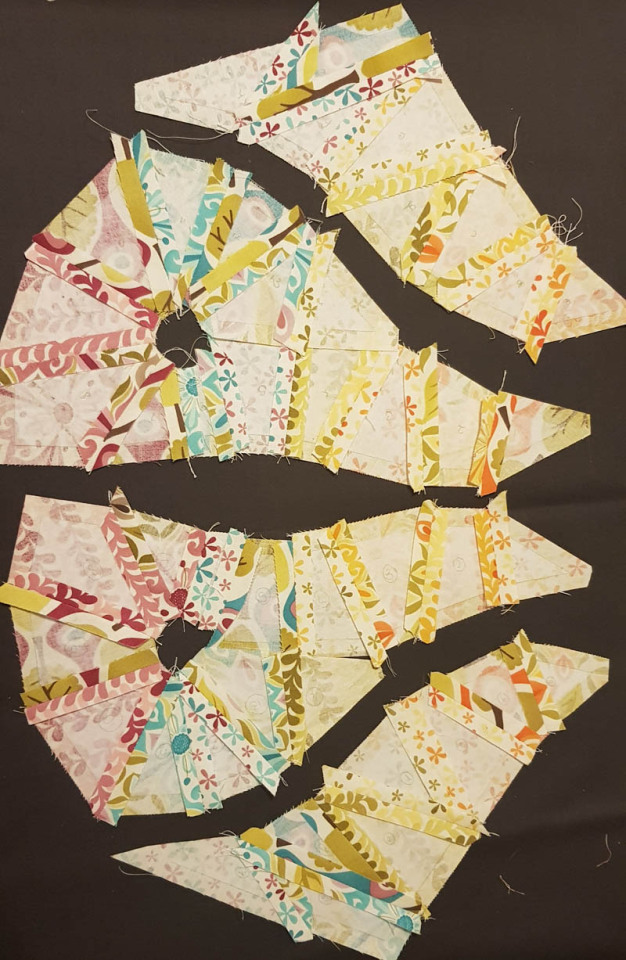
Using the paper pattern, cut out two mirrored top and bottom pieces from fusible batting.
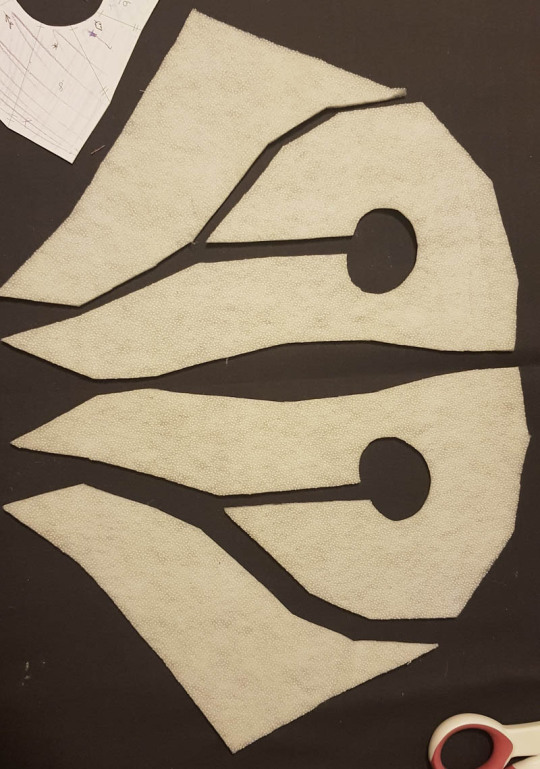
Iron these onto the inside of the pieced parts, so that their edges line up with the interfacings. In my experience, the best way to iron on fusible batting is from the right side, so I pin them in place and flip them over, iron a little bit so they barely stick, pull out the pins, and fuse properly.
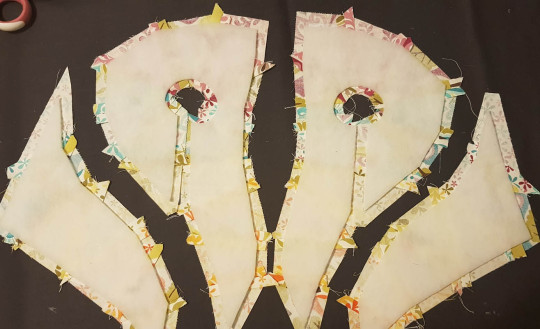
Do some quilting. I just went 5mm to the side of every seam, because the next lot of seams need to be topstitched in the same way, and I like the consistency.
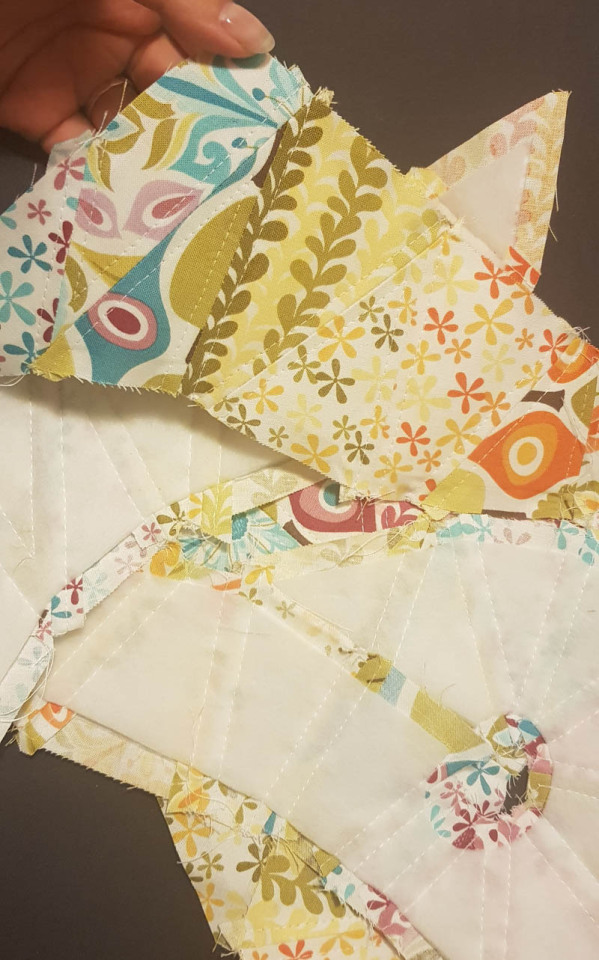
Assembly of the Patchworked Outer
Join together the gap in the top pieces. The batting was aligned to the interfacing, so the technique is the same.
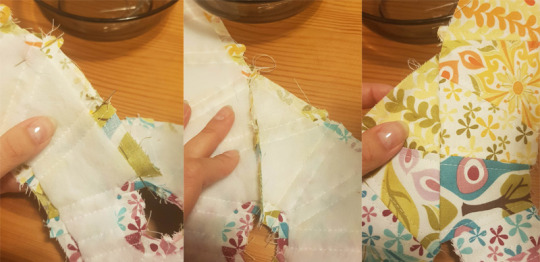
Press the seams apart and topstitch the seams to either side.
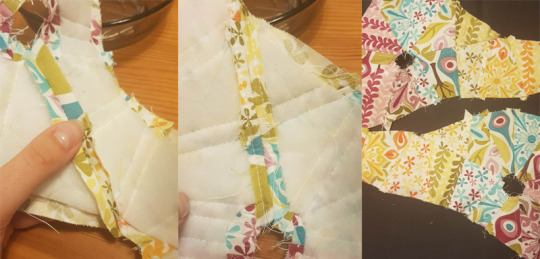
Trim off the excess seam allowance around the eye holes to the edge of the batting and interfacing. this was why we needed to backstitch earlier.
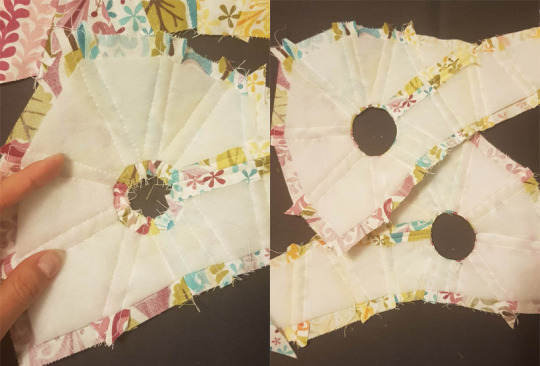
The next step joins the top and bottom pieces together. The bottom piece attaches to the more curved edge of the top piece - that last seam that was joined after adding the batting will meet these side seams, angled towards the tip of the beak. Sewing the sides is the trickiest bit to do on the machine, so, while I would normally say basting is for cowards, if you want the points to match perfectly, this is a time when pinning will not really cut it. I just hand sew through each point where the seams join, go back through a couple of threads over, and tie it off.
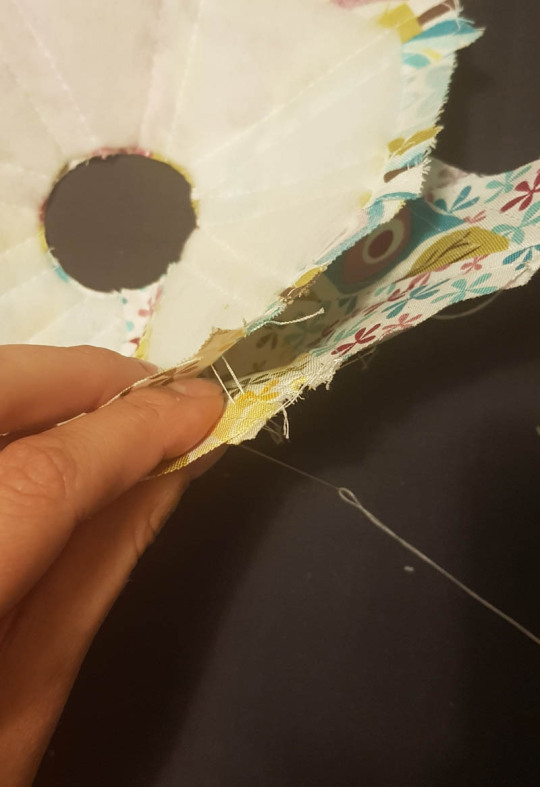
Then I put pins through the longer seams.
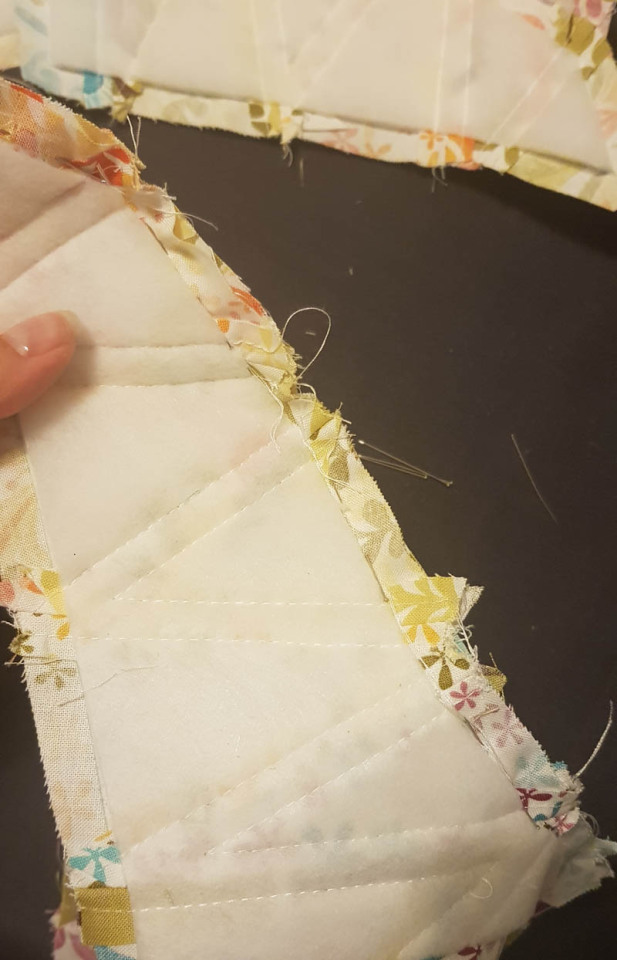
When sewing it with the machine, try to keep the lines as straight as possible, making turns only at the seams where you put a basting stitch.
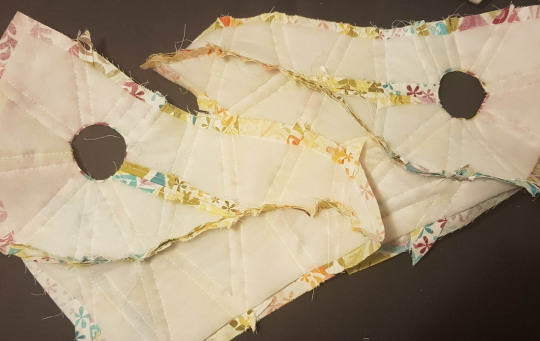
Once both sides are sewn, press the seams open and topstitch to either side.
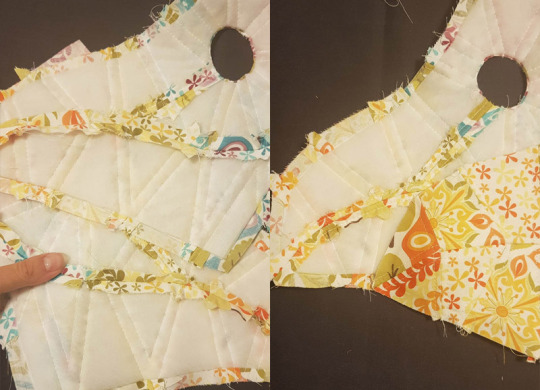
Repeat this step for the top centre seam. You can just pin baste this one if you would rather, because the angles match, but it is literally right there in the middle where everyone can see it, so if you are not confident in matching points, baste it.
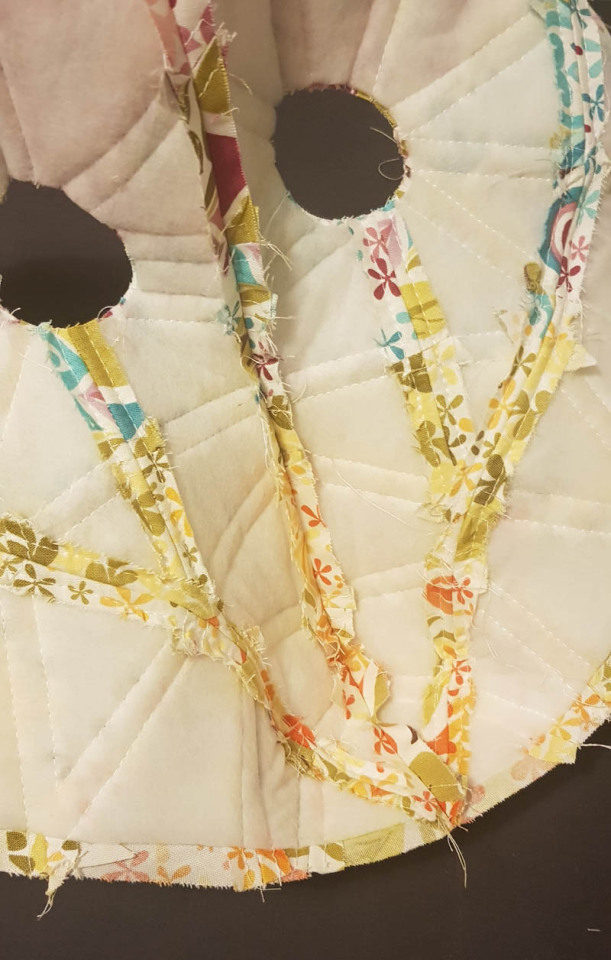
Press the seams open and topstitch.
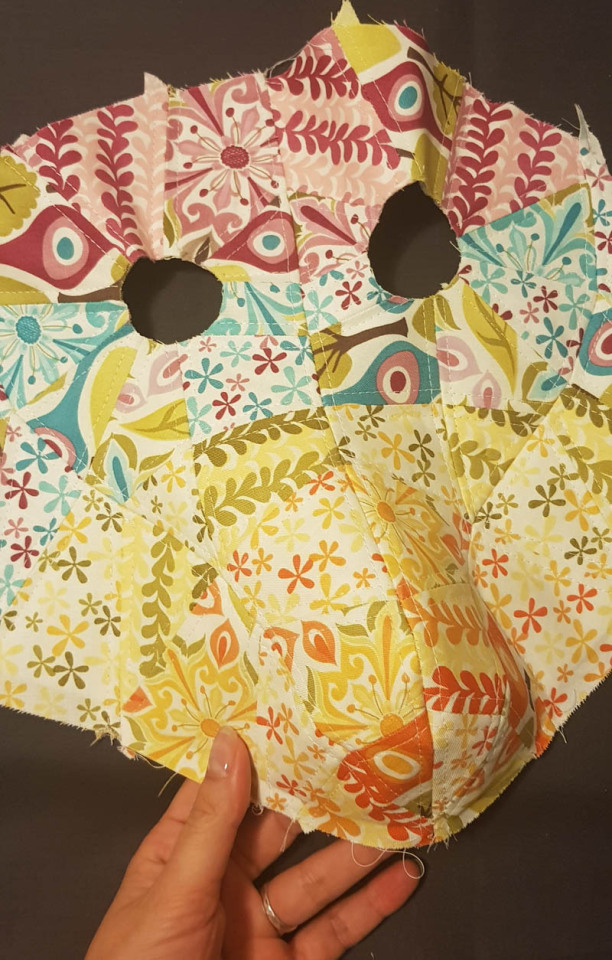
The technique is the same for the bottom centre seam, but topstitching all the way to the tip of the beak is not possible, so you will have to do the last bit of top stitching by hand.
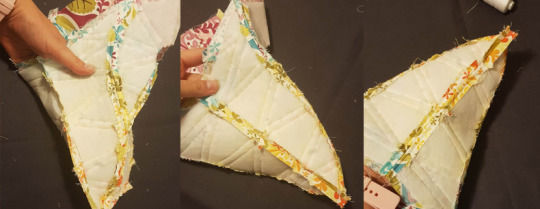
It doesn’t matter so much if it is a bit messy, because it is not in a place where it can really be seen, but spitting the seam will help it hold its shape more nicely.
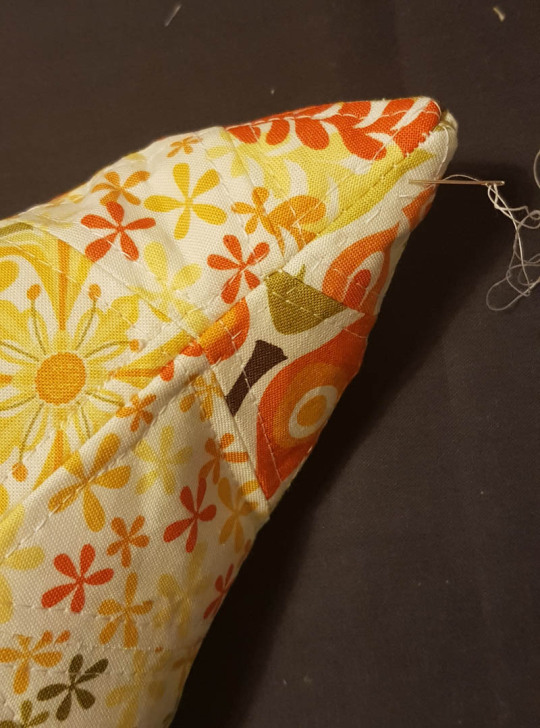
That is the pretty outside bit done.
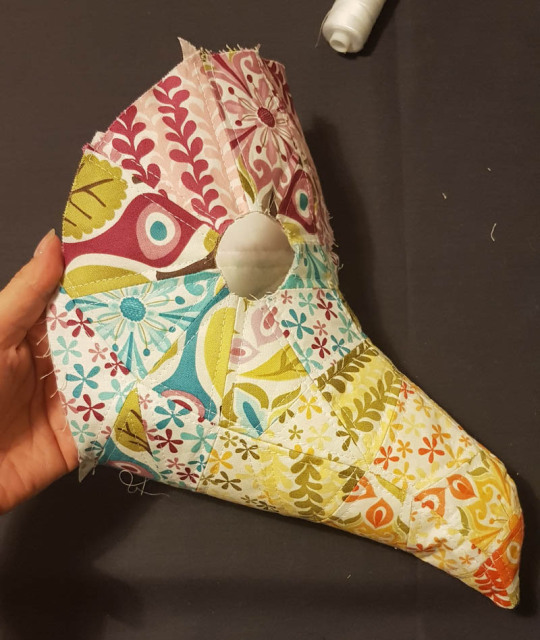
Making and Attaching the Lining
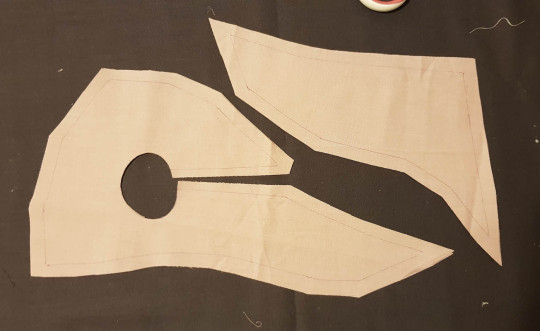
To make the lining, use the paper pattern to cut two mirrored pieces of the top and bottom pieces, with whatever seam allowance you prefer.
The gap on the top piece will have a maximum possible seam allowance of about a quarter inch, but this is enough for a secure internal seam. The eye holes do not need a seam allowance.
Sew together the gaps in the top pieces, then sew the top seam of the top pieces and the centre seam of the bottom pieces together.
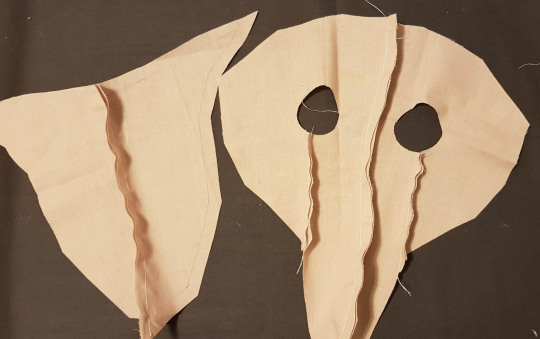
Open up both pieces and sew the sides together. You should have a lining piece that is a floppy, boring version of the outside piece.
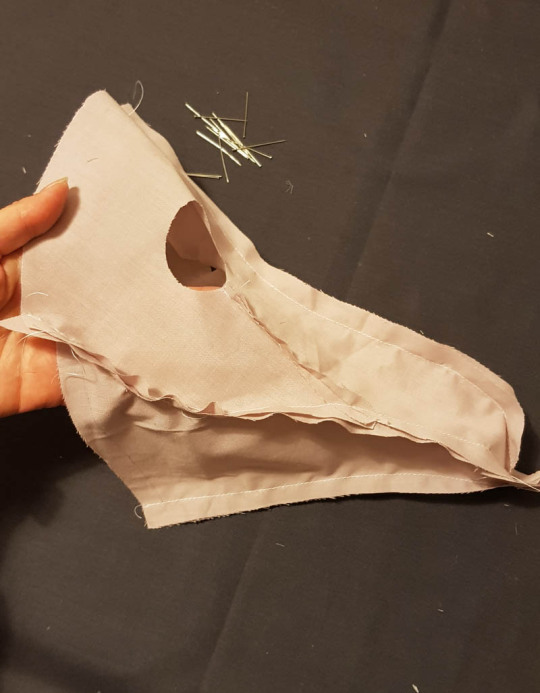
I have not included a step for how to make a strap, because everyone has their own preferred methods, and there are plenty of alternative options. If you don’t want to worry about making strapping you can use ribbon or elastic, or put a small loop there to thread something through afterwards. Whatever the choice, pin to the centre of the back edges of pattern pieces #10, facing towards the eye holes.
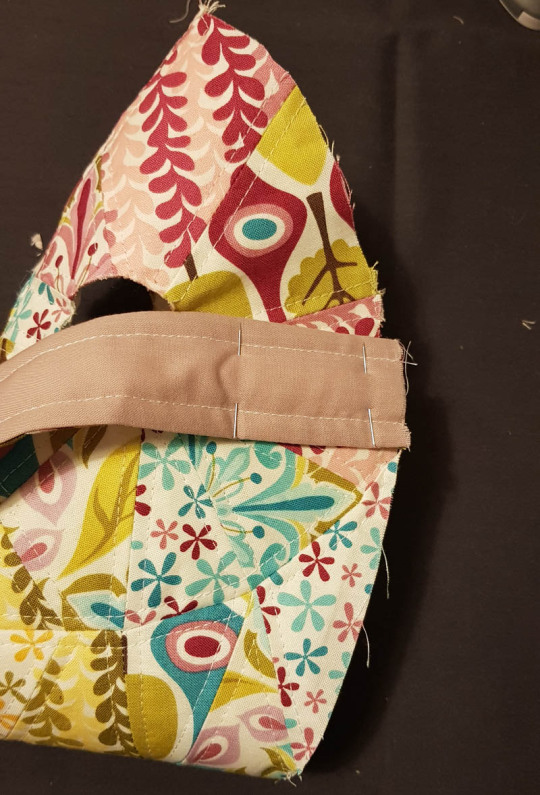
Put the lining piece, facing right side in, over the pieced outer and the strap pieces and pin around the edges, lining up the four seams of the lining with the seams on the outer.
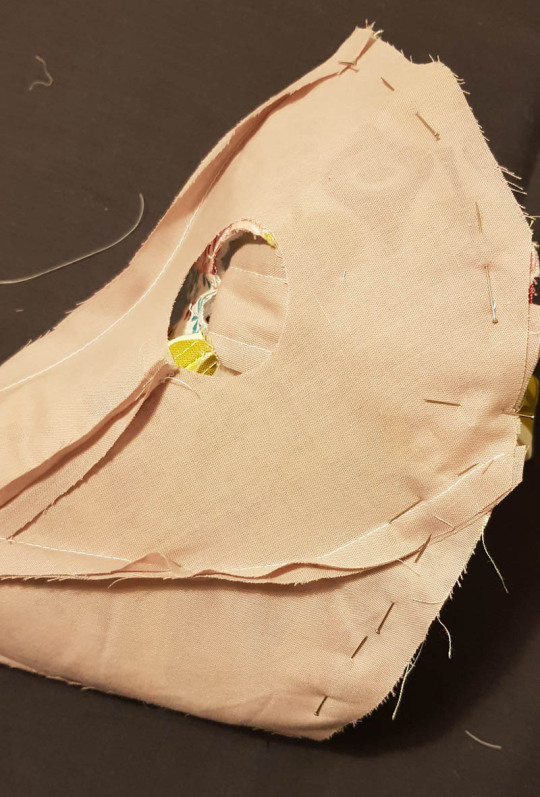
Sew around the edge.
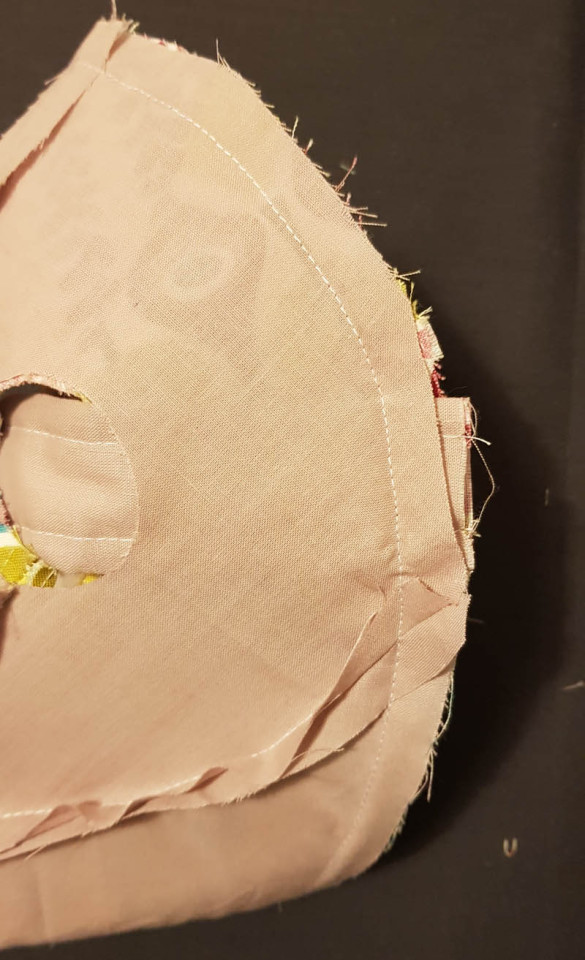
Turn the piece right side out through one of the lining’s eye holes. You just sort of pull the pieced outer (which is currently inside) back a bit, until the tip of the beak can come through an eye hole, and then try to pull it through as gently as possible so that the raw edge of the eye hole doesn’t get too stretched and frayed.
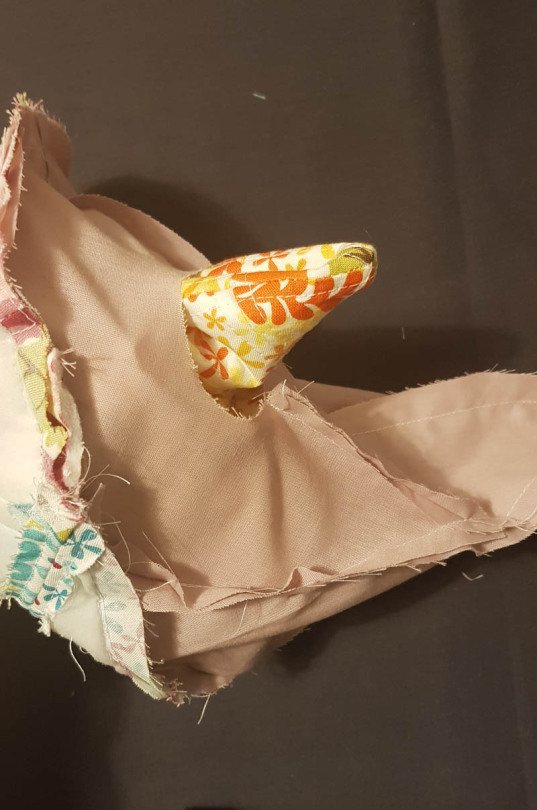
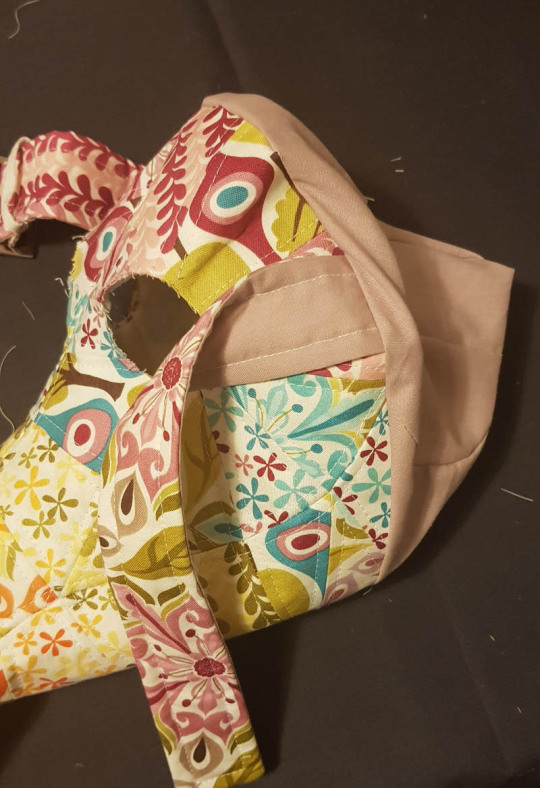
Then push the lining back into the pieced outer body of the mask.
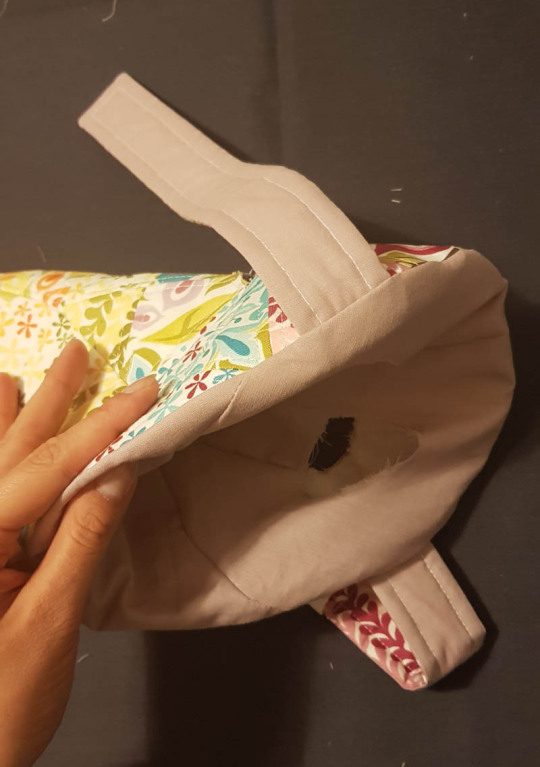
Pin around the edge, so that the lining is all tucked neatly inside.
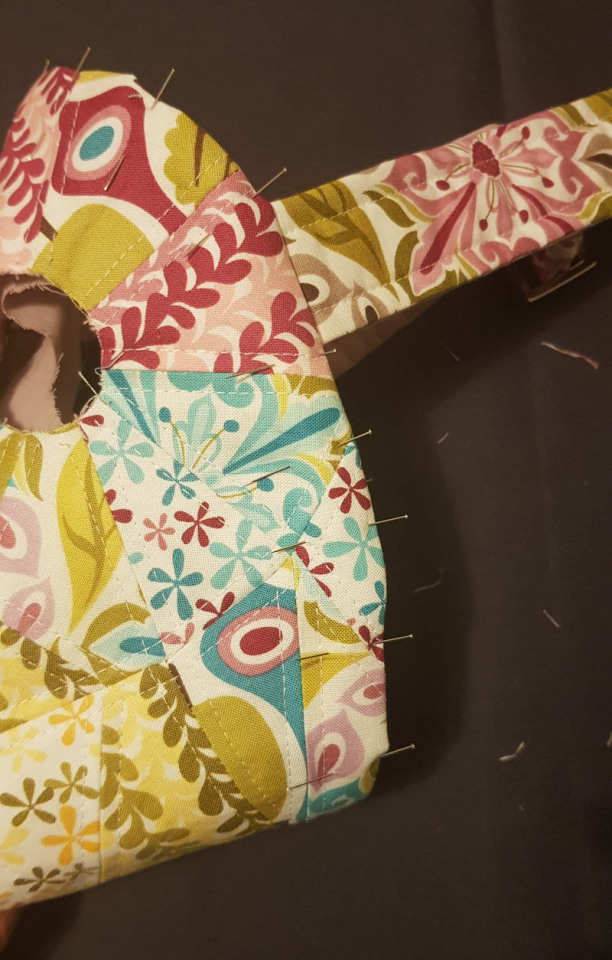
Top stitch over the edge.
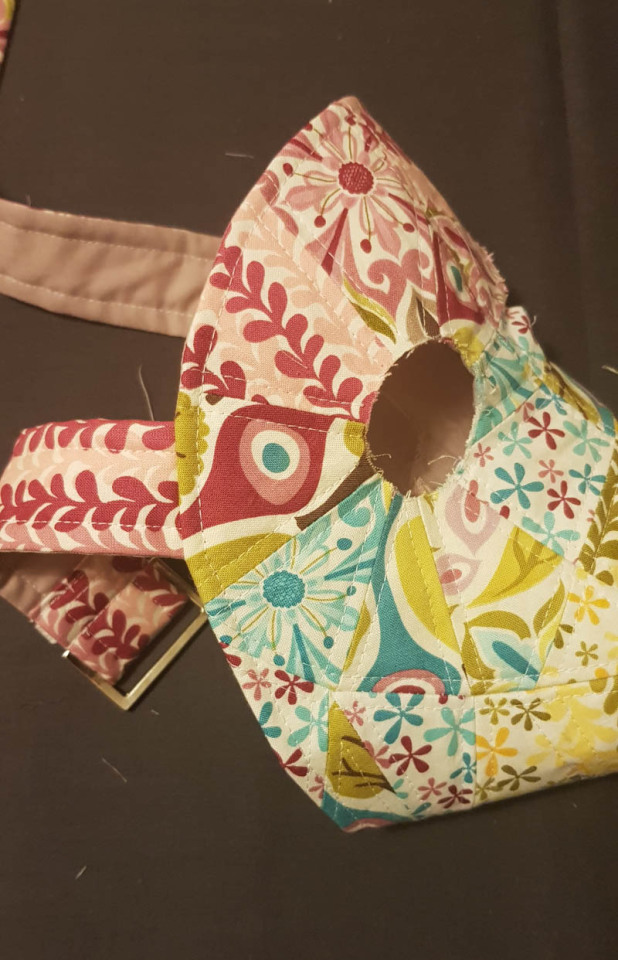
Eye hole time!
Pin the outer and lining together in the eye holes, and top stitch about 4mm (1/6th of an inch) from the edges. Trim any fraying bits.
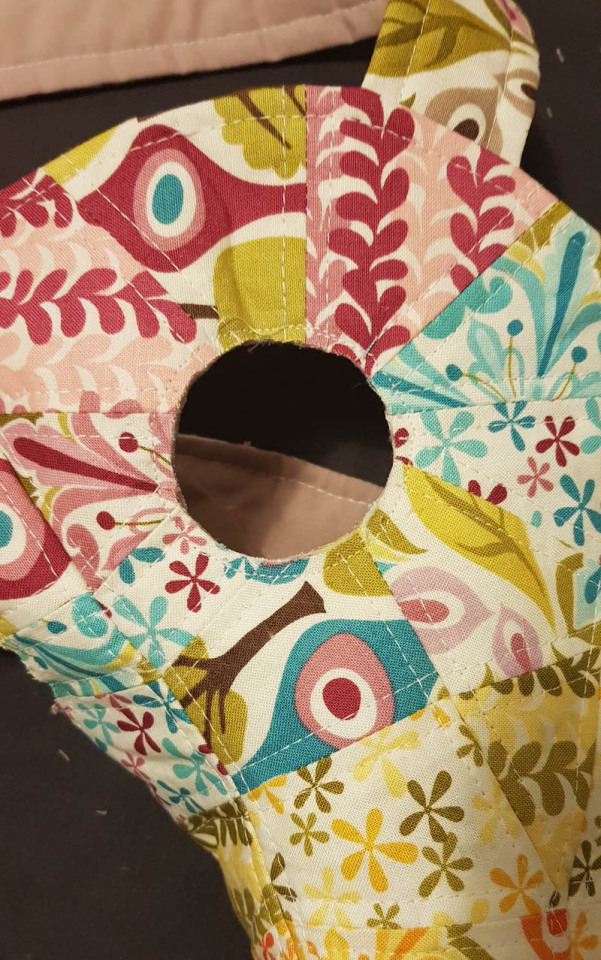
Hand stitch 1 inch wide bias binding to the inner edge of the eye hole, just over the top stitch.
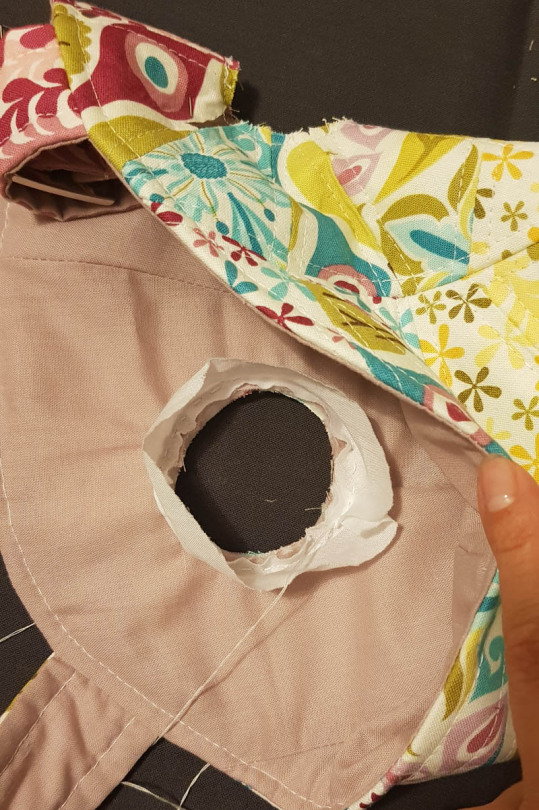
Flip the bias binding through the eye hole to the outer, fold the raw edge of the bias binding under itself, and hand stitch it down to the outside. Repeat for the other eye.
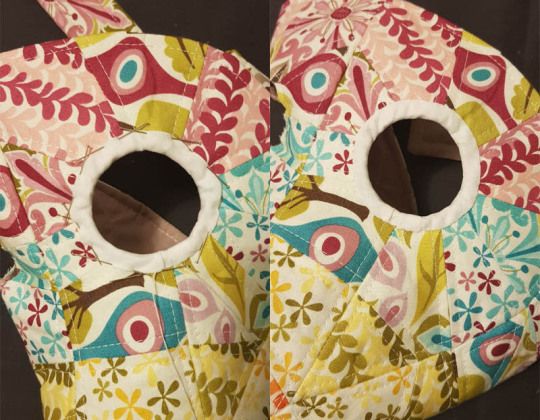
This next step is the worst bit, and if you have another method, go for it. Theoretically you could use something thicker that wouldn’t fray, like a felt or leather, so that you didn’t have to worry about lining the eye holes, but it depends on the look you are going for.
Cut out four circles from fabric, two of the biggest size, two of the medium size. Draw the smallest size circle in the middle of the back of the medium sized circle, and stack it on top of the centre of the big one, right sides together. From the fusible batting, cut two donut shapes of the medium size with the smallest circle cut out of the centre.
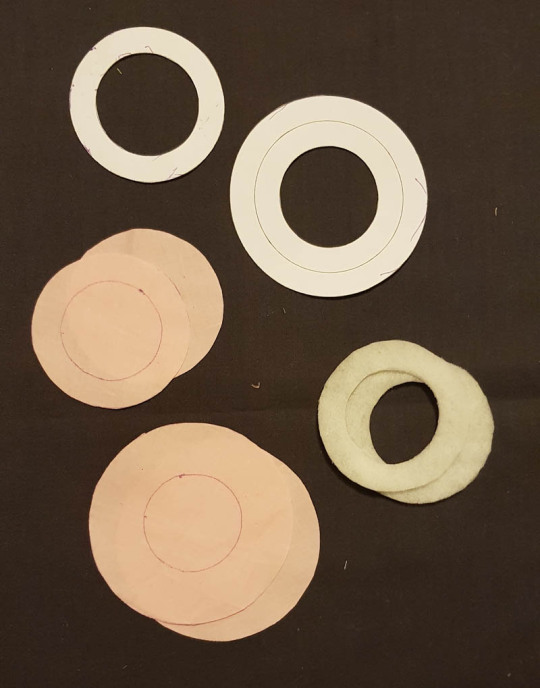
Using very small stitches, sew around the small circle drawn on the medium sized circles. Fuse the donut of batting to the back of the large circle, with the inside of the donut matching the sewn line. Cut an even smaller hole out of the middle, so that the seam allowance that remains is a slightly smaller width than the batting. Clip this into at least 12 pieces.
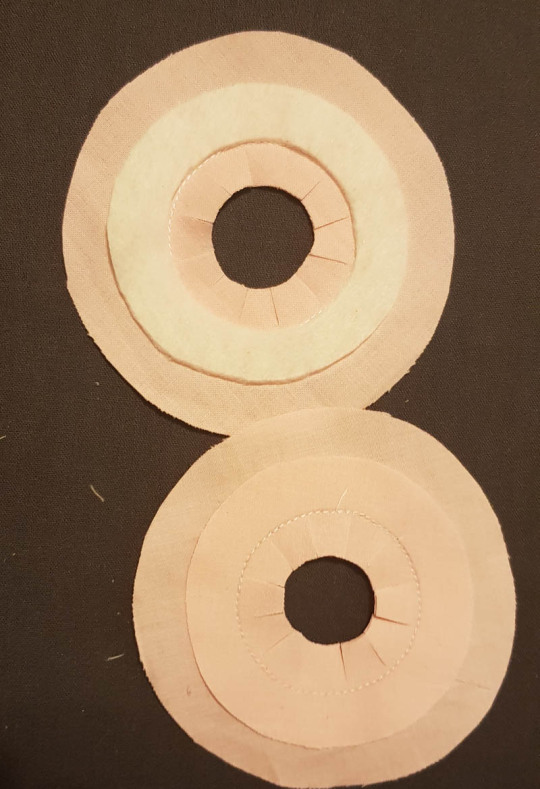
Press the smaller circle towards the centre, so that it can be turned in though the hole.
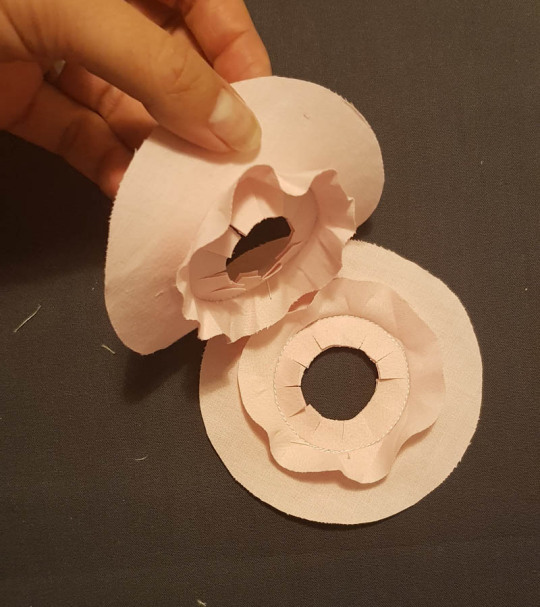
This will take a lot of careful ironing and pinning. Let it sit for a bit, so that it learns to be there.

Then unpin it, but hopefully the little clipped bits will stay there. Fold the bigger circle down over them – you will need a lot of little tiny pleats – making the outer edge as round as possible.
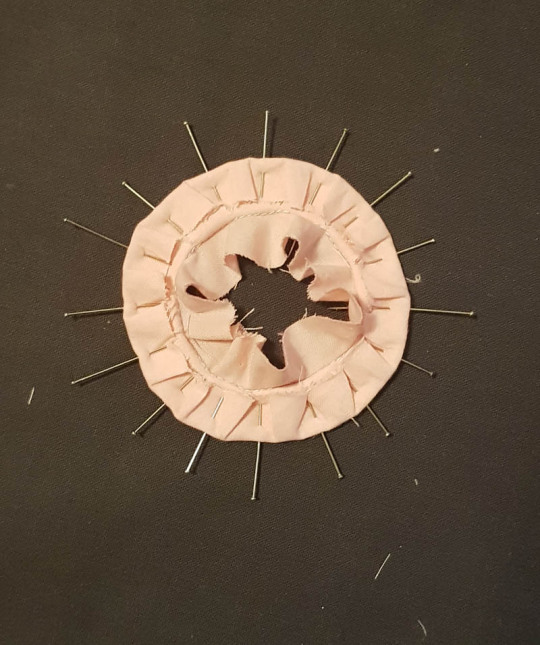
Then press that smaller circle back down over the pleats, so that it is level with the folded outer edge. If it sticks over in any places, trim it back, but only just.
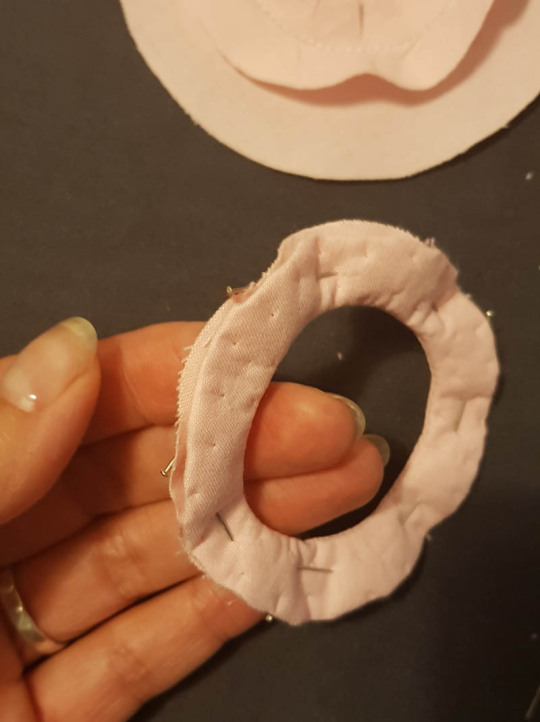
Pin this donut shape over the eye piece. The inside edge of the donut should be level with the inside of the bias binding, the raw edge up against the outer fabric.
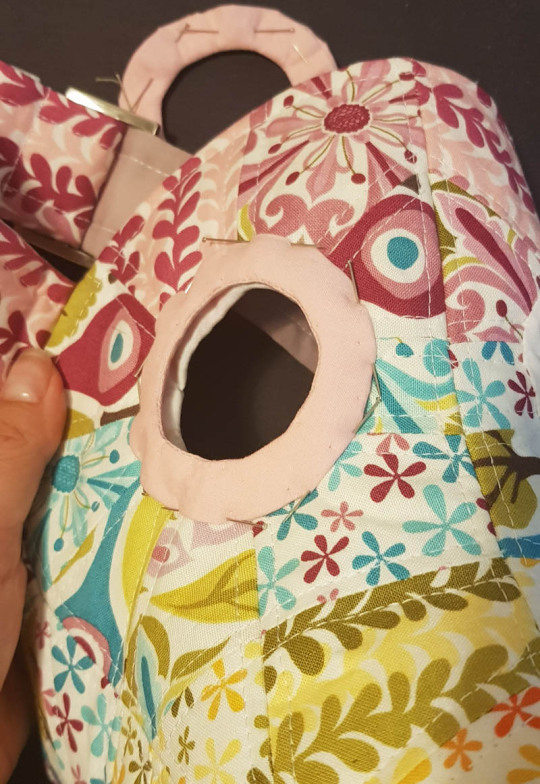
Hand sew around the outer edge of the donut to the pieced fabric. Make sure that the raw edge from the smaller circle is under the donut, but do not let it flip out through the middle. On the machine, top stitch about a quarter inch from the outer edge.
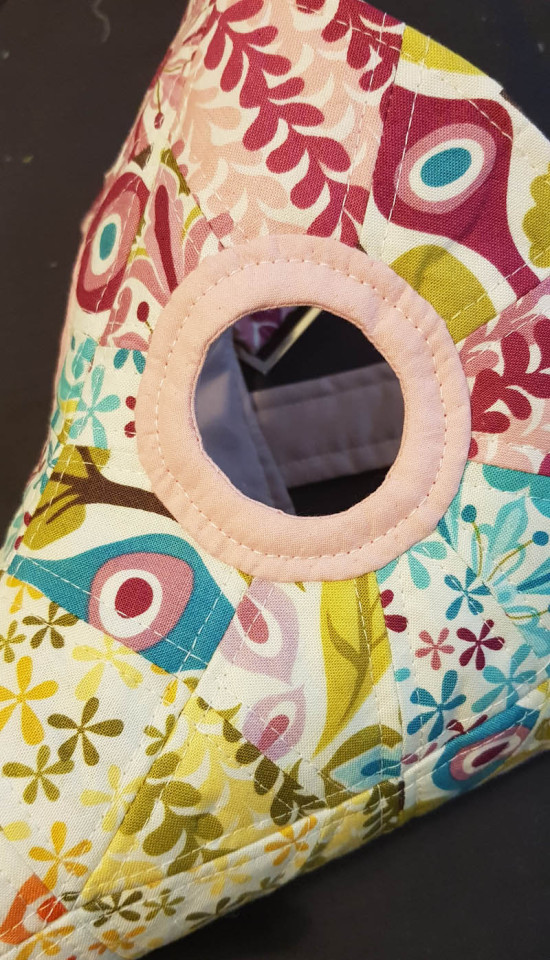
This should catch the raw edge inside, and leave a ridge between the outer eye donut and the bias bound eye hole. From the inside, it should be possible to pop in a round lens from a pair of sunglasses, or an improvised lens such as a circle of clear plastic cut from the lid of an old takeaway container, or some transparent holographic vinyl, such as this stuff on amazon. Repeat for the other eye hole.
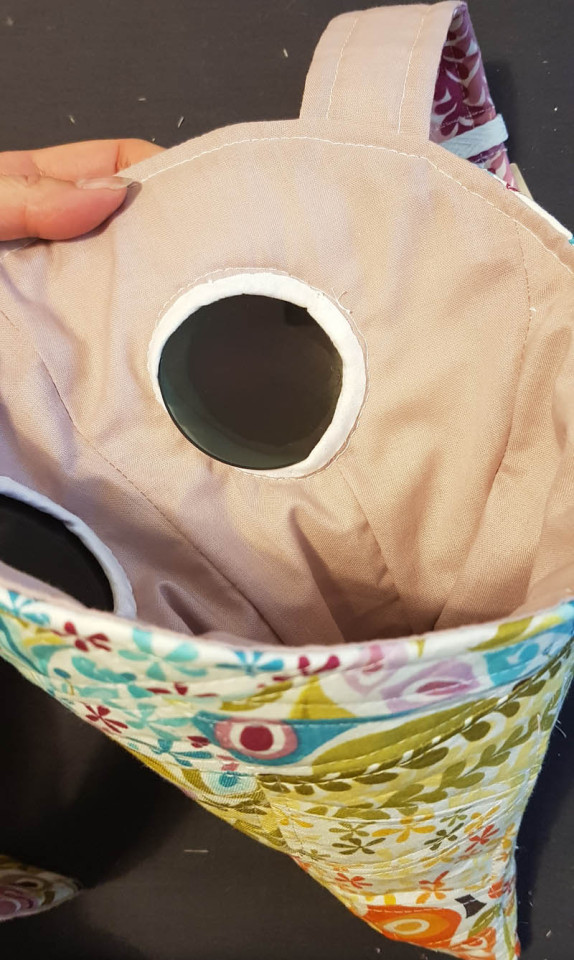
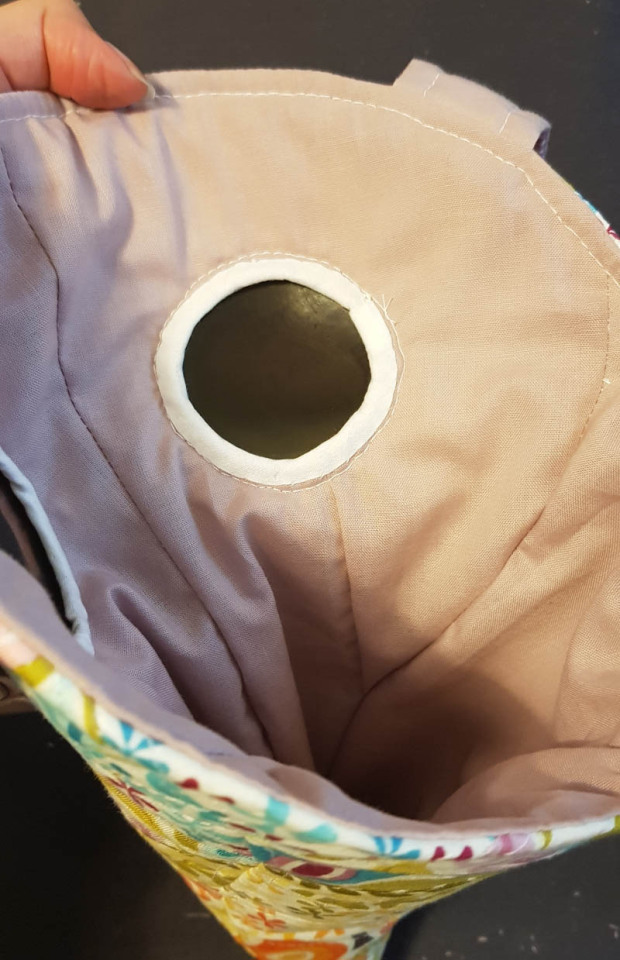
Hooray! You are all done!
I am really not sure on the efficacy of this as an actual viable mask. On the one hand, there are a lot of seams through which germs could pass, but on the other hand, the fact that the lining is a bit loose and baggy inside the beak might cancel that out.
Depending on your materials, it should be machine washable, although it will almost certainly look a lot less crisp.
I had a lot of issues with my lenses fogging up after a couple of minutes of me wearing it, but who knows, maybe I am just a very wet breather.
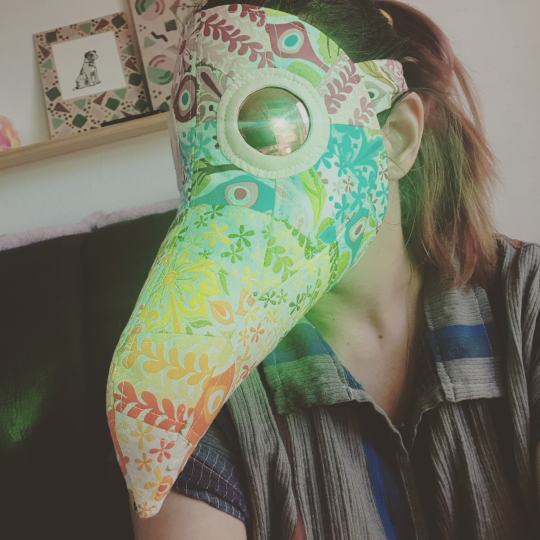
I am not going to charge anything for this pattern, nor am I going to place restrictions on what you do with the items you make. I do not control your right to profit from your work. All art is derivative, and you making your own version transforms this pattern. Don’t let assertions of intellectual property rights be another way you are alienated from your labour. If you decide to sell your work, demand fair remuneration for your time and skills. Someone offering to pay for the materials is not enough. If you have decided to take an activity you love and turn it into work, make it worthwhile.
On the flip side, please don’t try to sell this bit of writing or the PDF of the pattern net or these photographs. They are free for you and for everyone else. Resist society’s message that you should try to profit from your every action, and especially resist the notion that true success is achieved by profiting from anyone else’s labour.
If you want to discuss this stuff further, I would love that! I am researching the commodification of creative knowledge for my PhD, focusing on quilt patterns and designs. Message me @mctreeleth on tumblr and instagram or @sarasewsstuff on twitter for my uni email.
Edit: I have added in a link to a simplified version if you are going to make this with a single fabric rather than patchwork piecing.
#plague doctor mask#quilting#sewing#quarantine craft#sewing pattern#craft pattern#long post under the cut#with so so many pictures#it has been a wild five days#I haven't slept in about 37 hours#I have three of these but only one set of lenses#that just fog up instantly
35K notes
·
View notes
Text
Art Advice #14 - Downloading and/or Creating brushes for digital art!
Hi all!
I got asked recently to give some advice on how to download brushes in digital art (since I mentioned it in my last digital art advice post) so, ask and ye shall receive lol!
Now, I’ll have to preface this by saying I only know how to download and create brushes for FireAlpaca (the program I use to draw), so things might be slightly different for other software.
(Btw thank you @hellsitevistor for your question, I hope this is somewhat helpful to you!)
Downloading and/or Creating brushes for digital art!
As mentioned at the beginning of this post, I only really know the specifics around FireAlpaca, so I’d say to look up specific tutorials or blogs for whatever program you use if you want more precise information, but if you just want a more general guide for downloading and/or creating brushes then stick around!
I actually downloaded the textured brushes I use about 5 years ago, so it was a struggle to remember exactly what I did lol
Downloading brushes
The place I’ve used for getting free brushes is DeviantArt. Something good about this site is because the comments can tell you if the brushes are any good & the creators often have answered faqs from people about how to download and add their brushes to the program.
(Also, I know that some artists create and sell their own brushes, so that is another place where you can get downloadable brushes (and you get to support independent creators which is always great lol!))
Now, I would say if you’re looking at brush packs made a few years ago, a lot of the download links no longer work. I’ve also found that there are certain file types that you can’t download with FireAlpaca (they only work with Photoshop) or probably other free programs, so it might be a little hard to actually find brush sets that you can actually download.
Once you’ve downloaded a brush set you particularly like, which is often a zip folder, you’ll have to extract the brushes into png files (make sure it’s a Transparent png though!)
(This is something that may have changed in the 5 years since I did it, so I am sorry I can’t be more specific about downloading brushes... I also have 0 clue on how this works for art Apps you get on ipads/tablets etc either...)
On FireAlpaca you click on the ‘Add Brush’ icon and select ‘Add Brush (bitmap)’ option. (you can see it below, although you can also find this option along the top bar and click on the ‘Brush’ dropdown menu!)

This will let you select the png image of the brush and will pop up the brush creation box! (Seen below) I won’t go into what all the options mean because a) I honestly know know what all these things do lol and b) I always think it’s better to just have a play around with them yourself!

Speaking of brush creation...
Creating your own brushes
One thing I discovered a few years ago is that you can actually make your own brushes pretty easily without having to download anything!
You can use the brushes you already have to create your own (often this can just be a collection of dots or random squiggles which can go on to create some really cool textured brushes!! As with the downloaded brushes, make sure you save whatever brush you create as a Transparent png, otherwise it won’t work!)
(below is an example of a recent one I did, which you can see in both Edit Brush images I’ve shared in this post!)

The brush creation box will give you various options on how to create various types of brushes.
The ‘Bitmap’ option will just give you the brush you’ve either downloaded or created as a repeated image, which can be good for interesting background textures! ‘Bitmap watercolour’ gives a similar, but more ‘brush-like’ effect (give you pressure opacity options)! The ‘Scatter’ effect is good for collections of dots for things like freckles or stars. The ‘Scatter watercolour’ one is by far my favourite, and usually what I use to create my textured brushes! (see below for where to find these options!)
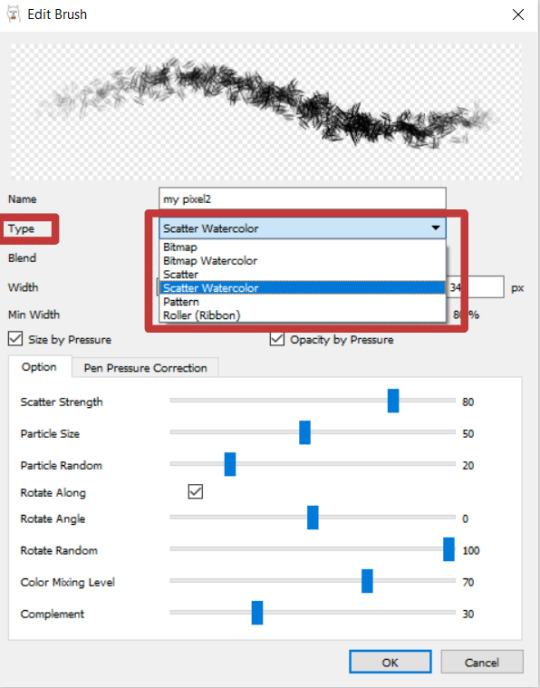
Play around with the other adjustments until you find a perfect combination (remember that you can change this at any point when you’re using the brush, so don’t worry if you find you don’t like certain effects cos you can change them back!) and voila!
As always, I’m not an expert on digital art, and I’m basing this post purely on the program that I use so this may not be as useful to you if you use something else!
But I hope that this can be helpful to anyone who was confused by how to do this! And feel free to ask a question about anything regarding digital art/or art in general and I’ll see what I can do <3
#art advice#digital art#digital art tips#artist advice#brushes#digital art brushes#firealpaca#art advice for beginners#this is a pretty short post honestly (less than 1000 words shock horror!) mainly because i dont have a lot of info about this...#sorry this reply took a little while btw!#i was trying to find where i got my textured brushes from 5 yrs ago but either they've been deleted or i'm just dumb#but i can't find them at all... (plus i've changed laptops several times so i dont even have the original files anymore rip...)
42 notes
·
View notes
Text
𝙅𝙀𝘼𝙇𝙊𝙐𝙎𝙔 | 𝙠𝙖𝙧𝙡 𝙟𝙖𝙘𝙤𝙗𝙨 (18+)

∘ request(s):
Ooh maybe edgy!karl teaching skateboarding :o. I’m also in uni and I remember my first frat party was quite interesting 😂 -🦋
ahhhh part four of your edgy karl was soooo good!!! could i get jealous karl? maybe someone else is hitting on the reader at a party
please please please more edgy!karl if u can. like maybe where him and reader get into a fight because he gets like jealous and he just shows the reader who they belong to fjsjjsj thankyouuu !! 🤍🪐 x
∘ pairing: edgy!Karl Jacobs x fm!reader
∘ warnings: nsfw (18+ minors dni), smut, light bdsm, jealous, somewhat toxic behavior, crude language, frat boys (again), mentions of masterbation, biting, domination, spanking
∘ word count: ~3200
∘ links: 𐐪 ao3 𐑂 𐐪 previous part 𐑂 𐐪 submit an edgy!karl edit 𐑂
a/n: not me having to watch daddy tony hawk tutorials for this bc I'm uncultured and only skateboarded for like three months when I was 14 :)))
thank you for all the requests (especially 🦋 ily). if any of you have ideas for what I should call this series, lemme know! as always, have a great week and happy reading :)
♡ ᵍᵉⁿᵉ

The parking lot behind the campus union was barren. The morning dew in the air left a sweet smell to combine with Karl’s cologne as he walked beside you, his arm bumping yours as he listened to you nervously ramble on about one of your classes. You weren’t sure why, but the thought of falling on your ass in front of Karl terrified you more than anything. This man had degraded you and made you completely submit to him in the past, yet you were worried that not being able to master his ~craft~ would ruin his image of you.
He dropped his skateboard, his feet settling on it lazily as he rolled beside you. You watched quietly as he stopped, kicking his foot down on the front of his board so it popped into his hand. “You won’t fall. I’ve got you,” he joshed, tugging on your hand so you were in front of him.
He set the board down, his hands going to your hips as you stepped on it. His fingers dipped under the hem of your sweatshirt, your skin lighting up at his touch as if his hands belonged on you. “You look like an anemic Victorian boy. I don’t trust you as a safety net,” you grumbled, your hands covering his. You knew, roughly, how to skate from a middle school phase you had. Karl only promised to teach you a few tricks, but to say you were rusty would be an understatement.
He chuckled darkly, nudging you closer to the middle of the board and peering over your shoulder to look at your stance. “I’ve fucked you without your feet touching the floor. I think I can catch you before you hit the ground, baby,” he chided, making you scoff.
Your cheeks flushed with heat at his words. “Dirty, dirty boy,” you mumbled. He instructed you on how to kick the board up to where you needed it. His words were simple and almost plain like he knew you could figure it out. You attempted to push the board up, but crashed into Karl’s arms, your back thumping against his chest.
He giggled slightly as he straightened you up, setting you back on the board as his foot kept it from rolling out from under you. His hands hovered over your hips again as he moved his foot, leaving you to balance on your own. “If you fall correctly, people will just think you were giving really good head,” he jested. You shoved his arms away at his words as he laughed at his own joke.
You attempted a few more times and nearly had it down before Karl’s hands were on your hips again, giving you further instructions. You fought not to smile as his breath ghosted against your neck. You knew he cared about teaching you something that---on paper---was seemingly so easy, but his vulgar teasing was beginning to swarm your head. With his next steps set as your goal as well as the feeling of his hold on you, you kicked the board up and attempted to jump with it. While your brain was up to speed, your feet weren’t, sending the board out from beneath you and you to fall into its place.
Karl snorted as choked back a laugh at you scrapping your hands on the concrete. “Come on, don’t be a pussy. Try again,” he chided, voice uneven and laced with whatever dark humor he was getting from watching you do this.
You rolled your eyes playfully, letting him tug you up in front of him. As you wobbled on the board once again, you let his hands dig into your sides. Obviously, it seemed that he actually was worried about dropping you again, despite the fact that he was holding back some kind of sick laugh. “You would be great at teaching a kid how to ride a bike,” you quipped, the fact that he called you a pussy seeping into your mind.
You gasped slightly as you slipped again, this time Karl’s arms wrapping around you tightly, pressing your body against his. “Awe, you want me to put a baby in you, pet?” He jeered with his lips near your ear. You shrugged out of his grip, breaking up your indecent thoughts at his comment.
You could feel the heat rising to your ears as you balanced on his skateboard again. “Stop, you perv,” you deflected, hoping he couldn’t tell how hard you were having to bite back a smirk.
After your skateboarding escapades, you sat typing away at your computer, Karl occasionally looking over his phone to peer at you. His legs were thrown lazily on either side of you as he stretched out on his pillows.
An alarm went off on Karl’s phone, startling you in the process. He fought against smirking at your surprise as he sat up, crawling over to you. “Okay, I gave you two hours,” he stated, leaning forward to press his lips against yours and gently close your computer. The taste of him on your tongue was like a drug for you, leaving you constantly wanting more.
You smirked into his kiss as your brain finally caught up with you. “I hope that document saved, asshole,” you groaned, pushing him back into his pillows as he chuckled at you. His fingers dragged up the length of your thighs, squeezing the flesh in his hands as you straddled him. “Fucking weirdo, timing me. Who are you, my dad?” You teased, pressing a kiss to his neck and digging your fingers into his hair.
He moaned lowly, grinding against you. “Oh fuck yeah. Call me daddy,” he cantered.
“No,” you answered simply. You sat up, reaching over to his top drawer in search of protection, but running your fingers over a lacy garment instead. Your brows knitted together as your gaze shot to the drawer, your underpants dangling from your finger. Karl tucked his hands behind his head, looking up at you nonchalantly as your mind flashed with memories of your time in the bathroom.
Before you had the opportunity to ask him what he was still doing with them, his door popped open to reveal one of Karl’s roommates, his name beginning with a D but slipping your mind. “What are you guys doing in here?” He asked with a rather dopey smile, gesturing to Karl still between your legs. “Everyone’s downstairs, come on.” You and Karl shared a look as he left.
You leaned back down to him, kissing him briefly before pressing your lips to his neck again. “Wanna come over instead?” You suggested softly, your lips ghosting over his ear.
Karl loped down the stairs in front of you, a heavy layer of smoke hanging in the air above your heads. A mass of people crammed themselves together, finding solace in each other after the long week. If you weren’t so hung up on getting into Karl’s pants, you might have considered joining them.
Before the two of you could reach the door, someone called out for Karl. Their voice boomed over the loudness of the music, making Karl wince slightly. His face flattened into a frown as “Todd” waved at the two of you. Karl took a few slugging steps to stand close enough to Todd’s group that they wouldn’t have to yell at each other. You settled your hand on Karl’s hip as you wrapped your hand around his waist, leaning against him. Todd’s eyes traced over you.
He wet his lips. “You guys leaving already?” He asked, leaning back in his chair and accepting the joint offered to him. From an outsider’s perspective, he looked like the king of the castle. Luckily, you knew better. “Come on, play a game with us!” He suggested, patting the empty spot beside him. Even though you couldn’t see his face, you could tell Karl was rolling his eyes. “I got a seat warmed up for you, baby girl,” he nodded towards you.
You perked an eyebrow in his direction and Karl slipped his hand into yours nonchalantly. “Thanks, but no,” Karl stated.
“Come on, Karl. Don’t make me pull pin.” At Todd’s words, Karl groaned reluctantly, the sound barely audible. You furrowed your brows at him. “Fifteen minutes. We were gonna play Never Have I Ever.”
You leaned towards Karl. “What’s pulling pin?” You mumbled.
“Flexing rank,” he grunted back. He tugged you with him to join the group. Before you could sit down, Todd pulled you into the spot beside him. You laughed nervously, watching as Karl’s features darkened as he sat across from the two of you. Todd handed you a drink, which you took but avoided sipping out of.
A boy beside Karl piped up. “Okay, so never have I ever graduated high school. My degree is literally fake.” The boy smiled before taking a drink, making you giggle slightly. Todd draped his arm around the back of the couch where you were sitting. He wasn’t touching you exactly but every ounce of his being was getting under Karl’s skin.
Todd smugly shook his head. “No, Zeke. Those aren’t the rules. You have to say something that’s not true about you. Like…” he trailed off slightly, his gaze settling on you before his mouth twisted into a smirk. “Never have I ever slashed someone’s tires.”
You humored him with a subtle smile as if to ask if he was serious. He gestured towards Karl, who took a drink. You bit back a grin. “Well, never have I ever masturbated to a girl my roommate’s sleeping with,” Karl retaliated. Your eyes grew wide, suddenly happy to watch the event unfold before you.
Todd took a drink after glaring at Karl. He leaned closer to you, this time his arm dropped to pull you against his side. “Do you wanna take a turn?” You shook your head, flashing your eyes to Karl before looping your fingers with Todd’s. Karl chewed the inside of his cheek, looking like he was holding back another laugh. “Alright, I’ll go.” Todd brought your hand up to his lips, kissing your palm. “Ah, I know. Never have I ever betrayed the secret oath of the frat and called the police.”
Karl took another sip, his eyes on you. “Yeah, because never have I ever set the house on fire trying to light a bong,” he answered, making you snort.
You let your free hand settle on Todd’s knee. “Awe, I’d light your bong for you,” you chided, making Todd laugh as he took a drink.
“I bet you could do a lot for me, Princess,” he flirted, his lips nearing your ear. You raised your eyebrows in Karl’s direction, who was sitting with his chin in his hand. His expression was darkly entertained as you flirted with Todd. “Speaking of,” Todd looked to Karl again. “Never have I ever fucked someone on my roommate’s bed,” he teased, tucking his nose in the crook of your neck.
Karl smirked. “You’re right, you probably haven’t,” he stated simply, downing the rest of his drink. Todd tensed slightly beside you. Karl stood, ruffling the hair of one of the other Brothers that were in the group before holding his hand out for you to take. As the two of you left, you heard one of the guys whistle and say something about never having peed in a pool before.
As the two of you left the house, you walked in time with Karl’s heavy steps, swinging your entwined hands as if you were completely oblivious. “I can’t believe I made you jealous,” you taunted. You could practically see the steam rolling off his shoulders as he opened the passenger car door for you. Before you could slip into the seat, Karl’s hand gripped the back of your neck, bringing you to press your lips roughly against his. He pinned you between him and the cool metal of the car as the taste of beer spread across your tongue.
His fingers dug into your hips, his other hand tightening around your throat. The coolness of his tongue ring was a welcomed sensation as you attempted to find friction against his hips. Your fingers moved to close around his wrist as he pulled away, leaving you gasping for air. His face was expressionless as his gaze danced from your lips to your eyes. “I’m going to fuckin’ ruin you for the way you acted,” he ribbed, stepping away from you.
You nearly slid down the side of the car at his words. “Okay,” you whispered, heat rising to your cheeks and ultimately to your core.
Karl’s calm exterior followed you until you finally got your apartment door open. Karl pinned you against the wood of your bedroom door, reaching to twist the lock as his lips began to commandeer your own. His hands dragged up your thighs beneath your skirt, squeezing at the flesh roughly. He yanked your shirt off, grinding his hips up and against yours as his teeth moved to nip at the skin of your neck before returning to badger your lips.
The taste of beer on his lips blended with your flavored chapstick as your tongue slipped into his mouth. In a mess of tugging and biting each other, your body melted into his rough grasp. You wanted whatever repercussions his twisted mind could come up with. You wanted him to do whatever he wanted to you. You fought against diving your hands into his jeans to beg him to continue, but he broke away from you as you fought to catch your breath.
Your lips were buzzing as the feeling of him still lingered. He brought his hand up to your jaw, tipping your chin up to him. “Fucking slut,” the devil’s grin painted across his face before he continued, pressing his lips against yours once more, his grin dragging your bottom lip between his teeth. “You act like I don’t fucking own you,” he nearly growled, his face hovering over yours as his hand squeezed your throat. You moaned quietly as he regulated your breathing with his hand. You wanted to drink in his dark, commanding appearance.
He pushed you back on the bed, making you instinctively crawl up towards the pillows. He smirked slightly, undoing his belt and slipping it into his hands. He put the garment on your bedside table. After tugging his shirt off, he was on top of you again, pushing you into the pillows and the fluffy comforter. Karl’s lips seared yours, showing you how much command he had over your body. He ground his hips against yours, the fabric of his jeans digging into you to elicit a moan echo from your mouth. You could feel his erection hardening against your leg, the tension deep within you tightening at the prospect of what he was going to do to you.
His fingers tugged at your skirt, gripping the material in his fist and dragging it down your body as if it was nothing. He flipped you, your elbows crowding the pillows as you felt him sit on your back, snapping the belt in his hands again. You let out a short breath as Karl’s nails raked up your back before his fingers dipped in your hair, tugging your head back to look at him. “I want you to scream my name tonight,” he groaned. You obliged as he dropped his grip on you.
He pulled your wrists between the bars of your headboard before binding you to the metal with his belt, yanking the leather to sinch against your skin. He dropped his head to press his lips against your shoulder, a tender nod of affection you knew would be the last. You leaned on your side to watch him sit back on his knees to unbutton his jeans. “Be gentle,” you leered, tugging your bottom lip between your teeth to fight your grin again as you watched him spit into his hand and stroke himself in preparation.
He chuckled. “I’ll take good care of you, sweetheart,” he murmured darkly through a smirk. He pulled your hips up and against his own, forcing your face into the mattress. Your hands tightened around the metal bars, as he angled himself at your entrance before driving himself into with an act of force you knew you deserved. A moan of his name slipped past your lips as his fingers dug into your hips, thrusting into you to drive himself deeper into you. “That’s right. I want the neighbors to know who’s fucking you,” he groaned, snapping his hips against yours.
Moans of pure bliss escaped your lips as his head neared yours. Karl used your hips as leverage for his unwavering pace, leaving you a mess of pleasure beneath him. His lips found their way to your neck as he nipped against the sensitive skin. You wanted him to mark you, to claim you, and he deserved to. His hand from your hair became wrapped around your throat as he began to reach his peak.
His hand slapped your ass with such force you knew there was a handprint, but you were too overwhelmed with the noises escaping his lips and your climax threatened to disobey your control to be concerned with the sting. If anything it threatened to push you over the edge. Your hands pulled against the leather of his belt as he pounded into you.
Your toes began to curl as he leaned over you, his breath fanning against your shoulder as you bit back heavy moans of pleasure. Karl’s hand was knotted in your hair again, his other fisting the sheets beside you. “Who’s making you feel this good? Huh?” You moaned out his name as he punctuated his sentence with the thrusts of his hips. “That’s right, you fucking slut.” You tightened around him, your orgasm sweeping over you with an element of shock.
You could practically hear Karl’s smirk as he moaned at the sight of you coming undone beneath him. He continued to ride you, finishing rather abruptly. He pressed his lips between your shoulder blades before loosening the belt around your wrists. Your back popped as you were finally able to move freely. He bit back a chuckle as you gingerly snuggled beneath the covers beside him. You slipped your hand across his torso, hugging his side against your chest as he rested an arm behind your head.
As you laid your head on his chest, his heartbeat began to steady, his fingers lightly brushing against your skin. “I’d rather eat my own feet than sleep with Todd, you know,” you croaked, realizing just how much your voice was weakening, breaking the silence between the two of you.
Karl chuckled softly. “Me too,” he commented, making you smile slightly. “I’m actually…” he paused slightly before continuing as if searching for what he wanted to say exactly. “I’m actually not sleeping with anyone else.”
You couldn’t fight the smile spreading across your face. “I’m not either.” You hugged him tighter, letting his fingers twirl into your hair. “I’m good with you.”
“I’m good with you, too,” he mirrored, a smirk evident in his voice as his other hand traced over the red marks on your wrists from his belt.

Tags:
@mrwinemaker @madsbbg @idiotinnit @xxtakechancesxx
#karl jacobs x you#karl jacobs smut#karl jacobs x reader#edgy!karl#edgy!karl jacobs#edgy aesthetic#eboy#🦋 anon#mcyt x reader#mcyt smut#karl jacobs imagine
601 notes
·
View notes
Text
Pinned note
Please stop sending me messages to reblog your gofundme posts, pleas also remove me from lists to message people about donating/sharing them. I’m sorry but I’m done, I’ve mistakenly reblogged scammers too many times & have trouble figuring out if these are scams or not. Please do not @ me either, I understand that if these are real they’re for important posts but I’ve been messaged repeatedly by people & it’s getting hard to tell at points who is fake. I’m getting multiple messages from people. I’m getting too many messages & I’m done. If I come across a post I'll reblog it if I can, I can't donate but I'll share. Otherwise I'm not accepting people asking me to share in my inbox. Please stop messaging, I'm tired of scammers that apparently want to pretend when there's actual people that deserve the money more than these scammers.
I'm sorry | Please read this
If you send me a private message(do not message me about gaza gofundme posts there) please explain why you’re messaging me.(It can just be “Hi, I just wanted to talk to you about something”) I’m hesitant about answering messages that only say “Hi” due to past spambots & it feels a little awkward cause I don’t know the people messaging me like this.
I’m only making this cause I need it at some point, at some point I’ll delete the post & replace it with a new one.
Link to my art is linked on the side as “My art blog” though here’s a link for mobile users
-
Links to tags I use sometimes
Help - Mostly for boosting people that are asking for donations for like food & medical bills or something but might be for other things sometimes
Boost - Used for if I think it’s important or something that needs it’s info boosted or whatever. Some of these might also belong in the tags for the section below. I put this stuff in boost before I decided to work on tags for them.
Resources/References This is for stuff like resources/refs mostly art related stuff, some of these are also mixed into Boost as that was where I use to put things I thought were interesting along side things that felt should be signal boosted.
Art resources - If someone has a link to stuff like assets whether it’s tools, programs or images then this is the tag for it
Art references - Posts that are either art tutorials or references that help could help with art
References - Posts that like the tag above are tutorials or references that could help with stuff. I put doll customizing refs/tutorials here.
Resources - Tutorials/info that can help from baking to info that might help like daily things you might not understand(if I come across it), reminders of not mixing medicine with stuff(like what stuff not to eat/drink with ADHD meds) & info people post that could help out with Autism or ADHD. Also resources to help with writing characters & other things I’m starting to struggle to explain.
Game related Section setup for game related stuff, mostly tamagotchi blogging & mod/custom related stuff
Tamagotchi - I have a few posts that are kinda blogging about the tamagotchi I’m caring for.(It’s for my own tamagotchi not any tamagotchi stuff I reblog) Links to related tags: Ps | Mix | On/Meet | Pix | Uni
Sims - Reblogging posts that are downloads for custom Sims 4 stuff, mostly clothes & hair but sometimes other stuff
Mods - Mods/modding resources unrelated to the Sims 4 custom stuff, homebrewing consoles is here too
Game resources - It’s like the art resources but with game making
Yo ho ho - Do not check the links, do not check if you want to download it, keep archive alive
9 notes
·
View notes
Text
How to Update TS4 Custom Skin Colors for Patch 1.69 with Sims4Studio
EDIT 12/22/2020: S4S has updated with a batchfix and several other related improvements; so I’ll be updating this post soon to focus more on editing already-fixed files (and to update the names of the fields).
You can use this method to update any non-default custom skin COLORS, as well as defaults that are not texture-only (but not any other type of skin-related custom content, and not texture-only defaults which already needed updating after the October patch), that do not work after the December 2020 skintone patch. (This is particularly relevant to Macintosh users who can’t use CmarNYC’s automated tools, or to people who just want to do it themselves at least once so they have a better idea what’s under the hood.)
You can also use this method to change whether custom skin colors that already work in the game show up as Warm, Neutral, Cool, or Miscellaneous, or to change the values of the light-dark sliders on custom skin colors. (This is particularly relevant to people who have downloaded a creator’s own updated version of their custom skin colors, but have totally different ideas about where they should appear in CAS.)
It’s possible S4S may later add prettier GUI tools for at least some of this process. If so, I’ll update to mention it.
I am going to assume that you have some basic familiarity with Sims4Studio and not tell you how to open a package file in it. Skintone packages don’t have the Studio tab, only the Warehouse. You’ll see something like this (which is the upper left part of the S4S window):

(You might also see other resource types, but in this tutorial I’m only working with the things that say SKINTONE. This tutorial also doesn’t cover updating RLE2 image resources to LRLE, which may be necessary in some cases, as there are already multuple good tutorials on how to do that.)
There will be one Skintone resource for each skin color in your package. (That could be quite a few.) You’ll need to follow these steps for each one, or any that you skip won’t show up in game. (If you click on the Type header, it will sort the contents of the package file by type so that all the Skintone resources are together in the list.)
The fields inside the Skintone resources (and resources in general) are listed in alphabetical order in S4S, so we’ll update them in alphabetical order. Click on the first Skintone resource you want to edit, and here’s what you’ll look for next:
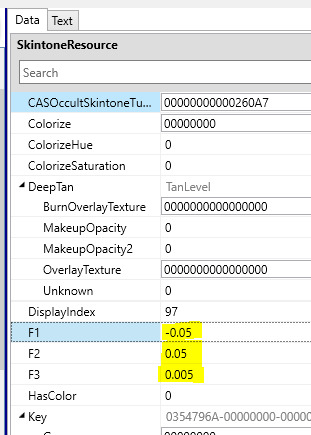
The F1-F3 fields are the slider values. (EA hasn’t shared the technical specs for the new version of the CASPart resource yet, so we don’t know what their proper names are.) You don’t have to change them to make the skin color work, but you do have to change them to make the slider work; sliders with no values are not disabled, but work poorly. If you’re fixing the skin color for the first time, all the numbers I highlighted in yellow will be zeroes before you change them. Unless you specifically want to fool around with these values, you should set them exactly as shown, which is the same way that EA skin colors are set.
If you do want to fool around with them, F1 is the minimum value, F2 is the maximum value, and F3 is the increment the slider moves by. If you want a larger or smaller range, you can try things like setting F1 to -0.07 and F2 to 0.07 (bigger) or setting F1 to -0.03 and F2 to 0.03 (smaller). Beyond that, you can experiment as much as you want; you can’t break anything in a way that can’t be fixed by changing them back to the EA values.
Next you’ll want to scroll down near the bottom of the Skintone resource, where you’ll see a section like this:
We need to make sure all three of these fields are updated. Unlike the sliders, these are needed for the skin color to show up at all.
TanFlags might already be set to 3, since it was introduced in Island Living and your skin colors may have already been updated for that. If it is not, change it.
U1 is the field that determines whether each skin color shows up as Warm (U1 = 1), Neutral (2), Cool (3), or Miscellaneous (4). THIS AFFECTS GENETICS. If both parents have Warm, Neutral, or Cool skin colors, then their kids will have skin colors based on, but not necessarily identical to, their skin colors. (More on that in a bit.) If at least one parent has a Miscellaneous skin color, then their kids will get the same skin color as one parent or the other.
Version tells the game which version of the Skintone resource the skin color is using, and must be set to 0000000B.
Once you’ve changed everything, save your package file for safety, then start over with the next Skintone resource and continue until done.
Re: genetics, my info is based on my own testing in CAS. Also, which skin color kids whose parents all have Warm/Neutral/Cool skin colors get is based on both those values and how light or dark the game thinks each color is is.
If Sim A has the lightest warm skin color and Sim B has the darkest warm skin color, then their kids could have any warm skin color, but not a neutral or cool one. If Sim A has the darkest warm skin color and Sim B has the lightest neutral skin color, their kids could have any warm or neutral skin color. If Sim A has a fairly light cool skin color and Sim B has a very light neutral skin color, their kids could have any cool or neutral skin color that is fairly to very light. You can probably extrapolate from there, or do some of your own testing. A warm/cool pair does not appear produce any kids with neutral skin colors, so neutral doesn’t seem to be considered a middle point between warm and cool.
Miscellaneous skin colors don’t participate in this system because the EA Misc colors for humans alone include green, blue, red, blue-white, and a small range of greys. It’s just straight up one parent’s skin color or the other.
Telling the game to put a skin color in the Warm/Neutral/Cool bins does not necessarily mean that the game will correctly understand how light or dark the skin color is. I have not played with this in the game yet (and EA’s own ordering of swatches doesn’t seem perfectly based on light/dark value either, though it’s clearly at least approximately based on it), but I have some ideas about it. If I learn anything useful later, I might add it, or make and link a separate tutorial.
That’s all I’ve got! At least 95% of the important information in this post came from conversations with CmarNYC, who I’m pretty sure knows at least as much about CAS content in TS4 as anybody else who doesn’t work for EA. I just wrote it up and added screenshots to it.
Let me know if there’s anything in here that is unclear, or if you run into something that doesn’t match with the info here, and I’ll try to clarify/investigate. I’m also often hanging around on the Creator Musings Discord (as are many other people who may be able to help, that’s what it’s for!) since Tumblr is (still) a terrible way to have a conversation.
26 notes
·
View notes
Note
Hey there! Just wanted to know if I could write fics based off your anon prompts? Bc some of them are pretty in-line with my idea of sqh, but I'm not sure who I should credit? Hope you don't mind clarifying, xoxo!
Ah, yeah, anon asks/prompts make it difficult to share credit around sometimes. Option 1 for me is asking the anon to come forward if they would like “credit” in the form of AO3 gift and if they don’t, to respect the fact that they might want their participation in fandom to stay anonymous. Option 2 is to just link to the ask or something if I feel like the interaction is worth mentioning.
Credit sometimes feels like the wrong word here. Sometimes inspiration is more accurate, I think. If I write 250 words of a basic premise or make a tweet that just says, “What if Sha Hualing was 2 meters tall like MBJ?” and you write 10,000 words of actual fanfiction, it would be rude as hell (on my part) and also incorrect to say that I should get half the “credit” for your fic. Giving a shout-out for credit/inspiration is a fandom courtesy, not a necessary business contract.
I don’t know how to phrase this, but you (speaking generally to everyone here, not just to you, Anon) don’t have to ask me permission to take over a basic premise? Or even a longer but still basic fic idea? I mean, if you completely took over a full and detailed outline of mine without asking permission first or giving any credit as a courtesy, I’d be very pissed off because I think that’s rude. Planning a fanfiction is work!
But I’m not going to get in anyone’s face because they wrote a “moshang forced marriage au” or a fic in which “SQH works for Demon Emperor TLJ” without asking and receiving “my permission” (I am not the authority here and, though it’s besides the point, I’ll probably be delighted, tbh) even if they were directly inspired by my posts about it. I am not your Fandom Parent, you know?
With basic premises, just go for it! This is fandom and no one really has “rights” to any fanfiction or fanart idea. I’ve had someone directly plagiarize my fanfiction before (including fic structure and direct dialogue including identical jokes) and honestly? I just let it go. It wasn’t worth my time to harass them over it. Plagiarizing work and being inspired (or having a case of convergent evolution) are super different things. I will, however, get in people’s faces with my feathers all fluffed if they decide to write one of my fic premises and then they come at me when I get around to making my own take on the fic premise too, or because they happened to have a similar fic idea independently and earlier.
(Alternative interpretation of this ask: If this is about my prompt list of “A Guide to Troubled Birds” quotes, you definitely don’t have to credit me for that. I mean, you can say, “Thanks to Tossawary for making a SVSSS prompt list of ‘A Guide to Troubled Birds’ quotes! They go super well together!” But you really don’t have to do that. Like, they’re not mine.)
If you feel like you want to share where your inspiration for a fanfiction came from, you can either Option A: give a shout-out in your Author’s Notes (“This is the interaction or post that inspired my fic!”) OR Option B: if you use AO3, you can use AO3′s “inspired by” feature and they’ll make the link for you, even if your inspiration is a random tumblr post or a tweet.
Quick tutorial with simple HTML code and images below.
OPTION A
Creating a link in your author’s notes on AO3 is really easy. Just write:
<a href=“URL”>Text that will become a link.</a>
Like:
If you enjoyed my fic, come follow me on <a href=“https://tossawary.tumblr.com/”>Tumblr</a>!
OPTION B
When creating or editing your work, find “This work is a remix, a translation, a podfic, or was inspired by another work.” and click the box.

As AO3 will tell you, if you were inspired by another AO3 fic, all you need to do is give them the URL and they’ll fill out all the other categories. If you’re linking to a tumblr post or a tweet, you’ll need to fill these out yourself.

Let’s say you were inspired by that anon with the Transmigrator Liu Mingyan concept. You’ll need the post or tweet URL. You’ll need to give it a title, probably “[Subject] Tumblr Post” or “[Subject] Tweet” will do, like “Transmigrator Liu Mingyan Tumblr Ask”. And you’ll need to name the people involved, which in this case is “Tossawary & Anonymous”.

This will create something in your beginning Author’s Notes that says “Inspired by Transmigrator Liu Mingyan Tumblr Ask by Tossawary & Anonymous”.

If you click that link, it will take you to a blurb that looks like this:

If you click that link AGAIN, it will take you to the URL you submitted.

Which could be the original tumblr post or original tweet, like so, or the tumblr post or tweet reblogged/retweeted to your own account. (There’s always a chance that the OP might delete the original post or tweet.)
Hope that’s clear, Anon! Have fun!
16 notes
·
View notes
Text
» 𝐆𝐈𝐅 𝐈𝐂𝐎𝐍𝐒 𝐓𝐔𝐓𝐎𝐑𝐈𝐀𝐋 𝐁𝐘 𝐑𝐄𝐏𝐋𝐀𝐘𝐆𝐈𝐅𝐒 !


hi folks! i’ve gotten a few messages on how i make my gifs, on what tutorials i used, etc. so i decided to make my own (since i didn’t use one) in hopes of helping a few people get their footing on how to make gif icons from scratch! this tutorial has been made with the assumption that you have prior knowledge of using photoshop (e.g. like smart filters), but please don’t be afraid to ask me any questions if you need anything explained or you’re a lil confused. however, do bare in mind that i am no photoshop genius, and have never become more advanced than what i required for my needs. anyways, without further ado, the tutorial on how you can make something like the above can be found below the cut. please like or reblog if you found this useful in any way!
some starting tips:
gif icon making, or gif making in general can be strenuous. do not give up if it doesn’t look like you want it to the first time! it’ll take time to find what you like.
don’t compare your gif icons to other’s, which i’m guilty of, but your gif icons are unique and lovely in their own way and you should view them as such!
♡
i am using a macbook, with a mac operating system and adobe photoshop 2020. keep in mind that this is the way i make my own gif icons, and i’m just sharing what i know so this may not be the best/easiest way to go about things, like you can probably include scripts that save it for you, etc. but i prefer having more control over to process.
♡
screenshots will be distorted, for easier viewing i’ve added a link that will take you to the full size image.
♡
before anything, a high quality gif comes from a high quality video. when downloading your content, make sure it's either 720p or 1080p resolution.
♡
step 1: open up your .mp4 file
open it up as if you are opening any other file on photoshop. no need to import video frames to layers or anything of the sort. i find that way better for making gifs for gif sets instead of like 100+ gif icons. your photoshop should look like the image below.
this works best with shorter video files of around 1-3 minutes.
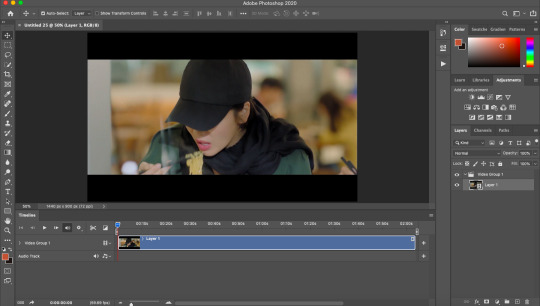
step 2: find your faceclaim
your video should now be open in photoshop as a video timeline, keep this the way it is, you’ll be able to move along the video to the next gif. using the timeline layers (see:layer 1), you can slide along until you find your faceclaim.
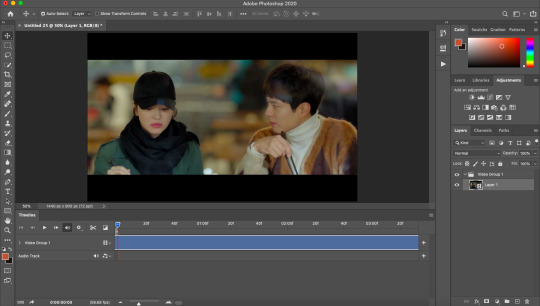
*extra info for those that don’t know. to extend your layer and make it easier to find your faceclaim, you can use the slider down below which looks like this:

this will essentially space the frames out more, if that makes sense?
step 3: select your gif focus and crop
use the rectangular marquee tool (circled in red) and select the area of your gif icon.
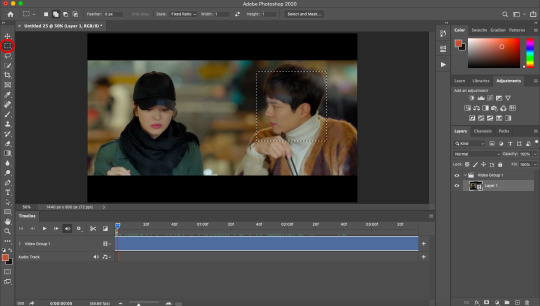
following this, use the crop tool (again, circled in red) to cut out the rest of the area. you are now left with a square.
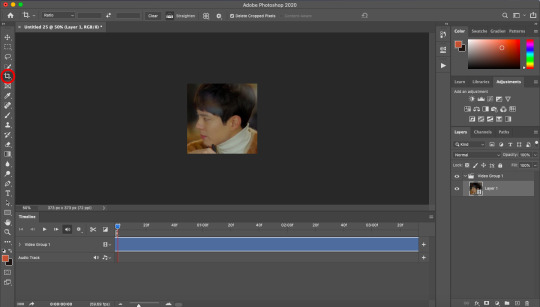
step 4: select the length/frames of your gif
this step can be done pretty much anywhere between step 2 and step 7, depending on your preference. anyway, use the slider (red arrow pointing to it) to decide where you want your gif to end.

then, bring the end of your video timeline (red arrow pointing to it) to where your animation slider is. your video timeline should now look something like this:

the space in between the lil sliders will only includes what will be in your gif.
step 5: resize
using image size, resize your gif to whatever size you wish. i prefer 80px.
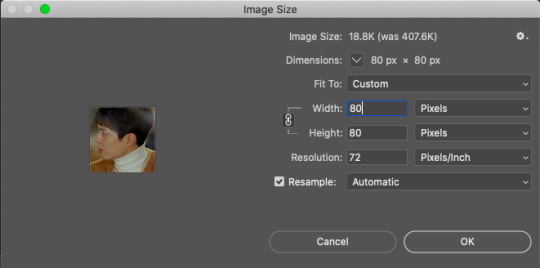
following this, it should say that your file is going to be converted into a smart object, click okay. (i can’t show the pop up since i got rid of it).
yet, now that you’re looking at your gif icon, you’ve realised you don’t really like the placement of it. simply cmd/ctrl+t to go to free transform. i moved it a tiny lil bit to the left.
as you can see, the rest of the video area is still there. you can now transform it to your liking. this will be useful when you want to change the area again.
step 5: add sharpen settings
you now have an icon, you can sharpen it to your liking.

i use smart sharpen and gaussian blur. i tend to have them in this order.
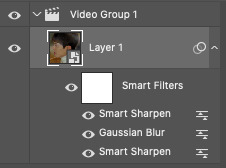
you can change the opacity of each smart filter to your liking. i won’t be sharing my exact sharpen settings (not that they’re hard to figure out), as i’d like them to stay unique to me, but do play around with this and see what you like the most (the key is less is more).
the trick here is to include the sharpen>blur>sharpen filters, which will give a sharpened appearance without overdoing it, and make your gif icon a lil smoother as well due to the blur.
**also, you may see the lil video group 1 in my layers there (and in your own too), this isn’t really necessary and is more of a pain in the ass that anything. if you have this, you can get rid of it by right clicking on it and ungrouping layers.
step 6: add your colouring
my colouring is a mixture of psds i’ve interchanged for years and i have lost the originals so do not intend on sharing. do look around at psds or make your own colourings that suit your tastes.
BE MINDFUL OF WHITEWASHING!!! if you are giffing people of colour, use colourings that do not make them into a white sheet or a gray mess. i see this constantly as if it isn’t 2020.
adjust! adjust! adjust! your colouring will not always work on different people or different scenes. adjust your levels, saturation, selective colour, brightness, etc to make sure the colouring works for your previous gif, as well as your next one.
even you can see here that my layers are mess because i adjust constantly.
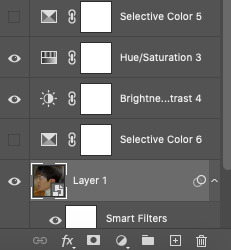
step 7: save for web
now that you’ve made your icon all pretty, save it for web and it should look like this:

step 8 (optional): speed
if you like your gif icons slower, you now have to upload the gif file into photoshop again. this will take you to the frame timeline. you can change the speed of your gif to whatever you want, and save again.
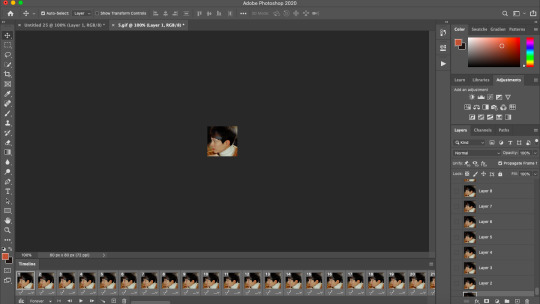
and there you have it, your is gif icon complete.

step 9: making more!
instead of going through this whole cropping process again, you can continue to move along the video timeline to different frames of your faceclaim, and making the next gif with just the exact sharpening settings, colouring, etc. this will make it super easy to make more gif icons in less time.
this can be done by simplying moving your animation timeline.
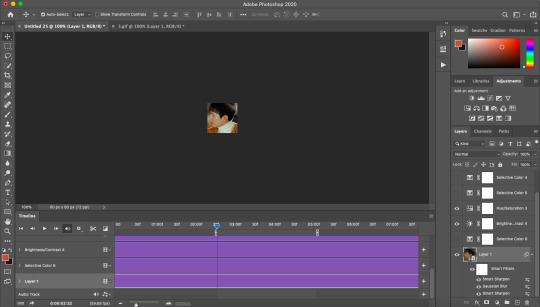
again you can use cmd/ctrl+t to adjust your gif placement. of course, this doesn’t always work, and you may need to revert back to your original video to crop the area again. an example of this is if you need a bigger or smaller area for the gif.
i just made this gif in a few seconds.

action
i use my own script to crop and have included the rest all in one action file. i did a lil digging and found this gif icon making action (resizes to 80px) that does essentially the same thing with no script. this will make it already 10x easier to make an icon. you can then make your sharpening into an action and you’ll basically have most of the job done for you in one click.
tips:
make things into actions! for example, i cut down a lil on the speed changing process by making actions that change the speed for me.
save your actions! you never know when you’ll lose them
you might get tired of looking at your gif icons after a while, they might even start to look ugly but that’s most likely because you’ve been looking at them for too long, so don’t feel discouraged!
crop close to the face, this is important! what in the fresh hell am i supposed to be seeing in a 70px gif icon if its so far away, or in general tbh
anddd that's about it! i hope you find this useful! again, if there are any questions, feel free to im me or send in a message and i'll do my best to help!
#rph#rpc#gif icons#gif icons tutorial#gif icon tutorial#i hope this is explained well im ...#i tried to be as thorough as possible to like make sure it all comes together
217 notes
·
View notes
Video
tumblr
質問コーナー第2弾!『みんなの質問に答えるよ!〜その②〜』 Question Corner 2! 『Answering everyone’s questions ~ Part 2 ~ 』
Sorry, this is quite late. I was super busy. Either way, here we have another cute as hell and quite informative Q&A video. I am loving these SO MUCH.
❗Please support Wakana❗ ❗Join her Fan Club❗ ❗Read my TUTORIAL here❗
All you need is a proxy service like TENSO and a credit card. PLEASE consider joining! Wakana is providing so much awesome content. It’s totally worth the annual membership fee of 4.000 yen! I want to motivate people to join Wakana’s fan club so I will not share the content publicly. However, I really don’t like withholding content so I will resort to the following plan 〈(•ˇ‿ˇ•)-→ 👉LIKE and REBLOG my posts about Wakana’s fan club content 👉Leave a REPLY explaining why you currently cannot join the fan club / If you have already done this, just say you would like to receive a link 👉I will send you a Google Drive link via direct message 👉DO NOT SHARE the link or its content anywhere
Find a detailed summary of the video below the cut 〈(•ˇ‿ˇ•)-→

This is actually part 2 of her “question corner”. Find part 1 HERE. She couldn’t answer all the questions in her last video and since then she has also received a bunch of new questions so she will be answering a mix of old and new questions in this video. She doubts she will get through all of them but she is gonna do her best and try.
Question 1: What kind of drinks does she drink often? The fan wants to know if she is team!tea or team!coffee etc. Actually, she mostly drinks water and she aims for around 2 litres a day. She even has a big pitcher which she prepares in the morning and she checks at night whether or not she managed to finish it. And she always brings water with her when she goes out. In the morning she will always drink a big cup of hot black coffee. She will take her time drinking it (it usually takes her around an 1 hour to finish). She won’t drink coffee at any other time of the day because she doesn’t think it’s good for her to have so much caffeine. If anything, she will drink some tea during the day with little to no caffeine.
Question 2: What are her favourite/most beloved kitchen utensils? She doesn’t really use a lot of stuff to cook or any special items. However, there is one thing she can’t live without, and that’s her wooden spatula. She got this from her mum. She had always used plastic spatulas in the past but she didn’t feel they were working very well and they always got burned from the heat in the pan so one day her mum recommended a wooden spatula and from then onwards she has never looked back.
Question 3: What is she doing while on the train? Wakana easily gets motion-sickness so for example when she checks her phone, she might start to feel sick. That’s why she always tries to keep her head straight, even when she looks at her phone. That might look a little awkward to some people. Her personal trainer also recommended that she should make sure to look at the things that are right in front of her in her line of sight. It’s very exhausting for the eyes to look down or up so everyone should make sure to look straight ahead most of the time. It’s a little hard for Wakana to do that because obviously she doesn’t want people to think she is staring at them but somehow she manages XD She tries to focus on random items or she looks out of the window at the scenery/sky.
Question 4: What kind of music is being played at her home? She doesn’t really listen to music in her house. She mostly spends her time watching films and TV shows on Netflix and other streaming services. Other than that she doesn’t like to have any background noises in her home. If she checks her recordings or does other work related stuff she will use headphones
Question/Suggestion 5: Why doesn’t she try and carry her portable fan on a belt or something? She has previously talked about her struggles with carrying her fan. She loves it and wants to bring it with her everywhere she goes but it’s quite big and heavy so she never knows what to do with it. That’s why the fan suggests she should try carrying it on a sort of belt. Wakana has actually thought of something that’s quite similar to that idea. Her very own invention so to speak XD. She takes a tiny crossbody back and puts the fan inside so it sticks out a little. This way she can turn it on and the fan can do its work and keep her cool. She could also try putting it in her jeans pocket
Question 6: What is her favourite kind/taste of cup noodle? She doesn’t really eat cup noodles but during the stayhome period she has discovered a cup noodle with a soy-tonkotsu broth that only has half the calories of a normal cup. She couldn’t help but buy it and she actually quite liked it.
Question 7: Among all Ghibli characters, who would she choose as “lover”, “friend”, “senpai” and “idol”? Wakana LOVES this question. She is super excited to answer. Lover = Seiji Amasawa from Whisper of the Heart (she actually has many guys she would like to have as her lover, Ashitaka from Princess Mononoke is one of her faves too); Friend = Kiki from Kiki's Delivery Service; Senpai = Dola from Laputa: Castle in the Sky; Idol = Nausicaä from Nausicaä of the Valley of the Wind
Question 8: What does she use to wash her clothes? For her laundry she uses Lavons Le Linge (Floral Chic). And a friend recommended the detergent gel balls from Bold (Platinum Rose) so she is using that as well. She keeps singing/singing the “Bold” commercial slogan. So cute! She puts the ball into the washing machine and then adds all her laundry. One is more than enough for a nice fragrance. However, the smell is quite overpowering so she prefers to use it for towels and such. She would rather not step out of the house or into a train smelling like she bathed in a pot of Bold
Question 9: Which books has she been reading recently? She hasn’t had the time to read actually. Too busy editing all of her videos XD [Note: Poor baby, I hope she is not overdoing it. All this filming and editing must be SUPER hard and tiresome] She has been really into magazines though (like the fashion magazine Gisele). She has been especially passionate about indoor plant magazines (such as Elle Decor) to get inspiration.
That’s it for this video. Once again she wasn’t able to answer all the questions. She will do a part 3 in the future so everyone please be patient. Also, she has set an uploading schedule for herself. She will upload a new video on days with a 7 (so either the 7th, the 17th or the 27th of a month). She likes the number 7 (also, in Japanese 7 = nana => WakaNA). So everyone, please think of Wakana whenever there is a day with a 7 ^_^ Official Wakana Video Day! She will most likely upload a video on that day (there might be some exceptions though).
#kalafina#wakana#fan club exclusive content#video#botanical land#wakana's live stream is coming asap#oh bold XD
30 notes
·
View notes
Text
5 Reasons Why & 5 Ways How to Use Pinterest
More than 70 million people are on Pinterest, looking to share and discover – and with the average user spending more than 14 minutes on Pinterest per visit, it’s clear that this audience is an engaged one, too. Depending on the characteristics of your target audience, Pinterest might be a perfect platform for your brand. Want to know why Pinterest could be a good fit for you, and some basic tips on how to use it? Read on.

Why Should My Brand Use Pinterest?
It’s a huge spot for sharing. Although all social channels encourage sharing among friends and followers, Pinterest seems to do so exceptionally well. Pinterest beat out traditional email as 2013’s fastest growing sharing channel, and in 2014 it ranked as the second-highest social referral site. From a marketer’s standpoint, this means that quality content created on Pinterest has a better chance of spreading organically to more people – ultimately increasing exposure and creating value.
It’s inspiring. One of the most common reasons users come to Pinterest is for inspiration. They want to find and share new ideas, which suggests that they’re more open to investigating a new brand, concept, or product. One recent study showed that 43% of people preferred to associate with retailers and brands over Pinterest; in comparison, only 24% preferred to do so on Facebook.
It’s free. Like many social channels, Pinterest is currently exploring options for paid and promoted Pins; but for the moment, brands are enjoying significant “organic reach” through the platform. In comparison, “pay to play” platforms like Facebook require companies to pay up in order to snag placement in their audience’s News Feeds.
It’s informative. Pinterest Analytics allows you to get to know your audience better. This new tool reveals the demographics and common interests of your audience, allowing you to more strategically communicate with them. Some retailers have even said that Pinterest traffic and referral information allows them to better estimate upcoming demand for different products, thus increasing efficiency and reducing losses.
It’s female-dominated. If your brand audience is mostly made up of females, Pinterest is the social media platform for you. Pinterest is used by more than 1 in 5 American women on the Internet. From food and fitness to technology and humor, women are pinning all types of content on Pinterest.
Ok, I’m on board. How do I get started? Like any social media platform, Pinterest is a space where dedication, creativity, and originality equal success. Focus on Pinning relevant and inspiring Pins for your audience, and make sure to share and like the Pins of others just as much (if not more!) as you do your own content. With that in mind, here’s a brief Pinterest 101 to get you started.
What are Pins and how do they work? Pins are visual bookmarks that help users organize ideas, share ideas, and find inspiration. A Pin can be created in two ways: either by pinning something found anywhere on the Internet, or by pinning an existing Pin on Pinterest. When you see a “Pin It” button on a website or on an existing Pin, you can pin it to your board by simply clicking the button. If a website doesn’t have a “Pin It” button, you can still pin an image with the help of the Pinterest browser button. *Why brands love Pins: No matter how a Pin is created or shared, it will most always link back to its original source. So if a user pins an image from your brand’s website, you’ll continue to enjoy referral traffic as the Pin is shared among users.
What are Pin boards? Pin boards are where your Pins “live.” You can create boards based on categories, interests, events, or other themes relevant to your brand and audience. When other Pinterest users choose to follow one of your boards, that board’s Pins will populate on their Pinterest home feed. *Why brands love Pin boards: Social media platforms like Facebook and Twitter display your brand’s content mainly according to the time it was posted – which can be useful, but also difficult to manage if you’re targeting multiple personas or campaigns at once. Pinterest’s Pin boards allow you to simultaneously keep multiple conversations “fresh,” while also keeping them separate and contained to the relevant audiences.
How do I connect with others? A good starting point for finding people to follow is by linking your brand’s email contacts with your Pinterest account and following them. Hopefully, they’ll follow you back. Boost your number of followers by increasing the amount of people you follow, consistently pinning Pins, and making sure those Pins appeal to your audience. And be sure to link to your Pinterest page on your brand website and email blasts, so that your followers on these platforms know they can find you on Pinterest, too. *Why brands love following & followers: Pinterest recently rolled out a refined search and categorization feature that makes it easier for users to discover other users to follow. If you add descriptive copy to a Pin, pin it on a logically named board, and make sure that board is properly categorized, the Pin could greatly help increase new followers via search.
How do I build my profile? Your profile consists of a main image, bio section, and previews of each of your Pin boards. You can also add links to your brand’s website, Facebook, and Twitter, and go through a verification process to boost your authenticity. Stats such as the number of users you follow and the number of users following you are displayed, with big red buttons prompting users to follow you. *Why brands love Pinterest profiles: Pinterest allows brands to customize their profile’s appearance to fit their brand image. With the ability to handpick featured images for each Pin board, you can make sure the overarching personality of your brand is the main focus of your profile – not just a streaming list of your latest posts.
What else do I need to know? These basics will get you started, but there’s a whole lot more to discover about Pinterest – all of which can be found in the company’s in-depth tutorials, “Interesting” blog, and business-focused resources. *Why brands love learning about Pinterest: Because Pinterest is one of the newer social media platforms and shows solid growth, many brands have found that learning about and investing in Pinterest pays off. Start pinning and see what happens for your company.
#pinterest#freelancing freelancer freelance workfromhome freelancers marketing digitalmarketing graphicdesign business fiverr design entrepreneur freel#fiver gigs#fiverr
3 notes
·
View notes