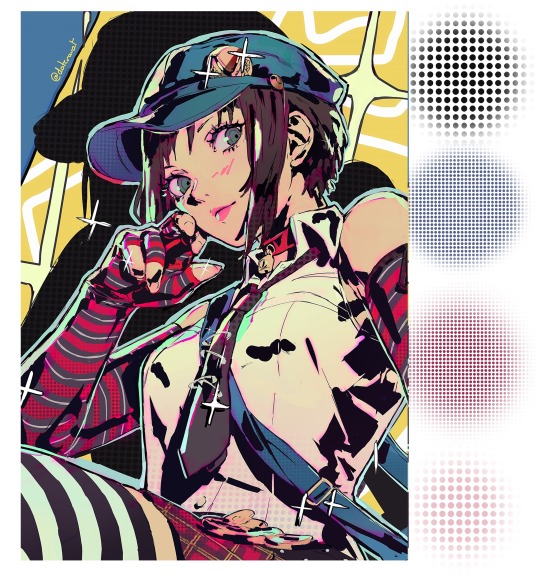
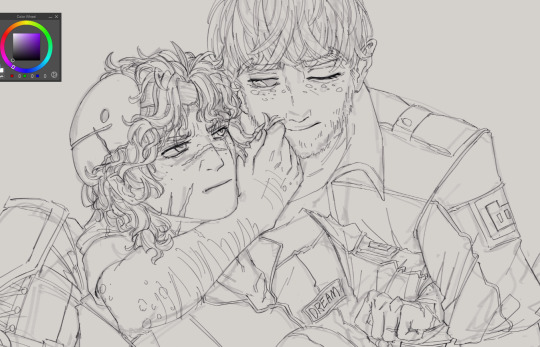
#I made the lineart and was like ''If I try to colour this I /will/ mess it up'' so I let my art program take the brunt of that one hehe
Explore tagged Tumblr posts
Visit Tumblr Blog
Explore Tumblr blogs with no restrictions, modern design and the best experience.
Last Seen Tumblr Blogs


Fun Fact
Total funding amounts to $125.3M.
Text

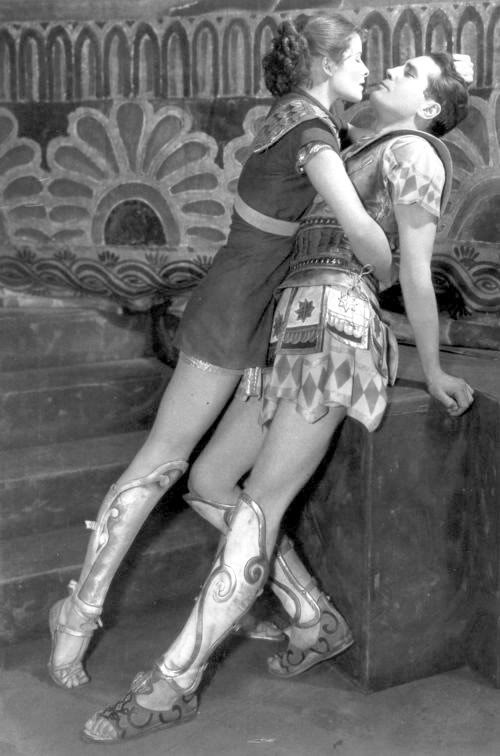
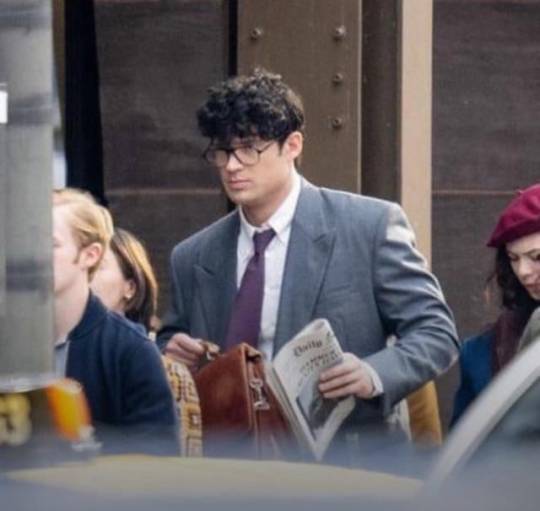
I've had this pose ref saved for a while and the Superman set photos just gave off the same energy 👉🏻👈🏻
The reference is this photo of Katharine Hepburn as Antiope and Colin Keith-Johnston as Theseus in the 1932 play 'The Warrior's Husband' (and I'd love for people to turn into a draw your otp meme pls pls pls this pose is so good)
And also, of course, the Superman (2025) set photos
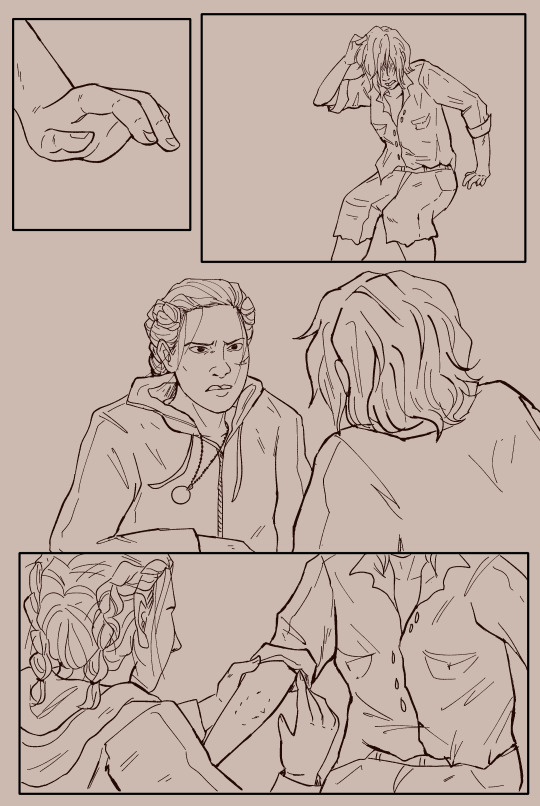
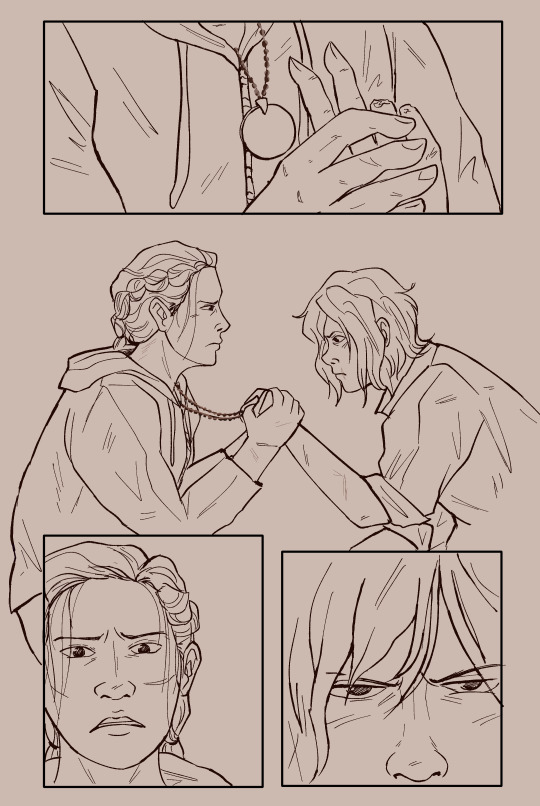
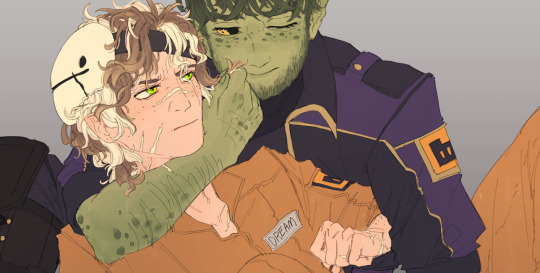
#superfamilyweek#superman#dcu#clois#lois lane#clark kent#i was actually gonna post this a few days ago but then i found out about the superfamily week#it wasn't made for it but i hope you can accept this humble offering even if it doesn't really fit the prompts#art#digital#fanart#live-action#dc#regular#final#colour#this actually from june when the set photos came out and i just got completely obsessed and went into a clois haze#it all looks so good though!! the whole thing!!!! i'm vibrating with excitement just thinking about it!!!!!!!#if this film isn't good i'm gonna be sooo disappointed you guys have no idea how much i'm looking forward to it#but anyway. ART RAMBLES: as i mentioned on the tags of my last drawing this piece gave me SUCH a headache#i think it's probably cos it was just supposed to be a quick sketch so i used a more stable pencil brush#but then i really liked it so i decided to properly colour it instead of just doing the watercolour thing i usually do for sketches#but with finished pieces i like the lineart to be kinda messy and the sketch to even show through bit#and since i used the more stable brush for the sketch it ended up looking WAY too clean. not like my stuff at all.#so i just started throwing stuff at the wall to see what could make it more interesting. full background! actual lineart! texture layers!#and this here is what i was the happiest with. i don't... love it though. it should be looking way more interesting given the pose#and then i also did the purge girl halfway through this and it looked SO good right out of the bat (pun intended)#so i went a bit into a spiral. did some realistic stuff i'll post soon. and now am trying out a thick black lineart style.#(i'll definitely still use the coloured lines for the sketchy watercolour stuff though. it just looks way too cute)
448 notes
·
View notes
Text

Director of the False Last Act
#orv#omniscient reader's viewpoint#orv spoilers#han sooyoung#art i made#another of the drawings i fished out of my drafts that i completely forgot id started#if the face doesnt look like how i usually draw hsy uh. i apparently did the lineart like 4 months ago#and the way i used to draw her was WAY different#like i had to redo the face cuz i was like man this aint my girl wtf#oh yeah the sort of. watsonian reason why the title of the book shes holding is scrubbed out is bc it could either be twsa or orv i guess#the doylist reason is i couldnt decide between twsa or orv so now its neither LOL#side note but like. intellectually i know the thousand hand guan yin is like an actual thing in buddhism but my familiarity with it is#mostly from the dance move#so like as i was colouring this i was just imagining hsy like creating this pose in universe w the avatars which. one hell of an image#only two of the hands are supposed to represent like specific points in the story the rest are just. symbolic...?#the lemon candy one is obvious and the knife one is meant to be from when she stabs 49!kdj in the epilogue#also holy god im so bad at coming up with backgrounds for this kind of art#the original background i had i think i was trying to make it look like some kind of. book cover...? hence the borders#whatever it was it wasnt working#now i have no idea what its supposed to be 👍 like its giving. poorly designed tarot card
359 notes
·
View notes
Photo
Can’t, too busy flirting ♥ (Patreon)
#My art#SCII#Damned#DAX#ZEX#FRICK I forgot ZEX's bruises lol#I drew them in the sketch even! It's why his left eye is closed rather than his right fjdsaklfdfds#Well DAX will probably have that ankle brace on him still by the time ZEX's face and neck are all healed up anyway *handwaves handwaves*#Anyway lol#I've been wanting to try my hand at the ''heartbeat'' style for a while now! Pretty sure this is my first ever attempt! :0#I guess that one blushy react I made a couple years ago for VLH could count? But that was with vectors so#Was mostly curious as to how long it would take and how tedious it would be with my tablet#Using my crayon brush for the lineart and colours made it more fun :) Very unconcerned with how ''clean'' it would look by the end#Which I think is how this style is meant to be approached - if it was too smooth or too aligned then it wouldn't move!#I think I like it well enough :)#I had another one I was thinking about doing first - even sketched up a while ago now - but this image hit me most recently#New shiny - you know how it is :P#And they're so cute how can I resist <3#Max being shorter than Dexter is So good and then ZEX nad DAX are in there and it's just jdkslafd#Extremely yes very much so agree#They're cute! I love them!#Someday I'll get really good at DAX's parade rest pose because I keep attempting to draw it correctly and haven't yet#But I haven't given up!! I'll get it someday!!!#ZEX is effortlessly adorable so that's easy lol#Even if I didn't get the bruises his blush was still real fun to texture :)
12 notes
·
View notes
Text
(Click image for better quality)
This shot from the latest update of @somerandomdudelmao's series was absolutely incredible, and I desperately needed to colour it after I saw it. I had a lot of fun with the colouring and details, and I also really wanted to get this before the next update.
#cass apocalyptic series#cass fanart tag#cas fanart tag#i had a LOT of fun with the colouring + shading + rendering here#and i tried a few new techniques too#like changing the lineart colours to match the lighting more#and because tumblr image quality sucks#y'all need to click the image to see all the details#anywhizzle#this was a lot of fun to do!#the lighting is so different from anything i've done before which made it so fun to try!#and i got to play more with rendering which was a LOT of fun#tmnt#rottmnt#rise of the teenage mutant ninja turtles#jae's art#tmnt fanart#rottmnt fanart#donnie tmnt#future donatello
45 notes
·
View notes
Note
hi ⭐ anon again I FORGOT TO SAY IT IN THE LAST ASK BUT YOUR ARTSTYLE IMPROVEMENT IS ABSOLUTELY INSANE!!!!! + i really really love how you render and work with colours !! idk i love your art so much it's so warm
Eee thank you again ૮꒰ ྀི >⸝⸝⸝< ྀི꒱ა
I don’t even know how to respond anymore so I’ll just ramble lolol but like… Not to sound arrogant or anything but I also get really baffled by my own art style improvement. I sometimes come across art from last year and I’m like “woah… I can point out all the mistakes I did and fix them.” and that’s such a cool thing to experience??
I won’t lie, I cringe when I see my old art but it feels like a good reaction to me. Knowing I’m not actually stagnant with my work is neat and I’m really happy when people agree that I’ve improved,, After all, my biggest fear is art style regression so I appreciate messages like this so much 😭
#꒰ v’s answered asks ꒱#• queue times with V#this is going to be stupidly late since it’s on queue HELP#but also lil mini ramble in tags#I think I improved when I stopped trying to be a ‘proper’ artist#Like I became more unconventional with my work flow#Instead of doing lineart after sketch I do the flat colours first#And I swear doing that has made art nicer#both process wise and looks wise#so that’s neat :33#but yeah thank you ⭐️ anon ur super sweet ^_^
4 notes
·
View notes
Note
A bit of a strange question, but if there were any of your videos you were to "remake" today for any reason (ex: you feel like you misrepresented the original text or spread misinformation), which would it be and why? None of them is a perfectly valid answer
Again: bit of a strange question, but I've been thinking about my own creations and how I could have done so much better with some of them, but I also know that is a sign of my growth and constantly chasing "what if I did this instead" isn't always healthy for nurturing a creative mindset, and I was wondering what your opinion might be as a Creator of Things with a bit more experience than I
There's been a few trope talks where I've thought later of other angles I could've explored that might warrant sequels or part 2s, but I don't dislike any of the summaries enough to justify a rework.
I always find "I could've done this better if I made it now" to be a bit of a fallacy. I'm only better at making things now because I made all those earlier things. If I knew everything I'd learn from making a project before I started the project, it wouldn't come out the same.
I think when it comes to the "rework remake perfect" instinct, it helps to zero in on what the impulse is really grounded in. In my experience, more often than not, it's not actually about making the art better, except incidentally. It's usually about showing that you are better. It's demonstrating your competence and your higher standards and your skills, and more importantly it's overwriting the proof that you were once less than perfect. If people look at your old work and think that's all you're capable of, they'll be judging you poorly!
If that's the motivator, it's a very unhelpful one. You can't control for being harshly or incorrectly judged. It's a fruitless effort to stave off potentially upsetting outdated criticism, and it's not even going to work. Fear of critique is an unreliable and untrustworthy motivator.
If it really is about making the art itself better, perfecting your magnum opus with your newly leveled-up skills, that's a little more solid. But from where I'm standing, it's always better to use those skills to make something new instead of polishing something old. The older, unpolished work has already acquired its audience that finds it appealing for reasons that might never occur to you. Trying to bury or overwrite it just deprives that audience of the thing they like, and maybe makes them feel bad for having liked it in the first place. Also, usually when you look back on the older work, you'll conclude that the problem is everything and it'll need to be torn down and started from scratch. I know when I revisited the first three chapters of the comic, when I let my critic brain spin up, it wasn't shading or lineart I wanted to fix - it was panel composition, overall pacing, the entire structure of the chapters as a whole. I would've had to make them all over again to be happy with them, and they wouldn't be the same story by the end.
I've been thinking a lot about the Discworld through this lens lately. It ended up over 40 books long, but everyone agrees that the first two are not what you should start with, because they're the worst ones. They're entirely parodic, purely referential of at-the-time major fantasy series, and borderline mean-spirited in places. If you haven't read Fafhrd and the Gray Mouser and Dragonriders of Pern, you're not gonna understand like a full 50% of The Colour Of Magic.
It's clear that when he started in on them, Pratchett was entirely focused on taking the piss out of a genre he found mostly shallow and unimpressive. But the Discworld wouldn't leave his head, and everything he made fun of he clearly eventually found himself overthinking. He'd make little one-off jokes in the early books about Dwarves having no women and a hundred words for gold, and then twenty books later he'd have a Dwarf gender revolution make waves across the Disc, and then he'd write Thud!, a book that delves deeper into the nuances of Dwarf societal structure than Tolkien ever did.
If you look for them, there are continuity errors everywhere in Discworld. In his introductory book, Carrot defused a dwarf bar full of rowdy brawlers by guilting them all into writing to their poor lonely mothers back home. Shortly thereafter, Carrot will be outraged at the mere concept of an openly female dwarf. Pratchett even eventually wrote Thief of Time, a book that loosely explains that the Disc makes no sense because history has been broken and put back together incorrectly twice, and therefore any continuity errors are because of that.
He's the writer. He could've gone back and fixed it, edited the reprints to be less disruptively discontinuous with the later books. Instead he continuously moved forward and allowed the world he made to grow without cutting it off from its roots. And because he didn't bury his older, far worse work, we have the privilege of following the Disc's evolution from the very start, and seeing how this shallow, stock fantasy world parody became something incredibly rich and complex without ever pretending like its early installments never happened.
Anyway, that's why I think it's better to move forward. You make more good stuff that way.
493 notes
·
View notes
Text
✧.*100 follower celebration type thing*.✧
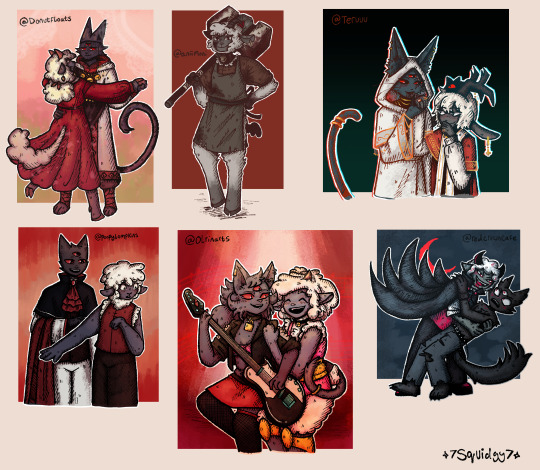
So, to celebrate 100 followers on tumblr, I decided to draw some fanart for people. This community is so sweet. Every one of these artists has inspired me in some way.
I'm really sorry for those I haven't made art for. I may make a part 2 one day for those I missed. Who knows.
This was a really nice way to try out different art styles while mixing them with my own.
Apologies for all the link later on. Want to explain the creative process a bit for those interested cause I put way too much effort into it to not mention.
Close ups below cut:
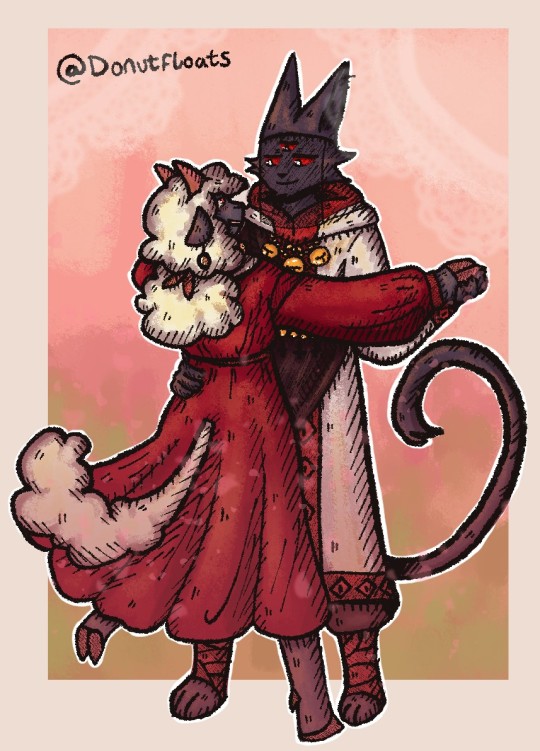
@donutfloats
Your arts so cute and soft, I love it. You have a great way of just expressing love through your art.
I was inspired by 2 of your pieces for this, the main one being the 3rd image for this post. The lambs dress is so pretty, I just knew I wanted to draw it flowy and dancing, and the second image I used is this post for the rendering style.
✧.*-----------------------------------------------------------------------*.✧

@aniimoni
I really like your artstyle. The monochrome colours are delightful, as with the way you do lineart. while making this, I was thinking this is the perfect style to meld with mine.
I was inspired a lot by the axe and hammer drawings in this post. As a hammer lover, I decided to combine the 2 together.
✧.*-----------------------------------------------------------------------*.✧
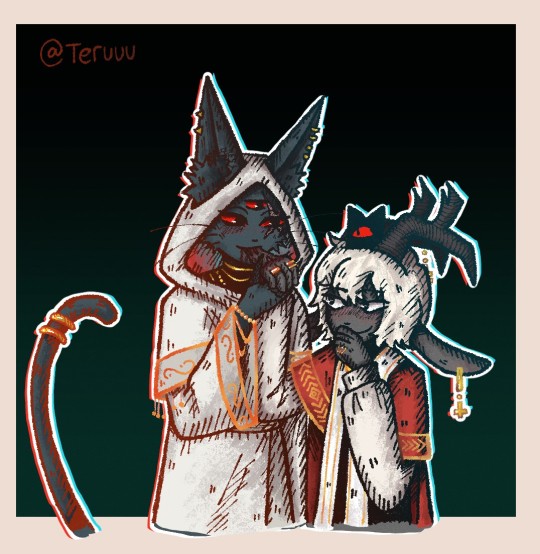
@teruuu
Something about your style is mischevios. Your rendering and lineart are just wonderful as well. You have a very distinctive style that matches mine quite well, i think.
I feel compulsion of the flesh Lamb and Narinder would give each other kisses on the hand but take a bite at the same time. They freaky like that. Based my rendering around this post and the previous draw you character here, I did. These are fun designs to draw.
✧.*-----------------------------------------------------------------------*.✧

@poopylumpkins
I really like your vampire au something about it really spoke to me as a afab non-binary.
Lamb deserves to wear their own clothes and something about narinder helping with their makeup convinces me he'll help out.
if you're curious, i colour picked the background and shading from this post
✧.*-----------------------------------------------------------------------*.✧
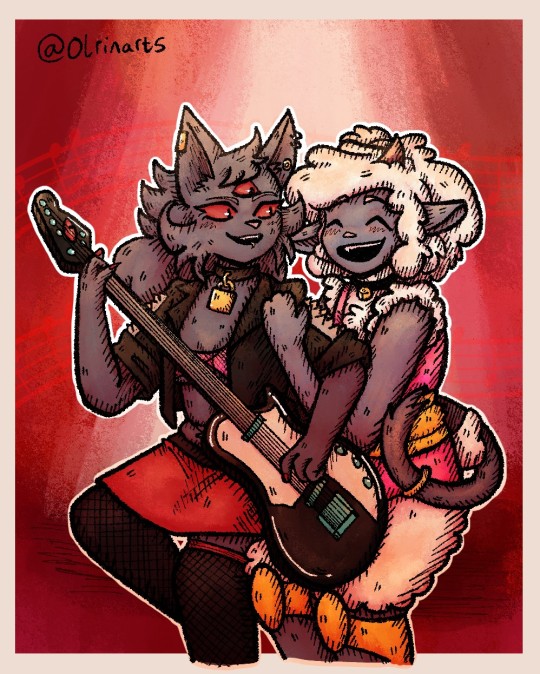
@olrinarts
This was a really fun style to draw. Something about how you draw these 2 is delightful. Love yuri narinder's eyes in particular.
Rock god yuri. What more can I say these are really good designs. Showed them to my friend, and they loved them.
Decided to have them dueting, while Narinder can't sing lamb can always pick up that role.
Used this post for the background and shading colours, and this is a kinda basis for the pose.
✧.*-----------------------------------------------------------------------*.✧
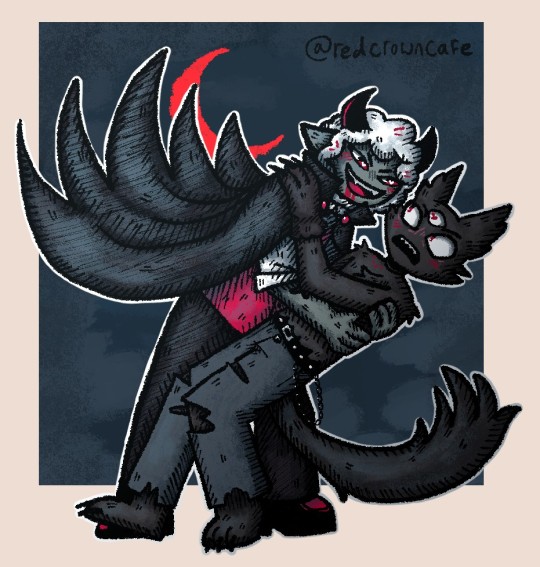
@redcrowncafe
Really love you fic and art. I like to see the fic brought to reality through all the comics and art, which has a very pleasing look to the eye.
I have never struggled so much with an art style, fun challenge, but very different to my own.
Wanted to draw their Halloween costumes from this post. Lambert would definitely get too into the vampire costume and bite Nari at some point probably.
✧.*-----------------------------------------------------------------------*.✧

@joffyworld
Just wanna say thank you so much for the reblogs and kind words. It gives me a lot of confidence in my work and is a genuine brightness in my day.
I wasn't sure what to draw you, so I thought I'd just show you a pic of my new one who waits figurine, that arrived recently. Its a little weird, I think an earlier design but cool none the less.
✧.*-----------------------------------------------------------------------*.✧
251 notes
·
View notes
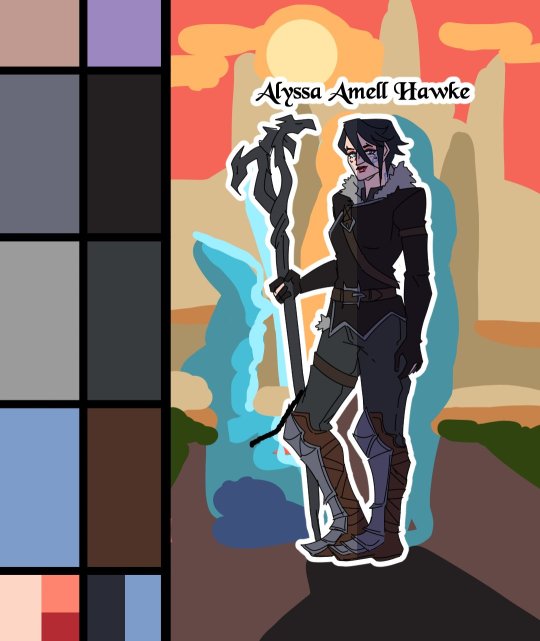
Text
Heroes of the Dragon Age
An animation I've made for Dragon Age Day 2023, featuring my main Warden (Alyssa Cousland-Theirin), Hawke (Eleena Amell Hawke) and Inquisitor (Sulevin Lavellan)!
It's to this day one of my best artwork and I thought I should share it here too! 90+ hours between the original sketch, outfit design, the rough animation, rotoscope, inking, flat-colours, background shading and even the audio :')
Interested in the process? I detailed it below since it was my first time doing something like that:
I would like to start by saying I'm not a professional animator!Everything you've seen here is the result of experimentation and a lot of practice to learn and understand how 2D animation works.

My first idea started in May 2023. I just finished rewatching DA Absolution for the X time, and wanted to analyse why I loved the intro so much. (Even after countless rewatch, I never skipped it once.) I was inspired to study it with my main three protagonists!


Then came the first test with Alyssa Cousland-Theirin, my Hero of Ferelden! I tried to understand which part to separate for the animation. Mainly the hair and cape because it flows a lot more than the rest! If I recall, my first idea here was to make her counter flame attacks (?). Then, as the camera turns around her, I tried to add a grid to know how the camera would work around it.
I ended up making the clip longer, so she could position herself to the further left and leave space to the two other protagonists.

Now it was time to try to animate Sulevin Lavellan, my Inquisitor. I really kept that quick doodling style just to capture the vibe without putting too much time/effort into it! The background would be static to contrast with Alyssa's. I also loved the idea of a rogue sneaking!

Instead of working on Eleena Amell Hawke, my Champion of Kirkwall, I went back to Alyssa and started working with Clip Studio Paint 3D models (this entire animation has been done on the EX version of the software!) It helped for rotoscope animation and maintaining likeness! That's when I got the idea to make the background swirl around the character to let the eyes be guided by the rest of the screen!

After a couple more hours, I planned the entire animatic with 3D models and quick doodles! I finally found a cool pose for Eleena Hawke, which was honestly the hardest of the three to imagine for some reason? I tried many other poses but ended up picking an animation from the game!


This whole time, I was studying a bunch of background ideas and how studio Red Dog Culture House (who made Absolution) work! Thankfully, they have a YouTube Channel where they shared some BTS content so I could analyse it!


Then, I simplified my character and their original designs in the style of the studio! These outfits are how I imagine them after Trespasser. Alyssa as the Queen of Ferelden, looking for a cure to the Calling, Hawke following Fenris to Tevinter & Sully as a Red Jenny Inquisitor!


The idea for Sulevin's animation actually came from a piece I doodled on a live stream, when I was drawing pose studies and turning them into finished artworks haha As for Alyssa, I wanted to draw the fight that got her facial scars!

Once their designs were ready and the background ideas too, I made the rough version of the animation! Basically a sketch done on top of the 3D models to add the details, staying pretty rough just to capture the idea and movements.


Then it was time to start the lines! I decided make a folder per frame, so I could separate all he main elements and draw them one by one. It helps keeping the likeness of a character in the different frames without having big "jumps" between frames! In fact, every parts were coloured differently to recognize them, and then I used vector erasers and masks (Ah yes, the entire lineart is done in vectors of course! It's easier to adjust and save time when working on similar frames!)


At first of course, everything overlaps! But I find it easier to draw too much and erase after, just to make sure everything is coherent in each frames! The cool thing about CSP is how you can change the colour of the layers in one click! So all the coloured lines turned into black in one second, and I could reverse it just as quickly to double check!

Then I started working on Sulevin! I made a blue line to mark where her feet were, as the sketch in the background wasn't perfectly straight! (Like Sulevin's sexuality 🤭😂) The silhouettes were very quick to do, but I had fun adding more & more details as she came closer to the foreground!

I really wanted to add that little dagger trick, but I remember it required me to change the pacing of Eleena's apparition, as it was recovering her arm too quickly! I had to change the pace of multiple frames quite a lot during the project, to make sure the flow was right! For Eleena, most of her animation remained around her arms and the staff itself, as magic would be the most difficult part! That way each character has their own focus: Alyssa has a very animated background, Sulevin got the grappling hook and Eleena the ice!

Then it was time to start adding colours! Just like for the lineart, I separated every colour on it's own layer, so I could easily adjust the colours later if needed. I added one colour at the time, going through all the frames, and then another colour!
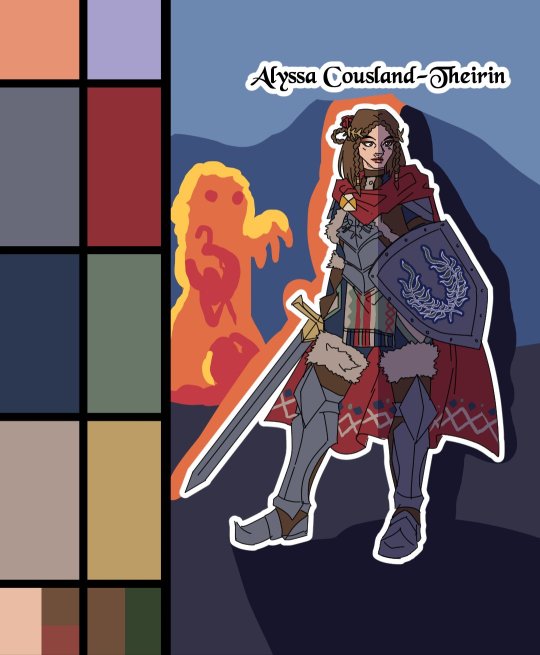
I made full palette tests with the colours I would use for their background at this point, checking if the details remained readable! Alyssa was the most challenging in terms of clothes, because I made her a very detailled armour! I had to simplify the Theirin heraldry, vectorize/redraw the Cousland, and make a brush for her cape's pattern!

Once I was done adding the flatcolours, I started the background, and oh boy it was a wild ride. For the cave, I painted multiple tests. I imagine was to use CSP panorama tools, which transform a texture into a 3D sphere, so each corners must match to look good. Sadly, it made the background very blurry, so after hours of testing, I changed ideas. Instead of the random fire balls (?) I originally imagined for Alyssa, I made three simple frames of a Rage Demon to attack her.


I ended up using the cave as a repeated pattern to make it turn 360° around the character. For Eleena, I mixed inspiration from the comics, Dreadwolf & Absolution, using warm colours matching Hawke's signature red. Just like I made the cave very grey/blue to match Grey Wardens. For Val Royeaux, it was more complex because I wanted to make it green, matching the Inquisitor's signature green. But bright green couldn't work, and the original colour during day time was blue/white/gold. So I added more leaves, played around the design a bit! After adding the rage demon, I made the shading! It was surprisingly easy and quick to do now!

I clipped a white layer on the flatcolours to not be distracted by the colours, and made thin lines to separate the light/shadows, then simply filled everything with the bucket tool! Then you set the layer to multiply and remove the white layer, and you have celshading shadows! Now the character looks out of the picture, so I added layers of blue in color burn, saturation and substract blending modes to make her look like she's in the right setting! Of course, I did the same with the other two, giving Hawke a red overlay and Sulevin green shadows!

Then I added the details, it went from white irises, to sword/staff smears to earrings and smaller finition that goes on top of these layers. To add the lights, I simply selected the shadows and reversed the selection! Using warm and cold tones to create contrast with the purple/bluish shadows! I also added more ambient light layers for Alyssa to reflect the Rage Demon fire. Now it was time to add ice magic! My first attempt had too many frames, making it look weird! Sometimes it's better to lower the frame rate to make things less bumpy!

Then I downloaded some cool ice brushes on CSP assets that made it look less like blue magical flames! But when I covered the screen in ice, I realized "Oh wait, I could make a cool transition from the ice, to blue lyrium turning red?"Red Lyrium truly links these three games and The Veilguard somehow! I spent the next hour painting over the idol and putting it in a black background, with lyrium and then the golden Dragon Age title text.
For the SFX, I used free youtube libraries sounds & "Darkspawn!" comes from the violent human female voice set (iconic for ""Can I get you a ladder? So you can get off my back!"😂🤭) After editing all that, the animation was finally done!

Here's the final math:
About 15 hours for the sketching/rough/animatic phase, 30h for the lineart, 25h for colours, 10h for backgrounds, 5h for details & 5h for music & SFX, for a total of 90 hours. Aka the same amount of time it took me to finish Baldur's Gate 3 the first time lol
If you have any question regarding the animation or the softwares etc. do not hesitate to ask, I'll do my best to answer!
#dragon age#dragon age origins#dao#dragon age 2#da2#dragon age inquisition#dai#da4#dragon age dreadwolf#dragon age the veilguard#animation 2d#original character#tutorial#warden#grey warden#warden cousland#alistair x cousland#alistair x warden#ferelden#hero of ferelden#queen of ferelden#hawke#fem hawke#eleena amell hawke#mage#warrior#rogue#lavellan#inquisitor lavellan#solavellan
253 notes
·
View notes
Note
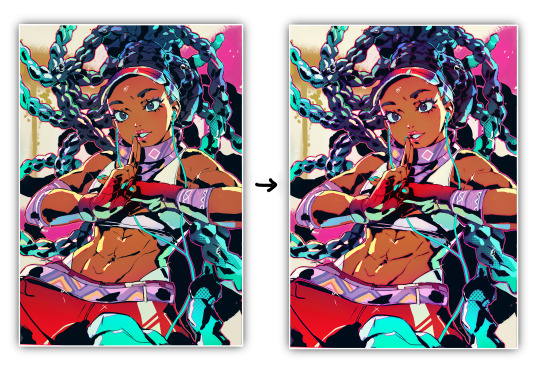
HI HELLO I love your art So much,,, do you have any tutorials on how you render your stuff? For example, the colors you use & how you pick them, how you get that pink tone around the Lineart (I think) (it's just rly cool). I would love to see stuff like that, cuz your art is Such visual candy (◍•ᴗ•◍)
Hey! Thank you so much, I'm glad you like my art, I worked hard to make it what it is!! Means a lot you appreciate it!!!!!!
I've had no professional art training, I seriously don't know what I'm doing and struggle making tutorials. But will try here!!
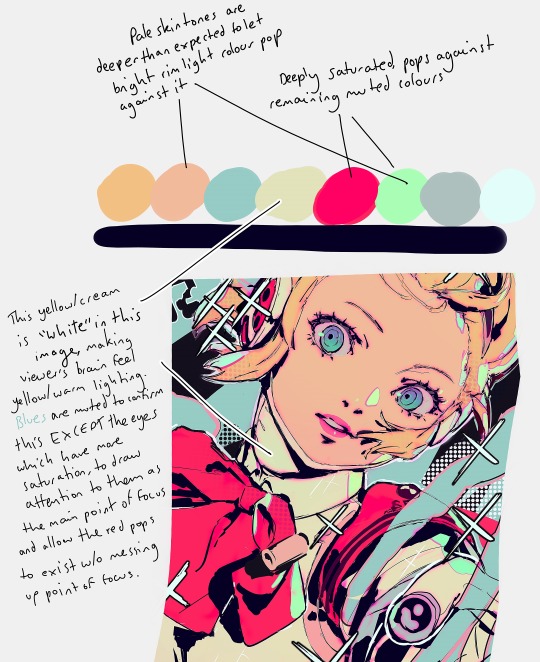
For me the colour work is really situational on the drawing! I find myself experimentally attempting to weaponize colour theory and there's a lot of instinct involved that I can't figure out how to verbalise yet. Here's an example of some thought process I have:
My main advice is to play with sliders a lot and really experiment (that's what I do for every drawing)!
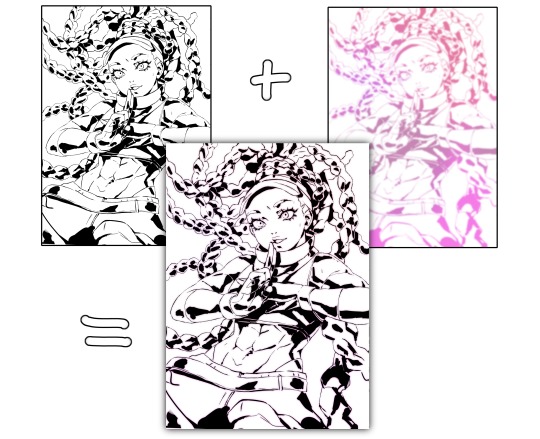
To get the pink glow around your lineart, copy your lineart layer, fill the copy in with a pink of your choice (sometimes I do a gradient), blur the layer (experiment with how much blur you'd like), put it directly below the lineart layer, and set the layer to multiply (or any mode you think looks pretty)!
You may want to adjust your piece's brightness/colours after applying it and sharpen the image after exporting.
A lot of colour gradients are involved and on their own they can eventually compromise the gritty/punchy style, especially the ones that are between extreme and subtle. A good way to combat this is with screentones/haftones!! You can use them to diversify colours and imply shading/texture.
I recommend going nuts and having a lot of fun with it to find what works for you!
I often add a lot of small lens flares as they satisfyingly cut through the piece, imply flash photography (which goes well with the strong black shading), add visual noise to areas you don't want to be your main point of focus, are a great way to show speculars, and idk man sparkles are just pretty haha.
Go nuts with them and have fun!! When you get them to look good, think to yourself why that is.
I made a tutorial ~1 year ago on how I shade with black. This simple trick will really help it look good, 3D and rendered - it just requires a lot of knowledge about shadows to start with. I have a lot of experience rendering "normally" which helped me learn how to use black in an experimental way.
Minor correction that the shadows labelled "ambient occlusion" in the tutorial are actually just normal shadows, ambient occlusion is total lack of light.
I hope this is useful to you!! You have a knack for art, your work is very inspired. Please keep drawing!! I am still learning too, let's keep going baby.
-Cravat x
458 notes
·
View notes
Text
Rise August: Couch Potato

Alt version with my own style-ish design changes for the characters
I've seen a few artists do their own iterations of TMNT so I guess this would be mine? My iteration based off the Rise designs? I suppose?? Idk I do too much stuff anyway so let's move on — but I did draw this version first and then got too in my head about whether or not people would like it so I uh redrew it because I'm a coward so here's the secret version:
I made Splinter have a more similar colour scheme to the 2012 Splinter, a brown rat with some pale marks and stubble on his face and tail.
The boys have slightly altered green tones — slightly darker shades than usual. They all also have facial marks, and I gave Raph his own birthmarks!! Their shell designs and stuff have simplified, no outlines, just solid colour (same with Leo's banana marks).
Raph is probably the biggest change — he has birthmarks, extra spiky scales, and tons of red in his skin!
I put in my own art style bits for this as well: I try to draw Rise as close to the actual style as I can, but for this I wanted to go for more of my style traits. The knees have swirls and the limbs are a bit more loose. There's some more detail and strands in the hair for Splinter. Raph's toes are claw-like. The boys' hands are rounded out, a lil' pudgy. I prefer drawing rounder edges, so I included a lot of those. I also (on occasion) do this style thing with my lineart where I add some shades and tones to it so it has multicolour... things? I dunno what to call it, but it looks dope as heck. Only issue with the art choice is it takes a while to draw so I don't do it a lot, only for special art pieces (like this one)!


@sariphantom
#rise august 2024#rise august art challenge#rise august#rottmnt#rise of the teenage mutant ninja turtles#rottmnt fanart#tutant meenage neetle teetles#turtle tots#couch potato#dad splinter#splinter#rottmnt splinter#if i were to give the iteration/designs/au/whatever the heck this is i would probably call it ���Risewell Turtle Tots”#risewell turtle tots
182 notes
·
View notes
Note
Hello! i absolutely adore your art and agree with your sonic opinions, you're overall one of the best sonic blogs out there. May i ask how do you plan out and draw your comics? How do you choose the formatting of panels themselves, the composition, the dialogue and so on? From A to Z, please! I apologize if this ask might be inconvenient, but i'm curious because i love your comics and have attempted to draw a sonic comic myself that failed miserably.
Typically the first step I will take is to just rough it out in a sketchbook, because I find it much faster and when working digitally I feel more pressure to make things look nice. This is where I start thinking about paneling and composition. It doesn't look perfect or cohesive at this stage, but at least now I have a rough idea presented with barely legible scribbles that don't make sense to anyone but me.
For paneling, large panels linger more, and small panels indicate quick succession. This is the most important rule I personally follow when making panels. It affects things like comedic/dramatic timing and how the reader will be guided through your comic.
It's important to vary up the composition when it comes to dialogue scenes where not that much is happening. The shot-reverse-shot format works, but remember that once you have an establishing shot and the reader knows where the characters are, you can get creative. I like to do close-ups where not everything is shown to create a sense of vagueness around what emotion the character is feeling.
Don't do this too excessively unless you're trying to create a claustrophobic feeling - let it breathe with a medium shot or long shot after!
In film-making, there's a rule called the 180-degree rule that basically states that in a two-character interaction, there is an invisible line drawn between them. The camera does not cross this line and stays on one side. This basically keeps the characters on one respective side of the frame at all times to avoid confusing the viewer.

This is by no means something you have to follow for comics, but if you want to create something that is easier to follow, it's a good rule of thumb that I consider when drafting! It can also be broken depending on the effect you're going for.
Once I have a draft, I'll typically go into editing and changing things that don't work quite as well as I'd like. This can be done by yourself or you can get it revised by a friend, like I do!
After the draft is finished, I'll get to lining and colouring. To be honest, it's not something I can teach so easily, but rather something that takes a lot of time and practice to learn. I typically draw the backgrounds with thinner lineart so that the characters stand out. Same deal with colouring - the characters stand out from the background colour-wise. There are multiple ways to do this, but for example, here I made the background have less colour contrast than the characters and stick to an orange-ish tone, while the characters are different colours from the background.

For speech bubbles, generally the words should fit the shape of the bubble to the best of your ability. The line spacing should be as close and compact as possible without touching the lines above or below. This is to save space on the page so that speech bubbles don't take up a majority. The tail of the bubble should point towards the character's mouth.
Avoid tangenting! This is when the very edges of two different things touch each other. It creates a flatter effect so you want to avoid it as much as possible.
That's about all I can think of right now. Hope this helped!
#tbh i have also dropped comics before because it was too hard to get it to work#they take a lot of time and dedication#but you shouldn't give up!#ask#tutorial
76 notes
·
View notes
Text
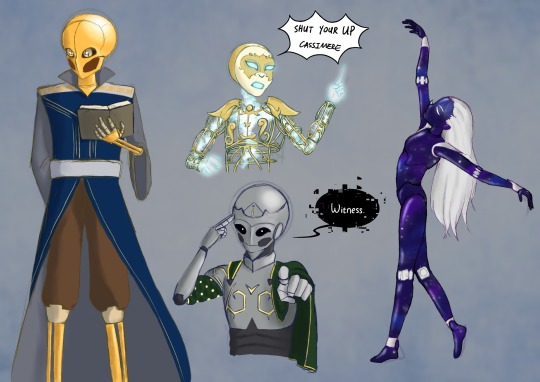
oh lol i forgot to post this robit sketches! because i have one (1) bit and im sure as hell gonna commit to it apparently
#rolling with difficulty#art I made#'shut your up' is a verbatim quote from an ex classmate i just thought it was funny#i dont think it was intentional i think he was just so angry that Words Failed on him#anyway im absolutely not keeping that maxim design. god i fucking hate clothing design *so* much#austin: 'hes a gold plated mechanite dressed in blue and grey robes' me trying to figure out colour placement: 'what FUCK'#i had one (1) good idea and that was 'skeleton shaped robit' and every other part of that design went to hell apparently#bc all the other mechanites we've had were either like... flesh..? shaped?? like that sorta silhouette (basically most of the old crew)#or more mechanical/geometric (vr-la's designs and like.. k-lb? i guess? if that counts)#so. therefore. bone shaped mechanite. also if i was gonna try that concept on anyone it may as well be maxim if you think about it#idk i thought it would be interesting. and also undertale was my first fandom so uh#ANYWAY. MOVING ON FROM THAT THOUGHT.#this started as a 2am intrusive thought of like#'we (artists in the discord) keep joking abt how k-lb would be a nightmare to draw but like.. how hard is it really'#anyway as you can probably expect. famous last words#i mean genuinely mad respect to noir but i think i said to one of my friends when i showed them this sketch#'i mean this in the nicest way possible but you can just tell he was designed for an audio only storytelling format' LMAO#if anyone is unwise enough to attempt this (so basically @ my future self lmao)#do the lineart and colouring for the wires in front of the inner electricity skeleton (???) and the ones behind it on SEPARATE LAYERS#drew the wires all together then the electricity and had to painstakingly go over the electricity with an eraser it was a fucking nightmare
46 notes
·
View notes
Text
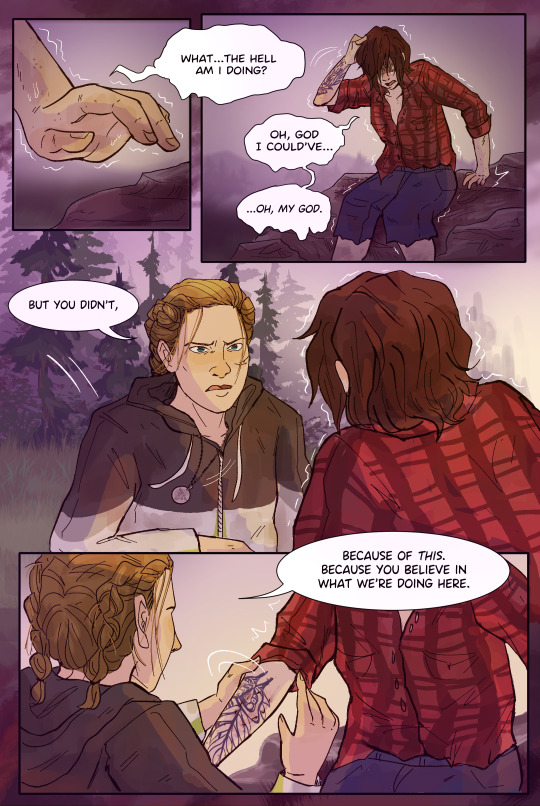
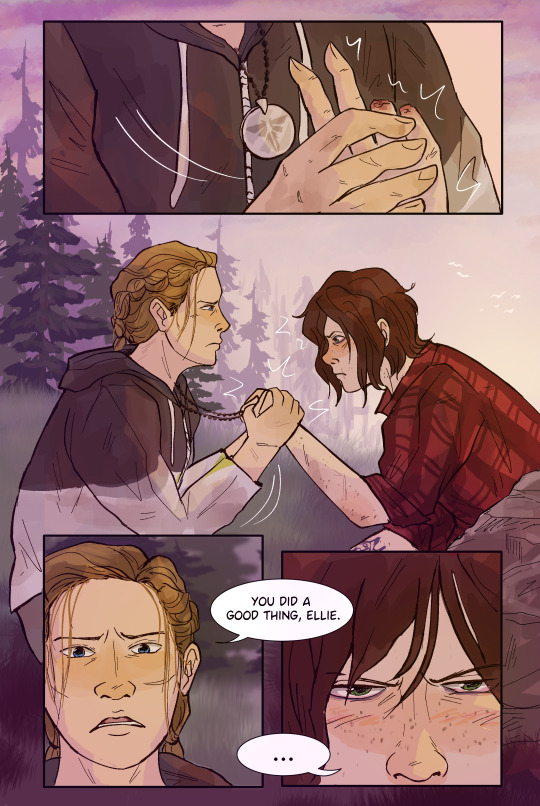
From @thedreadslayer's fic Unbroken, Chapter 37.
Sometimes I like to make comics, as a treat. See below the cut for a snippet of my progress. :)
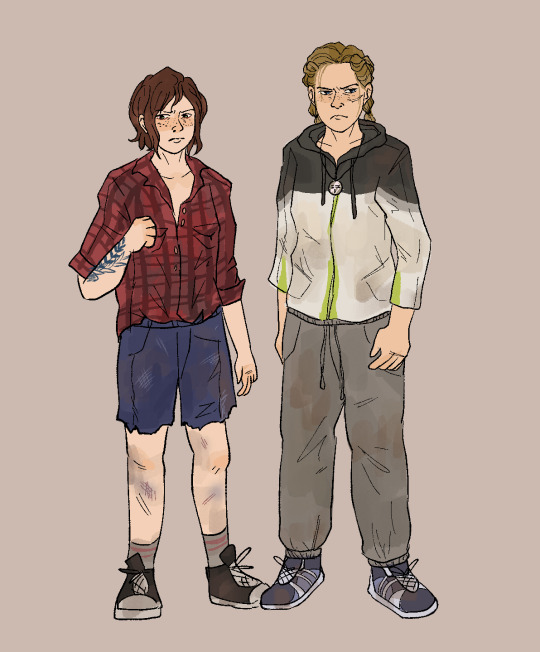
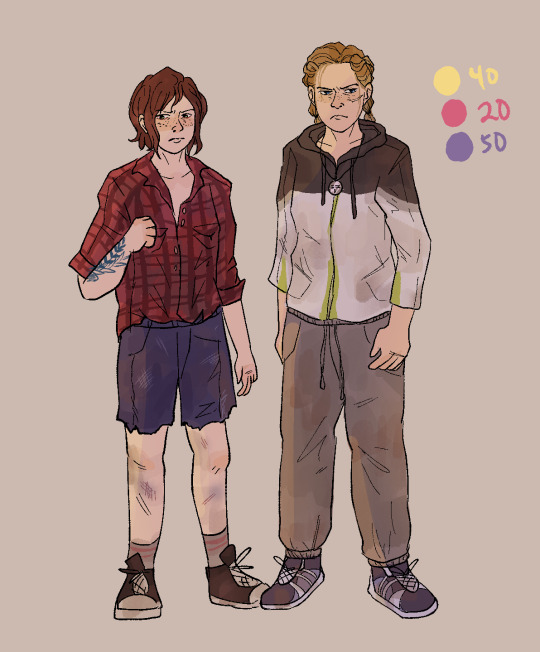
Clothing refs for Ch 37, Ellie's hand-cropped shorts and red flannel were given, but Abby's clothes were not as clear so I took some artistic liberties. :')
+ lighting test - was aiming for early morning/dawn colours. Purple hues are some of my favourites to work with.
The section of the fic I was adapting, written by the brilliant @thedreadslayer:
“What … the hell am I doing?” Her legs go numb and unsteady. She plants herself down on a boulder. “Oh, god. I could’ve … oh, my god.” “But you didn’t,” says Abby, kneeling beside her. She gently rotates Ellie’s arm and indicates her masked bite. “Because of this. Because you believe in what we’re doing here.” Abby takes Ellie’s hand, clamps it around her Firefly dog tag, and just … holds it there. It’s terribly intimate. And terrible. “You did a good thing.” Ellie glares at Abby and imagines ripping her pretty face right off. Because the Fireflies, the cure, humanity - her supposed “greater purpose” - had little to do with her decision to stay.
I've made comics from prose a few times before in the past, but I can't say that I've developed any specific process for it lmao 🥲 i just try to make thumbnails and see what vibes well
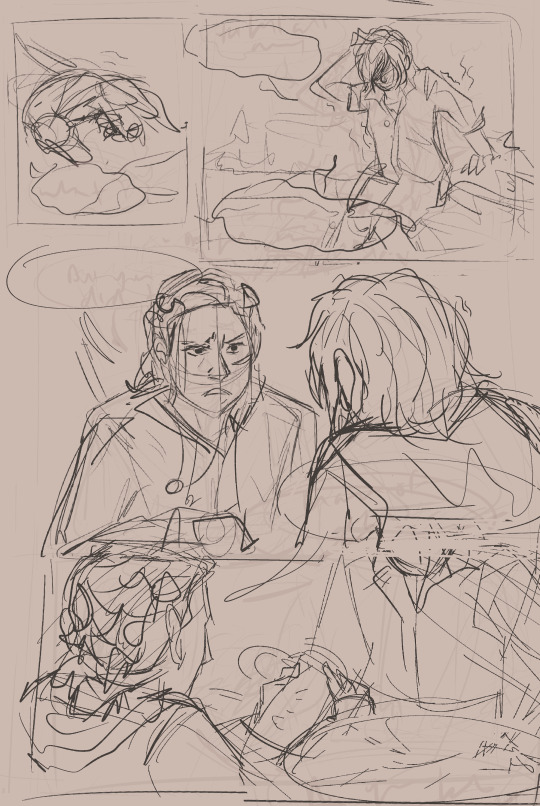

from sketch (damn they messy)-> lineart -> to final
it isn't shown here, but I've learned to start blocking out the colours before I line and found it's been a great help figuring out the tone and layout :')
and that's p much it!
#still have much to learn in terms of comicing but i've been having so much fun with it ;;#fun fact unbroken has ruined tlou for me because i will be disappointed if tlou3 ends up being nothing like it#guys it's so good i highly recommend#the last of us#the last of us part 2#the last of us fanart#ellie williams#abby anderson#ellabs#tlou2#tlou#tlou fanart#ellie x abby#my art#comic
330 notes
·
View notes
Note
i love the style of that 3d render of your character! may i ask how you animated the outline and made the whole thing pixel-y? :0
Very glad you asked!
There isn't many tutorials on how to make this kind of stuff so I am totally glad to be the first one.
BLENDER 2.5D TUTORIAL
First of all

Get your model ready and steady, that part is what I ain't explaing, however if you want it to have these colors, you will have to put this nodes in your texture shader
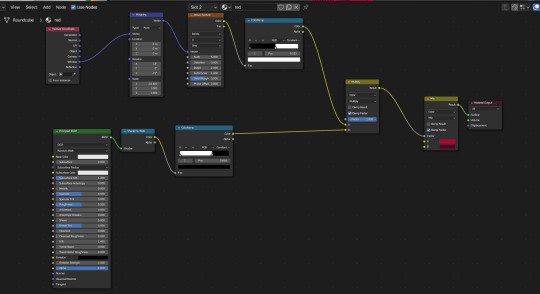
`[ This is for her red jacket, the lower nodes is for her primary colour and the upper nodes are for her shadows, which also has some extra nodes to give it a comic texture. ]
Quick reminder to give the model some lineart yourself to the parts that don't form its sihlouette, for example her shoes.
Now for the lineart, first of all make sure you have created a black Emissive material and that it has Backface Culling activated

After that go to the Modifier Properties and add a Solidify modifier

Make sure to Flip the Normals, set the Material Offset to where the Lineart material is, and adjust a little bit the Thickness of the mesh, then you will get some natural good-looking lineart like hers.

Now, you could easily be satisfied like this, but now we are going to make it feel like each frame is a new drawing by making her model lineart jiggly
First of all create a Displacement Modifier and give it a cloud texture

Make sure to lower the strenght and midlevel, otherwise it will look like this


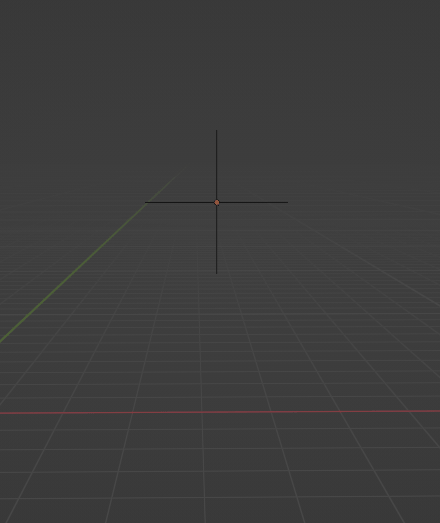
Now, create an Empty Plain Axes and go to the Displace modifier, change the coordinates from Local to Object and focus the object on the Empty


And thanks to this adjustments, if you move the empty around, it will create a slight jiggle
Now what we want is for this empty to automatically move around without you having to do anything
Create a new screen and go to the Graph Editor section
In here we will be making the empty move with a modifier
Select the empty and press "I" of Italy and select Location, this will create a keyframe for the empty that we will be able to manipulate

Go to the Editor and ONLY SELECT THE Z POSITION, and then go to the Modifiers tab and add a Noise modifier
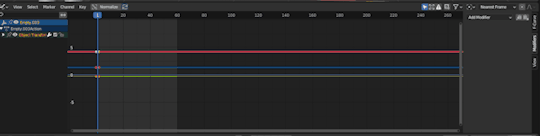
Make sure to adjust the Scale and the Strength so that it looks more proper for the jiggle effect, make it look like a rollercoaster!

And now, if you did everything right, your empty will be moving up and down and all around by its own
WHICH also means, the model displacement will follow the path of the empty to create that jiggly effect we crave so so much
However...

The model is indeed jiggling, but it's doing it the wrong way, we are trying to make it look like a cartoon not a gosh darnit gelatin
So to make it jiggle the right way we are going to make its noise feel more STEPPED
Go back to the modifiers of the Graph Editor and add a Stepped Interpolation, and make sure it has a Step Size of 5
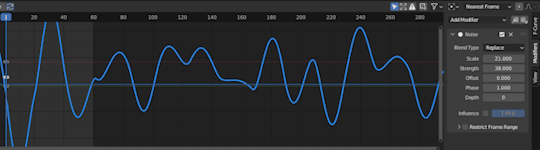
And now we finally get the choppy jiggle effect!!
Now you can play around the Displace and the Noise to make it more or less jiggly
But nonetheless, if you followed the tutorial right, you will be gifted with the perfect looking 2.5D effect!!!

Now you can go ahead and try to fool everyone into thinking a 3D animation is 2D
And before we wrap up, one more extra for the one who asked how this is made,
We are going to make the render feel pixel-y!
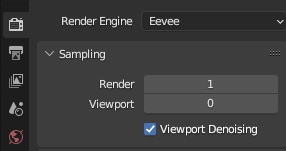
Go to Render Properties, make sure you are using Eevee, and in Sampling put the Render on 1 and the Viewport on 0
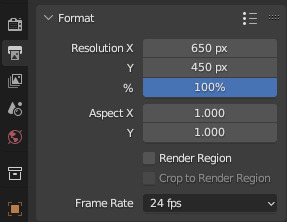
Then go to Output Properties and you can do two things:
1) Change the X n Y to a size lower than 1000 px
2) Change the Resolution % to these numbers (8, 16, 32, 64) This way if you wanna do pixel art you are more accurate
For this render I used the 1st option
And last but not least, in the Output Properties make sure you save your files in the right way with these settings

THen render animation, make an image sequence with all the pngs, and TA-DAH
You get a pixel-y 2.5D animation!!!
Thank you so much for checking, I hope this is useful for anyone who wants to do this stuff, if anyone has any questions don't be afraid to ask, I may have explained some stuff badly.
Anyways have a very jolly day
Tsuyo OUT
#blender#blender 3d#blender tutorial#tutorial#3d modelling#3d tutorial#art#model#3d model#my art#tsuyo art
1K notes
·
View notes
Note
Your AweSamDream art has given me so many brain worms how do you make your lines so thin and smooth??? Any time I try ultra thin lineart it always looks very... first time digital artist.
For me it was first i found a brush i liked and then I slowly just kept making it smaller or the canvas bigger. It's a gradual thing and I honestly don't really know what I do or don't do to make the lineart look good. I think maybe part of it is me doing alot of detailing?
I'll put some examples under the cut!
I don't know if these examples will help because I have no idea what im actually doing and can only guess based on what i think i might be doing æsldkjfælksd I colour my lineart which kinda hides(?) the mess a bit sometimes, smooths it out.
I think its important to note that my lineart isn't actually that smooth, it's kinda messy and sketchy alot because i don't put alot of details on my sketches (comparatively) and i dont follow the sketch perfectly when i line. my lineart would probably count as a detailed sketch for many. (the colouring helps alot!)

For an example c!dreams leather armour! in sketches or older arts its more flat where i draw more dimension to it now which also lets me add damage to the leather which i like doing because otherwise i end up feeling the lineart is "empty?" if theres too much space with no lines

I also paint on top of lineart when i don't like how it looked! (link to timelapse of this art)
In the second example i used a round brush for a new way i like with drawing hair! which is why as i wanted to use my favourite brush in this art, i made the lines so small so i could have more lines in the hair! as my favourite bush is fixed in a flat 20 degrees!
My sketches are generally pretty thick lined compared to what i end up lining so many times one line in the sketch becomes two lines in the lineart! i also draw pretty quickly which I'm happy with for the loser energy it gives the lineart (even tho colouring in the lineart can be a pain when i cant just select it all because of so many goddamn holes) But ultimately when you zoom in you can tell its not that smooth, its just smooth-sketchy but throughout it all which makes it conhesive! (i think) (maybe)
the fact c!dream is my own design i know basically on the back of my hand also helps! it means i can just slap it out without really thinking that hard about it because im so practiced ! (which is why i draw him alot lmaoooo) when i dont know a character as well i stuggle more with thinner lineart because i keep refrencing back instead of just doing what i want. when i draw new characters i usually start thicker and then slowly get thinner lines as i figure out how i want them to be drawn.
50 notes
·
View notes
Note
Just wanted to ask, please forgive me if you've already answred this, what program do you use? Your art fucks HARD and like. I was looking at your art of the two moths over the city they die in and I was hit with the wave of "oh that looks really fucking fun actually." Like i know my art program can't do some of those effects and like, I'd love to try fucking about with them.
hi there, thank you! all my art is done in procreate and paint tool sai
because you mentioned that drawing in particular i thought it would be fun to break it down and show ppl what exactly went into each part of it so check this out
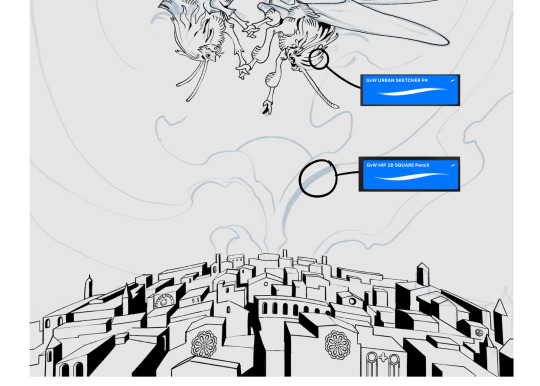
sketch & lineart - the brushes come from georgbrush.club and the urban sketcher is my most commonly used lineart brush, it has a nice irregular shape. the square brush is nice for big blocky sketches.
the cityscape was REALLY hard but basically I got a photo of the skyline of florence, traced some basic building shapes, then bullshitted the rest using the vertical symmetry/mirror tool to cut down on the amount of work (so i only had to sketch one half of the city). then for lineart I turned off vertical symmetry, turned on the two-point perspective tool, and got this:
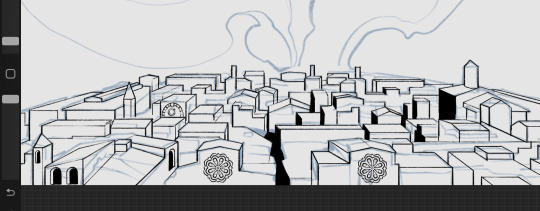
the rose windows were made using the radial symmetry tool.
I didn't like it being so flat, so I used the liquify tool to make a kind of fish-eye effect (limited success tbh). I liked how it looked but the buildings in front needed something to cover them up to make the liquification less obvious...
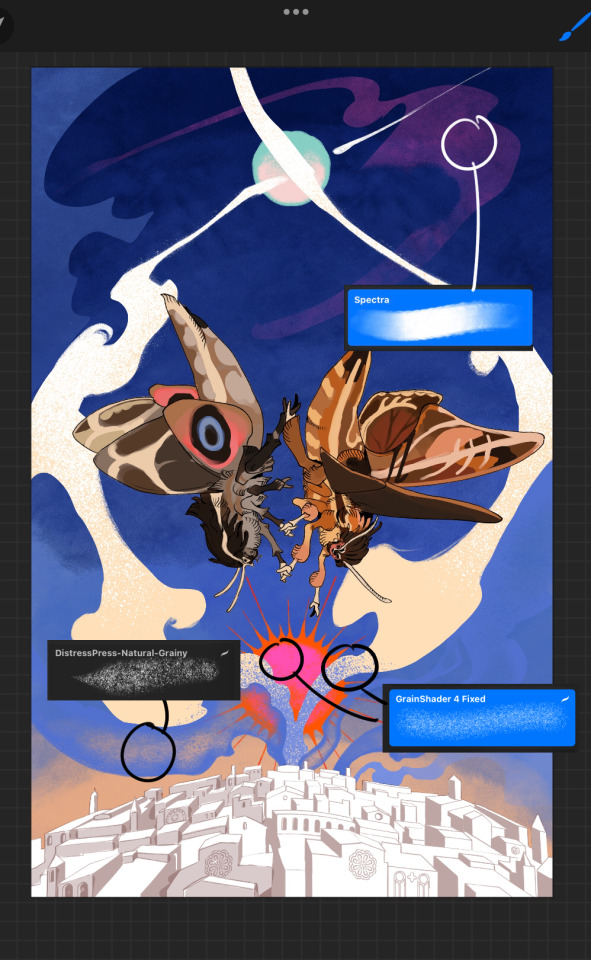
first pass colours. I felt they were very washed out, aside from the sun which i loved. I use the spectra brush (default procreate) for skyscapes a lot, I love the texture. Although the clouds were filled in using the lasso selection tool, I softened the edges using the square pencil again and added texture using true grit sampler grainy brushes. The translucency effect comes from my setting the brush as an eraser. The sun rays come from the radial symmetry tool.
Blocking in the moths' colours was done with the urban sketcher again.
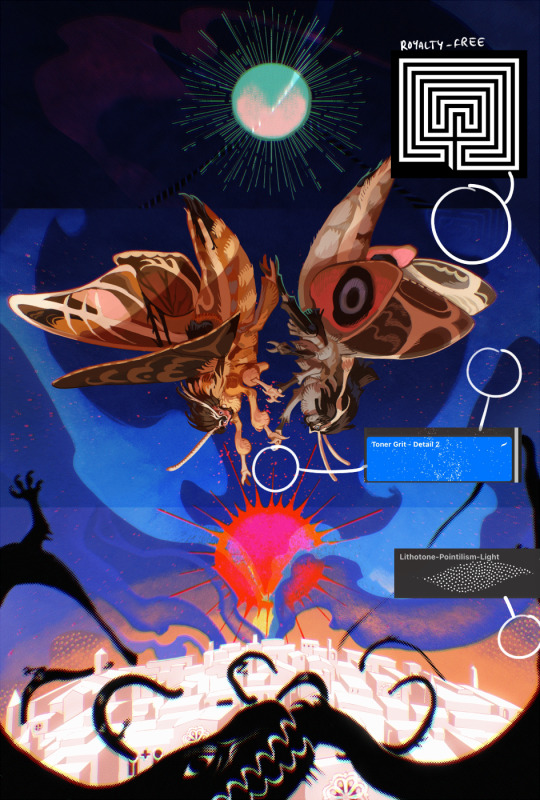
Something people may not have noticed is the labyrinth hidden in the sky! yeah I had a bunch of versions where it was more obvious but I found that it clashed a bit and was too busy, so I made it subtle. But yes. I searched for "royalty free labyrinth" and picked one.
The toner grit brush is one you've seen before if you've looked at any art on tumblr lately (this is such a popular brush) and it's from the true grit fast grit set. The pointillism brush is from the true grit free sampler pack, like my grain brushes.
I added shadows to the moths, increased saturation overall, and changed the clouds to a translucent blue (you can even see in the sun where I forgot to block in the sun itself because the clouds over it used to be opaque lol). Moon rays were drawn using the radial symmetry tool but this time with rotational symmetry off. I also moved the moon down closer to the moths because I felt that it was a bit far away, and this served to visually divide the drawing into three equal parts, so I chose to lean into that and divide the sky colours too, to show passing time, or an endless moment - morning, evening, night, etc.
And then the oroborous, I tried a few different effects on it because I wanted it to be very clearly separate from the main scene - I settled on a dot matrix newsprint texture, using procreate's onboard tool, and some heavy chromatic aberration. This is because the oroborous isn't real, it's purely symbolic and the moths' demise started when they became photographers so I liked the print media aspect there as well. The story itself is about grief without closure, cyclical violence, and sunk cost fallacy, while everyone explores an endless labyrinth, so an oroborous fits I think
what makes art fun to me is thinking up ways I can tell a story using just a single image. and sure a lot of it will be lost to an audience who isn't familiar with the characters or backstory but i want to leave enough in there that even complete strangers to my work will be able to construct a narrative about what's happening here, rather than it just being a cool image. that's my goal.
Finally I exported it to sai on my pc to give it a once-over. this is really important because the retina display on an ipad is oversaturated on purpose, to make everything look amazing and vibrant. but what this means is that on other screens, your work might look washed out. it's especially bad at displaying yellows! so i look at it in sai on my pc and i make minor adjustments, in this case I actually added another multiply layer on the moths and an overlay on their non-shadowed parts to increase the contrast there.
finally if you've read this far, I played a little trick with the caption of the drawing. yeah, THEY die... but only one of those moths is a theythem pronoun haver... the other has to survive. he isn't given a choice in the matter.
#fr you will never catch me trying to mystify my process i will explain literally everything#brushes
467 notes
·
View notes