#Fishing knot tutorial
Explore tagged Tumblr posts
Text
youtube
#Fishing rigs#Fishing knots#How to tie fishing knots#Fishing rig setup#Best fishing rigs#Strong fishing knots#Snell knot#Paternoster rig#Snood rig#Fishing techniques#Fishing tips#Angler knots#Fishing hook knots#Fishing line knots#Knot tying guide#Fishing tutorials#Fishing gear#Fishing hacks#Fishing tackle#Fishing knot tutorial#Fishing knot tying tool#Easy fishing knots#Secure fishing knots#Fishing rigging#Fishing setups#Advanced fishing knots#Fishing for beginners#DIY fishing rigs#Knot tying tips#Fishing success
0 notes
Text
Me: uggghhhhgh want fishnet sleeves + stockings but they're either expensive, super fragile, don't fit me, or just don't ship to where I live :(
Also me: I mean, people make fishing nets by hand??? It cant be THAT hard to make??

Reader... They're really not so hard.
LITERALLY just knot em together, I knitted an i-cord band for the waist band, but like 👀👀👀
I'm just combining my knitting knowledge with the technique of making fishing nets, and I THINK it'll work?
I'm also using fine wool yarn, so this mf AINT gonna break
Will update later, and maybe post a full tutorial if it goes well?
375 notes
·
View notes
Note
Hey, lovely work! If you don't mind I'd love to see the inside of the jacket and know more about how you're fixing/lining the back of clothing with cross stitch on it? Also what count zweigart do you use!
Hi, thank you! I'm using 18ct for the jacket and double knotting the thread on the back and weaving in the loose ends. At the moment it still looks like a mess, but when I've finished stitching I'll put a thin cotton fabric over the back of the area to protect it.
I'm preparing a tutorial/infosheet for the fish jacket, so stay tuned.
13 notes
·
View notes
Text
I was looking up diy instructions on how to make a tattoo choker 'cause I have some fishing line beading string and some beads and gd I loved those chokers back in the day.
but im
so confused??????
by how many of them start out with "buy some stretchy beading cord"???????
you ... you don't need stretchy cord???? the loose loops are what gives it its stretch!
Like it would be one thing if they were just like "I didn't feel like going out and buying more craft supplies, this is what I had on hand so I'm just gonna use it". No, literally every one I saw listed "stretchy/elastic cord" specifically as one of the necessary materials and at least one explicitly said "Step 1: Buy elastic cord".
I kept flipping through different tutorials trying to find one that used the right cord until I finally gave up and figured well at least I can get the actual pattern, I don't need them to be using the same materials
so I got the pattern and I skipped to the end just to see how they closed it and
guys
you made a necklace that was already designed to be stretchy
then you (unnecessarily!) added stretchy cord to it
so you made a doubly stretchy necklace
WHY DID YOU FINISH IT WITH A LOBSTER CLAW CLASP???????
why are you doing ANY of the things you are doing?! do YOU even know why?!
The ONLY possible justification I can imagine for this is that the stretch cord makes it so that, when you actually stretch out the necklace, the loops get completely warped and some of them tighten into proper knots and it completely fucks up the pattern
BUT THEN WHY USE THE ELASTIC AT ALL????? WHY NOT JUST USE LITERALLY ANY OTHER NON-STRETCHY CORD????
Listen
the tattoo choker is made with fishing line cord
BECAUSE IT HOLDS ITS STRUCTURE
It is a CLOSED CIRCLE. You get it on your neck by stretching it out, and because the hard plastic cord is rigid and WANTS to be straight, the loops widen back up and the choker returns to its smaller size. This is also what makes it probably the ONLY truly "one size fits all" thing in the world because it can accommodate any size neck without any discomfort
It doesn't need any extra help with elastic cord and jewelry clasps! You're just making a thing that was already designed perfectly, worse!
4 notes
·
View notes
Text

Here comes the Bride Widow🕷️🕸️
A little something made over the weekend. Read bellow for process!
Material used:
Fake spider
Papercraft
Fishing string
Metal wire
Crazy glue & Hot glue
Exacto Knife
Pincers
Acrylic & Spray paint
Frame from thrift store
Looking through my creepy crawlies from Halloween, I found the perfect body for a Black Widow. However she needed a little bit of love.


First of all, I removed the legs and cut four slits using my knife on the abdomen to squeeze the metal wire. The crazy glue was good enough but I added some hot glue to seal the part better and not make them fall when positioning the legs with the pincers. Afterwards I sprayed the body and painted the signature red hourglass of the spider.


For the web, I forgot to take more pictures. However this tutorial from Kristine Crochet (and many more creators) helped me understand better how to make it. Attach your string in a pie formation and make sure to tie a knot each time you intersect with another string before securing at the back of the papercraft. Since the material is more rigid than yarn, I had to knot at each section for it to keep its place. It took me longer and it's not perfect but from afar it looks almost like the real thing!
Place within your frame and voilà! Another grim decoration!
#gothic decor#diy#my crafts#dark aesthetic#spider#black widow#tw arachnophobia#tw arachnids#tw spiders#gothic aesthetic#spooky decor
5 notes
·
View notes
Note
I love your hoard and jewelry posts! Your vibes are so soft and charming and calming 💕
Do you have any tips on jewelry making? All your stuff looks so cohesive and well built, like it looks like its made to last. And i love all the beads and charms you use
♡♡♡ Thank you so much!! ♡♡♡ That's very thoughtful of you to say!! (୨୧ᵕᴗᵕ) .·₊˚❀·₊˚✩˚₊·.<3
ᕦ(^ω^)ᕤ I guess some tips I might have for sturdy jewellery-making would be tying good knots and using thick string when it's possible (or braiding together thinner string). Fishing line is also pretty strong.
ᕙ(>◡<)ᕗ I often tie knots in between beads or bead groups to make sure they stay in place, and if the necklace were to break, only some beads would fall off, not all of them at once.
ᕦ(òvó)ᕤ Another thing that I often do for jewellery strength is a bit of sewing. If there's anywhere I want to reinforce or any loose small ends I want to keep down, I'll take a needle and thread in a matching colour and just stitch them down.
ᕙ(-ᴗ-)ᕗ Some sort of fray-stop (it's a type of fabric glue to prevent frayed edges) can also be helpful, because it's often washable and not very visible.
I tend to graviate towards earthtones and I enjoy limited colour schemes, so that usually helps with consistency. I like to keep warm tones with warm tones, and cold tones with cold tones. I do also often use beads made of more "natural-looking" materials, like wood, crystals or stones, as well as metal and glass.
I'm able to find most charms and stuff at my local craft stores or fabric stores, I also sometimes make them myself with wire, clay, buttons, shells or stones. I've also made a few keychains into pendants before as well.
You can basically make anything into a pendant, if you wrap it with wire or string well enough. There are plenty of macrame or wire-wrapping tutorials online.
I also often add adjustable closures to my necklaces. The way I do it would be kind of confusing to just type out, but there are plenty of good turorials for adjustable knots online as well.
𓍊𓋼𓍊𓋼𓍊𓍊𓋼𓍊𓋼𓍊𓍊𓋼𓍊𓋼𓍊𓍊𓋼𓍊𓋼𓍊𓍊𓋼𓍊𓋼𓍊𓍊𓋼𓍊𓋼𓍊𓍊𓋼𓍊𓋼𓍊𓍊𓋼𓍊𓋼𓍊𓍊𓋼𓍊𓋼𓍊𓍊𓋼𓍊𓋼𓍊𓍊𓋼𓍊𓋼𓍊𓍊𓋼𓍊𓋼𓍊𓍊𓋼𓍊𓋼𓍊𓍊𓋼𓍊𓋼𓍊𓍊𓋼𓍊𓋼𓍊𓍊𓋼𓍊𓋼𓍊𓍊𓋼𓍊𓋼𓍊𓍊𓋼𓍊
I think that's all I've got to say about that, sorry if this is a long read, but I hope there was something helpful in here. Thank you very much again, I really appreciate it! <|:^D
。⋆·₊˚𐐪𐑂 Take care! 𐐪𐑂˚₊·⋆。
16 notes
·
View notes
Text


Propagating moss
So awhile back I bought this silly little contraption called a “moss dome” which came with 3 sprigs of willow moss. It’s a semi circular cage which fits onto a solid plastic dome with some ceramic balls in it. When it came in the mail and I was mega unimpressed but thought, fuck it let’s see how it goes. A couple of months later, it didn’t grow to become a sphere/bush of moss like the packaging promised. The one in the photo was possibly created using a co2 setup but I can’t bring myself to commit to one.
Next to the moss dome in the first photo there is a plant pot the Anubias came in which I had weighed down with a ceramic plant weight and stuffed a load of moss in. Not tightly packed in, but the idea was that the moss would get a lot more water flowing through it, because moss feeds from the water column, not through roots. The plant pot grew so much more than the dome did. So I had another idea…

I had this idea that I wanted to try a take on the Dutch aquascape using only moss, but using 4 varieties of it in these neat little squares like you would see from an aerial view of the countryside landscape. The idea was that I would make a cage which would trap the moss and let water flow through it but also allow the shrimp to pick at it like they were little farmers. I actually preferred using them like big picture frames on the back wall of the aquarium and the shrimp love to pick at them.
A sortof tutorial:
Materials:
- fishing line
- barbecue sticks
- tank safe super glue
- a new plastic bath luffa (the one that’s made of a bunch of nets)
- airline pipe suction cups
- Hair elastic (possibly not aquarium safe so go with caution on this one, but I’ve had this in my tank for 2 months and we’ve been good )
Step 1, make the frames
I cut some barbecue sticks to 10cm cutting off the pointy ends and then cut little notches 1cm from the ends which would allow them to slot into eachother nicely. I then used an aquarium safe super glue to glue them into a square. Make two of these. They should fit together neatly when layed on top of each other.
Step 2 adding the netting
Cut the plastic bath luffa into 2 neat 10 x 10cm squares
Take some fishing line and use either your hands or a sewing needle, evenly thread the fishing line through the net and wind it around the one of the wooden frames, secure it at the corner with a knot and then continue until the net is evenly distributed. It’s good to have a bit of slack so the moss isn’t completely squashed. Do this for the other side and then tie them together at one side so they open like a book. You now have the frame!
Step 3 Adding to aquarium
Loosely pack some moss into the frame. You should allow all the moss to get some water flow and light. If you pack too much or too tightly it might suffocate and go brown.
To close the frame, tie one corner shut with a small hair elastic. (As I’ve mentioned before, I use this to secure my nets and have had no problems but if you can find something more certified fish-safe then go for it)
Fix an airline suction cup to the wall of your aquarium and then hook the frame onto it like a picture frame.

Hope this helps someone! It was a very quick and satisfying craft project that can be done in an hour or two :3
#mosscore#moss covered#moss#aquarium#nano aquarium#fish tank#freshwater shrimp#cherry shrimp#freshwater snails#amano shrimp#cycled tank#freshwater tank#shrimp
5 notes
·
View notes
Text
Mini fish/whale pattern + video tutorial easy to make and beginner friendly + has pictures
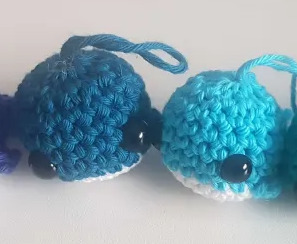

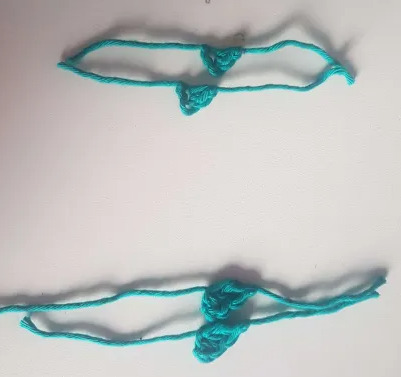
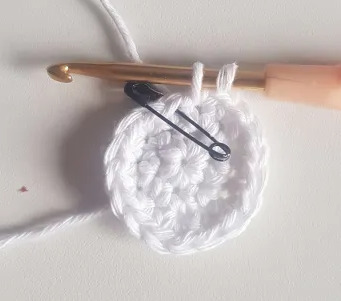
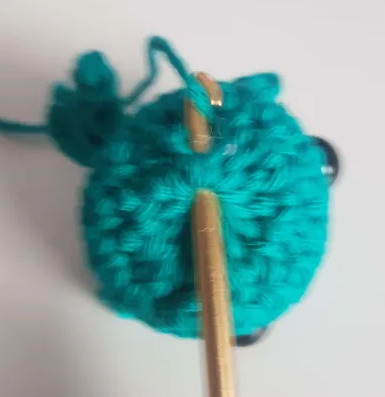
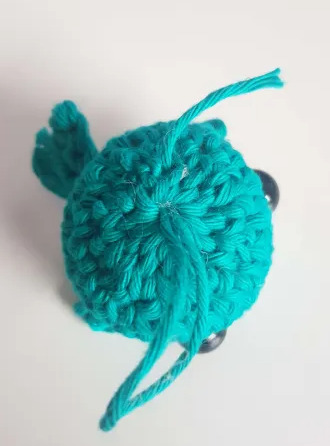
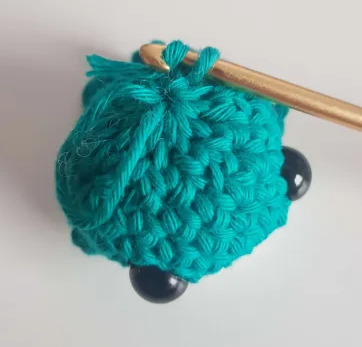
There are some differences to the whale in the vid and mine, but the basic pattern is still the same (body, fins, tail). So things will vary from the video (video also isn't mine). Mini whale: Body: start with white Rnd 1: 6 sc (6) Rnd 2: inc (12) Rnd 3: sc, inc (18) CHANGE COLOUR Rnd 4-8: sc (18) eyes between round 5 & 6, 4 apart. Put the fins and tail on the body Rnd 9: sc, dec (12) DON'T FASTER OFF, cut the yarn, leave it decently long close the hole like in the video Make the loop on top for keychains (not in the video) Fins: ch 2, sc in 1st chain. attach to the sides of whale (the lil triangles) Tail: magic circle 2 sc, dc, fasten off put on the back of the whale (the half hearts, the bottom ones)
How to change colour: Go into the last stitch of the round. Pull up a loop. Take the colour u want to change to and pull that one through both. Continue to crochet like normal. Cut the (in this case) white yarn. Make a knot to secure.


How to put the fins and tail on the mini whale/fish: Fin: First put the eyes opposite of the end of your round. Then put the fins into the second hole. Take the second other yarn of the fin and put it into the stitch next to the other one. Repeat for the other fin. Tail: The tail is put between the two fins. The stitches between the fins should be 7 stitch holes (and one down. the fins aren't on the same height. That's normal). Put both tails into the 4th stitch, so it's in the center. Knot: Knot the fins 2 yarns together to secure them. Knot the tails with each other and then use the yarn of the center white to secure the fins (or they will be able to be pulled out). Knot the yarn of the outside fins togehter with a double knot and cut close to the knots.
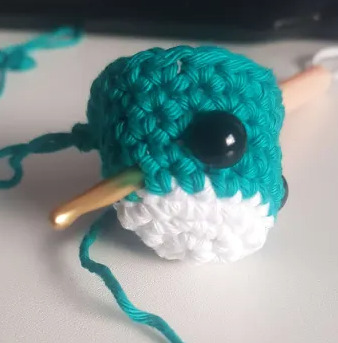
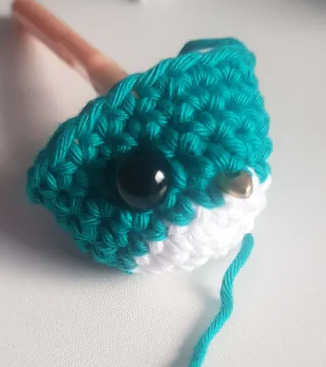
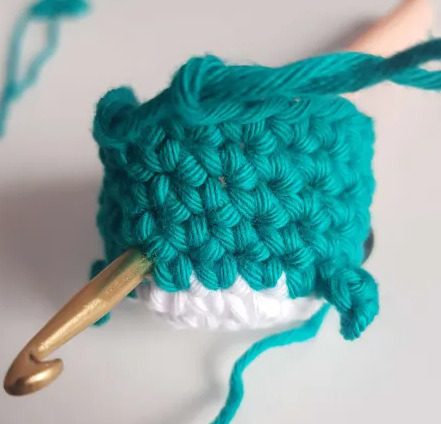
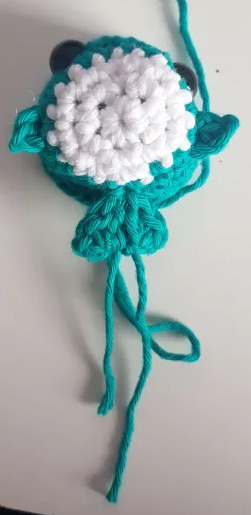
Keychain loop: Take the yarn, go through the top of one of the yarn strands made by closing the head and make a knot. Pull through the hole of the head. Use the yarn still on the other side to knot it to the whale. Spin test. Hide the yarn in the whales body.
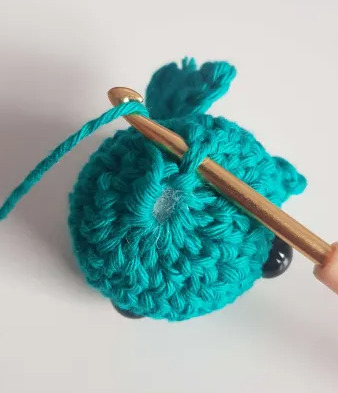
Congratulations you're done ^^.
youtube
#crochet#crocheted#crocheters of tumblr#cute#crochet pattern#crochet ideas#I'm finally done with writing this down omg#Youtube#amigurumi
2 notes
·
View notes
Text
Tips to Maintain a Healthy and Stylish Beard

A well-maintained beard has become an essential element of grooming for many men, symbolizing style, masculinity, and personality. Whether you're sporting a full beard, goatee, or a carefully groomed stubble, keeping your facial hair in top condition requires a dedicated routine. While growing a beard is easy for some, maintaining it to look sharp and healthy demands attention, effort, and the right products. If you're aiming for a polished, healthy beard, these tips will guide you through the essential steps to keep your beard looking great.
1. Commit to Regular Washing
Your beard is constantly exposed to dust, food particles, and environmental pollutants, making regular washing a crucial step in its maintenance. A clean beard not only looks better but also prevents irritation, acne, and bad odor. Washing your beard 2-3 times a week with a beard-specific shampoo or a mild cleanser helps remove dirt without stripping natural oils. When washing, gently massage your skin beneath the beard to exfoliate and remove dead skin cells, promoting healthier hair growth.
2. Condition Your Beard
Just like the hair on your head, your beard benefits greatly from conditioning. Using a high-quality beard conditioner or beard oil keeps your facial hair soft, reduces itchiness, and makes your beard easier to manage. Look for products containing natural oils like argan oil, jojoba oil, or coconut oil that penetrate deeply to moisturize both the hair and skin. Conditioning also helps to combat beard dandruff and prevent dryness, which can lead to split ends and breakage.
3. Trim Your Beard Regularly
Even if you're growing out your beard, regular trims are essential to maintain a neat appearance. Trimming prevents split ends, defines your beard shape, and keeps it from looking unkempt. Use quality beard scissors or a trimmer to touch up uneven growth, focusing on areas like the neckline, cheeks, and mustache. It’s advisable to visit a barber for professional trimming or follow a tutorial if you prefer to do it yourself.
4. Invest in a Beard Comb or Brush
A beard comb or brush is a must-have tool for every man looking to maintain a well-groomed beard. Combing or brushing your beard daily helps detangle knots, distribute natural oils evenly, and train your beard to grow in the desired direction. A wooden comb or a boar bristle brush works best as they are gentle on the hair and help eliminate frizz while keeping your beard neat. Brushing also stimulates the hair follicles, encouraging thicker, healthier growth.
5. Use a Beard Growth Serum
If you're struggling with patchy or slow-growing facial hair, incorporating a beard growth serum into your routine can make a significant difference. A specialized serum, like the Best Beard Growth Serum, contains ingredients that nourish your beard and stimulate growth, giving you fuller, thicker results over time. Look for serums with natural growth-promoting ingredients like biotin, castor oil, and vitamins that support hair health and rejuvenate the follicles. Regular use of a beard serum not only boosts growth but also adds moisture and shine to your beard.
6. Keep Your Beard Hydrated
Hydration is key to keeping your beard soft and manageable. A well-hydrated beard looks healthy, feels smooth, and is less prone to breakage. In addition to using beard oil or balm, ensure that you're drinking enough water daily to hydrate from within. Using products like the Best Serum For Beard Growth can also enhance moisture retention, improving the overall texture and strength of your beard.
7. Eat a Balanced Diet
A healthy diet plays a vital role in beard growth and maintenance. Just as your body needs nutrients to thrive, your beard requires essential vitamins and minerals to grow strong and full. Foods rich in protein, healthy fats, and vitamins like A, C, and E are crucial for hair health. Include lean meats, eggs, fish, nuts, seeds, leafy greens, and fruits in your diet to ensure your beard gets the nutrients it needs. Omega-3 fatty acids from sources like fish oil can also promote hair thickness and shine.
8. Stay Stress-Free
Believe it or not, stress can have a direct impact on the health of your beard. High-stress levels lead to hair loss, patchiness, and slow growth due to the increase in cortisol, a hormone that can restrict hair follicles. To keep your beard growing optimally, practice stress-relief techniques like meditation, yoga, regular exercise, and getting sufficient sleep. Reducing stress promotes overall well-being, which in turn enhances beard health.
9. Be Patient
Growing a beard requires time and patience. Many men become frustrated during the awkward growth stages, which can lead to premature trimming or shaving. Embrace the journey and understand that every beard grows at its own pace. Patchiness and uneven growth are common, especially in the early stages, but with time and proper care, your beard will fill out and develop a more uniform appearance.
10. Use Beard Oil and Balm
Beard oil and balm are two essential products that no beardsman should go without. Beard oil moisturizes the skin and hair, preventing dryness and itching, while adding a healthy shine to your beard. On the other hand, beard balm provides a bit more hold and is perfect for shaping your beard and taming flyaways. Both products work in tandem to soften your beard, making it more manageable and giving it a well-groomed finish. Apply beard oil after washing and use balm throughout the day as needed for hold and texture.
11. Tackle Beardruff (Beard Dandruff)
Just like the scalp, your beard can suffer from dandruff, often referred to as "beardruff." This condition results from dry skin beneath your beard, causing flaking and irritation. To combat beardruff, keep your beard and the skin underneath moisturized with beard oil or a serum. Regular exfoliation with a beard brush also helps to remove dead skin cells that contribute to flaking.
12. Exercise Regularly
Exercise doesn’t just benefit your body—it’s also great for your beard. Regular physical activity boosts circulation, sending more oxygen and nutrients to the hair follicles, which can improve growth. Additionally, exercise reduces stress, one of the factors that can negatively affect beard health. A daily workout routine, combined with proper rest, helps create the ideal conditions for optimal beard growth.
13. Avoid Over-Styling and Heat Damage
Over-styling or applying excessive heat to your beard can cause damage and hinder healthy growth. Using blow dryers, heated brushes, or harsh chemicals can weaken the hair and cause it to become dry and brittle. If you do use heat, ensure that you apply a heat protectant and limit the temperature to a low setting. Opt for natural products and styling techniques that don’t put unnecessary strain on your beard.
14. Maintain a Healthy Sleep Schedule
Sleep is vital for every aspect of health, including beard growth. During sleep, the body regenerates and repairs itself, which includes the hair follicles. A consistent sleep schedule helps ensure your body has ample time to promote healthy beard growth. Aim for 7-9 hours of quality sleep each night to give your beard the best chance of thriving.
15. Don’t Neglect the Mustache
While focusing on your beard, it’s easy to forget about the mustache. Keeping your mustache trimmed and styled is essential to maintaining a cohesive look. Trim the area above your lip regularly to prevent your mustache from becoming unruly. You can also use a mustache wax to style and shape it as desired.
Conclusion
Maintaining a beard is about more than just letting it grow. With proper care, regular grooming, and the right products like the Best Beard Growth Serum and Best Serum For Beard Growth, you can ensure that your beard remains healthy, strong, and stylish. Following these tips will not only improve the appearance of your beard but also foster its long-term growth and health. Embrace the process and enjoy the benefits of having a well-maintained, handsome beard!
0 notes
Text
youtube
How To Tie A Ground Line Hitch - Knot. ABOK 1680
The Ground Line Hitch Knot is a versatile knot designed to securely attach a smaller line to a larger one. Commonly used in fishing, camping, and other outdoor activities, this knot offers a strong and reliable connection. The Ground-line Hitch is considered to be a little more secure than the Clove Hitch. So if you are looking for a good way of securing a line to a spar or stanchion, then it is well worth considering the Ground-line Hitch. The Ground-line Hitch is very quick and easy to tie and can be also tied with a quick release slip. It got its name because it is the standard knot for cod fishermen. It is used in affixing ganging lines to the ground line of codfish trawl. #groundlinehitchknot #fishingknot #knotguide Also known as: - Spar Hitch Knot - Picket-line Hitch Fender Knot - Miller's Knot Uses: Attaching a smaller line to a main line Creating a secure anchor point Securing equipment to larger objects Advantages: Relatively easy to tie and untie Holds securely under moderate loads Versatile for various applications Disadvantages: May require practice for perfect execution Not suitable for extremely heavy loads or critical applications Related Knots: -Clove hitch knot -Fisherman's knot - Prusik knot ABOK 1680 _____________________________________ Welcome to the "Knot Guide" channel! Here, we offer a wide range of videos focused on knot tying, bushcraft, survival skills, and more. Our content includes: Knot Tying Tutorials: Learn how to tie essential knots for various applications. DIY Projects: Creative ideas and hands-on projects using ropes and knots. Crafts and Tips: Useful tips and tricks for making the most out of your materials. Survival Skills: Techniques and knots crucial for outdoor adventures. Life Hacks: Practical solutions for everyday challenges. If you enjoy learning about knots, DIY crafts, and survival skills, you're in the right place! Subscribe to our channel for daily videos featuring creative ideas and helpful tips. Don't forget to hit the notification bell to stay updated with our latest content. We hope you find our videos useful and share them with your friends! _____________________________________
#firefighter#camper#sailing#art and craft#knotwork#knotguide#survival#soldiers#maritime#craft ideas#fishing#sailboat#vanliving#Youtube
1 note
·
View note
Text
youtube
#Snell knot#how to tie a Snell knot#Snell knot tying#fishing knots#best fishing knots#strongest fishing knots#Snell knot tutorial#traditional Snell knot#Uni Snell knot#Easy Snell knot#fishing hook knots#knot tying guide#how to Snell a hook#tying Snell knot#Snell knot uses#fishing line knots#circle hooks#bait fishing knots#heavy cover fishing#saltwater fishing knots#freshwater fishing knots#reliable fishing knots#strong fishing knots#fishing knot instructions#Snell knot benefits#fishing techniques#knot tying tips#fishing rig knots#how to tie a knot in fishing line#how to tie fishing knot
0 notes
Text

Couldn’t find any netting needles in my grandfather’s workshop - maybe he didn’t have them, maybe his sons have thrown them away in the twenty years since his death - so I used one of my grandmother’s cake forks.
Still have no fishing net because I feel like the longer I try the less it works. All my knots are slipknots and I do the exact same thing as the tutorial does, yet increasingly I’m getting no knots at all. At least I was resourceful in finding my equipment…
#soz life#fishing net#crafting#dunno what the fuck I’m doing wrong so I’m taking a long break from this thank you
0 notes
Text
Fishing Tackle Solutions for Valley Tieless Fishing: Revolutionizing Your Angling Experience

Fishing is not just a hobby; it's a passion, a way to connect with nature, and an opportunity to find peace amidst the hustle and bustle of everyday life. For many anglers, finding the right fishing tackle solutions is crucial to ensure a successful and enjoyable fishing trip. In recent years, a groundbreaking innovation has taken the fishing community by storm: Valley Tieless Fishing. This new approach offers simplicity, efficiency, and effectiveness, making it a must-try for both novice and experienced anglers. In this blog, we'll delve into the world of Valley Tieless Fishing and explore how it can revolutionize your angling experience.
Understanding Valley Tieless Fishing
Valley Tieless Fishing is a technique that eliminates the need for traditional knots when attaching hooks, lures, or other tackle to your fishing line. This method utilizes specially designed tackle that allows for quick and secure attachments without the hassle of tying knots. The concept behind Valley Tieless Fishing is simple yet ingenious: it streamlines the process of setting up your gear, saving you time and reducing frustration.
The Advantages of Tieless Fishing Tackle
Simplicity and Ease of Use:
Traditional knot-tying can be challenging, especially for beginners or those with limited dexterity. Tieless tackle simplifies the process, making it accessible to everyone.
The intuitive design of tieless tackle allows for quick changes and adjustments, enhancing the overall fishing experience.
Time-Saving:
In the world of fishing, every second counts. With tieless tackle, you can spend more time casting and reeling in your catch and less time fumbling with knots.
Quick and easy tackle changes mean you can adapt to changing conditions and target different species without missing a beat.
Enhanced Reliability:
Knots can weaken over time, especially if not tied correctly. Tieless tackle provides a secure connection that minimizes the risk of losing your catch due to knot failure.
High-quality materials ensure durability and longevity, giving you confidence in your gear.
Versatility:
Tieless tackle solutions are designed to work with a wide range of hooks, lures, and lines, making them suitable for various fishing styles and conditions.
Whether you're freshwater fishing in a serene lake or tackling the challenges of saltwater fishing, tieless tackle has you covered.
How to Get Started with Valley Tieless Fishing
Embracing Valley Tieless Fishing is easy and straightforward. Here are a few steps to get you started:
1. Choose the Right Tieless Tackle
There are several options available on the market, so it's important to select tackle that suits your specific needs. Look for products made from high-quality materials that offer secure and reliable connections. Popular brands such as Valley Tieless Fishing offer a range of options designed to meet the demands of different fishing scenarios.
2. Familiarize Yourself with the Mechanism
Each tieless tackle product may have a slightly different mechanism for attaching hooks or lures. Take the time to read the instructions and practice using the tackle before heading out on your fishing trip. Many products also offer online tutorials and videos to help you get the hang of it quickly.
3. Test Your Setup
Before you hit the water, test your setup to ensure everything is secure. Give your tackle a few gentle tugs to make sure the connections hold. This step will give you peace of mind and prevent any unexpected surprises while fishing.
4. Hit the Water
With your tieless tackle in place, you're ready to enjoy a seamless and stress-free fishing experience. Focus on your technique, enjoy the scenery, and get ready to reel in your catch with confidence.
Conclusion
Valley Tieless Fishing is a game-changer in the world of angling. By eliminating the need for traditional knots, this innovative approach offers simplicity, efficiency, and reliability, making it a perfect solution for anglers of all skill levels. Whether you're a seasoned pro or just starting out, tieless tackle can enhance your fishing experience and help you make the most of your time on the water. So, why not give it a try? Embrace the future of fishing tackle solutions with Valley Tieless Fishing and take your angling adventures to new heights.
0 notes
Text
The Ultimate Guide to Choosing and Styling Your Yukata from Yukata Australia
Diving into the world of traditional Japanese attire can be as exhilarating as stepping into a cool stream on a hot day. A Yukata from Yukata Australia not only cools and comforts but also immerses you in deep cultural heritage. Whether you're a seasoned enthusiast or a curious newcomer, this guide will walk you through selecting and styling your Yukata, ensuring every experience is as fulfilling as it is fashionable.
Understanding the Yukata
A Yukata is essentially a casual summer kimono, traditionally worn in Japan for various festivities. Think of it as the jeans and t-shirt of Japanese traditional wear—versatile, comfortable, and stylish.

The Importance of Fabric Choice
The choice of fabric can transform your Yukata experience. Cotton is breathable and perfect for warmer climates, while a blend can offer a lighter feel for those breezy evenings.
Selecting the Perfect Pattern
Patterns in a Yukata can express everything from personal style to seasonal themes. Whether you choose swirling koi fish or serene cherry blossoms, your pattern says a lot about your personality.
Sizing and Fit Matters
Just like any outfit, fit is crucial with a Yukata. A well-fitting Yukata should be snug yet comfortable, allowing you to move freely without the fabric slipping or bunching.
Color Theory in Yukata Selection
Colors can affect how we feel and how others perceive us. Bright colors like red or yellow can energize, while cool tones like blue or green can calm. Choose a color that complements your skin tone and suits the occasion.
Seasonal Considerations
Just as you wouldn’t wear wool in summer, choosing the right Yukata for the season is key. Lighter fabrics for summer and darker, richer colors for cooler months make your Yukata appropriate and comfortable year-round.
Accessorizing Your Yukata
Accessories can make or break your Yukata ensemble. A simple obi belt can accentuate your waist, while a pair of geta (traditional wooden sandals) adds authenticity and flair to your outfit.
Tying Your Obi Belt
The obi belt is the centerpiece of your Yukata. Learning a basic obi knot is essential, and there are plenty of tutorials that can help make this task as simple as tying your shoelaces.
Yukata for Different Occasions
From fireworks festivals to tea ceremonies, there's a Yukata for every event. Dressing appropriately for the occasion will help you feel part of the celebration and respect the culture.
Care and Maintenance
Maintaining a Yukata involves proper washing, drying, and storing techniques. Treat your Yukata like a beloved garment—handle with care, and it will last for years.
Yukata Styling Tips for Men
Men's Yukata styling focuses on subdued colors and bold, simple patterns. The key is in the fit and the minimalistic approach to accessories.
Yukata Styling Tips for Women
Women can experiment with vibrant patterns and colors. A floral obi belt or a colorful fan can add a personal touch that enhances the overall elegance.
Shopping at Yukata Australia
Yukata Australia offers a wide range of authentic Yukata directly imported from Japan. With quality assurance and a variety of styles, shopping for your Yukata is as enjoyable as wearing it.
Embracing the Yukata Lifestyle
Wearing a Yukata isn’t just about attending events; it's about embracing a lifestyle that appreciates simplicity, beauty, and tradition. It’s a way to connect with a culture that values the subtle art of living.
FAQ: Common Yukata Questions Answered
Still got questions? We’ve got answers! From how to choose your first Yukata to how to keep it looking fresh, we cover all the bases.
Shopping for and styling a Yukata doesn’t have to be daunting. With the right guidance and a bit of practice, anyone can master the art of wearing this traditional Japanese garment. Yukata Australia is here to provide you with high-quality Yukatas and all the support you need to wear them with confidence and pride. Dive into our collection and find your perfect match—your Yukata is waiting to tell its story with you
0 notes
Text
Double Figure 8 Knot Tutorial. Strongest Fishing Knot 🪢
MARCEDRIC KIRBY FOUNDER CEO.
MARCEDRIC.KIRBY INC.
THE VALLEY OF THE VAMPIRES
0 notes
Text

okay i will try to follow my process here (thrown together and accumulated from a bunch of random online tutorials) with the following disclaimers
1. i am still a huge cosplay novice and i dont know SHIT
2. i still have no idea how to permanently prevent tangles. maybe impossible. this is just how I got rid of them, temporarily, for pictures
this is a wig i got 2 years ago and i kind of just fucked around with it and didn't know how to treat it the best. i fished it out of the closet and decided it might help if i gave it a wash before i started the detangle. so i just threw that in the sink with lukewarm water, dish soap, and a bit of the conditioner i use for my actual hair. (i hear some people also use fabric softener but i didn't have any and didn't feel like buying a whole Thing of fabric softener...) so then I sloshed it around a bit in the sink, let it soak, towel squeezed it dry then let it on the wig stand overnight
then for the detangle. the materials i used were 1. wig stand, 2. wide-toothed comb, 3. wig brush with metal bristles, 4. ebin 5 sec detangler
okay so i put the thing on the wig stand and i sprayed a shit load of the detangler on it. i made sure to get the inside and outside of the hair and kind of work it in and out. what i DIDN'T realize is that the spray also gets a bit on the floor and it makes hardwood super slippery so don't make my mistake and put an old towel or tarp underneath to catch it
then I alternate the two tools (brush & comb), starting with the brush to work out knots and tangles and then combing to make parts nice and straight. i also tried to pay attention to how the wefts were sewn on so that the hair would fall natural-looking instead of it being tangled up weird over the scalp. i also spritzed more detangler here as needed.
(also sometimes it was just best to cut my losses and snip out any particularly bad knots. just don't cut out a giant polygonal-looking chunk or something.)
and... yeah that's pretty much it. the wig is still definitely showing age and the ends are getting super wispy but I tried to squeeze together the ends (esp around the front and side bangs) with some lucido hair wax that I have and never use and that helped a lil bit with the styling
and at the con it still got super tangled super fast but. it was manageable!!! to an extent!!! i don't know anything about crimping wigs or any of that stuff but maybe I will study for next time.
ok thats my process have fun and dont die
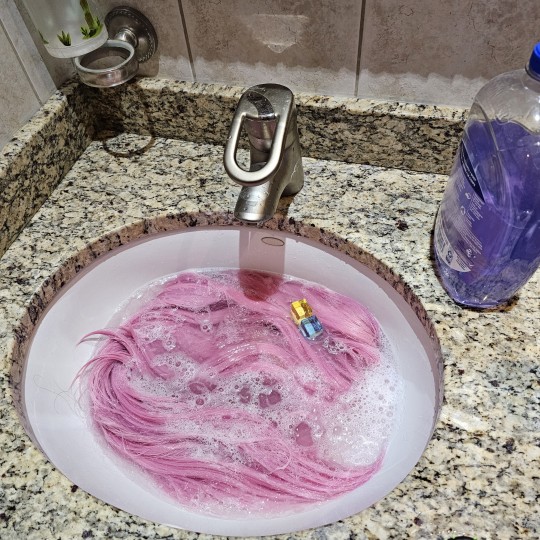
bocchi the PUDDLE
929 notes
·
View notes