#AutoHotKey
Explore tagged Tumblr posts
Visit Tumblr Blog
Explore Tumblr blogs with no restrictions, modern design and the best experience.
Last Seen Tumblr Blogs


Fun Fact
The most popular pages on Tumblr are about Minecraft, GIFs, and David J. Peterson.
Text

So, like this?
The idea was so cool I had to make it happen.
There is an updated version you can see here that ads rewind playing the music backwards, and an additional song. Check it out at the link below because Tumblr is lame and only lets me put one video in a post.
#vtuber#indie vtuber#twitch#emulation#fast forward#breakbeat#breaks#breakcore#game emulator#autohotkey
5 notes
·
View notes
Text
BOOP YOUR FRIENDS TO HELL AND BACK
Do YOU want to boop your friends so hard they look at their inbox and go, "oh shit, I've been fuckin' booped!" Well then I have the tool for you!
boop.ahk <- link (does NOT auto-download)
What is AutoHotKey? Is it a virus??
AutoHotKey is like an autoclicker but better. Think of it like Notepad++ but for autoclickers. It can hold code that is great for booping, such as:
Finding the boop button
Clicking the boop button
How do I use this??
1. Download AutoHotKey. It's very lightweight (1 KB).
2. Download boop.ahk .
3. Go to Tumblr
4. Press shift+P to enter dark mode
5. Using the Snipping tool (Mac, Windows), take a screenshot of the "boop" link

6. Save it as "boop.png"
7. Open boop.ahk by right clicking it and pressing "Edit Script"

8. Follow the instructions inside!
#I promise u it looks like a lot of steps but that's just bc I broke them down a lot#each step takes like. 2 seconds#it has to be in dark mode bc the white background doesn't work with the image finder for compression reasons#any dark background is gucci#tumblr#april fool's day#april fools#boop#super boop#code#computer science#??? idk how to tag this lol#autohotkey#ahk#ahk my beloved
11 notes
·
View notes
Text
so should i install x11 or wayland?
and what kind of hotkey daemon do you guys use? i don't think just hardcoding all my hotkeys into the i3 config is a good idea, because it kinda venderlocks me to i3.
i want to port my autohotkey script

its mostly this kind of stuff tho
#textpost#linux#arch linux#arch#arch linux install#i'm taking this very slow 0_0#germanyposting#autohotkey#win10
8 notes
·
View notes
Text
I have written a booping script

the script if you want to use it lol
go := false
pos1x := 0
pos2x := 0
pos1y := 0
pos2y := 0
; ---Settings for running---
boopCounts := 500
boops := 0
; --------------------------
loop {
if go && boops < boopCounts{
MouseClick, left, pos1x, pos1y
sleep 500
MouseClick, left, pos2x, pos2y
sleep 500
}
}
return
F1::
global pos2x
global pos2y
MouseGetPos, pos2x, pos2y
return
F2::
global pos1x
global pos1y
MouseGetPos, pos1x, pos1y
return
F7:: ExitApp
; Toggle on and off
F6::
global go
if go {
go := false
} else {
go := true
}
return
3 notes
·
View notes
Text
a few days ago i spent some time showing someone on omegle some of the code i wrote and uh

it seems to invoke certain emotions
4 notes
·
View notes
Text
Anyone know how to use AutoHotkey with tumblr?
I wanna make a hotstring that'll paste in OP's blog name, but I am an amateur and have no idea how to do more than check that the focused page is actually tumblr and make the hotstring itself with an empty %OPGet% variable. What I probably need is: determine what post is hilighted (this must be a thing since tumblr can navigate with keys already) grab the post contents. find the post's OP link. strip the name out of the url with regex return the name to the variable.
Any help?
0 notes
Text
Setting Up A Windows 11 Computer as a Permanent Installation
This guide covers setting up a brand new Windows 11 computer to serve as an arcade machine, but it is relevant for any project that where a single program should run in a gallery environment.
I'm a member of the arcade non-profit, Arcade Commons. As you might guess, we frequently make arcade machines that need to work as easily and reliably as possible. They are often on loan to venues, so the more automatic the machine is, the more likely it is to actually be running. This is equally true for setting up interactive projects in galleries.
The goal is for the computer to turn on as soon as it gets power, launch the game on startup, and not be interrupted by myriad updates and other popups that plague the modern Windows operating system. I also added an AutoHotkey script to handle restarting the game if it crashes.
This is an update to my previous post on how to do this for Windows 10.
That post was itself based on this excellent guide by Eva Schindlin on setting up Windows 7 for permanent installation.
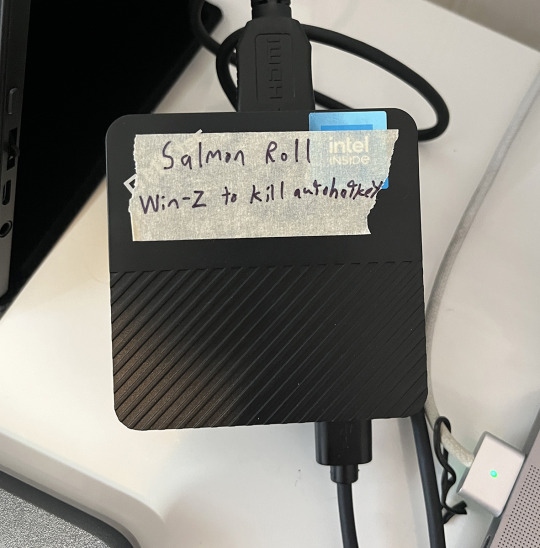
I'm writing this post because I just got a new computer to serve as a dedicated device for Salmon Roll: The Upstream Team, a game I developed with Jane Friedhoff and Diego Garcia. I took notes as I setup the machine, following along with my old post and adding some new things along the way.
I am working with a GMKtec NucBox G5 running Windows 11 Pro.
Required software
Before we get started, get installers for Notepad++ and AutoHotkey on a thumb drive.
I say to put these on a thumbdrive, because I do not want to connect my new computer to the internet if I can avoid it.
AutoHotkey is used for automation. If you don't plan on using it, you can skip this. Note: the AutoHotkey scripts I provide in this post are for v1.1, NOT v2.0. Make sure you grab the right installer.
Notepad++ is an excellent free text editor for Windows. Maybe you can get by doing things with TextEdit, but taking the 30 seconds to give yourself a good text editor will pay dividends.
Finally, I add the game I want to run.
Initial setup
The first time you plug the computer in, you'll get the usual Windows setup flow. If you are not connected to the internet, you should be able to skip linking the device to a Microsoft account.
If you do need to be online, it is possible to circumvent the seemingly required Microsoft account login. Here are a few posts on the subject.
Set the username as something simple with no spaces. I went with "salmon".
Leave the password field blank. This prevents needing the password to login.
On the privacy screen I unchecked every option. No tailored experiences etc.
After that I hit confirm, and the computer thinks for a bit.
Prepping the computer
This is the bulk of the process! We're going to change a lot of settings to keep things running smoothly and without interruption.
1. Run those installers
Install Notepad++ and AutoHotkey.
2. Test the game
Now is a great time to make sure your game actually runs well on this computer.
3. Prevent sleeping
We do not want the computer to go to sleep ever.
Control Panel
Hardware and Sound
Power Options
Change when the computer sleeps
Set it all to “never”
4. Disable Windows Fast Startup
If you set a wake time in BIOS (more on that in a bit) but it doesn't work, that may be because Windows Fast Startup is turned on. This makes the computer startup faster, but does it by hibernating instead of actually shutting down.
While in Power Options:
Select Change What Power Buttons Do
Click “Change settings that are currently unavailable”
Uncheck “Turn on fast startup”
Save changes
On this computer, "Turn on fast startup" was unchecked by default, but that is not always the case.
5. Turn off screen saver
Go to settings and turn the screen saver off.
Right click on the desktop and select "personalize"
Then search for "screensaver" in the search bar of the personalize window
This computer already had screensaver set to "none" but it's worth checking.
6. Change the desktop background
The desktop will be visible during startup and might be seen if the game crashes. It really breaks the illusion of an arcade or art installation to see the default Windows desktop.
While in personalize, you can:
Search for "desktop"
Select "Choose your desktop background"
If you have a logo for your project you can set that image. Otherwise, from the dropdown, select "solid color" and pick one. I go with black.
For the DreamBoxXx we set the desktop to be an image that looked like a loading screen, which worked amazingly well!
7. Set the computer time
Make sure the system clock has the correct time. This is important to automate startup/shutdown.
Right click the time in the bottom right corner of the taskbar
Select “Adjust date/time”
8. Disabling updates
Updates have a good chance at messing up the setup, so it is worth avoiding them. As much as possible, you want this install to be frozen in amber.
I'm trying to avoid this by simply never connecting to the internet, but that will often not be viable.
Poking around online and the consensus seems to be that there is really no way to stop them short of staying offline.
Some possible solutions that I have not tested:
Reddit post
Microsoft Forum
9. Disabling startup processes
Press the Windows key and search for “startup”
Select "Startup Apps"
Disable all of them
If your project requires QuickTime or some other Apple product, set Apple Software Update to never check for updates.
10. Hide the taskbar & widgets
Right click the taskbar and select “Taskbar settings”
Turn Widgets off
Scroll down and expand "Taskbar behaviors"
Check "Automatically hide the taskbar"
11. Add shortcuts/aliases to the startup folder
We'll want to have items that run on startup. This means dropping them in the startup folder (which is different from the panel where you disabled the startup processes).
You can open this folder by pressing Win-R for the run prompt and entering shell:startup
If you don't mind doing this every time, it's fine to just memorize that command, but I like to make a shortcut to the startup folder.
With the startup folder open:
Go up one level by selecting the enclosing folder, Programs
Right click the Startup folder
Select "Show more options"
Select Send to->Desktop (create shortcut)

A shortcut is an alias, a link to another file or folder on the computer. It is not a copy.
You can move this shortcut anywhere. It does not need to stay on the desktop.
Double clicking it will open the startup folder, same as entering "shell:startup" on the run prompt.
I'll dive into some AutoHotkey stuff further down, but if you just want your game to launch on startup, you can make a shortcut for the game and drop that shortcut into the startup folder.
Go to the exe for your game
Right click and select "Show more options"
Select Send to -> Desktop (create shortcut)
Find the shortcut/alias on the desktop
Drag it into the startup folder
This should be enough to launch your game on startup.
12. Bypass the login screen
If you kept the password blank and did not connect to the internet, the computer should skip the login screen. No muss no fuss.
But if you are getting a login screen, here's what I did on Windows 10. It may still work.
By default, you need to enter your password on startup, but this can be turned off. Here are the steps in this guide to bypass this.
Search for “netplwiz” in the start bar
Uncheck the box labeled “Users must enter a user name and password to use this computer.”
Hit OK
If you do not see this checkbox in the netplwiz screen, you may need to disable "Require Windows Hello sign-in for Microsoft Accounts." You can follow these steps from Tenforums user Faslane to do it pretty easily:
Just open the sign in options at settings/accounts/sign in options and turn the "Require Windows Hello sign-in for Microsoft Accounts" to off, then re-open Netplwiz. Voila! it's back ;-)
Modern Windows 10 PCs are set up with a PIN and not a password. Presumably this is true in Windows 11 as well. You will need to disable the PIN first, otherwise the option to bypass the password won’t show up in netplwiz.
Furthermore, if you don’t have a password OR pin, then the message “Require Windows Hello Sign-In” will be checked ON but greyed out so you can’t change it! So you need to then ADD a pin, uncheck the box, then you will see the checkbox in netplwiz.
Although I have not tested these steps for Windows 11, in favor of never connecting to the internet, they seem to match up with this Windows 11 answer from Tobias Schneider on the Microsoft forums.
13. Preventing the “Let’s Finish Setting Up Your Device” blue screen
Fellow Arcade Commons member Mark Kleeb recommended I add this as it has come up in a bunch of our machines. This screen can be really annoying because it often waits a few days or months before popping up and ruining your installation.
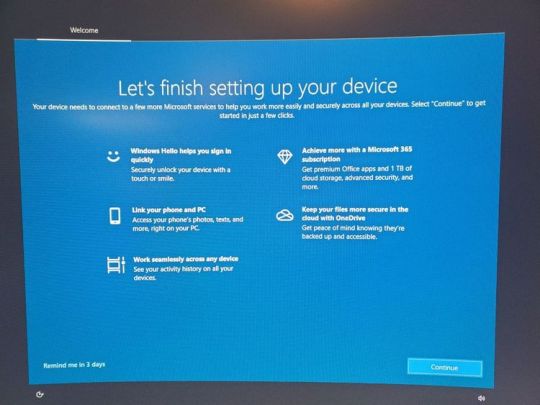
This post on the Microsoft forums has a solution for Windows 10.
The exact options are a little different on Windows 11:
Open Settings
Select System
Select Notifications
Scroll down to Additional Settings and select it
Uncheck everything
While I was in the Notifications page, I went ahead and unchecked everything because why not.
14. Hide desktop icons
This is optional, but I like to put the various files I need on the desktop. I also don't want it to look cluttered if people see the desktop during startup:
Right click anywhere on the desktop
Select View
Uncheck "Show desktop icons"
You can still view the desktop files by opening a file explorer window.
15. Setting the computer to shut down automatically
For some installations, this will not matter, but we often have the arcade machines living at venues. We can't count on the staff there turning them on and off, so it's good to automate this so the computer is not running 24/7.
Shutting the computer down can be done via the Windows task scheduler. Turning it back on is done via BIOS (we'll get to that in a second).
You can ignore this if you're in an environment when you will be around to turn the computer on and off.
Eva Schindling’s guide has this process with pictures and it is relatively unchanged in Windows 11, but here are the steps:
Control Panel
System and Security
Windows Tools (in Windows 7 and Windows 10 this was "Administrative Tools")
Task Scheduler
Action Menu
Create Basic Task
Add title and description
Task Trigger: select Daily
Set your shut-down time and recurrence
Action: select Start a program
Program/script: C:\Windows\System32\shutdown.exe
Add arguments: /s
Click Finish
Make sure you remembered to set the computer time!
BIOS settings
BIOS is short for Basic Input/Output System and it is the firmware that lives on your computer at a lower level than your operating system.
There's a good chance you've never needed to look at it, but this is where we can do things like ensuring that the computer turns on as soon as it receives power, or having it turn itself on at a given time (as long as it is plugged in).
Every computer has a different BIOS and there are different ways to open up BIOS, but it generally involves holding a function key during startup. Restart the computer, and start holding the key as soon as it shuts down. You generally need to be holding it the moment it starts to enter BIOS.
The specific instructions here are for a GMKtec NucBox because that's what I'm setting up, but the general principle can be applied to any computer.
You may need a wired keyboard to do this. Wireless keyboards may not be connected yet during the startup process. Often it's fine (it was on this computer), but if you're not getting a response, try a wired keyboard.
For this computer I had to hold the delete key during restart. Other computers I've worked on have used F12 or F2. Search for "enter BIOS [brand of computer]" for this info. Some computers will print the key you need to press for BIOS during the startup process, but many don't.
BIOS may be a keyboard-only DOS-looking screen, or it may have a simple GUI (although one that you can probably navigate with just keyboard). Likewise, the exact settings will be a little different, but I'll tell you what to look for.
Make sure to save and exit when you're done. The computer should startup normally after that.
BIOS to turn the computer on at a set time
You are looking for a setting along the lines of “Resume by Alarm” or “Wake Settings.”
For example, on the computer we used for the DreamBoxXx, it was under advanced->S5 RTC Wake Settings.
On my GMKtec NucBox it was under Power->S5 RTC Wake Settings.
Then I set it to "Enabled" and selected "Fixed Time".
Note: Make sure you disabled Windows Fast Startup earlier or this may not work.
BIOS to turn the computer on when plugged in
It's very handy to not need to press the power button to start the computer. By setting the device to turn on as soon as it receives power, your whole installation can be turned on by flipping on a power strip.
In the BIOS settings, there will also often be an option to have the computer turn on when it is connected to power. The setting is often primarily for what to do after a power outage, but we can use it for our purposes. The name of the setting changes from machine to machine, but it is typically something along the lines of “AC Back On” or “Action When Lost Power” or "Wake on Power".
For my GMKtec NucBox, it was under Chipset:
Chipset -> PCH-IO -> Wake on Power -> S0 State
You really have to dig to find this option sometimes. Searching the web for "[Computer band] Wake on Power" can help.
AutoHotkey
This part is optional, but using an AutoHotkey script to automate things, like relaunching the game if it crashes, can be useful.
In the case of Salmon Roll, simply putting an alias to the game in the startup folder is not enough because when it launches, there's the little Unity popup where you have to click "Play".

So instead I made an AutoHotkey script that launches the game, waits a few seconds and then presses ENTER.
It also checks every 10 seconds to see if there is no window matching the window title of the game (which is what will happen if the game crashes or somebody closes it), and it will relaunch the game if that happens.
You can see my script here. Feel free to modify it for your own purposes: https://gist.github.com/andymasteroffish/41a02deb5d2924dadb4e3c005e564b8f
If you do not need it to press ENTER after launching the program, just remove these lines:
Sleep 5000 ; Wait 5 seconds Send {Enter} ; Press Enter
Full disclosure: I am script-kiddie-level with AutoHotkey and this is mostly clobbered together from old scripts and random things from the internet.
I HIGHLY recommend putting the hotkey to kill the script in writing on the computer. It can be super confusing to try to work on a machine where an AutoHotkey script is running in the background opening apps or taking control of the mouse etc. I always use Win-Z to kill my scripts, but it's up to you. Do not write an AutoHotkey script that has no way to exit.
It is easy to forget to do this and you will regret it.
Once you have your AutoHotkey script, you can put it directly in the startup folder. If you are using AutoHotkey, make sure that you do not also have an alias to the game in the startup folder or it may launch twice.
That's it!
Hopefully that gets your arcade game or art installation running from now until the end of time.
Remember: do not connect to the internet if you don't have to!
And if you are more technically inclined, consider Linux for tasks like this.
If you use this guide, hit me up on Mastodon or Tumblr and show me what you made!
Follow Arcade Commons on Twitter, Instagram or Bluesky to see our games in action!
0 notes
Text
Capslock 키의 활용도 높이기 (AutoHotkey)
여러분은 CapsLock키 많이 쓰시나요? 유용하게 잘 쓰시는 분들도 있겠지만, 저 같은 경우에는 거의 사용하지 않습니다. 심지어 어떤 분들은 이 커다란 키가 뭐하는 키인지 모르는 분들도 계실 것 같고요. CapsLock키에 대해 한 가지 아쉬운 점은, 그 쓰임새가 신통치 않은 것에 비해서는 너무 좋은 자리에 위치하고 있다는 점입니다. 이 낭비되는 키를 어떻게 더 효율적으로 활용할 수 있는 방법이 없을까요? CapsLock키를 다른 키로 변경하기 먼저 해야 할일은 키보드에서 CapsLock 키를 누르더라도 해당 키가 아닌 다른 키로 인식하도록 하는 것입니다. AHK에서도 CapsLock 키를 조합키의 일부로 사용할 수 있지만, 기본적으로는 윈도 레벨에서 이 키를 흔히 쓰지 않는(?) 키로 인식하도록…

View On WordPress
0 notes
Text
does anyone on here know autohotkey and is willing to help someone out with syntax?
I'm working with regex and I know how to get what I want on the regex side of things, but not on the autohotkey syntax.
1 note
·
View note
Text
AutoHotkey Newsletter September 7th
Imagine you’re making your cup of morning coffee ☕. If you’re like my wife you like it with 2 sugars and 3 creams. However here is how you go about making it: You pour 2 ounces of coffee in your coffee cup You add 1 sugar You add 1 cream You pour 2 more ounces of coffee You add the 2nd sugar You add 2ndcream You pour 2 more ounces of coffee You add 3rd cream You pour 2 more ounces of…

View On WordPress
#AutoHotKey#AutoHotkey News#AutoHotkey Newsletter#september AutoHotkey newsletter#september newsletter
0 notes
Text
someone who is good at autohotkey please help me
i cant multi-letter inputs to work at all. not even just multi-character, specifically multi-letter

with this, typing t will always result in test. doing so while holding shift will result in Test
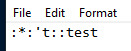
if i change it to this, now typing 't will result in test
so far so good right?

with this, i can't get ts to put out test at all. i don't know what's so different about checking for multiple letters compared to checking one letter and an adjacent bit of punctuation. help
0 notes
Text
(FAKE) ANY GAME STARTER AND RPC
Okay, so I used Numenor's Any Game Starter to run multiple Sims 2 games with separate mods and such for years, but I also wanted to use Lazy Duchess' RPC launcher for it's many conveniences. Since both use their own launchers, you couldn't't use them together...
UNTIL I MADE A WORKAROUND
AND IT WORKS (mostly)!
What I've done is made AutoHotkey scripts, one for each separate 'installation' of the game. I have a launcher icon for each script on my desktop.
When I run a game's script it:
Deletes everything in the running directory that RPC uses
Copies everything from the game directory backup I have saved on a separate drive (with the downloads and all the save data for each 'game') and pastes it into RPC's running directory (this takes a while but I can just leave it going while I do other things, which I'm used to since I have a lot of mods and CC so my game takes a while to launch anyway)
Runs a separate script I use to change Ctrl+Shift+C to something that doesn't interfere with the mouse/keyboard sharing software I use for unrelated reasons
Waits in the background until I close the game
Copies everything currently in the RPC's directory to the relevant backup folder (overwriting any duplicates) (this also means my game is backed up every time I play which is nice since I am terrible at remembering to back things up)
Closes the secondary hotkey script (except I haven't got this part working yet, I have something that I thought should close it, but it doesn't work)
Then closes itself
So I have one script that opens the game with all my mods and saves that I use when playing with Lazy Duchess' Story Progression mod. One that opens the game with all the mods and saves I use for my medieval save. One that opens the game with the mods and saves I use for the one with the sims who have super long lives.
It's limited only by the amount of space I have on my secondary drive where I back up the game directory to.
I still need to get the part where it exits the secondary script that does my hotkeys for the console working, and I'd like if I could get it, so I didn't have to copy/move/backup the entire game directory because it takes a while, but I'm not sure what all I need to make sure I have all the relevant stuff for the saves in that particular game.
#sims 2#ts2#AnyGameStarter#Any Game Starter#sims2rpc#AutoHotkey#Auto Hotkey#It's not that complex#But I feel very smart
0 notes
Note
I got a second keyboard and used a combination lua macros and autohotkey to make it so that I can type a bunch of non-qwerty keys using that second keyboard: one of the characters that was the onus for me getting that keyboard was I really wanted to be able to just type – instead of having to rigamarol a copy past.
And now in addition to having immediate access to – and —, I can just type ä, æ, ö, ü, ß, é, ñ, þ, ‚ (for 'commas' in tumblr tags), ‽, –, —,℉, ¡, ¿, ¹²³⁴⁵⁶⁷⁸⁹⁰ (for citations /footnotes), and a bunch of other characters which have... varying degrees of usefulness, all set up in such a way that if ever I want to change the set up it's as easy as look up the unicode index for the character, and put it into a text doc on which ever line represents the key I want it to correspond to.
My current keyboard looks like this (one physical 8x6 keyboard with three modifiers):

I wholeheartedly reccommend that anyone who semi-regularly needs one or more characters not in their standard keyboard's layout bother with setting up a custom auxilary keyboard.
A pet peeve of mine, as many others, is when the dialogues format is a fucking horrible mess. But my first language is not english, so I can get over the comma being out the quotation marks instead of in, for example. But also, as many americans, I also do not like the „“. However, I can get over it too because that's just a cultural difference, being the German way of writing it. (Though I think other languages also do that, but don't remember the list.)
Now. Cultural difference is one thing. Using whatever the fuck you want because (general) you can not even phantom the idea of searching the correct punctuation mark is another thing.
My language used em dashes. And sometimes people just use everything but em dashes. I have seen people using the hyphen, the minus sign, and even the underscore. The damn underscore. I want to cry when I see the underscore in what is supposed to be dialogues.
--
721 notes
·
View notes
Text
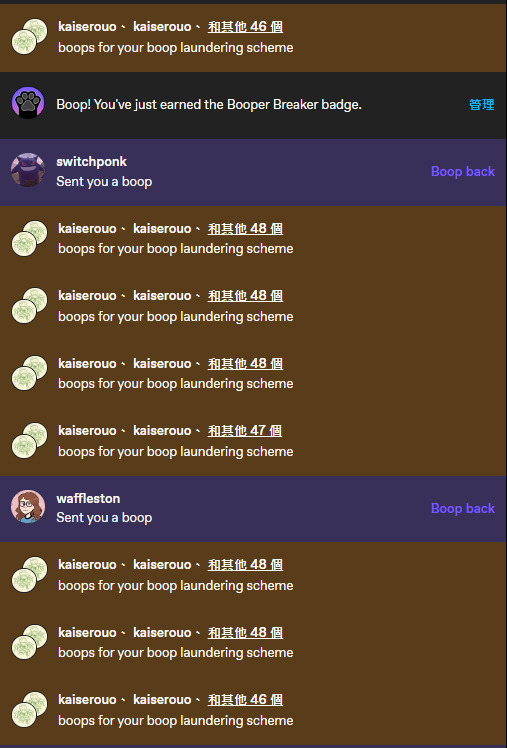
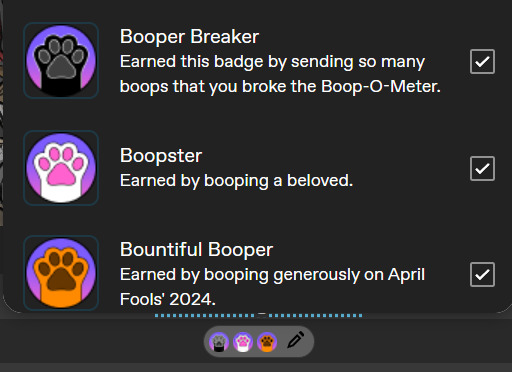
performing mass boop laundering scheme before bed for the badge
#just notice those badges exist#and if this actually only last 1 day then i'll wake up with the event already ended#panicked and jumped down from bed#emergency autoclicking activated#thank you autohotkey#btw i dont wanna frighten anyone with 900+ consecutive boops so thats why i dont really do this on people
7 notes
·
View notes
Text
oh thaaaaaaaat's how you mass boop someone

6 notes
·
View notes
Text
i have never known peace
#autohotkey is my best friend in times of need#also mouse buttons 4+5#whenever my wheel decides it hates me they keep my safe
4 notes
·
View notes