#2 layer print
Explore tagged Tumblr posts
Visit Tumblr Blog
Explore Tumblr blogs with no restrictions, modern design and the best experience.
Last Seen Tumblr Blogs


Fun Fact
In Q3 of 2020, 31% of US users access the Tumblr app daily.
Text


@wickjump you will never not be an absolute genius
#UTDR#UTMV#Wickjump#I just need these tags I have to keep them#I wanna print them and put them on my wall#This is everything to me#He just instantly becomes that like ''I'm the only one who does any work around here!!''#But if you try to help he's like ''but that's mine :< that's my job I do that :c''#Nightmare is gonna have to invest in so many star stickers#Do you think they have one of those star charts for Cross to put them on?#And the others have like. maybe 1 or 2 stars and Cross has like 45#But still refuses to believe he has earned anything around here#And him being mildly terrified of Horror#He's got that Jason Voorhees intimidating aura lol#I love Killer being like finally I don't have to do dishes! and then immediately trying to distract the guy who does dishes#Nightmare must think he hates having plates or something#No he just can't see Cross and leave him alone apparently#Also I feel like this adds a new layer to the saga of ''why are you always in Cross's bed''#Because I can imagine one time Killer invited Cross to sleep in his bed instead#But Cross took one look at the clothes all over his floor and junk everywhere and was like ''I have to leave right now immediately'' lol#Anyway I love reading your tags and posts so much they make my day <3
66 notes
·
View notes
Note
was heaven watching after all?

#Sorry about the short loop#this was making my computer lag out bad cause of how many layers it had so i couldnt do much else with it lol#Im sure you can figure out why the computer has to have them printed out now#[you've got mail!]#spamton#spamton g spamton#deltarune#deltarune spamton#deltarune chapter 2
294 notes
·
View notes
Text
making clues for a murder mystey rpg and have spent 4 days on a photobooth photo that might not even be used (˚ ˃̣̣̥⌓˂̣̣̥)


frame 1 of 3 done... why do i do this to myself?
#BrainDeadArt#yes#i'm a tracer#sue me#this was the easy part#now i have to make 2 more of these but with the same people doing different poses#why is there a photobooth at a carnival anyway?#why does it have to be one of the clues?#why do i even have to draw it and print it out like a real photo???#i made the map the same way#wtf#last time i played Dread we just talked about it. it was just a verbal game#and here i am making every single prop imaginable#I EVEN MADE COSPLAY#(i'll upload those photos later)#i just hope the lego people i ordered online will get here soon because the last dread session i hosted I borrowed my nephew's#and he cried when he went home without them because he thought i stole them#lil homie you left early you can't fault me for that#hay naku#dread#the things i do because i'm#neurospicy#ms paint#layers are hell#but such a blessing#mp
5 notes
·
View notes
Text
i think i reached a new level of hyperfixation today. i'm not just burning custom tjmd dvds i'm printing custom labels and box art for those bad boys
#even at 480p it's gonna take two dual-layer discs for each season#i could probably squeeze it onto fewer if i didn't care about seasons and just put as many eps as would fit#but 1 season = 2 discs makes my brain happy#i need to call my library tomorrow and ask if they'll let me print the labels on their printer as i do not own one#tjmd#my posts
12 notes
·
View notes
Text

✨travel hopefully✨
click for better quality (i had to resize it to be able to upload it 😂) I made this fanart of 13 to take to gally1 (& gave a copy to Jodie!)
I wanted to encapsulate a lot of my favorite things about this era. the main reference image I used was the scene where she builds her sonic screwdriver because I just loved the expression of joy (and the goggles!) and then I swapped out her outfit and picked the magenta shirt bc it's my favorite, and I love whenever they take the tardis into outer space and open the doors to look out at the incredible universe, so that's here (and color-coordinated to go with the galaxy decor in my room!) and of course, I've loved the inside of 13's tardis and how alive it feels 💙💙
#doctor who#thirteenth doctor#13th doctor#doctor who fanart#the thirteenth doctor#this took me about 2 months to finish#and i made the image size so big my little procreate program could only handle 4 layers total#but now the image is big enough to print on a blanket probably lolol#watermark is my instagram#my art
56 notes
·
View notes
Text
For the last few weeks of my second year of art college I worked on a comic (as I might have mentioned haha) and I finally got around to translating it into English!! Soooo

(rest is under the cut!!)


#i think i spend abt 3 weeks on this? had to speedrun all the illustrations in one week (with an injured drawing wrist too smh)#and the other 2 weeks were spend riso printing it!!#it had to dry for 2 years per printed layer haha#but!!!#i love the results#blocked out my legal name on the introduction page lmao don't mind me#the comic is about the church and church tower in the dutch city Utrecht (the Dom tower and the Dom church)#the buildings got seperated in a storm 350 years ago#and this comic portrays the story of the woman who is trying to rebuild a part of the dom church and her trials and tribulations#when we got the comic printed we also handed them to visitors at the worksite which was really fun!!#was a good project to make!!!#i really loved doing it#anyway#artinandwritin's art#illustration#comic#comic book
4 notes
·
View notes
Text
for real shoutout to 2 trans 2 furious zine's impending printed availability in a handful of presumed indie bookshops hither & yon....that Is fun as hell overall and in knowing that wynnstannery led to a page in a book that someone might wander into their whimsical local bookstore and flip through and learn about cam stone
#plus all the individuals' preorders that have already happened....and that's not even counting the intended digital option#2 trans 2 furious#my [that contribution title] wasn't lying [i want everyone to know cam stone; nonbinary f&f character; already exists]#i didn't title it Exactly That but extremely similar. like ''i want everyone to know about nonbinary fast & furious character cam stone''#also got the Printed Copy advantage of that very flip throughability#there's definite other comics / illustrations / collages / pics / edits etc but it is Mostly Shortform Text entries#so the breaks in text for images will not only have the [more immediate visual parsability] of images always but ofc be rarer#that is. flip through and learn about cam stone all the more readily / quickly lol. Spreading The Word#and i do find it also fun & silly that we've put a page of anything in a book ppl can buy; & have; & now may even buy in stores#bluestockings in nyc accept this within your book category challenge#very fun specific layers of alignments to lead to that happening. that's serendipity babey#cam stone
3 notes
·
View notes
Text
A small shelf update
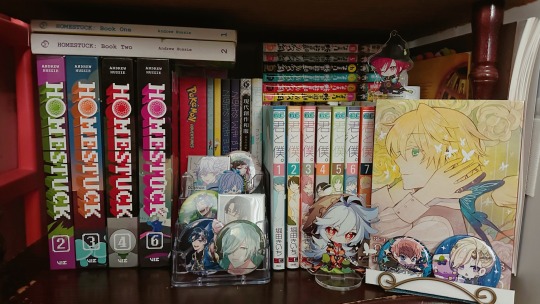
I bought the Homestuck books.
I bought Vol 3 and 6 on Instocktrades and they arrived this morning and were very well packaged. I ordered two volumes of The Royal Tutor, from the same site, to finish my set, but that’s arriving separately.
This shelf will only temporarily look like this since I still need Vol 5 to finish my Homestuck set, and I might buy Vol 2 and 3 of the collectors edition of Pokemon Adventures at some point.
I’m basically at the point where I’m just waiting on series to continue or manga I already read getting licensed (“I want to end this love game” is releasing in a few weeks!). It’s a good thing since I don’t have a lot of space left on my shelf and I had to move some other series into letter boxes (from Michaels) under my self to make room.
Though they all won’t be up there, I’ll post another shelf pic when I finish off The Royal Tutor (I’m hoping I can fit Vol 6-8 and 14 to 17 on the top shelf, I have Vol 1-5 with part of Pandora Hearts and The Case Study of Vanitas)
#desiree reads#desiree talks#manga#homestuck#tfw your shelf already has a bunch of old books so I have to make do with what I already have#i could fit like another like 60 volumes if they weren’t there#though they’d be double layered or whatever to describe it#the homestuck books are incomplete into act 5#which sucks#but i bought them since theyre no longer in print and hs still has a place in my heart#so why not my self#i had vol 1 of the tapatoco ver back in high school#and vol 1 of the viz version is out of print#like i cant even find used ones on amazon ebay or mercari#so i ended up just getting a used vol 2 of the tapatoco ver instea
0 notes
Text
Gotham has always been weird, so when the groundskeeper at the cemetery noticed the Wayne kid’s plot was disturbed, he just chalked it up to more of the same ol’. Alright, so ‘disturbed’ may be a tad too light of a word, but what’s an empty grave in the grand scheme of Gotham? God knows in a city like this one, they could use all the burial room they could get. He figured he’d just jot it down on the website and hope nobody noticed for a while.
Too bad he didn’t account for the 13 year old boy in Bristol who periodically checks the cemetery’s website when he’s feeling particularly lonely.
Plot Removed.
Tim Drake stared at the two words under the heading for Jason Todd’s plot number. Removed? What do they mean ‘removed’? They can’t just remove a plot? That’s a person down there! That’s Robin down there! You can’t Remove Robin!
Calm down. Deep breaths. Assess the situation.
Robin has been dead for 5 months and 14 days. There is no reason for a grave to be removed that early, especially one of a member of such an affluential family. Chances are likely it’s a simple clerical issue. He can call first thing in the morning and make them aware of the mistake. He can have it all fixed in 5 hours.
Just a phone call.
In 5 hours.
…
Tim hates talking on the phone almost as much as he hates waiting.
Well it won’t be the first time he’s snuck out to head to Gotham proper at 1am. It can’t even really be considered sneaking out if there’s no one home to catch you.
Buses stop running at 2, so he layers a couple sweaters under his coat and grabs his best running sneakers so he can comfortably make the trek back.
Just a quick trip to settle his nerves. Maybe get a few shots in if he spots Batman, but really he just wants to see with his own two eyes that things are okay and Jason can rest.
It’s 1:37 by the time he gets to the headstone reading ‘Here Lies Jason Todd’ and the gaping, muddy pit in front of it.
This- This doesn’t make any sense. This is not removal. This is destruction. Desecration. Somebody did this. Somebody-
Assess the situation.
A hole in the ground, approximately 1.5 feet in diameter.
Mud and grass flung outward but with little force.
Large chunks of earth turned over and shoved away.
No signs of tool marks or clean lines of entry into the dirt.
Dragging claw marks.
Staggering, shuffled pairs of foot prints in the mud.
A trail of dirt.
Something… Something large clawed its way out of the ground here. Something large and bipedal and- and humanoid.
Tim refuses to jump to any conclusions he can see all the facts laid in front of him. He’s going to cautiously follow the trail and simply hope to any god listening that he isn’t the world’s first line of defense against the zombie apocalypse.
He’s been walking for 23 minutes and there’s good news and undecided news. Good news: he’s closing in on the target and the trail isn’t taking him out of the way so his trip home won’t be prolonged. Undecided news: The potential Zombie Robin is heading directly for Wayne Manor.
As zombie apocalypse news, this is very bad. From Tim’s collected observational evidence, his not-so-professional opinion is that Batman, faced with a horror movie level zombie of his dead son, would not respond well, and would likely not fight back.
In Batman and Robin news? Tim’s unsure. If Jason is simply back? What could that mean for them? Batman can have his Robin. He wouldn’t have to continue nearly killing others and himself every night in his grief. Jason could-
No. Stop. Do not jump to conclusions.
Hope only brings heartbreak.
What would Batman do? Get close and see if the target is a threat.
Target is male. Mid-teens. Dark hair. Pale skin. Leaning against surfaces as he walks. Appears injured and disoriented.
Minimal risk assessed. Approaching and attempting contact.
Target identity confirmed: Jason Todd.
“J-Jason?” It comes out as a croaked whisper. Jason shows no sign of acknowledgment.
Tim clears his throat, steps right in front of his path, and tries again.
“Jason. Jason, stop I want to help you.” Still nothing.
“Please, Jason. I can help, I promise I can help!”
Why isn’t this working?! Why can’t he just do something right for once?! He wants this to work, he wants to help Bruce, he wants to fix Batman, he wants to not be alone, he wants-
“Robin!”
Robin jerks to a stop.
Tim reached out his hand.
“Robin. Robin please, I’m sorry you’re going through this, it’s really scary, I’m really scared. But I just want to help you. Help you find Batman. Help you get home.”
Jason just stares at him. Of course he does. Of course it’s not going to work. Why did he even bother hoping he could help?
Hope only brings heartbreak.
His sight blurs as his eyes fill with tears and he starts to lower his outstretched hand.
His arm is slowed as a cold hand weakly grasps his own.
“Don’t… scared… Bat… help… Dad… help.”
A relieved sob tears out from Tim’s chest and he gathers himself together. He yanks his extra sweater off and gently pulls it over Jason’s cold shoulders. Jason lets Tim drag his arm over his shoulders to try and carry some of his weight.
“Okay, Robin. Yeah. Your dad will help us.”
Batman will solve everything once Tim gets Robin home.
#Hello Mr. Batwayne forgive me for waking you but I brought your Jaybin home#Tim: I’m not jumping to conclusions!#also Tim: Holy fuck it’s the zombie apocalypse we’re all going to die#I know it seems like Tim might have some bat detective training but really he just watches a lot of cop shows and asks ‘wwbd?’ all the time.#writing this is the first thing I did as soon as I turned 27.#this was my birthday present to myself ig#not a ship pls n thx#batfam fanfic#batman#dc robin#dcu#batman and robin#jason todd#tim drake#red hood#ficlet#batfam#jason todd and tim drake#robin#red robin#shut up grandpa#fanfiction#‘’JASON! JASON STOP! LOOK AT ME! look at me. please. this isn’t you’’ ass dialogue 🙄
2K notes
·
View notes
Text
Unprintable: Artists Against Authority


I am absolutely beside myself with excitement to announce the launch of Unprintable.
Unprintable is an online free shop, where original artwork and arts resources are released into the public domain.
Everything listed here is free to use, copy and remix any way you like. You can print off hi-res artwork to decorate your apartment, or to use in your own projects. You can use the writing in your own zines, anthologies or performances. You can put it on a t-shirt. You can read it on the radio. You can paint it on a truck. It's up to you, entirely and forever.
The collection will be updated continuously, on an unfixed schedule, with contributions from a wide range of named and anonymous artists and activists. You can read the FAQ for a full rundown of what Unprintable is and why it exists, but these are the really important parts:
Can I download/print/use the work listed here? Yes. Can I use it for [X]? You can do whatever you want with it forever. But what if I want to [Y]? You can do whatever you want with it forever. Why do this? A few reasons: 1. We want a space to just share things, no strings attached. We recognise that copyright is an irrational system that was designed to protect the profit interests of publishing middlemen and IP hoarders. In fact, copyright is often weaponised against the creators it pretends to protect. As long as it exists, we are unlikely to win any other form of protection for our work, and we are profoundly limited from engaging in the kind of communal artistic and storytelling practices that were the norm around the world for thousands of years. 2. Radical art is often unprintable. Profit motives make people cautious. A lot of print-on-demand or local print shop services will refuse artwork with controversial, sensitive or political content. This is very frustrating when these themes are the focus of so much of our work (and indeed our lives). Rather than waste any more breath trying to explain why a trans artist might want to print the word ‘faggot’, we can give our work away for free. Got a printer? It’s yours. 3. It feels good. Sharing is joyful. It’s the reason we love making things in the first place. We don’t write poems because we look forward to filleting them for consumption, or layer colours so that we can sell a canvas by the ounce. We have only ever wanted to be able to support ourselves so that we can make, but that relationship is deeply dysfunctional under capitalism. We made these things, and we want you to have them. It doesn’t need to be complicated.
I'll write up some more posts introducing the launch collection soon. In the meantime...be free, enjoy, explore, have fun!
https://free.mortalityplays.com
2K notes
·
View notes
Text
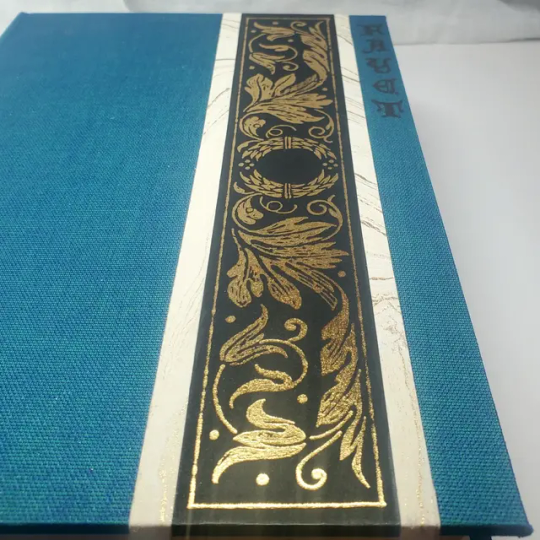
Book Decoration: AKA All The Ways I Don't Use a Cricut
(this post is for people who don't want to buy an expensive cutting tool, or for those that do have an expensive cutting tool that would like to mix things up a little)
1. Print That Shit
If you're already printing your own textblocks, an easy step for titles is to print them. Above is a title printed onto an "obi" of decorative paper. I measured out where I wanted things on the finished book and laid it out in Affinity, then printed it on a full sheet & trimmed it down to wrap around the book. A more simple method is to print & glue on the label into a slight indent in the cover (to protect it). A third option is to do the spine in bookcloth, while you print on paper for the cover and then glue that paper onto the boards (this usually looks even better when it is a three-piece bradel bind).
2. Foil Quill / Heat Pens
The heat pen is one of my go-to tools, but it can be a bit touchy about materials. The most popular version is the We R Memory Keepers' Foil Quill (which is one of the most ergonomic), but other pens exist that can get you to a higher heat temp, finer lines, or more consistent foil. For example, I have a pen created by a local Japanese bookbinding studio that fares way better on leathers than the WRMK quill & with a finer tip, but it's hell to control. Best results in general are on paper or smooth bookcloth (starched linen, arrestox, colibri - even duo will work but its less solid). The fuzzier a bookcloth is, the less your foil quill wants to deal with it. This means the heat n bond method of making bookcloth does not play nice with a heat pen usually, but there are two solutions: 1) use this tutorial on paste + acrylic medium coated bookcloth instead that will get you a perfect surface for the heat pen, or 2) use the pen on paper & then glue onto the cloth. I did a video tutorial for both foil quill use and this type of homemade bookcloth for @renegadeguild Binderary in 2023.
You get the most consistent results by tracing through a printed template that is taped in place, as I do in the video above.
3. Paint That Shit
Acrylic paints will do you fine! The above is free-handed with a circle template, because I wanted that vibe. If you need straight lines that won't seep, lay them down with tape first & then paint over it first with a clear Acrylic medium, then your color. Same goes for stencils. Two more examples of painted bookcloth:
4. IT'S GOT LAYERS

By using layers of thinner boards, you can create interesting depths & contrasts on your cover. You can also make cutouts that peep through to the decorative paper behind. The most important part to this technique is the order in which each edge is wrapped. To get a good wrapped inside edge, you will split the turn in into tabs to get them to conform to a curve. You can also layer multiple colors of bookcloth without multiple layers of board, as seen below left, so long as you mind your cut edges for fraying.
5. Inlaid... anything
Mirrors! Marbled paper! I saw someone do a pretty metal bookmark once! The key is creating a little home for it to live in, which is pretty similar to the above layering method. On one layer you cut the shape, & glue that layer onto the bottom solid board before covering. You can do the top layer as an entire 1 mm board (like I did for the mirrors) or a sheet of cardstock, like I would use for inlaid paper.
6. Decorative Paper
Decorative paper is always helpful & adds to the paper hoard... & its effects can be layers with other techniques, as below. Marbles, chiyogami, momi, or prints & maps of all kinds can be great additions. Some papers may need a protective coating (such as wax or a sealer).
7. Stamps (with optional linocut)
While I've not used many more regular rubber stamps, I do know some who have, successfully! And I've used one once or twice with embossing powder (see photo 3 up, the gold anchor on the little pamphlet bind). What also works is to carve your own linocut or stamp, & then use block printing ink to ink it onto your fabric (as i did above). A bit time intensive, but it was nice how easily reproducible it was, and I liked the effect I got for this particular bind.
These methods are not exhaustive, just ones I've used, and there are of course many others. I haven't gone too into detail on any of these for the sake of length (& post photo limits) but feel free to ask about more specifics. Usually I'm using them in combination with other options.
#fanbinding#bookbinding#celestial sphere press#ficbinding#in progress review#bookbinding how to#i am not particularly anti-cricut or anything#it's just a very expensive tool#and its prevalence sometimes makes new binders think they HAVE to get one#when they absolutely do not#you can make pretty books without it
702 notes
·
View notes
Text
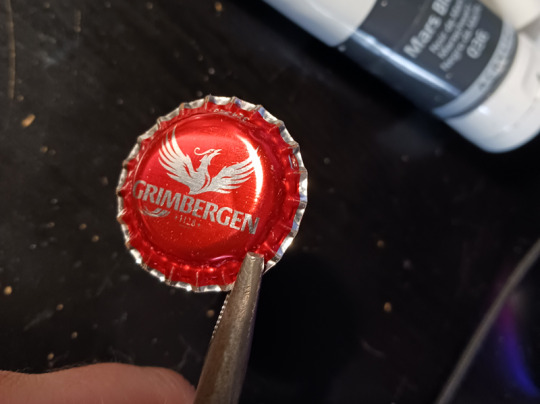
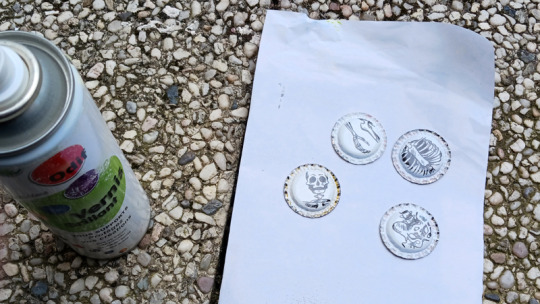
Someone on discord asked how I was making pins with bottle caps so here goes nothing
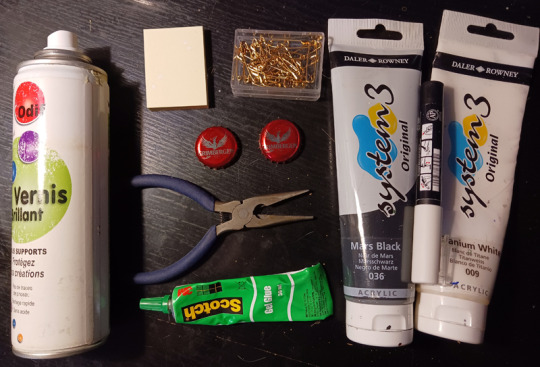
you need
bottle caps (the ones made of metal obv)
pliers
safety pins
paper
glue
optional acrylic paint
optional paint varnish (the kind you would spray on top of an acrylic painting)
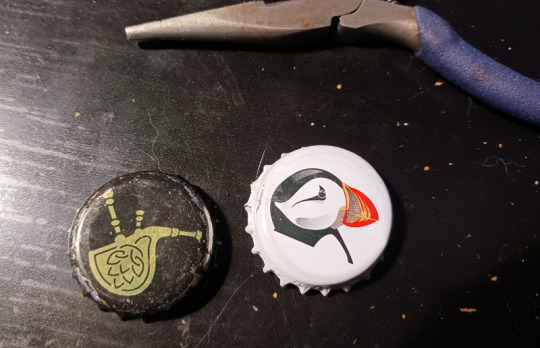
I'm only saying "optional" because sometimes you just like what's already printed on the bottle cap. I mean look at this puffin, it's so cute. But you should probably spray the print with varnish anyway if you don't want it to disappear too quickly (that cap on the left was in my pocket for like 3 months and the print has already disappeared around the edge)
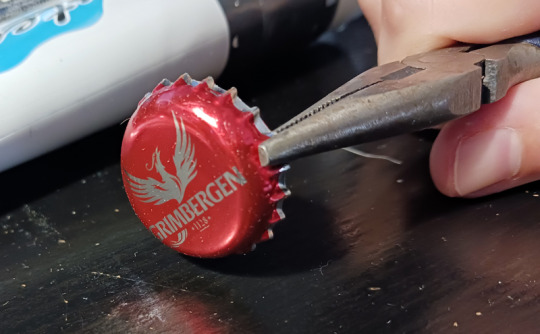
pinch the edge of the cap with the pliers and turn it slightly toward the top side of the cap. Continue to do so around the entire cap but don't try to flatten it all in one go cause it's kinda hard. It should only take two minutes or so anyway
almost there
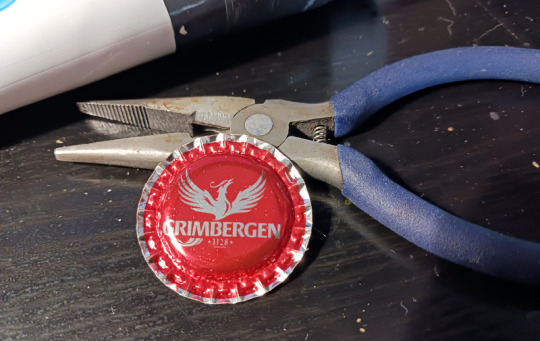
there, it's flat now. If you want to paint or write something on it, add a couple of layers of acrylic paint on it before you paint/write what you actually want on the pins
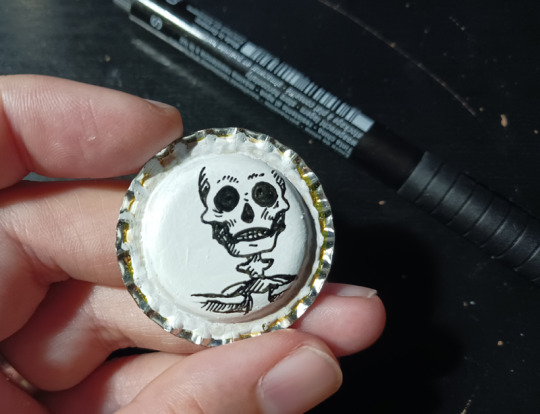
I wanted skeleton parts on mine because I saw someone with pins like that and idk where they bought them
I drew them with a Pitt pen on top of 4 layers of white acrylic
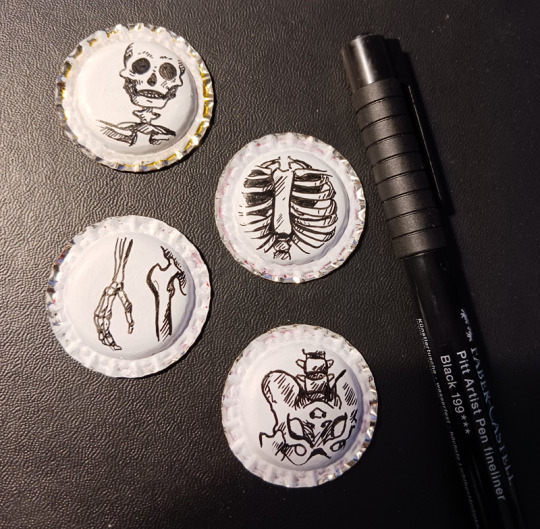
spray a coat of varnish on them but PLEASE do that outside, you do NOT want to breathe that stuff. Then wait a few hours for it to dry
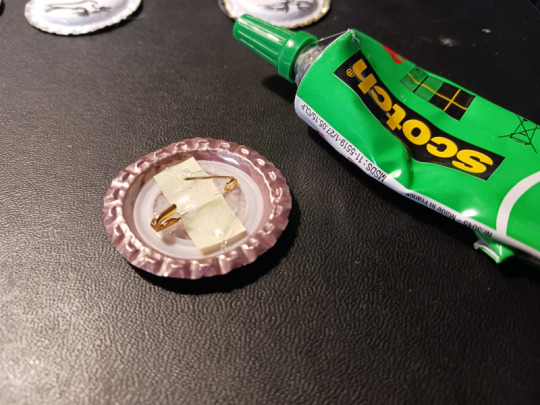
on the back, add 1) glue 2) one safety pin 3) a thin paper across the pin - squish the paper against the wet glue. When it's dry, add another layer of glue on top. Just drown the back of the pin in crystal glue otherwise it's gonna break too easily. Just make sure the safety pin can still open and close easily
let it dry until the next day just to be sure. Tug on the safety pin a bit to make sure it's glued correctly
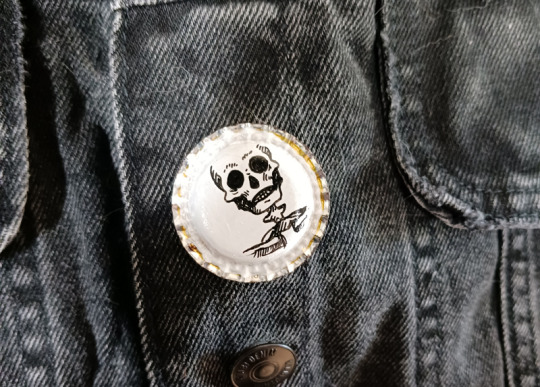
congrats you've made pins with bottle caps
2K notes
·
View notes
Text
How I save time on backgrounds as a full-time webcomic artist
Hi! I make webcomics for a living, and I have to be able to draw a panel extremely fast to keep up with my deadlines. I draw about 50 panels a week, which gives me about 45 minutes per panel if I want any semblance of a healthy work-life balance.
Most webtoon artists save time on backgrounds by using 3d models, which works for them and is great! but personally I hate working in 3d... I went to school for it for a year and hated it so much I completely changed career paths and vowed never to do it again! So, this is how I save time without using any 3d, for those of you out there who don't like it either!
This tactic has also saved me money (3d models are expensive) and it has helped me converting my comic from scroll format into page format for print, because I have much more art to work with than what's actually in the panels. (I'll touch on this later)

So, first, I make my backgrounds huge. my default starting size is 10,000 x 10,000 pixels. My panels are 2,500 pixels wide, so my backgrounds are 4x that, minimum. Because of this, I make them less detailed than I could or that you might expect so it doesn't look weird against my character art when I shrink portions of it down.
I personally find it much easier to add in detail than to make "removing" details look natural at smaller sizes, but you might have different preferences than I do.
I also make sure to keep all of my elements on separate layers so that I can easily remove or replace them, I can move them to simulate different camera angles more easily, and it's simple to adjust the lighting to imply different times of day.


Then I can go ahead and copy/paste them into my episodes. I move the background around until it feels like it's properly fitting how I want.
Once I've done that in every panel, I'll go back through the episode and clean up anything that looks weird, and add in solid blacks (for my art style) Here's a quick before and after of what that looks like!

This makes 90% of my backgrounds take me just a few hours. This is my tactic when I'm working in an environment that an entire scene, or multiple scenes, will take place.
But many panels will inevitably have a location that's used exactly once, and it would waste time and effort to draw a massive background for those. So in 10% of cases, I just draw the single panel background in the episode. I save all of these, just in case I can re-use it later (this happens more often with outdoor locations, but I save them all nonetheless!)
I generally have to draw about 2 big backgrounds per episode, and 3-5 single-panel backgrounds per episode! At the beginning of an arc/book the number is higher, but as the series is continuing and I'm building up an asset library of indoor and outdoor elements to re-use for the book, the number generally goes down and I save more time.
My series involves time travel and mysteries, so there's a lot of new locations in it and we're constantly moving around. If I were working on a series that was more consistent in this aspect, this process would save me even more time!
Like I said earlier, this also saves me a lot of pain and gives me a lot more options as I'm converting from scroll format to print format!
panels that look like this in scroll format...

can look like this in print!

because I drew the background like this, so I didn't need to go through the additional effort to add in the extra detail to expand it outwards at all.
Anyways, I hope this helps someone! As always if it doesn't help, just go ahead and disregard. This is what I do and what works for me, and I feel like I only ever see time-saving tips for comics that involve 3d models and workflows, which don't work for me at all! I know there's more people like me out there, so this is for you!
Enjoy!
Also obligatory "my webcomic" if you want to see this in action or check it out!
#webcomic tips#webcomic making#comic tips#comic tutorial#art tutorial#art tips#time and time again#my ocs#digital art#ttawebcomic#hmmmm....#longpost#yeah it's a long post#I'll claim this one#lots of images#I hope this helps#I'm always worried when I make some kind of guide or tutorial people are gonna get mad at me lmao#I'm not saying 3d models are bad to use!!!#I just dont like them!#my brain doesnt work like that and it feels SO so so so tedious to me#TO ME PERSONALLY!!!#plenty of people see 3d models as a total lifesaver#and that's perfectly fine!#but yeah I don't see tutorials about saving time in comics that like... dont... mention 3d models...#like what about me and the other extremely particular girlies who hate 3d#anyways#yeah#just hoping this helps#nothing against 3d at all#I mean. ok personally yes against it cause it sucks for me to use
1K notes
·
View notes
Text
Good Omens graphic novel update: June 2024
Welcome to the June update. A lot of behind the scenes work at the moment but we're grabbing the travel sweets, popping in the Bentley and hitting the road. More on that below.
Admin
Ongoing reminder that the project FAQ can be found here.
I pledged using my Apple ID, or no longer use the address my pledge is attached to, or I cannot work out what email address my pledge is connected to. What should I do? Please contact us via your Kickstarter account where the pledge is connected; we will be able to see on our system which address it is. If it's one you have access to, great! The FAQ has information on how to resend your invite link to access the PledgeManager. If it's one you are not able to access, then you can let us know which email is preferred and we can update this on the system, which will automatically send a new invite.
Events
We've had a lot of queries about when the Good Omens team will be attending events more formally, after some Aziraphale and Crowley spotting at conventions we'd been to previously. Well, we're excited to confirm the first: Good Omens HQ will be at ACME Comic Con in Glasgow, Scotland this September.

We'll be bringing the actual-real-life-home-to-Crowley-and-his-plants Bentley from Season 2 of Good Omens, the first time the car has been made available publicly for fans to come see and get photos with, ahead of its journey back to the set and the start of Season 3 filming.
We also see Quelin Sepulveda, aka Muriel, has been announced for the event for some additional ineffable joy.
You can get your tickets for ACME Comic Con here. We hope to see some of you there.

While we won't be rocking up with the Bentley to this next one, we want to let you know about Ineffable Con which, though sold out in person, is also taking place virtually in July. The fan-run event hosts great panels, auctions and more, with money raised going to Alzheimer’s Research UK, in memory of Sir Terry Pratchett.
Where next? We have - not an exaggeration - a list of about 200 events somewhere from when we asked fans this on Instagram and while we can't promise quite that amount of convention attendance, we're certainly looking to do some more things in future with Good Omens at large. Watch this space.
Good Omens items...
This month has largely seen prototypes and samples for the wider Good Omens merch store arriving, and while we can't share those yet, we are certainly excited to see more fan product suggestions coming to life. That does, however, leave our public item updates a little slim on the ground.
To make up for that, here's some new panels from Colleen:

Also known as, "What could possibly go wrong?" And:

Also known as, "Well why don't you ▇▇▇ ▇▇▇▇▇▇ ▇▇▇ ▇▇!@#▇" or words to that effect, we'd imagine.
Update from Colleen
Following such a positive response to Colleen's piece last month, bringing you behind the scenes into making the Good Omens graphic novel, we are delighted to say that she has agreed to write something for our updates going forward! For June, she's going more in depth into the process of flatting and the technicalities of colouring on screen vs print. Over to you, Colleen.
---
I mentioned the other month that I use a flatter to help me with technical work on GOOD OMENS, and here is a great example.
This is my original, hand drawn line art.

And this is the flatting file which was created using the MultiFill computer program.

It will put your eyes out.
The raw image above demonstrates how the color art lines up solidly under the line art. If it doesn't do that, you get a weird phenomenon in print called ghosting, a tiny little line of white around each segment of color. I had this issue on one major project and ended up redoing every single color file after I got a look at the first printing. Nearly two weeks of work.
The same image with the line art on top.

The layer order looks like this.

Background copy is the clean, line art layer.
I scan the art at 600 dpi, then make the blacks pure black, the whites pure white. Then I convert back to greyscale, then RGB, then duplicate the layer. Then I delete the white on the upper layer so the line art layer is transparent but the blacks on that layer are not.
If you have blacks on a layer that has been multiplied, you can see slight color through those blacks. You want pure black.
The lower layer is where I use the MultiFill program to create the digital flats. First you use MultiFill to drop in the random colors, then the companion plug-in Flatter Pro to make those colors seal under the black lines.
This probably sounds like a silly thing to worry about, but if the flat colors don’t line up perfectly under the black line art, you get the dreaded ghosting I mentioned. You can see it below in this image. It’s a tiny little white line that will appear around the black lines and color areas.

This drives me nuts and is an absolute nightmare to fix.
It’s a very common problem, especially for people who work for web and don’t anticipate the problems going from web to print.
What looks great on your computer can cause big problems in print.
From here, my flatter Jul Mae Kristoffer, who is way over in the Philippines, does flatting that is more in keeping with the areas of color I want to isolate. As you see on Layer 1.

But again, this is still pretty ugly, and not what I would use for final color. Flatting is a technical issue, not a creative one, though in some cases a flatter will make choices you may use. Most of the time they don't.
Here is my final color page.

Sometimes my MultiFill flats are so wonky I have a hard time getting my brain to snap out of what I see before me. If I get stuck, it's a good idea to just pick at it and come back to it later.
If it really, really bothers me, I’ll take the MultiFill flatter layer and desaturate the color so it doesn’t poke my eyes out.
Here’s an example. The digital flat file.

The desaturated flat file that doesn’t make me want to poke my eyes out.

And the final color.

Sometimes I just put in a solid white layer so I don’t see the flats at all. Flatting is there to allow you to easily pick spots to color in, and doesn’t usually appear in the final work.
Sometimes I want to create my colors using transparent color over a white ground, which is more delicate in the final.
Here’s an example from Neil Gaiman’s American Gods. I also selected all black line art here and converted it to sepia to give it a vintage look. Except for the fairies. They’re green.

A colorist must also consider color settings.
Different clients can have different requirements. I find these color settings, which I got from the Hi-Fi Studio, to be pretty solid. I use them as my default for all my projects unless otherwise requested. If your publisher has other settings, they’ll usually send you a csf file which you can upload to Photoshop. The program will save your files and you can just switch between them as you need them.

This tells the printer things about the paper and the spread of the ink you will use. That’s what dot gain means - it makes printed color look darker than intended, so you set up your files to account for it.
When you hover your pointer over each box, it will tell you what each setting is supposed to accomplish.
Another really important thing to consider when coloring comics is color range.
I’m coloring this book in RGB range, but for print you use CMYK.
I’m about to confuse the heck out of some people with this post, I’m afraid. But here we go.
Here is this shot in RGB color setting.

And here is the same page calibrated for print in CMYK.

The biggest shift is in the reds. Print cannot match those reds.
You may not see much difference here, but it’s the sort of thing that drives artists crazy.
A computer should be perfect for conveying exactly what you want, right? It's all just 0's and 1's, binary information, and that information should be the same from one computer to the next?
Nope. Not even close.
First off, computer monitors must be calibrated. You can use a computer program or a tool that measures the color on your computer screen and then adjusts the color to an industry standard.
Have you ever been in an electronics shop where a bunch of TV shows were on display, all of them playing the same show, and have you noticed how different the color was from one TV to the next?
It's like that.
I freely admit I don't pay a whole lot of attention to calibration, but if I were a professional photographer I would. I'd have a little spectrometer attached to my screen and software would adjust my monitor to the best possible standard range. As it is, I just use the default setting on my computer and hope for the best.
If your monitor is properly calibrated and your art is shown on another monitor that is properly calibrated, the art will look almost identical from one monitor to the next.
YAY!
But from one monitor to the next, that's about where the resemblance ends.
Colors are calibrated to something called RGB, or Red, Green, Blue.
All colors come from a mix of red green and blue. At their greatest intensity, all the colors in the spectrum together become pure white light.
This is why RGB is called ADDITIVE color, because you ADD colors from the spectrum to get ALL colors, and all colors create the entirety of the rainbow, and pure white light.
Your computer monitor, your phone, your television, all images are created via light using RGB, a gamut that covers all possible colors that can be created.
That's a lot.
And that's why some of the colors you see on your TV or phone are so deep and intense.
For the widest possible range of color and intensity, you use RGB.
Unfortunately, there is what you can create with light, and then there is what you can create with pigment or ink. And that is why printing what you see on your computer almost never looks exactly like what you see in a book.

For printing, you must use a color setting known as CMYK. This stands for Cyan, Magenta, Yellow and Key/Black.
In printing, the pure blue is actually Cyan and the pure red is actually Magenta.
CMYK color range is not created by addition, but by SUBTRACTION. In order to get the color you want, you reduce the percentage of one of the four colors for ink mixing. Mixing all colors, instead of giving you white, gives you black.
The gamut of CMYK is limited to what can be created with ink.
You've probably heard the term four color press? This is what that means. Four colors, with each color of ink run over the paper on rollers which, combined in varying layers of opacity, create all the printing colors you see.
But remember, what you see on your computer monitor and what CMYK gamut can handle are two different things.
Now, I’ve been really careful with the color settings on Good Omens, so there haven’t been any big surprises, but let me show you a snippet of a project I did for the French fashion house Balmain.
The RGB version:

And then this shot after it was converted to a CMYK file for print.

That's a pretty big difference.
Now, you see this shift mostly with vibrant colors, such as that pink there. But other colors hardly changed at all, right?
That's because this issue is about range of color. CMYK and RGB occupy a shared range which you can see demonstrated by this graphic I got from Wikipedia.

The graphic shows the RGB ranges supported by various digital formats. SWOP CMYK is the most common range my publishers use. Note that the bounding box line shared by the RGB and SWOP CMYK formats shares about half the range space. So whatever RGB colors you use that are outside that range will be digitally converted to the smaller SWOP CMYK range.
And you may not like what you end up with.
As you can see, some of the most ethereal and intense colors get lost outside of the SWOP CMYK boundary.
A look at the Dark Horse Comics color settings in Photoshop. Theoretically, this information should prevent your art from looking like mud on publication.

Now, after I just told you the dangers of coloring in RGB then converting to CMYK for print, I tell you I am coloring Good Omens in RGB anyway. There’s a couple of reasons for this.
Remember, RGB give you a greater range of color, so it can be to your advantage to preserve your original files using a format that gives you the greatest range.
Again, here is the unaltered file.

You can see what the CMYK result will be simply by clicking the Proof Colors button here. This will show you how the art will convert.

And the Gamut Warning will show you which colors are out of gamut range for print.

The intensity of that magenta and that purple in the top right are not going to print true.
This is how it will look in final.

So even if you do what you think is perfect color on screen, there is no way it can perfectly convert to print. Almost everything will involve a little bit of compromise.
Even though you have to consider the color shift issues, preserving your files in RGB gives you greater wiggle room, especially if you get lucky someday and get to work with a printer who can print in 6 colors. Or maybe some technology you don’t know about will pop up and make printing super glorious. Who knows.
Regardless, you should keep an eye on that gamut and color for CMYK print, while preserving your master files in RGB.
Until next time.
848 notes
·
View notes
Text
⊱ 🥘 PRE-ORDERS ARE OPEN 🥘 ⊰
With 140+ pages of mouth-watering and heart-warming pieces from 65 contributors, it’s a delicious dungeon meal for the soul!
🪄 See below for our bundles! 🪄
💸 dungeonzine.bigcartel.com
🗓 Nov 15th - Dec 20th

🍱〘 Main Course: Full Bundle 〙🍱
💵 USD $70 💵
🥘 1x A5 hardcover zine book (140+ pages)
🥘 1x A5 zine PDF (140+ pages)
🥘 12x digital downloadable emotes/icons
🥘 2x 5"x7" foil prints
🥘 2x 2"x6" double-sided interlocking bookmarks
🥘 3x ~2.5"x~2.5" die-cut stickers
🥘 2x A5 sticker sheets
🥘 1x glitter enamel pin
🥘 1x ~2.5"x~2.5" double-sided glitter acrylic shaker charm
🥘 3x 9.8cm (diameter) ceramic coasters
🥧 This bundle is eligible for all stretch goals.

🍨《 Dessert: Partial Bundle 》🍨
💵 USD $50 💵
🥘 1x A5 hardcover zine book (140+ pages)
🥘 1x A5 zine PDF (140+ pages)
🥘 12x digital downloadable emotes/icons
🥘 1x 5"x7" foil print
🥘 2x 2"x6" double-sided interlocking bookmarks
🥘 3x ~2.5"x~2.5" die-cut stickers
🥘 1x A5 sticker sheet
🥧 This bundle is eligible for stretch goals.

🥗 〚 Appetizers: Zine Bundle 〛 🥗
💵 USD $30 💵
🥘 1x A5 hardcover zine book (140+ pages)
🥘 1x A5 zine PDF (140+ pages)
🥘 12x digital downloadable emotes/icons
🥧 This bundle is eligible for stretch goals.

🍤〔 Hors D’oeuvres: Digital Bundle 〕🍤
💵 USD $15 ��
🥘 1x A5 zine PDF (140+ pages)
🥘 12x digital downloadable emotes/icons
🍥 This bundle is not eligible for stretch goals if purchased alone or only with other non-eligible bundles.

🥄〈 Limited item: Wooden Spoon Set 〉🥄
💵 USD $27 💵
🥘 3x engraved bamboo spoons (30cm tall, 6cm wide bowl, 2.4cm wide handle)
🍥 This bundle is not eligible for stretch goals if purchased alone and requires its own shipping.
‼️ Only 100 of these items will be sold; once sold out we will not open further preorders.

🌶〔 Midnight Snack: 18+/Pin-Up Digital Zine Add-On 〕🌶
💵 USD $10 💵
🥘 1x A5 zine PDF (~50 pages)
Midnight Snack has exclusive pin-up and other "suggestive" content from our artists and writers. This zine is rated "M" and, while not explicit, is meant for adult audiences.

🥩〔 In The Kitchen: BTS Digital Zine Add-On 〕🥩
💵 USD $15 💵
🥘 1x A5 zine PDF (300+ pages)
Wondering what went into making Melting Pot? Want to see exclusive content? Here's over 300 PAGES of full works of art and writing, sketches, artist process walk-throughs, sequel comics, and more!
🥧 ᐓ STRETCH GOALS ᐗ 🥧


🔓 200 UNLOCKED - layered wooden magnet
🔓 300 - UNLOCKED - three cover print set
🔓 400 - UNLOCKED - acrylic keychain
🔓 500 - SECRET UNLOCKED - enamel pin
🥧 Bundles Main Course, Dessert, and Appetizers are eligible for stretch goals!
↢ 🍖 ADDITIONAL INFO 🍖↣
💸 Shop: dungeonzine.bigcartel.com
🔖 Carrd: https://dungeonzine.carrd.co/
❓Retrospring: https://retrospring.net/@DungeonZine
📩 If you have any questions, feel free to drop us a message on our socials.
#dungeon meshi#delicious in dungeon#dunmeshi#dungeon meshi zine#dungeon meshi anime#dungeon meshi manga#marcille donato#laios touden#falin touden#senshi#chilchuk tims#fanzine#fanzines#zine#zines
484 notes
·
View notes
Photo
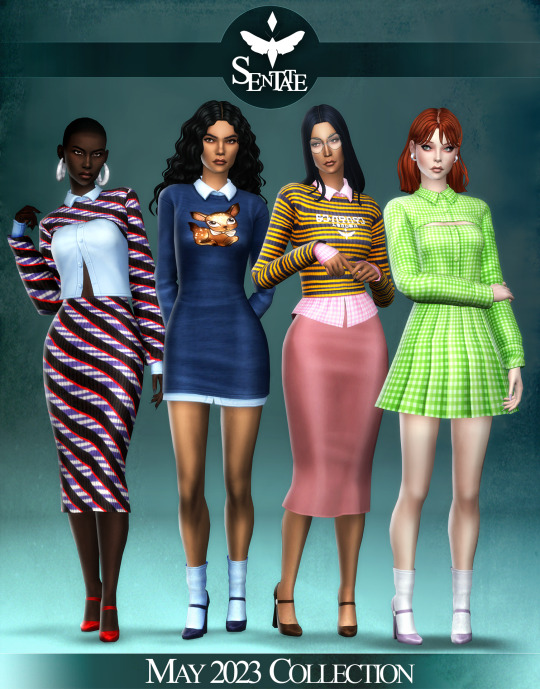

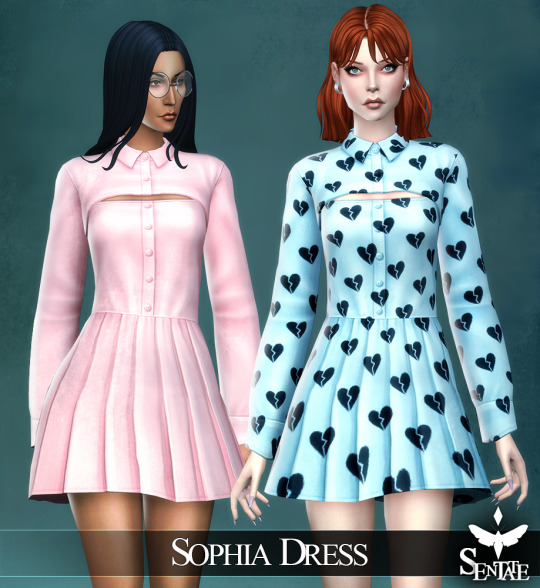

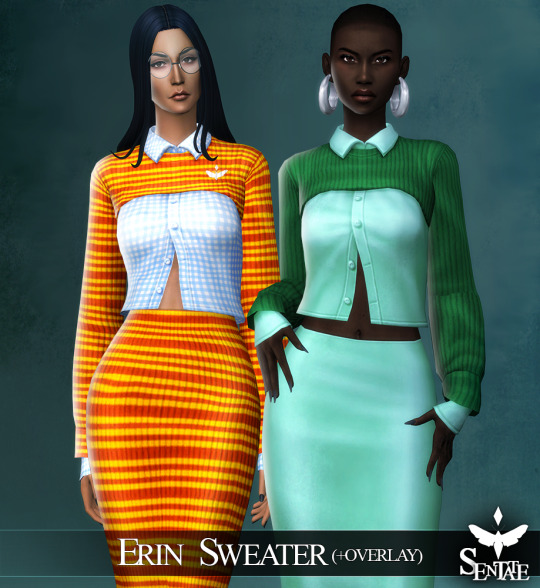

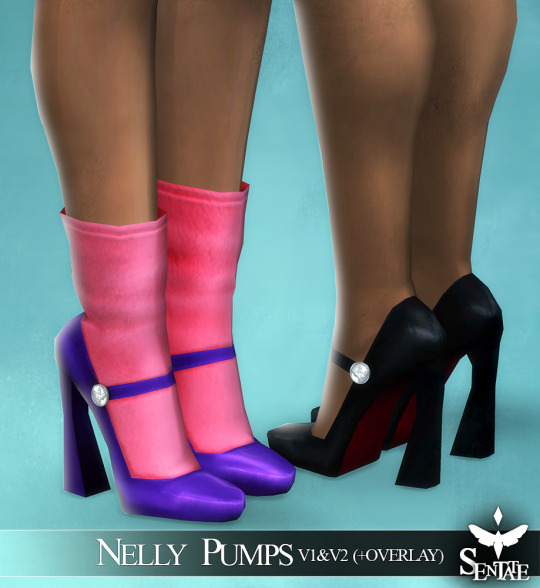
SENTATE - MAY 2023 COLLECTION
For this months collection I wanted to tap into a bit of Prada energy and bring some geek-chic looks into the game. Think of an awkward librarian who reads Vogue, isn’t afraid of clashing prints and wears knitwear well into spring!
The collection features some cute sweater/shirt combos in various styles, aswell as my favourite style of skirt, updated and improved, that can be mixed and matched! Also included is a cute layered shirt dress with pleated skirt and a pair of... MARY JANES!?! Available with or without 3d socks.
The collection features 2 tops, 2 Dresses, 2 skirts and 2 pairs of shoes. The shoes with socks and every item with a shirt under it comes with an overlay so you can really match or clash your colours.
The full collection will be public on the 26th of May.
DOWNLOAD - PATREON (Early Access)
MORE DOWNLOADS | TERMS OF USE | LINK TREE
#sentate#sims 4#sims 4 cc#sims 4 mm#sims 4 download#maxis match#sims 4 custom content#the sims 4#the sims 4 cc
5K notes
·
View notes