#1 is an anatomy study i wanted to draw some muscles…
Explore tagged Tumblr posts
Visit Tumblr Blog
Explore Tumblr blogs with no restrictions, modern design and the best experience.
Last Seen Tumblr Blogs


Fun Fact
Average visit duration of Tumblr.com is 10 mins and 25 secs.
Text


^__^ love this guy
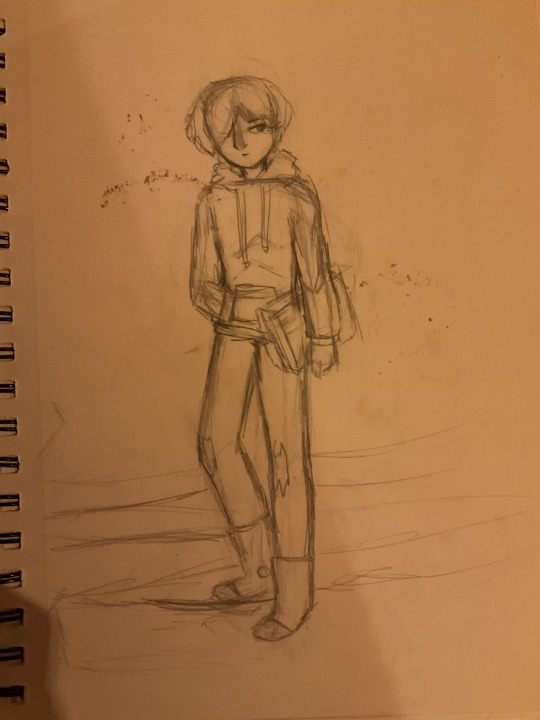
#dungeon meshi#delicious in dungeon#laios touden#my art#1 is an anatomy study i wanted to draw some muscles…#procreate has good pencil brushes#he is the cutest#is it still an art dump if its 2 drawings. Whatever
73 notes
·
View notes
Note
Any advice on drawing McCoy? I’m not used to drawing ancient wrinkley bastards (affectionate) and it’s surprisingly tough v-v
FOR SURE lmao i made. a diagram. just a warning that i am going to be irritating and long winded because u just hit a topic i really like sorry lmao
so first off i did some traces just to show whats there vs redraws to show my interpretation
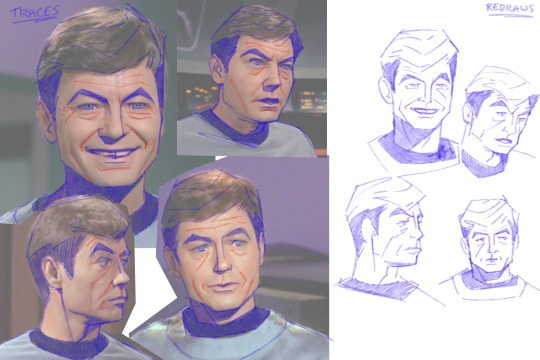
ive said this on other asks but again jsyk, tracing isnt bad!! its a tool. theres some stuff with intellectual property and whatnot but using tracing to study shapes and forms is a really valuable practice.
also just taking some time to learn facial structures and anatomy is super useful, reading what bones and muscles are where and how they interact with one another. taking this info and staring in the mirror and moving your face around and thinking about it. just really furthers understanding of how the face works. trying to sound normal about this but i love anatomy and motion and physics and whatever


anyways im going to go through all the numbered points so there's no confusion. 1. forehead lines - self explanatory. more prominent when brows are raised 2. crows feet - at the outer corners of the eyes, more prominent when smiling or squinting 3. nasolabial folds - the folds that go from the corners of the nose to the corners of the mouth. more prominent when the mouth is wide, like smiling 4. brow furrow - self explanatory, most prominent when brows are furrowed. mccoy tends to have two right next to his eyebrows, kirk has one in the middle. everyones face works different lmao 5. chin crease - caused by how the chin and lower lip interact. 6. nasojugal groove - start from the inner corners of the eye and can extent over the cheeks. everyone has these and idk why people dont like them i think theyre really cool!!!! but Society. i guess. :/ 7. eye bags - caused by the skin sagging beneath the eyes. mccoy isnt even that old in tos i think hes meant to be mid 40s by the end of the 5 year mission, hes just got really prominent eye bags lmao 8. idk what the name is for these, but when the mouth is wide and pushes the skin to the sides, these folds sometimes form outside of the nasolabial folds 9. philtrum - the groove above the upper lip. i dont usually draw this but mccoy's struck me as prominent enough that i usually draw it on him 10. masseter - the muscle that moves the jaw up and down. its a pretty rugged muscle and while i wouldnt say mccoy's is especially prominent, it kind of extends that nasojugal groove from certain angles/positions 11. orbicularis oris - mouth muscle, usually easier to see when lips are pursed or frowns are pulled. mccoy's is pretty prominent from 3/4ths or side, his mouth tends to protrude in profile 12. this isnt a muscle but more of a line defining the planes of the face, but since i drew it i felt i should explain lmao
a few points:
im an animator i tend to exaggerate and emphasize certain things so i usually make him more square.
i like to combine eyebags and crows feet for brevity/flow, same with nasojugal grooves, eyebags, and masseter lines. my approach is always subject to change based on pose, expression, reference image, etc.
i take out details that i deem redundant or cluttering and keep what details i need to make things feel Right
all this info is applicable to any character of any age, its just in how you apply it and facial proportions that willl change how old a character is perceived to be
there's a lot more with drawing a Character rather than an Actor, just because the features are there doesnt necessarily mean things will feel correct? its very much in the mannerisms and poses and expressions
i only went over my approach to his likeness but not really body type or posing or anything idk if u want that i could always try to answer that later haha
_______________
anyways all that info kind of exists nebulously in my brain while i draw its not like im sitting there thinking Must Draw. Nasolabial Fold...... i jsut do what feels right with the visual info i have. also i love specificity in faces.... i dont like to be a hater but when every character is drawn the same it pisses me off a little lmao. so
also dont take my word as The Only Way to do anything i just draw how i like to draw and no one should feel like these are things that Must be done to be a good artist or anything do whatever the hell u wanna do
#anyways my apologies that was. a lot#it will happen again if asked of me.#anon#ask#everyone has this stuff going on with their face and its really cool but capitalism and the beauty industry and whatnot#have been rotting peoples brains since the moment they came to be#the more u look at and appreciate how ur skin an muscles and bones interact with one another the more fine u are with your own face#trust me#because its really cool. like mechanically and stuff#idk if its like theraputic or something but maybe it is or maybe i think about it all way too much#how i draw#ive got some other similar things under that tag i think pertaining to merlin but still similar info
176 notes
·
View notes
Text
Week 1 Evaluation

It's been a week since I've started this journey, so let's reflect on how the first week has been!
First of all, let's have a refresher on what my GOALS for this 30 days initially is~
Fixing my sleep schedule
Incorporate more physical activities (doesn't have to be exercising, can be stretches or walks!)
Drawing more often for practice
Sleep:
I'd say sleep wise, I'm slowly getting better at it. Though, there are moments where I couldn't get myself to sleep and ended up getting worse. But in general, I think I've made good progress than before I started on this journey, so good job me! ദ്ദി ˉ͈̀꒳ˉ͈́ )✧
Physical activities:
I'm pretty proud of my progress for this! So far, I've managed to do something everyday for the past week to get my body moving! Whether it be actually following along exercising videos on Youtube or some stretching to ease some tension on muscles! Again, good job to myself uwu
Drawing:
Now this. I did NOT meet this goal at all during this entire week, which is a shame. I think I was focusing a lot on taking better care of my own body that the thought of taking care of my skill set kinda slipped my mind? Which, to be fair, is kind of expected since even trying to remind myself to do certain basic self care task is difficult in itself. So, it's okay, we'll just have to do better during the following week~
Extras:
Other extra stuff for my health that I think would I've done well is also finally taking my meds and vitamins. Though it's not consistent yet, I'm glad I finally was able to take them more than I was before. This goes for my water intake as well! Sometimes I would go on days without drinking any water at all, which is quite bad... But now that I'm trying to actively record down my days and what I've done to better my body, it serves as a reminder in itself to drink more water, so yayyy another great job done for me °ʚ(´꒳`)ɞ°
˚₊‧꒰ა ☆ ໒꒱ ‧₊˚
Things I need to improve/add for the following week:
After a week into this journey, I think I'd like to adjust some of my goals and be a little more specific in what I want to achieve for hopefully the next week! This will help me be a little clearer with what I need to do and help myself feel good in the future >:)
Try to sleep 30 mins earlier than the last, but the latest time for me to go to bed would be 3am. I have been doing quite okay with only a few slips here and there on this. So hopefully by the end of the next week, I can somehow sleep around 12am instead.
Still moving my body every single day, but let's try to exercise 3 times this week for at least 30 minutes! It's been a long time since I've exercised that I forgot how good I always feel afterwards both physically and mentally. So yes, I'd like to challenge myself to actually do some exercise more often! ( *` • ω •´)ゝ
Since I have 0 progress on my drawing, I want to start slow and easy myself into it. Since it feels daunting (for some reason), let's try achieving at least 30 minutes per day for 3 days of art practice. Can be anything, like anatomy, color study, or even just my own personal art. As long as it reaches the goal I set, then it's good :>
#productive#productivity#self care#self love#self healing#self improvement#it girl#that girl#dream girl#wonyoungism#mental health#blog#girl blog#girl blogger#girl blogging#diary#journal#my journal#get better with me#week 1 evaluation#goal#goals#life goals#motivation#inspiration#inspirational
69 notes
·
View notes
Note
How did you learn to do your line weight so perfectly? Is there some secret to this?
I sketched using a highly pressure-sensitive brush for a long time and got better and more confident with using it.
Gonna use commissions I've done as an example. I started off basically doing sketches with my own inky lineart brush. Then, by taking a high volume of commissions, I used them as practice to fine-tune my muscle memory, but without high expectations so that I wouldn't try too hard. Note that I also didn't think hard on how I wanted the drawings to look; I only leaned towards line weights that "just kinda felt right", and it snowballs from there as I get better.


1+ year ago, 8+ months ago, 2 months ago
You can see how rough I started out with at the beginning, trying to freehand stuff and ending up with kinda wonky forms. After doing a few dozen, I became more confident with just doing simple lines. After a decent amount of time, I gained enough confidence to implement very deliberate line weights to my strokes.
So to break it down:
Sketch with a rough, highly sensitive inky brush for so long that you're basically just doing lineart. Sketch freely with a relaxed grip and without exerting excess pressure. Your only commitment is to make it readable and clear after cleanup.
Do not practice with intent of making the lineart perfect. Rather, sketch with intent of just making the weights feel clear and readable. My goal was to become more efficient at sketching, not making good lineart. This includes using longer strokes for certain contours instead of little scratches.
I use an undersketch/rough draft layer set to 20% opacity to block out the anatomy and posing, and then do a cleaner sketch on top of that. It is crucial however that you do not think of the clean draft as "lineart". Always keep your brain in sketch mode; Accept a certain level of mess. Your process will optimize into something cleaner with time.


Most recent commissions I've done as of writing this
I also have a basic <20 minute daily practice regimen for studies you can find here. Consistent practice and patience with using simple yet versatile tools will get you where you need to go.
325 notes
·
View notes
Note
Hello! I have an advice question if you have the time and inclination. I would like to draw better extinct animals and I am wondering if you have any advice for putting meat on old bones. I know I need to do anatomical studies, and I'm familiar with all yesterdays/not shrinkwrapping. However, when faced with a fossil, I don't know where to start. I've tried looking up papers where they model the muscles, but those are usually 1 leg, or a jaw, so not particularly helpful for illustration. What's your thought process? Your illustrations look so real. I know part of that is your lovely handling of light and shadow, but the animals have real heft to them.
hiii!! ahh i'm probably not the best person to ask tbh, sorry. but i'll try to help as much as i can and explain how i do things:
i still don't feel confident enough in my paleoart. i came to paleoart from "art" part, not from "paleo", so if we talk about science, i know very little. i'm still trying to learn myself and do studies whenever i can, so i can't really explain things in a scientific way. however, there are some things that are helping me to learn: i have a good knowledge of anatomy in general, so if you study extant animals and how their anatomy and muscles work, it helps to draw those who are extinct. it's a really good base, and a lot of references you can work on! and while you're working on those, you can also study light and shadow, that helps to understand the shapes as well. if you want to be more confident in paleo, i think it's easier to start with an extinct animal that is well known, has muscle 3D models, good skeletal drawings, etc. it will help you more than looking on a jaw fragment and not knowing what to do with it (trust me i've been there). also, when it comes to paleo, and especially soft tissue, a lot of it is speculation. for most of the species info about it isn't known at all, so you can do something fun with it! having fun with speculation might be scary (i know it well i'm still scared lol), because you don't know what you can draw, will it be wrong or not, but the answer is - we don't know how most animals looked like, so the fear of making a mistake goes away with practicing and allowing yourself to speculate here and there. for example: if you know how to draw a well studied pterosaur, and later want to draw their relative that is known by only the fragment, you'll be more confident to do so, because you'll know their base features already. so when there's some animal known from a tiny piece of a bone and not much is known, i think the safest way is to look at their closest relatives that are more studied. that definitely doesn't hurt, especially with new described species that don't even have any reconstructions yet. long story short (from the artistic point of view since i don't have another): study living animals, gain confidence drawing well studied extinct ones (you'll have more references there and it's less confusing for a start!), and most importantly have fun! <3 ah and also, there are places where you can get a feedback on your drawings from paleo people. i ask for it often, especially when i'm drawing something far from my comfort zone. i'm learning a lot from my mistakes and it feels good tbh:)
26 notes
·
View notes
Text
How I draw: Use of references
Second response to a few art questions from @johnny-and-clyde let’s gooo!
I love references! Like most artists I did have that phase where I thought I was better than everyone because I didn’t use ‘em, but lemme tell ya- starting to use references took my art from this


(Art from 2021-2022) To some better lookin stuff, and eventually to the stuff y’all know me for now lol!
Nowadays I do use references for almost every drawing, but the amount that I reference them varies Occasionally it’s pretty direct, like my drawing of Curly Shepard, in which I HEAVILY referenced a photo of myself for the pose and fit:

(I don’t dress like this on a daily basis the pic was taken at a Twilight-themed school dance ok) (I’m not cool enough to wear that many necklaces w/o a good reason 😔)
In drawings where I directly reference photos that don’t belong to me, I put the reference in the post under the drawing, so folks know I didn’t plan the concepts/compositions on my own. But usually I don’t directly reference things…
Usually I use a bunch of different references for a bunch of different things. This is for two purposes:
1- Making sure everything stays vaguely anatomically decent, that the fabric folds in the right places, that the perspective works, that the lighting looks good, etc…especially in tricker/unusual poses. Um I’m also pretty sure that I might have some form of aphantasia, or at least a really weak “mind’s eye”, which is probably why I struggle with composition/planning in art and why I do so much better with references
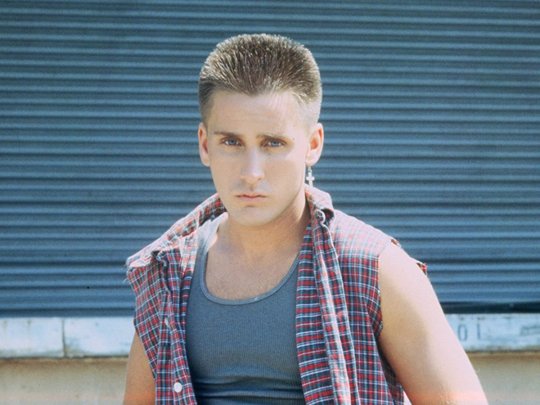
Like here, when I used this pic of Emilio Estevez’s character in Repo Man to make sure I was getting Mark Jennings’s face shape right- just glanced at it off to the side and (more or less) drew what I saw

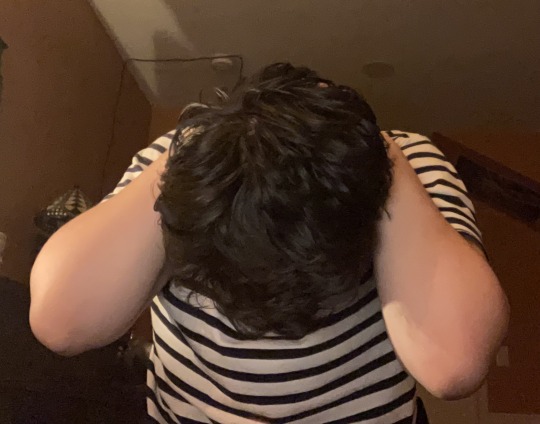
Or here, in this pic of Steve Randle- I didn’t know how to even start to draw the angle I needed, so I took a pic of myself and used that

2- Capturing the likeness of a person. For most new characters I draw, I take a bunch of screenshots and roughly redraw them and occasionally trace them to build muscle memory, all while taking little notes about unique features they have. Then, once I have a feel for them, and enough odd-looking line drawings to look like a crazy stalker, I’m ready to start actually drawing post-able art yk?
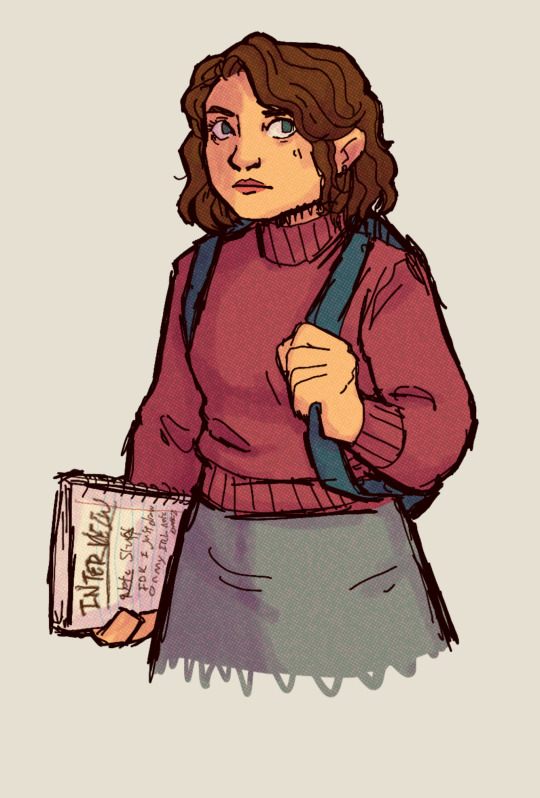
Here’s an example from 2023 where I studied Nancy Wheeler. Final product ain’t fantastic, but this was two-school-years ago so it’s basically ancient in my book lol

I do still use refs often in the finals, but less directly and with less adherence
But I will say, for rougher/cartoonier drawings I don’t use as many refs. Like, I didn’t use references for these (although I did pose in the mirror to get the arm right in the self-portrait lol) :


Lastly, I also find it’s nice to have a mirror/window nearby to look at my own anatomy and reference that, although that’s mainly just useful for characters who look semi-like me/have similar builds to me lol. Like I can reference myself for drawing Steve Randle or Johnny Cade (at least his face lol), but not so much for drawing like…Dally or Evie or Marcia. Still, it’s useful, especially when I can’t find a specific reference I want, yk?
Anyhow, those are the main ways I utilize references in art! Hope some of this was helpful :))
#ask#how i draw#digital art#art tips#rambling#long post#will answer the hands question tomorrow probably?? It depends lol
32 notes
·
View notes
Text
Art Resources 01 [Facial anatomy]
Hi! First post of the Art Resources thing I mentioned a while back :) Figured I'd start with something people generally want to know more about- or something people think they already know about but could still used some lesser known tips!
Resources, break downs and tips under the Keep Reading thing :]
1. The Basics
There are thousands of methods to constructing the face. The most popular one is the little circle with the cross in the middle, and sometimes a few more lines for the jaw. While that can be a useful guideline, if you're just starting to learn the ropes it might be better to use a method that has more structure decomposition and land marks to help guide you. Here I'll leave two methods of deconstructing the face that I believe are the most useful to draw faces in different angles and perspectives as well as identify where exactly should each element be placed.
REMEMBER: All of these methods are just guidelines. In order to get different facial features, you can adjust proportions for each of these and play around with sizes.
1.1 The Loomis Method
A structural approach to drawing the head, based on first: simplifying general forms and second: identifying landmarks for the face elements. Pretty good for beginners, helps you understand the head from a more tridimensional stand point to be able to draw it from different angles.
youtube
1.2 The Reilly Method
Also a structural approach, but this one is based on understanding the rhythms of the face (proportions, harmonies, and even some general muscular anatomy). It can be a bit harder to understand and use as a building block for beginner artists, but it can serve as a way to check your proportions after an initial sketch.
youtube
Here are other two methods, a bit less known, but that go a bit more in depth about the head. If you're a beginner, I'd recommend watching the Loomis method first before diving into these other two methods. Note: these are playlists covering each method, and the videos are longer, but worthwhile.
1.3 The Michael Hampton Method
1.4 The Steve Huston Method
And here's a hybrid of a visual and structural approach too if you're interested! (Again, this one is recommended mostly if you already have a good grasp of the general structure)
Having trouble finding that reference of the head from that specific angle? Here's a 3D model that can be used as reference from any angle. Bonus: It has a built in light feature that allows you to understand which planes of the face the light would hit!
There's also a version with more feminine features.
Here's a website that lets you pick a head angle and then searches for reference images with that angle too. Allows you to pick age, gender, and other features like glasses, facial hair, etc.
2. Understanding What's Below
When drawing the head and face, what most people think of is what we see everyday: the skin. However, there's more to the head and face than just that: there's a whole structure laying underneath that builds up everything on top. Understanding that structure can lead to better execution of skin level facial anatomy.
And what's that structure? Well, bones of course. And muscles. Even if (most of the time) we don't draw them, knowing they exist and how they are placed on top of each other can help with building what we do draw. Understanding the building blocks of the face will make it easier to avoid, say, making one eye bigger than the other. Or a forehead that's too small. Or ears that are too high. Or side profiles that cut off the brain.
Something I recommend for this is making study sheets of the bone structure, muscular structure, and skin structure. For this it's important to name the main bones and muscle groups. Not because you need to commit them to memory, but because if you name them on your practice sheet, it's easier to remember later on that they EXIST (even if you don't remember the name).
Here's a 3D model of the skull
Useful guide for the names of the bones of the skull
Here's a 3D model of the face muscles with names
3. Elements of a Whole
So we now understand the general structure of a face and some useful guidelines to build it. Good! But now, a face has a bunch of individual elements with their own individual structure and stuff to look out for. Those are, of course:
Eyes
Noses
Lips
Ears
3.1 Eyes
It's important to note that the eye has a volume of its own- it's not just a sticker laying on top of the face. It can be helpful to think of the eyeball inside the eye socket when drawing it (taking into account the bone structure we learned before). When understanding the eyeball as a sphere, it becomes easier to place the skin above: the eyelids. This can help with drawing the eye from any angle.

This can also help when drawing the dreaded Other EyeTM, specially if you are still a beginner artist. If you start by constructing the eyes with spheres and approach it from the perspective of "placing" the skin above that sphere, it's easier to get sizes and proportions right.
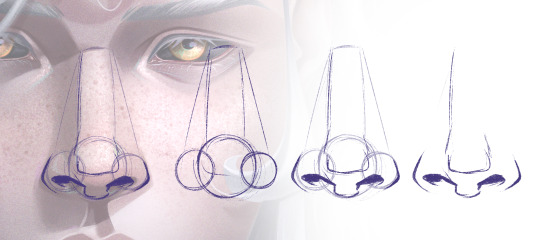
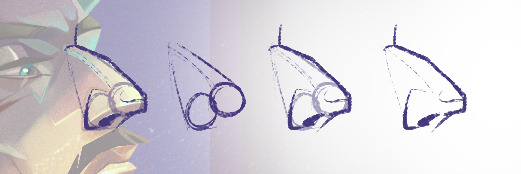
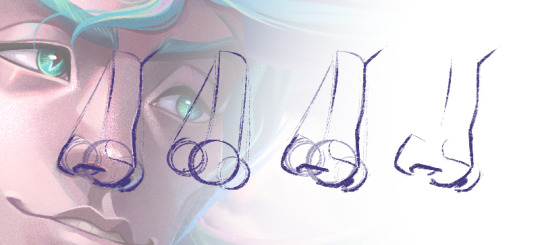
3.2 Noses
Again, spheres can be your friend.
3.3 Lips
Spheres part 3
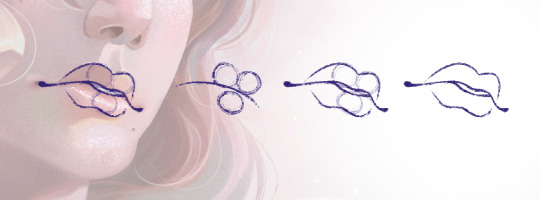
A funny thing with lips that often gets over looked when one is just learning the ropes of anatomy is that it also wraps around the volume of the face. Just like the eyes aren't stickers laying on top, the lips aren't either. It's important to take the curvature of the face when placing the lips from different angles and expressions. For example, when we thing of a smile, its usually this idea that comes to mind:

Which yeah, that's fine! ...As long as your subject is facing straight to the camera.
But when we have even a bit of perspective, the way the mouth looks changes, and we often don't think of that and just draw what we think the mouth looks like... which can lead to odd looking mouths, like they're pasted on. So, it's important to keep in mind the volume of the face:
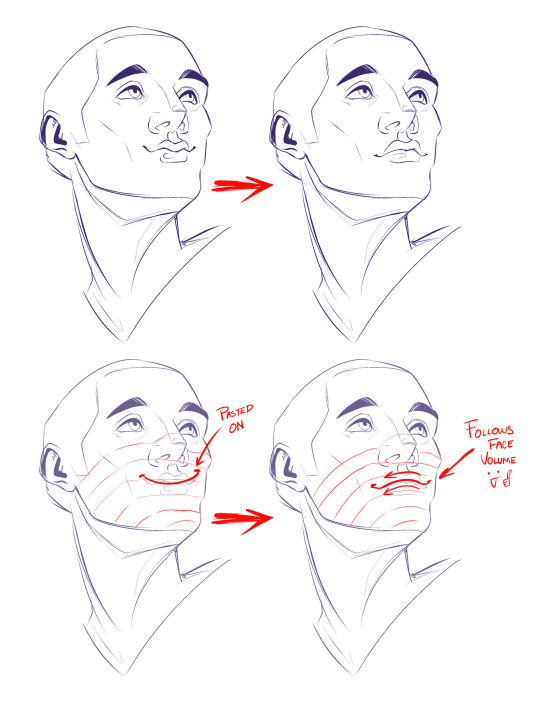
This is true for all features of the face: keeping in mind the volume. But, it can be more noticeable on the mouth.
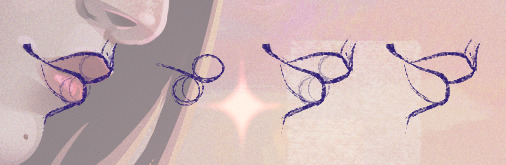
3.4 Ears
Spheres part- no.
Even if the ear is one of the "flatter" parts of the head, it doesn't mean they don't have volume. Depending on the angle of the face, it'll change how much of the ear is shown- or which parts.
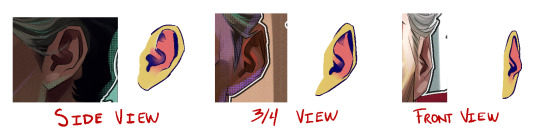
All ears are different and have their quirks, but they all can be divided in three major segments, colour coded in the image. If you deconstruct the ear in these three major parts, keeping in mind they have their own volume, it should be easier to figure out which of those parts will be seen depending on the angle of your face.
4. Expressions!
Now that we understand the elements and construction blocks of the face (bones and muscles), we can play around with them a bit more. So, time to make expressions!
When playing with how the skin moves, it's fundamental to understand the muscle groups of the face and how they move, relax and tense depending on the expression. Knowing that these muscles exist and how they interact with the skin above will help you know where the eyebrow should furrow, where wrinkles would form.
A BOOK I widely recommend is Anatomy of Facial Expression, which you can find here for purchase
Or here as a PDF
This book also covers skull anatomy, so it's a useful tool to study the structure talked about in 02.
There's also an ArtStation account that uploads a bunch of useful 3D model resources for anatomy (facial or otherwise).
Scott McCloud's book, Making Comics, has a section dedicated to facial expressions too (great book in general, not only if you're interested in comics!). You can find it in PAGE 80 (or 88 in the document).
Another thing that can be helpful is studying from life! You can do that by making different expressions in front of a mirror and pay close attention to which muscle groups tense and relax, where wrinkles appear, how your skin moves. Or, if you're like me and hate staring at your face, you can also study from video references.
Here's a link to a PLAYLIST containing various videos of people making different expressions.
The previous playlist contains real people, thus, REALISTIC ANATOMY. It's important to note that even if your drawing style is heavily stylised (like anime, cartoon, etc), it's still fundamental that you understand real world rules so you later know how to bend and break them properly to implement those to your own style.
However, that doesn't mean you can't study STYLISED EXPRESSIONS too! It's actually a great idea to see how other people exaggerate certain anatomical aspects to their own work so you can also understand how to do it in yours. Here's a list with various videos of EXPRESSIONS IN MOTION for animation tests. Study them the same as the previous ones: paying close attention to how the face and muscles MOVE.
youtube
youtube
youtube
youtube
youtube
Pause the videos you study as needed! While all of this might seem more useful for animation, it's also incredibly useful in illustration, and studying things in movement can help with understanding them better, thus putting them to paper (or tablet) becomes easier.
Finally, here's some videos in a sort of CLASS FORMAT that can help with walking you through drawing expressions more effectively than a text post could lol
youtube
youtube
youtube
#art resources#I'm sorry this took so long life just gets in the way some times#also sorry for the radio silence over here#it'll probably stay like that for a while lol#hope this can somewhat make up for it tho :']#please also tell me if the redaction is clear or if I should change something about format for these things#Maybe I'm doing way too much explanation and y'all just want the links lol
71 notes
·
View notes
Note
Any tips on anatomy and how you do your posing?
I’m mostly going to explain what you should study/look for rather than showing exactly how I do things, cuz it’d be counterintuitive the way I do some things in one drawing and not in the next !!
1) body to head ratio

This is just a rough guide, so I recommend calculating and “averaging it out” with the references that you have. Body to head ratio is really important when it comes to fat/muscle distribution and proportioning a reference image to the character that you want to draw if their body shape does not match.
2) gravity and body fat

Not just gravity, but the way the body folds and fat is distributed is very important when it comes to making drawn anatomy look realistic. In real life joints fold weirdly, some body parts look unconventional and out of proportion on certain angles, so PLEASE do NOT use that “silhouette” art tip thing please oh my god I hate it so much you should NOT try to make something that is inherently imperfect “perfect”.
3) time your sketches

A classic full body pose should not take you more than a minute. Don’t use that line of action thing or whatever because neither the body nor the spine is fluid. Coming from a medical student’s perspective, learning about the joints and how they move will help you more than learning about the muscles
4) always blunt your angles

Sharp angles barely exist in our body unless it’s like maybe the ribs tbh. Knees, elbows, the jaw–everything should consist of at least 2-3 corners.
5) take pics of yourself or your acquaintances!!
I never had an anime phase or anything other than maybe a Minecraft one. I used to love anatomy so much that I would make my dad pose in silly ways and take pics of him to reference for my oc art. And no that’s not only why I’m good at drawing middle aged men/j
Anyways I hope this helps!! Learning comes with studying (and no, not all studying is drawing consistently if you don’t analyze what you’re drawing) so I hope you get to study anatomy better with these tips!!! Eventually you won’t have to calculate stuff like this and will be muscle memory!
8 notes
·
View notes
Text


Accidentally did a lineup of some Helvetia girls (plus Merlin) impulsively past midnight. I wanted to try draw different body types because I think of them as an extension of storytelling. Plus, it's fun and good practice! (I say this without ever having learned anatomy or having searched up reference for this lmfao oops)
Characters 1-3 and 5 belong to @theroyalzealot, and character 4 belongs to @katastrofish. Image description + more info from left to right under cut!
Marianne (red), 42 y/o: Pear-shaped, keeping in mind she's in her 40s. She also has small lip corner/cheek wrinkles. No idea what it is anatomy wise lmao. I designed her for my friend. Not much to say here? She's your average middle-aged woman who has curves in the right places. She's not on the athletic end because she sits behind a desk all day. I drew her in an A-pose because I didn't know I was going to be doing a lineup LOL
Molly (blue), 24 y/o: Slouch, shoulders slope more. She's the reason I started doing this lineup in the first place, because her designer and Marianne's original designer (same artist) draws them with the exact same body type and face shape, and given the big age difference and their very different personalities, I thought to try redesign her while staying true to being curvy/round. I tried leaning hard into softness since she's not self assured and is kinda melancholic sometimes. To match, I gave her a rounder face, a wider/rounder nose, and droopy eyes. (Marianne's French and Molly's Brazillian, so I wanted Molly's features to not be so Eurocentric.) I also changed her hair to try reflect her personality more.
Abaddon (green), 33 y/o: Hip dip, like she's always flexing. Originally desgined by someone else. I was drawing these with Mika on call, and this was the point they said they were curious about my interpretation of Abaddon. This woman is supposed to be fucking tall and built like a tree, so I really wanted to show that LOL. It's just angles, angles and hard lines everywhere. Whenever I'm drawing muscular/fit people, I try to remember that muscle is soft when unflexed, and that people aren't flexing all the time (unlike what media potrays). BUT. Abaddon is constantly jacked on hypergeometric steroids to the point of addiction. So I think being uncannily shredded at all times even when she's fully relaxed fits. Also, hip dip is there because she doesn't have a lot of fat. The same goes for the next 3 characters.
Melydice (purple), 30 y/o: Muscular, but not in the steroid kinda way like [Abaddon]. Toned af. Originally designed by Mika! I wanted to draw Melydice to contrast against Abaddon, by showing what a very athletic woman who's not constantly on steroids looks like. It probably would've been more effective if I've actually studied muscle anatomy! But anyway, I followed Mika's description for this: pretty average frame, but with broader shoulders, and all the muscle she packs hide beneath loose clothing. Maybe I should've drawn Melydice flexing her arm for contrast to see how fucking swole she is when she's actually flexing. But otherwise, I think she has a sleeper build. She takes her duties as a field agent very seriously, and she's been one since she was 18.
Eve (cyan), 39 y/o: Narrower shoulders. Ectomorph kinda build; leaner and not as muscular as [Melydice]. Very lean frame. Originally designed by another artist. I drew her in for variety and to contrast against Melydice. In my head, her body naturally can't build muscle as easily as Melydice's (and Abaddon's), thus having smaller muscles (and less fat) than them both. So she's more of the 'mean and lean' kinda gal, and would definitely look slim/narrow when her muscles are relaxed. However! Do not underestimate her! The fact that she's nearly 40 but has a body as toned as this means that she's been consistently training for ages! She can absolutely pack a punch if she needs to, I'm sure. She sure packed a punch in Hrothgar's criminal record by framing him-
Leyna/Merlin (orange), 30 y/o (stuck permanently at this age because she's dead): Narrower frame, but proportionally broader shoulders. L o n g l e g s. I've had the idea to draw a lineup for a long time, and I knew I wanted to include Leyna and Elmira in it. It's nice to compare/contrast her against Eve, too: they're similarly lean, except with how Eve is more muscular, Leyna's pelvis is narrower, Leyna's flat as a board, and Leyna's legs are proportionally longer. Even though both their shoulder widths are kind of the same, I like to think that skeletally, Eve's are narrower. It's just that she has muscle built on top of that. If Leyna were to work her shoulders/chest, I think they'd be broader than Eve's. She's lucky to have this build since she very often presents as male (she's genderqueer, uses any pronouns).
Elmira (magenta), 43 y/o: Petit but round. Pigeon SML shapes, as in I wanted to capture the 'small medium large' shapes of a pigeon and implant it into Elmira (since her surname is Golubev, aka pigeon/dove). Not much to say here, either. I didn't want her to necessarily be curvy like Marianne (though I could've done a better job at Marianne). I just wanted her features to be very round. She often wears a hijab but doesn't do it all the time, so it was about time that I started ideating what her hair would look like. One day, I'll achieve the thick and curly/wavy look I have in mind.
#helvetia#birdfam#delta green#ttrpg art#ttrpg character#pawsedsart#character development#original character#character design#character art#oc#oc art#ttrpg campaign#ttrpg oc#original character art#oc art dump#oc artist#oc artwork#oc story#ocs#my ocs#my art#artists on tumblr#drawing#sketch dump#sketch#sketches#character sheet#reference sheet#art study
7 notes
·
View notes
Note
can I have an outline of how you draw bodies for reference please ^^ if u can and want too
I’m not good with tutorials because I’ve never been asked, but I’ll try my best tee hee
Also forgive the crusty art, it’s 2 am and I’m drawing mermaids.
Now, personally, I have a very different style that’s mainly culminated of many other styles that I have studied from other artists that I like, so this might not work for you or any other person that sees this, but I think trying in general is a big step in the right direction!
1. BLOCKING!!

Funny enough, I just started this step very recently, so if anything, it’s just an extra step to make sure everything is right. It’s actually helped me quite a lot since I have problems with anatomy and posing, so I really recommend it as a first step.
Think of it as a really messy sketch. In this step, you can do literally anything without being upset for getting frustrated because it doesn’t look right. It’s just a silhouette of an idea that you will expand on in the next step. I also recommend this for character design since silhouette is a BIG part of it and can make or break a line of characters. The last thing you want is for everyone character to look like a recolor of each other. ^^’
2. SHAPES!

I cannot stress enough how important shape language is for literally every single thing. Everything is made of shapes. People, animals, buildings, food. It all can be broken down into squares and circles. This is a part of anatomy that takes a little study, but once you get it, you get it.
For me, it’s changed a lot, but to put it simply: trapezoid and triangles. That’s all you really need for torsos really.
Now, for people of different body types, that’s a whole different story. Of course pear shaped people are not going to be built the same as people that are under rectangle or apple. That’s for another day, though. Slow and steady winds the race. If you take in too much, you’ll stress yourself out.
3. DETAILS!

Warning! If this part stresses you out the most, you are not alone.
I am better at drawing women and femmes because that was what my first Ocs were, so I’m still learning maize anatomy, but whatever. Nothing to worry about now.
This is completely reliant on what the person looks like. People have different bodies so not everyone is going to have a perfect hourglass figure. That being said, simply making the body wider or taller is not enough!! People have fat, it’s just one of the many things we are made of. Some people have more, some have less.
Think of it like a blanket almost. If you were to put a bed sheet over a chair, you would be able to see almost everything regarding the shape of it. If it was made of something thicker, like chunky crochet yarn, it would be harder to see the shape of the chair underneath. That’s putting it very simply. Things like muscle and stuff would be like throwing clothes onto the chair before putting the blanket on. Not a nursing major or anything, so take this with a grain of salt. I’m a stupid little guy.
It would take me forever to explain all of this, so I suggest looking into it on your own time in order to get a more in depth understanding of bodies and stuff like that. :)
EXTRAS!

If you haven’t noticed already p, which I completely understand, I am not that good at robots. I joined fnaf when Security Breach came out cus I like Suna nd Moon and I started this account with the intent of gaining an audience for my other Ocs. You goobers reeled me in and now I’m stuck here.
Anyway, when it comes to metal people, I draw them slightly different. They don’t have organs or anything, and are video game characters, so they don’t need a space for them. And nothing is better than saving space :)
I also make their bust a literal circle because I come on this app each day and see someone else draw them better and I start to sob uncontrollably. /j
This is completely up to you since people draw them all kinds of silly ways and I see no problem with that.
I don’t know how to end this but I hope this helped in some way :)
#mxiize#askcornmxiize#art help#artists on tumblr#original art#digital art#tutorial#helping#i don’t know what i’m doing#don’t hurt me#i so tired#honk shoo honk shoo
18 notes
·
View notes
Note
How do you anatomy? Tell me your secrets!! /silly
I don't know 😭😭😭/silly too
Alsooo english is not my first language so I’m sorry If some things don’t make sense here ⬇️
I think what made me improve was, ironically, not worry much about anatomy hahaha
I started to question what I wanted to achieve with my drawings and come to the conclusion that I just wanted to have fun :D
So I started focusing on doing anatomy with more fun and dynamic shapes instead of doing it correctly
I am very far from being an expert but, based on my own goals and my personal experience, this is what works for me:
1- Think about what you want to achieve with your art style: in my case, I want my art style to be chaotic, especially in the line and colors, so that also means to me that I can exagerate a little bit the shapes in the body of the characters I draw)
2- When you practice anatomy do not focus on small details: since I am very lazy to learn all the body's muscles and bones, I always try to simplify everything in big shapes and then see if the small details are really necessary
3- Have confidence in your lines: I always try to use long and fast lines to maintain dynamism (You can try to copy a pose from a photo with a limit of time like 1 minute or 30 seconds)
4- The body has no straight figures: The best way to prevent my drawings from looking stiff is always using curved lines. It doesn't matter what part of the body you are seeing, the lines that form it will always be slightly curved (If your art style is based on using straight shapes, this point is useless I guess lol)
5- Do not forget to look at the drawings of others: I used to focus a lot on "study" anatomy using photographs of real people, but it is also very useful to see simplified anatomy drawings from other artists (obviously I do not mean copying drawings of others lol, but understand how they simplify it to simplify in your own drawings)
Oh! Also!!! these are some of the artists who inspire me the most (all on Instagram because I don't use tumblr much, sorry 😭)


#I try my best so I hope this help you!!#Also I feel very honored that someone cosidered me for art tips 🤧#thank you :)#I was like what??? me?? anatomy??
6 notes
·
View notes
Note
HII! this is my first time sending an ask so i apologize if anything is confusing. do you have any sort of tips for drawing bodies or faces? i always struggle with anatomy and can't find any simply tutorials or explanations
THANK YOU!! >_>
hello!! hiiii!!!! thank you for the ask!!! no worries, you did just fine and i'm happy to be your first ask!
as mentioned in my previous post, the best way to learn to draw bodies is by studying references and actual parts of the body as shown by muscle diagrams. learning where each muscle and bone is (generally) helps SO much, seriously. tutorials don't work for me either, so i prefer to stare at references on pinterest until i get the gist and draw from that. it's a great way to pick up new fundamentals you didn't know before. i would make an image with some of the steps i follow, but if i'm being honest, i don't trust myself to give advice on anatomy in the slightest, LMAO
for faces, i usually follow a few key rules.
1. the distance between the eyes should be the length of the eyes.
2. the length/size of the ears should fit in the space between the eyes and the tip of the nose
3. the brows are typically slightly longer than the eyes, and create an arc with the bridge of the nose.
4. chins are rounded, not pointed.

hopefully this image gets my meaning across a bit easier! just like bodies, i reccomend studying images of the human skull. i vividly recall a time back in middle school where i'd been given an assignment to recreate a photograph while drawing, and choosing to draw a skull was the best choice i've made as an artist, i think. i spent so long staring at it that i tend to imagine the placement of skulls when drawing people.
remember that these are not laws! anatomy can still be good if you move the eyes closer, or make them bigger, or make the nose smaller, or do literally anything. feel free to discard everything i say if it doesn't apply to your or you don't want to, especially if you draw in a more cartoonish style.
thank you again!!! ❤️
7 notes
·
View notes
Note
Hi! Hope you're doing well!
I'm trying to learn how to properly draw people. I'm fairly decent at drawing objects, but people? Nope, that's out of question. So, do you have any tips for a beginner? Like what should I focus on, any YT channels, etc.?
(If you see this ask on other pages as well, it's because I'm sending this to my favorite artists on this site <3)
Hyello!
I don't know if I'm exactly the person you should asking, seeing as I'm still fairly new to art so I'll point you in the direction of a few of my personal favorite artists as well! I do have a few tips and exercises for you that I've found to be quite helpful (if not fun) that have been passed down to me by other artists and teachers, though.
1. You should really learn your anatomy before you try to find your specific style. Without knowing the basics first, you'll probably jump around and have no consistency when drawing the same character. Knowing the body is very, very important.
Exercise 1: Using reference photos (I recommend dancing and sports photos for more dynamic shapes, beauty influencers and photographery for what is typically "attractive," and lots of different body types and skin tones for a diverse and more realistic character) and trying to figure out the line of action, then make a gesture drawing to get the basic feel of the body's movements, then the shapes of the body, etc.
Exercise 2: (The fun version) Draw a random shape. Yes, a random one - it can be pointed or round or wavy. It just has to connect. Then, try to make a character that fits in the bounds of that shape. This will push you to try to figure out what is necessary to make a human look, well, human, and also limit the clutter of your characters' accessories and clothing. It also helps you create a unique silhouette (which is always great when making a good, recognizable character)
-
2. Colors! I'm sure you know basic color theory from when you learned how to draw objects, but if not, you should definitely get on that. It's best to know what colors work best with specific skin tones or whatever you're putting on your character. There are a lot of color theory videos on YT which I think you should check out!
Exercise 1: Limit yourself to 1 color - you may only use variations of that color for your entire character. Yes, this includes skintone and hair. This exercise helps you with values and gets you connected to what places need darker or lighter colors. It's also just really, really fun.
Exercise 2: (Variation of 1) Find a color pallette and stick to those colors exclusively. Try to use the 60-30-10 rule if possible (meaning 60% of the character is one color, 30% is a different color, and 10% is another color). Not everyone adheres to this rule since character design is fluid, and you can do whatever the heck you want, but I personally think that it helps to push your knowledge of color.
Exercise 3: The internet is your best friend. Find a very colorful image online of a model that you really like, or a person that's sitting in some nice lighting, or even an animated character that had some funky colors. Try to imitate the rendering. Shading is pretty important when learning how to draw because it can really change how the muscle looks without it. (Depending on your style, shading can look very, very different.)
-
3. (Extension of Color) Once again, shading is very important! Depending on the project, however, the way you should shade can be very different. For animations, shading is typically minimal so that they can focus on the movement and not slave over their computer for days on end shading and shading and shading. Keep that in mind! For cartoon or anime art styles, it's often blocky and not blended. For real-life proportions and art styles, it's often blended and rendered (and normally without line-art if that's the route you wanna go 👍).
Exercise 1: Try out and study all sorts of art styles and shading types! It's really helpful in the future if you want to know what you like best! If you want to study a specific artists' art, it's best to ask them beforehand, however. Get their OK before starting. If they say no, then don't. (By the way, no art style is original, no matter what anyone says.)
-
4. There are lots of online courses or resources you can use! Utilize them. Some of my favorites/things I've heard good things about are...
Artstation - Courses
IAMAG - Courses
Senshi stock - References
Croquis Cafe- References
Rad how to school - Courses
Life of action.com - References
Quickposes.com - References
Proko - Courses
Posemaniacs - References
Warrior Art Camp - Courses
Pexels.com - References
Marshall Vandruff - Courses
Cactus Art Academy - Courses
Sketchdaily - References
Bodyvisualizer.com - Body types
Figurosity - References
Pinterest - EVERYTHING
-
5. Youtubers and Content Creators !!! There are a lot that I watch and a lot that other artists have recommended to me, so I'll tell you them. Also, find your favorite artists on your favorite social media sites and mentally study their art when you see it! Trust, it helps. (Warning: Long List)
Drawfee Show - They're very funny + watching how they quickly build their characters and settings can really help you figure out what is most important in character design.
Hanacue - Their shading is to DIE for <3
Marikyuun - Very good with a cutsie art style!
Kooleen - Funny, sarcastic + amazing tips
Marc Brunet - Anatomy at its finest
At Lojart - I just find them really cool
Jaiden Animations - Silly + watching her animations can help with your animations
GinjaNinjaOwO - They're funny + their character design makes me want to scream /pos
LavenderTowne - Very sweet + great tips + cute art!!
Pixiv - Wondeful tutorials
TheOdd1sOut - Same as JaidenAnimations, really
Sinix Design - <333333 so many great tips for shapes and painting !!!!
Marco Bucci - Color Theory!!
Mmmmonexx - I don't know much about them but my friend swears by him
Naoki Saito illust Channel - Putting stories/feeling into your art made easier
HxxG - More attractive art <3
Coax Illust - Fun! Semi-realism (I could never)
-
6. Lastly, learning art takes a long, long time. You can't just wake up one day and know how to draw. You have to keep trying and keep learning and never, ever give up. It's all part of the journey, even the pieces that you don't like. Practice doesn't make perfect. It makes permanent. <3
My favorite artists (and my moots <3): @gl4ssfan , @aiyumiyeou , @coffeeisfortheresponsible , @foxlow , @roselock22 @alicecraftgirl @twigs-sprigs @greenflowerceo @spoopy-sloth @laziilizard @enavstars @miyuliart
Hope this long post didn't bore you! Plus, I hope this helps. Have a wonderful day <33
#queue#ask august#august's art#august's opinion#august's real life#august's moot#my art#art tips#art tutorial#artists on tumblr#art
40 notes
·
View notes
Note
Ur strength is definitely color and line work. Something I would say needs some work is definitely your full body drawings and poses. Your poses are always static and rigid and (especially when in motion) it takes me a moment to figure out what the character is supposed to be doing. Your anatomy is fine, its the stiffness of the over all pose thats the issue. It makes your pieces lack energy and any real umph. Your beautiful use of color and line usually covers for this but for me (someone who also struggles with this) it pops out like a sore thumb.
To practice, id suggest doing gesture drawings (1 minute sketches of action poses) to really understand how the body moves fluidly and to practice capturing that energy. Id also suggest doing 5-10 minute studies of full body figures in which you specifically observe how the pose affects the distribution of weight. How the torso curves in relation to the pose (your torsos are often very vertical and stiff) and how their muscles, fat, and clothing stretch, bulge, or fold depending on the pose.
Try to keep things loose during these studies and focus on capturing the energy of the pose over perfect anatomy. Focusing on anatomy can often be a distraction and can actually detract from capturing the fluid movement of a pose when you are first learning. You dont want to be thinking about anatomy during a 1 or 5 or 10 minute study if that is not what you are trying to learn.
While doing gesture drawings, its important that you move fast and dont get hung up on details. Get the line of action in there and the general shapes of the figure. Focus more on the movement of the figure over anatomy or details. Feel the rhythm in the pose and do your best to capture it. Id suggest doing 10 or 20 of these at a time. Sites like Line of Action are great for studies like this.
For 5-10 minute studies you want to build on the rhythm you developed during the 1 minute studies. Again, you want to focus on the movement of the pose over the details. Keep shapes simplified and force yourself to think in the abstract. A vibe i get from looking at ur art is that you get focused on the small details while losing sight of the big picture (might be wrong bout this but its something i also struggle with lolol) so during studies its important to keep ur mind on the bigger picture. Focusing in on small details adds to the stiffness of a piece as instead of one singular piece, it’s made of many smaller pieces. Idk if that makes sense lololol. Id do 1 hour of these 5-10 minute studies.
But yea id say this is really the main thing holding you back right now. Once you figure out how to capture the rhythm and energy in a pose id say ur golden lololol good luck! I hope this helps XD
oh gods yeah I need to whip some referencing for poses and specially dynamism, I tend to make things a bit too stiff. I think I cornered myself into making very static poses since I do a lot of character ref oriented work, and showing the design and outfits is a priority over the dynamism, and like, I need to get working on that.
It sucks to realize how I've let social media performance guide a bit on what I draw and I practice. People like their fullbody character designs with a grey background, and I've let a lot of What Isn't That fall apart, and it's bad! I gotta get better!
I need to find a way to maybe get a way to do these practices and still post it, bc even when I've done them, they stay in a folder and never get to see the light of the day. (Also, I saw the other ask and I'm gonna check that one soon! I struggle so much finding good refs for that!)
13 notes
·
View notes
Note
if it’s not too much to ask and if you can and want to could I get an outline of how you draw bodies as reference please ^^

*eats ur art* That’s what ur art tastes like ^
First of all, thank yew 😋, and of course! (Not sure how helpful this will be tho cuz a lot of the time I'm just winging it. You don't have to follow this to a t, it's just mostly tips and what I use.
Basic shapes
I don't really follow these sometimes because it often depends on the general aspects of the character I'm drawing, but it's relatively the same


I mostly use triangle sort of stuff for the chest and small bowl shapes for the rest of the torso till I get to the pelvic/hips which is like a bump and then triangle down (??). The arms and hands are what I bend to my will the most and ignore the anatomy on mostly. I just mainly keep it mind that the arm is like half flat half bump when straight out. Even when in a pose, there's always a flat part to the arm.
Ex: 1

See how I kinda used that with this one?? Idk but like that's basically how I do it using shapes. But I also do it another way with the collar bone
Ex: 2

Okay so with the collar bone, basically I start with the head and maybe the triangle torso shape. Then I draw the collar bone and connect everything to that. Ex: the arms are connected to the shoulders, which is connected to the collar bone, which is connected to the torso, which is connected to the pelvis, which is connected to the legs.
It helps in a way tho I've been told before that's a pretty inconvenient way to do it soooo 😗 do what you will with that info
References & studying
I didn't study shit. Deadass. My biggest helper was my gayness and muscular women

I would just stare at muscular women for ages on Pinterest till I realized that their muscles are VERY visible. Like in an anatomy way.
Ex:
Basically, I would map out muscular women and take in what I could exaggerate and stuff to my style.

I also kept in mind how muscles look on different bodies, but how they're all the same muscles no matter. So I was like "they all have the same muscles, just some more defined and sharp, other less so" AND BOOM :D it was like the pearly gates of art had opened for me.
Sketching
I sketch in 3/4 ways

Outline is when I would either trace my ref or do a small stick man of what pose I want, then define on that.
Shadow is when I basically do a filled outline of what I want my end product to look like without any details or fill in a ref and use that as my base for what my end product should be similar to.
Raw dog is when I just go in, no ref no outline no nothing, and just draw what I'm thinking. It's a process of draw, erase, and draw till I sort of can tell what I'm thinking of. This is often the process I use for fanart. Just ref if the opposite of that. It's when I trace the ref and just the ref. No added details, no change of clothes, expression, no nothing. I often do this when artblock hits.
Bones

Bones are friends, not foe.
I only really pay attention to the shoulder, rib, and neck bones. Sometimes the pelvic but often I let the other bones float to the back of my head. This just helps with knowing the limits to the bends of a body and stuff. I keep these in my a lot when drawing.
#sorry this took so long to reply 😭 this took forever#hope this helps tho cuz like idk how to explain it#i like learned how to do it and just never thought about it further#i was like “okay i know it now” and never remeberwd how i learned it#:D 👍🏾#my art#art#drawing#sketch#art tips
4 notes
·
View notes
Note
YOUR YUGIOH ART IS ABSOLUTELY GORGEOUS!!! Your lines are so perfect yet expressive and the way you show dimension is just stunning!! how did you get so good at anatomy!?
THANK YOU SO MUCH AAAAAA 😭😭😭
Honestly I think I'm not that good at anatomy, but I can give a little description of how I got here with it.
Heads up for long reply
There are 3 things that had helped me along the way to draw bodies and art in general:
1) STUDY: I'm not talking about going to art school (even if I did, it didn't help and only got me several traumas) I'm talking about sitting at your desk and study the body. I did it in so many ways. One of my favorite was to take a bunch of fashion magazines and draw the movement line on the models (I know it by that name, I don't know if on english has another term, but is basically the line that goes through the spine), the movement line helps quite a lot to have a basic idea of how the pose will go, how the energy is distributed along the torso and limbs, etc (if you want I can give a little 'how-to-do' in another post so it can be easier to understand). Adding to it, studying actual anatomy helps a lot, to know where the muscles are, how the bones work and how the skin also does its thing. You don't have to know everything, you just need to have the idea.
2) REFERENCES: fuck pinterest, albums with 174.747.426 pics references from a random person, all you need to know is your own body. I know that people always argue to me about this topic 'but hey I don't have a jojo body, I'm not even a man, I'm a big size, I don't like taking pictures of myself, etc, etc,etc' I get it, but guys ME NEITHER! I don't have the body of the characters I draw, but if you want to understand anatomy you have to start with yourself.
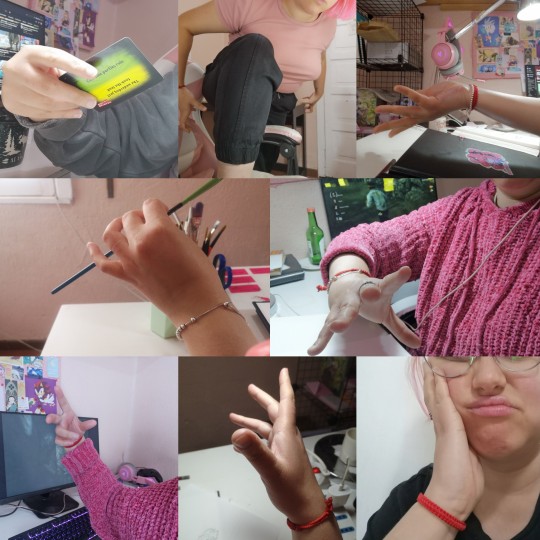
It's embarrassing to admit it but most of the hands I draw are all made in base of my own selfies, and I used em for so long that I don't need to take pictures so often anymore, cos I ended up understanding how it works. Even on poses I kept using my own body as the biggest reference and I'll keep doing it.
These are some of the hundreds of pics I've taken of myself for references. Embarrassing myself only to prove my point :'D
3) and the most important PRETEND THAT YOU KNOW: Sounds weird but back me up on this. Art is the work of the liar, the artist is the person that found a way to turn something 3 dimensional to 2 dimensional, it's the lineart that fakes reality to pretend that there's space in a piece of paper. So for that to work you have to draw pretending that you know what you're doing.
This is not a 'believe in yourself' this is a 'keep lying to yourself until others believe it'. Art is not about being loyal to reality, is about knowing the shortcuts. The majority of my drawings aren't anatomical correct, but I faked it so much that you think that it is (PSYCHE!)
I know it sounds like you only need this one point to be capable of drawing but nope nope nope! You first need to understand the reality to be capable of fake it.
There isn't a single way to draw a body, I'm pretty much against those 'DON'T DO THIS. DO THIS INSTEAD' bc it basically tells you that you don't have other option but learn that one way, basically telling you the shortcut without explaining you why or how. There are millions of ways and for you to find yours, all you need is understand the way you see the world.
This was my way of learning, it could help as much as it cannot help at all! But I hope one of the three points managed to ring a bell on someone ^^
24 notes
·
View notes