25! Art, Animation, and Fanart! Will talk about my fanfics occasionally https://linktr.ee/Phoenix_inblue
Don't wanna be here? Send us removal request.
Text
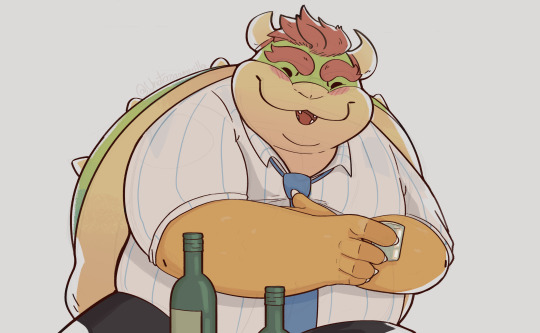
prompt: Costume Party
Happy (very late) Halloween everyone!
Here is my 1st, only, and very last minute entry for the Bowuigi Halloween event. I wished I've been more productive in making these but hey, I'm glad that I made something :D
#oh don't worry I finished 0 of my sketches#luigi#bowser#super mario#bowuigi#bowser x luigi#digital art#my art#mario#halloween#bowuigi halloween 2024#bowuigi halloween event
154 notes
·
View notes
Text
youtube
261 notes
·
View notes
Text
MARIOKONG COMMUNITY ATTENTION
DK pulls this on Mario
Thanks for listening.
#HAHAHA#mario#super mario bros#donkey kong#donkario#mariokong#dkario#There's too many ship names I vote we just keep Donkario#Mariokong sounds better I know but its awkward because everyone in the Jungle Kingdom is called “Kong”#ALSO if we go by who TOPS#Mario is not the one with the coconut cream pies
18 notes
·
View notes
Text
As a fic writer, i need every reader to know that:
I don’t care if your comment is coherent. I know what you mean and i love you
I don’t care if you ramble. I read every word and i love you
I don’t care if you leave a comment on a fic from four years ago or leave comments/kudos on like ten of my fics in one go. This isn’t IG, pls stalk my AO3. I love you
I don’t care if you mention the same thing in your comment that four other people have already mentioned. It’s actually really useful to know what resonated with people and I love everyone who takes the time to tell me they liked a particular turn of phrase
I don’t mind if your comment is super long or just a couple of sentences, i love them all
I love you
#100%#If one of you comments on my old fics 5-10 years from now I appreciate it XD#I don’t want my stories to be forgotten once I finished them#fanfic#ao3
87K notes
·
View notes
Text
Yoooo!!! Hell yeah!!!
And gl with the surgery! Recover well!!!
Hello everyone! Chapter 15 is out (and it’s on time haha!) There is no date for the next one atm because I will be having surgery in the morning BUT! I will keep you all updated on when the next post should be expected : )
#go read#not my fic#bowser x luigi#bowser#bowuigi#luigi#soulmate au#archive of our own#fanfic#fanfiction#super mario bros#princess peach#mareach#mario bros#mario movie#mario#mario and luigi#super mario#bowser junior
19 notes
·
View notes
Text
YESSSSS
Some gift arts for my fren @babblingblend, a lil assortment of their dnd characters
11 notes
·
View notes
Text
Mom said it's Mario's turn on the possession plot point.
Anyways I know it's been done before but here's my take on a King Boo possesses Mario AU dgjknfh.The concept has kind of had my brain for the past couple years teehee.
Here's a reference sheet I made for Mario's design. I couldn't help but draw that after deciding on the cape teehee ^^
#accurate brotherly love#he'd kick his ass anyday#mario#luigi#king boo#luigi's mansion#smb#not my art#King Boo was an only child
477 notes
·
View notes
Photo
this was funnier in my head
1K notes
·
View notes
Photo
[Source]
the next luigi’s mansion is just gonna be this
3K notes
·
View notes
Text
Yoooo, it turned out amazing!!! It's been so exciting watching you build it. Way to go!!!
Factor Builds a Poltergust!
Part One
Poltergust?! In my kitchen?! At this time of year?!!
More probable than you might think.
For those who didn't see this post a few days ago, I've been building a prop Poltergust. I've got a costume to go along with it, and both are at the point where I can step out to an event right now and feel proud of myself.
After I find fingerless gloves and give the vacuum tube a couple more coats of paint, of course.
So, how did I do it? Why should you care about a ghost vacuum that can't actually suck things up? Well, I'm about to tell you the process I've gone through this week to get this bad boy ready, because I did a decent job documenting my steps and I wasn't just about to not share something like this.
Ready?
Here we go!
Disclaimer
This is not a tutorial. I am not in the business of giving Poltergust workshops. This is just me documenting my process, which you're free to riff off of for your own uses, but this is in no way a step-by-step instructional. This is what I got after gleaning two walkthroughs online and distilling them into something my artsy ass can manage. If I tried to pass this off as a tutorial in real life, I'd probably get fired.
If you do reference this for your own purposes, make sure to wear gloves, put down cardboard and other protective coverings, and do your work in a well-ventilated area. It should go without saying, but do not let your pets into this shit.
With that being said, let's get into the base of this whole thing.
The Base
Not gonna lie, this whole idea started with a cat carrier. It's been with me for several moves now, and neither of my cats have taken to it. Needless to say, I was ready to give this thing purpose.
The carrier I have has a bubble in the front, several panels to zip and unzip, and appears to be made of some kind of leather. With this in mind, I prepared the surface for painting by using a deglazer. If you can't find any (or you run out early like I did), some strong isopropyl alcohol and a bit more elbow grease will also do the trick.
Next, I went with some leather acrylic paint. It went on nicely and dried quickly, so I did a couple of coats.
As you can see in the picture above, this carrier had a nice black trim to it that I wanted to preserve as much as possible—hence, drafter's tape. I also left the straps as is, since E. Gadd has a thing for leather straps on his devices.
After the paint was good and dry, I sprayed the whole thing a couple times over with a clear topcoat. I might've picked something semi-glossy (I really don't remember), but so long as it's clear and sprayable, it'll work.
I did get a little bit of topcoat on the bubble, but this really won't matter in the long run.
Panels and Wheels
Each Poltergust I've come across has a set of wheels or cylinders on the sides. Seeing as this was a consistent choice, I figured I'd cook something up to cover the side panels of my base.
Each wheel piece is based on a wooden circle (mine are about 6.5" in diameter). From there, I glued a smaller foam disc onto the center, and then covered each disc in gray foam for a smooth look.
While waiting for that to dry, I then took a triangular dowel of EVA foam and painted that black. One calculation for the circumference of the inner circle later, and I had the outer rims for these pieces. For error's sake, I rounded up.
End result?
Snazzy. Now to apply this and the other panels onto the base. I chose a thicker piece of black foam for the accent paneling, which also went under these circles. However, I didn't immediately glue all this on.
Instead, I went to work on some other doodads.
Doodads, part one
There are a number of holes on the cat carrier. They come in sets of three, are ringed with metal, and were probably intended to provide airflow to my spoiled little fur babies. For the Poltergust, though, these holes provided opportunities for additional decorations.
All of these holes were 1" in diameter, which made some of my choices awfully convenient.
First off: bottom three. These are the reason I held off on gluing the panels. I wanted to cap them and put some lights behind them. Some little jewelry organizers did the trick, and provided a nice serrated edge that I used many times in this build.
Now, this photo is a bit out of order. I got a bit impatient and glued the side panels and these things on before I did the topcoat. As a result, I sprayed them a bit. Again, I like to think this works out in the end.
At this point, I was ready to take my foam and do all sorts of measurements and shit to get it all to perfectly align. And then I realized...
Foam is impressionable, and these suckers are serrated.
With that, I pressed my front panel into the circles, carved out the holes, and was able to slide it on just like that.
From there, I eyeballed and trimmed it down before gluing. And I got the circles hooked up as well.
Doodads, part 2
I came across some black desk feet that, with some nuts and a piece of foam glued in for good measure, made for some nice button-looking things on the side panels. Because I needed to work on the tube, though, this won't get applied until closer to the end.
The Tube and the Tools
The bones are good, but what about the tube? The means by which a ghost goes from outside to within?
This, along with lights and other device pieces, required a trip to the hardware store. Believe it or not, I spent quite a bit of time in the plumbing section for this stuff. Kinda funny when you think about it.
Anyway, tube. I went with a drain and bilge tube/pipe thing because it was long and flexible—not to mention easily cuttable with a hacksaw. It's attached to the Poltergust with a metal closet rod support, which again, was about the diameter I needed.
All good, right? Wrong!
That tube wasn't just gonna go into the hole nice and neat. After getting the metal circle around the tube, I cut some slits into it to cheat my constraint, further forcing it in by applying sealant to the circle and clamping that shit down.
Hot glue is nowhere near strong enough for this part. Given that it's metal, on the most vertical slope, and is gonna get tugged around a bit, I opted for sealant. Please keep in mind this shit is strong, so let it cure outside.
Since the sealant takes a while to cure, we can pretend I got everything in one trip and get started on the flashlight attachment. I found this PVC pipe thing that had a slideout bit of pipe, and something about the way it felt in my hand screamed "comically big flashlight". With that, a bell drain cap thingie, a puck light, and some paint later, I had Luigi's flashlight, ready to screw in or change out with a nozzle (which isn't built as of posting. I'm tired and it's daunting and I want to go back to writing.)
But like, wow. I'm a bit screwed when the batteries die, but for this? This is beautiful. See that black bit at the bottom? That's meant to screw into the thing pictured below.
Which, fine, there is a bit of a time skip with this top. But the whole idea is to stuff it with sealant, follow up with hot glue, and put it on the end of a trimmed down, painted bilge tube. To paint the tube, stick the whole Poltergust in a trash bag, poke a hole in it, and feed the tube through. Tape up anything loose, get that spray paint, and spray.
Rule of thumb: do not assume any of my steps are chronological. I'm going off of categories to make a bit of sense out of my madness. A lot of parts were painted in batches because I was waiting on something else and I wanted to save time.
But, once things are painted, glued, and sealed, the worst of the work is over.
That being said, we are far from over. I'd keep going, but Tumblr on mobile won't let me do more than ten pictures, so keep an eye out for the inevitable reblog featuring part two!
#super mario bros#smb#luigis mansion#poltergust#e gadd#cosplay props#cosplay#diy craft#luigi#trust the process#hey guess what Nintendo#i have a poltergust now#luigis mansion dark moon#luigis mansion 3#not my art#art
15 notes
·
View notes
Text
Are we gonna talk about the new renders of Bowser and Junior? SHALL WE???🔥🔥🔥
#I want this game so bad T-T#It looks crazy good#super mario#super mario bros#mario and luigi#mario and luigi rpg#mario and luigi brothership#m&l brothership
167 notes
·
View notes
Text
It’s the season again! 🎃🍂
#god this is beautiful#just rewatched the show this month#art#illustration#otgw#otgw fanart#overthegardenwall#over the garden wall#fantasy#fanart#halloween#the beast#otgw wirt#otgw greg#otgw beatrice#jason funderberker#not my art
22K notes
·
View notes
Text
Followup to this post
515 notes
·
View notes
Note
Hi piano randow question:in the past you had made a drawing with Mario,Luigi and Donkey Kong in the snow where warms up luigi and leaves mario in the cold,do you still have it?i can't find it
I can't find it either, but I still have the drawings laying around!:
333 notes
·
View notes
Text
For many of years I had this tradition of drawing Wirt and the beast once a year to see how much I have improved, then depression hit in 2023 and couldn't continue, but it left so really amazing art in the process
#my tradition is I rewatch this every October#special place in my heart#not my art#art#over the garden wall
14K notes
·
View notes
Text
Spooktober Week 1: Ghost
Happy Spooky Month guys👻! As tradition, I'm gonna join the Inktober and like I did last year I'm gonna follow my friend @/lintushadow.art (on Instagram) prompt list🎃! As first day, have some boos💫
See prompt list under the cut
by @/lintushadow.art (on Instagram)
#inktober#inktober 2024#spooktober#spooktober 2024#super mario#super mario fanart#super mario bros#super mario galaxy#boo mario#boo#boo super mario#bomb boo#digital art#my art#fanart#not my art
14 notes
·
View notes
Text
For many of years I had this tradition of drawing Wirt and the beast once a year to see how much I have improved, then depression hit in 2023 and couldn't continue, but it left so really amazing art in the process
14K notes
·
View notes