I'm Braden Storrs. I'm an Editor, Content Creator, and Video Creative who loves sharing knowledge and inspiration about Apple's innovative and unique Final Cut Pro X.
Don't wanna be here? Send us removal request.
Text
How to Record and Monitor System Audio with Quicktime Screen Recordings
By Braden Storrs
Quicktime has a lot of great features hidden in it. Like the ability to do screen recordings of all or part of your screen.

The only problem is it can’t record system audio directly to the .mov files it creates. It has to rely on a microphone for audio input. Like your system mic or any connected microphone. This is definitely not optimal for getting a clean recording if say, you want to hear the audio from a video you are playing on screen.
There are of course paid programs for doing screen recordings. Each having its own set of benefits. If those are overkill for what you are needing to do though there is another alternative.
Soundflower
Soundflower is a free open source system extension and app. It will allow you to create a virtual audio input/output that your Mac, and in this case Quicktime, can access. So it’ll feed the system audio into Soundflower and it’ll show up as a mic for Quicktime.
It can be a pain to setup though if you don’t know what you are doing. Simple if you do, so here’s the “how to”:
1. Download and install both the extension AND the app.
First install the extension.During the install the system extension will ask for security clearance. ALLOW this. So you know, the install WILL fail the first time. After you’ve allowed the extension in system preferences start the install again. It will complete correctly this time.
Then install the app. This will just open a finder window with the app. Drag it your Applications folder to install it.
Download from Github:
The Soundflower System Extension
The Soundflowerbed App
2. Configure the system and Soundflower for recording.
This is what I did. There may be extra unnecessary steps in here, but after playing with it for a while this is the combo that worked for us.
Double click on the app to launch it. It’ll show up as a utility in you top bar. Put a checkbox next to “Built-in Output”. If you do not do this you will NOT be able to hear your system audio during a screen recording or otherwise. Having this checked allows for monitoring through system speakers or the headphone out jack.
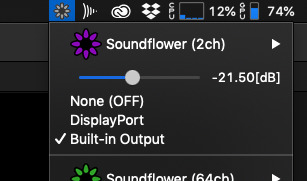
Next in System Preferences in Sound, Change the Output and Input to “Soundflower (2ch)”.

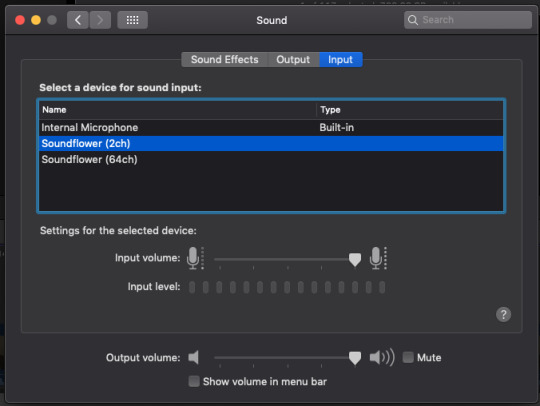
At this point you can check and make sure still hear the system audio. If you can’t (we experienced this at one point) restart the Soundflowerbed app or try a system restart.
****A gotcha we found out. The Soundflower output bases its volume off of the Built-in Output/Headphone volume level. So if it is low even when maxed out when on Soundflower then switch back to the “Built-in” output and turn up the volume. Then switch back to the “Soundflower (2ch)”.****
3. Do you Screen Recording. Then open your Quicktime app and go to New Screen Recording. From the drop down choose “Soundflower (2ch)”.
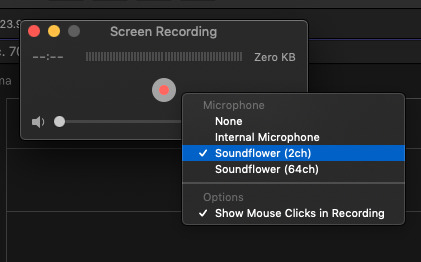
It’ll ask you to allow SoundFlowerBed to access the microphone. ALLOW this.

Then start your screen recording and you should be able to hear system audio while recording.
When you finish, check to make sure audio was recorded. You should good to go though.
****One more gotcha I guess is so far I’ve only been able to monitor audio while using Soundflower with the built in speakers or headphones. Other outputs, like streaming to an Apple TV at the same time as using Soundflower will not allow you to monitor/hear the audio.****
#blog#FCP#FCPX#the fcp editor#FinalCutProX#apple#screen recording#quicktime#tutorials#how to#how to's
1 note
·
View note
Text
FCP X Collaborative Proxy Media Hack

By: Braden Storrs
Here’s a multi-user proxy workflow hack that should be helpful. It’s a neat tip I found via someone's Youtube comment on a MacBreak Studio video. I tested it out and all seem to work. If there's a more official way to do this let me know. To my knowledge though there is not (REALLY, REALLY needs to be improved). Feel free to correct me.
Situation: Tons of .R3D media on a Lumaforge Jellyfish central storage with proxy media stored in an external folder, also on the Jellyfish. A case were this would be helpful is when we want to send out a project to a contractor. You normally can't just copy and paste the whole project folder structure in the finder. The files paths will be different for the proxy media. So, while you can relink to the originals, there is no reliable way to relink to the proxies (replacing proxy aliases has not been reliable). Or is there a way....
The kosher way to do it is to set up a new Library on the new drive, set it's media storage location to an external folder on that drive, then use the move/copy to Library command, and then in the new Library, to get the proxies over, you have to Consolidate the media to the new drive. This is currently a half baked system as there is no option to leave the original media in place. This makes FCP X, VERY slowly, copy over all the .R3D, .wav, etc files as well as the proxies, into the new media storage location. Once you wait two years for that to finish you have to go delete the extra copy of the original media in the new storage location. Then you'd relink the original media to the copy of the media you copied over when you moved over your whole project file structure from the finder. That way you can maintain your project finder organization structure. In other words a giant pain in the butt. The other option is to not move over the proxies and regenerate them. Which is not practical at all with .R3Ds. We really need a "Move Only Proxy Media" option.
So the fix. It's actually quiet easy. Just copy over everything from the Jellyfish to the portable hard drive via the finder. Open the Library on the new drive and relink the original media (if you've included it, you don't have to and can just send proxies). Make sure you've set the new Media Storage Location for the new Library to the folder that contains the "Final Cut Proxy Media" folder. Then select all the appropriate files and go to Transcode Media...>Proxy Media. This will run the normal Proxy generation code but it'll see the media all there and create the proper proxy links immediately and will relink to that media. That way there's no extra slow internal transferring and no new proxy generation. 🎉
#blog#final cut pro#Final Cut Pro X#FCPX#The FCP X Editor#FCP X#post production#video editor#video editing#videoproduction#proxy media#proxy
1 note
·
View note
Text
FCP X 10.4 Announced
By Braden Storrs
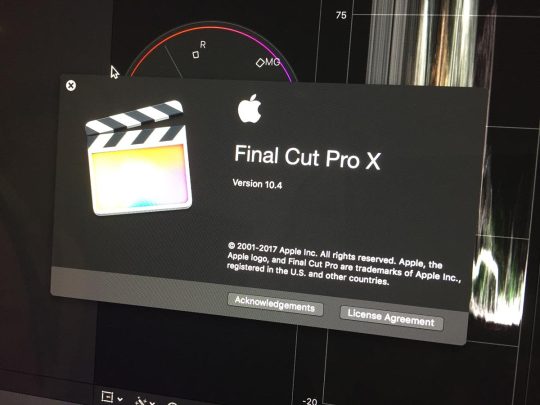
Image from FCP.CO
This was a surprising one for many because of what they focused on. One of the biggest things is actually that it was pre-announced, like the Mac Pro and iMac Pro. Once again showing Apple's new policy of transparency in action for media pro related stuff. Interesting at least. The 360/VR was expected to be coming after we found out Apple hired Tim Dashwood and acquired his industry standard 360 degree toolset. I just didn't think it would be this soon. Though from Apple's WWDC presentation they showed a focus on VR. I assume they instructed the FCP team to make it a priority. Here's some more info on what they've done there: https://medium.com/.../apple-to-introduce-next-level... The second big thing was color.... finally.... The color board was simple and fairly powerful, but had it's limits. We all assumed they would stick with leaving it to the 3rd parties. This new stuff is a fully fledged coloring system though. Including HSL curves! There are some great plugin options but for project stability and longevity built in tools are almost always a better option. They went the extra mile with a couple things. Unlike many of the color grading plugin options this is fully key-framable per parameter. The other big thing if you look at the interface is that about every parameter has the ability to color mask independently. That's something no one else has, even Resolve (without adding a whole other corrector). So say you wanted to use the blue curve, you can tell it exactly what color range to affect. They also finally added built in external LUT support, but not just for input effects, they also have an export LUT option if you need your export to conform to a certain color space or film stock. Related to color is HDR. They expanded wide gamut to full support for two industry standards for HDR and extra tools in the scopes to properly monitor and control levels. Overall while they mainly focused just on a couple things they did them right. Went the extra mile (unlike the FCP X initial launch). There’s a couple small edit functionality improvements as well involving Roles, but the focus is VR and Color. This is where some of us are disappointed. I was hoping for a more edit functionality and workflow heavy update like last year. Hope there’s more in the official release for that. It's almost certain major workflow stuff is coming at some point though. Apple also hired the guy own owns Automatic Duck this year. He's the leading expert anywhere on project translation/conversion between applications. Anyways, this update has cool tool additions, but either really not applicable to me or mostly covered by plugins I have. Huge though for anyone doing VR. Finally a truly native solution.
Here’s an article with more screenshots.
#FCP#FCP X#The FCP X Editor#finalcutpro#Final Cut Pro X#FinalCutProX#final cut pro#blog#apple#postproduction#post#video#video editor#video editing#post production#video post production#video post
4 notes
·
View notes
Text
Review: MotionVFX’s mFlare 2 Plugin
By: Braden Storrs
MotionVFX recently released their long awaited updated to their excellent flare generator suite mFlare, aptly called mFlare 2.

Funny enough I believe the original mFlare was the first plugin I ever bought, 6 years ago, after I saw this promo video. I was sucked in by the pretty lights, haha. I’ve used it on a number of projects since though, including compositing into some still photos for some magic wand effects. Flares can easily be overdramatic and overused but with prudent use can enhance a drab shot. It all depends on the subject matter of course.
The level of control in crafting the flare in mFlare was always impressive to say the least. If you could dream it you could make it. There were some drawbacks though to the original. To edit the flare you had to open a separate interface outside your composition that didn’t update in the composition till you finished editing, so you couldn’t see the changes in relation to the image. This led to a edit>check>edit>check workflow. Not efficient. Switching out to a different flare was not as easy as it could be. In FCP X there was no tracking option except manual. Tracking in Motion was limited to the strength of Motion 5′s point tracker. Which isn’t great to be honest (please Apple do something about that).
I’m happy to say that along with a UI refresh that is familiar but better, all of those shortcomings have been addressed. While you still have a separate window for a lot of the changes many of the controls have been added to the inspector. Including a new color picker tool. Also a big improvement is that any changes in the external window are immediately reflected in the FCP X Viewer. No more back and forth.

Switching out flares is super simple. You click on the “Presets” onscreen control button and click on a different one. The flare is replaced while maintaining all your settings and tracking info.

To customize a flare just click on edit and you can tweak to your heart’s content. There’s nearly endless combinations and controls for all the various flare types and elements. You can of course save your own customized presets.

The on screen position, size, and brightness controls are a nice addition too.

The previous version of mFlare had a form of brightness tracking but I found it’s uses limited without decent position tracking. It is now an option in the inspector and has a very helpful preview option to show your the luma matte it’ll be using. Using the smoothness and threshold sliders to fine tune it will give very nice smooth transitions to the flares.


Easily my favorite thing is the new tracker. It utilizes the widely praised Mocha Pro planer tracker and works right in the FCP X or Motion interfaces. MotionVFX’s implementation of it is the easiest tracker I’ve ever used. In conjunction with brightness tracking it is very powerful and can give very realistic results. I really wish I had this system for everything else I do in post. What they’ve done is allow you to use one tracker but reference multiple track points in time. So say you are tracking something but it is about to leave the frame, you can then choose another point, and another, etc. You just go to a point in the clip where the tracker is about to exit and reposition then tracker box over something new. The tracked position data is independent of the effects general position data giving you a ton of flexibility. Brilliant. It was even able to deal with an arm passing completely over my tracking point and it maintained the track no problem. Focus changes didn’t throw it off either which is something most regular point trackers have trouble with. Mocha for the win.

To test all this I took my son out and shot a simple little video of him wandering around a local park. I chose mostly natural looking flares for this video (not an alien invasion, haha) but it gives you an idea of what you can do. There are side by side examples of the flare shots at the end.
youtube
There’s a few gotcha’s and constructive notes I’ll add:
• If you track and then resize the clip the tracking data won’t always scale completely correctly. I had to re-track at the new scale level on one of the clips to get a good track.
•I really want the ability to resize the Edit/Presets window. It’s annoying because I want to be able to access more/all the parameters at once or see more elements/presets.
•Another thing is there were a few times where I hit track and it popped up for a second and then disappeared and I had to hit track again. Not a big deal but something to look at.
•Lastly I’d love to see support expanded to Photoshop/Affinity Photo and After Effects. Which I use from time to time. This tool makes it so I don’t need to leave FCP X but it would be nice to have when the workflow calls for it.
•The final thing is an issue with the FCP X plugin API I think. I have the same issue with Color Finale at times. The windows that pop up are specific to the clip you are working on. If you move to another clip without closing and reopening the Edit or Presets windows they will still be affecting the previous clip which could lead to unintentional changes. Just be aware. I really wish it auto updated to the new clip’s plugin when the clip is selected.
#review#reviews#FCP#FCPX#FCP X#The FCP X Editor#finalcutpro#Final Cut Pro X#FinalCutProX#final cut pro#MotionVFX#mflare#mflare 2#postproduction#video#video editor#video editing#vfx#visual effects
0 notes
Text
Wait to Upgrade to macOS High Sierra

By Braden Storrs
macOS High Sierra is about to drop and because this happens... every... single... year... turn App Store auto updates off completely and don’t just blindly jump in headfirst and update. In the days following the major OS releases our Final Cut Pro X Group gets filled with posts from panicked people who jumped in and found the update broke everything.
If we are lucky the Apple Pro Apps (FCP X, Motion, Compressor, Logic Pro X) will be updated along with the High Sierra release. Don’t count on it though. Last year we had to wait over a month for an update to FCP X after macOS Sierra came out. They released it just before the FCP X Creative Summit. This year though there are some major changes to the underlying OS, most especially in the disk formatting area and 32 bit software support. Also the iPhones are shooting in video and photo formats that are not currently supported in macOS (though I imagine a Pro Formats update could fix that for Sierra). That all being the case I could see them speeding up the next FCP X release.
Anyways, the safe route is wait till at least the first FCP X update after High Sierra is released. Same should be said for any other programs and plugins that are essential to your workflows. Things could work fine, but there are a million little things that can go wrong with software, hardware, plugins, etc. If you make money with your software then do yourself a favor and wait. If it’s just a hobby or you like to live on the digital edge then be my guest and be a guinea pig for the rest of us. Somebody’s got to find the bugs. 😉 Just make sure and report them. The faster they find them the faster they can be fixed. Software and plugin makers will report on compatibility usually within the first day to week or so. Audio plugins in particular seem to break a lot with OS updates so check with your 3rd party companies.
Also, especially as disks will be reformatted to Apple’s new AFS (Apple File System) with this particular OS update, BACK UP EVERYTHING ESSENTIAL. Personally I’d also disconnect any external dives of any kind before the update. Probably not be necessary... but I’d do it anyways.
To keep up to date on how the update is going for those that choose to jump in join our FCP X Editors Facebook Group.
#FCP#FCPX#The FCP X Editor#FCP X#FCP X Editor#FCP Editor#finalcutpro#Final Cut Pro X#final cut pro#blog
2 notes
·
View notes
Text
DJI Inspire 1 Raw FCP X Workflow

By Braden Storrs
Over here at Jamestown Films we've recently picked up a DJI Inspire 1 raw drone. Here’s a quick little workflow breakdown for you if you are thinking about getting one as well. The files are large and there is a workflow time cost involved so consider that before buying the raw model. The image is very nice though. Just watch out for low light exposure noise, it’s just a Micro 4/3 sensor after all.
Camera Offload

To get the files off of the drone's SSD you need to use a program called DJI Cinelight on OS X. On a Windows PC there's a simple program called DJI Camera Exporter that you would use. This gives you a separate folder full of Cinema DNGs for each shot.
The Current FCP X Struggle
DNG is a format spearheaded by Adobe. That being the case I’m assuming (PURE SPECULATION) to use it fully you have to pay a licensing fee of some kind for each use in software. That would be a likely reason FCP X does not currently support it. While FCP X can import DNGs, it does not natively support image sequences and I’m not sure you can really access the full color/exposure range of the file. If anyone knows for sure let us know in the comments and I’ll update the article. The workaround is to import the DNGs, drop them in a timeline, “Select All” and change their duration to 1 frame, then compound clip that selection and you will have a editable video clip to work with. This works but it is an annoying workflow when you have a large number of clips to do. Oddly enough Motion 5 does support image sequences in general, so I’m not sure what the holdup is for FCP X.
Footage Prep
So, instead of dealing with that messy workflow I head right to DaVinci Resolve. Id rather work with self contained clips that I know are a very high quality codec personally. Either version of Resolve will work fine but there is a UHD limit on the free version and the DJI shoots in cinema 4K which is slight wider, so you’ll lose the edges a bit. Not a big deal, especially if you finish in HD, but be aware.
Drop the folder containing your DNG folders into the Media Pool, they will appear as clips instead of an image folder by default.
Then in the Edit page drop all the clips into a timeline.
Next go to Color page. Here do as you wish. Personally I do most color work at the end of the edit stage with Color Finale. In resolve I’ll do a basic exposure adjustment/correction. Just enough to make sure I have all my shadow and highlight information properly protected. The Cinema DNGs from camera are very nice to work with and have an incredible amount of exposure latitude. You could do a full color job at this stage though if you want.
Next, over to the Deliver page. I tend to stick with online editing and rarely mess with proxies so I make full quality output files. You want to maintain as much of the raw capabilities as possible so choose your format appropriately. In the Deliver page, select your destination and then next to Render click “Individual Clips”. Under Video choose Format: Quicktime and on Mac Choose Codec: ProRes 4444 XQ (highest possible quality ProRes). Unfortunately there are no ProRes options for Resolve on Windows (even third party options are filtered out). The next best thing I’ve found is Cineform. GoPro owns Cineform now so go download and install GoPro Studio and it will install Cuneiform onto your computer. You must do this on both the Windows machine so Resolve can output it and on your Mac so FCP X can read the files. So once again if on Windows choose Format Quicktime and Codec: Cineform RGB 16-bit, or YUV 10-Bit if you like. Click “Render at Source Resolution”. Skip the Audio tab as there is none. Under the File tab I choose “Source Name” but you can do a custom name. Then click “Add to Render Queue” and then “Start Render”. It will render out back clip separately as a .mov.
Settings up this workflow (more so on Windows) takes a little bit, but once set up the ingest to “Star Render” process takes just a couple minutes. The files are very large though so it will take some time to process. For example even on a strong custom PC about 20 mins of raw drone footage took Resolve about 3 hours to process into clips.
Ingest into FCP X
At this point everything is normal. Import and edit like any other file via the Import dialogue or drag and drop from the finder. As long as you have Cineform installed you won’t have any trouble with either format. Drawback of Cineform though (at least in UHD) is it is a little hard for FCP X to process compared to ProRes, which works wonderfully.
#dji#drone#inspire 1 raw#inspire 1#dpi inspire 1#FCP X#fcpx#blog#final cut pro#Final Cut Pro X#apple#resolve#DaVinci Resolve#Blackmagic resolve
4 notes
·
View notes
Text
Updates Out For FCP X, Motion, Compressor, and Pro Video Formats - Feb. 4th, 2016
By Braden Storrs
The long awaited updates have arrived. They aren’t as feature rich as many hoped (aka Roles Based Audio Mixer), but they are welcome and there are some nice refinements in them. No official word on wether Metal was implemented in FCP X with this update. I welcome anyone out there to do some speed tests.
To recap, here’s the FCP X update history:
10.0.0 - 2011/06/21 Tuesday 10.0.1 - 2011/09/20 91 DAYS Tuesday 10.0.2 - 2011/11/16 57 DAYS Wednesday 10.0.3 - 2012/01/31 76 DAYS Tuesday 10.0.4 - 2012/0410 70 DAYS Tuesday 10.0.5 - 2012/0611 62 DAYS Monday 10.0.6 - 2012/10/23 134 DAYS Tuesday 10.0.7 - 2012/12/06 44 DAYS Thursday 10.0.8 - 2013/03/28 112 DAYS Thursday 10.0.9 - 2013/07/30 124 DAYS Tuesday 10.1.0 - 2013/1219 148 DAYS Thursday 10.1.1 - 2014/01/16 28 DAYS Thursday 10.1.2 - 2014/06/27 162 DAYS Friday 10.1.3 - 2014/08/19 53 DAYS Tuesday 10.1.4 - 2014/11/25 105 DAYS Tuesday 10.2.0 - 2015/04/13 138 DAYS Monday 10.2.1 - 2015/05/14 32 DAYS Thursday 10.2.2 - 2015/09/04 113 DAYS Friday 10.2.3 - 2016/02/04 154 DAYS Thursday
So that makes this update the 2nd longest we’ve waited for, 10.1.2 being the longest. With NAB coming up I wouldn’t be too surprised to see another update. Quick ones have happened before in that timespan.
FCP X 10.2.3 Highlights

Customizable shortcuts for default audio and video effects is a pretty cool addition to FCP X and is one of the few feature updates in this release. Here’s how it works:
youtube
In my case, I’ve set my default video effect to my most used effect, the Color Finale color correction/grading plugin. For the audio effect I’ve set the default to a combination preset effect I created which has a Compressor and a Channel EQ.
Improved SAN speed ia welcome news to the enterprise/broadcast crowd.
Extra support for Canon, Sony, and Panasonic formats is always a good thing. For Canon though, make sure and install the Canon XF Utility 2.1 for XF-AVC Plugin.
I do a lot of web delivery so being able to log into multiple Youtube accounts is a welcome addition.
Other bug fixes and optimizations! I’ll never complain about that. As great as extra features are, having a stable workstation is the first priority.
Motion 5.2.3 Highlights

Bug Fixes Galore. Got to love that. I really would like to see a 3D camera tracker added, but no luck yet.
Compressor 4.2.2 Highlights

Apple Device 4K Presets and expanded Apple Device support across all three applications.
Bug Fixes.
Pro Video Formats 2.0.4

Got to love extra ACV/XAVC support.
With this update out now, what’s on your wish list still? Let us know in the comments below.
#update#FCP#fcpx#FCP X#the fcp editor#finalcutpro#final cut pro#Final Cut Pro X#apple#Motion 5#motion5#compressor#compressor 4#Pro Video Formats#Canon#Sony#Panasonic#XAVC#AVC#formats#native support
3 notes
·
View notes
Text
Possible Roles Based Mixer Coming to FCP X
By Braden Storrs
A FCP X Roles based audio mixer has been high on the feature request lists of many many editors for years. Coming in at number two on FCPX.TV’s list, for example. It appears Apple was listening.
Alex Gollner of Alex4D shared in the FCP X Editors Facebook group:
“Apple knows that a roles-based mixer would be a good idea. They were awarded a relevant patent today that they applied for in 2013: http://pdfpiw.uspto.gov/.piw?Docid=09240215 In case it isn't a team priority at the moment, submit a story of how much it would help you here: http://www.apple.com/feedback/finalcutpro.html It is much easier for team members to use emotion-based user stories to sell the idea of spending time and money on specific features.”
Here’s the images from the patent. The general concept looks about what we thought it would:
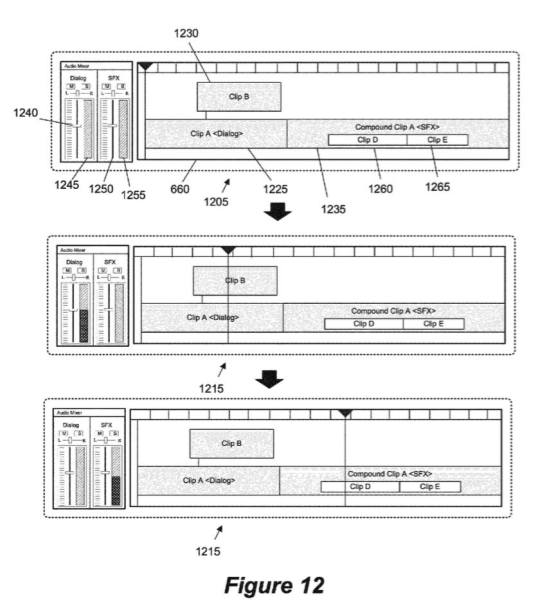
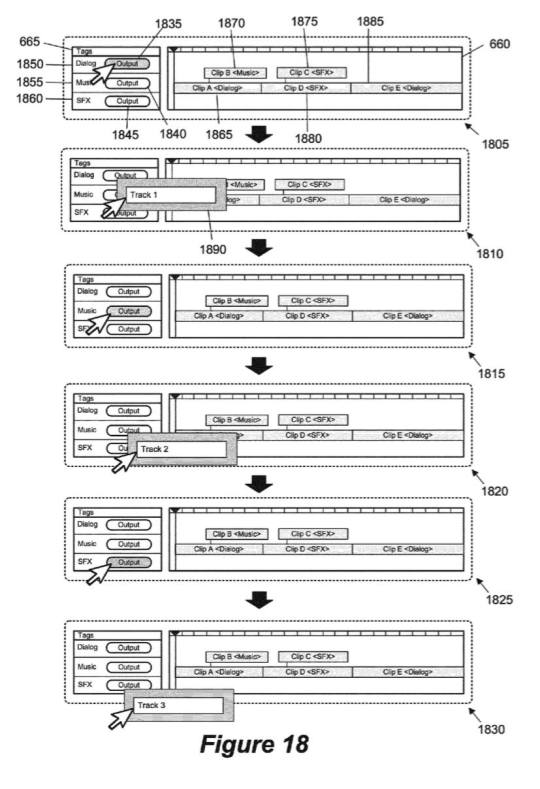
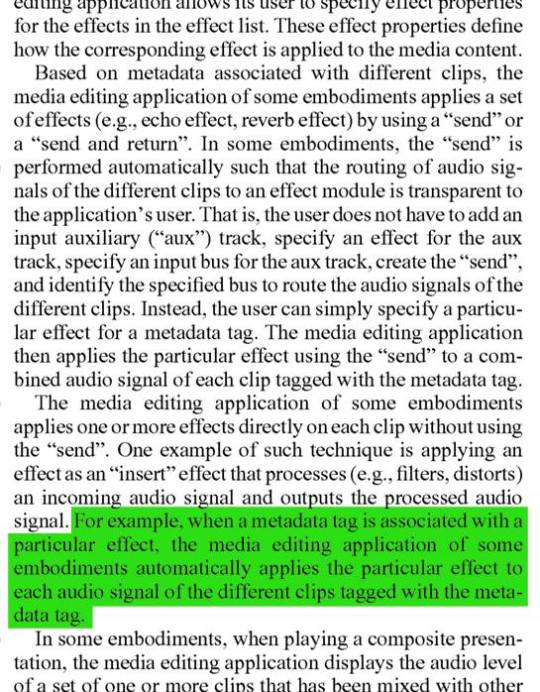
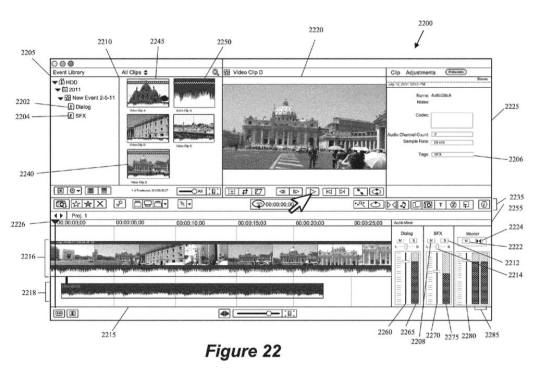
Hopefully this means it is in active development. It would be just about universally celebrated if introduced. Hard to know for sure though so, as Alex recommended, leave your feedback: http://www.apple.com/feedback/finalcutpro.html
#FCP#FCPX#FCP X#The FCP X Editor#finalcutpro#Final Cut Pro X#blog#apple#post#postproduction#video#video editor#video editing#videoproduction#audio#audio editing
1 note
·
View note
Text
FCP X Editors Group Featured By Apple

I found out today that my FCP X Editors FB group is featured as a resource on Apple's official Final Cut Pro X website! Pretty surreal, considering it was just me when I started the group three years ago. Now, it's over 15,000 members.
6 notes
·
View notes
Text
A Look at FCP X and Premiere Pro
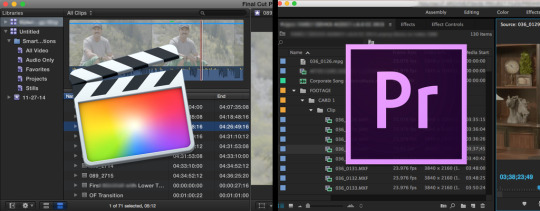
By Braden Storrs June 29th, 2015
This is in response to this question from a current FCP 7 user, 7Presley, looking to update: FCP X vs. Premiere for a Feature I started typing and realized it was so big I might as well make it into an article. Everyone has different needs as an editor so I’ll just share my experiences for what they’re worth. I’ll cover 7Presley’s questions as well as my own thoughts. This is not an exhaustive comparison, or a bashing session, these are observations and opinions based on user experience.
Unfortunately I don’t know the details of 7Presley’s production workflow or cameras used. Not all productions or workflows have the same requirements so for anyone to say one program or another is the only way to go for everyone is a bit short sighted. There are many factors to consider. That being said I personally believe FCP X is the best option for most productions, if you know what you are doing with the tool. I’ll explain below. Wether it is capable is not a question anymore. Unfortunately comments like that still come up. It’s been proven in every type of production. From the smallest family movies upwards to wedding videos, web series, corporate and commercial productions, broadcast television, and Hollywood and otherwise feature films.
Of course it's worthwhile to know various tools. While I highly prefer FCP X, I use Premiere when needed. I came from FCP 7 but haven’t had to use that professionally in 3-4 years. Going back to it now it’s amazing how antiquated it feels/is. Avid is still widely used due to its being engrained in so many long standing workflows. I would never use the adjective innovative and Avid in the same sentence though (except this one).
Color Grading
7Presley mentioned wanting to use the Red Giant color plugins. They are compatible with both Apple and Adobe suites so there's no difference there. Though I prefer Color Finale from Color Grading Central personally. It's a lot faster to work with and more accessible then Magic Bullet while still having the tools I need. Magic Bullet has a few extra tools that are nice at times. PPro CC just got the new Lumetri color system which is a big step up for its built in color effects. FCP X has the Color Board which, while not as advanced, is very intuitive and quick to work with. FCP X has key-framable shape and color masks for all effects. Premiere has shape mask tracking built in for effects. I’ll cover a few more app specific tools below.
Premiere Pro/CC:
Pros (I’ll just mention ones FCP X doesn’t have)-
All in one package that interacts and exchanges elements and media fairly efficiently between applications. Gives you video, motion graphics, design, web, and photo editing for one monthly price.
Access to After Effects, which is a powerful, though unnecessarily complex program. Older UI and lack of modern hardware optimization.
Speedgrade gives you an included color grading suite.
Basic audio mixer for rough mastering inside PPro.
Custom Window layout presets. Those are nice.
Cons-
Subscription based business model. I really, really, don’t like the forced subscription model. If you ever stop paying them, for example if you switch to another platform, you loose access to all your work on all of their programs. Video, design, etc. You can save XML for some things but you’re out of luck for the most part. As opposed to a license where you can always go back as long as your hardware supports the software. Let’s be honest though, that’s the point, to keep you paying. To have access to your work and to stay compatible you have to keep paying them $600 a year. It has ZERO to do with being able to deliver updates faster/easier. That’s just marketing speak. They are so integrated into so many workflows they can get away with it but it’s dirty business to me.
Aside from the subscription the thing that has really turned me off to the platform has been reliability. I don’t care how many features they have, if it doesn’t work, it doesn’t matter. Apparently on Windows it’s actually stable but for us in the Mac-sphere that’s not the case. I don’t trust the software to let me deliver on time, especially on large or complex projects. The bigger it is and longer I work on it the nastier things get. It’s been the same story on Mac Pros, iMacs, Macbook Pros. It’s not the hardware. There been so many missed deadlines, angry supervisors/producers, clients that won’t return. So much lost productivity that I almost got to a point of refusing jobs that require PPro. It costs me money and reputation and that’s bad for business. I definitely let people now what I think about using the NLE when I have to. it’s just warning from experience. It’s not a capabilities thing, it’s a trust issue with a tool that has failed me dozens of times in so many ways. To Adobe’s credit they are very responsive in their forums and via email. I appreciate how prompt they are. Unfortunately though, it hasn’t paid off. Having worked with PPro consistently since CS5.5 through CC 2015 I can confidently say the problems have gotten worse not better. It literally took minutes for some nasty bugs to show up in CC2015 on a new project. The same bugs go from one generation to the next. For more info on what happened a couple years ago when I switched to FCP X here’s that article: An Editor’s Journey to FCP X
Tracks. They’re proven and strait forward, but they are inefficient and slow you down.
Playback performance has been generally improved but both PPro and AE are no where as optimized to take advantage of newer hardware as the Apple applications. Too much old code in there.
FCP X/Apple Pro Apps:
Pros (some built in, some 3rd Party)-
It’s a modular system. You only have to pay for what you need. FCP X, Motion 5, Logic Pro X, and Compressor 4 make up the Apple Pro Apps. Just buy the ones you need. Those don’t do something you need? I bet you there’s a plugin that does. Since the initial cost are so low, getting any needed 3rd party tools is a lot easier cost wise. Buy it once, use it forever. I’ve heard FCP Compared to a RED camera. Buy the base and add the accessories that fit your needs.
Perpetual License! FCP X and it’s companion apps came out 4 years ago (except LPX which came out a little later). $600 for all four apps and free updates since. Roughly $150 a year. Not including any third party tools of course, which depend on the case, but you get the point.
Performance in general is much higher. The newer, optimized, 64 bit code takes full advantage of the newer hardware and they continue to improve this aspect of FCP X. Seriously impressive export and render times. Amazing thing is for many projects the need to render is either very limited, or not needed at all. Just edit and export.
Stability, in general, is much better. Every application has bugs, no way around that, but FCP X’s bugs are almost always just annoying at their worst. They are very rarely cost me any significant amount of time. In nearly every instance, if there is a crash, I can open FCP X back up right away and I haven’t lost any work because of the autosaving database design. Then I’m right back to work. After feature addition updates in particular there’s generally an update or two needed to smooth out new hiccups. They always work them out though, that’s what’s important.
Media/asset organization in FCP X is hands down the king. The FCP X Library system combines the very best aspects of a database combined with the flexibility of a project file. Libraries can live anywhere and be moved around like any other file. Inside there’s metadata, Keywording, Smart Collections, multiple retainable in and out ranges, Roles, the Timeline index, and that’s just scratching the surface. Premiere hijacked some of that functionality in an update (they’ve done that a lot since CS6) but the implementation is no where as intuitive. It’s harder to implement and harder to review at a glance. For more info on how insanely organized you can be quickly in FCP X check this out: FCP X Quick Tip: Organize at High Speed
Multicam in FCP X is also king of the hill. It’s the best implementation of Multicam I’ve seen in an NLE. The general design is excellent but also includes built in tools to sync via audio, markers, content creation date/time, timecode, or a combination of elements.
The Magnetic Timeline takes away a lot of the track based mechanics that stood in the way of editing efficiently. It’s now more of a spine to which elements attach. I’ve also heard it called a canvas. It’s more free flowing then tracks, but not to the point that you’re not in control. As long as you know the tools available to you. If you do learn them, you can move faster then you ever have. If you go in and try to make it work “your way” then you’ll end up with headaches. In the words of Yoda, “You must unlearn what you have learned.” Newer editors find it very intuitive while established editors have a harder time “getting it.” This article shows how it is an effective part of speeding up workflows: FCP X is Faster!
FCP X has an excellent, mature, and current XML that can be used to get project or clips into about any program. Smoke for example supports the FCP X XML. PPro still uses the old FCP 7 XML language unfortunately. XoCC and 7toX are useful XML converters. Intelligent Assistance has created some amazing tools for large productions like Sync-n-link and The Producers Best Friend that use the XML to save you DAYS of work.
Motion 5 is a huge improvement over Motion 4 (which I never cared for). For me, it’s replaced AE for most things. Especially with many of the plugins from MotionVFX at my disposal, one of which I mention below. It’s playback/rendering/export engine is so much better and I find it far more intuitive then AE.
DaVinci Resolve Lite is a very, very, powerful color correction suite and naturally fills that hole in the FCP X suite. It is the best coloring suite out there and has been used on countless movies. It natively supports the FCP X XML. Amazing thing is that the “Lite” version is free.
Logic Pro X supports the FCP X XML and provides an excellent mixing and composing tool for your FCP X projects. I like it a lot better then Audition personally. Here’s a detailed video with a lot of tips for that workflow: Workflow: FCP X to Logic Pro X and Back Alternatively, if you properly use the Roles system and run your project’s XML through X2Pro you will have an AAF that will be the best organized project your ProTools guy has ever seen. It’s a well worn, proven, workflow.
Slice X, Track X, and Drive X are all tools from Coremelt that use the famous Mocha tracking engine. They have various uses from tracking color corrections, masking and compositing, tracking 2D and 3D text, to tracking 3D particle generators. The possibilities are pretty endless and they all work in your FCP X timeline without having to go to other applications.
mObject from MotionVFX is an amazing plugin. As of a recent update, FCP X and Motion 5 have built in, really nice, true 3D titling tools. mObject takes it further. It can do 3D text with far more complex customizability, plus extruding vector artwork to make 3D logos for example, and you can open up the mObject extension app and build 3D scenes with actual 3D models which can then be animated. This works inside FCP X and Motion 5 with full 3D control over the elements and the camera. After Effects has a similar tool called Element 3D but it only works in After Effects and not Premiere.
One more 3rd Party tool. Frame.io has released a free plugin that lets you seamlessly export and upload to their online collaboration/client review system without leaving FCP X.
Cons-
Audio is a mixed bag in FCP X. There are some excellent, built in, audio plugins carried over from Soundtrack Pro and Logic. Editing wise I LOVE not having to manage audio tracks all the time when moving clips around. Not having tracks though means visual organization can get pretty messy. Many people want color coding based on Roles but we don’t have that yet. I have a quick, easy, method though that works really well. Check out the article here: Audio Organization Tip For FCP X The other challenge is that without tracks you can’t have a track mixer. Once again Roles could be the answer but there’s no Roles based mixer yet. Really though, we have Logic Pro X for mixing so that’s covered if you plan your workflow.
Being there’s no dynamic linking things can take a little longer when going between applications. Not enough to be an issue but thought I’d mention it. Unfortunately, while Motion is very integrated with FCP X, once something is in the timeline there’s no “Open in Motion“ option.
Anyways there’s my novel. Any questions, clarification, comments? Share them below.
13 notes
·
View notes
Video
youtube
The NLE Ninja shares some good tips for streamlining project creation and organization in Final Cut Pro X.
He uses the Library Template Concept, the PostHaste App, and the Final Cut Library Manager.
7 notes
·
View notes
Text
This is what it's like showing FCP X to an Avid Editor ;)
When someone shows me a new software that makes my job easier

26 notes
·
View notes
Text
mLUT - The Best FCP X LUT Plugin

By Braden Storrs
Up to this point there have been a couple plugins for Final Cut Pro X that allow the use of LUTs, but there always seems to be a compromise of some kind with them. Some workaround or and issue because of the design. LUT Utility allows the loading of LUTs but you have to go through the System Preferences app and it really lacks any controls to tweak the effect of the LUT in the inspector. With Magic Bullet Looks you can load LUTs and you have control but first you have to pay the fairly heavy entry fee to own it and then you have to load an external interface to use it and, in my experience, it is less then reliable. They are working on it but there seems to be recurring issues every time a new version of FCP X comes out.
MotionVFX is what I consider to be the best plugin developer for the Apple Pro Apps. mObject, mFlare, mHUD, among other plugins, there's a long list. Everything they bring out is solid, useful, and fairly priced. Adding to the lineup they've just released mLUT.
If you're not familiar with LUTs (Look Up Tables) here is a link that explains the technical mumbo jumbo in detail: LUTs Basically they take the chroma and luma values of an image and reassign them new display values based on an algorithm in a "Look Up Table". Unlike an effect plugin, which is just like painting over top of the existing image. In my experience LUTs can make more subtle and specific changes to an image in a way that filters can't. For the NLE this lets you give a look to your film but uses less power to process and playback. They were originally used to emulate the film a movie would eventually be printed out to but quickly people figured out they could be a powerful color grading tool.

mLUT is the first LUT plugin for FCP X that allows you to load LUTs directly into the inspector. Finally! The second big thing is that mLUT gives you a whole set of strait forward, key-framable, controls to fine tune the look of the LUT. Levels and Hue and Saturation, for example. Which is important when applying a LUT as not all clips will react the same to it depending on their luma and chroma values. They've also included the option to add film grain or other noise types. This way you won't need to add yet another plugin to get the look you want.

The other unique feature of mLUT is that it features the mLUT Library. Clicking the blue "mLUT Library" button launches another UI window which lets you click on and preview their LUTs, including with viewer playback, before applying it. You can change the active LUT at an time.

They've included with the plugin 30 LUTs based on the looks of popular blockbuster films that you can start using right away. Looking at MotionVFX's plugin history they're likely to have more LUT packs come out in the future, if I were to guess. Now while many of us probably have our favorite film or custom LUTs that we will load in, these can be good options for when you're in a hurry or want a very stylized look. I'd like to note the blockbuster pack of LUTs is designed for Log style flat footage and will give any rec.709 footage an over contrasty, saturated, look using the default settings. Luckily, given the controls available in mLUT you can dial down the look of any of these LUTs to work with the type of footage you have. These LUTs can also be used in any other application that accepts 3D LUTS.
Click the "Load Custom LUT" to do just that and navigate to your LUTs in the finder, select it, and click open to apply it.
Here's a how-to video they put together:
The workflow if fairly strait forward. I'd like to point out that either you can apply mLUT directly to the clips or use an adjustment layer and stretch that over the whole project and apply the LUT to that and then adjust the files underneath independently.
The ability to import and utilize LUTs in your workflow is very important, especially in larger productions when you really want control of the look of your film. I now put mLUT up there with the other essential FCP X apps.
For more info and to purchase mLUT go HERE!

Another app I think is worth mentioning alongside mLUT is called Look Converter from Picture Instruments. This nifty little tool generates neutral LUT images which you can then put into any still or video application which can output an image. There apply whatever filter or action you want to it and save it. The Look Converter will then take that file and create a custom LUT that replicates the look you applied to that neutral Look Up Table. This essentially gives you the unlimited ability to create LUTs. For example there's a bunch of still film emulations I have that are not available for video applications and now I have access to them through this tool. *Note* There was an issue with LUTs created by Look Converter not working properly with mLUT because of the unique way Look Converter structures their LUTs but, as always, contacting MotionVFX support went super smooth and they tweaked some things to accept the LUT structure from Look Converter. The fix will be in the next update.
#MotionVFX#fcpxplugins#reviews#FCPX#motion5#Motion 5#apple#mac#Final Cut Pro X#final cut pro#plugins#video#video editing#review#video editor#post#post production#mlut#lut#luts#Adobe#avid#davinciresolve#color#color grading#colorist#film#production
5 notes
·
View notes
Text
FCP X Quick Tip: Quicker Access Stock Libraries in Final Cut Pro X

By Braden Storrs
Final Cut pro X comes packed full of sound effects and a few tracks you can use in your projects. Many of us though have stock music and sound effect libraries stored on our hard drives.
Normally you would think to just go through the import window, dig into the finder, and pull out the ones you want. There's a better way though.

Selecting the Music and Sound Browser will bring up a list of resources including the built in sounds effects and your entire iTunes Library. What we want to do is add your stock sound library to this browser. It's extremely easy to do.

Grab the folder containing your stock library, in this case "Sound", and drag and drop it into the Music and Sound Browser.

This will add the folder with its existing folder and subfolder structure to the browser. As long as those assets remain connected to your Mac when you launch FCP X the folder will always be accessible.

After that, using the media in your projects is as easy as dragging and dropping into the timeline. When you do that a copy of the file will be placed in the Event so that if you move between workstations the music won't go offline.
You can also select any of the media and hit the play button at the bottom of the browser to preview the file before placing it in the timeline.
Enjoy.
#FCP#FCPX#FCP X#quick tip#Final Cut Pro X#final cut pro#apple#video#video editing#video editor#video post production#post production#post#audio#stock music#sound effects#fcpxusefultips
6 notes
·
View notes
Text
Final Cut Pro X 10.1.4 Update - Broadcasters Rejoice!

By Braden Storrs
A nice surprise appeared in the App Stores today. FCP X was updated to version 10.1.4 and the Pro Video Formats to version 2.0. I don't know about you, but I think I get a bit of that "it's christmas" feeling when that happens.
The response has been pretty mixed though on the various forums I'm a part of. Many were wanting this to be more of a new feature heavy release. Blah, blah, whaaaaa, where's my features? That's kind of what I hear to be honest, though it's a trend across the industry from software to cameras. People want the world. Quality content people, that's what's important, but I digress. While there are a few things I'd like to see added as well I'm more concerned at this point about having a solid, stable, system on which to rely. There's some important bug fixes in this update. Everything I need for my workflow, feature wise, is already there or easily attainable via plugin. Believe me though, there's probably few people who have sent in more FCP X feedback and feature requests then me. Still, let them know what you want, they're listening. That's why MXF is here.
The other response was the opposite. The addition of a built in native MXF (material exchange format) workflow is about the best update to ever come to FCP X for some people. Import, editing, export, and a MXF XML option make a lot of people's lives in broadcast a lot easier. Networks have very stringent requirements when it comes to delivery formats so this will help a lot. With the Pro Video Formats update Compressor has a number of MXF export options. For example AS-11. Yes, there were a few plugins that would cover import and export of MXF before but they were very pricey and if you were outfitting a lot of editing seats that could get expensive. I'm hoping this move will open many more broadcast house to use FCP X and further shift the opinion of FCP X many have of in that division of the industry. Motion 5.1 also benefits from the same export options.
FCP X Update:

Pro Video Formats Update:

Ripple Training did a quick little video to get everyone up to date on some of the MXF workflow options:
Keep those updates coming Apple! I'm looking forward to the Motion and Compressor updates. Though, unless they're late, it looks like they won't come till the next FCP X update. Looking forward to Logic Pro X's update as well. Those are generally pretty impressive.
#blog#FCP#FCP X#update#upgrade#10.1.4#Final Cut Pro X#apple#video#video editing#video editor#video post#video post production#post#post production#mxf#import#export#xml#rippletraining#workflow#final cut pro
3 notes
·
View notes

