#weaving tutorials
Explore tagged Tumblr posts
Visit Tumblr Blog
Explore Tumblr blogs with no restrictions, modern design and the best experience.
Last Seen Tumblr Blogs


Fun Fact
Mobile Tumblr US users spend an average of 4.04 minutes per session on the app.
Text
found this tutorial on how to make a 4 shaft weaving loom out of cardboard boxes, tape, glue, skewers, string, and a few other odds and ends.
it may not look pretty, but as an introduction to multi shaft weaving this could be a fun project that doesn't break the bank.
442 notes
·
View notes
Text
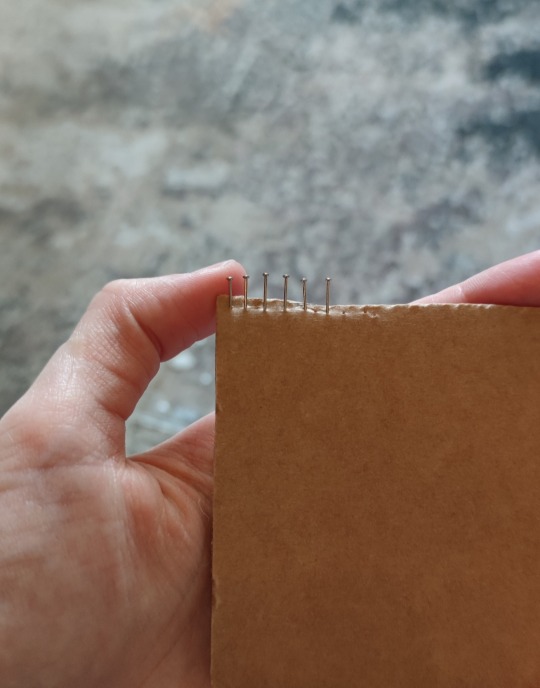
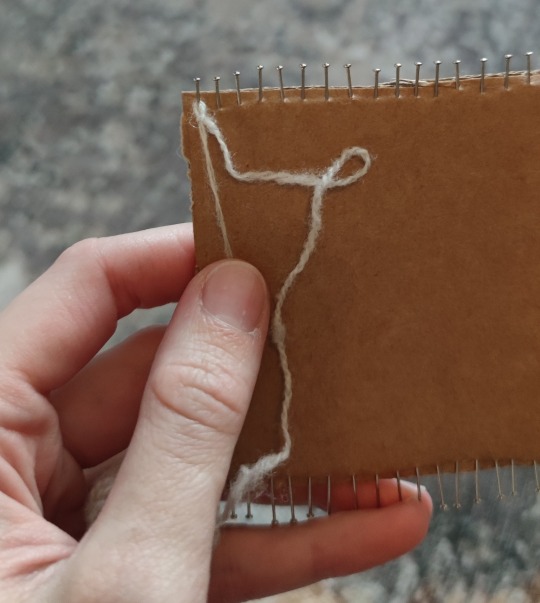
How I make myself a minx loom form test weaves
Take some cardboard box and stick some pins on both sides with desired distance
Like this for example
To test if you like the distance, just wrap.sime yarn around
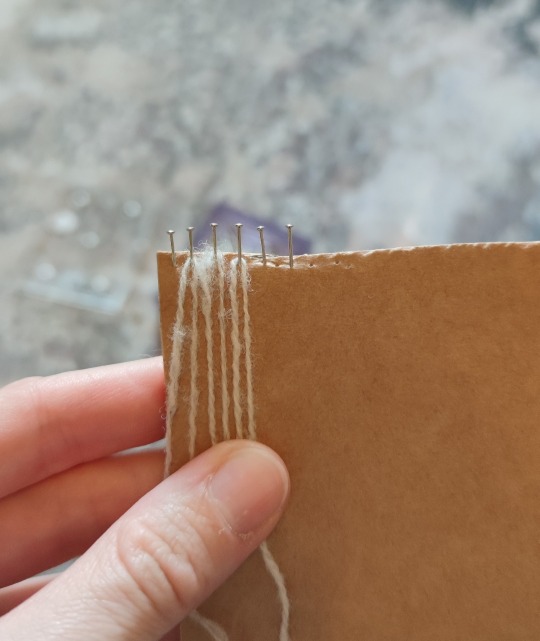
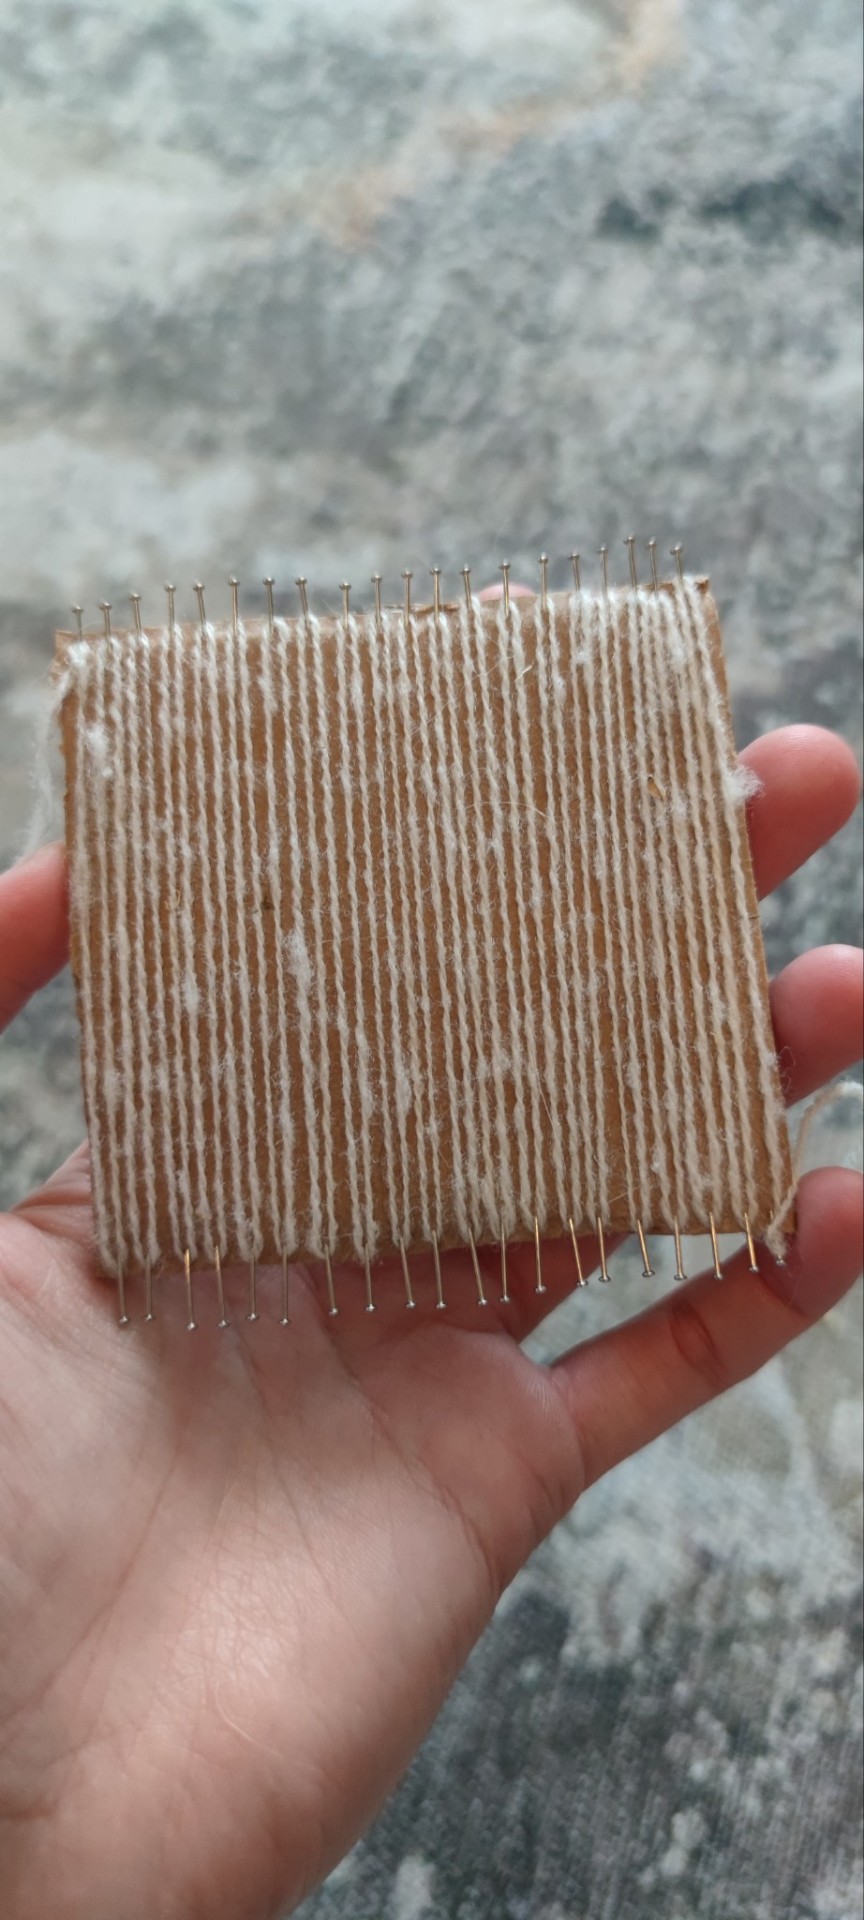
Now fill opposite sides of the cardboard with the pins
Tadaa make Shure you have the same amount of pins on both sides, stick them into the side of the "waves" so it doesn't binge when you warp it.
Each pin should have one on the opposite. Don't pin them offset
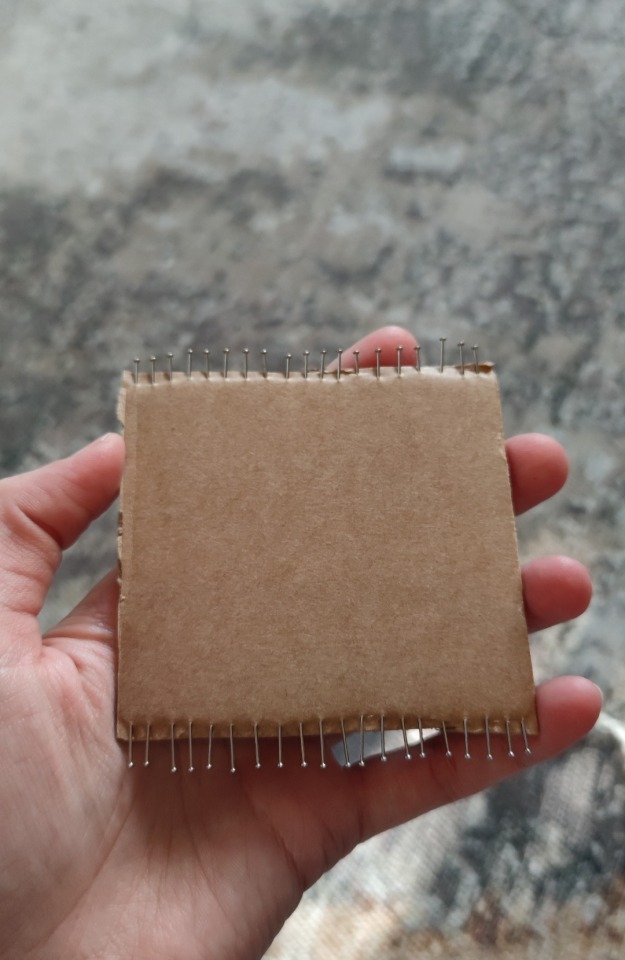
Also make Shure the pointy ends stay in the cardboard, so you don't hurt yourself
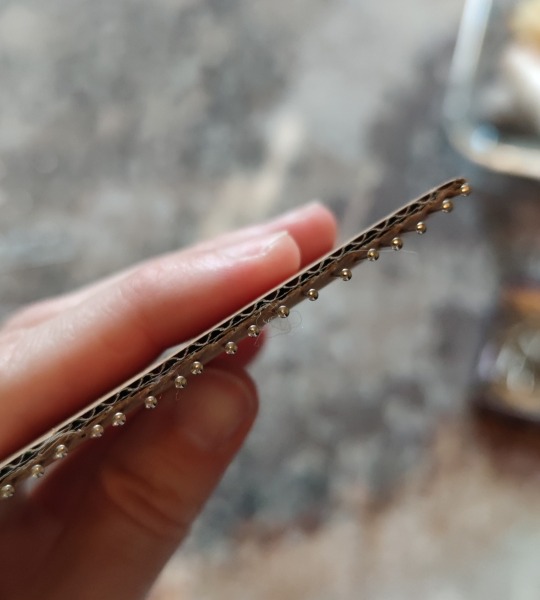
Fix your warp yarn and warp :D
Then tread your weave yarn, and weave! (I have some needle tatting needles that make it much more easy)
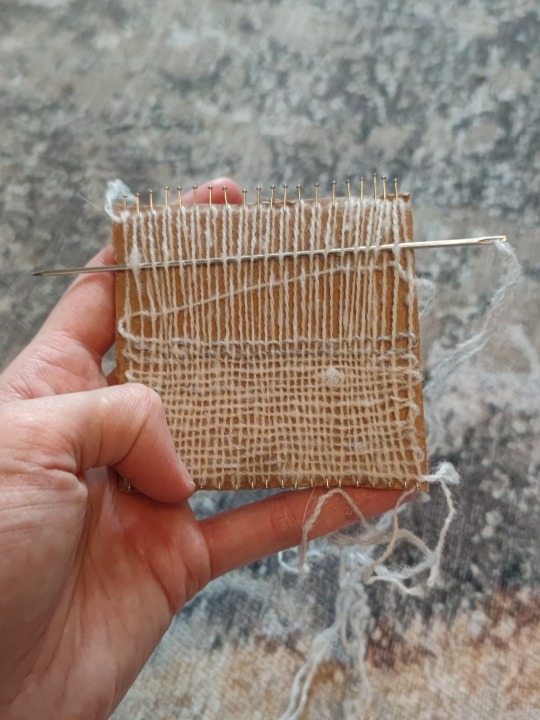
If done, remove pins and finish as you want the future project to be finished
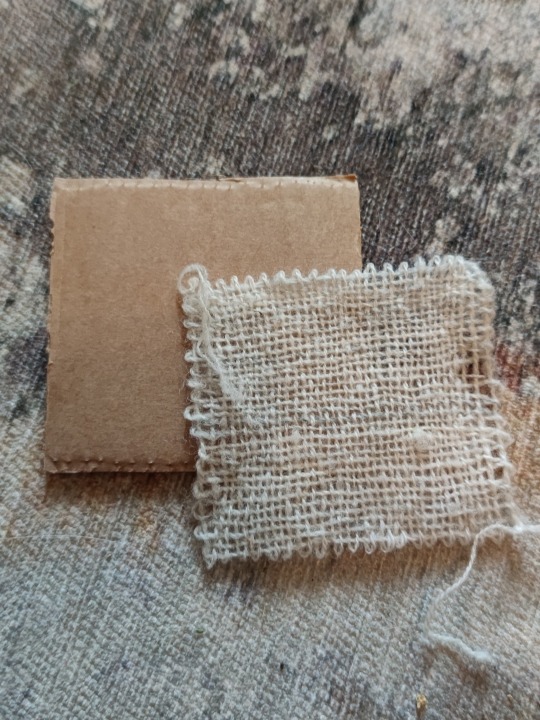
If you want a fringe elongate the cardboard :D
And now you can make yourself a mini loom for tests :3
233 notes
·
View notes
Text


~ tommy fictive
#first attempt at a web weave !! can't find any tutorials :\#web weave#web weaving#ctommy#c!tommy#tommy#c!tommyinnit#tommyinnit#c!dsmp#dsmp#dream smp#c!tommy angst#angst
156 notes
·
View notes
Text
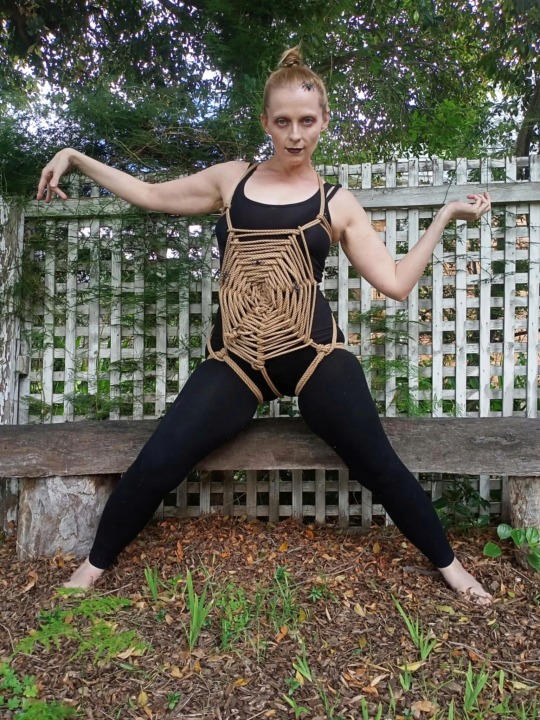
Let's tie this full body spider web harness just for the helloween of it 🕸️🪢
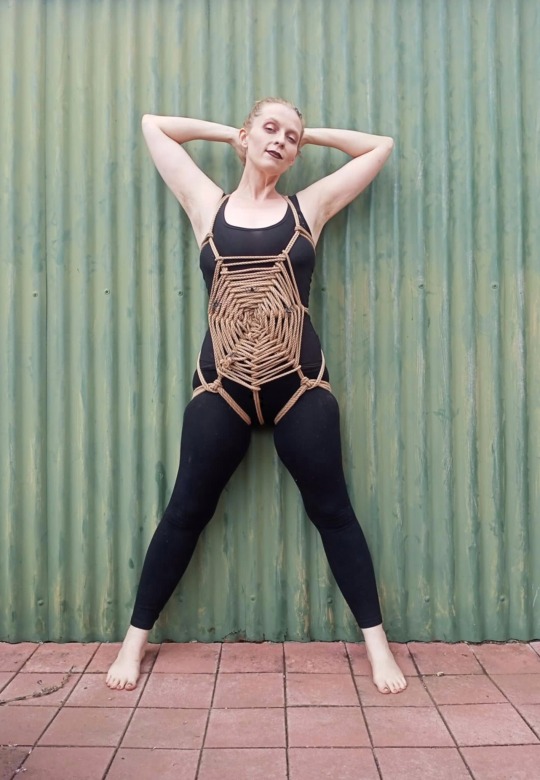
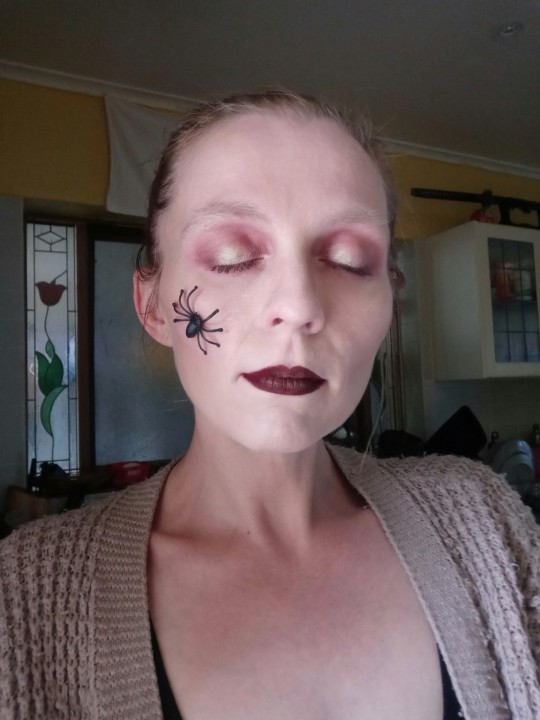

#shibari#rope#decorative tie#spider web#rope web#rope tutorial#spiedher#shibari tutorial#web#Karada#Halloween#Halloween costume#diy Halloween costume#shelob#little plastic spiders#weaving#fiber art
42 notes
·
View notes
Text
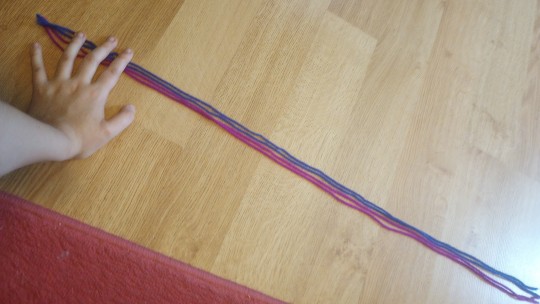
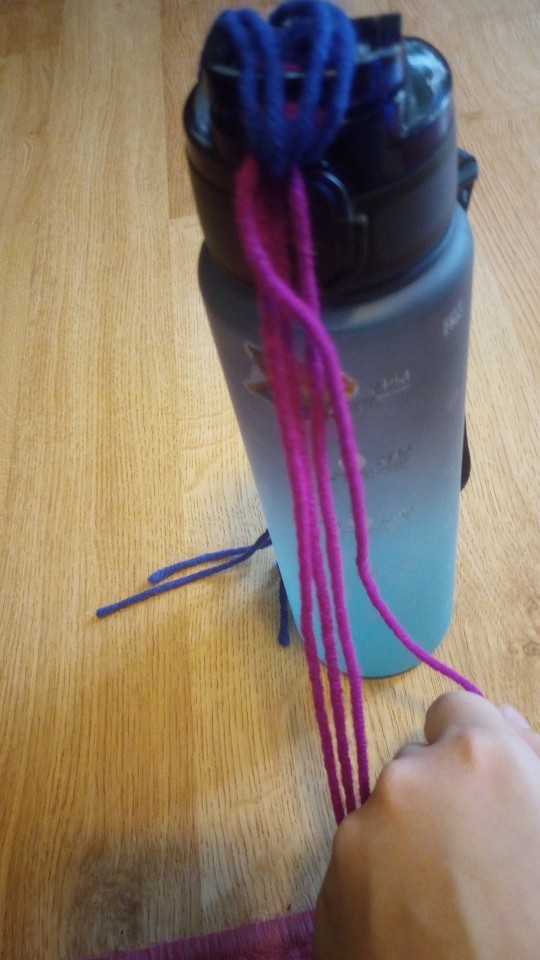
Finger-woven bracelet tutorial! (Part one)
Note: this is a very simplified version of what is originally an indigenous craft. I am learning this craft and sharing it with others with respect for its origins.
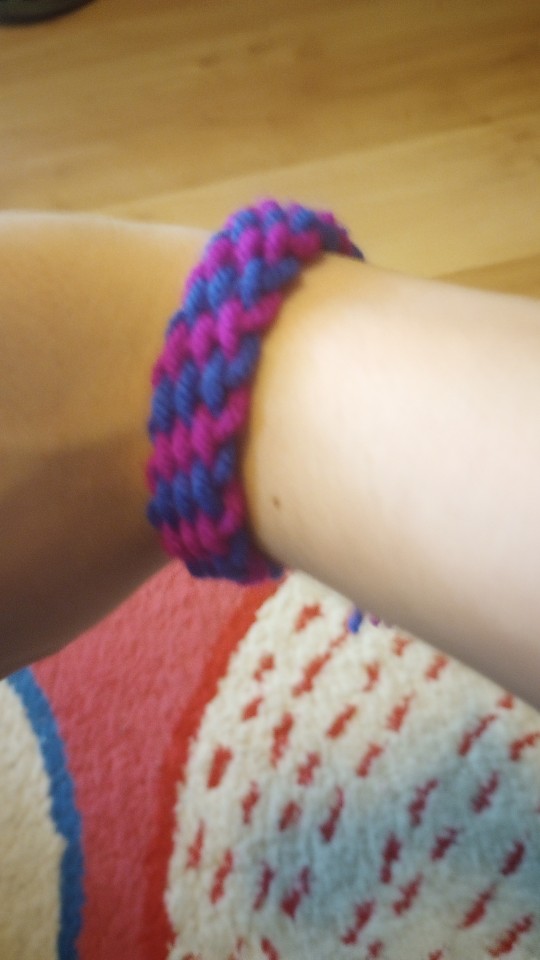
You will need:
- At least two colours of yarn/string, I recommend thicker yarn while you're learning
- Something to hold it in place
Step one:
Cut yourself two lengths of yarn from each colour. We'll be folding them in half, so make them pretty long- here's what I used, for scale.
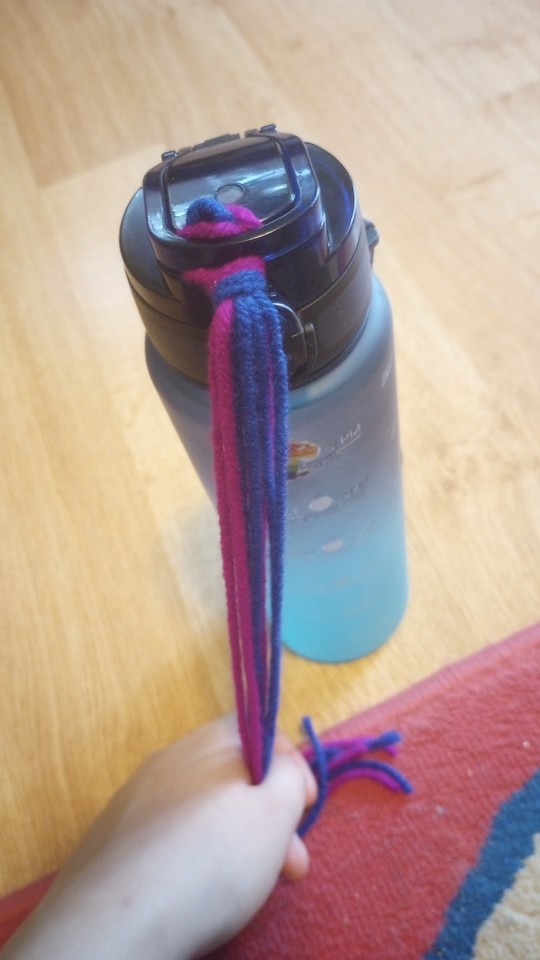
Step two:
Fold the yarn in half and tie a slipknot.
Tighten it to your preference- a small slipknot will make it a little bit easier to make into a bracelet.
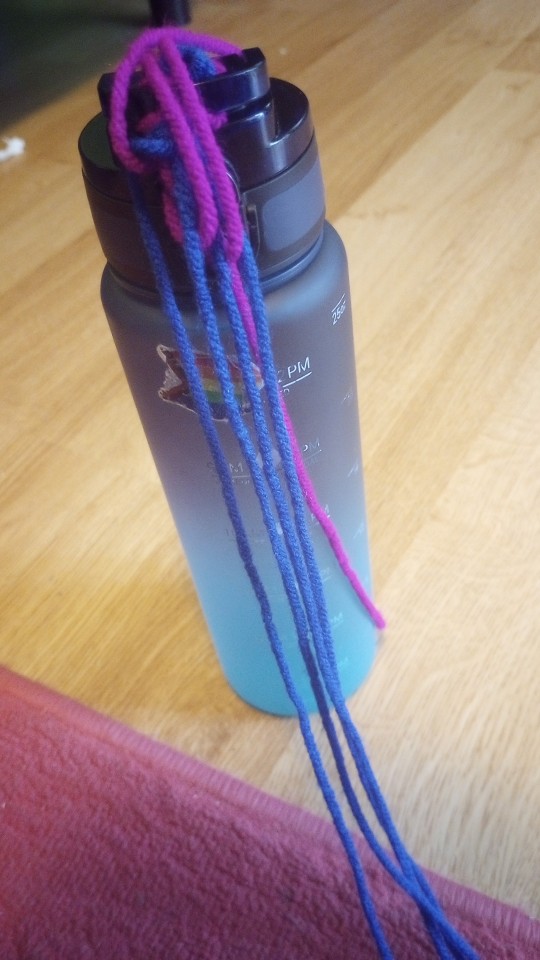
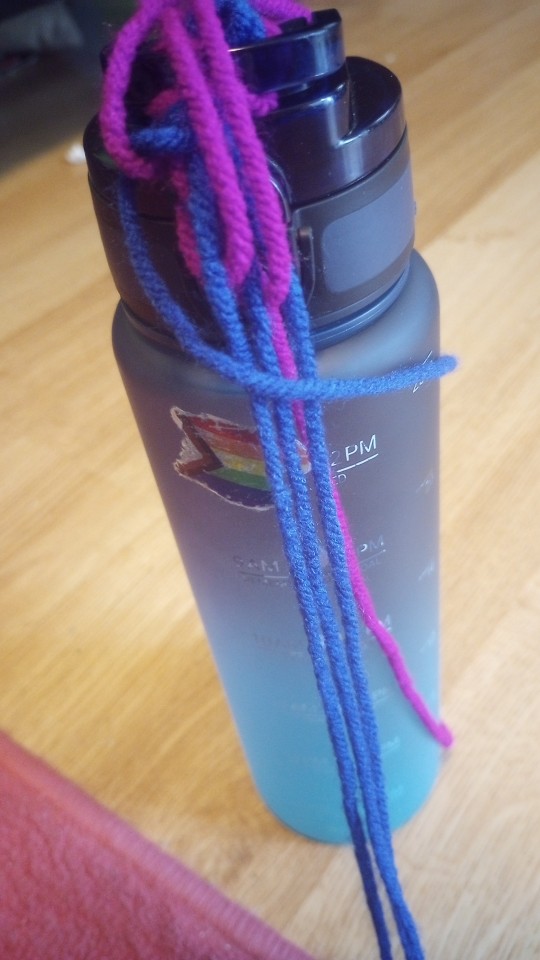
Step three:
Pin your yarn or thread to something to hold it in place- I use the clasp on my water bottle, but while learning I recommend taping it to a flat surface like a table.
Arrange your colours so that they're alternating.
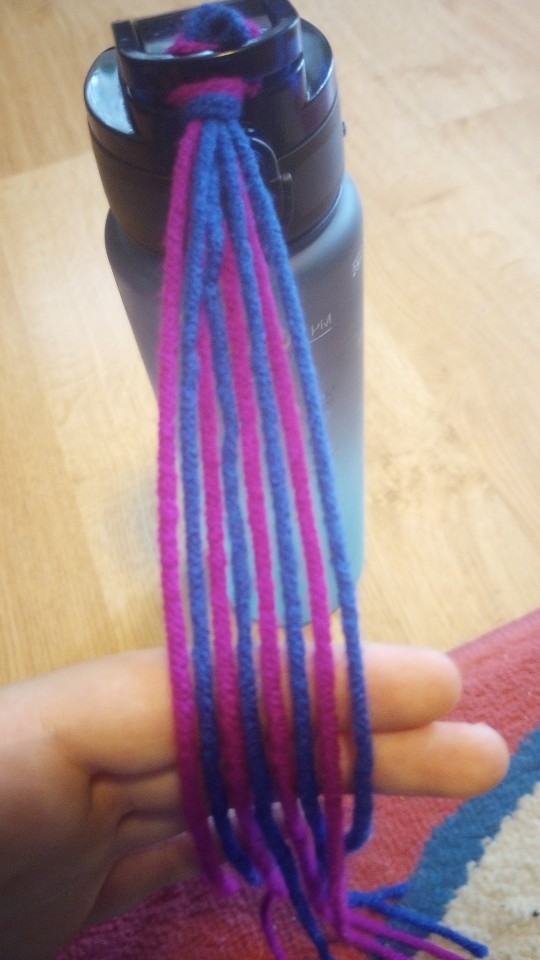
Step four:
Pick up the colour on the far right (in this case, the blue.) Whichever colour is on the far right, pick up every thread and lay them above the slipknot. This should be every other thread.
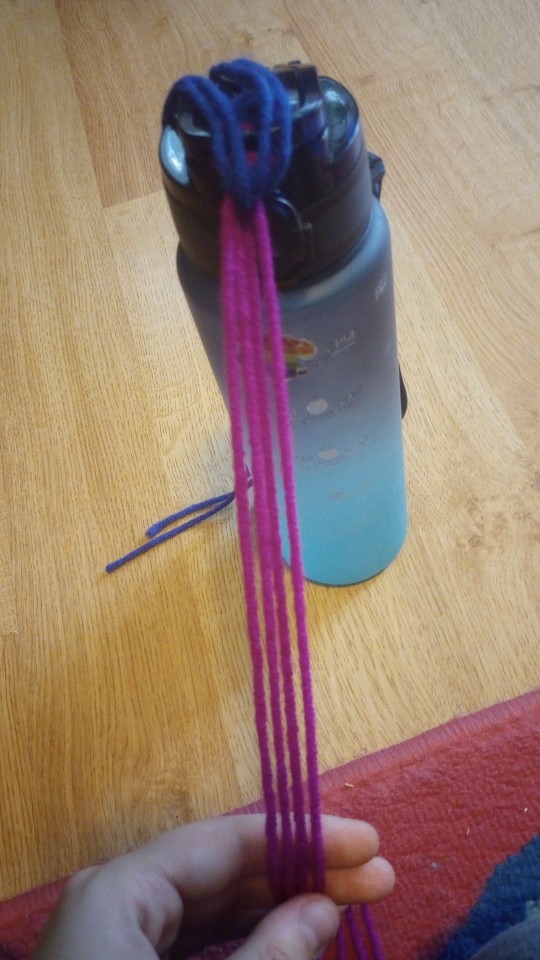
Step five:
Pick up the thread that is on the far left and cross it over to the right. It should lay over the other threads of the same colour.
Step six:
Bring the threads above your slipknot back down to their original positions, returning to the alternating pattern. The thread you just crossed over should now be on the far right, and the far left thread should be of the colour you just brought back down.
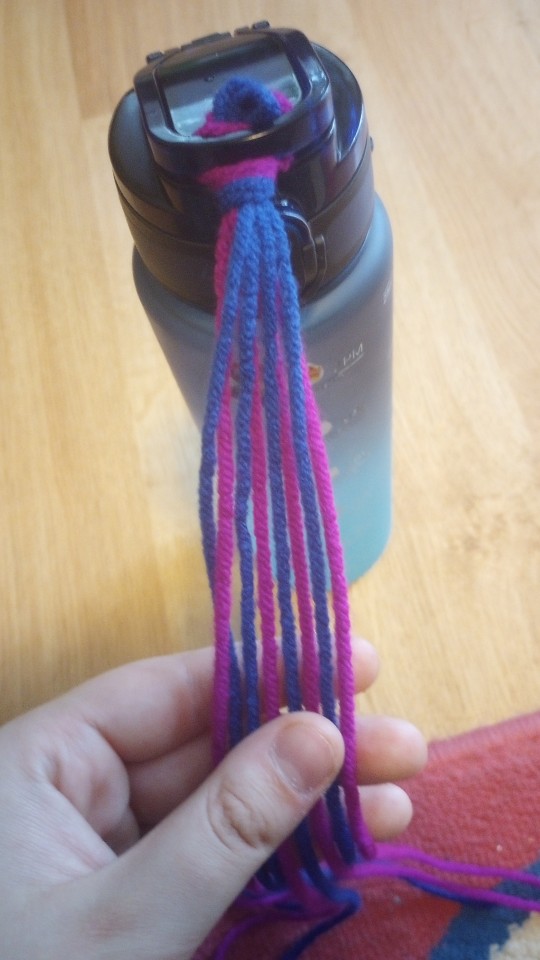
Step seven:
You're going to repeat steps four to six with the new arrangement of threads. The colour you just crossed over will be lifted over the slipknot this time.
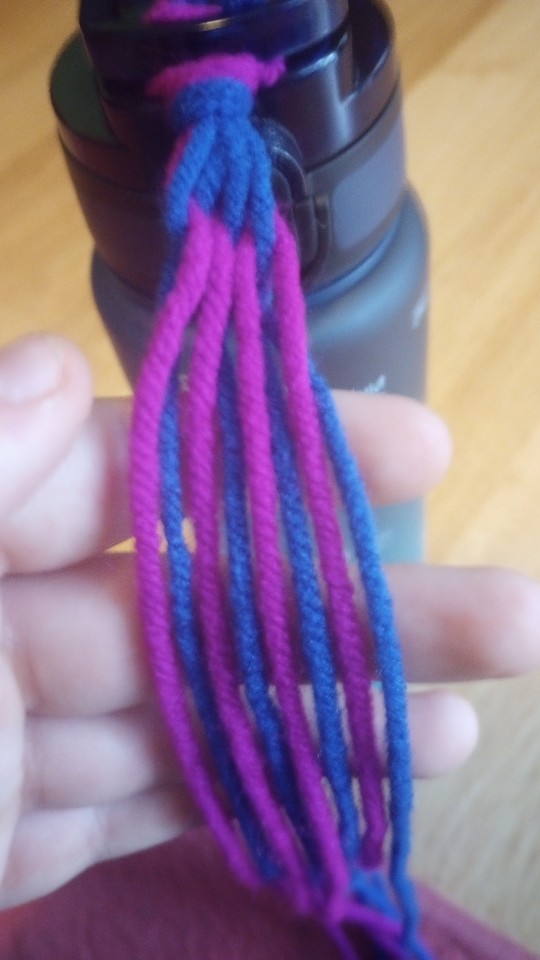
I've hit tumblr's image limit, so I'll continue the tutorial in a reblog!
25 notes
·
View notes
Text
FIGHT FOR THE ARTS AND CRAFTS!!!
FIGHT FOR THE LEGACY OF A CULTURE!!!
The book binders, the shoemakers, the secrets of fabric and wood. What will happen when all is automatized, what will happen if we grow far and far away from the things we use and do.
Fight to keep alive the legacy. The wisdom and knowledge macerated by generations. Someone has to carry the torch!
#ahshashahsa ok I know it sounds like shit you'd find in a pamphlet#But I think a lot of what it means to be part of a hobby of a subculture and all of that#And I just saw the post about the user that started into bookbinding to bind beloved fanfics#and MAN#What will happen to the shoemaker in my town when he dies?#There are another 15 but they all will eventually die. And many people buy more shoes from fabrics in the other side of the world#The book binder closed his workshop years ago#and here I'm trying to bind a book with a youtube tutorial#what will happen when the secrets of tools and craftmanship die?#The little secrets. The secret wisdom. The correct way to cut fabric#The best posture to weave a basket. The divinitaion meaning of every card in a playing deck#Being part of a hobby is like being suddenly part of a whole guild#but we're so far apart#will someone pass the knowledge of how to make a nice table? will someone remember?#if a tree falls in a forest
33 notes
·
View notes
Text
Odysseus having the ultimate storytime youtube channel dedicated to telling stories of his travels, the war, and yapping about his wife and son
#Penelope with the weaving/loom tutorials#she does 'weave with me :D ' livestreams and sometimes you can hear Odysseus and Telemachus off screen playing#when she explains the designs or patterns of her pieces you can hear the love and fondness behind the memory or inside joke its about#she's experimenting with making tapestry clothing and Odysseus wears each piece with pride in his videos#the odyssey#homers odyssey
6 notes
·
View notes
Text
just finished tgaa1. beautifully crafted game but it felt like an insanely long turorial
#i feel like most other aa games have like. 70% gameplay to 30% visual novel ratio#but this one had soooo many cutscenes and text outside of the actual gameplay i was like enough!!!!!! let me play the fucking game#chizitxt#i did like the tutorial case + the runaway room + the last one but every pay off took so long#i think something i appreciated a lot about older aa games was how simple + concise they were while still weaving a full compelling narrat#ive#and this game was like. the opposite
7 notes
·
View notes
Text

Peyote bracelet pattern that uses 24kt gold beads! Perfect for most occasions, you can find this pattern here https://www.etsy.com/shop/LizzieMig
#bead weaving#beading#seed bead jewelry#peyote stitch#beaded bracelet#beading tutorial#bracelet making#bracelet tutorial#diy bracelet#loom bead
8 notes
·
View notes
Text
For all the people excited about weaving via my earlier post
tbh you can make a loom out of just about anything. you just need something to hold the warp and something to separate the sheds, a shuttle, and something to beat the weft with (like a really long shuttle or a separate stick) Below is a picture of my great grandmother weaving a chinchorro (hammock). Wayuu weaving is a little different than what you're probably used to, but the basic thing to understand is the same. There's a bar at the top and a bar at the bottom, she's using her hands and small balls of yarn to wind the weft through, and tie warps together to make patterned gaps. No shuttle is involved. But if you wanted to you could easily add pickup bars (basically a long stick and shuttles to this type of setup and weave that way. It'd basically be a tapestry loom setup, but tbh you can weave just about anything, you just have to get creative with how you manage the sheds. I'd look up backstrap looms and translate the way the different bars are set in place for this kind of a setup. All you'd need is dowels or sticks of some sort for it. You could figure out a mini one on a box or a picture frame. Abuela had a floor to ceiling setup on one of the walls that was just basically a frame.
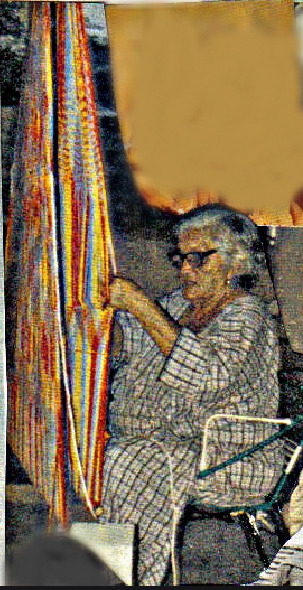
I wish I had photos of some of the chinchorros she made, they were beautiful. My uncle has a video somewhere of her weaving one with a horse on it and the artistry to it was absolutely gorgeous. I wish I'd gotten the chance to learn from her tbh, she was a brilliant artist from the work I've been able to see. I think it was cos of her that I inherited my love of weaving and textiles so much.
25 notes
·
View notes
Text
(gets into a hobby that's very complicated and has limited documented instruction for everything i want to learn the farther and more niche i get into it just bc of the nature of a lot of the more complicated things i find are uploaded by one person who didn't make a tutorial) what the fuck. why is this hard
#things dont click in my brain i think lol#like i know how to do chainmail and i can do some pretty tricky weaves and occasionally extrapolate how to do something from a picture if#it's very simple and easy to understand bc it's comparable to something else i've done#but im not making my own patterns or experimenting w my own stuff like so many ppl i see online#and like w glassblowing i can follow the steps kind of but my mind blanks and i can't like. work with limitations or experiment or try new#techniques like every other person i know who is into glassblowing can. and it's like whatever but im so sick of plateauing and wish i could#just understand how something works and its properties so i can then work within those properties like feel like im getting out of a#tutorial stage where i can move on my own and feel like im actually really good at something when i've had years of experience with it#alex talks
19 notes
·
View notes
Text
How to make tablets for tablet weaving
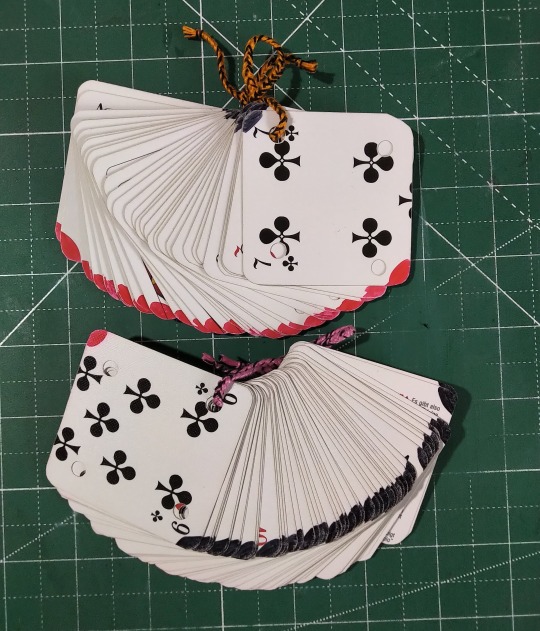
You'll need: Playing cards, scissors, punch, pencil, permanent marker in 2 different colours.
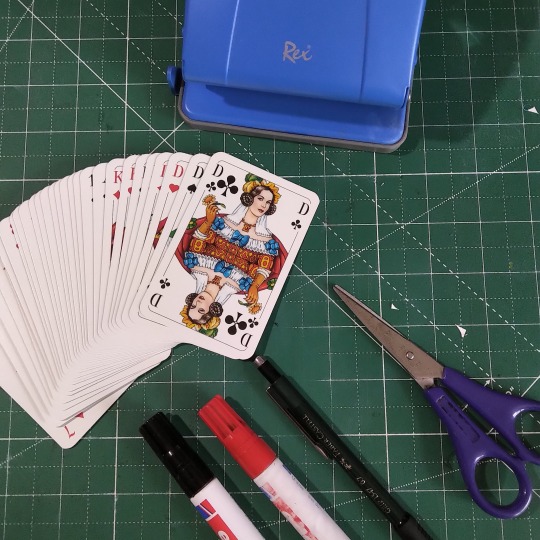
Why playing cards specifically? Because they are made to be handled. Their edges don't fray, even the cheapest ones. These were like 2€ for 32, the rest was stuff I already had lying around, making it a very cheap project. Also they make it very easy to divide a pattern into groups of 4.
Step 1: Square your cards by laying another one on top perpendicularly and mark with a pencil (pen used for visibiliy).
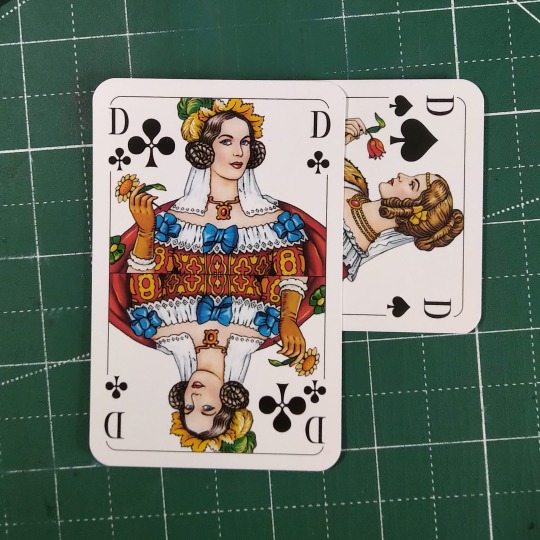
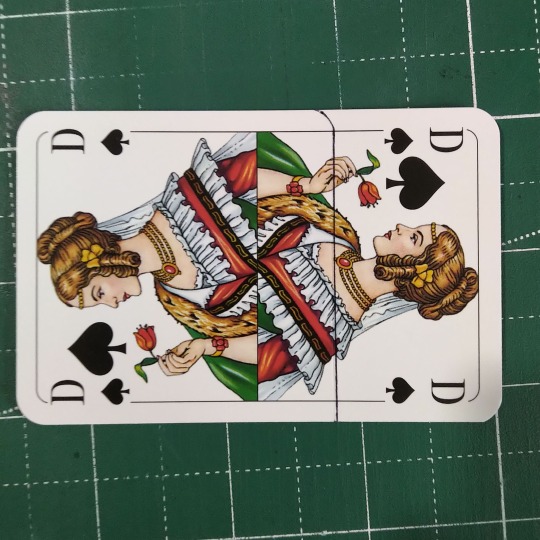
Step 2: Cut and round the edges (it's fine, these people are royalty). I cut a little inside the line here because the pen drew a smidge to the side.
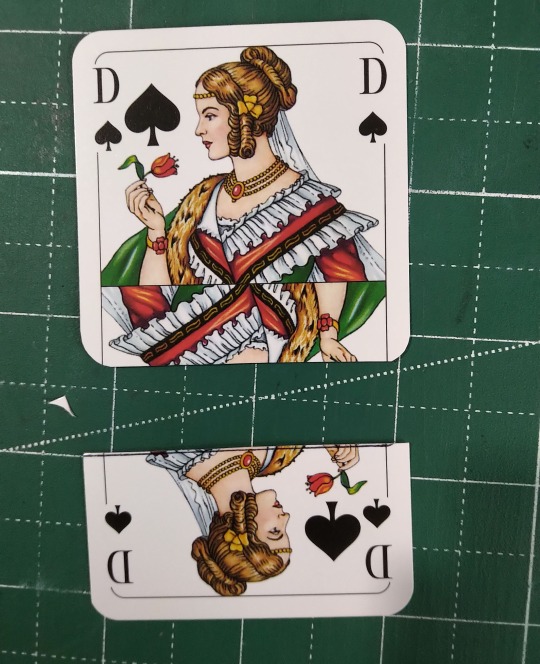
Step 3: Punch holes in the corners. First try on a spare piece of paper to figure out how far you have to hold it in to get the hole where you need it to be. It doesn't have to be 100% accurate, but close enough. I built myself a little jig to hold the card out of the cut off bit. When the thingy touches the punch I know the hole is gonna be where I want it.
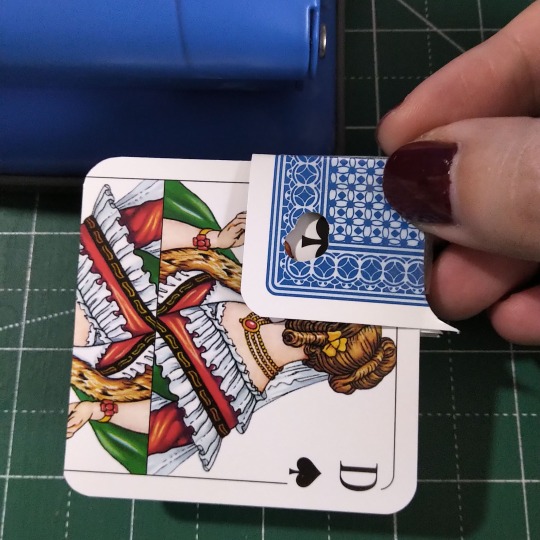
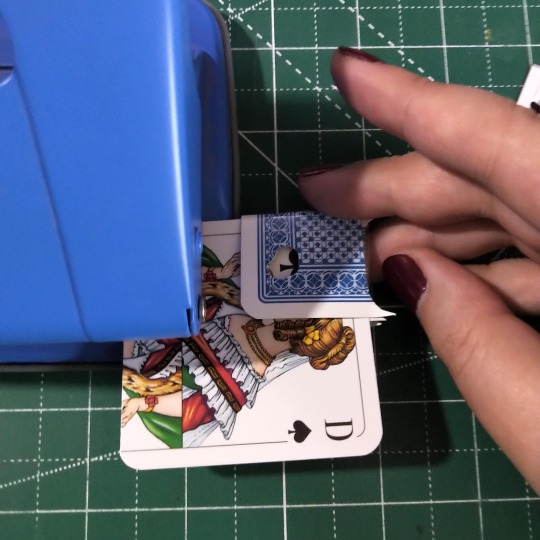
Step 4: Mark two opposite corners with permanent marker on both sides. This is technically not necessary, but very useful. Also mark the same corners on all the cards for aesthetic.
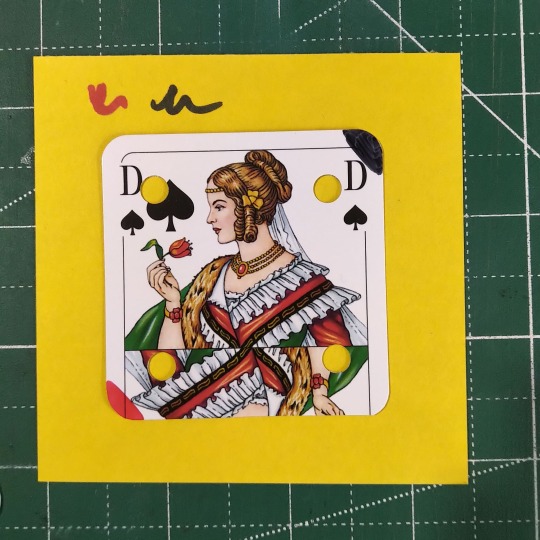
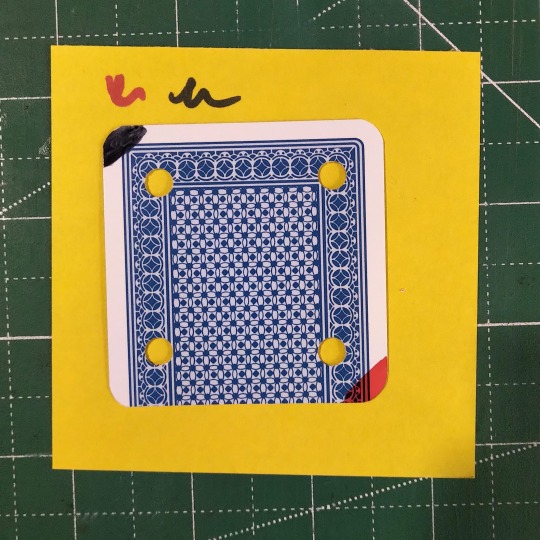
Congratulations, you have tablets now! How many do you need? 32 is enough for most patterns you'll find on pinterest, but there are patterns with over 90. So make a couple more!
#tablet weaving#hand weaving#hand crafted#tutorial#tutorial with pictures#weaving tools#crafting#historical crafting#crafting tutorial
8 notes
·
View notes
Text
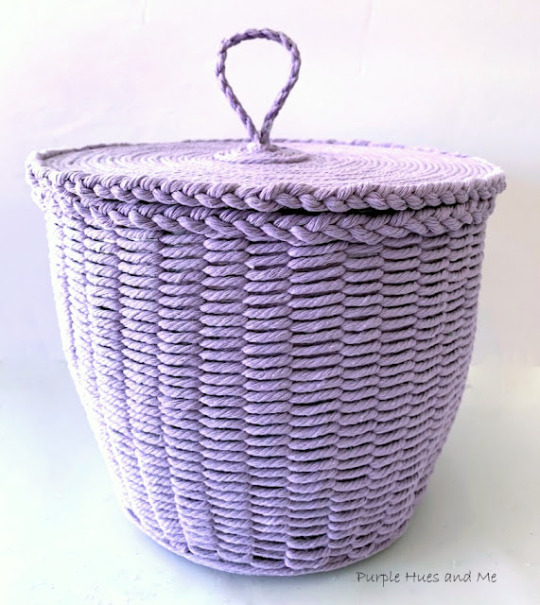
What a nice upcycling basket made from a plastic cup and twine. Tutorial by Gail at Purple Hues and Me. Looks so neat and even, too, you'd never know what lurks inside.
#crafts#crafting#DIY#baskets#weaving#bins#lidded#materials#twine#plastic tub#plastic bin#plastic container#purple#lilac#tutorials
4 notes
·
View notes
Text
How to draw Woven Baskets
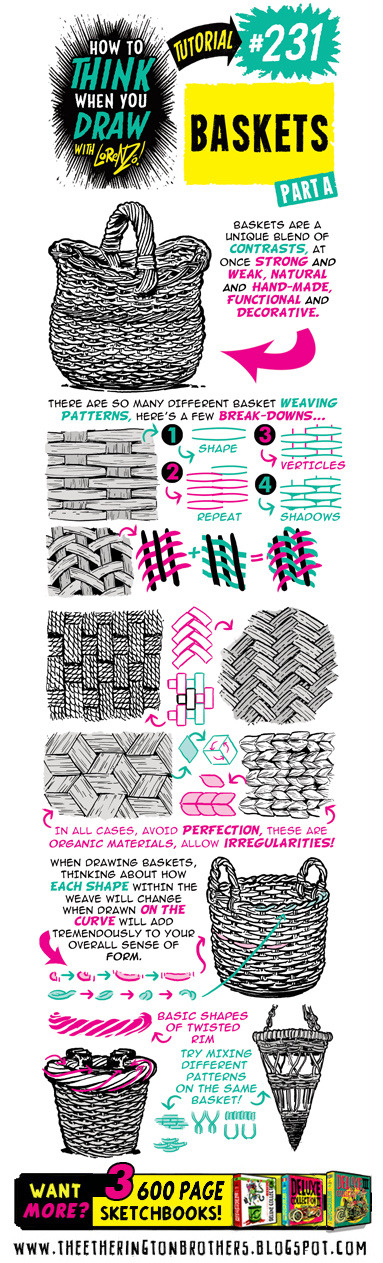
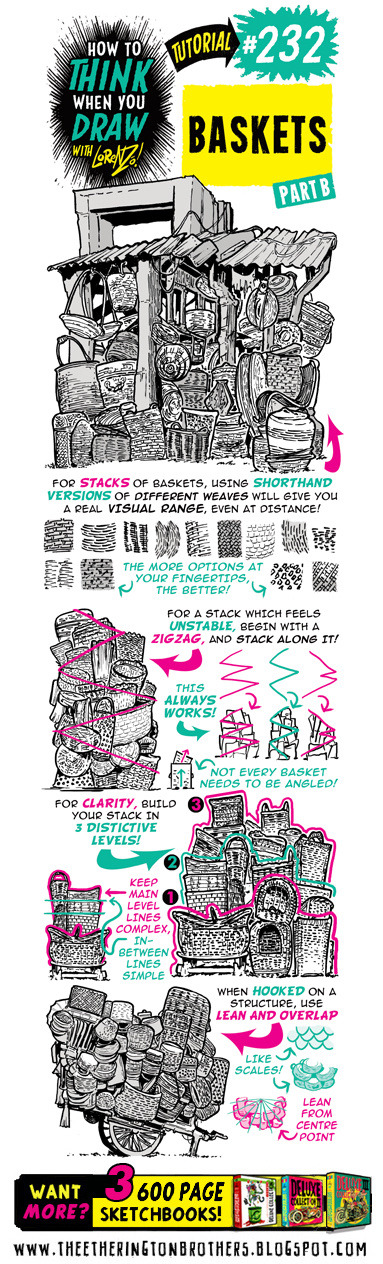
Credit: Etherington Brothers
#231#232#tip#basket#baskets#woven#weaving#straw#material#pattern#patterns#object#objects#item#items#prop#props#art tutorial#drawing tip#art tip#art tips#art tutorials#drawing#drawing tips#drawing tutorial#drawing tutorials#art
11 notes
·
View notes
Note
Can you share pictures of your loom? Where did you get it? I've been wanting to try weaving, but don't know where to start
Sure!
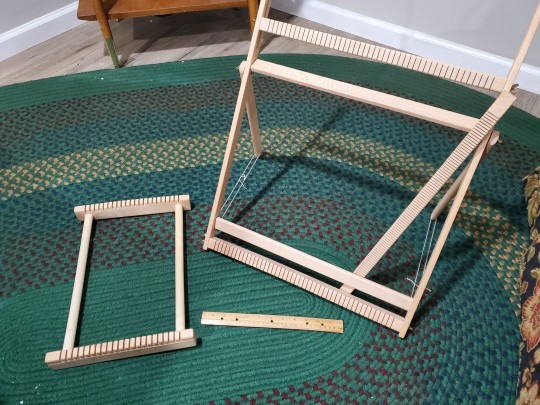
I recently bought the big fancy one on the right from Amazon. It has adjustable height, a stand, and it came with a heddle bar and shuttles and other fancy accessories! I wanna say it was like $50, but I only invested when I knew I was gonna stick with this.
The loom on the left is a simple little lap loom that I got for $2 at a thrift store! And that's the one I've done most of my work on! I've seen people make a basic loom by just pounding some nails into a wooden picture frame, and other people made theirs out of cardboard.
If you're just getting started, I recommend watching YouTube videos about weaving. I learned everything I know from watching YouTube videos! The Spruce and Linen channel has great basics, and then Rebecca Mezoff has videos about more advanced techniques.
I hope you're able to get into it, it's a lot of fun! Enjoy!
#I've considered making a video tutorial on the Dogwarts banner. Is that something people would be interested in?#asks#weaving
8 notes
·
View notes