#video popup generator
Explore tagged Tumblr posts
Text

How To Embed Google Reviews Widget Code On Your Website?
The process to generate and display the Google reviews widget on your website is simple and easy with Social Proof Booster.
Here are the steps on how to embed the Google reviews widget on your website with EmbedReviews:
Create an account on Social Proof Booster
Go to ‘widgets and select Google reviews widget code
Once the reviews widget is generated, Social Proof Booster will provide a code
Copy the provided code
Open your website HTML and paste the widget code on your website.
And, that’s it. You are good to go now!
Isn’t it easy?
Browse Social Proof Booster now!
#Social Proof Booster#social proof booster#popup generator online#online youtube embed code generator#video embed code generator#html video embed code creator#website widget popups#html widgets for websites#htmlwidgetsforwebsites#video popup generator#youtube embed code generator
2 notes
·
View notes
Text
Oh, you know, just the usual internet browsing experience in the year of 2024

Some links and explanations since I figured it might be useful to some people, and writing down stuff is nice.
First of all, get Firefox. Yes, it has apps for Android/iOS too. It allows more extensions and customization (except the iOS version), it tracks less, the company has a less shitty attitude about things. Currently all the other alternatives are variations of Chromium, which means no matter how degoogled they supposedly are, Google has almost a monopoly on web browsing and that's not great. Basically they can introduce extremely user unfriendly updates and there's nothing forcing them to not do it, and nowhere for people to escape to. Current examples of their suggested updates are disabling/severly limiting adblocks in June 2024, and this great suggestion to force sites to verify "web environment integrity" ("oh you don't run a version of chromium we approve, such as the one that runs working adblocks? no web for you.").
uBlockOrigin - barely needs any explanation but yes, it works. You can whitelist whatever you want to support through displaying ads. You can also easily "adblock" site elements that annoy you. "Please log in" notice that won't go away? Important news tm sidebar that gives you sensory overload? Bye.
Dark Reader - a site you use has no dark mode? Now it has. Fairly customizable, also has some basic options for visually impaired people.
SponsorBlock for YouTube - highlights/skips (you choose) sponsored bits in the videos based on user submissions, and a few other things people often skip ("pls like and subscribe!"). A bit more controversial than normal adblock since the creators get some decent money from this, but also a lot of the big sponsors are kinda scummy and offer inferior product for superior price (or try to sell you a star jpg land ownership in Scotland to become a lord), so hearing an ad for that for the 20th time is kinda annoying. But also some creators make their sponsored segments hilarious.
Privacy Badger (and Ghostery I suppose) - I'm not actually sure how needed these are with uBlock and Firefox set to block any tracking it can, but that's basically what it does. Find someone more educated on this topic than me for more info.
Https Everywhere - I... can't actually find the extension anymore, also Firefox has this as an option in its settings now, so this is probably obsolete, whoops.
Facebook Container - also comes with Firefox by default I think. Keeps FB from snooping around outside of FB. It does that a lot, even if you don't have an account.
WebP / Avif image converter - have you ever saved an image and then discovered you can't view it, because it's WebP/Avif? You can now save it as a jpg.
YouTube Search Fixer - have you noticed that youtube search has been even worse than usual lately, with inserting all those unrelated videos into your search results? This fixes that. Also has an option to force shorts to play in the normal video window.
Consent-O-Matic - automatically rejects cookies/gdpr consent forms. While automated, you might still get a second or two of flashing popups being yeeted.
XKit Rewritten - current most up to date "variation "fork" of XKit I think? Has settings in extension settings instead of an extra tumblr button. As long as you get over the new dash layout current tumblr is kinda fine tbh, so this isn't as important as in the past, but still nice. I mostly use it to hide some visual bloat and mark posts on the dash I've already seen.
YouTube NonStop - do you want to punch youtube every time it pauses a video to check if you're still there? This saves your fists.
uBlacklist - blacklists sites from your search results. Obviously has a lot of different uses, but I use it to hide ai generated stuff from image search results. Here's a site list for that.
Redirect AMP to HTML - redirects links from their amp version to the normal version. Amp link is a version of a site made faster and more accessible for phones by Bing/Google. Good in theory, but lets search engines prefer some pages to others (that don't have an amp version), and afaik takes traffic from the original page too. Here's some more reading about why it's an issue, I don't think I can make a good tl;dr on this.
Also since I used this in the tags, here's some reading about enshittification and why the current mainstream internet/services kinda suck.
#modern internet is great#enshittification#internet browsing#idk how to tag this#but i hope it will help someone#personal#question mark
1K notes
·
View notes
Text
Okay something I'm noticing with the current Green arc (which I've found incredibly interesting as a whole btw, I've just been busy irl so haven't found the time or words to do a full analysis on or contribute to every amazing analysis I've seen by other people) is the glasses.
Note: I don't have Tiktok and don't really have the ability to view things on it, and I don't have an Instagram either, so I may be missing a few things. I'm mainly focusing on the Youtube aspect of this.
I've seen mention that Green's been losing energy, getting less involved with their friends, and generally doing more clickbait-y and iffy videos. But also they've been starting to wear these glasses more - and I think that's a pretty direct representation of when Green's behavior, energy, creations, and friendship have all been going downhill.
For the basketball, superhero saga, and most of the Minecraft vlog (also the Tiktok announcement, which I'm not sure where that fits in), Green has just been Green, no glasses or anything. And that's when they seem to have the most energy, and have been doing things with their friends. Sure it's silly and a bit over-the-top, but it seems like everyone's legitimately having fun, and everyone's involved. I wouldn't be at all surprised if the popups and stuff over the vlog video was done by other sticks just wildly tossing in effects like they did in the first official video.
But at the end of the vlog video, and for most of the recent things, Green put on these orange-rimmed sunglasses. And the end of the vlog video is when we first started seeing the rest of the CG looking less than pleased with the videos. And after that, Green's started doing things that not even they seem happy with - the couch challenge, or the eating grass.
So I believe the sunglasses are a symbol of that. Of abandoning friendship in favor of personal goals, and losing yourself and your enjoyment of the world in the process.
Because this isn't even the first time a similar pair of sunglasses were used to express that.
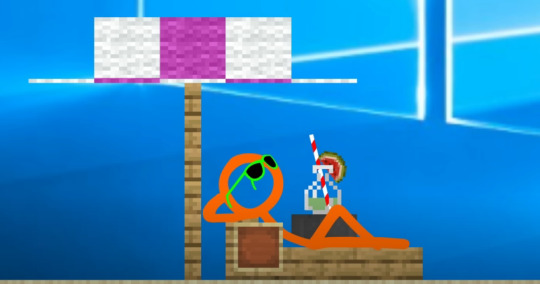
Orange abandoned their friends so Orange could do something they thought would be better and make them happier. Until they realized it didn't, and realized they were wrong, then they put down the glasses and went back for their friends.
Hopefully Green learns to put down the glasses too.
#analysis#alan becker#animator vs animation#green influencer arc#orange#lil analysis this time#then back to vanishing into the void to do all the other things i need to do#but i wanted to talk about the glasses#has there been any other time glasses have popped up?#i feel like there has but i dont have the time to look through everything rn#but it reminded me of when orange was being not the best at friendship#and they have matching glasses
107 notes
·
View notes
Text
guide to ad-free youtube for mobile via. youtube revanced
since youtube vance is no longer maintained and youtube is cracking down on adblockers here is how to download youtube revanced which has the best options for customising youtube features; including removing youtube shorts popups, sponsorship segments in videos, hiding unused buttons, bringing back dislikes, and more! [official revanced github]
this guide is for android only. sorry apple users idk how to help you. your device doesn't have to be rooted. even if it is, you should still be able to follow this guide. if you have youtube vanced installed, revanced shouldn't clash, so you don't have to uninstall it if you don't want to.
installation guide:
1. download all 3:
i. microg (this will let you log into your youtube account) [apk mirror] (scroll past description, download the latest one)
ii. revanced manager apk [github] (select the latest release, scroll to the bottom in assets, install the .apk file)
iii. latest youtube apk [apk mirror]
2. open revanced manager
3. select in this order: "patcher" -> "select an application" -> "storage" (note: if your phone asks you to let the app have storage access, say yes)
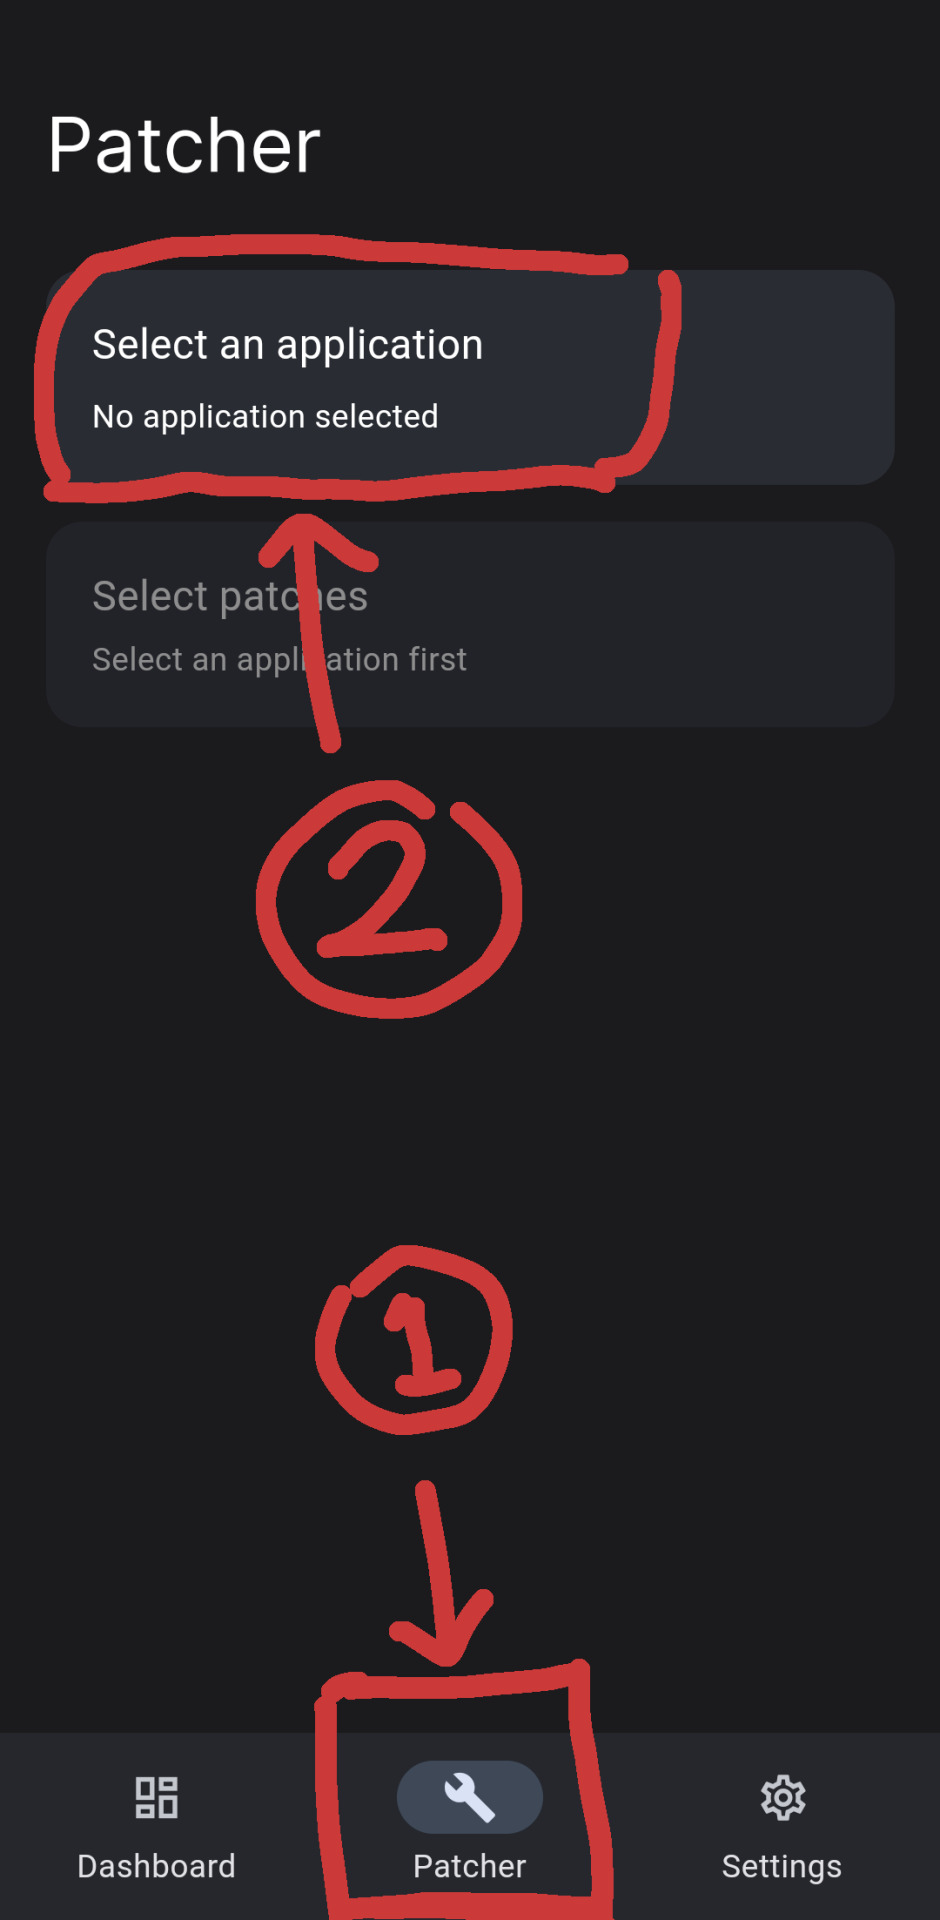
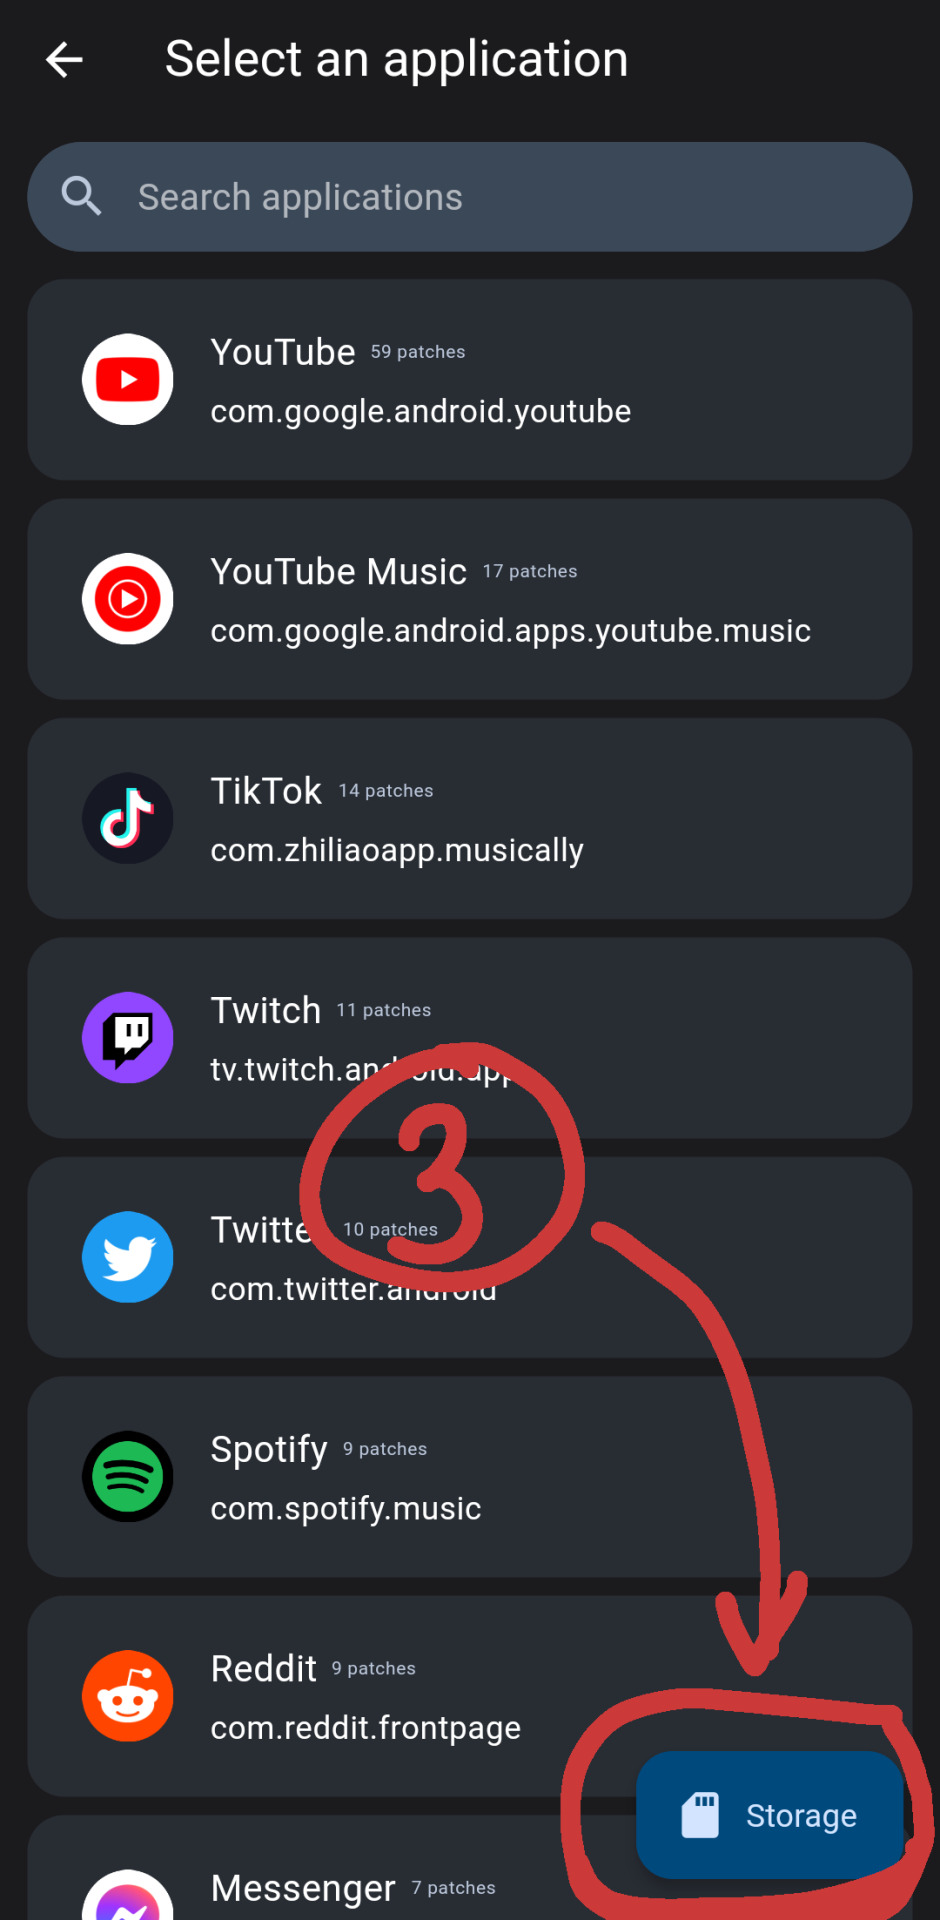
[id. two screenshots of the revanced manager app. there are red markings drawn overtop, indicating areas to select mentioned in step 3. the three spots are circled by a red square, an arrow pointing towards it, and a circle with a marked number to indicate the order at the end of each arrow. id end.]
4. select the youtube apk you downloaded
5. select patches. you can tap "recommended" or "default" or turn on/off patches you want
6. once you have selected, select: "done" -> "patch"
7. wait as it intialises youtube revanced. when it's done select "install" (note: if your phone gives you a warning that the app is blocked, select: "more details" -> "install anyway")
8. if this worked, you should have youtube revanced installed, and you can log in like normal. if this didn't work, read the next part.
(under the read more are troubleshooting solutions + other alternative apps)
issue a) if the botom right now says "open"
1. select: 3 dots on the top right -> "export apk"
2. save it
3. open whatever file browsing app you use (most phones should have a default one that comes pre-installed called something like "files" or "my files". if you don't have one, you can go to the play store and search "files" and pick one. if you aren't sure, i use "files by google")
4. find the exported file and install it (it will be called something like "youtube-revanced-versionnumber.apk")
5. if this worked, you should have youtube revanced installed, and you can log in like normal. if this didn't work, you can read the next part.
issue b) can't build or install youtube revanced with no option to export
1. something may have gone wrong with the file installation at some point, so try a clean start. to do this, uninstall:
i. revanced manager
ii. youtube revanced
iii. microg
iv. (optional) disable/uninstall the default youtube app
2. follow guide from step 1 again, hopefully it works. if it's still not working, you can try other alternatives. i've listed some in the next part of this post
alternatives:
libretube, newpipe, songtube, vuetube, astron, puretuber
i haven't used any of these personally, but i haven't seen any problems with them. let me know if there are and i'll remove it from the list.
you can also use youtube through your web browser with adblock add-ons. i'm not sure whether youtube has affected their mobile site though. with the firefox app you can use ublock origins (for ads) + youtube high definition (for general quality fixes)
#txt#❤️🩹#yay ^_^ feel free to rb this i hope it helps#let me know if something doesn't make sense and i can try to reword it or add screenshots#i tried to keep it concise
860 notes
·
View notes
Text
Rogue Trader - (mostly) Heinrix related romance and general information, toybox flags + etudes
My youtube channel with Rogue Trader videos.
Heinrix romance related
Toybox - general and Heinrix specific information
Devil/closeness flirt
Heinrix romance - flirting differences (devil vs. closeness)
Corruption points
Act 4 - Heinrix romance - Overview over Corruption Points
Act 4 - Heinrix + Guard difference (kill/spared) and corruption points
Act 4 - Heinrix 2nd romance scene
Questions
Janus corruption dialog popup when
Heinrix quest flag/etudes + affected endings
Act 4 Date trigger
Toybox Navigator Points
Dialog screenshots/videos
Heinrix - amasec and wine
Act 1 - shard options and affected Heinrix dialog
Act 2 - Black Ship - Heinrix romance specific dialog
Act 3 - Heinrix joining party dep. on romance
Act 4 - Heinrix romance - Date - love confession
Act 4 - Heinrix romance scene if he was not in Commoragh
Act 4 - Heinrix romance specific talk after freeze scene (video bridge talk)
Not romance related
warp event - Heinrix, Argenta and Abelard
Act 1 - Idira prophecies about companions
Act 1 - Heinrix changed voice over in intro
Act 1 - Heinrix recruitment - disguise
Act 1 - Heinrix and Evayne in Prison (Evayne unharmed)
Act 1 - Rykad Minoris - Ritual Chamber + Heinrix dialog
Act 1 - Heinrix dialog at Cassias recruitment quest
Act 1 - lower deck banter (Heinrix+Abelard, Idira+Abelard)
Act 1 - Heinrix - Triumph and Psyker
Act 2 - Heinrix add. dialog for iconoclast act 1 ending
Act 2 - Heinrix Footfall (interactions)
Act 2 - Footfall - Heinrix dialog - Drink in Cantina
Act 2 - Janus - Heinrix and Abelard
Act 2 - Heinrix dialog suppressed on Janus
Act 2 - Kiava Gamma mission talk with Heinrix - additional/hidden dialog line
Act 2 - Kiava Gamma mission briefing
Act 2 - Heinrix at the Magnae if not romanced
Act 2 - Ceremony - joining Inquisition - affected Endings
Act 3 - Heinrix + Achilleas/underlings spoiler
Act 3 - Heinrix + companions interactions in Commoragh
Act 3 - Heinrix escape dialog dep. on Yrliet/Marazhai
Act 3 - Heinrix, Yrilet and Marazhai versions (anat. opera)
Act 3 - Heinrix joining party dep. on romance
Act 3 - Help Achilleas/Wrack return to realspace
Act 4 - Xavier Calcazar - Heretic > 2 and Heinrix reaction
Act 4 - Heinrix on bridge "Lies"
Not act related
Examples of Heinrix not blindly following Xavier
Heinrix and his rosette
Some Heinrix dialog observations
Ulfar and Heinrix interaction
Other
Regicide
Turns and Cycles (time)
Act 2 - Inquisition Signet Ring color
Xavier Calcazar appreciation (spoilers act 2-5 + ending)
Interesting details (Time spent/Theodora/von Valancius dynasty)
#don't mind me - organizing master list - I have too much stuff#rogue trader#rogue trader crpg#rogue trader rpg#heinrix van calox#rogue trader heinrix van calox#heinrix x von valancius#rogue trader spoiler#rogue trader analysis#rogue trader videos#rogue trader dialog#heinrix van calox romance#rogue trader heinrix von calox romance#masterlist rogue trader game analysis
91 notes
·
View notes
Text
more or less the full tiktok situation
okay so im not tinfoil hatting because its pretty obvious when you think about it
2020 trump wants tiktok banned im pretty sure the people who overlooked the whole spiel thought that there wasnt anything wrong with it and it and continued on as normal
then for some curious reason the stupidest most tech incompetent people of the congress are part of the hearing with classics such as asking the ceo 10 different ways of "are you chinese" making the viewer think that the next question is going to be whether or not the CEO has ever eaten chinese food. there are of course the other classics (and these are all real questions) "does tiktok read your brainwaves when you put on headphones" "does it record your eyes dilating to figure out what videos to boost via the algorithm" "does tiktok access your home wi-fi network" "are you chinese" "if you turn on airplane mode while in a plane, can tiktok talk to the plane"
im not making this up. these are real actual questions. its not word for word but im not changing the meaning of the questions it really was that bad
then of course beause they took the dumbest people in the congress they made a rule that basically boils down to "apps from countries we dont like have to be owned by america" (so we can censor it) (this is while also being racist towards china and yknow being all 'china censorship bad!')
now there hasnt been an official announcement of tiktok having been bought, BUT!
while it was down for americans, these messages appeared
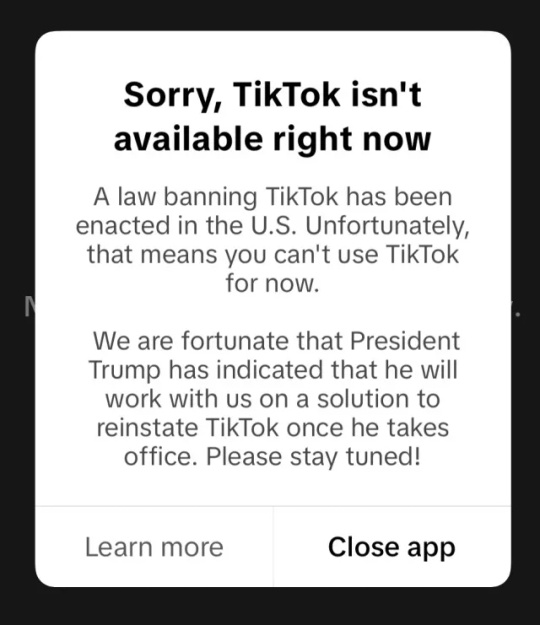
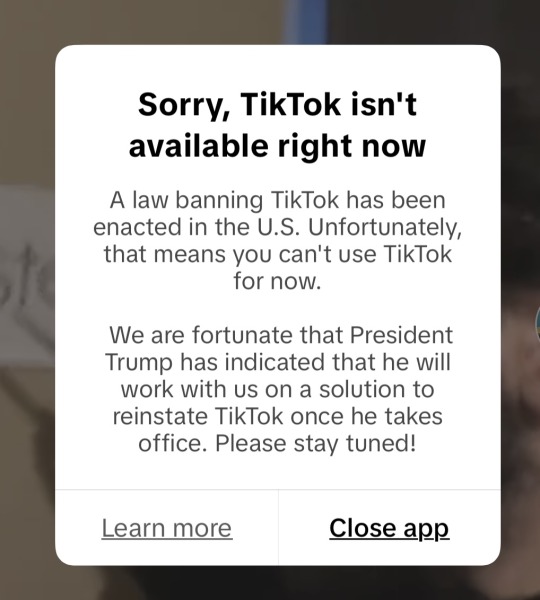
message 1 ID: Sorry, Tiktok isn't available right now A law banning TikTok has been enacted in the U.S. Unfortunately, that means you can't use TikTok for now. We are fortunate that President Trump has indicated that he will work with us on a solution to reinstate TikTok once he takes office. Please stay tuned! End ID oh yeah the same trump that got it banned in the first place, right? about 15 hours later the app is up again
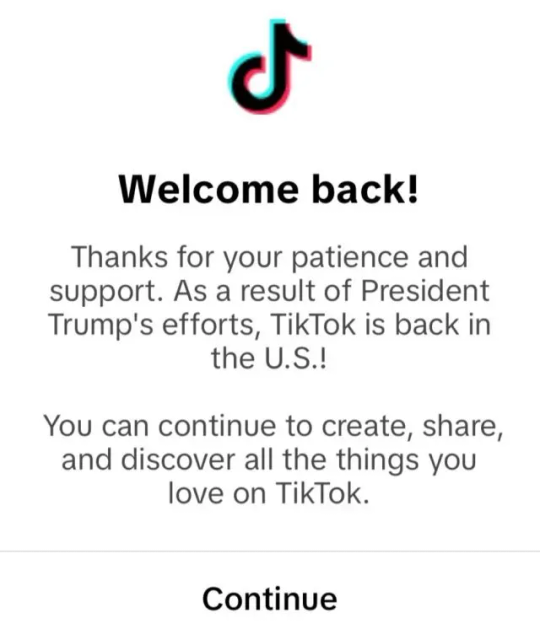
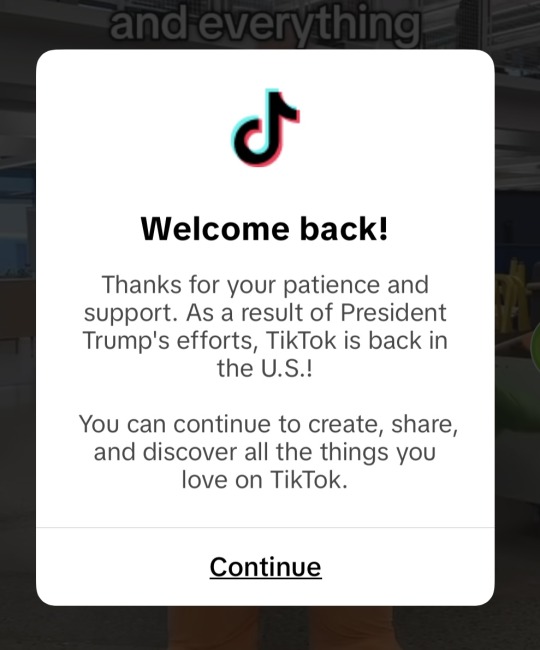
Message 2 ID: Welcome Back! Thanks for your patience and support. As a result of President Trump's efforts, TikTok is back in the U.S.! You can continue to create, share, and discover all the things you love on TikTok End ID.
heres the part where you gotta put the clues together! the tiktok page of the tiktok CEO no longer has "CEO of tiktok" on his profile
facebook/instagram is all of a sudden having popups of "link to tiktok" and an official tiktok page too. if youre on tiktok you get an add facebook friends promo (this hasnt happened to everyone yet, rolling out feature)
convicted felon donald trump is holding his inauguration indoors, probably because last time he got all pissy that the crowd size was small, but you cant take aerials indoors and indoors have limited seats anyway(maybe as a last fuck you, tiktok will once again reserve a bunch of seats that are left empty? oh please do that!). also its easier to check for weapons and not have snipers when indoors, which is important when first lady elon musk is going to be there, and his fellow oligarch mark zuckerberg is also going to be there. theyre reaaal scared of the snipers since their egos are so big they become an easy target!
but we all know the drill by now. "saving" tiktok is just a failed way to make the younger generation like him. even if he set it up and everyone on tiktok knows. its also a way to make people overlook whatever this weeks war crime is going to be. probably the mass deportation. forgot to add this thing but facebook recently removed fact checkers so tiktok is probably going to have even more (worse) misinformation
TL;DR facebook is going to announce they bought tiktok any day now and give the glory to trump even though he is the reason it was banned in the first place
also as a bonus on the last day, a lot of influencers and stuff like that were having the "since we're all getting banned anyway" moment so a lot of them said stuff like "i never used the products i promoted" "i hated collabing with this creator" "i was never xyz" people who did masked thirst traps (male presenting) were women all along. and then 15 hours later theyre unbanned and have to be like... yep...so that just happened.
anyway tiktok was one of the last few places people got news that werent completely filtered through the right wing lens of whoever owned the newspaper. even if there was a lot of misinfo. think of the ceo shooter and think of how the media portrayed it vs the people. "rich man is murdered in cold blood by some vile monster. he was very beloved" vs "this guy is a vile human being who is responsible for millions of deaths, and he was finally killed"
21 notes
·
View notes
Text

some quick info: ↳ this is specifically for the screencapping method. i use mplayer osx extended to get my caps, but there are a few other programs you can use as well. i’ll specifically be going over mplayer here. ↳ i’m using ps 24.4.1 on a 2020 m1 macbook air
[tysm to @kyubinz for looking this over and adding some things ily]
�� feel free to send me an ask/message with any questions you have! ☆
「 setup 」
1. finding videos
one big thing to remember is that the overall file size of your video will impact the quality of your gif. the larger, the better. i almost never use anything below 1080p, and try to use 2160p whenever i can. 4k video downloader is the program i use for downloading videos from youtube, it’s free to install and works great! because of how large some files can be, i always store any media on my hard drive. i highly recommend using one if you plan to keep lots of files on hand.
.mkv files are best, but .mp4 works fine as well (.mkv files are usually bigger aka better quality).
2. getting your screencaps
after downloading mplayer, go to the top bar and click file > open. open the video you’ll be screencapping.
you can either drag the little time indicator or using the arrow keys on your keyboard to move to the spot you want to capture. the > key can also be used to move forward frame by frame. to start capping, pause the video and press shift + cmnd (ctrl if you’re on windows) + s to take a screencap. i usually just hold it down until i’ve gotten all the screencaps i need.
by default, screencaps go right to desktop. you can set up a folder for them to go to automatically by going to settings > general and then selecting a spot in the menu under “interface”, but i just let them go to desktop and then sort them into individual folders so they’re easier for me to find while i’m giffing. in general, i try to stay under 80 frames so my gifs fit into tumblr’s 10mb image size limit.
3. importing screencaps into photoshop
to import your caps into ps, go to file > scripts > load files into stack. this window should open:

click browse, and navigate to the folder with your caps in it. select all of the caps you want to import, and then click open.
click ok to create a file with your caps, and then wait until it’s finished loading your caps into the layers tab. once they’re loaded in, this is what your screen should look like:

(if you aren’t seeing the timeline at the bottom of your screen, go up to the top bar and go to window > timeline)
click create frame animation, then go to the hamburger menu at the top right of the timeline and select make frames from layers. once your frames have loaded in, select the same menu again and click reverse frames. play through your gif to make sure everything looks good.
if you were to save your gif at the speed it’s set at now, it would be way too fast. to fix this, you have to set the frame delay. do this by selecting all your frames in the timeline using shift click, and then clicking (on any frame) where it says “0 sec”. select other from the menu that comes up, and you should get this popup:
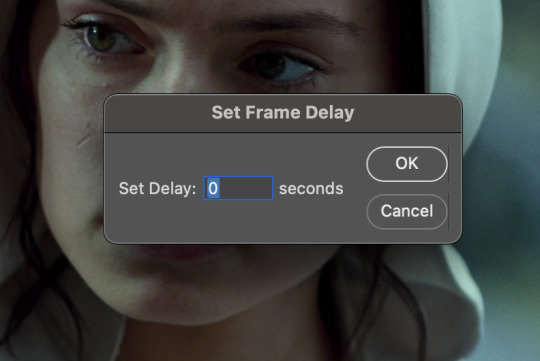
the general rule of thumb for gif frame delay is 0.05 seconds. there are some cases — certain animated movies or video games, for example — where other delays are best, but for the most part, 0.05 is what you want to use (0.05 can slightly slow gifs, and sometimes using 0.04 better matches the clip's original timing. this is really a "train your eyes" thing, and picking the best delay gets easier as you gif for longer). you can set this by typing the number into the text box and then hitting the ok button or enter on your keyboard.
at this point, i’d go ahead and save your file. you can go to file > save in the top bar, or just hit cmd/ctrl + s on your keyboard.
「 making your gif 」
1. sizing
after your frames are ready, the next thing is to size your gif. to crop your gif, press c on your keyboard to open the cropping tool. white borders will show up around your gif.
before doing anything, i would suggest making sure “delete cropped pixels” is unchecked. this will allow you to drag your gif around later if you want to reposition. you can find this option at the top of your screen. drag the borders on either side until you have the area you want selected. mine looks like this:
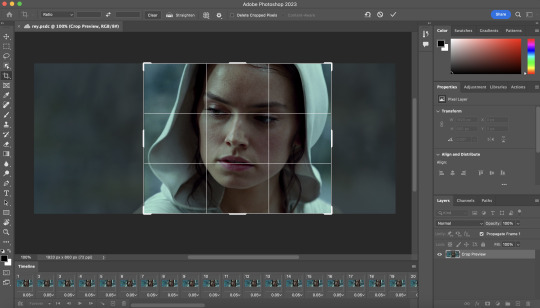
once you’re happy with your selection, hit enter on your keyboard to finalize it.
the tumblr image guidelines require gifs to be 540px across (here’s a post detailing this). to change your gif’s image size, go to image > image size in the top bar. you’ll get this popup:

instead of setting the width right to 540, i’ll be setting it to 544, and then trimming down the edges using canvas size. this makes the quality just a little better, and also prevents any weird borders being made around your gif on the off chance photoshop decides to add them. this isn’t necessary at all, you can absolutely size right to 540, but i just like doing this. if you choose to do this, open canvas size right after you set image size (image > canvas size in the top bar), and trim your width down to 540 and your height down a few pixels as well.
2. sharpening & other filters
sharpening is essential for good-quality gifs. the first step to this is converting our timeline from frame animation to a video timeline. select this little icon in the bottom left of your screen:
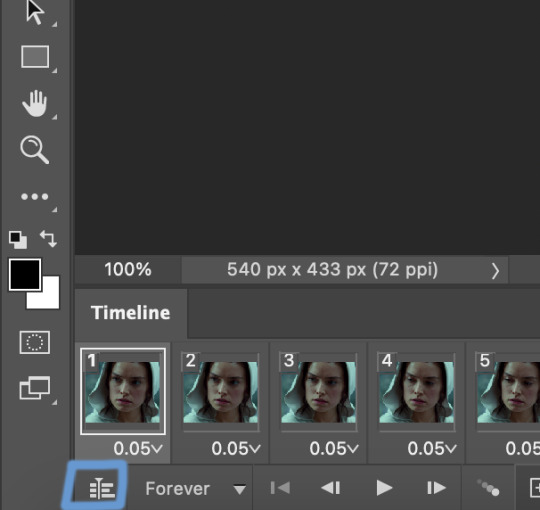
this is what your timeline will look like now:

you can use the little slider with mountains on either side to change the width of your frames in the timeline for easier access when editing. now that we’ve got all this set up, we can sharpen! i use this action pack to sharpen my gifs in addition to a few of my own settings (here is a video on how to install actions into photoshop). go to window > action in the top bar if you aren’t seeing the action tab.
i’ll be using the sharper action from the pack. to use an action, select it from the list and press the little play button at the bottom of the panel to apply it.
in addition to this, i usually also add unsharp mask at 50% amount with a 0.5px radius:


there are a few other filters than can be helpful when giffing:
a. add/reduce noise noise (aka grain) can be added with “add noise”. go to filter > noise > add noise.
these are the settings i usually use, but the amount depends on the gif (i don't ever go over 3.5 for the most part):
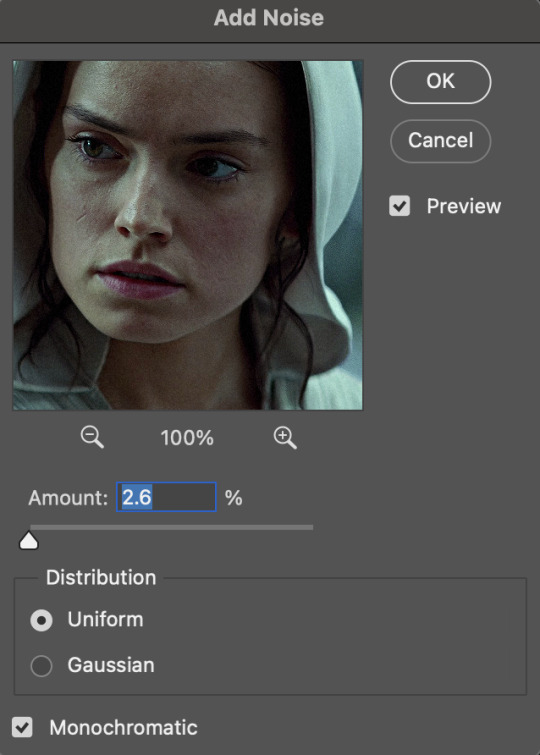
(if you want a grain effect but moving noise doesn't work for the gif, you can also add a grain overlay and then mess with blending mode and layer opacity until it looks how you want)
reduce noise can be used to remove some of the pre-existing grain on a clip. go to filter > noise > reduce noise. here are my settings:

leaving reduce noise on its own at 100% is a bit too much, so double click this icon and change the opacity (i usually do around 45):

b. gaussian blur if your clip is a bit pixelated, gaussian blur can help with smoothing it out a bit. go to filter > blur > gaussian blur. my settings are 1 pixel radius w ~20% opacity (this changes based on the gif).
3. coloring
time to color! i want you to keep in mind during this section that everyone likes different colorings, and this is just my process! please don’t feel pressured to follow exactly what i’m doing, the best way to find what you like is to just mess around and experiment!
i like to start off with lighting adjustments: brightness/contrast, levels, exposure, and curves.
a. brightness/contrast i usually start out with this first, just because brightening the gif right away helps me start thinking about how i want to color! here are my settings:
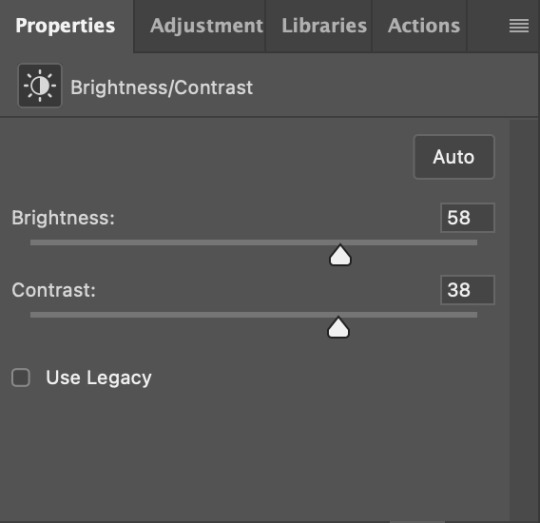
b. levels/curves levels and curves can either be used interchangeably or together. i usually use levels to adjust lighting and curves to adjust color values, but i’ll go over using both for lighting as well as using curves for adjusting color values.
for both of these adjustments, i use the eyedropper tools to pick out white and black points. for levels, the top eyedropper tool to the left of the graph is used to pick out a black point. i do this first. use the tool to pick a spot on your gif that you want to be the base for black values. for me, that’s the shadow inside rey’s hood. the bottom eyedropper tool picks white point. use the tool to pick a spot on your gif that you want to be the base for white values. i chose the outside of rey’s hood. make sure you’re doing this on a new levels adjustment layer.
now, on to curves. you can either use the same eyedropper method or manipulate the graph directly. using the eyedropper is the same as levels, so i’ll just go over graph manipulation.
shade lightens as you move to the right along the x-axis of the graph — black is the far left, white is the far right, middle is the midtones. generally, i don’t work with midtones.
i’m going to use levels for this gif’s lighting, and curves to adjust color values. here’s how to do that:
curves can be used to adjust the amount of a certain color in different lighting areas of a gif. for example, i can specifically decrease the amount of green in the gif’s whites. to edit these values, select the rgb drop-down menu and adjust them one at a time. here are my final graphs:
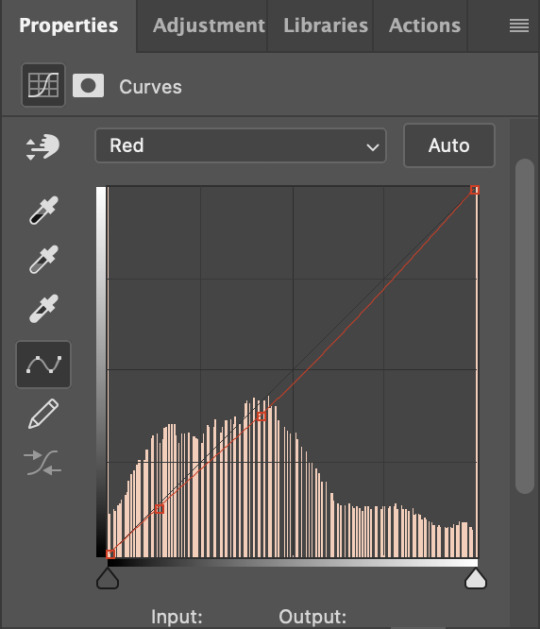


c. exposure this one’s pretty straightforward. the exposure slider adjust general exposure. the offset slider adjusts how dark your dark points are, and gamma correction can be used to lighten/darken scenes as a whole. here’s my settings:

d. color balance color balance is used to adjust overall tint of a clip. this is in general pretty simple, but i do want to point out that using the shadow and highlights tabs in addition to just the midtones can really help. here’s my settings:

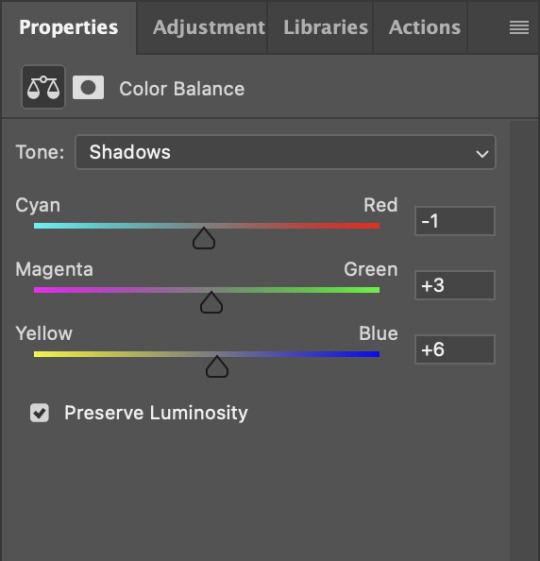
e. channel mixer channel mixer is one of my favorite tools in ps, especially for coloring scenes that are a pain in the ass without it. to avoid taking up too much space, here’s a great tutorial covering channel mixer. here’s my settings:


[at this point, i’m noticing my gif is still a bit darker than i’d like it, so i’m adding just a bit of brightness/contrast to fix it. there’s also a patch of blue over one of rey’s eyes, so i’ve used a hue/saturation layer to get rid of that bit and masked it to her eye. i’m not going to go over masking here, but there are lots of great tutorials out there!]
f. selective color selective color can be used to adjust the amount of specific colors within a color. for example, if i were to go into the red tab and take out cyans, the reds would become more red. if i were to add yellows, the reds would become more orange, etc etc. this can be especially good for color manipulation. for this gif, i’d like to make the background more blue, so i’m going to use selective color to do this. here’s my settings:

g. color lookup color lookup uses 3dlut files to remap gif colors (it’s a preset — think instagram filter or something similar). i don’t always use these, but when i do, i almost never leave them at 100% opacity. color lookup is great for giving gifs a film-type look if you want to do that, it’s got loads of different options. here’s my settings (adjustment layer is set to 20% opacity):

atp i’m pretty much done with coloring! i usually end up doing a few extra little lighting adjustments at the end. for this gif, i added some brightness/contrast at +8. i’ve also noticed that my gif’s looking a bit grainy, so i’ve added some noise to lean into it. this is usually the way i fix it, but you can definitely do reduce noise/gaussian blur as well if you don’t want a grainy look.
here’s my fully colored gif + a process gif (fast images warning):


「 saving gifs 」
1. frame rate
one thing you may have noticed is that my gif is looking a bit choppy. photoshop has a tendency to mess with frame delay after gifs are converted to video timeline. here’s how to fix that.
select all of your layers and convert them to a smart object (right click > convert to smart object). next, click on the hamburger menu in the top right of the timeline and go to convert frames > flatten frames into clips. now we need to change the timeline from video timeline to frame animation. click the little 3 boxes symbol in the bottom left corner of the timeline:

go to the hamburger menu again and select make frames (this is the same one you used earlier), then go through your frames and delete any duplicates. the first frame usually needs to be deleted specifically. once you’ve done that, set the frame delay back to 0.05 the way you did earlier.
2. exporting
once you’re happy with how your gif looks, go to file > export > save for web (legacy).
these are my export settings, but feel free to experiment with the menus where i have selective and diffusion selected, different settings work best for each gif. in general, most gifmakers only use selective/adaptive and diffusion/pattern because they generally work the best for tumblr. before saving, make sure your looping option is set to forever:

gif size for tumblr has a 10mb limit. my gif is under this, so i don’t need to make any changes, but if yours is over, you can either delete some frames from the beginning/end of your gif and/or adjust the height of the gif (width needs to stay 540px so your gif doesn’t get stretched/compressed on tumblr, but height is fair game).
here's my final gif!

happy giffing, and please don’t hesitate to send me any questions you have! ♡
#*mine#gif tutorial#tutorials#allresources#usertheos#userzesty#userzaynab#usershreyu#rogerhealey#userabs#userhekaates#usermaria#userraffa#usermorgan#uservivaldi#tuserheidi
340 notes
·
View notes
Text
Favorite Firefox Extensions
Firefox is a very extensible browser - through a combinations of addons and userscripts you can make it behave just about any way you want. The best part is, they're all free. Here are some of my favorites.
Note: if you have an Android device, check out my post about Firefox for Android's new extended support for addons!
Note: if you have an Apple device, check out my favorite Safari extensions here!
Last updated Feb 2025 (updated list of languages supported for native, local translation by Firefox).
Index:
uBlock Origin
Tab Session Manager
Sauron
Bypass Paywalls Clean
Auto Tab Discard
Video DownloadHelper
Highlight or Hide Search Engine Results
TWP - Translate Web Pages
UnTrap - YouTube Customizer
Indie Wiki Buddy
Cookie Auto Delete
ShopSuey - Get Rid of Ads on Amazon and Ebay
LibraryExtension
Absolute Enable Right Click & Copy
uBlock Origin
(compatible with Firefox for Android)
This is the first addon I install on any new Firefox browser. It's an adblocker, but at its core it can remove pretty much any HTML element from a website, and it comes with pre-configured lists for removing everything from ads to cookie banners to those annoying popups that ask you to sign up for email newsletters.
Tab Session Manager
Have you ever accidentally lost all your open browser tabs due to a computer update, or even just accidentally closing Firefox? With this addon you no longer have to worry about that - it automatically saves your open tabs and windows every time the browser closes, and autosaves a restore point of tabs every few minutes in case the browser crashes unexpectedly. Opening all your previous tabs and windows is a one-click deal.
Sauron
Ever wished your favorite website had a dark mode? With Sauron, now it can! Sauron attempts to intelligently figure out how to edit the color scheme of the web page (including text) to make it dark-mode friendly. It preserves the original color of images, but dims them so that they don't blind you. You can disable image dimming or dark mode on a site by site basis too. It's not perfect since it is making guesses about which colors to change, but it goes a long way toward making the internet an enjoyable place for me.
Bypass Paywalls Clean
This addon removes paywalls from hundreds of news websites around the world or adds links to open the article in a wrapper that provides the article text (like the Internet Archive etc.)
Auto Tab Discard
Ever wanted to keep a tab open for later use, but you notice the browser getting slower and slower the more tabs you have open? Auto Tab Discard will automatically "hibernate" tabs that you haven't used in a while so that they use less resources on your computer. It's smart enough not to hibernate pages that are playing media (like YouTube) or that have forms you haven't submitted yet (like job applications). You can customize how fast it puts tabs to sleep too and exclude certain websites from hibernating at all.
Video DownloadHelper
This addon can download streaming videos from most modern (HTML5) websites, and even finds soft subtitles that accompany the stream and downloads those too. Just browse to the webpage that has the video on it, click the icon in the Firefox toolbar, and select the video you want to download and click "Quick Download". For YouTube I would recommend using a YT downloader website (like KeepVid) to download the video directly, but Video DownloadHelper really shines for websites that aren't popular enough to have dedicated downloader websites like that. I've used it download videos from a Japanese film festival streaming portal, news websites, etc.
Highlight or Hide Search Engine Results
This addon allows you to blacklist websites and completely remove them from Google, Bing, or DuckDuckGo search results. Don't want to see image search results from AI websites? Blacklist them. Searching for tech support advice and getting frustrated by all the auto-generated junk websites that stuff themselves full of SEO terms to jump to the top of the search results without actually providing any information at all? Blacklist them so they don't come up in your next search. Conversely, you can also whitelist websites that you know and trust so that if they ever come up in future search results, they'll be highlighted with a color of your choosing for visibility.
TWP - Translate Web Pages
(compatible with Firefox for Android)
Does what it says on the tin: auto-detects a website's language and provides a button that can translate it to a language of your choosing. You can also just select individual text on the page and translate just that. Note that this sends whatever text you translate to the servers of your selected translation service (Google, Bing, Yandex, or DeepL), so keep in mind the privacy implications if you don't want your IP address associated with having read that text.
Edit: As of version 118, Firefox now has the ability to translate text locally on your computer, without needing to send it to a cloud service. You can enable this in Settings -> Translation -> Install languages for offline translation. Note that at this time (Feb 2025), 31 languages are supported - Russian, Korean, Chinese (simplified), and Japanese were recently added. More info here.
UnTrap for YouTube
(compatible with Firefox for Android and they have a Safari for iOS extension too)
This addon lets you tweak the YouTube interface and hide anything you don't want to see. For instance, I hide all the "recommended" videos that come up when you search YT now. They have nothing to do with your search, so they're essentially just ads YT puts in your search results. I also hide Explore, Trending, More from YouTube, and Shorts sections, but you can customize it to fit your preferences.
Note: depending on the particular set of tweaks you want to make to YouTube, you may prefer to use YouTube Search Fixer instead. User preference.
Indie Wiki Buddy
I loathe Fandom.com wiki sites - they are cluttered and filled with ads and autoplaying videos that follow you down the page as you scroll. The organization is also hostile - if a community tries to leave their platform and bring their content to a new wiki hoster, Fandom bans them from the platform and reverts all their deletions/changes. Indie Wiki Buddy attempts to find an independent alternative for the wiki you're trying to browse and automatically redirects you to it, and if one doesn't exist, it will redirect you to a proxy site like antifandom or breezewiki that shows the Fandom content but removes all ads/videos/background images so you can actually, you know. READ it.
Cookie Auto Delete
(compatible with Firefox for Android)
Websites store "cookies" - little text files with info about you - on your computer as you browse so they can track you as you browse the internet. This addon automatically deletes cookies from a website a short while after you close the last tab you had open for that site. You can customize how long it waits before clearing cookies too. Note that this can sign you out of many websites, so you can whitelist any site you don't want cookies cleared for.
ShopSuey - Get Rid of Ads on Amazon and Ebay
Removes the ads/recommended products that clutter up Amazon and Ebay search results and product pages.
LibraryExtension
This fantastic addon recognizes when you are viewing a book on many popular websites and can automatically check whether that book is available in any of the library systems or subscription services you have access to, including how many copies your library(ies) have and how many are currently checked out. The best part is it shows the availability for physical books, ebooks, AND audiobooks at supported libraries. The extension currently supports libraries in Australia, Canada, Germany, New Zealand, the United Kingdom and the United States, but it also supports some global repositories like the Internet Archive and subscription services like NLS Bard for the blind and print disabled, Kobo Plus, Libro.fm, Anyplay.fm, Bookmate, and Everand. Great extension for people trying to support their local library and also save money.
Filtering+ for Tumblr
This addon lets you add tags or phrases to your tumblr tag filters with two clicks, without leaving the dashboard. I've been asking Tumblr for this tag filtering behavior on their mobile apps (i.e. press and hold a tag to get a filter option) for at least a year now in asks and surveys, without ever stopping to see if someone had already implemented this on desktop. More fool me. This addon is from the author of XKit Rewritten. Note that the right-click tag filtering only works on the dashboard; it will not appear if you are on someone's blog. Right-clicking selected text to filter the phrase works everywhere based on my testing.
Absolute Enable Right Click & Copy
This addon does its best to re-enable the normal right-click context menu and copy/paste actions on pages that try to disable them. If you run into a site that messes with either of those, select this addon and check "Enable Copy," then try again. If that doesn't work, check "Absolute mode." It doesn't work everywhere, but I find it very helpful.
123 notes
·
View notes
Text
News for Gamers
So the most notable recent gaming news is that there’s going to be a whole lot less gaming news going forward. Which to most of you is probably a massive win. See, IGN announced that they’ve bought roundabout half of the remaining industry that isn’t IGN, and with online news also dying a slow death due to the approaching new wave of journalism called “absolutely nothing”, I can’t imagine IGN and its newly acquired subsidiaries are long for this world.
Not too long ago, I was studying some magazines for my Alan Wake development history categorization project (please don’t ask), and reading the articles in these magazines led me to a startling realisation: Holy shit! This piece of gaming news media doesn’t make me want to kill myself out of second hand embarrassment!
Many of the magazines of yesteryear typically went with the approach of “spend weeks and sometimes months researching the article, and write as concise a section as you can with the contents”. Every magazine contains at least 2 big several-page spreads of some fledgeling investigative journalist talking to a bunch of basement-dwelling nerd developers and explaining their existence to the virginal minds of the general public.
Contrast this to modern journalism which goes something like:
Pick subject
Write title
???
Publish
Using this handy guide, let’s construct an article for, oh I dunno, let’s say Kotaku.
First we pick a subject. Let’s see… a game that’s coming out in the not too distant future…Let’s go within Super Monkey Ball: Banana Rumble. Now we invent a reason to talk about it. Generally this’d be a twitter post by someone with 2 followers or something. I’ll search for the series and pick the newest tweet.

Perfect. Finally we need an entirely unrelated game series that has way more clout to attach to the title… What else features platforming and a ball form… Oh, wait. I have the perfect candidate! Thus we have our title:
Sonic-like Super Monkey Ball: Banana Rumble rumoured to have a gay protagonist
What? The contents of the article? Who cares! With the invention of this newfangled concept called “social media”, 90% of the users are content with just whining about the imagined contents of the article based on the title alone. The remaining 10% who did actually click on the article for real can be turned away by just covering the site in popups about newsletters, cookies, login prompts and AI chatbots until they get tired of clicking the X buttons. This way, we can avoid writing anything in the content field, and leave it entirely filled with lorem ipsum.
Somewhere along the way from the 2000s to now, we essentially dropped 99% of the “media” out of newsmedia. News now is basically a really shit title and nothing more. Back in the day, when newscycles were slower, most articles could feature long interviews with the developers, showing more than just shiny screenshots, but also developer intentions, hopes, backgrounds and more.
Newsmedia is the tongues that connects the audience and the developers in the great french kiss of marketing video games. Marketing departments generally hold up the flashiest part of the game up for people to gawk at, but that also tells the audience very little about the game in the end, other than some sparse gameplay details. It was the job of the journalist to bring that information across to the slightly more perceptive core audiences. Now with the backing of media gone, a very crucial part of the game development process is entirely missing.
It’s easier to appreciate things when they’re gone I suppose. But at the same time, since gaming journalism is slowly dying from strangling itself while also blaming everything around it for that, there is a sizable gap in the market for newer, more visceral newshounds. So who knows, maybe someone of the few people reading my blogs could make the next big internet gaming ‘zine? Because I’m pretty sure anyone here capable of stringing more than two sentences together is a more adept writer than anyone at Kotaku right now.
23 notes
·
View notes
Text
Thinking about Veilguard general gameplay. The first time I played, I genuinely enjoyed just ... running around and exploring everything. It was just a fun game to play. And I love it when the things you do matter, so I liked the mechanic of all of the side quests strengthening each faction so that they can better contribute to the endgame.
I loved it the first time I played.
It kind of sucks for replay value, though. If I've already played a game through, and especially if I've already played it several times, I don't care as much about the side quests anymore. I want to be able to just hit the high points of the plot and see how a new character reacts to things, not get bogged down saving every Dick and Harry across Thedas, y'know? I've already said for years that RPG's should have a pure story mode, or an "I've already played this 10 times can I just pick different options and see what changes after that?" mode. So not being able to skip sidequests without consequences in the endgame is, like, the opposite of what I want on replay. It's not as bad as having to scan planets in Mass Effect because at least there's stuff going on, but it's not great either.
And it's not helped by the general lack of romance content. One of my main reasons for replaying is to do the different romances, and Veilguard just barely has anything going on there. I romanced Neve first and we got one INTERRUPTED kiss and then a single, very short post-game scene and that was it. I later learned that I missed the main romance scene by *checks notes* trusting my girlfriend with an important job. Afterwards I looked up a Youtube video of her entire romance. It was 16 minutes long. 16 minutes, including EVERY flirt option tucked into a normal conversation. Now I'm doing Lucanis' and SUPPOSEDLY I'm locked into a romance, but honestly, the way that conversation went, I would not have known that if a little popup hadn't straight-up told me. We still haven't even kissed. And I want to keep going and see how it turns out, I really do, but the thought of slogging through all the side quests before I can get anywhere really kills that desire. (Yes I'm aware I could look up a video for him too, but I want to see him with MY character, y'know?)
7 notes
·
View notes
Text

Effective Video Popup Generator by Social Proof Booster!
Video Popup Generator is a simple script that generates popup video ads with pre-made template designs.
You can use it to advertise any product, service, or idea. For example:
Advertising your business in a unique way.
Promoting your products
Promoting your latest blog post
Advertising your latest videos
Advertising your new website design
Visit Social Proof Booster and take advantage of Video Popup Generator now!
#Social Proof Booster#social proof booster#html video embed code creator#online youtube embed code generator#video embed code generator#website widget popups#html widgets for websites#video popup generator#htmlwidgetsforwebsites#popup generator online#youtube embed code generator
0 notes
Text
4/6/24 Demo Update
Hey guys, got that demo update I promised. It's up on itch.io right now and will be updated on Steam tomorrow.
Some major changes to note:
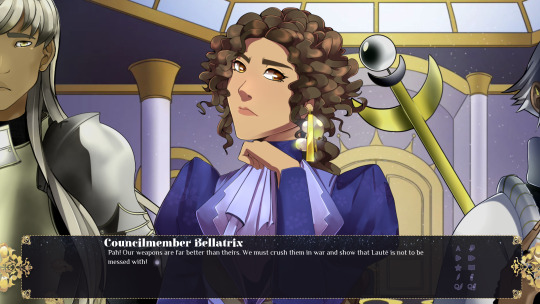
Bellatrix's sprite has been changed to better reflect their voice actor's appearance, per the VA's request.
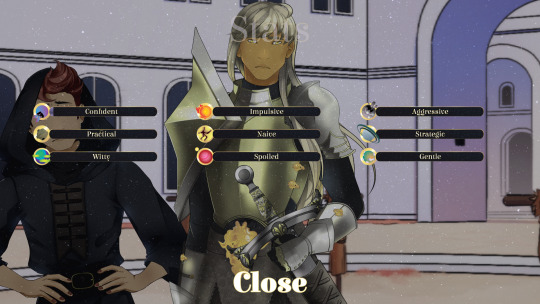
The stat screen can no longer be viewed while clicking through and reading. I saw a lot of confusion in testing over how to close it during choices, so I've added a 'close' button to head that off.
All skin tones have been added and reflected in the CGs.

Please report any bugs to the Celestial Crowns discord.
Here is the full changelog:
Added additional voice "barks" for Lune, Terra, Sahi, Celeste, and Aalam
added 15 new SFX
added existing SFX in places where it made sense to
added additional art assets to ballroom scene
added camera animations throughout first 3 chapters
created chapter cards for first 3 chapters
implemented new skin tones
added voice lines where needed
fixed bug where camera was not working properly when skipping
updated textbox
updated popup for increased stats
updated save/load screen bg
updated preferences screen bg
added additional text effects in some places
added new theme song
added new sad song
added new romance song
changed music on character select screen
adjusted button size for title buttons to ensure the hitbox was working properly
adjusted text size of save file names so they fit under the screenshots
adjusted Terra's history screen picture to be generic to accommodate all skin tones
changed some text for clarity (no trade at all if marriage goes through, the only benefit is they must protect each other when wars happen)
changed main menu
changed character customization music
There is also a new trailer. Give it a watch, it has some new CG teasers ^^ Any feedback/constructive criticism would be greatly appreciated, video editing isn't my strong suit.
New BGs
Our BG artist is on fire! We now have a first look at the inside of Andromeda castle.
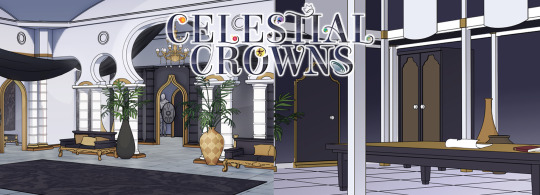
I still haven't had time to sit down and start writing the third draft in earnest as some life stuff tripped me up, but with any luck by next week I will be ready for that. Hope you enjoy this update in the meantime ^^
#visual novel#celestial crowns#vndev#english otome#celestialcrownsvn#game development#english visual novel#character customization
26 notes
·
View notes
Text
I found it interesting/annoying/funny that... with YouTube's adblocker popups, one of the points they want to try to make, to convince you to remove/disable your ad blocker, is that creators on YouTube make a living on the ad revenue from their hamfisted ad breaks with the videos you're watching. To an extent, this is true, though it's not the sole source. They can't make their living on ad revenue alone. It's also just general viewership, sponsors and additional outside sources that help a creator be successful and continue making their living being a creator. Not only that! Sponsorship ad space is weaved WITHIN the video you're watching, so both the creator and their sponsor benefit directly from any traffic gained from the creator putting it into their videos. IMO, if a creator can creatively/flawlessly weave their sponsored ad into their video that makes me smile or chuckle, I'll let that ad ride instead of skipping ahead. Why not hear them out? The ads that YouTube interrupts your viewing entertainment with? Blocked. Always.
66 notes
·
View notes
Text
the 1000 ads & popups & autoplay videos & AI generated nonsense content & promoted posts & paywalls etc. are absolutely making the internet unusable & I am tired
104 notes
·
View notes
Text
Coding A Simple Firefox Extension

Hiya! Today I want to share my experience creating a simple Firefox extension. I was a bit intimidated by the idea of creating an extension, but I was determined to give it a try! Been on my 'projects to-do' list for a long time! 😅
I found that the process was actually quite straightforward, and with some guidance from a couple of YouTube videos, I was able to create a working (temporary) extension in just an hour. My hope is that this post will serve as a helpful guide for anyone who is interested in creating their own Firefox extension~!

What exactly are we making?
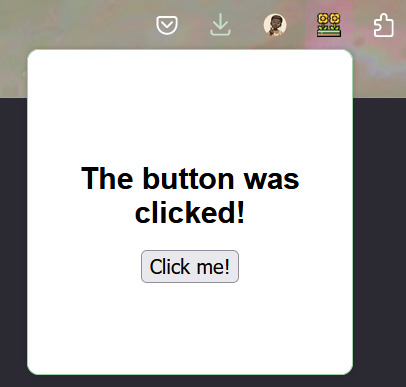
We will be making a simple temporary extension - an extension that only you have access to e.g. end-users will not be able to use the extension. This is a way to test if your extension works and find issues. I might make another post on how to actually upload it for other people to use, but for now, this method is for you to use the extension.
This is the link to the official Mozilla Firefox 'Temporary installation' Guide' for extenisions - LINK
Now, for the steps into making the extension:
Setting up the development environment
Creating a manifest file
Adding a pop-up window
Attaching JavaScript functionality to a button
Load your extension in Firefox
Let's get started~!

Step 1 - Setting up the development environment
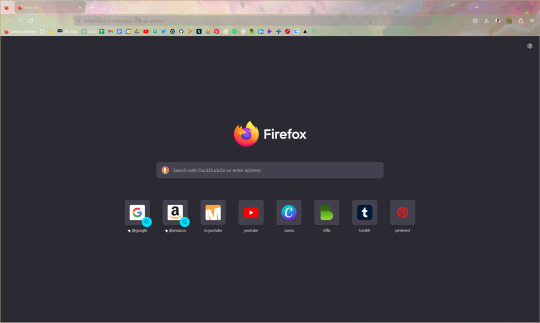
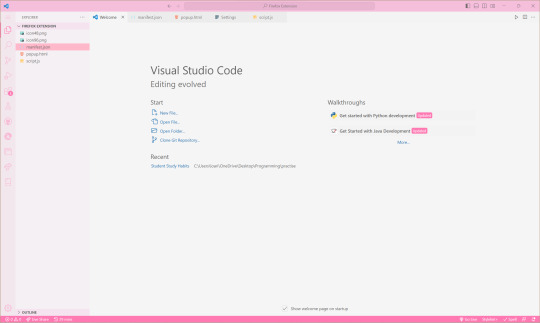
Obviously, you will need to have Firefox installed on your computer. You will also need a code editor, such as Visual Studio Code or Sublime Text, to write your code. I'm going to use VS Code.
In your code editor, create a new folder where you will store your extension files. You can name this folder whatever you like. For this example, I will call it 'Firefox Extension'. I also recommend adding the following files in the folder:
index.html (or in this case popup.html file)
icon image in .png or .jpg or similar formats
manifest.json - talked about in the next step
script.js
Step 2 - Creating a manifest file
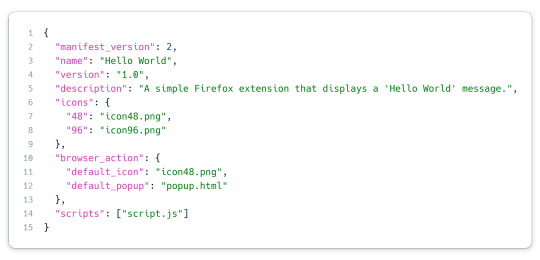
The most important file I believe when creating an extension is the manifest JSON file. This file will contain metadata about your extension, including its name, version, and permissions. In your new folder, create a new file called "manifest.json".
This is the general structure of the file. The icon size you need to have is 48x48 pixel size image and then you can have others to be responsive to screensizes, I just added one extra. The 'browser_action' part includes the default icon image that will display an icon in the Firefox toolbar and the popup html file. In 'scripts', that is where we will add the JavaScript code to run.
Step 3 - Adding a pop-up window
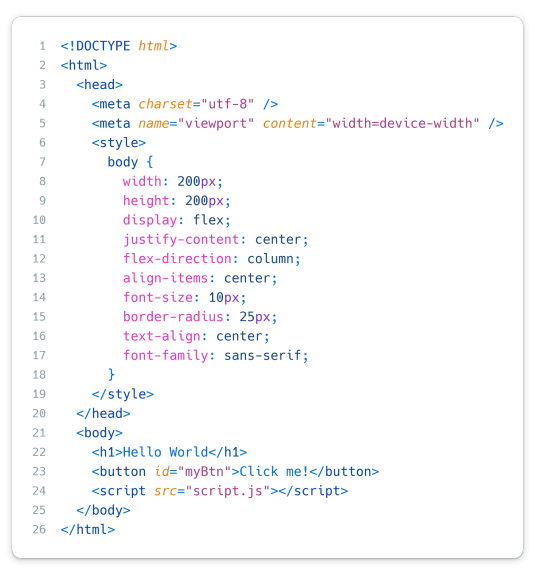
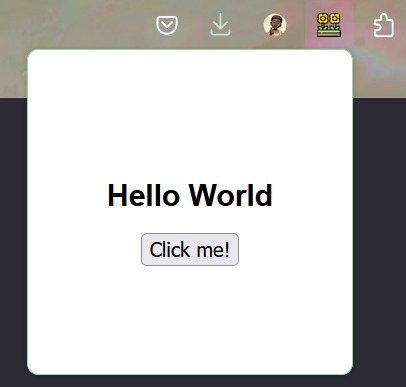
The code simply displays the text "Hello World" and a button in the center of the window. I assume you're good at your HTML and CSS so I won't go into too much detail here but the CSS is in the style tags within the head tags and what we can see also is what is between the body tags - the 'Hello World' and the 'Click me!' button.
Don't forget to include the script tag at the end of the body tag so it'll link to the script.js file in your folder AND include "scripts": ["script.js"] in the manifest.json for the javascript code.
Step 4 - Attaching JavaScript functionality to a button
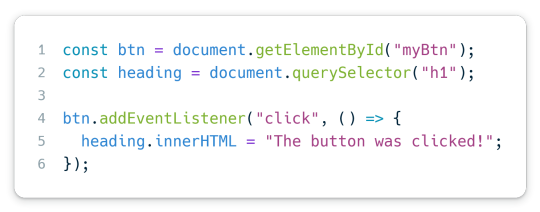
Again, I hope you very basic JavaScript. This code basically adds an event listener to the button with the ID "myBtn" (which is the button with 'Click me!' on it). When the button is clicked, it changes the heading 1 text from 'Hello World' to 'The button was clicked!'.
And that it! Done with all the coding part and now to upload it for you to use~!
Step 5 - Load your extension in Firefox
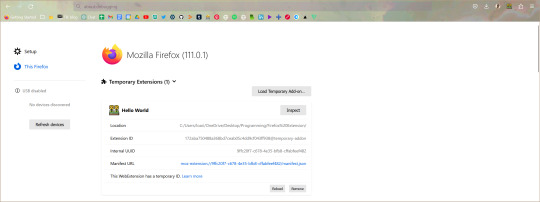
Open Firefox and type "about:debugging" in the address bar. This will open the Firefox Developer Tools page. Click the "This Firefox" section to the left of the page, then click "Load Temporary Add-on". Navigate to your extension folder and select the manifest.json file.
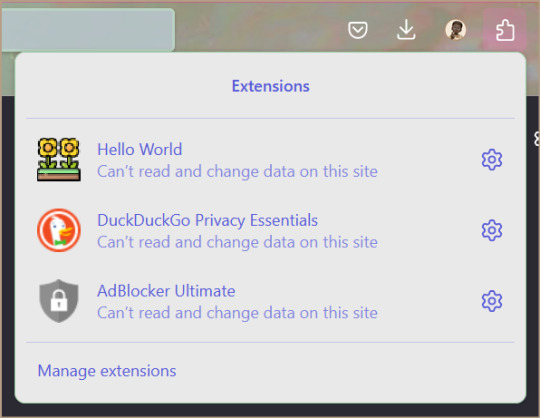
The extension is now loaded in Firefox! Click the icon in the toolbar to see your pop-up window!
Whenever you make changes to the extension, back on the Firefox Developer Tools page, click the 'Reload' button on your extension section and changes should show up!

I hope that this post has been helpful to you and that it has inspired you to create your own Firefox extension! 👩🏾💻💗 Remember, the most important thing is to have fun and experiment with different ideas - play with the colours or sizes or the javascript code! Don't be afraid to try new things and explore!!
Extra links that helped me learn:
How to build an extension for Firefox in less than 5 minutes [video]
Temporary installation in Firefox [webpage]
Thanks for reading 🥰💗
#xc: programming blog post#programming project#coding#programming#studying#studyblr#codeblr#progblr#firefox#extensions#computer science#project#tech#developer#web dev#add ons#comp sci#html5 tutorial#tutorial#learn how to code#my resources
169 notes
·
View notes
Text
The tiktok Ban and what being on the FYP was like before we got shut down (and rebooted)--
None of us knew what the SCOTUS decision was going to be. There was this tension of "should I say goodbye?? Is this really it??"
We had the tiktok end credits song and the general feeling that we were losing something important.
A loss of community, a loss of information, a loss of rights. Everyone kept crying because we knew this valuable tool of connection was going to be taken down.
The FYP was filled with old 2020 anime trends, people remaking their most popular videos or nostalgic stuff. Lots of people who swapped to RedNote (xiaohongshu) talking about their cross cultural experiences.
Lots of videos using Porter's Goodbye To a World (since it's literally about an online world ending).
Bad Bunny's DtMF was everywhere, reminding people to take more photos and value the moments we have together.
We also had people doing face reveals, thank you's, revealing family secrets or stories they had never told anyone. And apparently people posting hole???????
When we finally got the ruling and knew we'd get shut down, the dread was imminent. We didn't even have until midnight-- the servers went down 10:30pm EST on January 18th 2025. Videos slowly cycled out of the fyp until it was blank.

then, we got a popup message:
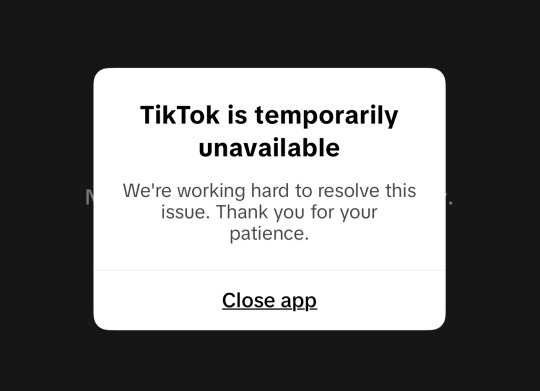
the message kept changing over the night, indicating this was all a political move of propaganda for the upcoming inauguration:
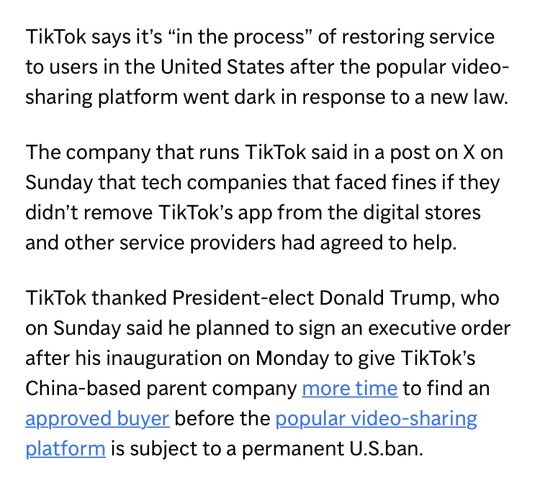
not even 12 hours later, we learned bytedance was ignoring the ban, accepting the penalty fees, and restoring the servers. Even though we were "banned" we suddenly were back online around 12:30/1:00pm EST Jan 19, 2025.


and then we got the final popup:
All the tears over losing a community and the goodbyes. All was just emotional manipulation for a propaganda stunt. Everyone had this foreboding sick feeling.
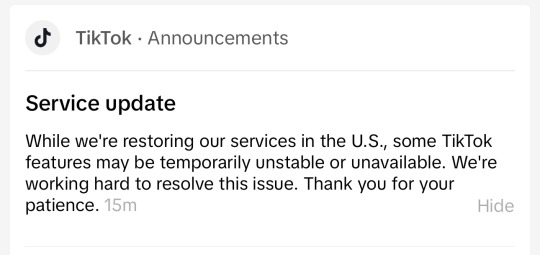
And suddenly everything was now being censored. In the time offline, new protocols had likely been introduced.
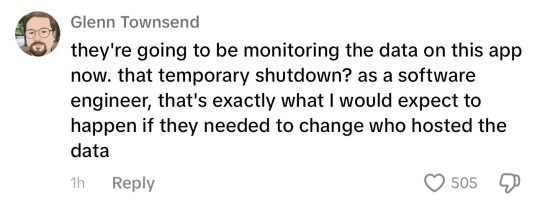
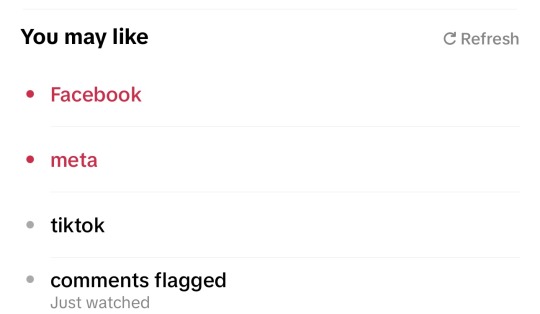
People were now told to "fact check" or getting posts put into review for 12 hours. suddenly fb and ig and meta were advertising and being pushed on the platform


at that point, the app was dead to me, so I decided to delete--
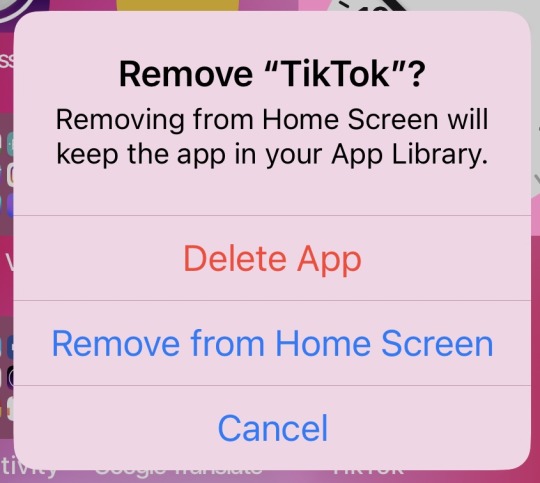
I can't get the app back atm because it's gone off the app store, so I'm focusing on archiving all the videos I was able to save :)
5 notes
·
View notes