#vapourscript tutorial
Explore tagged Tumblr posts
Text

Hi ^^
It’s me, the creator of some gifs you like and the creator of many gifs you could’ve probably lived without. A few people have asked me for a giffing tutorial recently so I have made one documenting my normal process! I’m going to gif this Aespa stage in this tutorial because I am still pretty bad at coloring stages. So come struggle along with me 🫶!
Step 1. Getting Sources & Vapoursynth
The worst enemy of the tumblr gifmaker is tumblr itself. You will spend your time making the clearest gif imagineable only for the blue site to reduce it to pixels. But alas, we must gif on. The best way to get good results is have a good source and to precompress your gif with vapoursynth.
As far as downloading from Youtube the best app to use is 4k Video Downloader. 4kVD let's you get download your file as a .mkv which is how youtube stores their 4k quality vids. Only limitation is on the free tier you get only 10 downloads. There are other more technically dubious methods to get 4kvids but I've literally never hit this limit.
10 out of 10 gifmakers agree if you want those good good crystal clear gifs you gotta stick with 4k or 1080p sources. Although if you are a complete sicko like me you can gif 720p and still get pretty good (not great) results.
So now you got your source video but you won't actually be able to open that bad boy up in PS yet. This is where the Vapoursynth step comes in. Vapoursynth will blast that footage into a nice denoised, sharpened and resized little baddie of a video clip for us.


To download VS and get a more in depth explanation of the exact steps on how to use it please reference this post. The basic steps of Vapooursynth are:
Drop your source video on the "vapourscript (drop a video file on me).bat" icon and type in the timestamps
Crop your gif to your liking (I do a lot of 540 x405 or 540x335 for horizontal gifs. 268x480 for vertical.)
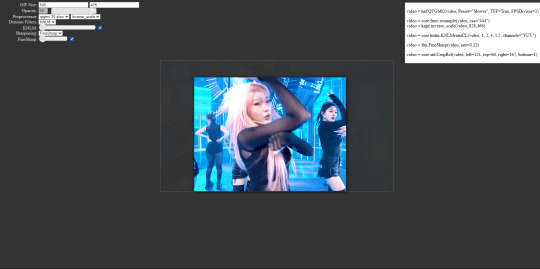
Apply the sharpness and denoise (these are the options I use):

copy the code from the white box and paste it into the script like below
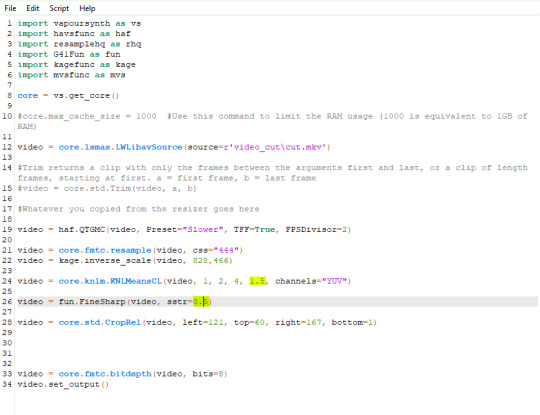
I set my denoiser to 1.5 and my sharpening to .5. (I stole this from @hyeongseo lol)
Go to Script > Encode Video. Make sure on this screen to name your file and set the header option to 'Y4M'. (Sometimes this is the step where it crashes and all your dreams are ruined because it can't convert it unfortunately. But 99% of videos are good lol)
You will find your Photoshop ready clip in gifs/output
Step 2. Photoshop
You are now good to open up your clip in Photoshop.

if we export our gif at this moment it will look like this:

Which isn't too bad. They just are pretty washed out and a lot of times at this step you'll see a lot of grain.
Sharpening (again lol) and Noise:
This might sound weird cause we just denoised lmao but stick with me.
We are going to convert our clip to a smart object. If you want to slow down or speed up your clip make sure to do so before converting.
(Often times if i have 60fps clip I put it at half speed, but if the action of the gif is really jerky or flashy at 30fps a lot of times I'll set it to 85% speed)
Convert your video to a smart object by right clicking it in the layers panel and selecting the "Convert to Smart Object" option
Create a copy of layer 1 and arrange it so it is aligned perfectly on top of the first video in the timeline. You have to drag it outside of the video group to do this. It should look like this once you are done:

On the bottom clip (layer 1), select filters -> sharpen -> smart sharpen. Apply the filter with these settings:

Then on the same clip (layer 1) apply the same smart sharpen filter with these settings

Setting up the Sharpness like this makes sure the finer details with stand out with crisp lines in the final product. (Look at how the mesh on her arms is in finer detail now)

Your video might look a little crispy at this point and that is ok cause we are going to soften that.
Now on our top video layer (layer 1 copy) select filters -> Blur -> Gaussian Blur. Use this setting:

Finally apply filters-> Noise -> Add Noise to layer 1 copy with these settings

"Vacancy what the hell? It looks like shit now."
Yeah... But now we'll put layer 1 copy at 25% opacity and it will look less like the shit that it does look like right now I prommy. Here is the current output:

The idea behind all this blurring and adding noise is that it will help create smoother transitions between the colors of the gif and reduce large blotchy bands of pixels that can sometimes show up
PLEASE!!! Save your current step as a PSD file. You can skip having to apply all those filters and just drag the filter groups on to the layers after the smart object conversion step.
Step 3. Coloring
Now to the fun part! There is a lot of trial and error in this step since we only have 256 colors to play with.
Typically my goals for this step are:
Raise the black point (Make Giselle's outfit in this gif black so more color can be used on her hair, skin and the background.)
Reduce the overall contrast of the gif. (Darken the lightest lights if possible)
Saturate the colors enough so they stand out but not so much that everything looks gross.
Depending on how we do these steps we may need to subtract frames from the gif. (Which I hope not cause there is exactly 69 frames in the current version lol)
Here is an example of what my coloring difference can look like:


In this case the colored gif is actually smaller because I elminated a lot of the dark greys in the background.
Vacancy's Dumbass Original Recipe thing
This is probably the only thing different that I do from most creators
My first adjustment layer is usually a gradient map. The green and red one to be more specific.

I then change the blend mode to luminosity and set the opacity somewhere between 12 and 20% (Usually 15%).
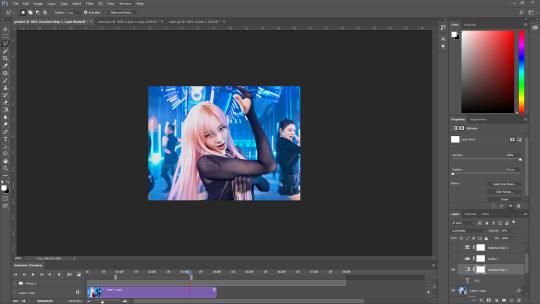
This step brings all our shades closer together so we have more freedom with coloring later. Also when idols are very white wash this seems to bring out the shadows and skin tone better in later steps as well. If you overdo it though the person in the gif can wind up looking very orange or yellow so less is sometimes more here.
There's also probably a better way to achieve this but you know... oh well
My Other adjusment layers usually consist of:
Levels: With the gradient map applied you can darken the blackpoint of your gif pretty significantly.
Selective Color: This is the most useful adjustment layer. Make sure to expirement with adding to the black slider on the blacks and neutrals color options. Often times kpop vids are over exposed and darkening this can bring out a lot of unseen color.
Hue/Saturation: I use this layer to darken the blues of the background with the lightness slider as well. You can adjust individual colors with this layer and with selective color and that is a very powerful tool for coloring.
Start:

Finish:

Because I darkened the gif so much I was able to add around 6 frames!
Though I’m not 100% satisfied with this gif, this would be my process from the start. You can put those adjustment layers all in a group and save it to the psd as well to skip all the steps to apply them. I used all the same adjustment layers for the header gif of this post as well which saved me a lot of time ^^!
Since every video is different you usually have to play around with the sliders a lot between clips.
Step 4. It Flops…
Jk jk but it does happen a lot tho on this site so don’t get discouraged ☺️
Parting Notes
If you want a really nicely colored fancam to practice on I would see if MIRAI on YouTube has a fancam of your fave idol. Their videos are really nicely color balanced from the start where stages like this tend to be very bright.
I’ll probably make a follow up post with more coloring tips and my thought processes while making gifs but this is the very basics to making hq gifs hope you learned a lot.
You can always hit my dms or inbox with questions if you have them ^^!
#hope this helps#tagging a few people#tuserflora#userdoyeons#forparker#useranusia#rhitag#usercherry#<- these are all creators I try to learn from#flashing tw#flashing cw#tutorials
89 notes
·
View notes
Text
♡ basic gif tutorial!

hiiiii!!! i've made a tutorial in the past but i thought i might update it with this tutorial (re an ask i got a few days ago)! please keep in mind that i'm far from an expert when it comes to giffing but i am open to clarification and further questions <33
DISCLAIMER! there are so many ways to make gifs! everyone has a different process, so don’t be afraid to deviate from this! also! feel free to send an ask for further clarification :)
1: converting !
one of the major issues when it comes to ensuring the best quality for your gifs is making sure that you’re using an application that maintains at least a 1080p quality of the video you use. it’s not a good idea to gif anything below 720p as the quality of the video and consequently, your gifs are not going to be the best!
i) choosing a video
if you’re going to gif, i’d recommend choosing videos that are hq!
✰ Stage Gifs
for stage gifs i use .ts files! it’s definitely easier to source a performance video from youtube, but they won’t provide you with the quality you desire. if anything, use youtube as a source for stage gifs as a last resort!
for ts files, you can use:
-> rosebay
-> twitter (search [group name] + [date of performance] + [ts])
i personally use rosebay for my seventeen performance gifs but other groups do have sites/blogs that are specific to them.
psa: kpop24hours are currently not taking in any applicants atm! best advice would be to follow them on twt and keep their notifs on in case they do
these sources (at least, rosebay) are easy and pretty self explanatory to download!
✰ Normal Gifs
for normal gifs (i.e. of interviews, behind the scenes, going seventeen, etc.) i use youtube <3 keep in mind that it’s always best to use the source most reputable to ensure quality. for example, if i were to gif an inside seventeen video, i would use the seventeen official channel’s post of that, not reposts or anything like that!
to download youtube videos, i use:
-> 4K Video Downloader!
ii) how do you download youtube videos via this application?
all you have to do is:
1) copy the link to the youtube video (PSA this application only works for converting youtube videos)
2) press the green plus button on the very lefthand corner at the top
3) a window that lists the options for the video quality you want will then come up.
4) if it offers 1080p, it is almost always best to choose that for optimum quality!
5) the video will then download and you’ll be able to access it via a folder labeled 4K Video Downloader in your files app.
2. resizing and sharpening !
personally, i don’t sharpen in ps unless absolutely necessary. for most of my sharpening, i leave it to vapoursynth.
now, vapoursynth is a massive pain to download and use but it’s worth it in the end (i promise!! i’ve cried over it a lot but i probably wouldn’t be happy with posting my gifs without it)
i personally found it a bit complicated to download vs so i’ll refer you to a tutorial i used (i also got help from some of my moots bc idk how to do anything so dw if it’s confusing :sob:)
i) how to use vapoursynth now that you’ve gotten it downloaded?
this is probably the hardest part of the tutorial (at least, in my opinion) :sob: for this example, i’ll be using my 4K Video Download instead of a vlive, so if you were using a vlive, you’d have your downloads folder open instead of the 4K Video one.
1) open your files folder twice, make sure that there are two windows open - one being the vapoursynth folder (for me, it’s called VapourSynth64Portable (200722) but it depends on which version of vs you download) and another being the 4K Video Downloader folder.
2) notice the different applications (?) within the vapoursynth folder. in particular, the vapourscript (drop video file on me) one. drag the video you want to gif from the 4K Video Downloader folder onto that app, and it’ll open up a new window. this window is the timestamp window.
3) in this new window, type in the length of the video you want to gif. i personally do this bit by bit (as in, i timestamp each gif instead of letting vapoursynth run through the whole video, which, in retrospect is probably smarter but i am a Fool). for example in the video i’m giffing, i want one of my gifs to run from 0:56-0:58 of the video. so i input the start timestamp. in my case, this would be 00:00:56. and then i press enter. this would direct me to put in the duration of the video i want to encode, which, in my case, would be 2 seconds (00:00:02).

4) press enter again! it’ll open up a window on whichever internet server you use (for me, this is chrome) with a bunch of options:

5) next, you want to alter all the options so that it becomes a gif of the size and sharpening you want.
psa: all of the things below are advised options! it’s completely up to you to choose what settings you use. don’t be afraid to experiment!
ii) resizing
-> to resize, you want to use the GIF Size option. keep in mind the acceptable sizes of gifs on tumblr! if you gif something of an incorrect size, tumblr will probably destroy the quality even more than it already does and make it incredibly blurry, and you don’t want that! to prevent this, make sure to refer to this helpful guide on gif sizes for ones you could use!
for this gif, i’ll be using a 540 x 450 size.
make sure to move your gif around so that everything you want people to see in the gif is there. you can even drag the gif out to zoom in, etc.
6) input the size you desire in the width x height sections next to the GIF Size option.
iii) preprocessing
-> this indicates how fast or slow vs will make your gif. for normal videos, i use qtgmc 30 slow and debilinear. however, i’ve seen in other tutorials that it should be different for performance gifs (i.e. qtgmc 60 slow and debilinear). however, this is all up to you and your preference! experiment, and see what works for you!!
for this gif, i’ll be using qtgmc 30 slow and debliniear.
7) select the speed and debiliniear options next to the processing title.
iv) denoise filters
-> this option basically acts to smoothen your gifs!i tend to use KNLM and have actually never used BM3D before, but feel free to choose the latter!
8) choose between KNLM and BM3D (next to the denoise heading), and select the tickbox that comes up underneath it.
v) sharpening
-> this is when you sharpen your gifs! and make them look less grainy than if you were using ps directly. i personally use finesharp, but again it’s up to you!
9) choose between finesharp and VCFreq, and check the tickbox that comes up underneath it.
this is what my settings are like for this gif:

10) next! you need to alter the values for sharpening and denoise! this can be done on the coded box in the upper right-hand corner:

11) first, change the denoise filter value to whichever one you wish. for this gif, i will be using 1.8. this can be done by altering the “1.2” value in the row that has the text “video = core.knlm.KNLMeansCL(video, 0, 6, 4, 1.2, channels = "YUV”)
12) next change the sharpening value to whatever you want! for this gif, i will be using 0.33. this can be done by altering the “0.22” value in the row that has the text “video = fun.FineSharp(video, sstr=0.22).
the text box should now look like this with your altered values:
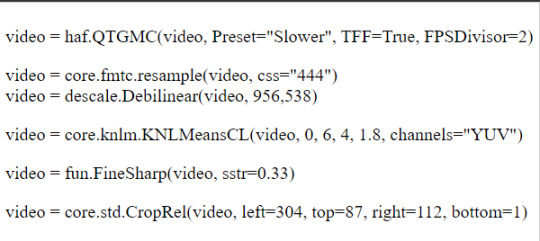
13) copy the text and you’ll notice that this window has opened on your taskbar. you will need to copy the text from here into this app - vapoursynth editor.
14) paste the text from that upper right-hand corner into the vapoursynth editor underneath the text #whatever you copied from the resizer goes here.
15) before continuing, depending on your laptop’s speed and ability to process things, i’d recommend lowering the RAM usage to something more bearable for your laptop to process without it overheating and getting damaged. i personally use 300 as the RAM usage but feel free to use whatever you want.
this is what your editor should look like now!

16) press f8 and it’ll open a new window. this will be where you get your edited video that will be good to put in ps and play around with. change the preset option to Export to MOV. and next to the header title, make sure to select Y4M in the dropdown menu. after this, you should be good to press start!
3. giffing !
now this is the part of the tutorial where you kind of get to do your own thing
i) importing
1) open photoshop and click on file, then import, and video frames to layers. it’ll open up your files.
2) what you want to do next is find the output folder. this folder can be found within your vapoursynth folder. that is:
vapoursynth64portable >> gifs >> output
3) click on the output folder and it’ll come up with another window:
make sure your settings are like this before clicking ok!
ii) actual gif making!
4) once you’ve clicked ok, it’ll direct you to the workspace. you will have the frames for your gif on the bottom and the layers on the right-hand side. i won’t go into the specifics for giffing since you asked for quality but if you’re looking for more specific instructions on how to actually gif, feel free to send in another ask or i can refer you to another tutorial!
i) timing
you can alter the timing by selecting all the frames and making it faster or slower - it depends on your preference!
ii) colouring
colouring is the foundation of your gif - it’s what makes it look good!! have fun with it, and try out different colouring! you could also look into using psds if you want! psds are basically pre-made colouring (filters, essentially) that you put over the top of your gif
5) once you’ve finished with the aesthetic steps of making your gif, it’s time to export! to export, you must click file >> export >> save for web (legacy). it’s up to you which export settings you use but make sure that your gif is under 10MB!
6) and voila <3 you’ve got a gif!

#not sure who wants this but this is re an ask i got a couple of days ago!#aria.gifs#aria.txt#userngocchi#tuserrose#hanatonin#isaishi#gif tutorials#tutorial
154 notes
·
View notes
Text
gif making guide — by mars
it's finally here, my own personal gif making method exposed and explained! in this guide i cover how to install and use vapourscript, as well as how to use photoshop for sharpening, colouring, sparkling, and exporting your final gif!

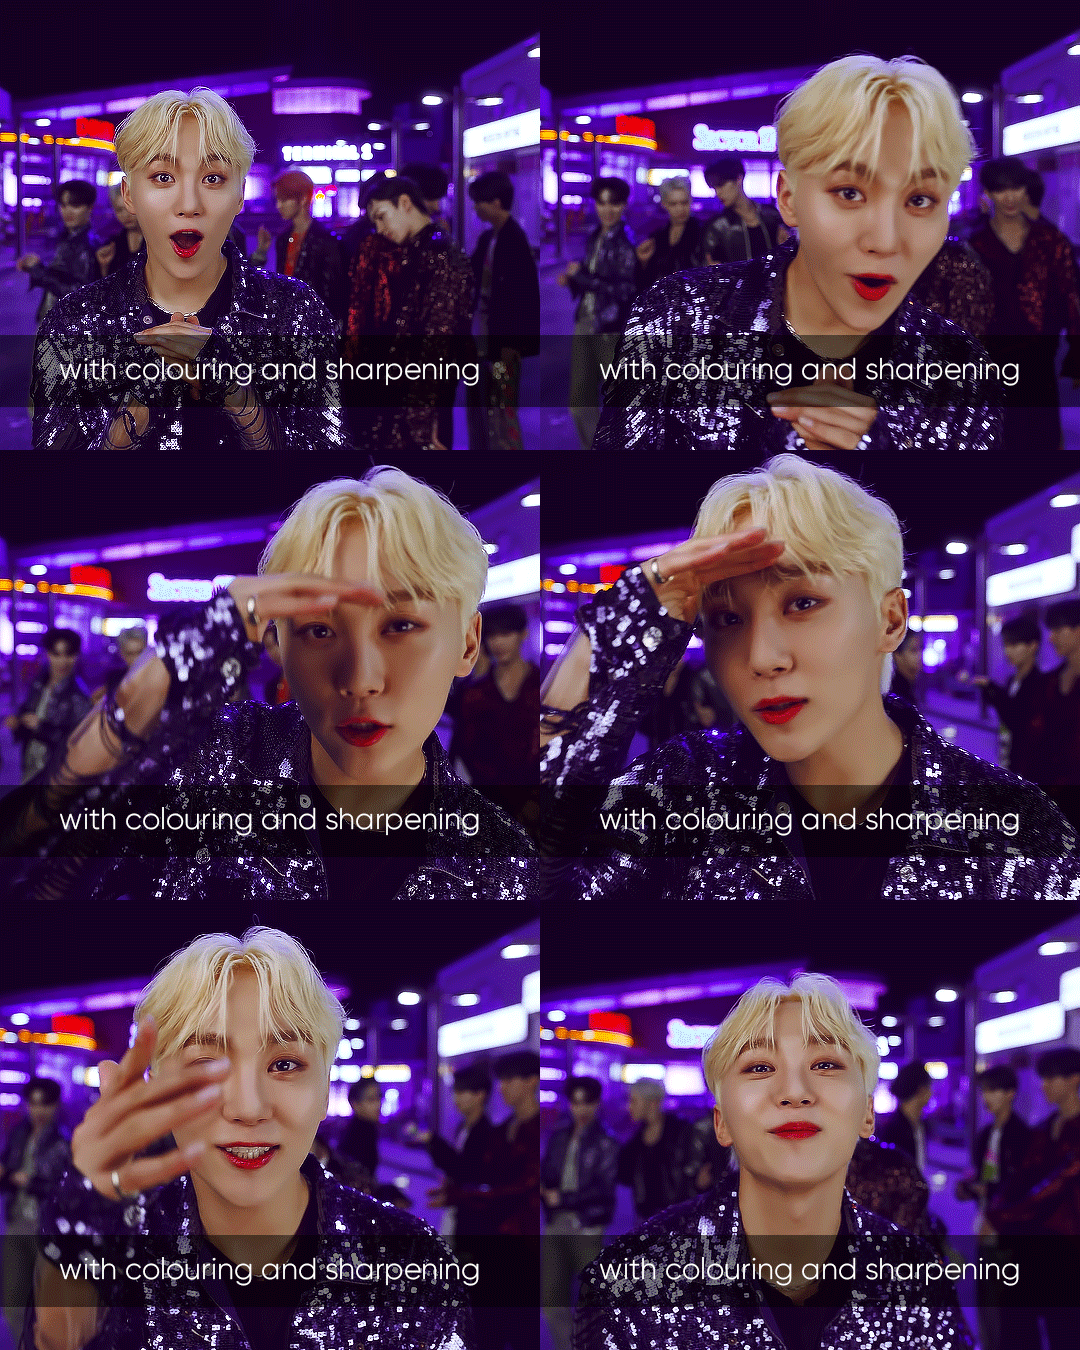

please let me know if you have any questions! i tried my best to be as detailed as possible so this got very lengthy but it's possible i missed some things.
#photoshop tutorial#gif tutorial#vapourscript tutorial#gif making guide#sparkle tutorial#studiocarat#idk what to tag this with lol#anyway i hope this is useful#gifref
110 notes
·
View notes
Note
hi cotton 🌸 would it be possible to know how you managed to make your header for the mobile version? it looks so good quality it's amazing!

A very messy guide for my mobile header, presented by yours truly. This tutorial has very few visual aids this time around, apart from one video reference. this is because i didn't want to show my computer during the vapoursynth process :((( for this tutorial, you will need to know how to work with blending modes, timeline, clipping masks, and smart objects in ps.

✩ ― programmes ⨾
4K Video Downloader ( HERE )
Photoshop CS6
Vapoursynth 64 PORTABLE 200722 ( HERE )

✩ ― setting up ⨾
First we’re going to load up our programmes. For Vapoursynth I will usually open up two File Explorers, one with my 4K Video Downloader folder and the other with my Vapoursynth folder.
I’m unsure how well this tutorial will translate into Photopea.

✩ ― downloading videos ⨾
Once we’ve got everything open we’re going to find the video we want to edit on Youtube and copy the link into the 4K Video Downloader. In this tutorial we’ll be using Vernon’s Black Eye M/V.
Heads up, for my Video Downloader I have smart mode enabled as it saves me an extra unnecessary step of choosing the settings. You may want to enable this option, too.
Mine is set on Any Video & Best Quality.
When the video has downloaded you’ll find it in File Explorer through videos & a folder named 4K Video Downloader.
To ensure our gif comes out with the best quality possible please make sure you’re using a video from Youtube with at LEAST 1080p. If 4K is available that’s great.

✩ ― vapoursynth note ⨾
Now, this is where Vapoursynth comes in. It’s not technically necessary for this tutorial, you could very much do it without Vapoursynth if you just cut your clips in like …. The editor that comes with Windows, but this is just how I do it because I like the resizer as opposed to the resizer tool in Photoshop.
Vapoursynth may look intimidating, but it’s really not. All you’re doing is copying your code in and letting it encode.
Be cautious on lower-end computers, though, as the fan will make quite a bit of noise for a few seconds to a minute, depending on how many frames you’re extracting.
As this is hefty on your computer for a minute, maybe don’t have a lot of tabs open.
We’ll get to this step later on, though.

✩ ― vapoursynth ⨾
Right now we’re just going to open our two File Explorer folders - Vapoursynth & 4K Video Downloader. On the Vapoursynth folder scroll down to the very bottom.
From 4K Video Downloader, we’re going to locate the M/V we just downloaded and drag + drop it onto “Vapourscript (drop video file on me”.
From there a small black box will appear. This is where you will input the timing of whatever you want to clip.
It’s best to have your M/V open so you can refer to the time - for me, I wanted to gif the part where Vernon is rubbing his ear and yelling at the camera.
The timing for that was 2:29, but in Vapoursynth we’re going to write it a little differently. Please note that I ALWAYS add an extra second at the beginning and the end, to capture all frames possible.
so, instead of my clip starting at 2:29 it’ll start at 2:28.
Vapoursynth’s format follows an hours, minutes, seconds format.
00:00:00.
For a clip that begins at 2:28 on Youtube, we’re going to type it in like this:
00:02:28
Hours, minutes, seconds.
When you’ve input the start time, hit enter. Another line will appear, seemingly asking you to do the same thing - this time we’re going to input the duration of our clip. How many seconds does the clip we want to gif last? Again, I always add an extra second at the end.
Vernon stops yelling at the camera at 2:31 on Youtube. This, from 2:28, is a difference of 3 seconds. Add an extra second, and that’s 4 seconds.
We’re going to type in,
00:00:04
And press enter.
Allow the box to do its thing and soon a new tab should open up in your browser. Along with it, Vapoursynth will open up as a programme.

✩ ― setting up vapoursynth + warning ⨾
If you’ve just downloaded Vapoursynth and yours is BLANK, press File -> open script -> script.vpy and that should be it all ready to go.
If you have any issues then let me know through ask.
The most important step is to REMOVE the “#” from line 9 beginning with “core.max_cache_size (etc.)” because if you don’t then Vapoursynth will take a HORRENDOUS amount of time encoding. You need to do this every time you open Vapoursynth.
It may also freeze your entire computer for several minutes for a few frames if you don't. It doesn’t break your computer but boy is it a pain in the ass.
Don’t ever forget to take that pesky “#” out in line 9.
Back to the resizer.

✩ ― vapoursynth resizer ⨾
On the left side you’ll see two boxes beside the word “Gif Size” - the sizing I used for my gif, and I believe is the general sizing for mobile headers, is 640x360.
You may notice that the canvas has been resized but your gif hasn’t moved - if you hover on the bottom right edge of your gif your cursor will change. Click on that edge. You can push, pull, drag your gif around.
By clicking it and dragging outward ever so slightly the gif will snap to the size of the canvas.
I usually just leave mine like that.
We’re going to turn our attention to “Preprocessor” and change it to qtgmc 30 fast. Once that’s done we copy the code on the right side.
With your code copied, open that Vapoursynth window sitting in your taskbar. On line 16, where it says, “Whatever you copied from the resizer goes here,” we’ll highlight it and paste our code from the resizer over it.
From there, Script -> Encode video -> change “Export to Gif” to “Export to MOV” and press start.
You might be wondering, we’ll … we’re making a gif so why are we exporting to mov? Answer is, I don’t know. My computer just refuses to export to gif for some odd reason. But I know that it works for some people, if Export to MOV doesn’t work.
When it’s done, keep Vapoursynth open and keep it on the backburner because we’ll need to redo this * vaguely gestures * entire process again from the two folders step for another clip later. Sounds like a pain in the ass, just two minutes in reality.
The entire process summed up is drag, drop, input time & duration, resize it, copy code, paste it into encoder, delete the “#” on line 9, and actually encode it. That’s it. It takes me two minutes.

✩ ― photoshop ⨾
In Photoshop, we’re now going to File -> Import -> Video frames to layers. Navigate through the Vapoursynth folder to Gifs & click on the mov file named “Output”.
Photoshop will open up a little window! It’s not really important what you do here, but you can select where your gif starts and ends. I prefer to do it in photoshop for a more accurate cut, but I do sometimes use it if there’s an annoying amount of frames before the clip i want to edit.
Then it’ll open in Photoshop. We’re going to convert the gif to timeline, select all of our layers with shift+click, right click and select “convert to smart object”.

✩ ― sharpening ⨾
Now, my sharpening settings are available in this post HERE in action form. This is what I used on my header and it’s what I’ll use now.
To use an Action, make sure it’s got a tick next to it on “Window -> Action”.
On the right side of your screen, maybe next to the color wheel / gradient, it’ll look like a play button.
Click on it, navigate to “SHARPEN - tinytowns”, open the little folder up and click on “sharpen your giffies :]” and press the play button which is at the bottom of that window, next to a folder and a circle.
If anything pops up just select Okay.

✩ ― re - do the process ⨾
Now, our first part is done. We’re going to re-do the Vapoursynth process for another clip that we’ll overlay. For me I chose the timestamp 2:47.
Once you’ve imported that clip into Photoshop using the Vapoursynth process, we’re again going to sharpen the new clip with the action.

✩ ― blending ⨾
Now, drag the smart object layer you want to overlay onto the clip we worked with first. Move it around a little and find a place you think fits well. Somewhere with empty space usually works best.
We’re going to fiddle with the blending setting on the overlay layer. It can be found in the layers tab and will at first be titled “Normal”, but if we click on it we can scroll through a few different options. I can’t remember what specifically I used, but re-making it I’m noting that “Lighting” or “Screen” work best for me.
Once you’ve settled on your blending, we’re going to apply a mask to the overlay gif. To do this look at the bottom of the layers window and you should see a rectangle with a circle in it - next to “fx” and a circle with half-color. Click on the rectangle with the circle in it and a white box will appear next to your gif in the layers.
Make sure you’re clicked on to the white rectangle. If you’re not Photoshop may stop you with a pop-up asking if you want to rasterize the layer - don’t. That will make your gif stop working. Always work on the white rectangle.
With a very soft eraser brush set on 0 hardness and maybe an opacity of 30%, we’re going to begin gently rubbing at the sides of our gif to blend it in better with the base gif.
Once you’re happy with the eraser blending we’ll color our gif.

✩ ― coloring ⨾
For a more vibrant and consistent color I’m adding a Black & White layer on top of my overlay gif and right clicking on the B&W layer and selecting “create clipping mask”.
Then, I’m making a new layer and also making a clipping mask for it. With my selected colour, I’m literally just coloring in the new layer. Then we’ll mess around with the blending again - for me, this time “Overlay”, “Soft Light,” or “Color” work best. Go with whatever pleases your eye more - for me, I’m going with Soft Light.
As for our base gif coloring, I use a combination of curves, levels, and selective color to achieve something I’m happy with. I’d recommend putting those layers under your overlay layer so that they only apply to your base gif.
I won’t get too much into coloring because I’m not actually very good at it.

✩ ― back to frames ⨾
But when you’re done, make sure your blue tab in the timeline is dragged all the way to the beginning - not sure what it’s called.
Then select all of your Layers with shift+click and select convert frames -> flatten frames into clips & reselect all of ur layers !!
then convert frames -> make frames from clip -> convert into frame animation.
You can actually see this exact process on another tutorial i did linked HERE & starting at 01:28
Set the speed of the frames to 0.5
Export that sucker as shown in the video linked above and apply it to your header. If you have any questions or concerns please send me an ask !
#i speak!#answered.#anon.#thank u for the question..#very flattered..#this tutorial is probably not very helpful#lmk if you need help thru ask !!#* further help#m: help
55 notes
·
View notes
Note
I tried to download the Vapoursynth that is in the tutorial you indicated, I think I'm very stupid because even following a YouTube tutorial on how to download and install it, I couldn't open it on my computer, ugh, could you help me by telling me how did you get this program on your computer? pls if it's not bothersome for you
don't worry i struggled with this too, so i'll gladly help! a lengthy vapoursynth tutorial under the cut 👇🏻
here's a link to download it (pick the one that is named VapourSynth64Portable(200722).zip) and unzip the file when it's finished downloading. the folder should look like this inside:

now to make the giffing process easier, make a shortcut of these two files and place them on your desktop:

then select your video that you want to use and DRAG it on the vapourscript like this:

this opens up a command prompt that first asks you where to START your timestamp on your video. type it and hit enter, then it asks you the DURATION of the clip you want to gif. here's an example:

hit enter and it will open up the resizer on your default browser (i use chrome) and it will also open the vapoursynth editor on your pc. go to the resizer and you can now drag the video so it fits into the image and then choose the settings in the upper left corner. these are my settings:

copy these settings on the upper right corner:

now go to the vapoursynth editor and choose file > open script and choose the gif folder you made a shortcut of earlier, and select "script.vpy" and click open. choose file > save script so it stays like that. it should show this:

now paste the settings you copied earlier under "#Whatever you copied from the resizer goes here", like this:

now go ahead and click script > encode video and change the preset to "Export to MOV", it should look like this in the end:

now press start and it's all ready to be finished in photoshop! if you wonder where you can open this file you just made, go to photoshop and click file > import > video frames to layers and go to your desktop > gifs folder shortcut > output > output.mv! this was a little long so i apologize LMAO but i just wanted to make sure that it was helpful and simple to follow along with the screenshots! good luck :)
5 notes
·
View notes
Note
How do you make your gifs? I really like the way you do it and would love to learn how
Hello nony! It really makes my heart warm that you like the way I gif, thank you so much! I'll make a detailed step by step of how I do things and give you the download links and other tutorials because learning it from scratch is usually a long process:
1. Vapoursynth
windows (if you have a x64 windows, I’d advise downloading the VapourSynth64Portable(200616), I just tried that one and the folders look like the tutorial video, I’m not sure about the others.)
macOS
Tutorial:

You have these two icons on your desktop. You drag the file you want to gif on top of the one on the right, the one written vapourscript. It's going to pop up a window like this:
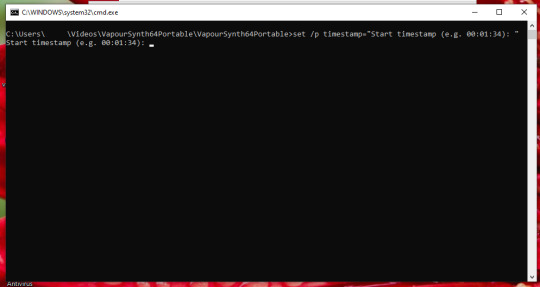
Then you write down when your footage starts, say, 00:00:07. Click enter and then you write down for how long it lasts, say, five seconds = 00:00:05. So when it starts > enter > for how long it lasts > enter. VS will do its own thing and you just have to wait until it pops out this window in your browser:

You can resize the footage however you like.
(Photoshop dimensions:
1 column set: width of 540 px
2 column set: width of 268 px
3 column set: width of 177 px)
For denoise + sharpening I use this:

Just check out both and leave it like that. I hardly ever make either setting stronger than the minimum. If it is a TS file I also check out the qtgmc 30 fast on the Preprocessor option. If it is not a TS file and just a normal video, I don't click on it.
Then you copy everything from here
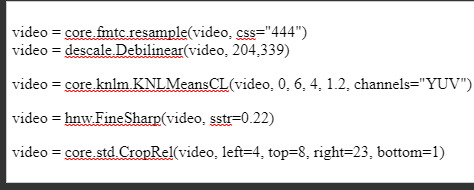
And you paste it on the other VS window that will pop out here:
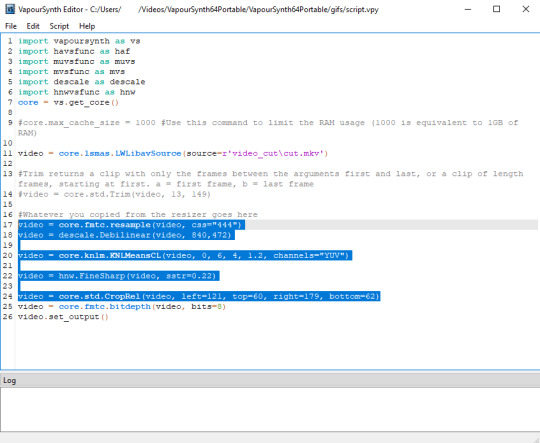
I just ignore everything else. I have no idea what the coding actually says.


Now we go to:
2. Photoshop
download here *blows a kiss for @woodzm my fave lil hacker*
download from the torrent one, you’ll need the file that already have all the parts. do not download the parts separately.
Tutorial
After you open photoshop, click ctrl + O to open a file. This is the pathway to the folder where my files from vs are (pay attention to the top in case you need to go through your folders) (vs > vs > gifs > output)
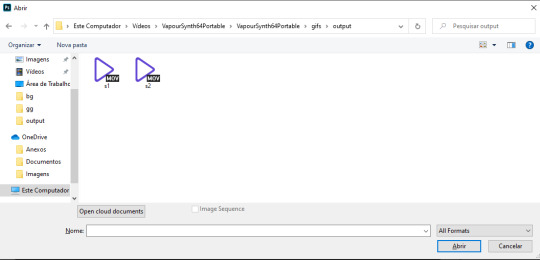
The next steps will depend on what you like / how your original footage looks like.

A) Blur > Gaussian Blur. Either 1,0 or 1,5. Set opacity to 30 - 40%
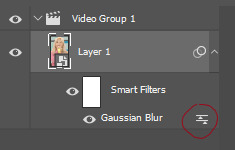
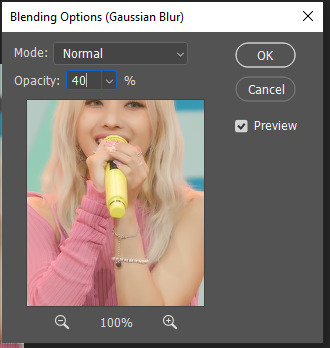
B) Sharpen > Smart sharpen.
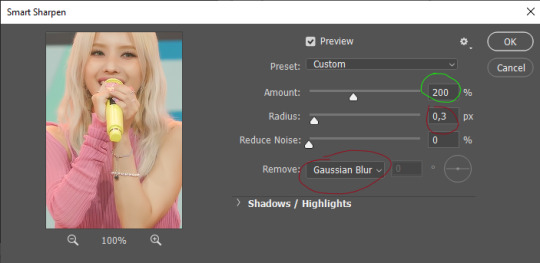
Red is fixed. Green you decide what you think looks better.
You can add A + B together or use one or the other. To know what will help requires practice, so gif a lot!
Now this is a personal preference, I can’t gif in another way:

Convert Frames > Flatten frames into Clips.

Click on those three little squares on the bottom left, and then Make Frames From Layers from the same place you clicked to Convert Frames just a step prior.
Delete the first frame and whatever else doesn’t fit the gif you’re making.

This is when I color, which is personal and it depends a lot on what I’m dealing with. If you want I can make a tutorial of tools I like later, but my advice is to find something that suits you. This is the most fun part!
Now the last touches are:
C) Select all frames and set their timing to 0,07. I always use this one, it’s neither rushed or slowed down.
Save it with ctrl + shift + alt + s (at the same time).
And you’re done! (E tá pronto o sorvetinho :D)
Now for more info:
This post by @chawoongs with everything you need to know regarding TS files and where to get them *blows a kith for my fave boy*
These two alternative tutorials, which I did not read but might just be more coherent than my own: 1 and 2
I’ve done this for a while so things are mechanic for me. If I jumped any step that is not clear to you don’t hesitate to send me a message!
#photoshop tutorial#answered#m: photoshop#anonymous#id never do smth so lenghty but flattery IS the way to my heart#i keep editing this as people point out difficulties w the links lmao
142 notes
·
View notes
Text
gifmaking tutorial
As requested, here's a tutorial on how I make my gifs. Everyone's process is a little different, and mine changes from time to time, so it'll take some experimenting to find the settings that you like best. I’ll also link this tutorial here by Em, who is way more thorough than I’ll probably be, so check that out! The tutorial will be found in the read more below (apologies if it doesn’t work on mobile - this is a screenshot heavy piece of text).
My process uses Vapoursynth and Photoshop CS5 (I’m ancient I know!!). Avisynth is also another popular option if you already have that, but it’s been a while since I’ve used it. After the frames have been loaded into Photoshop, I then sharpen and colour my gifs before exporting. Some people will also use Topaz to clean up their gifs, but unfortunately that does not work well on my laptop. I use a Windows computer, so things may look slightly different if you’re using a Mac.
STEP ONE ⤅ Downloading your video
To start off, find the highest quality possible of the video that you want to gif from. If it’s a stage, I highly recommend using ts files, which are much better quality than the versions you’ll find on Youtube. Ts files can be found on a variety of website such as 4sashi, kpop24hours (requires membership) and on Twitter. Here is an additional resource for finding ts files and downloading videos. For non-stages, 1080p will work best, though 2k and 4k are absolutely lovely and I would highly recommend those if they’re available.
STEP TWO ⤅ Run your video through Vapoursynth
You can install Vapoursynth following this tutorial. Vapousynth is essentially a program that will crop and compress your video files without losing any quality. It also has built-in sharpen and denoise functions that can take over the functions of Topaz.
To start the process, you’ll drag your video onto the vapourscript and see a pop-up from Command Prompt. It will prompt you to enter two numbers: the first is the timestamp on the video for the start time for your gif (mine was at 3 min, 27 seconds). After pressing enter, it will then prompt you to enter the duration of the moment you want to gif (mine is 3 seconds). If you’re using Avisynth, the second prompt will be the second time stop (when you want the moment to end). I find that sometimes adding an extra second will help me capture the entire moment, but it’s up to your own discretion.

Once you press enter a third time, the command prompt will run and then a pop-up will appear on your browser. You can then adjust several settings, including gif size, preprocessor, denoise filters and sharpening. There’s a lot of freedom here to choose what you’d like to do.
In terms of gif size, you can pick any height that you think looks good but the widths that are optimized on Tumblr go as follows:
1 gif per row: 540px width
2 gifs per row: 268px width (I tend to use the default 350px for height when making these)
3 gifs per row: 178px width (it’s funky here because the middle gif is 178px while the two on the side are 177px each, so you have to crop off a pixel later)

For the purposes of this tutorial, I’ll be making 178px gifs. The next option is preprocessor. This option will alter how the video renders. There are two main options - 30 or 60 - and this will refer the number of frames per second you’ll obtain. For live performance gifs, qtgmc 60 slow is generally the option I choose as it gives better quality frames (especially with a lot of movement) but you may find that qtgmc 30 slow is sufficient. For non ts files, I typically do not use any preprocessor settings.
Most of the time, I don’t use denoise or sharpening filters as I prefer to do my sharpening and denoise in Photoshop. When I do choose to use denoise and sharpening, these are the settings I use. I don’t have a particular reason, but just that I like the way the gifs look. You can experiment with the settings to see what you like, and it can also vary with the gif.

The difference between having those sharpening/denoise settings vs. doing it in Photoshop vs. no sharpening/denoise can also be seen with the three gifs below (note that I've coloured them, which we’ll get into a bit later). As you can probably tell, there’s not a HUGE difference in quality between the three because ts files tend to be already be very high quality but I would always recommend sharpening as it can make a very big difference in the quality of your gifs!

After choosing the settings you want, you’ll then paste them into the VapouSynth Editor (which should’ve automatically popped up at the same time as the browser setting adjuster). For the purposes of this tutorial, I have chosen not to sharpen and denoise. You will copy paste the code from the browser (found at the right side) into the editor. My code was 4 lines and goes in between the code from the 11th line and 22nd line (yours should as well, though the line numbers may not match up - just make sure they say the same thing!)

You’ll then want to hover on the script on the top bar and click on “Encode video”.
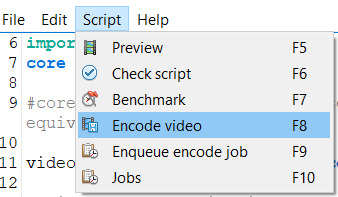
Once you click encode video, another box will pop up. Here, you’ll want to make one adjustment (shown in purple), before pressing start. At the header bar, you’ll want to exchange the preset “No header” for the Y4M option. After you’ve done that, you can press start found below (also highlighted in purple).
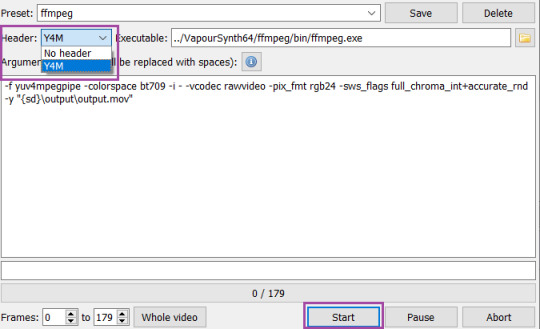
Congrats! You’ve finally finished processing your video!
STEP THREE ⤅ Make the gif in Photoshop
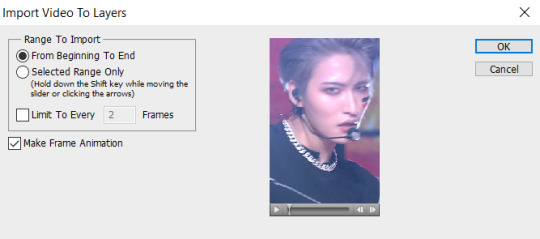
To important the frames into Photoshop, you’ll click File (top bar) > import > video frames to layers. Your output file from vapousynth should be found in the VapourSynth64Portable folder (based on where you first saved it) > gifs > output. Finally, click on the output.mov file to select it. You will then get a pop-up that looks like the following. I always keep these settings, though sometimes people will use limit to every 2 frames, but I find that will make your gifs look choppy.
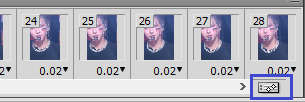
Based on the way your Photoshop layout is set up, the following steps may be found in different places than they’re found on my screen. You’ll want to have animation turned on (can be turned on under the windows dropdown menu, and just click on animation to turn on the frame view). If your bar is on the bottom of the screen, in the bottom right corner, you should press on the button (convert to timeline animation). I’ve highlighted the button in blue.
After converting to timeline, I select all the frames in the layers window (can also be turned on in the windows dropdown menu and selecting layers). Then, right click and and press convert to smart object. This will turn all your layers into a single object so you can edit all the layers at once rather than having to edit each layer separately.
After your smart object is created, I like to sharpen. I have an action, but to recreate the same effect, you will need to (1) duplicate the smart object (right click on the smart object > duplicate layer) (2) smart sharpen both smart objects with the following settings and then (3) put a gaussian blur only on the top layer with 1.0px. Both smart sharpen and gaussian blur can be found under the filter dropdown menu (filter > sharpen > smart sharpen or filter > blur > gaussian blur).

Depending on the quality of the video, if I find the sharpening too strong, I will sometimes change the radius to 0.3 or 0.2 (a higher number = more sharpening). Finally, set the top layer to 50% opacity (I go anywhere from 35% to 50% depending on how “soft” I want the sharpening to look. A higher opacity for the top layer will create a softer look). When I finish this step, my layers will usually look like this. And good news: your basic gif is done!
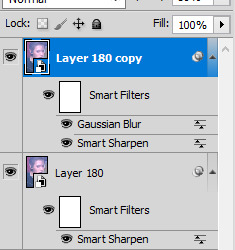
STEP FOUR ⤅ Colouring
Before you save the gif, you may want to colour the gif to make the colours look the way you want. This step is super subjective and every CC will colour differently - it’s why it’s so fun to see multiple sets of the same moment giffed, because each CC will colour a little differently!
I’m not a colouring expert at all, but I’ll put a basic skeleton of the way I colour below and show you the difference between no colouring, a basic colouring, and a more complex colouring. Another fun thing about colouring is that it can also make your gif look much sharper and higher quality depending on what you do.
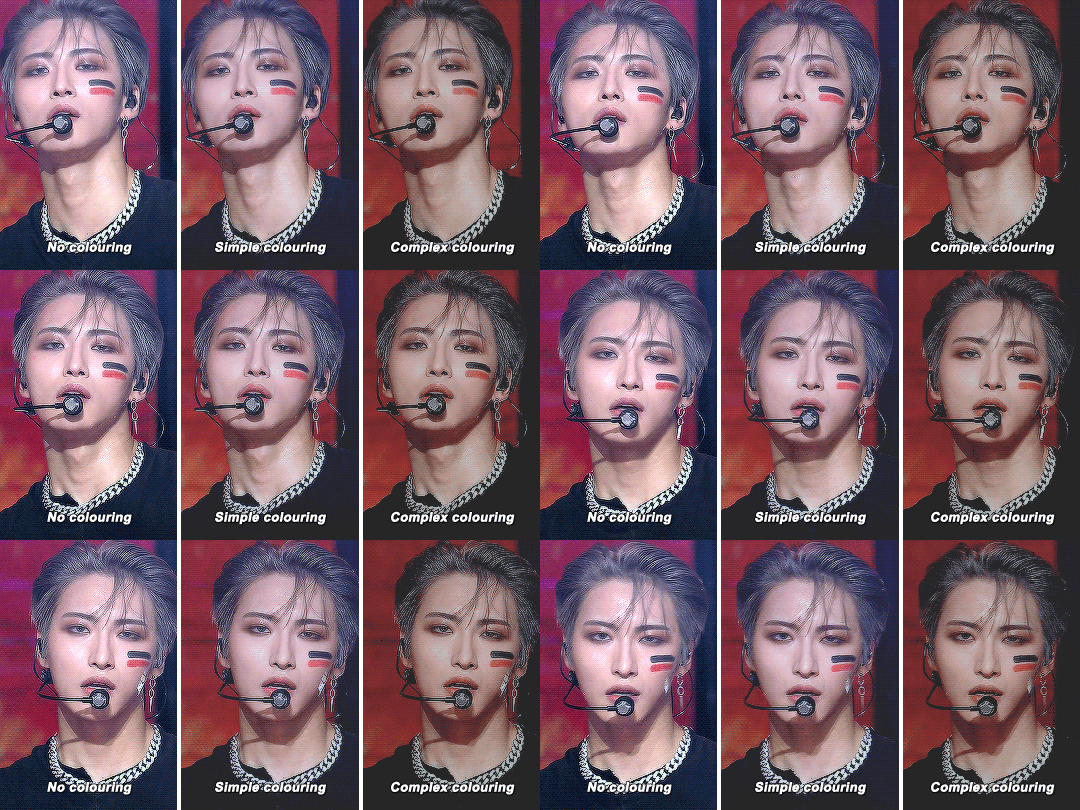
To access the possibilities for colouring, you’ll want to go the adjustments window (once again can be accessed in the window dropdown menu and selecting adjustments). As you can tell, there’s a ton of adjustment options, which may seem overwhelming. You should definitely experiment to find that looks best to you! I usually go in the following order: curves (red), colour balance (orange), hue/saturation (yellow), selective colour (green), levels (blue) and finally exposure (purple). I won’t attempt to explain what each one does (there’s tons of tutorials out there!), but note that sometimes you’ll want to use an adjustment more than once to get the effect you desire. Layering of multiple of these adjustment layers is what will create a more complex colouring that you will find you like more. I also haven’t mentioned some of the other options, but definitely explore them all to figure out what you like!
STEP FIVE⤅ Saving your gif!
We finally made it to the end! To save your gif, head into the file dropdown menu and select save for web and devices. There’s a lot settings you can fiddle around with here in order to save the best possible gif, but these are typically the settings I go with. The most important to note in the top right corner with selective and pattern selected (play around with those as you may find that the other settings will look better based on the gif!). Also make sure colors is at 256 (maximum) as having less than 256 colours can make your gif look patchy. At the bottom right, make sure you’ve selected looping options: forever to make sure the gif will loop. Finally, at the bottom left, you can see the size of the gif in megabytes. Note that Tumblr will allow gifs up to 10mb to be uploaded, but gifs will typically look best when under 3mb (though debatable).

Press save and you’re done! Note that sometimes after you’ve saved, the timing of the gif will be either too fast or slow. You may need to reopen the gif again and adjust the timing. I find that if you’re using 60fps, 0.02-0.03s generally looks best, while 0.04-0.05 will look best when using 30fps or with a preprocessor. Try them out and see what looks right to you.
Congrats on making it through this tutorial and taking the time to make gifs. Making gifs you find nice won’t always come easily or with the first try, but keep going and you’ll eventually find a way that works for you that you’ll be happy with. As always, if you have any questions, feel free to stop by and ask me and I’ll do my best to help. Almost every CC will be happy to share tips and advice as well, so don’t be afraid to reach out to the people whose gifs you love.
#gif tutorial#tutorial#mine#*tutorial#omg this took so long i hope this helps though anon!!#if there are any mistakes or grammar issues please let me know i'm too tired to read this over again LMAO#again everyone has different processes so this may not be something that works for you
121 notes
·
View notes
Note
Anna! Your gifs are always so beautiful 😍 Would you mind explaining your giffing process? Do you use VapourScript? Topaz? What are your sharpening settings? Hope you didn’t answer this already (I tried to look through your blog but couldn’t find anything) and I hope you don’t mind me asking. Thank you! Have a lovely day!
Hi! Thank you so much for your kind words!
After I download the video I want to gif at the highest quality (usually 1080p but I’ve giffed 720 and 480 too when there isn’t a better option) I use Vapoursynth (tutorial here if anyone is interested); my usual vs settings are 0.8 FineSharp and 2.5 sigma for BM3D. If I’m giffing a lower quality video or a scene that has some weird filter on it I will vary these two parameters. After I’ve saved my sharpened gif I take care of all the coloring and editing on photoshop. (My adjustments are usually curves > layers > color balance > selective color > hue/saturation > vibrance > brightness > exposure in this order. I don’t always go through all the steps.)
I’ve used topaz in the past but I never really liked it, it looks too blurred for my taste even when used in very small quantities. Before I started using Vapoursyth I just sharpened through photoshop’s smart sharpen function.
I do have a tag for gifmaking related questions but it might be hard to find, especially on mobile! It’s right here. I don’t mind answering the same question multiple times because I keep varying my process (especially the coloring step) so it gives me a chance to keep the tag updated!
16 notes
·
View notes
Note
Hey :) idk if you can help me but I saw you answering another anon about vapour synth. I downloaded it and followed some tutorial but I'm supposed to have something called vapourscript I think, but it's not there? And I literally don't know who to ask, Google is not cooperating
yes, your vs folder should look like this: (or similar, i have the newest version)

idk from where you were downloading, but try the link i sent to the previous anon? theres no way it wont be there :(
1 note
·
View note
Text
how i make my gifs
making gifs this way will require you to have 4k video downloader (dl), photoshop, and vapoursynth (dl). i personally use photoshop cs5 (dl) but any other version of photoshop should work too.
1) downloading the video
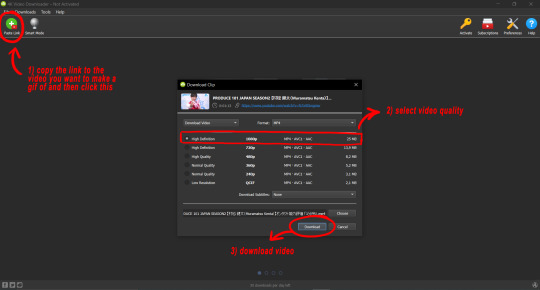
i recommend using 4k video downloader to download videos from youtube since it lets you choose which quality your downloaded video will have. the better the quality of the video, the better the quality of your gif, so i usually try to aim for at least 720p, although 1080p and 4k are much better. also, you can download videos as .mkv this way, which is higher quality than .mp4. they also take up more space tho, so it’s up to you.
you can get 4k video downloader here. 4k video downloader also has a premium version but the free version lets you download 30 videos per day, so unless you for some reason want to download a ton of videos at once, the free version’s good enough. to download videos from sites that aren’t youtube, i recommend using this:
kpop ts files: 4sashi, twitter also works sometimes
twitter: savetweetvid
instagram: downloadgram
vlive: soshistagram
2) using vapoursynth

first, download and install vapoursynth from here. this tutorial uses the windows version but the mac os version probably works similarly. after that, drop your video on the batch file named “vapourscript (drop video file on me)”.

now, a command window should pop up. enter the timestamp where the section of the video you want gif starts and then the duration of the clip you want to gif, not the end timestamp. usually, 2 seconds will produce ca. 100 frames, which is more than enough. once you’ve entered everything, hit enter and the program will crop your clip for you.
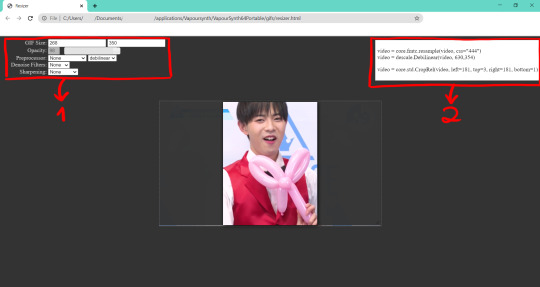
a browser window should open once your file is finished processing. this is called the resizer.
1) on the left, you can sharpen, denoise, resize, and process your gif, which will affect the code in 2. i usually set my preprocessor to qtgmc 60 slow, denoise on the lowest setting using knlm, and sharpening on finesharp's lowest setting. depending on how grainy or blurry your video is, you might want to adjust this.
2) this is the code you will enter into your vapoursynth script. whatever you set on 1 will appear here. copy the code once you’re done with setting everything up and copy it into your vapoursynth script.

your vapoursynth script should look something like this. just copy whatever you got from the resizer in the section marked as 1. if you want to preview your video, go to script > preview. you can also trim your clip to the exact frames you want here. below is a sample code with annotations, which you can just copy-paste into your vapoursynth editor like that:
import vapoursynth as vs import havsfunc as haf import muvsfunc as muvs import mvsfunc as mvs import descale as descale import G41Fun as fun core = vs.get_core()
core.max_cache_size = 1000
video = core.lsmas.LWLibavSource(source=r'video_cut\cut.mkv')
#Trim returns a clip with only the frames between the arguments first and last, or a clip of length frames, starting at first (a = first frame, b = last frame). Untag the line below before using it.
#video = core.std.Trim(video, a, b)
#Whatever you copied from the resizer goes below
video = core.fmtc.bitdepth(video, bits=8) video.set_output()
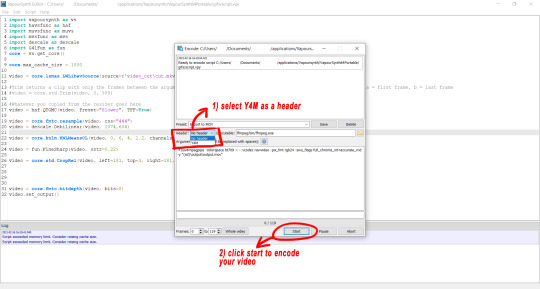
once you’re done with your script, go to script > encode video and select y4m as your header before clicking on start. your video will now be encoded. the finished file will be automatically saved as “output” and the file path will look roughly like this, depending on where you initially saved vapoursynth: vapoursynth > vapoursynth64portable > gifs > output.
you might want to copy the generated clip and save if somewhere else as once you run the script again, it will be overwritten again.
3) using photoshop
download photoshop from here and install it. to change the language from spanish to english, follow this tutorial. afterward, go to file > import > video frames to layers and open the file you just generated with vapoursynth.
i use the “animation frames” tool to make my gifs. if it’s not already opened on your version of photoshop, you can open it by going to window > animation.

also, vapoursynth will already have slowed the video for you but if you want it even slower/speed it up again, just press shift and select all frames in your animation timeline, then click on one of the little black arrows at the bottom of each frame and adjust the time from there.

then, to loop your gif infinitely, go into the bottom left corner and set your animation timeline to forever.
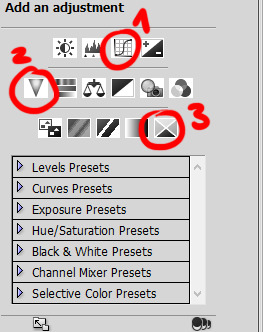
this next part depends on personal preference but they are the basic things i do to every single one of my gifs. they are 1) curves, 2) vibrance, and 3) selective color. vibrance and selective color are very straight forward to use: for vibrance, just move the slider to the left or right as you desire; for selective color, you can change the value and hue of every color in your gif as you desire by using the sliders.
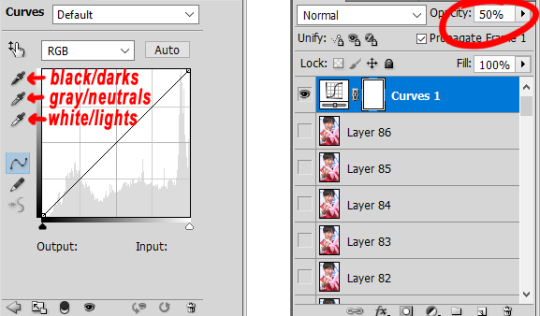
curves might require some explanations, though. first of all, curves will give you 3 pipettes to work with: black/darks, gray/neutrals, and white/lights. to use them, just click on them and then on a part of your frame in that color (e.g. click on the black pipette and then on a black spot on your frame). sometimes, curves make your gif look sort of harsh; if that is the case, just just select all of your frames while pressing shift and adjust the opacity of your curve accordingly.

here is a comparison for the same frame using no curves, curves at 100% opacity, and curves at 50% opacity. i also highlighted the spots in the frame that i used to create my curve.
4) save your gif
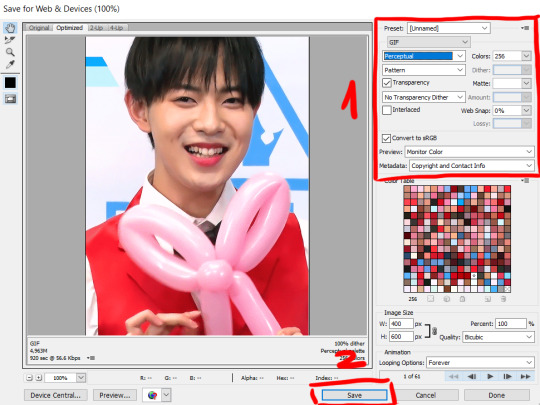
lastly, save your gif by going to file > save for web & devices. then, copy the settings in the area highlighted as 1. depending on your gif, you might switch from perceptual to adaptive to get a smoother look. i personally don’t recommend the other settings tho, as they tend to make gifs look grainy.
lastly, hit save and you’re done.

3 notes
·
View notes
Note
Could you please help me figure out how VapourSyth works? I've downloaded it and installed it following a tutorial but I can't find the application (actual program shortcut) where I should drag the video to? Do you know in which folder it's located in? The only application I see is vsedit?? I feel too dumb for this lol
hi hi, love!!! 💙 no, don’t be too hard on yourself bb vps can be confusing!! ok so you just need to find vapourscript bb. that’s where you have to drag your video 😘
#in my version of vps it says it's the one that says (drop video file on me)#if you have questions just drop an ask alright? i would love to help!! 😘#replies (soft moons)#💌 ask.
3 notes
·
View notes
Note
I wanted to ask you if you could explain Vapourscript in detail 🥺 I keep getting script errors even though it's correct. And encoding video takes too much time.
i already have what i consider a very detailed explanation of vapoursynth in my gif tutorial here 😭 i can’t really help you with errors unless you tell me what they are but also there are many errors that people get that i’ve never personally encountered...
4 notes
·
View notes
Note
how do you make your gifs?
hi there! i’m not sure if you wanted the very basics or a tutorial, but i think this is more of a tutorial? sorry if that isn’t what you wanted! i tend to overexplain everything ;;;
i only started making gifs this summer, but i hope i explained everything (somewhat) clearly! feel free to send any other questions if you have any~
to make gifs, i use vapoursynth (alternatively, you can use avisynth) and photoshop cc 2019
under the cut!
downloading videos:
so! for live stages, i always use the ts file for it. ts files give the best quality for your gifs, and i’ve found i don’t like how the quality looks even if it’s 1080p, but that’s all your preference!
to find and download ts files, i use these websites:
4sashi, kpop24hours, kpopexciting // along with these, i’ve heard you can use twitter as well for ts files but i honestly don’t know what to search to find them lol
if you’re downloading from youtube, i always look for 4k videos, but if i can’t find any 4k for what i’m looking for, i use 1080p! i don’t really like going less than that, though ;;
to download youtube videos i use 4k video downloader! it’s really nice because it lets you download any youtube video (no matter the length) and it lets you download it in the highest quality for free! (if you want to download videos with 4k resolution, you have to pay a one time fee of $20 *i believe* and you have an access key for up to three computers! otherwise, 4k video downloader is completely free!).
if you want to download anything from vlive or twitter, i normally just look up “vlive video downloader” or “twitter video downloader” and just click the first thing that pops up
using vapoursynth: (link to where i downloaded vapoursynth -> here)
i somehow by miracle got vapoursynth to work on my windows computer, but i honestly have no idea how because the first time i tried it just would not work! it’s a big pain, but i’ve heard it’s a lot easier to download and get to work on mac! if you’re using windows, though, a nice alternative is avisynth, which i used before i got vapoursynth!
vapoursynth is really simple to use, to be completely honest! i don’t know how good i’ll be at explaining it so i’ll leave a link to a tutorial i used at the end of this explanation! it can be a bit daunting at first because of all the code, but tbh you don’t really need to know everything it says, most of it is just copy and paste!
to get the resizer and the vapoursynth script to load, you just have to click and drag your video file over on top of the file called vapourscript, which can be found in your vapoursynth folder! (my folder is called “VapourSynth64Portable”, because that’s how it came for me) to know if you’re in the right folder, you should see other files in there like “gifs” “scripts” “plugins” and others!
after you drag your video file onto the vapourscript and resize your gif, copy what it says in the resizer and paste it in vapoursynth!
here’s the tutorial i used to explain it easier -> here
options i use:
i normally use the size 268 x 400 in the gif resizer (makes it portrait), or if i want it to be a landscape type size, i use 268 x 200!
if you’re using a ts file, click the preprocessor option (the first one that says none), and change it to one of the qtgmc options! i always use qtgmc 60 fast, but it’s up to you!
for anything else (mkv, mp4, etc), i would suggest leaving it on none!
i don’t use any sharpen actions in photoshop, i use vapoursynth instead!
typical vapoursynth settings:

for the amount of frames: ts files i try to keep under 200 (even under 100 if possible) and for everything else i don’t really pay attention to the number of frames!
everything from here on is done on photoshop!
coloring:
this is all preference!! a lot of gifmaking is just about what you like personally! some people actually have a base psd or use others’ colorings (again, preference!), but i personally really love coloring, it’s my favorite thing about gifmaking, so i almost always make a new psd (coloring) for every gifset i make! the main things i use in coloring though are selective layers, color balance, hue/saturation, threshold, contrast/brightness, and then i top it off by lessening the exposure!
frame delay:
0.04 or 0.05 seconds, i never use anything above or below that! this is another preference thing though lol
exporting:
to export your gif go to file > export > save for web (legacy)! here are my export options!

i hope this tutorial helps you! sorry if it was too long or if i overexplained anything/made it even more confusing! i only started making gifs during the summer, so if you have any tips for me as well, please don’t be afraid to send any in! you can send in any more asks as well, if i made things too confusing/you have any more questions!
bye bye!
42 notes
·
View notes
Text
Another Gif Tutorial
No one asked for this, but I thought I’d make another gif tutorial on how I do my gifs now. I’ve changed the process over the last two months. Granted, the other is still useful as well.
This will end up being long so everything will be under the cut!
Previously, I used AviSynth. And while I like AviSynth, and there’s nothing wrong with it I recently decided to try out VapourSynth. It was recommended to me by a few other gif makers in a chat with. For reference, the other one, here.
Why do I use VapourSynth?
Easier to find the exact time stamp that you want/need. It also reduces the loss of quality when importing the frames into photoshop. You can also use Avisynth to crop the gif that you need, but I often just crop in photoshop for personal preference on how I edit my gifs.
However, here is a link on how to install on Windows. The video is at the top on how to install it. It can be complicated, but it’s soooo worth it! If you need any help, feel free to ask me!
Drag your video to VapourScript (I put mine on the desktop like in the video)
This CMD prompt will open.

From there, you will add in the start of the time stamp. So I did 00:00:09 (i want it to start at 9 seconds.
The next is encoding duration, which just means how many seconds of it do you want. I normally just always use 00:00:03 (this gives me 90 frames). Just hit enter next.
Just like AviSnyth, another window will pop up in your browser so you can see the settings you want. For this, I only use the denoise filter KNLM.
Settings for KNLM: 0, 6, 4, 1.9 (you can play around with these if you’d like.
I also use 30fps fast, but you don’t have too. It’s what you like and how you want your timing to be.
Once it cropped the time stamp, another pop was open, right? The VaporSynth Editor. This is where it can get a bit tricky.
The video goes into detail on where to copy and paste the code from the resizer, but it also allows you to trim the frames you want, but I don’t want to go through that. So I’ll just put the # sign there to cancel that out. Just like below.
So you see here the trim is grayed out, it just means I won’t use that feature of it.
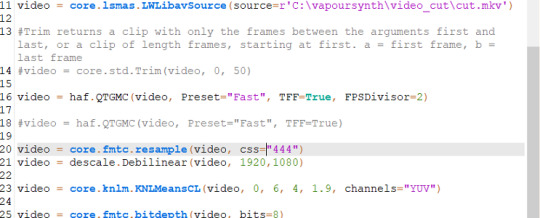
Normally you’ll see this :
video = core.fmtc.resample(video, css="444")
video = descale.Debilinear(video, 630,354)
Instead of:
video = core.fmtc.resample(video, css="444")
video = descale.Debilinear(video, 1920,1080)
I personally like to change it to the original size of the video so when you crop it, it doesn’t come out stretched or weird looking when you use 630,354.
You’ll also see where I used:
video = haf.QTGMC(video, Preset="Fast", TFF=True, FPSDivisor=2)
This is just the present for 30fps fast. That’s optional.
From here once your settings look good, you go to file save script and then script encode video.
Where it says header change it to Y4M (always).
Hit start, and let it do its thing. Then after it's finished you can close it. Sometimes it can take a minute or two once you change the size of the video.
Photoshop
If you haven’t already cut your gif in another program, then you can use photoshop to crop. I, however, recommend that you do. I started using Avisynth maybe a month ago, and it’s the best thing ever. I won’t force that on you, get comfortable with photoshop first if you’re new to PS.
Importing and Resizing
Import video into photoshop (file > import > video frames to layers)
Use these settings
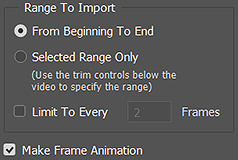
Using the sliders, select the part that you want with the sliders to the left and the right.

Once it’s all open in photoshop, you will need to make sure you have timeline open. window > timeline.
If you used VapourSynth, and have cropped to the frames that you want. Then all you need to do is crop the gif.
So you’ll just go to import > video frames to layers > windows > vapoursynth > output > select output.move
NOTE: IF YOU USE PS CS6 for some reason it doesn’t open MOV files. My mutual found a way to work, so I’ll have to ask her if it’s alright to direct her to you to see how she got it to work.
When I crop my gif to the correct size for Tumblr to keep it under 3MB.
Go in with the rectangular marquee tool. With sizes below:
268 x 360 - 400
268 x 200
540 x 280
Position it to the place that you want. Then go to image > crop.
Once it’s cropped, you will then go to image > image size.
I normally set it to bicubic (smooth gradients).
Also always lock in the width & height.
Here is tumblr’s sizing.
Delete any unwanted frames you don’t want.
Sharpening
I use a varies of settings when sharpening and clearing my gifs how I like.
Select all your frames, and then at the bottom of that timeline window click the convert to video timeline.
Select all your layers, and then convert to smart filters. (filter > convert to smart object)

I no longer use topaz settings. It takes entirely too long, and I’m lazy. So now to get my gifs smooth looking I use gaussian blur and smart sharpen only.
So the steps I take are:
Duplicate your smart filter
On the bottom filter, I use smart sharpen
I normally keep it at 500 / 0.2 or 500 / 0.3.
Copied smart filter:
Filter > Gaussian Blur > I usually use between 1.0-1.6 just depends.
You can lower the opacity of the gaussian blur like below:
Double click the one next to the gaussian blur I usually lower it between 50 to 80% just depends on the look I’m going for.
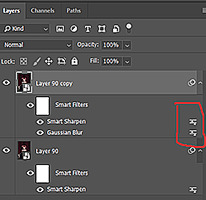
Filter > Smart Sharpen > 500 / 0.3 (a second time)
Convert frames > flatten frames into clips.
Click the bottom button again to convert video to timeline (using that same button as before).
Then delete the first two layers. It’s the one that says layer, the others will say frame.
Once it’s deleted, go to the timeline option button. It’s located at the top right corner of the timeline.
Select the option to make frames from layers.
Coloring + Timing + Saving
To avoid this being longer than it is, I’ll link the original tutorial on coloring, timing, and saving gifs, here.

14 notes
·
View notes
Note
hi!! i've heard you use vapoursynth for making your gifs lets just hope im right- i had a teensy bit of problem downloading it; would you mind helping me out? I really need the link from which you download it, when I extract the file, based on the tutorial I'm supposed to get this thing called vapourscript, but that isn't showing up :( tysm for your help darl!!!
im so sorry i have no idea where I downloaded it from HDKDNDK I've had it for like 2 years now and I installed it over the course of 5 hours across 2 days it feels like a genuine fever dream, vapourscript isn't a separate program though thats something within vapoursynth when u open up the file after extracting it!! sorry i can't be more helpful fjnfnf
#asks#anon#i am very bad at explanations i just got angry at my computer andnit eventually installed nffmfmf
0 notes