#tutorial link
Explore tagged Tumblr posts
bobapplesimblr · 2 years ago
Text
Currently trying to learn puppet animation in after effects
Here’s the video I’m using as refference for now, I’ll come back to yall once I actually start doing stuff:
https://youtu.be/iMuG6okkm58?list=PLrrFvlqttwbws35C6f6WYv1jRz4HbfUxu
2 notes · View notes
sterina-sims · 3 months ago
Photo
Since @meisiu's f.a.q page is no longer available, so here's a link to a similar tutorial.
Tumblr media
Family Tree Template by sterina-sims
Here is the template that I use to create my Goodie family tree. This is a .psd file and you need Photoshop to use it.
Things to know:
All images seen are from sims’ memories.
The title on the banner has a space between each letter, and a gap of 3 spaces between each word. 
There are two key containers, a large one and smaller one for you to choose from. 
Get additional icons from @eddysims‘ Icon Pack or via online search.
I use this template in conjunction with my Photoshop action.
How to create your own family tree page:
Here is a tutorial by @meisiu, see question #7. 
DOWNLOAD
346 notes · View notes
wr1t3w1tm3 · 1 year ago
Text
https://www.tumblr.com/wr1t3w1tm3/732346383458304000/not-me-attempting-to-learn-how-to-crochet-a-beanie
So...
I actually finished the beanie a while back. But I didn't have anything to model it on and I don't wanna do a face reveal.
But now, I give to you: my tri-color practice beanie on an A&P model skeleton.
Tumblr media Tumblr media Tumblr media
Anybody got a good name for this guy? It was either him or the muscle torso.
0 notes
iniro · 1 year ago
Photo
Tumblr media
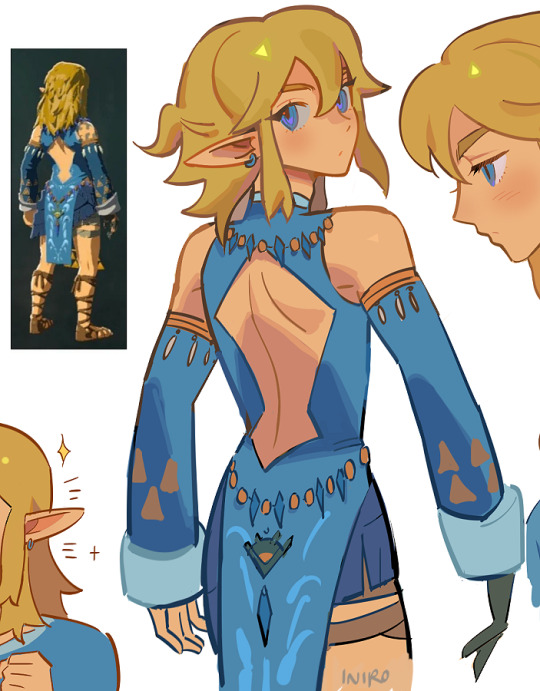
frostbite armor my beloved
[ patreon ]
5K notes · View notes
lethesbeastie · 6 months ago
Note
Hi, I saw your post about practicing drawing fat people and I was wondering if you could compile like a list of resources or references?
Tumblr media
It can be difficult to find resources for drawing the wide variety of forms fat bodies can occupy, so I've done my best to bring together some resources I've been able to prove have some degree of diversity in the references they offer!
My primary resource recommendation for drawing fat people is Morpho Anatomy For Artists: Fat And Skin Folds! It does a wonderful job breaking down where fat accumulates on the body, how it interacts with the familiar landmarks of human anatomy, and what sort of shapes it tends to form under the influence of gravity. It's a phenomenal reference and my top recommendation for anyone seeking to improve at drawing fat people!
When it comes to finding decent photo references for fat people, the pickings are frustratingly slim. Most sites that specialize in pose references either don't have fat models or have all their images behind paywalls. Of the resources I looked through, the best sources for pose references were Adorkastock and Line of Action.
@adorkastock actively seeks to provide an incredible profile of pose references with diverse body types, and as an added bonus you can access a lot of their images for free on their site/Tumblr or join their patreon for early access to images! Line of action is a site aimed towards practicing figure drawing, providing images and a timed function to challenge artists to sketch within a set time limit. I took the time to go through roughly 300+ images and was pleased to find that during my session around two-to-three out of every ten photos were fat models. The only caveats to this was the fact that most of the images were of the same individual, limiting the applications for studying the variants of fat bodies. Still, it's an amazing tool that has a free mode and allows you to filter the types of references you want based on age and level of nudity.
Beyond sites that specialize in art reference photography, there's also the ever popular Pinterest, which is the site where I typically seek references for my personal studies. Due to the nature of Pinterest's extensive collection, there's a vast variety of references for different fat body types that includes a lot more "everyday" people. The primary issue with Pinterest however is the rampant reposting and lack of proper credits for images, which can make things dicey depending on how you wish to use the references you find. For personal studies this isn't really an issue, but for any sort of professional or paid work is something to be aware of just for the sake of accountability.
* For those who are 18+, porn photography of real people also offers an incredible wealth of visual resources for fat bodies and how they interact with gravity/movement/etc. The variety of positions and angles offer many opportunities to study human anatomy, and it's a pretty well-known fact that drawing NSFW art can be an important learning experience for those struggling with drawing anatomy. In the end, it depends on your personal level of comfort with viewing/drawing explicit images, but it's not something you should completely overlook.
Last but not least, look at the work of artists you admire who draw fat people! While I typically recommend sticking to photo references for learning anatomy, studying artist's portrayals of fat people is also incredibly helpful for learning different tactics for simplifying and/or stylizing fat bodies to better fit ones own style. There are also plenty of artists who've crafted tutorials detailing their approach to drawing fat folks, so I highly recommend you check them out as well! I hope the resources I've linked here can help you in your studies, and feel free to drop another ask if you have any more questions! I'm planning on posting a tutorial on how I do studies for fat people soon, so that will be an additional resource for you once I've got it posted!
855 notes · View notes
linderosse · 3 months ago
Text
Tumblr media Tumblr media Tumblr media Tumblr media Tumblr media Tumblr media
Sure!!
(To the folks who asked in one of my Monday drawing streams as well— here ya go!)
I picked BotW Link; I’ve had him on my mind recently because my copy of TotK broke 🥲, so I’ve been messing around in BotW again 🥰
404 notes · View notes
nudjismo · 1 month ago
Note
¡Hola!, ¿Podrías hacerme un link con separador invisible? pero que diga "princesita dulce" con la letra en negrita, eso sería todo lo que te pido :3
http://⠀⠀⠀𝗽𝗿𝗶𝗻𝗰𝗲𝘀𝗶𝘁𝗮⠀⠀���𝗱𝘂𝗹𝗰𝗲.⠀⠀
http://⠀⠀(⠀⠀.⠀⠀)
https://⠀⠀﹟.com
Estos son ⠀algunos links que tengo, el último sólo lo colocas así mismo, no le modifiques nada, cc (no recuerdo a quién le pertenecía el último link TT) 💧💧⠀
235 notes · View notes
jibberjibbsart · 11 months ago
Note
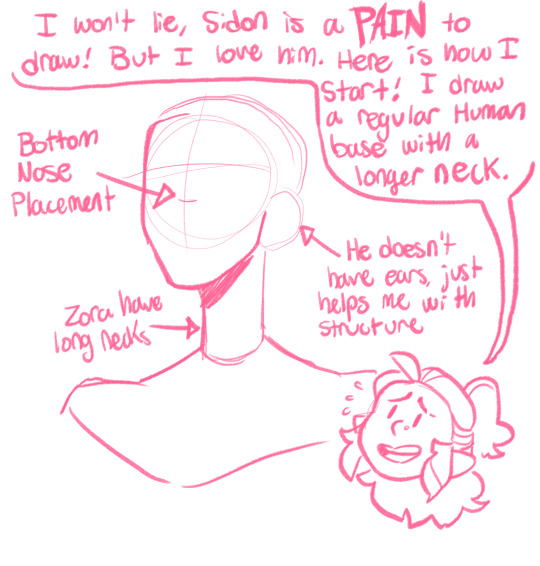
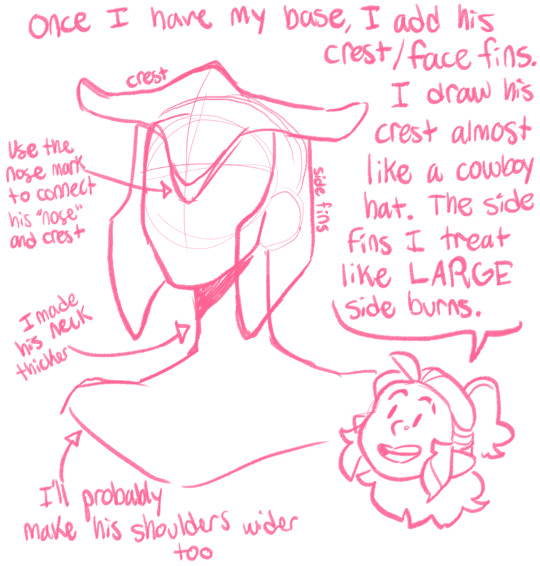
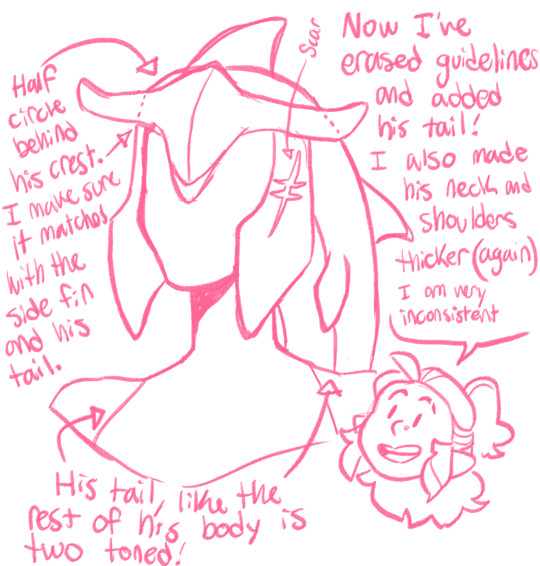
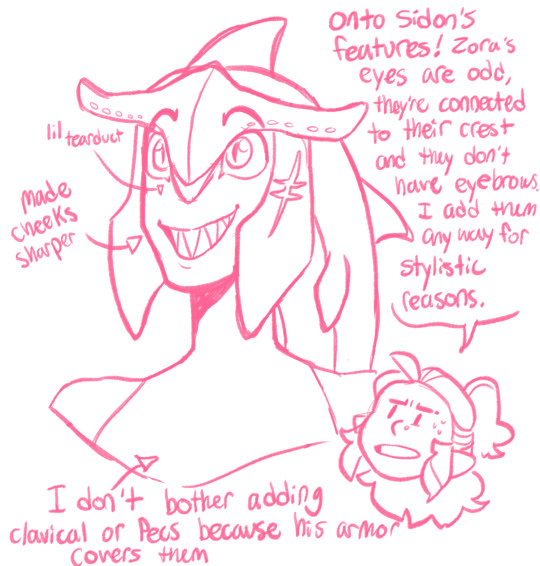
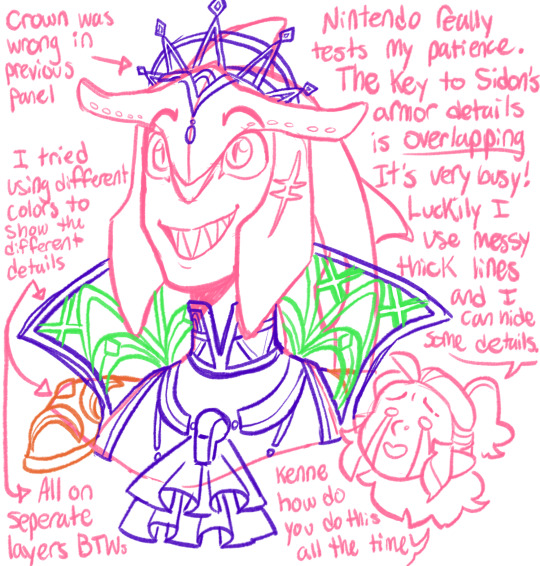
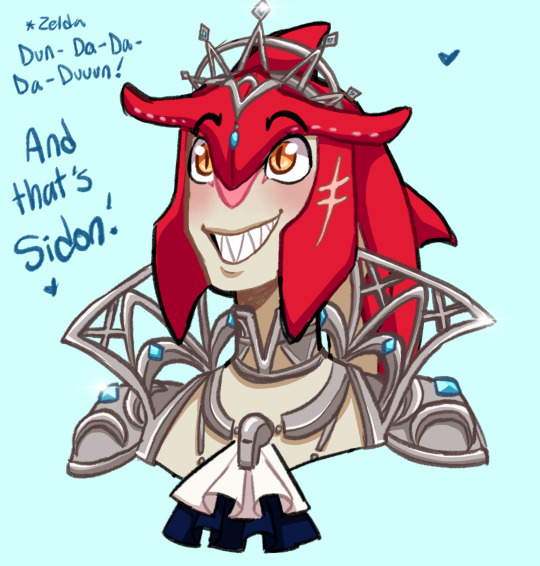
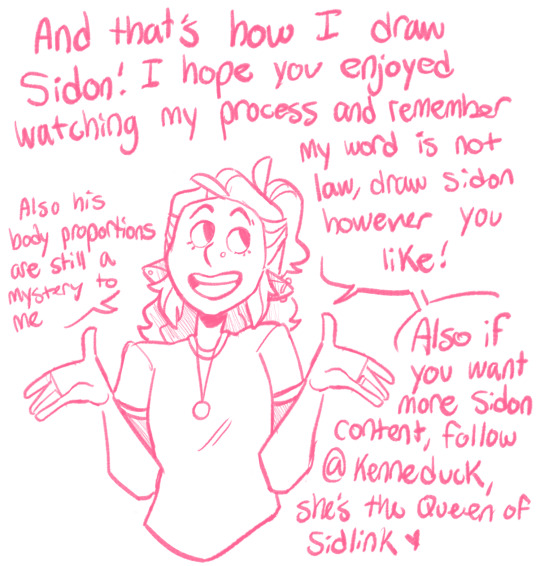
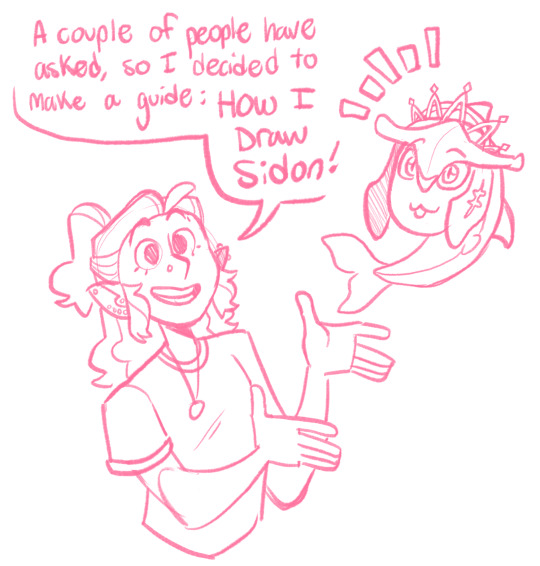
Do you have any tips for drawing sidon, specifically his like armor/jewelry stuff? I've recently gotten into zelda and sidlink specifically and have been trying to draw them, but I'm struggling
Tumblr media Tumblr media Tumblr media Tumblr media Tumblr media Tumblr media Tumblr media Tumblr media Tumblr media Tumblr media
I made a comprehensive comic on how I draw Sidon from the shoulders up 💀 his body still confuses me, but maybe I’ll make another tutorial in the future! I hope this helps!! Also follow @kenneduck she’s the Queen of Sidlink
947 notes · View notes
petorahs · 1 year ago
Text
Tumblr media
link and the light dragon as a spirited away redraw
2K notes · View notes
buglaur · 11 months ago
Text
Tumblr media Tumblr media
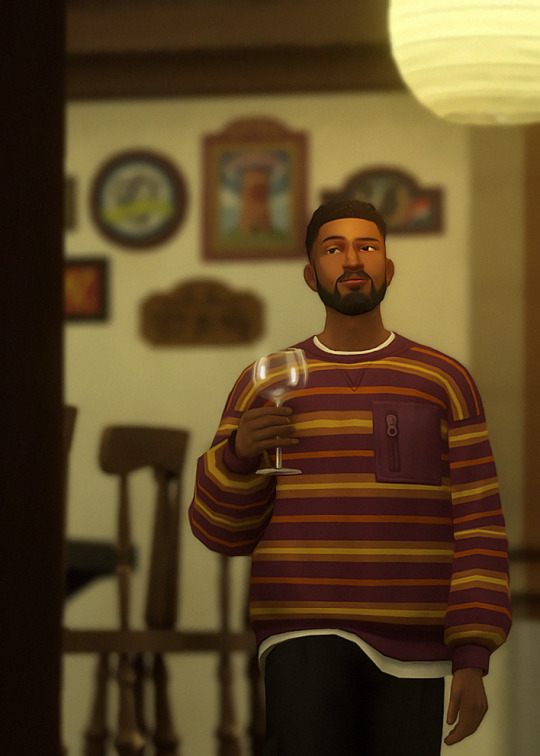
shots from messing with my reshade and decorating the pub
515 notes · View notes
wolfiery · 10 months ago
Text
Tumblr media Tumblr media Tumblr media
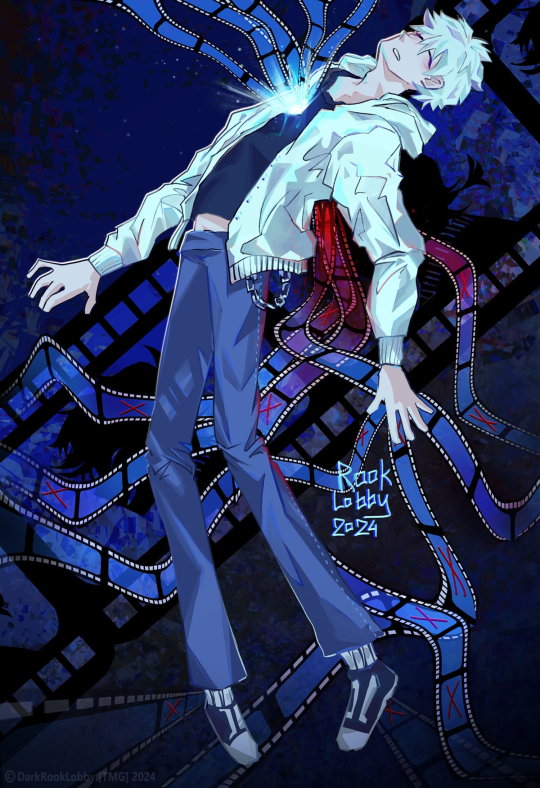
The taste in the mouths of the starving crowds Oh, pulling at the leaves, pulling off to me In feet first the savage dust Don't leave me be, leave me be
379 notes · View notes
zellink · 6 months ago
Text
Tumblr media
pink funeral
301 notes · View notes
aroworlds · 9 months ago
Text
Tumblr media Tumblr media Tumblr media
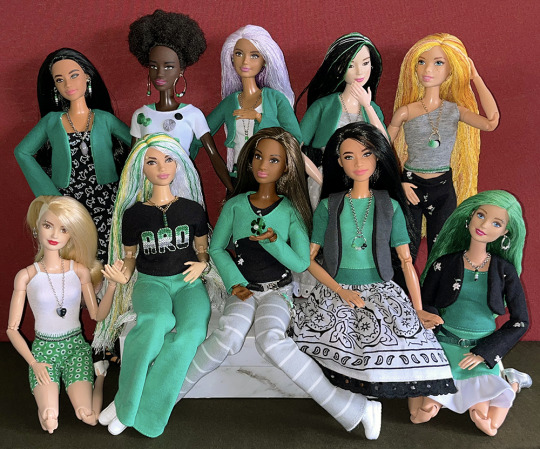
This Aro Week, I've made cross-stitched card designs perfect for gifting to your favourite slightly-snarky aromantic.
The free tutorial includes patterns, card and fabric dimensions and a materials run-down as well as instructions on attaching an aida swatch to cardstock and other border techniques.
325 notes · View notes
theminecraftbee · 9 months ago
Text
Joel sits awkwardly at a family dinner table that isn’t for him.
It’s nice and all, he reckons, for Impulse’s family to invite him over after he leaves the hospital. Even before—everything—Joel’s family hadn’t really been the “big meal around a big table” type, so he’s getting some new experiences here too. And it’s nice and all, that they want to thank him for his role in finding Skizz.
But like. It’s not like he or Impulse or Skizz could explain how it happened, when asked. “Magic brain ghosts” and “evil butterflies” and “Joel still isn’t certain all of that was real and is trying to pretend it wasn’t” puts a damper on that. Also, adults are kind of shit at talking around the fact Joel’s whole family is dead, so he gets the sense he’s sort of harshing the vibes, you know?
Still. It’s a nice gesture. He guesses. It’s free food at least, which is decent, and as close as Impulse and Skizz are, every time one of Impulse’s family says something stupid, Skizz taps Joel’s leg with his foot or steals a roll or something, and it makes Joel feel…
He’d have been sad if Skizz had died, probably. Like, he wouldn’t know. He didn’t come here to make friends, he came here to get a degree and get out. Also, that’s stupid, because it’s not like Joel would have known he was missing a really awkward congratulatory family dinner in which Skizz kept on trying to sneakily steal beans. Probably would have just moved right on. He’s not… friendly.
But.
They stand outside afterwards, waving by to Impulse, promising to walk together so that neither of them Vanish. They’re quiet.
“Thanks, man. That meant a lot to them,” Skizz says.
“Yeah, well, I can do stupid things for free food,” Joel says.
Skizz laughs. “It was nice having you there, too. Man, they’re even worse with you! It’s like not knowing you means they’re even more awkward about family tragedy.”
“Trust me, most adults are way worse. You should see my social worker,” Joel says.
“Didn’t he ditch you, dude?”
“Haha, yeah, he did,” Joel says.
They stare up at the streetlamps together.
“I was really ready to go for a bit there,” Skizz says. Joel’s hackles raise. Oh no. Emotions. Bad. Go away. “It was like—man, it felt like the whole world was empty. But when you showed up, it’s like I remembered… I’d miss dinners, dude.”
“I have no idea why, that kinda sucked,” Joel says, baffled and sarcastic, because he’s a moron who can’t handle emotional conversations, this is why everyone avoided him at the funeral, stupid.
Skizz breaks out laughing.
“You’re great, man! I’m glad we met. Uh, my place is only a block away, and I won’t go following any stupid butterflies. See you at school?”
“Yeah man. See you,” Joel says—
I am thou.
Thou art I.
Thou hath formed a new bond.
With the power of the Chariot Arcana, you shall build the chains with which to hold on to reality.
RANK 1!
“What the hell?” Joel says, tripping over his feet. “What? What? Where did—what the fuck that wasn’t Pygmalion oh god do I have more than one voice in my head—”
“Dude, are you okay?”
Skizz’s almost frustratingly strong and comforting arms grab Joel.
“Tell me you heard that,” Joel says desperately.
“I—I don’t know what you’re talking about. I could take you back to the hospital—no?”
“I am either crazy or am going to end up in a government lab?” Joel says, voice getting high and squeaky.
“We can ask Mr. Hills about it? He came to talk to me after I woke up in the hospital, apparently he like, knows stuff,” Skizz says.
“I don’t wanna,” Joel says.
“Tough luck, buddy, you just almost fell over and cracked your head open!”
Suddenly, Joel remembers a long-nosed man and a blonde in a very blue boat. He remembers a cryptic conversation about bonds and power and their importance. He takes a deep breath. “Can you cover your ears for a moment?” he says.
“Yeah, sure thing, why—”
Joel, as loudly as he can, screams. He hears several birds fly away. He pants.
“…Joel,” Skizz says.
“Yeah thanks man don’t worry about it let’s never speak of this again I’m sure it’s nothing. I definitely didn’t have a weird dream about this and should go to bed.”
“Yeah, okay, whatever you say,” Skizz says cheerfully before laughing, which Joel continues grumbling about all the way back to his apartment.
222 notes · View notes
juergenklopp · 2 years ago
Note
How do you make your gifs?
Tumblr media Tumblr media
Hello hello! I love talking about gifmaking, so thank you for giving me the chance to ramble.
Instead of a detailed step-by-step walkthrough, I will link tutorials and resources written by the wonderful Tumblr creators on here along the way. Everyone has their method and preferences, and there’s no right or wrong way to make gifs. I’m going to share techniques and resources I picked up along the way that work best for me—they may or may not be suited to your preferences, but I hope you’ll find some helpful things here.
(Warning: screenshot/image heavy)
USEFUL TUTORIALS AND RESOURCES
Here are some tutorials and resources that I found very useful when I got back into gifmaking:
Gifmaking tutorial using video timeline by @hope-mikaelson is identical to my own process
Gifmaking and coloring tutorial by @kitty-forman​, whose process is very similar to my own
Giffing 101 by @cillianmurphy​, an incredibly detailed tutorial that covers everything you need, including a step-by-step guide to using HandBrake
Gifmaking and coloring tutorial with 4K HDR footage by @sith-maul​, another incredibly detailed tutorial with many useful tips
Gifmaking tutorial by @jeonwonwoo, incredibly comprehensive and covers so many aspects of gifmaking from basics, sharpening, captioning, and text effects
Gifmaking/PS tips and tricks by @payidaresque
Action pack by @anyataylorjoy​, the Save action is especially a true life-saver
@usergif and @clubgif are amazing source blogs with many tutorials on gifmaking, color grading, and gif effects, can’t be thankful enough for the members for their work curating and creating for these blog!
TOOLS
Adobe Photoshop CS6 or higher, any version that supports video timeline. @completeresources​ has many links to download Photoshop, have a look!
Photopea is a free alternative to Photoshop, but it has a slightly different UI, check out these tutorials for gifmaking with Photopea
HandBrake or any other video encoder, especially if you’re working with .MKV formats 
4Kvideodownloader for downloading from YouTube, Vimeo, Instagram, etc.
OBS Studio or any other similar screen capturing software. To prevent duplicate frames in gifs that prevents your gifs from looking smooth, try to match the recording frame rate (FPS) with the source.
IMPORTING FOOTAGE AND WORKING IN VIDEO TIMELINE
I work exclusively in video timeline instead of importing video frames to layers or loading files into stack. For videos that don’t require converting/encoding using HandBrake, especially ones that are already in .MP4 format, I tend to open the video directly on Photoshop, and trim the videos around directly.
Tumblr media
As mentioned above, this gifmaking tutorial using video timeline is exactly how I make gifs. I find it more efficient, especially if you’re making multiple gifs from the same video/the same scene with little to no change in lighting conditions You can simply slide around sections of gifs you want to save, and they will all be the same length.
Tumblr media
Another thing also covered in the tutorial linked is the ability to change video speed in video timeline mode. Right click on the video and set the speed before proceeding with cropping/resizing. This is also very useful when you’re making blended gifs where you need the footage to have the same length.
Slowing footage down.
As mentioned in this post, changing the FPS before slowing down the gif results in smoother gifs. Doubling the frame rate before slowing down your gifs usually yields the best result.
Speeding footage up.
I love using this to speed up slow motion B-rolls to make the speed slightly more natural. It will result in nice, smooth gifs:
Tumblr media Tumblr media
(B-roll footage, normal broadcast speed)
Tumblr media
(200% speed)
Subject won’t stay in frame?
Another feature of the video timeline mode. Keyframes are your best friend. This tutorial by @kangyeosaang covers everything you need to know about panning gifs. I use this technique regularly, it’s a life-saver.
COLORING
Here are some coloring tutorials I found very useful:
Coloring tutorial by @brawn-gp beloved, their coloring style is second to none
Mega coloring tutorial by @yenvengerberg, for stylized /vibrant coloring
Understanding Channel Mixer by @zoyanazyalensky
Coloring rainbow gifs by @steveroger, which delves deep into Channel Mixer
I tend to go for neutral-saturated coloring in general,  especially for minimalist gifsets with no effects (blending/isolated coloring/overlays etc.), but the possibility is endless for stylized coloring. Here’s what my adjustment layers look like for the example gifs above.
Tumblr media
The base footage for this Charles gifset is incredibly desaturated. I started with a Curves layer to bring contrast to the gif, as well as do some color-correcting to bring the base footage to a more neutral tone. To bump contrast, I also like to add a black and white Gradient Map layer with a Soft Light blending mode at 10%-30% opacity:
Tumblr media
The Vibrance layer is then used to lift the saturation of the base footage, with the Selective Color, Hue/Saturation, and Channel Mixer layers to help remove the green/yellow tint to his skintone.
An underrated adjustment layer/preset in my opinion is the Color Lookup. You can layer in pre-loaded .LUT color grading presets to help speed up your process. For this gif, it’s simply a base preset Soft Warming Look to achieve a warm, pink-tinted tone.
In hindsight I feel like this gifset is too saturated, his skintone is skewing very red/pink, I could’ve bumped down the lightness of the reds with a Selective Color layer or a Hue/Saturation layer. Try to err on the side of neutral for skintones. Experiment with layer orders—there’s no right or wrong! Remember that each layer build up on the one before it.
Tumblr media
The base footage of the Jalen gif is already quite nicely color-graded, but it’s still muddy and underexposed. As with the Charles gif, I started with a Curves layer to bring the gif to a better baseline contrast. Then I focus on brightening the gif with the Brightness/Contrast and Exposure layers.
The Hue/Saturation and Selective Color layers are to color-correct Jalen’s skin tone—it’s something I spend most of my time coloring gifs and focus a lot on, especially when color grading BIPOC skintones. Putting a Vibrance layer, upping the Vibrance and Saturation, and calling it a day would make his skintone skew very, very yellow/orange.
Tumblr media
Focus on the reds and yellow for skintone, play around with the Saturation and Lightness sliders, use the Hue slider with caution.
It can be tricky to achieve the right skin tone when working with sports footage vs the higher quality, higher dynamic range footage of films or TV shows, but I try to keep it as close to the subject’s natural skintone as possible.
Here are some of tutorials with tips and tricks on coloring BIPOC:
How to fix orange-washed characters by @zoyanazyalensky
How to prevent pink-washing and yellow-washing by @jeonwonwoo
Coloring tutorial by @captain-hen
Changing lighting conditions?
Fret not—this is why I love working in video timeline. I’ll take this gifset as an example: it’s a deceptively difficult one to color. The footage is 720p and the sunlight shifts throughout the video, so matching across gifs was tricky.
My solution was to split the clips in sections with consistent lighting, and apply adjustment layers to the individual sections before applying general color grading layers on top of everything.
Tumblr media
We can make use of the Fade Transition effect for sections where the lighting changes within the gif section we want to color.
Tumblr media Tumblr media
(without vs with Fade on the Brightness/Contrast layer)
The difference is subtle in this example, but the brightness in the right gif is noticeably more consistent throughout. You can also add the Fade Transition effect to the beginning for a fade in, of course.
SHARPENING AND OPTIMIZING GIF QUALITY
This tutorial by @anya-chalotra​ covers everything you need to know about optimizing gifs for Tumblr.
Sharpening.
Sharpening is essential to making crisp gif images. Here’s another ask I answered re: my own sharpening settings and maximizing gif quality.
Tumblr media
(base footage, unsharpened)
Tumblr media
(color graded, unsharpened)
Tumblr media
(color graded, sharpened)
The final gif is sharpened with Smart Sharpen, 500% at 0.3px and 10% at 10px (my standard sharpening settings).
Here are some tutorials and resources on sharpening:
Sharpening process by @anya-chalotra
Sharpening tutorial with added gaussian blur by @haleths
Sharpening action by @daenerys-stormborn
Size your gifs for Tumblr correctly.
This is essential: full width gifs are 540px wide.Two side-by-side gifs should be 268px wide. Here’s a handy post on gif size guide for Tumblr.
Incorrectly sizing your gifs will take away the quality of your gifs: undersizing your gifs will especially make them grainy, blurry, and /or pixelated, and won’t display correctly on many people’s desktop theme. Oversizing usually isn't as dramatic as undersizing, but it will make the gifset glitch when displayed, and the file size will be unnecessarily bloated.
Work with HD footage if possible.
Media fandoms (films/TV shows) are luckier than us in the sports trenches—we have to work with what we have. Broadcast footage is usually subpar: lacks contrast, pixelated, very desaturated, the list goes on. But it’s possible to still make high quality gifs from subpar footage. Here are a couple of tutorials to mask low source footage quality:
low quality video ➜ “HD” gifs tutorial by @nickoffermen
Sharpening low quality footage by @everglow-ing
(This gifset I made is from a 480p footage with horrendous lighting conditions and colors, and the end result is decent I’d say)
Save for Web (File > Export > Save for Web (Legacy) or Ctrl + Alt + Shift + S) settings.
I default to Adaptive + Diffusion but also use Adaptive + Pattern from time to time. Any combination of Adaptive or Selective + Diffusion or Pattern will give you a good result. In my experience some gifs will need the Selective color table for the colors to display correctly.
Here are my default settings:
Tumblr media
SAVING AND EXPORTING FOR TUMBLR
Converting to frames and adjusting the gif speed.
If possible, avoid exporting your gif and reopening it to adjust the frame speed. I used to do this sometimes when I’m lazy, I have to admit, but this is where this Action as mentioned at the beginning comes in very handy. It converts all visible layer into smart object, then converts it back to frame animation.
Step-by-step:
1. Select all layers
2. Right click > Convert to Smart Object
3. Go to the Timeline menu (≡) > Convert Frames > Flatten Frames into Clips
4. Go to the Timeline menu again (≡) > Convert Frames > Convert to Frame Animation
5. In the same menu (≡), select Make Frames from Layers
6. Delete the first frame (it’s a duplicate) then set your frame speed
Tumblr media
Now you can adjust the frame speed before exporting it (Save for Web).
Tumblr media
Pay attention to the source framerate.
The frame delay of 0.05 s is usually the default to make gifs for TV shows and films, and it is preferred by most gifmakers. This stems from the fact that most movies and TV shows are 24 or 25 FPS. This may not be the case for all source videos: you might get 30 FPS footage, and sports or gaming footage can be 50 or 60 FPS. Gif speed also depends on the FPS of your original file. Play around with gif speed and see what feels most natural to you.
My rule of thumb is the frame delay Photoshop gives you + 0.01 s. For example, 50 FPS footage will give you 0.02 s frame delay (25 FPS gives you 0.04, 30 FPS gives you 0.03, etc.), so set it to 0.03 s. I usually err on the side of a faster frame delay for smoothness in in-game sports footage, anything else (interviews, press conferences, B-rolls) can get away with being slowed down. Again, experiment and see what you think looks best!
Keep gifs under the Tumblr file size limit (10 MB).
Cut down the number of frames. My gifs are usually around 60-70 frames for 540px full-width gifs, but depending on the coloring, sometimes you can get away with more. 268px gifs can go up to 200+ frames.
Crop your gifs. Remember to keep full-width gifs at 540px wide, but if necessary, you can crop the height. My go-to sizes are 540x540, 540x500, 540x450, and 540x400.
Amp up the contrast of your gifs. Flat colors like black cut down gif size.
The Grain filter or Noise filter, though beautiful for aesthetics or simply necessary sometimes to mask low source footage quality/pixelating, may bloat your gif size.
Play your gifs back before exporting.
Pay attention to duplicate frames or glitches, you might need to get rid of them!
Hope this is helpful! Don’t hesitate to send an Ask or DM if you need any help, I will happily answer all your questions and send over PSDs. (I’m also on Discord—just shoot me a message if you need my tag!) Happy creating :]
Tumblr media
1K notes · View notes
nudjismo · 23 days ago
Note
kiki, sabes cómo poner en twt (x) símbolos o letras en el link? recuerdo que era con un link en específico pero no lo encuentro :-( me preguntaba si lo tenías o algo así ∩ΘωΘ⊂ ♡
Hola corazón, te lo voy a explicar así bien rápido porque hoy estoy algo ocupado. 💧🫶🏻💗
Lo primero que vas a hacer es abrir este enlace -> 𓆡 🍎 ~ 🐛
Y lo primero que te aparece es la página para convertir tu texto en un link
Tumblr media Tumblr media
Después vas a escribir tu frase o lo que tengas en mente, para poner los símbolos es un poco complicado, tienes que tener paciencia.
Tumblr media
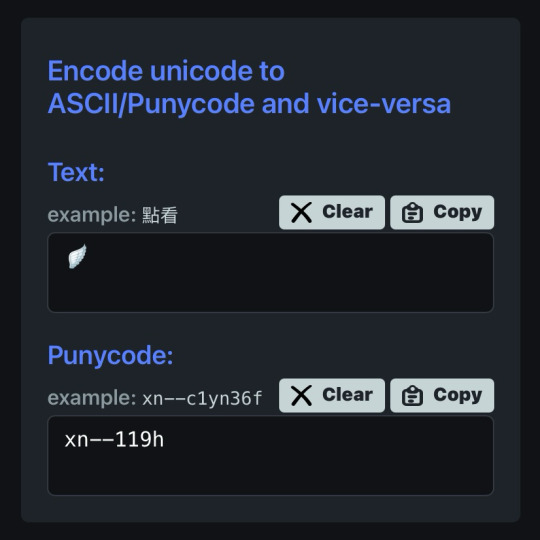
Sí o sí te tiene que aparecer esto arriba, el "xn--campodetrbol-jeb9110dca2873gea.xn--psd" y tiene que terminar en ".xn--psd" o sino no funciona, ya después copias el punycode
Tumblr media
A mí solo me dejó poner un pequeño símbolo y nada más, pero después trataré de tener más paciencia y conseguiré poner los símbolos.
Tumblr media
Y así me queda el link a mí, aquí te dejo un texto para que puedas modificarlo a tu gusto :3 (espero que hayas entendido, no sé explicar muy bien)
(Cruzᅠdeᅠnavajas.ᅠ)
172 notes · View notes