#tutorial 1 example
Explore tagged Tumblr posts
Visit Tumblr Blog
Explore Tumblr blogs with no restrictions, modern design and the best experience.
Last Seen Tumblr Blogs


Fun Fact
Users from the US are the majority of Tumblr visitors.
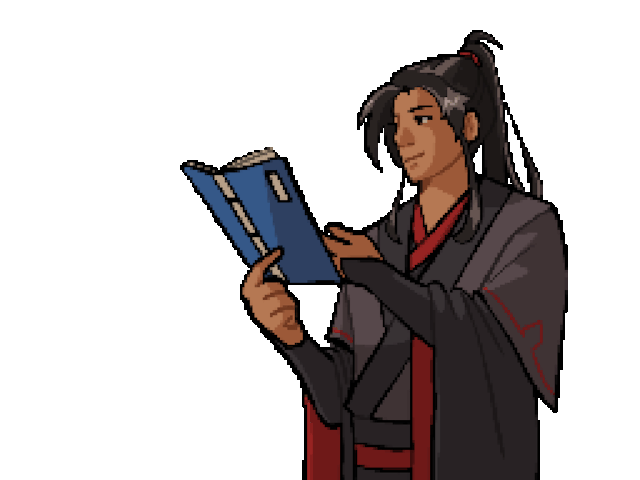
Text


Two different settings here.
The top clip was rendered and optimized into a gif with this code:
for i in *.mp4; do ffmpeg -y -i "$i" -sws_dither bayer=5 -filter_complex "fps=30,scale=540:-1:flags=lanczos,smartblur=1.5:-0.55" gifs/${i%.}.gif; done
Then the second one using this code:
for i in *.mp4; do ffmpeg -y -i "$i" -filter_complex "smartblur=1.5:-1" gifski1/${i%.}.mp4; done
Which sharpens the frames of the MP4 clip, then this to make the gif:
for i in *.mp4; do gifski --fps 23 --width 540 --quality 100 -o ${i%.*}.gif "$i"; done
The differences are way more apparent on mobile. The bottom gif has inkier blacks, overall handles the original colors better, and doesn't have the very obvious dithering that the top gif does. However, it's also a larger file size at 7.3MB vs. 4.3 MB—but those are both pretty good amounts of compression for a 3.25 second gif. If you wanted to do a long gif (like 5-6 seconds) you could probably still upload it using the first code.
3 notes
·
View notes
Text
for i in *.mp4; do ffmpeg -y -i "$i" -sws_dither bayer=5 -filter_complex "fps=24,scale=540:-1:flags=lanczos,smartblur=1.5:-0.75*" gifs/${i%.}.gif; done
There's a very aggressive sharpening effect here which is part of it.
These gifs would be too large to export with the custom pallet filter.


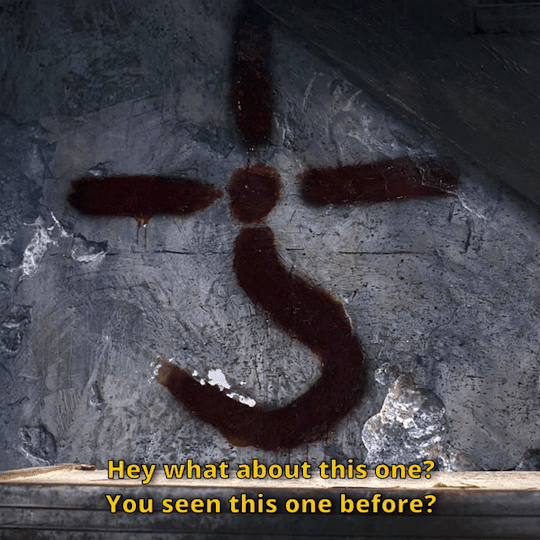
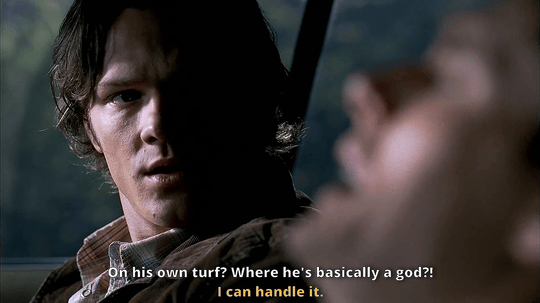
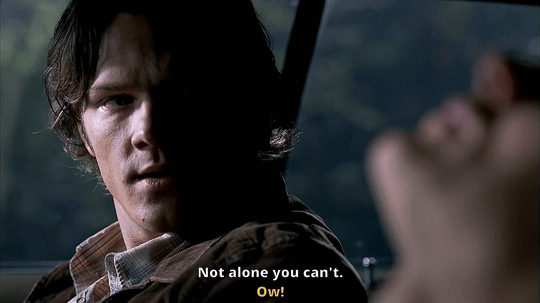
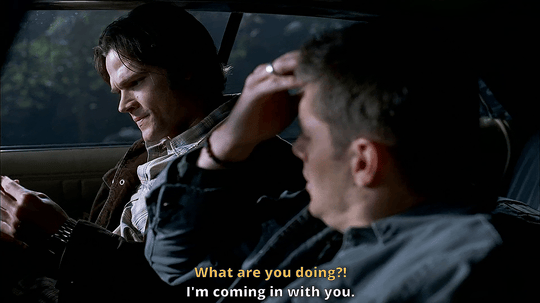
Sam's Motivations 6/? | 1.12 "Faith"
333 notes
·
View notes
Text

Later, Bruce finds him climbing the cave to join the bats.
#dick grayson#robin#alfred pennyworth#fanart#my art#traditional art#watercolor#colored pencils#I'm going to rant in 3... 2... 1...#omg I'm so pissed at how poorly this end up looking#I worked on this for so long and I all fucked it up because I couldn't paint the background well#I do not know how to use colors it's frustrating#I know color theory by heart like I have this shit memorizes#but I'm someone who needs examples to apply theory and all color theory stuff never goes into how to apply it to your art#outside the really contrasting illustrations#also all tutorials for illustration are for digital art and every watercolor tutorial is for landscape and I'm jrcbuyezrcufnqud#watercolor in illustration is not a new thing I came up with#anyway I used gouache to fade the background and it is still so bad#but I spent so much time on this I cannot just throw it away#the miniature I drew was so good and I made garbage why am i so bad at this??????#one day maybe I will draw it again better because I really like this idea
36 notes
·
View notes
Note
what’s your process on rendering hair? i love the way you draw you’ve got gorgeous colors and artstyle plus the way you draw hair is so detailed and natural looking, love it :D
thank you so much!!! that means a lot!!!🥹 i have diff approaches for coloring diff charas hair (eg cedric vs jesse)... but the way i draw hair/hair shines is heavily inspired by cardcaptor sakura(1998 anime)..!! (mentioning bc maybe u could get insp too... ahh it's still so lovely...)
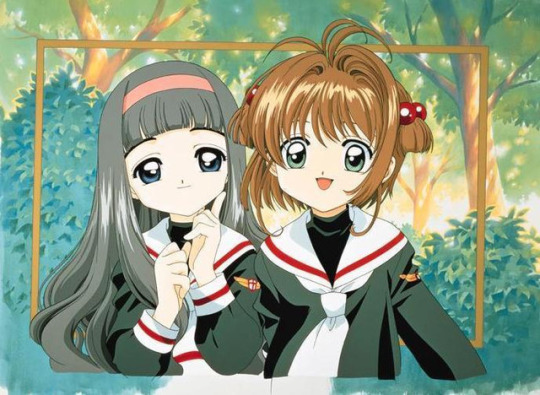

as for my process... most of the time i just do base color + shadows(*often too lazy) + hairshines... and again i learned a lot from studying ccs and yyh...
i color jesse's hair the most detailed i think... i mentioned before that i learned how to color golden hair(for jesse) from looking at these rapunzel screencaps lol... like looking at how the shadows and highlights and colors look... i think these 2 were the most helpful to me bc it shows the same hair in 2 diff lighting conditions (in shadow + stepping into the light)

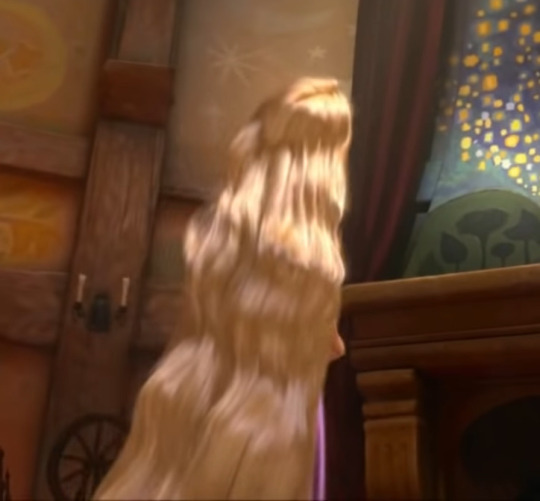
my fav part of drawing golden hair: going crazy with highlights!!! that rly enhances the shiny golden look...the highlights r the diff btwn the 1st and 2nd pic there^ also tip: darkening under the highlights rly makes hair look shiny! (same for fabric)
a v important thing to keep in mind when coloring hair is the form..!! as u can see from those screencaps the highlights r created from raised areas... like the waves in rapunzel's hair and the top of her head... so keep in mind the shape of the hair..! (same thing for the shadows)
as for black hair... it depends on my lazyness lvl dkfbdm sometimes i create the hairshines with negative space by painting individual brushstrokes in black and other times i just color it like other hair (fill in the black base color and add shines on top)
i learned how to do the former from observing webtoons, manga, other artists etc... ex: (from lilac 200%, yyh)
was this helpful at all... i really do mean it that sm of what i learned abt coloring hair comes from ccs🫡
#i thought itd be more useful to show my insps dmfhdj#so u can also learn from the 'source' in a sense...#i wouldve included examples from my own art but... u can just go to my art tag if u want that.. cmdbcn#ask#im still learning!!! coloring hair is fun tbh...#1 of my fav parts#NOT A TUTORIAL!!!! IM NOT A PRO!!!! IM JUST DOING MY BEST TO ANSWER THIS ASK#they asked nicely so how could i say no...🫡
17 notes
·
View notes
Text
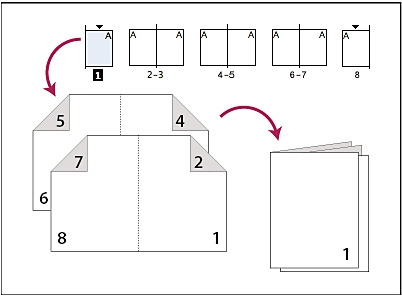
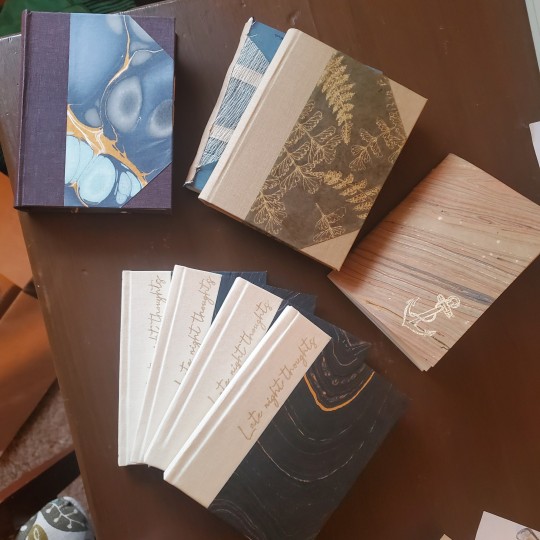
How to bookbind your fanfic!
Part 1: From AO3 to printing
The necessary first step is turning your AO3 fanfic into booklets. Your whole book will be a bunch of booklets piled on top of each others and stitched together.
Booklet examples:

Btw, this is the official Word tutorial on how to make a booklet.
You can see there are different options. I usually do 8 pages, which is what you will see in the video. This means that a booklet of 8 pages is two sheets of paper, printed front and back, folded and one put inside the other. To have your word pages in the correct order you will need to format your word document.
Everything is in the video but here is the text for easy reading (btw the fanfic I used is Exit by schwutthing, an amazing Valjean/Javert fic)
Do not download the fanfic on AO3. Click on "Entire work" and copy paste it on word.
Format your word document. Click on File-> Margins. Select "Multiple pages: Book fold" and "Sheets per booklet: 8". Put "Gutter" to 1cm.
Double click on the empty area just above your text, on a random page of the document. This will make the "Do not download the fanfic on AO3. Click on "Entire work" and copy paste it on word.
Format your word document. Click on File-> Margins. Select "Multiple pages: Book fold" and "Sheets per booklet: 8". Put "Gutter" to 1cm.
Double click on the empty area just above your text, on a random page of the document. This will make the "Header and Footer" option appear. You can click on "Footer" and select the format for the pages' number. Always add the pages number, it will make your life easier.
Now you can justify your book. I usually justify (select all text with CTRL+A and click on Justify), but keep in mind that some documents might not enjoy passing through "justify" so double check your final document. For example, if there are lines of poetry and the author wrote into the next line without starting a new paragraph the justify option will make it weird.
Make your book pretty! I added some illustrations and blank pages. I also made the title of the fanfic bigger.
Fix the chapters' titles and notes. I clicked on Home-> Find and searched for "Chapter", so I could select on each chapter title and make it bold, and also delete the "Chapter text" added just after. You can do the same with "notes" in case you want to delete notes.
Now it is time to print! I prefer to save in pdf before, so I will do that.
IF YOU HAVE A PRINTER THAT DOES NOT PRINT BOTH SIDES
Click on print
Select "Microsoft print to pdf"
Select "Manually print on both sides"
This will create two different files pdf, one for the front pages, and one for the back pages.

Click on the file for the front pages and print them all. Do not panic if you see the pages number all over it.
Now take your printed (only on one side) block of pages and load it into your printer again, making sure that you will now print on the blank back. Open your back pages pdf file and print.
(you can do a trial with a few pages to see if everything is lining up correctly).
IF YOU HAVE A PRINTER THAT PRINT BOTH SIDES
"Click on print
Select "Microsoft print to pdf"
Select "Print on one side"
This will create a single pdf that you can print on your both-sides printer. You will see that the page are not in the order you had on the word document, but the whole file will start with page 8 (see video).
Now print!
What you want is this:
You can see that on the front you have page 8 first, page 1 after, because when folded it will end up with page 1 at the start of your booklet! And on the back of this first sheet you have 7 and 2, that will end up in the correct position.
Now you will have a lot of pages... time to fold and create your booklet! Every two sheets... you will fold as you see above.
Next post will be specifically about folding the booklet, making the holes and sewing them together.
1K notes
·
View notes
Text
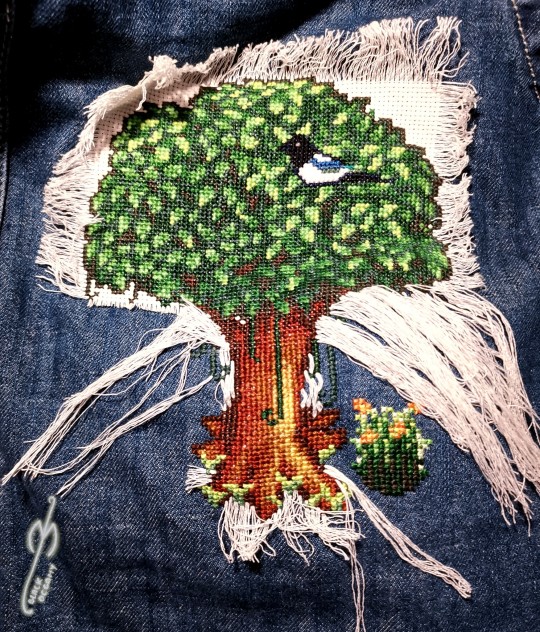
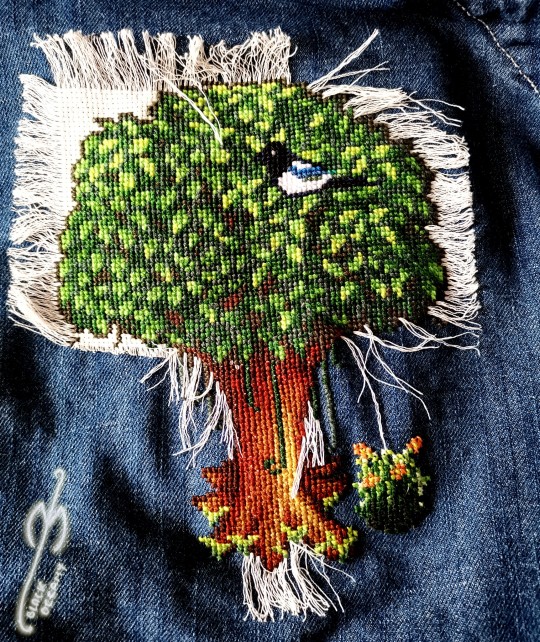
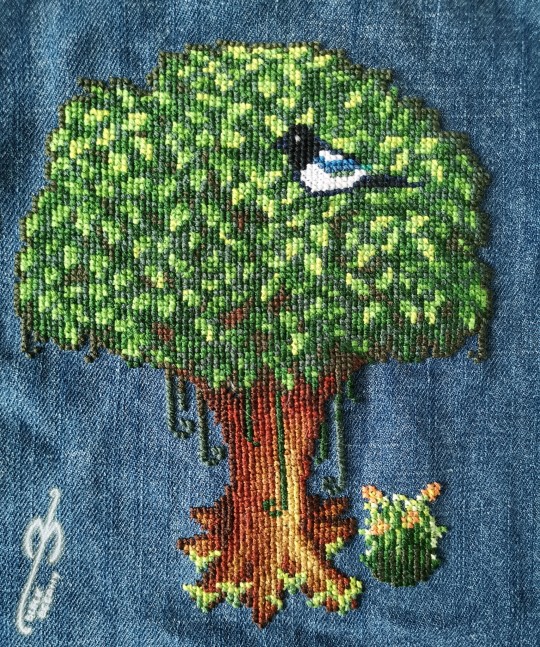
I have recently received another ask about my canvas pulling and since I've been thinking about making a serious tutorial for a while now, I took the opportunity to take some pics and vids while finishing the tree. Do please enjoy :3
1. Why pulling out canvas at all?
Primarily, this is a fantastic technique to apply cross stitch patterns directly to the item you want OR to make patches from old jeans, like this one:
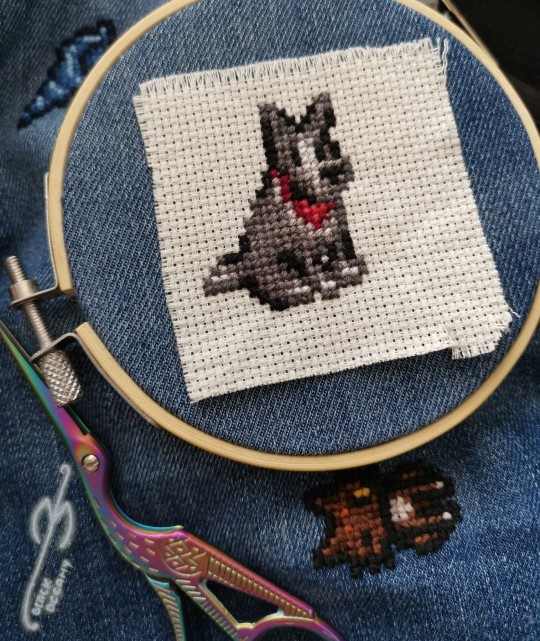
With small patterns I usually don't bother to sew the canvas prior to embroidering, like with the pupper above. In case of the bigger patterns, I usually sew it lightly on the edges just to keep the canvas in one place. The more stretchy the material type is, the more important it's going to be to keep it in place.
2. Why not use a soluble canvas?
I'm sure you can and that they'll be as successful as the regular one 😁 However, as I mentioned in my previous posts here and here, I prefer to err on the side of cheaper, hence the tutorial.
3. Okay. I'm convinced - I even have a pattern embroidered on! What's next?
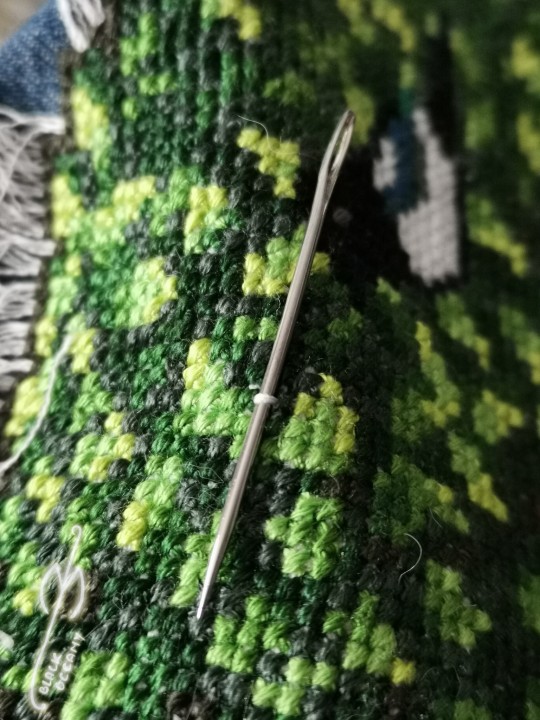
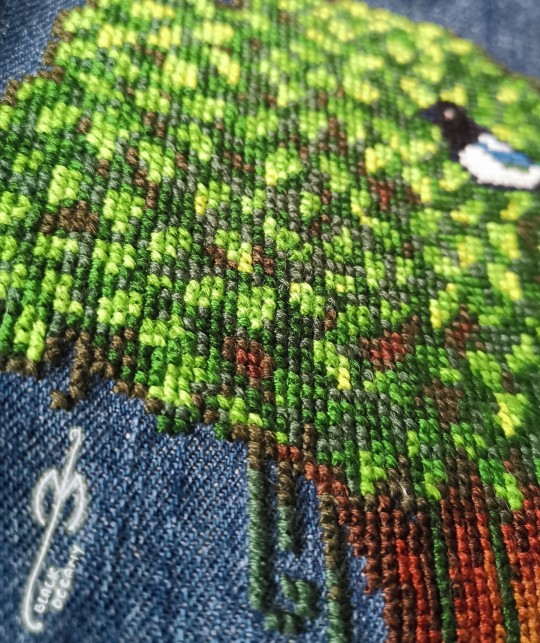
With small patterns (like the doggo earlier) it's going to be pretty easy. You just pull the threads one by one - preferably starting on the thinnest part of the pattern - and you may not even need the pliers. The fun (?) is with the large pieces, because the canvas has on average quite fragile threads and they like to break. Note - the canvas I'm using and I suppose most of the existing canvas types, will have four threads per one embroidery row. It's usually easier to pull one first and then the other three, bit that may vary when, for example, you managed to pierce the thread during stitching phase earlier 😉
If you were already careful during the stitching, you paid extra attention to embroider EXACTLY between the canvas threads and avoid piercing them at all. There are two benefits to that being extra careful: one, it's easier to pull it out later; two, the stitching gains an extra precision to it (and it looks great!). I recently discover that the round tip needle is making it much easier and if you're interested, there's a separate post about it as well!
On to the process! You can see from the pictures how I started with cutting out a piece of canvas that I can later reuse for something small (recycling is my hobby 🤷🏻♀️). I also pulled loose threads from around the tree:
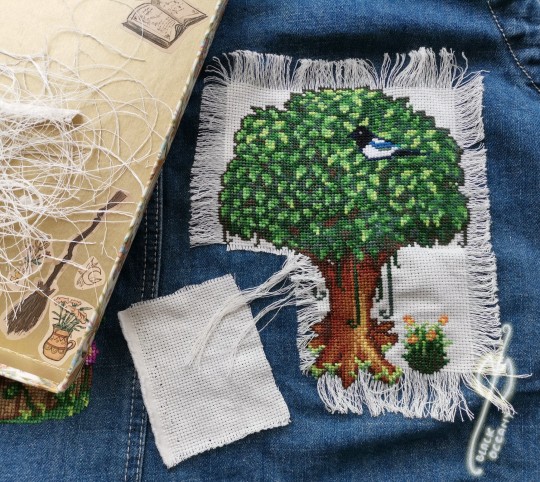
Next part was to clean up the trunk and the grass on the right:
I then cut off the excess to avoid the threads tangling and slowly moved to the sides of the leaves on right and left:
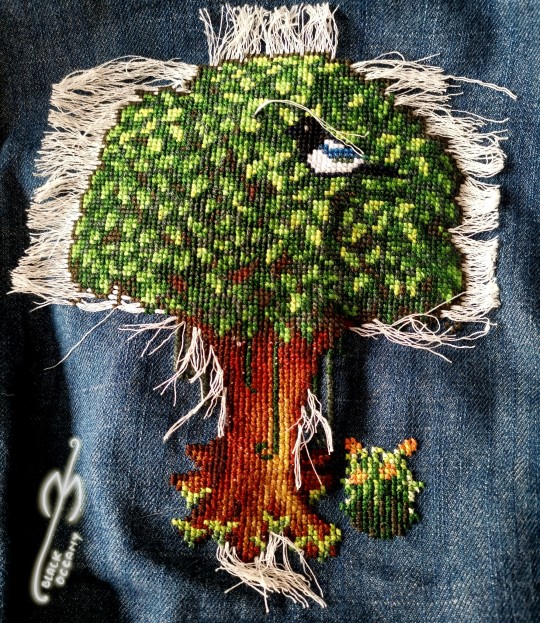
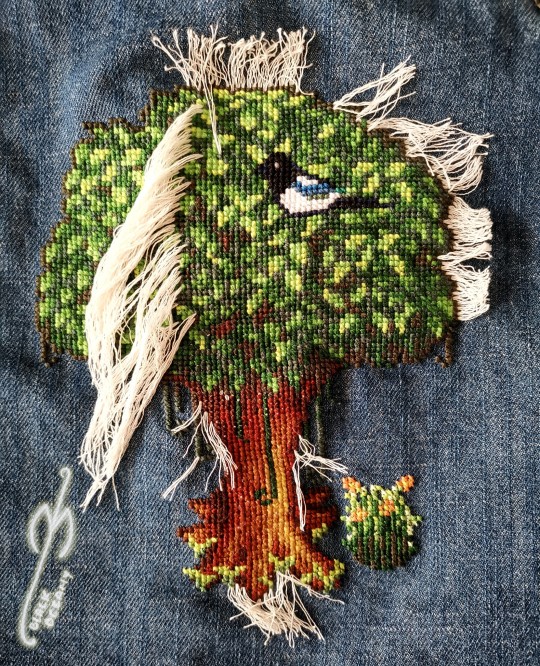
You'll notice that the last photo has the thread pulled halfway through the pattern. That's because on this stage it's usually impossible to simply pull the thread out - even with the pliers it is just going to break off. I use a needle to pluck it from between the embroidery like this:
If you're more of the visual learner, I made this vid that I hope explains the process in more detail. You'll notice that I'm using my fingers and not the pliers here, because it's faster than to switch between tools.
And finally, when you're left with single direction threads like these, it's just a matter of pulling them out one by one.
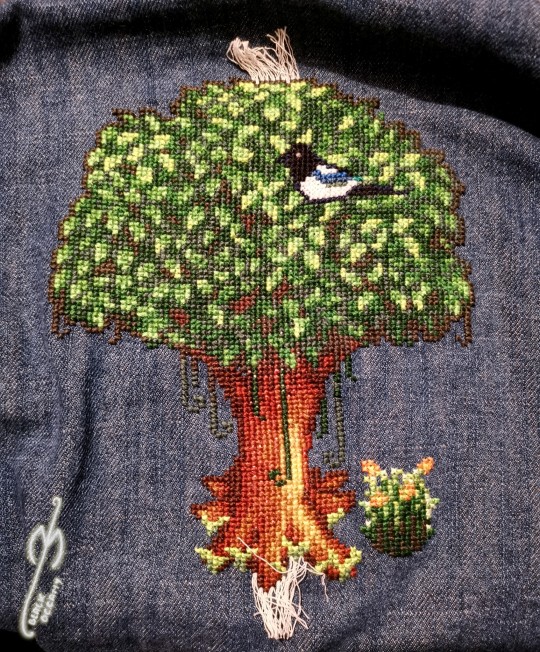
And that's it! The final product looks clean and neat, AND you will notice that without the canvas beneath it's also getting a bit of volume that looks cool (and helps even out small mistakes you may have made along the way).
Thanks for reading this far! Let me know if there's something else I forgot to explain 😊
1K notes
·
View notes
Text
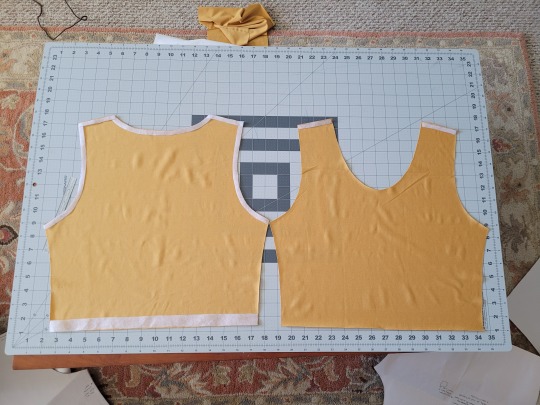
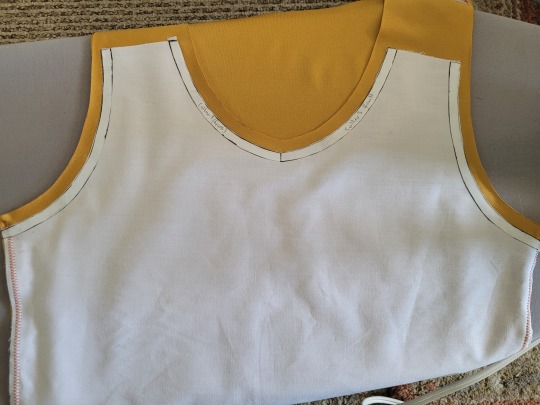
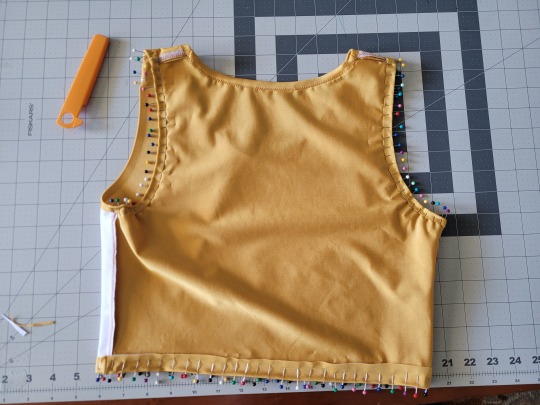
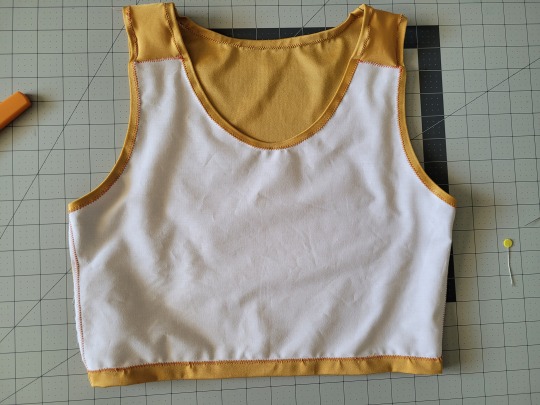
How to Make Your Own Binder that Fits Well and Looks Good
A while back I was in need of some new binders and thought hey, I bet I can make one way cheaper than buying it from somewhere (especially cus some of the ones I’ve bought in the past didn’t really fit right). Except when I started looking for a binder patterns online, I was very surprised that I really… couldn’t find many that looked very nice lol. Most of them had really wrinkled necklines, or didn't bind well, or just overall looked weird. A lot of the patterns also required a serger, which I don't have.
So I just said fuck it and made my own pattern! And it ended up being relatively easy! And the binders fit REALLY WELL and are comfortable to wear, even for long periods. The neckline doesn't show under shirts with loose collars, and the bottom hem doesn't gap or stick out. Here's me wearing one:
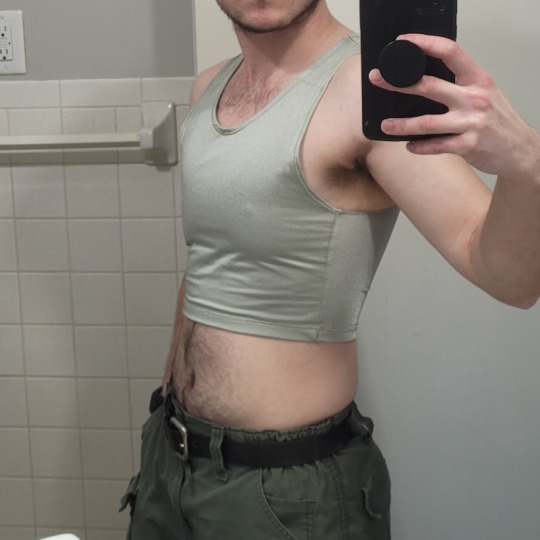
(plus I was able to make myself 5 of them for a total of like ~$50.)
So I figured I could throw together a guide to help out anyone else who wanted to make their own binder but was dissatisfied with the patterns available!
Disclaimer: This tutorial is going to assume a baseline level of sewing experience, and also will require access to a sewing machine. It is not a complicated pattern, but it will most likely require some tweaking and adjustments after you make the first one. Don’t be afraid to make alterations to make it fit better!
This tutorial is for a gc2b-style half-tank binder. It could be altered to be a full-tank binder, but all instructions will be for the half-tank design.
Materials needed:
Stretchy fabric, probably listed as 'athletic fabric' (I use this kind from Joann’s. Most athletic stretch fabrics should work, look for around 80% nylon/20% spandex blends)
Stiff fabric (I use this shirting cotton because I like how lightweight it is. If you want something a little stiffer with more structure, you can use a cotton or cotton/poly blend twill like this. gc2b binders use twill for theirs.)
Lightweight fusible interfacing (I use this kind) (get FUSIBLE not sew-in)
Fusible webbing like Pellon Wonder-Web (this is technically optional but it WILL make your life easier when you’re sewing - just make sure to get the kind with the paper backing!!!)
“But kiwisoap thats 4 whole kinds of materials, surely I don’t need that many!” Ok sure, you can probably get by without the fusible web and interfacing, but consider: they are both dirt cheap (im talking like $1-2/yard), they will make it much easier to sew the final product, and will give you an overall better-looking result. This tutorial is written with the assumption that you’ll use them.
"How much fabric will I need?" Measure the circumference of your chest below your armpits. Add 6 inches just to be safe. This is the yardage of stretch fabric you’ll need, and should give you enough material to make at least 3 binders without much excess left over. You will need around half as much stiff fabric.
Other supplies:
Big Paper (for drawing the pattern)
Flexible measuring tape
Sewing machine
Iron
Pins
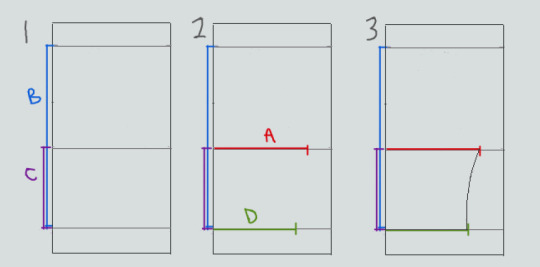
Step 1: Measuring
You will need 4 main measurements for this pattern.

A) Measure the circumference of your chest just below your armpits, then divide the number in half. This will be the widest part of the pattern.
B) Measure from the top of your shoulder down to where you want the binder to end. For most folks, this will usually be around the natural waist (narrowest part of the torso), about 3-6 inches above the belly button. This will be the overall height of the pattern.
C) Measure the distance from below your armpit to where you want the binder to end. This will determine where the arm hole starts.
D) Measure the circumference of your waist where you want the binder to end, then divide the number in half.
So for example, after dividing A and D in half, my measurements are 17", 15", 7", and 14.5".
Next:
Subtract one inch from measurement A - This will help provide some compression. You might need to take it in even further depending on how it fits, but one inch is a safe starting point. I take mine in around 1.5 inches.
Subtract half an inch from measurement D. This will help prevent the bottom edge of the binder from gapping. Again, you may need to take it in more or less, depending on your own body.
Add 1.5 inches to measurement B and one inch to measurement C. This is to account for the hems and armhole placement.
This makes my final measurements
A = 16"
B = 16.5"
C = 8"
D = 13.5"
From here on out, we are only going to be working with the measurements that we have added/subtracted to, NOT the ones we initially took.
Step 2: Drawing the Pattern
You will need a piece of paper large enough to accommodate the entire pattern. This may involve taping multiple pieces together, or using a piece of newsprint, etc.
I recommend folding the paper in half to ensure that you get a symmetrical pattern. However, this means you will need to divide measurements A and D in half again, or else you’ll end up with a pattern that’s twice as wide as it should be!
Also note: the pattern is drawn with the seam allowance built in! You don’t need to add any seam allowance.
To draw the pattern:

Begin with your folded paper. Measure and mark B and C on the paper, and draw a line extending across the paper. These will be your guidelines.
Measure and mark A and D along the middle and bottom guidelines, respectively. Remember, the paper is folded, so you only use half of the measurement for A and D.
Draw a loose curve connecting the endpoints of A and D. If needed, you can also just draw a straight line between the two.
Mark the opening for the neck hole. Depending on your size, it will measure around 6-8 inches across at the top (remember to divide this in half for the folded paper) and about 5-6.5 inches deep. (mine is 6.5" across and 5.5" deep) Draw a curve to connect the two points. This part will take some tweaking and adjusting to get it to look right lol.
Measure the width of the strap - this should be somewhere between 2.5 - 4 inches wide. They will end up about 1/2” to 3/4” narrower once you sew them. Draw the line at a slight angle, as shown.
Connect the endpoint of the strap to the endpoint of line A with a curve like in the diagram.
This will be the pattern for the front piece.
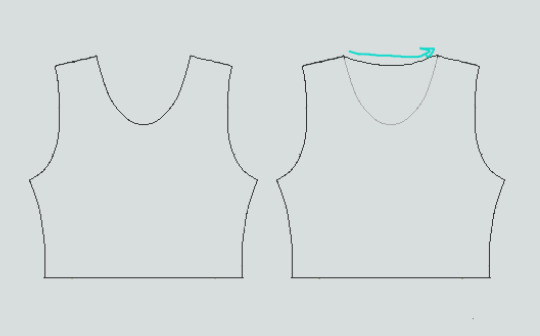
To make the back piece, trace the front pattern, but make a very shallow curve for the neckline instead of a steep one, as shown:
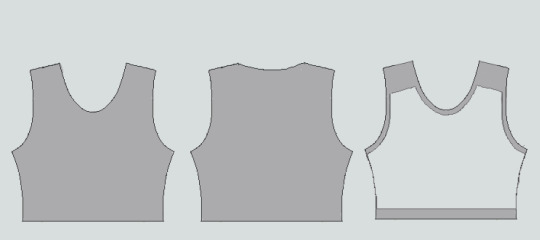
The last piece is the stiff front panel. This is what provides the flattening effect of the binder. To make the pattern, trace the front pattern again. Trim 3/8” in on the sleeves and neckline, and 3/4” to 1” along the bottom. This gives a flatter hem. Then trim the straps shorter by a few inches. This helps the binder lay flatter along the shoulders.
When you're done, you should have 3 pattern pieces that look approximately like this (stiff panel shown overlaid on the stretch fabric to show how it fits together).
NOTE: If you want more compression or just want to make it a bit sturdier, you can add a second panel of stretch fabric to the back piece. Just use the bottom half of the back pattern (from the widest part down to the bottom hem) to cut out another piece of stretch fabric. Attach it to the back piece with a strip of fusible webbing and a zig-zag stitch along the top.
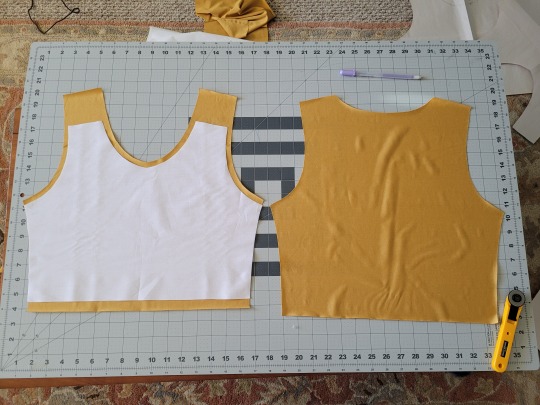
Step 3: Putting It All Together
Once you’ve made the patterns and cut out the pieces of fabric, you should have something that looks like this:
The next step is adding interfacing and fusible webbing. Use your pattern to cut out 3/8" strips to fit on the top of the straps for both pieces, and to the neckline, sleeves, and bottom hem of the back piece, as shown:
If you want to add it to the bottom hem of the front piece, it will help keep that hem flat when sewing it down later, but it's not essential.
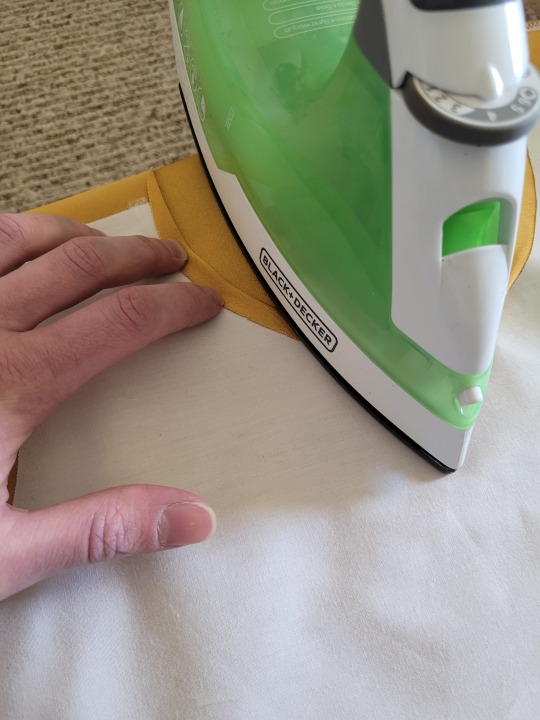
If you choose to also use fusible webbing (WHICH I RECOMMEND), you will apply it to the stiff front panel similarly to how the interfacing was applied, ~3/8” strips along the neckline, sleeves, and top of the straps. Cut out two strips for the neckline and sleeves, because we'll use those later too.
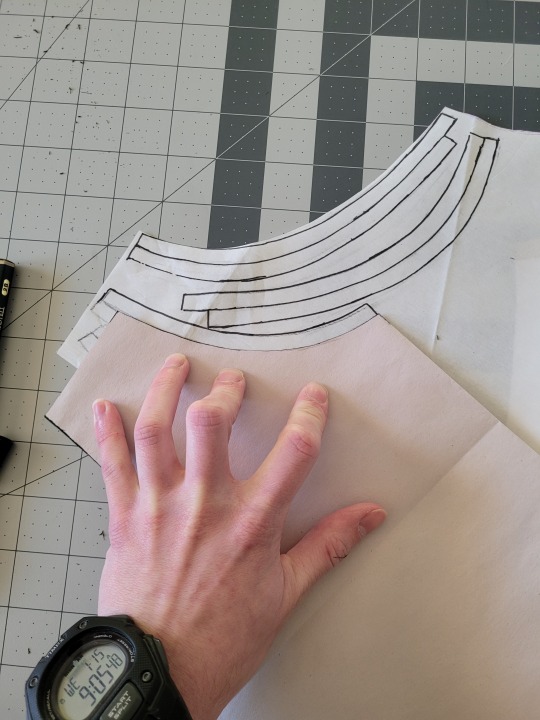
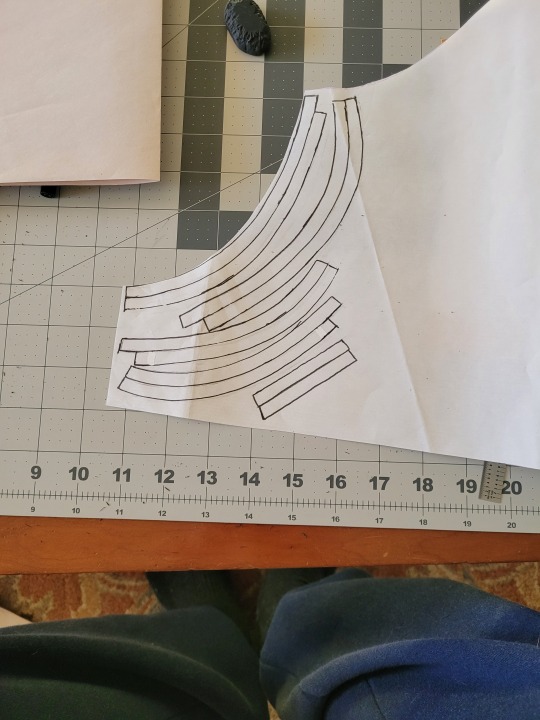
Iron the strips onto the front panel as shown:

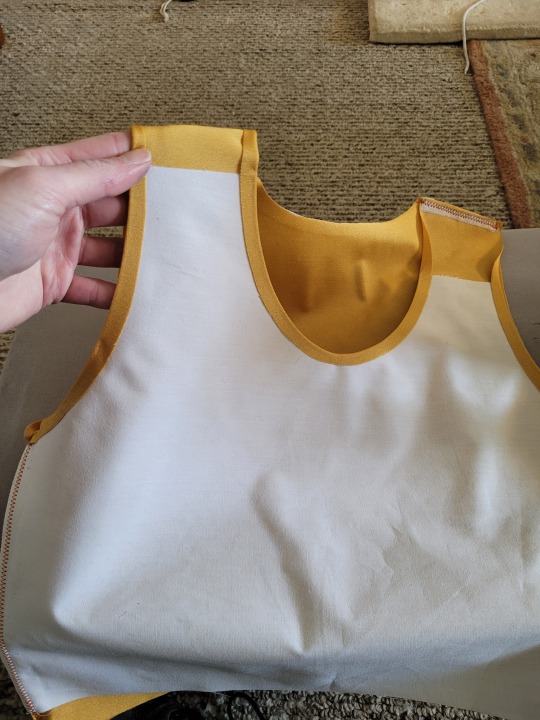
Once it's on, just peel off the paper, position it webbing-side down on the stretch fabric, and iron it to fuse the two pieces together so everything stays in place while you sew. THIS MAKES IT WAY EASIER TO SEW.
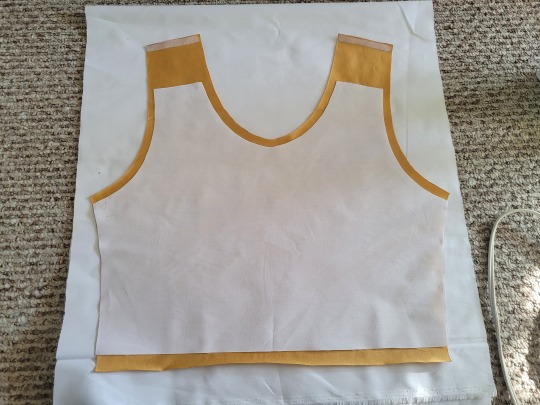
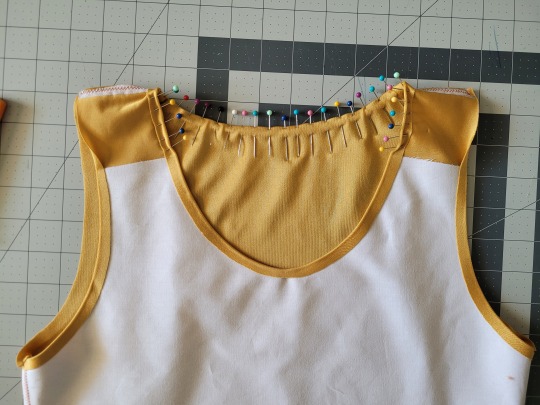
After the stiff front panel is fused to the stretch fabric, you’ll sew the straps of the front and back pieces together, then join the pieces along the sides. Pin the hell out of it to keep everything in place -this type of material is VERY prone to puckering.
When sewing, USE A ZIGZAG STITCH. A straight stitch will NOT WORK for stretch fabric. I adjust mine to 1.3mm long and 3.5mm wide which has worked well. If your machine doesn’t let you adjust stitch length or width, well. That sucks, I don’t really have any advice.
After you sew the front and back pieces together, you can add more fusible webbing to the front panel to help hold the hem down flat and prevent it from puckering while you sew it. Just add the strip, peel the paper off, then fold the hem over and iron it down. This part isn’t really necessary, but it does make the hems look nicer. If nothing else, I would recommend adding it to the neckline.
After that, you just fold & pin all the hems and sew them up with a zigzag stitch, then go over the raw edge at the top of the stiff panel (where we cut the straps shorter).
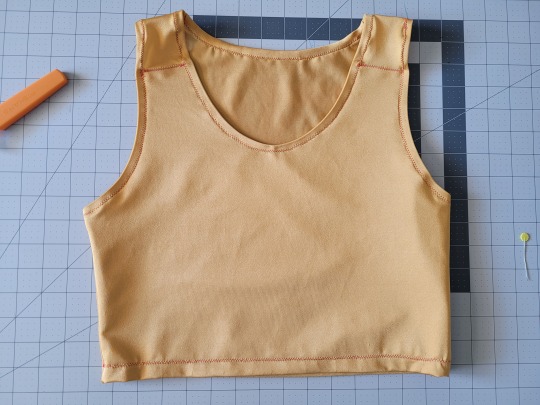
And that’s it! You’re done! And now you can make your own binders whenever you want!
And hey! If you used this tutorial and wanna throw me a dollar or two on ko-fi, I wouldn't complain.
920 notes
·
View notes
Text
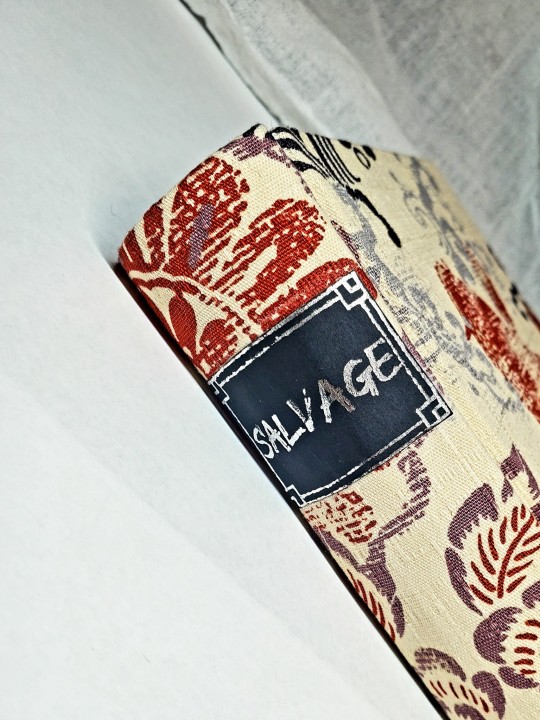
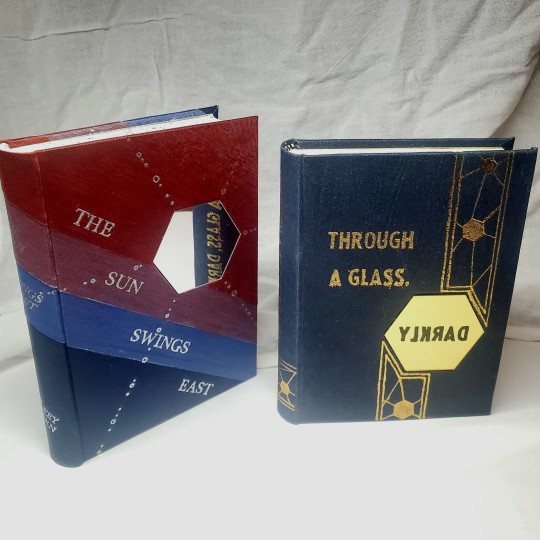
Book Decoration: AKA All The Ways I Don't Use a Cricut
(this post is for people who don't want to buy an expensive cutting tool, or for those that do have an expensive cutting tool that would like to mix things up a little)
1. Print That Shit
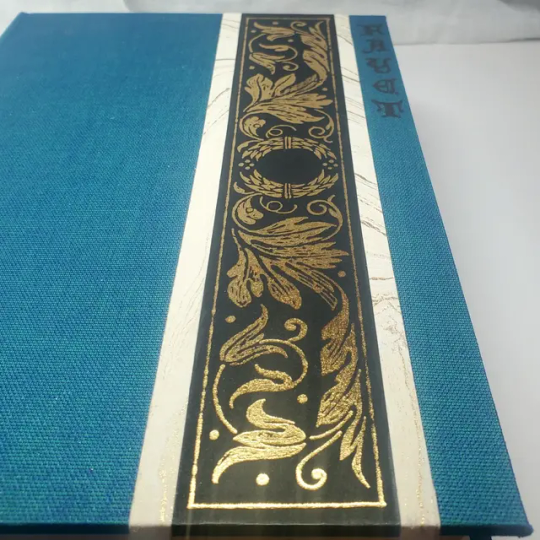
If you're already printing your own textblocks, an easy step for titles is to print them. Above is a title printed onto an "obi" of decorative paper. I measured out where I wanted things on the finished book and laid it out in Affinity, then printed it on a full sheet & trimmed it down to wrap around the book. A more simple method is to print & glue on the label into a slight indent in the cover (to protect it). A third option is to do the spine in bookcloth, while you print on paper for the cover and then glue that paper onto the boards (this usually looks even better when it is a three-piece bradel bind).
2. Foil Quill / Heat Pens
The heat pen is one of my go-to tools, but it can be a bit touchy about materials. The most popular version is the We R Memory Keepers' Foil Quill (which is one of the most ergonomic), but other pens exist that can get you to a higher heat temp, finer lines, or more consistent foil. For example, I have a pen created by a local Japanese bookbinding studio that fares way better on leathers than the WRMK quill & with a finer tip, but it's hell to control. Best results in general are on paper or smooth bookcloth (starched linen, arrestox, colibri - even duo will work but its less solid). The fuzzier a bookcloth is, the less your foil quill wants to deal with it. This means the heat n bond method of making bookcloth does not play nice with a heat pen usually, but there are two solutions: 1) use this tutorial on paste + acrylic medium coated bookcloth instead that will get you a perfect surface for the heat pen, or 2) use the pen on paper & then glue onto the cloth. I did a video tutorial for both foil quill use and this type of homemade bookcloth for @renegadeguild Binderary in 2023.
You get the most consistent results by tracing through a printed template that is taped in place, as I do in the video above.
3. Paint That Shit
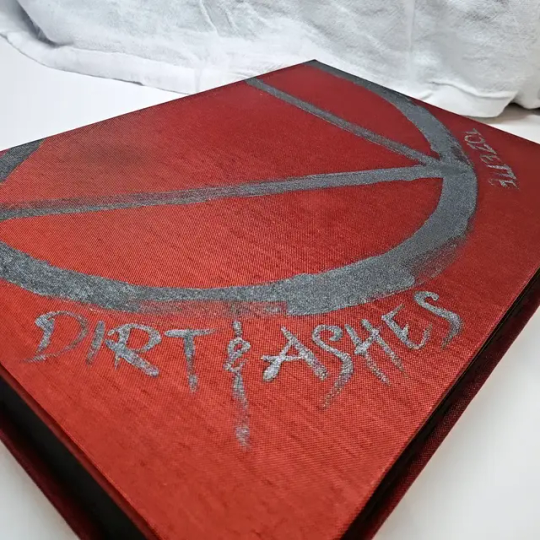
Acrylic paints will do you fine! The above is free-handed with a circle template, because I wanted that vibe. If you need straight lines that won't seep, lay them down with tape first & then paint over it first with a clear Acrylic medium, then your color. Same goes for stencils. Two more examples of painted bookcloth:
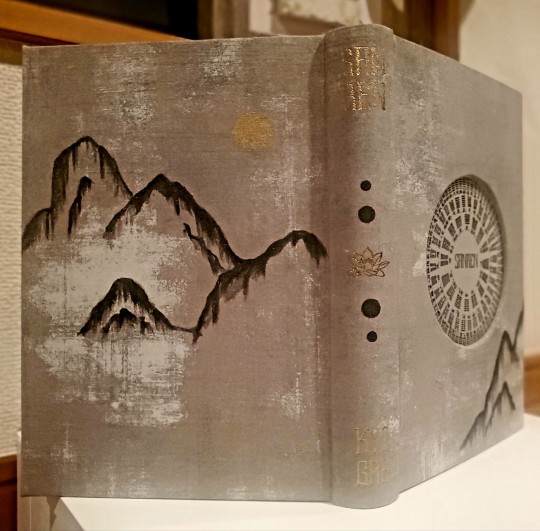
4. IT'S GOT LAYERS

By using layers of thinner boards, you can create interesting depths & contrasts on your cover. You can also make cutouts that peep through to the decorative paper behind. The most important part to this technique is the order in which each edge is wrapped. To get a good wrapped inside edge, you will split the turn in into tabs to get them to conform to a curve. You can also layer multiple colors of bookcloth without multiple layers of board, as seen below left, so long as you mind your cut edges for fraying.
5. Inlaid... anything
Mirrors! Marbled paper! I saw someone do a pretty metal bookmark once! The key is creating a little home for it to live in, which is pretty similar to the above layering method. On one layer you cut the shape, & glue that layer onto the bottom solid board before covering. You can do the top layer as an entire 1 mm board (like I did for the mirrors) or a sheet of cardstock, like I would use for inlaid paper.
6. Decorative Paper
Decorative paper is always helpful & adds to the paper hoard... & its effects can be layers with other techniques, as below. Marbles, chiyogami, momi, or prints & maps of all kinds can be great additions. Some papers may need a protective coating (such as wax or a sealer).
7. Stamps (with optional linocut)
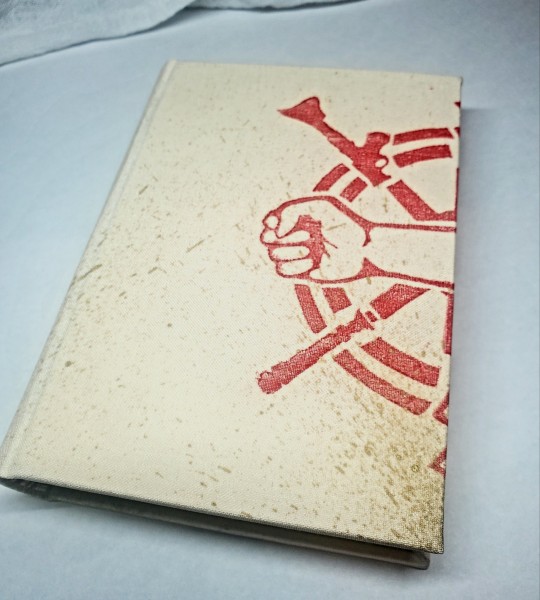
While I've not used many more regular rubber stamps, I do know some who have, successfully! And I've used one once or twice with embossing powder (see photo 3 up, the gold anchor on the little pamphlet bind). What also works is to carve your own linocut or stamp, & then use block printing ink to ink it onto your fabric (as i did above). A bit time intensive, but it was nice how easily reproducible it was, and I liked the effect I got for this particular bind.
These methods are not exhaustive, just ones I've used, and there are of course many others. I haven't gone too into detail on any of these for the sake of length (& post photo limits) but feel free to ask about more specifics. Usually I'm using them in combination with other options.
#fanbinding#bookbinding#celestial sphere press#ficbinding#in progress review#bookbinding how to#i am not particularly anti-cricut or anything#it's just a very expensive tool#and its prevalence sometimes makes new binders think they HAVE to get one#when they absolutely do not#you can make pretty books without it
702 notes
·
View notes
Text

I am now opening custom Ace Attorney sprite commissions!
I have 3 open slots.
Depending on how the initial slots go, I may or may not offer more. DMs also welcome.
>> Commission form! <<
Details
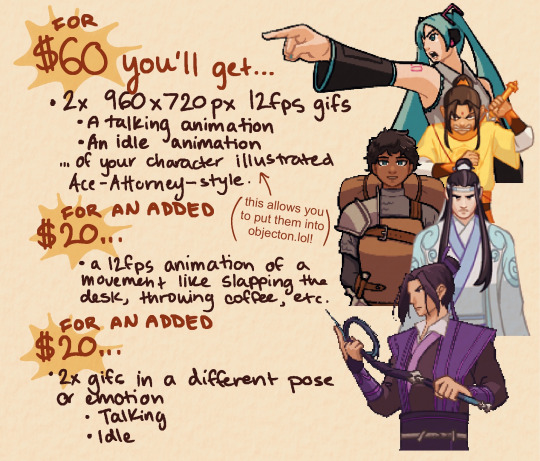
What exactly will you receive for $60?
Two 12fps looping .gif files in an Ace Attorney style, one talking and one idle, of the character of your choice from the waist up. They can be in pretty much any still position, but I get final say on whether something is too difficult or too complex. I will work to make the sprite as accurate as possible while adhering to the style.
What will you receive for $20?
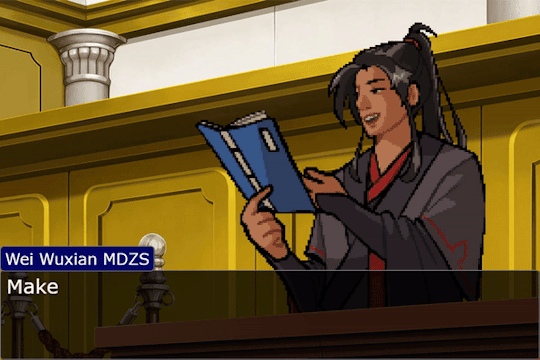
Either a short 12fps animation of your character or another two looping gifs (talking and idling) in a different pose/emotion. An animation can be combined with talking. For example, this Wei Wuxian MDZS would be $80: $60 as a base price (standing still and talking) with $20 added for his hand gesture.
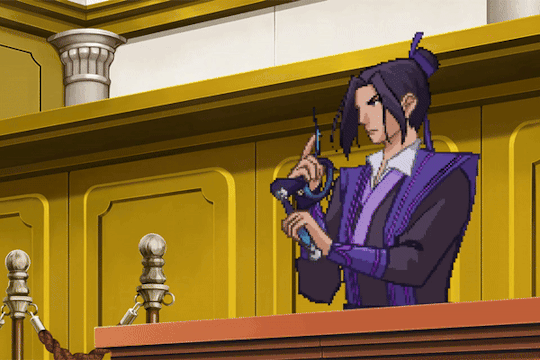
This set of Lan Wangji MDZSs would be $100: $60 (base price, neutral animation) + $20 (happy) + $20 (displeased).
What counts as a "slot"?
Art of one character, no matter how many pieces I was commissioned for.
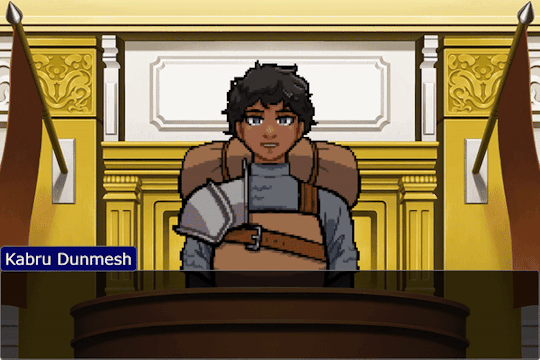
For more examples of my Ace Attorney-style work, here is the masterpost for my MDZS x Ace Attorney crossover series, which I have been adding to for a while now. Here are Kabru, Miku, and Hela Vitrum (my most recent commission). They are a good example of the base commission -- a looped talking gif and a looped idle/blinking gif.
Policies (read this before filling out the form!)
I am not affiliated with objection.lol. The sprites *can* be used in the program to great success. However, I will not guide you through creating a case in objection.lol. There are a lot of tutorials available. I am selling animated illustrations of your character and nothing else.
I am not affiliated with Capcom or Ace Attorney. My work copies the style of original games. In many cases, I have referenced pre-existing animations or sprites.
Just in case, I'm limiting the max number of pieces for a single character to 3 poses and 1 animation ($120) (so I don't get bored drawing them over and over again). One person can commission me for multiple characters but they will count as different slots (i.e., you may commission the max amount of work for Blorbo Bingus ($120) and also commission two poses for Dworbo Dingus ($80) for a total of $200, counting as two slots).
It is my privilege to take or refuse commissions at my discretion.
Depending on demand, I may adopt a first-come first-served waitlist system, but I really can't know at this point.
Payment depends on the price of the commission, but in general I will not start the piece until I am paid via Paypal. Venmo is a secondary option. My prices are in USD.
Once I get started, I work quickly, so any changes should be requested at the sketch stage. I will work with you to get it right. Once I have started work a piece (once planning is finished) I will not give refunds. Finished piece(s) should be done within a month of finalization (you giving me the go-ahead to start).
Filling out the form does not mean I have accepted the commission, but it does mean that I will contact you in a routine way about it.
These commissions are intended for personal use. The pricing reflects that. Tell me if you wish to use a commission in a monetized way, as that will require renegotiation.
If you wish to communicate with me about commission work without filling out the form, my email is [email protected]. I am not planning to offer commissions other than Ace Attorney sprites at this time. I will reply within the week.
Communication via tumblr DMs, asks, or comments is welcome!
#art commissions#commissions open#open art commissions#art#my art#ace attorney#ace attorney fanart#animation#animation commissions#artists on tumblr#mdzs aa au
2K notes
·
View notes
Text
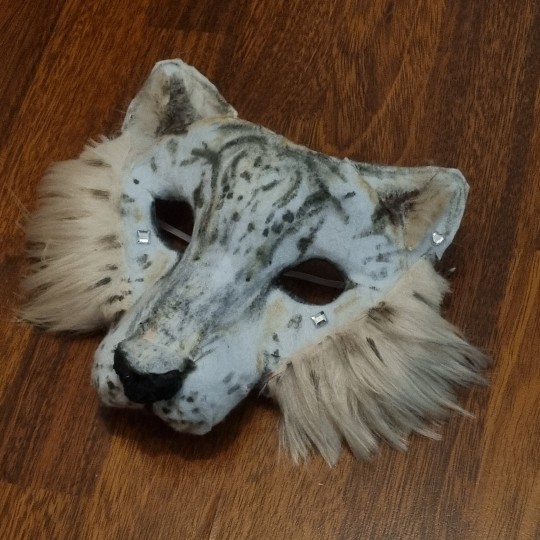
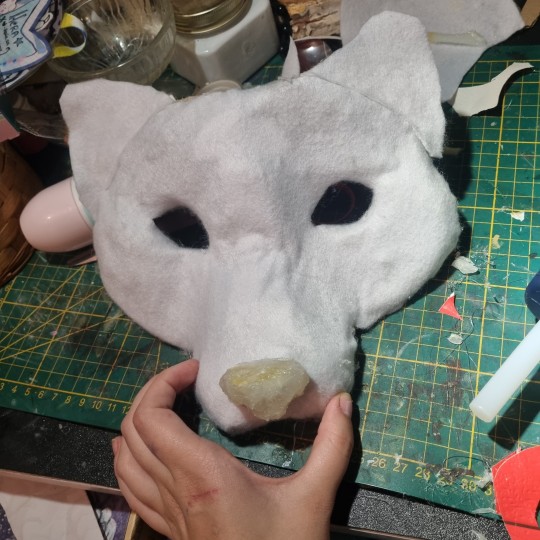
Long awaited Hera's mask tutorial (no cat base, low budget)
example of the masks I've made, here:
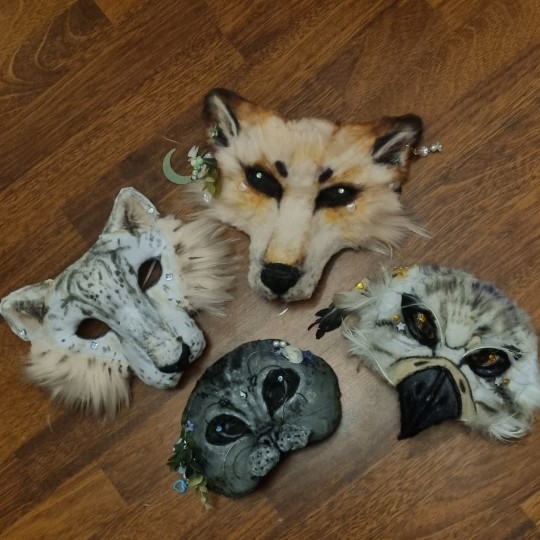
Author note: I have a 3 year experience, and I got used to making gear like this, so if you are trying masks for the first time, you might find some difficulties.
also, the whole thing Is REALLY "trust the process"... Anyway here we go!
You need: Cardboard, paper(optional), hot glue gun, felt/something to fur it/any material is okay if it works, foam (optional), basic tools like scizzors
1. Cardboard forming
You need a piece of cardboard that's kinda a little bigger shape than your face, and measure where the eyes should be, so you can see well.
you can make the mask symmetrical by bending it in half, but it's optional
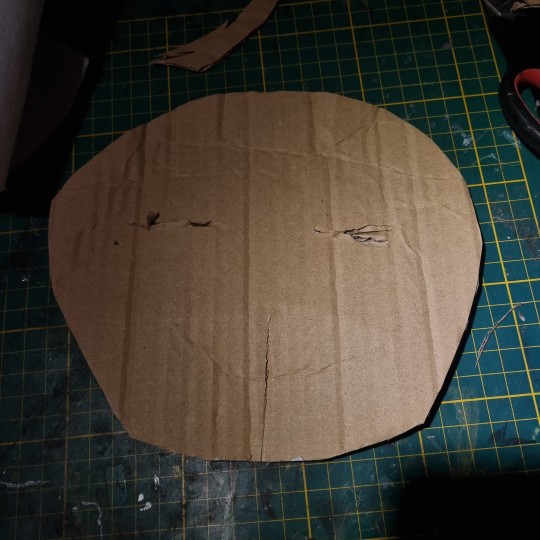
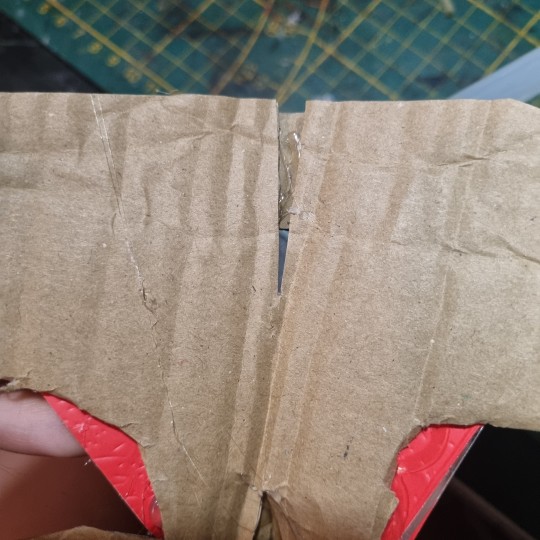
the first picture down there shows the back of the mask, don't be scared to pull it in and out, I'd say, you need to form the mask shape with your fingers VERY GOOD.
it really depends on what species you wanna make, I'm making a snow leopard rn!
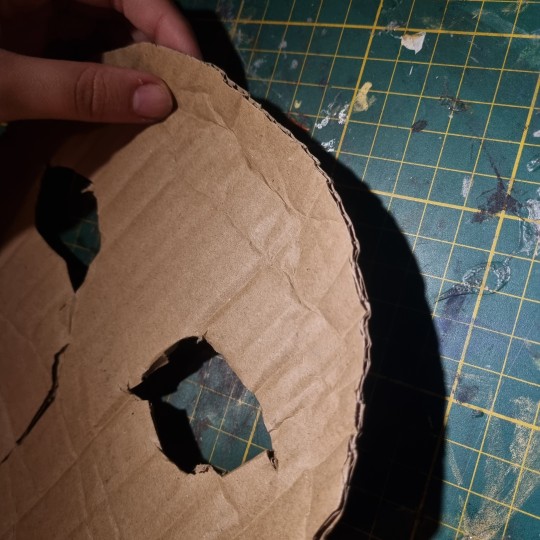
you can even cut it almost in half, and shape it to your liking
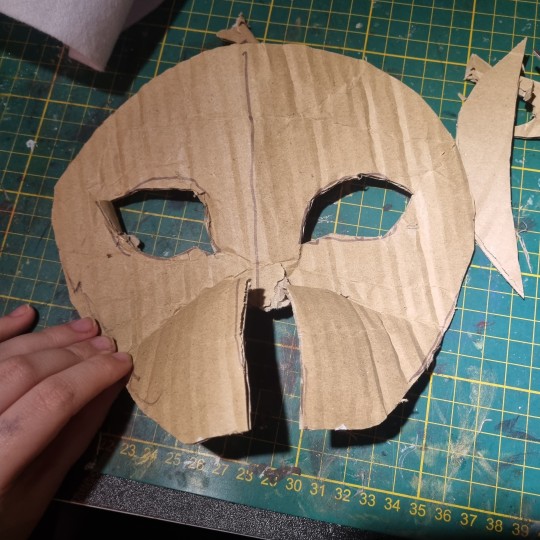
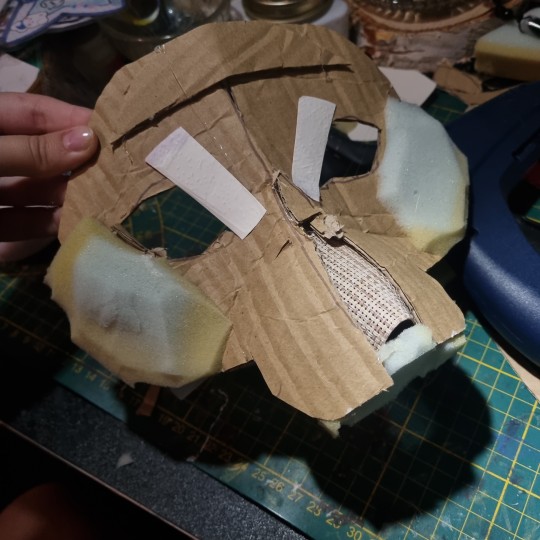
2. Texture
for this part, when you have your BaseOfTheBase ready, you need to make it more 3d, so it doesn't seem flat. small pieces are a key.
u can use various materials to recreate the real look, for example - foam that is easy to work with, and maybe more cardboard pieces layered on eachother. also you can use the pieces to glue the whole thing down together so it's sturdy.
I smooth it out with paper too, so the fleece/felt/fur sticks better to the mask and doesn't leave unnecessary bumps..
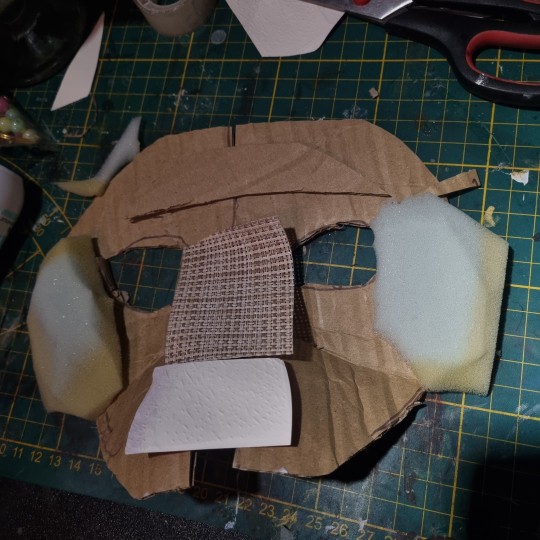
you use the bends like that to create a 3d effect, and expand the mask a little.
That's what I came up with! I added alot of paper pieces to smooth it down ^^
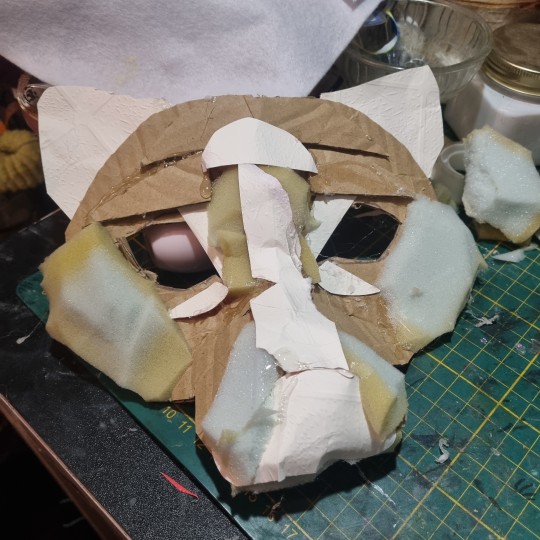
3. furring/felting, and the final touches
this part may be kinda tricky, so i reccomend you to watch various of felting tutorials on cat masks, cause this works basically the same!
I didint take any more photos rly, but here's the final product, and only felted one. (the nose is made out of hot glue)
I don't really want to elaborate on how to do the patterns, since you're the one who's customising the mask, but I like to use alcohol-based markers to make them! acrylic paint is also okay ^^
I hope I helped in some way !
If you have any questions, feel free to ask <3
#alterhuman#therian#nonhuman#bird therian#therian gear#snow leopard#art#therian art#tutorial#aviankin#birdkin#therian mask#mask making#otherkin
780 notes
·
View notes
Text


Gifset from Tutorial 1 with and without the basic recoloring steps in DaVinci Resolve.
1 note
·
View note
Text
Example of a set made with the script I mentioned here.


Taurus Sam In The Flesh 4 /. | 3.10
96 notes
·
View notes
Text
Ok, as much as I have been hyping and playing 12 hours a day since it got out (still in Act 1 though, bc I'm a slowass player and completionist), I feel like I have to say something that is getting hard to ignore at this point... and I wanna preface this by saying that I am loving a lot of aspects of the game and I adore the writing when it comes to the companions, who I am obsessed with.
And maybe this will get better yet, as I generally heard the writing picks up once the story progresses beyond picking up all companions..
But I'm starting to get quite upset at the way the writing just does NOT care about the established lore and the politics of Thedas like at all, when to me - and many others - that richness, nuance and depth of the world is what makes the games so special.
(Spoilers below)
I looked past the way the elves in Arlathan just seemed to know that their gods are evil and Solas is "kind of a dick" but was right about that. When, you know, that made him basically the Satan of their pantheon up to now.. It was after all the tutorial stage of the game and I understand that you wanna ease newcomers into the lore. I could also handwave it in-universe with Morrigan being there - she could have filled the Veiljumpers in on the discoveries of the Inquisition or even what the Well told her.
It felt a bit weird that our contacts in every other faction just accepted this huge revelation without a blink, but again it was the early stages and I also get that having a discussion about it 6 times with different faction leaders would have been incredibly tedious. So I ignored that. And yeah, at least the First Warden found it hard to swallow.
The fact that they brushed aside the gods finding elven subjects - many of whom after all still worship them - with one sentence from Solas was disappointing though. Instead they chose to ally them with the Venatori and the Antaam who are the pure evil factions with no nuance or motive to side with them besides a comic book level of hunger for power. They didn't even throw in a sentence about the gods maybe speaking to the Venatori through the Archdemons to get them on their side or how it's very ironic that the Venatori, who want to make Tevinter great again, stoop to working with the pantheon of the people they oppress because they see them as lesser and other. No political exploration of the massive lore implications at all.
It really hit me when I picked up Davrin and he commented how Elgar'nan and Ghilan'nain blighting the world would really endear us (elves) to the rest of Thedas - this was the first time anyone actually mentioned the political impact of the elven gods being real, freed, evil and blighted on modern day elves at all, when this should be HUGE. It should be ugly. It should be complex. It should be explored in as many examples as bloodmagic and the oppression of mages was in DA2. It should be a central point of Act 1. (This btw made me love Davrin so much in that moment because this was the first time in the game for me when I actually felt like talking to a Dragon Age elf and even just that one line felt like home.)
And now I just did Taash's first companion quest and it seems Qunari lore is also being ignored (except for the gender aspect of it, which I look forward to). Taash's mum was a scholar and had a baby and the only problem about that was that it could breathe fire and was special but otherwise all would have been dandy? Like she would have just been allowed to keep Taash long enough to find that out about her baby if she was living under the Qun? That directly contradicts everything we know about how the Qunari's culture around reproduction and childcare works.
Sorry to be negative and talking myself into a rage - I know it's not something people want to see rn. But like, I realise you have to brush over some lore intricacies for brevity and to make it digestible for new players. But this is a world initially inspired by Wheel of Time and ASOIAF, both of which are interesting because of the depth of ficitional cultures, lore and politics, and hence it's also what gives Dragon Age its appeal. And now they take us to the most politcally interesting areas on the world map and just get rid of all of political depth?
That's really disappointing. Imagine if Winds of Winter dropped all political themes just because there's several previous books and it's been some a lot of years.
Also, I managed to play DA2 before I ever played Origins and they could introduce me to a vast established background of lore just fine back then.
Sorry. Rant over. But I had to get that out of my system.
#veilguard critical#datv critical#datv#dav#veilguard#dragon age#dragon age the veilguard#dragon age: the veilguard#bioware critical#datv spoilers#veilguard spoilers#da4#da4 spoilers#bioware#da elves#qunari#the veilguard#dragon age veilguard#my obsessive da ramblings
662 notes
·
View notes
Text

the ultimate beginner metadata tutorial !! by a dummy :3

HEY PALS AND PEOPLE doing some tips and tutorials ,,,, kinda explaining the metadata that people do in rentry
the site already have a "tutorial" on the "how" window, these on the post are the ones who need further explanation
i will put in topics and try to do my best on this, its a long read!
• the border i will be using for example its by @/suturical on this post
• now, how to understand this and make the magic happen?
GOTCHA!!!
1. Borders: container adjustements
• the least important thing is the container width, you can put as you please but i use it on 400px — 610px, its just my recommendation
• now the padding is important, its basically the distance between the border and the elements of your rentry
• example: padding on 25px
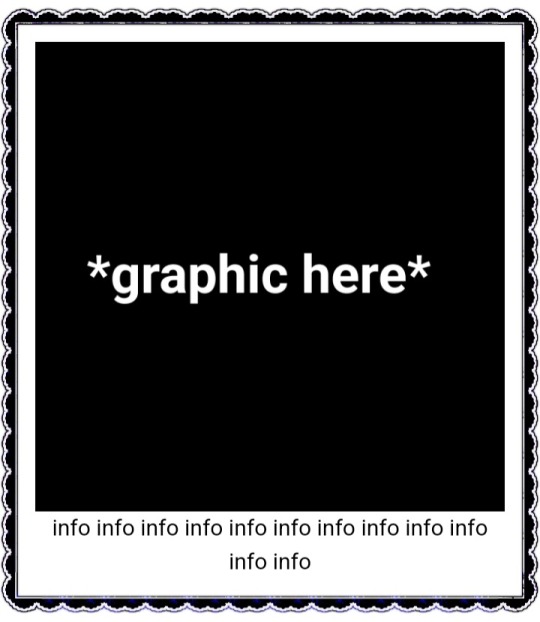
• example: padding 20px

2. Borders: slice
• the image slice is basically how much it will slice your border and repeat it, i recommend using it 20% – 40%, however adjust as you please!
• example: slice 37%
• example: slice 23%
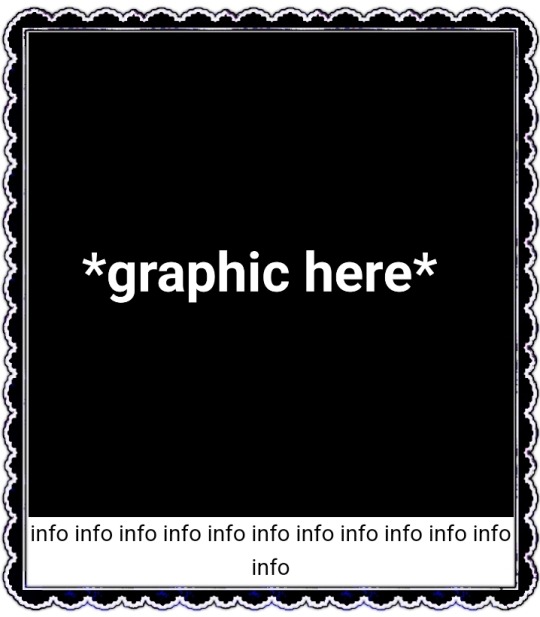
big difference isnt it? and i only changed the slice part, nothing else!
3. Borders: width
• basically the width of the border, adjust as you please but i also recommend to put on 30px as its the maximum size you can put
• example: width 30px

• example: 15px width

4. Borders: repeat
• this is another thing that dont have much secret and explanation about, there are 4 repeating types for borders, they are:
• stretch: will stretch the original size of the border across the entire container

• round: most used, 'normal', will make your border get around the container
• repeat: will repeat a certain part of the graphic image across the sides

• space: will give space between the repetitions

• onto the next part, text!

2. Text: font applying
• ngl its pretty simple, first catch ANY font of the google fonts site and do like the screenshot above, detail, if you font name has a space between the name (example: playfair display) you MUST put the _ to substitute the space, or it won't work
• but if the font name doesn't have any spaces, write it normally
2. Text: text size
• also really simple, explore the sizes on the rentry, i use it 10px – 25px, adjust to your liking!
2. Text: coloring
• tired of coloring all sentences manually? just do the code from screenshot and input your color! it can be written like i did or the hex code/whatever!
• you can still color things manually even when using this
• final with all these changes:


SO THATS IT! the most important actually :33
hope it isnt confusing, any questions please send an ask!
tagging oomfie @chokingonchairs bc finally got the courage to make this and yu asked for hehe ^___^
THANKS FOR READING!
#ᛝ the messy little angel ꒱ .#rentry tutorial#tutorial#rentry#rentry decor#rentry graphics#graphics tips#graphic tutorial#icon pack#icons#random headers#twitter icons#headers#icon#random icons#twitter header pack#twitter headers
309 notes
·
View notes
Text
DEBUNKING COMMON RAIN WORLD MISINTERPRETATIONS
The target audience for this was for people who don't know too much about the game as well, so I'm going to explain things that a normal player might already know.
Rain World is known for how it simply throws you into the world with almost no tutorial, and is often praised for it.
But this lack of explanation if you do not go out of your way to find it has also lead to a lot of misinterpretations from those who did not read all the game’s available information, or misunderstood what they were being told. I used to watch some RW lore videos that would explain and summarize these things, and in the past I believed them.
I’ve since stopped doing that after having some time to actually process what I’ve been reading, and I’m here to say...
YOU ARE ALL WRONG ABOUT RAIN WORLD.
Ok, hyperbole. Not everyone believes these, and art can always be interpreted in different ways by different people, and I won’t stop you from having these beliefs. But also, there’s plenty of ingame content which completely disproves most of these unsubstantiated points from those who do not fully research the game before making videos about it.
Looking at you Tale Foundry…
The purpose of this is to pick apart some of the sadly far too common points I’ve heard many times before from Youtube videos, to Tumblr posts, to people I’ve spoken to on Discord.
Starting with my least favorite…
------
“The 5 karma were seen as sinful”
Obvious westernization of a game based off fucking Buddhism aside, there’s no ingame text directly supporting this claim. There isn’t any that says otherwise, but we have good reason to believe this isn’t the case.
The 5 natural urges, as they’re sometimes called, were NATURAL. They were what bound you to the cycle. They never worsened your life or made you a terrible person should you keep following them, but an aspect of life on the same level as suffering or ecstasy.
Hey, I’ll break down the 5 karma and their meanings to show you that they're not just "sins"
I believe the natural urges have 2 different meanings: an animalistic one, and a more “human” one.
KARMA 1 This obviously represents violence, as you see one guy stabbing the other. I believe it also represents competition and intense emotions, For example: Artificer experiencing intense grief and lashing out in violence as a result. It was not the violence that started it, but her emotions. (Yes, its Downpour. But it’s a good point.)

KARMA 2
They’re having sex. They’re fucking. They’re- ok you get it. Karma 2 represents reproduction. But, I also believe it’s desire. Joyful bodily experiences, and such. The 2 figures seen here are in a much more playful pose than if they were simply doing this only to reproduce. No, they’re having fun.

KAMRA 3 Connection. Bonding with others. Yet also trade and personal belongings. Attachment to things that are not yourself.

KARMA 4 It’s mentioned ingame that this represents gluttony It’s overindulgence, you know. Similarly to karma 2, it can also be searching for fulfillment. I'm not particularly good at telling what the meaning of this could be.

KARMA 5 Self preservation. Self preservation can come in many forms, from an animal running away from a predator or somebody getting defensive after being accused of something or being threatened, this one is rather vague about its meaning.

I do this to show that the 5 urges have very NEUTRAL meanings. It being positive or negative is entire dependant on context. They’re not sinful, get out of here with that Catholic shit!
The 5 karmas have both positive, negative, and neutral contexts which they can fit into.
------
“The ancients hated being alive”
The ancients simply hated the cycle itself and its unknowable properties, as well as being much more aware of things like karma and the urges. Rather, they valued being effortless to disconnect themselves from this cycle.
“This was an eternal dilemma to them - they were burdened by great ambition, yet deeply convinced that striving in itself was an unforgivable vice. They tried very hard to be effortless.” – Bright Green Pearl (DS)
Some practices did of course include things like starving yourself, but as mentioned by Moon, these methods proved to be mostly obsolete. Void Fluid fundamentally changed their culture from what we see. Rather, we do see the ancients enjoying life and valuing it in their own way, which is INCREDIBLY important to some of the games themes, but I’ll get into that later.
"[...]'In this vessel is the living memories of Seventeen Axes, Fifteen Spoked Wheel, of the House of Braids[…] Seventeen Axes, Fifteen Spoked Wheel nobly decided to ascend in the beginning of 1514.008, after graciously donating all (ALL!) earthly possessions to the local Iterator project (Unparalleled Innocence), and left these memories to be cherished by the carnal plane.The assorted memories and qualia include:Watching dust suspended in a ray of sun (Old age). Eating a very tasty meal (Young child). Defeating an opponent in a debate contest, and being applauded by fellow team members (Late childhood/Early adulthood).’...and the list goes on. I'm sorry, little creature, I won't read all of this - the list is six hundred and twenty items long.” – Deep Magenta (SH)
There’s quite a lot to pick apart here, I had to cut down some parts short, but even the cut parts have important details. Just not important enough for me to bring up here.
The Memory Crypts we see ingame are… well where memories are kept. The qualia (personalized experiences) is stored within these mutated fleshy neural organisms referred to as “cabinet beasts”. These of course, contain the “living memories” or qualia of those who have ascended. There are people smarter than me who have already covered these ideas of course, so I won't go TOO indepth.
The ancients greatly valued titles and achievements just as us. They still lived normal lives. As well as this, they valued personal experiences and memories of the carnal realm so much they built an entire citadel to store memories.
As we can see as well, Seventeen Axes has quite a lot of enjoyable memories from throughout their life. Eating nice food and winning a debate contest and getting validation from their peers? That sounds rather… complacent with the 3rd and 4th natural urges, doesn’t it?
I do not believe this screams “I hate being alive!” as much as people have made it out to be, and is honestly ruins part of the game’s messages of compassion and personalized experiences, especially in the game’s ending where Survivor dreams of home.
“You have no name. I once had! I was embalmed, adorned, readied for the journey. So proud. There was jubilation! My name was sung, loud and clear. Did they know? That I didn't quite leave, didn't quite stay? Should I be ashamed? That I linger here, where my memories are kept? Should I be ashamed that I now envy your flesh prison?” - Four Needles under Plentiful Leaves
This is leaning into personal theory territory, but...
I personally believe that the ancients were somewhat terrified of the unpredictability of the cycle and the fact that life would always have more suffering in it.
RW’s religion is heavily based off Buddhism. This is well known of course. The Cycle is a variation of Samsara. Now, I’m not Buddhist, and I’ve tried to do my research about some of these topics. Feel free to correct me, I’m simply going off what I know. (Also I'd love to hear what you have to say regarding your thoughts on the game!)
In Buddhism, each new life you could be taken into the body of an animal, or even end up being tortured in hell for a very, very, VERY long time if you made the wrong decisions, which made escaping it as soon as you could seem like a rather reasonable thing to do.
The ancients never fully grasped the scope of the cycle, and the prospects of having your soul wake up in the body of some miserable worm with no memory of your past or any ideas of your future might’ve seemed bleak.
Suffering is inevitable. But that doesn’t mean they hated being alive, like I said before.
------
“Rain World is post-apocalyptic.”
It really isn’t. There was never any apocalypse. The ancients simply left on their own accord, leaving behind their mark on the world that will slowly be buried once again in the ever so present cycle.
“The bones of forgotten civilizations, heaped like so many sticks.” - Two Sprouts, Twelve Brackets
The world is thriving, even. The purposed organisms left behind have evolved and taken over and become it’s own ecosystem.
The iterators are dying though. Dying very slowly, but soon they’ll all decay and everything will move on.
It’s all just another manifestation of the cycle.
------
“The creatures in Rain World cannot die”
This is definitely something I hear from people who haven’t played much of the game and only hear about it from outside sources and watch the gameplay.
Yes, it is easy to believe this. As slugcat, when you die, you wake back up again. This is entirely a gameplay thing and not actually related to the lore. Saying this might seem like I'm avoiding the question at hand here, but the rules that apply to you do not seem to apply to other creatures.
Every creature in the game has a 4 integer ID (it can go higher, but not in a standard playthrough).


This makes every creature you see an individual of sorts with its own randomized values or appearance.
As well as this, creatures spawn from specific marked dens. When you kill a creature that spawns from a certain den, the next cycle, that creature’s ID will never appear again. Instead, the den spawn is replaced by a creature of the same species with a different ID, or a new species entirely.
Through gameplay, you see that the respawn rules that apply to you do not apply to other creatures. I’ve heard many points about how these dead creatures are transported to another alternate universe where they are alive, but I really do not want to delve into that theory. You do that yourself.
Excuse my unprofessional language, but this is kind of stupid. Billions and billions of little timeline splits accounting for every single insect and microbe that dies seems far too complex of a solution. Occam's Razor and all that.
With this gameplay element you see, I also want to give LORE explanations as to why this is incredibly stupid.
1) If death had no impact, the 5 natural urges would not matter
If no creatures died, there would be no point in eating (karma 4), competing with other species (karma 1), or any form of self preservation (karma 5). Reproduction (karma 2) has no role and there would be absolutely no reason to do anything any longer. All natural processes would be useless.
2) Light Blue Pearl
The information received from the cycle is most likely from the Light Blue Pearl, found in Outskirts.
“[...]The repeating mantra is important because it symbolizes the cyclical nature of life and death, and the termination verse is a symbol for ascension above and beyond it. I don't know how familiar you are with the nature of life and death, but I imagine like all living creatures you have some intuitive knowledge? Then you know that death isn't the end - birth and death are connected to each other like a ring, or some say a spiral. Some say a spiral that in turn forms a ring. Some ramble in agonizing longevity. But the basis is agreed upon: like sleep like death, you wake up again - whether you want to or not. This is true for all living things, but some actually break the cycle. That doesn't apply to you or me though, you are too entangled in your animal struggles, and for me not breaking that cycle is an integral part of the design. Our mantras keep repeating.”
“Then you know that death isn't the end - birth and death are connected to each other like a ring, or some say a spiral. Some say a spiral that in turn forms a ring.“
This line is very misunderstood. Moon specifically mentions birth and death. She mentions death. She never brings up the notion that nothing truly dies either.
As well as this, Moon says that “some say”, implying that even the ancients weren’t sure what the cycle was either. This is more important to my point regarding how the unfathomable nature of the cycle was why the Ancients were so averse to it from above, though.
------
“Sliver of Straw found the solution.”/"There is/isn't solution"
No she didn’t.
.
.
Ok fine I’ll explain.
If you’ve played Rain World you know that the purpose of the iterators is to find the solution to the “Great Problem”, the problem of how to ascend ALL living creatures.
You’ll also know Sliver sent out the Triple Affirmative…
“[...]affirmative that a solution has been found, affirmative that the solution is portable, and affirmative that a technical implementation is possible and generally applicable. She's also one of few that has ever been confirmed as exhaustively incapacitated, or dead. We do not die easily.[…]” - Pale Yellow (SL)
After sending out this affirmative, the iterators became conflicted. They never could figure out if she really ascended and had found the solution, or if it was some sort of catastrophic error.
The answer to the Great Problem is clearly intended to be as obscured as possible. There cannot be an answer one way or the other. The themes of it and the endless tolling of the iterators would not be as impactful if we knew there was or wasn’t a solution.
“[...]Either way, after that these different factions developed, as well as a huge forensic effort to recreate and simulate Sliver of Straw's last moments. Some of the simulations were wrapped in a simulation wrapped in a simulation, in case something dangerous might happen. Nothing much has come from it.[…]“ - Pale Yellow (SL)
Here’s my favorite way of explaining what I mean…
Imagine Schrodinger's Cat, the famous thought experiment. There’s a 50/50 chance that when you open the box, you either find the Solution, or find out there is No Solution.
Except you cannot open the box. And the box is entirely theoretical and nobody’s seen it. It seems impossible, but maybe one day you’ll find that box. That’s what the Great Problem is.
Sliver apparently having found the solution would have completely broken everything. Five Pebbles wouldn’t have ended up hurting himself and Moon had Sliver finding the solution been known with certainty. He was taking a shot in the dark.
------
“Ascension is akin to suicide.”
I strongly believe this point harms the role that ascension and the void sea play in Rain World’s narrative. Ascension is meant to be a final destination, a goal you build up to and prepare for when you’ve lived every bit of life you possible could, and can now move on.
Bringing up the Memory Crypt pearl from earlier, Seventeen Axes lived an incredibly fulfilling life from what we see, and ascended happily.
As well as this, Buddhism strongly encourages those who wish to liberate themselves to discover their own path, which is also subtly shown through the gameplay, as there are many many routes you can take to Five Pebbles, Looks To The Moon, and The Depths.
I do also think this is why Five Pebbles failed. He tried to brute force his way to ascension.
Suicide implies that ascension is only meant to be a fruitless escape and that it’s wrong to ascend. I… do not want to go into why suicide is bad. It’s a strong topic and I’m just here to talk about video games. But ascension is a neutral thing that you can choose to do or not do and to wait until you’re ready.
------
Conclusion...
I really only have the time to cover these 6 misconceptions, and I believe it should be enough. There have been many others I’ve seen, such as the ancients being malicious or that there weren’t any civilizations before them, but there’s not as much to say about them, and they aren’t as common.
Rain World is a very confusing game. I’m not upset at people who think these things to be true, and I do not believe they’re stupid or don’t have any media literacy. I just wish that the people who did actually cover this game did some more looking into it, and actually discussing it with Rain World fans.
Also I should say, that during this entire discussion I have avoided talking about Downpour- RW’s DLC- as it’s more of a official fanmade project. And so much of what it says may not be entirely in line with Vanilla. Because my life isn’t easy and of course there has to be an incredibly divisive and confusing thing like this that I need to avoid bringing up so that way the conversation isn’t muddled.
Thanks if you managed to make it through all this by the way
496 notes
·
View notes
Text

How to start your own save file (+ LOTS of tips, advice & mods) by Amelie
Watch Video Here
1.Pick your save file
Empty Save (personal favorite)
Simlicy's Save
Lilsimsie's Save
2. Take inspiration from real worlds i.e. New Orleans for Willow Creek, New England for Brindleton Bay. Find a theme/style for each world to make it cohesive.
More examples would be:
San Sequoia | San Francisco
Windenburg | Germany & Austria
Sulani | Tahiti
San Myshuno | New York (atleast part of it)
Oasis Springs | Arizona
Henford on Bagley | English Countryside
Mt. Komorebi | Japan
Del Sol Valley | Los Angeles
Tartosa | Italy
3. Finding beautiful builds on the gallery | tips & showcase in video
Video of my favorite gallery builds
Some lots I have in my save file
My favorite gallery creators (scroll down)
4. Map Replacements
5. Tool Mod
Used to further customize your save file & add cars, trees, etc.
Can also be used to change apartment windows
Tutorial
6. No random townies Mod
Prevents the game from further spawning and generating townies
Make sure to have enough unemployed sims that can fill npc jobs such as waiters, baristas, etc.
7. Sim spawn overhaul Mod
Sims only show up in their own residential worlds
Adds realism and doesn't break immersion
#pixelglam#ts4#ts4cc#ts4 mods#ts4 save file#sims 4 save file#ts4 aesthetic#the sims community#ts4 simblr#the sims 4#sims 4#the sims 4 simblr#pixelglam's save file#tips
3K notes
·
View notes