#tips for software testing
Explore tagged Tumblr posts
Text
1 note
·
View note
Text
POS Implementation
POS Implementation: A Comprehensive Guide
In today’s fast-paced retail and service environments, implementing a Point of Sale (POS) system can significantly streamline operations, enhance customer experience, and improve overall efficiency. Whether you’re upgrading from a traditional cash register or installing your first POS system, proper implementation is crucial to maximizing its benefits. This guide will walk you through the essential steps of POS implementation.
Step 1: Identify Business Needs
Before selecting a POS system, assessing your business requirements is important. Consider the following:
The size and type of your business.
Specific features you need (e.g., inventory tracking, customer loyalty programs).
Budget constraints.
Integration requirements with existing software and hardware.
Step 2: Choose the Right POS System
Not all POS systems are created equal. Here’s how to select one that fits your needs:
Research and compare various providers.
Look for scalability to accommodate future growth.
Ensure it supports multiple payment methods.
Check reviews and testimonials from similar businesses.
Step 3: Hardware and Software Setup
A POS system consists of hardware (like barcode scanners, receipt printers, and card readers) and software. Ensure you:
Acquire hardware compatible with your chosen POS software.
Install and configure the software according to your operational needs.
Test all components to ensure they work seamlessly together.
Step 4: Data Migration
If you’re transitioning from an older system, data migration is a critical step:
Back up your existing data.
Transfer inventory, sales history, and customer information to the new system.
Verify the accuracy of migrated data.
Step 5: Employee Training
Proper training ensures your team can effectively use the POS system:
Organize hands-on training sessions.
Provide user manuals and support materials.
Address common troubleshooting scenarios.
Step 6: Pilot Testing
Before full-scale implementation, conduct a pilot test:
Use the system in a controlled environment.
Monitor for any issues or inefficiencies.
Gather feedback from staff and customers.
Step 7: Go Live
Once testing is complete, it’s time to roll out the system:
Schedule the launch during a low-traffic period to minimize disruptions.
Ensure on-site support is available for the initial days.
Communicate the change to your team and customers.
Step 8: Monitor and Optimize
Implementation doesn’t end with the launch. Regular monitoring is essential:
Analyze performance metrics (e.g., transaction times, error rates).
Update the system as needed to fix bugs and improve features.
Seek ongoing feedback from employees and customers.
Conclusion
Implementing a POS system is an investment in your business's future. With proper planning and execution, it can simplify daily operations, enhance customer satisfaction, and drive growth. By following the steps outlined above, you can ensure a smooth and successful implementation.
#POS System Implementation#Point of Sale Guide#Retail Technology#Business Efficiency#POS Hardware and Software#Data Migration Tips#Employee Training for POS#Pilot Testing POS#POS System Optimization#Small Business Solutions#Inventory Management#Customer Loyalty Programs#Payment Integration#Retail Operations#Streamlining Business Processes
0 notes
Text
#tips for new software tester#tester#testing#manualtesting#softwaretesting#automation testing#performance testing#training courses#testing interview questions
0 notes
Text
Building a Career in Software Testing: Tips and Tricks From Industry Experts
Software Testing is a low-profile profession that is frequently disregarded, but it is a highly sought-after job in the technology sector. Their main responsibility is to continuously test the software for faults and report any bugs they discover into a tracking system. Before being released, every piece of software must pass through numerous rounds of meticulous testing to guarantee that it…

View On WordPress
#Performance Testing Techniques#software development#Software testing by industry experts#software testing certification#Software testing course#Testing sofwares#tips and tricks
0 notes
Note
Hello! I was wondering what company you use for your sticker sheets? I bough one from your Ko-Fi shop and really like the quality, and the pricing you were able to sell at is waaaaaay more reasonable compared to any of the companies I've seen and used myself. Is it a POD company, or a mass purchase of them to sell on your own?
Thank you for your time if you're able to respond!
I'm really glad you like the quality, because I actually make them by hand at home! (Please forgive the lighting, my bedroom is my office lmao.)
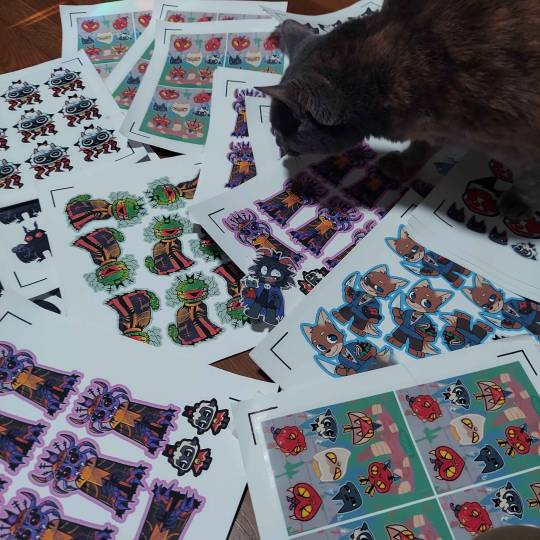
I don't use a company (and Idk what a POD company is sorry!) but making them at home gives a lot more freedom of stock, just be wary it can be very time consuming depending on how many you need to make.
I've had other people ask before, so here's a rundown of how I make my stickers at home: At most you'll need:
Printer
Sticker paper (this is the type that I use)
Laminator and lamination paper (the lamination paper that I use.) You can also use adhesive non-heat lamination paper if you don't have a laminator, gives you the same result, just be careful of bubbles. You will get double your worth out of a pack because we are splitting the pouches to cover two sticker sheets.
Your choice of a sticker cutting machine or just using scissors.
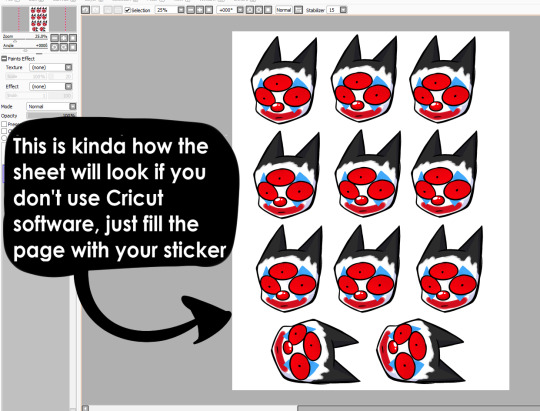
First, I use Cricut's software to print out the sticker sheet with the guidelines around the corners so the machine can read it. If you do NOT have a Cricut machine, open up your art program, make a canvas of 2550x3300 and fill it up with your sticker design with some cutting space between them. This the 8.5x11 size for the sticker page.
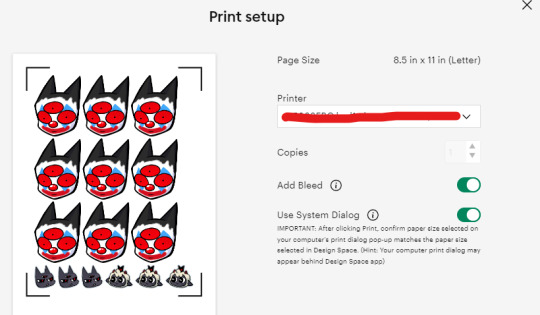
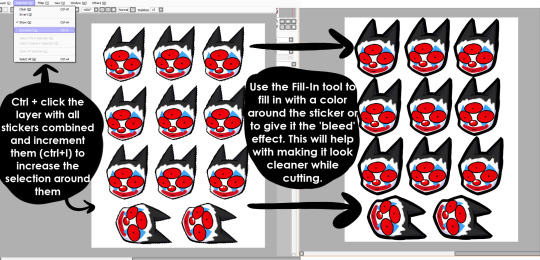
I usually have bleed selected so the cut comes out cleaner. Tip for non-Cricut users below: Increase the border around your sticker design to fake the 'bleed' effect for a cleaner cut.
These are the print settings I use for my printer. I use the 'use system dialogue' to make sure I can adjust the settings otherwise it prints out low quality by default. Make sure if you're using the above paper that you have 'matte' selected, and 'best quality' selected, these aren't usually selected by default.

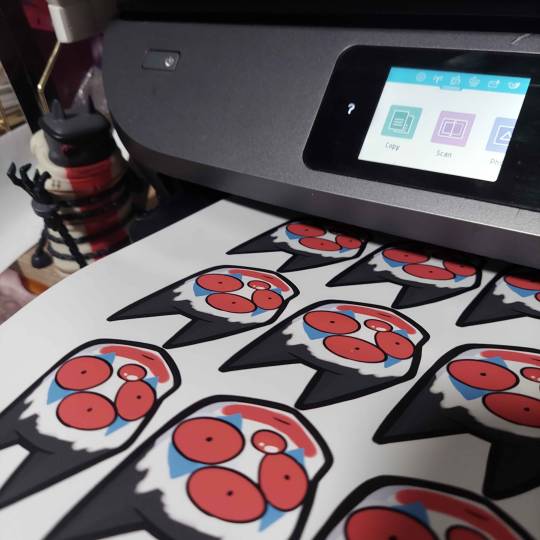
So you have your sticker sheet printed! Next is the lamination part. I use a hot laminator that was gifted to me, but there is no-heat types of lamination you can peel and stick on yourself if that's not an option.
(This is for protection and makes the colors pop, but if you prefer your stickers matte, you can skip to the cutting process.)
Important for Cricut users or those planning to get a Cricut: You're going to cut the lamination page to cover the stickers while also not covering the guidelines in the corners. First, take your lamination page and lay it over the sheet, take marker/pen and mark were the edges of your stickers are, and cut off the excess:
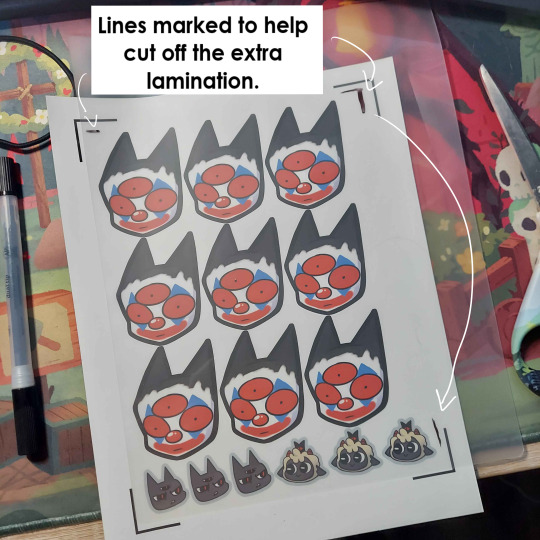
(I save the scrap to use for smaller stickers or bonuses later on)
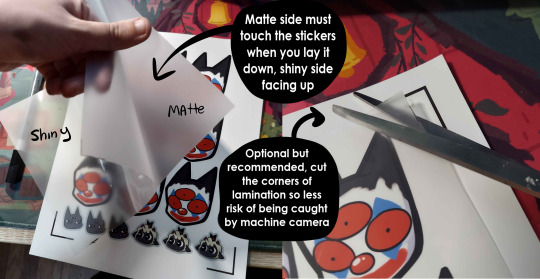
After you've cut out your lamination rectangle, separate the two layers and lay one down on your sticker sheet over your stickers with matte side down, shiny side up. (Save the other sheet for another sticker page)
The gloss of the lamination will prevent the machine from reading the guidelines, so be careful not to lay it over them. It also helps to cut the corners afterwards to prevent accidentally interfering with the guidelines.
Now put that bad boy in the laminator! (Or self seal if you are using non-heat adhesive lamination)
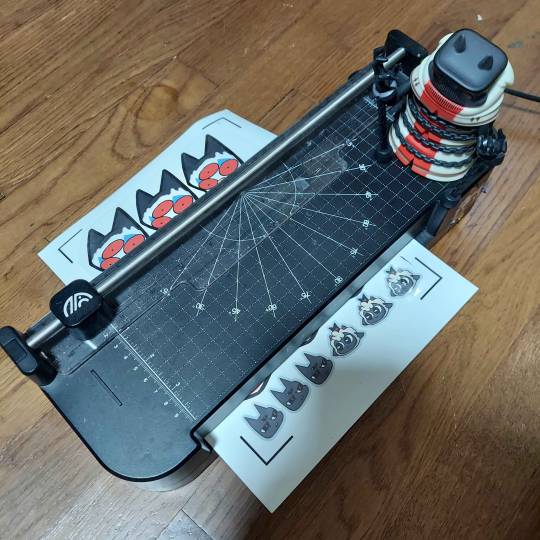
Congrats! You now have a laminated page full of stickers.
For non-cricut/folks cutting them out by hand: this is the part where you start going ham on the page with scisscors. Have fun~
Cutting machine: I put the page on a cutting mat and keep it aligned in the corner, and feed it into the machine. For laminated pages I go between 'cardstock' and 'poster board' so that it cuts all the way through without any issues, but for non-laminated pages or thinner pages, I stick for 'vinyl' and 'light card stock'. Kinda test around.
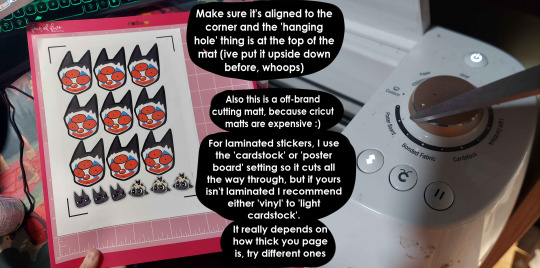
Now I smash that go button:

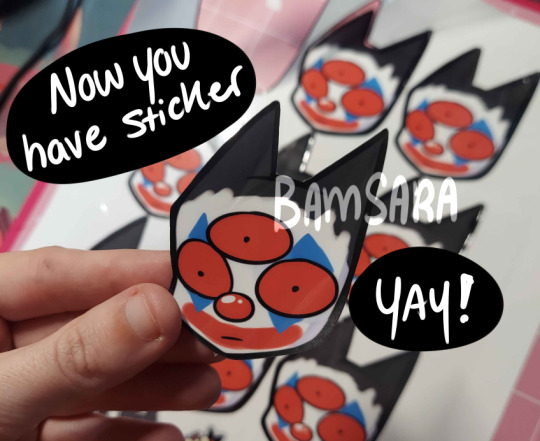
You have a sticker now!
The pros of making stickers at home is that you save some cost, and you have more control of your stock and how soon you can make new designs. (I can't really afford to factory produce my stickers anyway)
However, this can be a very time consuming, tedious process especially if you have to make a lot of them. There is also a LOT chance for some errors (misprints, miscuts, lamination bubbles, ect) that will leave you with B-grade or otherwise not-so-perfect or damaged stickers. (Little note, if you have page mess up in printing and can't be fed into the cricut machine, you can still laminate it and cut it out by hand too.)
I have to do a lot of sticker cutting by hand, so if you don't have a cricut don't stress too much about it. I have an entire drawer filled to the top of miscuts/misprints. I keep them because I don't want to be wasteful, so maybe one day they'll find another home. Sucks for my hand though.
But yeah! This is how I make my stickers at home! Hope this is helpful to anyone curious
1K notes
·
View notes
Text

A sol test drawing, BUT IN KRITA!!
It's really nice surprisingly! Just have to deal with the fact that the clipping on it has a different meaning to it. It's more grouping than transferring something from the top layer to the directed layer
I'd love more tips on the software if yall would like to share :3c
#(4) sol#splatoon#agent 4#her head is massive lmao its been too long that ive drawn her properly#krita#beginner on krita
248 notes
·
View notes
Text
How to Deal with Windows 10/11 Nonsense
This is more for my own reference to keep all of this on one post. But hopefully others will find this useful too! So yeah, as the title says, this is a to organize links and resources related to handling/removing nonsense from Windows 10 and Windows 11. Especially bloatware and stuff like that Copilot AI thing.
First and foremost, there's O&O Software's ShutUp10++ (an antispy tool that help give you more control over Windows settings) and App Buster (helps remove bloatware and manage applications). I've used these myself for Windows 10 and they work great, and the developers have stated that these should work with Windows 11 too!
10AppsManager is another bloatware/app management tool, though at the moment it seems to only work on Windows 10.
Winaero Tweaker, similar to ShupUp10++ in that it gives you more control over Windows to disable some of the more annoying settings, such as disabling web search from the taskbar/start menu and disabling ads/tips/suggestions in different parts of the OS. I think ShupUp10++ covers the same options as this one, but I'm not entirely sure.
OpenShell, helps simplify the Start Menu and make it look more like the classic start menu from older versions of Windows. Should work with both 10 and 11 according to the readme.
Notes on how to remove that one horrible AI spying snapshots feature that's being rolled out on Windows 11 right now.
Article on how to remove Copilot (an AI assistant) from Windows 11. (Edit 11/20/2024) Plus a post with notes on how to remove it from Windows 10 too, since apparently it's not just limited to 11 now.
Win11Debloat, a simple script that can be used to automatically remove pretty much all of the bullshit from both 10 and 11, though a lot of its features are focused on fixing Windows 11 in particular (hence the name). Also has options you can set to pick and choose what changes you want!
Article on how to set up Windows 11 with a local account on a new computer, instead of having to log in with a Microsoft account. To me, this is especially important because I much prefer having a local account than let Microsoft have access to my stuff via a cloud account. Also note this article and this article for more or less the same process.
I will add to this as I find more resources. I'm hoping to avoid Windows 11 for as long as possible, and I've already been used the O&O apps to keep Windows 10 trimmed down and controlled. But if all else fails and I have to use Windows 11 on a new computer, then I plan to be as prepared as possible.
Edit 11/1/2024: Two extra things I wanted to add onto here.
A recommended Linux distro for people who want to use Linux instead of Windows.
How to run a Windows app on Linux, using Wine. Note that this will not work for every app out there, though a lot of people out there are working on testing different apps and figuring out how to get them to work in Wine.
The main app I use to help with my art (specifically for 3D models to make references when I need it) is Windows only. If I could get it to work on Linux, it would give me no reason to use Windows outside of my work computer tbh (which is a company laptop anyways).
267 notes
·
View notes
Text
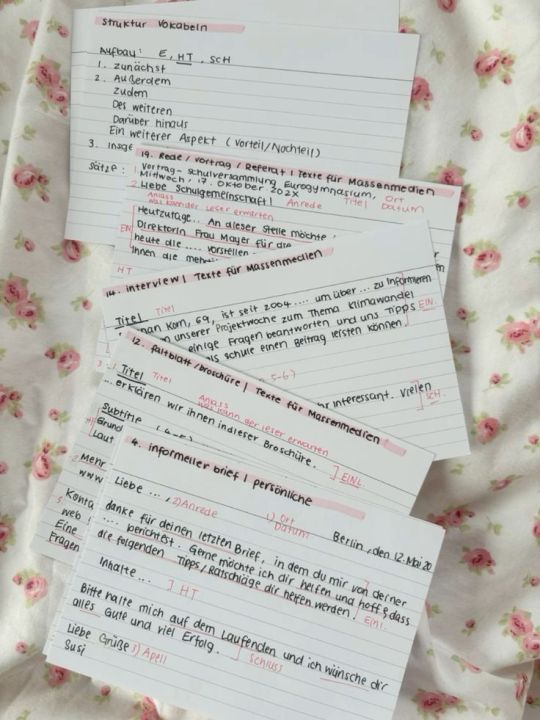
flashcards
flashcards are a study tool that aids in memorization. they typically consist of a card bearing information on both sides, with a question or definition on one side and the answer or term on the other. flashcards can be used for various subjects, such as vocabulary, historical dates or formulae, and are effective because they involve active learning through self-testing and spaced repetition. they can be created physically with paper and pen or digitally using software.
here are some tips to create flashcards that are effective and engaging:
phrase your flashcards as questions: instead of simply writing a term or concept, phrase it as a question. this encourages active recall, which is more effective for memory retention.
use the specification: refer to your exam boards specification or past exam papers to ensure your flashcards cover the necessary material and help with exam technique.
one idea, one flashcard: keep your flashcards simple. each should contain one question and one answer. this makes it easier for your brain to process and remember the information.
engaging questions: write questions that are interesting and thought-provoking. avoid one-word answers; instead, aim for answers that make you think about the topic in depth.
regular review: use your flashcards regularly and shuff them often to avoid simply memorizing the order. spaced repetition is the key to long-term retention.
personally, i don't enjoy using flashcards so i'd like to add that everyone is very different and we all learn and enjoy various things. what works for someone online may not work for you. you just have to try and find out.
i hope you find the post helpful.
❤️ joanne
#elonomh#student#elonomhblog#student life#academia#chaotic academia#productivity#study blog#that girl#becoming that girl#studyblr#studying#studyblr community#study motivation#study aesthetic#studyspo#flashcards#study technique#study techniques#advice#learning#romanticizing school#school
201 notes
·
View notes
Note
I adore your art! I especially love how you do faces and capture the small details in expression/clothing! Do you have any tips about how to go about getting anatomy and facial structures correct? I do drawing as a hobby but I always find it so frustrating. Thanks for sharing your art with us on here :)
Thank you so much! Trust me I totally understand and I don't fully get anatomy myself.
The way I draw faces kinda kicks off from the Loomis method by drawing the circle first and then working around that. I think that's a good place to start, it's really good for face proportions and knowing where to put everything. After you do it so many times you don't need to lay everything out and you'll just know by hand. I can churn out so many faces now just drawing the circle part. I went ahead and looked online and I found a free PDF of one of his books you can take a look at :)
I still struggle with anatomy but whenever I try to figure it out I usually block in what I want on a canvas with a big dark pen and shave it down. I turn down the opacity and then try to sketch over.

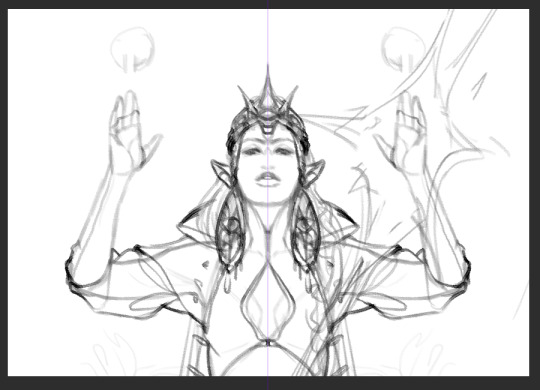
I will say, use any resources you have available to you - they are there for you to use. I always use references and If I'm still struggling to get my idea out, I'll pull up a 3d model and sketch over. It saved me a lot of tears and frustration in the end and a lot of options out there are completely free or one-time purchases.
CSP has built-in software for modeling and lots of downloadable poses, Magicposer you can use for free but some stuff is locked behind membership subscriptions. DAZ studio software is free but that one has a bit more of a learning curve to operate. Handy I think is a one-time purchase and there are many options for hand and lighting reference. These are just ones I've tried for anatomy that worked for me but I definitely encourage looking around and doing some testing with other software if you're interested!
Best of luck lovely!
52 notes
·
View notes
Text
A quiet place to work - pt. 1
As you entered the bullpen this morning there was pure chaos. Everyone was upset that they couldn't work. That was the reason why they called you at 7am and ordered you to immediately come to the office.
“Hey, McGee! What have you broken this time?” you asked him nearing his desk.
“Me? Nothing. But nobody can work anymore because of this error we get if we do anything in our software.”
He showed you the error on the screen for you to read. You read it two times then furrowed your brows and murmured “that's a database error.”
Gibbs and director Shepard had come to you and were not amused.
“Y/N! Nobody can work anymore. Fix the error as soon as possible!” Jenny ordered loudly.
“Any idea what's the cause of the problem?” Gibbs asked.
He was not amused, but relatively quiet compared to the director.
You took a deep breath and answered
“I don't have any clue right now. I have to run a few tests and protocols to analyze this.”
“How long?” Gibbs stated.
You shrugged your shoulders “don't know. Depends on what the problem is, when I find it and how it can be solved.”
“Work quickly. Everything is stopped at the moment and that can't be.” Madam director ordered and went to her office slightly annoyed.
You watched her go, rolled your eyes, sat at your table and began to work.
While you tried to concentrate your colleagues constantly came and disturbed you when they asked about the status of things.
Your phone was constantly ringing too and you did your best to ignore it. After 1 hour of nearly constantly ringing Jenny stood in front of your desk and seemed to be angry.
“I've tried to call you multiple times,” she said. “Yep. I've ignored you,” you just answered matter of factly. You didn't look up and just tipped away on your keyboard.
Jenny on the other hand huffed and stormed away again.
Tim tried to be invisible and Gibbs grinned. Tony was smiling widely, coming to you stating “wow, Y/N. Finding a whole new respect for you.”
You stopped typing and looked at him without saying a word. He laughed, held his hands up and retreated to his desk.
After another 30 minutes the director came again to ask the status of the progress. She huffed, fumed and yelled at you “you are still not getting to the phone when I call you! I can't WORK!!!”
You just looked up, reached behind the phone and held up the loose plug, saying calmly but slightly annoyed “I pulled out the plug.”
Everyone was quiet, the atmosphere was tense and Gibbs was watching the events with interest and grinned from one ear to the other. At least he seemed to be having fun.
Now Jenny was losing it and yelled again “you can’t do that! You have to be available!”
You stood up, leaned on your desk and replied as calmly as possible “yes, I can do that. It was very easy. Just pulled the plug. And I AM available. Otherwise you couldn't be standing here in front of me and snapping at me.”
A quiet snort could be heard from Tony and Gibbs, who were giving you mentally a medal. Tim has taken cover behind his computer.
Jenny then snapped “you are just as impossible as Gibbs! He is really rubbing off on you!”
“Why? Because maybe he just wants to do his work in peace and concentrate?”
Madam director gasped and opened and closed her mouth like a fish, not knowing what to respond.
You stood up, put your hands on your hips and said slowly and threateningly “you can call me every minute and get on my nerves because you can’t work. But the only thing you’ll achieve is to tear me out of concentration and slow down the analysis and correction. If you want to contribute something productive, you can get me some fresh coffee. Working without coffee is bordering on physical assault”
You were about to explode, so you tried to compose yourself and keep as calm as possible. She was your big boss after all.
So you pushed your cup into her hand, sat down and said “and now let me do my work in peace.”
With that this conversation was closed for you and you got back to concentrate on the problem and ran further protocols and tests.
Jenny stomped away indignantly, the colleagues laughed loudly and Gibbs patted you on the shoulder “well done. I didn't know you could be so dangerous.” You were amazed and perplexed hearing these words from your boss.
“Let me do my job and correct this shit” you huffed.
He laughed briefly, smiled and replied “come with me, I know a place where you can work in peace and nobody will bother you. There's good coffee too.”
You looked stunned at him, smiled and answered “I'm in.”
You both packed your things and went to Gibbs’ Truck. “Were are we going to?” you asked curiously. “Wait and see” Gibbs answered, smiling.
In fact, he was driving to his house, you noticed in surprise. “Come inside and let's get some coffee” he stated.
“Uhm….” You couldn't say a word.
“Now. Come on” he ordered you rolling with his eyes.
Quickly you got out of his car and followed him inside. He was standing in the kitchen and made some coffee. As he heard you enter he turned around “make yourself at home. You can sit in the dining room or in the basement. Just take a seat where you think you can work with concentration.”
So you took residence at the dining room table and started your laptop. Until you opened the needed programs a mug came into your view and the coffee smelled heavenly. You looked up at your smirking boss who told you “coffee with a lot of milk, I think it is, right?”
You were speechless that he knew this and just nodded “thanks”.
“You're welcome. I'm down in the basement. Call, if you need something.”
“Okay, will do.”
“Good.”
So Gibbs went downstairs and you began to work on the problem again.
But after half an hour you had a feeling of being lonely, took your laptop and walked down the stairs that led to the basement, where Gibbs was working on his boat.
Seeing you standing there he stopped in his work and watched you “you need something?”
“Hm, yes. I'm feeling a little bit lonely up there. Can I work here?”
He laughed briefly “sure. You can sit on the workbench over there” he said and pointed to it.
You smiled, walked to the place he showed you and whispered “thank you.”
So the two of you worked in the basement and enjoyed the company and the silence.
After another half an hour you cried out “I've got it!!!”
Gibbs watched you intently and waited for your explanation.
“I've found the reason for the error. Someone had interrupted a saving process and therefore corrupted the database. But thankfully I can repair this easily.”
“Good” was the only response you got, but you were nonetheless working on the repair again, typing away.
A short while later you had done the repair, tested it and everything was good once more. The problem was solved and inwardly you patted yourself on your shoulder.
So Gibbs and you drove back to the office to check, if everyone else could work again, too. And yes, they could. You were sooo happy!!!
Only one task was left. You had to go to the director to inform her. You sighed and started to go to her, but you were held back by your upper arm.
“I'm coming with you. Don't let yourself go in there alone.”
Entering her office Jenny growled “these are exactly the two I wanted to see. They're both the same.”
“It was a database error, but I could repair it. Just let me check quickly, if everything's okay on your computer. Then you can go back to work again.”
You checked the system and everything was fine once more.
“Thank you.”
“That's my job.” You said.
“I'm sorry for my behavior earlier. I have a due date to keep.” Jenny admitted.
“It's okay, but when I can't work because I'm interrupted all the time, the correction needs more time.”
“Understand.” Jenny said and hung her head.
Gibbs and you left her office. On the way to your desks, he pulled you aside and whispered in your ear
“Dinner. Tonight. Straight after work. I want to know more about you.”
If you want to know where the dinner leads, you have to read Chapter 2. 😊😉
----------------------------------------------
Here you will find the other chapter of this story and the other stories I've written to date.
-----------------------------------------------
#ncis#jethro gibbs x reader#gibbs#leroy jethro gibbs#gibbs x reader#leroy jethro gibbs x reader#ncis fanfiction#ncis x reader#ncis reader insert#leroy jethro gibbs fanfiction#jethro gibbs fanfiction#gibbs fanfiction#jethro gibbs#mark harmon
129 notes
·
View notes
Text
Test Ride Pt. 2 (Peter Parker x Android!Reader)


Pairing: Peter Parker (TH ver.) x Android Reader (with a robovagina) Rating: Explicit Words: 1189 POV: Second Summary: The Big Tober Day 10 - Robotfucking Note: A sequel to a piece I did for kinktober 2020. Reader is a robot and has no gender. Last time reader got a robopenis and I thought it only fair to give reader a robovagina this time. Reader's chest is unmentioned. Tags: robotfucking, unnecessary use of fancy words to make it more sci-fi, at least I don't put 'quantum' in front of everything to make it science, dom/sub dynamics, overstimulation, safeword ignored(?), robot tentacles as restraints, vibrating pussy, nipple play and software/hardware updates gone ' wrong'
A new HUD interface greeted you as you booted up after your last upgrade. Your physical statistics and environmental parameters were found in new places, but that mattered little. Your optics activated after a short delay, visual input now also available to you. Your creator stood before you, his lips moving, but you received no audio input. “Audio module connection failed,” you replied to whatever he said. You saw him curse, or at least that was your best prediction of what his expression conveyed. He motioned your head down. You bent at the hips, allowed him to unplug and reconnect your audio modules.
Once the cables reconnected, you could hear Peter clearly. “Please, don’t be ruined, please don’t be ruined,�� he muttered to himself.
“All modules operational,” you informed him. He jumped at your voice, but let out a sigh of relief right after. “Awaiting command,” you added. As per usual after an update, Peter started poking and prodding your frame, confirming your sensory input was still operational. When he was done testing your basic functions, he dragged you to his bed.
“Program D.O.M. version V, please,” he spoke nervously. You detected an increase in heart rate and blood flow to the genitals. You confirmed the break command, as it was standard protocol, before you could execute the D.O.M. program. Once the safety protocols were satisfied, you had your digits on Peter’s clothes. You unbuttoned his flannel, revealing his pale chest underneath. There was minor bruising, but a quick scan revealed no serious injuries that were contraindications to the program. You pushed him onto the bed and started running your tongue over his chest, paying extra attention to his nipples.
Peter whimpered as you played with his chest, artificial tongue and teeth taking turns with your digits pinching his sensitive nubs. You kept track of his arousal, only stopping your onslaught once his involuntary noises got a little louder. You sat up, retracting your pelvic panel and rubbing your wet hole over Peter’s crotch. He whined as you slowly soaked through his jeans and underwear, until he could feel your wetness on his cock through his clothes. “Please, I need to be inside you,” Peter eventually moaned, his mind tethering on the edge of madness.
He was hard underneath you, so you deemed him ready for the next stage. With superhuman deftness, you removed his clothes until he was naked on the bed. His cock protruded from his body, the tip red and leaking. You wrapped a servo around his rod, stroking slowly as to tease him. When he started thrusting into the tightness, you placed your other servo on his hip, your mechanical strength counteracting his. He was forced to only take what you gave, which was exactly what he programmed you to give. It was not enough to get him even remotely close to orgasm, but the build-up was perfect to make him start begging. Once the begging got frequent enough, you proceeded on to the next stage; you mounted him, letting his cock slide into your wet and soft hole. Peter moaned, his eyes rolling back as you rode him at a decent pace. “Please, give me more, I’ve been good. I will be even better, I swear.”
His moans filled the room. You took his dick all the way inside and paused on top of him. “I will grant you more. However, unpermitted orgasms will be reciprocated with punishment.” He nodded, promising he would not cum. You decreased the elasticity of your inner walls, giving him a tighter squeeze as you proceeded to ride him. Your movements were quicker than before, fully intending to make him cum without permission. Peter was moaning to the ceiling, eyes squeezed closed sometimes and other times wide open. His mouth stayed wide open, tongue peeking over his lower lip.
Just as predicted, your inner sensors detected his cum painting your inner workings. You rode him until the spurts seized. Then you planted yourself firmly on him. Tendrils extended from your body and wrapped around his appendages. “You have disobeyed my orders,” you stated as you held him down and turned on the vibrations of your inner walls. Peter wailed as his sensitive cock was forced to endure the intense vibrations. He writhed against your restraints, but not even his super strength could remove you. Just like he had begged you before to fuck him, he was now begging for your mercy. You bent your upper body, putting a servo around his throat. You put a little pressure on the blood vessels below his jaw. Tears poured down Peter’s eyes as you forced a second orgasm out of him. You detected more cum inside you as he cried out.
After his second orgasm, you ran a scan on him, the analysis showing that he had enough. You removed your servo from his throat and turned off the stimulation or at least… attempted to. “Error: deprecated code, V-module unresponsive.” You stated, your tendrils no longer retracting and your hole vibrating on and on.
“What?” Peter exclaimed, clearly in panic. You ran a diagnostic check, your hole trying to reboot by first ramping the vibrations all the way up, so it could be brought down again. Peter screamed during the process, his brain unable to process the stimulation.
The tactic worked fine, but the module got stuck again at the same level of vibrations you started at. “Tendril module interfering with V-module. Attempting tendril reboot.” Peter did not perceive a word you said. As the tendrils rebooted, they lifted up a little, Peter’s body now hanging in the air except for his pelvis, where you still sat, vibrating his cock.
Peter cried, feeling like his brain had melted away from the intense pleasure. “Stark! Stark!” He screamed the break command. You tried to terminate the program immediately, but the backlog of reboots and diagnostic checks made it impossible. Your creator, against your predictions, came again, barely a drop of cum leaving him. He kept screaming, trying to get through to you. Just after his third orgasm, you regained control of the tendrils. In a flash, they were retracted and you uncoupled the module for now.
Peter’s cock was gradually turning limp inside of you. The poor boy was hoarse from screaming. Without the tendrils, you regained full control, the vibrations stopping instantly. “Thank you, thank you,” Peter whispered over and over as you lifted your frame off him.
“Program D.O.M. paused,” you stated, “do you wish to continue after a delay or shall I proceed with aftercare protocols?”
Peter laid starfish-style on the bed. His chest was heaving. He could use some aftercare, but it was hard to trust you right now. “Terminate the program all together,” he groaned, “initiate shutdown.” A second later, he was met with the sound of your vents shutting down and your pelvic plate closing to protect what was behind it. He was left in silence. As far as updates went, it still wasn’t as bad as that time Windows went from XP to Vista. He counted it as a win.
—————
REBLOG TO SUPPORT YOUR FANFIC WRITERS
Likes do not help exposure!A comment in tags or replies can sustain a writer for months!
#peter parker#peter parker x reader#peter parker x male reader#peter parker x gender neutral reader#male reader#trans male reader#ftm reader#gender neutral reader#nb reader#peter parker imagine#tom holland#tom holland x reader#tom holland smut#mcu#mcu x reader#mcu x you#mcu x y/n#mcu x male reader#mcu x gender neutral reader#marvel#marvel x you#marvel x male reader#marvel x reader#marvel x gender neutral reader
358 notes
·
View notes
Text
Syzygy Podfic Project Auditions - Second Round!
Are you interested in voice acting, but intimidated by the prospect of a large role? Did you consider auditioning for the Syzygy project before, but didn't because of time constraints? Are you just finding out about this project now and wishing you had discovered it sooner so you could be a part of it?
Well, you're in luck, because the Syzygy Podfic Project is in need of extra voices to fill out our cast! There are dozens of minor roles that are perfect for anyone hoping to dip their toes into voice acting in a large project!
Find the audition information here!
Make sure to only submit the form once you are confident in your recording! Only the first submission will be accepted, so take your time and get the best take you can before submitting!
Tips for recording your audition:
Record in a small space that's insulated - a closet can work very well, as the clothes can minimize the echo and avoid too many outside sounds.
Make sure you are the proper distance from your microphone - this can take some testing and trial and error!
Have your microphone resting on a flat surface, don't attempt to move it while recording.
Don't be afraid to do multiple takes and only pick your favorite ones!
Audacity is a free audio recording software that is very intuitive for a beginner to use, if you're looking for a recording program.
Feel free to send an ask if you have any questions!
@tsseventhub @sanders-sides-events
#syzygy podfic project#sanders sides#thomas sanders#logan sanders#patton sanders#remus sanders#roman sanders#virgil sanders#audition info
60 notes
·
View notes
Note
rubs hands evilly. well hello there I Dont Kmow Jow To Make A Robot Anon. i imagine vseriesgroup har to be a project funded by the goverment, since. there had to be a LOT of fundingfor something like this, and well everyone needs to have new fucked up weapons when theres war out there, right.
step 1: BRIANSTORM VIOLENTLY. BOTH HARDWARE AND SOFTWARE. the hardware is nothing like ever existed before, but the software could jave been based off an already existing machine. NOTE THAT V1S PLATING IS EXPERIMENTAL, that had to be a HUGE risk, a huge step. NOTE STYLE POINTS - ARE THEY IN-BUILT, OR DID V1 ADOPT THEM LATER?
step 2: building. you can do wahtever here, but generally building things like this you have to reimahine and rebrainstorm things jn the middle of development, because you simply DONT catch all the vulnerable parts in the og design. irl you would build software and hardware seperately, but i assume that with machines this complicared and selfaware, THAT would be like trying to sculpt a human body and its nervous system independently to each other. i personally imagine that v1s software isnt just its "personality", but also things like firmware (through which it can control its body lmao) and an assesment of analysis and testing utils, as well as memory and reward centers. also, mind that v1 isnt purely mechanical - it BLEEDS, there has to be viscera and gore inside of its cute little chassis, and you cannot just... turn biological components off, can you........ so uh yeahlmao idk i think it was prolly conscious a lot of time it was worked on
step 3: learning and testing!!! listen you cannot have a personality without softcomputing. and you cannot have softcomputing without machine learning. look into irl machine learning its SO FUCKING COOL I PROMISE. anyways yeah theres no way a mqchine as complex as v1 can be hardcoded all the way to use all those weapons. load 826 hours of people fighting into its memory slot. let it lay catatonic plugged in for a day or two sorting through the data. put it into an arena. see it put the kmowledge to use, test for itself what its body can do, calibrate and better itselt in real time, right in front of you, going from clumsy to terrifyingly effective in less than a hour. im going to SOB i am SO jealous of the vseries creators. PUNVHES THE WALL. amyways yeah think about all the things a war machine is made for, and test them, and fix them if theres anything wrong. agaim, look into irl machine learning, into the way they use purely virtual "rewards" and "punishments" to make machines figure shit in their own. MIND THAT THIS IS A VERY EXPENSIVE PROCESS AND WHORVER FUNDS IT WILL NEED TO BE SHOWN THE RESULTS OCASSIONALLY, which wwill be extremely stressful for the team lmaooo. your sponsors barely fimd intersting the same things as you, the actual maker, does, you gotta throw a bit of a show arond it.
......... m .. might have gone overboard with this ask slightly. oh well! ..,, mind that im a compsci bachelor, not a robotics one, so the hardware part might be fucked slightly. tips hat.goodmight ily AND good luck writing that thang i hope i Was Uswful. 🦚
-
31 notes
·
View notes
Note
Hi there, Love your work! I'm also doing stuff in Unreal and it feels like it's rarer to find other indie devs using it. I love how clean all your UI feels, and UI is something I seem to really struggle with.
Do you have any recommendations for workflows / tips / sources etc for getting better at UI?
Also I'd love to know more about the material / shader workflow for your latest post if you have more information anywhere.
Thanks :)
Hello there! Thank you!! I hope you don't mind me answering publicly as I feel like some people might be interested in the answer!
I really appreciate your UI (User Interface for those not knowing the acronym) compliment as it's something I've spent a long time working on and specializing in, in my career as a software engineer. UI/UX often goes completely unacknowledged or taken for granted even though it takes a lot of time and hard work to create and develop. In the engineering world I frequently had to advocate for and explain user experiences to those who didn't have as deep of an appreciation for UI or a very sophisticated understanding of why a good, visually appealing user experience makes, or on the flip side, can break everything. I think it's a very challenging, overwhelming topic to grasp and communicate, but just by being interested in it you're already way ahead!
There's a lot going on with UI. From visuals to knowing common design elements to successfully conveying a story to the user to implementation to testing to designing for accessibility to animation and I probably didn't cover everything with that run-on sentence. There's frontend engineers out there whose role is solely to maintain and improve UI component libraries for companies. And that's without throwing games, whose UIs are all uniquely visually tailored to their experiences, into the mix... I could keep going on about this honestly, but I'll get to what I think you can do personally! 1. Learn about common design patterns. What's a toast? What's pagination? What's a card? Little things like that. These apply to all software UI/UX, including video games- and knowing these off the top of your head will make it so much easier for you to invent your own UI designs and patterns.
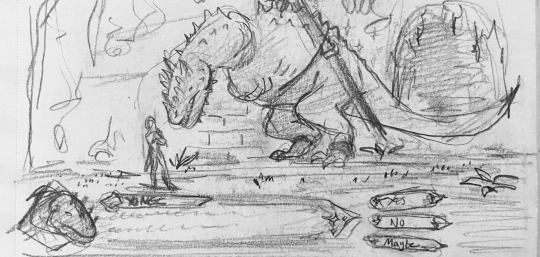
2. Study the UI in the everyday applications you interact with. Step through menus and think about how you got from point A to point B. Take a moment to think about the why someone put a button where they did. Study the UI in your favorite video games, too! Take a lot of notes on what you think works really well and what you think doesn't. And also there's online resources that are great for inspiration. I personally spend a lot of time on the Game UI Database. - https://dribbble.com/ - https://www.gameuidatabase.com/ 3. Don't be afraid to start with basic sketches or even just simply representing everything with grey boxes. All my UI starts out as really crappy sketches on paper, or tablet sketches on top of screenshots. Visualize your ideas and then keep iterating on them until you've got something. For example, I went from this:

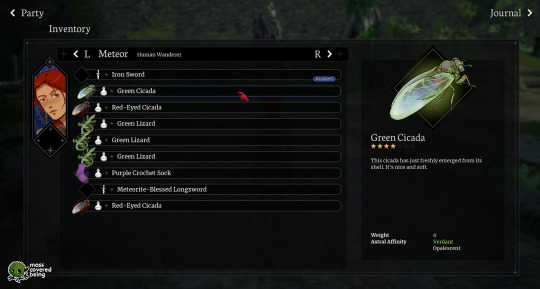
To this. (And come to think of it I might actually still want to make those cooler looking buttons in my sketch) 4. Break everything out into pieces and individual components. A good UI is made up of building blocks that you can reuse all over the place. That's how it stays consistent and also saves you a lot of stress when you need to go in and update components. Instead of a million different looking UI pieces, you just have to update the one! These individual components will make up your very own UI Component Library, which will be the standardized design system and source of reusable components for your project. This also applies to your visual elements that don't do anything (like I personally have a whole mini library of diamond and star shapes that I reuse everywhere).
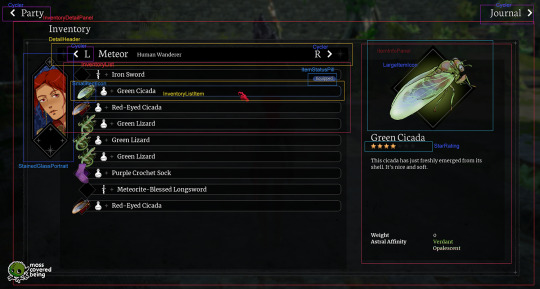
For reference, here's a breakdown I made of my Inventory UI. On the right, I've labeled most of the individual components, and you might be able to see how I'm reusing them over and over again in multiple places.
5. Spend some time listening to designers talk, maybe befriend some designers! Many of them have an unique, interesting view of the world and how we interact with it even beyond just software. Their perspectives will inform yours.
6. Test your UI on users whenever you can. Get feedback from others. This is the best way for you to see what works and what doesn't. As game devs we spend so much time with our games it's easy for us to lose sight of the full picture.
7. Be patient and don't give up. Continue to be open to expanding your knowledge. These UI skills take time to develop. I personally am still learning even after like 10 years of doing it. Coming up with the visual elements is very challenging for me and I spend a lot of time rearranging things in photoshop before I actually start coding anything at all in Unreal.
Whew, that was a lot, but I hope that gives you some thoughts and a place to start!
I don't have any posts out there about Blender/Unreal shader workflows right now, but I'll consider making another post sometime soonish. I appreciate you asking and you're welcome! :)
23 notes
·
View notes
Note
Do you have any tips/useful information for people who want to start making audio rps?
(Also love ur content sm!!! Mitch is the most lovable little guy)
Aw thank you so much! Love him too!
This is a great question, had to think about it for a bit;
If you want to dabble with making audios, feel free to start off with public scripts! I think there's subreddits like ASMR script haven (IIRC?) that has public scripts that can be filled by anyone. Just be sure to read the author's conditions carefully i.e. credit, terms of use, what can be changed etc. Right at the start I recorded a public script to try and get started, it's a great way to just jump right into making something to learn the ropes of it without also first having to write an entire script for it too. Filling public scripts is a fantastic way to start off, however I reckon writing your own stories is a major part of the fun!
You don't need an expensive mic, but audio quality is a very important factor. Do some test recordings and listen back to them (with headphones!) and see how it sounds. This is especially important for whispered scenes (DO NOT get too close to the mic or breathe on it!) or loud scenes (DO NOT peak the mic!). If your mic has a gain / input dial, play with that before recording! Just start with mono to begin with, play with stereo if your mic supports it after you become familiar with it. Aim for your recording to be no louder than -6db at the highest, if you can keep your voice roughly between like -20 and -6 that tends to sound reasonably natural.
Do your best to eliminate external sounds! If you have AC or anything like that on, turn it off. I have to shut down my main PC and record with only my editing Mac on because the PC fans are much louder and my mic is very sensitive! There'll pretty much always be background fuzz, some mics will just have some, but try to make your room as quiet as you can. Your software may have some background noise removal tools, I use filters for that (expensive so I can't recommend them), but DO NOT use the noise removal tool in Audacity! It's terrible!
Speaking of, Audacity is decent to get started with. It's good basic recording software, plus multiplatform. For a while I preferred recording on Windows with Audiodope, also very simple, plus I liked that it asks me whether I wanted to record in mono or stereo first in case I forget to switch, I currently record on Mac with ocenaudio which does the same, while Audacity won't ask, you have to go into settings. Anyway Audacity is okay to start with for editing, it's free, but from what I understand it's a "destructive" editing software in that after you make a change like adding a filter, you can't then go back in and change it other than just undoing, which I really don't like, plus changing the timing of things looks fiddly. I don't know what to recommend to move up from, I've heard good stuff about Reaper but it looks very complicated. Avoid Adobe unless you have a free subscription from somewhere else. I edit entirely in Final Cut Pro so I can't recommend that unless you're on Mac, plus it's my old work software and expensive! If you need sound effects, I use freesound.org, there are other great free resources as well, but make sure you check each individual sound effect's license before use.
Once you've edited the audio and want to turn it into a video, I've heard good stuff about Da Vinci Resolve and Kden Live, both are free! Make a video canvas of 1920 x 1080, FPS doesn't especially matter if you only have a still thumbnail, 25 or 30 is fine, and render it out as a h264 mp4 if you're not sure what to select! Good compression for internet video, good for streaming. Try to record and export your audio as wav if you have enough space, wav is uncompressed audio so it maintains full quality but they can get large.
I also make my thumbnails in-edit but you may want to use external software like Gimp to make them. Avoid getting random stuff of google especially anime boys / girls, and definitely don't ever use an artist's stuff without asking for permission + giving proper credit. Using pre-built generators like Picrew is totally fine, just be sure to credit where you got it from, but 100% avoid AI generators, obviously. Be careful with Adobe stock images, apparently there's AI slop in there too. You don't need art for audios though, they're a nice to have bonus, but many of my most viewed videos have no art at all. If you need background images, I like unsplash.com because it has a free license! Read over it yourself but basically you're able to use pretty much any image they have in your videos!
Just jump in and try making something small, never start with your magnum opus! I started with the introverted incubus character because I'm a very shy person myself, it was an easier role to get started with! If you want to start writing your own scripts too there's a lot we could talk about there as well, just try to picture the scene from the perspective of the listener, what they may be thinking or feeling at any given moment, not just the perspective of the character you're going to be playing!
This was a lot and I don't think I covered much, I hope some of it helps though!!
30 notes
·
View notes
Text
Making Baldur’s Gate 3 GIFS Tutorial

TOOLS USED:
Nvidia or alternate game video recording software
PotPlayer
GIMP (Optional)
Adobe Photoshop
PART 1: Recording
I personally use the Nvidia recording software that came with my computer to capture videos of the game, but there are plenty of video recording options out there. I know OBS Studio is a popular one, for example. Whatever your choice may be, here are three important tips for when capturing video:
Use the least amount of compression settings your recording software can output, and I recommend at least 30FPS, though 60 is better
Press F10 to hide the Baldur’s Gate 3 UI and capture the entire screen
Give about three seconds worth of video before and after the section you want to record, as safety buffers, if you can
PART 2: Frame Extraction
Open the video you’ve recorded in PotPlayer in window mode (not full screen), and pause a little bit before where you want to start your GIF. Press Ctrl + G to open up the Consecutive Image Capturer window, and drag it to the side of the video player. These are the settings I recommend in general:
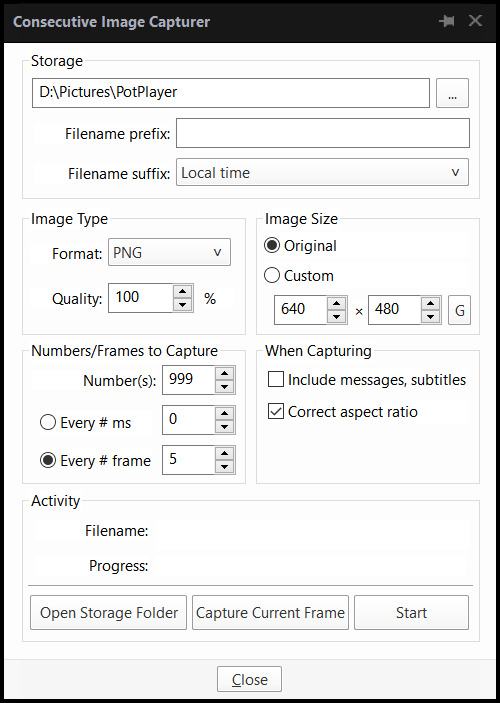
HOWEVER, I suggest playing around with the “Every # frame” option to your own liking. I have a pretty high framerate for this video I’m using, so 5 is fit for me, but if you have a lower framerate, you may want a lower number, like 2.
With your settings in place, click “Start” and unpause the video. Pause the video again after you’ve captured all the frames you want, then click “Stop”. If you’re making a gifset, I recommend then storing each set of frames in a single folder at a time.
PART 3: Resizing
I personally use GIMP to resize/crop the images because I find it easier, then export the image as a PSD for the next steps in Photoshop. But you can use Photoshop for this step too, if you’re more comfortable with that.
The number of frames you can get away with in a single GIF for Tumblr depends on the aspect ratio you plan on saving it as—for example, 270x200 obviously can handle more frames than 540x300 while still fitting within Tumblr’s size limit.
PART 4: Sharpening
In Photoshop, use the Filter > Sharpen > Smart Sharpen tool on each layer. The settings are your choice, but I usually use 200 for the Amount and 0.5 for the Radius.
PART 5: Animation
If you don’t yet have the timeline set up in Photoshop, click on Windows > Timeline to bring it up. Then from the arrow, choose “Create Frame Animation” and click on the button to do so. This will insert the first frame into your timeline. Click on “Make Frames from Layers” in the timeline options menu to add them all.
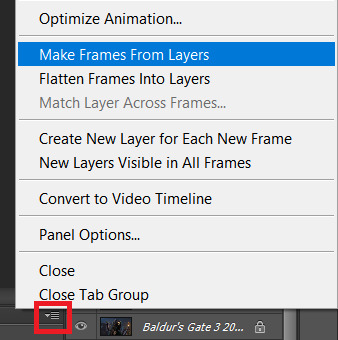
Click on frame 1, then hold down Shift and click on the last frame to select them all. Then click on the drop-down arrow from the last frame and set the delay between each frame changing. I usually use 0.1 seconds.
Change the “Once” option to “Forever” to make the GIF repeat itself ongoing.
PART 6: Editing/Colouring
Click on frame 1. Then click on the top layer, while still keeping frame 1 visible.
You can use a variety of tools in Photoshop to editing the colours, brightness, contrast, etc. of the gif. Make sure the filters are the top layers to apply them to all the frames. If you test out your gif and see that the filters are not applied to all the frames, toggle the visible option on them off and on again.
I’m not going to go into detail of how to edit your GIF here, because each one is different. But I will say the tools I most typically use are Brightness/Contrast and Curves.
PART 7: Export
Click on File > Save for Web. These are the settings I like to use:
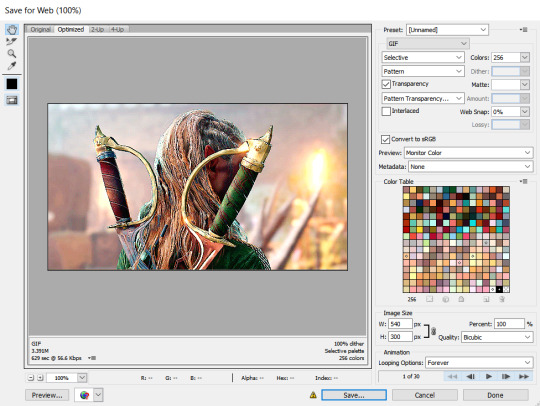
Congratulations, you’ve made a GIF!
148 notes
·
View notes