#this is more photoshopped than illustrations
Explore tagged Tumblr posts
Visit Tumblr Blog
Explore Tumblr blogs with no restrictions, modern design and the best experience.
Last Seen Tumblr Blogs


Fun Fact
12.7% of mobile users access Tumblr.
Text
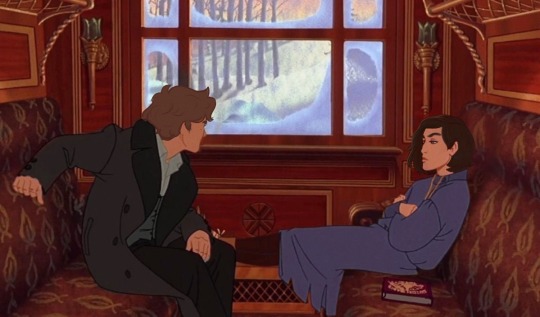
“Simon, do you really think I’m royalty?”
“You know I do”
“Then stop bossing me around.”
Or, Anastasia AU. For Day 3 | AU/Alternate Universe | @carryon-countdown
#I make it to day three 😭#this is more photoshopped than illustrations#been thinking about this#anastasia au#simon snow#snowbaz#baz pitch#fanart#letraspal#carry on#illustration#book characters#carry on fanart#rainbow rowell#carry on countdown#letraspal coc
552 notes
·
View notes
Text

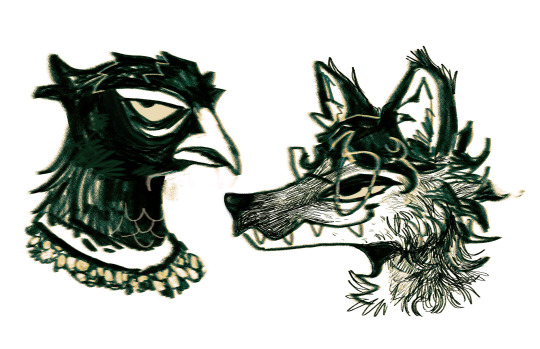
more assorted stuff. giving funney animal people versions to my human ocs because i'm normal
#my art#oc#mika#heidi#anthro#furry#illustration#mika's a pheasant and heidi's a cross fox. in a very on the nose reference to their silly little story#i love pheasants even if they love nothing more than running directly under the wheels of speeding automobiles. thumbs up emoji#anyway sorry i will draw other characters except these pricks i swear. i really wanna do something with them one day#so i need to speedrun drawing humans and stuff#also i'm having so much fun letting photoshop layer effects do the work for me#replicating real life textures and colour blending hard as hell!!!
799 notes
·
View notes
Text

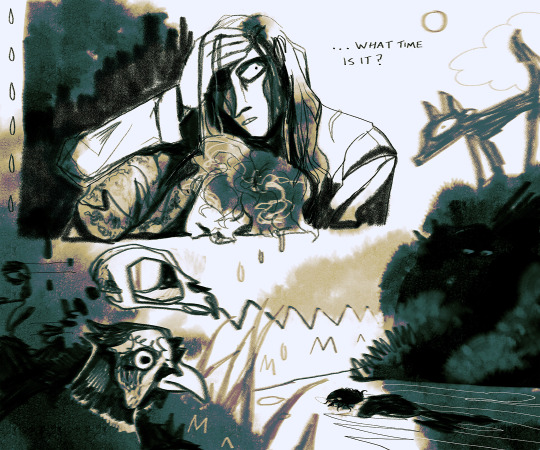
From sketch, to...

... Final piece. Commission for MercuryF0x, Process video can be found here (it took a bit of energy to edit so please give it a look).

Bonus headshot detail - first time detailing something like this and really happy with how it ended up.
#genuinely a bit sad almost no one will see this#but i also feel like ive hit a breakthrough with art recently#and its just too much fun where I want to paint for the process of it#so trying to focus more on that than anything#sketch#art#traditional#furry#painting#furry art#speedpainting#digital illustration#youtube speedpainting#youtube video#youtube#furry artist#small artist#small blog#zephra#kitsune#fox#sword design#will-o-wisps#silk#embroidery#glow#photoshop#corel painter
58 notes
·
View notes
Text
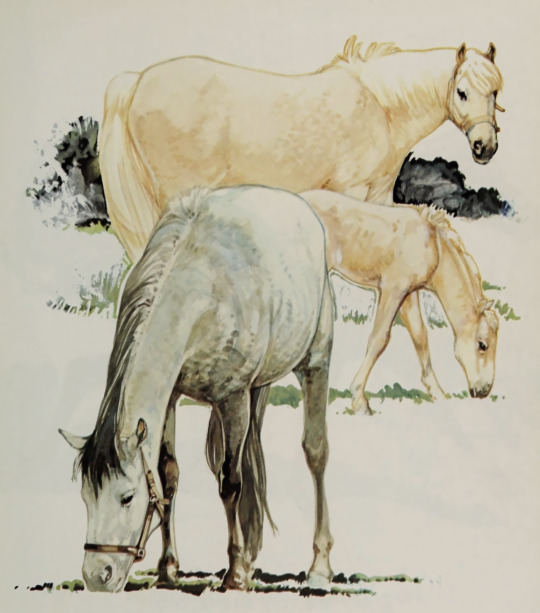
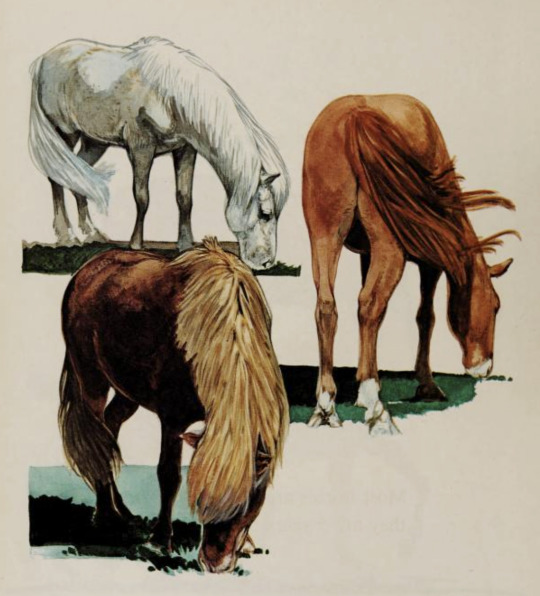
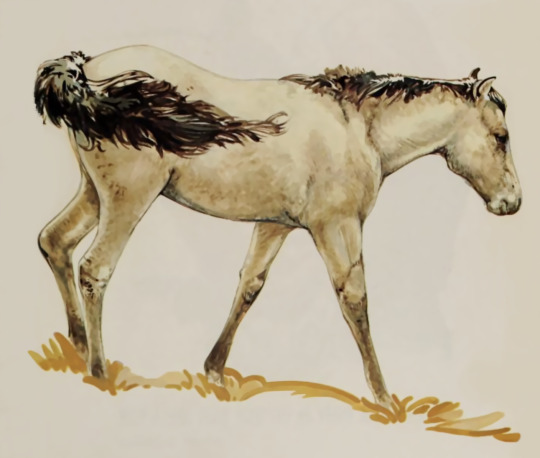
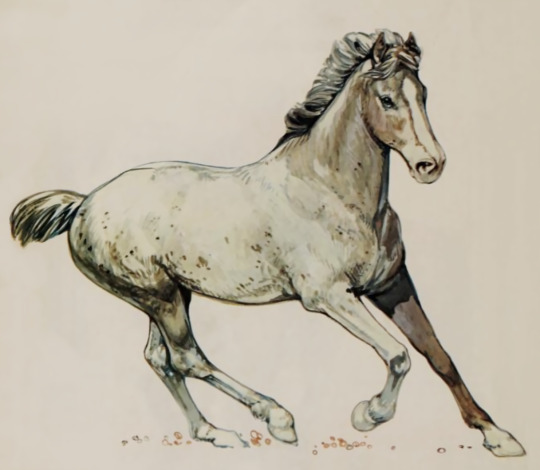
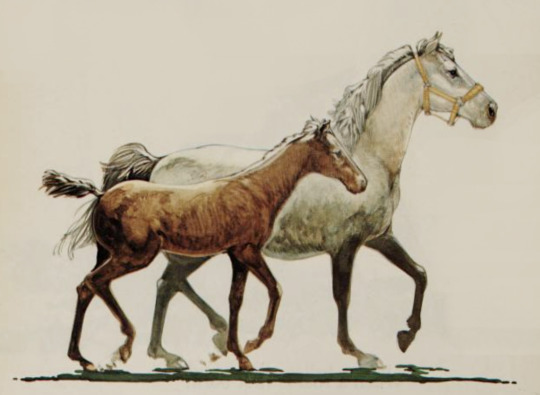
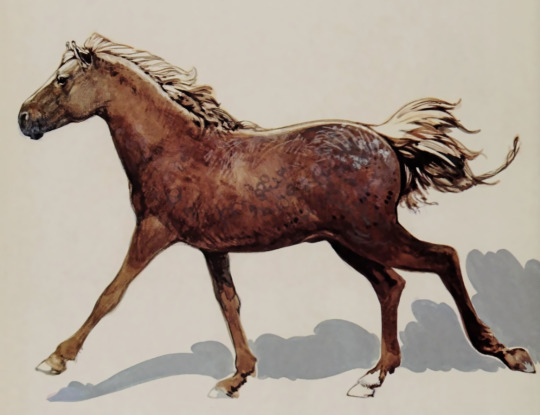

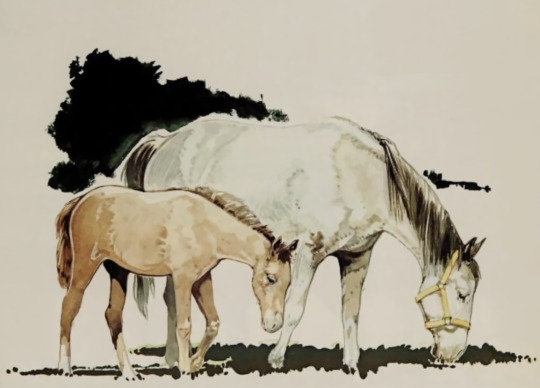
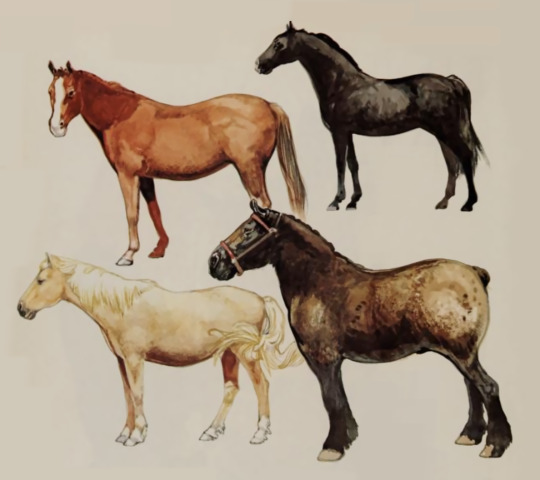
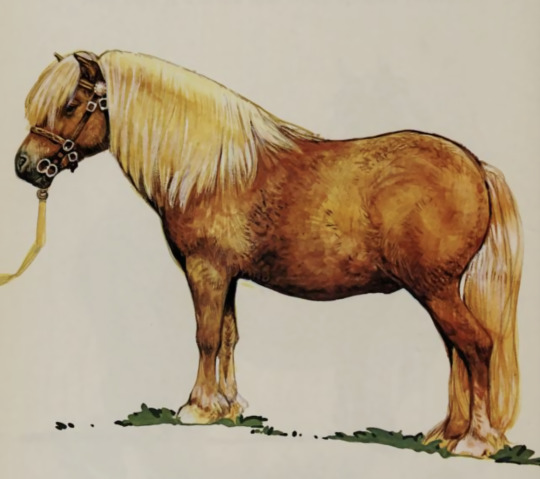

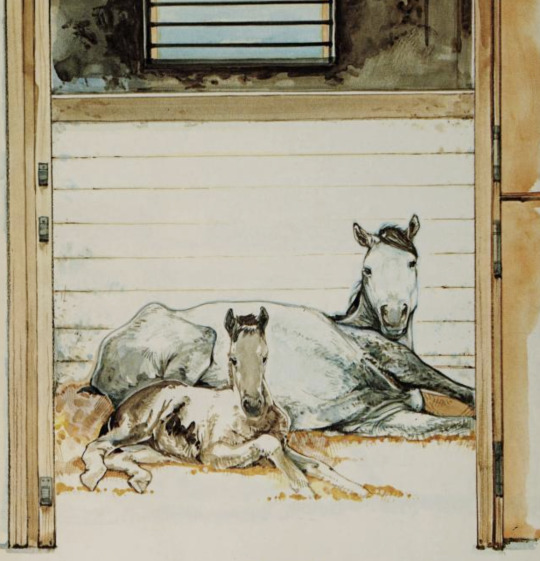

Horses (1983) written by Rose Greydanus, illustrated by Joel Snyder
#horses#now i know#rose greydanus#joel snyder#this one was a delight to photoshop#but i did have to construct multiple tails#that were cut off by the middle binding#so that was new#but it helps me learn!#these were my favorite types of books#the watercolor paintings are beautiful#and have so much more personality than the 90s grainy photographs#i hope i can find more like this book#internet archive#photopia#horse art#illustration#horse#equids#yee haw#watercolour illustration#watercolour art#watercolourpainting#watercolour portrait#1983#1980s art#1980s vintage#1980s toys#80s#vintage books
479 notes
·
View notes
Text
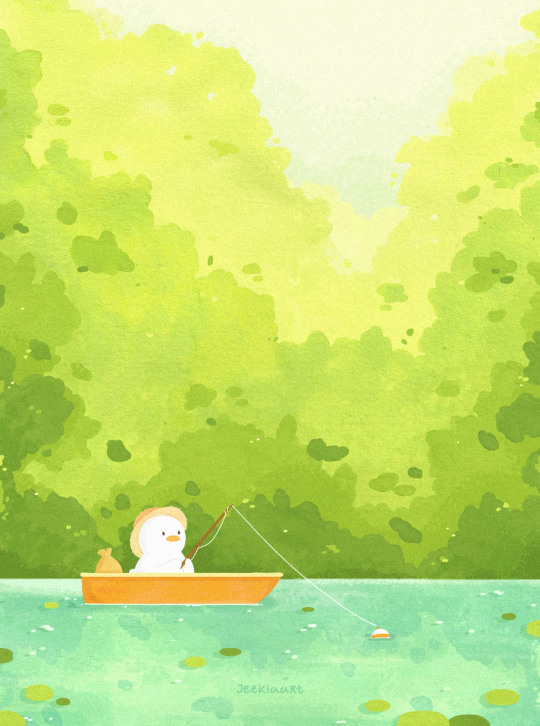
an relaxing outing 🎣
( find me here )
#my art#me posting green and summery art during winter?#more likely than it seems#it's still summer in my head#art#illustration#drawing#painting#mixed media#watercolor#watercolour#traditional art#digital art#photoshop#aesthetic#summer#relaxing#cute#duck#duck art#fishing#artist on tumblr#artists on tumblr#jeeklaart
210 notes
·
View notes
Photo

living in the midwest kinda sucks ngl
#those midwest emos are onto something fr fr#my art#digital art#digital art diary#made with photoshop#smalltowncore#you think it's about the escape#that once you leave this place you'll be able to grow into something more than what everyone assumes you're capable of#but you see people come and go#you see people who do change#and you wonder if maybe it was never the place at all#but you#am i static?#landscape#comic#digital comic#digital illustration
45 notes
·
View notes
Text

happy new year!! first digital piece of 2024- an ice princess ❄️
#I wanted to draw an elegant dress and it turned into an ice themed character!!!#I could've made it so her look was more “ice” like blatantly but I just felt the energy whilst making it more than the look I guess#happy with it though!! I think that's a good way to start the year#my art#illustration#digital art#photoshop#photoshop art#character art#digital illustration#character design#original character#character concept#fashion art#elegant dress
8 notes
·
View notes
Text
So uhh, we kinda all goofed off in our digital arts class at the command of our professor
We had to photoshop ourselves into a historical photo before we left at the end of the day, and this was literally the only good picture I had of myself on my phone 😭😭
Anyway the dinos didn't go extinct they're just doing laps on the moon now

#i wanted to do more but we had other stuff to do#i had liberty leading the people loaded and ready to go#but alas#i ran out of time#never used photoshop before today but its lightyears better than illustrator good god
3 notes
·
View notes
Text
...
#personal#bruh i gotta start sitting in on some automation meetings at work#which a) id better get a raise in dec#(otherwise im taking my portfolio of automation documents...blanking out the confidential#sportsball art............ and looking around after updating my personal website)#and b) .....uh i didnt think that adobe automation and Javascript for illustrator and photoshop was a unique skill#like no one in my office other than two other ppl know ANY of it and i self taught it#to make fucking KPOP GIFS?????#like i legit told my boss.........i learned this in 2017....to make 50+ kpop gifs a day#dude looked at me like i was nutso#but i automated all the boring parts of giffing away#like......changing to frames from video....cropping multiple documents...duplicating watermarks and color layers#all of its automatic#sharpening after i decide on settings....automatic#i get to chilll.....happily stabilize video......color one document and tweak it on others.......and wait until computer processes#thats how i gif now lol#ive added more and more batch processes over the years and more js scripts#BUT its just all been the same idea lol
0 notes
Text
If anyone is currently looking for a good Adobe alternative, the Affinity suite's universal license (aka, one time purchase for all 3 programs) is currently (as of July 12th) on sale for 25% off
#maeve.txt#graphic design#illustration#artists on tumblr#art#digital art#photoshop#adobe photoshop#illustrator#adobe illustrator#I'm normally not a shill but#i've been nothing but impressed by affinity#great alternative if you want a program that does more than adobe#i was gonna wait to purchase until my trial was done#but I love a good sale
1 note
·
View note
Text
How to get past the fear of OC posting
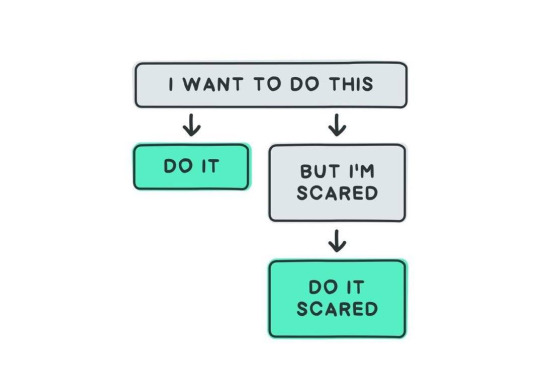
People should create for the sake of creating but people post to engage with the community. However, posting can be intimidating and anxiety-inducing for a lot of people. It’s easy to say “do it scared” but much harder to put into practice. So, I’ve put together a few steps that lead up to doing it scared. These won’t work for everyone and this is meant more as general advice.
Step One: Why are you scared?
The first step is to figure out what about posting is scary for you. Oftentimes, it’s not as simple as “what if my post flops” or “what if people think I’m cringe”. Once you’ve figured out the surface-level reason, dig a little deeper. If your post flops, does that lead to you doubting the worth of what you’re creating? If you’re worried about what people think, is that because you’ve experienced judgement before or are worried your inbox will be flooded with criticism?
Identifying why you’re scared will not only help you understand yourself better (yippee!) but you can also then work on the source of your fears and anxieties at your own pace.
Step Two: Find ways to lessen your fears
One way of working through anxiety online is to find ways to mitigate the specific source of your fear.
Some fears have easier solutions than others. If you’re worried about people criticising your work, you can turn off anonymous asks (as most people are less likely to be haters when there’s a name attached to it) or turn asks off entirely, as well as limiting replies to those who have been following for a week. This way, if someone does want to be an unpleasant individual, it’s a little harder for them to do so.
A lack of engagement is a little harder to remedy. Here, the only real solution is to try and divorce the idea that engagement = worth. Remember why you’re creating an OC. Because it’s fun! It’s an act of creation! Because you want to find a community…? A community or OC friends will never just drop into your lap. You need to seek them out yourself. Look into discord servers, forums, tumblr networks (are they still a thing?), fandom events and exchanges, and most importantly: go out of your way to send asks/questions to others and build friendships with them! If you’ve got social anxiety like me, this is going to be a big challenge. Which leads to the next step…
Step Three: Start small
It doesn’t matter how small your first step is - so long as that step is forwards! If you’re nervous about OC posting, find the smallest thing about them and post it with the expectation of getting no notes. That’s right, I want you to go in and expect it to flop. Anything over one note is an automatic win. This first post isn’t about engagement - it’s about getting over the initial fear of posting.
It can be tempting to just go right out the gate with elaborate explanations of backstory, lore implications, power levels, everything. But the trick really is to start small. Most people scrolling tumblr aren’t going to read a few thousand words on something they’re not invested in yet. TL;DR is a curse that I’m sure we’ve all fallen victim to.
Instead, break up information about your OC into small pieces that can be posted one by one and have some kind of visual piece with it. People are usually more drawn to images than text. For example, which of these two things are more visually interesting?
What Perseus keeps in his bag:
Amulet
Tinderbox
A broken blade
50ft of hempen rope
25gp of silver powder
Waterskin
Rations (cheese, bread, sausage)
OR
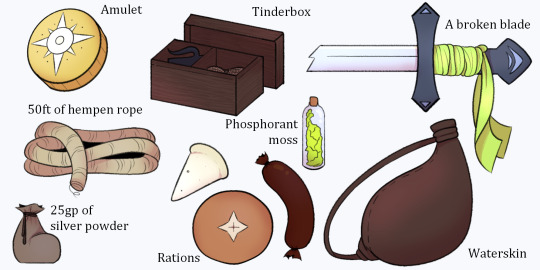
Obviously this comes down to personal preference but a lot of people would find the illustrated version to be more interesting. You don’t need to be an artist to do this either! You could make a version of that example in photoshop or a similar program. Picrews, moodboards, edits, game screenshots and photography can all be used to add a visual element to your posts.
Step Four: Why am I still scared?
Fear is not easily stamped out. Anxiety is definitely the kind of thing that lingers. These steps aren’t meant to immediately make OC posting not-scary. That’s something that will only come with time as you get used to it. Again: Do it. Do it scared. Gradually, it’ll be less terrifying and in the meantime, you might be able to make a few friends who also want to talk about your blorbo.
668 notes
·
View notes
Text

here's a version with real colors i made before i decided on a color palette.

ace of hearts
#these sketches with the numbers are supposed to be short controlled bursts of drawing mixed with obsessing over people#this took like 6 hours. which isnt a lot grand scheme but is way more than a sketch#anyways don't question rules rules are good im bad all hail annie#art#my art#digital art#sketch#drawing#photoshop#community#nbc community#community tv#sitcom#tv#annie edison#annie#community annie#western#cowboy#alison brie#illustration#digital illustration
17 notes
·
View notes
Note
Hi there! 🙂 I was wondering if you would be willing to share your Procreate brushes as well as any textures? 💕 It doesn’t matter if it’s paid or not. I would be more than happy to pay for anything. I’m planning to use Procreate for the very first time on my very first iPad, so I wanted to know what you use for Procreate. As a longtime follower, I find your art to be very gorgeous! 🥰
These are the ones I use the most! 💕
Hope you enjoy them as much as I do (-:
146 notes
·
View notes
Text
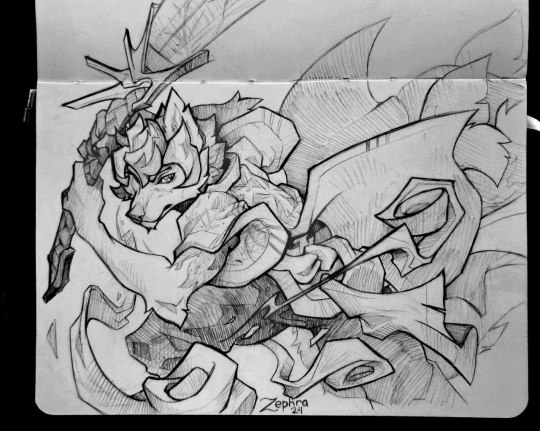
From sketch, to...

... Final piece. Commission for MercuryF0x, Process video can be found here (it took a bit of energy to edit so please give it a look).

Bonus headshot detail - first time detailing something like this and really happy with how it ended up.
#genuinely a bit sad almost no one will see this#but i also feel like ive hit a breakthrough with art recently#and its just too much fun where I want to paint for the process of it#so trying to focus more on that than anything#sketch#art#traditional#furry#painting#furry art#speedpainting#digital illustration#youtube speedpainting#youtube video#youtube#furry artist#small artist#small blog#zephra#kitsune#fox#sword design#will-o-wisps#silk#embroidery#glow#photoshop#corel painter
17 notes
·
View notes
Note
Do you have any tips for making gif comic pages? Whenever I make them the file is so huge and different than the other pages...
I was wondering bc I really like the Kochab pages and they maintain their quality!
yeah, it's just hard to make them without a huge file size :') some things I do to lessen it a little:
I make gifs in Photoshop and save them by going to File > Export > Save for web (legacy), lowering the amount of colors as far as possible without losing too much quality, same with dithering, and try to keep the image size under 1000px wide or tall at most, if possible. you can play around with the settings in those panels to see how they affect the file size, and make changes.
keep the animations to about 20-25ish frames. less frames = smaller files I think
after I'm done in PS, use https://compressor.io/ to lower the file size a bit more. I do that for big illustration jpgs, or illustration gifs, as well as comic page gifs ✨

497 notes
·
View notes
Text
Writing Notes: Book Cover

“Don’t judge a book by it’s cover!” We’ve all heard the phrase and we all know that’s impossible. Because the cover of a book is the first thing a potential reader sees—it should stop them in their tracks. It’s a very powerful marketing tool; having a well-designed book cover is crucial.
Tips for Making a Great Book Cover Design
Using more than two to three typefaces on a cover is discouraged, as it can look really messy.
Keep things simple. Your cover will be in a sea of other covers so try to keep your design from getting muddy and make sure it stands out.
Show your designs to people who have a design eye and/or you trust. It’s great to get feedback.
If you hire a professional designer, write a brief and send them info. Be really clear on what you want. Designers usually do a certain number of design rounds included in the agreed upon fee and any extra rounds of design will be extra.
If you hire a professional designer, they will likely have ideas about printing and may have connections to printers. They are a resource so don’t forget to ask questions.
Don’t forget: a book cover is an important part of selling any book. Whether you decide to do it yourself or collaborate with a professional, pay special attention to this part of the process, as a great cover goes a long way.
6-Step Guide: Professional Book Cover
STEP ONE Generate Ideas. Look around at book covers you like. Go to a bookshop and peruse what’s currently happening in book cover design. Take notes of what elements you like on the cover image. A certain typeface? Color? Do you prefer an image or an illustration or something purely typographic on the cover? Another option is to create a mood board. You can use a platform like Pinterest or Evernote, or create a folder on your desktop, and pull book cover inspiration from the web. While you’re gathering inspiration, keep in mind what genre your book is and what kind of book design feels appropriate.
STEP TWO Find a Designer (Who Could Be You!). Do you have design skills? If so, your next step is to begin layouts and mock-ups of the covers. You should use whatever software program you are comfortable with. Most professional book cover designers use a program from the Adobe Creative Suite:
InDesign. InDesign is a multi-page design platform but can also be used for single page design.
Photoshop. Used to manipulate and experiment with photography.
Illustrator. Illustrator is a vector-based program, which means you can create graphic art that can be scaled up or down without loss of quality.
Photoshop and Illustrator. These can also be used together as you can bring your Photoshop file into Illustrator to set the type after you have worked with your cover image.
If you don’t have design skills, now is a great time to hire a book cover designer. The first step is to figure out what kind of budget you have for this. A designer’s fee will range depending on their expertise. Get a figure in mind and then write a design brief which should include the book specs:
Size
Print-run
Intended audience
Where and how the book will be published
Anticipated publish date
You should also include a summary of what the book is about and what you are looking for in a cover. Also share the inspiration you’ve gathered with the designer.
If you don’t have design skills but want to create the cover without the help of a professional, there are a few software programs you can use, such as Canva or 100 Covers, design tools that allow you to DIY the cover (for free or a fee).
STEP THREE Decide on the Dimensions. If you’re self-publishing and printing with a local printer you can work with them to make sure your book dimensions will fit on their printer (remember a book prints front, back, and spine in one sheet of paper). It’s also a good idea to find examples of books whose size you like and feels good to hold. Use that as a jumping off point for your book.
Book Cover Dimensions List. If you are printing for a specific market, from print to ebook, here is a handy list:
Amazon Kindle Direct Publishing File Format: JPEG or TIFF Cover Size (Recommended): 2560x1600 pixels Cover Size Requirements: between 1000x625 pixels and 10,000x10,000 pixels (one side must be at least 1000)
Apple iBooks File Format: JPEG or PNG Cover Size (Recommended): 1400x1873 or 1600x2400 pixels Cover Size Requirements: at least 1400 pixels wide
Barnes & Noble File Format: JPEG or PNG Cover Size (Recommended): Rectangle height and width, at least 1400 pixels Cover Size Requirements: Min. 750 pixels height and width
Kobo Books File Format: JPEG or PNG Cover Size (Recommended): 1600x2400 pixels Cover Size Requirements: Min. 1400 pixels width
Smashwords File Format: JPEG or PNG Cover Size (Recommended): 1600x2400 pixels Cover Size Requirements: Min. 1400 pixels width Draft2Digital
File Format: JPEG Cover Size (Recommended): 1600x2400 pixels Cover Size Requirements: Tall rectangle
STEP FOUR Choose Your Style
Photo-based cover. If you’re creating an photo-based book cover, you’ll need to source stock imagery. There are lots of great resources online to find stock imagery including ShutterStock, Getty Images, and Adobe Stock. (Keep in mind: most photography archives require payment to use their images. Always investigate the copyright of images you’re interested in using.) Look for images that convey or allude to your book’s genre. You can use programs like Photoshop to manipulate your image, making it black and white instead of color or cropping it in a certain way.
Illustration-based cover. If you’re considering a more graphic approach to your cover, Illustrator is the tool to use. You can bring hand-drawn drawings into it and outline them to create scale-able, high-res illustrations which you can manipulate within the program. You can also create shapes, patterns, experiment with typography within illustrator and play with color, transparency, size and much more.
Typography-based cover. Finally, many successful book covers use typography as the main graphic device. This takes some skill and knowledge of typefaces, the historical context of a typeface, and how to manipulate it thoughtfully. That said, using type as a graphic can be very impactful.
STEP FIVE Pick a Typeface (Font). No matter what kind of cover you are designing, you are going to need the title of the book and the author’s name on the cover. As mentioned above, picking an appropriate typeface is very important. You want to pick something that feels right for your book—is it a sans serif or serif? A heavy weight or lighter weight? You want to make sure it’s not something with a lot of baggage, like Comic Sans or Papyrus. It is a good idea to actually do a little research on when, where, and who your typeface was designed by to give you context and feel out if it will be right for your book. You might also consider using up to two different typefaces, one for the title and one for your name. A serif and sans-serif mix can give a bit of contrast and visual interest. There are some typefaces that pair really well together. Check out the website TypeWolf to get ideas of what fonts pair well together.
STEP SIX Test, Tweak, and Repeat. Once you have a few versions of your cover, print them out on your home printer and take a look with a critical eye. Does the type size feel chunky? Too bold? Too small? How does your image look? Is it cropped right? Are the lines of your illustrations too thin and not showing up? Go back and refine your design and then repeat! Don’t forget to look at your book cover as a small thumbnail as well. People are on their mobile phones and you want to make sure your cover still stands out and is impactful.
Book Cover - serves as your first impression with potential readers—and though book covers don’t always look the same, they do tend to contain the same essential elements.
Design standards may be different in the world of traditional publishing than they are in self publishing, and book cover templates for physical paper books may differ from those of ebooks—but they all serve the same purpose.
Some Functions of a Book Cover
A book’s cover provides essential information. At its most elemental, a good cover includes a book’s title, the author’s name, the publisher, and the price.
A good cover offers clues about your book’s content and tone. Your cover design indicates whether your book is a work of high-minded literary fiction, a pulpy page turner, or a compelling work of non-fiction.
A front cover reveals a book’s genre. You can usually tell if you’re holding a thriller, a memoir, a sci-fi epic, or a nineteenth century classic just by looking at a book’s cover art and typography.
A back cover offers broader context. It may feature quotes from reviewers and fellow authors. Softcover books may contain a plot summary or author biography on the back; those summaries and bios are typically moved to the inner flaps of a hardcover book.
How to Hire a Professional Book Cover Designer
Book covers are marketing materials, and a well-designed professional cover can make your book stand out among the competition. If you want someone with expertise in the realm of cover design to work on your book, you may want to hire a professional book cover designer. Here are some steps to consider when hiring creatives to design your book cover:
Hire a cover artist. A cover artist produces the cover art and imagery that will appear on your book cover, either on their own or with heavy input from an author or publisher.
Hire a graphic designer. Certain graphic designers specialize in layout; they incorporate cover art that you provide them—whether that’s an original illustration, photograph, or even a stock image—into the overall design of the cover.
Find a cover designer online. Reedsy is one of a number of online resources for independent authors, self-publishers, and anyone connected to the world of books. Many professional book designers list their services on Reedsy.
Use your personal network. Seek out writers’ groups, either locally or on Facebook. In these groups, people share professional referrals and help support one another when a member has a new book in the works. A group of like-minded individuals can be an invaluable resource when creating your own book cover for the first time.
When to Call a Pro:
You have a budget (a designer’s fee will vary depending on experience and location).
You have enough time to work with the designer.
You have a clear idea of what you want or at least what you don’t want.
You don’t have any design skills.
You don’t want to invest in the design software.
Your book isn’t selling.
How to Design a Book Cover Yourself
If you don’t have the budget for a pro designer or just have a DIY itch you want to scratch, it is easier than ever to design your own book cover. While it may not be quite as rudimentary as when you covered your textbooks in a brown paper bag back in fifth grade, modern technology has made cover image design accessible to anyone with a computer. Here are some tips:
Use a template. There are numerous websites that offer book cover templates and step-by-step tutorials covering basic cover design skills. Some even have a free book cover creator tool, along with cover ideas, design tips, pre-made design templates, and digital cover image tools.
Use standard design software. Book covers can also be made using standard home computing software including Photoshop, Microsoft Word, and even (with a little sweat equity) Google Docs. This is particularly easy if you are importing a pre-made cover image from another source.
Make a prototype. The process for assembling a book is straightforward and satisfying. If you want to test out how your book will appear in print, you can learn to bind a copy yourself.
When to DIY:
You don’t have any budget for design.
You have design skills to do it yourself.
You have the design software.
You have a template and know exactly what you want.
You have people with an eye for design that can guide you.
How to Make a Hardcover Book
So you’re ready to bind your own book. Here’s what you’ll need:
Content, of course.
Uncoated printer paper for book pages
Decorative paper for endpapers, such as wrapping paper or cardstock
Davey board (aka bookbinder’s board), thin chipboard, or cardboard for the book covers
Craft knife
Polyvinyl acetate (PVA) glue such as Elmer’s glue
Hot glue gun and glue sticks
Ruler or straight edge
A long stapler
Thin fabric or book cloth for cover
Binder clips
Thick decorative paper (optional, for dust jacket)
Paper trimmer (optional, for trimming book pages)
Paintbrush (optional, for spreading glue)
There’s more than one way to bind a book, and you’ll find tons of great tutorials online for making homemade books, including Japanese bookbinding and perfect bound softcover books. The most popular style of hardcover book binding is called case binding, which is traditionally done by stitching pages together with thread. Here is how to make a hardcover book step-by-step—no sewing or special materials required:
Assemble the content. The number of pages and the type of paper you work with depends on whether you’re binding a novel, a full-color photo book, or a sketchbook. Familiarize yourself with the format by taking some hardcover books down from your bookshelf and observing how they were made.
Format your pages. If you’re creating a blank book, you can skip this step. If you’re printing a book with text, you'll need to format the text so that you can print it into a book. You can get help with this at a copy shop, or you can download book design software and print at home. Eventually, you’ll end up with a PDF with a page count. This page count has to be divisible by four so that your book can be bound as folios made up of eight sheets of paper (32 pages) each. You may need to add some blank pages at the end of the book to keep your page count correct for the folios.
Print and fold. Once all of your pages are printed, fold pages in half and stack eight within each other, making sure the pages are in the correct order. Staple the folios together in the folds, alternating the location of the staples so that you don’t end up with a bulge in the spine.
Bind your folios together. Arrange all of the folios in the correct order and flatten them between heavy books. Once your folios are flat, it’s time to glue them together. Hold the folios together with binder clips and use a glue gun to glue the folios together along the stapled edge. This will become your book’s spine. Be careful not to overdo it on the glue: Use just enough to keep the folios together. Before the glue cools, use a thin piece of fabric to cover the spine only.
Even out the pages. Carefully trim the edges of the pages with a paper trimmer or craft knife, if needed.
Make the hardcovers. Cut two pieces of cardboard for the front and back covers of your book. For the spine, cut a piece of cardboard that is the same height as the front and back covers, with a width equal to the thickness of the spine plus the front and back covers.
Attach the hardcovers. Paint the cardboard (both covers and the spine piece) with a thin layer of PVA glue and attach to the cloth you’ll use to cover your book, leaving a space between the covers and the spine equal to one and a half times the thickness of the cardboard. Let dry.
Assemble the book. Use PVA glue to attach the fabric-lined spine of your bound folios to the cardboard spine. Keep the book propped up between other books while you wait for it to dry.
Attach the endpapers. Trim the paper lining so that it’s twice the size of the first page and fold it in half. Paint glue onto the inside of the front cover and the front page, and attach paper lining. Repeat with the back cover.
Make the dust jacket. If you’d like to cover your book with a dust jacket, measure a piece of thick decorative paper as tall as your book and as wide as the entire book, plus a few extra inches to fold over the edge of the cover. Fold the dust jacket over the bound book. Lay another heavy book on top of it to help the dust jacket keep its shape. This is the place to add a cover design, if you’d like.
Sources: 1 2 3 4 ⚜ More: Notes & References ⚜ Writing Resources PDFs
#books#book cover#writing tips#writeblr#booklr#literature#writers on tumblr#writing reference#dark academia#spilled ink#writing prompt#creative writing#bookblr#writing inspiration#writing ideas#writing advice#on writing#light academia#writing resources
113 notes
·
View notes