#the thing is most of those images are shot vertically so i have to find one that will look semi decent rotated
Explore tagged Tumblr posts
Visit Tumblr Blog
Explore Tumblr blogs with no restrictions, modern design and the best experience.
Last Seen Tumblr Blogs


Fun Fact
The Tumblr app for Google Glass was released on May 16, 2013.
Note
whenever you change your theme i imagine you frantically searching for "[x colour] lightning aesthetic"

caught in 4K 📸
#diya answers#achilles <3#congrats for being the funniest ask i've gotten in a while#i cannot believe you exposed me like that#the thing is most of those images are shot vertically so i have to find one that will look semi decent rotated#which makes my life even harder
10 notes
·
View notes
Text
A lot of positives (with a few negatives along the way)
Well by golly, I did it! 365 days (well nearly... I'll get there later) of photos on my Sony a7iii, each day attempting to create an image that has some semblance of professionalism and artistry, in a twofold effort to create some beautiful pictures and give myself a reason to use my camera!
To say it was a big task to accomplish is both completely true, but also somehow and oxymoronically, false! I guess it's like what people say a dream job is... it's work, but in a fun and rewarding way.

But work is a four-letter word they say, so it's important to state that there were days aplenty that I did NOT want to take a photo, not because I no longer enjoyed photography or something, but because I didn't feel inspired. I think that's where I struggled the most this year... feeling truly inspired to go out and take a beautiful photo every day. The world that surrounds you daily can seem to be void of personality and charm, all the beauty that was once seemingly at every corner now gone with the normalcy of reality. Couple all that with a small world while on paternity leave during the winter months and it starts to become monotonous. Going back to work in mid-February was good for seeing different landscapes, but it still wasn't ideal for photography with the rainy climate of the Pacific Northwest in the winter.
Which is why I bought a small camera case for my lunchbox to take with me on route! Truly a game-changing moment! No longer did I have to wait until I got home to take a picture for the day or try to use my phone to get something of lesser quality. After all, if I wanted to come away with a lot of keepers this year, I was going to need to all the help I could get! And henceforth, the quest continued!

But with all that background now out of the way, let's talk about some of the things I learned.
I shoot vertical... a lot! I did the math, and I chose to shoot vertical around 25% more than landscape orientation. Pretty wild! My main speculation for this is because so much of the content we ravenously consume on our phones is centered around vertical images and video, due to how we hold them. I think it's a subconscious "rewiring" of the brain that makes portrait orientation photos/videos seem more normal or even preferred. But to defend it for a second, sometimes that just looks best for the subject! No shame in admitting it here ;)

2. My defacto subject when I don't know what shoot is... flowers. It seems like at least once or twice a week I wouldn't find anything interesting to capture, so I'd default to taking a picture of a flower. Not a bad thing because flowers are certainly beautiful, but since I've never fancied myself a flower guy it's a interesting observation that has yielded some good shots of those little colorful petals!

3. Slowing down for me is tough. My entire working career I've been with UPS, a company and industry known for working quickly. Add to that that I've always had a tendency to do things fast (speed cubing, sport stacking, talking fast, etc.) and the result is a lack of slowing down, even if for a minute or two, to take a photo. I probably missed some good shots this past year because I was in too much of a hurry to stop and smell the roses. I definitely want to be better about that this year!

4. Vintage lenses are fun! If you remember my last post, I talked about the fun and magic that come with vintage glass from yesteryear. It was fun to delve into researching them this year and getting to produce some stunning images with them! Not to mention, it's probably for the best that I brush up on my manual focusing skills! One of the best things about vintage lenses is that they are relatively affordable and can still hold up stupendously well despite some of them being over half a century old. But I'm taking a break from buying them for the next few months; it's definitely a great way to spend a lot of money without realizing it!

5. Didn't do a ton of astrophotography this year, but really want to in 2025! Part of what I wanted to do this year is shoot some more Milky Way photos this year, but alas I never made the time for it. It's definitely a commitment in the planning and shooting and editing departments, but it's also incredibly rewarding to look at the final shot! But even though I didn't capture any stunning Milky Way photos, I was able to get some of the aurora borealis! Thanks to my honeybee for dragging out the kids to go with me on a work night!

6. Tried some new things this year, namely shooting on 35mm film for the first time! Crazy how it sounds, but it's actually very rewarding not being instantly shown what you just photographed. My first was a some Kodak Portra 400, but I got some Fuji 400 for Christmas that I'm excited to shoot with and see the results! Definitely a neat experience that I was glad to take part in! What's old is new again, as the saying goes!

7. One thing that this challenge also contained was discipline. It's hard to commit to something, especially when you don't feel like doing it every day. But I'm pleased to say that I did use my Sony every day this past year, with the exception of the few days that I used my phone (which I did account for at the beginning the year) and one random day. It was 10:30 at night, the lights were off in the bedroom and all of sudden I realized, "I didn't take a picture today!" But since we were already in bed, I didn't get up and take a pic... consider it a cheat day ;)

I guess that about wraps it up! If you expected this blog post to go in-depth into incredulous stories that belong around the smoky campfire, filled with unbelievable twists and turns that cause you to sit there with your mouth gaping open like a toddler... yeah I got nothing for you. To my recollection there aren't any stories to tell, and that's okay; life isn't always the premise of a major motion picture that you see on the silver screen. Not every day has that, because often times it's truly a grind of normalcy and routine. I guess that's what I truly learned out of this whole deal: life isn't always exciting or flashy, and that's perfectly okay. It's good to slow down, take a deep breath and fill your lungs with the air that surrounds you, because it's another moment the Lord has let you live! How often do we forget each day, each hour, each minute... that those are truly gifts of God! I blogged several months ago about reflecting on the little things; that's kinda the crux of the matter. Reflecting on the small blessings in life and thanking the Lord for them. One way I want to better in 2025 is to complain less. Being in a mindset of thankfulness is the way to do that.
2025 is a big year for me in a lot of ways... turning 25, hitting top scale as a driver, five year anniversary. Lots of milestones and so much to be thankful for! This year, may the Lord help me to be thankful for all the moments no matter what the situation, to put the past in the rearview, and to be sold out for Him in all that I do!
Oh, and take some pretty dope pics.. yeah that would be pretty sweet too.

2 notes
·
View notes
Text
Extraction
The process of developing some better assets for the vertical slice began in earnest today. I wanted to turn my attention to the very first thing the player will be doing - setting up extractors to pull up material from the underlying asteroid.
Time to replace the ugly placeholder assets!
My typical workflow for this is to set up a new Blender file with a placeholder tile that represents the footprint of a single grid tile. This helps me keep within a size boundary and helps me to contextualise the height of things a bit easier.
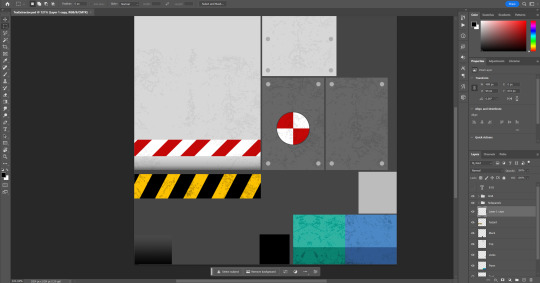
My default Blender file for setting up new objects that will sit on the level grid.
I then set up a new texture file in Photoshop for the object at 1024x1024 pixels in size. Not quite the 4k textures that you might see in AAA studio games - but this is a management / factory game, and super high resolution textures are just wasted at the draw scale of most objects in the game!
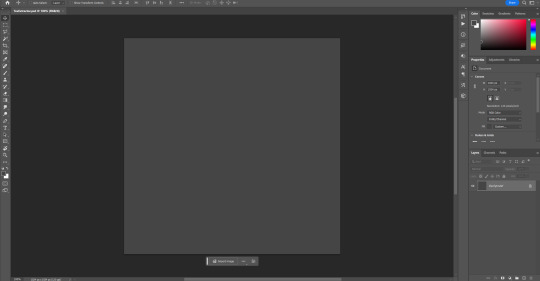
An empty texture. I'd best start doing some painting!
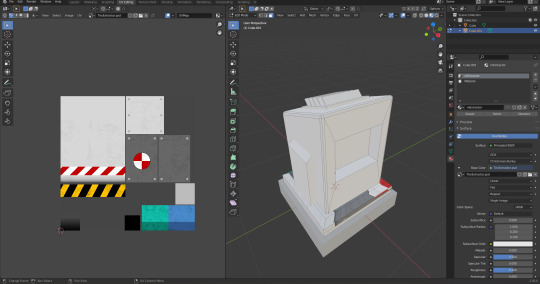
It's then time to rough out the geometry into something resembling my idea for an extraction machine. I'm limited somewhat by my (arbitrary) decision to have this object only occupy 1 tile, but it's mainly because I don't want these objects being too large when you have a factory to fill with other more interesting things!
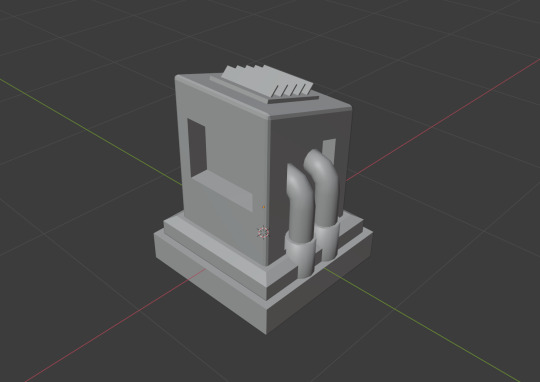
A shot of the front of the new Extractor model.
And from the rear, giving a better look at the vent and back detail.
I then start blocking out rough colours and areas in the texture map, making sure to consider the size / shape of the actual model surfaces they'll be applied to. Then I'll add some small surface details, maybe some decals, and a small amount of scuffs and scratches just to break up the smoothness of it all.
An almost complete texture map!
I keep refreshing this PSD texture in Blender (I don't bother exporting actual image textures at this stage, since PSDs are natively supported in Blender), this keeps the model up to date and also lets me progressively work my way over each part of the model and align up its texture coordinates.
A freshly imported texture. I haven't yet started mapping polygons to areas of the texture map yet.
Some people use UV-unwrapping techniques for laying out and painting textures, which I find great for more organic shapes. But for more angular, man-made objects, I often find it easier to map the texture to the model, rather than the other way around.
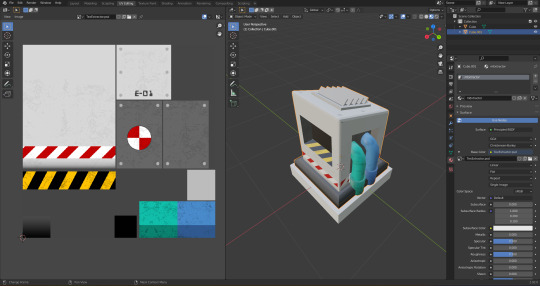
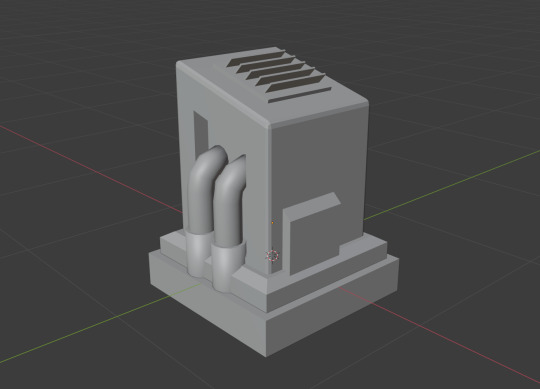
After some final texture tweaks and some polygon UV mapping, we have a finished model!
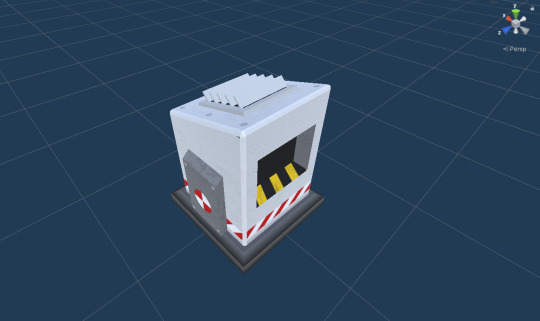
Once I've finished texturing, I export the Blender model as an FBX and import into Unity, making sure not to import the Blender material, animation rigs or any of that other stuff (I prefer to set up most of those things within Unity itself).
A finished model!
I perform a final pass on the texture to create a height map from it (grayscale). This is used to generate a normal map to bring out some of the surface details under certain lighting conditions. Not essential for this game, but in the event I add any situational lighting, it'd be nice to catch some of those details in specular highlights created by the normal map. It's just a nice bonus.
So that's about it for this one. It was a fun lunch break to set this up, and you can see how it looks in the game below.
Thanks for sticking around, and have a great day!
3 notes
·
View notes
Text
Hello peeps!

Thought some of you might be interested in some tips and tricks for making gifs of your GW2 characters. Don't get me wrong here please, I'm by no means the be-and-end-all of gif-making, but maybe a handful of you might enjoy this? I do at least have experience with throwing myself in front of chak for hours. You decide if that's good or bad.
This is how I personally proceed and maybe some of you have better ways to do it! Feel free to share your own advice here :D
Let's get started! ・°˖✧◝(⁰▿⁰)◜✧˖°.
Choosing a location
So you chose a victim and have a neat little idea of what you wanna show. Now all you have to do is find a fitting location. Here's some things to consider:
How's the ambient lighting? Rotate your newly found top model at your location of choice to make sure the light hits from the best angle. Keep day and night cycles in mind. Some places also simply have bad light for your character; in that case try to think of a similar location that might look more flattering.
How busy is the background? You probably want your character to pop out, so the choice of scene is important especially if you don't have access to 3rd party depth-of-field filters. Keep in mind that moving background elements might look distracting.
If there are enemies around, can you get rid of them reliably or will they keep interrupting you? Are there safe spots to stand in outside of enemy range? Most enemies really don't hate you as much as you think. Unless you're in the Crystal Desert.
Strike a pose!
The basics:
Play around with the camera sliders in your options. Having your character big in the frame goes a long way! The vertical, horizontal and zoom sliders are your best friends.
Remember the UI doesn't have to be visible for you to type emotes in chat. Just to be safe from (public chat) typos though, I like to type the command with the UI turned on, then hide the UI, and then once I've adjusted the camera hit enter to play the emote. This is especially useful if you're trying to pose around enemies and don't have the time to frantically type things in chat.
Some tips for posing:
Rotating the camera while in first person mode rotates your entire character. This way you can turn around without having to redo your /emote all the time. This is especially useful if you use persistent emotes that last an infinite amount of time (as opposed to emotes that play an animation once and then return your character back to the default idle).
Similarly, zooming into first person mode and zooming back out will (client-side only) display your weapons and back piece. Those usually get hidden during emote animations.
If you swap weapons via keybind mid weapon idle animation, the animation will usually keep playing despite not fitting your newly swapped in weapon. This will often look silly, but can sometimes get you some cool poses too. Try out some combinations!
The technical side
So you're a master at staging the perfect shot, how do you get all of this into a neat little moving image?
To capture your gameplay, any recording software of your choice works. Windows 10 should by default come with the ability to record your game (press the Windows key + G to bring up the overlay; you can change keybinds for active and retroactive video recording & other things in the settings).
Once you've made your video file, the tricky part begins. It's kind of difficult to write a definite guide for this since programs and methods for making gifs vary so much. Different programs might compress your file differently, giving you different results in terms of file size and quality. Personally I've been using an ancient student version of Photoshop CS6 since the dawn of time, and it took some trial and error to figure out a good balance between quality and size.
About posting on tumblr:
tumblr currently allows a file size of 10MB max per gif (you can have several <10MB files per post).
The tumblr dashboard displays images at a width of 540px, so make this your gif's absolute minimum width if you want to ensure a crisp image.
Now for some subjective observations based on my experiences with how I create gifs. ! Important ! This is how my particular version of Photoshop handles sizes. You might get completely different results using any other software that compresses files differently.
Getting a good balance between image dimensions, quality and length of animation is hard if you're limited to a maximum file size of 10MB.
Your file size will depend on: The amount of frames your animation is using, the amount of colours, how much movement there is, and of course the dimensions of your image. Editing your image in terms of colours, saturation, contrast etc. can also impact the file size (it can go both ways).
Using a video recorded at 60 fps I can usually squeeze about (give or take) 3 seconds of animation into the gif before it gets too large (given a – by my standards – decent image quality). Take this into consideration when you pick your poses.
Things you can do to reduce file size, other than the two obvious solutions of simply making your animation shorter or image dimensions smaller:
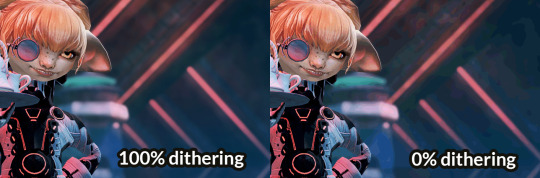
Lower the amount of dither. This has a huge impact on file size in my experience. If you have many transparent effects (e.g. smoke, fog) or use strong depth-of-field filters in your image it will look bad if you go too low.
Limit the colour palette when you export your gif. Highly dependent on the scene, sometimes you can get away with reducing your colours by half, sometimes it will look atrocious.

In the end I don't think there's one formula that works for every situation. It really depends on what you're showing, so mix and match different methods to try and get the best compromise between quality and size!
And that's all I can think of right now! I hope that maybe one of these points could help someone :D
303 notes
·
View notes
Text
advice for small fighters
Someone messaged me to ask if I had any advice for small afab people getting into SCA heavy combat, so I figured I should make a post about it!
This got long, so I’m putting it under a cut.
Things to keep in mind:
I’m not a knight, I’m not officially squired to anyone (my dad is functionally my knight, but nothing formal), and I’ve only been fighting consistently for four years. I’m not an expert. But I do have access to some very excellent teachers, and I’ve been doing this long enough to have some idea what I’m doing, so hopefully this will be helpful for some people.
What works for me may not work for you. Keep what clicks, discard what doesn’t seem relevant.
I’m 5′3″, about 115 lbs, with an estrogen-dominant hormone system. In comparison to most heavy fighters, I have low upper body strength, small hands, wide hips, and a small ribcage. The more of those traits apply to you, the more likely my experiences are to be relevant, but some of this will hopefully be helpful regardless.
Also, this is in no particular order. Some of it is basic technique, some of it is mental stuff, some of it’s about equipment, some of it is tactics that won’t be relevant until you’re a bit further along.
1. You will probably have a longer learning curve than other people. This is not a bad thing. As a small person with significantly less muscle mass and body weight than the vast majority of heavy fighters, it will probably take you longer to be a challenging fight. Your technique has to be excellent before you can even hit hard enough for people to take it. A lot of big guys can brute force their way through the beginner stage, they can just pick up a stick and start swinging, whereas you will have to be very solid on the basics before anything else. In the long run, this is to your advantage. By the time you're past the beginner stage and starting to be a credible threat, those big guys will reach a point where they'll have to unlearn a lot of bad habits in order to progress. Then after that, there won't be any real difference.
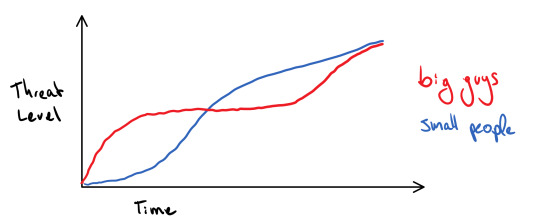
(Image description: a graph with Time on the horizontal axis and Threat Level on the vertical axis. The red line labeled “big guys” increases rapidly at first, then levels out, then gradually increases again. The blue line labeled “small people” increases slowly at first, then very rapidly, then slows until both lines are increasing at the same rate. End image description.)
So I know it can be frustrating at first, but keep in mind it'll pay off eventually. In the meantime, try to find chill people to practice with, who are willing to take light from you occasionally so you can practice things other than power generation.
2. On that note, make sure someone teaches you how to throw the basic shots: snap, wrap, off-side. Practice them on a pell. Everyone who comments on your power generation will tell you to throw from your hips; that's not the only way to generate power, but it is generally the easiest to learn. As a general rule, the less mass you have, the more of your body you have to put into a shot. A big guy can barely twitch his body and throw with more than enough power; a small person like me has to engage their entire body from foot to shoulder. To start, think big motions. (NOT big with your arms, big with your body. You want to keep the path of your hand as straight and compact as possible, it'll hit faster and harder, don't let it swing out. But your entire body should be engaged to throw a shot.) You'll be able to use smaller motions eventually, but at first, you’ll need all the help you can get. Think of it like screwing your body into the ground.
3. Remember to stay low. That’s the other reason why I say to screw your body into the ground. A lot of people instinctively raise their center of mass as they fight, as if somehow standing on their tip-toes is going to help. It's really not. One of your big advantages is having a low center of mass, don't throw that away. When you stay low, you're a smaller target, you're harder to push around, and you generate more power. To start out, especially if you’re lightweight and struggle with power, try moving like a wrestler, low and grounded.
4. Be conscious of range. When you're fighting someone much bigger than you, to get to the range that you can hit them from, you have to pass through the Danger Zone where they can reach you but you can't reach them. Different people have different approaches for dealing with the Danger Zone, but you need to know it exists and have some method for handling it. My main piece of advice is to make sure you're actually close enough to hit them before you throw a shot. Personally, I try to close in quickly and defensively, then hang out about as close as I can comfortably be without restricting my own movement, because that's generally uncomfortably close for my opponent.
5. On the topic of closing range: as you get closer to a tall opponent, you have to raise your shield a smidge to cover the same amount of helmet. That’s a tip about perspective that I learned from Sir Helga at Sport of Kings a couple years ago. Here's a diagram:
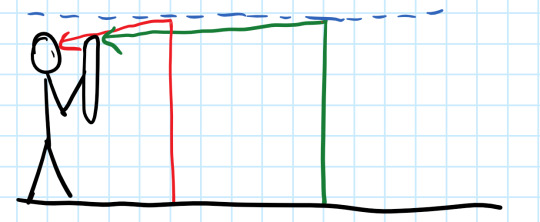
(image description: a stick figure holds a shield at about head height. A horizontal blue dotted line passes over their head. There are two vertical lines in front of the stick figure, a green one which is further away from the stick figure and a red one which is closer. Both vertical lines are the height of the blue line and they each have an arrow that points from the top of the line to the person’s head. End image description.)
The blue dotted line represents the height of your opponent's shoulders, so where they're throwing from. The green line is from further away, and at that distance, the shield blocks a straight shot. The red line is much closer, and at that distance, the angle is more steep and a straight shot gets in.
6. Get equipment that works for you. I started out with an extremely light shield because that’s what I could physically lift for an entire practice. I also highly recommend shaving down your sword handles until you can wrap your fingers all the way around the handle, or as close as you can get without making it so thin it’ll snap. When the handle is thin enough to grip easily, you can keep your grip much looser, you have less tension in your wrists, it’s easier on your body and you’ll throw whipier shots. It should feel more like a ruler than a club (though not as thin as a ruler). Being able to feel where the edge is will give you much better control over the angle of your sword.
7. You will get so. much. redundant and unasked-for advice. You learn to sift through the chaff to find the bits of advice that are actually useful for you. I haven’t had anyone be rude or exclusionary to me; I have gotten a lot of mildly patronizing advice. No idea if it’s a gender thing, an age thing, or just overly enthusiastic nerds wanting to share information, but I suspect it happens more often to women and gender minority fighters than to cis guys.
8. One common side effect of having an estrogen-dominant hormone system is crying easily. That's a totally normal response to get from fighting. What I do if I start to have a tear response is I end whatever bout I'm in, go take my helmet off and get some water, take a breather. Then I always try to do at least one more fight. Sometimes I'm fine after that and can keep going, sometimes I still need to stop, but either way, it teaches my body that crying won't get me out of doing the hard thing. It helps to have an understanding person around who you know won't make a big deal out of it.
9. Find out if there are any other not-cis-guy fighters in your area, I've found that there's a really good sense of community among the women + gender minority fighters. There's also a facebook group, Women & Gender Minority Fighters - SCA Unofficial, that I would highly recommend joining.
10. Have fun!!!
#am i a stickjock now#questions for the bard#sca heavy fighting#medieval sword fighting#trans in the sca
126 notes
·
View notes
Text
so... I called Seiya a fake and a fraud the other day and...
I might have been wrong?
Recapping with the images I used in the linked post...

him do his lil dance
This is what I got when I taped some paper on my monitor and traced the path of his arm movements
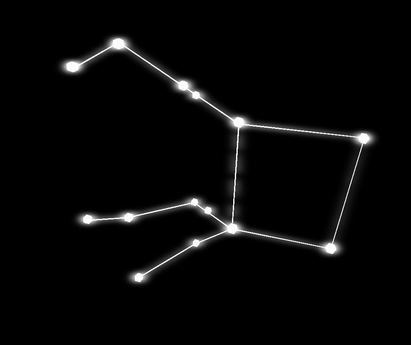
This is the Pegasus constellation
chile...
yall about to watch me lose 5 years of my life for the second time in 48 hours
how special does that make YOU feel?
okay, SO-
The Pegasus constellation in real life actually appears in the sky flipped both vertically and horizontally from the picture I used in the last post. That's how the Pegasus constellation appears behind Seiya.
but here (below) is how it appears in the sky in real life
Also, while reviewing the GIF specifically, I noticed that the Pegasus constellation behind Seiya when he's channeling his cosmo has extra stars for the back legs of the Pegasus.
In both images I've posted so far of the Pegasus constellation, those stars aren't there. At first, I thought they were extra stars to make the background more "balanced" with more stars to outline Seiya's silhouette and to further frame him as the focus of the shot.
so... that was f a l s e
The extra stars for the legs in that GIF/animation are actually the Andromeda constellation.

The Pegasus constellation is made of the Great Square of (the) Pegasus and a few more stars that make the two front legs and the head of the horse.
The Pegasus and Andromeda constellations share a star in the Great Square called Alpheratz. The Andromeda constellation, while being its own thing and not actually being part of the Pegasus constellation, looks like the back legs of the Pegasus.
This explains away the extra stars in the GIF as being accurate to astrology and not just artistic choice.
All of this is very interesting and has fuckall to do with the actual point I came here to address today.
sew...
I started to play around a bit with the pathing of Seiya's arm movements and see if there was any, and I mean ANY possible way it could really be matching up with the Pegasus constellation.
and honestly???
ye, it kinda works
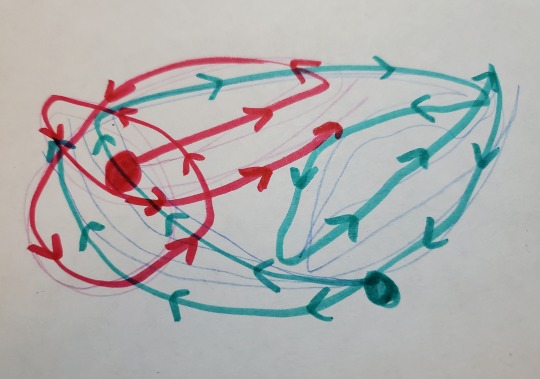
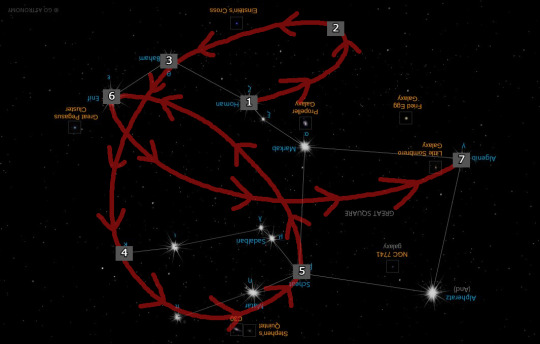
First, let me clean up what I traced out yesterday.
Okay, so when I clean up the path and separate the two, this is what it looks like.
This is the exact path his arms move in and I've marked every place where his arms change trajectory/curve with numbers so you can have a better idea of the order he's hitting which points since there is quite a bit of overlap.
The Pegasus constellation has 15 stars but I don't think he's hitting like... every individual star? More like tracing over where each one roughly is?
this'll make more sense in a bit...
Alright, so-
Earlier I discussed the orientation/direction of the Pegasus constellation as it appears behind Seiya and how it will appear in most images when you look it up. The head is up top and to the left with the Great Square, it's body, to the bottom right.
But again, the way it appears in the sky in real life is flipped both vertically and horizontally with its head to the bottom right and Alpheratz, the farthest out corner of the body/Great Square connected to Andromeda (the hind legs), to the top left.
I've tried countless times to fit different images of the Pegasus constellation into the outline and while it never quite fits, I've realized that in spite of that, the path still kind of works.
sooooo . . .
I'm gonna try to get an image of the Pegasus constellation that includes the names of all the stars in it. This'll help me explain the path and how it hits/curves around or through each part of the constellation.
And then I'm going to show you what it looks like when you trace the path of each hand over the constellation.
Like I said earlier, if you draw out the path itself and then try to use a photoeditor to like, idk... 'superimpose' a stock image of the Pegasus constellation into it, it won't really fit like that. But I think I've found a way to make them align.
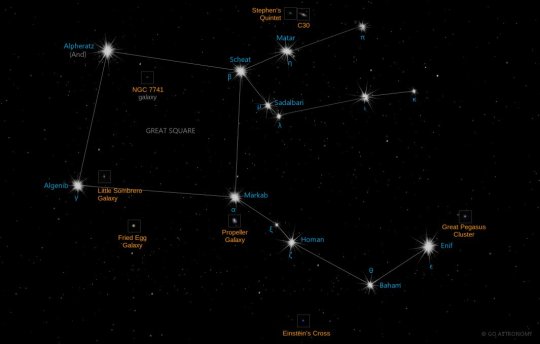
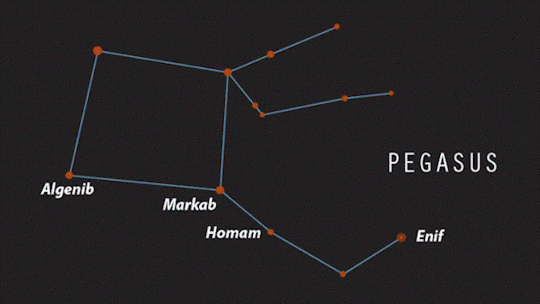
This is the best image I could find of the Pegasus constellation with almost all of the stars named.
Sadly, I couldn't find an image like this with the constellation facing the same way it does behind Seiya, but I'll mark the paths and do my best to explain.
ye, I think I'm about to hit the image limit
I think it's clear where Seiya's hands start. His left hand starts on the star Alpheratz and his right hand starts either on Baham or Enif, but I think it starts on Baham.
Actually, it might start at Homan.
I'll start with his left hand, though.

So, like I said earlier, Seiya's left hand starts on Alpheratz, which is way in the bottom right corner. From there it does a HUGE diagonal left upward curve to Enif. Enif is the furthest star in the upper left of the constellation, it's the Pegasus's nose.
And from Enif, it swerves really far back right again to Algenib. Algenib is the star above Alpheratz in the Great Square (the upper right corner). From Algenib it goes a little bit back left to Markab, the upper left corner of the Great Square. From Markab it goes down to Scheat, the lower left corner of the Great Square, and then upwards, diagonal and right back up to Algenib.
The final movement is a HUGE downwards crescent from Algenib that sweeps under Alpheratz to the left, through the legs of the Pegasus, and up, not quite to but very close, to Enif again.
Actually, on the first swing from Alpheratz to Enif, I think it might swing through the stars Matar and ι or Iota Pegasi which are the stars in the middle of the bottom and top leg respectively.
Alright, looked at it a little more and Seiya's right hand very likely starts at Homan. Homan is a star in the middle of the Pegasus's neck.
From Homan, Seiya's arm makes a pretty sharp crescent to the right, it doesn't go through anything, but when it comes back to the left, it passes through Baham, which is the top of the Pegasus's head. From Baham, he makes a massive, downward sweeping motion that I believe is going through the star at the tip of the top foot.
The Pegasus's feet are out in front of it with one leg positioned over the other.
I think that star is called Kappa Pegasi? In the picture, it just looks like κ which is probably supposed to be short for κ Peg. Kappa Pegasi is the second star after Sadalbari, which is the bent knee of the top leg of the Pegasus.
Both of the legs are coming out of Scheat at the lower left of the Great Square.
From there it continues to curve rightward and it goes by, quite possibly through, the tip of the bottom foot of the Pegasus. The star at the end of that leg is represented in the image as π, short for π Peg which is Pi Pegasi. From Pi Pegasi, it continues its loop and goes through Scheat where both legs start.
From Scheat it arcs up and to the left to Enif, the Pegasus's nose, and finally, from that point, it swings slightly downward and far right to the upper right corner of the Great Square, Algenib.
Edit - Honestly, that last arc was probably supposed to go just a bit lower and hit Sadalbari. I think that's the only major named star I haven't hit yet. but oh well
Actually...
Seiya might be crossing all of the major/named stars. oh wow...
The attention to detail is astounding, high key.
but bruh- I really went in on this lil boi the other day
I came for his stance. I came for his character; I deadass called him a liar at one point.
chile... I came for his eyesight
Marin was out there catchin strays-
okay, girlies. so i redid the math and the math IS mathin, but liek...
bitches cain't carry decimals
Hi there, this is your Captain bitches speaking~ We're almost off this flight ✈️🌠
chile... nah, Cause I dragged tf out that poor boi in my last post and I was wrong. Not just for draggin him and not mindin my business but because I was actually, factually wrong.
ima go on now and let him do his lil Disney Cosmo channel thang mid-fight and sit down someplace
im sorreh, mah boi...
but ye, Within 48 hours we learned net zero information in which the person that debunked me was like... future me.
Anyways...
Much love and thanks to anyone who reads this thing.
And a lil extra love and thanks to people who read the first post too~
💖 * 💖 * 💖 * 💖 * 💖
please go outside
#pegasus seiya#saint seiya#long post#matpat behaviour#i'm tagging the previous post as seiya slander#not seiya slander#like i'm actually SO sorry#my poor horse boi#forgive me#i went off on marin's trainin and errthang the other day#sorry marin#not marin slander#and called seiya near sighted#not eye slander#it's worse than having one braincell left#it's having all of your braincells but at most two function at a time#and this is what they choose to do#the 5 years i lost on that last post???#i deserved that#i deserved to lose the 5 i just lost typin this shit up too#really and truly love and adoration for those of you who stick around this blog and read literally anything i type#let alone this#💖#the annual reminder to touch grass has now become monthly#i'm still in hell#UNunhingedHINGED#net zero information
25 notes
·
View notes
Note
hi!!!! do you have any advice era taemin styling thoughts to share!!!!!
oh of course!!!! who would i be if i didn't? i talked about the advice styling in more general terms in my taemin and masks post a million years ago and a little bit here in this post where someone asked me my fave taemin stylings, but there are a couple of places where i wanted to go into more detail!
advice is very interesting, styling wise, because on first glance it's all over the map. but there's very conscious effort at play to conceptualize and visualize the idea of combined dualities. ngda was taemin's magnum opus, an interrogation of binaries and strict moralities with the conclusion of creating a new self outside those systems. and, very importantly: the new self is built from those systems. as exemplified with ending shot of him being doused in white paint, the new is informed, synthesized from the old. which you can see in how none of the clothing is in true monochrome. it's always as a purposeful duality: skin/covered, black/white, white/red, red/blue. even his hair is dual toned. and it also is ingrained in the fabric of most of the garments themselves. the split black and white suit, the thorned jacket, the tartan suit set. i know the tartan might not seem like it follows the trend, but tartan patterning is made from using multiple colour warp (vertical) and weft (horizontal) lines while weaving, which creates an entirely new pattern just from alternating colours.
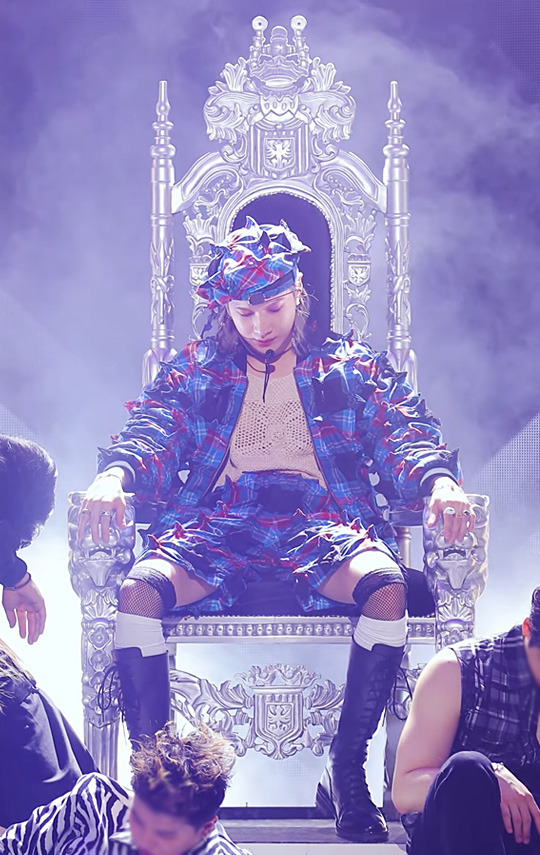
the other point i want to note in particular is the king imagery. with the minting of a new self in a new system outside of the old, one has the choice whether or not to take a position of power, and taemin 100% does that. the most obvious king imagery is in one of the rounds of concept photos:


and there's also the extremely obvious:
as well as the thorned jacket, which is undoubtedly a jesus reference but importantly it is a marker of carrying the thing that hurt you as a mark of pride and strength. taemin has taken a lot of public scrutiny over the course of his career and there are some motifs throughout advice that are emblematic of that scrutiny:
the extensions: the last time taemin had notable extensions was for sherlock when he was nineteen, almost a decade ago. he had a lot of unwarranted criticism levelled at him for being 'feminine' and that public response had a very dramatic impact on his persona and the trajectory of his work
the instagram 'baddie' look: again, he's taken a lot of shit for being 'feminine' and he took that to the most extreme he's ever done
the mascara tear tracks: taemin has spoken several times about how he doesn't like to/finds it uncomfortable to cry in public
the boyishness of the point styling: because he debuted so insanely young, there's always been a perception of youth and immaturity around him and with this tartan suit he embraced it instead of trying to shy away from it. that outfit also bears striking similarity to gainsborough's blue boy portrait (c. 1770):
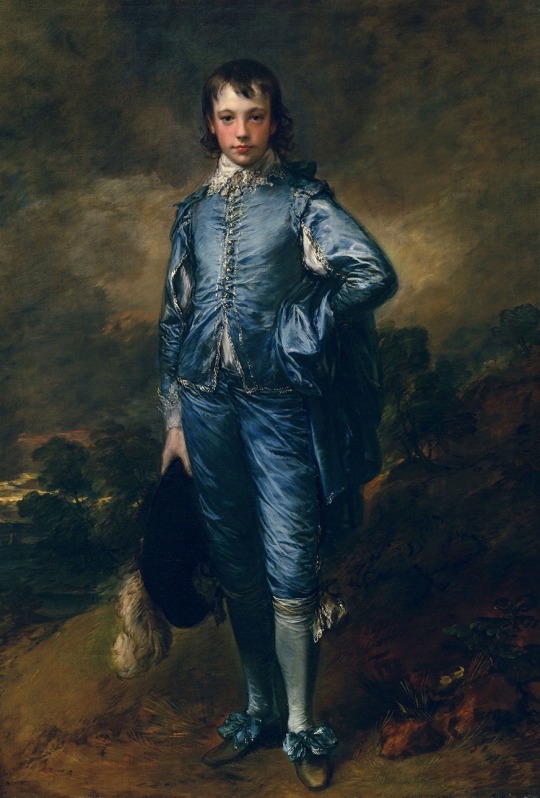
which, although it would be incorrect to say that this particular portrait is indicative of 'short pants as indicating boyhood' ('teenager'/youth clothing doesn't exist in this period but that's a costume history lesson for another day), it is true that short pants in the last two centuries have become inextricably linked with school-aged youth. that, combined with the previously cited image from the inkigayo stage of him in this outfit sitting on a throne, paint a very clear picture of a boy king who has rightfully and confidently taken his place at the head and as the inspiration of an industry.
and a parting thought: i know it's a likely coincidence but i'm not going to look down on the fact that this suit combo is from the loverboy ss21 collection, titled 'the healing'

#this is my evidence submission for why advice was supposed to be an epilogue repackage of ngda#taemin meta#kpop analysis#me checking twt this morning: oh its advice's first anniversary i guess i should finally finish that advice ask#alskdjf;alsdjf im so sorry i take so long..................#someone sent me as ask like two days ago that started 'idk if youre finished all your asks or not....'#anon i don't think i am ever going to be finished my asks but i will eventually get to everyone!#text#answers#i didnt put this in the main body bc im not sure abt it in terms of from the media + whatever but#taemin as been pretty frequently harangued on twt/by intl fans for 'not showing emotion the right way'#hence why i think the tear tracks were included in the styling#in fact i think it might be specifically a response to how vitriolic ppl were about the vlive he did when he announced he was enlisting#again idk how much of that he really sees but he did probably know about it#also like. not to mention about the whole policing grief thing that kpoppies seem to have a hard on for#ANYWAYS HBD ADVICE MY BELOVED
28 notes
·
View notes
Text
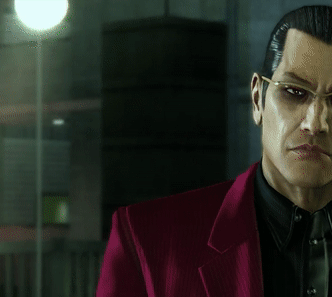
Let's talk about Kazuto Arase

Yakuza / Yakuza Kiwami , Yakuza 3 side content spoilers. Later on Yakuza LaD too, but I'll give a warning before that especially since a lot of people haven't played that yet.
So I have a lot of thoughts about Yakuza on my mind and just want to scream into the void about it somewhere to write 'em all down somewhere! I'm starting with... Arase.
Yeah, I know, a mostly very hated character (personality and battle-wise) that has so little screen time on top of it all too, is the first thing I'll be talking about.
Hear me out, I actually really love this character and only really started to appreciate him after I went for the Yakuza 3 platinum trophy... I've replayed this game so many times, I didn't mind it when I played through it first but seeing all the hate it has gotten, I went to replay it just in case and with that replayed it again and again because I just somehow loved it so much-
And you know, one part of Yakuza 3, also completion related so there was no way I could've missed it, were the Hitman missions. In general, after playing through all the main games I started to come back to a lot of characters I didn't like or minded the first time playing that are now some of my favourites (other examples are Tamashiro or Lau Ka Long, hell even Katsuragi)!
To come back to Arase, let's start with, well, the start: Yakuza / Yakuza Kiwami.
Introduced already in the very first Yakuza game, Arase is just there for a brief moment in the game, yet has a heavy impact on the game's story and Kiryu. It starts with Arase's oath brother Shinji being shot by Arases subordinate, Mochizuki, at least it looks like it. Shinji came here to rescue Reina, whose corpse then gets dragged on the roof of the Dragon Palace by Arase, Sergeant of the Nishikiyama Family. Now that's a pretty... heavy and sadistic first image for a character introduction, and honestly, his strong personality like that seemed also to be the reason he wasn't exactly loved by other members of the Family.
His battle theme in the first Yakuza game is called "Turning Point" which also puts more emphasis on how important this scene is, Kiryu breaking down, his scream when he sees Reina's body... It's really a turning point in the story.
In Kiwami, his new theme "Virtical Point" is also used as the intro song (or at least, the intro song "Vertical Point" is similar and shortened). Which also once again shows the importance of this piece.
Of course, he's not the most important character in the story, but it's still interesting to see how much there is around him other than his rather short appearance.
Then, his fighting style. Yeah, most hate this too and also the fact that starting from there, other bosses also sometimes use his moveset or a similar one. Like, take Jiro or Jo Amon or Andre Richardson... Basically just the usual dual wielding guns while being an athlete on crack - layout. It is actually not that bad, it's even less bad when you've got the right equipment but I have to admit I didn't really have that much good equipment when I first played all the games and basically just rushed through them because I just couldn't stop!
Arase's goal here of course was also to beat Kiryu but well, just like every other character ever, he couldn't do it and got beat instead.
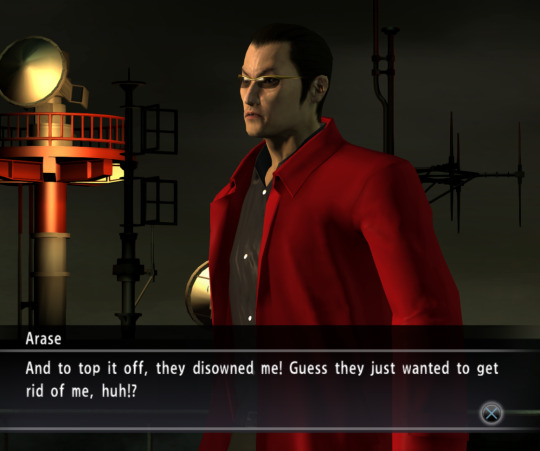
And that's the end of that... The end of his part in the story and also the end of his part in the Nishikiyama Family, because he got disowned right after his failure.
Which is so... hmm... It makes me think. Many others have tried to take Kiryu down, too. And I mean, Arase was normally a very successful assassin, right? Yet this one failed attempt, at which everyone else too failed, got him disowned? Seems to me like they didn't like him and gave him an impossible task to have a reason to throw him out, huh?
And with that wonderful transition, let's get into his appearance in Yakuza 3.
You get introduced to the concept of the Honest Living Association, in short the HLA pretty much after Kashiwagis death. An association, founded by Kashiwagi to help Yakuza / former Yakuza who weren't meant for this life or just wanted out but just couldn't do in it on their own. For some, all they knew was the criminal life, so having a thing like this is especially helpful. Although, I'm kinda sad this was never a thing anymore after Yakuza 3. The whole concept of it was very cool.
Kiryu gets asked by Ibuki to help the HLA because there is an organisation of hitmen, also known as The Reapers (or The Avengers on PS3) whose goal was a different one than the HLA's, it was to kill Yakuza. The Reapers consisted of former criminals, mainly Yakuza, who were wronged by their superiours and expelled, disowned, you name it. Basically what happened to Arase.
Apprehending those hitmen is a totally optional part of the game and I have to admit, I didn't finish it my first time playing. Which is such a shame because it goes by so fast too when you play it after finishing the game! And the individual stories are all so interesting too, I've really enjoyed this side content and also replayed those missions already. You don't really expect someone like Arase to be behind all of it when it turns out to be him who is the founder and the leader of it all. I was already taken aback by Shinzaki being the lieutenant, or part of it at all. I often stopped by to listen to his guitar playing and talked to him, often asking myself is there's anything else up with him.
And once this one hitman contract came in and guitar playing was mentioned, I was just thinking "It can't be him...?", god, this whole side storyline just was so good. And here people come and say Yakuza 3 was a bad game.
The whole build-up to then reveal Arase was just so cool, honestly. It made me start to look more into his character after this confrontation. The fight was really cool too, just having to fight Shinzaki so many times wasn't really necessary, but Arase seems to like to fight alongside others, so fair enough.
And his theme "End Point" is also just so good. It's more similar to Turning Point than Virtical Point was. The name is also again fitting, since this is the end for The Reapers and Arases power.
It is made clear here that Arase has a strong hatred against the Yakuza and especially holds a strong grudge against Kiryu. He sees Kiryu as the reason he got wronged and had to leave the Yakuza behind, while also seeming to be very aware of the fact that the others there probably didn't like him at all.

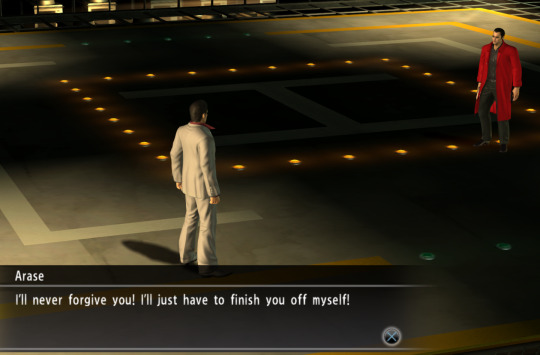
He's so angry at him, he holds this whole speech and talks about revenge while Kiryu tries to talk some sense into him, eventually Ibuki also joins and tries to reason with Arase too. Telling him how that's what Kashiwagi wanted, even for Arase to find a new, honest life.
Arase is too strongly lead on by his grudges, so even though it seems like he might be thinking about turning his life around, he decided to not let them help him. Then he goes on about how he will definetly return to take revenge on Kiryu... Well. That's the end of that.
It becomes clear that Arases stubborn way of thinking is kind of childish. Not taking responsibility for any of his actions, thinking that his vile personality and actions are in fact the reason he got disowned. Failing to beat Kiryu was just the final puzzle piece to have a solid reason to throw him out. He's clearly unstable, doesn't think twice before shooting someone, he could turn on anyone and wouldn't be sorry for it. Just, he doesn't seem to really think about what he does.

I guess he probably thinks he's strong enough, he doesn't need to be careful. Also fitting for that is his fighting style in Dead Souls, how when he gets low on HP, he pretty much fends for himself, disregarding orders and just charging head first with full strength.
His Dead Souls appearance is also interesting. Okay, we all know, this game isn't canon, it's a spin-off and just doesn't fit in to the story. But it is interesting how he teams up with Kiryu for a bit and then leaves again. The game itself takes place after the events of Yakuza 4, meaning at this point RGG did remember that hey, they have a rival that swore to beat Kiryu one day. But after that... radio silence.
Really, this is such a shame. Just alone from his short appearances I can talk so much about Arase because he really is an interesting character with so much more potential! The only thing that's good about it is that he didn't die, making him technically one of the longest surviving characters in Yakuza which really is a great achievement.
Okay, we don't exactly know that he's still alive, but assuming due to there not being a mention of him being dead, he's probably alive. He might be, might not. Schrödinger's Arase.
One other thing I thought about is Jo Amon. I mean, his outfit and fight style is also similar to Arase, but that's not what I'm mainly thinking about. So the name Amon is for the greatest assassins, right? And they have a strong hatred against Kiryu at the beginning too.
So, putting those things together, Arase being a former assassin in the Nishikiyama Family, then the leader of a dangerous hitman organisation... Then, to fight Jo Amon in Yakuza 3 you also need to do all the hitman missions other than the substories and the IF7 fights. And to start the search for Amon, you also need to go to Ibuki again, where you got all the other hitman missions.
Yeah, it's a bit far fetched, but ... not too far fetched to think that maybe Arase and at least Jo Amon could know each other. I'd say, they could team up in a future game but. Well... Yeah.
Now some more things I thought about, I'll put a warning here though.
Yakuza LaD spoilers ahead!
Soooo, in this game we've gotten a couple of characters "back" ... Some more real than others... Thinking about Joon Gi's body double.
But one character that survived is Kashiwagi! Now the bartender of a bar named Survive. What a fitting name. After surviving such a heavy attack and believed dead by, well, everyone, it was the best approach to keep a low profile, start a new life. Also, he doesn't seem to be fit for any fighting after the incident.
So Kashiwagi is still there. And, now I just thought about, what if there was a possible redemption arc for Arase? Kiryu is believed dead now too, alone the fact that it seems that Kiryu never met Kashiwagi while being in the same area is kinda sad. I like to imagine they met each other...
I think it could go either way, Arase somehow got information on Kiryu being in Ijincho. He is a professional after all. Plus, by now Kiryu is also, well, not really working with... but. You know, not fighting with the Amon Clan anymore, even having Shin Amon to help determine Ichibans strength with the (True) Final Millennium Tower.
And, now, maybe there can be some other comnecting inside the Amon Clan and some info got out to Arase, ah, hell, I don't know, it's all so far fetched but I just like to have those possible headcanons of Arase somehow coming back!
Another possibility could also be Arase thinking Kiryu has died, just per chance being in the area and just going to the Survive bar? He'd probably be way more open about the thought of redemption and with Kashiwagi probably being pretty good at talking former Yakuza into that, given how the whole HLA was his doing.
Just... Thinking about possible things.
Yakuza LaD spoilers end here!
Well. That's that.
At the end of the day, the chances of Arase returning are pretty much 0, other characters you never thought of reappearing sometimes appear in one way or another, so it can be possible, but probably won't.
But one thing is clear, looking more into this character made me really appreciate him more. I guess that's the fact with a lot of characters, not just in Yakuza, but in general.
The characters in Yakuza are just so well written and even though it has some very weird and silly plot points and plot twists, I just love this game so much and looking more into it and replaying it is just so much fun.
I even started to like the minigames in Yakuza 3, even though I got very hopeless at the last pool opponent and the goddamn Mahjong completion, ugh. But at the end of the day it's all just really fun once you get the hang of it. It hasn't aged too well when you play it after the other Yakuza games, but replaying it on all the difficulties and then casually, then trying to beat it as fast as I can just made me love the game more and more every time.
So, uh... I don't know if it's a blessing or curse for me to often really like the characters that either everyone hates or have almost to screen time. Because well... there's such a lack of content and appreciation but hey that's what I'm writing this for!
I hope maybe someone starts to appreciate Arase more after this - if anyone even reads further after learning that I love this character. :D' I swear I tried to write it with as little bias as possible. I do know he's a morally very very grey character but after all, it's a video game character. (...There's no way I'll ever like characters like Yoneda...Ogita...Or Kume though... ugh)
Well anyway, with that, I go!
#ryu ga gotoku#yakuza#yakuza 1#yakuza kiwami#yakuza 3#yakuza lad#kazuto arase#yakuza arase#rgg#yakuza dead souls
32 notes
·
View notes
Text
Guide to Food photography
from culinary nutrition----
by Anna Pelzer
The Best Food Photography Settings Ever
Awesome Cookery Recipes for Your Next Project
Do you want to photograph your recipes but aren’t sure where to begin? Food photography opens the door to so many possibilities, such as Instagramming, writing e-books, product photography and more! It’s also a creative outlet and a fun way to work with color and express your own style. As a food photographer, I’m often asked for tips about how to take great photos. Let’s get started with this introduction to food photography!

Camera
First up, you need a camera! If you are just starting out, you may want to begin with a point-and-shoot because of its low cost and its ease of use. You can learn the basic functions of a point-and-shoot in a few minutes. (Like the name says, you just point and shoot.)
A DSLR is steeper both in price and in learning curve. I won’t get too technical, but DSLR stands for ‘digital single lens reflex’. This means when you take a picture, the camera opens up its shutter, the image reflects on to the camera’s internal mirror, and then on to the sensor. I started out using a point-and-shoot, but switching to a DSLR made a world of difference in clarity and color representation. A DSLR also gives you much more control in different light situations. For me, the price difference was worth it. If you have someone in your life who is really good at finding deals online, this may be a great way to find a used DSLR.

However, whether you are using a point-and-shoot, DSLR, or a phone camera, the basic principles of composition are the same.
Creating Bright Images
Shutter speed, aperture, and ISO are the three elements that affect the brightness of your images. Let’s talk about them in a little more detail.
Shutter Speed
The speed at which the shutter opens can be slowed down to allow more light to hit the sensor in low light situations. I do this on dark, gloomy days or in the fall when it gets dark early. However, with the shutter being open longer, there can be more blur and therefore you might need a tripod. As a rule of thumb, I shoot handheld at 1/125th of a second – you may have a steadier hand than I, but below 1/100th of a second, I use a tripod to avoid camera shake (this results in blurry images).
Aperture

Aperture refers to the width of the opening of your lens. Opening up the aperture lets in more light and also creates a shallow depth of field, resulting in more background blur. This effect allows you to draw the viewer’s eye to where the camera focus is. The lower the number, the wider the aperture. Thus, if you want a sharp focus in one area with a lot of background blur, you may choose a lower number such as 3.2 or 3.5. If you want background objects to be more in focus – a wider depth of field – you may choose a higher number, for example, 11 or 14 (remembering that this won’t let in as much light and you will need to adjust shutter speed or ISO).
ISO
ISO refers to your camera’s sensitivity to light. It is the element I would adjust last, after shutter speed and aperture, because having a high ISO can affect the quality of your image, creating “noise” especially in the darker areas of the photo. I try to keep ISO below 500, but in a dark situation, if I don’t have a tripod and my aperture is already wide open, I will go higher.
Using Light in Food Photography

My preference is to use natural light whenever possible. Professional lights are available however, I would recommend getting familiar with your camera and using natural light before making that investment.
The most important thing is to avoid, as far as lighting goes, indoor kitchen lighting as it casts a yellow glow on your food. If, however, you have food that you want to photograph and it’s 5 pm on a rainy day in November, and you have no choice but to use your indoor lighting, turn your white balance to the Tungsten setting. This will add more blue to your shot and neutralize the yellow.
Another thing to consider is which direction you want the light to come from. Back lighting is the technique I use most. I usually prefer to stand facing my subject on a table with a window on the other side of the table. I find the way the light hits the subject to be the most pleasing to my eye. But try letting the light hit from the front and the side and see what you prefer most! Depending on the weather and the type of dish I am photographing, my preference will sometimes change.
On a dark day, if using back lighting, you may need to bounce some light back at your subject to reduce shadows on your food. You can purchase reflectors designed for this purpose from photography stores. You could also use foam core, poster board, or anything on hand that is white. In a pinch, I have even used napkins and a roll of paper towel!
Composition
If you were to draw two vertical lines and two horizontal lines evenly across your image, dividing it into nine squares, then having the point of focus at one of the intersections adds compositional interest to the photo. This is known as the rule of thirds and is why you may see this on your camera or photo editing software.
One possibility would be to place your main subject near the front and have other blurred out subjects behind, to lead the viewer’s eye through the photo.
Vertical or Horizontal Photos?
Try getting one good shot of each. Vertical works well for Instagram and Pinterest, while horizontal is ideal for blogs, banners and Facebook.
Angles
There are a few common angles you can use to successfully photograph food:
A 45 degree angle shows food as if you were sitting down to eat it. This is one of my favorite angles, as it shows a beautiful texture. There will usually be more focus towards the front of the dish.
Shooting from top down (directly overhead) can show the entire dish in even focus (if everything is the same height), but you lose some of the texture.
A straight on angle can be used to show height if, for example, you are showing a stacked sandwich or a drink.
Styling
A crucial point to food photography is to have your food looking its best. I like to add some raw vegetables or herbs alongside cooked foods to add more freshness to the dish, especially if the meal is brown, such as chili. I soak herbs and greens in cold water for about 30 minutes before using and remove any wilted ones. I add garnishes for color and interest, preferably ones that show something that went into the dish – such as a basil leaf in a pesto.
Plating

If you are making steaks and one is perfectly browned and looks better than the others, put that one in front or on top and make it your camera focus.
In food photography, full bowls are desirable. Even if your normal serving of soup only fills up half the bowl, fill it up for the photo! I stop before it reaches the point of overflowing, although you may want to experiment with drips – many people make that part of their style. It can be helpful to use smaller plates, bowls and other serving pieces in food photography, as large ones can overwhelm the food and make it more difficult to make those full bowls. sauces can soak into the food
When you are setting up your shot, reserve some sauce to add once you figure out your perfect angle. I always take a few shots before adding dressing to a salad because the leaves can start to wilt quickly from the oil and acid.
Best Food Photography Props

Use neutral props that keep the focus on the food. Avoid busy, distracting patterns on plates as the food can become lost in the photo. My favorite dishes are gray or white and matte, so there is no glare shining back at the camera and the food is what stands out.
Another thing I highly recommend using is a wooden background board, which you can purchase from Etsy, My favorite board was made from an old barn door! With wooden boards, I again look for a matte finish to reduce glare, as well as interesting textures.
I prefer to use clean backgrounds so the focus is entirely on my dish. However, you may want to display some of the ingredients around the food to show part of the cooking process. Other options for adding interest include colorful napkins, flowers or unique serving utensils. Check out secondhand shops for some great vintage finds.
Also try using a hand model to show interaction with the food!
5 Suggested Props for Beginners
Wood background board or large cutting board
Monotone plate and bowl
Vintage cutlery (check out thrift shops)
Cloth napkin or a dish towel
Stemless wine glass or Mason jars for smoothies or parfaits
Do not let a lack of props or a hand-me-down camera stop you from creating. You can create amazing art on a plate just by having fresh and colorful food displayed in your own unique style. Remember that good food photography takes time to master and it’s OK if you don’t love your photos right away. Practice as much as you can and enjoy the process!
WE WELCOME COMMENTS ABOUT OUR WEBSITE TO MAKE A COMMENT
on my email control click below on CLICK HERE and choose mailto:[email protected]
tell us what you like about our website or what you don't like, and what you would like to see in the future.
WE HAVE MANY TUTORIALS ON PHOTOGRAPHY
FOR BEGINNERS, INTERMEDIADE, AND ADVANCED PHOTOGRAPHERS.
5 notes
·
View notes
Text
Three Things

So...this happened. It may happen again. No idea exactly what is happening. But it happened. So I hope you enjoy it.
Timeline: Post-series, minor spoilers for season three.
Thanks to @scribbles97 and @i-am-chidorixblossom for reading and support.
-o-o-o-
Cool Things
“Hey, everyone! I’m Alan Tracy.” The blond young man in the middle of the screen waved. A green shirt with a faded guitar motif, a pair of cargo shorts that really needed a good yank in the northerly direction and a dash of freckles across a rather cute nose was enough to keep her interested. The name Tracy wasn’t a familiar one, but hey, she was bored.
“Aw, could you make it more boring?” Hmm, read a girl’s mind why don’t you, random voice.
Alan glared at someone beyond the field of the camera. “Hey, this is my vlog. I’m doing it my way. Just hold the camera still.”
“Pfft, world class aquanaut and rescue operative reduced to cameraman. If you renege on this, kid, you’re paying for this forever.”
“Shut up, you’ll get your flippers back.”
“Damn right I’ll get my flippers back.” The camera bounced up and down. “You had no right to borrow them in the first place!”
“Can you just hold the camera still?”
Apparently not, because the screen wriggled all over the place. Why the kid hadn’t bothered to buy a tripod, she had no idea.
“Can you just give me my flippers back?”
“No. You borrowed my tripod for underwater filming, so you can stand in for its rusted remains until I can get to the mainland to buy a new one.”
Well, that explained that.
“Why did you have to start the vlog today, then?”
“Because yesterday I was in space, tomorrow I’ve got college work. Today is free, so I’m taking it. Can you just be quiet, hold the camera still so we can do this?”
“Do what?” A deeper voice echoed off of the hardwood panel floor and a buff dude dressed in red flannel wandered into shot. Sharp eyebrows glared at the camera. “Alan, what are you doing?”
“Er…” Terror? Guilt? She wasn’t quite sure how to gauge blondie’s sudden drop in expression. “Uh, hey, Virg. Weren’t you supposed to be with Scott? You know, in Auckland?”
“Brains needed a hand last minute. Are you filming?”
The screen shuddered and went black.
Huh?
But suddenly it lit up again. This time it was in a completely different location. Blondie was huddled in some greenery. “Sorry about that, guys. The first thing you have to learn about living here is that there are far too many brothers around and most of them aren’t cool.” He blinked. “Okay, Gordon can be great when he isn’t being an ass. And, yeah, John is my space bro. He is totally cool. Did you know he can eat a bagel while hula-hooping upside down? Sure, he does it in space, but the coordination required…totally fab. Gordon dared him once, and John really isn’t one to let Gordon win anything. Not that we fight, really, but Gordon can be irritating at times.” He paused for a moment. “And yeah, Scott and Virg are cool in their own way. Just a little smothery at times. Even worse now Dad’s home.”
He stood up. Over his green t-shirt and shorts, he had some kind of harness. “But that is not what we are here for.” He shoved a helmet on his head. It was bright red and sported a bold white number three on the front of it. “This video is the first in what I hope to be many. Each will contain three things I think are cool. The camera shifted and an ocean came into view. She realised he was standing on the side of a mountain on a coastline.
“First up is the view.” He held out the camera. He must have on some kind of gimbal because all the wobbly movement was gone and the panning was smooth. A huge ocean started at the bottom of the cliff and disappeared into the blue haze of distance. “Not as high as I’m used to, but still totally cool. This is a spot we call Rocket’s Roost because Dad once landed one of his model rockets up here by accident. Took us three days to find it because its transponder was fried. It has a great view, but the down side is that it is a pain to get to. Vertical hike and all. The upside it that although there is miles of ocean in that direction. In this direction…” The camera moved around and a mountain appeared. “Is thrilldom itself.”
He bent over and grabbed a line and clicked it to what appeared to be a bearing on a taut cable stretching off into the hazy distance. Was he going to?
Yes, he was.
“This is the Tracy Train central line. A one-way zip-line home after the struggle to get up here. I love it. And I’m going to take you along for the ride.”
This time the camera did wiggle somewhat as he fastened it to something. She could no longer see him, but she could see the drop and the angle of that cable.
Wow.
“You ready? Here we go! 5, 4, 3, 2, 1…” He let off one hell of a yell and the view narrowed to one of speed and descent at an astonishing rate. She found her heart in her throat just staring at the screen. The cable led first to the opposing mountain side and then turned back on itself, giving her a great view of what was now clearly an Island for a few moments before it abruptly turned again. Alan let out a whoop at the turn and the camera rocked crazily. A glass roof came into view and the ground was coming up awfully fast.
“Yeeeeeah!” Something caught the literally falling man and the camera rocked like crazy. “Woo hoo!”
The image shuddered for a moment before steadying as shoes hit dirt and Blondie stood up. “Aww, man.”
Standing directly in front of the camera was that same red flannel dressed hunk from earlier. The frown on his face was set to split the planet in two and his beefy arms were folded across his considerable chest. “Alan?”
“It’s for fun, honest. I’m not exposing anything. I just wanna be cool.”
“You are cool, Alan. I thought we had covered that. I thought Brandon had covered that. You told me yourself.”
“Yeah, well, I want to be cooler.”
The frown relaxed and, to her surprise, Flannie rolled his eyes. “Alan, you do know you are pretty great, don’t you?”
“Pretty great?” So much scoff in those two words.
“I think so.”
“Thanks, Virg.” It dripped sarcasm. Yeah, thanks, Flannie, give the guy a break. He only wants to have some fun. “I just want to have some fun.” Yeah, you tell him.
Something shifted in flannel-draped man. His expression became more considered. “Can I see your footage?”
“Why?”
“I’m interested.”
“Why?”
“Do you want to do this or not?”
“Huh?”
And the camera cut off again.
She blinked a moment. What exactly was this supposed to be?
Then Blondie was back. The background was obviously somewhere inside. A guitar hung on the wall in the background, an odd echo of that same green t-shirt he was still wearing.
“Hey, there, everyone. Sorry about that again. As I said, brothers are everywhere.” His head tilted to one side. “But that isn’t a bad thing. In fact, family can be cool. I know that can be considered to be the least cool thing to say, but yeah, they’re great. So, for my third cool thing today, I’m going to say family is cool. Don’t care if you rat me in the comments. Cool view, cool zip line, cool family. They are my three things today.” A grin. “A thank you to Virgil for lending me his tripod. And a big thank you to Gordon for choosing a career in aquanautics rather than film. I hope you enjoyed. Be fab. Three out.”
The video ended and the streamer cued up the next in line, a video from that Bear vlogger. She hit cancel and poking at the screen, pulled up the Tracy channel. It only contained one video. The one she had just watched. Blondie’s grinning face shone out at her from the mostly empty screen.
His profile said next to nothing and other than an odd gif of slowly spinning dots and circles appearing on the screen in one corner, there was no further information.
A shrug and she wandered off into the net looking for something else to watch.
-o-o-o-
#thunderbirds are go#thunderbirds#thunderbirds fanfiction#Alan Tracy#Virgil Tracy#Gordon Tracy#TB Three Things
44 notes
·
View notes
Text
Holodeck Deep Dive
Or: Where even is anything supposed to be? - Part 2
EDIT: We now have confirmation of the location of the holodeck :D In the most recently uploaded Ready Room, there was a short set tour of La Sirena that included a glimpse of the production team’s plans for the set layout. It confirms the theory that La Sirena’s holodeck is behind the prominent door on the starboard side of the upper deck. The tour also made it appear very likely that Picard’s study is indeed a fully built set that you can access from the upper deck. I’m not entirely sure what to think about that (see below for some door-related problems and why I thought it was in a different part of the sound stage to begin with), but there will be a more in-depth update of this deep dive in due course (which I will also link here). Until then: please enjoy my now vindicated speculations on the location of the holodeck.
From the very beginning, but especially since episode 5, the question of “where on this ship is the holodeck supposed to be located?” has hounded me to no end. As you can probably imagine by now, I have a lot of Thoughts (and a bunch of clues/evidence), which tie in with the layout of the upper deck in general
Follow me under the cut for long discussions of doors and sight lines, and a ton of pictures.
(N/B: I won’t actually be mapping the layout of Picard’s study, since a) it’s a holodeck so it can look like anything b) many people have done so very successfully already, and c) they move the furniture around quite a bit, so it would be a pain ;] Maybe this’ll be something for the end of this project, if I still feel like doing more floor-planning.)
To start us off, we never get full confirmation that the holographic version of Picard’s study on Sirena is, in fact, a holodeck. We’ve seen that the entire ship, including crew quarters, is equipped with holo-emitters and I’ve read some people interpreting this scene as Picard basically redecorating his cabin. While that is, of course, a possibility, in my opinion, having your bedroom be entirely holographic has a ton of drawbacks, from energy consumption to what happens to all your physical belongings (and yourself) if the power ever cuts out. So, I’m going to go with what I think is the mainstream view: Picard’s chateau is, in fact, recreated on the ship’s holodeck.
But where is it, though? As far as I can tell, the show gives us three hints and I will look at them in turn: 1: Editing 2: Acting Choices 3: Door Design
1. Editing
In Episode 6, The Impossible Box, we get a hint regarding the location of the holodeck that many people (including myself for a long time) found very compelling. After his discussion with Dr Jurati and Elnor in the mess hall, Picard gets up from the table and walks through the door into the room under the bridge. Jurati and Elnor continue their discussion and then we cut directly to Picard, having apparently just entered his study.
The implication of this editing choice seems to be that the holodeck is, in fact, located under the bridge (especially when you consider that there is no conceivable way to get out of the room under the bridge except that one door but that’s a story for another day). Could there be a couple minutes or so in between cuts where Picard leaves the room under the bridge again or uses some hitherto unknown corridors that travers the bowels of La Sirena to get to the upper deck and enter the holodeck there? Yes. But the editing creates a specific sense of the holodeck’s location and a lot of people have read it this way (as I said, myself included).
2. Acting
The very first indication we get of the holodeck’s location actually happens an episode earlier, near the beginning of Stardust City Rag. Raffi and Rios meet on the bridge and discuss Seven being holed up “in the Chateau with Picard”. And throughout the scene, the two of them keep looking at and gesturing towards the back of the ship, specifically, I’m pretty sure, in the direction of the one door on the starboard side of the open deck.


Now, we don’t know who made this choice, whether it was something decided by the set designers, by Jonathan Frakes who directed the episode, or something the actors agreed on and incorporated into their performance, but it’s consistent enough across shots that in my opinion, somebody must have made the decision to imply that the “Chateau” was on the starboard side on the upper deck of the ship.
3. The Door (hoooh boy...)
Now, if you’ve read my last deep dive into the Upper Deck, you’ll probably already anticipate that the door is what I would like to use as the most solid piece of evidence for the holodeck’s location, but, predictably, it’s where we run into the biggest problems.
To start off, what do we know about the door to the holodeck? We see it a few times closed from the inside, from which we can tell it’s a two-part door that separates in the middle, same as the doors to the captain’s quarters and crew quarters.
This rules out the door under the bridge, since that is a one-part door that opens to the side:

In fact, the only doors of the split-down-the-middle-type we have seen so far are the two portside doors I discussed last time (only one of which seems to be a functioning door on set) and the single, prominent door on the starboard side. (Let me refer you back to this wide shot:)

Now, we only get one single instance of a glimpse through the opening door from the inside of the holodeck, and that is in episode 4, Absolute Candor, when Raffi enters the study to yell at Picard about their detour to Vashti. This is what we can see there:

It’s not a lot and it’s very blurry, but mostly, it raises a lot of questions.
First off: Looking at the floor outside the door, that is clearly the same pattern as the floor plating on the upper deck. It could even be the section outside the starboard-door, which you can see here:
However, the structures that you can see over Raffi’s shoulder can’t be found anywhere on the port side of the ship. We see those in exactly two places throughout the show. As you have probably noticed, the first is the construction surrounding the mysterious starboard-side door. For comparison:

The other is in the port-side corridor at the back of the upper deck, basically the outside of what I have concluded must be Raffi’s quarters. Seen here:

I’m a bit more uncertain about that one, since a) perspective distortion makes it difficult to tell whether those vertical lights actually have the same dimensions as the one’s around the starboard door and b) there is a whole lot of those white liquid-containers in that section of the ship (cf. image below) and I would expect those to be in the shot if we were looking at that particular wall. Also, the only door through which you could get a look at that section of wall is this one, which can be seen towards the end of Stardust City Rag...

... and as you can tell, that is one of those single-piece doors, like the one under the bridge, not the split-down-the-middle kind.
What does this mean?
At this point, my best guess is that the whole thing happened something like this: Picard’s study is built on a separate set from the rest of La Sirena. The actors have mentioned in several interviews that the Sirena set is massive and it’s amazing how you can just walk into the rooms and they’re actually there, and that’s true for things like sickbay and whatever use the conference room/quarters are being dressed for that day. But I don’t think it’s true for the holodeck.
I’m basing this suspicion on the fact that if you look at the inside of the door on the holodeck, you can see that the wall continues straight up to the ceiling of the room. But all three doors that we can see on the set of the upper deck are set in walls that angle inwards either halfway up (quarters; see comparison from last post:)

... or above the door (starboard door; I refer you back to this:)
In-universe that is not a problem, of course, since it’s a holodeck. The door could literally be inside a wardrobe or free-standing with nothing but air around it. It wouldn’t matter what the physical wall around it looks like when the programme is turned off. With regards to filming practicalities, though, the only explanation I can come up with is that the holodeck/study is, in fact, not connected to the larger Sirena set.
I have only been able to find a single image of the outside of the Sirena set so far, courtesy of the amazing people at Trekcore, and it shows that the door on the starboard side of the upper deck doesn’t actually lead anywhere. However, it’s impossible to tell what might be happening on the port side or the back of the set. So, this is only marginally helpful.

If we assume that the study is a separate set, I would imagine the view through the door was added digitally, at which point I have to wonder why they chose this particular piece of wall as a backdrop. Are they trying to imply that the holodeck is behind one of the two doors on the port side? That doesn't jive with the acting in episode 5 or anything we have found out about the quarters-situation. Are they saying the holodeck is behind the back wall on the port side? Again, doesn’t make sense with the acting and also the shape of the door is wrong.
At this point, I’m most inclined to say that for this less-than-3-second shot, of the open door, the most likely scenario is that someone made some kind of mistake. Picked an angle that doesn’t make sense, had some kind of miscommunication, whatever, but there just is no consistent explanation that I can find.
So, where does that leave us with regards to the location of the holodeck?
Honestly, I’m not sure. After puzzling over this for well over two weeks now, looking at it from every angle I can think of, and taking into consideration even the silliest details (like the fact that the inside of the holodeck door is clean and pristine, so it can’t be the same physical door that leads to the quarters-set since that one is aged and scratched up), I’m still no closer to a definitive answer. But, as I mentioned in my master post, since the set is in itself inconsistent, that does give us a bit of a card blanche to make up a layout that seems most plausible to us.
My Headcanon
I’m sticking with my initial decision, as depicted in my floor plan sketch, that the holodeck is behind the single door on the starboard side of the upper deck. Whether or not that’s what the set designers/screenwriters intended, it makes sense to me for the holodeck to have a prominent, articulated entrance and to take up a bit of space, which is why there’s no other on that side of the deck. It also tracks with the acting choices in episode 5 and creates the fewest inconsistencies with regards to the door.
Now, if any of you have other theories or arguments (or any more behind-the-scenes pictures or info), I would love to hear about them! Any explanation that could solve some of these contradictions would be utterly amazing!
Until then, I am officially deciding to stick with my initial sketch with regards to the layout of the three rooms on the upper deck. They are, in my opinion: the holodeck on the starboard side, Raffi’s quarters on the portside towards the back, Rios’s quarters on the port side towards the front. Once I have a real idea of how wide the support beams are and thus what the actual proportions of the upper deck might be, I’ll draw up a more detailed version of that portion of the ship. Stay tuned ;)
#star trek picard#la sirena#upper deck#holodeck#headcanon#which turned out to be canon...#deep dive#long post#inconsistencies#(i feel like every longer post is going to be tagged 'inconsistencies' but oh well...)#(maybe not the deep dive into sickbay#Emil seems to have his place under control...)
21 notes
·
View notes
Text
Aniplex Online Fest - How to Produce an Anime - Notes!
1:00 PM - 2:00 PM (PDT) | Aniplex Live Stream | Sunday 5 July 2020
Panel Description: Anime producers will talk about behind the scenes of anime production. Master of Ceremonies/Host: Hisanori Yoshida Guests: Shizuka Kurosaki (Aniplex, Producer) Masami Niwa (Aniplex, Producer), Atsushi Kaneko (A-1 Pictures, Producer), Toshikazu Tsuji (CloverWorks, Producer)
_
Credit: Casea Mhtar | @madamekrow & Peggy Wood | @peggyseditorial
How Do You Produce An Anime?
Here’s the process for an anime: first proposal, the script, the storyboard, the key animation, painting, compositing, editing, and recording and that’s when it’s ready to be shown.
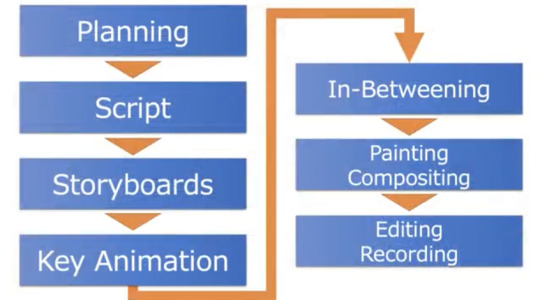
Step 1: Planning
There are mainly three different ways that proposals tend to come in during this planning stage. The first is when the publisher tells us about one of their hit products (games, a manga, etc.) and they ask us about adapting it into an anime. The second is when we find a series we like from a light novel or manga we’re reading already. Like, “Hey, this is cool!” Then we ask the publisher/get their permission to make the anime. The third is when a producer from an anime studio, or a director, or a staff member brings us something that they personally want to do. These are the most likely ways we come to a proposal for a new series and, of them, the third probably happens the most often.
Next comes the decision stage. A few more patterns emerge when we’re discussing whether to adapt or create an original series.
With originals, you are starting from scratch so the project is much more involved and time-consuming. Generally, a lot of staff members are involved and all of them want different things and, on top of that, the producer’s job is to make sure it does well. That it sells well, that it’s received well, that the team feels good or great about the project, and so on. So we have to find a way to respect everyone’s vision, while also guiding the project to profitability, which is pretty demanding. This also includes what I want to do as a producer. It’s fun to create something from scratch, but it also comes with so much risk. For example, originals don’t have a built-in fanbase, they don’t have the same support.
Shizuka Kurosaki provides an anecdotal example of a series he started 8 years ago that he is still working on from time to time. According to him, the series is still nowhere close to being produced. It’s just a sign of how hard it is to get it all to come together, especially when things change as time goes on.
Adaptations are different but still tough and demanding. First, you have great source material. Naturally, there are fans of the source material with what they want for the original. When we depict it through anime, there are things that were fine in the source but have to be changed for animation. We are pretty sensitive about how the original’s fans would see the results of our decision-making. Needless to say, that is a struggle that we don’t face when creating an original anime.
One of the hardest parts about adaptations is that novels and manga, which are largely still images and text, as opposed to anime, which is video, all have different rules of depiction. And when the time comes for us to make changes, we’re presented with options. Depending on what the scene is, certainly, some viewers will say, “Why couldn’t you just stay faithful to the original?” However, there are also times when changing it to be more anime-like gives it a shot of energy absent from the printed version. There's really no right answer so the process is like groping around in the dark and hoping that you find what works.
Producers don’t tend to have a lot of free time and when they do, like Masami Niwa mentioned, it’s mostly spent on things that will help at work. For example, reading what’s trending in novels or manga, watching movies, and even other animes from other companies. While it may seem like entertainment and is often enjoyable, these all serve one’s work as a producer in the field.
Step 2: Scripting
Generally, a “scenario meeting” or script meeting is held first. It’s when we look at what a writer has come up with and plan out some “book reading time.” For adaptations, it means reading the source text(s). Additionally, the planning producers and animation producers hold these meetings where the discussions start with talking about the potential series and gathering the team/assembling our staff. We already have a director in place by the time we have the first script meeting. The script is only done once the staff, including the director, gathers and is written.
Live-action scripts have hardly any screen direction when compared to anime scripts. Anime scripts are packed full of exposition. In the case of live-action scripts, if it’s like an ordinary office story. You pretty much recreate normal life. Whereas in an anime script, even if it’s an ordinary office story, there might be an employee with mind-blowing supernatural abilities. To depict something that doesn’t exist in real life, you need screen direction. And in the eyes of someone from another industry, I think it would seem like a really complex script because of the sheer amount of detail regarding action, layout, and such.
Step 3: Storyboarding
The storyboard is drawn from the script. Normally, the director draws the storyboards. But since the number of episodes keeps increasing for TV series, lately we’re seeing several storyboard artists dividing the labor.
Here are some samples of storyboards from Saekano the Movie: Finale, one of Toshikazu Tsuji’s past projects shared with the panel:
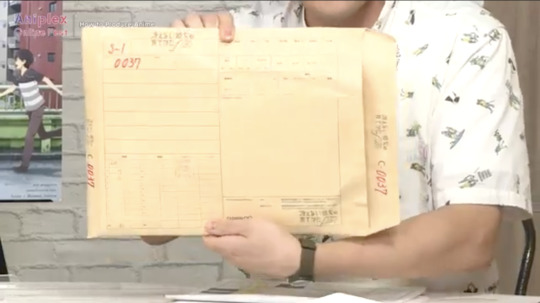
Envelopes like these, sometimes referred to as “shot envelopes” contain the layout drawings and artwork that become the key animations and in-betweens of individual scenes. By the end, all the materials that make up each scene and the finished ones are all inside one of these envelopes.
This is what storyboards look like:
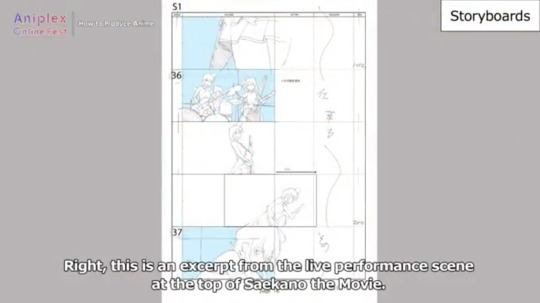
This is an excerpt from the live performance scene at the top of Saekano the Movie.
Using Saekano the Movie as an example--it was a tad difficult to associate the “live scene” of the script to the animation. In the script, the directors and team have endless discussions of what they want to see within however many seconds of the animation. This is described to the animators, the people who is actually drawing the actions/storyboards/etc., who only remember parts of the conversation or only get a few words and they have to create these complex drawings after hearing the phrase “live scene.” Sometimes there is a lot of direction in those discussions while in the original novel it may just say, “they fought, they won,” but the battle leads into an epic space war.
Producers are always excited to see the storyboards. They know it must be a lot of work, hard work, to get them but they’re amazing. Animators sometimes get mad at the scripts and the different “grammar” of the adaptations between the novel and the anime script, but they do great work. To the producers, it's almost the same feeling as a fan seeing the anime for the first time.
Back to the Saekano the Movie example, in the live performance scene above, the animator that was asked to draw the scene knew how to use the instruments being played. That experience is indispensable in some cases as it helps make the movements more accurate and realistic. In the worst case scenario, producers sometimes go with motion capture or use recordings of live performances that are then 3-D rendered for the key animations.
Step 4: Key Animations
Key animations are a part of the storyboard. They are often more detailed images used to depict specifics in individual scenes, with other frames used for movements happening in between. They are often discussed and detailed during and post conversations between the animator, director, super director, and the producer.
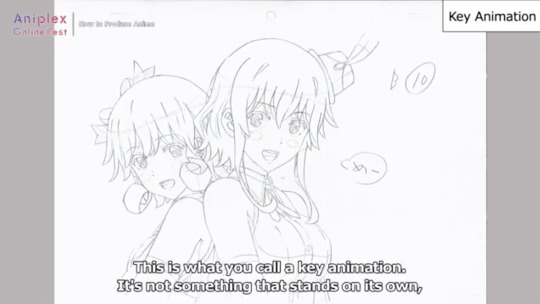
The above is an example of a key animation. It’s not something that stands on its own, rather, they’re made out of multiple drawings. This is where she utters the “meee” from the lyrics (Saekano the Movie). This key animation is to clarify that she’s saying “meee” from the lyrics as the shape of her mouth changes. The words on the page are helpful, but not necessary.
Next we see a sample of timesheets (image below).
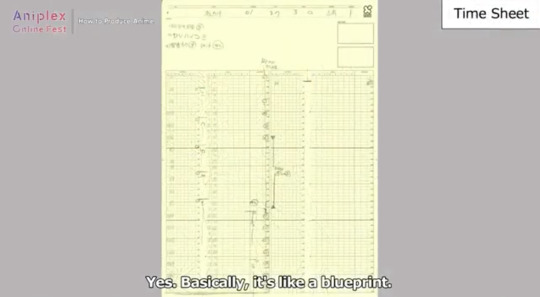
Time sheets are like a blueprint. This is a 3-second shot described in a timesheet and it contains all of the information going into that 3 seconds.
At the top of the timesheets are numbers and that’s where they write where they want the key animation positions to be. Since this is a live performance scene, it ends on a unique shot, and for normal shots, they’d insert some dialogue, or time a movement there. There are also instructions for Compositing. The timesheet is filled with all these details.
There are all kinds of key animations, and a key animation that’s cleared every step in the process is what we call an in-between.
Step 5: In-Betweening
In-betweening is creating the materials that fill up the spaces between the key animation positions. Since anime is all about movement from point a to point b, we have several pages to make characters and items move in-between the two points.

(Image from: https://boords.com/animatic/what-is-the-definition-of-an-animatic-storyboard)
The above is an example. On the left, you see and anamitc--which is essentially a storyboard shown in order to create the story. The frozen frames make up the key animations prior to details. On the right, you have the fully animated piece. All of the movement seen in-between those key animations seen on the left, come together to create the moving animation seen on the right is an example of the in-betweening discussed here.
Going back to the time sheet--if you look closely you can see numbers going vertically which say 1-2-3-4 etc. Those are key animations. And the tiny dots you see in between, those are in-between animations. So drawing between the first and second key animations is the job of the in-between animator for this scene.
Step 5: Painting & Compositing
Next comes painting and composition--it’s where all the colors are applied. Years ago, this used to be done with real paint. Today though, this process is usually done digitally and it’s done for every frame (all of the in-betweens, key animations, etc.). The painting process includes Compositing. It’s not until after it’s been Composited that it’s truly finished.
During compositing, all of the different piece of paper shown in this panel so far are transformed into the animation you later see. Compositing gets the timesheet you just saw, with the materials for the backgrounds and cells, the animations and such, and then they work from that blueprint to create the full animation.
In the images seen above from the Saekano the Movie example, what you’ve seen is less than a single second but it took that much work to get there. As the producer, sometimes it’s your job to step in and help if the animators taking on that workload get overwhelmed.
Animators probably leave their personal mark somewhere on the key animations they create, something that only they know about. So if that storyboard can be thought of as a blueprint for drawing, then the key animations have their character settings, and they’re drawn by diverse people with unique intentions. That’s what we try to go for, and it’s really great to be able to see it all before anyone else as a producer. Like a character who’s never made a gesture like that in such a situation in the original story, but then when a certain animator draws that character, you’ll see that gesture and it will bring life to the image. If you start looking, it’s pretty endless. But seeing all these personal stamps is what makes it so intriguing. As long as it doesn’t stray far from the story, it’s not usually a problem for the producer. It what makes anime adaptation so enjoyable for one of the panelists.
Final Step (6): Recording & Editing
After the visuals are done, comes the sound production and voice actors. Once you find the people for the roles needed, they move onto recording, and then background music is added, and finally you get the finished product that viewers see. Editing happens then too, though it also happens throughout the process as things are added and taken out over the course of production.
An example of the finished product:
youtube
The producer can change the whole feel of the show as they often make executive decisions on music, editing, marketing, etc. They have to oversee the process, as we’ve seen throughout the panelists’ discussion on the production process. It’s worth understanding from an analytic point of view as you see how their styles, focuses, and insight can influence the creation of a series.
3 notes
·
View notes
Photo

A/N: Chapter 2 for my @marveltrumpshate fic for @quillofchoice! I wanted to try alternating between Brock’s and Jack’s PoVs a bit. I’m not sure if I made him too soft, but my research has given him the image of a soft house husband. XD
Summary: Jack never expected to find himself in the middle of a children’s toy aisle, looking at Barbie Dolls. When Hydra promised new experiences, this was not what he was expecting.
…
…
…
…
In the years they’ve known each other, Jack had gotten used to Brock’s temper tantrums (for lack of a better word). The man was a walking volcano, just waiting to erupt, and every now and then he would explode in a fit of rage. Usually it was on a mission, sometimes it was during sparring (Jack had long gotten used to the bruises), and occasionally it was during something mundane like eating dinner (which led to bruises of a different nature).
Yet, for all of his experience, this was a strange outburst. In front of him, a miniature Brock paced across a desk, tiny firsts clenched tightly. Scattered around him were shredded magazines and distorted paper clips. When you were the size of a finger, there were very few things left to take your anger out on. That said, Brock had managed to leave an impressive trail of destruction. It wouldn’t be a surprise if he actually killed someone in this form.
Oddly enough, as deadly as the image was, Jack couldn’t help but find it cute.
Not that he could ever say it aloud, least he wanted to be the dead person. Despite whatever label he would put on their relationship, Brock was never one to let feelings get in the way. Jack didn’t have that level of detachment, it was beyond him.
“What is taking them so fucking long?” Brock growled, his usually deep voice coming out a high pitch.
Again, very cute. Jack had never thought he was one to like cute things, but, as usual, Brock was an exception to that. “It takes time to process things,” he pointed out.
Brock glared at him (adorable) before letting out a chain of expletives. The angrier he got, the worse the words, and by now Jack was starting to feel awkward listening to them. It was a small mercy that no one else was in the waiting room with them. When Hydra had shuffled them off to one of their post-mission check-ups, they had ensured privacy. Whether it was out of respect for Brock, out of fear for what he’d do, or just to keep word from getting out, Jack wasn’t sure but he was grateful nonetheless.
It had been a long check up, with two doctors putting Brock through every kind of test and machine possible. Or at least, tried to—most devices were configured for human-sized bodies, not dolls. Jack had waited patiently in the small, white waiting room, idly flipping through old magazines. After two hours, a tiny Brock had marched out of the doctor’s room, looking not a wit taller and a fuckton angrier.
“Maybe they got some Pym particles off you at least?” Jack suggested with a shrug. “Then the mission won’t be a write off.”
“That is not—”
The door opened, cutting off Brock’s high-pitched growl. A man with a white lab coat stepped out, looking incredibly ordinary for a doctor who looked after mercenaries. He skimmed the clipboard in his hand, flipping through pages, before looking down at Brock. And then even further down, because god, Brock was tiny. “I’m afraid you’ll have to stay like that for a while.”
Brock’s expression grew dourer. “The fuck.”
“Fortunately, the change isn’t permanent—after a few weeks, it should wear off. However, we don’t have the capabilities to force a change. You will just have to wait,” the doctor continued, ignoring Brock’s reaction. “Come back for a checkup after that, I would like to see if there are any alterations to you after the fact.”
“Alterations?” Brock stomped forward, each step shaking the table. “I’ll show you—”
Jack groaned and leaned back into his seat.
-x-
“No.”
After three hours, Brock’s voice had gone from endearing to downright annoying. Jack glanced furtively to his left and right, scanning the toy aisle for any witnesses. Fortunately, it was midday Wednesday and the Toys R Us aisle was deserted. The only people to watch on to this argument were the hundreds of Barbie dolls lining the shelves, rows upon rows of blankly smiling dolls that sent a shiver up his spine.
He had never been good with dolls.
“You don’t have a choice,” Jack argued back softly, gesturing at the Kens stacked behind Brock. Despite standing on the shelf with them, no one could mistake Brock for them—he was slightly shorter and the scowl on his face was downright bloodthirsty. “There’s nothing else your size besides a Ken doll.”
“They are nowhere near my size,” Brock scoffed, patting one of the dolls at the crotch. He leered. “But you’d know that, right?”
There was nothing remotely arousing about that when he was that size and Jack bit back a frustrated sigh. “Look, just pick a few, okay? You don’t want to stay in that for weeks.”
“You need to do better than that to get in my pants.” Brock leered once more before turning to the Kens. Rolling his eyes, he jabbed his thumb over his shoulder in the direction of Hawaii Ken, with this pastel, floral shirt. “Do you seriously expect me to wear that?”
“It’d be a change of pace,” Jack snarked, grinning. He picked up Ballerina Barbie and dangled it in front of Brock. “Or you could always wear these.”
“Didn’t know you had that kink,” Brock shot back dryly. “I’ll make sure to buy you one later.”
Jack didn’t drop the Barbie, but only just. He nodded at the Hawaii Ken once more. “Only if you wear that.”
Brock kicked the doll with a surprisingly amount of strength for his size. Ken crashed on the ground, bending in a way dolls weren’t meant to bend. “Try again.”
And he was back to angry. Jack rocked back on his heels, scanning the dolls. Finding a Ken that looked like he belonged in the 90s, with his leather jacket and black jeans, he held it out. “What about this?’
“That’s a fucking boy band. Do I look like a boy band?” Brock grimaced, swatting the doll away. Yet another casualty. Jack wasn’t going to pay for them.
“They don’t really have an ‘army’ Ken,” Jack muttered under his breath, irritated. “Or—oh.” Sitting on the second highest shelf was a Ken with camouflage print. “They do have one. They really do have every profession covered.”
“Stripper?” Brock suggested, leering again.
“We’re trying to get you more clothes, not less.” Jack rolled his eyes, picking up a box featuring Barbie and a carriage. There were other ones, with motorcyles and horses and even a huge dollhouse. Brock would need a bed too, right? Somewhere safe he could rest without worrying if he got squashed. Tiny forks and plates so he could eat. “Maybe we can get one of those sets?”
When he didn’t get a response, his eyes flicked up to the shelf Brock sat on. Or rather, had been sitting on because he wasn’t there anymore. “Brock?”
Footsteps to his right alerted him to the reason his commander had disappeared. “Do you need help with anything, sir?” a kind but curious voice asked.
Jack bit back a groan. Helpful employees were worse than dogs and almost impossible to shake off. Clearing his throat, Jack turned to his right and tried to smile. The way the woman flinched told him he’d failed. “No, I’m good.”
Sporting a blue vest and jeans, the employee clasped her hands behind her back, her expression nervous. A bright yellow name tag identified her as Linda. “If you do need anything, let us know.” She paused looking at the doll in his hand and then smiled up at him. “Buying a gift for your daughter?”
Automatically, he shook his head. “No.”
“Oh.” Linda guessed again, “Your son?”
“I don’t have—” Jack paused, realizing just how strange it was for a single grown man his size to be standing in the doll department. “Yes…it’s for my…niece,” he lied. He could almost hear Brock’s laugh; he was terrible at impromptu lies.
“Right.” She gave him a strange look, her smile strained. “Of course. I’ll be…leaving now.”
Without waiting for a response, Linda fled the aisle. The second she stepped outside the aisle, Brock laughed in earnest, jumping out of the shelf and onto Jack’s shoulder. “Your niece? Why are you so shitty at this?”
“Shut up,” Jack growled, irritated.
“Seriously, you can’t even come up with a—”
Having had enough, Jack flicked Brock away with his finger, listening to his tiny yell as he flew through the air. Unfortunately, unlike a bug he didn’t go splat. Picking himself up off the ground, Brock shouted, “JACK!”
No matter how strong his body was, he was still insanely slow, and Jack dropped several dolls and a dollhouse into his shopping cart before leaving.
And if he threw in the Hawaii Ken, it was not out of some need for revenge. No, he got that just by watching Brock struggle to catch up as he marched through the store.
-x-
Today was a day full of firsts, including Jack sitting in the middle of his living room trying to assemble a Barbie playhouse. When this was over, he was burning the whole thing. Scattered around him were garish, bright pink plastic pieces, all waiting for him to force them together in the shape of a house.
“I’m not living in there,” Brock stated flatly, picking up one of the tiny plates. At least it seemed the right size.
“You don’t have to, but you need furniture, right? A bed, a chair, a table?” Jack listed out, flipping through the instruction manual for directions. How was this harder than planning a mission? It made no sense.
“You’re spray painting them,” Brock ordered, dropping the plate. Good thing it was plastic.
“What, can’t handle pink?” Jack teased. He winced as Brock punched his thigh. “Fuck, how does that hurt more than normal?”
Brock shrugged. “Science.” Neither of them had been hired for their academics, after all. He patted the mattress of the bed doubtfully. “These aren’t made for sleeping.”
“Better than nothing.” He turned the directions vertically, his mouth twisting as he tried to figure out how to screw together two pieces. And after this he had to make dinner—what should he do about that? Get a normal amount and give Brock less? Did Brock have a normal-sized appetite or a tiny-sized? Would he need to cut rice into tiny pieces?
Suddenly, he didn’t want to finish making the dollhouse. It was the easiest thing on the list.
-x-
At the end of the day, Brock had somehow swung back from irritating to cute. Maybe it was dinner—a single spaghetti noddle chopped up into small pieces with a few drops of sauce. Maybe it was the tiny doll’s cup he drank from or the way he washed his face with a bottle cap full of water.
Or maybe it as the way he ignored, in typical Brock fashion, the bed that Jack had painstakingly made and opted to instead sleep on Jack’s pillow.
Jack tried not to smile as he gingerly laid his head down beside Brock.
11 notes
·
View notes
Note
Hi there, I love your art/boards a whole lot!! I really want to be a storyboarder once I graduate, but sometimes I find it hard to create interesting/visually appealing boards, instead they look a bit flat and lifeless. Any tips on how to incorporate interesting perspective/composition?
So! Composition! I’m gonna start out with a disclaimer: any of these suggestions can be broken for artistic expression. These are starting points when it comes to building an interesting dynamic scene! BIG POST. CLICK THE READ MORE!!!
Composition is the arrangement of SHAPE, LINE, CONTRAST, or COLOR that leads your eye in a path around the screen. You don’t want the audience to search the screen for info--they should find and follow easily.
FIRST THOUGHT: Where in the frame?
Where does your eye go on each of the following images? And why? Can you connect them to a sensation or emotion?

Faces will draw attention. Movement will draw attention. Bright against dark will draw attention. Dark against bright will draw attention. And, despite size, we will look at in-focus items first.

Avoid creating static, balanced shots ON ACCIDENT. Avoid straight lines, perfectly stiff characters, and perfect shapes. Let your characters lean, slump, slouch, reach, stretch. Act in a mirror! Act out your boards. Now, you can use precise/stiff drawings and symmetrical shots for style on purpose (it’s Wes Anderson’s signature). But if you don’t make an effort to put flow and rhythm in your composition, it will feel static and dead. Organic, living, designed shots will have imbalance, they will have weighted area of the screen, and interesting use of blank spaces.
The movie screen has 5 specific areas most action takes place in: upper right, upper left, lower right, lower left, and dead center.

Since the point of a film is to cut from one shot to the next to the next to the next, we don’t want our audience to work too hard searching around the screen for their next point of information. So to avoid static, square compositions, story artists will think of the screen split into thirds.

And keep our points of interest along those lines, and those dots.
You can break out of this of course, but be kind to your audience. If you direct them to the far side of the screen, be kind and bring them back! Even with messy, simple drawings, I can help your eyes follow a simple story: Person lights a lighter.
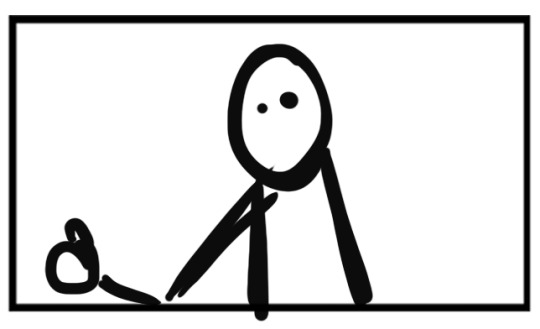
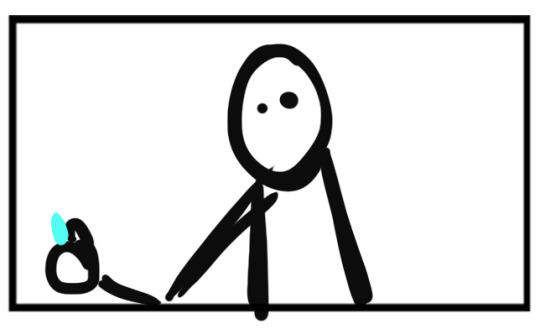

We look at faces first--even ‘symbolic’ faces. Those two dots? You know they are eyes. You probably looked at the face first, then traveled down to that NEW blue spot in frame two, so I took you in for a closeup in panel 3 to get more information about this point of interest. Did I leave the new point of interest in the same spot? Nah, I bumped in a little closer to frame center. This leaves your eye readier to jump to my next shot more easily.
SECOND THOUGHT: What’s the Line of Action?
When you looked from the eyes to the lighter in their hand, you followed my Line of Action for that composition.
Line of Action in an art sense is the path your eyes travel to gain the information in an image. We usually start at the point of highest interest (a face, a bright spot in the dark, a green stone on the yellow sand) and then look around the frame to see what else we can learn.
When I storyboard, I focus on 4 basic lines of action: vertical, horizontal, diagonal left and diagonal right. Below are some examples from movies.
Your eye can travel up and down one character, move back and forth between two points, or following around the screen to gather multiple pieces of info.
Put the characters in a clear and interesting distance from camera. How much of the screen does your character fill up? Do we need to see their face, their body, or the set they are standing in the most clearly? Does their body language act more, or subtle facial cues? Here’s those same shots with JUST the characters blocked in. To you, what different information does each piece represent? What does the feeling of someone very far from camera say vs a face SO CLOSE we can see their pores?
Things moving through frame can also follow these lines! Having something move closer or farther from camera can give you more interest.

THIRD THOUGHT: How do my shots stitch together?
For very short shots cut close together, I use my line of action to make sure your eye is heading towards the next point of interest after the cut. If the eye is moving left, the next shot should have focus on the left side of the screen.
Mad Max: Fury Road has lots of beautiful, varied compositions--but always keeps the point of interest super close to DEAD CENTER, so eyes don’t have to travel far at all to follow the fast action!

In a slower scene, with longer cuts like a conversation, I’m fine with letting the audience bounce left and right, like watching a tennis match. BUT I want each of those slower shots to be something slightly different and interesting either by changing the composition or acting (but this post isn’t ABOUT acting, so none of that today!!!!)
Hey, guest star time: Every Frame a Painting, can you talk to us about shooting conversation basics?
youtube
https://www.youtube.com/watch?v=5UE3jz_O_EM
(ALSO WATCH ALL OF TONY AND TAYLOR’S VIDEOS TO LEARN SO MUCH MORE THAN WHAT I COVER HERE)
A simple scene doesn’t mean complete repetition of shots. You can have similar compositions with slight differences that make them more interesting. AND we’re gonna back that up with an example drawn by one of my favorite board directors, Johane Matte.

Original found here: https://www.deviantart.com/rufftoon/art/Last-Airbender-Spoilers-02-170233494
Now, if your interest is built off of acting, repeating shots is a-ok!
Take this sequence from the West Wing. If you are unfamiliar with the episode, it’s Thanksgiving and Charlie, the President’s aide, has been trying to find a new carving knife for President Bartlett. Charlie has presented MULTIPLE knives throughout the episode, and the President has turned down every one so far.
youtube
https://youtu.be/LQlUVfz_qbg?t=21
I’d split this scene into 3 parts, plus a transition out.
Part 1: President and charlie banter, same energy level as they enter the scene. It’s a classic walk-and-talk that West Wing fans know--they switch around spots as they walk, are sometimes close, are sometimes far. It’s fun and interesting!
Part 2: The characters plant, and have a small face-off as Charlie respectfully confronts the president. Most of the shots are the same--it’s a shot reverse shot with the patter-patter-patter of the dialogue driving the cuts.
Part 3: When the emotion gets more intense, we cut in CLOSER and really let the actor reactions land.
Transition out, they say goodbye and Charlie walks away.
Now this is a simple scene driven by dialogue and the personality of each character. We don’t need EXTREME shots or incredible close-ups. This scene has solid blocking, clear compositions, but isn’t flashy--it doesn’t need to be.
So...when is it time for flash?
THOUGHT FOUR: ACTION AND FIGHTSSSS!!!!!
LINE OF ACTION. SO IMPORTANT. You want your action to happen fast? Lots of cuts, lots of motion, lots of EMOTION!??! Guide the eye!!!!! GUIDE the EYE.
Here’s a breakdown of a short fight sequence from Voltron. This features only the silhouette of the two characters, and how much of the ground we see. Forget the story and characters for the moment--focus only on these two enemies andthink of the following questions: How much of the screen does each character they fill? WHAT side of the screen are they on? How does their size or position change from shot to shot? How does their size or position change INSDIE each shot? If the camera were held by a real person, how high or low would it be?
FIGHT SCENE!!!!


youtube
Now watch the screen and ask the same questions but add in this: How long does each shot take? When does the camera move, and when does it stay still? And what emotion does that convey?
FINAL THOUGHT: How to apply...?
I’ve asked a lot of questions throughout this post. Now it’s your job to ask yourself those questions every time you storyboard a scene.
553 notes
·
View notes
Text
‘Corset pour taille epaisse’, 1890 (part 1)
The pattern is an original 1890 pattern from Le Mode Illustree, one of the several home-advice-and-sewing-pattern magazines popular in the latter half of the 19th century. As the name indicates, it is a French magazine. Scans of many of the issues, from 1861 to 1924, are available here.
19th century patterns were primarily printed on one sheet of paper containing multiple patterns. You traced the pattern pieces you were interested in off onto your own paper or muslin using a tracing wheel. Tissue paper patterns, more familiar to modern sewers, were not available until the 1890s, and did not become the more common way of distributing patterns until the 1920s. Multi-sized patterns did not become common until the 1920s as well.
(Behind the cut for length and large images)
In reality, that means the pattern (rather, the set of patterns, as there are around 20 in every issue) looks like this:

The pattern sheets are scanned as four A3-sized pages per side; there are two sides full of patterns. (The original would have been one fold out piece of tissue with printing on both sides; you can see the bleedthrough on the scan.) Here, I’ve assembled the scanned images in my CAD program and aligned them.
A close-up view of the overlapping pattern lines:

You find your set of lines and trace them off. Because it’s 2019, I’m doing this in a CAD program, which I find delightfully ironic.
Traced off:

Rotated so that the grainline is vertical and arranged in order:

This gives you some idea of how the corset is structured. The vertical interior lines on the patterns are for boning; the horizontal line is the waist line.
One of the most interesting things to discover was that notches are not a thing on these patterns. I’m uncertain if notches were not a thing on French patterns, printed patterns in general, or patterns distributed in this particular way, as they were a thing on patterns drafted to measurements by drafting methods at this point in time (and I have the drafting manuals to prove it). Instead, the corners of the pattern pieces have tiny numbers on them, and you line up the pattern pieces number-to-number. Fascinating.
At this point I measured the waist, bust, hip, and waist-to-bust and waist-to-hip measurements. This is a “corset pour taille epaisse” (literally translated, “corset for thick size”, or what a contemporary English pattern would call a “stout form”). It ends up being a bit too big for me -- it measures my measurements with a nice bit of wearing ease, but because it’s a corset, it should measure my measurements with negative ease. So I do some math, based on the waist-to-bust measurement, which in my experience with working with historical corset patterns is the hardest to adjust later, and end up scaling it to 82% of its original size (proportionally). This should give me about a 2″ waist reduction, which again in my experience is both historically accurate and completely comfortable in a well-fitting corset.
The scaled pattern, which admittedly looks identical in screen shot to the original:

Then I use my CAD program to do what it’s designed to do, name turn those lines into usable patterns:

And print it off onto A1 paper. Next: the first mockup.
8 notes
·
View notes
Text
How to manage Samsung Galaxy S8 Camera Settings, configure shooting modes, take screenshots [Tutorials]
Your Samsung Galaxy S8 has a 12-megapixel primary camera that, by default, already captures standard quality pictures. New and average users don’t need to change settings to be able to take good pictures but if you are one of the people who have a little or advanced photography background, there are settings you can manipulate to take even better images.
In this post, I will walk you through on how to take pictures with your Galaxy S8 camera and use other features. I’ve also tackled the shooting modes you can use and how to manage the settings of the camera. Read on to learn more about your phone’s camera.
If, however, you found this post while looking for a solution for a problem you’re currently experiencing, visit our Galaxy S8 troubleshooting page as we’ve already addressed some of the most common problems with this phone. Find issues that are similar with yours and use the solutions we suggested. If they don’t work for you or if you need more help, then fill up our questionnaire and hit submit to contact us.
How to take pictures using your Galaxy S8 Camera
Taking pictures with your Galaxy S8 must be one of the most common things you can do if you own a phone with an impressive camera. Just like any other smartphones, it’s easy to manipulate the camera to take really good pictures. But if you’re new to the phone and still learning how to use it, here’s how you take pictures with it:
From the home screen, swipe up to access Apps.
Find and tap the Camera icon to open the app.
Use the display as the viewfinder and aim the camera at the subject. You may use the following options to enhance the picture:
To focus the shot, tap the screen. When you tap the screen, a brightness scale is displayed. Slide the light bulb up or down to adjust the brightness.
To add an effects filter, swipe to the left and tap a preview filter to apply it to the screen.
To add a shooting mode, swipe to the right and select a mode.
To quickly switch between the front and rear cameras, swipe the screen up or down.
Tap the capture icon to take a picture.
There are times when you have to quickly open the camera to take important pictures but unlocking your phone, swiping up to access Apps and tapping on the camera icon take time. You can actually use the Power key of your phone to immediately open the camera and this is how you set it:
From the home screen, swipe up to access Apps.
Find and tap Settings.
Tap Advanced features and then Quick launch camera.
Now tap the switch to toggle it On.
After setting this, you can now double press the Power key to open the camera. You can also take advantage of the camera and the new Bixby Vision. If turned on, you can point your camera at an object or location to search for products online, discover new places nearby, or translate text. To do so, follow these steps:
From home, swipe up to access Apps.
Tap Camera > Bixby Vision and follow the prompts.
Additional Information
The following options can be found in your camera’s viewfinder and here’s how they work:
Animated filters and Beauty: Adjust skin tone of faces. Add animated effects to live self-videos.
Gallery: View your picture or video in the Gallery application.
Capture picture: Take a picture.
Record video: Begin recording video.
Bixby Vision: Use Bixby Vision to search or shop for similar images on the Internet.
Modes, camera, or effects: Swipe right to change the shooting mode. Swipe left to add an effects filter.
Switch cameras: Switch between the rear camera and the front camera.
HDR (Rich tone): Enables the light sensitivity and color depth features of the device to produce a brighter and richer picture.
Flash: Activate or deactivate the flash. Toggle through flash options—on, auto, or off (rear camera only).
Camera settings: Opens the camera settings menu and lets you change additional camera settings.
How to configure Galaxy S8 Camera shooting mode
The default setting for your camera’s shooting modes are already good and if you only have a limited idea how to configure the shooting mode in your phone but still want to produce moderately good pictures, then leave everything as is. But for those who are curious enough and want to try a thing or two, the following information might help you:
From the home screen, tap Apps.
Find and tap Camera.
Swipe to the right for the Mode options and then feel free to use them with these information in mind:
Primary Camera (rear)
Auto: Allow the camera to evaluate the surroundings and determine the ideal mode for the picture.
Pro: Manually adjust the ISO sensitivity, exposure value, white balance, and color tone while taking pictures.
Panorama: Create a linear image by taking pictures in either a horizontal or vertical direction.
Slow motion: Record videos at a high frame rate for viewing in slow motion. You can play a specific section of each video in slow motion after recording it.
Hyperlapse: Create your own time lapse video by recording at various frame rates. The frame rate is automatically adjusted depending on the scene being recorded and the movement of the device.
Food: Take pictures that emphasize the vivid colors of food.
Secondary Camera (front)
Selfie: Take selfie shots and apply various effects, such as an airbrushed effect.
Wide selfie: Take wide-angle selfie shots to fit more people into your pictures.
Common to both cameras
Selective focus: Change the focus of pictures after they have been taken. You can focus on subjects near to the camera, far away from the camera, or both.
Virtual shot: Create multi-directional views of objects.
Download: Download additional shooting modes from the Galaxy Apps store.
More options: See more options for the camera modes.
How to manage Galaxy S8 Camera settings
Your phone’s camera has already been configured so that users could just point it at the subject and shoot and produce standard quality pictures. For most of the owners, the default configuration is enough but for those who have advanced knowledge in photography, you can try manipulating the settings of the camera. Here are the available options for you:
Primary Camera (rear)
Picture size: Select a resolution. Use higher resolution for higher quality. Higher resolution pictures take up more memory.
Video size: Select a resolution. Use higher resolution for higher quality. Higher resolution videos take up more memory.
Tracking AF: Focus on and track a subject selected on the preview screen.
Shape correction: Correct distortion in pictures automatically.
Timer: Take time-delayed pictures or videos.
Secondary Camera (front)
Picture size: Select a resolution. Use higher resolution for higher quality. Higher resolution pictures take up more memory.
Video size: Select a resolution. Use higher resolution for higher quality. Higher resolution videos take up more memory.
Save pictures as previewed: Save the self-portrait or self-recording as viewed on the camera screen, not as flipped images.
Ways to take pictures: Tap screen (tap the screen to take selfies) and Show palm (hold your hand out with your palm facing the camera to have your picture taken in a few seconds).
Tap heart rate sensor: Once your face has been recognized, tap the heart rate sensor to take a selfie.
Timer: Take time-delayed pictures or videos.
Common to both cameras
Motion photo: Create a short video by taking pictures.
Video stabilization: Activate anti-shake. Anti-shake helps to keep the focus steady when the camera is moving.
Grid lines: Display viewfinder grid lines to help composition when selecting subjects.
Volume key function: Use the Volume key as the camera key, the record key, a zoom key, or for system volume.
Location tags: Attach a GPS location tag to the picture.
Review pictures: Set to show pictures after taking them.
Quick launch: Open camera by pressing the Power key twice in quick succession.
Storage location: Select the memory location for storage. This option only appears if an optional memory card (not included) is installed.
Voice control: Take pictures by saying “Smile,” “Cheese,” “Capture,” or “Shoot,” or record videos by saying “Record video.”
Floating Camera button: Add an extra camera button that you can move anywhere on the screen in Auto and Selfie modes.
Reset settings: Reset the camera settings.
How to change default camera storage in Galaxy S8
It might be just one of the options or settings you can find in your phone but it’s actually very important to many owners especially those who love taking pictures and recording videos. Your phone has enough storage space to handle your most important files, data and even apps. But 40GB of usable storage isn’t enough to hold thousands of pictures and videos and that’s the reason why Samsung included an SD card slot in the S8 to make its storage expandable. Once you have inserted your SD card, here’s how you change the settings so that your phone will automatically save pictures or videos into it:
From the Home screen, swipe up on an empty spot to open the Apps tray.
Tap Camera.
Tap the Settings icon in the top right.
Tap Storage location.
Tap one of the following options:
How to delete pictures and videos from your Galaxy S8
Deleting the pictures or videos that don’t look good always depends on you but if you really want to discard some of them, please note that you could no longer retrieve them:
From the Home screen, swipe up on an empty spot to open the Apps tray.
Tap Gallery.
Tap the 3 dots icon.
Tap Edit.
Tap each picture (or album, if applicable) to be deleted.
Tap DELETE.
Tap DELETE.
How to take screenshots with your Galaxy S8
There are actually two options you can use if you want to take a screenshot with your phone. Here’s the first method:
Navigate to the desired screen.
At the same time, press and hold the Power key and the Volume down key.
When the white border appears around the edge of the screen, release the keys. The screenshot has been captured.
Screenshots are saved in the main Gallery application folder or inside the Screenshots album.
And this is the second one, which I think is a lot easier than the first one:
Navigate to the desired screen.
Place the edge or your hand flush and perpendicular against the left side of the screen.
Swipe right until the white border appears around the edge of the screen. The screenshot has been captured.
Screenshots are saved in the main Gallery application folder or inside the Screenshots album.
Read More : How to manage Samsung Galaxy S8 Camera Settings, configure shooting modes, take screenshots
Connect with us
We are always open to your problems, questions and suggestions, so feel free to contact us by filling up this form. This is a free service we offer and we won’t charge you a penny for it. But please note that we receive hundreds of emails every day and it’s impossible for us to respond to every single one of them. But rest assured we read every message we receive. For those whom we’ve helped, please spread the word by sharing our posts to your friends or by simply liking our Facebook and Google+ page or follow us on Twitter.
2 notes
·
View notes