#sewing is fun!! I said
Explore tagged Tumblr posts
Visit Tumblr Blog
Explore Tumblr blogs with no restrictions, modern design and the best experience.
Last Seen Tumblr Blogs


Fun Fact
The total number of visits Tumblr.com received during January 2021 is 327 million.
Text
Don't mind me, I'm just over here trying on the sixth fucking front-bodice muslin that I've made for this godforsaken dress and finally having an "IT FITS!!!! IT FITSSSSSSSSSS" moment
#problem 1: made the wrong cup size. I went wrong here by using the fucking size chart to pick a size#problem 2: bust apex is in the wrong spot. I went wrong here by using the fucking pattern as designed#problem 3: bust apex is in a different wrong spot. I went wrong here by not being able to use a fucking tape measure apparently#problem 4: bust apex finally right!! but the dart length isn't right and also this bodice is boring. Went wrong here by being too picky#problem 5: rotated all darts into a shoulder gather with front yoke. went wrong here by underestimating HOW MUCH FABRIC is hidden in darts#mockup 6: rotated side dart back into place and it's is FINALLY in a state I like it and I honestly could cry of relief#time to cut out the whole mockup instead of just this one piece over and over again lmao#sewing is fun!! I said#I'll sew myself a dress for my brother's wedding this summer even though I'm still a beginner!! I said#what could go wrong?! I said#my only saving grace is that it's a wrap dress and I won't have to sew in any zippers or buttons lmao
1 note
·
View note
Text


Not Batman but I made a quilt!
#my art#??????#causeimanartist#I have had little time to draw between puppy quilt and anxiety#I was on a deadline (today) since I made it for my friend's baby shower#(the fact that I have a friend who is pregnant is wack#anyway this was my first time sewing!#I've been wanting to learn and this seemed like the perfect excuse#I picked bears because she said forest greens and on her regristey was some bear related items)#I (mostly) had fun - I hated doing the binding (last night lol)#big shout out to my mom for guiding me through the process since she makes quilts all the time#quilt#quilting#first quilt
121 notes
·
View notes
Text
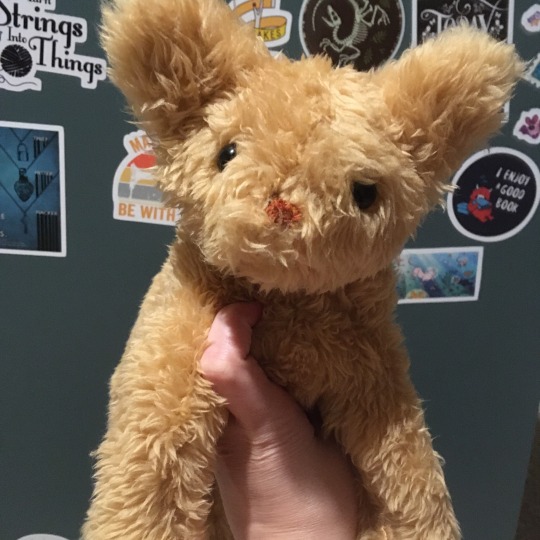

I forgot how quick it is to make plushies compared to quilts
Aka I made a cat in an evening
Well. He still needs his patch of lighter fur on his belly appliqued on, but still!! A cat!!!!
#sewing#handmade#plushie#cat plushie#cat#I LOVE how this fabric works with this pattern#that said I do want to write a new cat head pattern to go with it#because the body pattern is a lot further on the realism scale than the head#and I want to kind of even it out#fun fact at one point the body was completely sewn closed with no head#and it looked incredibly odd#I might make myself one for Halloween this year
330 notes
·
View notes
Text


In today's edition of I have too many hobbies: quilting 😅
A friend of mine was diagnosed with lymphoma so I teamed up with another friend to make a quilt for her. I just managed to finish it up before her last chemo session.
I learned so many new skills on this project and I REALLY enjoyed the hand quilting part of it. It has me itching to start another quilt...The skull in the center is a reference to Gideon the Ninth. Due to a set of circumstances with her treatment my friend made a lot of necromancy references and related a lot to Gideon. ����
#my art#quilting#they really weren't lying when they said that having hobbies outside of drawing is healing 😂#this was a lot of fun to make even if sewing the binding nearly killed me#gideon the ninth#gideon nav#technically fanart I guess...?
26 notes
·
View notes
Text


Tried out soutache for the first time today since I would like to use it for my journeyman‘s piece.
I fell in love with the historical garment and pretty much just copied the design
It's ridiculously hard to find good soutache braid that's suitable for sewing, most of the time it's for jewelry making. The one I used is low quality trim for carnival costumes.
#it was a lot of fun#i'll have to see if it is suitable for my exam. if i can get it neat enough and find the right materials#one teacher said she wouldn't go with round shapes for the exam.#I'll practice some more and see where it takes me but i am definitely going to use it for personal sewing#i am thinking some 1900s inspired skirt with a soutache decorated yoke#meins#sewing#do i have a tag for my sewing? idk#expect more journeyman's piece rambles in the future. this has got me really excited.#we are going to sew the first set before christmas but without the decorative elements#and then one more practice run before the real deal
19 notes
·
View notes
Text

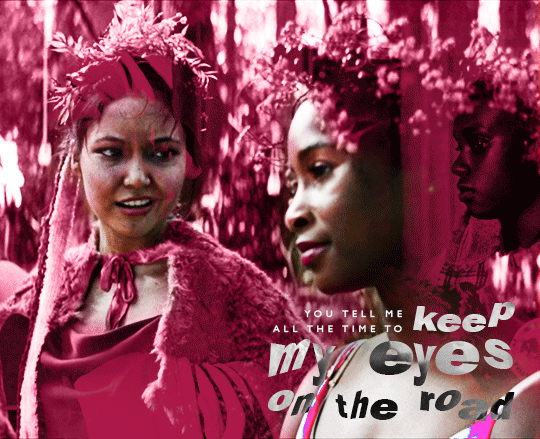
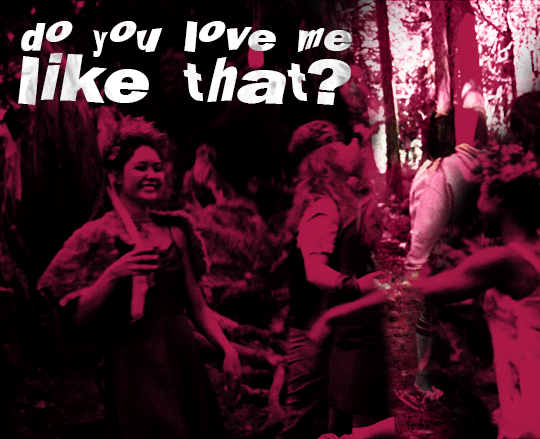
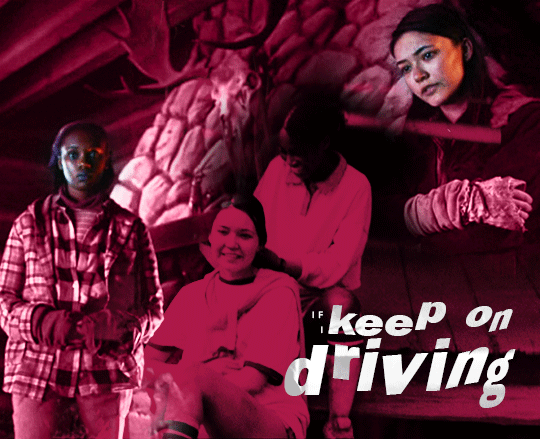


(do you love me like that?) you're a reckless driver (I'm a reckless driver) and one day it will kill us if I —
#yellowjacketsedit#yjedit#akilahmari#lyricsongifs#yellowjacketscentral#ok i WANT TO DISCLAIM. im not 100% sold on pitgirl mari im not 100% sold on anything. the show will tell me when its ready!#that SAID im incapable of giffing unless theres tragedy involved and also i think it would be an interesting trajectory for them#akilahmari work imo because while different they are both very vulnerable in the same way#they want to be seen and cared for and they arent in an environment where thats easy#and like. yeah the you tell me all the time to keep my eyes on the road gif IS the gay scenes#but its also akilah being in tune with people and their emotions. ofc she knows taivan love each other ofc she knows lottienat need a momen#and later ofc she knows lottie and nat need a moment!!! that skill serves her as tension escalates#whereas mari cannot read a room + does not filter herself. and akilah often gets the best of that from her!#but also. akilah shoots her a look when she presses javi about the missing bear meat. but also. mari isnt wrong to be concerned#mari is vulnerable and scared !!!AND!!! heavily concerned about survival. so whereas akilah and mari are both scared to hunt javi#mari is the second to run to grab javis body. akilah follows still horrified. mari is better suited to survive in a lot of ways#but also tends to step on toes!!! but also mari is so loyal and so like. attentive? eager? in a way akilah isnt#so mari says more controversial things but ultimately follows status quo in a way akilah is less inclined to#even in terms of skills mari can cook and akilah can sew but eventually what good is stitching people up when they need to eat. you know.#IDK i think theyre soooo interesting and im rly looking forward to their relationship hopefully developing bc i think theyre cute and fun#but i think their dyn could get sooooo interesting. even in terms of letting mari go. like. many connotations#akilah can giggle when the jokes are still funny and they can find each other in any given space. but does that matter if it cant save them#anyway ive run out of tags to tag the chars for my blog and im being really brave about it btw.#also its 2 am and i wanna post and im being even braver about that (not deleting this tag but its not 2 am my time as i post im drafting<3)
71 notes
·
View notes
Text


i made my own clown cat
#clown cat#calico critters#sylvanian families#vintage toys#ooak#russ berrie#this was made 100% from scratch#ie i 3d modeled it and printed it and hand sewed all its clothes#i could never ever find any listing of this little man anywhere so i said fuck it i’ll make it myself 😤#i did adjust the design slightly to make it my own#it’s not perfect and there are things i’d do different if i did it again but he turned out pretty cute :’)#toy making is a lot of fun…..
231 notes
·
View notes
Text
A little mend here that I was pleasantly surprised worked, I fixed the fraying bits on my book-shaped wallet! Figured that red thread works quite well with the themes of War of the Worlds.

First up, we've got some simple stitches perpendicular to the edge of the wallet, think a blanket stitch but the thread doesn't run through the loop created. Honestly, there are probably more complex ways I could have stitched that vinyl "leather" back onto the fabric and cardboard of the book structure, but I figured these simple stitches would be faster, and work just fine.

Second, on a slightly larger tear on the "spine" corner, I did some randa stitching! This actually draws from a style of embroidery I'm almost completely unfamiliar with, most popular in Brazil, so I may be labeling it wrong. If you know better, let me know! It's a sort of baseball-stitching like process, I was roughly following this video as a tutorial: https://vm.vxtiktok.com/t/ZT8TNMKw9/
and also this one to understand how to get started: https://vm.vxtiktok.com/t/ZT8TNrMML/ (Excuse the tiktok links, but I am not immune to the allure of short video on occasion! I even have posts of my own, every now and again)
I actually need to do similar rim-lining on the other three corners, as the adhesive is starting to come off, and that'll hold it still enough to solve the problem.


Also, some miscellaneous adventures in hemming patches properly! A process that proved MUCH simpler once I found my rolled hem foot. These two patches came out quite good, actually! straight stitching, for the most part, and relatively even folds.


It was much simpler to get the hems just so on a larger patch like this one, thankfully! I'm actually really pleased with the way this one in particular came out, and hopefully, I can make something pretty with it on the thigh of the jeans it goes with. (yes, that's why the patches are numbered, so I can keep track of where they go in the stack!)

Even despite how well things went overall with the patches, I still fumbled, got a bit hasty in trying to get the corner of one of the later patches through the machine. Said haste had me trying to shove shove, cram cram the fabric through the foot to get it hemmed, turns out, don't do that! Results in bending the needle on my machine! Oof!
Luckily, the machine came with some spare needles, so it only slowed me down a little bit!
#fabric arts#sewing#making#mending#visible mending#solarpunk#denim#novel bookwallet#book wallet#queue.queue#a thousand words#sproutleboople#nesterian lifestylings#I have such a love hate relationship with this wallet tbh#It's such a delightful design!#little book! and it comes in so many different fun public domain covers!#but also it uses vinyl “leather” which I've consistently had a major beef with#honestly before I decided to kinda just go for it with the embroidery thread I actually considered throwing this out since it was busted#but then I realized 'hey wait a minute: they use thread to bind books'#so I figured it was worth a shot! plus if it worked I'd keep that much more plastic outta the landfill#that said if the next set of stitches don't stop the continued delamination of the adhesive I'll still consider getting another#because they debuted the phantom of the opera design after the kickstarter happened and that's how I wound up buying mine initially#they even do a version that holds a tiny journal alongside your wallet things which is Tempting Major#honestly if they had gone with actual leather over plastic I would have no hesitation about recommending them!#tee bee aech if you don't mind the plastic flaking eventually they're actually fantastic#it's just when I buy a wallet I want to not buy another for as long as is feasible y'feel?
17 notes
·
View notes
Text

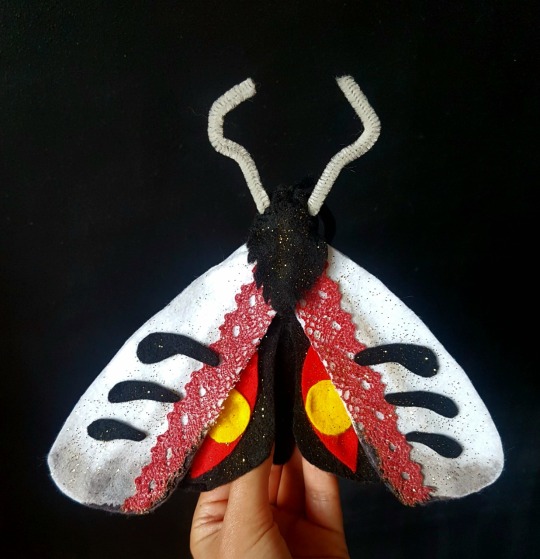
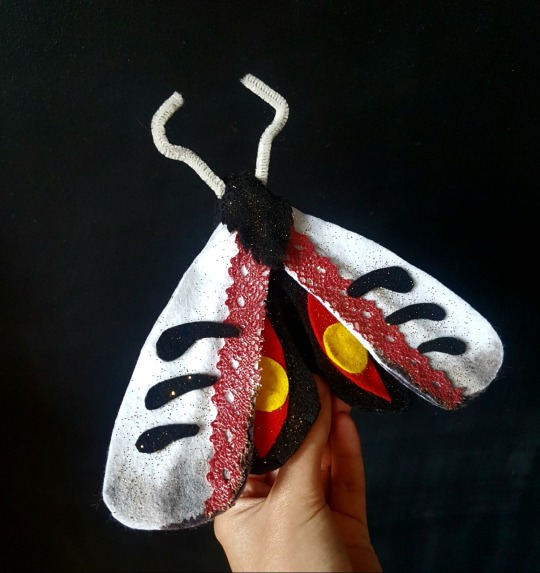

Obligatory eyes like fire moth fanart: ✔️
My, those photos look terrible on desktop. Anyways! I don't like it in terms of "fanart for this specific lyrics part", i don't think it shows what i wanted it to represent, but i have grown to like it as a funky fluffy moth pal that's chilling over my desk now, so yeah.
Btw, it has legs. One of them keeps falling off.
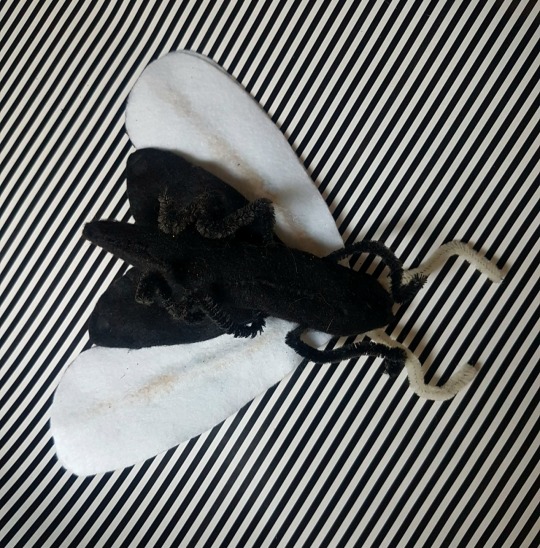
#it was supposed to be a normal papercut art using normal paper on a normal flat surface#but then my treacherous brain went 'what if it could move its wings'#(i can't sew)#(the wings are not moving anyway)#i've also used real soot for Dramatic Reasons™#and burned some felt and the lace and my finger#burned felt looks like crisps. 0/10 do not recommend#'why is it covered in glitter' you may ask#that's bc my bestie said 'moths are shiny. use glitter' and i couldn't have argued with that <3#sleep token#sleep token fanart#sleep token art#alex vs the mortifying ordeal of having her art perceived#lots of mistakes were made here but i've had fun making it and it's all that matters
76 notes
·
View notes
Text
YOU SELECTED: SHIRT DRESS
phew, that was close huh? looks like i better get button shopping! with this pick, it feels like we are already getting into the home straight with this design- the structure is set, and we are onto cosmetic details now. so first up, sleeves!
for the sake of not having too many options per poll (i have NO idea what im gonna do if we tie anywhere down the road) im splitting sleeves up into two rounds. the first one is purely to decide the length of the sleeve. the next poll will deal with the design, if its straight/puff etc.
ive generalised the lengths here a bit, ill do the fine tuning when the whole design is put together! also no full length option simply because i dont want one- i know if i do full length ill wear it far less (or just roll them up)
No propaganda here, just a quick elaboration on what the length categories mean :)
No Sleeves: could cover anything from mid shoulder to where the sleeve seam sits (directly up from the crease of the armpit)
Grown On Sleeve: technically this isnt a length but it felt like it fit better here than anywhere else- grown on sleeves are a style of sleeve where, instead of it being a separate piece with a seam, the sleeve is cut as part of the blouse pattern piece- its pretty straight forward. they can also be known as kimono sleeves. if i did do this i would be doing a pretty short length, probably no more than level with the armpit. (theres a couple images of them in the last post, def the ivory with the patterned collar & the green dot one. its not always easy to tell, but they do have a unique silhouette in the way they drape and fold around where a seam would be. i think they bring enough to the table to be considered)
Short Sleeve: around tshirt length! from level with the armpit to 3ish inches above the elbow
Elbow Length: clues in the name! somewhere between an inch above and a couple below the elbow- i think itll probably be in the bend of the elbow or above, looking at how much this fabric has creased being folded
#WAY more on grown on sleeves than anything else but i figured. its sleeve length u understand#but that i might need to explain their deal#ive never done a grown on sleeve but i was seeing them everywhere in my research. i think theyre maybe cute? as a short sleeve anyway#mostly no propaganda bc i worry my bias will show lol. purely sleeve FACTS here#(i mean i dont put anything on i wont wear. i am god of this game. but also i do think i have a preference on this one)#sewing#design#crafting#dress making#pattern making#polls#vintage fashion#sewist#theres gonna be at least three more rounds here- probably 4 but. im unsure at what point to stop breaking it down.#when does this stop being fun#(bc as i said above. i dont wanna offer too many options per poll so like. i could make two more on the sleeves if i wanted to.#but does anyone even care about the Smaller details. i dont knowwwww)
9 notes
·
View notes
Text
just remembered that for some definition of self harm I've self harmed almost all of my life... just not in ways that led to scarring, not until the last year.
#tw sh#i had forgotten all that#then someone just mentioned needles and oh yeah i would always stab myself with sewing needles from a small child just because i needed the#emotional release the pain brought. hm. like there were other things but also that. and i would burn myself for the fun of it in class yr 9#like it was very much a conscious thing i just didn't connect it to being self harm until just now lol#a friend the other day said 'you seem to carry some guilt around being alive at all' well HM#anywayyyyyyyyyye#i am so normal and not at all messed up /lie#personal#puddleglum hours
9 notes
·
View notes
Text
I need to get into cosplay or drag or something because I really like some subtypes of women's fashion but I simply cannot wear any of it without feeling miserable. If I was dressed as a character or persona I don't think it'd bother me so much
#Alas I have no money or the social and performance skills required for said activities#I mean I guess you can be lame and do cosplay but drag requires a certain level of like#Not extroversion but an ability to be comfortable Performing and more uhh whats the term#Bodily awareness than I have. I Cannot do body language acting for the life of me. Too autistic. Can't dance for shit especially#I know you can do other sorts of acts or just do the outfit and not perform but idk. It's hard. I don't have any friends in the scene#Cosplay would be easier to get into but it's quite expensive... I can sew pretty well and have a machine but materials add up#I don't know how to make clothes just alter them and some embroidery#Sigh. I just envy those who can see a pinafore skirt and buy and wear it and not want to kill themselves#I LOVE femme trad goth and lolita fashion a ridiculous amount I just can't. Wear it. And it's no fun to just draw and not wear!
2 notes
·
View notes
Text
Cosplay update!! Here’s how it’s going!
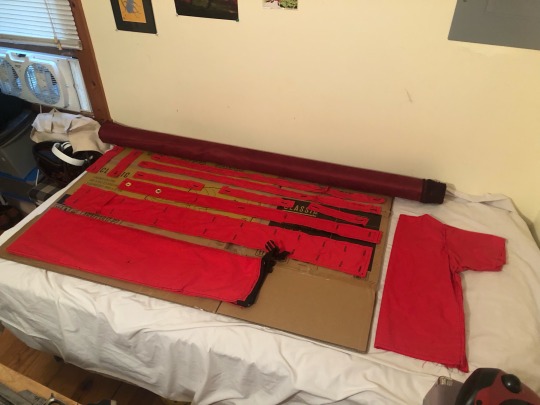


I’m going to be using the dark red fabric in the first one :3 (yes im doing this on my bed don’t judge me) I still have a lot to do but I’m getting closer and closer to finishing this!!!
#cosplay#vash cosplay#vash#vash the stampede#AHHHHH IVE GOT SO MUCH DONE!!#this is the first thing I’ve ever sewn!!!#so many rectangles#i said fuck sewing all the extra buttons on the front panel#THEYRE DECORATION ANYWAYS#I’m sure they really go to the shirt underneath buttt#i wanna take the shirt out and wear a red and black mesh top for sexy vash#trust me trust me it’s good#oooo and the boots#i love cosplaying this is s much fun#pls ignore my dirty hair I’ve been holed up in my room making this outfit all month long and just got a couple days off so I’m 24/7 on this#before the connnnnn#oh god and I gotta get a Yuki cosplay together fucccck#my room is an absolute mess rn
20 notes
·
View notes
Text

I got a 1000% got distracted, and i'm not even sorry.
#[ 🕷️ ] —— out of character#[ I love you guys so muCH! LOL!! ]#[ made my night fun. ]#[ however I must switch off now my ADHD said I done now. BAHAA ]#[ I'm eepy ]#[ maybe if I play with hector I'll be awake again ]#[ I'll try writing again the next sewing break ]#[ edit: okay I'll try ONE THING and see how I feel ]
4 notes
·
View notes
Text
Who ever invented pattern making; we have extreme beef count your days
#what do you mean I have to draft it myself#what do you mean patterns for original design don’t magically appear#also the body dysmorphia that comes when you measure yourself#do fashion design they said#it will be fun they said#i hate it here#Juaan de Alcega#when i catch you#pattern making#sewing#fashion#fashion design#i’m gonna cry
3 notes
·
View notes
Text
gotta get off the internet and only interact irl with people who were 30 before they got their shit together i cant keep doing it like this
#like this being. feeling like i have no future and nobody likes me#‘youre only 19’ only goes so far when i dont know any other fail 19 year olds#im not gonna be a damn dentist for sure but like. and ive said this a thousand times. what am i gonna do. i cant live a worthless nothing#life where i work a shitty job i hate. i have to like something#i hate my art. i hate my lack of creativity. my art is so bland i just dont think its in me anymore#i finished. and i hate it#i have other hobbies. i like to cross stitch. i like to sew. i like to paint. i like to make dolls. do you see the common theme here#i have a few more than that i technically could do but i cant create anymore and it kills me. i want to. i constantly want to but i cant#it doesnt help that even if i havw ideas i dont even want to do them#i was gonna draw some characters from a game i played when i was little but i just#didnt want to. at no point did it not feel like a chore#ill try to go to new mediums! its fun to mess around and then itll feel boring again and going back doesnt feel any better#idk. googling it is useless. ive tried all the things. for years. ive been TRYING to draw consistently and like. doodles are fine theyre fu#but theyre not what i want to do i want to make something im proud of. i drew almost every single day for like 2 years#and its not burnout bc its been like. 2 more years! and ive barely wanted to at all!!!#i want to be creative and i also want people to recognize it. different complaint but it sucks so bad#i feel like nobody likes me. still. nobody cares about what i do. nobody would care if i stopped#like except me but i can only support myself so far!!!! im so tired of it!!!! someone PLEASE be here for me and just say ‘hey i love this#drawing :)’ like you have no idea what that would do for me#not always. but yknow especially if its been a while. if you like it. if you dont like it :( idk. you should tell me that too i guess#yknow so i can have some confirmation so i dont feel like im crazy. idk. dont actually id never go online again. i would probably. well.#i dont like to say the words#simons spouting#vent :(
2 notes
·
View notes