#sc pompom
Explore tagged Tumblr posts
Text


finished the shawl!!! 😋
#green shirt blue shawl deancas combo was NOT intentional. but such is the beautiful way of life#anyway i was here and there about the pompoms but i think i figured them out#i did them like. (into top loop only) sl‚ sc around the pompom‚ skip a stitch and sl and it seemed to work nicely so 👍🏻👍🏻#the pattern was originally off youtube but i did triple crochets instead of doubles to save yarn#but ANYWAY! 600g of yarn small price to pay for cozy shawl#crochet#emi's meandering jotts#this + my blue tie dye shorts + white nehru shirt + blue bandana i can see it so so clearly......fashion ‚
26 notes
·
View notes
Text
~ furby beret - crochet pattern ~

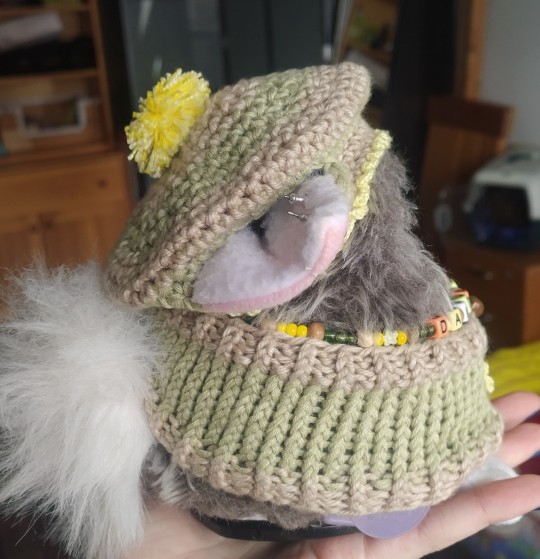
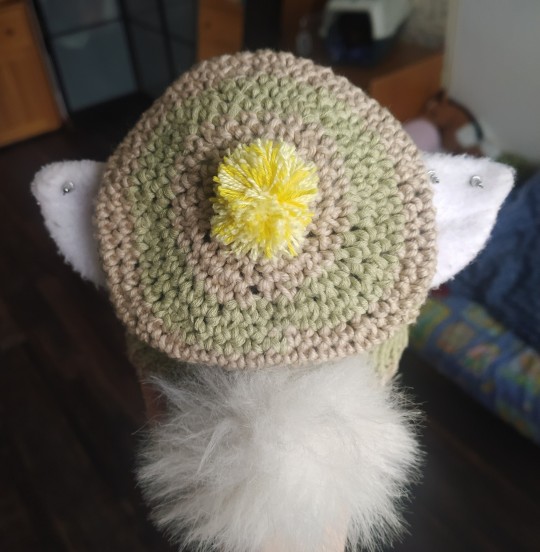
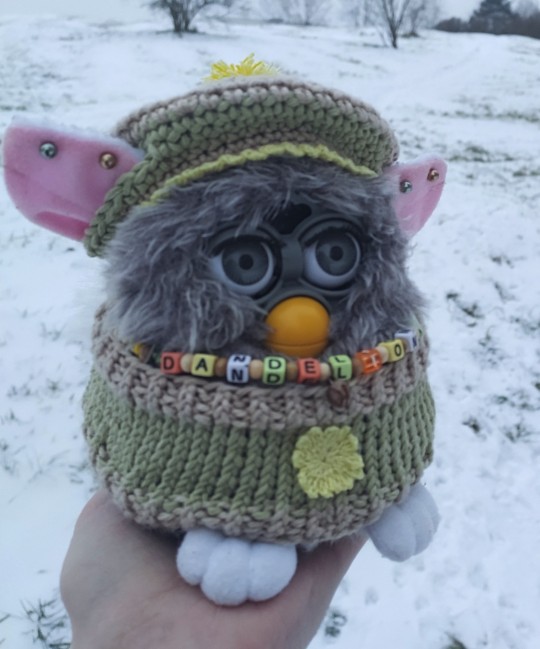
I´m new to actually writing patterns up for others to use, so please tell me if there is anything that´s hard to understand or if you find any mistakes. Also, if you do make your furb a beret, please send me a pic or tag me in your post, I would love to see what you make!
ꕀꕀꕀꕀꕀꕀꕀꕀꕀꕀꕀꕀꕀꕀꕀꕀꕀꕀꕀꕀꕀꕀꕀꕀꕀꕀ
Gauge: 10st X 5 rows -- 6,5 cm X 2,5 cm (I used a 3, 5 mm hook)
Finished size (fits a 1998 furby): total diameter - 11cm, head hole diameter - 9 cm
Abbreviations
sc - single crocet ss - slip stitch inc - increase (two into one) dc - invisible decrease (go through only the fron loops of two stitches, sc as one) [] - nuber of stitches in the row () - repeat sequence
ꕀꕀꕀꕀꕀꕀꕀꕀꕀꕀꕀꕀꕀꕀꕀꕀꕀꕀꕀꕀꕀꕀꕀꕀꕀꕀ
Main hat - stripes not included, I changed color every 3 rows
R1 - chain 50, ss into first stitch [50]
R2, R3 - sc all aroud [50]
R4 - 10sc, (chain 9, ss into 10th stitch from hook), 14sc, (chain 9, ss into 10th stitch from hook), sc rest of the round [50]
R5 - sc all around [50]
R6 - (9sc, inc)x5 [55]
R7 - sc all around [55]
R8 - (7sc, dc)x6, sc [49]
R9 - (3sc, dc, 3sc)x6, sc [43]
R10 - (5sc, dc)x6, sc [37]
R11 - (2sc, dc, 2sc)x6, sc [31]
R12 - (3sc, dc)x6, sc [25]
R13 - (2sc, dc)x6, sc [19]
R14 - (sc, dc)x6, sc [13]
R15 - 6dc, sc [7], bind off and leave a longer tail
Take your taill and your needle and "pick up" the remaining 7 stitches (just whip stitch around), pull on the tail to close the hole
Weave in your tails
Pompom - please look up a separate pompom-making tutorial, i suck at making pompoms. After you make one, just use the same thread you used to tie the pompom together to sew in to the beret on top
The trim - entirely optional, I used a crochet thread and a 2mm hook
(ss, 5sc, ss) into each [50]
ꕀꕀꕀꕀꕀꕀꕀꕀꕀꕀꕀꕀꕀꕀꕀꕀꕀꕀꕀꕀꕀꕀꕀꕀꕀꕀ
Decorating ideas
different trims! just look up "crochet trims" and find one you like more stripes! crazier stripes! center-out stripes! replace the pompom with someting else - a flower, or a bow maybe? crochet emroidery add some lace or a ribbon
#my furbs#furby resources#furby 1998#furby#furblr#furby fashion#furby community#crochet pattern#allfurby#safefurby
538 notes
·
View notes
Text
::stares in crochet outfits i might need to attempt to make:: what a fabulous fucking look.
I think the netting is a chain of 6 or 7, then joined in the middle of the previous rows chain, then repeated.
Top edge looks like it might be bobble stitch. The arm band and detail at the pant cuffs are likely pompoms that were stitched together.
The flared bottom of the pants looks to be the same 6 or 7 ch stitches just not stretched to fit over the body like the ones above it. I would guess it was worked from the waist down (no real idea how the crotch/legs transition was made), and then then there were increases worked at the waist to work up and get the drape at the waist by working extra rows to get the fold.
If it's 6 or 7 chain between scs, this is probably worsted weight yarn, which also matches what was commonly used in fashion in this time period.
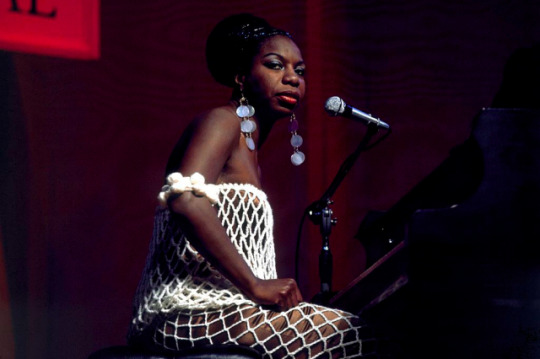
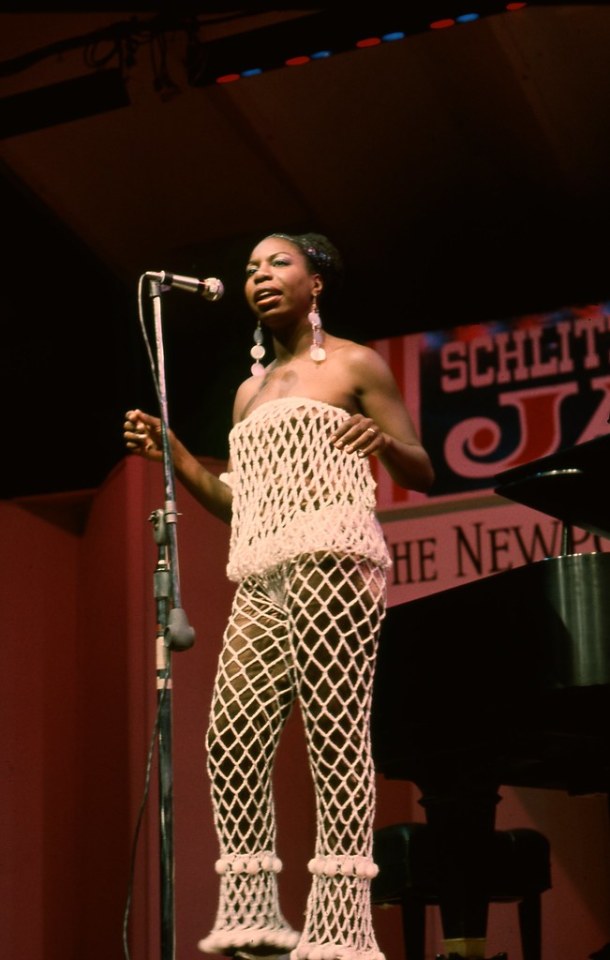
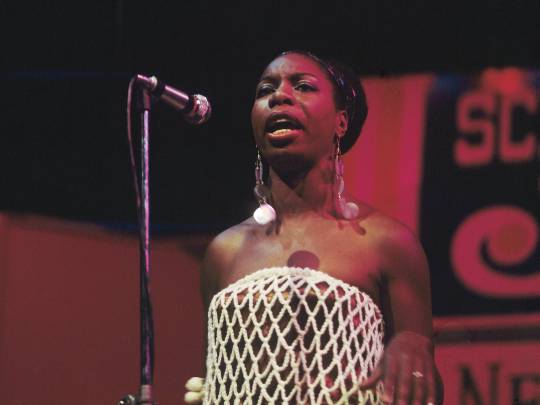
Nina Simone's gorgeous white netted jumpsuit, performing in Newport, 1967. Photos in part by David Redfern/Getty and John Rudoff via Flickr.
6K notes
·
View notes
Text

Pink Heart White Baby Hat with Pompom
0 notes
Text

not quite finished in a single evening, but we have very nearly achieved bunny!
body
magic ring start, 6st
two sc in each sc (12)
*one sc, two sc in next sc* around (18)
*two sc, two sc in next sc* around (24)
*three sc, two sc in next sc* around (30)
three rounds sc in every sc (still 30)
*three sc, sc dec over next two sc* around (24)
*two sc, sc dec over next two sc* around (18)
*sc, sc dec over next two sc* around (12)
{stuff the body}
*sc dec over next two sc* around (6)
weave tail through 6st and draw closed
head done the same way but only increased to 24 total and only two rounds crocheted evenly before decreasing back down, loooong tail used to sew the head to the body
ears (make two)
pink: foundation sc 4, ch, sc down the other side of the foundation to make a long skinny oval
grey: foundation sc 4, ch, sc down the other side of the foundation to make a long skinny oval, then sc through pink oval edge and grey oval edge all the way around to stitch them together and outline in grey, leaving a long tail to sew the ear to the head
probably will do a small fork pompom for the tail...
uh, he just last-minute booked us to go meet the new-ish great-nephew this weekend so now it's time to bang out a bunny?!?
13 notes
·
View notes
Photo


Teams from my new story series! :D (read Story 1 on DA here!)
Descriptions under cut!
The Vampires are objects that have been given the ability to shapeshift and drain the life source of different creatures! However, they lose these powers when exposed to sunlight, but once it’s dark, they get them again.
PomPom-Female-Cheerleader, and very energetic.
Butterscotch-Female-Sweet as heck.
Milk-Female-The Mom friend.
Soccer Ball-Male-Has a crush on someone back where he’s from, but doesn’t want to admit it and is often short tempered.
The Zombies are objects given the ability to dig really well and gain abilities of creatures they consume the flesh of for up to seven hours! They’re also immune to suffocation.
Shot-Female-Really wants to heal those who are hurt and is worried about others’ health.
Computer-Male-Geeky and memetic, often doesn’t do much but is useful for facts.
Sludgy-Female-Hillbilly who gives no care for her or anyone else’s hygiene.
Football-Female-Mostly no nonsense, but it’s said she’ll soften once she finds someone she loves. (platonic or not)
The Wizards are objects given the ability to cast magic! However, exposure to water temporarily disables their powers.
Rubber Duck-Non Binary-Quack.
MP3 Player-Female-Quiet, anxious, and a music lover.
Inkwell-Non Binary-Unlucky but artistic.
Cloak-Male-Tries to be mysterious, goth.
The Ghosts are objects given the ability to shift into a spectral form, shapeshift, and possess stuff! However, they can’t possess transparent stuff for some reason.
Basketball-Female-Very shy, has a crush on PomPom but is too nervous to admit it.
Arcadey-Male-Hyperactive and often makes theories.
Die-Male-Sleazy and arrogant, based on the Cuphead character King Dice.
Easter Egg-Non Binary-Often hides and really sneaky.
The Werewolves are objects given the abilities and senses of wolves! However, they lose these powers in the day hours of the island, but when night falls, they get them back! They are especially powerful during the full moon nights!
Shadowy-Male-Sneakier than Easter Egg, hard to see in darkness, dramatic.
Baseball-Male-Loosely based on the Inanimate Insanity character, this Baseball, while mostly kind and passive at times, is also extremely violent and dangerous.
Clock-Female-Drama queen, impatient, often stressed, and determined to get things done.
YinYang-Male-Inspired by the Inanimate Insanity character. Here Yin is just shy and passive, while Yang is full of energy and not really evil. In Shadow Castle, YinYang is a member of a species of dragon known as Taijitu (the real name of the Yin-Yang symbol)
#object shows#object show community#shadow castle#that's the name of it#my art#object stories#characters#sc pompom#sc butterscotch#sc milk#sc soccer ball#sc shot#sc computer#sc sludgy#sc football#sc rubber duck#sc mp3 player#sc inkwell#sc cloak#sc basketball#sc arcadey#sc die#sc easter egg#sc shadowy#sc baseball#sc clock#sc yinyang
10 notes
·
View notes
Text


chunky blankets are the best blankets
#I hit the halfway point tonight its wild#ALTHOUGH idk if its gonna be long enough?? I dont wanna have to order yarn a third time but also extra length!!!! and a border!!!!!#its meant to have pompoms but they’re too hard to wash so I just wanna do a row of sc to tidy up the edge#but I would need So Much Yarn for that#crochet#post#my face#my yarn adventures
6 notes
·
View notes
Photo
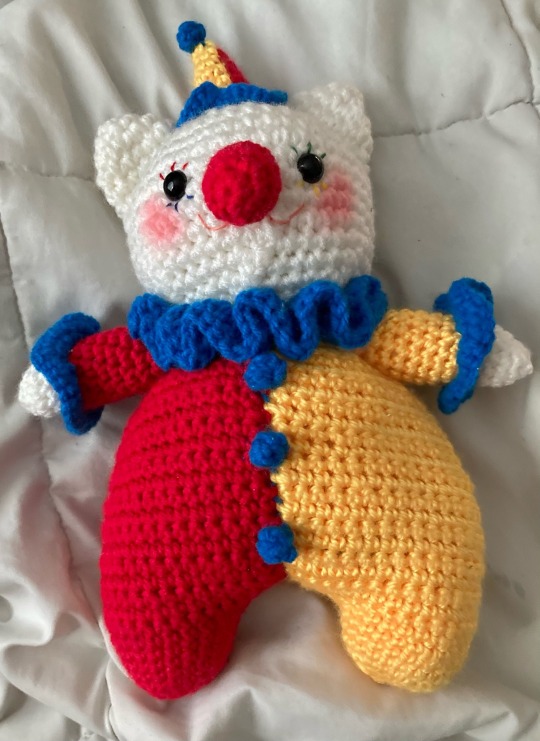
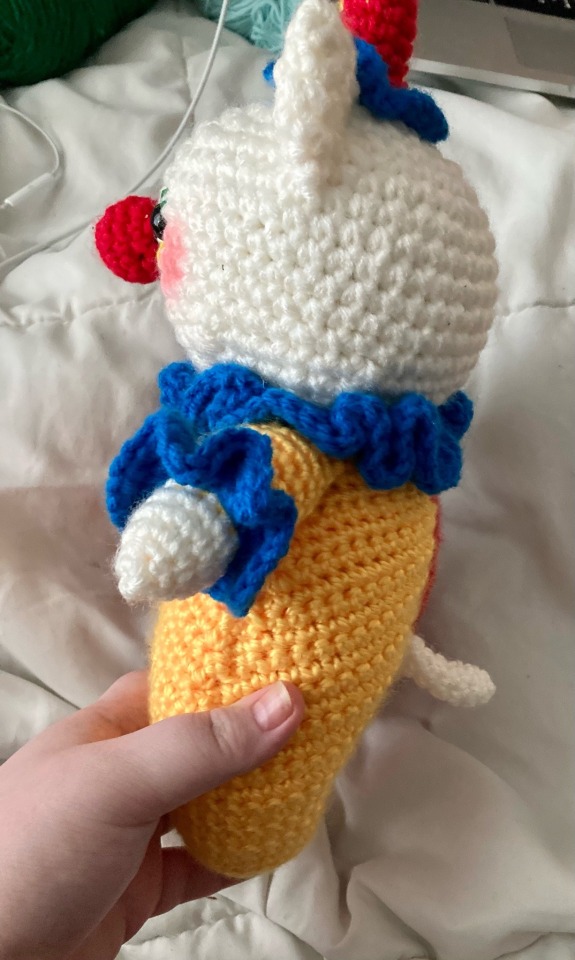
Clown Cat Crochet Pattern Listed Below!
Full disclaimer, this pattern has not been tested by anyone but me yet. I haven’t had the chance to make a second clown cat and take pictures of the process yet. I only have the pattern written for a bi-color hat and body for now but it would be pretty easy to convert to once color. Feel free to message me if you have questions about any part of the process and I can hopefully explain a little better! *instructions listed are specifically for a cat, but the ears, face, and tail can be altered to be a different animal. crochet the head as instructed below, embroider your desired face, and find a good pattern for ears you want. just make sure to use two strands of yarn and an H hook so the size isn’t off.
Materials: - 2 balls of yarn in chosen head color (white) - 1 ball of yarn in color A (½ main colors. I chose red) - 1 ball of yarn in color B (2/2 main colors. I chose yellow) - 1 ball of yarn in color C (1/1 accent colors. I chose blue) - Tiniest amount of yarn for nose (I used red for that classic clown nose look) - safety eyes (I used 12 mm, you can also embroider them or use buttons) - stuffing/wadding - H/size 8/5.00 mm hook - F/size 5/3.75 mm hook - bell (optional, for nose) - pompoms or buttons (optional, for body and hat decoration. I opted to make my own tiny pompoms because I didn’t want to buy any. Instructions are listed in this pattern) - embroidery thread (optional, I used thread to embroider eyelashes and mouth) - makeup or fabric paint + clean brush to apply (optional)
Abbreviations (US Crochet Terms): ch - chain sl - slip stitch sc - single crochet dc - double crochet inc - increase dec - decrease fo - finish off st - stitch
Special Terms/Techniques: Intarsia/Mosiac/Jacquard crochet - used for hat. Daisy Farm Crafts’ gingham blanket patterns explain the technique really well. Here’s a link! You have to scroll a bit to find the explanation. Popcorn/Bobble stitch - used to make pompoms on hat and body Ladder Stitch - Used to stitch parts together, join halves of body, and minor tailoring of the “hip” area.
Head (head color) x1:
*Use H hook **Head is worked using two strands of yarn at once
Worked in the round. Start with a magic ring
sc 6 in magic ring (6)
*sc inc in next stitch* repeat 6 times (12)
*sc inc, sc in next stitch* repeat 6 times (18)
*sc inc, sc in next 2 stitches* repeat 6 times (24)
*sc inc, sc in next 3 stitches* repeat 6 times (30)
*sc inc, sc in next 4 stitches* repeat 6 times (36)
sc in each stitch (36)
sc in each stitch (36)
sc in each stitch (36)
sc in each stitch (36)
sc in each stitch (36)
sc in each stitch (36)
sc in each stitch (36). Place your eyes between between rows 9 & 10, about six stitches apart.
*dec, sc in next 4* repeat 6 times (30)
*dec, sc in next 3* repeat 6 times (24)
*dec, sc in next 2* repeat 6 times (18). Embroider the rest of the face and begin stuffing.
*dec, sc in next stitch* repeat 6 times (12). Finish stuffing.
*dec* repeat 6 times (6). FO and stitch shut, leaving a long tail to attach head to body later.
Ears (head color) x2:
*Use H hook
**Ears are worked using two strands of yarn at once
Worked in the round. Start with a magic ring.
sc 4 in ring (4)
*sc, inc* repeat once (6)
*inc* repeat 6 times (12)
sc in each stitch (12)
sc in each stitch (12). FO, leaving a long tail.
Flatten into triangle and stitch to top of head. I positioned the ears between row 3 & 4 of the head and sewed down the side.
Nose x1:
*use f hook from this point on **use one strand of thread at a time from this point on
Worked in the round. Start with a magic ring.
sc 6 in magic ring (6)
*sc inc in next stitch* repeat 6 times (12)
sc in each stitch (12)
sc in each stitch (12). If you’re using a bell in the nose, add that now.
*dec* repeat 6 times (6). If you’re using stuffing, add that now.
*dec* repeat 3 times (3). FO and stitch shut, leaving a long tail.
Sew one or two rows below the eyes, directly between them.
Hat (colors A, B, and C):
*Intarsia/Tapestry crochet is used for this piece. A link explaining how to use this method is provided under “special techniques.” Brush up and practice if you need to!
Using color A, start with a magic ring.
sc 2 in color A. Switch to color B. sc 2 in color B. (4)
sc inc, sc in color A. Switch to color B. sc inc, sc in color B. (6)
*sc inc* repeat 3 times in color A. Switch to color B. *sc inc* repeat 3 times in color B. (12)
sc in first 6 stitches with color A. Switch to color B. sc in last 6 stitches with color B. (12)
sc in first 6 stitches with color A. Switch to color B. sc in last 6 stitches with color B. (12)
sc in first 6 stitches with color A. Switch to color B. sc in last 6 stitches with color B. (12)
sc in first 6 stitches with color A. Switch to color B. sc in last 6 stitches with color B. (12)
sc in first 6 stitches with color A. Switch to color B. sc in last 6 stitches with color B. (12). Switch to color C.
*sc inc* repeat 12 times. (24)
*sc inc* repeat 24 times (48). FO leaving a long tail.
Weave the end of color C towards the center of the hat, between the space where the hat ends and the ruffle begins. Sew the hat to the head, adding stuffing to the hat to make it stand. Pompom will be added later.
Because the hat is worked in the round, the colors may create a kind of swirl instead of a true half and half look. I chose to block my hat out by dampening it with warm water and twisting it until I was happy with the way the colors sat.
Arms (head color, A or B) x2:
*work first arm in color A, second in color B. Ruffles are worked separately in color C and sewn on
In Head Color, start with magic ring
sc 6 in magic ring (6)
*sc inc* repeat 6 times (12)
*sc inc, sc* 6 times (18)
sc in each stitch (18)
sc in each stitch (18). Switch to color A or B.
sc in each stitch (18)
sc in each stitch (18)
sc in each stitch (18)
sc in each stitch (18)
sc in each stitch (18)
sc in each stitch (18)
sc in each stitch (18)
sc in each stitch (18)
sc in each stitch (18)
sc in each stitch (18)
sc in each stitch (18)
sc in each stitch (18)
sc in each stitch (18). Stuff and FO leaving a long tail. Stitch the top shut and leave a long tail to attach to body later.
Arm Ruffle (color C) x2: ch 18, join to make a circle 1. sc inc in each chain (36) 2. sc inc in each stitch (72). Sl in next stitch and FO. Sew onto arm where body color meets color A/B.
Body (color A or B) x2:
*body is worked in halves and stitched together **body is worked in rounds for feet, then rows for chest/belly ***the “hips” of the body are angular due to decrease; I ladder stitched over the angles after stuffing and constructing to make the body look smoother on the sides
In color A or B, begin with a magic ring
sc 6 in magic ring (6)
*sc inc* repeat 6 times (12)
*sc inc, sc* repeat 6 times (18)
*sc inc, sc in next 2 stitches* (24)
sc in each stitch (24)
sc in each stitch (24)
sc in each stitch (24). Chain 5. Body is worked in rows from this row on.
sc in 2nd ch from hook and next 3 ch. sc in next 24 stitches. sc 4 in other side of ch spaces (32). Ch 1, turn.
sc in each stitch (32). Ch 1, turn.
sc in each stitch (32). Ch 1, turn.
sc in each stitch (32). Ch 1, turn.
sc in each stitch (32). Ch 1, turn.
sc 14, sc dec twice, sc 14 (30). Ch 1, turn.
sc 13, sc dec twice, sc 13 (28). Ch 1, turn.
sc 12, sc dec twice, sc 12 (26) Ch 1, turn.
sc 11, sc dec twice, sc 11 (24) Ch 1, turn.
sc 10, sc dec twice, sc 10 (22) Ch 1, turn.
sc 9, sc dec twice, sc 9 (20) Ch 1, turn.
sc 8, sc dec twice, sc 8 (18) Ch 1, turn.
sc 8, sc dec, sc 8 (17) Ch 1, turn.
sc 7, sc dec, sc 8 (16) Ch 1, turn.
sc 7, sc dec, sc 7 (15) Ch 1, turn.
sc 6, sc dec, sc 7 (14) Ch 1, turn.
sc 6, sc dec, sc 6 (13) Ch 1, turn.
sc 5, sc dec, sc 6 (12) Ch 1, turn.
sc in each stitch (12) Ch 1, turn.
sc in each stitch (12). FO and weave in end.
Stitch the halves of the body together with a ladder stitch. Stuff the feet to desired firmness. You should have about 24 total stitches at the top of the body where the “neck” is – it’s okay if you’re missing a stitch or two though. The neck ruffle will be worked directly to the top of the body and will be made in the round.
Join color C to neck.
sc inc in each stitch (~48)
sc inc in each stitch (~96)
dc inc in each stitch (~192). Sl in next stitch. FO and weave in end.
Tail (head color) x1:
*tail can be made longer or shorter. add or subtract repetitions of row 3 to desired length **i chose not to stuff the tail but you can if you’d prefer to
start with a magic ring
sc 6 in magic ring (6)
*sc inc* repeat 6 times (12)
sc in each stitch (12)
sc in each stitch (12)
sc in each stitch (12)
sc in each stitch (12). FO and leave a long tail.
Pompoms (color C) x4: *regular fuzzy pompoms or buttons would work just fine for this project but in case you don’t have access to either of those and don’t want to buy them, here’s a fast lil tutorial. it’s basically just one single popcorn stitch tacked into a sphere shape. ch 3 in 3rd ch from hook, dc 5 (5). remove hook from loop and reinsert in the top of first dc. insert hook in loop and pull through. ch 1, FO and leave a long tail. Sew your popcorn stitch into a sphere. I sewed the top of the stitch to the bottom chain, then the side of the first dc to the side of the last dc. Play around with tailoring your popcorn until it looks like a pompom.
Construction:
At this point, you should have a head (stuffed with eyes and mouth), nose, hat, two ears, body, two arms with ruffles on the wrist, a tail, and some pompoms.
If you haven’t already, stitch the ears, hat, and nose to the head.
Attach the head to the body using the long tail left after FO. Finish stuffing as you sew. I used a ladder stitch and aligned row 15 of the head to the neck opening since both have ~24 stitches. It’s okay if part of the neck ruffle is tacked to the head.
At this point, I tailored the “hips” of the body to be smoother. Originally it was pretty angular. I used a ladder stitch to hide some of the “extra” fabric on the hips. You can leave it if you choose, of tailor it to whatever hip shape you like.
Attach the arms to the body. I, of course, used a ladder stitch. The arms are sewn to the side of the body, right underneath the neck ruffle.
The tail is sewn to the back of the body. I chose to place mine towards the bottom, where color A and color B meet.
Sew pompoms onto your clown cat. I put one on top of the hat, then three on the center of the body like buttons.
Finally, add makeup. You can do any design you like! I’ve used fabric paint before but I don’t like the texture it has, so now I use cheap makeup and brushes. (Because I sell/gift plushies, the pallet and brushes I use have never touched human skin and are consistently cleaned but if you’re making a plushie for yourself, you can use whatever you have. Finish off with a little scotch guard if you want to protect the makeup or leave as is. Of course, if the plushie is being gifted to a pet or a child, don’t put makeup on it – embroider or use non-toxic paint instead).
That’s it! Now you have your very own clown cat (or other animal, if you decided to use a different head pattern).
Again, this pattern has only really been tested by yours truly and I haven’t had a chance to take pictures to go with these instructions, so if you run into any problems, go ahead and reach out to me! Happy crafting!
This pattern is available for free here because I don’t believe in gatekeeping crafts but if you’d like to show me some love, support my yarn habit through kofi!
999 notes
·
View notes
Photo

lanling prep's golden boy & his brain cell- er, best friend are working on his people skills.
(zixuan is a good boy & his mom told him to say hi to yanli. yanli just came to cheer for a-cheng but now she's confused. MM's hair puffs looked like pompoms.)
the series so far: nie bros | sangcheng | sangcheng pt.2 | wangxian | sc date night | morning after with dage | sc couple selfie
#jiang yanli#mian mian#jin zixuan#xuanli#mdzs#mo dao zu shi#mdzs modern au#(art)#(fanart)#(april2020)#im taking cues from the drama with mianmian btw she goes to lanling and is close to jzx
4K notes
·
View notes
Note
I ask for opinion on a rare pair: Sophia & Alan. I’m not sure whether it be romantic or friendship pairing, but brief discussion w/ my mom (she loves the show too XD) decided that Sophia and Alan would be cute together. I mainly find it fun due to the height difference and if these two are more of a close friendship like situation (much like how I view Alan & Katarina as chaotic siblings), cue situations of Sophia making use of Alan’s height and giving both Geordo & Nicol bits of protective sibs
OOOOH yeah they would be very very cute together! The height gap alone is giving it so much ship points gfjhsd.
For Alan, I like the kind of girl for him who would string him along on random activities and adventures, someone who bothers him with fun ideas and an infectious energy. People would usually think of Katarina and Mary at a description like that, but given that hamefura!Sophia is so much more energetic and active than her Fortune Lover self, she pretty much fits the bill too (especially when she wants to drag people into her books and book-inspired ideas) XDD @/rosamundrosemary and @/ineedglassesalways would often gush about how cute they would look from behind, like an old couple due to their white and grayish hair colors jhfsdhf it's so cute!!
Sophia having trouble getting a book from a shelf so Alan gets it for her, Alan fending off nobles who are making fun of Sophia's albinism, Alan carrying Sophia where he notes how small and light she is, Sophia recommending books to Alan where she gets him into the heavy fantasy and adventure type ones; so many fun scenarios.
I don't know about Geordo and Nicol moments of being overprotective, I think they would both be delighted if Alan and Sophia were to like each other since they could become family that way. Nicol knows the siblings well and entrusts Katarina to Geordo (even if it hurts his own heart) so I feel like he would trust Sophia with Alan too if the feelings seemed mutual. But I guess if we really need an overprotective brother moment, I think Geordo and Nicol might not like the idea at first since they think a guy like Alan who is rough and laid-back might be too much for the soft Sophia (almost forgetting that Alan is a very responsible guy, I mean he's the SC's secretary after all, and that Sophia is a wild little pompom)
There's lot of fics where the girls and boys and switched around in pairings to explore more ship dynamics, and my favorite of those is definitely Sophia and Alan. I think there is even a fic where a young Sophia would somehow stumble upon a sick Alan earlier during everyone's childhood, and the two would bond over Sophia sharing and reading her books to him to help him spend his time recovering from his illness. I can't be bothered to look for the name or to even check if it exists, but the idea of Sophia sharing the world of stories to a young sick Alan so that he can experience a world of adventure in the comfort of his own room is so nice!!!
Platonic or Romantic, I'm all for it!! It's a really high quality rare pair! :DD
Thank you for the ask^^
#mh ask#hamefura#my next life as a villainess#hamehura#bakarina#destruction flag otome#sophia ascart#alan stuart
29 notes
·
View notes
Text

hat I finished last night, ~0.8oz of the green and ~1.25oz of the blue (probably red head super saver or caron 1 lb, either way it’s 4 weight acrylic), not including the pompoms.
pattern is [here] from AllFreeCrochet, in adult medium. I added 1 extra row of the finishing sc, and I forgot to do the ties while doing that so I joined on at each one to add them. I also used a sc chain instead of a chain stitch for those ties, and they might be 1-2 stitches short.
1 note
·
View note
Text
AlpacaMütz* Now
So with the help of my magic hook, this:

turned into this:

And I'm super proud and happy with how it turned out. It's warm and slouchy and soft and spacious enough to contain my curls 😄💕💕💕Also it has the first pompom I ever made ^_^
Also also, it took me just about 5 hours over the course of only 4 days to finish it, thanks to public transport, and my kids who played by themselves and let me crochet in peace. This is a new record, and taught me that I'm better of with winging these kinda things. I mean, I put 14+ hours into a hat working from a pattern, and while it was insightful and I learned new techniques, the thing was so ugly in the end that I frogged it in utter frustration ("frogstration").
But this lovely hat came together almost all by itself and I hope to wear it for many years to come 😌💕
Started: 2019-12-12
Finished: 2019-12-15
Yarn: Alpaca wool from Mogley and Herri from the nearby Alpaca Farm
Hook: 5 mm
Pattern:
started with a Magic Ring and 16 sc
the rest is hdc and dc, but, like, without a plan xD
*(German "Mütze" = hat, beanie, toque, cap, things you put on your head ;) )
#crochet#slouchy beany#alpacamütz#alpaca yarn#my crochet#mappsie crochets#Mogley and Herri are the alpaca's names from which furs the wool came in case that wasn't clear ^_^'#finished 2019
18 notes
·
View notes
Text
Free Crochet Amigurumi Pattern : Siu Mai

Materials I use:
4ply yarn in Yellow and light brown by Red heart Comfort
Clover Amour crochet hook size E/3.50mm
stitch marker/ sewing needles / scissors / hot glue gun / stuffing / orange pom pom
8 mm plastic safety eyes
Abbreviation
ch: chain
st: stitch
sc: single crochet
inc: single crochet increase
dec: single crochet decrease
BLO: back loop only
FPS: front post single crochet
3FPS cluster: 3 front post single crochet cluster in the same post.
MR: Magic Ring/an adjustable ring
For example:
MR3: make 3sc in the magic ring
Notice
Always use the stitch marker to mark your first stitch each round.
Start with yellow yarn.
Rnd1. – MR6sc (6)
Rnd2. – Inc (12)
Rnd3. – (sc, inc) 6 times (18)
Rnd4-7 – Sc around (18)
Change color to light brown
Rnd8. – BLO: (sc, dec) 12
Cut off the yellow yarn
Stuff a little bit now
Rnd9. – dec around (6)
Insert the safty eyes now
Stuff more to make it firm and close off.
Siu Mai folds- total of 9
Re-attach the yellow yarn to round 8 , insert at the stitch where you changed the color.
Make 3FPS clusters around for 9 times and you will have 9 petals (folds) in total.
3FPS: 3 front post single crochet cluster :
Make 3 single crochets in the same front post, let go the last loop on hook, insert to the first front post single crochet in this cluster, pick up the loop you just let go, pull through, chain 1, slip stitch the next , skip one stitch –Repeat this pattern till you have 9 petal(folds). Finish off .
if you still don’t understand how to make this , Check my YouTube Step by Step tutorial of this pattern! (Please like and subscribe my Youtube Channel!)
Final Step – Hot glue the orange pompom on top of the siu mai and you are done!
Wanna be featured in my IG story and be added to my Highlight “Made by You” in my IG main page?
Here’s how:
Tag @ohanacraft and #ohanacraft in your public IG post and Story, so I can repost from you.

25 notes
·
View notes
Text

Hearts Pink Elf Hat
0 notes
Text
Workbasket #1 Vol. 48

Pub. October 1982
(id: a photo of a photo of the martian and astronaut toys in the original craft magazine. it’s in black and white- the astronaut is white, and the martian is a grey-ish color. in someone’s handwriting it says “stacey” above the astronaut and “chris” above the martian. they’re “sitting”)
Martian and Astronaut
“Beep! Beep! Beep! Now landing from outer space, our astronaut has brought back a friendly Martian, complete with antennae and funny ears! Made over a frozen juice can, the Martian and astronaut could hold a child’s jacks, marbles or other small treasures. Worsted weight yarn and a size G crochet hook are used. The martian is made of 2 ounces light green and a small amount of red. The astronaut requires 2 ounces white, 1 ounce pink and a small amount of black. You will also need two 6 ounce juice cans, small amounts of stuffing and a pipe cleaner for the Martian’s antennae.”
Abbreviations:
St (stitch)
Rnd (round)
Sc (single crochet)
S st (slip stitch)
Ch (chain)
Tog (together)
Dc (double crochet)
MARTIAN: Use light green for entire Martian except eyes and mouth.
Body: Rnd 1: Ch 3, 10 dc in 3rd ch from hook, join.
Rnd 2: Ch 2, 2 dc in each dc around, join.
Rnd 3: Ch 2, working in back loop this rnd only, dc in each dc around, join.
Rnds 4 through 13: Ch 2, *dc in dc, dc around post of next dc, repeat from * around, join, fasten off after Rnd 13. Be sure body is long enough to cover can.
Legs: (Make 2) Rnd 1: Ch 12, sl st in first ch to form ring, ch 2 dc in each dc around, join.
Rnds 2 through 6: Ch 2, *dc in dc, dc around post of next dc, repeat from * around, join.
End 7: Ch 2, dc 2 tog around, join.
Rnd 8: Ch 1, sc in 2 dc, 2 dc in 2 dc, sc in 2 dc, join.
Rnd 9: Ch 1, sc in 3 st, 2 dc in dc, sc in 2 st, join.
Rnd 10: Work in back loop this rnd only, ch 1, sc in each st around, join, fasten off. Sew opening shut. Stuff legs firmly and sew to bottom front of body.
Arms: (Make 2) Rnd 1: Ch 10, leaving long tail for sewing, sl st in first ch to form ring, ch 2, dc in each ch around, join.
Rnds 2 through 6: Ch 2, *dc in dc, dc around post of next dc, repeat from * around, join.
Rnd 7: Ch 2, dc 2 tog around, dc in last dc, join.
Rnd 8: Ch 2, 2 dc in each dc around, join.
Rnd 9: Ch 2, dc in each dc around, join.
Rnd 10: Ch 2, (dc 2 tog) 3 times, (sc 2 tog) twice, sl st in first ch, fasten off, sew opening shut. Stuff arms lightly. Do not stuff hands, sew to top sides of body.
Thumb: (Make 2) Rnd 1: Ch 3, sc in 2nd ch from hook, sc in ch, ch 1, turn.
Rnd 2: Sc in each sc across, ch 1, turn.
Rnd 3: Sc in each sc across, fasten off. Fold thumb in half, sew. Sew thumb to hand.
Head: Rnd 1: Ch 2, 6 sc in 2nd ch from hook, do not join rnds.
Rnd 2: 2 sc in each sc around, mark beginning of rnds.
Rnd 3: *Sc in sc, 2 sc in next sc, repeat from * around.
Rnd 4: *Sc in 2 sc, 2 sc in next sc, repeat from * around.
Rnd 5: *Sc in 3 sc, 2 sc in next sc, repeat from * around.
Rnd 6: *Sc in 4 sc, 2 sc in next sc, repeat from * around.
Rnds 7 through 12: Sc in each sc around.
Rnd 13: *Sc in 2 sc, sc 2 tog, repeat from * around.
Rnd 14 *Sc in 3 sc, sc 2 tog, repeat from * around.
Rnd 15: *Sc in 2 sc, sc 2 tog, repeat from * around.
Rnd 16: 8Sc in sc, sc 2 tog, repeat from * around. Stuff head firmly.
Rnd 17: Sc 2 tog around, fasten off.
Ears: (Make 2) Row 1: Ch 7, sc in 2nd ch from hook and in each ch across, ch 1, turn.
Row 2: Sc 2 tog, sc in sc, sc 2 tog, ch 1, turn.
Row 3: Sc 2 tog, sc in sc, ch 1, turn.
Row 4: Sc in each sc, fasten off. Sew ears to sides of head.
Antennae: (Make 2) Ch 11, holding pipe cleaner against ch, sc over pipe cleaner, sc in 2nd ch from hook and in each sc across, fasten off. Make small pompom and sew to end of antenna. Sew antennae to top of head.
Eyes: (Make 2) Rnd 1: With red, ch 2, 6 sc in 2nd ch from hook.
Rnd 2: Sc in each sc around.
Rnd 3: Sc in each sc around, fasten off leaving long tail for sewing. Sew eyes to face.
Mouth: Rnd 1: With red, ch 2, 4 sc in 2nd ch from hook.
Rnds 2, 3: Sc in each sc around.
Rnd 4: Sc in each sc around, fasten off leaving long tail for sewing mouth to face.
Head sits on open end of can.
ASTRONAUT: Using white, work body, legs, arms and thumb same as Martian. Make head with pink, same as Martian.
Helmet: Rnd 1: With white, ch 2 6 sc in 2nd ch from hook, do not join rnds.
Rnds 2 through 6: Work same as Rnds 2 through 6 of head.
Rnds 7, 8: Sc in each sc around.
Row 9: Sc in 28 sc, ch 1, turn.
Rows 10 through 14: Sc in 28 sc, ch 1, turn.
Rnd 15: Sc in 28 sc, ch 7, sl st in first sc.
Rnd 16: Sc in 28 sc, sc in each of 7 ch.
Rnd 17: Sc in each sc around, fasten off.
Nose: With pink, ch 2, 6 sc in 2nd ch from hook, fasten off and sew to face.
Finishing: Embroider eyes with black yarn. Slip helmet over head. Head sits on open end of can.
1 note
·
View note
Note
si ils nous foutent du colonel reyel pour la scène de la sérénade (vu que c'est censée être une musique cringe), je pers tout mon respect pour Eliott. Déjà la dubstep, bof mais alors là, ce serait le pompom
Dead.
3 notes
·
View notes