#foundation single crochet
Explore tagged Tumblr posts
Text
how to: Foundation Single Crochet
0 notes
Text

not quite finished in a single evening, but we have very nearly achieved bunny!
body
magic ring start, 6st
two sc in each sc (12)
*one sc, two sc in next sc* around (18)
*two sc, two sc in next sc* around (24)
*three sc, two sc in next sc* around (30)
three rounds sc in every sc (still 30)
*three sc, sc dec over next two sc* around (24)
*two sc, sc dec over next two sc* around (18)
*sc, sc dec over next two sc* around (12)
{stuff the body}
*sc dec over next two sc* around (6)
weave tail through 6st and draw closed
head done the same way but only increased to 24 total and only two rounds crocheted evenly before decreasing back down, loooong tail used to sew the head to the body
ears (make two)
pink: foundation sc 4, ch, sc down the other side of the foundation to make a long skinny oval
grey: foundation sc 4, ch, sc down the other side of the foundation to make a long skinny oval, then sc through pink oval edge and grey oval edge all the way around to stitch them together and outline in grey, leaving a long tail to sew the ear to the head
probably will do a small fork pompom for the tail...
uh, he just last-minute booked us to go meet the new-ish great-nephew this weekend so now it's time to bang out a bunny?!?
13 notes
·
View notes
Text


Finished another silly crochet project!
First I made some normal bandanas based on Passionit's video tutorials, to get practice making them/triangles. The first one is a granny square stitch, but the dark colors of the yarn doesn't really make it visible, heh. (And I guess a bandana was too small an object to get the ombre yarn to change shades much.)
One day I misinterpreted a crochet short and thought it was a crochet bandana on a headband, so I wrote it down in my project list and yesterday I put this together after many color thoughts. I do think the sc border really helped, and using the glow in the dark yarn was fun!
Cowl Mode is also a fun bonus, haha. It reminds me of those lace collars.
#Crochet#I'm calling it 'Headband-ana'#The headband is just some simple single crochet ribbing (Back Loop Only)‚ with foundation sc to start#I got so into the ribbing that I went WAY past my target length‚ so there was a lot of frogging and trying again‚ haha#Probably should've done a double crochet of the glow yarn in that one weird dip in the corner where the bandana and headband come together.#I didn't notice that until I finished off that border section though‚ ugh
1 note
·
View note
Text
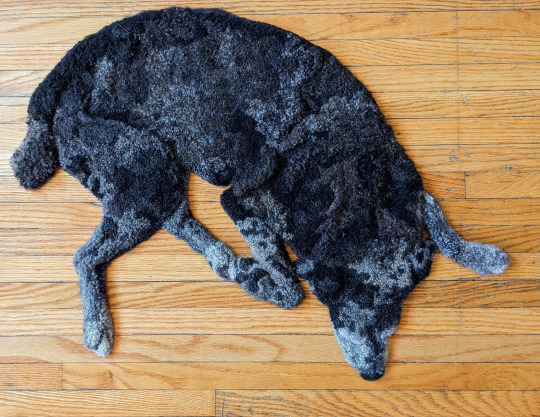
Hooking rugs that look like dogs
Here's how I do it:
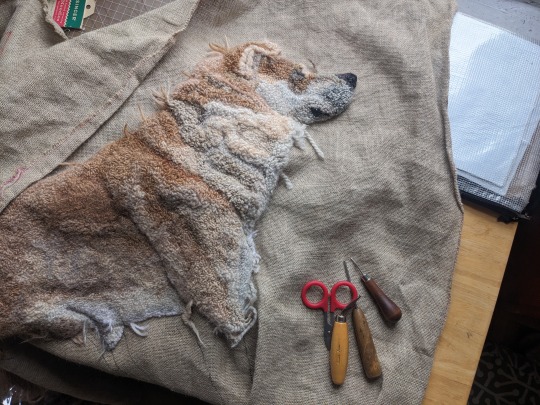
The process I use is called rug hooking (not latch hook or punch needle or tufting, though it is the forerunner of the latter two techniques). Rugs are hooked by pulling loops of fabric strips or yarn through the holes of a base fabric with a coarse open weave, like burlap, or linen, or rug warp. The loops are pulled through the fabric with a squat-handled hook whose business end is shaped like a crochet hook. There are no knots and the loops aren't sewed down in any way. The whole thing stays put just by the tension of all those loops packed together in the weave of the foundation fabric.
This isn't a true detailed tutorial but a walk-through of my particular process. The same information is on my web page, emilyoleary.com .
I hook with yarn, rather than with cut strips of wool fabric, which is what many rug hookers use. I can get a looser, more organic distribution of loops with yarn than I could with wool strips, which are hooked in neat lines.
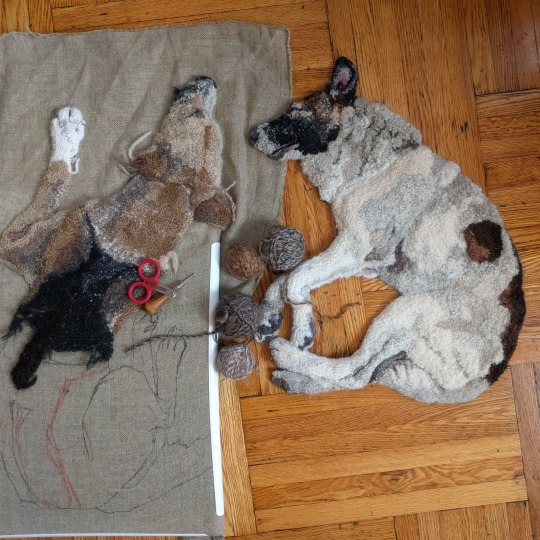
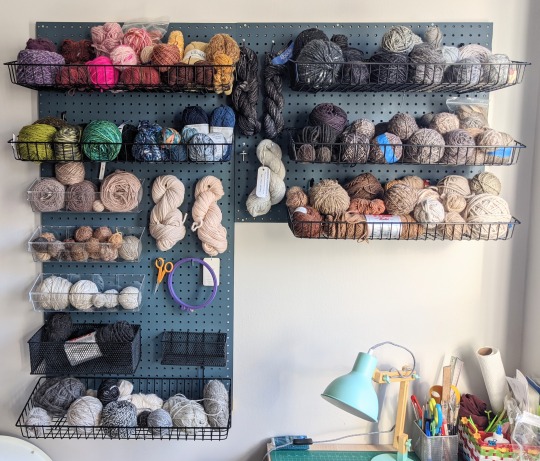
Mostly I use wool yarn. In terms of yarn weight, I can use DK, worsted, or Aran. If I'm using thicker yarn, I leave more holes un-hooked; if I'm using finer yarn, I hook more densely or double up lengths of it. I particularly like using single ply yarns (like Brown Sheep Lamb's Pride or Malabrigo Worsted). I don't keep count, but I think I usually use around two dozen types and colors of yarn per dog.
This is my yarn wall in my apartment. Mostly brown and gray yarn!
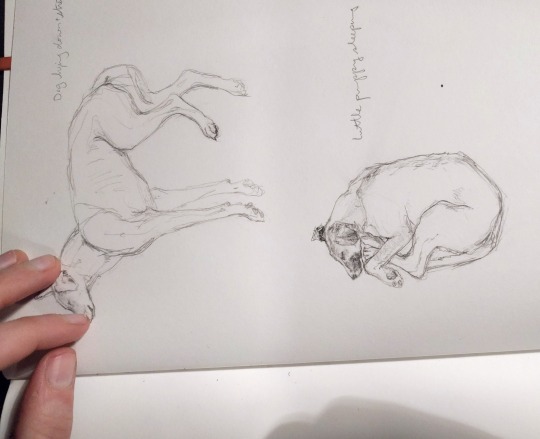
I start from a small drawing in my sketchbook, then I head to FedEx office to use a copy machine, blowing up the drawing repeatedly and experimenting with how big the dog rug should be.
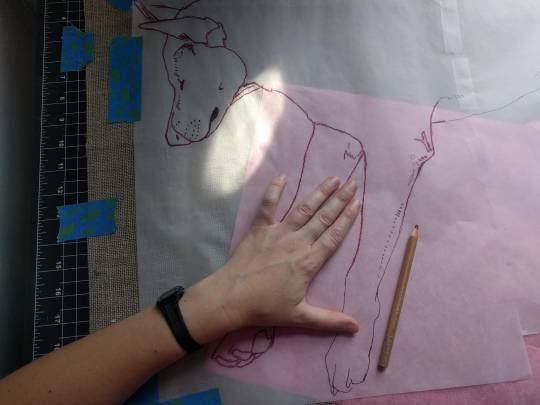
After transferring the image onto my linen, I immediately go over it with Sharpie, because the Saral is really difficult to see and really easy to rub off.
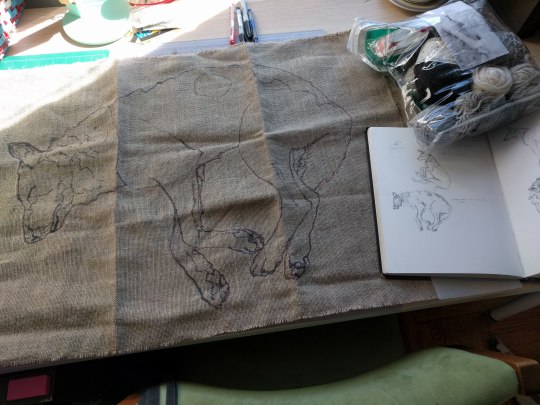
The rug is held taut by a PVC quilting frame that I set on my lap.
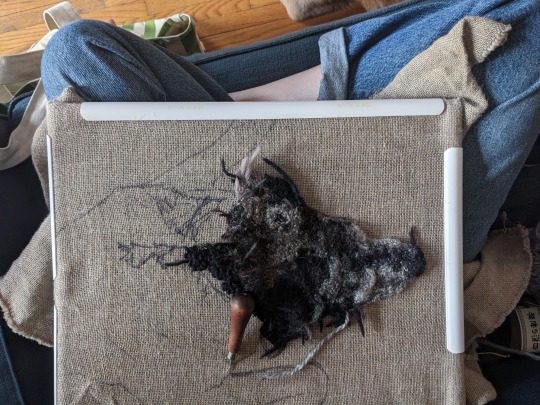
I push my hook down through the fabric with my right hand and my left hand stays below the fabric and guides the yarn while I pull it up and through with the hook. Not every hole in the fabric is hooked. Hooking every hole would make the rug too dense. I do hook pretty densely, though-- If you pick up one of my rugs you’ll see they have a slight curl to them, which is because they’re hooked pretty tight. I'm using all different weights and types of yarn, so it's a challenge to keep the overall tension even.
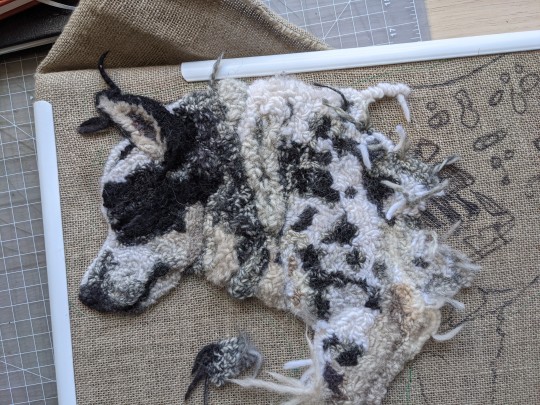
I hook my loops at varying heights to create a very low relief. Sometimes I trim the loops to make them fluffier or wispier or to shape a particular part. I look at a reference photo while I work and pull out and redo sections a lot.
My q-snap frame can accommodate the growing dog rug. I have extenders to make it bigger and I can clamp around my hooking.
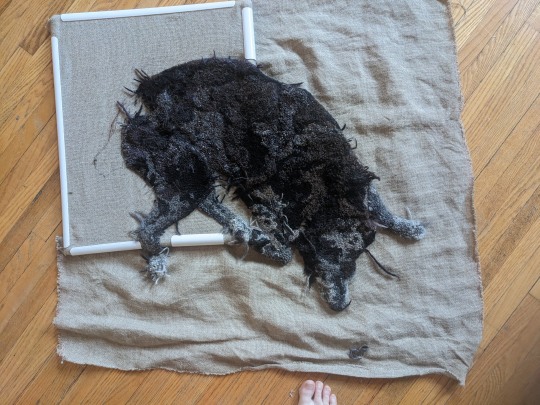
The back of a rug looks like lines of little stitches. The lines are little worm trails snaking around because lines of hooking are not supposed to cross over each other. It's important to start a new length of yarn rather than cross over a stitch you already made! I read this when I first started and took it to heart. It makes it much easier to undo and redo hooking if you have to (and I redo sections A Lot). It also keeps the back from getting too bulky and resulting in uneven wear on the back of a functional rug that gets floor use.
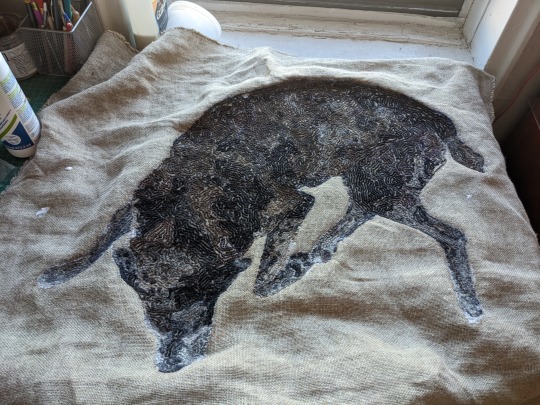
When I’m done hooking everything I turn the rug over and brush watered-down Sobo glue on the edges of the dog, making sure to get one or two of the outermost lines of hooking. I do a couple coats of this thinned out glue. I'm careful not to use so much that it seeps to the front of the rug. When the glue is dry I cut the rug out, but I don't cut so close that the loops don't have any linen to keep them in.
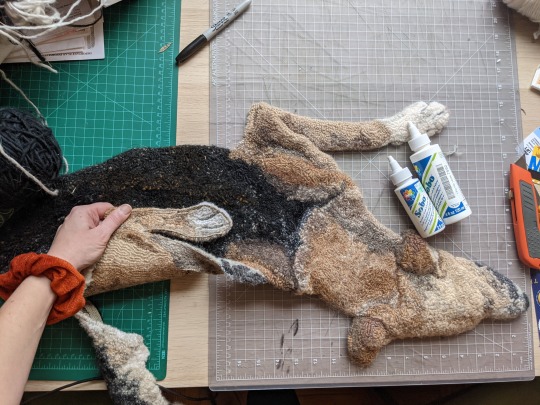
It generally takes me at least several months to finish one dog rug. My hooking frame and yarn bag are very portable (though bulky) so I can hook out and about at coffee shops or the library or a brewery if there's enough space and light.
Hooking in the wild makes me an ambassador for making things in general and rug hooking in particular. I answer people's questions and always emphasize how relatively easy it is to get started hooking. Sometimes I get anxious that other people will hook rugs that look like mine but better, but I think that working in a traditional medium means you should share your knowledge for the good of the craft.
6K notes
·
View notes
Note
Not to be a downer, but I actually finished my novel and now I’m confused because I don’t want to publish it. I don’t even particularly want anyone other than maybe my two close friends to even read it. What on Earth did I write 40k words (which I know is not really long enough for a novel, but it’s still far and away the longest thing I’ve ever written) for? I know people say “write for yourself” but like… am I just wasting my time? Help?
(p.s. you can leave this off anon)
(p.p.s your blog is really great 👍)
There's No Such Thing as Wasted Writing
I'm going to tackle this two ways...
#1 - "Write For Yourself" - there's a reason this common phrase has echoed through the Hall of Writers since time immemorial. It's because it's true! Writing doesn't have to be anything more than a pastime. It doesn't have to be anything more than something you do for your own benefit and enjoyment.
I have an in-joke with family members about how any time one of us does something the least bit crafty, DIY, skilled, whatever, a particular family member will always say, "You did a great job! You should do it for a living!" Like, someone can't even crochet a Kawaii mushroom without being pressured to turn it into an Etsy dynasty, or paint a cabinet without being pressured to become the next Property Brothers. And that's such a BANANAS capitalistic mindset, isn't it? This idea that nothing can be done purely for our own enjoyment. That you can't just write a novel because you want to... you can only write it if you plan to share it or publish it? It's just so silly.
And, the thing is, we don't even apply that mentality to a lot of other things people do purely for enjoyment. No one is streaming all of Bridgerton in two nights and saying, "I enjoyed every second of that, but why did I do that? Such a waste of time!" No one spends an hour strumming their guitar under the stars on a beach, and then says, "That was so relaxing and fun, but I didn't charge for that performance and I didn't record it to sell it, so that was obviously a waste of time."
You know what I mean?
#2 - And Anyway, Practice Makes Perfect - And if you keep writing--even if you continue not to share or publish--you'll get better and better with each story you write. Which, maybe all that means is you get to appreciate your own improvement, but also, should you ever change your mind and decide to write something to share or publish, you've now spent time honing your skills. Even if those other stories never see the light of day, they're still an important foundation of the writer you become. Do you know how many unpublished novellas, novels, and short stories I have? Too many to count. Hundreds of fan-fiction and original fiction short stories I've only shared with one or two other people, if anyone. A dozen or so novels and novellas that have only been read by a few people, and some haven't been read by anyone else or have only been read by my CPs. I would never consider those stories and novels and novellas to be a waste of time, because I know every single one made me a better writer. My published work is better because I wrote those other things.
So, I hope that makes you feel better. At the very least you hopefully enjoyed writing your novel--or at least got something out of it--and you definitely honed your writing skills, which matters! ♥
•••••••••••••••••••••••••••••••••
I’ve been writing seriously for over 30 years and love to share what I’ve learned. Have a writing question? My inbox is always open!
♦ Questions that violate my ask policies will be deleted! ♦ Please see my master list of top posts before asking ♦ Learn more about WQA here
472 notes
·
View notes
Text
Great job! The foundation chains do seem too tight, it looks like a tension issue. Tension is the level of tightness you hold your yarn with, and can be tricky to master even if you've been crocheting for years. What helps a lot of beginners is buying a tension ring (dont get the ones shaped like a peacock, theyre cheap but don't work great) so that way you only have to focus on the hand movements as a first step. As for the single crochet, you put your hook into one of the loops you made in your chain. Then using the hook part, you grab the yarn you're using, that's what the picture shows. It's showing you a middle step, which is very confusing lol. So now you have 2 loops on your hook, the one from your chain and the new one you just made. Now you grab the yarn again with the hook, and this time you pull the yarn through both of the loops. You're making foundation chains on top of each other by using the original foundation chain as one of the loops. putting an extra loop there by "yarning over" (grabbing the yarn and pulling it up through your chain) means that there's a little bit of space between the foundation chain and the new row! I hope this makes sense, if it doesn't let me know and I can shoot you a message personally to explain things more in detail :)
Learning to crochet! Excited about it. :) (Also, any mutuals who know how, I could use some help)
So far I've, managed foundation chains:

And these:


I think I might have it too tight? This keeps happening to the white:

I'm ready to move on to a single crochet, but this illustration is confusing me and the YouTube tutorials are not helpful:

I'll probably figure it out, but any tips, tricks, etc. would be very helpful.
#crocheting#crochet#i do hope this is helpful#im so excited for you!#also#an additional tip that may help#the yarn youre using is so hard to work with even for me and ive been doing this shit for years now#it looks like what we call a roving yarn which means its more likely to fall apart and isnt as structurally sound. the cheapest yarn at like#a walmart? a great choice to use as a beginner.#most yarns you see in stores are a “weight 4” or “worsted weight” yarn#the higher the number on the label is in terms of “weight” the thicker the yarn is#4 is a great middle space#it looks like youre using like maybe a 6 weight which can be hard to use#especially if youre having tension issues#plus hooks! id suggest looking up pictures of an “inline hook” and a “tapered hook”#those are the names for the two main types of shapes of the hook!#inline has more of a point at the tip and is generally sharper looking#tapered has a skinnier neck below the hook and is more curved in the notch itself#i personally prefer inline hooks because the shape helps me get into tight stitches easier and keep my tension consistent#also just went back and looked at the pics again- the pink yarn is probably a worsted weight#and your tension looks great in that picture! it can be confusing to look at but the raised bumps are the “wrong side” of a foundation chain#and sometimes patterns will have you make your single crochets into those back bumps because itll look cleaner and have a nicer edge#but thats not something to worry about for now and i only do it if im going to be doing a lot of sewing my pieces together
22 notes
·
View notes
Text
Shadow the Hedgehog Scarf Pattern
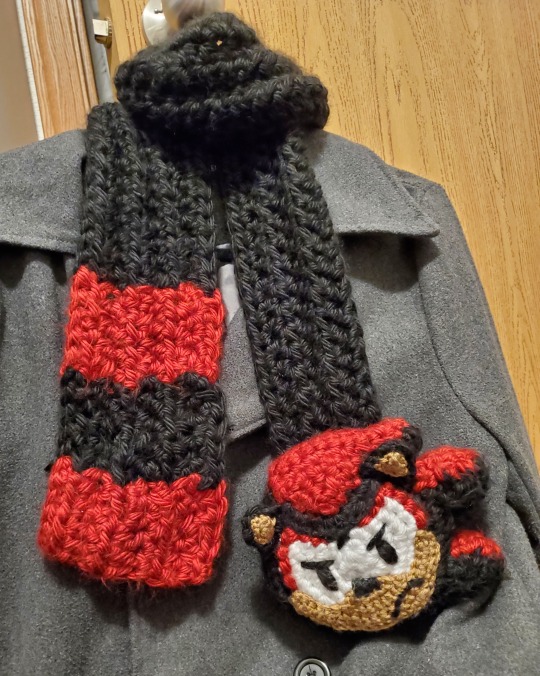
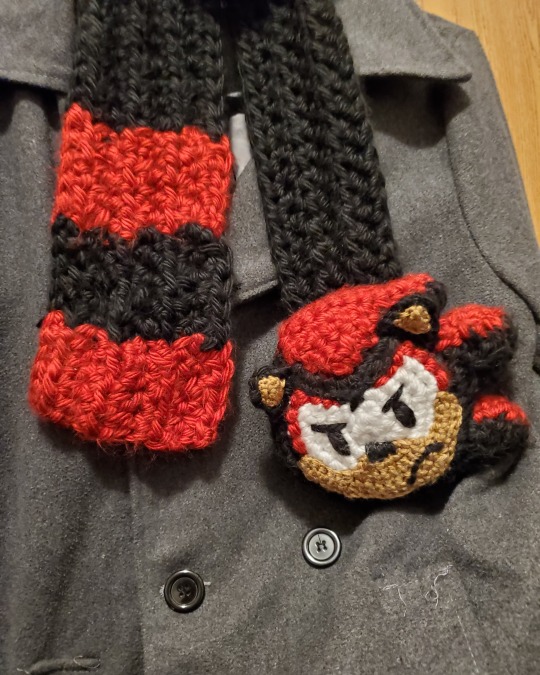
Some people said they wanted the Sonic Speed Simulator character scarves in real life, so I made the Shadow Scarf!
I wrote up the pattern below the cut, so you can create your own!
This is a crochet pattern based on the Shadow Scarf model designed by Gamefam. You may use anything you make from this however you like, but please credit me if you redistribute the pattern. You may not sell the pattern. I will not stop you from selling items created from the pattern, but you should check Gamefam’s and Sega’s policies for fanworks first to avoid copyright infringement. You may modify this pattern, and share modified versions of it. You may not sell modified versions of this pattern.
Tools and materials:
Crochet hooks in sizes N, K, and G
Yarn needle
Super bulky (6) weight yarn in your main color (black if you’re making Shadow). It took almost an entire 160 yard skein. I used Lion Hometown in South Dakota Black.
Super bulky (6) weight yarn in your secondary color (red if you’re making Shadow). I used Lion Hometown in Tampa Spice.
Super bulky (6) weight yarn in white. I used Lion Hometown in New York White.
Medium/worsted (4) weight yarn in brown/tan. I used Lion Basic Stitch Anti Pilling in Cedarwood.
Stuffing
Abbreviations:
R - Round
Sk - skip
Ch - Chain
Slp - slip stitch
Hdc - Half-double crochet
Fhdc - Foundation half-double crochet
Blo - Back loop only
Sc - Single crochet
Inc - increase (single crochet)
Dec - decrease (single crochet)
Inv-dec - invisible decrease (single crochet)
Sc3tog - single crochet 3 together
[something] * 6 - repeat “something” 6 times
Alternate techniques:
The listed stitches are the ones I used. However, as some of them are a bit tricky, there are substitutions that can be made. Any invisible decrease may be replaced by a standard decrease. A magic ring may be replaced by chaining 4, slip stitching to the farthest chain from the hook, then chaining one (for height) and working stitches into the center of the chain-ring like you would a magic ring; note that this will leave a hole in the center of your circle, which you may want to cover with the tail while weaving in the ends. Also, the foundation half-double crochets may be replaced by adding a starting chain as follows:
Row 0: Ch 5 in red; change to black, ch 5; change to red, ch 5; change to black, ch 77 (75 + 2 for height), turn.
Then simply use regular half-double crochets instead of the foundation stitches, beginning in the third chain from the hook.
I have tried to make this easy to follow, but if you have any questions, don’t hesitate to reach out to me, and I will do my best to answer them.
Pattern, scarf:
Starting with black yarn (N hook) Row 1: Fhdc 75 in black. Change to red, fhdc 5. Change to black, fhdc 5. Change to red, fhdc 5. Ch 2 and turn. Row 2: Hdc 5. Change to black, hdc 5. Change to red, hdc 5. Change to black, hdc 75. Ch 2 and turn. Row 3: Hdc-blo 75. Change to red, hdc-blo 5. Change to black, hdc-blo 5. Change to red, hdc-blo 5. Ch 2 and turn. Rows 4-5: Repeat Rows 2-3. Row 6: Hdc 75 in black. Change to red, hdc 5. Change to black, hdc 5. Change to red, hdc 5. Finish off and weave in ends
Head:
Starting with white yarn (K hook) R1: Make a magic ring, ch 1, then sc 6 in the ring. R2: Inc 6 R3: [sc 1, inc 1] * 6 R4: [sc 2, inc 1] * 6 R5: [sc 3, inc 1] * 6. Change to black R6: [sc 4, inc 1] * 6 R7: [sc 5, inc 1] * 6 R8-9: Sc 42 R10: [sc 5, dec 1] * 6 R11: [sc 4, dec 1] * 6 R12: [sc 3, dec 1] * 6 R13: [sc 2, dec 1] * 6. Finish off leaving a long tail for sewing.
Forehead/top of eyes:
With black yarn (K hook) R1: Sc 6 in MR R2: Inc 6 R3: [sc 1, inc] * 6 R4: [sc 2, inc] * 6 R5: [sc 3, inc] * 6. Finish off, leaving a long tail for sewing.
Large spikes (create 2):
With black yarn (K hook) Ch 8 Row 1: Ch 1 and turn, dec 1, sc 4, dec 1 Row 2: Ch 1 and turn, sc 1, dec 2, sc 1 Row 3: Ch 1 and turn, inc 1, dec 1, inc 1 Row 4: Ch 1 and turn, sc 1, sc3tog, sc 1 Without chaining, slp to the farthest stitch from the hook. Finish off, leaving a long tail for sewing.
Small spike:
With black yarn (K hook) Ch 6 Row 1: Ch 1 and turn, sc 1, dec 2, sc 1 Row 2: Ch 1 and turn, inc 1, dec 1, inc 1 Row 3: Ch 1 and turn, sc 1, sc3tog, sc 1 Without chaining, slp to the farthest stitch from the hook. Finish off, leaving a long tail for sewing.
Red, lower spike:
With red yarn (K hook) Row 1: Ch 2, 2 sc in second ch from hook Row 2: Ch 1 and turn, sc 1, inc 1 Row 3: Ch 1 and turn, sc 3 Row 4: Ch 1 and turn, sc 3. Finish off, leaving a long tail for sewing. Sew to one of the large spikes, attaching the first row of the red portion to the final row of the black portion.
Red, middle spike:
With red yarn (K hook) Row 1: Ch 2, 2 sc in second ch from hook Row 2: Ch 1 and turn, sc 1, inc 1 Row 3: Ch 1 and turn, sc 2, inc 1 Row 4: Ch 1 and turn, sc 4 Row 5: Ch 1 and turn, dec 2. Finish off, leaving a long tail for sewing. Sew to one of the large spikes, attaching the first row of the red portion to the final row of the black portion.
Red, forehead/upper spike:
With red yarn (K hook) Ch 10 Row 1: Ch 1 and turn, sc 10 Row 2: Ch 1 and turn, sc 10 Row 3: Ch 1 and turn, sc 6 Row 4: Ch 1 and turn, dec 1, sc 2, dec 1 Row 5: Ch 1 and turn, dec 2 Row 6: Ch 1 and turn, dec. Finish off, leaving a long tail for sewing.
Face:
With tan yarn (G hook) Ch 26 Row 1: Ch 1 and turn, [sc 2, dec 1] * 6, sc 2. Ch 1 and turn Row 2: sc 20, finish off Row 3: Slp to join in 6th stitch, sc 8, slp 1 Row 4: Ch 1 and turn, sk 1, slp 1, sc 7, slp 1 Row 5: Ch 1 and turn, sk 1, slp 1, sc 1, dec 1, sc 1, dec 1, sc 1, slp 1 Row 6: Ch 1 and turn, sk 1, slp 1, sc 3, slp 1 Row 7: Ch 1 and turn, sk 1, slp 1, dec 1, slp 1. Finish off, leaving a long tail for sewing.
Ears (Create 2 in black and 2 in tan):
With black yarn (K hook) With tan yarn (G hook) Ch 3 Row 1: Ch 1 and turn, sc 3 Row 2: Ch 1 and turn, sc3tog. Finish off, leaving a long tail for sewing.
Assembly:
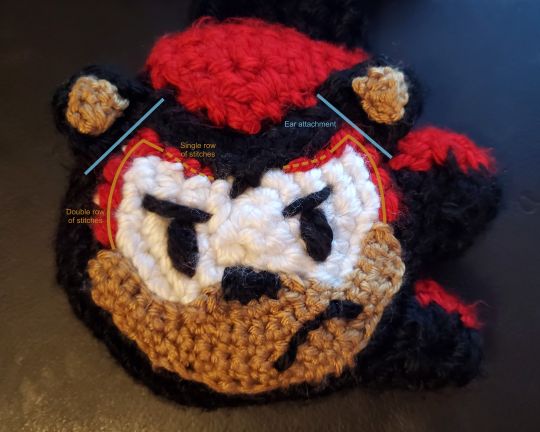
Start by sewing the forehead onto the main head. Next, sew the spikes to the right side of the head, starting from the bottom and attaching each right above the previous one; stuff the lower two spikes before finishing attachment. Add the upper red stripe with the large triangular portion in the center of the forehead and the side portion attached to the upper spike, stuffing the upper spike before closing it. Sew on the face (you may want to create the mouth before attaching the face if you dislike sewing through multiple layers).
Using red yarn, embroider on the red “eyeliner” using a backstitch. Use one line of backstitching along the top of the eyes and two lines of backstitching along the sides of the eyes, trying to cover the join between the white and black. Use black yarn and a satin stitch to create the nose and the pupils; you can also cut ovals out of felt and sew them on if you prefer. Backstitch with the black yarn to make the mouth.
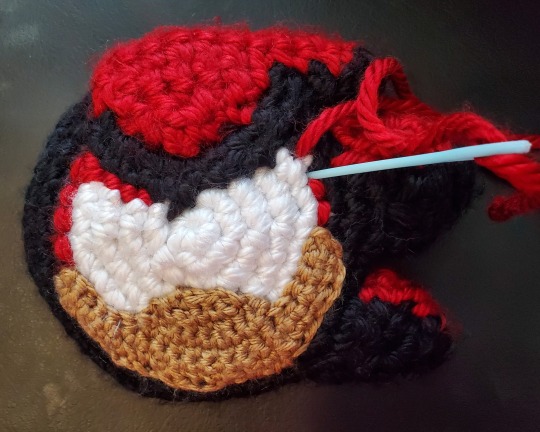
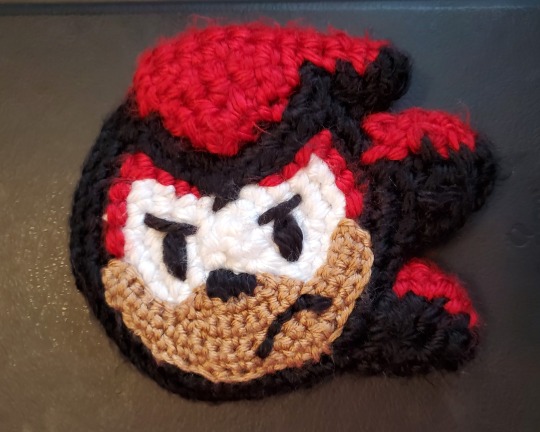
Sew the tan parts of the ears to the black parts, then attach the ears to the head. Finally, attach the head to the black end of the scarf, stuffing the head before closing the gap completely.
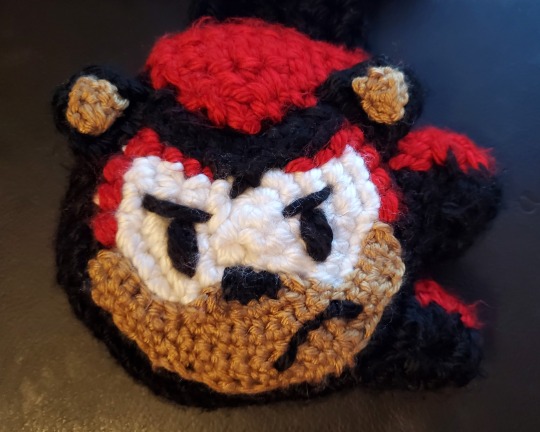
#sonic speed simulator#shadow scarf#shadow the hedgehog#sonic the hedgehog#crochet pattern#long post#crochet
84 notes
·
View notes
Note
Fellow crocheter! I heard you mention dragon scale gloves, do you have a pattern by chance?
Oh man I wrote down the pattern so long ago I have it memorized lol. My notes say I originally found it from the Reservoir Fibers youtube channel, so it'd be this video here I think.
youtube
They use a pretty thin yarn held double and for some reason they show it with black yarn, which is a pretty bad visual aid. But you can look up "crocodile stitch fingerless gloves" and find other tutorials as well!
Basically it goes like this:
Start with a chain in a multiple of six, which determines the number of scales you will have per row (it will shrink slightly in size once you add the scales. My hand is roughly 7 scales around but I can squeeze into a 6 scale glove. Just make sure the starting chain fits comfortably around the base of your fingers) connect the chain with a slip stitch.
Two options for the foundation under the scales. Either do 2 double crochet (UK treble) in one chain, chain one, skip 2 chains and then do one double crochet in the third chain (and then reverse it, ch1, skip2, 2dc, repeat around) or you can do a V-stutch in place of the 2 doubles, which puts the chain 1 bit in between those 2 dc. Basically you just need a V shape alternating with a regular lone stitch and a chain space to keep things from getting too tight.
And then the tricky part is learning how to do the scales. 5dc around the vertical post of one side of a V, ch1, 5dc around the next post of the V, single crochet on the lone stitch in between the V stitches.
The tutorial recommends turning the glove inside out for every foundation row but this can be avoided by simply working it in the opposite direction from the scales.
Boy I hope I didn't just make that more confusing lol. When I make these gloves, I usually have 6 scale rows, then the thumb hole (which is made by skipping the last lone dc of the foundation and replacing it with 6 chains) and then 6 more scale rows to make it wrist length. To get the cuff a little more snug, just do 3dc in the middle of each scale and then 2dc between each scale to make it a multiple of 5 instead of 6.
If you need to, you can also add an extra scale right before the thumb row, and then shrink it back down after the thumb row, but that is a whole extra step that's usually not necessary!
I use sock weight yarn that's a blend of wool and nylon, but I have seen people make them out of much heavier thick acrylic before, if that's all you have access too. It just means the scales will be a lot thicker and the gloves will be heavier. If you're going to use cotton, make sure it's a soft kind and not the rough sort that's used for washcloths.

(Image description: me, wearing dark multicolored wrist length fingerless gloves with a scaly texture, and making a heart shape with my hands. End description)
#crochet#the more dragon gloves are in the world the happier we will all be#this is the number one most popular thing my friends and family ask me to make lol
45 notes
·
View notes
Photo

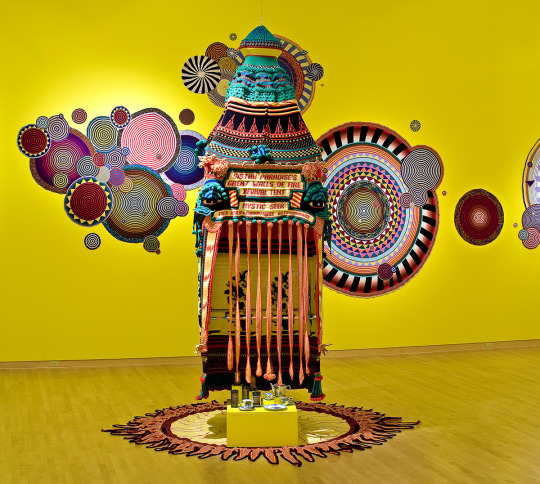
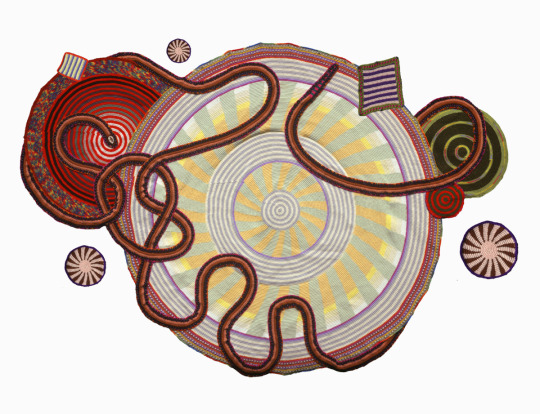
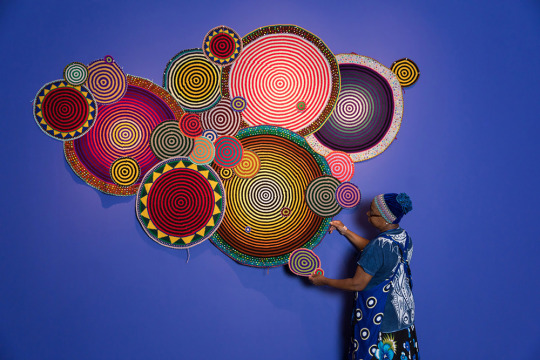
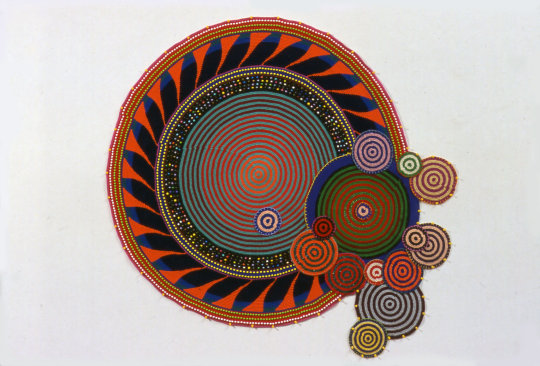
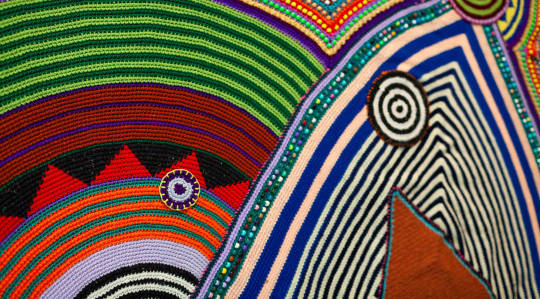
Aesthetics of Funk - Crocheted mandalas by Xenobia Bailey
Xenobia Bailey is a trash alchemist, a single stitch, urban crochet aficionado, designer, artist and community activist, whose practice industrializes the visual aesthetic of “Cosmic-Funk,” practiced by African-American homemakers since Emancipation, into utilitarian “Funktional” design. Media exposure ranges from an Absolut advertisement to a design consultancy with Disney World, and a subway mosaic commission from the MTA in New York. She has shown internationally, with such institutions as Creative Time, the Sharjah Art Foundation, and numerous U.S. Embassies. Her work is held by numerous museums, as well as in academic, corporate, public and private collections.
#Xenobia Bailey#funktional#art#crochet#knitting#craft#african american art#black artist#female artist#mandala#spiritual art#patterns#geometric#geometric art#colorful#women in art#cosmic
477 notes
·
View notes
Text
I'm making this purse. Join me!

You need:
fingering weight yarn (2 oz.) [The original was Twilley's Goldfingering, which was a metallic fingering weight yarn. Any fingering weight should work, though the loops will look slightly different.)
3.00mm hook.
6-1/2" bag frame and sewing supplies
Note #1: I am posting the original text as an image, and I will be making some minor changes to the text for clarity. This is basically how I update any vintage pattern I write out. I don't switch from Brit to American terms or vice versa, but I do try to make the pattern language match modern conventions when possible.
Note #2: This is a British pattern, so it's British terms. Chains (ch) are chains, but a British double crochet (dc) is a US single crochet (sc).
SILVER EVENING BAG
(when completed, bag should be approximately 9 inches long and 4 inches tall)
With a 3.00mm hook, chain 54. Chain should measure approximately 11 inches.
Foundation Row: 1 dc into 2nd ch from hook. 1 dc into each ch to end. Turn.
1st Row: 1 dc into first dc. *Ch 6, 1 dc into each of next 6 dc, rep from * to last 5 stitches on the row. Complete dc in next stitch, Ch 6. 1 dc into last 4 dc. Ch 1. Turn.
2nd row: 1 dc into first dc. 1 dc into each dc to end. Turn.
3rd row: 1 dc into each of first 4 dc, *ch 6, 1 dc into each of next 6 dc, rep. from * to last two dc in the row. Dc into next dc, ch 6, dc into final dc. Ch 1. Turn.
4th row: Same as for 2nd row.
Repeat rows 1-4 until work measures 4 inches, ending with a 2nd or 4th row. Fasten off.
Join yarn in the first starting chain and repeat Foundation Row, then repeat rows 1-4 until second side also measures 4 inches, making sure chain loops are on the same side of the work as the other chains loops.
Press work lightly on the wrong side with a warm iron over a damp cloth.
Fold sides in 1-1/4 inches and join to form a gusset. Sew to bag frame.
Optional: Before sewing gusset and bag frame, sew lining to wrong side of bag.

#crochet#free pattern#crochet purse#crochet bag#twilley's yarn#vintage pattern#vintage fashion#handmade#crochetblr#when i finish mine i need to throw a proper pdf together
9 notes
·
View notes
Text

2-colour Hartebeest crochet pattern
Free on Ravelry here as a pdf download
Pattern also under the cut, fewer photos due to tumblr image limits:
Requires:
- 50g (150m) DK yarn in 2 colours, here depicted as Dark and Light grey
- a 3.5mm hook
- a darning needle
- scissors
- stuffing
- stitch markers or scraps of yarn to mark stitches
- (optional, recommended) pins


This pattern uses an i-cord tail, but it can be substituted with chains or foundation single crochet.
A quick i-cord tutorial: leaving a long tail, put a slip stitch on your hook. Yarn over with the tail loop, then pull the working yarn through both loops. Repeat.
Head (Dark)
1. 6sc into a magic ring [6]
2. 6inc [12]
3. (sc, inc) x6 [18]
4. (2sc, inc) x6 [24]
5. 24sc [24]
6. (2sc, dec) x6 [18]
7. (4sc, dec) x3 [15]
8. 15sc [15]
9. 15sc [15]
Stuff the nose.
10. (4sc, inc) x3 [18]
11. (5sc, inc) x3 [21]
12. 21sc [21]
13. (6sc, inc) x3 [24]
14. (sc, inc) x3, mark the last stitch, (sc, inc) x3, 12sc [30]
The marked stitch shows the top of the face. This should be oriented upwards when attaching parts.
15. 30sc [30]
16. 30sc [30]
17. 30sc [30]
18. 30sc [30]
19. 30sc [30]
20. (3sc, dec) x6 [24]
Stuff.
21. (2sc, dec) x6 [18]
22. (sc, dec) x6 [12]
23. 6dec [6]
Finish off and leave a short tail. Use it to thread under the front loop of each of the 6 stitches and cinch the hole shut. Knot closed and hide the yarn inside.
Horns (Light) x2
(Note: stuff the horn as you go, as it's hard to stuff a long piece at the very end.)
1. 4sc into a magic ring [4]
2. (sc, inc) x2 [6]
3. 6sc [6]
4. (2sc, inc) x2 [8]
5. 8sc [8]
6. 8sc [8]
7. 8sc [8]
8. 8sc [8]
9. (3sc, inc) x2 [10]
10. 9sc, turn (without chaining) and skip 1, 6sc, turn again and skip 1... [10]
11. 10sc, including into edges of mound [10]
(Make sure you are left with 10 stitches, not 8 stitches. The stitches lost by skipping for shape are made up when going into the edges of the mound.)
12. 4sc, turn (without chaining) and skip 1, 2sc, turn again and skip 1 [10]
13. 10sc, including into edges of mound [10]
14. 10sc [10]
15. 10sc [10]
16. 10sc [10]
17. 10sc [10]
18. 10sc [10]
19. 10sc [10]
20. 2inc, 2sc, 2dec, 2sc [10]
21. sc, 2inc, 2sc, 2dec, sc [10]
22. 10sc [10]
23. 10sc [10]
24. 10sc [10]
25. 10sc [10]
26. 10sc [10]
27. 10sc [10]
Stuff.
Slip stitch and finish off with enough yarn to connect to the head.
Attach high up (approx rounds 18-21) and close to each other, leaving only a couple of stitches between the horns. The top tips should point backwards and inwards.

The closeness of the massive horns is an important characteristic of the Hartebeest.
Ear Inside (Light) x2
1. 7sc into a magic ring [7]
2. 7inc [14]
Finish off with only a short tail. Set aside.
Ear Outside (Dark) x2
1. 7sc into a magic ring [7]
2. 7inc [14]
Hold both an inside piece and an outside piece together, wrong sides facing each other, and go into the stitches of both:
3. (sc, inc) x7 [21]
Slip stitch and finish off with enough yarn to connect to the head. Hide the other ends inside.
Before connecting, fold on one edge and sew it to a pinched point. Attach this folded point to the side of the head.


Body
Start in Dark
1. 6sc into a magic ring [6]
2. 6inc [12]
3. (sc, inc) x6 [18]
4. (2sc, inc) x6 [24]
5. (3sc, inc) x6 [30]
6. 30sc [30]
7. 2sc, inc, 2sc [change to Light] 2sc, inc, 2sc [change to Dark] (2sc, inc, 2sc) x4 [36]
8. 6sc [to Light] 6sc [to Dark] 24sc [36]
9. 5sc [to Light] 8sc [to Dark] 23sc [36]
10. 5sc [to Light] 8sc [to Dark] 23sc [36]
11. 5sc [to Light] 3sc, dec, 3sc [to Dark] 8sc, dec, 8sc, dec, 3sc [33]
12. 2sc, dec, sc [to Light] 7sc [to Dark] sc, dec, 9sc, dec, 7sc [30]
13. 5sc [to Light] 5sc [to Dark] 20sc [30]
14. 3sc, dec, sc [to Light] 3sc [to Dark] sc, dec, (4sc, dec) x3 [25]
The rest is in Dark, you can cut your Light line.
15. 25sc [25]
16. 25sc [25]
17. (10sc, dec) x2, sc [23]
18. 23sc [23]
19. (9sc, dec) x2, sc [21]
20. 21sc [21]
21. (5sc, dec) x3 [18]
22. 18sc [18]
23. (4sc, dec) x3 [15]
Stuff.
Slip stitch and finish off.

Before sewing on, mark out an approximate triangle with sides of 5 stitches on the base of the head. It should be far back, not under the jaw.
Next, place 3 downwards-pointing pins (or stitch markers) dividing the open side of the body into 5 stitch sections. One pin/marker should be in line with the centre of the stomach patch.
This will be your guide when you sew the body on. Sew to the next point, change angle, and repeat.
Legs x4
Start in Light
1. 8sc into a magic ring [8]
2. 8inc [16]
3. into the back loops only, 16sc [16]
4. into both loops, 16sc [16]
5. 16sc [16]
6. 16sc [16]
7. (2sc, dec) x4 [12]
8. [change to Dark] (2sc, dec) x3 [9]
9-24. 9sc (16 rounds) [9]
Stuff.
Without cutting the yarn, fold the open end and sc across to close it. Finish off with a tail long enough to sew with.
These connect flatly and horizontally to the body, across four stitches at the shoulders and hips (approximately at rounds 6 and 22).
Tail (Dark)
Make an i-cord 3 inches (7.5 cm) long.
In Light, cut a few short lengths of yarn.
Sew the tail onto the back at row 6. Then pull a loop of a Light strand through the end of the tail, pull the two ends through this loop, and tighten. Add more strands until the tail is as dense as you like.
(Optional, not depicted: the yarn making up the tail can now be seperated by dragging a needle through to seperate the ply. Also, you can use a wire brush and some elbow grease to give it a fluffier look.)
Eyes

Mark across a couple of stitches where you want the eyes to be. Using the Light yarn, use a needle to sew many vertical strands across those same few stitches, over and over, until the eye is a good size.
Use the needle to wrap a small loop of Dark yarn horizontally over a strand or two for the pupil.
Eyebrows x2 (Dark)
Put a slip stitch on the hook. Surface single crochet several stitches over each eye in a small arc. Hide the ends.
Nostrils x2 (Dark)
Tip: mark out where you want the centre of the nostrils to be. Keep about a stitch's width away.
Put a slip stitch on the hook. Surface single crochet several stitches in a curve to form each nostril. Hide the ends.

Aaand done! For more photos, check the pdf link up top.
8 notes
·
View notes
Text
9 People You Want to Know Better
Tagged by @dmagedgoods
Three ships:
Leonosa x Daeran: A truly unexpected pairing indeed! The classic uptight busybody dates the wild party animal. However, Daeran truly appreciates Lenarius being a moral rock, even if he will never ever admit it.
Mazzy x Tatjana x Valygar: Someone recently left a string of comments on my BG meta fanfic, so it made me think about this pairing a lot. Mazzy and Tatjana are the definition of courtly/knightly romance with a knight and lady, and Valygar is the grump who they are overbearing to. There's also the camaraderie between the three warriors and a deep respect for each other's skills.
Tatjana x Wyll: Another knightly romance between the prince and the comely peasant maiden. I am so glad I decided to to this AU with Tatjana as the Dark Urge.
Last Song:
Hell's Coming with Me - Poor Man's Poison
Last Movie:
The Last Unicorn - I had the opportunity to view it for free online, and I enjoyed it so much I checked out the book from the library.
Currently Reading:
The Secret Country trilogy by Pamela Dean. I'm on the last book, The Will of the Dragon.
Currently Watching:
I don't watch a lot of TV. I haven't watched anything in months. I would like to get caught up with season 2 of HotD.
Currently Eating:
Ramen! I didn't feel like cooking tonight, so I made my quick meal. I'm going to have leftover salad with homemade dressing later to balance out the unhealthiness.
Currently Craving:
Some decent weather so I can actually go outside and go walking without getting drenched in sweat.
Favourite colour:
Blue. Especially that dark velvety blue that the sky takes just after the sun completely sets.
Current obsession:
The King in Yellow and other adaptations. Writing my RT fanfic.
Last thing I googled:
Reminding myself how to do the single crochet foundation stitch for a project.
Favourite season:
Autumn! I love the colors/harvests and being able to walk outside. Also, it the season for apple cider and pumpkins.
Skill I’d like to learn:
Well, I'd like to get better at crochet. But one of these days I'd like to learn how to sing. I've been told I had a lovely singing voice, but I've never been coached. There's a music program for adults near where I live, but I never find the time.
Best Advice:
I was at this writer's convention, and some of the stuff the panelists were saying just did not make sense. The lady who I made friends with at the convention told me that I had to learn what advice to take and what I can ignore.
No pressure tagging:
@arendaes, @mathlann, @forestdragoncat, @dujour13, @the-raging-tempest, @cassynite, @captastra, @fantastic-mr-corvid, @jean-dieu, @amatres, @arrow90-art
10 notes
·
View notes
Text
hey crocheters of tumblr i think there’s an issue in this pattern i bought and i haven’t heard back from the pattern designer when asking for help so i am crowdsourcing help

from what i can tell, the maths in this isn’t going to work out because this is a suzette stitch swatch and that only works over odd numbers of stitches (fsc is foundation single crochet, so it’s not an issue of chaining).
how do i carry out this essential gauge swatch? do i use 17 or 19 stitches as a base instead of 18 and just work it up like that?
also, for the thing about the chart, is that just saying that 16 stitches should be 4" and just measure 16 stitches of my swatch?
#crocheters of tumblr#crochet help#i really want to get started on this vest! but this swatch is essential for numbers :(
10 notes
·
View notes
Text
"Well, hearts are what I do."

Character Name: Azu
Fandom: Rusty Quill Gaming [Podcast]
Played By: Helen Gould
Yarn Used: Skin: Loops & Threads Cozy Wool - Chocolate Shoes/Trousers/Armor: Loops & Threads Cozy Wool - Petal Pink Armor Contrast: Lion Brand Wool-Ease Thick & Quick - Rouge Eyes - CraftSmart Value - Coffee Mouth - CraftSmart Value - White Cloak - Loops & Threads Facets - Coastal
Basic pattern here.
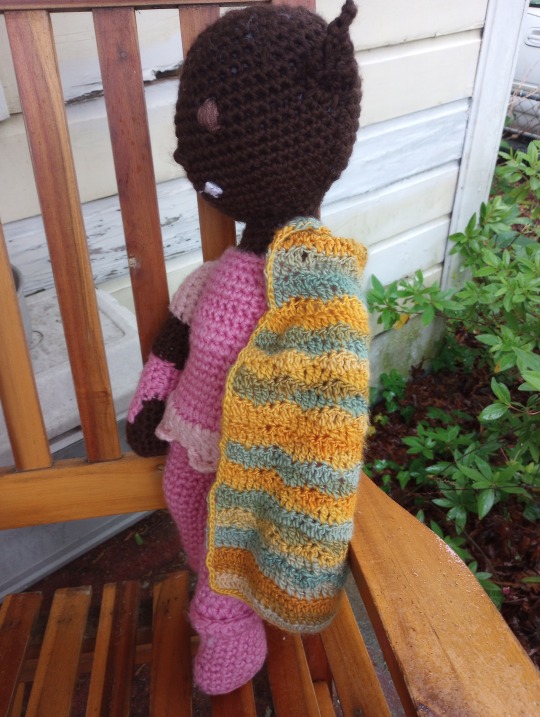
Canonically, I know Azu isn’t actually that much bigger than a human - her height is given as 6’6” in the finale before she activates her armor and doubles in height - but she’s got a big personality, so I wanted her to be bigger. Hence why I used a much thicker yarn for her. That being said, I actually went down a couple hook sizes from what the label said to use (it claims I should be using a 10mm/US 15 hook, but I did the foundation chain with a 9mm hook and then started crocheting with an 8mm, and it worked a lot better). Other ways Azu alters from the base pattern are as follows:
Shoes: The most fashionable of pink boots! Like most of the other blorbos, I made Azu’s shoes all one color, but in my defense, this yarn was only available in one shade of pink. To give her boots, I worked the pattern as normal up until row 11, then: R12: Ch 2, hdc in back loops of each sc around, sl st in first hdc (15 hdc). R13: Ch 1, dc in front loops of R11 around, sl st in first dc (15 dc). R14: Ch 1, hdc in each hdc from R12 around, sl st in first hdc (15 hdc).
Trousers: I didn’t really do anything special with Azu’s pants/leggings/whatever the heck she wears between her boots and her agile half-plate, but I did stop a row earlier than in the basic pattern because reasons, so the body starts at R29 instead of R28. Basically, take away R29 and the pattern is the same as the base from R15-34.
Armor: I wanted to give Azu a little bit of a waist, and also put a kind of decoration at the bottom of the armor (not exactly a skirt or kilt, but something like that), but also kind of emphasize that she had broad shoulders. I probably made this a bit more complicated than I needed to, but: R35: Ch 1, sc in front loops of each sc around, sl st in first sc. Without doing a chain st for height, sc in back loops of each sc in R34 around, sl st in first sc in back row (38 sc). R36: Ch 2, hdc in back loop of front sc and front loop of back sc around, sl st in first hdc (38hdc). R37-40: Continue as in base pattern. R41: Ch 1, inv dec five times, sc in next 8 st, inv dec 6 times, sc in next 8 st, sl st in first st (27 sc). R42: Ch 1, [sc in first 2 st, 2sc in next st] 9 times around, sl st in first sc (36 sc). R43-50: Ch 1, sc in each st around, sl st in first sc (36 sc). R51: Switch to skin color. Ch 1, [sc in first 2 st, inv dec] 9 times around, sl st in first sc (27 sc). Continue remainder of pattern as in base pattern. After completing her body (actually after completing literally everything else), I added on the decoration by joining the armor contrast color (Wool-Ease Thick & Quick - Rouge) to the loops standing out from R35, and then: R1: Ch 3, dc in front loop of each st around, sl st in first dc (38 dc). R2: Ch 1, [sc in next st, ch 3, skip next st, tc in next st, ch 3, skip next st, sc in next st] around, sl st into first sc.

Head: I embroidered Azu’s eyes with some of the regular yarn, partly because I didn’t have safety eyes big enough and partly because I forgot to put them on before I finished. For her mouth, I crocheted the single fang (she broke the other one in the battle with the Lads and Blokes) by ch 3, turn, sc in second ch from hook, sc in next st, ch 1, turn, inv dec, and then sewed it in place and embroidered the rest of the mouth. The ears were made as follows: R1: Leaving long tail, ch 7, turn, sc in second ch from hook, sc in each ch, turn (6 sc). R2: Ch 1, sc2tog, sc in next 2 st, sc2tog, turn (4 sc). R3: Ch 1, sc, sc2tog, sc, turn (3 sc). R4: Ch 1, sc in each st across, turn (3 sc). R5: Ch 1, sc2tog, insert hook into same sc, sc2tog, turn (2 sc). R6: Ch 1, sc2tog, turn (1 sc). R7: Ch 1, sc, bind off (1 sc). Stitch ears to either side of head using long tail. (I ended up getting them uneven, but I think it works for her.)
Arms: Pro tip for any yarncrafters starting or plotting a project: If the yarn you’re buying is on clearance, buy all of the yarn that is available. I realized when I got to her arms that I only had a little bit of the pink yarn left over, not enough for full sleeves, and I thought I had another ball but I didn’t…and Loops & Threads Cozy Wool was discontinued before I ever started Azu, let alone before I finished her. Thank God for yarnconverter.com, which helpfully provided me with the knowledge that Wool-Ease Thick & Quick had the exact same gauge. I used the Cozy Wool for Azu’s gauntlets. Pattern worked as normal up through R7, and then: R8: Ch 1, sc in first 9 st. Join armor yarn, fpdc around next 6 st in R6, join with sl st (9 sc, 6 fpdc). R9: Ch 1 using skin yarn, (sc in next 2 st, inv dec) 3 times, switch to armor yarn, (sc in next 2 st, inv dec) 2 times, join with sl st (12 sc). R10: Ch 1, sc in back loops of first 6 st, sc in next 6 st, join with sl st (12sc). R11-13: Continue as normal. R14: Switch to skin yarn. Ch 1, sc in front loops of each st around, join with sl st (12 sc). R15-18: Continue as normal. R19: Switch to armor contrast color. Ch 1, sc in back loop of each st around, join with sl st (12 sc). R20-25: Continue as normal.
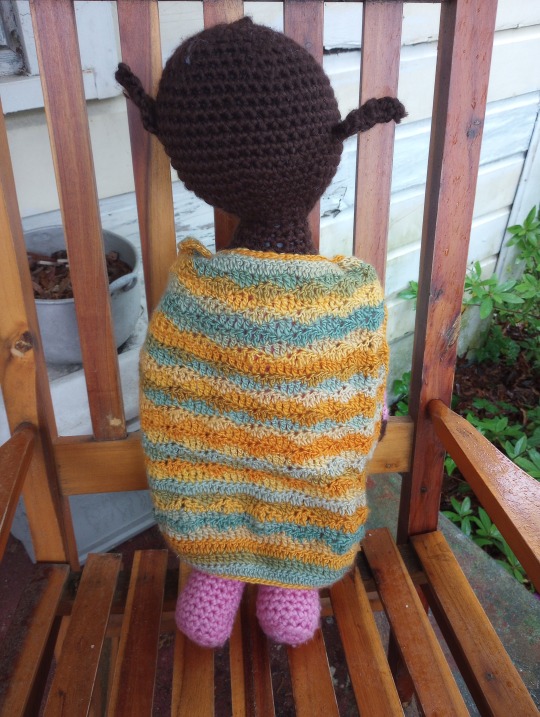
Cloak: The official art on the shirts has Azu with a cloak, so I made her one. (Admittedly, I also did it because I saw the yarn at Michael’s, thought it was pretty, and wanted an excuse to make it.) I really didn’t do anything particularly exciting with it, just made more or less a square with a fairly basic wave stitch pattern. When I decided it was long enough, I finished off with a row of sc and stitched three of them on either side directly to her shoulders so the cloak is part of her half-plate. I also edged the entire thing in a slip stitch, less for aesthetic reasons and more because I hadn’t realized how close I was to being done with it when I got to church and needed something to keep my hands occupied during the sermon. I do think it looks nice, though, and I’m going to have to start doing it more often…
11 notes
·
View notes
Text
Save me crochet tumblr
Crocher tumblr save me
So I've been trying to make this bobble crochet pattern for a few days now

I can't do a normal foundation chain cus that makes it way too tight and curls up. Recently i found a video by TL Yarn Crafts explaining how to do a foundation crochet that's super stretchy.
youtube
I was excited to try it out but i think because the single crochet row is also the same row as the foundation row, it puts the first row of single crochet on the wrong [as in incorrect for what the pattern wants] side and makes the single crochet rows after between the bobbles too visible.🤔 [test swatches: left is from the crochet foundation chain, right from a normal (but twisted) foundation chain]


i guess another row of single crochet would fix that problem but then i would have 2 rows of single crochet to begin with and im a bit worried about how that would affect the rest of the pattern, esp since i think the pattern wants me to slip stich around the panels when done to join them and mentions that "the top and bottom stiches should match up perfectly".
Wondering if anyone has some advice on this? Should i just do the extra sc row and ignore/tuck in the foundation chain when i go to join? Or should i just stick to a typical foundation chain?
[Also if you're wondering how I've been stuck on this simple pattern for days with no actual progress, aside frok the foundation chain problem, it's also because I'm using a different yarn for the project that's chunkier and fuzzier. And some how, some way, no matter how careful i am, i keep LOSING stitches in the sea of white/cream fuzzy yarn. and yes it's driving me entirely insane about it.]
#crochet#crochet help#crochet tumblr#knitblr#crochetblr#fiber crafts#fiber art#yarn crafts#yarnblr#crochet yarn#yarn#crochet advice#Youtube
9 notes
·
View notes
Text
The Scheduling AU - Pt 5
Technically this was supposed to be more Wednesday orientated but I decided to focus more on Larissa just because it’s a good foundation to build off of for Wednesday.
So a few facts:
Larissa, Gomez and Morticia got together at 16.
Their story is actually kinda cute, about a week into their third year Gomez and Morticia had a conversation that went something along the lines of we both like each other and we both like Larissa, lets woo her together
And after that they were giving her little gift and casual touches and just generally being romantic to her all the time. And Larissa was soooo confused it wasn’t even funny
Until about 3 weeks into this they basically brought her a lovely bouquet with headless roses and lily of the valley, oleander and foxglove and a couple of sprigs of hemlock. And asked if she wanted to date both off them
She said yes while crying.
Before the open dorm system was implemented by Larissa, it was still gendered dorms and they couldn’t really visit each other. So Gomez would sneak out onto the roof and come over to the attic balcony so they could spend nights together.
About a month into being together Gomez got them a king sized bed because he was sick of pushing together the two singles. (How he managed to sneak in a whole ass heavy wooden frame and mattress is between him and Fester.)
Larissa is a knitter and crocheter. This means that in the winter months both her and Morticia (and later on, the kids to) are kitted out in matching sweaters and scarves. It’s honestly one of Morticia’s favourite things
One of the very first things that Larissa ever crocheted was a giant granny square blanket and I kid you not this thing was almost the size of California king bed. It’s huge and it’s well loved over the years. First in the dorm then at the manor, when they move in and finally it’s spent the last few years in Wednesdays room and made it to her dorm room. Funnily enough the colours used were mostly reds and purples and it’s one of the few items that Wednesday has that is colourful
Larissa, Morticia and Gomez get engaged at 20 just a year before they finish at Nevermore and are married almost as soon as they graduate.
The proposal was really funny. They were on summer vacation in Italy on a tour of the crypts and catacombs dotted around and the one they proposed in was called Juliet’s tomb
As you can imagine they all found it very romantic and each of them pulled out two rings and turned to each other and just started speaking all at the same time. Eventually they started giggling and slipped rings on each other in a very sweet moment.
Their marriage was very sweet, in the family cemetery under a full moon. They exchanged their vows and a goblet of their blood in a hand fastening ceremony
Now both the Addams and Frumps have a innate resistance to poison of all types and eating it just makes that resistance stronger and once Larissa had that blood in her system she basically gained that same immunity and eating often with family also built up that resistance.
Larissa really likes dancing especially with Morticia and Gomez and so they have adapted most dancing to a three person style.
I’m have to be early tomorrow for the ANZAC dawn parade so I’m going to end this here but tomorrow I’m going to touch on my favourite bit of this AU. Honestly I think it’s what started this whole AU so I can’t wait. Anyway goodnight y’all imma go bed now.
Prev / Next
#moo writes#the scheduling au#wednesday au#wednesday addams#wednesday netflix#wednesday series#larissa weems#morticia addams#gomez addams#I’m sure there are other things I meant to add but my brain tends to forget what I think in the cow shed#oh well theres alway tomorrow
11 notes
·
View notes