#quadify this
Explore tagged Tumblr posts
Visit Tumblr Blog
Explore Tumblr blogs with no restrictions, modern design and the best experience.
Last Seen Tumblr Blogs


Fun Fact
The most popular pages on Tumblr are about Minecraft, GIFs, and David J. Peterson.
Text
make triples great again
#this is no longer a request isu this is a threat#but honest to god what i wouldn't give for a time machine so i can de-quadify this sport#figure skating
10 notes
·
View notes
Photo


those snazzy suits made me think of trot ups so here’s the sj boys back at it
#showjumping au#sj au#showjumping#yuri on ice#yoi sj au#yoi au#yuri on ice au#viktor nikiforov#yuri pisetsky#yuuri kastuki#yuri katsuki#ol eros#sv aria#quadify this#emvisc#my art
152 notes
·
View notes
Text
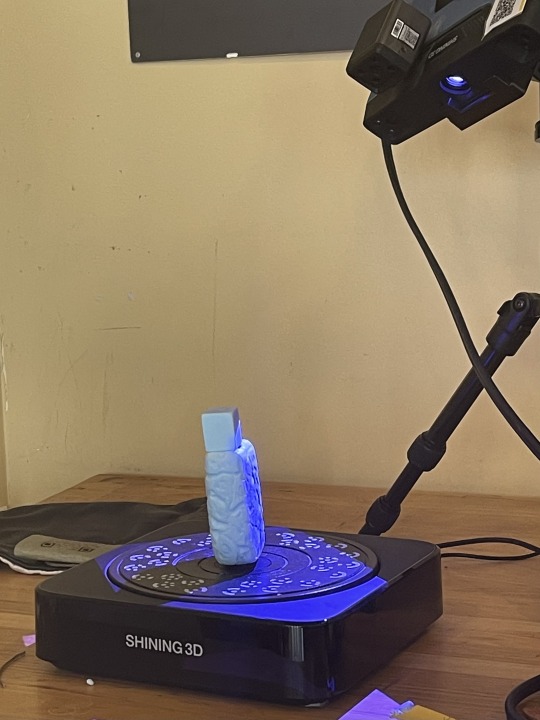
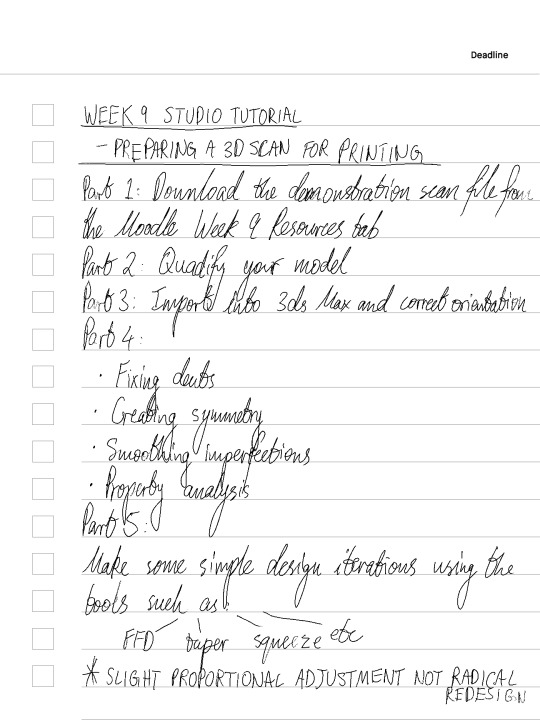
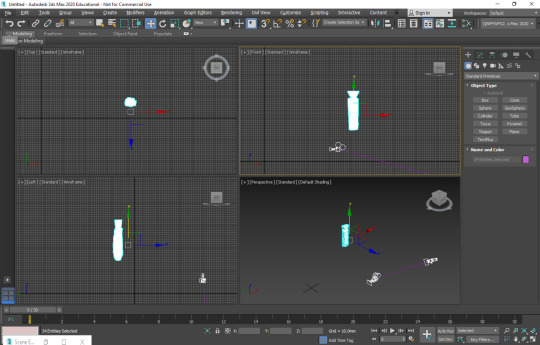
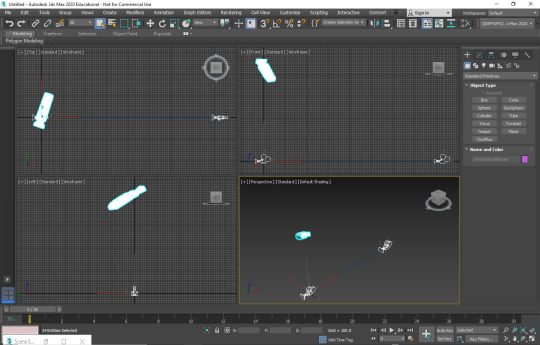
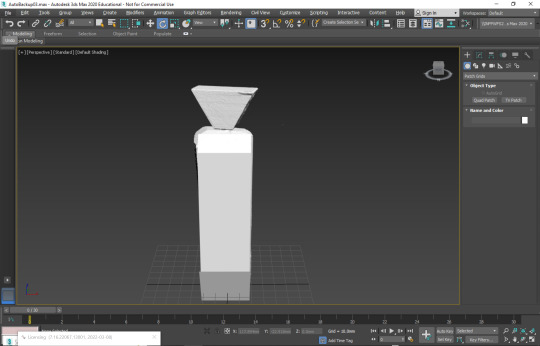
Week 9/10- Preparing a 3D scan for printing
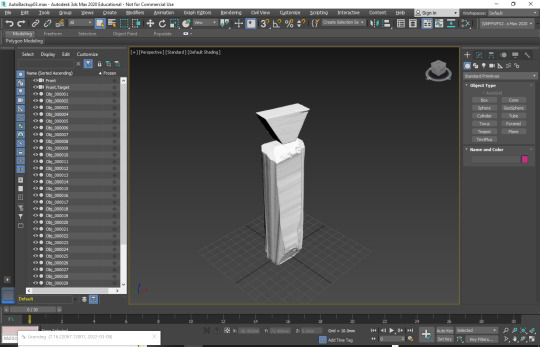
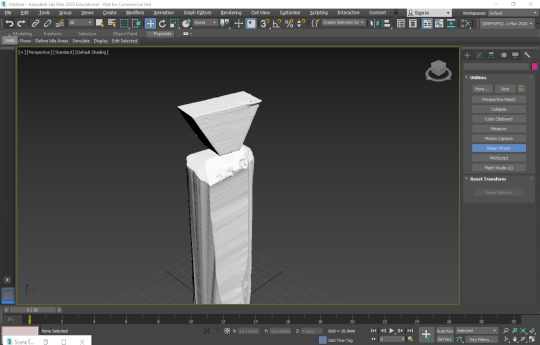
This week informed us on how certain programs can be used in unison to complete certain tasks. Since our goal was to print a scanned model, we had to perform quick modifications after quadifying the model in order to fix dents and smooth any imperfections.
After scanning my perfume bottle model, I imported it to Rhino where I used the Quad ReMesh function to wrap my bottle in a triangulated mesh as we did for the previous shape in Rob's demonstration.
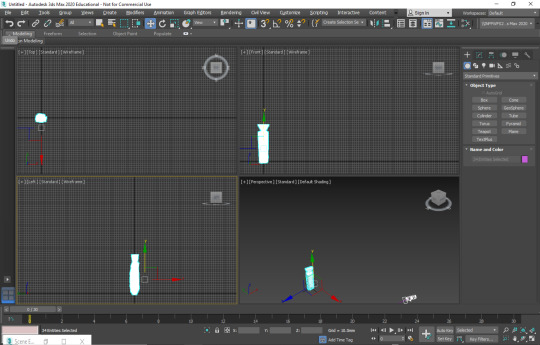
Next I imported this into 3ds Max and corrected the orientation. My model didnt require much modification as I used wood to create it, resulting in a more even surface lacking imperfections.

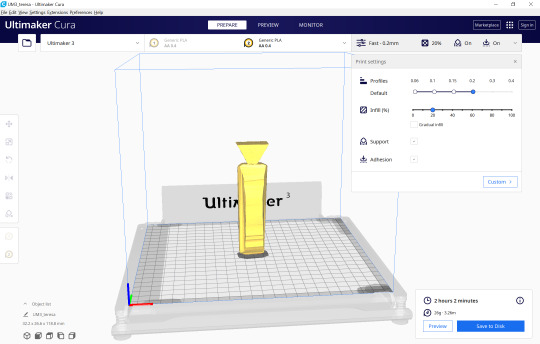
Finally to prepare my model for 3D printing, I exported the file and took it to Cura. I was rather unfamiliar with Cura since the induction I did was so long ago. As such, I asked the friendly staff at the DFL to assist with the printing of the bottle. They helped me place the model flat for printing as this was the best way to do it. Additionally I minimized the amount of infill and scale to save time.


The print took just under an hour and after peeling off the remnants of the backing, I was left with a model that was small in scale and fairly smooth in finish although the corners could have done with more sanding.

It was eyeopening to see that these programs arent as complicated as I thought and got a quick hang of the file types and process that goes behind 3D printing something. I feel that I have learned an important skill that I can benefit from by using it in projects to come, as the last few weeks have warmed me up to 3D modelling more than ever and to see how easily a 3D model can be printing is a great thing to know.
6 notes
·
View notes
Text
Week 9
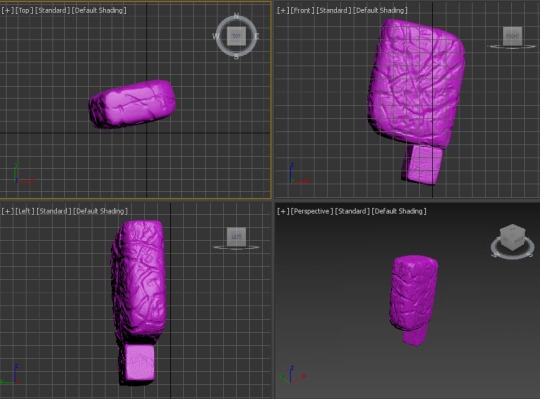
This week I learnt how to prepare a 3d scan for 3d printing using 3ds max. We were first given a base scan of an olay bottle which we would clean up and modify in rhino and 3ds max which we can then export as an stl file so it can be 3d printed. The first step was to quadify the mesh model so it is easier to manipulate later on. We did this through importing the file into rhino and using the quad mesh tool which was not that hard.
We then exported as a 3ds file and the opened it up in 3ds max so it can be further refined. To make it easier to fix up later, we first had reorient the bottle to make it more manageable. This included things such as positioning the bottle in the centre of the base of the bottle. There were quite a few steps that were involved so it took some time to get it right but overall not too hard to figure out.

After finishing off the bottle’s orientation, we could begin cleaning it up such as making it more smooth, removing any dents and more symmetrical. To remove the dents, I had to convent the mesh into an editable polygon to make it easier to edit different points and area of the bottle that need fixing. After removing the imperfections, I used the symmetry command to make the bottle more even and symmetrical. The symmetry tool left a seem on one of the sides of the bottle so I used the relax paint deformation command to smooth it out. Cleaning the bottle was not too hard to do but was tedious because it took time to find just the right spot that needed to be.

After cleaning up the bottle into a nice uniform shape, I could begin reworking the model into a different figure. To do this, I converted it to an editable polygon again and then used the FFD function in combination with the taper and symmetry commands to create a slimmer, taller and more ergonomic bottle shape. This was not difficult since I just repeated some of the steps I did previously. This could then be exported as an stl file so it can later be 3d printed. Overall, considering I don’t like using 3ds max and not very good at using it, I am satisfied with my end result.


6 notes
·
View notes
Text
Week 9 - Preparing a 3d scan for printing
This week we familiarized ourselves with using 3DS Max and Rhino as tools to re-mesh 3D scans into usable meshes. Fortunately for this process, we were not require to process pointcloud data into mesh geometry, rather an stl file of the triangulated mesh was provided.
Below: We were expected to Rhino to re-mesh the raw triangulated 3D scan into a usable mesh, however due to issues with my Rhino trial subscription, I opted to use blender. Similarly to Rhino's QuadReMesh tool, Blender's Remesh tool can "Quadify" a triangulate mesh into something more usable. Additionally in Blender, I oriented the bottle correctly so it would be upright when exported to 3DS Max.

Below: After importing the bottle into 3DS Max, I applied a Symmetry and smooth modifier. Reset XForm was also utilized to reset the bounding box of the mesh object; I am not sure if this last step was necessary however.

Below: Utilizing the measure function from the utilities panel showed me that the original mesh was ~93mm tall. Using the Squeeze Modifier in with an "Amount Value" of 0.1 allowed me to stretch the model from 93mm to 98mm , which is inline with "the scenario" outlined in the tutorial exercise, resulting in the model below.

Below: Afterwards I used more modifiers to change the shape and form of the bottle for fun.


To export the model height edited model to Cura, I exported the mesh as a .stl file and brought it into the software and sliced the file into gcode. Through experience with the makerbot 3D printers at my high school, I was already familiarized with the 3D printing process. Due to time constraints and the print being a waste of materials, I chose not to 3D print the remeshed bottle.

Overall I am pleased with the result. I was able to meet the brief requirements and further develop my skills in 3DS Max.
4 notes
·
View notes
Text
Week 9 - Preparing a 3d scan for printing
The design process is a really important component when managing time and expenses when producing a design. During the design process of prototyping, many important decisions are made. The materiality, colours, textures, manufacturing techniques, finishes, and how the product is marketed and who is marketed towards.
Rapid prototyping is also a way to save funds, instead of using expensive materials and techniques. Examples like additive 3d printing prototyping and subtractive CNC prototypes.
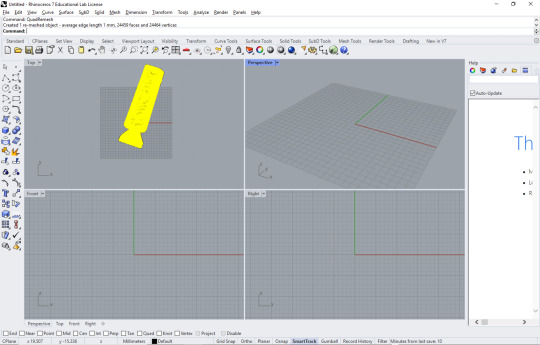
Step 1: 3D-scanning


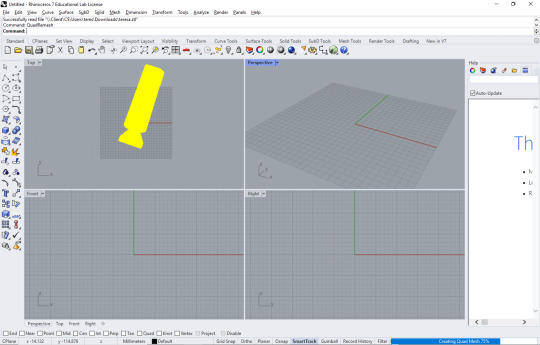
Step 2: Quadify scan on rhino


I imported the 3d scan STL file to rhino and applied the Quad Remesh tool to the form. This tool gave a much simpler polygon structure compared to the initial triangular mesh which would be useful in 3Dsmax, a polygon modelling software.

Triangular mesh Polygon mesh


Comparing the initial triangular structure to a more organised polygon structure.
Step 3: Orientating scan on 3Dsmax

After quadifying the scan, I imported the file to 3Dsmax and rotated the shape using the rotate tool, align tool, and move tool. I orientated the bottle in the orientation I would like considering the origin, and the X, Y, and Z axes and saved the file for printing.
Since my model has purposefully placed dents, I did not find the need to smooth out any dents. I wanted to maintain the organic aesthetic of the bottle to evoke the serene emotion
This part was a little bit frustrating working with Citrix again it was not as fast as the demonstration during the tutorial. I was very thankful the tutorial was recorded and I was to work through the remeshing stage at my own pace without interrupting the tutor or fellow students.
Step 4: Uploading to Cura


I then uploaded the file to Cura to print, however for some reason the scan was still not in the correct orientation. Perhaps have done some wrong or did not save properly. I was thankful that Cura also had a rotating and alignment tool as well.
When setting up the print settings, I was advised to print with a lower infill percentage to help with the cost and time required. I was also advised to add some support around the curved edge on the base to ensure it print successfully.
This week was full of new processes that I was not familiar with, it was very fun, interesting, and enriching to learn about the processes that are performed in the industry on a smaller scale.
4 notes
·
View notes
Text
Week 9 Studio Tutorial – Preparing a 3d scan for printing
Part 1: Obtaining a 3D scan from the MCIC
This class was really useful in opening my eyes to the amazing world of 3D scanning. With our studio class work coinciding with the work we were doing in this class, the practicality and applications of these technologies were amplified.
I was amazed at how well my blue foam model for my perfume bottle translated as a scan and will definitely be returning to this technique for projects dealing with similar-sized objects.


Part 2: Using rhino to quadify the model

Rob's tutorial introducing us to the Quad Remesh tool in Rhino was really useful in translating a 3D scan into something which could be inserted into a program and altered using CAD. These steps will be something I know I'll use in the future when it comes to 3D scanning any model.
Part 3: Import into 3ds Max and correct orientation

Again, I found that a video tutorial was extremely helpful in helping me correctly orientate my model in 3Dsmax. Rob's step-by-step tutorial gave me a lot of clarity that may not have been if I was simply reading a written set of instructions. I know in future, if video tutorials are not provided, to conduct my own research on Youtube or on websites such as Autodesk in order to seek clarity.
Part 4: Modifications to enhance original model
Luckily, my scan came out quite well as I had really worked to refine my foam model to a smooth finish. Therefore, there weren't too many noticeable dents but I did play around with some of the tools such as the relax tools just to experiment and gain experience in refining.
Part 5: Design Iterations
This part was really exciting as I was able to play around with my own design and utilise the tools I had been using on simple spheres and boxes on an object I was familiar with and that was close to my heart. I really had fun playing around with design iterations and see how this could be a step in my design process in future projects!


Here is an example of a subtle iteration: on the left is the original bottle and on the right I changed the form slightly using taper, bending and melting tools stacked on top of one another. This method opened my eyes to a great way of creating slight readjustments to an already existing model design.


These were some more subtle iterations where the predominant modifier used was the squeeze tool. This created more petite and taller looking designs. I can see how these iterations could be used in presenting different moods and feelings to a client, as these create a more feminine, yet tall and proud effect.


These were slightly more radical, experimental changes which were more to test how much I could do using 3Dsmax rather than to show slight changes in my bottle design. Using the bend tool as my main tool, I was able to change the form of the bottle to more of a triangular prism than a rectangular prism. Having separate scans for my bottle and lid also meant I could play around with the scale of the lid in comparison to the bottle.
I really enjoyed this process and can realistically see it becoming a regular part of my design process where suitable!
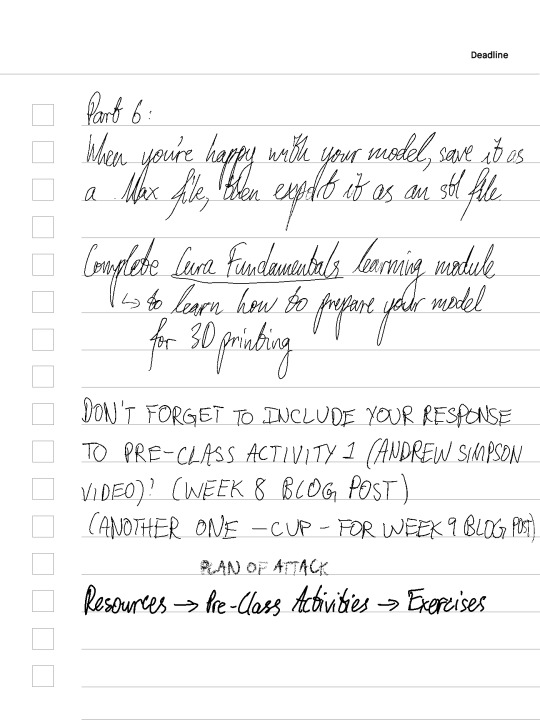
Part 6: Uploading to Cura


The orientation of my model was yet again an issue when preparing my Cura file, however, the ability to rotate your model on the plate was a really helpful tool. I found the rotation to be really frustrating and laggy, however, fixed this problem by turning off the snap rotation, which allowed me to make incremental changes to the rotation so that it sat well in the printer.
Again, I found this week really rewarding, as I could see how comfortable I had gotten with some of the digital programs compared to when I first encountered them. As mentioned throughout my blogs, I know I'll be utilsiing some of these techniques in future projects for sure! In terms of what to improve on, I think time management and starting things earlier would definitely minimise the frustration of tackling unfamiliar digital softwares.
2 notes
·
View notes
Text
Week 9 - Preparing a 3D Scan for Printing
Pre-Class Activity
I agree with his statement that with presentation models you have to be more true to what you are depicting, however with sketch models you have a bit more freedom with what you want to depict. I remember when I began making my initial physical sketch models, I first focused on how I could shape the model in such a way that suited the hand. An example of this was in my Week 7 post where I created a model that was solely based on a smooth, round elliptical form; and on the other hand, forms where I chose to focus more on the elevation of elements and the aesthetics of design. Another similarity between his design process and mine was flexibility. In his cup design, he added a couple of holes in the handle to experiment and see what is the most suitable combination. Likewise, I experimented with switching bottle bodies, caps, and bases to analyse and see which combination was most effective in portraying my emotion (pride). A difference that I noted was the materials he selected when making his initial designs; they were often made from plastic or glass for a smoother finish. This implies that he uses 3d printing or similar avenues for curved projects in their initial stage, which may be more accurate and efficient.
Tutorial Planning
Tutorial Activity
A misconception that I had previously had was that you could only access Rhino locally. After this tutorial, I am now aware that it can also be accessed via myAccess UNSW.
This exercise made me more comfortable with exporting 3D objects across applications, and aware of the limits and flexibilities of each. Quadifying a model is made possible through Rhino, whereas fixing indents and other imperfections can be managed in 3ds Max.
After doing this activity, I have come to the conclusion that it would be beneficial to see whether others also using myAccess to access 3ds Max, have had similar issues to what I have faced; and if not what are they doing differently. In my experience, the app repeatedly froze and was "not responding", it managed to lock me out of my own computer for a solid 20 minutes or so and I had difficulty locating my files after saving them. These technical difficulties reduce the reliability and efficiency of my workflow, hence I need to be on top of such difficulties in future circumstances. This can be achieved by seeking assistance and working together with those who are more proficient with the application from the beginning - so that I don't fall behind. I will hold myself accountable by ensuring that I am not surrounded by "brick walls"; and if I see one I get rid of it straight away.
On the whole, this exercise has made me aware of the ability to connect between physical and digital in ways that previously did not know were possible. Being able to 3D scan non-reflective models, alter them on 3D Max and Rhino, and reproduce them through 3D printing, allows designers to be more versatile in their model making; while developing and sustaining craftsmanship skills and technological skills simultaneously.
0 notes
Photo


The showjumping Yuris, I’m so jealous of Yuri P I really want his jacket!
@medicinqui finally updated the showjumping au fic which you can read [here]
#yoi sj au#showjumping au#sj au#equestrian au#ol eros#yuri katsuki#yuuri katsuki#yuri plisetsky#quadify this#ol agape#vicchan pdl#showjumping#horses#jumping#eventer#yuri on ice#au#my art#emvisc
49 notes
·
View notes