#physics tutorials
Explore tagged Tumblr posts
Photo
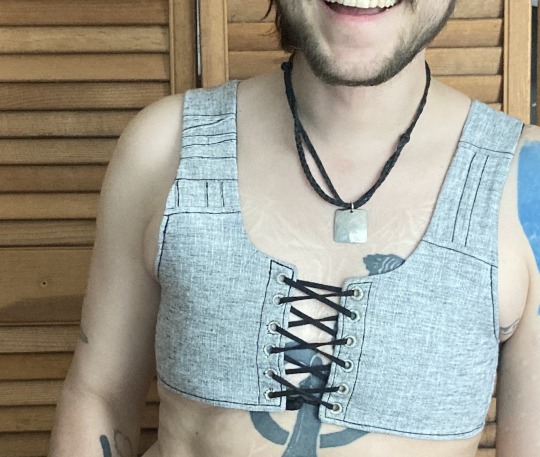
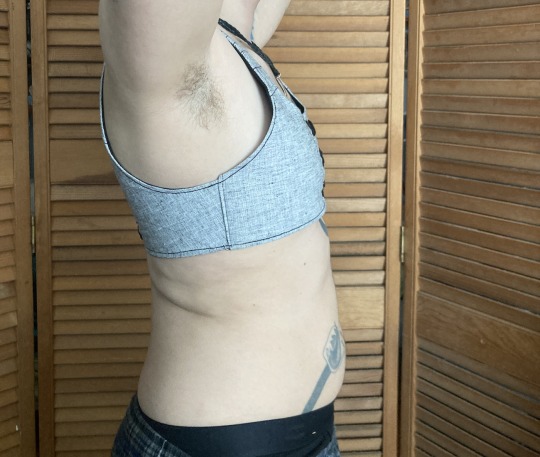
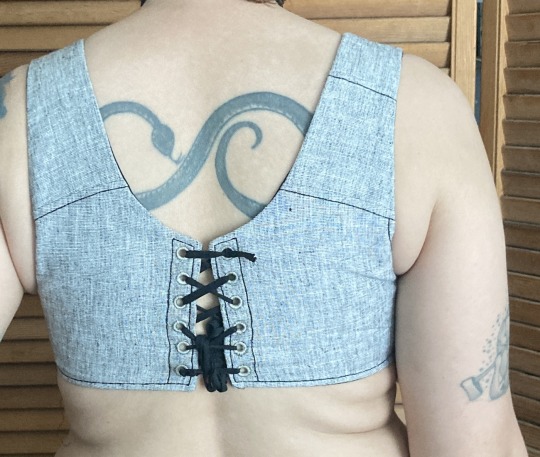
summer binder picture tutorial
this is the third binder ive made for myself recently and the first one i’m writing up. it’s designed to do a few things: 1) allow me to put it on by myself without dislocating my shoulders 2) allow me to breathe well enough to partake in normal activity 3) be cool enough to wear throughout a muggy 90-100F summer 4) not constrict my ribs in a way that aggravates my lack of connective tissue and causes intense pain.
this has become necessary even though i had top surgery many years ago, because when i had it i was extremely skinny and since then i’ve increased in size by about 50%. this has been really fucking good for my health in every single way* except that when my chest is squishy or moves at all it’s So Goddamn Triggering for me. but also since ive had top surgery ive developed and/or been made away of a plethora of chronic conditions that make every single commercially available binding option medically impossible. unbound, my chest is pretty much what you’d expect for a chubby cis guy but venturing out into the world in just a tshirt no longer works for me
*anyone who badmouths weight gain or fat bodies in the notes WILL be blocked
under the cut are a bunch of process pictures and explanations of what they all mean:
first i’ll give you a look at the pieces and measurements:
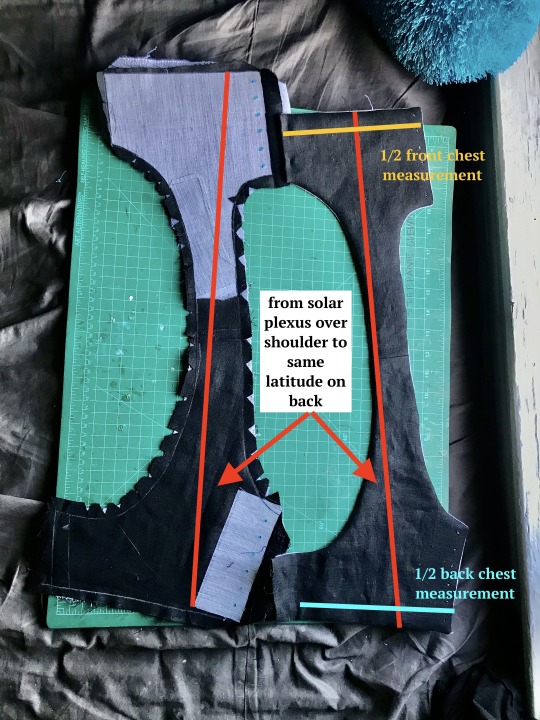
most of the seams are sewn in this picture and one half is turned inside out, allowing you to see both the finished dimensions (right) and the placement of the fusible horsehair canvas that gives this lil scrap of linen any structure at all (left)
to get your chest measurement, you’re gonna have to do some math:
first measure above and below what you want to bind. average these numbers. mine are something like 32 and 34, which average to 33. subtract a few inches--this is to allow the air movement between the laces at center front and back, critical in the summertime. i deleted 3 inches bc i like that number but you can go bigger if you want. the more inches you subtract here, the more youll be able to ratchet all your chest material down later, but at the same time you need to leave enough fabric for a sturdy garment. let’s say a range of 2-6 inches/5-15cm. by taking your measurements this way, you’re essentially measuring the chest you would like to have. that + the horsehair canvas work together to compress any squishy tissue/force anything that doesnt compress up and to the outside (basically into the armpit/lower shoulder--the chest might stick out but it will give a very puffed chest captain america pectoral silhouette)
you can also see how ive clipped my curves and pre-drilled my lacing holes. i used the marlin spike on my knife to open up the holes on the interfacing side, mainly as a way of marking them. this worked well bc the interfacing’s glue kept the linen from raveling
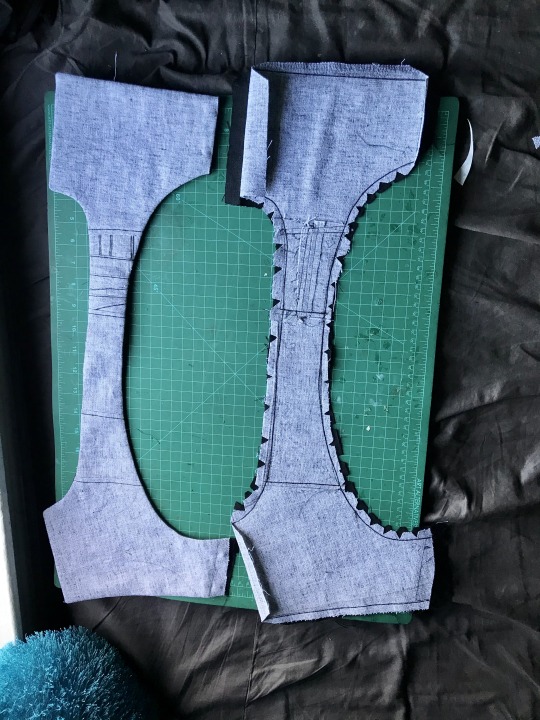
this is the same stage but looking at the non-interfaced grey linen/cotton blend (the black is some 100% linen from my cabbage stash). you can see ive broken the solar-plexus-to-back measurement up into a bunch of pieces to save on fabric but that’s not necessary. my original pattern was just two pieces (front and back) and chopping the straps into thirds on both sides was aesthetic
in the following picture you can really see how this is really just overgrown regency stays:
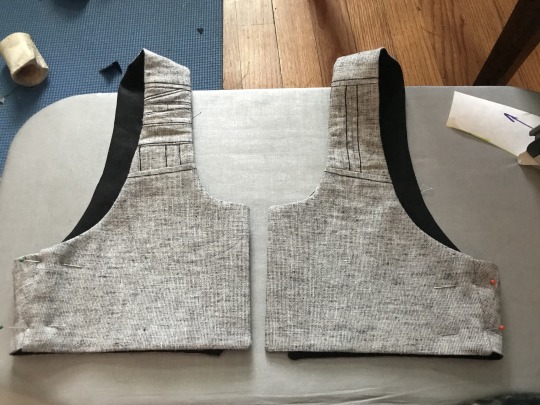
i thought about doing side lacing but didn’t think that would be comfortable for me. on the front, the side seam allowance was pressed inwards before turning to create a finished looking slot. on the back the side seam is left unfinished with an extra wide seam allowance, and is inserted into that slot.
here’s a closeup on it pinned in place (you can adjust the angle of the side seam and the fit during this pinning stage):
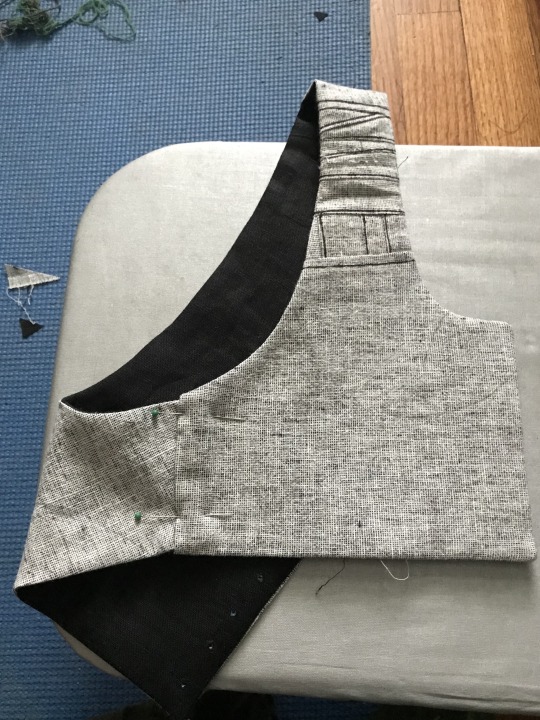
that side seam was just topstitched in place once i had the fit how i liked it, and the armhole was reinforced with more topstitching
alright, time for eyelets: first, you can see how well the marking worked:
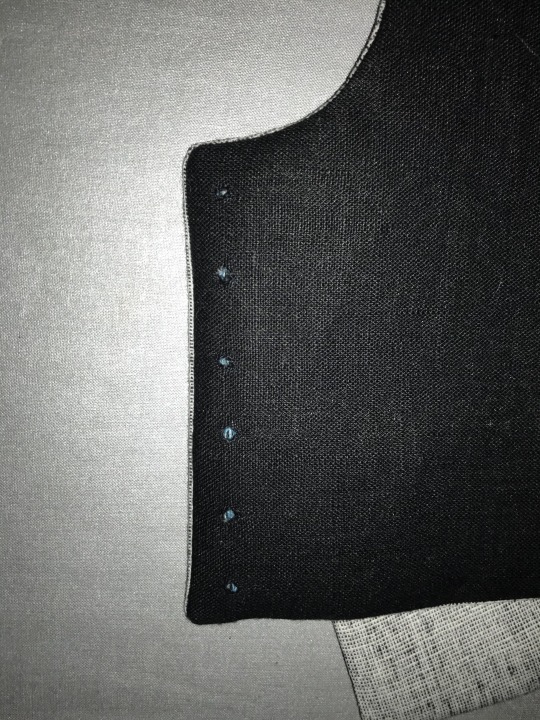
next, two rows of basted eyelets (left), one row of eyelets sewn with a doubled and waxed cotton thread (center right), and one row of eyelets opened and stainless steel rings placed (right).
next time i’m going to mark the eyelets same as i did above, but do this step differently--i’ll mark and baste the steel rings in place BEFORE widening the eyelets. this is bc i had a lot of problems keeping the eyelets on center
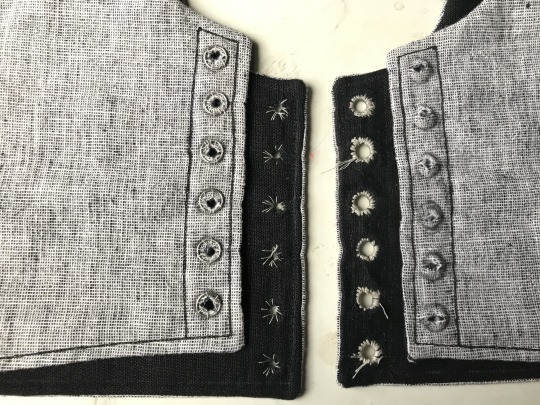
eyelets half done on this one! on the left are eyelets sewn with doubled and waxed cotton thread and on the right eyelets sewn with quadrupled and waxed thread. the center is basting again. i was able to force the holes back in line while sewing the eyelets but it was kinda annoying. adding a second picture that doesnt have great focus but hopefully shows how that process worked and shows the spike clearly
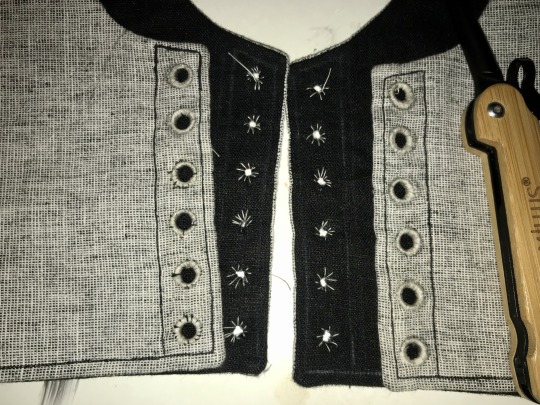
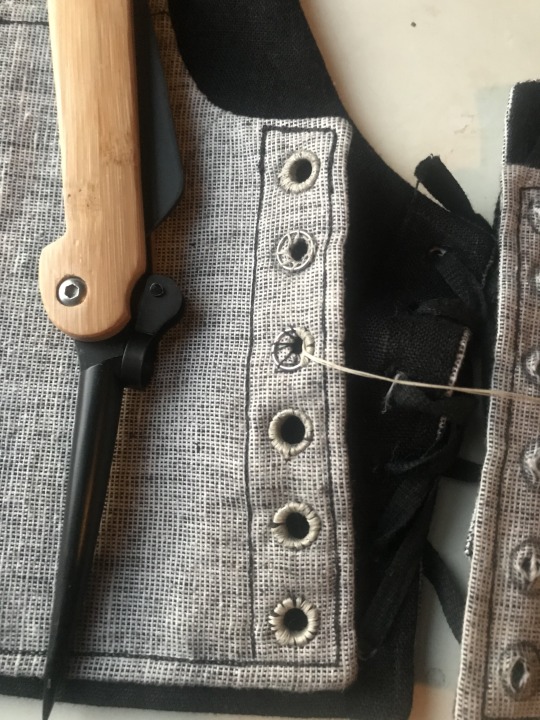
i ended up using this white cotton thread because it’s stronger than my black cotton thread (which the rest of it is sewn with). [eta: after this was first posted, i pressed the whole thing heavily, which effectively de-waxed the thread, and i dyed the whole thing a medium charcoal grey, the thread blends in perfectly on the lighter side and isn’t such a sore thumb on the darker side]
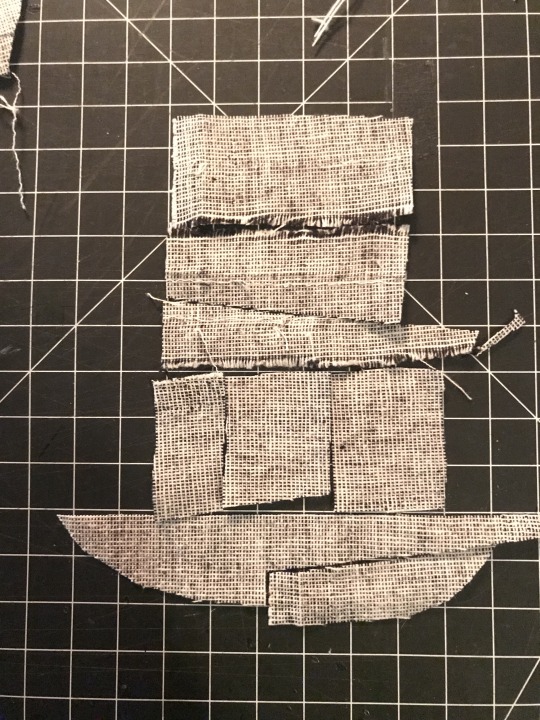
bonus: the piecing layout for that little piece of strap. the whole light gray half of the binder was made from 1/2 of one of the legs i cut off some linen suit pants to make slutty camping shorts last year and i really really didn’t want to break into any of the other three halves for this garment--i have Plans for it
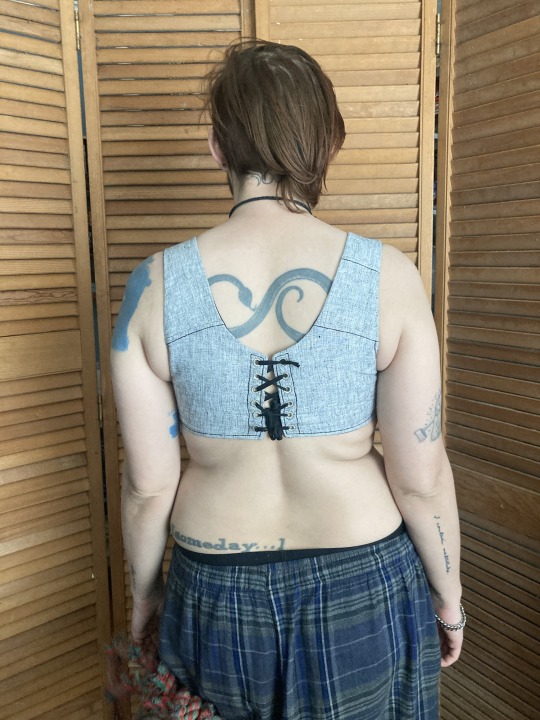
overall the fit of this is incredible. it DOESNT hurt my ribs which every zip-up garment ive been able to find (and it is difficult) does due to really thick elastic at the base. it doesnt aggravate my sensory issues with the synthetic fibers that every commercial option is made of. i can walk up a hill or stairs, or go to pt, without getting too out of breath. i can eat with it tight, or loosen the front easily and without taking it off to make eating easier and less nausea-inducing. it is reversible!
best of all the lacing at the back gives the garment enough movement for me to get it on without dislocating, and the interfacing and steel rings give it structure once it’s on. the shaping comes only from fusible horsehair linen canvas and stainless steel rings like youd use for chainmail, there’s no boning at all, which makes it very quick to sew (except the eyelets, but metal grommets would be sturdy and quick provided theyre of good quality)
there’s a small amount of gaping on the outside of the shoulder strap, which i plan on fixing with a tiny tiny dart in the armpit, i want to add pockets to tuck the laces into, and i need a better lace for the back, but it’s completely wearable in time for the 90 weather next week which is all i wanted. i’ll do a reblog when it’s perfectly finished with an update on the fit but for now it is done enough
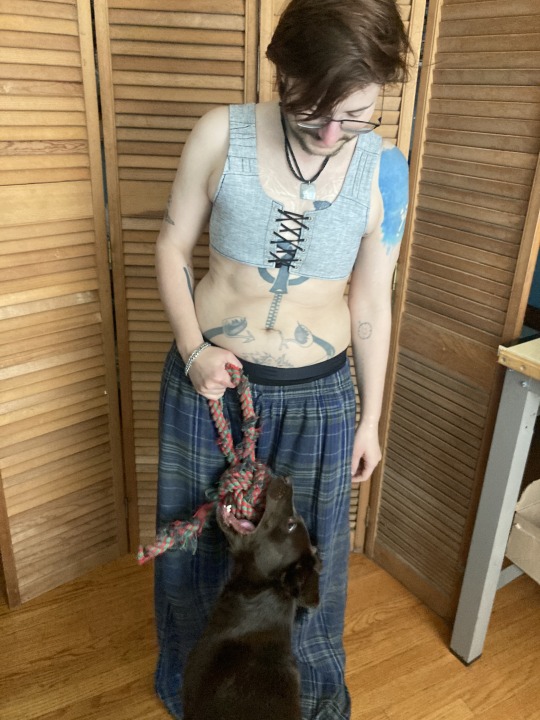
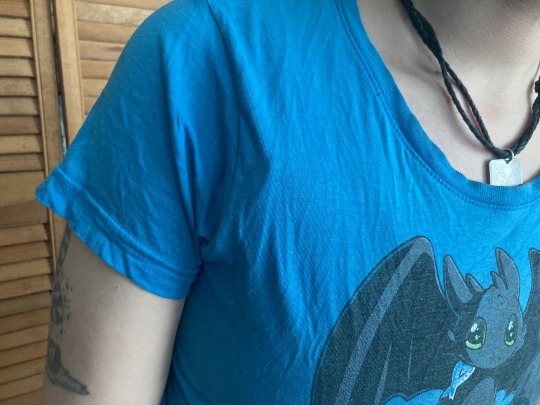
the little ridge where it doesnt lay flat against the shoulder is most visible with just a single t shirt over it. with a flannel or a sweater, it disappears, and by itself, it’s hidden in movement
eta: after dyeing this, i relaced it a bit looser in the back and that gape mainly disappeared. ive decided to leave it in instead of smoothing it with a dart because the loose fabric gives space for my chest to expand when breathing and shapes my silhouette in a way that emphasizes my shoulders
#sewing#trans#trans man#binding#body shaping#cotton#disability accommodations#physical#sensory#eyelets#fusible interfacing#historical fashion#regency#horsehair canvas#lacing#linen#lining#new build#drafted pattern#picture tutorial#piecing is contemporary too#stainless steel#stashbusting#stays#structured garment#treadle machine
1K notes
·
View notes
Text


#art tutorial#digital drawing#since people asked#i shall deliver my answers#being all serious and stuff#just add strong reflective light so the lighter value in the bottom is justified (as in physically make sense)
114 notes
·
View notes
Text


60 notes
·
View notes
Text

WE DID AN ANIMATION.
#hollow knight#hollow knight hornet#We cannot physically express how frustrating this was#Not because animation was hard!!#but because every tutorial we looked at went over animation principles#and we KNOW those#HOW DOES THE PROGRAM WORK.#WHAT IS AN ONION SKIN. DONT JUST MENTION IT AND MOVE ON SHOW US WHERE IT *IS*
62 notes
·
View notes
Text
theres been a few times now where ive seen someone very clearly plagiarize either a design, idea, or even rip tutorial sections verbatim to claim as their own from my work, but the issue is i simply dont have the time or energy to fight it so i cant do much, so whenever i see a new instance of it my soul is crushed for 0.2 seconds before reforming and i look verbatim like this paul rudd bit:

#for the most part i dont care that much actually since this isnt like#my job#i literally just do creative stuff to not go insane#and its mostly my cosplay work that gets stolen which....its all emulation#i get really weirded out by when i have tutorials ripped bc that is genuinely more of my actual unique innovation#but whatever floats your stoat i really dont want to be caught up in a grubbn's match#the worst ones where were it was people that got more credit/more traction or there was strange personal context#those ones are weird but not worth picking a fight over#but if anyone tried to rip my OC designs i would be actually hurt but also deeply confused bc they only make sense in context#like if someone tried to cop sulu it'd be like:#'ah yes you too are a mid-30s physics doctorate with bipolar II managing long form depressive episodes while medication intolerant-#and coping with the fallout of people being unable to stay by you due to the intensity of your suicidal nature and obsessive working'#genuinely i would be gobsmacked
32 notes
·
View notes
Text
Janus this Saturday
JOAN AND TALYN NEXT SATURDAY???
Awww this is amazing!!!
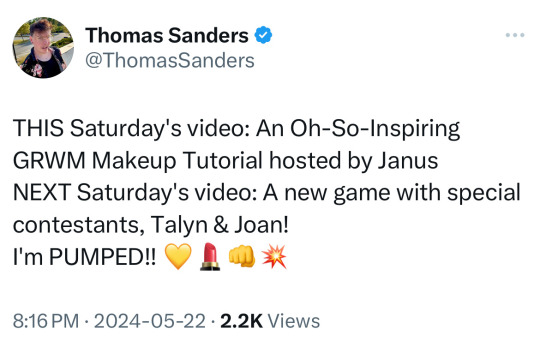
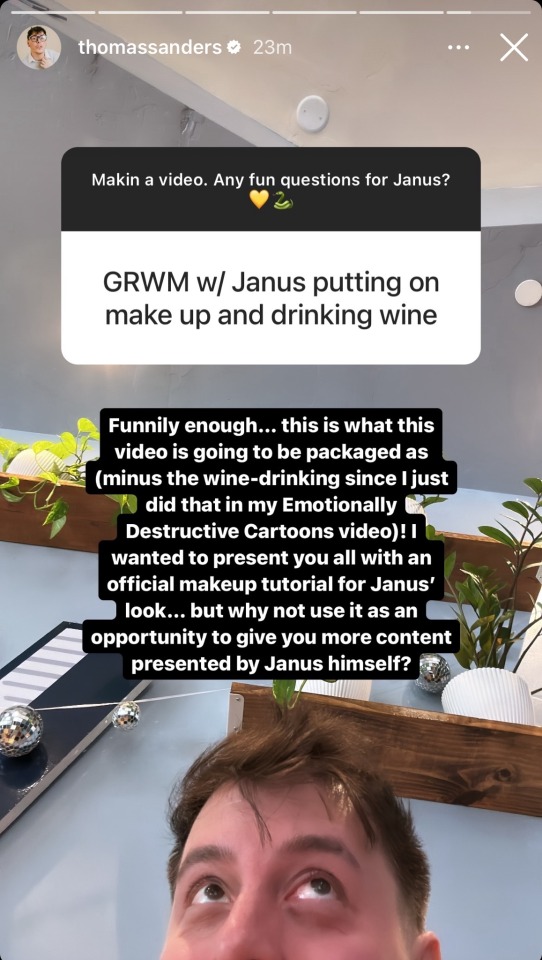
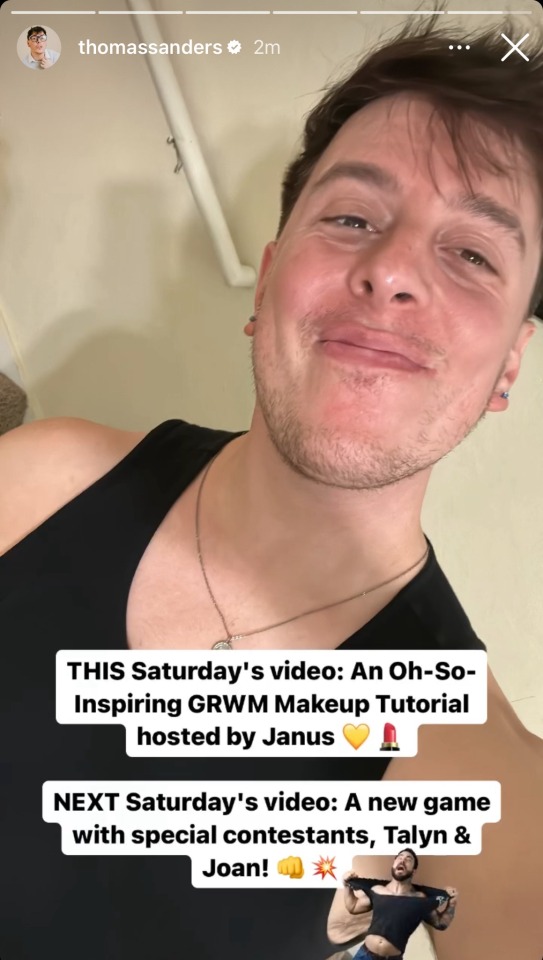
#so the Janus video is going to be a GRWM makeup tutorial while he answers questions#and the Joan and Talyn video is going to be some kind of challenge or game#unsure if they’re physically there or just over zoom#thomas sanders#sanders sides#Janus sanders#ts updates
64 notes
·
View notes
Text
Simplifying the process of drawing a rigid frame wheelchair

I always see people asking about how to simplify the process of drawing a wheelchair so I created this
please ignore that the line art is a little shaky I have a hand tremor
288 notes
·
View notes
Text
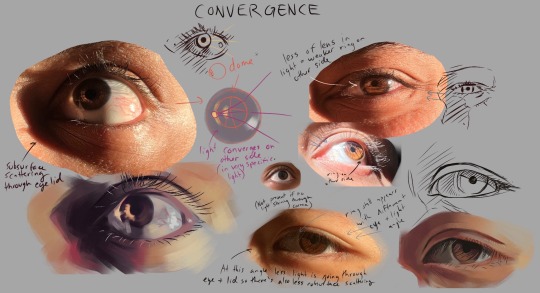
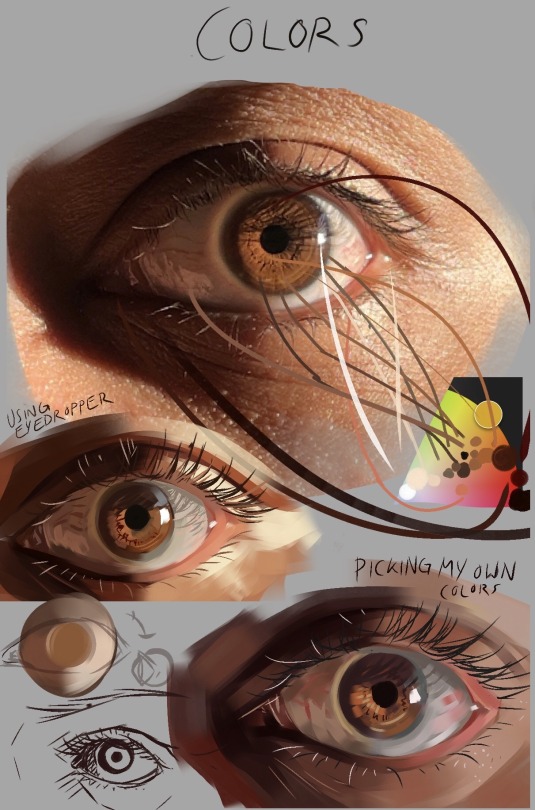
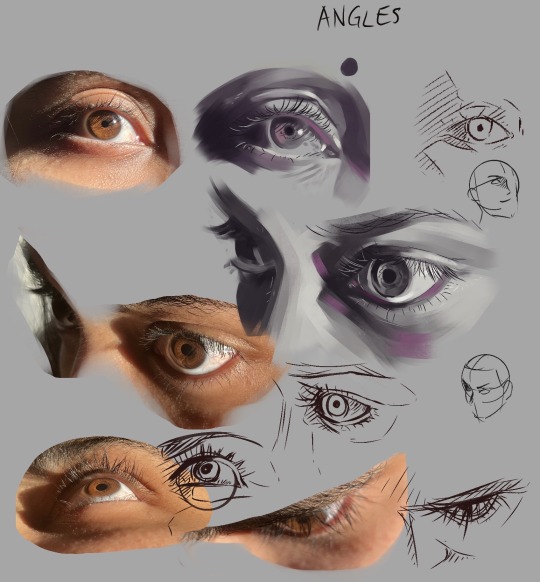
Some (kinda nerdy tbh) notes on light through eyes
#art resources#eyes#art reference#sometimes I forget how long I spent studying physics and then it sledgehammers me#this isn’t scientific or anything though#tutorial adjacent
57 notes
·
View notes
Note
Hey Sergle, how does one learn how to draw? Like, I am in my 20s, can barely draw a stick figure, and feel overwhelmed whenever I try to look up tutorials. Do you have any advice on how to start?
my Unprofessional advice on how to start in earnest, is to do it the way little kids do when they start learning to draw! which is to not approach it as learning at all. sitting down and scribbling out whatever comes to mind, reading a book or watching a movie and trying to copy the way the characters are drawn. draw a page full of cats. do it while you watch tv. doing all that w/o the Grown Up impulse to be embarrassed that you're new at a skill.
#I don't care if this advice isn't structured- i think this is the more fun way to learn!#I could send you a masterpost with links on tutorials and How Tos and Beginner Guides For Dummies etc but that's not.. the way I think#that it should work.#you could take a class or follow tutorials you find on yt and that's fine too. but like you said#it's overwhelming that way. bc then it feels like homework. and then it feels like there's a Certain Way to do it#and if there's a certain way to do it then that means there's a wrong way to do it.#oh the second part of this advice is to use physical art supplies. digital art is amazing#but traditional art and the practice of putting ink to paper is satisfying in a tactile way that digital art isn't#and you don't have to Set Up any art program to have the exact like. tablet settings you want#idk baby you should just pick up some art supplies that inspire you and get the ball rolling#steal some watercolor from hobby lobby if you must! paint some flowers. or some shit! have fun!#sergle answers
264 notes
·
View notes
Note
Dear Supporter,
I hope this message finds you and your family in good health. My name is Eman Zaqout from Gaza. I am reaching you out to seek your urgent help in spreading the word about our fundraiser. I lost both my home and my job due to the ongoing genocide in Gaza and we are facing catastrophic living conditions. 💔
I kindly ask you to visit my campaign. Your support, whether through donating or sharing, will help us reach more people who can make a difference. Thank you for your continued support for the Palestinian cause. Your dedication brings us closer to freedom. 🙏🕊
Note: Verified by several people as 90-ghost and aces-and-angels. ☑
.
#hatchetfield#starkid#hatchetverse#nightmare time#the magnus archives#the magnus protocol#the mechanisms#percy jackon and the olympians#sherlock and co#botany#organic chemistry#my chemical romance#candle making#magnus chase and the gods of asgard#marine biology#math#television#typography#tech#diy tutorial#ecology#entomology#epic the musical#quantum physics#quotes
10 notes
·
View notes
Text
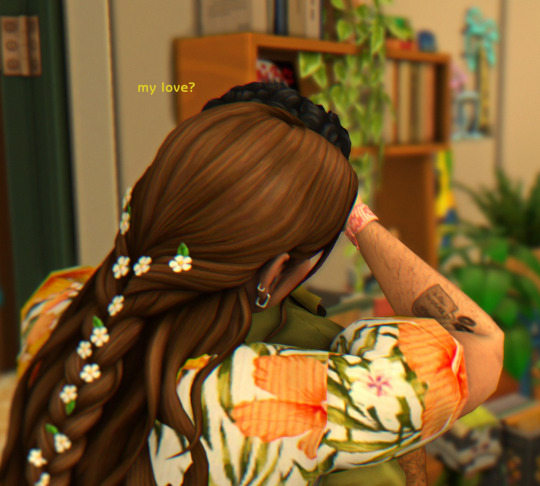
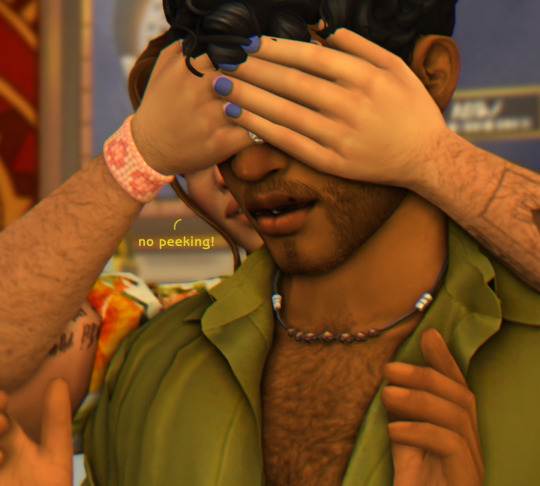


"do you like it?" "darling, i love it."
#ts4#ts4 gameplay#sims 4 gameplay#postcard legacy challenge#im gonna pass away#rua's vocabulary is full of pet names and words of adoration#adrien has some for him too. a few in spanish that make rua shiver.#he braided adrien's hair btw 😖 he loves to play with his hair#since adrien started growing his hair out he's caught rua a few times looking up long hairstyle tutorials 😭😭#“my love come sit” he'll pat the couch enthusiastically “let me fix your hair”#and when he's done adrien would complement him and ask him where he learned it#rua would puff out his chest proudly and say “learn it? ive always known this” or “my angel i made it up for you”#and adrien lets him get away with it bc it's cute and harmless#rua's love languages are acts of service and physical touch#he's so sick i cant stand him#YOU SEE HOW THEYRE MATCHING LOWKEY!!!!!!! IM GONNA GO CRAZY#postcard: gen3#queue#i switched a lot of feminine frame hairs to allow for masc frames and many of them worked#save for a bit of clipping around adrien’s back. i think the one he’s wearing now is the worst of it but it’s not too bad to bother me#i still haven’t figured out how to properly convert it in blender so this will have to do#sim: adrien herrera#sim: rua kamealoha
127 notes
·
View notes
Text
how to find very like overly specificdrawing tutorials
#i have been struggling so bad with figuring out how to draw physical objects interactig with eachother especially characters#and when i look on youtube all it gives me are shitty youtube shorts showing me how to draw Not anything useful to me#and manga drawing tutorials from eleven years ago#tldr physical touch is hard to draw and like nobody has trouble drawing that but me and baby needs drawing tutorial but cannot find on e.#HELP!!!!!!!!!!!!!!!!!!!!!!!!!#if anyone has videos or tutorials they would likr to shsre PLEase=(#talkin
19 notes
·
View notes
Text
Every time I go online, I get hit in the face with waves of ableism and mentalism that people don’t even realise they’re doing. So…
You’re not ‘creepy’ or ‘weird’ for having special interests.
You’re not ‘creepy’ or ‘weird’ for mentally behaving younger than you are or not fitting to the societal mould of what’s expected of your age.
You’re in no way a bad person for not being able to have or hold a job.
It is not bad to live with your parents.
It is okay not to have motivation or lack of ability to do things on a daily basis or at all.
It’s okay to listen to your needs and have differing needs from others.
You are allowed to use the internet just like anybody else.
Your condition(s) and symptoms differ from other people’s.
It is okay to have ‘peculiar’ triggers.
You are not a ‘parasite’, you should not in any way be made fun of for your mental and/or physical state. You don’t have to ‘prove them wrong’, you have to listen to your own needs so your health will be well.
#ableism#mentalism#mental illness#physical illness#chronic illness#autism#neurodivergent#depression#trauma#I have a lot of thoughts and experiences but I can’t put them all into word rn#I guess the big thing is that it’s vile how ppl treat and talk about disabled and mentally ill ppl as if it’s a synonym for ‘nasty person’#don’t know how people think it’s in any way acceptable#Also the web is beyond social media? God damn just let me watch Netflix and coding tutorials in peace#Feel free to add to the list btw I probably forgot a lot of things
6 notes
·
View notes
Text
I hate when girls post about something manual they're having difficulty doing and caption is like "me after saying i don't need a man" girl kys
#sometimes it's not even something that requires physical strength but something that could be easily learned from a youtube tutorial#setting feminism back for engagement#بات چیت
6 notes
·
View notes
Text
oh no help, i've managed to find all my paints, my paintbrushes, my palette, and my paintbrush cleaning pot, so now i'm completely out of excuses to keep me from painting
#personal#i suppose i could clean off my palette and the paint pots but that sucks and i don't want to do that#painting#i'm one of those people that loves to say their an artist and then physically cannot make themselves paint#(i'm attempting a portrait for the first time and i am TERRIFIED)#i'm going to go watch another tutorial in the name of preparation and put it off that way 😅#if anyone has any tips i would great appreciate them 🙏
10 notes
·
View notes
Text
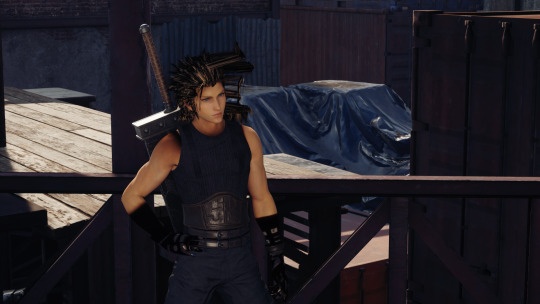
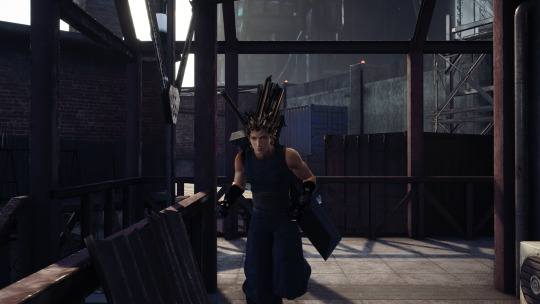
I tried to mod something and the good news is, it didn't crash the game. 🥳 The bad news is, not what I was looking for lmao.
Like, don't get me wrong. I've seen way worse (the stuff of nightmares) on a modding channel I've been teaching myself this stuff lately, so. It's not like I completely fucked this thing up or anything like that.
It's just... I still gotta ask though.
What went wrong here?
#personal#my mods#(sort of kjdkd)#i was just lamenting this stuff on a fandom discord channel. saying i'm at my wits' end here and about to quit this shit#i tried following a tutorial on a modding channel and i got the whole thing working for the most part#he's sized correctly. animations seem to work. nothing is stretching apart from hair. the textures are all fucked up now but yeah#but because what i'm trying to do here is a little different than what that tutorial does#(they still keep pointing to that very same tutorial though)#it seems that either i did something wrong. maybe i skipped some important part?#(because one answer claimed if it's a model extracted from the same game it doesn't need to be rigged or weight-painted)#but then that video tutorial also says you need to separate some parts so that nothing's stretching etc.#which is obviously a thing that's happening above. that hair is in fact stretching. A LOT#i'm guessing because cloud and zack have different hair. so they must have different hair physics or something#but then. i also learned on that channel that zack doesn't have his own animations. because he's neither playable/non-playable#because he only appears in this one cutscene towards the end of the game. he has his own model and textures though#so i don't know whether that means he doesn't have his own physics either or...?#meaning i probably need to use another model's hair physics as well and somehow transfer them on zack's hair too or smth like that maybe#i don't know. i'm so confused#like i've put so much effort into this. so many retries already. i'm getting sick of the shaders input part actually lmao#and i'm so close but i'm stuck!#i tried asking for help on a modding channel but because my question didn't get answered in a couple of hours i chickened out and deleted i#and now i'm like i need help. i just don't know what i did wrong 🙈 i need strength and courage
10 notes
·
View notes