#oil based varnish
Explore tagged Tumblr posts
Visit Tumblr Blog
Explore Tumblr blogs with no restrictions, modern design and the best experience.
Last Seen Tumblr Blogs


Fun Fact
The Tumblr app for Google Glass was released on May 16, 2013.
Text
#clear varnish for wood#wood varnish paint#cheap varnish for wood#varnish paint price#varnish#varnish paint#timber varnish#oil based varnish#varnish timber#wood varnish perth#wood paint#wood gloss varnish#wood lacquer perth#wood varnish price#wood varnish#wood gloss#interior timber varnish#interior varnish#wood lacquer#varnish paint for wood#high gloss oil varnish for wood#wooden furniture varnish#wood lacquers perth#buy wood lacquers online#gloss varnish#varnish for wood#wood varnishes perth#wood varnish gloss#gloss varnish for wood#oil varnish
0 notes
Text
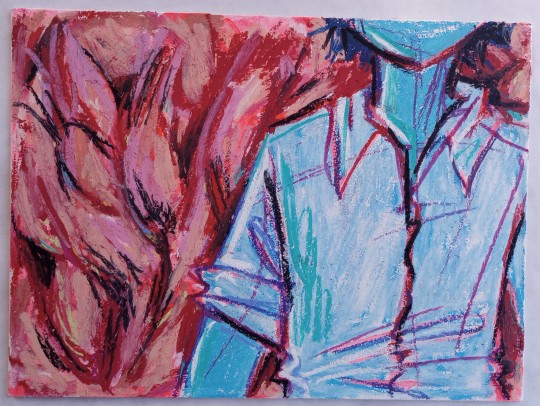
oog
#art#traditional art#oil pastel#so i had this old ass underpainting that i was gonna finish that was based off some weird eisuke art i did back when i was making all that#weird weird eisuke art and i was gonna actually use paint but the weather has been too fucked up to do oil painting and i didnt feel like#using anything else so i slapped a weird clear gesso i have that oddly feels like pastel ground overtop the underpainting and just used#oil pastels LOL i actually kinda dig how the weird fleshy parts look even tho i did it in like an hour#i do like doing oil pastel art a lot but when thing i still havent quite figured out is like#how on earth am i supposed to seal these thangs#is there oil pastel varnishes. i heard of one a long time ago but it was not available in my country#(and you know how hard it is to import aerosols in canada)#i wonder if other varnishes or sealants or fixatives would work#i must.....research
13 notes
·
View notes
Text
Discover the Magic of Manucurist: Green Nail Polish and Perfect Finish Essentials | Review - PR Gifted
If you're a nail enthusiast looking for eco-friendly beauty products, Manucurist's Green Nail Polish and their essential trio—drying drops, top coat, and base coat—are about to become your new best friends. Read why here! Rose xo
If you’re a nail enthusiast looking for eco-friendly beauty products, Manucurist’s Green Nail Polish and their essential trio—drying drops, top coat, and base coat—are about to become your new best friends. Dive into this vibrant world of sustainable beauty and discover why Manucurist is the go-to brand for eco-conscious fashionistas. As someone who loves to keep their nails looking healthy and…
#baobab cuticle oil#base coat#Beauty#Beauty Blog#Beauty Blogger#Beauty Discounts & Offers#Beauty Review#Best LED Nail Polish#best nail polish brands uk#Blog#Blogging#coconut oil cuticle oil#Cosmetics#Cuticle oil review#cuticle oils#Dorset#drying drops#Dusty Pink Nail Varnish#Easy Manicure At Home#eco cuticle oil#eco-conscious beauty products#eco-friendly nail polish#Fashion Blogger#french manicure#gel nail kit#gel nail polish#green cuticle oil#Green Flash Nail Polish Review#Green Flash Review#Green Flash™
0 notes
Text
DIY AGE-OF-SAIL INSPIRED FOULIES
part III: the process
it’s been a couple weeks since i finished making the alterations i wanted to make to the bibs before waxing, but we finally had an open shop day at school where i'm not bothering my buddies over at the Lady Washinton (though let’s be honest, the only reason i’m not there now is because they’re in anacortes and i dont wanna do the whole drive-ferry-drive thing). HOWEVER, that means i got to spend 4 hours painting my overalls with hot toxic soup. as far as the soup recipe goes, I did actually end up changing it again. in my first post i said i’d do varnish, and the second post i said black paint. i was going to measure everything out nice and had oz quantities i was going to adhere to, but i forgot my measuring cup… lets be real though, it’s probably more historically accurate to just throw shit in a pot and go. I’M MEASURING BY VIBES FOR SCIENCE!! the final recipe went something like this:
1lb microcrystalline wax
~1 cup mineral spirits
~3/4 cup tung oil
~1/2 cup rust-oleum oil based enamel paint (black)
~2 tbsp pine tar
I probably could have done more pine tar but the class bucket was basically empty and i didn’t want to walk down the hill to get more. I also know that pine tar takes fucking forever to cure, and even a small amount smells incredibly strong (though i certainly don’t mind, i actually prefer to be covered in the stuff most times- it’s more a courtesy to the non-tall shippers who aren’t used to the incredibly concentrated stink of 10 campfires burning directly into your nostrils). the reason i added the pine tar is because of it’s anti-bacterial and anti-microbial properties, since once the bibs are cured i really won’t be able to wash them. also, from my (limited and haphazard) research, you don’t need a lot to reap those benefits.
i put the wax in a double boiler, and once melted, added the oil, thinner, and paint/pine tar all at once. once it was all sufficiently combined, i started painting it on, let it cool a little bit, and then went back in with a heat gun and brush to help the solution impregnate the fibers of the cloth. oh also. make sure you are in a well ventilated space AND WEAR A RESPIRATOR (see the i-learned section below). i did 2 coats all over in this manner, and then a third over the knees, butt, and ankles for good measure.
oils and tar over any kind of fibrous material can take weeks to fully cure (as i have learned well from rigging), so i am expecting to leave my garment and it’s accoutrements hanging in the shop for about 3 weeks before they reach any kind of wearable or testable condition. everything seemed to soak in pretty well, but i left the shop before everything fully cooled so i’ll do another update at the beginning of next week- i’m anticipating that i over-waxed and there will be some residue i will have to deal with (though in what way is to be decided).
cleanup was pretty easy, considering my proclivity for giant messes with any project i engage in- lots of mineral spirits and several rags seemed to do the trick.
some things i learned/would do differently:
oh my god this recipe makes so much. like. so much. i had like 2 cups leftover and i did 2 coats on my overalls, pockets, AND a 1’x3’ piece of spare canvas. if you were just waxing a pair of pants, halving the recipe would still probably be more than enough
putting the cold liquids into the hot wax makes it congeal a little bit, but you can’t tell when the black paint makes the entire contents of the pot turn, well, BLACK. id put the transparent stuff in first, let it all melt together, and then add the black paint so that there wouldn’t suddenly be so many solid particles all at once
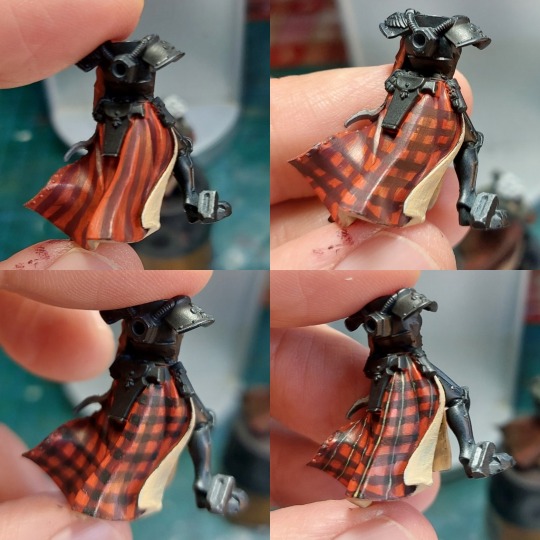
MIX FREQUENTLY. photo 3 shows the difference. i had mixed it really well at the beginning, but once it was all (presumably) a single solution, i stopped worrying about mixing it. the thing about paint/varnish/buildable coatings is that the reason they are buildable or have any sort of pigment is because of the suspended solids within it. this means that over time, the solids will coagulate at the bottom of the container, which is why you have to shake nail polish or stir paint before using it. this also means that i should have been mixing every couple minutes as i was painting it onto the bibs, so i ended up with a very pigmented mixture at the end, and a relatively translucent mix at the beginning. up until a certain point, i was getting a pigment that was not opaque but i was happy with, so i didn’t think too much of it until i was putting on coats that looked more brown than grey or black. anyways, mix your shit.
so… cotton burns. i was painting one leg at a time and then heat gunning it before moving on to the next leg. the wax/oil solution seems to make the fabric more resistant to burning, so the painted bits can take more heat than the untreated cotton next to it. if you, say, for example, (i definitely DID NOT DO THIS) get distracted by a particularly riveting tiktok your friend sent you of a snail vibing on a car windshield while your heat gun is blasting on high 2 inches from your pants, the raw canvas may or may not start smoking. i switched up to painting the Entire back or Entire front before heat gunning, and that seemed to solve the problem (also no more snail tiktoks)
respirators are kind of important. i was in a giant shop with vaulted ceilings next to a wide open garage door and i still had a bit of a headache after 4 hours of standing unprotected next to a pot of hot poison.
photo descriptions:
setup
setup part 2: electric boogaloo
pant ass- upper section 1 coat unmixed, lower section 1 coat mixed
spare canvas in the midst of coat 2
back of spare canvas after coat 1
back of spare canvas after coat 2
waterproof test!
finished garments and spare canvas, ready to cure
cleanup


#tall ship#sailor#historic sailing#boat building#sewing#oilskins#bibs#foulies#tin cloth#waxed canvas#age of sail#rain gear#fibre arts
61 notes
·
View notes
Note
those docs are sick as hell. did you use posca markers? comma also anything to seal the design on?
So I'm not an expert by any means but I'm happy to share my research
Also I wore them out and about on a misty rain day today and they seem to have held up but only time will tell
So from the research I did custom designs like this work best on certain types of docs (it said 'smooth leather' was best, and there was one that it absolutely doesn't work on so deffo look that up to be sure not to ruin your docs if you already have a pair you're thinking of decorating) I'm not really sure if mine count as smooth leather cause they're kind of matte and they might have been talking about a specific type but anyway- that's something to keep in mind.
Next said to prep the area you're painting. There's a few things you can use but i ended up just wiping some nail Polish remover (in place of rubbing alcahol) over the area with a cloth and leaving it to dry for a minute (don't go overboard with it though- you want to find the happy medium of taking off some of the oils so the paint can bond with the surface but not so much that you leave the area looking damaged or drying out the leather too much, that can cause long term damage)
I played with some designs and placement of the different eye sizes in my sketchbook before I was ready to brave putting paint on these brand new doc martens 😂
May have been a me thing but I do recommend it so you're as confident as possible with what you want to do every time you put the pen down. Depending on the type of fabric you can use tissue or a cotton swab with more rubbing alcohol to correct mistakes with posca but I couldn't find anything that worked for mine so I was just really careful.
Next unless you're really brave it's probably a good idea to use a soft pencil to draw the pattern to trace, then when you're ready to put posca on it (I used the type with the pointy plastic nib- makes it much easier to get sharp points) just really take your time with it
if you're adhd like me and feel burnt out after doing one side definitely take a break and come back to it when you're zoned into it again because when you're out of steam is when you'll start making mistakes and rushing things 😂
When you're all done and happy, and you're sure it doesn't need another layer for full vibrancy, (though fewer layers is preferable) posca dries really quick but just to be completely sure I let them sit for like half an hour.
Now I should preface this by saying i couldn't find literally anything about sealing posca on your docs online, most I could find were people saying just be sure to prep the leather and it'll be fine, but idk I live in England it's wet as fuck here I don't know if I trust that.
I did find one thing from posca saying you can use water based varnish to seal it on leather but idk if that was really talking about shoes? I don't have any varnish but I'm probably going to get some just to be safe.
I DID though use a layer of some of my sisters hairspray, because it was literally all I had to hand, which at least to me did seem like it made it more sturdy when I ran a fingernail over it but I don't know if I trust getting them too wet with only the protection of hairspray
Anyway this was a super long response overexplaining more than you actually asked 😅
but i thought this might be helpful to put out there for others who are trying it for the first time because I couldn't actually find anywhere that had clear instructions in one place, hope it helped 😂
34 notes
·
View notes
Text

Before oil wash on top, after oil wash on bottom. Probably going to gloss varnish everything before painting the base.
18 notes
·
View notes
Text
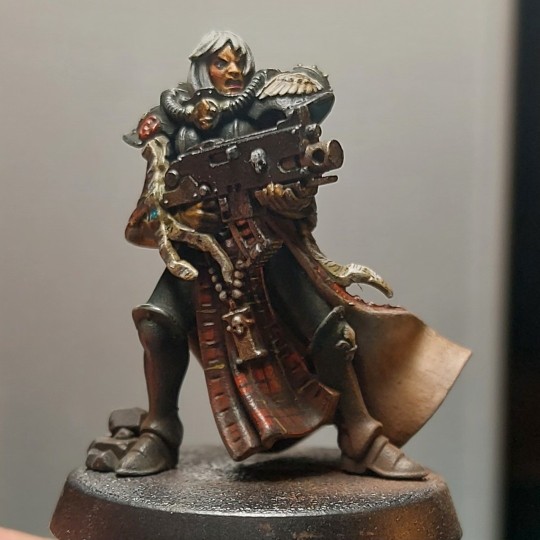

Painted another corpse fanatic today, so captured the process if some of you were interested. Yes, I still need to finish the base.
1. Base coat in scarlet/ rhinox hide mix
2. Black / khorne red stripes
3. As before, but make a lattice.
4. In the cross sections paint a black square.
5. A thin line vertical of Averland Sunset and white. I do this a bit bold, don't worry we'll knock em back in a bit.
6. As before, but horizontal
7. Using black, create a thin lattice in the scarlet boxes, vertical and horizontal.
8. Get brave. Apply a coat of matt varnish. Let it dry and cover in AK Streaking Grime. Let this dry and with a brush and white spirit brush to the bottom of the model.
9. Apply an oil wash of black and brown. As before let dry and dab off.
You're done. Add pigments if you like for extra dirt.
Full credit, I adapted my process on this tutorial by @kujopainting
youtube
85 notes
·
View notes
Note
What techniques do you use to get your T28 guys to look so magnificently dirty?
I wish you asked this a week ago, I had just finished painting a bunch of Fodder. Luckily for you the backlog is never ending, so I painted some more guys and took pictures!
The short answer is: Texture Paint, Drybrushing, and Oil Washes. But here's a more in depth tutorial with pictures. For this technique none of the specific colors or brands matter so I'm going to be very general about what to use.
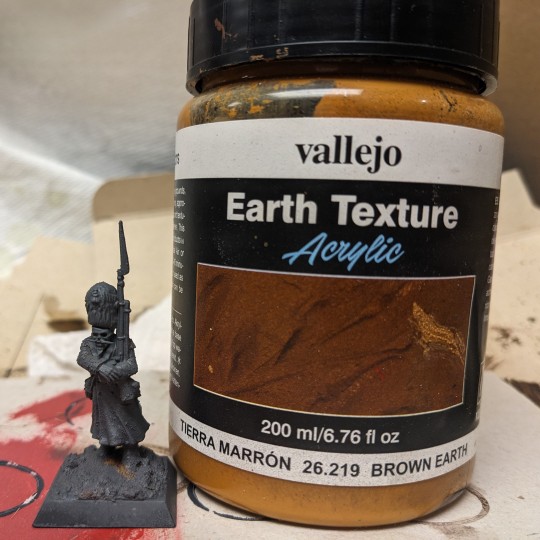
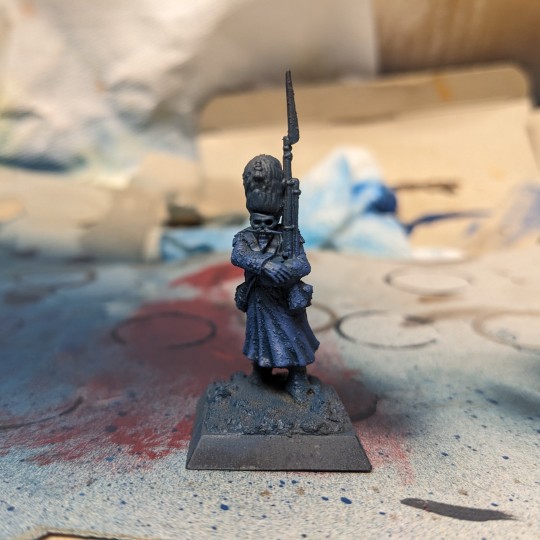
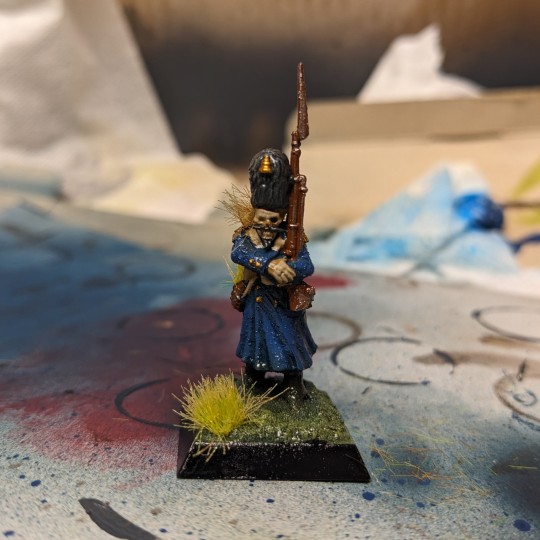
Before priming, I applied texture paint to the the model's coat, and his rifle. The dirt texture on the rifle will help sell the rusty appearance later. For pretty much every different color on the model I will paint it a dark color, then drybrush/rough highlight the same color in a lighter tone over it. Since the majority of the model is his coat, I paint the entire thing dark blue, then drybrush a lighter blue over it.
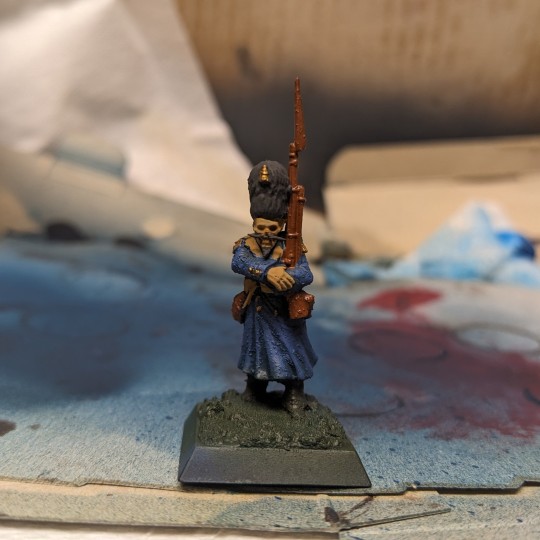
Next I paint all of the base colors for the rest of the model. Dark Grays for the boots and hat. Brown/Beige for the sash, skull, and hands. Dark brown for the leather and rifle. Dark gold for the shoulders and tassel on the hat. Once dried, I drybrush or dab rough highlights on these same spots with a lighter tone of paint. Light gray for the hat, bright gold for the shoulders and tassels, light beige for the bone. For rusty metallics, I drybrush silver over the brown painted rifle.
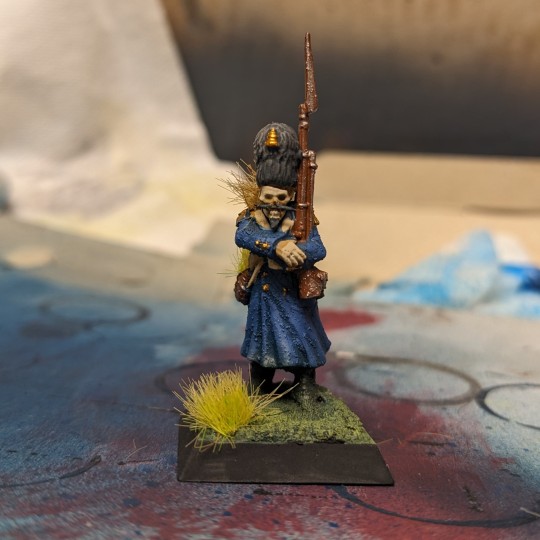
Grass tufts are carefully superglued onto the miniature. Do not overglue and be sure to let it dry properly before continuing. Too much glue will fog up the surfaces and ruin the paintjob! The miniature is then varnished with gloss clear coat. Wow, look at that shine!
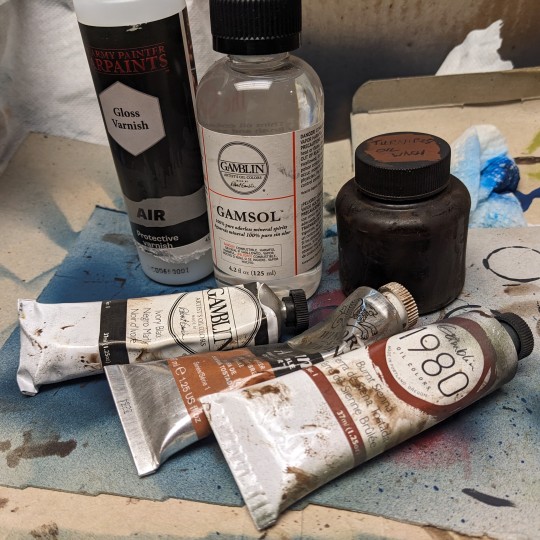
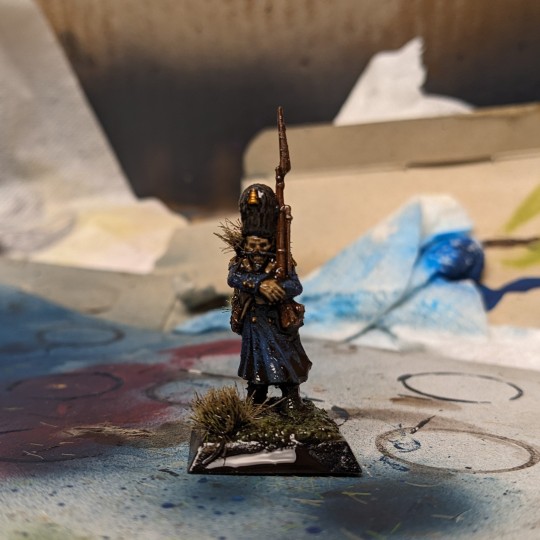
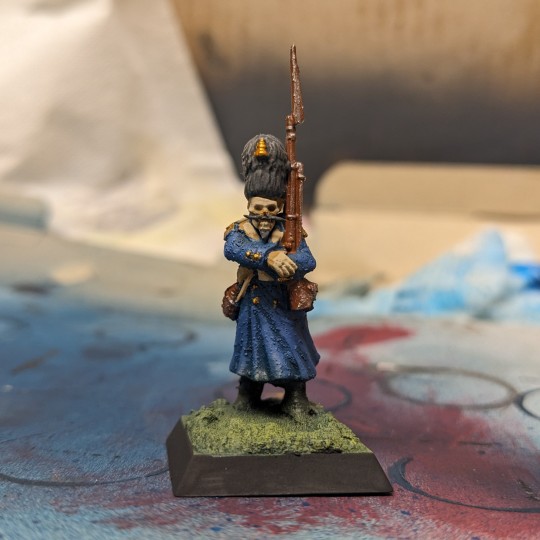
Now its time for the turnip oil! I have a shade wash I created by mixing Brown, Red, and Black Oil Paints with Mineral Spirits. I mix it thoroughly and test a small drop on a paper towel to make sure its not too thin or too thick. If you've ever spilled Agrax Earthshade, you know the consistency of the wash you're looking for! This is applied over the model to pick out the details like any other shade wash would, as well as give it that really dirty look.
Again, make sure the model was covered in Gloss Clear Coat first as it helps the Oil Wash spread out on the miniature and get into all the recesses. After the model dries, you can dip a cotton swab in Mineral Spirits to reactivate the oil wash and move it around as necessary. If you're happy with how everything looks, apply a final coat of Matte Varnish (Or Gloss or Satin, whatever your preference) to seal your miniature and done!
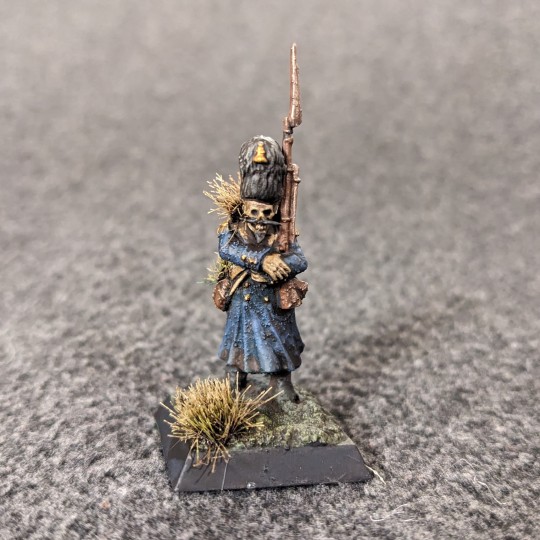
Ready to die an unglorious death for the Roots! Thanks for the ask, I hope all this makes sense, I've never done a tutorial before. Happy Hobbying! :D
#maniakminis#hobby talk#hobby tutorial#painting tutorial#turnip28#miniature painting#miniature wargaming#wargaming#long post#longpost
22 notes
·
View notes
Text
Here are the steps and some tricks that I use to make water bases for my minis! (〃´▽`〃)
Thank you @lisuune for asking!~☆ I hope this will be of help!
1st step is to decide what the base "water" colour is!
For murky pounds you can use browns and beige, for a swamp, I use dark greens, olive, and sepia, for deep water the best would be shades of blue, depending of the depth that you want.
I'll use this mini as an example. I had some fun pouring cheap acrylics mixed with regular white/school glue (not obligatory, but I added a drop of silicone oil for the eye effects). I cut a plastic bag in two and let the acrylics dry. After acrylics dry, they turn to plastic, which is easy to cut and glued on the base.
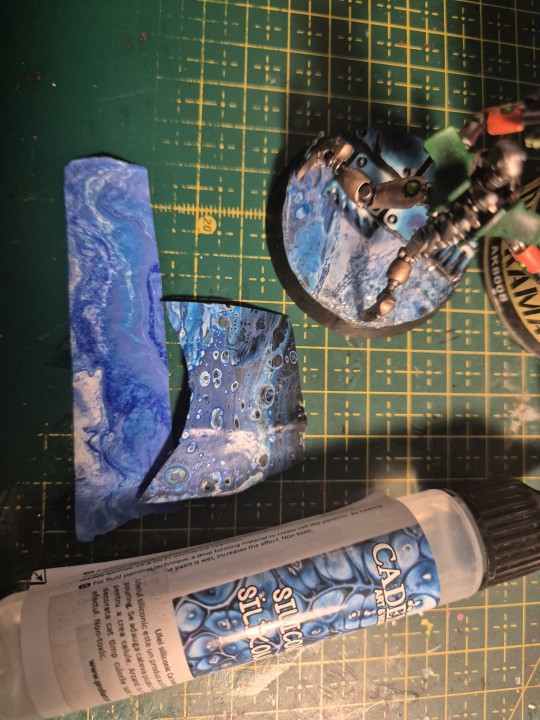
(I need to flip my cutting mate, sorry for the mess (ó﹏ò。))
Always let painrs dry in a well ventilated place.
2nd step is to decide what sort of "water" you shall use.
I am mostly using two materials, but there are a few others as well. I never tried them, but I read that people use transparent glue, varnish medium, or medium gel. I personally have experience with resin (both UV and regular epoxy resin) and clear acrylic.
(! Always work in a well ventilated space with resin ! It is super important, the fumes are toxic! Wearing gloves with resin is a must!)

When pouring, you can use a silicone mold for the base, or as my silly ass did the first time, use a little tape to create a dam (this only works if you intend to pour just a little).
Depending on how much you need, you can use: acrylic and epoxy resin for projects where you need a lot. Those allow you to pour multiple layers that will merge marvellously!
The trick is to be patient to let it dry, and pour very slowly to avoid air bubbles. Usually, a spritz or spray of alcohol is enough to eliminate the surface bubbles!
While acrylic is way safer and friendly for beginners, resin allows you to do neat tricks.
Use UV resin when you don't have to use a lot, because it doesn't layer as nicely as the regular one that needs to dry to gel (harden).
You can leave the UV resin under sunlight, and it will harden, or you can use an UV lamp, or flashlight, which will cause it to harden in seconds!
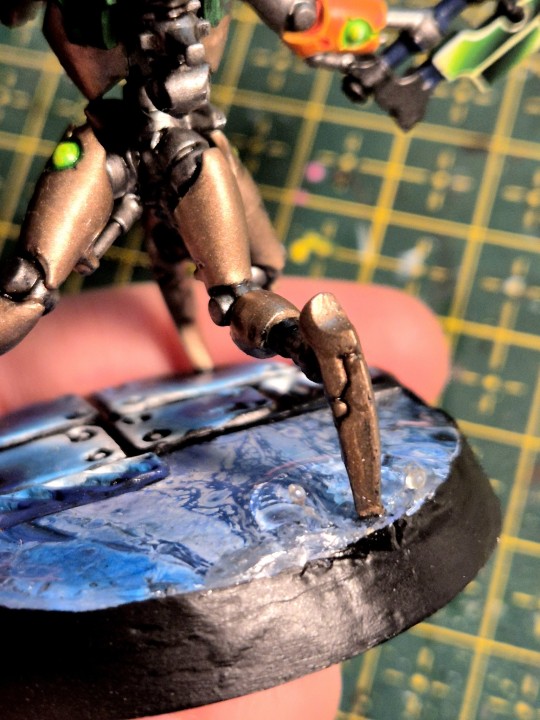
I made here a watter ripping by using a compressed air can and curing as it was blown into place. (*sensible chuckle*).
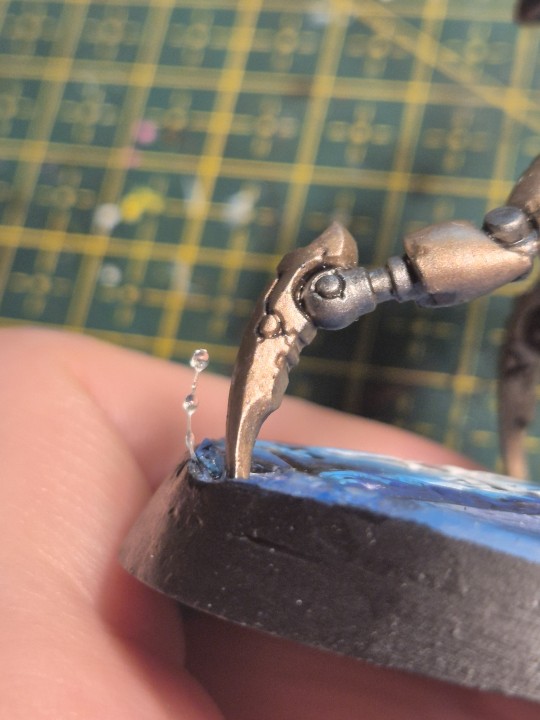
If you have fishing wire or transparent tread, you can pour a few drops on it and cure it for a cute splash effect!
As an extra, I use putty to make the "solid ground". I really like the Green Stuff world rolling pins, but a 3D printed one can work just as fine! (Don't forget to cover them with sculptor vaseline, or just water. For me, I prefer starch, that is why mine are so dusty)

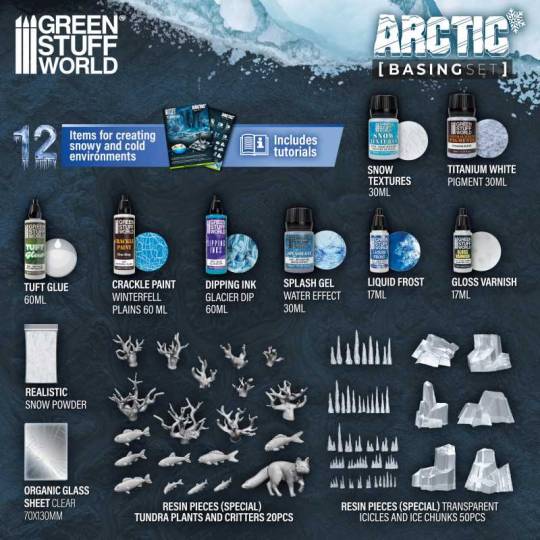
I saw some beautiful basing kits from GSW, that I will absolutely buy to try. They have them for all kinds of terrain, including water, swamps, lava etc.
Happy basing !~♡
(。・ω・。)ノ♡
15 notes
·
View notes
Text
Blogging this wicker restoration for some reason

My mom got ^this cool basket off ebay! She's very dingy (the basket not the mother) on the inside + handle tho:

So 1st step was a wash.
Filled the sink with maybe a quart/liter of warm water + 1tsp/5ml of Dawn dish soap (chosen for its oil-cutting abilities) + 1/2tsp/2.5ml of Dawn Powerwash (meant for burnt pans but I find it's a fast-acting general grime remover, while still gentle, given it's intended for use on teflon cookware without damaging it.)
After a gentle scrub with a horse hair laundry brush (they're softer), this was the result:


(Her base is thin oak planks; to be safe re: warping, I immediately blow-dried her, with an actual hair dryer & not a heat gun, bc I was also worried abt loosening any glues)
So. Better, but now we can see we're dealing with a worn finish (note the sheen/color vibrancy difference between the 2nd and 3rd pic) on the inside and handle.
Sometimes a wax buffing is enough to get vibrancy back in wood (& I'm fairly certain she's entirely wood, & not another plant fibre wicker with a wood base/handle), and that's what I was hoping to get away with,
But!
As I handled this thing, the wicker was so old + brittle that twig ends were breaking off. So to extend her life (& be able to actually put shit in it), I'm just refinishing the inside.
Hoping this will a) revive the wood coloration, obvs, but also b) that the varnish will soak into the very thirsty wood & give it some strength.
Varnish updates tomorrow!
#diy#carpentry#kinda.#gonna use that as the organizational woodshits tag i think.#im doing a lot of bs in the garage l8ly & i wanna talk abt itttt
8 notes
·
View notes
Text
Disrupt
•I hoped to cover the fridge and the painted food inside with a clear oil based varnish to make it look glossy, but I ran out of time.
youtube
•Here, I am grabbing a slice of cake to eat, but I then see a note saying
" Do not touch, this is for guests"
•I've added energy drinks cans, too.
youtube
•I added hinges by putting wire through the doors and through the fridges side. I didn't use real hinges because I was afraid they would tear the cardboard. Now the doors are finally doors!

•I added alfabet fridge magnets. Made from cardboard. They spell out binge eatting. Which is what my project is about.

•Also, I added a plug and socket

•I spray painted the fridge doors and body blue on the outside and white on the inside.
32 notes
·
View notes
Text

Producing JP-7, the fuel that powered the SR-71 Blackbird, caused a nationwide shortage of bug spray. Here’s why.
The SR-71 Blackbird
In the 1960’s, the US Air Force (USAF) developed the SR-71 Blackbird, a plane that could travel more than 3 times as fast as the sound produced by its own engines.
SR-71 T-Shirts

CLICK HERE to see The Aviation Geek Club contributor Linda Sheffield’s T-shirt designs! Linda has a personal relationship with the SR-71 because her father Butch Sheffield flew the Blackbird from test flight in 1965 until 1973. Butch’s Granddaughter’s Lisa Burroughs and Susan Miller are graphic designers. They designed most of the merchandise that is for sale on Threadless. A percentage of the profits go to Flight Test Museum at Edwards Air Force Base. This nonprofit charity is personal to the Sheffield family because they are raising money to house SR-71, #955. This was the first Blackbird that Butch Sheffield flew on Oct. 4, 1965.
Throughout its nearly 24-year career, the SR-71 spy plane remained the world’s fastest and highest-flying operational aircraft. Flying at Mach 3+ from 80,000 feet, it could survey 100,000 square miles of Earth’s surface per hour. And in the off chance an enemy tried to shoot it down with a missile, all the Blackbird had to do was speed up and outrun it.
Its engineering was so cutting edge that even the tools to build the SR-71 needed to be designed from scratch.
JP-7, the SR-71 Blackbird fuel
In fact, given that the Blackbird became so hot because it cruised at a speed of Mach 3.2 conventional jet fuel could not be used in it. A jet fuel with a high flash point, and high thermal stability was required. To satisfy this requirement Shell produced a special blend of fuel called JP-7.
Specifically, JP-7 fuel (referred to as Jet Propellant 7 prior to MIL-DTL-38219) was developed for the Blackbird’s Pratt & Whitney J58 (JT11D-20) turbojet engine. During flight, the SR-71 could attain speeds in excess of Mach 3+, which was the most efficient cruising speed for the J58 engines. However, very high skin temperatures were generated at this speed due to friction with the air. A new jet fuel was needed that was not affected by the heat, so JP-7 jet fuel, with a high flash point and high thermal stability, was developed for this purpose.
JP-7 fuel production caused a nationwide shortage of bug spray
According to the SR-71A Flight Manual, “The operating envelope of the [J58] JT11D-20 engine requires special fuel. The fuel is not only the source of energy but is also used in the engine hydraulic system. During high Mach flight, the fuel is also a heat sink for the various aircraft and engine accessories which would otherwise overheat at the high temperatures encountered. This requires a fuel having high thermal stability so that it will not break down and deposit coke and varnishes in the fuel system passages. A high luminometer number (brightness of flame index) is required to minimize transfer of heat to the burner parts. Other items are also significant, such as the amount of sulfur impurities tolerated. Advanced fuels, JP-7 (PWA 535) and PWA 523E, were developed to meet the above requirements.”
Producing JP-7, the fuel that powered the SR-71 Blackbird, caused a nationwide shortage of bug spray. Here’s why.

This print is available in multiple sizes from AircraftProfilePrints.com – CLICK HERE TO GET YOURS. SR-71A Blackbird 61-7972 “Skunkworks”
Flit mosquito repellant
Noteworthy, JP-7 production caused a nationwide shortage of bug spray.
Shell Oil developed JP-7 in 1955. Manufacturing several hundred thousand gallons of the new fuel required the petroleum byproducts Shell normally used to make its Flit insecticide, causing a nationwide shortage of that product!
One of the ingredients in JP-7 just so happened to be a crucial part of Flit mosquito repellant. Bearing in mind the huge amount of fuel we’re talking about here, Shell didn’t exactly have enough supply to meet the newly increased demand, so mosquitos everywhere caught a lucky break!
JP-7 had a high flashpoint. It was not flammable and every time an SR-71 needed fuel, tankers were always there, they were terrific and deserve high praise.
SR-71 Blackbird JP-7 fuel used by the Boeing X-51 Waverider
Today the JP-7 fuel is used by the Boeing X-51 Waverider in its Pratt & Whitney SJY61 scramjet engine, with fuel capacity of some 270 pounds (120 kg). As with the SR-71, the X-51A design super-cools this fuel (cooled by extended subsonic flight in the stratosphere; prior to acceleration to supersonic speeds); then, when in supersonic flight, the fuel is heated by its circulation through heat exchangers which transfer to it the heat load of the interior spaces of the airframe. The fuel is then pumped through rotating mechanical parts of the engines and auxiliary mechanical equipment, providing both lubrication and cooling. Finally, at a temperature of nearly 550 °F (290 °C), it is pumped into the fuel nozzles of the engines.
Be sure to check out Linda Sheffield Miller (Col Richard (Butch) Sheffield’s daughter, Col. Sheffield was an SR-71 Reconnaissance Systems Officer) Twitter X Page Habubrats SR-71 and Facebook Page Born into the Wilde Blue Yonder for awesome Blackbird’s photos and stories.
Photo credit: U.S. Air Force
@Habubrats71 via X
11 notes
·
View notes
Note
i do not mean to presumptuously impose on thee artiste's creative process but have you thought about pouring lightly-dyed epoxy or resin or something into the sardine cans to make it look like they're packed in oil?
thats no problem at all lmao, and I have actually! the original ones were coated / filled with varnish, but when it dried it set in a way that made it less full than intended (and gives em a lil varnishy smell)
i decided a few days ago that im gonna start on a new batch since i recently started to use resin on my clay works, so im excited to see how it turns out! I probably wont dye the resin, but i have been thinking about painting the base to look like theyre sat in tomato sauce and such
5 notes
·
View notes
Text


Painting has begun on my zone mortalis terrain! Several different coloured sections are planned. These ones will be silver, and an off white section is in the process of being base coated
Painting process for these walls is all follows
Prime black
Sponge on Rhinox Hide wherever you like or where you think rust would form. This is one of the steps with the purpose of suggesting rust.
Sponge/Drybrush on Leadbelcher heavily.
Paint details with some warm colours. (We are here). I used Scale 75 Decayed Metal and Dwarven Brass, as well as ProAcryl Burnt Red.
Later, I'm going to gloss varnish and oil wash, paint the lights with an airbrush spraying white and either one of the ProAcryl reds, contrast orange or blue. I plan to use a mix of lamp black and burnt umber, with more burnt umber in the mix. I prefer a warmer tone generally.
Then I'll matte varnish it.
After that, I'll hit it with some rust effects and pigment powders to represent rust.
11 notes
·
View notes
Text
DIY AGE-OF-SAIL INSPIRED FOULIES
“Cold, wet, sleep in your wet clothes no other way to dry them,” is the sentiment expressed by Capt. Irving Johnson in the 1929 film Around Cape Horn. As much as I understand the reality of having so little space that hanging wet clothes between watches below-decks is near impossible, I also would very much like to make note that rain gear did exist aboard ships long before the invention of our modern rubber and synthetic foulies. It was, in fact, quite common for sailors to go such lengths as impregnating the fibers of their clothing with things like tar, spermaceti, alum, lime, paint, and even lead (Putman).
My frustration with rain gear has been rather consistent through my life aboard boats; I find that the comfortable, flexible bibs wet through relatively quickly in the rigorous conditions of tall ship life, and the more rigid weatherproof fisherman-style bibs don’t allow me the range of movement I like to have in the rig. Therefore, I have turned to look into historic methods to attempt to create my own, re-waterproof-able foul weather gear. (Side-note: I hate that I am often not able to maintain or repair modern waterproof garments when at sea for long periods of time due to the inaccessible processes that went into making the clothing waterproof in the first place). That said, the methods listed above are not safe or accessible to me in our modern world, so I must create a more contemporary recipe based on both the needs that I share with my sailing ancestors, and our present available safe materials.
In Tyler Rudd Putman’s article “Whalemen and Waterproofing IV: The Recipes,” there are two materials mentioned that I can and do have access to: linseed oil and varnish. I am also aware of tincloth items sold by various companies -a canvas cloth made waterproof by the infusion of a beeswax and oil mixture into the fibers. And so, I have a jumping-off point. In my efforts to make this piece of gear as waterproof as possible (since I will be putting in valuable time and materials to make it) I turn to Youtube University to see if anyone has improved upon the linseed-oil-and-beeswax solution. Lo-and-behold, someone has! The Lone Woodman posted a video 6 years ago entitled “THE ULTIMATE GUIDE TO MAKING TIN PANTS,” where he goes into detail about the molecular structure of different oils and waxes in order to find the optimal combination of durability, water resistance, and flexibility. His final recipe is:
16 oz microcrystalline wax
2 oz Tung oil
6 oz Tung oil finish
8 oz mineral spirits
As you may notice, he includes Tung oil finish in the mixture: an oil finish with added varnish components and drying agents. An interesting alignment with the information gathered by Putman regarding rain gear in the age of sail. For this reason, I have chosen to forego the tung oil finish, and instead adjust the ratios to make an oil-wax-varnish mixture that will hopefully add extra uv protection and help with cure time for my own garment. My final recipe I have come up with is:
16 oz microcrystalline wax
6 oz Tung oil
2 oz varnish
8 oz mineral spirits
Now all that I have left to do is make the thing, and report back on whether or not we, with our modern technologies and fabrics, have overlooked an incredibly simple and effective way of keeping ourselves dry.
SOURCES:
youtube
youtube
#tall ship#sailor#whaling#foulies#age of sail#rain gear#historic sailing#historic sewing#tincloth#oilskins#Youtube
7 notes
·
View notes
Text
Just finished up at PONK.SPACE, a by-the-hour shared workshop in Holešovice
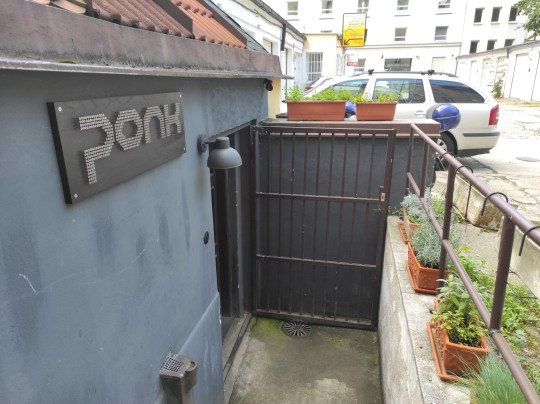

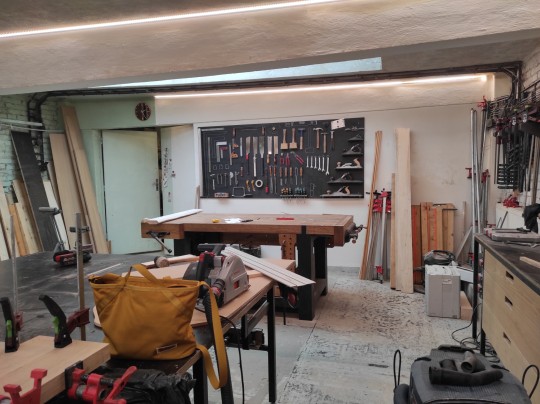
Absolutely fantastic shop, they were running an introductory welding class in the metal shop today.
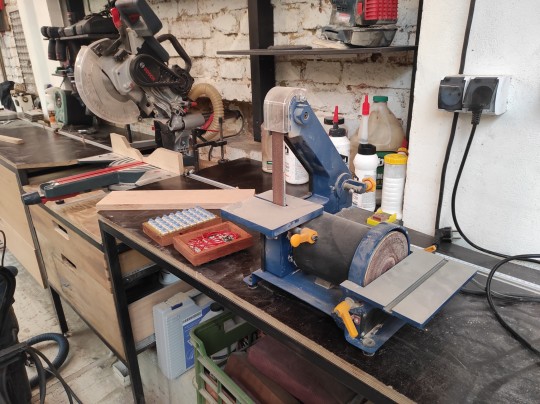
Final fit-up on Galena (yes it's still not finished. I know.) bringing in the wood frame to fit with a belt sander.
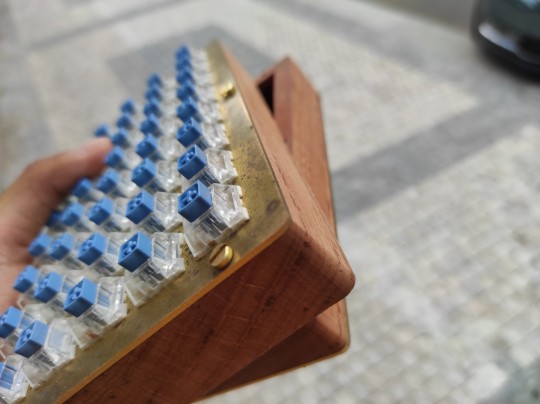

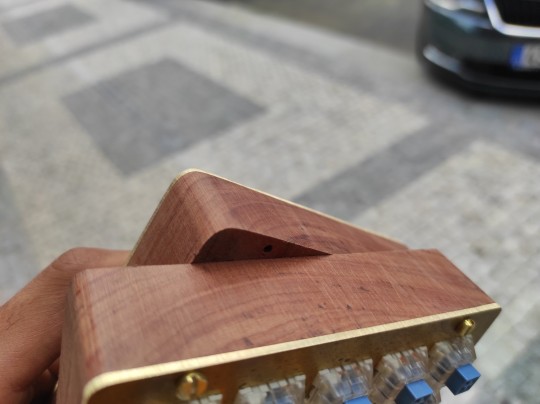

Looking damn fine if I do compliment my own handiwork, positively nautical. Ironwood remains a true pain in the ass to work with, in the future remind me not to work on projects in ironwood and white oak, which was what Galena frame Mk.1 was made of.
Remaining tasks: polish up the brass plate and seal it with... something, probably clear varnish, so that it stops tarnishing when you look at it. Print, laser cut or otherwise manufacture a base for this. Oil the wood. Last step there probably also going to be done at PONK so that I can just borrow their oils and also do the last sanding pass without having to do stupid shit on my balcony.
22 notes
·
View notes