#now the gifmaking begins
Explore tagged Tumblr posts
Visit Tumblr Blog
Explore Tumblr blogs with no restrictions, modern design and the best experience.
Last Seen Tumblr Blogs


Fun Fact
28.6 is the average number of monthly visits per US mobile user.
Text
youtube
Hello COD friends. Here's my full run of the campaign with no commentary. I died twice, but those have been removed and some silences / wait screens have been chopped to make the thing more seamless. Chapters and full subtitles are included. Full thing is 3 hours and 22 minutes :)
#modern warfare#modern warfare 3#modern warfare III#MW3#MWIII#call of duty#call of duty modern warfare iii#call of duty modern warfare 3#call of duty mw3#call of duty mwiii#simon ghost riley#john soap mactavish#john price#captain john price#kyle gaz garrick#kate laswell#vladimir makarov#c: mine#mine: cod#now the gifmaking begins
19 notes
·
View notes
Text


#mark lamarr#never mind the buzzcocks#gifset#my gifs#hello microscopic tumblr mark lamarr fandom#im in the gifmaking phase of insanity now#be the derangement you wish to see in the world#he's so cute i just finished this which is the last episode of his run#how will i RECOVER what am i going to DO#i took this boy for granted for so long i'm so sorry#TIME TO START FROM THE BEGINNING ASLBJHSDJLBHljhsldjhb#i need professional help#i REALLY do need professional help#blorboposting
10 notes
·
View notes
Text
TILE TRANSITION TUTORIAL

a couple of people have asked me for a tutorial on how I did the penultimate gif in this set, so here goes! this is my first tutorial, so please feel free to reach out with further questions if anything's unclear.
note: this tutorial assumes you know the basics of gifmaking, can create the base gifs, and are familiar with timeline mode.
STEP ONE: create the base gifs! I'd recommend staying between 25-40 frames for each gif, since the transitions we'll use later tend to increase gif sizes. these are the ones I'll be using for this tutorial:


STEP TWO: create the guide layouts for both base gifs. for this panel, I chose a 4x4 grid — I would recommend keeping the number of "tiles" low because it can get tedious, but have a minimum of 9 (3x3 grid).


now your canvas should look like this:

STEP THREE: create the tiles. this is where the going gets rough; there might be easier ways to do this that I couldn't think of 😭 if there are any please send me an ask!
essentially, in this step we'll cut up the base gifs into smaller squares so that each tile can be manipulated separately when we put both gifs together. to do this, first create a square using the rectangle tool and the guides. then duplicate the base gif, move it above the square, apply a clipping mask, and then convert the clipped gif and square (selected in the image below) into one smart object.


ALTERNATELY: you could duplicate the original base gif and use layer masks to isolate tiles. create a layer mask for the duplicated gif layer and, with the layer mask selected, drag your mouse over a square (using the guide layout) and press delete. then press ctrl/cmd + i to invert the layer mask so that the gif only shows in the square of your choosing.
now repeat until you've got the entire gif in tiles, and do the same for the other gif!
since the transition effect is achieved by staggering the crossfades for each tile of the final gif, you can cheat by having multiple tiles "flip" at a time, ideally no more than four. this means you need to cut the base gif up into fewer pieces. to do this, simply draw multiple squares instead of one and then merge the shapes, before duplicating and clipping the gif onto them.


if you do this, it's essential to remember that you have to divide both gifs up in the exact same way. each piece of the b/w gif has to correspond to a piece of the purple gif!
this is what the layers look like for each gif once I'm done:


I have them lettered so that it'll be easier to match them up in the next step.
STEP FOUR: this is the complicated bit that took me two days to figure out. I'll do my best to explain but don't hesitate to reach out if something isn't clear!
to begin, open up a new psd and import both base gifs into it. (remember to click "create video timeline" and ensure that your gifs are all in order before proceeding.)
now, the trickiest part about this transition is ensuring that all the little tiles sync up so that the larger gif is coherent. so first we'll create some markers (just empty layers) to ensure that everything lines up as it should. — marker 1: at about halfway through the first gif (b/w in this case) — marker 2: at about a quarter of the gif length — marker 3: close to the end of the gifs

at this point we're ready to start bringing in the tiles. I'm going to delete the base gifs from this new psd just to keep things cleaner!
first thing to do is import my b/w tile. move the timeline slider over to marker 1 and split the first gif. (if it helps, rename the split gifs and add (start) and (end) to the two halves.) then, move the (end) half to the beginning of the timeline, and the (start) half to line up with marker 3.
the purple tile is easier to manage. simply import it into the psd and line it up with marker 2.
your timeline should now look like this:

notice the overlap between the gifs at their beginnings and ends — this is where you'll be able to cascade the tiles flipping, so it helps to have a significant amount of overlap.
crop the three gifs for this tile as you see fit! since this is the first tile I want to flip from b/w to purple, I'll crop gif 1a (end) all the way to the current position of the timeline slider (red line with blue tip) and leave the beginning of gif 2a uncropped. for the flip from purple to b/w, I'll crop both gifs a bit.
once that's done, drag all three gifs onto the same level in timeline so they form a video group. your timeline should look something like this:

now you just repeat the process for all the other tiles! as long as you made sure that all the tiles in one gif correspond with tiles in the other gif in step three, this should be a fairly painless process. make sure to crop the starts/ends of the gifs separately so that they don't all flip together.
this is what my layers look once I've done all the tiles:

and the gif!

STEP FIVE: transitions! click on the half-white square (top right of the left column in the timeline, beside the scissors) and select the crossfade transition, then drag it between two gifs in a video group. it should create a two-triangle symbol and shorten the overall length of the video group.


apply the transition to all the tile flips, ensuring that the duration of all transitions is constant. this can sometimes be tricky because ps likes to change the duration of each transition, so right click on the transition symbol and manually change all your transition durations to be the same.
your layers should now look something like this:

STEP SIX: draw the grid. bring back the guide layout from step two and using the line tool (I like 2px thickness), trace the grid. adjust opacity as you see fit (50-80% is usually a good idea), so that the canvas looks like this:

STEP SEVEN: export and celebrate! you're done!
I hope this tutorial made sense and was easy to follow, and happy giffing! my inbox is always open for any questions <3
#tutorial#ps help#ps tutorial#userace#alielook#userabs#usercats#userhella#userfaiths#tuserabbie#usershreyu#usertreena#tuserlucie#uservivaldi#usertj#usergiu#userroza
803 notes
·
View notes
Note
Hello!
I absolutely love your edits and gifs. I was thinking about making edits/gifs too but I'm not sure where to start : ( Would you be able to share some resources? Or any tips you have for someone that's just starting out? I'm not even sure where to download the videos from :/
Thank you in advance!
hello!! omg thank you so much for liking my gifs 🥹🫶🫶
Of course! In this post I'll share some tips that I think are helpful when making gifs, specially from asian dramas (mostly chinese and korean)!
Where to download k/cdrama videos?
dramaday (korean media only)
mkvdrama (korean, chinese, japanese, thai etc)
avistaz.to (they have the most complete catalog of asian dramas but you can only have access to the files if you register and they open for registration only every now and then so if you want to join, you have to have a invite or wait till they open)
2. Where to make gifs?
Mostly, the gifs on this website are done using Adobe Photoshop but I think for the past few years there is a lot of users who use Photopea which is an online (and free) version of photoshop.
3. How to make gifs?
Well, I think there's a some ways of making gifs but the 2 most common are through screencapping and using vapoursynth. Before I knew how to use and install vapoursynth I used the screencap method a LOT so I totally recommend you to begin giffing using the screencap method before you try other ways of giffing. Also, with this method, you can use on both Photoshop and Photopea.
In this gif tutorial made by @kylos you can learn how to install the program mpv to take screencaps and how to make gifs using the captures.
There's this complete guide on how to gif made by @cillianmurphy that is very helpful.
Also, this comprehensive giffing tutorial by @redbelles is great!
But if you want to know how to gif using vapoursynth (if you are an MAC user), i totally recommend this how to install post and COMPREHENSIVE GIFFING TUTORIAL (vapoursynth + ps cc 2018) post, both from my beloved @dingyuxi 🫶
If you don't have Photoshop and want to make gifs using Photopea, I think this and this tutorials will be great for you.
4. How to color?
Coloring gifs is something very personal to each gifmaker but if you want to know how to start doing it, i recommend you these tutorials:
becca’s mega coloring tutorial by @nataliescatorccio
coloring tutorial by @magnusedom
simple gif colouring for beginners by @kinnbig (specially focused on east & south east asian skin tones)
Finally, I recommend you looking at the resource directory from @usergif because they have a collection of tutorials and resources that are very handy when making gifs!
If you have any particular question from how I gif, I will gladly answer!
201 notes
·
View notes
Note
hey!! would you mind doing a tutorial on how you blend your gifs? they're so perfect! if not, then that's fine but thanks anyway :)
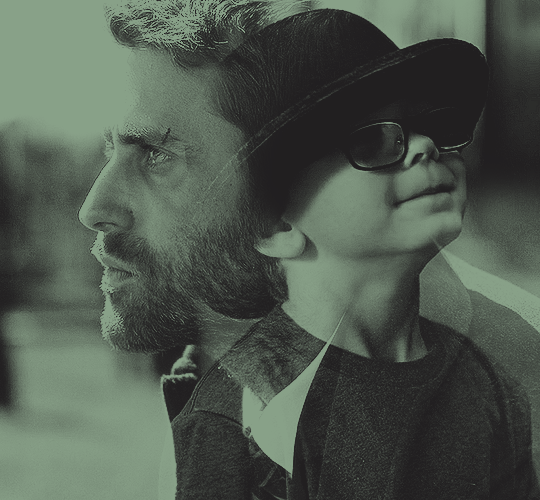
hi there! first of all, thank you for the kind words, i appreciate it so much! and i'm always more than happy to make tutorials! below the cut i'll do my best to explain my process when it comes to creating blended gifs like these:
original gifset
original gifset
original gifset
original gifset
disclaimer that i in no way consider myself an expert when it comes to blending. i actually struggle with it quite a bit sometimes and there are tons of gifmakers far more talented than myself. here's a link to all the blending tutorials i've come across for my other blog @gifmakerresource just in case!
when it comes to blending two or more scenes/shots together, i cannot overstate how important the scenes you choose are. i'll go more in depth on this in a moment, but there have been so many times when i'm making gifs like the ones above where i spend ages testing out different scenes together to see if they'll actually work and give me the desired effect.
so, what should you be looking for when selecting your scenes? in my opinion, what's most important (and can therefore cause you the most trouble) is lighting and contrast. dark on dark is what blends best. now, you can obviously tweak these things using adjustment layers, but i think it's best to set yourself up for success right from the very start.
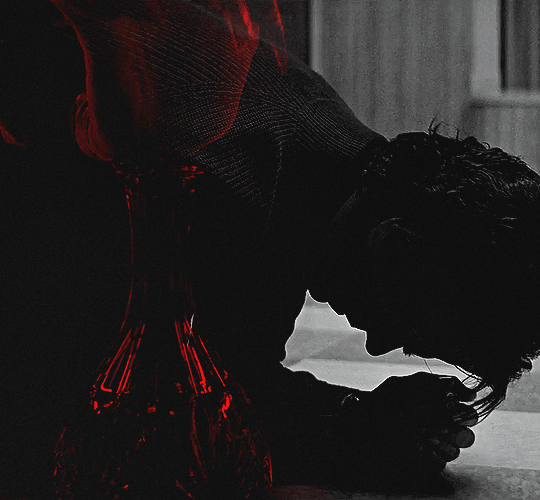
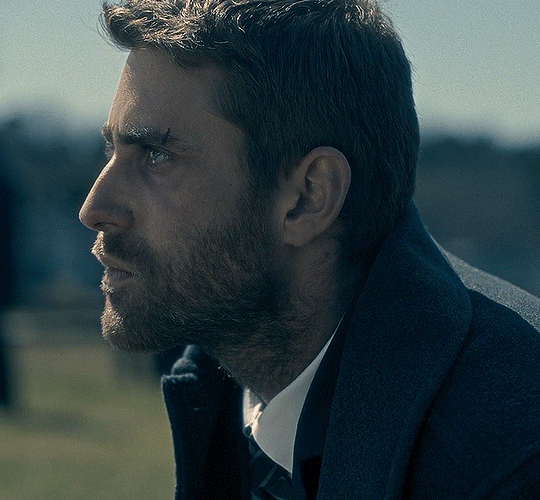
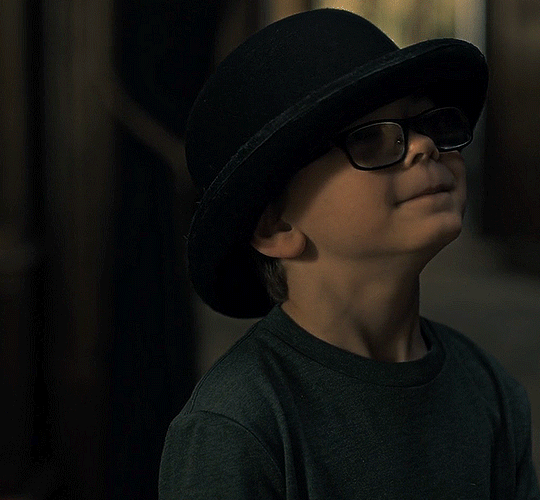
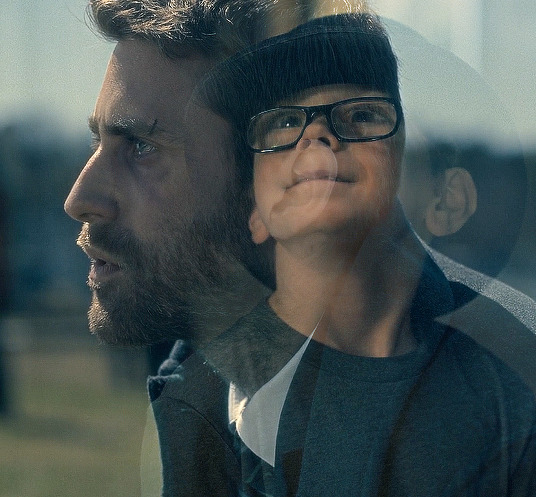
if we look at my first and last examples above the cut (luke in hill house and pruitt in midnight mass), these are the two that show this the best. the scene of adult luke is high in contrast to begin with; we've got areas of bright highlights and dark shadows and the latter are the areas where the blending shows through the most clearly. luke's hair and shirt are darker as is young luke's shirt and hat. the same can be seen in the midnight mass example. both scenes are on the darker side to begin with, but the shot of pruitt praying is silhouetted and makes for very stark contrast, allowing the shot of the angel's blood to be seen most easily in the darkest parts.
now, a lot of this does and can come down to trial and error and i want to make a point of saying that before i get into the actual process. there have been numerous times when i'm working on gifs like these where i have to try out multiple different shots and scenes until i find something that works. sometimes, i just save what i've done so far as a psd and go work on something else for a while, and then i can come back and look at everything with fresh eyes at a later time -- never underestimate the power of doing this, btw. some of my most popular and most favorite sets have happened as a direct result of taking a break!
now it's finally time for what you came here for! how do you do this? i'll walk you through this step by step and for now, i'm just going to be walking through 2 gifs blended into one. i've done 3 and even 4 blended into one, but they are outliers adn should not be counted. blenders georg, who created photoshop and blends over 10,000 gifs a day -- [gunshots]
step 1: make your base gifs. i'm assuming basic gifmaking knowledge, but if you need some help there, here's a tag on my resource blog with all beginner gifmaking tutorials (and i'm willing to make one of my own, personal process if anyone shows interest).
i'm mostly talking converting them to timeline and into a smart object. each person's process varies a little, but i personally use an action i made that converts from frames to timeline and applies the sharpening settings i use all in one. it's entirely up to you if you want to color your gifs before or after you have them on one canvas. in this case, i colored mine after, so this is what i have right now. two separate sharpened but un-colored gifs.
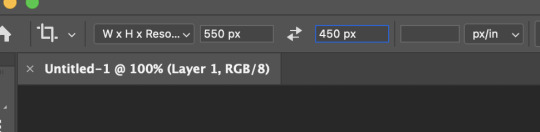
as an added note, when i'm blending gifs, i almost always keep them at their original dimensions until i bring them to the new canvas. i find it easier to position them where i want them and then crop to my desired dimensions. that way i don't have to worry that i accidentally cut something off. but for the purposes of this tutorial, i'm using my psd from this gif, which has been cropped to 540px x 500px.
step 2: bring both gifs onto a new canvas. as i just stated, the dimensions of this particular gif are 540px x 500px. if you're unfamiliar with tumblr's dimensions, i whipped this up. what matters is the width, whereas the height can be whatever you want. i saw something recently (though i can't find it now, of course) that said the middle gif in the row of 3 was no longer 178px and is now also 177px, but take that with a grain of salt! the gutters (the automatic spaces between gifs that tumblr puts in) are 4px.
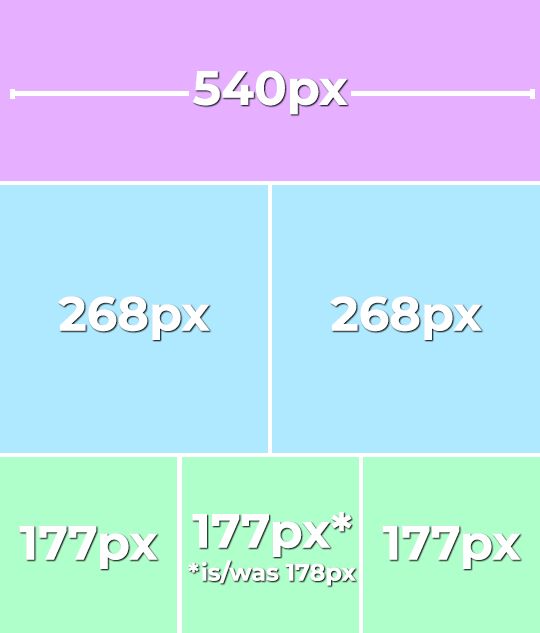
so, since this is a single gif in a row, the width must be 540. bear in mind that the larger your dimensions, the larger the gif file will be and tumblr's upload limit is 10mb per gif. with blended gifs typically being on the larger end, i try to keep mine somewhere between 35-50 frames. this particular one is 35, which along with 40 frames is what i most commonly use.
create a new canvas with your desired dimensions and either copy your gifs to it or drag them onto it. you should have something like this now:
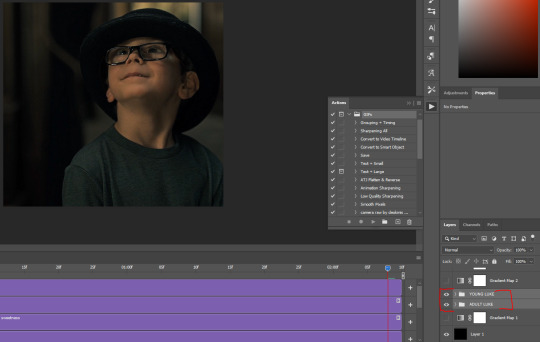
for now, ignore the other layers. as i said, using my psd of the completed gif.
step 3: add a black fill layer. this step is personal preference and therefore completely optional, but when blending, i always add an all black layer at the very bottom of all my layers. i find it helps when using layer masks (more on that soon) to make the blends appear more seamless. play around and see if you like it or not!
to create this layer, i use the keyboard shortcut (i'm on pc) ctrl+shift+N and then press G to call up the paint fill tool. once you have the color selected, just click anywhere on the canvas and it fills it. then drag this layer to the very bottom, beneath all other layers.
alternatively, you can go to layer -> new fill layer -> solid color -> choose your color but i heart keyboard shortcuts.
step 4: set the blending mode of each gif layer to SCREEN. right now, we can only see the layer that's on top. when you switch the blending modes from normal to screen, the blending begins! this is also where you can move your gifs around until you find the best placement for each one.
brb, crying about baby luke for the 800th time.
step 5: color! if i haven't already colored my gifs, i would likely do it now. that way, when i go to apply the layer masks, i'll know i'm working with a mostly-finished product coloring-wise. this is what i have now:
you can see just how important the contrast of lights and darks becomes. look at the difference between how visible the right side of young luke's face/hat is before coloring compared to after. when we lighten the highlights and darken the shadows, the blending becomes much more apparent.
step 6: layer masks! before i even tell you how to use them, we need to know how to apply them. you'll do this a layer/gif at a time. with one gif selected, press this button:

and you'll now have this:
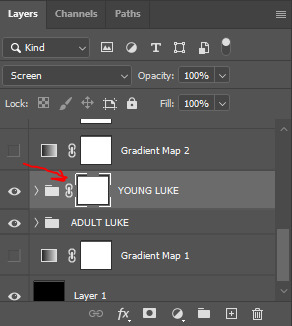
that selected white box is our layer mask. now do the same to the other gif layer. you should see this:
now that we've applied our layer masks, what are they for and how do we utilize them? layer masks allow you to, at their most basic, adjust specific parts of a single layer without permanently deleting them. the beauty of layer masks is that you can get rid of a certain area on a gif and if you realize later you want to bring some of it back, you can! all by using the colors black and white and, in this case, a soft round brush.
the most important part of working with layer masks is that you make sure the mask itself is what's selected. in the last image, the layer masks are NOT selected. in the one before, the layer mask IS selected. you can always tell because of the little borders around the corners of the mask. if you find something isn't working quite right, chances are that's your issue (speaking from personal experience).
as i said, we're only working with black and white here. using your brush tool (press B on your keyboard), select a soft, round brush. i personally set the hardness to 0 for the most gentle fade possible. i don't want hard edges in my blends. the size of the brush depends on how large of an area you're working with. sometimes i'll go all the way up to 150px+ and other times, i'll be well below 50px. the smaller the better for more detailed work. black (#000000) erases and white (#ffffff) brings your image back.
for a visual example, with a black brush, i'm going to mask an area of adult luke:
pretty obvious, right? because both layers are set to screen, masking an area of adult luke's gif reveals young luke's gif. because that area of the gif is no longer blending with anything, we see it purely with its coloring. now i'm going to take a smaller brush and switch the color to white (to do this quickly, pressing X on your keyboard will switch between the two colors [foreground and background] on your color picker).
you can see the lines/cuts where i ran the brush through the mask and it brought back the parts of adult luke we'd erased. if we did this same thing on young luke's gif, black would erase young luke and reveal adult luke and white would bring back young luke. i know this might sound a little confusing, and even though i knew a fair bit about layer masks before i started giffing again last year, there was still a learning curve for me.
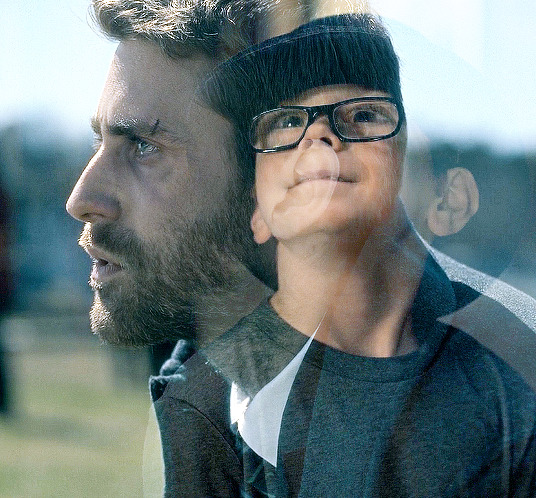
now that we have our layer masks, we need to identify which parts of which gif we want to mask/erase. for this one in particular, i didn't like that adult luke's ear was smack dab in the middle of young luke's face. to remedy this, i selected the layer mask on adult luke's layer and, using a fairly sizeable black brush, i colored over young luke's face and up into the top-right corner. i wanted to see more of his hat and because that area was so light, i covered that whole part. this is what my gif and layer mask looked like after:
the black on the little layer mask corresponds to where i colored on the gif. now that corner only shows young luke's gif and his face is much clearer without an ear in the middle of it.
step 7: that's it! maybe.
in theory, this could be a completed gif. from here on out, nothing changes as far as blending or layer masks. you could save and export this and upload it and be done. but in this case, i just didn't like the coloring. because mike flanagan wants to see me suffer, his shit is almost impossible to color and i just didn't like the difference in coloring between present day adult luke and 90s young luke. this is also part of a larger gifset with a color scheme.
regardless of that though, i have to confess that i do this almost every. single. time. i make gifs like these. i slap a big fat gradient map on those puppies and somehow they look 10x better to me. i scrolled back through a shit load of my gifs and i only found 2 examples of blended gifs that weren't under a gradient map. oops. maybe this is the easy way out or maybe i just love colors, but idk i think it helps them look more cohesive! if you're interested, read on. if not, that's pretty much it!
if you still have questions or encounter any problems after following this tutorial, PLEASE let me know! i'm more than happy to clarify things or help out if i can! otherwise, check out some of the other blending tutorials i linked at the beginning! if you'd like me to make tutorials for anything else, feel free to send an ask, anon or not! i'm quite literally always happy to help as i don't believe in gatekeeping resources or knowledge!
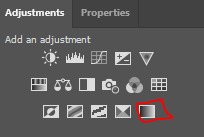
step 8: i ended up applying two gradient maps on this gif. it's important that these go on top of all your other layers (namely, the gif layers). if you're unfamiliar, you click this to apply a gradient map:
then you'll see this:
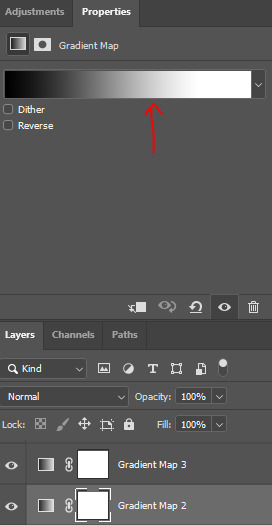
photoshop automatically applies a gradient map using your current foreground and background colors. to edit the colors, click on the map itself (my arrow). unless you're going for an inverted x-ray sort of look, your darker color needs to be on the left and the lighter one needs to be on the right. click on the bottom color points to change their colors:
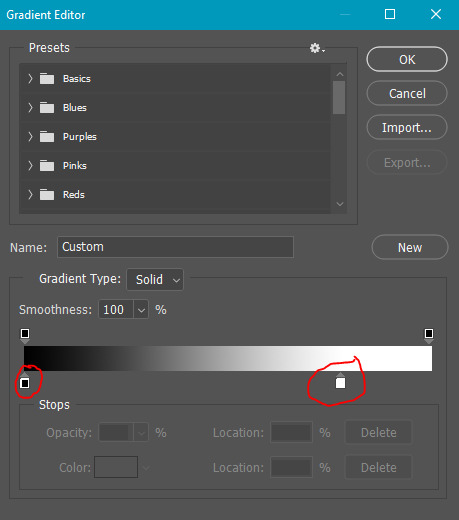
normally, the right one will be all the way to the end, but moving it in will let more white show through and brighten the image, which i wanted in this case.
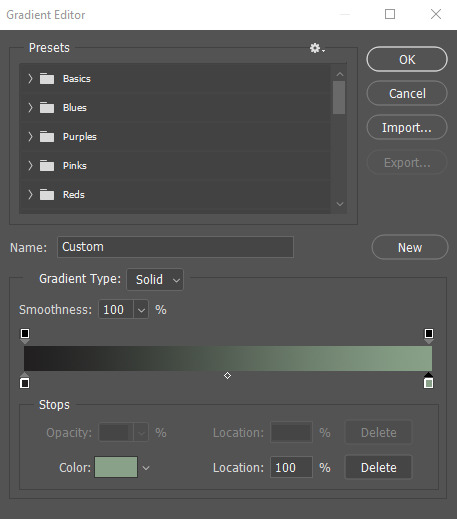
my second gradient is the green one, which looks like this and goes from #211f20 to #88a188.
i encourage you to play around with gradient maps. as you adjust the colors, you'll see the changes live as long as you pull the window to the side a little bit. i think they're super fun and can completely change the vibe and aesthetic of a gifset.
from here, i added my typography (lyrics, naturally) and then exported and saved the gif! and here we have this gif that literally made me cry while i made it because HE WAS SUCH A BABY
again, i hope this helps and if you have any further or other questions, don't hesitate to ask!
#answered#Anonymous#my tutorials#gif tutorial#gifmakerresource#completeresources#dailyresources#chaoticresources#thanks for being patient anon!#i know it's only been a few days but typing all this took me like 3 hours lmao
64 notes
·
View notes
Text
Dear swifties:
I've had the time of my life experiencing the Eras Tour with you guys! By the time I joined this community Eras was already in full swing, but everyone was so welcoming to a swiftie who was new to tumblr. We've lived so many lives since the beginning (and let's be real, so has Taylor.) Within all that time I managed to pretty much recover from health issues, let go of people and memories that weren't serving me anymore, make tons of new friends, and become a (kind of??) popular blog! And during that time friendship bracelets have become a core part of our legacy, we had a whole Eras movie released to theaters, we had 3 WHOLE ALBUMS!!! One of which literally became a whole new era, Cruel Summer is probably the song of all time now, we've had more outfits than I can count, and many exciting surprise songs! (Also there was Travis 🤭) it's been magical running @erastourtoronto-n2, seeing the movie in theaters, and then actually going on Toronto n2! I'll hold on to these memories forever. Special thanks to @cages-boxes-hunters-foxes for making this community fun and accessible for everyone! We're all thankful for you! Thanks to @hope-ur-ok for providing the surprise song audios! I love listening to mine. Thanks to @stuckinthistaydream for having a lovely space to talk about all things Eras! Thanks to all the beautiful gifmakers! I see and love all the time put into making gifs to capture the magic. Also thanks to @merryoliveoil. Thinking about her supremacy 😌. And an extra big extra special thanks to Taylor Swift! I'm so happy about everything you've done! We've made so many magical memories and it's all because of you! It's an honor that Eras ends in my country. I'm ready for the final show tonight!
Long Live the magic we made,
- Katelyn
@taylorswift
#Taylor Swift#Eras Tour#Eras Tour Vancouver#2024#December 8#December 8 2024#Swifties#hall of fame#my thoughts#she speaks!
20 notes
·
View notes
Text
Suo Gân — Part Two
Chapters: 2/4 Rating: M Relationship: Edwin Payne/Charles Rowland Additional Relationships: Crystal Palace & Charles Rowland, Edwin Payne & Crystal Palace, Charles Rowland & Niko Sasaki Tags: Post-Season 1, Pining, Getting Together, Hurt/Comfort, Grief/Mourning, Religious Imagery & Symbolism
SUMMARY:
Charles tells her. He tells her of a boy who saved him, in one way or another. How Edwin came from hell on Earth and brought him light, brought him warmth. How Edwin read to him just so Charles wouldn’t feel scared, or alone. Who does that? Charles has always wondered. What kind of person escapes Hell, and the first thing they do is offer comfort to someone they don’t even know? He tells her about how Edwin is his best mate, that he is the best person Charles knows and will ever know. He tells her that Edwin was bullied, just like him, and those bullies led to his death, but if it makes her feel any better, those boys were probably sent to Hell, too. “He’s kind,” Charles tells her, head dipped low and he’s smiling as he looks into Bette’s eyes, recalling Edwin. “The nicest bloke I’ve ever met. And—and he’s good now. You know he went through a crock of shit but it somehow only just made him kind. You would be proud of him, yeah? You’d be so proud. So you don’t need to worry about him.” Charles smiles. Bette doesn’t say anything.
NOTES: I wasn’t planning on updating for a little while yet (I still have more writing to do) but with the news of the cancellation I felt the urge to connect with the fandom, and since this chapter was done I thought it was only right. I’m obviously very sad. I don’t have a lot of words, but this show means a great deal to me. I really connected with it and the characters in a way I haven’t to this level with any other show in a very, very long time. I was really hoping we’d get at least one more season with Edwin, Charles, Crystal and Niko. I’m trying to remind myself, so I will also remind you, that just because a show is gone does not mean the fandom goes with it. Writers, gifmakers, artists, etc. are all still here, and there is still so much we can play around with in this universe. Just because Netflix abandoned DBDA does not mean we have to. We are still here. As long as the red earth rolls. ♥️
Read Part Two on Ao3 | From the Beginning
34 notes
·
View notes
Note
love love LOVE your The Sign gifsets. im still a newbie in giffing lmao and your gifs are like reaaally pretty so i was wondering how you do your gifs? i really like how it's sharp and the colors pop up beautifully (only if you don't mind sharing ofcc <333)
bun this is the kindest thing you could have said to me, thank you so much <3 i wanted to write down my giffing process for a while in case anyone would find anything in it helpful, so thanks for giving me a push!
guzhu-furen's photoshop gifmaking process (kinda oriented on saving up time)
from

to
1. Downloading a video. i prefer to download video files instead of making screen recordings because the latter usually leaves watermarks/captions and makes image quality lower. i will not be linking the downloading websites themselves directly, but they are all easy to find through search engines if you know what to search for! i download ql dramas from:
youtube:
if the video you need is above 1080p quality, search for youtube4kdownloader
if the video is age restricted, search for 9xbuddy
both these websites work for normal videos too!
mkvdrama usually has 1080p episodes of most asian dramas.
dramacool also has downloading options in case the show is not available on other websites!
2. Screencapping (i learned it through this tutorial)
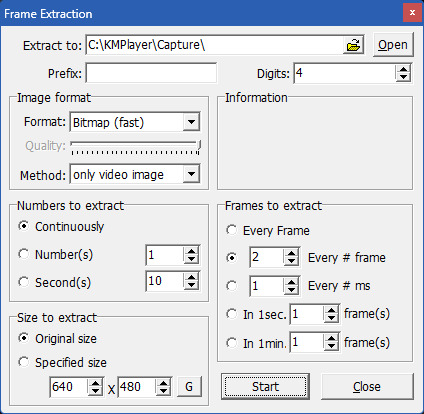
i screencap using KMPlayer. here is the installer i used, but you can find versions of this program on various websites and torrents too! install the program and proceed.
screencapping steps: open KMPlayer > press "CTRL + G" to summon the Frame Extraction window > set identical settings to these:
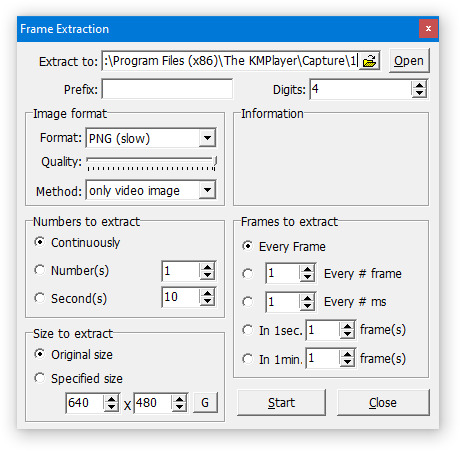
note which computer folder the screencaps will go to (it has a label "Extract to") > go to that folder on your computer and create a bunch of numbered folders there, for example ten folders named from 1 to 10, these would be our separate folders for ten gifs > write "1" or a name of another numbered folder after the backslash in "Extract to" bar in kmplayer > go the timestamp that will be the beginning of your gif in KMPlayer > press "Start" in the Frame Extraction window and press play on the video > when the moment you need to gif is over, press pause on the video and press "Stop" in the Frame Extraction window. great, you now have your folder of screencaps!
3. Importing screencaps to Photoshop
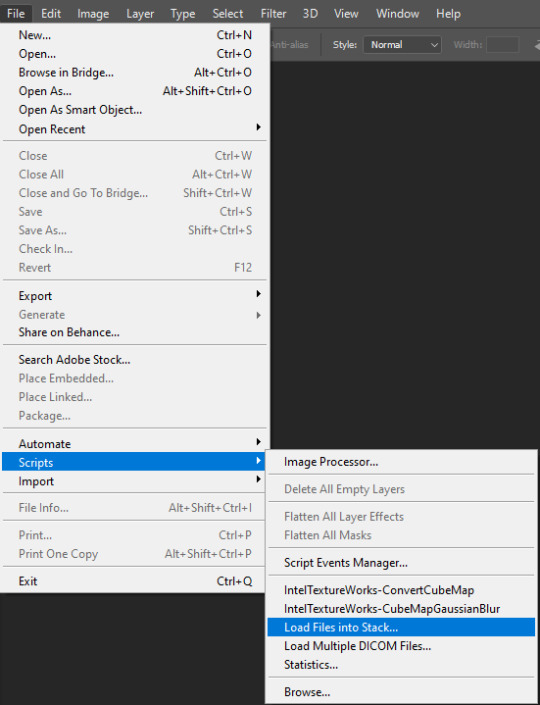
i use Adobe Photoshop 2023, but had used Adobe Photoshop CS5 for a long time before that, so you can use any version you have or find! it's available on various websites and torrents.
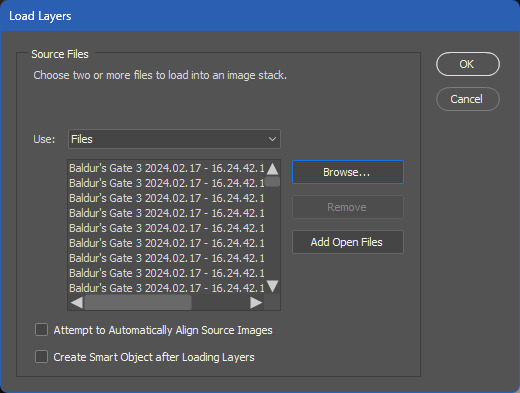
open Photoshop > Scripts > Load Files into Stack > press Browse in the "Load Layers" window that was opened
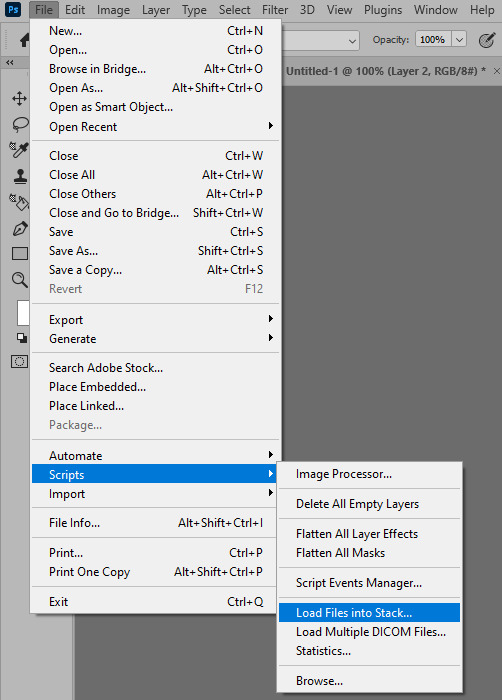
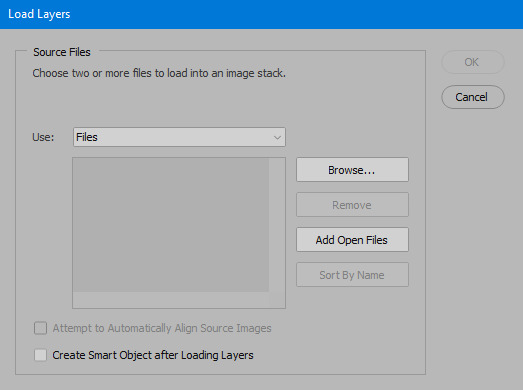
open your screencaps folder (and pin the KMPlayer Capture folder for faster future access) > pick the screencaps you want for your gif by clicking on the first one, and then clicking on the finishing one while pressing Shift on the keyboard > click OK and let them load for some time! i have 65 screencaps loading at the moment
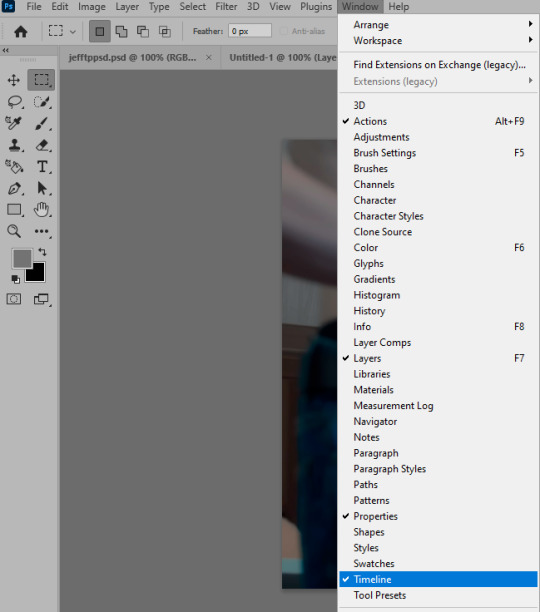
when the screencaps finish loading go to Window > press Timeline > press Create Video Timeline in the opened sidebar > press three dots that will say "Convert to frame animation"


4. Sizing & making the base of a gif
next part will be automatic. i use actions for almost everything from this moment. download the basic action pack here and my additional action pack that we will need here. load them in your photoshop actions window (Actions > Load Actions).
play the Script action to create frames.
now onto sizing your gif. these are tumblr's width dimensions for 3 types of gifs
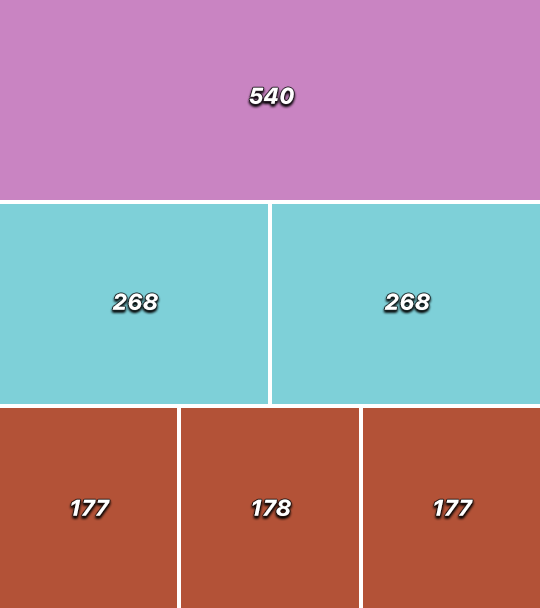
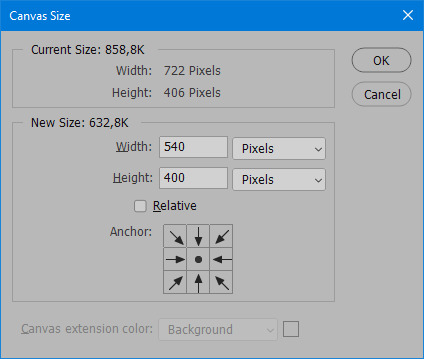
my gifs are usually 540 px in width and 640, 400 or 345 px in height. i added a 400 px action (Sizing 400) in the action pack, you can use it! or you can follow the steps by hand:
Image > Image Size > put in the height you want and add 4-6 pixels there (mine will be 406 for a 400 px high gif) > OK

now we need to crop the gif for it to fit tumblr's dimensions:
Image > Canvas Size > change Width to 540 (or 268 or 177) and take away the 4-6 pixels that we left in the previous step in Height
when you figure out which gif dimensions work best for you, record an action and use it to save up time!
after sizing use the action Smart Object. now we have the base of our gif!

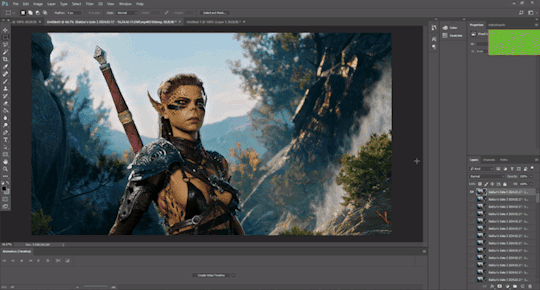
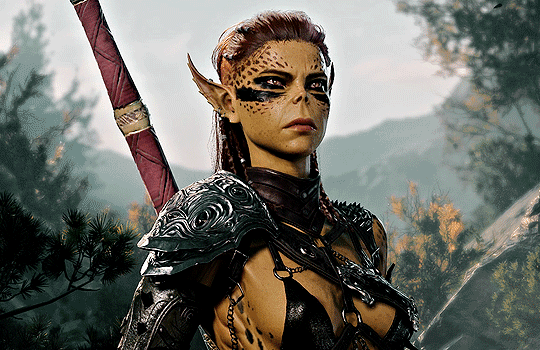
you can move your gif left or right if you want! i will be doing this because i would like to show more hips in the gif.
press Ctrl + T > move the layer however you need (not in height though) > press Enter to save
i moved it to the right and my gif looks like this now:
5. Sharpening (i use Tan's sharpening settings explained here)
i added two sharpening actions in the pack, they are called Sharpen Spicy and Sharpen Spicy 12. you can use one of them or you can sharpen your gif by hand, i will explain how to do it below.
Filter > Sharpen > Smart Sharpen > 500% amount, 0,2 px radius > OK
Filter > Sharpen > Smart Sharpen > 17% amount, 10,0 px radius > OK (you can change 17% to lesser or bigger, depending how intense you want your sharpening to look. i use 17% for 4k footage and 12% for 1080 px or less videos)
to smooth the sharpening a bit i use Gaussian Blur (this is optional, you can leave the sharpening as it is if you want your gif to be sharper).
Filter > Blur > Gaussian Blur > Radius 1,0 pixels > OK
now change blending intensity to let only a bit of the blurring effect stay (you need to change this by hand if you used the sharpening action also).
press Blending Options (the highlighted place) twice > change Opacity to 10%

this is what my gifs looks like with sharpening now!

6. Colouring (i learned how to colour the way i do through this tutorial)
to make it easier for you to learn i will share my blank colouring file. i created it to save as much time while giffing as possible, so whenever i need to colour a gif i simply duplicate all the blank adjustment layers to the base of my every gif and start colouring! once you figure out which adjustment layers work for you best, i recommend creating a blank colouring file too to save time.
if you want to go the easy way, open my colouring file and duplicate selected layers to your gif file by Layer > Duplicate Layer > insert gif's document name

if you want to learn by hand, create the adjustment layers that i will be naming in the process on your own, you can find them all in Layer > New Adjustment Layer
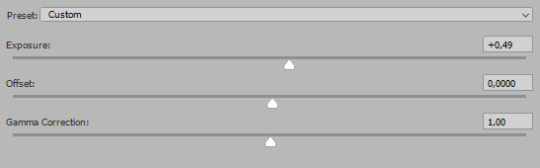
now we will use adjustment layers for our colouring from the bottom to the top! first, Exposure layer to add a bit of light to the gif. i don't always use Exposure because sometimes shots are bright enough on their own. i will, however, use it here. don't use it on your gif too much, because in the next few steps we will also be brightening the gif with other adjustment layers. i added +0,49:
next, Hue/Saturation layer. i use it in gifs with neon lighting to color correct overly bright colours. for example if your characters are standing in neon pink, you might want to lessen Saturation in Magentas and Reds to make the final gif less pixelated, and etc. i will not use Hue/Saturation on this gif, cause it doesn't need it.
proceed to the layer Levels. this layer usually does most of my colouring. click on the lowest white dropper in your Levels window:
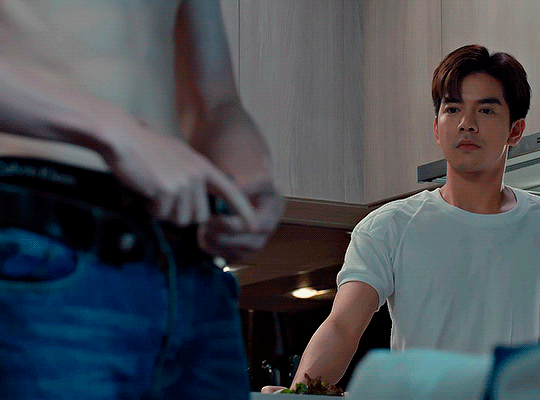
now choose a light place on your gif and click on it with the white dropper. it works especially well if you use the white dropper on the lightened parts of face skin. you can play around by choosing different bright spots and seeing what works best. here is the spot i chose and the resulting colouring:


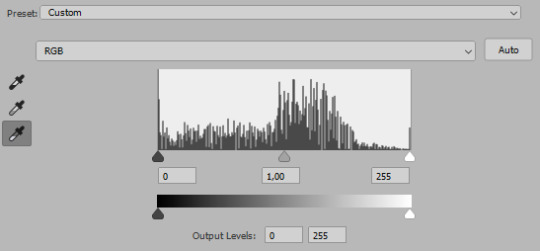
this is too light, so now we need to balance it out with the black dropper:

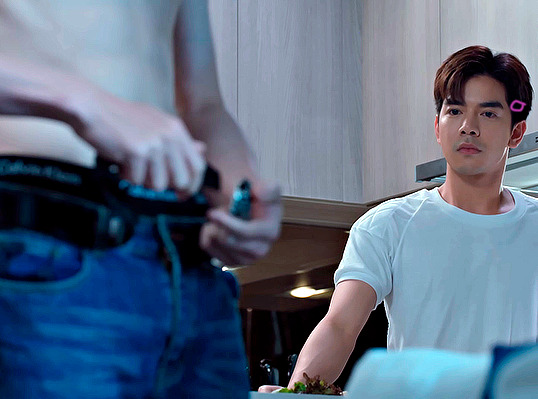
choose one of the darkest places this time and click it with black dropper! once again, you can play around and click different spot to see what works best. i will be clicking the highlighted spot and you can see what my gif will look like with this Levels settings

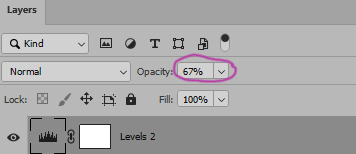
as you can see, darkest places became darker and other colours were corrected a bit! now, this is still too bright, so i will be decreasing the opacity of Levels layer from 100% to a smaller number:
i will have to continue in another post because tumblr only allows 30 pictures per one post in the new editor now and i'd like to explain everything in visuals. click to continue
99 notes
·
View notes
Text
hi everyone! I've gotten several requests to make a tutorial on how to make gifs for someone just starting out and I finally got around to slapping a tutorial together.
This tutorial will cover:
software recommendations
choosing what to gif
creating a gif step by step with probably a lot of unnecessary detail
some tips and tricks:)
(This particular tutorial will not cover how to find tv and movies to download and gif, or any specific instructions on coloring. only the basic gif making process.)
so for the purposes of this tutorial, we will be using Adobe Photoshop, which is the most common program for making gifs, and the one I recommend. the version you have doesn't make a major difference in terms of capabilities but the interface may be slightly different looking if you have an older version or a different type of device. you cannot make or edit gifs in any mobile version of the photoshop application. Optionally, we will also be using Adobe Premiere Rush/Pro or another video editing software of your choice. wherever you are downloading Photoshop, whether from Adobe or a third party, you should easily be able to acquire Premiere as well. I am aiming to be as detailed as possible in this tutorial, so it may sound more time consuming than it really is. once you get the hang of things, it goes fast. the most time consuming part by far is the editing and coloring. in my opinion, one thing that majorly saves time while giffing is knowing your keyboard shortcuts and using your mouse/trackpad as little as possible. I will be going over these in this tutorial as well.
before we begin, some general tips:
gifs of single shots that do not cut between angles or subjects generally will look the best, barring exceptions
for a single gif set, choosing scenes and shots with similar lighting will be easiest to get to look uniform when compiled together, since editing wildly different looking scenes to have similar coloring and lighting is hard and takes some practice!
avoid shots that will require you to majorly crop or zoom to properly frame the subject, as this will greatly diminish quality
speaking of quality, gifs will look best using 1080p video, but you can get away with 720p as well. I would not recommend giffing with anything lower resolution than that
Tumblr's upload capacity for image and gif files is 10mb. be sure when exporting your finished gif that it is under that size. if it is a bit over, you can try trimming a few frames off your gif in the video timeline.
if you get frustrated, don't give up! giffing is hard and complicated especially if you are new to photoshop. I tried to make this tutorial as detailed as possible so it's easy to understand (although im sure I still forgot some stuff)
ok onto the tutorial!!!
STEP ONE: choose what range of frames you want to gif, and how.
once you have decided what you want to gif, there are two main way to convert your episode into a range of frames to make into a gif. the first is by screencapping. this involves downloading a program like mplayer or vlc which can be used to convert video files into "stacks" of screencaps, which can then be separated into whatever range of frames you want and imported into photoshop. this is seemingly by far the most common method I have seen amongst gifmakers*, but personally I don't care for it and I think it's more confusing and time consuming overall, so I will be explaining the second method: importing video frames to layers.
now, normally what this would mean is opening the full episode in photoshop and using the pathetic little playheads on either end of the scrub bar to trim the file into a clip. this is where your video editing software comes into play.
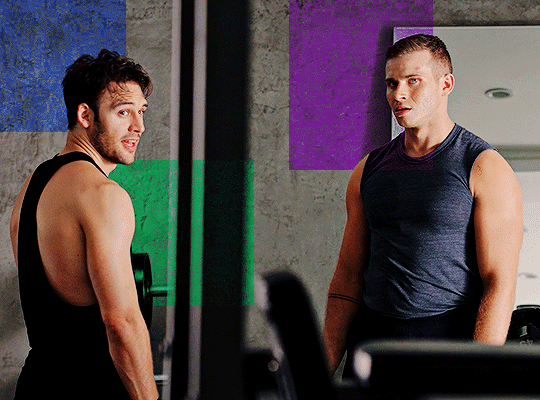
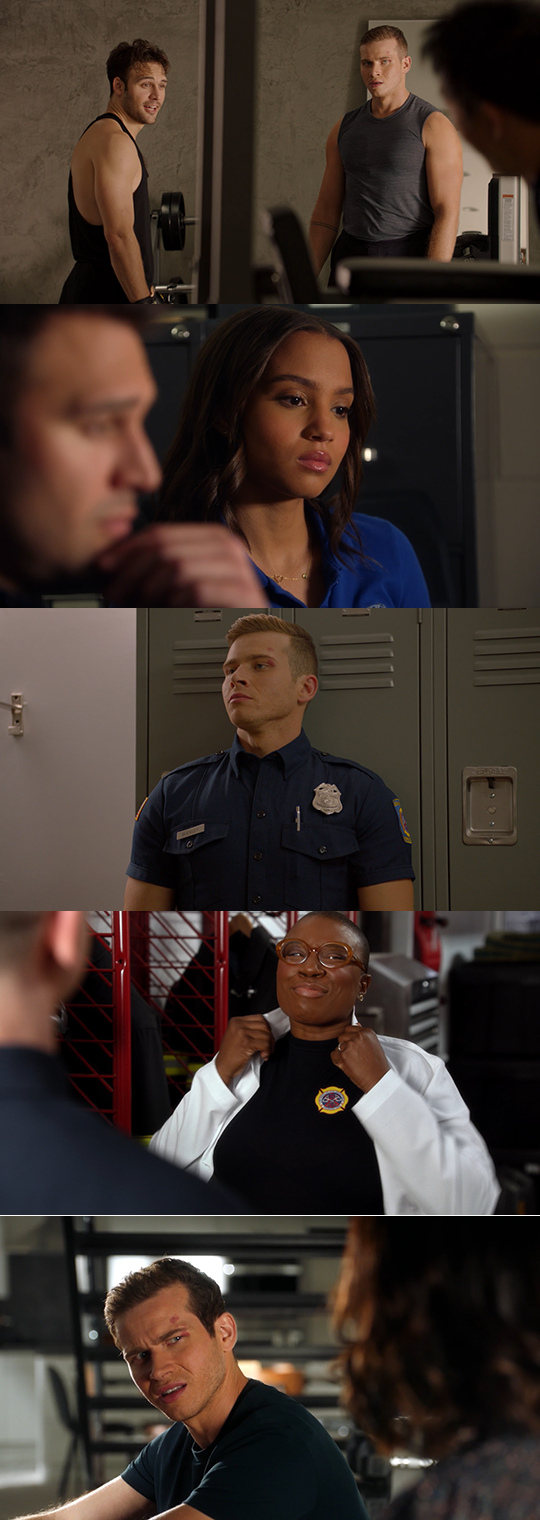
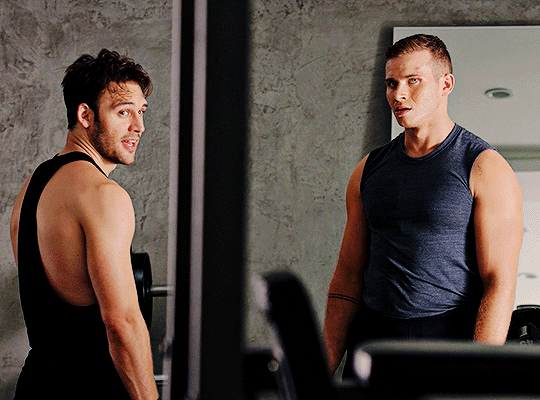
open whatever episode or movie you want to gif in your program. if it is a large file like a long movie in 1080p, this may take a few seconds. like I said, I am using Premiere Rush. I will be using a random episode of 9-1-1 for my example gif.
in your media browser, hover over whichever episode you want (you can also just add the whole episode to your project and scrub through, but that can take longer unless you know what time stamp you're after). click the fullscreen button by the bottom righthand corner.
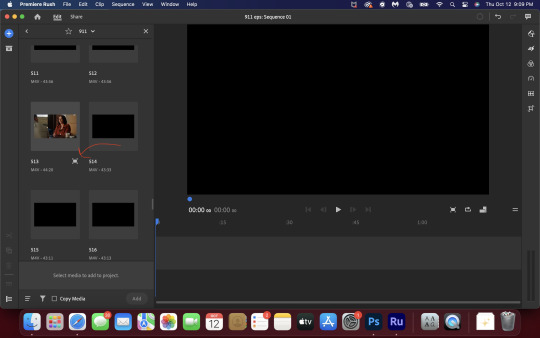
now you can scrub through and trim the episode before you even import it to premiere. this makes trimming your clip even easier.
use the trim bar (yellow outlines) to trim as close as you can around the scene you want to gif.
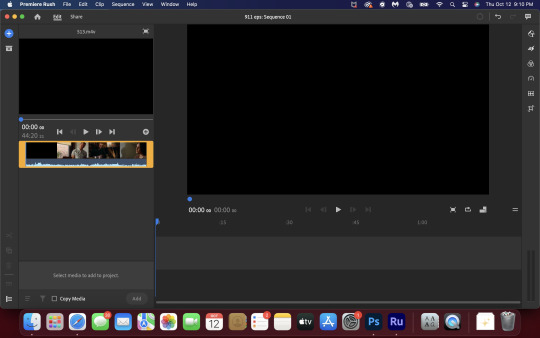
then click this plus, and then "add" below. this will add the clip to your project.
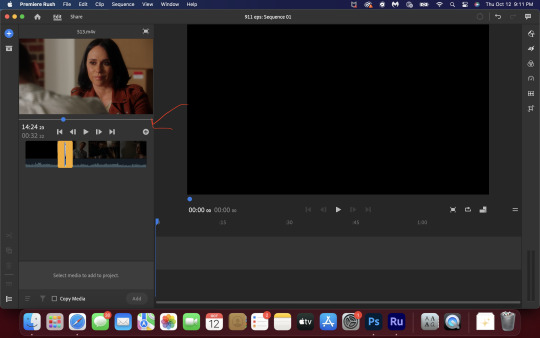
now, move the blue playhead up to the frame you want your gif to start on. then, use the scissors button off to the left to slice the clip. select the portion before the playhead, and delete it.
now move the playhead to where you want the gif to stop. a good length for most gifs is around 1.5-2 seconds in my opinion. some may be shorter depending on how long the shot is, or longer if you plan on making them smaller (remember, the uploading capacity on Tumblr is 10mb per file.) trim again, now delete the portion after the playhead. you can also use the left and right arrows beside the play button to move frame by frame, and you can adjust the side of the horizontal scroll bar below your clip to “zoom” in on it and make scrubbing easier.
once you have your clip, go up to where it says "share". your clip will be rendered, and then you can click export to save it.
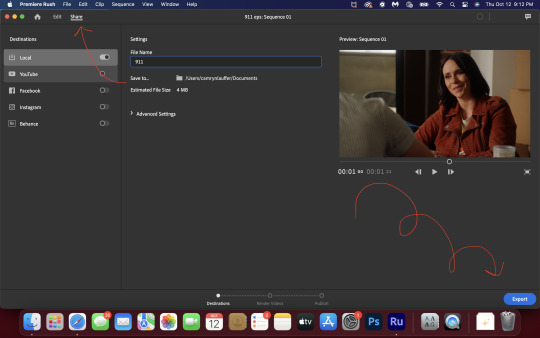
repeat step one as many times as you want for each gif. I know this may sound complicated, but like I said above once you get in the rhythm this step takes only a few seconds.
STEP TWO: create your gif!
close premiere. open photoshop. head to the control bar at the top. select file > import > import video frames to layers.
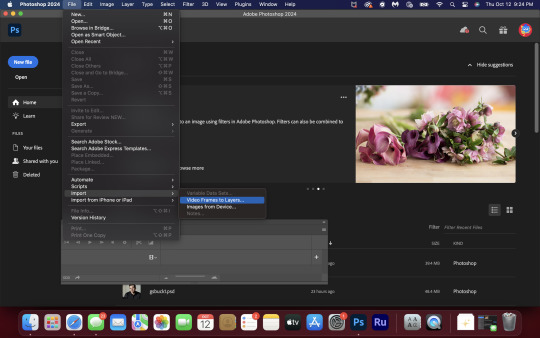
navigate to whatever folder you exported your clip to. select it, and hit enter. a second popup will appear asking you to select your range of frames. since you have already trimmed your clip to your liking, simply hit enter a second time.
now your screen looks like this, and we are going to crop and resize our gif! (troubleshooting: if you do not see the timeline bar at the bottom, select window from the control bar, scroll down, and make sure timeline is selected as part of your workspace. Adjustments and layers should be there automatically but if not add them too).

Tumblr posts are 540px wide, so in order to make my gifs as small as possible while maintaining quality, I typically crop my gifs to be around 550-600px wide, with varying heights depending on what shape I want the gif to be. experiment with this a little and decide what works for you. just don't make the width lower than 540px. once you have the portion of the frame you want inside the cropping grid, hit enter again. sometimes you have to hit it twice.
here are the measurements I am using for this gif
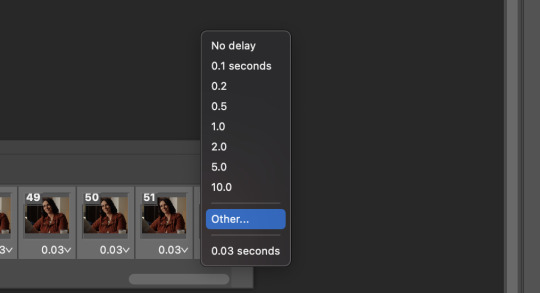
now in your timeline, select frame 1. hold down the shift key and scroll to the end to select the very last frame, thereby highlighting them all. from here we will edit our frame delay rate. photoshop will automatically set it to .03s, which will make your finished gif awkwardly fast. I typically use .05s, or .06s if I want a gif to be subtly slower (this comes in handy if the shot you are trying to gif is very short). anything longer than .06s will look weird though. choose "other" from this menu and type in your delay rate. make sure not to miss the zero after the decimal.
once you've set your frame rate, go to the other end of your timeline and click here to convert your frames into a video timeline.

then press option + command + A (on Mac) or windows + alt + A (on PC) to select all layers. then right click (control + click with a trackpad) on any one of the highlighted layers in your layers tab off to the right. scroll down in the popup menu and select Convert to Smart Object.
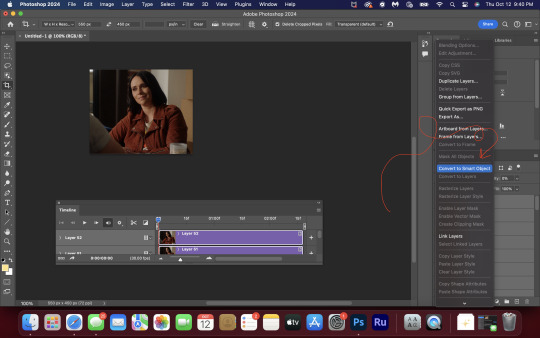
THAT'S IT!! CONGRATULATIONS!!!!! WE HAVE GIF!!!
from here comes the fun part!! you will begin adding action filters like sharpening as well as adjustment layers to color and edit your gif. experiment with different adjustments and styles until you find something you like. too many adjustment layers will up the size of the finished gif though, so I tend to keep mine to 3-4 layers max unless its a really hard to color scene. if anyone is interested in a separate coloring tutorial, please let me know!
once you are finished editing your gif, click file > export > save for web (legacy) OR hit shift + option + command + S. play your gif in the export window to make sure it looks okay, and then hit save!
I hope you guys find this helpful and informative! please hit up my in box if you have any questions or if anything doesn't make sense. happy giffing!!!
*one reason people seem to prefer screencapping to this method, is saving all the individual clips as video files does take up a lot of space on your scratch drive, which in turn can cause your computer to work slowly or crash programs. this can be rectified by making sure to delete the clips from your computer once you are done making the gifs. another space hoarder to look out for is the proxy files of your episodes that will be automatically saved to your hard drive whenever you add an episode to your project in Premiere. Periodically, go through your storage and delete all the .proxy video files. this will not delete the original episode files, only the proxy files created by Premiere.
tagging some mutuals to sb hehe: @shitouttabuck @lover-of-mine @honestlydarkprincess @eddiediaaz @compactdiscmp3 @eddiebabygirldiaz @bigfootsmom @callaplums @athenagranted @firemedicdiaz @sibylsleaves @loserdiaz @buck2eddie @diazass @eddiediaztho @giddyupbuck @monsterrae1 @icecreampotluck @sunflowerdiaiz @swiftfootedachilles @singlethread @aziraaphales @911onabc
142 notes
·
View notes
Text
Caryl Fanfiction Recs - Celebrating single-fic authors (part 1)
Happy Sunday, dear fellow carylers! Today I bring you the first part of a list that I have been preparing for some time.
Every fandom has its big stars: incredible gifmakers who everyone recognizes their work from a distance; amazing artists who draw fanart and edit fanvideos that deserve to be in a museum; and talented and prolific fanfic authors who are better storytellers than the actual canonical writers/creators. All of them deserve all the praise and love in the world, but, in reality, even the most popular ones don't get the feedback they truly deserve. Now, what about those fans who only create one thing for the fandom? Just one art, one video, one analysis, one fic? Where are the compliments for them?
So this list it's a way to rectify that for single-fic caryl authors. I hope a little bit of love reaches them wherever they are. Thank you for contributing to our fandom!
1. Wait by acaryler [ 9Lives ]
Summary: A new day only begins when the darkness goes away.
Rated: G
Word count: 814
Published: February 22, 2017 (one-shot, contains character death)
2. This is Who We Are by CarylLover [ 9Lives | AO3 | FF.net ]
Summary: Aaron is badly injured and, after the attack of The Wolves, the group at ASZ is left vulnerable. Daryl needs to go out to find more people, but he can't go alone. He chooses Carol to go with him. This time together will revive some painful memories for Carol and confessions will be made. But will they only come from Carol? Does Daryl have a dark secret too?
Rated: M
Word count: 10.490 (05 chapters)
Published: May 31, 2015 (complete)
3. Weeping Statue by Evilangel [ 9Lives ]
Summary: She watched silently from the shadows.
Rated: T
Word count: 151
Published: January 22, 2016 (one-shot)
4. Contently Broken by FloraDora [ 9Lives ]
Summary: Following the deaths of Beth and Tyreese, Carol's concern for Daryl grows as he continues to distance himself from the group, clearly struggling with his grief. Carol attempts to reach out to him which results in a very emotional encounter.
Rated: T
Word count: 1.410
Published: March 17, 2015 (one-shot)
5. We belong by Ithil [ 9Lives ]
Summary: Daryl helps Carol to start healing after the events of 5.16. Inspired by Ryan Adams' song I love you but I don't know what to say.
Rated: T
Word count: 1.622
Published: June 24, 2015 (one-shot)
6. Doors by @jtsbar [ 9Lives | AO3 ]
Summary: Daryl before he opens the door.
Rated: T
Word count: 513
Published: August 16, 2014 (one-shot)
7. Felicity by Lesoni [ 9Lives ]
Summary: He hoped that she would understand him like she always seemed to do. That she was his woman-his Carol. The woman that he'd learned to love more than he loved anyone else-especially himself-because it had been her that had shown him how much he was actually worth. He was trying to give her that back. He damn near worshipped her, and she needed to know that.
Rated: E
Word count: 2.787
Published: April 23, 2016 (one-shot)
8. New Habits by LouWho88 [ 9Lives ]
Summary: Daryl and Carol have stuck with their usual habits while becoming roomates in Alexandria even as their relationship has been growing. However, on this particular morning it seems as though Daryl has developed a new habit and Carol hope it sticks.
Rated: T
Word count: 1.238
Published: May 02, 2016 (one-shot)
#caryl#caryl fic recs#caryl positivity#caryl fanfiction#caryl fandom#caryl fic recs - single-fic authors
18 notes
·
View notes
Note
Heyy, do you have a tutorial on how you make your gifs? They’re so crisp and beautiful, I wanna start making gifs but idk where to begin
hello!! first of all, thank you kindly!!!! i'm always stunned when someone genuinely appreciates my gifs 😭
second of all, please do!! gifmaking is such a fun hobby, i wish it were a tad more rewarding but truly it's a great creative outlet for hyperfixations.
now, i personally don't have a tutorial but that's only because i myself have learned from a bunch of other ones during my years of trial and error and my technique has nothing that's original to it. i can, however, tell you which tutorials i turn to whenever i need a refresh + some tips i have started implementing on my own!!! i'll put everything below the cut.
the tutorials are this one and this one; the first one is a more general step-by-step one and the second one is for adding noise to gifs when they don't have it naturally, which imo greatly helps with making gifs look more hd.
as for the tips:
whenever possible, and if your pc can handle processing them, try and find files that are at least 1080p. 2160p isn't really necessary unless you're making close-up gifs (though i almost always use it if i can find it), but a 1080p file is only legitimate if the size of it is 1.5gb+. anything below that is not actually hd, no matter the claims.
with videogame footage, i generally record my own gameplay and take screencaps from there. when i want to gif youtube videos or anything i can't download by my usual means, i use 4k video downloader.
i used to take my screencaps with kmplayer, but i've been using mpv over the past few months and i find it works more smoothly. kmplayer did serve me well for years though, and the installation isn't as gimmicky, so go with that if you find it easier!
when it comes to resizing the gif (image > image size), i always leave the mode on bicubic automatic; for a time i used to pick bilinear, but i later learned it was the reason why my gifs didn't look how i wanted them to look.
i generally sharpen my gifs with the same action pack mentioned in the first tutorial i linked, but i do also add an unsharp mask layer to make it extra crisp and detailed. these are my settings for it:

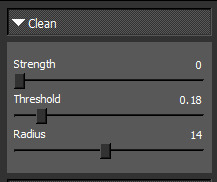
whenever i'm giffing something that is not available in Real HD (like youtube videos), i add a step to my usual sharpening by using a set of plugins from topaz labs; now, i have absolutely no idea how i installed them when i did years ago, and i have no clue how to find them anymore, but i'm sure tumblr has answers somewhere. specifically i use topaz clean. i'm pretty sure you could achieve a similar enough result by adding a gaussian blur level to the sharpening, though; either way, my settings for topaz clean are:

when it comes to coloring, i never use .psds, i make the coloring from scratch for each scene, and most times i use multiple colorings per scene. it will take a little while to find your footing with color correction perhaps, but then again, each gifmaker has their own style and that's what's fun!!! one thing i've taken to doing most times, however, is adding an exposure layer towards the end of my coloring layers and upping both exposure and gamma correction based on how much or how little the gif can tolerate; i find it helps a ton with making gifs look hd on mobile, which is notoriously hard to achieve because mobile hates gifs. also, i have a pretty heavy hand when it comes to contrast and to darkening blacks, because in my experience that also helps with resolution.
when i go to save for web once i've finished making my gif, i tend to pick the combo adaptive+diffusion. very rarely i switch from adaptive to selective, but only if adaptive makes the gif look weird, which is usually not the case.
this should be all, i really always follow the same process and it's pretty automatic by now lmao. forgive me for yapping at length, but i hope this can be helpful to you or anyone who might want to try their hand at gifmaking! i'll update the post with my settings asap. thanks again for the love 💕
15 notes
·
View notes
Note
Hi! Do you have a tutorial about how to make gifs like this? https://www.tumblr.com/captain-hen/718203110790660096/911-under-pressure-lgbtqcreators-creator?source=share
Like making them with only one certain prominent colour if that makes sense? I'm not good at explaining tbh, i'm sorry! Your sets always look so amazing! Thanx for making them!
hi! thank you for your kind words! so, in this set, i used three different methods to get those results. the method i used for hen and maddie's gifs is already explained here. the method i used for the rest of yellow gifs, and the gif with Buck coming out of the swimming pool, was just highlighting and isolating colors that are already prominent in the image. i'll touch on that briefly, later, but i'll expand more on how i did the buddie and buckley siblings gifs, which is color manipulation. i'll be showing you how to get a gif that looks a bit like this:
so, before we begin, there are a couple things to be kept in mind
i'm going into this tutorial assuming you know the basics of gifmaking, coloring—particularly the selective color layers. i won't be explaining any of that.
scene selection is probably more important than the actual coloring process. if you don't have a scene that works, the methods i explain here will be completely useless.
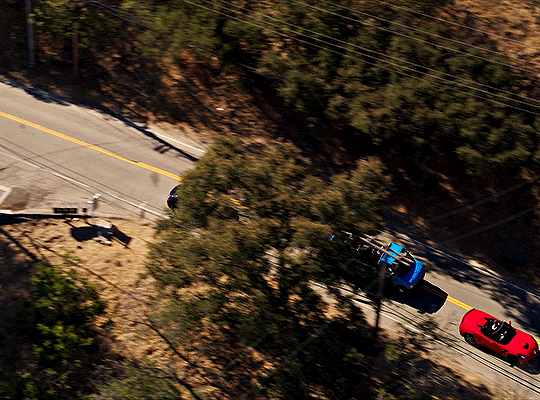
with the above point in mind, i'll tell you which type of scenes work for the color manipulation method. you'll need a scene with a grayish, neutral kind of background. here are some scenes which more or less fit what i mean:
your scenes shouldn't have too much white in the background. a little white can be fixed, but too much will result in your coloring being pixelated. keeping all this in mind, choose a scene that has a background that looks like this, in terms of color palette. or just go with my example of the buddie one, and we can get started!
make your gif, sharpen it, and color it as you normally would. this is how my gif looked after the basic process:
for the purpose of this tutorial, we will be working entirely with selective color. i'm aware that other gifmakers use color balance, instead, for color manipulation, but that's not what we're doing here.
please keep in mind—whatever color you ultimately want your gif to be, we are gonna start by making it a bright blue. we can manipulate it from there to look like anything you want.
first, i want you to add a selective color layer and then go to the neutrals tab. in case you're not familiar, neutrals works a bit like color balance—it adds a tint that affects the entire image when you mess around with it. this feature is perfect for working with scenes like this one. right now, we'll only be touching the cyan slider. go ahead and slide it up a bit, but not too much, because then you'll affect the skin-tones of your characters in a way that won't be easy to fix.
i forgot to add it in the gif, but please keep in mind—when you mess around with neutrals, the skin color of your character gets invariably affected. you'll need to go back to reds in selective color and make the color look normal again, in this case, i decreased the cyans in the reds and upped the yellows.
now, our gif has a good amount of cyan in the background. this is enough for us to work with, you won't need to touch the neutrals tab again. add another selective color layer, this time, go to the cyans tab. while trying to turn cyan into true blue, you:
up the cyan slider to it's fullest
up the magenta slider—magenta cancels out green, so any greens that maybe present in your cyan will get killed
decrease the yellows, because yellow cancels out blue. this not only makes your cyan into true blue, it also makes the color bolder and brighter.
as you can see, i added two such cyan layers, with similar settings. the gif looks fairly blue, now, but it's still not enough. after adding a third cyan layer, i focused my attention on the blues in selective color. you'll probably need only one—two at most—of this layer.
here in the blues tab, you do essentially the same thing you did in cyan. essentially, what we want is—1) the scene to be true blue, no hints of cyan or green or anything else, and, 2) the blue to be as bright as possible.
let me explain why i wanted the background to be a bright blue first. blue is a cool and neutral color—any manipulation you do of it shouldn't affect the skin tone of your characters, which is the main thing we're trying to avoid here. even if you want your background to be, say, a bright red, i recommend starting with blue and working your way up from there. hope that makes sense!
if this is the color you're happy with for your background, that's well and good. if not, let me show you how to make it into other colors.
if you wanna make the background purple, you'll want to go into the blues tab in selective color and decrease the cyans, increase the magentas and yellows. then you should go into the cyans tab and do the same, like so:
now, if you want to make it green, instead, you'll need to increase the cyans in the blues tab, decrease the magenta and increase the yellow. rinse and repeat in the cyans tab.
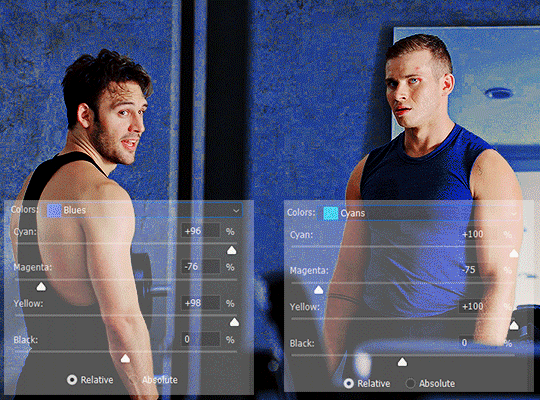
by now you should have a pretty good idea of the process works, of which colors cancel each other out or compliment each other. using this method, with the correct type of scene, you can manipulate your background in almost any way you want! let me demonstrate with a few other scenes:
(sorry if these gifs look jerky—adding the fade in affect always messes with the frames 😔)
now that we're done with this, i'll touch briefly upon isolating colors that are already prominent in an image. i'll use the example of one of the gifs in this set.
as you can see, the original scene with no coloring already has a lot of yellow in it. we can work with that. after doing my normal coloring, i added a selective color layer, went to the neutral tab again, and this time, i upped the yellows all the way to 100. that gave me this result:
(again, i'm sorry this gif looks weird—i have no clue what happened)
there's still a lot of green in the trees, but that can be fixed. i went to the yellows in selective color, decreased the cyan completely, increased the magenta slightly and increased the yellows completely. that gave me this:
so that's how you do it! if the prominent color is blue, like the gif of buck in the swimming pool, all you have to do is use selective color to highlight the blues as much as possible—like i've already explained. using the same principles, you can do the same thing for pretty much any color that's already prominent in a gif.
a word of warning, though: while trying to highlight colors such as yellow, red and orange, take caution to do it only for scenes where the character's faces aren't really visible, like in overhead shots. this is because messing with these particular colors will definitely screw up their skin tones, which is not a good thing, especially for characters of color, it is easiest to go wrong with them. colors like blue, green, pink, purple are all fair game, but take the greatest caution with warmer colors.
i hope this helped you, and made sense! i know i rambled a lot, so i'm sorry about that. feel free to reach out if you have anymore questions!
#neethu answers#*tutorial#usergif#resources#allresources#completeresources#alielook#usercorrine#userisha#useralie
106 notes
·
View notes
Note
hello! I was wondering how do you make gifs? I'm not a very social person in any of the fandoms I've been/am in and I haven't written in years but I guess I wanted to contribute more to fandom. I also see people lament the fact that there aren't that many gifmakers anymore so I thought maybe I should be the change I wanna see in the world! all the best! ☺️
Hey!
First of all I love that you are interested in/making an effort to put content out there and are not just moaning about it like some people do. Unfortunately there aren't enough active gifmakers around, a lot of them have stopped making content because it's a terrible era for us at the moment with the dire like/reblog ratio and other issues we have to deal with. But I'm supposed to be encouraging you not discouraging lol, so I will pop some information below that will hopefully help you out!
Fun fact, this is how I started out making gifs. I came onto tumblr and found zero content for my interests so decided to take it upon myself to learn and here I am all these years later.
I personally use photoshop, but I know it's not easily available to everyone you either have to pay for it or obtain it by 🏴☠️. If you are able to access it here is a beginners tutorial to help get you started.
The next best option to photoshop is photopea which is basically the web based free version of it's predecessor. It can do the majority of things that photoshop can from what I remember, but the finishes just aren't as sharp, but i would definitely recommend. The website can be found here and a tutorial here.
Final option is another web based version called ezgif, now this is the one I would recommend the least as it really can only do the basics ie produce a gif and the finished product is mostly grainy and not the best quality. I don't have a tutorial for this but if you do a search online or on youtube you should be able to find one.
Whatever option you use, to ultimately make a gif you have to either upload a video to the software and then take screencaps, or take screencaps and then load them in. I use the screencap method and use kmplayer as my chosen software found here for download.
p.s Just remember that it will take time and practice to get into the swing of things, so don't be too disheartened if you don't always get it right. The basic fundamentals of simply producing a gif is hard enough before you get into the colouring/sharpening of it all.
Also the tutorials are just here to help you begin, you don't have to stick to them as time goes on you may find an easier/better method to the one offered, so go with what works for you. I have definitely got my own own tailor made gif method that I love.
I hope any of these options are of help to you, and wish you well on your gifmaking endeavour!
#soph asks#gifmaking resources#gifmaking asks#all the luck to you and maybe i'll see some of your creations around the dash
8 notes
·
View notes
Note
i'm curious to know why you're so passionate about making gifs. what is it that makes you love it so much?
i'm not a gifmaker, but i can say why i love seeing gifs so much (especially yours ❤️): it is as a way to see special moments for me over and over again and appreciate the details in those scenes even more, because they keep repeating and i can also zoom in. it's like engraving that moment even more in my memory and i love it. and it's only when you start to see so many gifs that you realize that the coloring in the contents is usually very faded, lifeless, or strange :/
I think you just answer the question you asked ALKSAKSAS. I love rewatching content while I'm making gifs of it. sometimes I sit still watching the content and forget to finish the gifs 😅 that's one of the reasons, I love making bangtan gifs, I love making colourings for the scenes, to be honest I love the whole process of making gifs. but it took a while for it to reach me. at the beginning of my blog in 2013 I made gifs just because of bangtan and not because I liked making gifs. I started to really love making gifs it was when I came back from my hiatus, I got into my head that I was going to improve the way I made gifs, so I started playing around in photoshop until today's result which in my opinion is the my best. I'm really more satisfied with the gifs I make. they look really nice now~ for me it's a hobby that makes me relax and distract me from real life. I can actually disconnect more when I'm making gifs. I also feel this way because I make bangtan gifs. I don't think I would love making gifs as much if I were gifting other things that I like. bangtan is what makes this hobby so enjoyable for me.
7 notes
·
View notes
Note
hi sorry if this has been asked before, but i've been looking on your faq page for aska regarding your gifs? especially how yo make them - I'd like to create some too but it's so complicated😅
i use photoshop (not paid for lmao i downloaded a version off here years ago from like. 2016) + kmplayer + if it's game gifs, i use nvidia shadowplay to record
i'll put this under a cut because of images/length
i open my footage in kmplayer, and use the frame extraction function over the timespan of the clip i want to gif. these are the settings for that:
normally for games, i record in 60fps and extract every 2nd frame, but sometimes i extract every frame and scroll through to delete duplicates made from stuttering etc. for everything else like movies/tv, i extract every frame. normally, i try to go for around 100 frames, but you can have more or less depending on your final gif size, and also you can always trim your gif down when you're in photoshop, but more frames = longer import time
then in photoshop i go to file > scripts > load files into stack and select all the frames i want to go into the gif i'm making
for the method i use, you need a version of photoshop with timeline animation, and make sure the timeline i displayed (window > animation)
now the next part has a lot of little steps, but they're fairly easy to get the hang of once you've done it enough. it's basically muscle memory for me now but i still do sometimes do things in the wrong order lmfao
anyway. the steps are as follows:
click 'create video timeline'
click the 3 little boxes in the bottom left
in the right menu, choose 'make frames from layers'
when thats loaded, open the menu again and choose 'reverse frames'
click the last frame and change from 5 seconds to no delay
make sure you choose 'forever' instead of 'once' in the bottom left
select all frames (you can select the last one, then scroll back to the first and shift click to select them all, or just click 'select all' in the menu, i'm just used to doing it the first way for some reason lmao)
in the right menu, choose 'convert to timeline'
then select all the layers (can use shift click again)
and finally go to filter > convert for smart filters
here's a very small shitty gif of the process for a visual aid (a gif of a gifmaking guide... wow)
now you have a gif, basically! but you still need to resize and sharpen and edit, etc. i've posted about some of the things i do before but not really in detail because i mess around every time and don't always do the same things. and you don't have to do much! just do whatever looks good to you :')
tumblr's gif dimensions are 540px width for wide gifs, 268px width for two small gifs, and three small gifs are 177px for the two outer gifs, 176px for the middle one (don't ask me why they did that)
once you're done with that, you can export the gif by going to file > export > save for web (legacy). these are usually my settings:
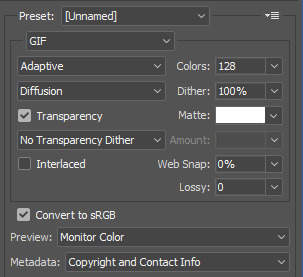
but i might change the colors to 264 if it's a smaller gif, or even to 64 if there are less colours and i can get away with it. for example in these gifs, i only used 64 colours since they were pretty brown/monochrome anyway, but something a lot more colourful would look terrible with 64 colours
the gif needs to be max 9.99MB, but if it goes over, you can always adjust it in the next step. once it's exported, i open it again
select all the frames and click the little arrow on one of the frames, then change the timing. i almost always use 0.05, but you can experiment with what you like the look of
then if the gif's over 9.99mb i just delete frames from the beginning and/or end until it's under the limit. then export it the same way as before (overwrite the old one or save it as a new file if you like) and you're done!
#ask#gif tutorial#kinda. i suck at explanations so maybe this isnt the best LOL#if you need me to clarify anything pls lmk! i always wanna help people learn new stuff if i can
22 notes
·
View notes
Text
had someone ask about my glitter GIFmaking process so i will give! i exclusively use web-based programs, so you don't need to download any software for this!
to preface, my process is a bit convoluted but it's so my images aren't compressed or made fuzzy. ALSO, these steps are for PC.
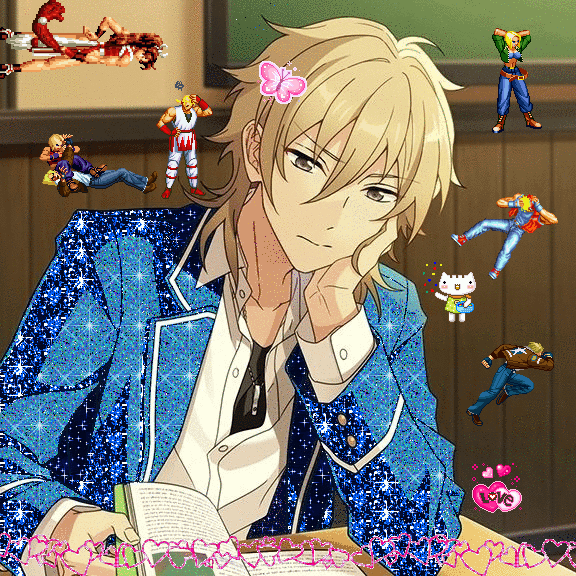
this is the final result, but you can make basically anything [and probably something prettier than this, i just made this image to demonstrate rotating & resizing pixel GIFs]
tutorial below!
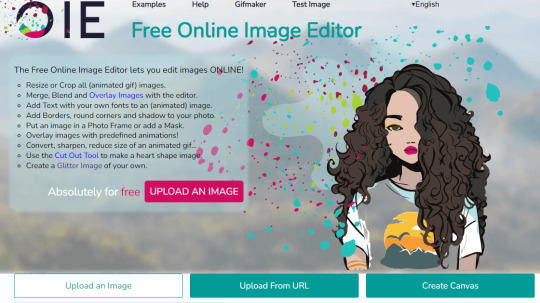
the site i use for glitter backgrounds is online-image-editor.com
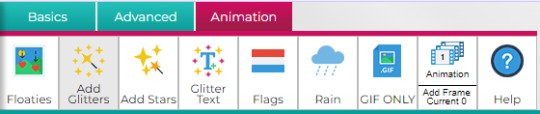
click "UPLOAD AN IMAGE" to get your picture in, then click the "Animation" tab. it'll take you to "Add Glitters". click that!
if your image is over 650x650 pixels, it WILL be rescaled. this is why i only upload images below that size, but it's up to personal preference and the compression isn't that bad unless you're using pixel art.
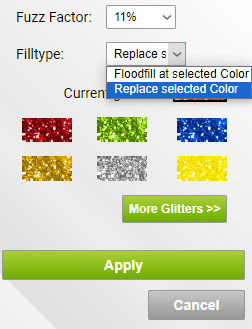
here are the settings i use when filling with glitter. i always change "Floodfill at selected Color" to "Replace selected Color" because it makes it faster, but it really depends on what you need to be filled. you just click the area on the image that you want to be filled on the preview and it'll be filled

kaoru jumpscare! here's my image so far! i just open the preview into a new tab to save it. it won't be PERFECT but it'll look presentable and that's all that matters.
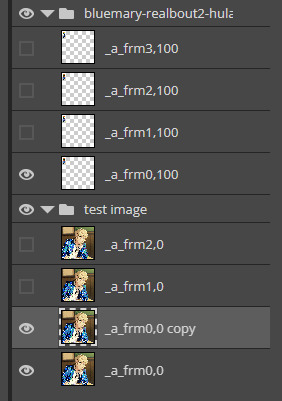
NOW, for adding GIFs to this unsuspecting kaoru, i use photopea.com. i usually use GIFcities.org, glitter-graphics.com or tumblr to find GIFs. where the GIFs are from doesn't matter, just make sure you save them as GIFs onto your computer.
when you upload your GIF into photopea, you might realize that it's not moving anymore!
this is OK, it will be a GIF when you export it. if your image is not exported as a gif, make sure that all the frames of each single animation are in the same folder, and all begin with "_a_".
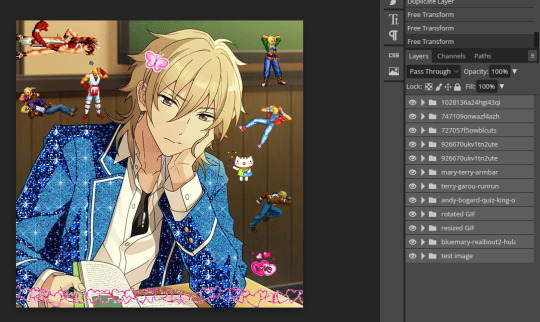
IMPORTANT because i didn't initially include this, but i recommend you duplicate every layer of your background image 1-3 times if you're inserting GIFs with a relatively higher count of frames so the glitter doesn't flash like crazy when you export. to duplicate layers, select a layer and "Ctrl+J". do this for every layer that doesn't have "copy" in its name first then repeat so you don't duplicate the wrong layers.
to open a new GIF or image, you go to "File", then "Open..." . note that you can do this with multiple images/GIFs in one go!
to add the GIF to the image you want edited, make sure you have selected the folder. go to "Layer" then "Duplicate Into ..." and make sure you duplicate to the image you are editing.

if you go to the image, it should contain a new folder containing all the layers from the image you duplicated from.
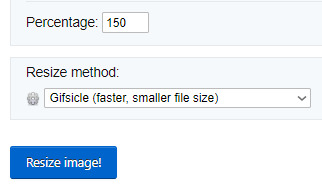
if you want to move the GIF, select the folder and use "Ctrl+Alt+T" to transform. if you only move the GIF it should not turn fuzzier, but if you want to resize the GIF i usually use ezgif.com/resize with the Gifsicle setting for "Resize method".
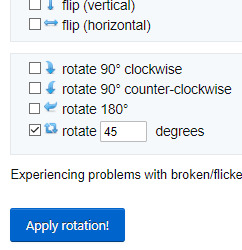
you can rotate GIFs by exact 90 degree increments if you hold the "Shift" key while rotating in photopea, however any other rotation WILL make your image fuzzier, and it's a bit harder to rotate the GIF but is possible!
i use ezgif.com/rotate for this, you can do any rotation you want but i did this one.
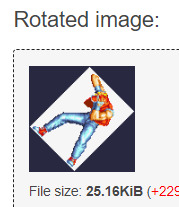
OK! it's rotated, but there's an annoying navy border so i'll show you how to get rid of that! DON'T bother saving the GIF you have just made, go from "Rotated image" and click "more tools", then "Remove background"
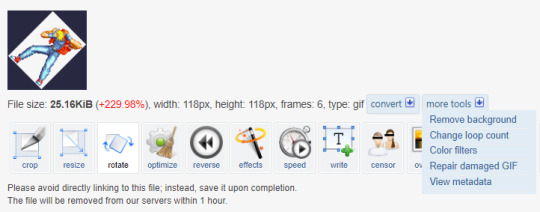
assuming you get the same navy as i do, the HEX code is #282840, but you can get you own hex code by converting the RGB to HEX [or getting a hex colour picker to work, didn't work for me. you can get the RGB by screenshotting and using MS paint]
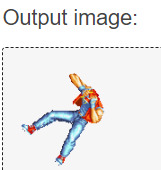
voila! it is now transparent!
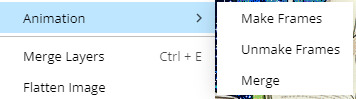
after you've added all your images in and you're satisfied with your image, you should select all the layers by holding "Shift" and selecting the top and bottom folders
and then, you go to "Layer", "Animation" then "Merge". you can always undo this and make edits so do not freak out if you've realized you want to edit parts
now, your GIF is ready to be exported!

go to "File", "Export as" and select "GIF"!
it'll take a while for it to load in, and you might notice an immediate issue! the GIF is too fast! you can fix this by messing around with the speed dial. this is the most frustrating part of GIF making for me because my computer is slow and freezes a lot. just stay patient, and do NOT reload your browser or you'll lose all your hard work!
annnddd that's it! bye bye!
#tutorial#glitter gifs#glitter graphics#glittercore#GIF#gif tutorial#kaoru hakaze#ensemble stars#fatal fury#hope this is helpful
22 notes
·
View notes