#nodata
Explore tagged Tumblr posts
Visit Tumblr Blog
Explore Tumblr blogs with no restrictions, modern design and the best experience.
Last Seen Tumblr Blogs


Fun Fact
Tumblr is available in 18 languages.
Text
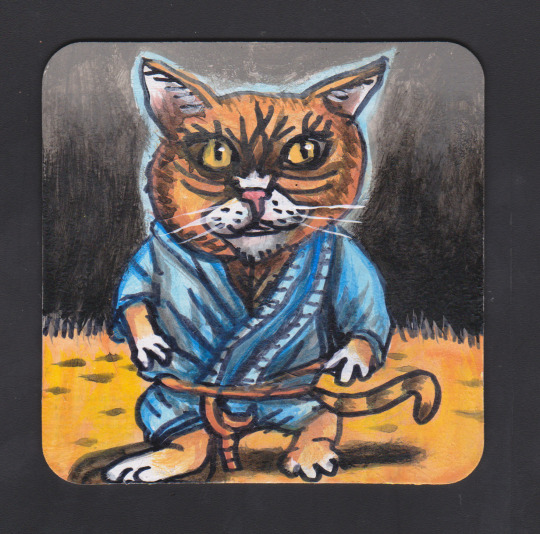
{cat shelter} Me: So you don't test for it, but you say none of them have it? Owner: We've never come across a cat with martial arts training, no.
#catshelter#littleninja#donttestforit#loophole#martialartstraining#cats#irony#humor#unregulated#rarely#turnsout#nodata#acrylic#dailyartwork#artoftheday#artwork#kunst#flomm#flommist#beercoaster#lowbrowart#outsiderart#painting#beermat#perspective
1 note
·
View note

Text

@rumarried changing your username is like a dad shaving his beard and i'm the baby crying at unfamiliarity but let's play a new weekly? fortnightly? game where we pick an old nodata comment and try to guess who it is about
17 notes
·
View notes
Text
"Call upon the Guardian, if you truly have her favour."

i had this wip marinating for like 2 months before i just went "nah i'm finishing this today". i am SO glad i finally got it done i love it.
(the lass that takes up the majority of the background is an oc of mine, Nodata :3 she's meant to be the eel that traverses in Treasure Reef :333333 very much accidentally influenced by athena and poseidon LMAO)
(also im back to haunt people with long ear wounded /silly)
#jupiter's radiation || art tag#sky: children of the light#sky cotl#wounded warrior#sky cotl oc#sky oc#yes this was sparked partially because i keep listening to epic the musical and i was listening to get in the water on loop this morning#'tags can only be 140 characters' SHUT THE FUCK UP TUMBLR /lh#let me ramble smh my head
11 notes
·
View notes
Text
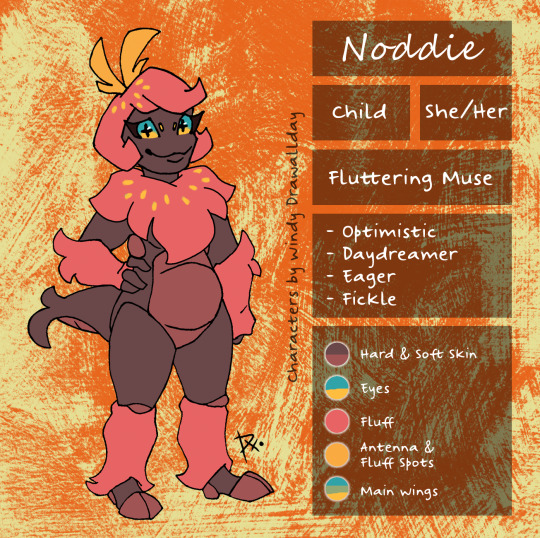
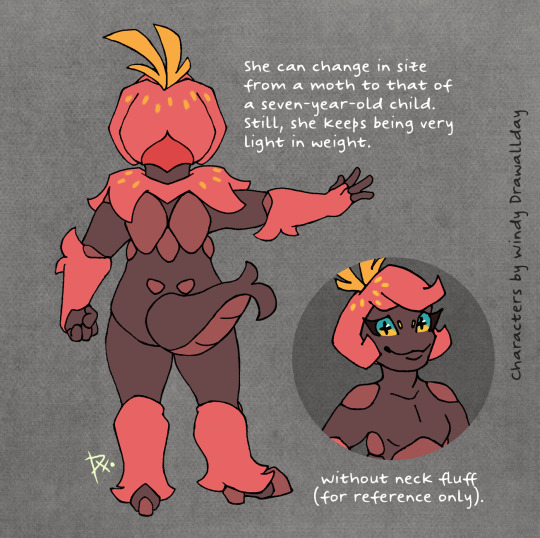
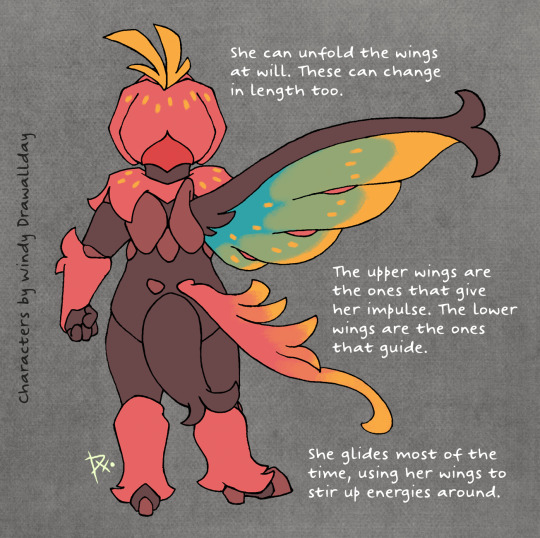
[ 28 - N O D A T A ] ~Fluttering Muse~
AKA "Noddie". She is one of many fae that can lift and "pollinate" positive energies around her. Nods focus and live from creative/constructive energies, and it is common for her to fly around individuals or groups of people with artistic tendencies.
You can usually see her around the shoulders or tuck in the pockets/hats of her monster neighbors!
(Nodata is an old nickname she got the first time because her small presence was hard to notice by everyone in the plane of Barrioween until she presented personally to the cast).
TBH this is a pretty informal quick reference and information about her because the project is still under construction but I want to be braver and show my original characters here too!
#myart#windydrawallday ocs#windy ocs noddie#barrioween (project)#original character#monster girl#moth girl#rosy maple moth#faerie#bug fae#character reference#character design
29 notes
·
View notes
Text
See you in 9 hours guys #nodata #carjourney save me binchtopia nymphowars off menu and dressed the history of fashion
5 notes
·
View notes
Text

Fanglongmon EX5-074 SEC <03>
Mega | NODATA | God Beast
[Digivolve: Lv.6 w/[Four Sovereigns] trait: Cost 4]
[On Play] [When Attacking] By returning up to 4 cards with the [Deva] or [Four Sovereigns] trait from your trash to the bottom of the deck, for each returned card, all of your opponent's Digimon get -4000 DP for the turn.
[When Attacking] For each of your Digimon with the [Four Sovereigns] trait, trash the top card of your opponent's security stack.
[All Turns] This Digimon isn't affected by the effects your opponent's Digimon.
10 notes
·
View notes
Text
Fill NoData holes in raster data
https://www.esri.com/arcgis-blog/products/analytics/analytics/fill-nodata-holes-in-raster-data/
0 notes
Text


t-shirt αφιερωμένο στον αγωνιστή Βαρδή Τσουρή. Πρωτοστάτησε στη δημιουργία του αυτοδιαχειριζόμενου στεκιού στη Χαλεπά και της κατάληψης Rosa Nera. Μπροστάρης σε όλες τις σημαντικές κινητοποιήσεις του Χανιώτικου λαού κυνηγήθηκε και διώχθηκε αμέτρητες φορές. Όμως, έμεινε αλύγιστος μέχρι το τέλος σε ηλικία 65 ετών, τον Μάιο του 2017.
φωτογραφία: Γιώργος Νικολαιδης, Προπυλαια 1995
Σχεδιασμός exausted.designers & nodata
1 note
·
View note
Link
0 notes


Photo

Available Wifi at Sun Tea Ackroyd Ask the counter for more detail 📍8211 Ackroyd rd, Richmond Opening time: 12:30 pm-10:00 pm . . . #nodata #nosignal #deadphone #rogers #internetdisruptions #nocellservice #phoneserviceoutage #untilmonday #sunteaackroyd #suntea #sunteabc #bbt #bubbletea #vancouverfoodie #vanlife #vanfoodie #cafe #wifi (在 SunTea Ackroyd) https://www.instagram.com/p/Cfy3gyprYuJ/?igshid=NGJjMDIxMWI=
#nodata#nosignal#deadphone#rogers#internetdisruptions#nocellservice#phoneserviceoutage#untilmonday#sunteaackroyd#suntea#sunteabc#bbt#bubbletea#vancouverfoodie#vanlife#vanfoodie#cafe#wifi
0 notes
Photo

2 notes
·
View notes