#nail tutorial
Explore tagged Tumblr posts
Visit Tumblr Blog
Explore Tumblr blogs with no restrictions, modern design and the best experience.
Last Seen Tumblr Blogs


Fun Fact
69% of Tumblr users are millennials.
Text
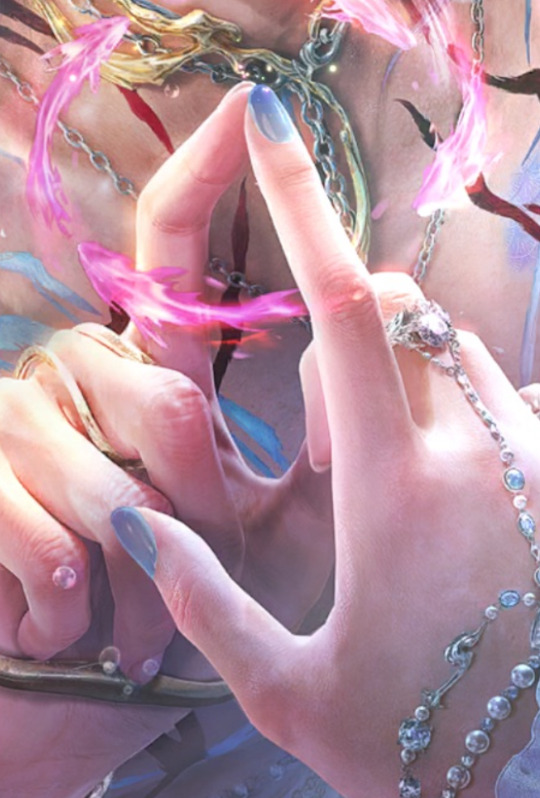
DIY MC nails!
Did you like MC's nails? Did you know these are easy to DIY???
What you'll need:
Nail polishes in light and darker blue, + a holographic/iridescent top coat (No quick dry; I've tried this with the instant dry and the struggle and pain I suffered.... I'm so sorry. This only really works with regular polishes!)
A clear top coat + your favorite base coat
School glue (I'm so dead serious yes liquid kids school glue, the non-toxic kind)
A disposable foam makeup sponge or an old beauty blender you were about to get rid of
Tweezers
Here's the finished result!
Tutorial with Pics:
Ok for people who want to know exactly what I used:
Dark blue = "To Me From Me" (#735) by Essie
Light blue = some kind of light cornflower blue cheap polish by Elle I bought for pennies at freakin' TJ Maxx 💀 (you do not have to spend on this I promise) just try to color match as close as possible!
Holographic Top Coat = "Ethereal Escape" (#30) by Essie's Special Effect [I might also recommend "Iris Illusion" (#546) by Sally Hansen, it's an extremely close second but a little more chrome than sparkle - which may be desirable!] Basically if you look at the reference photo, there's an everrrr so slight purple sheen to it. Like, very iridescent. You want something not "glittery" just enough that when the sun hits it, you get a subtle purple shimmer!
Clear Top Coat = I swear by Olive & June's Quick Dry Top Coat ("But Madi you said no quick dry!!" I KNOW BUT THIS IS THE TIP TOP IT'S DIFFERENT)
Step 1:
Grab your favorite base coat (everyone's needs are different, mine is to remedy my peeling nails sobbb). Slather her on and while you wait,
Apply a thin rim of school glue around your nails. Hang with me a minute.
It should be a thin coat, if it's too thick it'll take forever to dry. You can adjust it with your finger if it's too thick? it's fine.
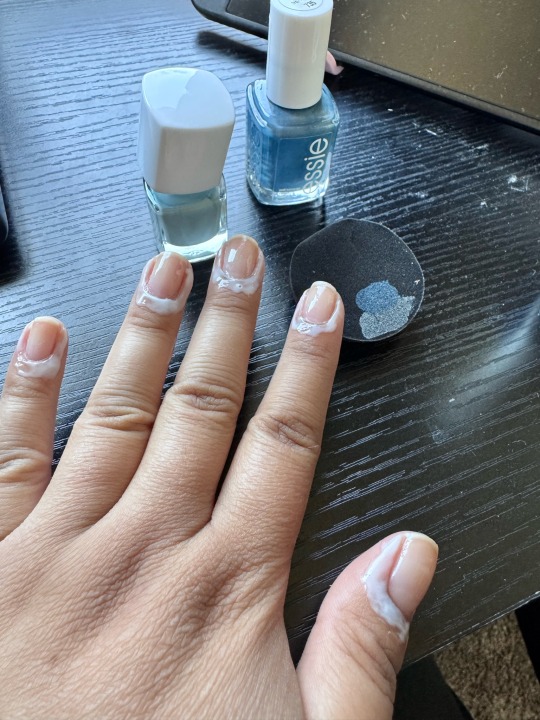
For you nosy guppies, we do this to protect our skin and our sanity later. Now shush.
Step 2:
Wait for the glue to fully dry. Like there should be no more white. You'll see in the next pic you can no longer see the glue.
Step 3:
Grab a makeup sponge - you'll only need 1! (those cheap white ones they sell in a big bag in the beauty section; OR if you're like me and couldn't be bothered, cut up an old beauty blender you're about to get rid of. Then you'll be able to save the other pieces for another time!)
Apply a thin line of light blue polish on the bottom, then a thinner line of the darker blue above it.
Step 4:
Gently stamp the colors onto the nail, it'll look like this and it'll be a mess but that's what the glue's for.

Do this for all your nails.
Step 6:
Wait a minute and apply a second "coat," so more stamping.
"But Madi! It looks bumpy!!" It's fine I promise 😭
Step 7:
Give it another minute, then apply your iridescent coat.
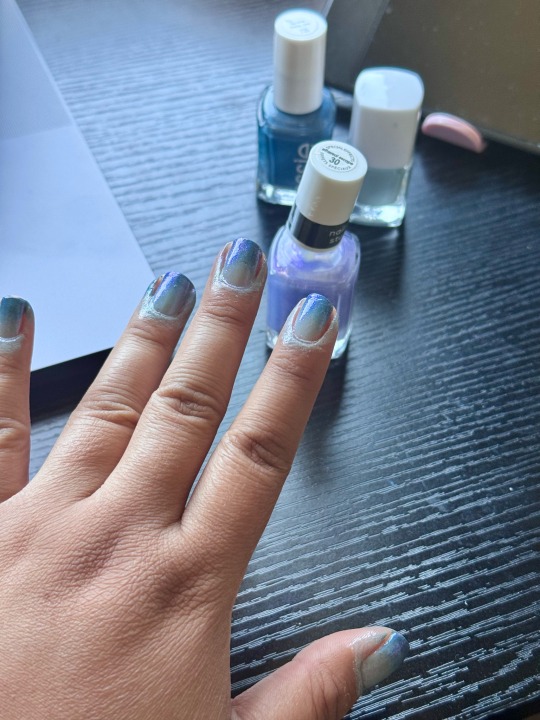
Omg look all the "bumpiness" was smoothed out!
Step 8:
Apply your top coat ✨
Step 9:
Grab your tweezers and you can start to pick that dried glue off. Wow no more mess! It's so easy!!!

Here i saved you a bit of glue.
Seriously it's so satisfying.
(Don't @ me about the dust ok i legit vacuumed and dusted 2 days ago but I've been leaving my window open a ton tyvm!!!)
AND YOU'RE DONE!!
---
{Reposts to other platforms are ok for this post bc I'm not on anything else but just please link and credit! ✨}
#nail art#nail tutorial#love and deepspace#love and deepspace rafayel#rafayel love and deepspace#love and deepspace mc#lads mc#l&ds rafayel#lnds rafayel#lads rafayel#l&ds
94 notes
·
View notes
Text
youtube
#acrylic nails#bling nails#cute nails#explore#nail blog#nails#press ons#nail art#nailsnailsnails#nail#long nails#press on nails#pretty nails#trendy nails#nail trends#trending#nail tutorial#tutorial#viral#viralpost#viral trends#fypツ#fypシ#fypage#fyp#tumblr fyp#small biz#small artist#small youtuber#pink nails
5 notes
·
View notes
Text
Dyeing my nails with Jagua
Hello! :)
I write this post because when I initially had the idea, I tried searching it online, and found literally nothing.
I found results about people dyeing their nails with henna, and the results can be beautiful, but that reddish-orange is one of the only colors that I *didn't* want to use on my own nails, so I'd been thinking about how to dye them other colors. I bought some cheap supplies and did a few vague experiments, but nothing really worked out that well.
However, in my research, I did learn about Jagua: a Central/South American fruit, of which the unripened juice stains skin a blueish black. I *think* I saw an image or two where a person's hands are dyed (much like you see with henna) and the designs extended onto the person's nails, and it looked like it had worked well enough for them, that I decided to try it myself.
The thing about jagua, though, is that once the juice has soaked into the topmost layers of skin and the residue has been washed off, it still takes about 36-48 hours to fully oxidize and reach full color.
That being said, I decided to document the process, and share it just in case anybody else wants to try it. (If you do, share your results! I'd love to see how it goes for other people ^-^ )
I started with clean, dry nails, and pushed my cuticles back beforehand.
The jagua I used came as a gel, and though the juice of the jagua fruit is clear, the gel was black and goopy. It was a bit of a process learning how to apply it neatly (since any skin it touches, even briefly, it *will* stain), but by halfway through the second application, I'd pretty much gotten the hang of it. It helped that I literally didn't have to worry about what the surface looked like, only the edges.
The first photo is of the 1st application, with the gel on.

I left it on for about 4.5 hours (the package said to "allow 2-4 hours to dry completely"), though in hindsight, it probably would have worked just as well if I'd only left it on for about 2 hours (it was dry enough to lightly scratch an itch with by about 2 hours, and it was tacky enough to withstand light touches (like pushing hair behind my ear, etc) after about 1.5 hours).
Afterward, I washed my hands with soap and running water (as instructed by the package), keeping the water lukewarm (the package instructs users to "avoid contact with VERY HOT water". I didn't know how hot exactly "VERY HOT" is, but I didn't want to take any chances that I didn't need to).
The next photos were taken about 6 hours after I washed off the first application.
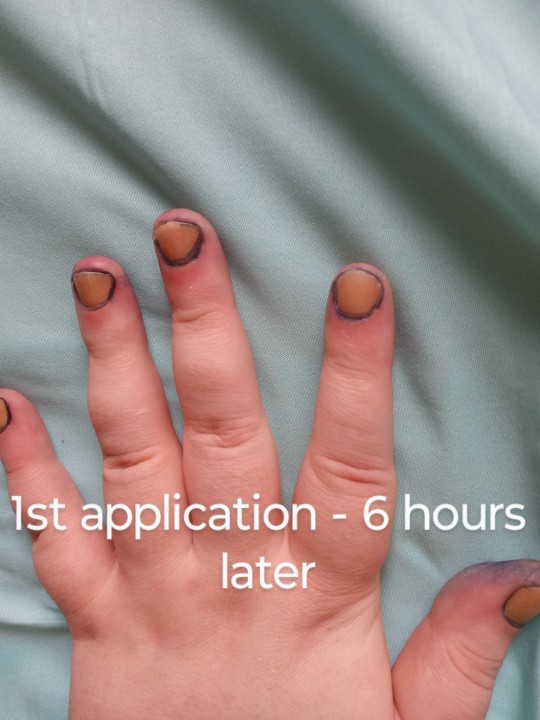

As you can see, it stained my cuticles far more quickly than it did my nails, but every instruction guide for using jagua says that it takes a couple of days to fully darken, so I wasn't worried yet.
30 hours later, my nails had darkened considerably, but my cuticles were still way darker than my nails, so I decided to try another application.

Again, be *very* careful applying it, any drops or overshots will likely fade (relatively) quickly on your fingertips, but they still stain dark for a few days.
All of those stains on my fingers were wiped off within one minute of touching it (which is apparently still too long).
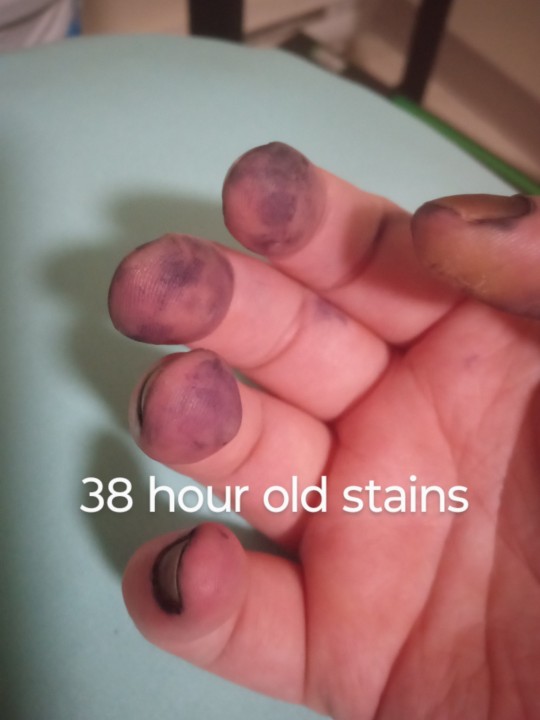
2nd application, 6 hours and 31 hours later, respectively.


It looks pretty decently dark from a distance, so if I were just doing this for myself, I would've probably left it here and declared it Done.
However, since I'm also doing Science here, I decided to go for one more application.
As you can see, even after 3 applications and 48 hours, the tips of some of my nails didn't want to take the color very well, looking kind of dark brown/whiteish under a bright light and close inspection.
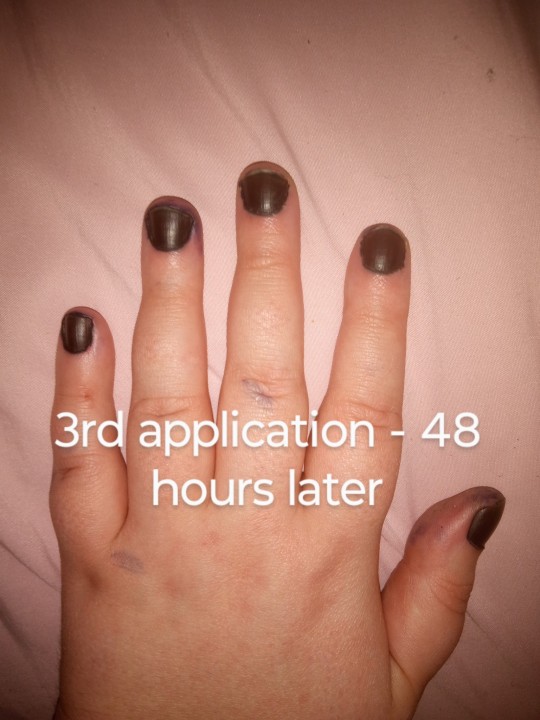

So, I decided to do *one* more application, but only on the tips, since the rest of the nail was already pretty solidly black.
As you can see, 41.5 hours later, the brownishness *near* the tips has gotten better and darker, but the tips themselves still don't seem to want to take the color very well.
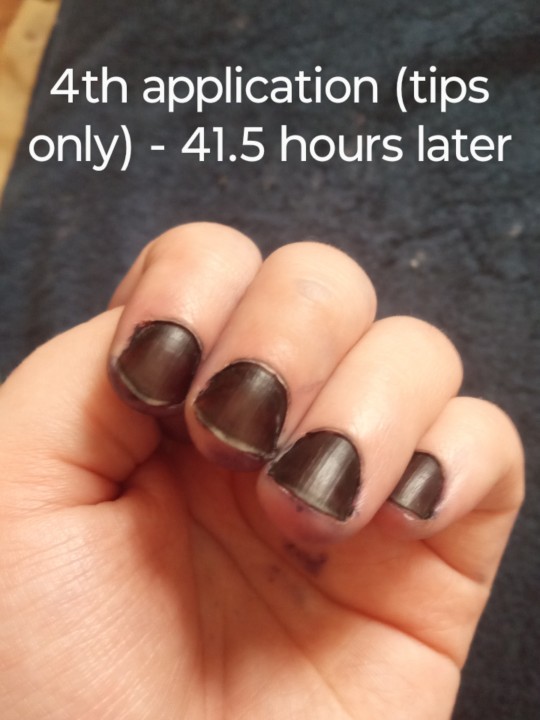
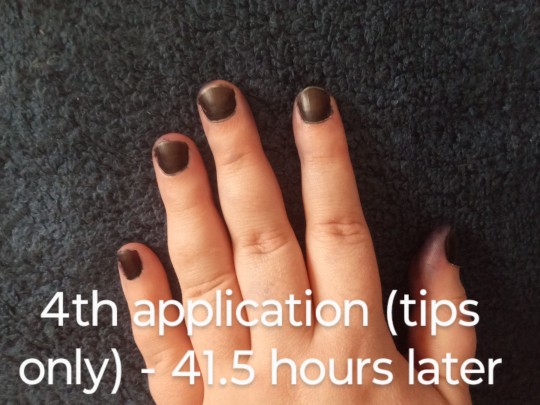
I'm not sure why that is (I even put a little bit of overhang on each nail-edge on my 3rd and 4th applications), but I think that this demonstrates *pretty* well that my nails have taken up about as much color as they're going to, and thus, I declare the main part of the project Done.
If you didn't push your cuticles back correctly (or maybe even if you did? I'm not sure how cuticles work, I'm a novice to doing *anything* to my nails), you might get little spots where the skin clings to your nail, and gets dyed instead of it.
I ended up with a couple of those, so I just scratched the dead skin off and re-dyed those spots (since they were close to the nail bed, it only took one application to get them looking as dark as the surrounding nail).

I did one final thing before I put the jagua away for the time being: I (attempted to) make a tattoo out of it, on my skin.
I'd tried to use a stencil and it didn't work well, so I tried to fudge the bottom part freehand (bad idea), and for the top part, I ended up painting a stencil on my skin with Elmer's glue, and then applying the jagua over that.
That didn't work super well, either, but that's not the purpose of this post. I include the image mainly as a comparison between when I leave the jagua on my skin on purpose, vs. on accident.
My cuticles look weird in the previous photo, but it's only because I hadn't pushed them back correctly beforehand. I took another one about 10 hours later that shows more accurately what they look like.

There are still some parts of the cuticles that are stained, but much of those parts have worn away by now. My cuticles also look pretty dry here, but I'm sure if I put some oil or lotion or something on them, they'd look a lot better.
A final word of warning: if your jagua instructions say to wash it off with soap, do it (especially if it has oils mixed in, like mine did).
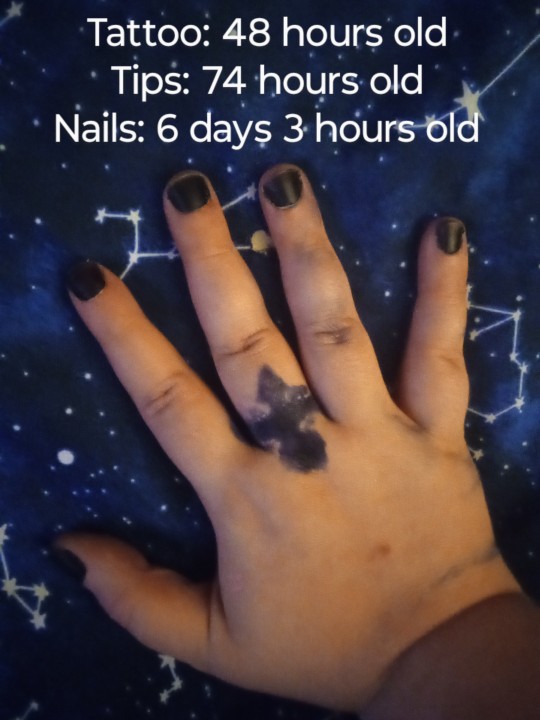
This stain is from the tattoo I did - it was late and I was tired and I just peeled the majority away and washed it off with water and a paper towel, and then I went to sleep and woke up with this stain, which had transferred from one hand to the other. Oops.

Final remarks:
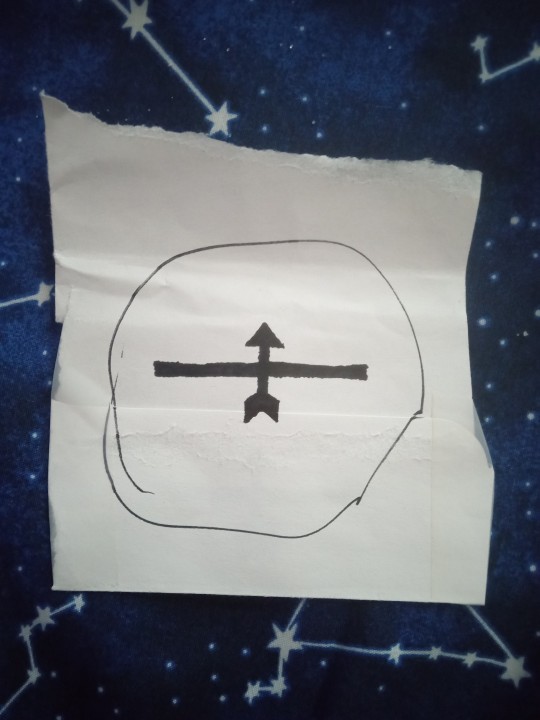
For anyone curious, this is what the tattoo was supposed to look like. Oops again.
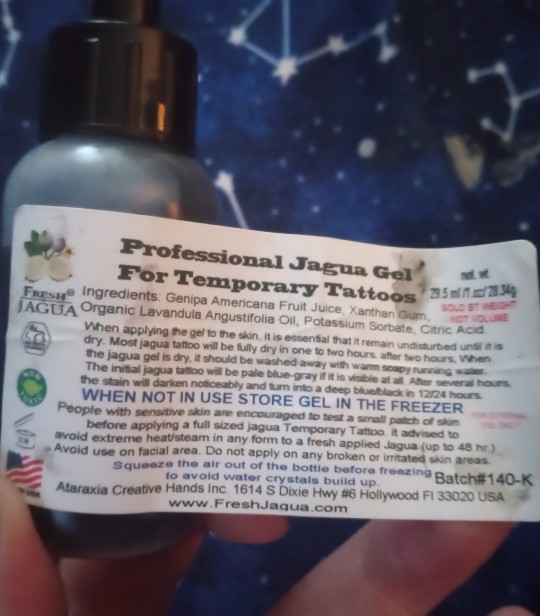
This is the Jagua I used. I'm pretty happy with it, I'm sure I'll end up getting it again when this one runs out.
For what it's worth, the stains around my nails are fading pretty quickly, at least compared to what I'd expected.
I don't know how deep exactly the jagua went into my nail, but aside from avoiding hot water, I've been treating them pretty normally, and they haven't scratched or chipped or anything.
I'm sure I'll find out how deep it goes the next time I have to cut my nails, and I'll update this post whenever I do.
The other reason I mentioned that I used an Elmer's glue stencil for the tattoo is that I think the same technique could be used on the nails to create patterns, with better results (as it's a less stretchy, moveable surface for the glue to sit atop).
I don't have anything else to say here, so until next time, good luck, guys! <3
4 notes
·
View notes
Text
❤️🩹Ha valentin nap, akkor jöhetnek a szívecskék😍😍😍 Neked milyen lesz a körmöd?🤭
@Roniki_Brand representative 💅
#roniki #valentinesday #valentinnails #hearthnails #naildesigns #nailtutorial #foruyou
2 notes
·
View notes
Text

instagram
#spring 2024 nail trends#nail trend#nail art#artistic nail design uk#artistic nail design#Norwich#Norwich nails#nails#manicure#nail ideas#beauty#beauty blog#trending#chrome nails#chrome#nail tutorial#Instagram
3 notes
·
View notes
Text
youtube
#dorotapalicka#nails#nailart#nail art#marblenails#marble nails#summernailart#summer nail colors#summer nails#purple nails#nail tutorial#Youtube
2 notes
·
View notes
Text
youtube
Bougie On Budget: How to Apply Long Lasting (2-3 Weeks) Press on Nails 💅🏾
#bougieonabudget#bougie#bad and boujee#press on nails#diy nails#beautyhacks#pisces girl#piscesgang#nailswag#naillove#press ons#black girls in luxury#level up journey#self care#self care routine#manicure#nail tutorial#grwm#youtuber#black youtuber#tarot card reader#glamour witch#customnails#grabbers#dick grabbers#nailed it#girl talk#90s aesthetic#astrology aesthetic#black girl aesthetic
2 notes
·
View notes
Text
Press-on nails 101 (7 step guide)
-ˋˏ ༻❁✿❀༺ ˎˊ-
This is a very compact guide on how to put on press on nails, take them off and keep them so they can be reused (this is not medical advice, proceed at your own risk, I am not a dermatologist).
Aside from teaching you the ins and outs of press on nails, I'd also like to share with you Abdullah's campaign, which has been vetted by gazavetters and is number #641 on their list. You can find his post here if you want to share it with friends, family or here on tumblr. They're at half of their goal which is incredible, and even with the money you could get a set of press on nails on Walmart you can help them get closer to their goal, so please consider instead of getting 2 nail sets, get one and spend the money of the other in helping them and/or other campaigns, thank you.
-ˋˏ ༻❁✿❀༺ ˎˊ-
How to choose the size? If you're putting on custom sized nails, then you just need to separate the nails for one hand and the other hand; if you're putting on store bought ones, then you'll need to check which nail fits each finger. Usually nail sets have more than 10 nails in them so you can try them on and get whichever one fits best on each nail. Make sure they're not too loose (bigger than your actual nail in a way that the fake nail covers your fingertip beyond your natural nail) nor too small (smaller than your natural nail in a way that it doesn't cover it completely or too tight, if it hurts or you have to force it to fit, it's not the correct size).
What happens if my natural nails are damaged? If your skin is irritated (and/or damaged) and/or your nails are damaged due to fungal infection or other conditions, I recommend not putting press on nails on since to prepare the nails you'll have to apply strong chemicals to them and you don't want to do that on damaged nails, please wait until they recover or until they are less fragile. If you have a chronic issue that causes your nails to be that way, I suggest you ask a professional, and if you choose to put them on anyways proceed at your own risk.
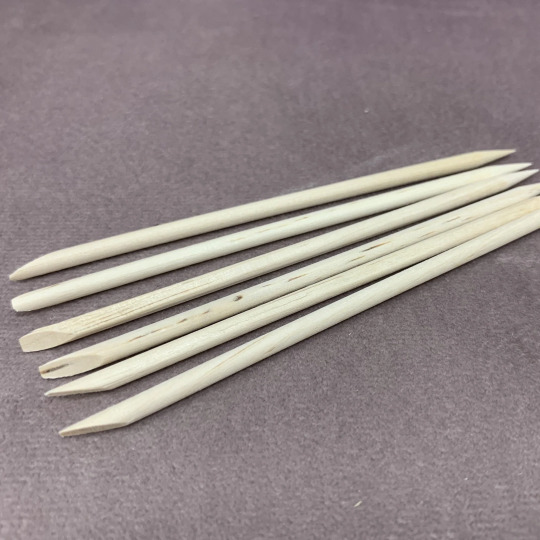
How to prepare your nails for application (steps recommended to make nail glue stick better to the nail) ? Usually removing or pushing back your cuticles is recommended to make press on nails hold on to your nail better and last more time; if you want to do that, consider getting an orange stick! It's a small stick usually as long as a finger and about 2 or 3 mm wide with a diagonally cut blunt tip:
The way this works is that you use the horizontal end of the tip, the "blunt" part of the orange stick tip and you carefully push back your cuticles. Make sure to do it gently and to not apply too much pressure to avoid bleeding, pain, etc. If available, ask a roomate or someone you trust to do it for you since it's a bit of a tricky process.
If you want to, at the end, you can cut the pushed back cuticle with special tools, but that's an optional step.
After pushing back your cuticles, with a nail file, sand the surface of your nails to create a scratched surface so the nail glue wil adhere better to your natural nails. To do this, file your whole nail instead of your nail tips in cross motion or zigzag.
You want a polished surface, don't do it too hard in order to avoid your nail breaking.
As always, refer to someone you trust to do this for you if you'd like to.
After the surface of your nails has been sanded down, you're going to rid your nails from their natural oils so the nail glue can work better. Usually, nail polish remover, acetone or alcohol are used for this step. You can either get special wipes that contain those drying agents or soak a wipe in one of those substances to then rub your nail thoroughly to ensure that they are dried.
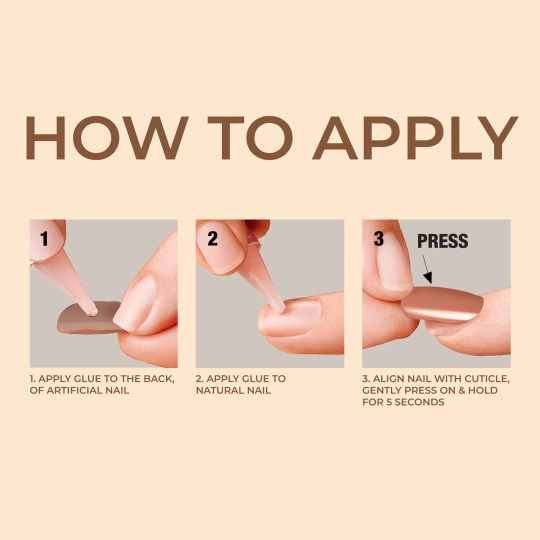
4. How to glue down your press on nails?
Prepare your press on nails by laying them down in the same order you'll be putting them on so you can do so quickly. Then, starting from your little finger, apply a bit (a drop or two depending on how big your nails are) of *nail glue* on the center of your nail and then spread it with the end of the glue tube.
You can also use a nail glue sticker which you will apply according to size to the center of your nail.
Start from the little finger up to the thumb. That will mean your thumb is free until you finish applying the other nails which will make application easier.
In both cases, after glue application you'll have to carefully press down your nail creating a 45º angle between the lower end of the fake nail and your natural nail and then carefully continue pressing down for 5-10 seconds aprox so the nail glue sticks well.
It's important that you start with a 45º for application to avoid the formation air bubbles between the press on nail and your natural nail which would prevent the nail from sticking correctly. (see image for further clarification, hope it helps)
In the picture shown, they apply nail glue to the fake and natural nail, you may do so too if you want to, but then you might need less glueon each nail (1 drop probably which, with the end of the glue stick, you will spread across your natural nail).
If at any point of your day one of your nails falls off, try re attatching it to the nail and pressing again for 5-10 seconds. If they keep falling off repeatedly and you feel like the nail glue is just not working, you'll have to either take off all your nails or just take off the one that's giving you issues and store it so you can use it again.
5. How to take them off?
This step is different if you've used nail glue stickers (double sided stickers) or nail glue. If you're used the first, see point A, if you've used the latter, point B. Warm water in both cases if you want to be very specific is (according to google) around 32ºC which is 89.6 ºF. You can use warmer water according to your needs up to 43º which is 109,4 ºF but be careful not to get burnt. You'll need to soak your hands in that water from 3-15 minutes depending on if you've used stickers or nail glue so make sure that it's not too hot to avoid discomfort.
A) Soak your hands in warm water for 3-5 minutes. When you feel the nail sticker soften and loosen, with an orange stick, carefully stick it between your natural and fake nail and go around the nail pushing upwards carefully. If your nails create resistance and getting them off hurts, soak them again until you feel them soften and try again.
Since the orange stick's end is diagonally curved, make sure that its curve is parallel to the curve of your nail. Create a gentle leverage force so that the fake nail ends up easily popping off.
Video tutorial
B) This will require a longer period of time. In a cup or bowl, place warm water with oil and soap and mix until homogenous, then, soak your hands for 10-15 minutes until you feel the nails getting looser. To be safer, put on some oil around your nails after you stop soaking them to help with removal. After this, you'll follow as in A):
When you feel the nail sticker soften and loosen, with an orange stick, carefully stick it between your natural and fake nail and go around the nail pushing upwards carefully. If your nails create resistance and getting them off hurts, soak them again until you feel them soften and try again.
Since the orange stick's end is diagonally curved, make sure that its curve is parallel to the curve of your nail. Create a gentle leverage force so that the fake nail ends up easily popping off.
Video tutorial
6. How to store them?
Clean with the orange stick any remains of the stickers and glue so you can place them again in their container in the order of your fingers so next time you take less time when choosing your nails for each finger.
7. How to take care of my nails after taking my press ons off?
Use acetone or nail polish remover to remove any glue remains off your nails; after that, rub in some cuticle oil and nail oil on your nails as well as some hydrating hand cream to help the hands and nails regain their moisture. If after nail removal your nail beds are damaged and/or you are experiencing any issues see an expert (dermatologist or pharmacist).
#press on nails#nails#nail tutorial#cute nails#pretty nails#nail application#nail aesthetic#tutorial#tips#vetted campaign#vetted fundraisers#palestine campaign
0 notes
Text
Pressed Flower Milky Beige Gel Nail Design: DIY Tutorial
Pressed flower nail art is the kind of trend that instantly catches the eye yet feels delicately timeless. While salons may charge a premium for these detailed manicures, the good news is—you can DIY this floral dream from the comfort of home. The combination of milky beige gel polish with real dried flower decals gives nails an elegant, boutique-quality appearance. Each bloom, nestled beneath a…
#DIY manicure#DIY Nails#floral nail art#floral nails#gel nail design#gel nail tutorial#milky beige gel nails#milky gel nails#nail tutorial#pressed flower nail art#pressed flower nails#summer nail trends
1 note
·
View note
Text
🖤✨ OK but… can we talk about Cat Eye Gel Polish for a sec? Because I just figured out how to do cat eye gel polish at home and I might never step foot in a salon again. 😭💅
You know that mesmerizing, shimmery galaxy swirl that looks like your nails got hit by a shooting star? 🌌 Yeah. That.
All you need is: 🔮 A magnetic cat eye gel polish 🧲 A little wand magic (seriously, it’s a wand) 💡 The right lighting + angle 🕯️ A candle lit for vibes (optional, but highly recommended)
✨ Full step-by-step guide + my fave affordable products = right here 👉 [your blog link]
Reblog if you're ✨manifesting✨ salon-level nails from your bedroom floor.
#HowToDoCatEyeGelPolish #CatEyeNails #GelPolish #MagneticNails #DIYNails #NailArt #NailAesthetic #WitchyVibes #NailInspo #BeautyTips #NailTutorial
0 notes
Text

youtube
#acrylic nails#bling nails#cute nails#explore#nail blog#nails#press ons#nail art#nailsnailsnails#nail#viral trends#trendy nails#nail trends#trending#y2k vibes#viral nails#viralpost#viral#y2kcore#y2k aesthetic#y2k nails#yellow nails#for you#y2k#youtube#rhinestones#long nails#nail tutorial#tutorial#diy
3 notes
·
View notes
Text
Boldog Új Évet!🍾🍾🍾
2 notes
·
View notes
Text
instagram
#sally stitches#the nightmare before christmas#halloween#reelsinstagram#nailsofinstagram#nailsoftheday#nail art#halloween nails#painted nails#acrylic nails#nail tutorial#this is halloween#spooky season#spooky nails#Instagram
0 notes
Text
youtube
Black lace nails
#dorotapalicka#nails#nailperfect#nailart#black nails#black nail art#nail design#lace nails#nail tutorial#gel nails#gel nail#gel nails tutorial#how to do nails#Youtube
2 notes
·
View notes
Text
instagram
#tutorials#nail tutorial#artistic nail design#Norwich#Norwich manicure#velvet nails#magnetic nails#Instagram
0 notes
Video
youtube
БЫСТРОЕ наращивание на ВЕРХНИЕ ФОРМЫ / Как сэкономить время / Аквариумны...
0 notes