#more of a test gif for effects and crop
Explore tagged Tumblr posts
Visit Tumblr Blog
Explore Tumblr blogs with no restrictions, modern design and the best experience.
Last Seen Tumblr Blogs


Fun Fact
In 2020, Tumblr had 29.4 million users in the US.
Text

#bg3#bg3 screenshots#baldur's gate 3#astarion#astarion ancunin#bg3 astarion#mine#reshade#gif#more of a test gif for effects and crop#astarion bg3#like idk why i didnt realize i could put blur filters on my gifs in ps bc theyre smart layers lmao... useful#trying to see how i can crunch these down size wise while keeping it looking good#only so much u can do tho lol
36 notes
·
View notes
Text
[ReShade 5.1+] Hide CAS UI & More
Unlike build mode & live mode, there's no shortcut to hide CAS UI, which is much needed for taking screenshots with Reshade. With this ShaderToggler add-on (made by Frans Bouma/Otis_inf), you can easily hide the UI! This guide will cover how to install the add-on and showcase its features.
If you find this useful, do share the word around! All I ask is that you link back here if you want to share outside of tumblr :-)
📌 UPDATE 19/09/2024: updated both DX9 and DX11 files to fix the hide CAS BG & mirror toggles. Please redownload.

How it works:
One of the features of this add-on is the ability to toggle on/off in-game shaders: UI, geometry, post-processing effects, and more (not reshade shaders). You do that by putting certain shaders together into a group which you can then toggle on/off. This is quite useful for CAS shots as you can't hide the UI when you use ReShade/GShade (unlike build/live mode where you can simply press tab).
This add-on is made by Frans Bouma/Otis_inf so huge credit to him as without this add-on this wouldn’t be possible.
Keep in mind that this add-on doesn’t prevent shaders (bloom/dof/mxao) from affecting the UI, it just hides the UI shader from view. This, along with a shader like ChromaKey/DepthAlpha that allows for transparent backgrounds, makes a great duo! No more cropping to exclude the arrows and editing out the background manually 🙌 (unfortunately alpha hair suffers a bit from it.)
What you’ll get by the end of this post:
A ShaderToggler.ini file that will hide CAS UI elements with the option to either leave the sim/trait icons and trait selections intact for posing your sims, or hide everything except for your sim. Great for taking close-up shots.
There'll also be a toggle to hide infant pillow in CAS, hide CAS BGs & mirrors, and hide camera UI when your sim is taking a selfie/picture in-game.
// ReShade/GShade requirement:
For Reshade users: tested on Reshade 5.8.0 (w/ full add-on support), but it should be compatible with ReShade 5.1+.
For GShade users:
To check if your GShade supports add-ons: check the ReShade version it's based on in the shader notification at startup, similar to the menu here (GShade x.x based on ReShade x.x). You can also check in the reshade panel and see if there's a menu for add-ons.

📂 DOWNLOAD .ini file:
SimFileShare / Google Drive
🆕 DX9 & DX11 support
ShaderToggler.ini : DX9 version
ShaderToggler_DX11.ini : DX11 version

// Installation:
First, make sure that you have the correct ReShade with full add-on support!
Grab the add-on from this github release. For non-legacy players, grab _v121.zip. For legacy players, grab _x86_101.zip
Extract the ShaderToggler.addon file into the game’s \Bin folder where your TS4.exe/TS4_64.exe is (where you had also installed ReShade/GShade).
Still in the \Bin folder, drop the ShaderToggler.ini file you downloaded. You’ll end up with both ShaderToggler.addon and ShaderToggler.ini in the same folder as TS4.exe/Reshade.ini.
The .ini file should be named ShaderToggler.ini for the add-on to recognize it and the toggle groups to show up. If you downloaded the DX11 version, remove the _DX11 suffix.
If you’re a GShade user: there’s a folder called gshade-addons; this is where you should place the ShaderToggler.addon file. Just move the add-on from the \Bin folder to the folder mentioned and you’re good. If this doesn't work, keep it in the \Bin folder.
Open up your game. If you see the add-on & list of toggle groups in the Add-ons tab, then you’ve successfully installed the add-on & settings! Restart if needed.
// Shortcuts (Updated):
Toggle main CAS UI (traits & trait selections excluded): Ctrl+ ]
Toggle sim/trait icons & trait selections: Ctrl + [
Toggle pillow for infants: Ctrl + ; (semicolon)
Toggle camera UI when sim is taking pic/selfie: Ctrl+ ' (apostrophe)
Toggle CAS BG mesh: Alt + ]
Toggle mirrors: Alt + [
Previews:
in CAS:
Hide CAS BG & mirror reflections:

in Live mode (for Camera):
note: you can use the hide pillow toggle to hide the phone object.
🆕 in Build/Buy mode, use caps lock to hide the lot outlines:

// FAQ
Issue: add-on works, but the list of toggle groups doesn't show up.
This is likely caused by my config (.ini) file not being installed correctly. Put the .ini file where the TS4.exe file is, which is under the /Bin folder.
Issue: Add-on failed to load with error code 193.
This is caused by downloading the incorrect addon file. If you're a non-legacy (x64) player and downloaded the x86 addon file, you will encounter the error. Download the right version (_v121.zip) and that should fix the error.
Issue: everything shows up & are installed correctly, but the toggle groups don't have any effect/hide the UI.
This issue only happens if you installed Reshade/Gshade and selected Vulkan/DXVK. You need to select DirectX 9 or DirectX 11 instead for it to work.
tagging @thefoxburyinstitute :-)
#ts4 tutorial#ts4 resources#ts4 reshade#ts4 cas#the sims 4#tutorial#t: shader toggler#reshade tutorial#t: reshade add-ons#hide cas ui#sims 4#vyx.resources
2K notes
·
View notes
Photo
HOW TO: Do a Motion Blur Transition Using Timeline or Frame Animation
Hi! Someone asked me for a tutorial on the transition effect in the second gif of this set (also featured in this set and the text on this set). So, here it is! This is one of the easiest and least tedious of the gif transition effects in my opinion — and I’m going to go over how to do it both in Timeline and Frame Animation (using the screencap method). Disclaimer: This tutorial assumes you have a basic understanding of gif-making in Photoshop.

PHASE 1: PREP
This phase applies to both the Timeline and Frames method!
1.1 – Prepare your caps. (New to gif-making? Check out my basic tutorial here!)
The key to this kind of gif is making sure your final gif, with all the transitions, won’t be too long or too big of a file to post (Tumblr’s limit is 10 MB).
If your gif is going to be big like mine (540x500px), you might want to keep your total frames between 50-60. I decided to try getting away with a whopping 70 frames total... because I like to test fate (spoiler: my final gif ended up being 9.6 MB 🙈). Since my gif is transitioning between two scenes, that means each scene was 35 frames.
If you aren’t doing screencaps like me, just make sure your clips are equal in length. And if you’re transitioning between more than 2 scenes (like the Mando example I linked at the beginning), you’ll have to use shorter clips/fewer frames per scene. In my Mando gif, each scene was 16 frames and my final gif was 64 frames.
1.2 – Crop, sharpen, color, etc. as you would. For this, since you’ll probably have 2 more more sets of coloring, just make sure your coloring is only being applied to the appropriate gifs. The way I do that is by aligning my adjustment layers with my gif as you can see in the screenshot in 1.3 below.
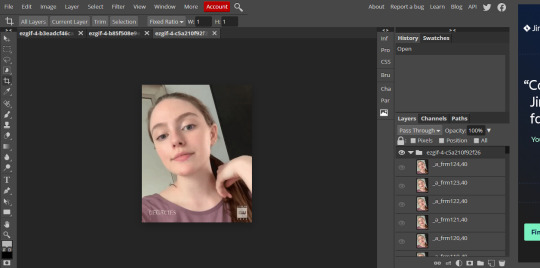
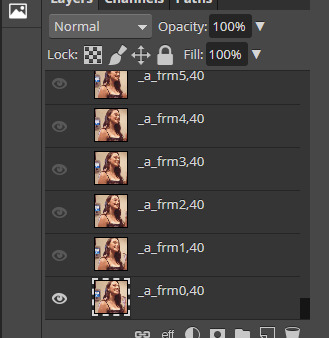
1.3 – Arrange your frames or clips. If you’re working in Timeline, drag the clips/layers of your second gif so they’re immediately after the ones of your first gif. I like to keep things separated in Groups:

Note: I’m keeping my text layers separate because I don’t want the motion blur to affect them. But if you wanted to make your text transition from one word to another, you can either follow the same steps I’m about to show you and apply them to your text layers, or simply merge your text layers with your gif and adjustment layers, so they can all get the motion blur filter applied to them!
If you’re working in Frames, simply paste the frames of your second gif after the frames of your first gif. Again, you can either keep your text separated or part of the motion blur.
METHOD: TIMELINE
T.1 – Divide the Timeline. Using the Scissors Tool, you’ll want to divide each gif so there are 3 small segments at the beginning and end. (3 is my go-to, however, for my Mando gif, I actually only did 2 segments because each section was already so short.)
Now there are two options for this:
OPTION 1: Simplest, 00:01 Seconds Each, Makes Duplicate Frames
You might be wondering, why on earth would I want duplicate frames? You wouldn’t, usually. But this method only causes the duplicates to happen on the blurred frames, so it’s not noticeable at all! However, if you’re like me (read: Type A) — just knowing there are duplicate frames may bother you. If that’s you, go to Option 2.
Each of these segments are the absolute smallest Photoshop will allow, a duration of 00:01.

Sometimes Timeline won’t let you cut things that short (for me, this typically only happens at the end of a clip). So my work around is to cut the segment so it’s 00:02 seconds long, then drag the clip until it’s as small as it can be. Here’s a gif showing that process:

You can see that after I dragged the clip so it would be 00:01, I also dragged the big clip over so it would still continue as normal. Timeline is neat because, even if you divide a clip, each segment can be dragged back to its full length.
OPTION 2: 00:02 / 00:01 / 00:02, No Duplicate Frames
Timeline works in a weird way... when you move forward one frame by clicking the right arrow, you don’t always see movement in your gif. And if you don’t line up the clips properly with the movement, it can create duplicate frames. The easy way to fix this is by making the 3 segments 00:02, 00:01, and 00:02 seconds respectively. This goes for the segments at the beginning and end.
You can see the duration of each segment and an example of how the gif doesn’t move on certain frames in this gif of my workspace:

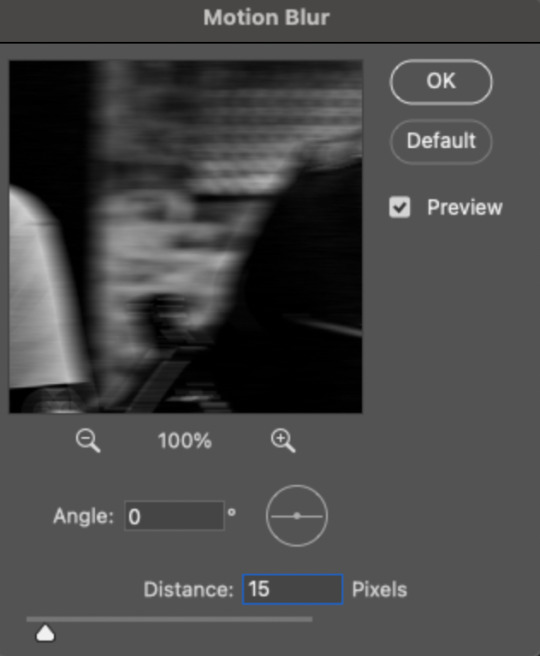
T.2 – Apply the Motion Blur filter in varying distances or strengths. Now that we have all of our segments, it’s time to apply the blur. Motion Blur is under Filter > Blur > Motion Blur!

This is the window you’ll see when you click it:

Note the fields where you can change the angle and distance.
The angle is basically the direction in which you want the blurred effect to stretch. I always do 0 because I want my gifs to blur together horizontally — I just think it looks smooth. You can play around with it if you want to get a different effect!
The distance is what I like to refer to as the strength of the blur. But really, it’s distance because it’s how long the blurred effect is being stretched.
The rule of thumb here is to apply the filter in a gradation. The part at the beginning of one gif should go from strongest (greatest distance) to weakest (least distance). The part at the end of one gif should go from weakest to strongest.
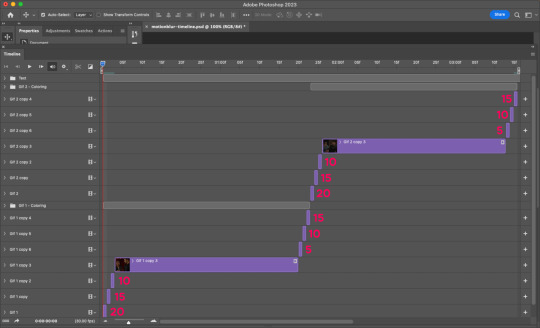
I keep things easy to remember and do 20, 15, 10 for the beginning and 5, 10, 15 for the end. The reason the numbers aren’t the same is because I don’t want the end of Gif 1 (which is blurred 15px distance) to be the same as the beginning of Gif 2 (which is blurred 20px distance). If they’re the same amount of blur, I don’t think the transition looks as smooth.
Here’s my entire timeline and the strength of blur I used for each of the transitional clips:
T.3 – Export That’s it! Convert from Timeline to Frames, export your gif, and there you go!
Reminder, if you decided to do Option 1, you’ll have duplicate frames, and therefore more frames than you started out with when you initially imported caps.
METHOD: FRAMES
F.1 – Apply the Motion Blur filter in varying distances or strengths. In Timeline, we created segments. But in Frames, each frame acts as one of those segments — so we don’t need to divide anything. We can just get straight to the filter!
Now, disclaimer: the way I’m working with Frames right now is with the adjustment layers merged with the frames. I typically work in Timeline, so I colored in Timeline and then converted into Frames for this. However you work, just make sure the coloring from one part of your gif doesn’t affect the other part.
Anyway, here’s where to find Motion Blur again:
And here’s what the window will look like:
Now just apply the filter in increasing and decreasing degrees. In case you didn’t read the Timeline section, I’ll paste exactly what I said there:
Note the fields where you can change the angle and distance.
The angle is basically the direction in which you want the blurred effect to stretch. I always do 0 because I want my gifs to blur together horizontally — I just think it looks smooth. You can play around with it if you want to get a different effect!
The distance is what I like to refer to as the strength of the blur. But really, it’s distance because it’s how long the blurred effect is being stretched.
The rule of thumb here is to apply the filter in a gradation. The part at the beginning of one gif should go from strongest (greatest distance) to weakest (least distance). The part at the end of one gif should go from weakest to strongest.
I keep things easy to remember and do 20, 15, 10 for the beginning and 5, 10, 15 for the end. The reason the numbers aren’t the same is because I don’t want the end of Gif 1 (which is blurred 15px distance) to be the same as the beginning of Gif 2 (which is blurred 20px distance). If they’re the same amount of blur, I don’t think the transition looks as smooth.
Here are all my frames and the strength of the blur I used for each of the transitional frames:

Note: I wanted to mention again that I kept my text layers in a separate group and didn’t apply the transition to them:

F.2 – Export Finished! Easy peasy!
EXPORTING TIP
If you’ve read my other tutorials, you already know this tip — but since I’m part of Discord servers where members are encouraged to share embed links to their creations, I often rearrange the order of my frames before saving them. (This tip is also handy for making sure the best frame of your gif is visible for Tumblr users who turn off auto-playing gifs.) In this case, I made frame 27 my new frame 1 because I didn’t want my embed preview to look like a blurry gif. Everything will still be in the same order, but anywhere your gif is paused, the best frame will be displayed!
Anyway, that’s it! If you have specific questions about this tutorial, my ask box is open. Hope this helps! <3
#gif tutorial#completeresources#usershreyu#useryoshi#userelio#userannalise#userzaynab#userives#usermarsy#usertreena#usercim#userrobin#userkosmos#usersalty#userhella#alielook#userk8#uservivaldi#resource*#gfx*
894 notes
·
View notes
Note
I just realized that you are my oldest mutual, interesting huh?
ANYWAY!
Do you think Nightmare has more psychological control over Killer than any other form? I think Killer can fight back (no thought if he would win or not) but the mental power that Nightmare has over him immobilizes him.
Maybe that's why Nightmare chose Killer: he had already been subjected to so much, controlled by someone as cruel and sadistic as Nightmare. It was too tempting to just ignore such a perfect pawn.

Yay I get to be the oldest mutual ✨ 🎉
And yes absolutely. I do think physical abuse is still very much a staple in their relationship (nightmare has canonically choked killer unconscious before and left him limp on the floor), but I do believe a lot of it was massively during the first few weeks of Killer’s captivity. Before he was ever sent out in the field—because Nightmare needed to get through Stage 3, to beat Killer into submission. Like..horrifically breaking in a horse.
However, I don’t think physical abuse really works much as a punishment or deterrent for Stage 2—he’s shown to be very much able to just uh..dissociate from any emotions attached to the memories of Stages 1 and 3. And he himself is very desensitized to violence, and enjoys pain, doesn’t seem to have any limits on what he enjoys.
So unless Nightmare can find a way to remove Stage 2’s framing of pain as “fun” and “enjoyable,” then he’s not going to get anywhere using that as a punishment.
It’ll be a mix of everything of course, and Killer is still being physically abused when in Stage 2 and threatened, but that’s only when Nightmare is annoyed and lashing out—trying to put Killer back in his place or to make him shut up, like a little stress doll he can use. It won’t work as an effective punishment when he’s like that.
It will, however, work on Stage 1. I’d imagine that any time Killer has another situation like in the Stage 4 comics—being triggered into Stage 1 and compromising Nightmare’s goals—then he will be brutally punished in any way that’s possible.
It’d depend on Nightmare’s preferred methods, but I still doubt he’d be anywhere near gentle even if the physical abuse isn’t the “worse” part of the punishment.
Stage 3, I feel, would physically fight for the longest—and anytime Killer’s overpowered or forced back into another Stage, he’d take to trying to run and hide away instead the next time he’s in stage 3.
I’d imagine that Nightmare doesn’t allow Killer to remain in Stage 3 around him for very long—and the more Killer starts falling back into submission or is beaten into it, flop response to wait until it’s over as soon as he’s triggered back into a lower Stage, the less Nightmare seems to have to “deal with” Stage 3–as Killer starts falling back into learned helplessness.
I’d imagine Nightmare has been bitten by Stage 3 many times before lmao.
And I’d imagine that Killer likely doesn’t know if those moments are real or not, and perhaps Nightmare thinks he doesn’t remember them very clearly until Stage 3 starts cropping back up, so it’s very easy to convince him he has no power or choice.
Leave a door open to his cage and he won’t leave because what if it’s a trap, what if it’s a test. What if something worse is out there. What if he’s caught. Stage 2 won’t even spare the door a second glance, but he would in Stage 1 —and he’d be held back by how helpless and trapped he feels to risk it.
#howlsasks#qin-qin16#utmv#sans au#sans aus#cw conditioning#cw dissociation#cw physical abuse#cw abuse#killer sans#killer!sans#undertale au#killertale#undertale something new#undertalesomethingnew#nightmare sans#nightmare!sans#killertale sans#bad sans gang#bad sanses#nightmares gang#nightmare’s gang#killer sans stages#something new#cw unreality#< kinda#stage 1!killer#stage 3!killer#stage 2!killer#cw dehumanisation
28 notes
·
View notes
Text
More video tinkering with Vidu 1.5
Vidu hit 1.5 this morning for testing, which I get access to as part of the artist's program. While making raw material for a "Big Professor" project-
(Shown here to establish a 1.0 baseline)
-I nuked most of my credits, I've still got enough to try out the new features and give you all a rundown of them.
First major change is resolution options. Fast, 720, or 1080. Shown here is my first attempt at a 1080 gen, using the same prompt as above. While most vids in this post will be gifs for ease of use, this one is an MP4 to provide full evaluation.
Ignore the odd playback speed, since that's something you'd fix in post. The gif at the start was one of my most stable renderings of Big Professor under v1. Got some minor wonk in the details, little distortion around the prof's claw and the kid in the first half second, but otherwise well above the average of the 1.0 versions I've been working with, especially the clarity on the button text.

The second one is a re-run of the same prompt, minus some detail issues with one shin, the level of consistency is promising.
720 can go up to 8 seconds, 1080 tops off at 4. At present, 1.5 does not have an upscale function. If you're not tinkering to test out prompts I'd generally recommend 1080, even for lower-res projects, for the purposes of being able to crop and/pan.
For most of these, assume I'm using either 720 or 1080 gens.
Multi-Subject Reference-to-Video
THIS is the big winner of the setup. Previously, ref-to-video only could handle a single referenced subject image. The current setup now allows you to reference up to three per generation.
Those can be characters, props, or settings, and it can be used for morphing effects. This is good, because first-frame-last-frame is more finnicky than reference-to-video. The obvious use is to create multi-character scenes, and it works well for that:

But it has other uses. For example, here I used:

And while this one was reversed and trimmed, it displays the potential for using the feature for transformation sequences. The backgrounds are especially helpful, since Vidu's internally-generated toon backgrounds are very modern and digital-painting-looking (the gif of Mrs. Nice turning back and forth into Mrs. Nautilus at the top of the section didn't use a background image reference) and as always, I like it retro.
To that point, using the more comic-booky Mrs. Nice control drawing didn't work near as well as the more period-accurate one:


And while I'll personally be cutting out frames to produce a more accurate 1980s TV animation look, the raw fluidity is bound to appeal to the majority of users, and minor issues like the color of Mrs. Nice's blouse changing mid-transformation are easy enough to fix manually (though if a flaw looks enough like a traditional animation screwup, I might just leave it in)
And another fun feature? Movement amplitude control.
In my last post about it, I said Vidu likes to move, and if you need a more subtle shot, like this one, setting the movement amplitude control to small is your move. (Funny how the robot interpreted the book binding as a mouth.) If something's too static you can up the movement as well, but I haven't had that problem much.
In terms of generation quality, 1.5 is a good but not huge leap up from 1.0. at least in terms of what I've made so far. Aesthetics are very similar, but issues of tearing, distortion, and wonky action are lessened.
And it's way better at understanding triceratops, so thumbs up there.
This is one of my wonk-tests, but man, check that walk cycle. This is why the movement controls are important, sometimes when set to auto a dialog scene becomes a weird chase.

Now, in terms of generation costs (and this can always change), 1.5 seems more expensive but in the end it works out more or less the same.
A 1.0 quality 8-second gen upscaled to max res would be 24 points (16 for the quality 8-seconds, 8 for the upscale), and an 8-second 720 render is also 24 points (as is a 4-second 1080).
Yeah, you don't want to use "Fast" in most cases. While both the 720 and fast versions here both have flaws (Bruce's disappearing popcorn bucket, etc), the 720 res version is substantially more on-model for both characters.
To close out, a bit of fun wonk. To try out the effect, I prompted using a "Specialist Matt Trakker" G.I.Joe/M.A.S.K. crossover figure as a character reference, to see if it could translate a character from toy to live action. And it can-
Though it is very, very literal.
The combination of live action-esq person and accurate G.I.Joe joints is harrowing, but there's potential there for some wild variants on the Toy Story/A Christmas Toy/'Wynona's Big Brown Beaver'-Music-Video-by-Primus concept.
#ai video#vidu#vidu ai#long post#tyrannomax#mrs nice#mrs nautlius#big professor#little professor calculator#80s cartoons#nostalgia#ai assted art#ai tutorial#ai discourse#ai animation#M.A.S.K.#Tyrannomax and the warriors of the core
20 notes
·
View notes
Text

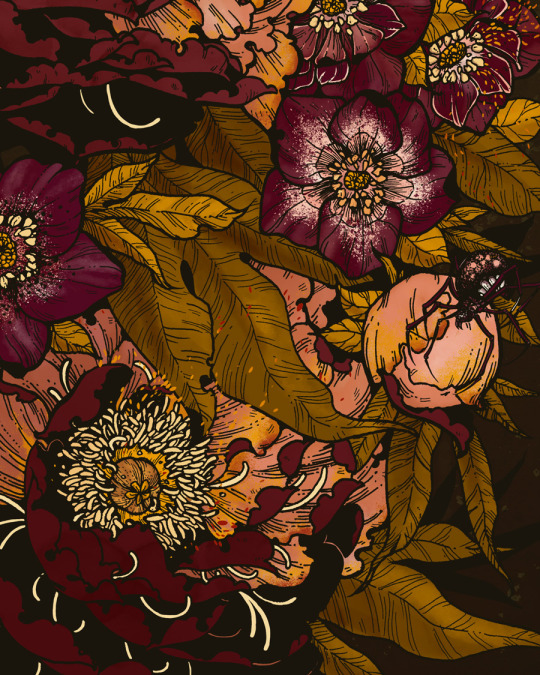
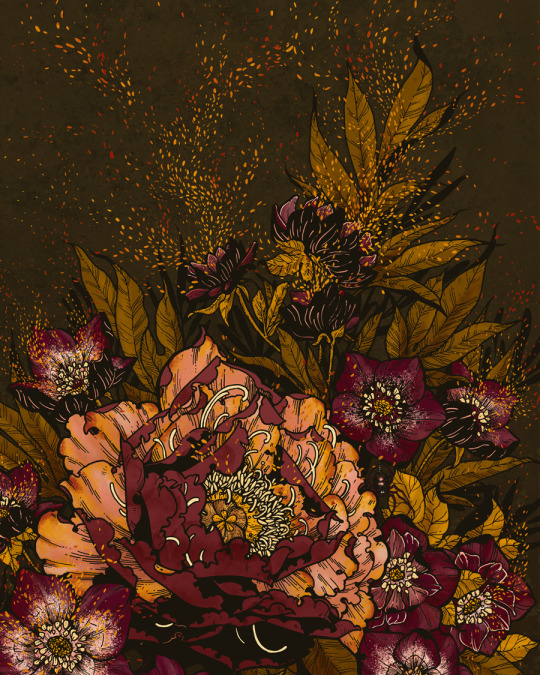
LIMITED TIMED RELEASE | EMBERS GILDED EDITION
We have been trying out monthly releases and preorders more this year, and have a new one available now. This month instead of apparel we are doing a Limited Timed Release fine art print of Embers. Two editions are available, a regular edition and a Gilded Edition.
Each print of the Gilded Edition will be hand embellished in metallic gold ink by your's truly. I did a test run of this on a smaller 8x10" print to see how it would look and really loved this effect.
To make this edition special a new cropping of the art that allows it to play more with the framing and border were made.
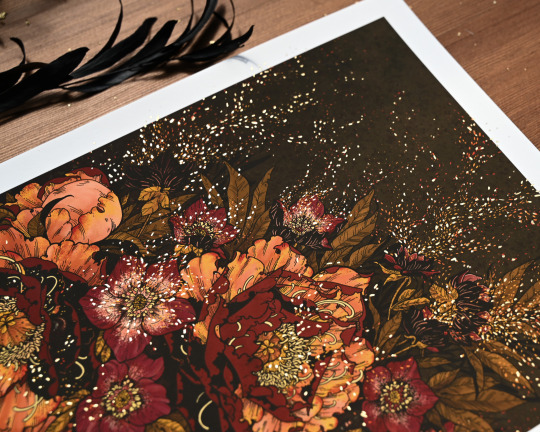

The hand embellished Gilded Edition caps at 75 available slots
65 notes
·
View notes
Note
Hello Sky! I've been following you for years, thank u so much for your work. BUT, and I don't know how to tell u this without sounding rude.. I really miss your oldstyle gifs. The current ones are too big and sometimes too cropped, and on PC don't look that good. Sometimes they're so big that take too long to load, especially in a large set. I wish that, once in a while, u would do a set like old times (I can't put a link here to show an example, but 2018-2019 setgifs)
hi ♡ you are mentioning 2018, 2019… so you really follow me for a long time 😭 thank you so much for putting up with me for so long SLASLASKALS
ok, now lets talk about my gifs~ 2019 was the year I came back from my hiatus and I had literally forgotten how to gif. I was on hiatus that year focusing on my studies so I didn't even think about make gifs.
my gifs had nothing "special" about them. it was just a regular gif. it didn't have something that represented me. I felt that I wanted to have something special in my gifs that could make even other people look at it and instantly identify that the gifset was mine. so for me to do that i kept changing my colouring and my sharpen style. but I was never satisfied, i wasn't happy with how my gifs looked. so i remembered about topaz clean and denoise and i decided to install them and use them in my gifs, but as always, i didn't go after tutorials. I was just using it on my gifs as I thought it would look nice but it didn't and I didn't realize it until much later. the topaz effect was too extreme.

so after doing that i thought i would then make a base colouring that i could use and then just change a few things. but that I could always use this base to have a ~gif style~.

but again i wasn't happy with my gifs. so i started to think, maybe i could get some inspiration from other accounts. I've always been very passionate about the style that most movies gifmaker have. and what they most have in common is big gifs, and then I started trying to make big gifs too. but it's not as easy as it seems. as most bangtan videos have a 1080p quality and it's not always that good, making big gifs wouldn't always look nice. but still I tried. i thought with topaz i could try to fix the quality of my gifs. so i did.
what i wanted to make clear in my gifs was that they were only focusing on the person i was giffing. so I always cropped as much as I could to make the person very centered in my gifs. that the person was my gif and not part of the gif, do you understand what I mean? 😅
but i still wasn't so happy with my gifs. I still thought that I was overdoing the topaz too much and that my colourings weren't that nice. so I'm still testing what I could do to change that and be more satisfied with my gifs. I love topaz but it doesn't always bring the result I want. but it helps me a lot in videos that the quality is much lower that even 480p. like here:
without topaz the quality of these gifs would look terribly ugly. but I still didn't feel like I found a setting that I really liked.
but after a long time trying to find it, i reached a point where i started to be happy with my gifs. I started to see that I don't need a "ready" setting, that each video's setting has to be different, that I don't need to make a colouring base, but work on the gif from scratch.


now i look at my gifs and i'm satisfied with how they look. don't think they look as ugly as before. and even with different settings and different colourings style, i think i have my own style. they look different but still got my style on them. I think that even without looking at my watermaker there are people who do recognize my gifs. I think I have my own style now.
I wish you could somehow send me the link to the gitsets you're talking about so I can have some examples of them. maybe like this jung-koook (.)tumblr(.)com/post/713740586334732288?
I am really happy that you came here to talk to me about this, but i really like how my gifs look now. maybe i might not make big gifs anymore when i add more than 10 gifs because in the app its really hard to reblog that kind of set, right. most of my gifs from 2019 are extremely ugly in my opinion. namjoons set example is one of the few that doesn't look ugly. so it's not something I wanted to go back to. :/ but again, thank you for coming here to share your opinion about my gifs in a nice way without being rude. constructive criticism is always good, right? again, if you can show me the example of this right here "sometimes too cropped" I will be very grateful. ♡
25 notes
·
View notes
Text
Well, it finally happened. After hoping that this would stay as an American thing, I came face to face with a personality test while applying for a job. Or, as I call it in my limitless eloquence, fucking bullshit.
Now, I already wrote a 400 word (in Finnish) reply to the request for my personality (and IQ as well) but I’m so incensed that I guess I’m going to write some more. Hold on to your anal cushions, it’s gonna get bumpy.
So, personality tests and job search. These are bad. These should not go together. Why? At least two things: repetition and bias.
Repetition
What personality tests are designed to do is not “to enable everyone discover the job most appropriate for them”. No, what they provide for their clients, ie. the companies hiring, not the people wishing to be hired, is the chance to forever repeat their past. To always and forever, only hire the same person as in the past.
It’s no great secret that companies have some pretty firmly lodged beliefs about what makes a good person for certain jobs. And how do they know these beliefs are correct? Well, it has worked in the past therefore it will work, forevermore. And because the companies that provide these personality tests are also for profit, they will gleefully reinforce these beliefs.
Considering new options is anathema to big companies which is why they will never change and also why personality test companies will sell their snake oil to them, knowing that the more they sell it, the more companies will be convinced of their effectiveness. Because what they provide is in the end, more of the same the company would have done alone, but now with the spectacle and appearance of science.
And I’m certain companies don’t mind how these tests make them feel more and more like exclusive clubs, with only the cream of the crop allowed in. Well, unless your daddy or mommy is already on the board.
Bias
The funny thing about people is that although sympathy and empathy are one of our base abilities, we are communal animals after all, we are ever so bad and good at it. Good because yes, we can do sympathy and empathy by and large, but how we place ourselves in someone else’s position or sense their feelings is coloured by our own position.
So, how ever good one’s intentions, one has bias. And when you put together a lot of people and let them mill about for a quite a long while, you get cultural bias. And that bias tells us who is the norm and what is the ideal. And because of that, what someone does in a particular situaton can depend a great deal on a person’s cultural background, something that is otherwise invisible to them.
And as written above, companies want to copy their Ideal Employee. And when you look around Western culture and its regard for neurodivergence and other cultures (even when well meaning), you have to ask yourself: would, no, could these personality tests treat them as the “norm” or better yet, the “ideal”? Because these kinds of people could bring something companies would never in their wildest dreams want: change, new points-of-view to their structures and systems. Because that would not be repetition.
And although these tests are marketted as something that “make the hiring process more equal” (something actually in the request for me to do them), a sickening claim in my humble opinion, their sole point is to be exclusionary. Because as I said, companies like to feel special, and you don’t get much more special than by being a “special people only” club. So you add more hoops to jump through. And I will again remind that the personality test companies are selling a product, catering to the wants of their clients. They want to feed into this special boys club feeling, no matter what they say to the person trying get hired. You aren’t the customer here, remember.
And what is the result from these personality tests reinforcing bias and companies’ beliefs? Well...
Systemic Unchange
Just like so many systems in our world, companies can, in the end, only repeat themselves. Their internal systems are all geared toward maintaining themselves and looking at systemic problems has never been the strength of any system of power. Especially because rather often, systems cannot be rebuilt or corrected while the systems still stands. Sometimes, these systems have to be torn down to the ground, past the foundations, for them to be made into something better.
And what personality tests of this kind provide is exactly what companies want to hear: “No, you’ve been doing it right all along. Here, let us do it even more right for you.” No change required. In fact, anti-change is required. Just cement your positions. Look, we have a graph, produced precisely to sell you this product, that says you should.
And what about the people wanting to get hired? Well, worst case scenario, we start seeing certain kinds of people, those outside the norm and ideal, becoming unhireable. Sure, you can learn which answers are right, but that only highlights how purposeless the whole system is. It’s just another hoop you need to jump through or not get hired. Because companies don’t want to give you the job you will be the most happy in. They want you to give them the employee they’ll be the most happy with.
So, basically, personality tests in hiring something something bad. Many words.
And this is without even going into how this reeks of the worst excesses of paternalistic, “we know best for everyone” modernism.
2 notes
·
View notes
Text
Developing the Experience
Angelique Shelley (MA Concept Art)
Blog Post # 5
After our feedback with Ian and Neil about surrealism, I thought about changing the planets to eyes. Eyes can be often be found in surrealist work, such as The False Mirror, 1928 by Rene Magritte.
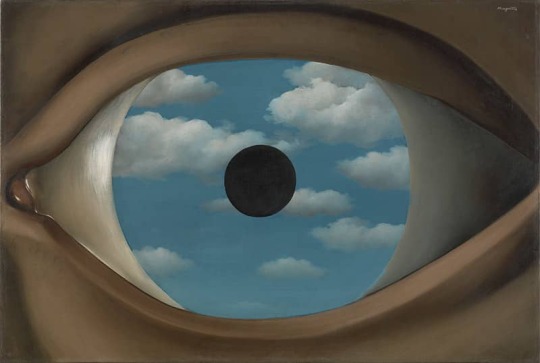
Fig 1. The False Mirror, Magritte, 1928.
On describing the effect of using eye(s) outside of their usual context, renemagritte.org (n/d) describe the effect of her particular work as such:
"The image jolts the viewer by removing the eye from its usual context, presenting it without the face to which it belongs. It further disrupts expectation by placing a circular sky inside the otherwise ordinary oculus. Sometimes called magical realism, such juxtaposition of normally unrelated objects within a seemingly incongruous context is characteristic of much of Magritte's oeuvre. For Magritte and Surrealists working in a similar mode, these surprising, even bizarre combinations were considered the products of their unconscious minds. By visualising them, the artists believed, they might also touch the unconscious minds of their viewers."
Other notable surrealist artists that enjoyed using eyes in unsettling ways were Salvador Dali, and Max Ernst.
I picked up the Maya project where I had left it off because of technical reasons. I found a free model of an eye on Sketchfab (see fig. 2), because it was modeled in Blender, I had some difficulty assigning the textures in Maya for the Arnold renderer, the main issue was the transparency mask for the cornea. I got the mask working with a Phong material (see fig. 2), but Arnold didn’t read it properly. In the end I retextured it using an Arnold material and assigned the bubble preset material to the cornea faces, the effect wasn’t as nice as the masked Phong though.


Fig. 2 I first textured the 3D model, Eye Blend, Vinny Passmore, 2019, with a Phong material.
After duplicating the eyes along the camera path that I had set up earlier I realised that they looked too static and thought that it would be more engaging for them to aim to look at the camera. Again, before this project my existing skills in Maya was limited to basic modeling so after looking through various forums and tutorials I found how to create aim constraints for the eyes to follow the camera. From an outside view of the camera zooming down past the eyes, it looked great and far more interactive (see fig. 3).

Fig. 3 A Playblast showing the aim constraints programmed onto the eyes.
During this time, I also played with different camera settings. I ran a test render of the spherical camera (see fig. 4), but that would be a lot of wasted render time after cropping into it. In the end, I chose an Arnold Fisheye camera.
From inside the camera, and in my render, I thought the always-tracking-you eyes looked almost 2D and fake like sprites from old 3D games that always faced the camera and the result was less impressive than I had hoped.
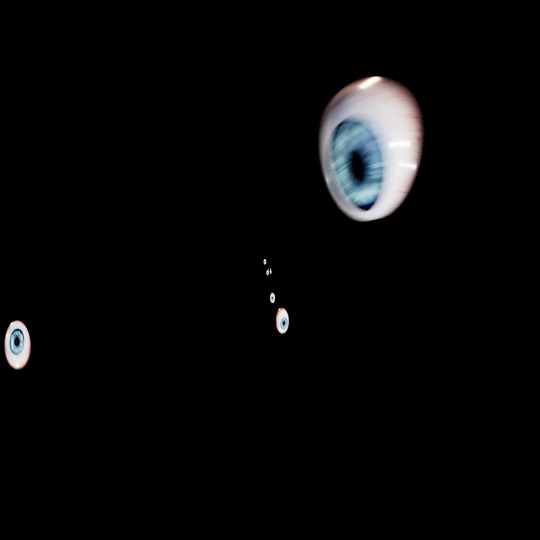
Fig. 4 A still from the spherical render with aim constraints on the eyes, I would need to crop into it too much for it to be efficient.
I then decided to leave some eyes not looking at you which looked more 3D but I still wanted it to look more unsettling. I rendered them off but had trouble getting the alpha channels out of Maya into a png. I troubleshooted to no avail then noticed a few forums telling people to use a white surface shader to act as a layer mask in After Effects. I applied this to an alternate Maya save file and set it so that the eyes were white on a black background, rendered it, googled how to apply alpha masks in After Effects using a luma matte layer mode (something that After Effects must have changed this year as it was no longer a drop down menu item but rather a toggle button that I had to find).
This is the result with added blending:

Fig. 5 A GIF showing the eyes composited into the wormhole.
I could not have them at the same speed as the wormhole as they would pass by far too fast. The motion blur that I added to them in Maya did help embed them slightly more though.
I was still not totally happy and thought that it would be more visually engaging to have the eyes blink open at you in space. Having recently learned about the surface shader luma matte workflow I figured that if I duplicated the eyes, split them across the middle, applied a black surface shader, and keyframed both hemispheres to open and close that I could get it to work in After Effects. Unfortunately duplicating the eye broke the black eyelids from aim constraints towards the camera. I again did some more digging and found that duplicate special and duplicate input graph made the eyes face the camera again. Unfortunately this duplicated the camera too so I tested it on duplicate input connections and it worked fine.

Fig. 6 A GIF showing the eyelid animation
Maya would crash reliably after “duplicating special” for each animated eyelid, but as long as I saved it each time I could progress. After adjusting the keyframes so that they would blink open at you just before passing I rendered them off again as an image sequence and applied them over a precomposition of the existing eyes so as to not interfere with the existing luma matte pass.
I was much happier with the result:
Fig. 7 A render of the final wormhole with blinking eyes.
References:
Magritte, R. (1928). The False Mirror. [Painting].
Passmore, V. (2019). Eye Blend. [3D Model]. Available at: https://sketchfab.com/3d-models/eye-blend-a8259f43d41e4204a7e9746dfd112c30 [Accessed 09 February 2024]
renemagritte.org (n/d). The False Mirror, 1928 by Rene Magritte. [Online]. Available at: https://www.renemagritte.org/the-false-mirror.jsp [Accessed 09 February 2024]
0 notes
Text
Development | Mixed Media Animation Test I

After scanning all my frames, I brought them into Photoshop and created a grid system so that I could crop each frame evenly. There were two problems with this; 1) The scans were at an angle, so I felt it would be a pain to crop everything. 2) I have no clue how Photoshop works. As such, I decided to take a different route.

By bringing my scans into Premiere Pro, I could simply scale and adjust the position of each clip to correspond with each frame. This process was far less time consuming, and the fact that I had lined everything up in a sort of grid helped me immensely. The whole process took maybe half an hour to do, including colour correction. Speaking of which, this was simply a matter of bumping up the contrast slightly and the saturation up by about 50%. I also brought up the whites more to emphasise on Bea's dress. After all that, I exported the sequence as an animated GIF, and this was the result.

I decided to try this first variation on threes, which gave a really nice effect to the whole thing. I also deleted a couple of frames towards the end where Bea brings her hand against her head, which left me with this snappy motion that I really liked. This being said, I felt the animation was a bit slow. This is when I decided to go in and set each clip to hold for two frames. I felt like this gave the sequence a bit more life, however when looking at the two variations it's hard to say which I prefer.

0 notes
Text
the deal (snippet) - rafe cameron

a/n: my first public writing piece ever! please be nice, i’m sensitive :) let me know what you think and if i should publish the entire thing. this is a small part of a bigger series that i want to do and also this is not the first part, just the first part that i wrote! i’ve been wanting to do an OBX rewrite for a long time, please let me know what you think! this is a snippet of a rewrite of ep 6 of s2.
Series Summary: Rafe Cameron and Josephine Whittaker. The couple of the Outer Banks. Nobody knew how they made it work. He was brash, arrogant, and viewed pogues as nothing more than the scum on the bottom of his shoe. She was soft-spoken, kind, and despised the social and financial hierarchy. Polar opposites who somehow fell in love. But when the two are caught up in a whirlwind of events surrounding half-a-billion dollars in gold and a historic cross, their love will be tested to the fullest extent.
Preview Summary: Jo goes to make a deal with an unexpected ally.
Pairing: Rafe Cameron x OC (*Rafe isn’t in this snippet, though)
Warnings: swearing, mentions of drugs (weed), Barry being a little creepy, not edited
Leaves crunch under her feet after every step. She already sees the beginnings of the mud that caked the bottom of her white Steve Maddens making their way to the sides, becoming more visible the more they trekked through it. She cringes, thinking about how much of a bitch they’re going to be to clean. Her mom was going to have a whole fit if she caught sight of them. She briefly wonders why she wore sneakers, but remembers it’s because her only other options were her sandals and it’s better her shoes be caked in mud rather than her feet.
Y’know what, I’ll just buy a new pair, she thinks as she steps in a particularly deep patch of mud, effectively ruining her current pair. She never stops walking though, her end destination being worth more than ruining a $75 dollar pair of shoes.
She finally stumbles upon the rundown trailer, a place she’d only ever been once before, but had never set foot in. She remembers seeing it through the passenger window of Rafe’s truck, but only for a short moment before he was grabbing what he needed and pulling out of there faster than he had pulled in.
She knew he didn’t want her there longer than she had to be.
She hesitates going up to the front door, realising how out of place she must look. Her stark white jeans, crop top, and (formerly) white shoes are a stark contrast to her surroundings. She’s grateful she didn’t drive because she’s sure her all-white BMW convertible would’ve stuck out like a sore thumb even more than herself.
Climbing the few steps up to the porch, she hesitates again. What was she even going to say? She had rehearsed it over and over again on the way but suddenly couldn’t remember anything she was going to say
Fuck it, she thinks before raising her fist and knocking on the screen door three times.
“Who is it?” a gruff voice shouts from within the house.
“Um, I’m looking for Barry,” she shouts back, trying to keep her voice as steady as possible.
She hears footsteps approaching and she takes a couple seconds to take in her surroundings. The wood is rotten and the floor beneath her creaks with every movement, the off-white, gray-ish color the house had faded into making the house seem dingier than it probably once was.
Not dingy, no, that’s rude, she thinks. Old, just old, She decides.
The screen door swings open, startling her out of her own thoughts. She has to move back quickly to avoid it hitting her, the floorboard beneath her letting out a discouraging squeak.
She comes face to face with Barry, or so she assumes. She hadn’t formally met him, only heard his name from around town and from Rafe a couple of times, but it wasn’t hard to tell. His black hair is pulled back in a ponytail and his outfit consists of a worker’s jumpsuit stained in what looks like grease. He leans against the doorframe with a cigarette hanging from his mouth, eying Jo with curiosity.
“Now, what’s a pretty lil’ thing like you doing out here?” he asks, eyes raking down her body.
Everything she practiced goes out the window and the only thing she can manage is, “I need your help.”
He tongues the inside of his cheek and chuckles.
“Well, you’ve come to the right place,” he says with a smirk. He opens the door a little wider and beckons her inside, the smell of weed becoming so strong Jo has to resist the urge to wrinkle her nose in disgust. She knows he’s got the wrong idea of what she wants from him, so she figures she has to say something else quick.
“Now, I usually save my good shit for the regulars, but for a pretty lil’ thing like yourself I could–”
“It’s about Rafe.”
Even though his back is turned, she can see him visibly tense at the mention of her boyfriend’s name. She doesn’t know whether or not to take this as a good sign, so she takes a tentative step inside the house. He turns around slowly to face her, making her regret the step she just took. Then he starts to laugh.
Wait, what?
“Well, I’ll be damned,” Barry chuckles, cracking himself up even more, “If it isn’t Mrs. Country Club herself. A pleasure to finally meet you, princess. ”
She cringes internally at both the nicknames he’d given her.
“You two are quite the talk of the town, y’know? Kook prince and kook princess. Try to bring you up around Country Club but he goes apeshit. Said he doesn’t want you involved in this shit,” he smirks. “If only he could see you now.”
“Can I explain or are you just going to keep making fun of me?” she says with a sudden burst of bravery. The frustration and lack of sleep from worrying had manifested itself into a short temper these last few days and her patience was wearing thin.
Barry’s face doesn’t falter, only throwing his hands up in mock surrender before taking a seat on the couch.
“To what do I owe the pleasure, Mrs. Cameron?” he jabs, kicking his feet up on the coffee table in front of him. “What’s your name again, sweetheart? Jessica? Jenny? Julia?”
“Josephine.”
He snaps his fingers in the air as if he finally remembered even though she knew he couldn’t give less of a fuck.
She takes a deep breath before speaking, afraid that if she doesn’t start now she’ll lose her courage.
“Rafe needs help. Like actual, real help. The longer Ward is able to tell him what to do, the worse he’s going to get and I’m afraid of what’s going to happen when worse comes to worst,” she starts, willing herself not to cry in front of Barry. She has a gut feeling that he wouldn’t be the most sympathetic.
“Rose isn’t going to do anything about it as long as Ward’s involved. I don’t want Wheezie to be involved any more than she is. He doesn’t trust Sarah. He doesn’t trust anyone right now except for me and, for some reason, you,” she states as she crosses her arms defensively. She wishes she could do this on her own but she knows deep down that Rafe opens up more to Barry than he does to her. She ignores the pit in her stomach that forms at that thought.
“We’re his best shot at getting the help that he needs.”
Barry’s face has dropped from the amused grin he had before, his jaw now clenched with a scowl. He kisses his teeth before scoffing, “What makes you think I want to help him, let alone you?”
“Because I know you’ve noticed. And I know you’ve been letting him stay here from time to time,” she challenges. Though they never crossed paths often, Jo knew Barry had been Rafe’s first point of contact with this whole Ward-John B-Sarah situation. Another blow to her chest.
“As for me,” she says, reaching into her crossbody slowly just in case he thinks she has a weapon, “I have this.”
Barry’s eyes lock on the wad of cash between her fingers and she knows she’s got him. If she’d learn anything from being a kook, it’s that everyone has a price. Wildly unethical, but necessary when you lived in a place like the Outer Banks. She throws the wad towards him, watching as he catches it and begins to inspect it.
“And how do I know you won’t fuck me over like your lil’ boyfriend did?” he asks, never taking his eyes off the cash.
“Because there’s more where that came from,” she promises. “And I know you’ll be able to do it.”
Barry ponders for a moment before his amused grin returns.
“Alright, princess, you got yourself a deal.”
#rafe cameron#rafe cameron fanfiction#rafe cameron imagine#rafe cameron x oc#rafe x oc#rafe#rafe fanfiction#rafe cameron fanfic#rafe fanfic#drew starkey#drew starkey imagine#drew starkey fanfiction#outer banks#outer banks imagine#obx imagine#obx fanfiction#obx fanfic#outer banks rafe#outer banks rafe x oc#outer banks fanfiction#outer banks barry
78 notes
·
View notes
Photo


HOW TO: MAKE HIGH-QUALITY GIFS
Hi! A few people have asked me about my gif-making process and an anon asked about my coloring on a specific Bridgerton set. So, I decided to make a tutorial combining both! This is a very in-depth tutorial but there’s also nothing groundbreaking here. If you enjoy seeing how other people work like I do, this is for you <3 very long tutorial under the cut!
tech: ★ laptop: macbook pro (13-inch, M1, 2020) ★ external hard drive: seagate one touch ssd 1TB* tools: ★ adobe photoshop 2022 ★ mpv 0.29.1** ★ windscribe (vpn) ★ qBitt⚆rrent (for tv & film) ★ 4k video downloader (for music videos, trailers, interviews, etc.) ★ rizz’s action pack by @anyataylorjoy (highly recommend!) resources: ★ resource directory by @usergif (a source blog I created for gif effects!) * I have 2 externals, one dedicated just to storing all my 4k Star Wars files and another for Bridgerton and everything else ** I use this version of MPV bc the other ones weren’t compatible with my laptop for some reason. This one works well for me and doesn’t create duplicate screencaps which I’ve heard is a problem with other versions
PHASE 1: Prepare Your Base Gif
1.1 – Download video files. I personally like not having to do this regularly for 2 reasons: (1) I t*rrent (I use r@rbg — make sure to use a VPN if you t*rrent!) and (2) I mainly work with 4k files which can take forever to download, especially old media, and I’m not trying to waste my life away. That’s why I keep my files on an external hard drive, so I only need to download when new content drops.
TIP A: Footage Type & File Size
As you saw in the header gifs, I work with HDR footage. You may have heard some gif-makers talk about HDR or 4K screencaps looking like the colors are faded or washed out. They are:
(I don’t have examples of the Mandalorian because I only have that in 4K which is always HDR — so I’m going to stick to using this Bridgerton clip for examples. Also, I made the Mando header gif a long time ago and I’m not letting it go to waste now lol.) Some people don’t like working with HDR as a base, which is understandable! There are ways you can make your screencap software fix the coloring automatically. But my mentality is: I’m lazy, I’m used to it, I’m already coloring it anyway, and the muted coloring gives me a sense of control over the entire palette — instead of fighting with the existing colors from the original color grading. (I also talked to a videographer at work about this and he mentioned he prefers to color grade with this faded/washed-out look as a base too!) For the sake of the demo, I tried to color these two scenes as equally as possible in black and white so you can decide if there’s a difference:

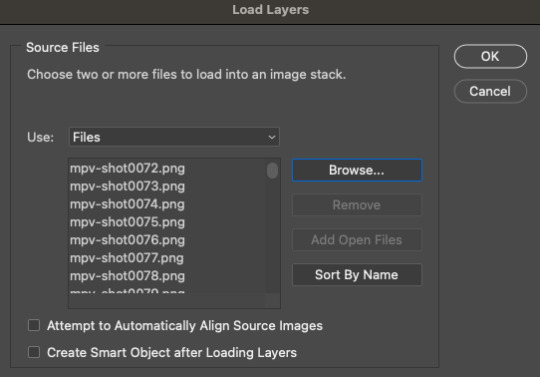
Ultimately, the file type you use is up to you! Hopefully this demo helps you make that choice easier. This tutorial is going to focus on HDR footage though. The size of your file matters too! 4k (2160p) isn’t always better than 1080p (but it typically is for me which is why I prefer to use 4k footage when it’s available). But the main thing is to look at the GB size of your file. 1.2 – Make screencaps. I use MPV which works great with 4k .mkv files (PS can’t read .mkv files if you try to Import Video Frames to Layers). Check out this tutorial for the basics on getting MPV set up and how to make screencaps. 1.3 – Import screencaps. Load your caps into PS by going to File > Scripts > Load Files Into Stack. Some people upload using Image Sequence because it loads faster, but idk. I don’t really care because I’m never uploading that many caps at a time that I need it to go any faster. This is what the Load Layers window looks like:
1.4 – Make Frames from Layers. Recently, I’ve been using the Script Action in Rizz’s Action Pack (linked at the top of this tutorial — if you use it, be sure to like and reblog Rizz’s post!) with some actions of my own added to make it perfect for my process. Actions are huge timesavers because all you do is press play!
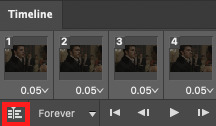
But to do this manually, you can simply select all the layers, click Create Frame Animation, click the menu in the Timeline tab (upper right), and click Make Frames from Layers. Click Reverse Frames in the same menu so your caps are in the correct sequential order and set your frame delay to 0.05 seconds.
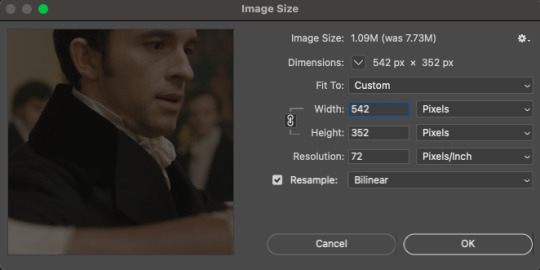
1.5 – Crop and Resize. For this gif, I want my dimensions to be 540px wide x 350px tall. Do this to your liking but remember, Tumblr’s max width is 540px (here’s a guide for other dimensions). Any width smaller will be stretched and look bad. Any width larger will be compressed, make your gif file huge, and look bad. P.S. RESAMPLE SETTINGS MATTER! Check out this resample experiment to figure out which one you prefer. I tend to stick to “Bilinear”
TIP B: Preserving Cropped Pixels
Have you ever cropped something, done all your coloring, then wished you could nudge your image just 5 pixels over only to realize you can’t because you’ll have 5 pixels of transparent space on the side? Uncheck “Delete Cropped Pixels” so you can change your image positioning later if needed!

TIP C: 2-Pixel “Buffer”
Something I do (and some gif-makers I know do) is resize with a 2-pixel “buffer.” Gifs sometimes have a slightly transparent border or “halo” effect. You can see it a lot when viewing Tumblr in dark mode. To get rid of it, I resize a tad bigger and then crop out the extra pixels. So, for example, since I’m making a 540x350 (w x h) gif, I’ll resize it to 542px width first. After I’ve converted to a smart object (Step 1.6), I’ll crop out those extra pixels so it’s a perfect 540x350.
(Btw, you can also do this in the export window by setting “Matte” to none. I guess I’m old school for doing this? Idk I haven’t properly tested and compared both methods.)
1.6 – Convert from Frame Animation to Video Timeline. The sharpening action in Rizz’s Action Pack does everything in one go: converts from Frame Animation to Video Timeline, converts frames into a smart object, and sharpens your gif. If you’d rather do this step manually, just select all your frames and click “Convert to Video Timeline” in the Timeline menu panel OR click this button:
Then, select all your layers in the right panel, right-click, click “Convert to Smart Object,” and add your sharpening filters. Again, I’m a huge fan of actions, so I’d rather just hit play on Rizz’s action. It includes two sharpening presets and is super easy to tinker with if you want to add more sharpening or put other filters like Gaussian Blur, Reduce Noise, or Noise on top. I’ve been using Rizz’s “Sharper” Action and occasionally throw a Gaussian Blur filter set to a radius of 1.0 pixels at 20-40% opacity (or sometimes a Reduce Noise filter), depending on the gif. Here are my usual Reduce Noise settings which I typically set to around 40% opacity:

In this gif, I used Reduce Noise at 40% and Gaussian Blur at 20% lol. If you prefer using your own sharpening settings but want to use this action for the converting steps, just right-click the Smart Filters under the smart object and click Clear Smart Filters. Then, apply your own sharpening settings. If you followed TIP C, my 2-pixel “buffer” trick, from Step 1.5, go ahead and delete those extra pixels now! I go to Image > Canvas Size and type in the gif dimensions I want there, 540x350 in this case:

If you had “Delete Cropped Pixels” unchecked, you can move your gif around until you like how your gif is positioned. Your gif should be looking sharp and perfectly sized now, with no weird borders hanging around the edges. Let’s move on to the fun part!

PHASE 2: Coloring
Disclaimer: this is MY process for coloring, not the be-all and end-all. Everyone has their personal favorite adjustment layers and unique styles, and it’s all preference! The only wrong way to color is by whitewashing, redwashing, etc. These steps are also just my typical steps, but I always color from scratch and my adjustments always depend on the scene. A dark, yellow-tinted scene from Narcos will be a completely different process from a bright, outdoor scene in Star Wars. Because an anon asked for it, I’ll be demonstrating my coloring on the gif above from this Bridgerton set. It’ll be a little hard to explain because it’s like a method-to-my-madness, lives-in-my-mind-untranslated thing — but I’ll try my best and mostly use screenshots to demo!
MY LAYERS PANEL OVERVIEW:
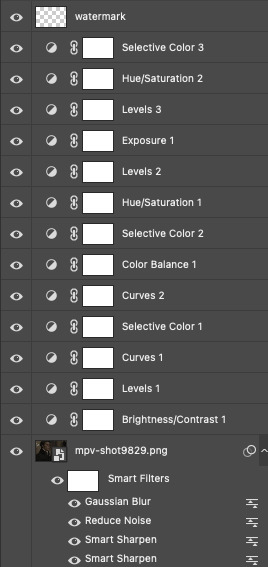
2.1 – Brighten + Color Correct My go-to adjustment layers: Curves, Levels, and Brightness/Contrast (set to screen). So, like I said, I use 4K/HDR footage which gives me a pretty washed out starting point coloring wise, but I actually love this as a base for coloring! I’m repeating myself but a videographer I work with said he films low-contrast because it provides the best base for natural-looking color grading. And I trust him and myself because I’ve been coloring like this for a long time lol.
ADJUSTMENT 1: Brightness/Contrast 1
When it comes to brightening, I’ve found myself starting to do this neat trick someone from usergif taught me! Literally just slap a Brightness/Contrast layer down, don’t move the sliders, set the blending mode to “Screen,” and lower the opacity to your liking so you don’t start out with a blindingly bright and pixelated gif.

Then, I pretty much always go in with a Curves and Levels adjustment. And I actually do a hint of color-correcting with them too!
ADJUSTMENT 2: Levels 1
In the RGB channel, I don’t add too much darkness just yet but I definitely bump up the highlights (right slider) a lot. I lift the reds in the Red channel a bit, especially when I’m working on a gif with people. It helps bring back some life to the otherwise washed-out coloring of HDR footage. In this one, I also lifted the greens and blues a bit too! When I say “lift,” I just mean I’m bringing those colors forward or emphasizing them.
ADJUSTMENT 3: Curves 1
I only tinkered with the RGB and Red channels this time — and no fancy S-curves here. But sometimes, I’ll also go into the Green and Blue channels if I didn’t do enough in my first Levels layer. You can see here that I barely even nudged that Red curve up lol. Why do I make such minor adjustments? My brain can’t explain. I just move things, decide if I like it, and stick with it. 🤷🏻♀️

2.2 – Basic Colors + Extra Brightness My go-to adjustment layers: Selective Color, Curves, and Color Balance.
ADJUSTMENT 4: Selective Color 1
Since my gif didn’t have any true green, cyan, blue, or magenta colors, I didn’t play with those channels at all. But there’s a lot of yellow in the background and a variety of reds and yellows in the people’s skin tones which is why I adjusted those two color channels. You might notice that I increase the blacks in my Red and Yellow channels. I actually do this almost all the time. I kind of think of coloring like makeup?? Idk if that sounds weird. But the blacks kind of add some dimension the way contour would, and my HDR footage naturally lacks this. Something else I almost always do is bump up the whites in the White channel. I love really bright whites and, with an ideally lit scene, it acts as the highlight makeup lol. It gives me some good dimension on nose bridges, cheekbones, and high planes of the face I do some overall adjustments in the Neutrals and Blacks channels, but very minor since I have more coloring to do!

ADJUSTMENT 5: Curves 2
Just a teeny tiny curves layer with an itty bitty S-curve (for contrast and so I can see what I’m doing lol)

ADJUSTMENT 6: Color Balance 1
I never really know what I’m doing with color balance. There’s no formula I follow or pattern of adjustments I always do. This step is literally the epitome of push the buttons and hope it does something good.
2.3 – Adjust Skin Tones and Other Colors My go-to adjustment layers: Selective Color and Hue/Saturation.
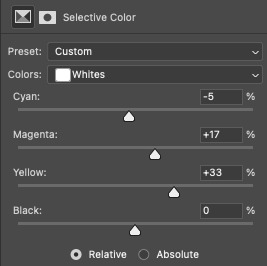
ADJUSTMENT 7: Selective Color 2
Again, I’m only focusing on the Red and Yellow color channels, adding more blacks to each again. Then, bumping up Whites and doing super minor adjustments in Blacks.
ADJUSTMENT 8: Hue/Saturation 1
Here’s where I do a lot of my skin tone correction. I try to be hyperaware of representing skin tones accurately and naturally, while still having that HQ-looking dimension. By no means am I saying I’m perfect at coloring skin tones, but I do my best using this adjustment. Again, there aren’t other colors in this scene besides Reds and Yellows, so that’s what I’m tweaking. I do sort of follow a pattern here which is: Reds Channel: slide down the hue slider a *tad* and I’ll sometimes lower the lightness (I didn’t do that here but I do in the next Hue/Saturation layer) Yellows Channel: slide down the hue slider so any overly yellow hues move closer to a neutral-magenta hue AND lower the saturation so the skin doesn’t look sallow.
2.4 – Shadows & Light My go-to adjustment layers: Levels and Exposure.
ADJUSTMENT 9: Levels 2
This is super simple. I’m just adding back some contrast. That’s kind of my trick for HQ-looking gifs. I bumped up the highlights (right slider) a lot again and darkened the shadows (left slider).

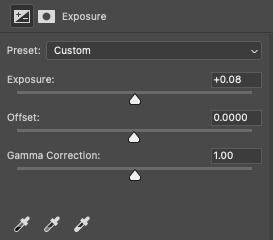
ADJUSTMENT 10: Exposure 1
I only do this sometimes when I want the light parts of my gif to be extra bright, and even then, I barely push the exposure up (I’ve only increased it by 0.08 here lol). Exposure can totally mess up your gif, so be sparing with this if you decide to use it.
2.5 – Repeat as Needed These are my go-to adjustment layers for basic coloring (i.e. no fancy color palettes or major color manipulation — if you want a tutorial on color manipulation, I made one on usergif right here!). And I tend to add several (but not too many) layers until I get it where I want. Usually, the only additional step I’d do for a color-focused set is add a few Gradient Map layers! Here are my remaining layers and their settings:

ADJUSTMENT 11: Levels 3
Some final contrast gets added here and some last-minute color correction. For example, if I find I’ve made my subjects’ skin tones too red or yellow, I’ll pull down the left slider in the Red channel to bring back some cyan or bump up the Blues.

ADJUSTMENT 12: Hue/Saturation 2
Only in Reds and Yellows again, I pretty much follow the same principles of my first Hue/Saturation layer. This time, I did lower the lightness in Reds. Their skin was looking a bit too saturated with Red, so this helped me bring it back to a slightly more natural-looking but still high-contrast state and I reduced saturation.

ADJUSTMENT 13: Selective Color 3
Idk why I did this originally... I didn’t bump up the whites and I didn’t touch any other color channels. But I guess my highlights were looking a bit too green-blue, so I bumped up the yellows and magentas a lot and pulled down the cyans.
And here are all the adjustments in action, step by step:

You can see how the middle adjustments were making them look quite red, but the final coloring is more neutral imo. Now, time to save your gif!
PHASE 3: Exporting the Final Gif
3.1 – Convert Back to Frame Animation + Fix Frame Rate If you can avoid it, DO NOT export your gif then reopen it to adjust the frame rate. Reopening your gif adds an extra, unnecessary compression step when you already have to go through the unavoidable steps of PS optimizing your gif for web and Tumblr compressing gifs over 3MB. I love Rizz’s Action Pack mainly for the “Save” action which takes all the guesswork out of this step! Just hit play and your gif will be ready to export in seconds. If you prefer to convert back to frames manually, I’ve written all the steps out here! Remember to set your looping option to “Forever” and then fix your frame delay aka frame rate (the speed at which your frames play). The generally preferred frame delay among gif-makers is 0.05 seconds (in fact, I’ve heard some blogs won’t reblog your gifs if they don’t appear to be set to this speed!).

But the speed also depends on the FPS of your original file! For example, when I gif video games (like Jedi: Fallen Order) which I believe are at 60 FPS, I tend to make my speed 0.04 (or sometimes faster).

I know that seems like such a minor difference, but as you make more gifs, you’ll be able to tell which speed looks the most natural! Before exporting, just always be sure to play your gif back, check that you like the speed, and delete any accidental duplicate frames! (Duplicate frames can happen if you animate using keyframes.) They may seem minor, but it’s something I personally can notice even if it’s just one duplicate frame... and it can throw off the entire smooth flow of your gif.
TIP D: MARKETING FOR DISCORD USERS (lol) 🤡
If you share your gifs in a creator server, here’s a fun tip that totally exposes me as a marketer. While you’re in Frame Animation, move your frames around before saving it so that your best-looking frame is Number 1. THIS is the frame people see in your embedded preview link when you share your gifs on Discord. (If your selected frame is in the middle of your gif, just be sure to move all the frames after it too so your gif still loops properly. Like, if you have 10 frames but want frame 5 to be featured in the Discord preview, move frames 5-10 before frames 1-4. Now, your frame sequence is 5, 6, 7, 8, 9, 10, 1, 2, 3, 4 — #5 being the featured frame.) Your gifs loop anyway, so your first frame doesn’t have to be the first part of your scene :) By being purposeful with your “first” frame, you have control over the still image people see in the server. And if you choose a really good frame, who knows? Maybe more people who aren’t in that fandom will be curious enough to click it because it looks so good and enticing lol See this preview? That’s actually the end of my gif, but it’s the best part:
(also, not me just realizing I posted this set on 4/20 lmao that was so unplanned a;lsdjk)
3.2 – Save For Web Go to File > Export > Save for Web (Legacy) to get your gif ready to export!
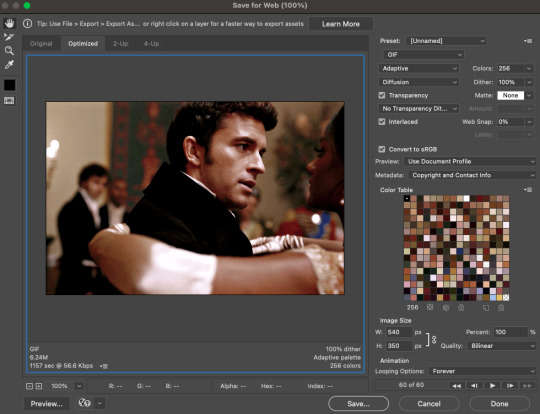
There are still some extra settings to play with here, mainly the Color Reduction Algorithm:
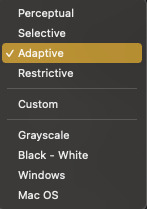
And the Dither Algorithm:

Typically, gif-makers only use Selective or Adaptive and Diffusion or Pattern. Again, these settings are going to be up to your personal preference. My usual is Adaptive-Diffusion. On occasion, I’ll go for Selective-Diffusion. And I don’t usually prefer the Pattern dither because I hate seeing the grid lines it produces. But there have been some gifs (like the first one in this set) where I have a solid background color and Pattern yields the best-looking gif. So, I’ll always toggle through the options to see which one I think looks best! Check out this guide that shows all the setting side by side!
TIP E: How to Keep Your Gif Under 10MB (Tumblr’s current max gif size)
Try to to keep your number of frames as low as possible. I think my average is 60 frames or so. Sometimes I can get away with more depending on the scene.
Make your gif smaller. Obviously, if you’re making a full-width gif, you can’t make it smaller than 540px wide. But you can shorten the height of your gif if your composition allows it!
Add more blacks to your coloring. Idk why this works but it usually does for me. More contrast or something
Try not to use too many adjustment layers (I say this but I don’t usually do this a;slkdjf)
This isn’t my personal preference and I’ll avoid it when possible, but you can add Lossy which is a compression setting that’s available when you do Selective color reduction. It helps reduce the file size, but I’d never go over 10 on Lossy:

3.3 – Upload to Tumblr Use the Photo Post option not Text Post. Gifs uploaded in a Text Post may look okay on the dash, but they can get very wonky on different themes, create size inconsistencies, and make the gutter wider than the 4-pixel default. (Plus, if you share your gifs in a Discord server — your embedded preview will be all tiny!)

Contrary to some beliefs, uploading to drafts does not mess with the quality of your gif anymore than publishing it instantly. So, go ahead and put your gifs in the drafts so you can see how it’ll all look before posting! I tend to leave my gifsets in drafts for at least a day so I can criticize myself more 🤡 kidding... a little... but I’ve also heard that keeping your sets in drafts helps them appear in the search/tags faster. I’ve never had problems with my stuff showing up in tags, so maybe that’s true! And that’s it!
Thanks for reading my dissertation on Tumblr gifs lmao. I hope it was clearer than it was long and ramble-y... and I hope it’s helpful for some beginner gif-makers out there! If not, here are some of the best basic giffing/coloring tutorials I know:
giffing and coloring tutorial by sashafierce
giffing 101 by msmarvel
gif tutorial by kylos
gifmaking for beginners by hayaosmiyazaki
coloring tutorial by magnusedom
and check out usergif’s resource directory here for more help!
[You can also find my other tutorials/resources here]
Before I go, let me just say a few TUMBLR/GIF ETIQUETTE things:
Clearly gif-making is a process. And it is art, whether you use fancy effects or not. So DON’T STEAL GIFS, don’t even use them as a base for your own adjustments. Use this tutorial if you need help making your own gifs from scratch! Another thing: give credit when credit is due! Trends come and go in gif-making, but you absolutely should link “insp” in the caption of your post (not in the source link and not in the tags). The caption is the most visible and intentional spot, which means it’s the most deliberate acknowledgement of your source of inspiration. If you didn’t come up with a concept yourself (be honest with yourself), just link it! It doesn’t make your post ugly or cluttered. It helps spread awareness to other talented creators that some of your followers otherwise may not encounter in their fandom. And doesn’t it feel good when more people see what you’ve made and celebrate it with you? Give that same feeling to the source of your inspo! Lastly, remember: don’t let anyone tell you that the gif styles you like aren’t right or aren’t beautiful. Gif-making is about having fun and creating art! As long as you like what you’ve made and it doesn’t harm any person/community or perpetuate problematic behaviors (i.e. whitewashing), then do what you want! It’s your blog!! Have fun! <3
#photoshop tutorial#gif tutorial#completeresources#dailyresources#userkosmos#usershreyu#uservalentina#useralison#usernums#tuserkay#usercim#userk8#tuserrex#userannalise#useryoshi#userelio#tuserabbie#uservivaldi#resource*#myedit*
2K notes
·
View notes
Text

𝐌𝐀𝐊𝐈𝐍𝐆 𝐆𝐈𝐅𝐒 𝐈𝐍 𝐄𝐙𝐆𝐈𝐅 𝐀𝐍𝐃 𝐏𝐇𝐎𝐓𝐎𝐏𝐄𝐀. This fun and easy + FREE as can be!! Anyways, Let’s get onto the tutorial! I made a tutorial on this before but I wanted to make an updated one. I love making tutorials even if that means redoing and adding even MORE DEPTH in old tutorials. Questions? Requests? Etc? ASK BOX HERE. Please like // reblog if you find this helpful!
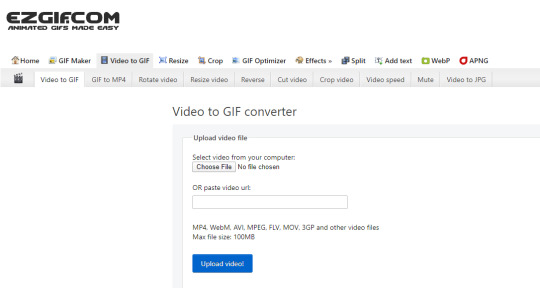
The first step is to look at EZ GIF. Gonna cut video into the frames you want to use!. Can upload or use a link. Decide how you want to go about it.

Is what it looks like when you have a video

Playthrough your video until you find when you want it to start and click USE CURRENT POSITION and then when you find the gif ending use USE CURRENT POSITION for the ending of the gif.

So the FRAME RATE is the thing I really wanted to show you. The biggest frame rate of 25 makes the number of FRAMES larger. I wouldn’t suggest that unless you test and see how many frames your gif has beforehand by going to convert to GIF! Just because if your gif already has a lot of frames, it makes for a bigger FILE and it doesn’t work out well.

When you convert to GIF! this is what you see BELOW your gif. It tells you how big your gif in FILE SIZE. Width and height along with the number of frames in total (If you want playing around with frame rate helps.)

You can also go and mess around with cropping the gif, resizing, rotation, optimize (Lowers the quality of the gif), effects, speed of the gif, etc.
My other tutorial shows you more of the PHOTOPEA side of things which you can find HERE You can in-depth color, use psds, etc all in photopea. I will do color tutorials, etc if you need them! I have one HERE about legacies Malivore blue scenes.
When it is all said and done you have yourself a gif that you can post to tumblr / facebook / instagram (If you convert to a video file again) / twitter.
----------------------------------------
In @faithwritess‘s tutorial, you will find a SHARPENING method tutorial for Photopea. It’s pretty much selecting all the layers in the gif and hitting sharpen. I didn’t think this could be done but it can! LINK TO TUTORIAL HERE. I would rec reading it.
------------------------------------
No tutorial or request on learning is too much to ask and I am here to help! I hope this helped you!
10 notes
·
View notes
Text
youtube
Tribute AMV for Dr. Underfang and Mrs. Natalie Nice/Nautilus.
From TyrannoMax and the Warriors of the Core, everyone's favorite Buzby-Spurlock animated series.
After all, who doesn't love a good bad guy, especially when they come in pairs?
Process/Tutorial Under the Fold.
This is, of course, a part of my TyrannoMax unreality project, with most of these video clips coming from vidu, taking advantage of their multi-entity consistency feature (more on that later). This is going to be part of a larger villain showcase video, but this section is going to be its own youtube short, so its an video on its own.
The animation here is intentionally less smooth than the original, as I'm going for a 1980s animated series look, and even in the well-animated episodes you were typically getting 12 FPS (animating 'on twos'), with 8 (on threes) being way more common. As I get access to better animation software to rework these (currently just fuddling along with PS) I'm going to start using this to my advantage by selectively dropping blurry intermediate frames.
I went with 12 since most of these clips are, in the meta-lore, from the opening couple of episodes and the opening credits, where most of the money for a series went back in the day.
Underfang's transformation sequence was my testing for several of my techniques for making larger TyrannoMax videos. Among those was selectively dropping some of the warped frames as I mentioned above, though for a few shots I had to wind up re-painting sections.
Multi-entity consistency can keep difficult dinosaur characters stable on their own, but it wasn't up to the task of keeping the time-temple accurate enough for my use, as you can see here with the all-t-rex- and-some-moving-statues, verses the multi-species effort I had planned:


The answer was simple, chroma-key.


Most of the Underfang transformation shots were done this way. The foot-stomp was too good to leave just because he sprouted some extra toes, so that was worth repainting a few frames of in post.


Vidu kind of over-did the texturing on a few shots (and magenta was a poor choice of key-color) so I had to go in and manually purple-ize the background frame by frame for the spin-shot.
This is on top of the normal cropping, scaling, color-correcting, etc that goes into any editing job of this type.

It's like I say: nearly all AI you see is edited, most of it curated, even the stuff that's awful and obvious (never forget: enragement is engagement)
Multi-Entity Consistency:

Vidu's big advantage is reference-to-video. For those who have been following the blog for awhile, R2V is sort of like Midjourney's --cref character reference feature. A lot of video AIs have start-end frame functionality, but being able to give the robot a model sheet and effectively have it run with it is a darn nice feature for narrative.
Unlike the current version of Midjourney's --cref feature, however, you can reference multiple concepts with multiple images.
It is super-helpful when you need to get multiple characters to interact, because without it, they tend to blend into each other conceptually.
I also use it to add locations, mainly to keep them looking appropriately background-painting rather than a 3d background or something that looks like a modded photo like a lot of modern animation does.
The potential here for using this tech as a force multiplier for small animation projects really shines through, and I really hope I'm just one of several attempting to use it for that purpose.
Music:
The song is "The Boys Have a Second Lead Pipe", one of my Suno creations. I was thinking of using Dinowave (Let's Dance To) but I'm saving that for a music video of live-action dinosovians.
Prompting:
You can tell by the screenshot above that my prompts have gotten... robust. Vidu's prompting system seems to understand things better when given tighter reigns (some AIs have the opposite effect), and takes information with time-codes semi-regularly, so my prompts are now more like:
low-angle shot, closeup, of a green tyrannosaurus-mad-scientist wearing a blue shirt and purple tie with white lab coat and a lavender octopus-woman with tentacles growing from her head, wearing a teal blouse, purple skirt, purple-gray pantyhose. they stand close to each other, arms crossed, laughing evilly. POV shot of them looming over the viewer menacingly. The background is a city, in the style of animation background images. 1986 vintage cel-shaded cartoon clip, a dinosaur-anthro wearing a lab coat, shirt and tie reaches into his coat with his right hand and pulls out a laser gun, he takes aim, points the laser gun at the camera and fires. The laser effect is short streaks of white energy with a purple glow. The whole clip has the look and feel of vintage 1986 action adventure cel-animated cartoons. The animation quality is high, with flawless motion and anatomy. animated by Tokyo Movie Shinsha, studio Ghibli, don bluth. BluRay remaster.
While others approach the scripted with time-code callouts for individual actions.
#Youtube#tyrannomax and the warriors of the core#unreality#tyrannomax#fauxstalgia#Dr. Underfang#Mrs. Nautilus#Mrs. Nice#80s cartoons#animation#ai assisted art#my OC#vidu#vidu ai#viduchallenge#MultiEntityConsistency#ai video#ai tutorial
15 notes
·
View notes
Note
hey! i was wondering how you make your gifs? they're so clean and captioned so well!
Hiii! Omg, thank you so much 🥹! I actually follow pretty much the same process every time when it comes to the first steps. I'm gonna detail it a bit under the cut:
It's really important to start with a good quality video - I download the shows / movies on 1080p and try to look for HD and UHD versions. Then I open them with VLC and use the recorder from the app to capture the scene I want to gif (sorry, I know it's in Romanian, but the order is the same):
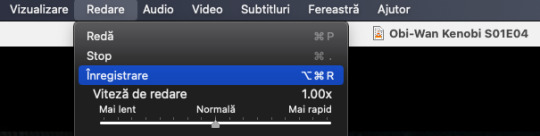
Then in photoshop (I have the 2022 version installed) I use the import video frames to layers feature (for video games, which are different from TV shows and movies, I usually also select the limit to every 2 frames option, so I get the proper speed - otherwise it looks in some kind of super slo-mo).
Depending on how big is the gif I want, I keep between 30 to 70 frames (I don't like how the shorter ones look - this is just a matter of preference - and the longer ones tend to be too big when I export them). Then I set the delay to 0,05, no matter which video I use.
After that I crop and resize the gif and then comes the sharpening. I first use a smart sharpen filter with these settings:
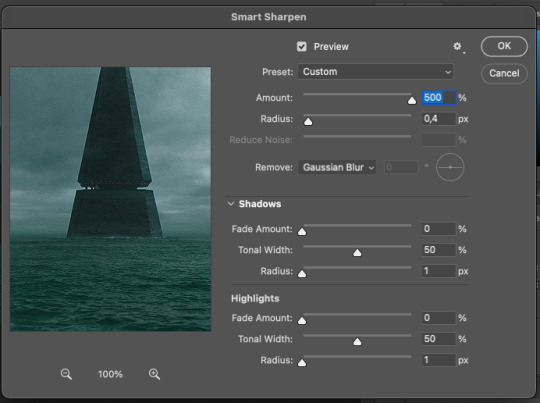
After that I add an extra filter of gaussian blur with 0,2 radius.
This is how it looks at this point:
The colouring part is a lot of trial and error for me, but the layers I use all the time are curves, saturation/vibrance, selective color, color balance, brightness/contrast and exposure (not in this particular order and the last one especially on dark scenes).

Here for example I wanted to get rid of the greenish hue and to improve the lightning, so I started with a curves layer, the I used selective color to change the greens in the gif and increase the blacks, the color balance to decrease the yellow tint remaining, then added some vibrance, saturation and contrast and at the end I used a cooling filter and set its blending mode to lighten (I'm starting to play more and more with the blending mode of the layers because you can get some really cool effects by testing stuff).
Then I export and these are my settings (most of the time I use that preview option from bottom left, to see how it actually looks on the web):
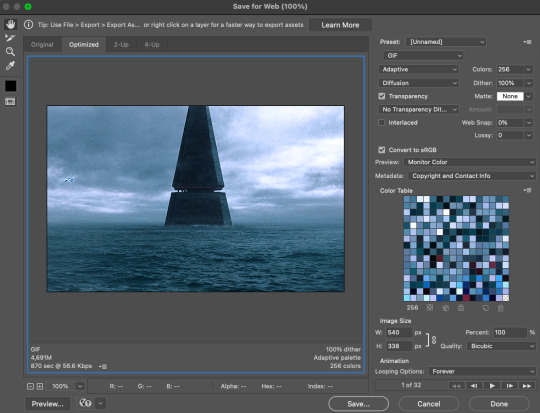
And then there's one last step before I publish. After I export the gif, I open it once again in photoshop and fix its frame delay back to 0,05 because for some unknown reason, the app messes this particular setting and if you don't change it, it looks kinda glitchy.
And this is it:

I learned all of this stuff from the amazing tutorials available on tumblr actually and then by adapting stuff to what I like. I do recommend this blog for all sorts of tips and different processes.
Sorry, I turned this into an almost tutorial, but I really hope it helps, even if my process is a bit messy 😇 I don't use the science of photoshop at its fullest like many creators here, but I test stuff and get frustrated and then try again and it really helps if you have enough patience (this was my first gifset posted here, almost 3 months ago and even I can admit the improvement).
Have fun and I hope you tag me in your stuff if you decide to post it here!!!
11 notes
·
View notes
Photo

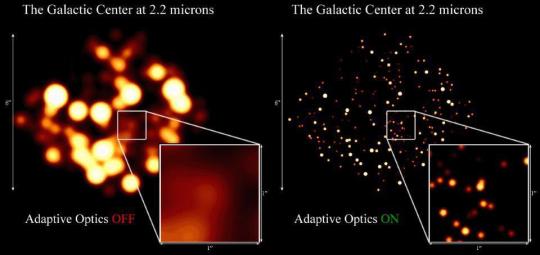
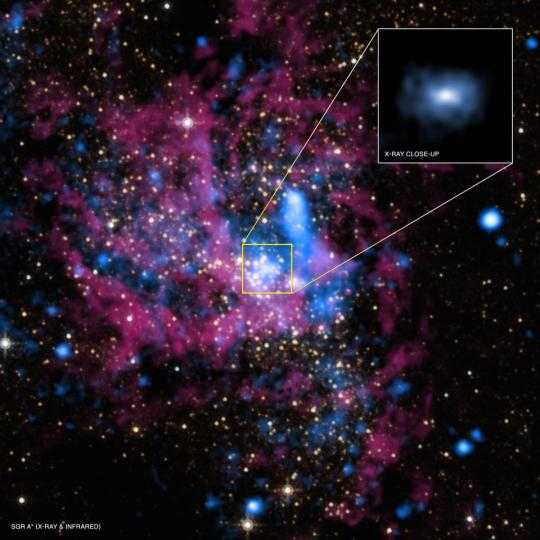
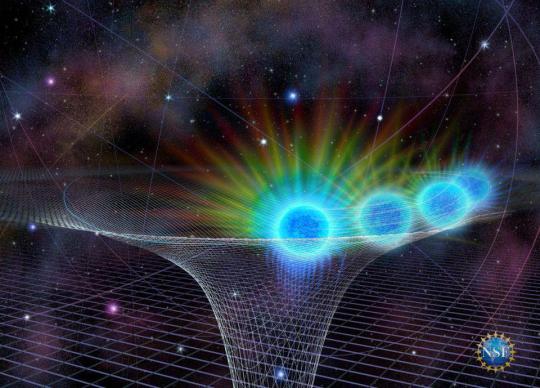
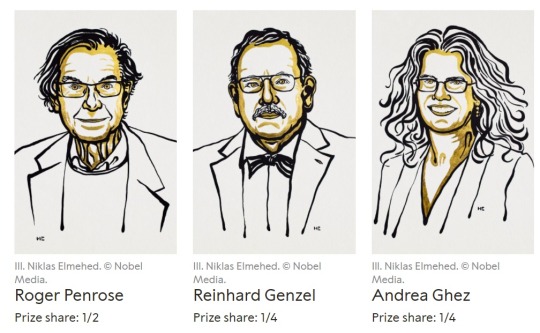
The Incredible Science Behind Black Holes, Gravity, And The 2020 Nobel Prize
“As deserving as the three Nobel Laureates are this year, many unheralded scientists laid the groundwork for these discoveries, participated in doing the overwhelming majority of the hard work that only a few people will get the credit and accolades for, and are working to extend and continue the foundational work that was laid by this year’s crop of winners. Additionally, the majority of Penrose’s most influential work occurred in the 1960s and 1970s; his work from the 1980s onward is frequently much more disputed, controversial and speculative, although no less imaginative than his landmark, Nobel-winning research.
But the most incredible fact is this: we can effectively “weigh” absolutely any object in the Universe, including one that’s completely dark or even invisible, just by measuring the light from the objects that orbit it over time. When we measure the light precisely enough, we can even infer the full three-dimensional motions of these objects, revealing the gravitational mass that’s anchoring them, and testing the governing law of gravity at the same time. For 2020, let’s join the world in celebrating black holes and three of the scientists — Penrose, Ghez, and Genzel — who helped unveil the scientific truth behind these cosmic extremophiles!”
For the third time in four years, the Nobel Prize in Physics has gone to an astrophysics discovery: this time, for black holes and gravity. Half the prize goes to Roger Penrose, the theorist who demonstrated how black holes can form from a realistic scenario in this Universe, while the other half goes to Reinhard Genzel and Andrea Ghez, observational astronomers who measured the black hole at the center of our galaxy as never before. Ghez is only the fourth woman, but the second in the past three years, to win the physics Nobel.
Come learn the incredible science behind this year’s Nobel Prize, and why it’s a victory for those of us enamored with black holes everywhere!
354 notes
·
View notes