#maybe i should make a tutorials tab?
Explore tagged Tumblr posts
Visit Tumblr Blog
Explore Tumblr blogs with no restrictions, modern design and the best experience.
Last Seen Tumblr Blogs


Fun Fact
When “GIF” was named word of the year in 2012, Oxford Dictionaries U.S.A. credited Tumblr for pushing the word.
Note
hi hi, could you maybe show us how to render skin in Blender or make it look a bit realistic? When i import my Sim into Blender it doesn't look like it should, it's texture isn't really good. Or do you know any good tutorial? Hope you can help me out<3
hey babes! :3 this got kinda long bc i ended up writing a tutorial so i put it under a readmore lol as usual anyone can dm me if they need more help
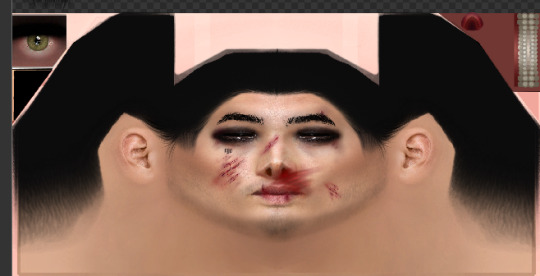
so first off if u dont have this setting enabled on simsripper, definitely turn it on

it makes a huuuuge difference.
i render in eevee nowadays so i also make sure to check ambient occulsion on so i have sexc shadows

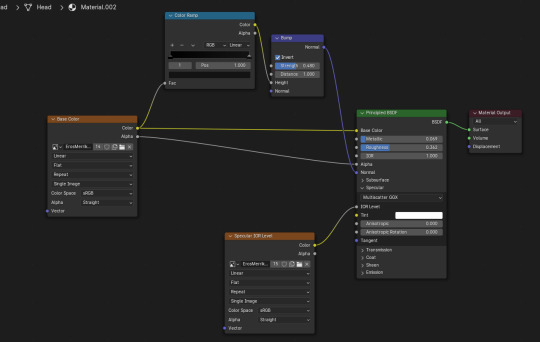
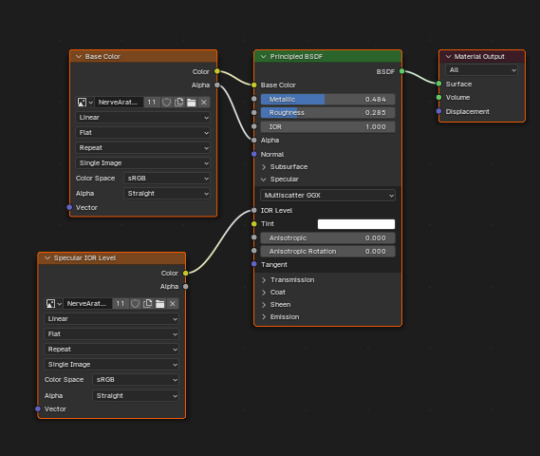
and these are my node usual settings for that look of pores/gloss my sims faces/bodies have it is MAGIC
to do this you have to separate the eyes from the head/the body parts from the top and bottom meshes, which can be done in the UV editing tab
this is what it looks like when u go into the uv editor after selecting the head mesh
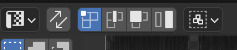
click those little arrow guys so it looks like this and u can select the eyes part of the head
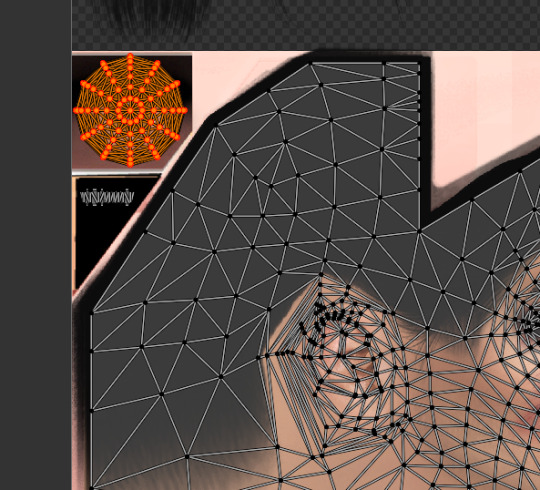
hover over the other window (the viewport thingy where u can see ur actual sim) and hit the P key, then hit selection and itll separate the two! this is suuuuper useful its how i add varying texture/shine to clothes n shit and u can even delete parts of meshes u dont like if the texture cooperates
i feel like there may be a better way to do this?? but back over in the layout tab ur gonna go to the materials section
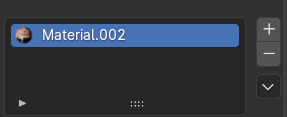
and hit that little minus so that the material thing goes away. it doesnt matter which part u do this on(the head mesh or ur new eye mesh) it just unlinks the textures so u can edit them separately
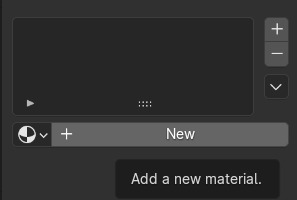
hit new
and then i usually go to another mesh that i havent messed w the nodes in and copy + paste them into this ~ new ~ material thingy u get it LAWL. so now it should turn from white to the normal texture and u can edit it at will! repeat one million times for everything u wanna change kjhkljhk
this is usually how my eyes nodes look
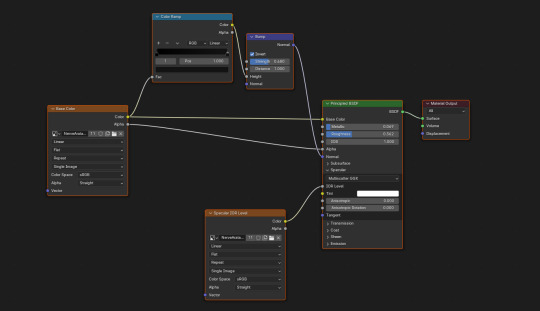
and again this is my head/body nodes like we saw before! the bump map is what gives it that look of pores its soooo sexy. u can get those by hitting shift + a and searching for color ramp + bump. obviously i mess w these settings depending on the vibe/lighting but yeah thats how i set up my skins for Realism!! :-)
ngl it was actually kurt tricoufamily that taught me this a whillleeee ago so thank him not me im just a thief
28 notes
·
View notes
Text

Hello and welcome back to my blog!
My fifth and final gift for the Petalruesimblr Advent Calendar is: Dermatology Career! This is my third full-time career that I've created for The Sims 3 and I'm so happy it is finally complete.
I just want to wish you all a very Merry Christmas and hope your holiday season is filled with joy and love! 💜
If you are interested, click on ’Keep Reading’ below for more information and pictures of the Dermatology Career.
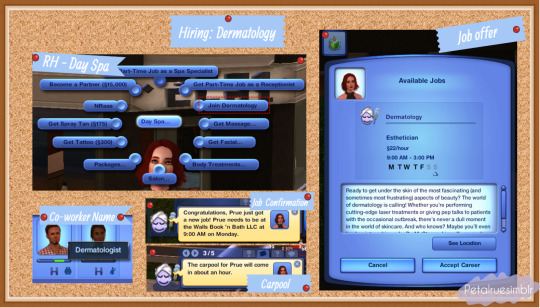


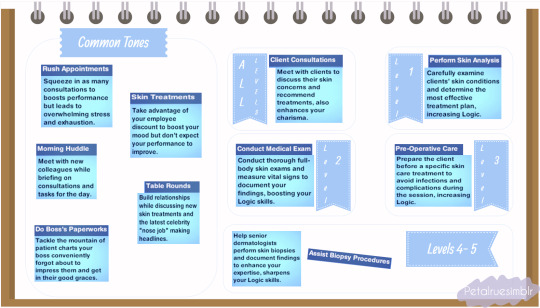


Dermatology Career

Sim File Share

Ready to get under the skin of the most fascinating (and sometimes most frustrating) aspects of beauty? The world of dermatology is calling! Whether you’re performing cutting-edge laser treatments or giving pep talks to patients with the occasional outbreak, there’s never a dull moment in the world of skincare. And who knows? Maybe you’ll even land an internship under Dr. McSteamy himself - so apply now!

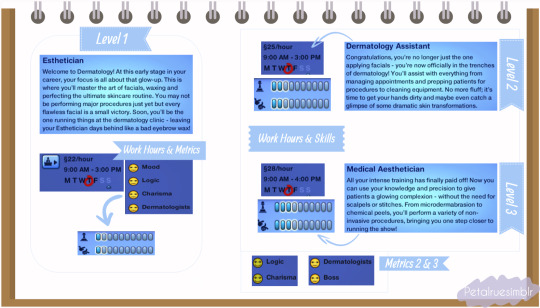
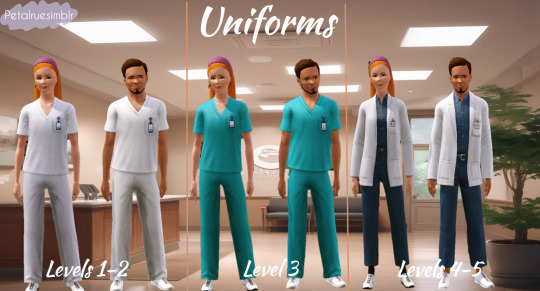
Career Type: Full Time Available for: Young Adults, Adults and Elders Available Languages: English Levels: 10 Rabbit Hole: DaySpa Does it have Carpool? Yes Does it have Uniforms? Yes (details under Final Notes) File Type: Package Min. Required Game Version: 1.42 Packs Needed: The Sims 3 📣All descriptions for the levels, tones and metrics as well as skills required, salary, uniforms and other details are provided on the pictures above. Right-click on a picture and select ’Open image in new tab’ for a clearer view.

NRAAS Careers Mod

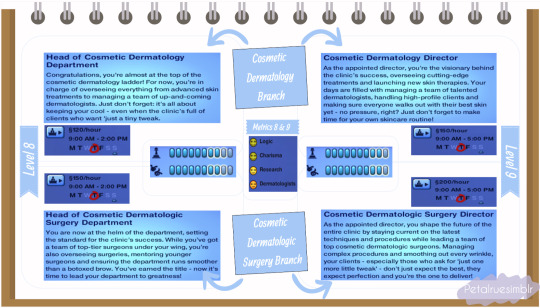
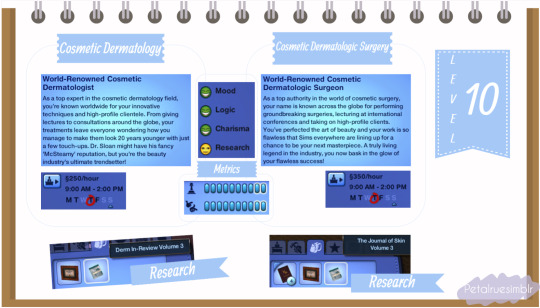
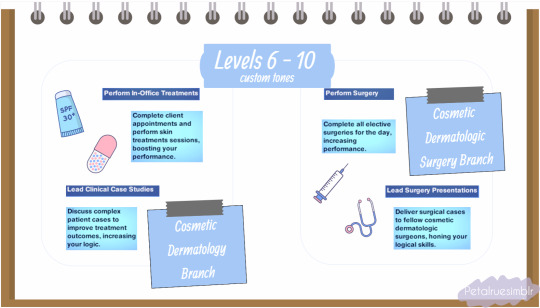
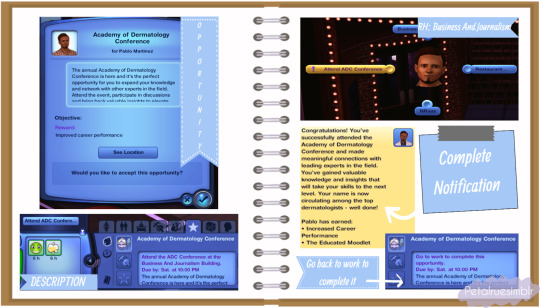
Branches and Wages: I decided to focus on two branches for my Dermatology career, which branch out after level 5: Cosmetic Dermatology, focusing on non-surgical treatments and Cosmetic Dermatologic Surgery, which specializes in skin surgery. The two branches share the same skill and metric requirements, as they are both part of the medical field. The main difference lies in their salaries, with the Cosmetic Dermatologic Surgery branch offering a higher pay. I aimed to make the wages as realistic as possible however to compensate for the increased days off and decreased work hours as the level increases, I had to raise the hourly wages beyond the normal salary ranges for Levels 6-10 for both branches. Metrics and Books: This career is similar to the medical career in The Sims 3, particularly in terms of the logic skill and research as part of its metrics. However, I also included charisma, as I believe it’s a vital skill for patients to trust and feel comfortable with their doctors, especially when it comes to skin treatments. Opportunities and Uniforms: With a bit of experience in creating opportunities, I decided to add four this time, three of which are repeatable! All of them are relatively simple and offer bonuses, as well as salary increases for some as rewards upon completion. For uniforms, I’ve provided a picture above to highlight the differences between the levels by assigning different colors to the scrubs. There isn’t a general color assigned to dermatology uniforms, as hospitals usually decide the scrub colors for their various departments. As stated above, you will need NRAAS Careers Mod for these careers to show up in the game and as long as you have the latest version of it, it should work for higher patches. You can also read my #psa regarding these careers, click here. I’m not fluent in any other languages to translate so if anyone is interested in translating this career, please don’t hesitate to send me a message here, comment on this post or let me know in my Ask/Contact form (if you don’t have a Tumblr account) and will let you know the details. I have tested this career in my game, so far it is working and all scripts are showing up. All feedback is very welcome to help me learn and improve my skills so please let me know if you experience any problems on your end and I’ll do my best to sort it as soon as possible.

MissyHissy step-by-step tutorial Twallan for the Career Mod S3pe
#petalruesimblr#custom career#the sims 3#ts3#ts3cc#sims 3#the sims 3 advent calendar 2024#ts3 simblr#ts3 advent calendar#ts3 simmer#sims 3 download#sims 3 screenshots#ts3 download#ts3 mods#ts3 community#ts3 screenshots#ts3 career#the sims 3 mods#the sims 3 career#the sims 3 advent calendar#advent calendar
223 notes
·
View notes
Text
CC Creation Tutorial: Smooth Seams in Blender

In this tutorial, I will show you how to make your mesh seams smooth inside Blender (no Milkshape required!) and walk you through the process step by step. We will make a perfectly smooth mesh and transfer the normal data from that mesh to our main mesh using the Data Transfer modifier.
I am using Blender 3.6 in this tutorial (though you should be able to follow along using other versions as well)
You do not need to have much previous knowledge to follow this tutorial, but I assume you know some basics in Blender like how to select, things, navigate around, etc, and know how to import the meshes and put them into Blender.
For this tutorial, I exported the Sims 3 afbodyEP4DressPromBigBow mesh with TSR Workshop. You can use any clothing mesh you like though, and works on any meshes, not just Sims 3 ones.

This is our mesh. You can already tell that it has the dreaded seams on the neck and the rest of the body.

First, we need to make a copy of the mesh (in Object mode, select the mesh and hit Ctrl+D Shift+D to duplicate it, then hit Esc to stop it from moving around).
Rename the mesh (I added Seamless to the mesh name).
Make sure the original mesh is hidden (click the eye symbol) and select the Seamless mesh.
Press the Tab key to go into Edit Mode.

Now we select the parts that we want to have smooth seams. Let's select everything that is skin (you can select a litte piece of the mesh and then press Ctrl+L to select the entire piece)!

Now, press M and in the menu, choose By Distance. (in older versions, this is called Remove Doubles).
This will remove all double vertices at the seams on the selection we made.

It will show you how many vertices it removed. The skin looks nice and smooth!
Let's switch back to our original mesh: Make sure you deactivate the eye on the Seamless mesh and activate the eye again on the main mesh. Then, select the main mesh.

Now, let's add a data modifier to our main mesh. Click the blue wrench icon in the vertical list of the properties panel and then onto Add Modifier, then choose Data Transfer from the list.

As the source, we choose our Seamless mesh.

Also toggle on Face Corner Data and click the Custom Normals button.
Hold on, there is a message saying that we should enable Auto Smooth in Object Data Properties. Let's do that next! (if the message does not appear for you, maybe Auto Smooth is already on).

Click the green inverted triangle button and in the Normals section, toggle on Auto Smooth.

Now we can switch back to the modifier tab by clicking the blue wrench icon again.
But hang on, what happened to our mesh? There are now black spots over the dress and shadows on the legs!

This is due to the Data transfer modifier's Mapping setting. If we change it to Topology, our mesh goes back to normal again. Phew!

Now that the normals look good, we can start the transfer of our new smooth normals from the seamless mesh to our main mesh. To do that, we hit the Generate Data Layers button. This button works destructively, so you cannot undo what it did, just FYI.

Note: On newer versions of Blender, Generate Data Layers may not be enough to transfer the normals and you may need to apply the modifier instead.
You can toggle the modifier's visuals on and off with the little screen icon to see the results after you click Generate Data Layers to see if it stuck. If it did not (and you see the seams of your base mesh when toggling it off), try to apply it instead.

I switched from textured to solid shading because the differences are just more noticeable in this mode. This is how our mesh looks now with the modifier turned off.
Because we clicked the transfer button, the normals have been permanently applied to our mesh. The skin is smooth now, and so is the dress (even though we did not smooth that one, hmm...)

If we toggle the modifier back on, suddenly the dress has seams again! What's going on there? I'm not exactly sure why, but Auto Smooth seems to be doing some smoothing on the dress mesh as well.
I am not sure if this is normal behavior or not, but let's pretend that this did not happen and the modifier in fact did not smooth the dress.
Maybe we just forgot to smooth some areas on the Seamless mesh that we noticed only later on. That's no problem. We simply modify our Seamless mesh again!

So let's swap back to the seamless mesh and select it (remember to click the eye icons so only the Seamless mesh is visible).

Let's select the main dress parts and press M -> merge by distance on them. We cannot smooth the whole dress all at once, because then that would remove some seams that we want (like those for the backfaces and the middle section of the dress where the bow is attached).
If we remove the wrong seams, we ruin our normals and will have black splotches.

Now, let's select the backfaces and areas we left out before and repeat this process: M -> merge by distance.

Look at how perfect our Seamless mesh is looking now! Now, let's transfer those beautiful normals to our main mesh.
Select the main mesh and toggle the eye icons again, to hide our Seamless mesh and reveal our main mesh.

Once again, we will use the Generate Data Layers button in our Data Transfer modifier. If you have previously applied the modifier, just add the modifier again to the main mesh and use the settings shown here.
And that's it, you are done! You have a perfectly smoothed mesh that you can export now.

Final Note: it is best to transfer the normals at the very end of your meshing process because any action that recalculates the normals can reset our custom-made smooth normals again.
Of course, you can simply use the Generate Data Layers button again to re-add them, but it saves you time to only do this step at the end.
I almost forgot to say: You still have to use Mesh Toolkit to fix the seams on the edges of your mesh and do the usual shenanigans.
178 notes
·
View notes
Photo
CDD ~ Fresh Start Styled Look
If you’re like me, the first thing you do in CAS is clear everything off the sim for a nice fresh canvas. This custom styled look (when coupled with Mizore’s hider mod) is intended to make that take as few steps as possible every time.
Download and info below the cut for future updates
Item Details:
Base Game Compatible
Toddler Infant - Elder; Masc & Fem frames (Added infant support on June 16, 2023; please redownload)
1 Variant (per frame)
Custom thumbnails
Needs @mizoreyukii’s Styled Looks Hider to truly be worth it. If you’re overly attached to EA’s styled looks, this cc probably isn’t for you.
Removes all accessories, clothing, shoes, makeup, skin details (excluding acne and scars), tattoos, facial hair and hair (changes color to dark brown for adultFem + children, blonde for AdultMasc, red for toddlers for all of them now I believe (I can’t remember tbh 😅 - if anyone knows how to remove the hair without changing the color, please hmu)
Does not change teeth, eyebrows, eye color, acne and scars (I couldn’t get it to remove these last 2 categories)
Tagged for all outfit categories
Added overrides (June 16, 2023) for shoes/bare feet and masc frame nude tops to resolve the look not applying to those categories after one of the recent patches. If you want to use an alternate override from someone else and it isn’t compatible automatically, (only do this if it’s not working otherwise) open your desired alternative in Sims4Studio, navigate to the warehouse tab, tick the setting box for “ShowInUI”, and save the file. (Edit June 6/20) I’ve been informed by @asixteenthrose that even with changing your desired override to have the showinui checked, you still need my overrides for the styled looks for some reason, and the desired override can’t be in a subfolder/must be in main mods folder.
Added “Stripped Start” (June 16, 2023) which affects the accessories, makeup, facial hair, clothing, and shoes, but does not affect hair, body hair, skin details, or tattoos. You can have both Fresh Start and Stripped Start in your folder at the same time or not; they should not conflict with nor do they depend on each other.
Downloads:
> SFS < (Current Version is a zip)
> Google Drive < (Current Version is a zip)
Needs: > Hider Mod for EA Looks < (by MizoreYukii)
Notes:
There is no way I would have been able to figure out this project without MizoreYukii’s How to Make Custom Styled Looks tutorial, so huge thank you to her.
This look is mainly for simmers who want nothing on their sim when they start in CAS. If there is enough demand for a version that keeps existing tattoos, skin details, and maybe hair; I might make that as a v2 down the road. After receiving nonny asks, I went ahead and added a version like this while updating the original.
I timed myself clearing every outfit category for a new sim using just this look as fast as I could, and it only took 15 seconds total.
I have added patch numbers to the files in case someone needs the outdated version.
Kijiko eyebrow texture defaults cause the fem frame teen-elder not to show Fresh Start.
1K notes
·
View notes
Text
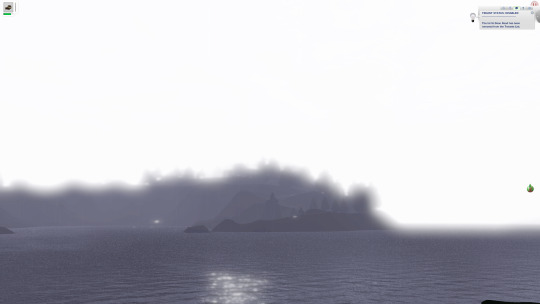
Unaffected UI - ReShade
REST ini for TS3 (REST 32x v1.2.3)
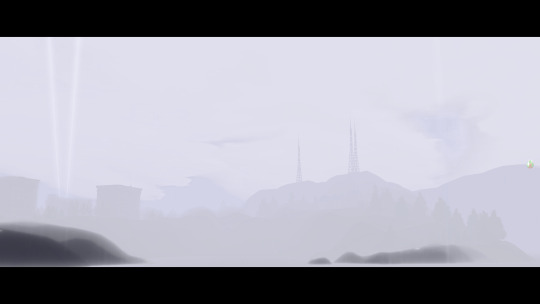
What this does? This edited ini file from REST allows the UI in the game to be viewable while using ReShade presets.
I will be leaving this as is for now until REST has better compatibility with dxvk with a x32 version that shows up in the addons (if it does in the future), since dxvk is essential for ts3 in a way.


Installation:
Install ReShade normally for TS3, at least making sure it is 5.8+ in order to use REST (you may need to select TS3W.exe, dunno if it makes a difference vs selecting TS3.exe though).
Important!! - When selecting ReShade's addons, don't select ReshadeEffectShaderToggle as it won't work on 32x nicely. Download the specified version of REST from the creators github instead, which will be linked in the step below. This will save you some frustration.
2. Then download ReshadeEffectShaderToggle v1.2.3 (release.zip file, Important!!), placing the content inside (step 3) it in the games bin folder. (There are other versions that work nicely with 32x version of ReShade but this one plays more nicely with shaders in the game. I will test to see at later dates to find one that works nicer if possible. [I don't think the version you use matters too much but v1.3.0 works I believe as well])
3. Place only the file "ReshadeEffectShaderToggler.addon32" in your games bin folder where you downloaded ReShade to. If you are on GShade and it's ReShade v5.0+ Equivalent (5.8+ required for REST v1.2.3), place it into your addons folder.
4. Download the addon .ini file here that's edited for ts3
sfs <- download
5. Then place "ReshadeEffectShaderToggler.ini" (The file from this post/sfs) into the same place as "ReshadeEffectShaderToggler.addon32"
This version of GShade v3.5 doesn't work with REST unless a version is made by someone for it (This goes for the regular GShade equivalent and older version of GShades). I don't recommend using official verions of GShade, especially the newer ones.
In-Game:
Make sure that anti-aliasing/edge smoothing is disabled in the in-game setting or Reshade effects will turn off with the REST ini after loading a save ( most likely the REST toggle shader I enabled is tied to the anti-aliasing shader of ts3).
Setting Up ReShade Properly & Enabling REST:
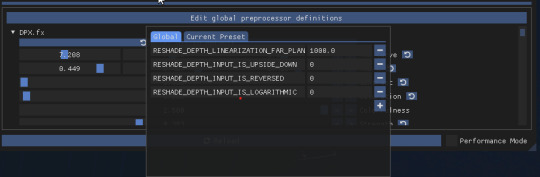
In the global preprocessor definitions, set it to look exactly like this in order to get ambient occlusion and etc. working properly. vvv
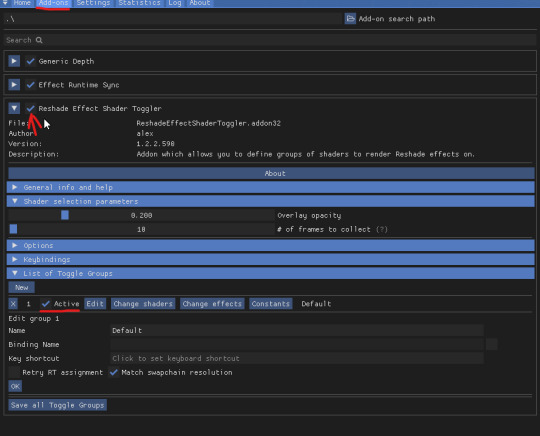
2. go into the "Add-ons" tab of ReShade, ticking ReShade Effect Shader Toggler on and then making sure the Toggle Group 1 or "TS3 Pixel Shaders" on the left, is activated.
Something Neat:
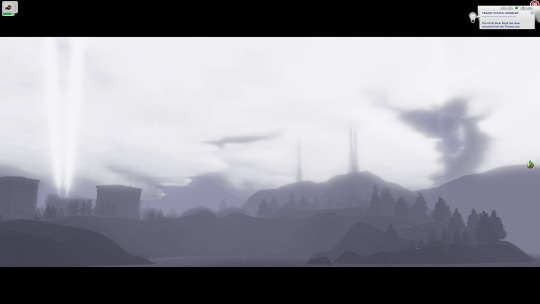
When hiding the UI with "F10" the shader toggle group doesn't affect that part of the game and your ReShade/GShade preset should be back to normal. (Tested on REST v1.3.0 I believe)
Downsides (Not REST's fault):
Existing Presets will need to be tweaked back to original form.
Some shaders may not work properly (maybe more than some dunno).
If you want to use existing presets without them looking wrong, you can disable the Toggle Group at anytime (one you activated in above picture).
Compatibility:
REST doesn't work properly with dxvk. It could also be the latest version of REST I tested which doesn't show up in the addons in-game, or the specific version in their github I linked to, which isn't working properly (shaders do show up in toggle groups though but that's as far as it works correctly).
References Used:
Clear UI by vyxated
Tutorial by Redronn
More by Me:
FO4 Version by me
Credits:
4lex4nder for creating ReShadeEffectShaderToggler
Frans Bouma for creating ShaderToggler
ReShade & ReShade Community
Clear UI by vyxated as reference
Tutorial by Redronn as reference
Affinity Photo & Designer for Title & Text Images
231 notes
·
View notes
Note
Hi! I hope it's okay that I'm sending you an ask.
I was looking at some of your posts about diy clothing and things like that, and I've been really into diy/alt clothing for a while, and I've been wanting to maybe make my own, but I don't know where to start.
I want to start small since I'm actually terrible at art (every time I try to learn how to sew, it just ends in me giving up in frustration, for example).
Do you have any advice you could give me?
-Anon
hey anon!
asks are always welcome, i love answering asks so dont hestitate to reach out. sorry for the wait on this, ive been busy.
i made a post about this months back but cant find it atm so ill just make one again.
if sewing, as you say, is difficult for you, id advise starting with something that doesnt require sewing to train yourself in crafting.
an easy one is for example making armwarmers from old socks by cutting them off above the heel, and using the top part (that goes on your ankles and legs). cut a slit in that on the side for your thumb, and youre done. you can bleach nice patterns or anything on them. which will also teach you how to work with bleach.
some other things you can make/do without sewing are: chokers and cuffs from old belts, bottlecap buttons (i have made a tutorial on those, ill put the link in the comments), fishnet/see-through top from old thights, painting/bleaching clothes, making jewellry from safety pins, chains from soda tabs, and a lot more.
in the long run learning how to sew really is a good and useful skill, and i advise investing time in learning it. it allows you to make way more clothes and accessoires, and also helps when you need to fix up old clothes.
remember it takes time to learn these skills! ive been crafting constantly for about three years to get to the level i am at rn. and i still have a lot to learn too. dont be harsh on yourself when your projects dont turn out how you wanted/expected them to. thats all part of the learning process. look at where you can improve and try different techniques to see what works for you.
also! you are not terrible at art. the "aesthetic-ization" of diy and art as a whole is really bad imo cause a lot of people feel pressured that their diys need to look perfectly aesthetic or else they cant wear/make them. and thats not what diy is about! make whatever you want, and if someone tells you its ugly or not good enough they should get a hobby.
ehh i think thats it for now? let me know if you got any more questions. (again ill drop a link to the bottlecap tutorial in the comments)
40 notes
·
View notes
Text
Instead of doing a Six Sentence Sunday today, I think I'll do a short tutorial on copying over fanfic from FFnet to Ao3.
So you've got some old fics on FFnet and you'd like to back them up to Ao3, given the instability of FFnet. And for whatever reason you don't have the original files for the fics, or maybe you have edits to the FFnet versions that you don't want to lose that the OG files don't have. Whatever the reason, you're looking to directly copy over your fic from FFnet to Ao3. And you're looking for a relatively easy way to do so, but Ao3's import functionality doesn't work with FFnet web pages.
Never fear! It's actually a fairly easy process to get your fic copied over from FFnet.
First, head over to FFnet and open up the fic you want to port over to Ao3. You don't need to log in if you don't want to, just so long as the fic in question is yours and you can access the page, then you're good.
In a separate tab, open Ao3 and login, then choose the option for posting a new work.
Now back on the FFnet tab, you should be able to directly copy over the title, summary, fandom, and what little tagging was available on that site onto the relevant Ao3 fields in the tab you have for a new fic. You'll also want to take note of the published date on FFnet and back date the new work in the Ao3 tab.

FFnet may not have a lot of useful tag data, but it's pretty easy to replicate and build off that in Ao3.
Now for the hard part. Which is still pretty easy. Getting the fic body, plus any notes in the fic itself, copied over to FFnet.
While getting around FFnet's lockdown on the text of the fics they host is fairly simple - I'm pretty sure it's entirely css based - you don't really need to do that in order to get the body of your fic copied. And, honestly, even if you do have a work around in place to allow copying of the fic's text... you will probably find the following method a lot easier still.
In the body of the fic, right click the first line of the fic, which should bring up a menu with a bunch of options. On Firefox or Chrome you want the inspect option.

This'll bring up the dev tools with the html inspection tab open and, if you give it a few seconds to load, the specific line you right clicked to inspect should become the visibly selected section of the html.
The selected section of the html should be a paragraph (or <p>) element. You're going to want to right click the div (<div>) element that encapsulates that paragraph and the rest of the paragraphs in the fic body. This'll bring up another browser menu with the option to copy, which will bring up a flyout menu when you select it. From that flyout menu, you want the select the option for Inner HTML.

You have officially copied the html for the fic body. And you can dump that entirely in html format straight into Ao3's html work text editor. Then switch it to rich text for easier editing if you want to fix any spelling, grammar, formatting, or aesthetic issues. I typically try to fix at least the line breaks since it took a long while before FFnet adopted real line breaks and so there are a lot of fics where I have various combinations of dashes, em-dashes, equals signs, and other characters as line breaks. I figure, if I'm bringing the fic to Ao3 then I can try to make it more screen reader friendly in the process.
You can also move fic notes around in order to move pre/post fic notes out of the fic body or basically whatever you want to the fic. Maybe re-read it to determine any additional tagging you want to add now that your fic has access to Ao3's much more robust tagging system.
But that's it. You can hit post and have your fic with all it's original notes, and a back dated post date to reflect when it was actually written, all available on Ao3 now.
It's a pretty quick process, all told, and the only real bottleneck you might encounter is any time spent in re-editing the fic between migrating and posting. Even chaptered fics are fairly easy to migrate with this process, since the bulk of the work in publishing a new chapter is just copying the inner html and then moving any notes to the appropriate location before hitting post.
Anyway, for my fellow fic writers looking to move your old FFnet fics to a more stable archive, I hope this process helps a lot.
#kitkatt0430 rambles#fanfiction archiving#migrating from fanfiction.net to ao3#ao3#ffnet#fanfiction.net#tutorial
13 notes
·
View notes
Text
˖⁺‧₊˚✦ ways to make your laptop aesthetic feat. some extensions, websites & apps for students
i created this cause i found some time to finally upgrade and properly personalise my laptop, it took me almost an entire day watching youtube videos, researching for these and setting them up. so... i'm basically posting this for myself lol, but i also feel like sharing cause these are actually really good hehe
i'm using a windows laptop but i think most of these should work on mac too. most of these are free but there are maybe like less than five that require to be paid.
those that are marked with an asterisk (*) are the ones that i'm currently using while others are recommended or alternatives!
here is what my home screen looks like now:
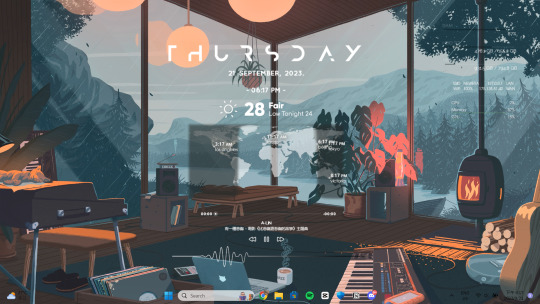
i. screen saver
fliqlo (ios & win) * flipit (win, an inspired & alt ver of ^) flix clock (mac & web, paid ver comes with colours other than black) aura gradient clock (mac & web) retro anime desk clock (mac) flocus (web) * studywithme (web) note: remember to right-click the file and select "install", then ensure that the wait time (e.g: 5 mins) is less than your "turn off your screen" and "put my device to sleep after" (e.g: both 15 mins) in power settings
ii. tab themes
kluk: a clock tab theme * angry study helper: a tab theme that gets angy at u whenever u open a new tab gratitutab: a minimalistic tab theme that works as a to-do list prioritab: a tab theme that shows priorities that u had set for the day, week, and month
iii. extensions
tldr this: summarizes long docs, websites, articles, etc. with just a click * paperpanda: download research papers by clicking on it, it searches on domains like google scholar, semanticscholar, aodoi, and more * coffeelings: mainly a mood tracker that also saves mini journal entries colorzilla: an eyedropper colour picker * whatfont: click on it and hover on any text to show what font it is * mybib: an apa, mla, harvard, and more styles citation generator * read aloud: a tts reader that supports more than 40+ languages * notion web clipper: creates a website into a bookmark into notion * noisli: lets u listen to relaxing playlist while u study/work
iv. websites
lofi.cafe i miss the office i miss my cafe i miss my bar i miss my library a soft murmur patatap tomato timers animedoro lifeat coolors blush designs untools fontjoy zenpen decision maker museum of endangered sounds future me
v. apps
virtual cottage chill corner notion *
vi. rainmeter skins
mond * lano visualizer amatical * small clean weather animated * ageo sonder * cloudy harmattan note: if you're new to rainmeter, it can be a bit overwhelming, u may check out this short and simple tutorial on it, make sure to read the instructions if you're using complicated skins like weather (may require u to edit in txt), i also highly rec watching techrifle's videos
vii. misc.
wallpaper engine * (highly rec getting from chillhop) my live wallpaper (free alt of ^) translucenttb * roundedtb note: u can disable your shortcut icons to be invisible by right-clicking on your home screen, go to "view", and untick "show desktop icons", this is optional and i would always enable it whenever i'm working and gaming for easier access, i also set the icons to small
66 notes
·
View notes
Text
So you want to make a recolor...
I made a quick recolor tutorial for a friend group so I thought I'd go ahead and share here too. This is just a super quick guide for how to recolor an object/cas item.
There are two types of recolors. Standalone and Overrides. Overrides will replace the item/swatches that exist in the game. Standalone recolors create an additional item with it's own swatches. This tutorial works for both kinds, you just pick which one in Step 1, and then the rest is basically the same.
This tutorial also works for pretty much all buy mode items and CAS items. Anything that is tileable...I think maybe that's what you could call it...anything that can be stretched across multiple tiles, for instance, wallpapers, flooring, roofing, fencing...these types of items require a few more steps that I will not be covering here.
Ok so you want to recolor something, you need Sims 4 Studio (S4S) and a photo editing program like photoshop (there are plenty of free alternatives out there too, like Gimp is one I know a lot of people use).
Step 1! Open up S4S and pick either "Standalone" or "Override" depending on what your end goal is. Generally, you'll probably do standalone. I usually reserve overrides for permanent world items I want to change, like changing the images on the billboards in San Myshuno, for instance.
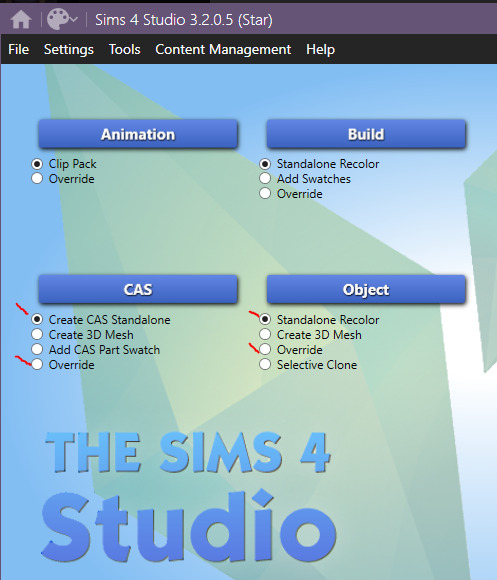
For this, I'm going to make a standalone recolor of an object so you would make sure Standalone Recolor is selected and then click "Object."
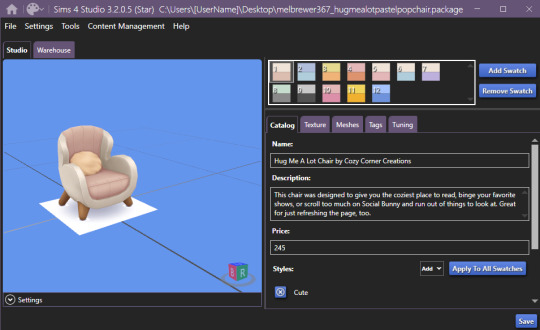
Step 2. Find the thing you want to recolor. Across the top there's filters so you can narrow it down by pack or search keywords to help find what you're looking for. Pick your item and click "next" at the bottom. A save window is going to pop up, save your file and make sure to name it something useful that's actually identifying so you can easily find it and remove it/update it/etc in the future. If you just hover your mouse over an item, it will give you the game's name for that item.


Congrats, you've created a Sims 4 package.
Step 3. (Optional) If you want to make changes to the in game display name, description, price, or style tags...you can do that on this first screen and then just hit "Apply To All Swatches." You do not have to make changes here if you don't want to though.
Step 4. This is where the fun begins. Click on the "Texture" tab. This is where you're going to get the file that you actually need to recolor. If there's a plain white swatch, I would pick that one, otherwise, I would go with whatever the lightest and most blank swatch is to make it easier on you to recolor. You just click one of the numbered swatch boxes at the top and then in the lower section make sure you have "Texture" highlighted, in this case it is my only option, and then click "Export." Another save window will pop up, just save that texture file somewhere easy to find, it'll only be there temporarily. (Or, if you want to be really smart and you plan on recoloring many things, you should make a project folder for each thing and save your texture files and things in there so you can always come back to them later.)

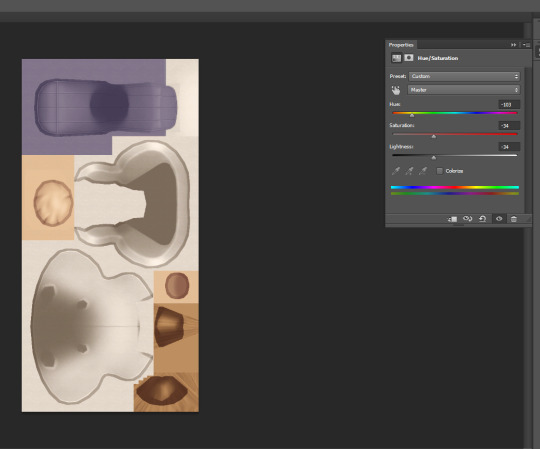
Step 5. So the exact tools and steps and such will kinda vary here based on what you want to accomplish and what program you use but, the broader overall process is the same. Open your texture file in an image editing software, change the colors/patterns/etc how you want, and then save that texture file. For instance, on this one I'm just going to change that pink section to a different color by just selecting the pink area with a marquee/quick selection tool and then using the Hue/Saturation tool to change the color.
Another example, this is something James Turner did in a recent video that someone asked about, you could choose some in game frames with images, put your own screenshots onto that image, and then boom you have your screenshots in game as framed photos. You would simply add your screenshot on top of the framed image as a second layer, line it up nice and neat, and you're good to go. Here's an example of what that would look like:
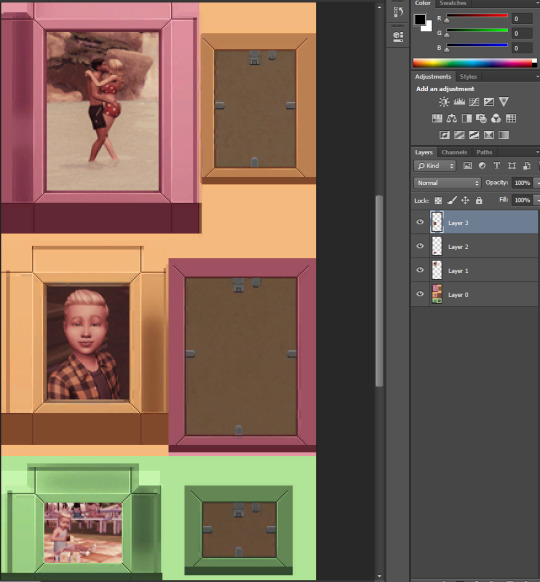
That's also basically how you could quickly add patterns to something. Lay your pattern image over top of the texture, change your layer style to something like "Multiply" or "overlay" depending on the look you're going for. Either way you do these, just remember to save your final product as a .png file.
Step 6. Back to S4S! Same place you were before, except now you need to click "Import" down in that lower texture section, select your texture file you just made. While you're on this screen, you should also update the colors in the "Swatch Thumbnail" section to match your new recolor, and you can also "remove swatch" to get rid of any additional swatches you don't need. Once you're done with all of this, hit save, and then go throw that .package file into your Mods folder.

Step 7. Go in game and check out your items and then pat yourself on the back.
Now you too can be cursed with this knowledge so that every time a new item/clothing is added to the game and you think, "wow I'd really like this if it was in better swatches" you can just...make those swatches.
135 notes
·
View notes
Note
Duu, I apologize if I'm asking too much, but would you mind doing a tutorial on how you use Rig Plus? The creator's tutorial is too complicated for me to understand :(
omg, okay. this is how I do it, but I'm fairly new to using this, so it might not be perfect. Still, it might help you get started 👇🏽
I'm going to make it as beginner-friendly as possible and include a lot of pictures because maybe you're like me, anon and you're more of a visual learner 🙃
First, let's check that we have the correct version of TS4 Studio and Blender (this is important, trust me). Following the creator's instructions: "It's compatible with any recent Sims4Studio Star (beta) that supports Blender v3.3 & v3.6". so I have Sims4Studio v3.2.1.2 and Blender 3.6 (Is that the latest S4S? I don't know, but it works for me).
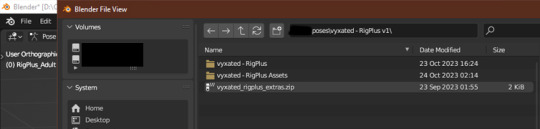
you need to download both files. Only extract the one that says 'vyxated - RigPlus v1' (if you extract the other one, Blender won't recognize it. Don't ask me why, I have no idea, but I extracted it and it didn't work, so I had to leave it as it is. we learn from mistakes, I guess). It should look like this:

Ok, can we make the poses now, Du? No, I mean, you can if you want. But first, we need to make sure we have everything ready to export it when we're done. For that, we need this:
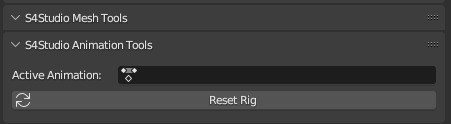
You can see this in the right column of the Blender window, under the 'Scene' section at the bottom
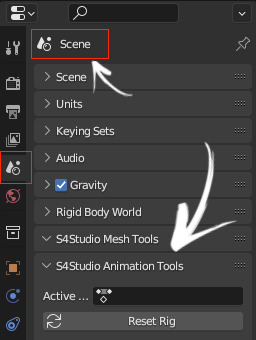
Do you have it in your Blender? If you do, yay, then you can make your pose. If you're like me and you don't have it, don't panic yet! I'll tell you how to get it. It's as easy as opening an exported rig from S4S in Blender, and magically, the little window appears. Now I'll show you how (assuming you previously synced your S4S with Blender from 'settings'. I'll assume you know how to do that; if not, send me another ask, and I'll tell you how).
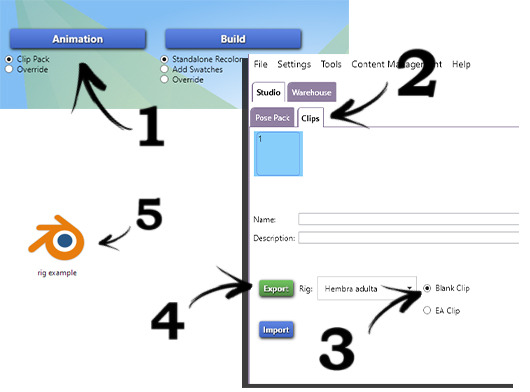
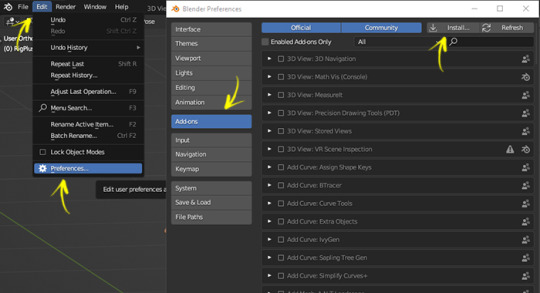
now what? nothing. you SHOULD have that S4S tab (when I first opened the EA Rig+ it didn't show up for me until I did that. You can close that blank rig; you won't need it anymore). ok NOW can we make the poses? yes! wait, no. the Add-ons. that's pretty easy: "File > Blender Preferences > Add-ons > Install… > select vyxated_RigPlus_extras.zip /.py"
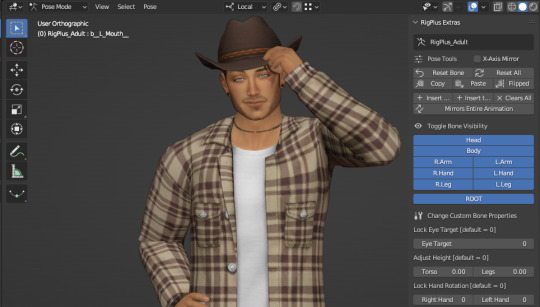
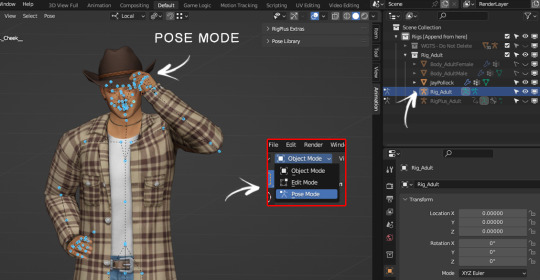
NOW you are ready to make a pose. here's mine 🤠
We're going to save the pose. For this, the process is a bit different from saving a pose normally. Just follow the steps and you should be fine. You can check if it's saved correctly at the end; I'll show you how, don't worry.
fist, HIDE 'the RigPlus_Adult' (that's the one with all the controls to move the sim).

It should appear orange, both the selected parts and the points on the sim body. According to the creator's instructions, you MUSTN´T insert keyframes while in Object Mode or you'll end up with the T-pose in the game. Orange = OBJECT MODE, blue = POSE MODE. You need to be in POSE MODE (all blue dots) to insert keyframes. let's see some pictures.
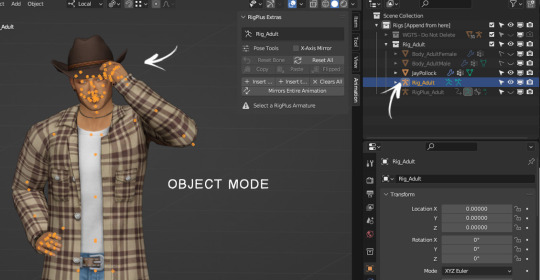
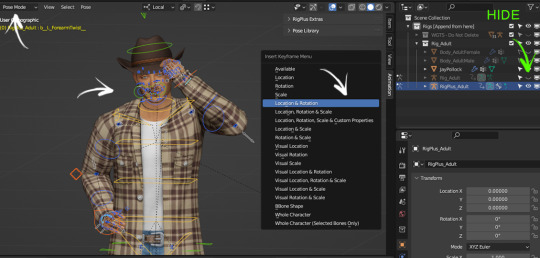
don't insert keyframes here ☝🏽
NOW you can inser keyframes (in other words: on your keyboard, you press A and then I > Location & Rotation). IMPORTANT: always remember to have Rig_Adult selected to insert keyframes.
Now hide Rig_Adult and leave only RigPlus_Adult visible because we're going to insert the keyframes there too. Same process: make sure you're in POSE MODE > A (to select all) > I > Location & Rotation.
You're ready to export your pose. But wait! Remember I told you we needed that S4S window? Here's where that comes in. To export your pose, you need to have 'Rig_Adult' selected, otherwise, it won't save properly. The way to check if you're selecting the right one is by looking at that S4S window. Let me show you how:
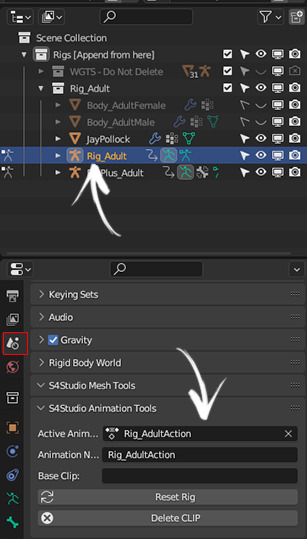
You go to Scene, and at the bottom where it says 'S4Studio Animation Tools,' it should say 'Rig_AdultAction.' If you have the right one selected, you can now save your pose as you would normally do.(you know, going to Files > Save As…)"
That would be basically everything!! ✨Now, Some tips:
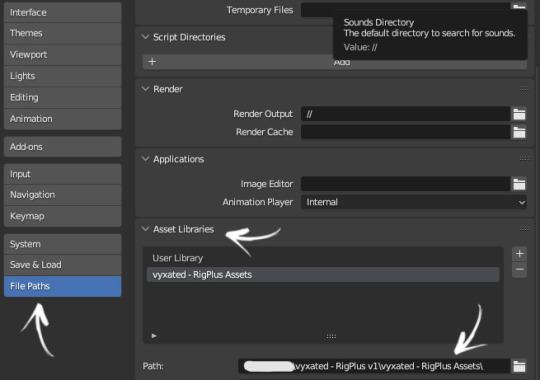
to view/use the Asset Browser (where you can find objects), you have to go here:
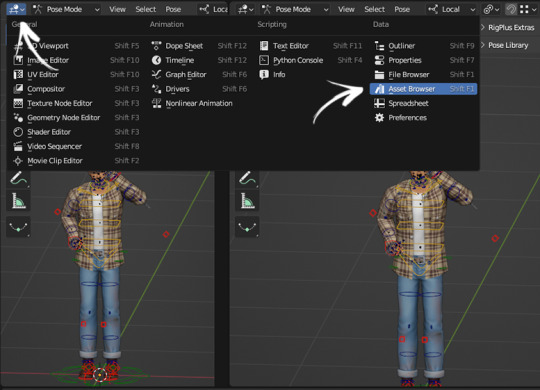
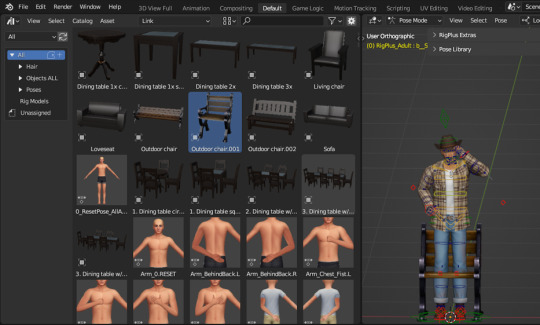
And to install it, in the creator's words: 'Edit > Blender Preferences > File Paths > Asset Libraries > add the vyxated - RigPlus Assets folder you've extracted'
I don't know how much you know about Blender, anon, so I'm going to be super basic here. To move the "bones" use R, RR, and G. Just press one of these keys and see if it moves where you want. Doesn't work with R? Then Ctrl+Z and try RR. Still no? Ctrl+Z and G. Just try until it looks the way you want 😁
Oh, right! I mentioned you could check if the pose was exported correctly and almost forgot to tell you how lol. Once you put the pose in your pose pack in S4S, all you have to do is export the pose you made from there (in the same way I explained to you above). I export it to the desktop, double click and open it. If the pose looks exactly like what you made, then congratulations! You've done it right. If all you see is the T-pose, then go back to the saving step because you've done something wrong (in my case, I was saving the pose in Object Mode, but I also had issues when I didn't have Rig_Adult selected when saving the pose 😆)
Alright, that's all! I hope it's not too confusing and that it helps you! Let me know if something isn't clear, nonny! 💖
50 notes
·
View notes
Note
Hello Sarah,
I'm so sorry for the multiple posts, but I have some good news!
The first one is that I might have found a way around SKIYAKI's region issue with the sms verification, which (guess what) was also a problem for me. 😅
You need a good VPN that works on mobile devices through an app (nord VPN, express VPN, etc.) I connected to Tokyo and attempted the SMS verification through the SKIYAKI app and it worked!
The 2nd is I managed to become a member of Keiko's FC! After all these countless attempts and failures, perseverance finally paid off!
Some tips for those who want to become a member and may run through similar issues:
At step 2.2 -2.3 where I got stuck and couldn't receive the email to proceed. I tackled it by using a VPN and incognito tab on an android mobile device (on pc this didn't work) in order to get around the possible region lock.
For the name, I just followed your advice for the closest instance of it in Katakana. After I receive the membership ID, I will follow the tip of the fellow fan hkrwa to edit my name.
Be careful as the Lawson ticket registration is extremely case sensitive. A single space after the name can cause an error.
Then, it was the address issue. At that point, I thought of asking tenso support if I had made a mistake at the address step since I couldn't make their tutorial work.
After a couple back and forth e-mails with them (they thought I was trying to get a ticket 😑), they sent me an email with what to place at the address fields and... IT WORKED!!! 🥳🎉
This is what they sent:
City [足立区千住曙町]
Street address [42-4]
Apartment name and room number [TS1330825 転送コム]
Maybe the width I used was wrong 🤔
For payment for both FCs I used my Revolut, which worked fine.
Anyway, my apologies for the long post and spamming your ask corner with posts all these days! I hope the above can be of help to fellow fans!

YAY!!! So happy it all worked out eventually. Thanks for the tip regarding the SKIYAKI SMS verification. I will try this method to register my new smartphone so I don't always have to bring my old one with me to Wakana's concerts. It was slowly becoming a hassle because the old phone required constant charging. I think it should be fine with my Surfshark VPN. *fingers crossed*
It's been so long since I registered my Keiko FC membership but maybe I struggled with similar issues. I don't remember T_T By now, I am almost used to constant errors when I first try to register on a Japanese site. It's always a lot of trial and error so I've learned to be patient and to try many different options. But it's honestly a case by case matter so there are no universal tips that I can give.
Thank you for providing all this info about your personal experience. I am sure it can be useful to people who want to join Keiko's fan club.
8 notes
·
View notes
Text

Blender Tutorial: Building a Scene Part 1: Importing Furniture from Sims 4
Building a scene from scratch is no mean feat, so this will likely be a multi-part tutorial.
In this tutorial I'll be going over the basics on building a scene. This will be the barebones necessities to get a room with a moose and some nice lighting to place your sims in for a render.
There are, of course, more in-depth and complicated ways of doing this, but these are the basics and the easiest (in my opinion!) way to get a nice little scene without too much work.
With that all said, let's get started!
Let's start by adding furniture into our scene. Usually I'd build a room first but I know many of your were asking how to do this so I'll cover this first!
Step 1: Exporting Meshes and Textures from S4S
Appending furniture and decor to a scene works the same way as appending jewelry to a sim. First we have to prepare it for blender in Sims 4 Studio. If you're using a piece of furniture from the game, select "Object" in Sims 4 Studio. It may load slowly so be patient!

Then you'll see the game's full catalogue:

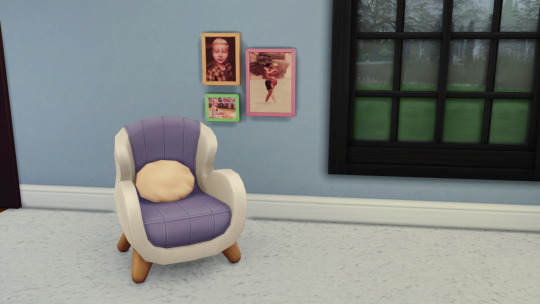
Filter and sort as needed to find what you're looking for. For this tutorial I'm going to remake (and revamp) one of the first blender scenes I've ever made, which looked like this:

So I'll export the fireplace first. It's from Vintage Glamour, so I'll filter my S4S by Vintage Glamour, and here it is:
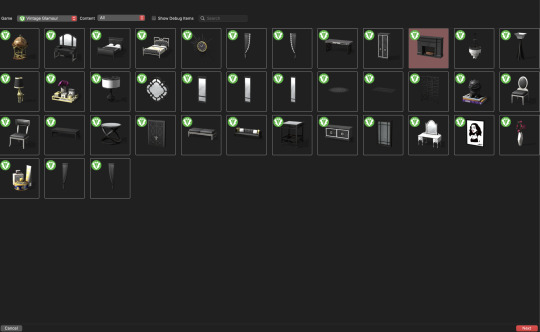
Highlight the fireplace then click "Next" Name the package anything, but make it easy to remember. If you need another swatch in the future you can always open the fireplace directly in S4S instead of searching for it each time. Save it somewhere easy to find! Once opened, you'll see this:

To render furniture, we need to export the Mesh and Texture files. I'm in the habit of exporting my mesh first, so we'll do it that way. Click the "mesh" tab and you'll see this:

Click "Export Mesh" and save the .blend file somewhere easy to find! I typically keep the .package, .mesh, and .png (texture) files all in the same place. I find it easier while working in blender. Do whatever makes sense to you just make sure to stay organized! After saving the mesh, navigate to the Texture tab and do the same thing:

Export the texture and save it somewhere easy to find. Repeat this process for all the furniture you'll need for your scene.
Step Two: Appending Furniture Items into Blender & Applying Textures
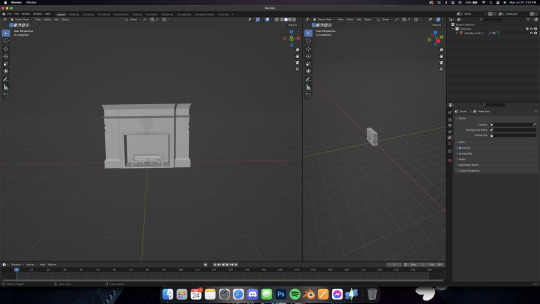
Now let's go into blender. As always, delete the default cube, lamp, and camera, then set up your workspace in whatever way is comfortable for you. I like to set mine up like this:

Now, just like with jewelry, let's append our fireplace in. Go to File -> Append and locate your fireplace .blend file. Open the file, then the Object folder, then select all "studio_mesh" files you see:


You should then have something like this:

Delete the bone_bone and rig as always, then also delete the footprint, which for me was the first studio_mesh in my Outliner list.

Then you'll have the fireplace by itself:
Navigate to the Shader Editor in your preferred workspace, then to the "Material Properties" tab.


Click the minus beside the diffuse texture to get rid of it. Then click the "New" button that appears once the diffuse is gone.


Nodes will appear in your shader tab!

Like we did with jewelry, add in an Image Texture node, a Mix Shader, and a Transparent BSDF. Connect and arrange them exactly like I have here:

Make sure you add in your texture file in the Image Texture node (click open, then navigate to your .png file we exported from S4S). Change the blend mode to Alpha Hashed in your properties window, like this:

And make sure you're in Material Preview mode (I wasn't) by pressing Z on your keyboard and selecting "Material preview"

Now you should have something like this!

In Part Two, we'll add in the walls of the room and maybe a window!
Some notes before I leave you:
Using CC works the same way, you can add it into the custom content folder in S4S OR you can double-click the package file and open it in S4S that way.
Some objects, like trees, have more than one texture. I'll do a separate mini tutorial on that if yall need but basically you'll export both texture files and then apply them to the proper parts of the object (for a tree, for example, the leaves and trunk are often separate texture files)
Please let me know if yall have any questions! And stay tuned for Part Two!
#salemsims tutorial#render school tutorial#sims 4 render tutorial#sims 4 blender tutorial#render tutorial#blender tutorial#tutorial
55 notes
·
View notes
Text
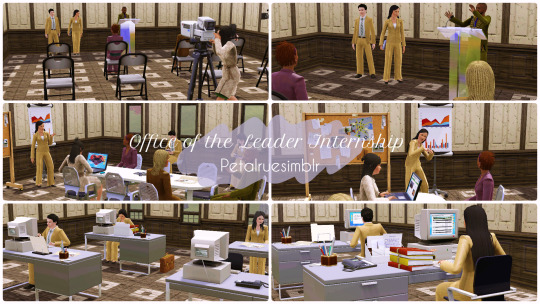
Hello and welcome back to my blog! This is another part-time career or internship for teens, which will offer a promotion into the Political career as they transition to young adulthood. This internship is inspired by a real program, specifically the NY Office of the Mayor Internship Program and as the The Sims 3 features a "Leader of the Free World" as the final level of the Political career, I named this internship the Office of the Leader Internship.
For those seeking a full-time career, I am currently working on a second one that will be released soon, so stay tuned!🌺
In the meantime, if you are interested in this one, click on ‘Keep Reading’ below for more information and pictures of the Office of the Leader Internship career.


Office of the Leader Internship

Sim File Share

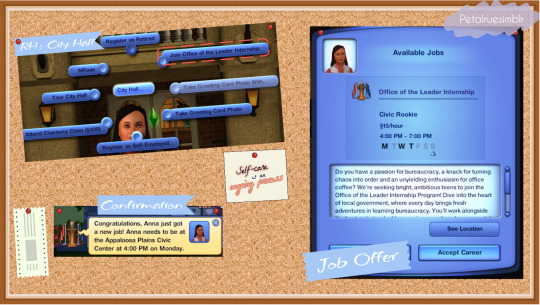
Do you have a passion for bureaucracy, a knack for turning chaos into order and an unyielding enthusiasm for office coffee? We’re seeking bright, ambitious teens to join the Office of the Leader Internship Program! Dive into the heart of local government, where every day brings fresh adventures in learning bureaucracy. You’ll work alongside the best, gain invaluable experience and maybe even catch the eye of some influential Sims. With fixed hours, free office supplies and the occasional donut day, you’ll enjoy a unique mix of fun and professional growth. Apply now and step into the action!

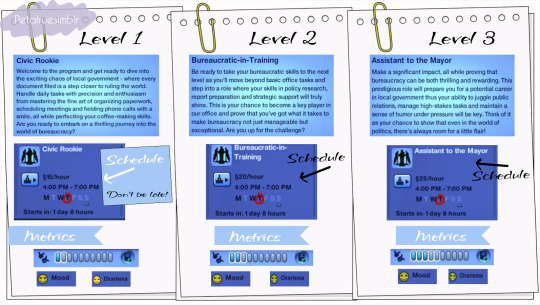
Career Type: Part-Time Available for: Teens Available Languages: English Levels: 3 Rabbit Hole: City Hall Work Days: M, W, Th Work Hours: 4PM - 7PM Does it have Carpool? Yes Does it have Uniforms? Yes (refer to picture above) File Type: Package Min. Required Game Version: 1.42 Packs Needed: The Sims 3 📣All descriptions for the levels, tones and metrics as well as skills required, salary, uniforms and other details are provided on the pictures above.

NRAAS Careers Mod

I initially considered including logic as one of the metrics but decided to remove it. The Political career in the game relies solely on charisma as its primary skill and mostly depends on funding for promotions. It didn’t make sense to include logic, as it isn’t used in the long run for this career path. The work days for this internship are scheduled for Mondays, Wednesday and Thursdays. If you have the Seasons expansion pack then it will only be two days due to Thursday is considered as a holiday and Drama Club meetings are on Tuesday and Friday if you have the Generations expansion pack (which is useful if you want your teens to increase their charisma faster). 📣 Upon reaching level three in their internship, teens will be eligible for promotion to the Political career upon applying once they become young adults. Instructions are provided in the picture above; right-click on it and select ’Open image in new tab’ for a clearer view. As stated above, you will need NRAAS Careers Mod for this career to show up in the game and as long as you have the latest version of it, it should work for higher patches. You can also read my #psa regarding these careers, click here. I’m not fluent in any other languages to translate so if anyone is interested in translating this career, please don’t hesitate to send me a message here, comment on this post or let me know in my Ask/Contact form (if you don't have a Tumblr account) and will let you know the details. I have tested this career in my game, so far it is working and all scripts are showing up. All feedback is very welcome to help me learn and improve my skills so please let me know if you experience any problems on your end and I’ll do my best to sort it as soon as possible.

MissyHissy step-by-step tutorial Twallan for the Career Mod S3pe
#petalruesimblr#custom career#the sims 3#ts3#ts3cc#the sims 3 part time#sims 3#ts3 simblr#ts3 simmer#sims 3 download#sims 3 screenshots#ts3 download#ts3 mods#ts3 community#ts3 screenshots#ts3 career#the sims 3 mods#the sims 3 career#ts3 teen internship#the sims 3 internship
98 notes
·
View notes
Note
Hi.. I hope this isn’t asking for too much but, how do you make links for your chapters? I’m new to tumblr.. and I am so lost on how to make links for like a masterlist,chapters, the whole thing 🤦🏽♀️. Every tutorial I’ve looked up is so old.. like 12 or 5 years ago old. And I’m a lil dumb 😭
no problem!! sorry this a bit of a late reply and maybe you’ve already figured it out but if you haven’t, here you go! i hope this helps! (the screenshots are on ios but it should all be the same process on any platform really)
!! pretty straightforward but be sure the posts you want to link are all uploaded before you make a post you want to include your links in.
when you make a draft—lets say it’s a masterlist—you should set up the layout beforehand or however you want it to look
and when finally want to link your posts, make sure to go ahead and copy the link of a post/chapter/etc you uploaded (it could be any link you want really)
then go back to your draft and highlight the text where you want the link to be
like this:

make sure the text you want to link is highlighted, then above your keyboard should be a little icon that looks like two rings linked together (chain link lol)
ANYWAYS it should look like this:

when you click that icon, a little text box should pop up that looks like this:

this is where you paste the link you copied/the link you want to direct people to.
it can be any link, even outside of tumblr.
in this example, i will just put tumblr.com lol

once you add your link, the text you highlighted before should be UNDERLINED like this:

and that’s pretty much all you have to do to link stuff! i think making/designing the layout of a certain post is a bit trickier. it’s also a lot easier on pc since you can keep tabs open on the browser and the process is less tedious but anyway…
really hoped this helped! or if you already figured out how to do i’m applauding you!!
4 notes
·
View notes
Text
How to install the native gog(and maybe steam? I dont own it to check) linux version of Star of Providence (monolith: relics of the past)! a very niche tutorial for maybe 6 people in the world.
This also might slightly help as a base guide in learning how to troubleshoot programs and games on linux.
This guide assumes you have Steam installed and can be trusted to find certain library files if you do not already have them installed. On my personal system I am running openSUSE tumbleweed and will be using Lutris to launch the game, but equivalent steps for launching through Steam will be provided when needed.
Firstly, turn off hidden files.
the base game is 32-bit only and requires files from /.steam/bin/steam-runtime/lib/1386-linux-gnu Base game+DLC is 64-bit only and requires files from /.steam/bin/steam-runtime/lib/x86-64-linux-gnu
if you're using Lutris. inside your monolith game directory place a new folder named "lib" place "libcrypto.so.1.0.0" and "libssl.so.1.0.0" from your respective steam-runtime/lib folders into the monolith lib directory in lutris, right click and confiure on monolith, select toggle "advanced" on the top right of the window under game options "add directory to LD_LIBRARY_PATH" add your lib directory in the monolith folder
on Steam.
into your game properties tab paste either
for base game
LD_PRELOAD="~/.steam/bin/steam-runtime/lib/1386-linux-gnu/libssl.so.1.0.0 ~/.steam/bin/steam-runtime/lib/1386-linux-gnu/libcrypto.so.1.0.0" %command%
OR
for base + DLC
LD_PRELOAD="~/.steam/bin/steam-runtime/lib/x86_64-linux-gnu/libssl.so.1.0.0 ~/.steam/bin/steam-runtime/lib/x86_64-linux-gnu/libcrypto.so.1.0.0" %command%
for the base game we should be done and the game is playable however, with the DLC at this point we're still missing (on opensuse tumbleweed, your system might be different, check your games logs while trying to launch)one library file to make the game launch, it wants to look for libcurl-gnutls.so.4 which is unavailable in the repos of non ubuntu/debian based distros, however this file (seems to be) completely cross compatible with libcurl.so.4 so we're going to be making a symbolic link, so when the game searches for libcurl-gnutls.so.4 it will find libcurl.so.4
open a terminal in your system's /lib64/ folder, with Dolphin this can be done by right clicking an empty space and under actions select "open terminal here", alternatively just move to the directory inside of your terminal paste | sudo ln -s libcurl.so.4 libcurl-gnutls.so.4
(now, this might have negative consequences however, I do not know what they would be and someone who actually codes might be able to pitch in here. if so, just add it to the lib directory for the game for lutris or add a new folder under LD_PRELOAD on the steam properties) the game should now be playable
Alternatively to all of this, just use proton. on Steam just change the compatibility mode to the latest version and in Lutris install the base games windows version and run it using proton or wine-ge, to get the dlc to work select "Run EXE inside Wine prefix, this can be found to the right of the play button at the bottom of the list to the right of the wine button. Now launch the DLC installer. Congrats! You got the game to work in hopefully a quarter of the time it took me to both figure this out and document all of this!
3 notes
·
View notes
Text
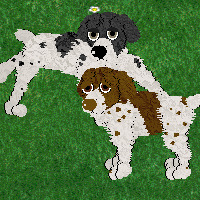
English Springer Spaniel
Haven't posted in a few days, not because I've not been doing things, but more so because I've been doing so much. (Plus two of those days I had a migraine, so concentration to words isn't very easy.)
Anyway, I had been on the hunt for OW for a dalmatian file.

I have this pup, Kloa, from my old hard drive. She's listed as a 2nd gen purebred Dalmatian born on 1/23/2002. Her Dam was Chloe adopted on 8/8/2000 and her sire was Dusk adopted on 2/20/2001. She was bred by Firebird @ MKC.
I figured she was a spaniel of some kind. I've been scouring old websites and the Wayback Archive. All that and Petz Life Discord archives. I did finally come across a similar looking dog and KingHarry on PL discord said that poster was still active. Low and behold, Lily still had that file.
Except hers was a non-overwrite. It looked close, it had white eyebrows and maybe the scale was a bit different.
So I still searched.
Did a second spelunking and came across a folder labeled "Sunshine English Springer Spaniel." Inside was a Dalmatian.dog file. It didn't work in Petz 4 which is the folder it was inside. I was pretty sure this was my file. But now I had a name!
Searching the name netted me this way back page. Down at the very bottom looks to be the same looking dog as the file Lily had given me. I bet this was my file! But, this page says it was for Dogz 2!
I tried converting my old file to a unibreed, but that didn't work. And while I could have used the non-overwrite that Lily had given me, I wanted an overwrite version.
So I made a breed file out of a Kloa's pet file. (I liked the non-white eyebrows better).
Then I started adding variations.
10 different eye colors, linked eyelids, a brown nose for the brown coat, and a coat in either white and brown or white and black. The spots are static, though. Same every time in either color. So I don't feel it's release-able quite yet. I don't know how well they breed yet, either.
I kinda pleased with it. I mean, it's not my work, not from scratch, but I did do the LNZ variation work by hand. Trial and error with a couple of tutorials.
I've been spending a lot of time in the discord servers: Petz Life, Petzcord, and Petz Show Club, and a bit of time on Whiskerwick, RKC, and Duke's Group forums.
I haven't made any more progress on my Dali Locations A-H line, but I've breed a few others. (And adopted a handful more, oops?) I should really figure out how to share the Airtable page properly. Or at least link the other tabs so you can see more than just my cats. And I have quite a backlog of stamps to make.
But that's today's update!
5 notes
·
View notes