#kubernetes etcd install
Explore tagged Tumblr posts
Visit Tumblr Blog
Explore Tumblr blogs with no restrictions, modern design and the best experience.
Last Seen Tumblr Blogs


Fun Fact
130K people were victims of a chain letter scam that affected Tumblr in May 2011.
Text
A Practical Guide to CKA/CKAD Preparation in 2025
The Certified Kubernetes Administrator (CKA) and Certified Kubernetes Application Developer (CKAD) certifications are highly sought-after credentials in the cloud-native ecosystem. These certifications validate your skills and knowledge in managing and developing applications on Kubernetes. This guide provides a practical roadmap for preparing for these exams in 2025.
1. Understand the Exam Objectives
CKA: Focuses on the skills required to administer a Kubernetes cluster. Key areas include cluster architecture, installation, configuration, networking, storage, security, and troubleshooting.
CKAD: Focuses on the skills required to design, build, and deploy cloud-native applications on Kubernetes. Key areas include application design, deployment, configuration, monitoring, and troubleshooting.
Refer to the official CNCF (Cloud Native Computing Foundation) websites for the latest exam curriculum and updates.
2. Build a Strong Foundation
Linux Fundamentals: A solid understanding of Linux command-line tools and concepts is essential for both exams.
Containerization Concepts: Learn about containerization technologies like Docker, including images, containers, and registries.
Kubernetes Fundamentals: Understand core Kubernetes concepts like pods, deployments, services, namespaces, and controllers.
3. Hands-on Practice is Key
Set up a Kubernetes Cluster: Use Minikube, Kind, or a cloud-based Kubernetes service to create a local or remote cluster for practice.
Practice with kubectl: Master the kubectl command-line tool, which is essential for interacting with Kubernetes clusters.
Solve Practice Exercises: Use online resources, practice exams, and mock tests to reinforce your learning and identify areas for improvement.
4. Utilize Effective Learning Resources
Official CNCF Documentation: The official Kubernetes documentation is a comprehensive resource for learning about Kubernetes concepts and features.
Online Courses: Platforms like Udemy, Coursera, and edX offer CKA/CKAD preparation courses with video lectures, hands-on labs, and practice exams.
Books and Study Guides: Several books and study guides are available to help you prepare for the exams.
Community Resources: Engage with the Kubernetes community through forums, Slack channels, and meetups to learn from others and get your questions answered.
5. Exam-Specific Tips
CKA:
Focus on cluster administration tasks like installation, upgrades, and troubleshooting.
Practice managing cluster resources, security, and networking.
Be comfortable with etcd and control plane components.
CKAD:
Focus on application development and deployment tasks.
Practice writing YAML manifests for Kubernetes resources.
Understand application lifecycle management and troubleshooting.
6. Time Management and Exam Strategy
Allocate Sufficient Time: Dedicate enough time for preparation, considering your current knowledge and experience.
Create a Study Plan: Develop a structured study plan with clear goals and timelines.
Practice Time Management: During practice exams, simulate the exam environment and practice managing your time effectively.
Familiarize Yourself with the Exam Environment: The CKA/CKAD exams are online, proctored exams with a command-line interface. Familiarize yourself with the exam environment and tools beforehand.
7. Stay Updated
Kubernetes is constantly evolving. Stay updated with the latest releases, features, and best practices.
Follow the CNCF and Kubernetes community for announcements and updates.
For more information www.hawkstack.com
0 notes
Text
What Is AWS EKS? Use EKS To Simplify Kubernetes On AWS
What Is AWS EKS?
AWS EKS, a managed service, eliminates the need to install, administer, and maintain your own Kubernetes control plane on Amazon Web Services (AWS). Kubernetes simplifies containerized app scaling, deployment, and management.
How it Works?
AWS Elastic Kubernetes Service (Amazon EKS) is a managed Kubernetes solution for on-premises data centers and the AWS cloud. The Kubernetes control plane nodes in the cloud that are in charge of scheduling containers, controlling application availability, storing cluster data, and other crucial functions are automatically managed in terms of scalability and availability by AWS EKS.
You can benefit from all of AWS infrastructure’s performance, scalability, dependability, and availability with Amazon EKS. You can also integrate AWS networking and security services. When deployed on-premises on AWS Outposts, virtual machines, or bare metal servers, EKS offers a reliable, fully supported Kubernetes solution with integrated tools.Image Credit To Amazon Web Services
AWS EKS advantages
Integration of AWS Services
Make use of the integrated AWS services, including EC2, VPC, IAM, EBS, and others.
Cost reductions with Kubernetes
Use automated Kubernetes application scalability and effective computing resource provisioning to cut expenses.
Security of automated Kubernetes control planes
By automatically applying security fixes to the control plane of your cluster, you can guarantee a more secure Kubernetes environment
Use cases
Implement in a variety of hybrid contexts
Run Kubernetes in your data centers and manage your Kubernetes clusters and apps in hybrid environments.
Workflows for model machine learning (ML)
Use the newest GPU-powered instances from Amazon Elastic Compute Cloud (EC2), such as Inferentia, to efficiently execute distributed training jobs. Kubeflow is used to deploy training and inferences.
Create and execute web apps
With innovative networking and security connections, develop applications that operate in a highly available configuration across many Availability Zones (AZs) and automatically scale up and down.
Amazon EKS Features
Running Kubernetes on AWS and on-premises is made simple with Amazon Elastic Kubernetes Service (AWS EKS), a managed Kubernetes solution. An open-source platform called Kubernetes makes it easier to scale, deploy, and maintain containerized apps. Existing apps that use upstream Kubernetes can be used with Amazon EKS as it is certified Kubernetes-conformant.
The Kubernetes control plane nodes that schedule containers, control application availability, store cluster data, and perform other crucial functions are automatically scaled and made available by Amazon EKS.
You may run your Kubernetes apps on AWS Fargate and Amazon Elastic Compute Cloud (Amazon EC2) using Amazon EKS. You can benefit from all of AWS infrastructure’s performance, scalability, dependability, and availability with Amazon EKS. It also integrates with AWS networking and security services, including AWS Virtual Private Cloud (VPC) support for pod networking, AWS Identity and Access Management (IAM) integration with role-based access control (RBAC), and application load balancers (ALBs) for load distribution.
Managed Kubernetes Clusters
Managed Control Plane
Across several AWS Availability Zones (AZs), AWS EKS offers a highly available and scalable Kubernetes control plane. The scalability and availability of Kubernetes API servers and the etcd persistence layer are automatically managed by Amazon EKS. To provide high availability, Amazon EKS distributes the Kubernetes control plane throughout three AZs. It also automatically identifies and swaps out sick control plane nodes.
Service Integrations
You may directly manage AWS services from within your Kubernetes environment with AWS Controllers for Kubernetes (ACK). Building scalable and highly available Kubernetes apps using AWS services is made easy with ACK.
Hosted Kubernetes Console
For Kubernetes clusters, EKS offers an integrated console. Kubernetes apps running on AWS EKS may be arranged, visualized, and troubleshooted in one location by cluster operators and application developers using EKS. All EKS clusters have automatic access to the EKS console, which is hosted by AWS.
EKS Add-Ons
Common operational software for expanding the operational capability of Kubernetes is EKS add-ons. The add-on software may be installed and updated via EKS. Choose whatever add-ons, such as Kubernetes tools for observability, networking, auto-scaling, and AWS service integrations, you want to run in an Amazon EKS cluster when you first launch it.
Managed Node Groups
With just one command, you can grow, terminate, update, and build nodes for your cluster using AWS EKS. To cut expenses, these nodes can also make use of Amazon EC2 Spot Instances. Updates and terminations smoothly deplete nodes to guarantee your apps stay accessible, while managed node groups operate Amazon EC2 instances utilizing the most recent EKS-optimized or customized Amazon Machine Images (AMIs) in your AWS account.
AWS EKS Connector
Any conformant Kubernetes cluster may be connected to AWS using AWS EKS, and it can be seen in the Amazon EKS dashboard. Any conformant Kubernetes cluster can be connected, including self-managed clusters on Amazon Elastic Compute Cloud (Amazon EC2), Amazon EKS Anywhere clusters operating on-premises, and other Kubernetes clusters operating outside of AWS. You can access all linked clusters and the Kubernetes resources running on them using the Amazon EKS console, regardless of where your cluster is located.
Read more on Govindhtech.com
#AWSEKS#AmazonWebServices#AWSservices#AWSVirtualPrivateCloud#AmazonEC2#News#Technews#technology#technologynews#govindhtech
0 notes
Text
Youtube Short - Kubernetes Cluster Master Worker Node Architecture Tutorial for Beginners | Kubernetes ETCD Explained
Hi, a new #video on #kubernetes #cluster #architecture #workernode #masternode is published on #codeonedigest #youtube channel. Learn kubernetes #cluster #etcd #controllermanager #apiserver #kubectl #docker #proxyserver #programming #coding with
Kubernetes is a popular open-source platform for container orchestration. Kubernetes follows client-server architecture and Kubernetes cluster consists of one master node with set of worker nodes. Let’s understand the key components of master node. etcd is a configuration database stores configuration data for the worker nodes. API Server to perform operation on cluster using api…
View On WordPress
#kubernetes#kubernetes cluster#kubernetes cluster backup#kubernetes cluster from scratch#kubernetes cluster installation#kubernetes cluster setup#kubernetes cluster tutorial#kubernetes controller#kubernetes controller development#kubernetes controller example#kubernetes controller explained#kubernetes controller golang#kubernetes controller manager#kubernetes controller runtime#kubernetes controller tutorial#kubernetes controller vs operator#kubernetes etcd#kubernetes etcd backup#kubernetes etcd backup and restore#kubernetes etcd cluster setup#kubernetes etcd install#kubernetes etcd restore#kubernetes explained#kubernetes installation#kubernetes installation on windows#kubernetes interview questions#kubernetes kubectl#kubernetes kubectl api#kubernetes kubectl commands#kubernetes kubectl config
0 notes
Text
Kubernetes Training from h2kinfosys
About kubernetes training course
Kubernetes is a portable, extensible open-source platform for managing containerized workloads and services that facilitates both declarative configuration and automation. It has a large, rapidly growing ecosystem. Google open-sourced the Kubernetes project in 2014. Kubernetes builds upon a decade and a half of experience that Google has with running production workloads at scale, combined with best-of-breed ideas.

In our kubernetes Training you will learn:
Various components of k8s cluster on AWS cloud using ubuntu 18.04 linux images.
Setting up AWS cloud environment manually.
Installation and setting up kubernetes cluster on AWS manually from scratch.
Installation and Setting up etcd cluster ( key-value ) datastore
Provisioning the CA and Generating TLS Certificates for k8s cluster and etcd server.
Installation of Docker.
Configuring and CNI plugins to wire docker containers for networking.
Creating IAM roles for the kubernetes cloud setup.
Kubernetes deployments, statefulsets, Network policy etc.
Why consider a kubernetes career path in IT industry?
Kubernetes demand has exploded and its adoption is increasing many folds every quarter.
As more and more companies moving towards the automation and embracing open source technologies. Kubernetes slack-user has more 65,000 users and counting.
Who is eligible for the kubernetes course?
Beginner to intermediate level with elementary knowledge of Linux and docker.
Enroll Today for our Kubernetes Training!
Contact Us:
https://www.h2kinfosys.com/courses/kubernetes-training
Call: USA: +1- 770-777-1269.
Email: [email protected]
https://www.youtube.com/watch?v=Fa9JfWmqR2k
1 note
·
View note
Text
In recent years, the popularity of Kubernetes and its ecosystem has immensely increased due to its ability to its behavior, ability to design patterns, and workload types. Kubernetes also known as k8s, is an open-source software used to orchestrate system deployments, scale, and manage containerized applications across a server farm. This is achieved by distributing the workload across a cluster of servers. Furthermore, it works continuously to maintain the desired state of container applications, allocating storage and persistent volumes e.t.c. The cluster of servers in Kubernetes has two types of nodes: Control plane: it is used to make the decision about the cluster(includes scheduling e.t.c) and also to detect and respond to cluster events such as starting up a new pod. It consists of several other components such as: kube-apiserver: it is used to expose the Kubernetes API etcd: it stores the cluster data kube-scheduler: it watches for the newly created Pods with no assigned node, and selects a node for them to run on. Worker nodes: they are used to run the containerized workloads. They host the pods that er the basic components of an application. A cluster must consist of at least one worker node. The smallest deployable unit in Kubernetes is known as a pods. A pod may be made up of one or many containers, each with its own configurations. There are 3 different resources provided when deploying pods in Kubernetes: Deployments: this is the most used and easiest resource to deploy. They are usually used for stateless applications. However, the application can be made stateful by attaching a persistent volume to it. StatefulSets: this resource is used to manage the deployment and scale a set of Pods. It provides the guarantee about ordering and uniqueness of these Pods. DaemonSets: it ensures all the pod runs on all the nodes of the cluster. In case a node is added/removed from the cluster, DaemonSet automatically adds or removes the pod. There are several methods to deploy a Kubernetes Cluster on Linux. This includes using tools such as Minikube, Kubeadm, Kubernetes on AWS (Kube-AWS), Amazon EKS e.t.c. In this guide, we will learn how to deploy a k0s Kubernetes Cluster on Rocky Linux 9 using k0sctl What is k0s? K0s is an open-source, simple, solid, and certified Kubernetes distribution that can be deployed on any infrastructure. It offers the simplest way with all the features required to set up a Kubernetes cluster. Due to its design and flexibility, it can be used on bare metal, cloud, Edge and IoT. K0s exists as a single binary with no dependencies aside from the host OS kernel required. This reduces the complexity and time involved when setting up a Kubernetes cluster. The other features associated with k0s are: It is certified and 100% upstream Kubernetes It has multiple installation methods such as single-node, multi-node, airgap and Docker. It offers automatic lifecycle management with k0sctl where you can upgrade, backup and restore. Flexible deployment options with control plane isolation as default It offers scalability from a single node to large, high-available clusters. Supports a variety of datastore backends. etcd is the default for multi-node clusters, SQLite for single node clusters, MySQL, and PostgreSQL can be used as well. Supports x86-64, ARM64 and ARMv7 It Includes Konnectivity service, CoreDNS and Metrics Server Minimum CPU requirements (1 vCPU, 1 GB RAM) k0sctl is a command-line tool used for bootstrapping and managing k0s clusters. Normally, it connects to the hosts using SSH and collects information about them. The information gathered is then used to create a cluster by configuring the hosts, deploying k0s, and then connecting them together. The below image can be used to demonstrate how k0sctl works Using k0sctl is the recommended way to create a k0s cluster for production. Since you can create multi-node clusters in an easy and automatic manner.
Now let’s dive in! Environment Setup For this guide, we will have the 4 Rocky Linux 9 servers configured as shown: Role Hostname IP Address Workspace workspace 192.168.204.12 Control plane master.computingpost.com 192.168.205.16 Worker Node worker1.computingpost.com 192.168.205.17 Worker Node worker2.computingpost.com 192.168.205.18 The other Rocky Linux 9 server is my working space on which I will install k0sctl and run the cluster on the above nodes Once the hostnames have been set, edit /etc/hosts on the Workspace as shown: $ sudo vi /etc/hosts 192.168.205.16 master.computingpost.com master 192.168.205.17 worker1.computingpost.com worker1 192.168.205.18 worker2.computingpost.com worker2 Since k0sctl uses SSH to access the hosts, we will generate SSH keys on the Workspace as shown: $ ssh-keygen Generating public/private rsa key pair. Enter file in which to save the key (/home/rocky9/.ssh/id_rsa): Enter passphrase (empty for no passphrase): Enter same passphrase again: Your identification has been saved in /home/rocky9/.ssh/id_rsa Your public key has been saved in /home/rocky9/.ssh/id_rsa.pub The key fingerprint is: SHA256:wk0LRhNDWM1PA2pm9RZ1EDFdx9ZXvhh4PB99mrJypeU rocky9@workspace The key's randomart image is: +---[RSA 3072]----+ | +B+o...*=.o*| | .. =o.o.oo..B| | B .ooo = o=| | * + o. . =o+| | o S ..=o | | . B | | . + E | | o | | | +----[SHA256]-----+ Ensure root login is permitted on the 3 nodes by editing /etc/ssh/sshd_config as below # Authentication: PermitRootLogin yes Save the file and restart the SSH service: sudo systemctl restart sshd Copy the keys to the 3 nodes. ssh-copy-id root@master ssh-copy-id root@worker1 ssh-copy-id root@worker2 Once copied, verify if you can log in to any of the nodes without a password: $ ssh root@worker1 Activate the web console with: systemctl enable --now cockpit.socket Last login: Sat Aug 20 11:38:29 2022 [root@worker1 ~]# exit Step 1 – Install the k0sctl tool on Rocky Linux 9 The k0sctl tool can be installed on the Rocky Linux 9 Workspace by downloading the file from the GitHub release page. You can also use wget to pull the archive. First, obtain the latest version tag: VER=$(curl -s https://api.github.com/repos/k0sproject/k0sctl/releases/latest|grep tag_name | cut -d '"' -f 4) echo $VER Now download the latest file for your system: ### For 64-bit ### wget https://github.com/k0sproject/k0sctl/releases/download/$VER/k0sctl-linux-x64 -O k0sctl ###For ARM ### wget https://github.com/k0sproject/k0sctl/releases/download/$VER/k0sctl-linux-arm -O k0sctl Once the file has been downloaded, make it executable and copy it to your PATH: chmod +x k0sctl sudo cp -r k0sctl /usr/local/bin/ /bin Verify the installation: $ k0sctl version version: v0.13.2 commit: 7116025 To enable shell completions, use the commands: ### Bash ### sudo sh -c 'k0sctl completion >/etc/bash_completion.d/k0sctl' ### Zsh ### sudo sh -c 'k0sctl completion > /usr/local/share/zsh/site-functions/_k0sctl' ### Fish ### k0sctl completion > ~/.config/fish/completions/k0sctl.fish Step 2 – Configure the k0s Kubernetes Cluster We will create a configuration file for the cluster. To generate the default configuration, we will use the command: k0sctl init > k0sctl.yaml Now modify the generated config file to work for your environment: vim k0sctl.yaml Update the config file as shown: apiVersion: k0sctl.k0sproject.io/v1beta1 kind: Cluster metadata: name: k0s-cluster spec: hosts: - ssh: address: master.computingpost.com user: root port: 22 keyPath: /home/$USER/.ssh/id_rsa role: controller - ssh: address: worker1.computingpost.com user: root port: 22 keyPath: /home/$USER/.ssh/id_rsa role: worker - ssh: address: worker2.computingpost.com
user: root port: 22 keyPath: /home/$USER/.ssh/id_rsa role: worker k0s: dynamicConfig: false We have a configuration file with 1 control plane and 2 worker nodes. It is also possible to have a single node deployment where you have a single server to act as a control plane and worker node as well: For that case, you will a configuration file appear as shown: apiVersion: k0sctl.k0sproject.io/v1beta1 kind: Cluster metadata: name: k0s-cluster spec: hosts: - ssh: address: IP_Address user: root port: 22 keyPath: /home/$USER/.ssh/id_rsa role: controller+worker k0s: dynamicConfig: false Step 3 – Create the k0s Kubernetes Cluster on Rocky Linux 9 using k0sctl Once the configuration has been made, you can start the cluster by applying the configuration file: First, allow the service through the firewall on the control plane sudo firewall-cmd --add-port=6443/tcp --permanent sudo firewall-cmd --reload Now apply the config k0sctl apply --config k0sctl.yaml Sample Output: ⠀⣿⣿⡇⠀⠀⢀⣴⣾⣿⠟⠁⢸⣿⣿⣿⣿⣿⣿⣿⡿⠛⠁⠀⢸⣿⣿⣿⣿⣿⣿⣿⣿⣿⣿⣿⠀█████████ █████████ ███ ⠀⣿⣿⡇⣠⣶⣿⡿⠋⠀⠀⠀⢸⣿⡇⠀⠀⠀⣠⠀⠀⢀⣠⡆⢸⣿⣿⠀⠀⠀⠀⠀⠀⠀⠀⠀⠀███ ███ ███ ⠀⣿⣿⣿⣿⣟⠋⠀⠀⠀⠀⠀⢸⣿⡇⠀⢰⣾⣿⠀⠀⣿⣿⡇⢸⣿⣿⣿⣿⣿⣿⣿⣿⣿⣿⣿⠀███ ███ ███ ⠀⣿⣿⡏⠻⣿⣷⣤⡀⠀⠀⠀⠸⠛⠁⠀⠸⠋⠁⠀⠀⣿⣿⡇⠈⠉⠉⠉⠉⠉⠉⠉⠉⢹⣿⣿⠀███ ███ ███ ⠀⣿⣿⡇⠀⠀⠙⢿⣿⣦⣀⠀⠀⠀⣠⣶⣶⣶⣶⣶⣶⣿⣿⡇⢰⣶⣶⣶⣶⣶⣶⣶⣶⣾⣿⣿⠀█████████ ███ ██████████ k0sctl v0.13.2 Copyright 2021, k0sctl authors. Anonymized telemetry of usage will be sent to the authors. By continuing to use k0sctl you agree to these terms: https://k0sproject.io/licenses/eula INFO ==> Running phase: Connect to hosts INFO [ssh] master:22: connected INFO [ssh] worker1:22: connected INFO [ssh] worker2:22: connected INFO ==> Running phase: Detect host operating systems INFO [ssh] master:22: is running Rocky Linux 9.0 (Blue Onyx) INFO [ssh] worker1:22: is running Rocky Linux 9.0 (Blue Onyx) INFO [ssh] worker2:22: is running Rocky Linux 9.0 (Blue Onyx) INFO ==> Running phase: Acquire exclusive host lock INFO ==> Running phase: Prepare hosts INFO ==> Running phase: Gather host facts ......... INFO [ssh] worker2:22: validating api connection to https://192.168.205.16:6443 INFO [ssh] master:22: generating token INFO [ssh] worker1:22: writing join token INFO [ssh] worker2:22: writing join token INFO [ssh] worker1:22: installing k0s worker INFO [ssh] worker2:22: installing k0s worker INFO [ssh] worker1:22: starting service INFO [ssh] worker2:22: starting service INFO [ssh] worker1:22: waiting for node to become ready INFO [ssh] worker2:22: waiting for node to become ready Once complete, you will see this: Install kubectl You may need to install kubectl on the workspace to help you manage the cluster with ease. Download the binary file and install it with the command: curl -LO "https://storage.googleapis.com/kubernetes-release/release/$(curl -s https://storage.googleapis.com/kubernetes-release/release/stable.txt)/bin/linux/amd64/kubectl" chmod +x kubectl sudo mv kubectl /usr/local/bin/ /bin Verify the installation: $ kubectl version --client Client Version: version.InfoMajor:"1", Minor:"24", GitVersion:"v1.24.4", GitCommit:"95ee5ab382d64cfe6c28967f36b53970b8374491", GitTreeState:"clean", BuildDate:"2022-08-17T18:54:23Z", GoVersion:"go1.18.5", Compiler:"gc", Platform:"linux/amd64" Kustomize Version: v4.5.4 To be able to access the cluster with kubectl, you need to get the kubeconfig file and set the environment. k0sctl kubeconfig > kubeconfig export KUBECONFIG=$PWD/kubeconfig Now get the nodes in the cluster: $ kubectl get nodes NAME STATUS ROLES AGE VERSION worker1.computingpost.com Ready 7m59s v1.24.3+k0s worker2.computingpost.com Ready 7m59s v1.24.3+k0s The above command will only list the worker nodes. This is because K0s ensures that the controllers and workers are isolated.
Get all the pods running: $ kubectl get pods --all-namespaces NAMESPACE NAME READY STATUS RESTARTS AGE kube-system coredns-88b745646-djcjh 1/1 Running 0 11m kube-system coredns-88b745646-v9vfn 1/1 Running 0 9m34s kube-system konnectivity-agent-8bm85 1/1 Running 0 9m36s kube-system konnectivity-agent-tsllr 1/1 Running 0 9m37s kube-system kube-proxy-cdvjv 1/1 Running 0 9m37s kube-system kube-proxy-n6ncx 1/1 Running 0 9m37s kube-system kube-router-fhm65 1/1 Running 0 9m37s kube-system kube-router-v5srj 1/1 Running 0 9m36s kube-system metrics-server-7d7c4887f4-gv94g 0/1 Running 0 10m Step 4 – Advanced K0sctl File Configurations Once a cluster has been deployed, the default configuration file for the cluster is created. To view the file, access the file, use the command below on the control plane: # k0s default-config > /etc/k0s/k0s.yaml The file looks as shown: # cat /etc/k0s/k0s.yaml # generated-by-k0sctl 2022-08-20T11:57:29+02:00 apiVersion: k0s.k0sproject.io/v1beta1 kind: ClusterConfig metadata: creationTimestamp: null name: k0s spec: api: address: 192.168.205.16 k0sApiPort: 9443 port: 6443 sans: - 192.168.205.16 - fe80::e4f8:8ff:fede:e1a5 - master - 127.0.0.1 tunneledNetworkingMode: false controllerManager: extensions: helm: charts: null repositories: null storage: create_default_storage_class: false type: external_storage images: calico: cni: image: docker.io/calico/cni version: v3.23.3 kubecontrollers: image: docker.io/calico/kube-controllers version: v3.23.3 node: image: docker.io/calico/node version: v3.23.3 coredns: image: k8s.gcr.io/coredns/coredns version: v1.7.0 default_pull_policy: IfNotPresent konnectivity: image: quay.io/k0sproject/apiserver-network-proxy-agent version: 0.0.32-k0s1 kubeproxy: image: k8s.gcr.io/kube-proxy version: v1.24.3 kuberouter: cni: image: docker.io/cloudnativelabs/kube-router version: v1.4.0 cniInstaller: image: quay.io/k0sproject/cni-node version: 1.1.1-k0s.0 metricsserver: image: k8s.gcr.io/metrics-server/metrics-server version: v0.5.2 pushgateway: image: quay.io/k0sproject/pushgateway-ttl version: edge@sha256:7031f6bf6c957e2fdb496161fe3bea0a5bde3de800deeba7b2155187196ecbd9 installConfig: users: etcdUser: etcd kineUser: kube-apiserver konnectivityUser: konnectivity-server kubeAPIserverUser: kube-apiserver kubeSchedulerUser: kube-scheduler konnectivity: adminPort: 8133 agentPort: 8132 network: calico: null clusterDomain: cluster.local dualStack: kubeProxy: mode: iptables kuberouter: autoMTU: true mtu: 0 peerRouterASNs: "" peerRouterIPs: "" podCIDR: 10.244.0.0/16 provider: kuberouter serviceCIDR: 10.96.0.0/12 podSecurityPolicy: defaultPolicy: 00-k0s-privileged scheduler: storage: etcd: externalCluster: null peerAddress: 192.168.205.16 type: etcd telemetry: enabled: true status: You can modify the file as desired and then apply the changes made with the command: sudo k0s install controller -c The file can be modified if the cluster is running. But for the changes to apply, restart the cluster with the command: sudo k0s stop sudo k0s start Configure Cloud Providers The K0s-managed Kubernetes doesn’t include the built-in cloud provider service. You need to manually configure and add its support. There are two ways of doing this:
Using K0s Cloud Provider K0s provides its own lightweight cloud provider that can be used to assign static external IP to expose the worker nodes. This can be done using either of the commands: #worker sudo k0s worker --enable-cloud-provider=true #controller sudo k0s controller --enable-k0s-cloud-provider=true After this, you can add the IPv4 and IPv6 static node IPs: kubectl annonate node k0sproject.io/node-ip-external= Using Built-in Cloud Manifest Manifests allow one to run the cluster with preferred extensions. Normally, the controller reads the manifests from /var/lib/k0s/manifests This can be verified from the control node: $ ls -l /var/lib/k0s/ total 12 drwxr-xr-x. 2 root root 120 Aug 20 11:57 bin drwx------. 3 etcd root 20 Aug 20 11:57 etcd -rw-r--r--. 1 root root 241 Aug 20 11:57 konnectivity.conf drwxr-xr-x. 15 root root 4096 Aug 20 11:57 manifests drwxr-x--x. 3 root root 4096 Aug 20 11:57 pki With this option, you need to create a manifest with the below syntax: --- apiVersion: v1 kind: ServiceAccount metadata: name: cloud-controller-manager namespace: kube-system --- apiVersion: rbac.authorization.k8s.io/v1 kind: ClusterRoleBinding metadata: name: system:cloud-controller-manager roleRef: apiGroup: rbac.authorization.k8s.io kind: ClusterRole name: cluster-admin subjects: - kind: ServiceAccount name: cloud-controller-manager namespace: kube-system --- apiVersion: apps/v1 kind: DaemonSet metadata: labels: k8s-app: cloud-controller-manager name: cloud-controller-manager namespace: kube-system spec: selector: matchLabels: k8s-app: cloud-controller-manager template: metadata: labels: k8s-app: cloud-controller-manager spec: serviceAccountName: cloud-controller-manager containers: - name: cloud-controller-manager # for in-tree providers we use k8s.gcr.io/cloud-controller-manager # this can be replaced with any other image for out-of-tree providers image: k8s.gcr.io/cloud-controller-manager:v1.8.0 command: - /usr/local/bin/cloud-controller-manager - --cloud-provider=[YOUR_CLOUD_PROVIDER] # Add your own cloud provider here! - --leader-elect=true - --use-service-account-credentials # these flags will vary for every cloud provider - --allocate-node-cidrs=true - --configure-cloud-routes=true - --cluster-cidr=172.17.0.0/16 tolerations: # this is required so CCM can bootstrap itself - key: node.cloudprovider.kubernetes.io/uninitialized value: "true" effect: NoSchedule # this is to have the daemonset runnable on master nodes # the taint may vary depending on your cluster setup - key: node-role.kubernetes.io/master effect: NoSchedule # this is to restrict CCM to only run on master nodes # the node selector may vary depending on your cluster setup nodeSelector: node-role.kubernetes.io/master: "" Step 5 – Deploy an Application on k0s To test if the cluster is working as desired, we will create a deployment for the Nginx application: The command below can be used to create and apply the manifest: kubectl apply -f -
0 notes
Text
CKA, CKAD or CKS: which Kubernetes Certification is best for your career?
Nowadays, Kubernetes is defined as one of the most sought-after skills that are quite popular in the IT industry. The Kubernetes Certification in Ahmedabad includes CKAD, CKA, or CKS, which is one of the hottest certifications in the IT sector. The Kubernetes certifications are basically practical hands-on exams that are very different from the typical certifications.
If you want career growth in the IT sector, then you need to spend your time in hands-on exams practices. It cannot be said which one is right for you, but you can choose the right Kubernetes course in Ahmedabad by yourself by knowing the similarities and dissimilarities between these.
Similarities between CKAD, CKA, and CKS
The Kubernetes Training in Ahmedabad provides CKAD, CKA, and CKS that complement each other based on usability and its role.
· In all the exams, the Kubernetes Core Concepts are compulsory, which is the foundation of everything.
· The CKAD and CKA exams State Persistence topics are also more significant as storage is widely concerned.
· The CKS and CKA have a common cluster monitoring system.
· In the aspect of networking and services, both CKAD and CKA share the same topics as both require an administrator and developer.
· You can also find similarities in CKAD and CKA exams in terms of pod designing.
· All these three exams take 2 hours to complete.
· The Kubernetes certification is defined to be cluster creation and configuration, which is one of the most important aspects.
· You can get one free retake and pay $300 for appearing in all the exams.
· An additional tab can also be opened with documentation located on GitHub and Kubernetes io at the time of all exams.
Dissimilarities between CKAD, CKA, and CKS
· CKA gives focus on the Kubernetes internals like kubelet, etcd, and tls bootstrap as its role requires familiarity with all the administrative skills.
· The CKAD examines the topics of Multi-Container Pods and Kubernetes Pod Designing that the other two do not examine.
· Unlike CKAD, the CKA exams give emphasis on scheduling and work loading.
· The CKA exam also highlights the actual cluster administrator like setting up networking, installing or configuring a cluster, setting up storage, and many more.
After knowing these similarities and dissimilarities, it becomes easy for you to take the right decision for your career.
Highsky IT Solutions
is offering Kubernetes Certification-CKA, CKAD or CKS along with a
Linux Administration Course in Ahmedabad
. You can contact the toll-free number to know more details about the exam and courses.
#Linux Certification Ahmedabad#Data Science Training Ahmedabad#Linux Online Courses in Ahmedabad#Red hat Certification Ahmedabad#RHCE RHCSA Training Ahmedabad#Cloud Computing Training in Ahmedabad#Microsoft Azure Cloud Certification#Red Hat Training Ahmedabad#Ansible Certification#Docker Training Ahmedabad#AWS Security Training Ahmedabad
0 notes
Text
heptio ark k8s cluster backups
How do we use it? (in this example, i am using microsoft azure's cloud)
Prepare some cloud storage
Create a storage account and a blob container in the same subscription and resource group as the k8s cluster you want to be running backups on.
$ az storage account create \ --name $AZURE_STORAGE_ACCOUNT_ID \ --resource-group $RESOURCE_GROUP \ --sku Standard_LRS \ --encryption-services blob \ --https-only true \ --kind BlobStorage \ --access-tier Cool \ --subscription $SUBSCRIPTION $ az storage container create \ -n $STORAGE_RESOURCE_NAME \ --public-access off \ --account-name $AZURE_STORAGE_ACCOUNT_ID \ --subscription $SUBSCRIPTION
Get the storage account access key.
$ AZURE_STORAGE_KEY=`az storage account keys list \ --account-name $AZURE_STORAGE_ACCOUNT_ID \ --resource-group $RESOURCE_GROUP \ --query '[0].value' \ --subscription $SUBSCRIPTION \ -o tsv`
Create a service principle with appropriate permissions for heptio ark to use to read and write to the storage account.
$ az ad sp create-for-rbac \ --name "heptio-ark" \ --role "Contributor" \ --password $AZURE_CLIENT_SECRET \ --subscription $SUBSCRIPTION
Finally get the service principle's id called a client id.
$ AZURE_CLIENT_ID=`az ad sp list \ --display-name "heptio-ark" \ --query '[0].appId' \ --subscription $SUBSCRIPTION \ -o tsv`
Provision ark
Next we provision an ark instance to our kubernetes cluster with a custom namespace. First clone the ark repo
$ git clone https://github.com/heptio/ark.git
You will need to edit 3 files.
ark/examples/common/00-prereqs.yaml ark/examples/azure/00-ark-deployment.yaml ark/examples/azure/10.ark-config.yaml
In these yamls, it tries to create a namespace called "heptio-ark" and then put things into that namespace. Change all of these references to a namespace you prefer. I called it "my-groovy-system".
In the 10.ark-config.yaml, you also need to replace the placeholders YOUR_TIMEOUT & YOUR_BUCKET with some actual values. in our case, we use: 15m and the value of $STORAGE_RESOURCE_NAME, which in this case is ark-backups.
Create the pre-requisites.
$ kubectl apply -f examples/common/00-prereqs.yaml customresourcedefinition "backups.ark.heptio.com" created customresourcedefinition "schedules.ark.heptio.com" created customresourcedefinition "restores.ark.heptio.com" created customresourcedefinition "configs.ark.heptio.com" created customresourcedefinition "downloadrequests.ark.heptio.com" created customresourcedefinition "deletebackuprequests.ark.heptio.com" created customresourcedefinition "podvolumebackups.ark.heptio.com" created customresourcedefinition "podvolumerestores.ark.heptio.com" created customresourcedefinition "resticrepositories.ark.heptio.com" created namespace "my-groovy-system" created serviceaccount "ark" created clusterrolebinding "ark" created
Create a secret object, which contains all of the azure ids we gathered in part 1.
$ kubectl create secret generic cloud-credentials \ --namespace my-groovy-system \ --from-literal AZURE_SUBSCRIPTION_ID=$SUBSCRIPTION \ --from-literal AZURE_TENANT_ID=$TENANT_ID \ --from-literal AZURE_RESOURCE_GROUP=$RESOURCE_GROUP \ --from-literal AZURE_CLIENT_ID=$AZURE_CLIENT_ID \ --from-literal AZURE_CLIENT_SECRET=$AZURE_CLIENT_SECRET \ --from-literal AZURE_STORAGE_ACCOUNT_ID=$AZURE_STORAGE_ACCOUNT_ID \ --from-literal AZURE_STORAGE_KEY=$AZURE_STORAGE_KEY secret "cloud-credentials" created
Provision everything.
$ kubectl apply -f examples/azure/ $ kubectl get deployments -n my-groovy-system NAME DESIRED CURRENT UP-TO-DATE AVAILABLE AGE ark 1 1 1 1 1h $ kubectl get pods -n my-groovy-system NAME READY STATUS RESTARTS AGE ark-7b86b4d5bd-2w5x7 1/1 Running 0 1h $ kubectl get rs -n my-groovy-system NAME DESIRED CURRENT READY AGE ark-7b86b4d5bd 1 1 1 1h $ kubectl get secrets -n my-groovy-system NAME TYPE DATA AGE ark-token-b5nm8 kubernetes.io/service-account-token 3 1h cloud-credentials Opaque 7 1h default-token-xg6x4 kubernetes.io/service-account-token 3 1h
At this point the ark server is running. To interact with it, we need to use a client.
Install the Ark client locally
Download one from here and unzip it and add it to your path. Here's a mac example:
$ wget https://github.com/heptio/ark/releases/download/v0.9.3/ark-v0.9.3-darwin-amd64.tar.gz $ tar -xzvf ark-v0.9.3-darwin-amd64.tar.gz $ mv ark /Users/mygroovyuser/bin/ark $ ark --help
Take this baby for a test drive
Deploy an example thing. Ark provides something to try with.
$ kubectl apply -f examples/nginx-app/base.yaml
This creates a namespace called nginx-example and creates a deployment and service inside with a couple of nginx pods.
Take a backup.
$ ark backup create nginx-backup --include-namespaces nginx-example --namespace my-groovy-system Backup request "nginx-backup" submitted successfully. Run `ark backup describe nginx-backup` for more details. $ ark backup get nginx-backup --namespace my-groovy-system NAME STATUS CREATED EXPIRES SELECTOR nginx-backup Completed 2018-08-21 15:57:59 +0200 CEST 29d
We can see in our Azure storage account container a backup has been created by heptio ark.
If we look inside the folder, we see some json and some gzipped stuff
Let's simulate a disaster.
$ kubectl delete namespace nginx-example namespace "nginx-example" deleted
And try to restore from the Ark backup.
$ ark restore create --from-backup nginx-backup --namespace my-groovy-system Restore request "nginx-backup-20180821160537" submitted successfully. Run `ark restore describe nginx-backup-20180821160537` for more details. $ ark restore get --namespace my-groovy-system NAME BACKUP STATUS WARNINGS ERRORS CREATED SELECTOR nginx-backup-20180821160537 nginx-backup Completed 0 0 2018-08-21 16:05:38 +0200 CEST
Nice.
And to delete backups...
$ ark backup delete nginx-backup --namespace my-groovy-system Are you sure you want to continue (Y/N)? Y Request to delete backup "nginx-backup" submitted successfully. The backup will be fully deleted after all associated data (disk snapshots, backup files, restores) are removed. $ ark backup get nginx-backup --namespace my-groovy-system An error occurred: backups.ark.heptio.com "nginx-backup" not found
And its gone.
2 notes
·
View notes
Text
オンプレミス Kubernetes デプロイモデル比較
from https://qiita.com/tmurakam99/items/b27d1055f7c881a03ba0
各種 Kubernetes ディストリビューションの、オンプレミス向けデプロイモデル・アーキテクチャを比較してみました。概ね、私がデプロイを試してみたもの中心です。 なお各ディストリビューションはクラウド向けのデプロイにも対応していたりますが、本記事はオンプレ部分のみ記載するのでクラウドデプロイはばっさり省略します。
私の勝手な分類ですが、大きく分けると以下のようになります。
a) SW on Linux タイプ
b) Docker タイプ
c) 独自 OS タイプ
d) VM タイプ
a) SW on Linux タイプ
Linux をインストールしたノードを用意し、この上にソフトウェアとしてインストールするタイプです。一番基本といえる形だと思います。
特徴としては、kubelet が Linux 上のデーモンとして起動し、それ以外のコンポーネントは Kubelet からコンテナとして起動されるという形になります。
Kubeadm
Kubeadm では、利用者が Linux OS とコンテナランタイム(Docker, containerd, cri-o など)、および kubelet のインストールまで行っておく必要があります。そのあと kubeadm を実行することによって、Control Plane, Worker の各コンポーネントをデプロイ、kubelet により起動されます。
Kubeadm を使う場合は、利用者が全ノードに kubeadm をインストールしてそれぞれのノードでデプロイ作業を実行する必要があるので、台数が多いと大変です。
Kubespray
Kubespray では、Ansible を使って各ノードに対して一斉にデプロイを実施します。Kubespray は内部で Kubeadm を使っているので、構成は Kubeadm を使った場合と基本的に同じです (etcd が kubelet 起動でないとか細かい違いはありますが)。
コンテナランタイムや kubelet のデプロイもやってくれるので、利用者が事前にやっておくのは Linux のインストールと ssh でログインできるようにしておくこと、sudo 使えるようにしておくこと、くらいです。
軽量ディストリビューション
以下軽量ディストリビューションも a) に分類できるかと思います。
b) Docker タイプ
Docker に依存するタイプです。実際のところ MKE や RKE は Linux には依存しているので、この分類はちょっと無理があるかもしれません。一応、kubelet が Docker の中で動くか、という観点で分類してみました。
kind (Kubernetes in Docker)
kind はその名の通り Docker コンテナ内で Kubernetes を動作させます。Docker コンテナ1つがノード(VM)1つ、というイメージです。
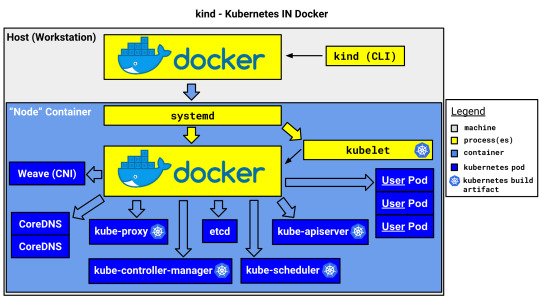
kind は開発・テスト用で、本番環境で使うものではありません。マルチノードクラスタに対応していますが、これは1つの物理or仮想マシン上で複数のVM(ノードコンテナ)をエミュレートできるという意味で、複数のマシンに跨ってクラスタを構成できるわけではありません。
MKE (Mirantis Kubernetes Engine)
MKE は Docker EE を買収した Mirantis の製品です。インストール手順はこちら
launchpad CLI から全ノードに対して ssh でログインして一斉にデプロイ可能で、Docker EE (MCR) のインストール、k8s のデプロイが実施されます。
RKE (Rancher Kubernetes Engine)
RKE は Rancher 社の製品です。
rke up コマンドで全ノードに対して ssh でログインして一斉にデプロイします。MKE と違い、Docker は事前にインストールしておかなければなりません。
なお、RKE の操作は CLI オンリーですが、Rancher Server を使用するとRKEクラスタ含む各種 Kubernetes クラスタの管理を GUI で行うことができます。
なお、上記は RKE1 の話で、RKE2 からは Docker には依存せず、containerd ベースになるようです。また Control plane は kubelet から static Pod として起動する形になるようです。
本題とずれますが Rancher/RKE は 100% OSS なのが良いです。他の商用製品は評価用はありますが本番で使うならライセンス購入が必要です。
c) 独自 OS タイプ
a), b) は OS は利用者が用意したものを使用しますが、このタイプは Kubernetes を動作させる OS 自体がディストリビューションに含まれているのが特徴です。
OCP (OpenShift Container Platform)
OCP はRedHat 社の製品 (OpenSource の OKD もあります)。OS には RedHat Core OS が使われています。
ベアメタルにインストールする場合は、物理マシンに Core OS をインストールし、この上に OpenShift をインストールすることになります。 ベアメタルにインストールする手順は ここにあります。インストール方法は以下の2通り。
IPI (Installer Provisioned Infrastructure)
インストーラが自動でインフラを構築する方法
各ノードをPXEブート(ネットワークブート)させ OS インストールする
UPI(User Provisioned Infrastructure)
ユーザが事前に用意してから構築する方法
ユーザが Core OS の CD-ROM を用意して各ノードをブートする
どちらの方法でも外部にプロビジョニング用のマシン、DHCPサーバ、DNSサーバなど用意しなければならないので準備が大変です。
d) VM タイプ
Kubernetes を稼働させるために専用の VM をデプロイするタイプです。
Minikube
Minikube は、Kubernetesが入った VM を立てるタイプです。Hyper-V や VirtualBox, VMware が使えます。また Docker も使えるので b) もできます。
なお、マルチノードクラスタは構成できません。シングルのみです。
Charmed Kubernetes
Charmed Kubernetes は Ubuntu で有名な Canonical の製品。
インストール方法は何通りかあるのですが、シングルノードにインストールするときは LXD を使って VM を立ててデプロイするという形になります。デプロイ用のツールは Juju というものを使います。
マルチノードデプロイする方法としては MAAS(Metal as a Service) を使うようです。これはローカルにクラウド環境を構築するようなものなので、VMware vSphere に似ている感じです(試してはいないですが)
VMware vSphere with Tanzu
VMware vSphere with Tanzu は VMware 社の製品。仮想化基盤の vSphere を用意し、その上に Kubernetes 用の VM を立てるという方式になります。VM 内で動作する OS は Photon OS なので、ある意味 c) にも近いとも���えます。
物理ノードにハイパーバイザの ESXi をインストールし、この上に VM を立てます。クラスタノード全体の管理には vCenter Server を使います。⇒ アーキテクチャ
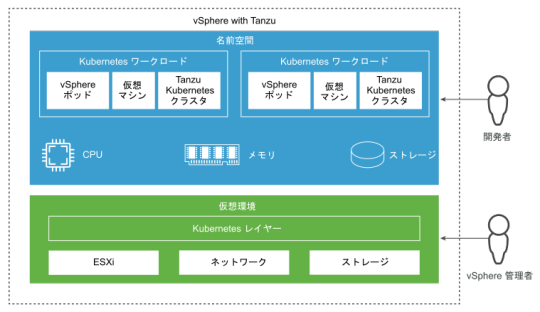
すでに vSphere を導入しているところに立てる場合は良さげですが、オンプレ Kubernetes クラスタ1個だけのためにこれを使うのはさすがに(運用が)重いかな、という印象。
https://qiita-user-contents.imgix.net/https%3A%2F%2Fcdn.qiita.com%2Fassets%2Fpublic%2Farticle-ogp-background-1150d8b18a7c15795b701a55ae908f94.png?ixlib=rb-4.0.0&w=1200&mark64=aHR0cHM6Ly9xaWl0YS11c2VyLWNvbnRlbnRzLmltZ2l4Lm5ldC9-dGV4dD9peGxpYj1yYi00LjAuMCZ3PTg0MCZoPTM4MCZ0eHQ2ND00NEtxNDRPejQ0T1g0NE9zNDRPZjQ0SzVJRXQxWW1WeWJtVjBaWE1nNDRPSDQ0T1g0NE90NDRLazQ0T2k0NE9INDRPcjVxLVU2THlEJnR4dC1jb2xvcj0lMjMzMzMmdHh0LWZvbnQ9SGlyYWdpbm8lMjBTYW5zJTIwVzYmdHh0LXNpemU9NTQmdHh0LWNsaXA9ZWxsaXBzaXMmdHh0LWFsaWduPWNlbnRlciUyQ21pZGRsZSZzPWNkZDZkNmJlZjBiNTM5MmUwYzE3ZjUxYzljOWY4Yjk0&mark-align=center%2Cmiddle&blend64=aHR0cHM6Ly9xaWl0YS11c2VyLWNvbnRlbnRzLmltZ2l4Lm5ldC9-dGV4dD9peGxpYj1yYi00LjAuMCZ3PTg0MCZoPTUwMCZ0eHQ2ND1RSFJ0ZFhKaGEyRnRPVGsmdHh0LWNvbG9yPSUyMzMzMyZ0eHQtZm9udD1IaXJhZ2lubyUyMFNhbnMlMjBXNiZ0eHQtc2l6ZT00NSZ0eHQtYWxpZ249cmlnaHQlMkNib3R0b20mcz02NTE0ZTc3OTU1ODllZTg1NmQzZDI5MGU4ODc5NmU4NQ&blend-align=center%2Cmiddle&blend-mode=normal&s=fea070b2c5c5d84e1587a7132daaec13
1 note
·
View note
Text
What are the resources and the ways to learn Docker and Kubernetes?
There are lots of sources out there about “getting” and mastering Kubernetes. Unfortunately, not all of them are actually helpful, to-the-point and worth your time. As with Docker, the Kubernetes industry is very well-known and moving extremely fast. There’s a lot of disturbance, outdated material, company bias and badly informed advice. Here’s a hand-picked choice of great sources for various factors of getting started with Docker and Kubernetes! 1. There’s a course offering an "Introduction to Kubernetes".
2. The "Kubernetes Fundamentals" program is quite a good and will carry you pretty far in direction of the certification chance. Be sure to generally do the exercises :)
3.“The best way to learn Docker for Free: Play-With-Docker (PWD)”
If you want to Learn Docker and Kubernetes with Real-time Projects with Clear Explanation Contact Visualpath. They will Provide Docker and Kubernetes online and Classroom Training with Real Time Projects.
What Will They Cover In this Course:Docker Engine:Docker OverviewDocker ArchitectureImages and layersUnderlying technology of Docker like namespaces, cgroups etc.,Docker CE Vs Docker EE and supported platformsPulling images from Docker registry The Docker HubDocker Engine Installation on Linux Servers (CentOS/Ubuntu)Docker commandsImages, ps, pull, push, run, create, commit, attach, exec, cp, rm, rmi, login, export, import, pause, unpause, system, volumes, build, rename, save, tag, network, logs, port, search, history Docker network
Container volume managementCreating custom network (bridge)Building custom images using Dockerfile and through container and pushing to the Docker hubCreating containers with limited resources (CPU, memory etc.,)Building apache with mysql database storage using DockerfileAssigning/remove multiple network to the running container.Selecting storage driver for the Docker EngineSetting limit on the resource like CPU, memory for running containerSetup and configure universal control plane(UCP) and docker trusted repository (DTR)Container lifecycleUnderstanding Docker Machine and Docker Swarm (Cluster).Setting up swarm (Configure manager)Setting up nodes (Adding nodes to the manager)Managing applications in Swarm with serviceReplication in SwarmDemonstrate the usage of templates with “docker service create”Identify the steps needed to troubleshoot a service not deployingDescribe How Storage and Volumes Can Be Used Across Cluster Nodes for Persistent Storage Kubernetes Orchestration:Difference between Docker Swarm and Kubernetes OrchestrationKubernetes overviewKubernetes ArchitectureUnderstanding the underlying concept of Kubernetes OrchestrationDesigning a kubernetes clusterhardware and underlying infrastructureService running on manage node and minionsOverview of pods, replication, deployment, service, endpointsDeploying the application through PODsBuilding multiple pods with high availabilityRolling updates of the Pods with the DeploymentKubernetes underlying network like overlay network with flannel, etcd etc.,Storage types in KubernetesUpgrading kubernetes componentsTroubleshooting in kubernetesNote: Practical examples on above scenarios like building applications mysql, wordpress etc.,
1 note
·
View note
Text
Kubernetes Installation Options: The Hard Way, Kubedm, MiniKube, Managed K8s (EKS, AKS, OKE, GKE)
Kubernetes The Most difficult Way is improved for realizing, which means taking the long course to guarantee you see each errand needed to bootstrap a Kubernetes Installation Options . This is for somebody intending to help a creation Kubernetes bunch and needs to see how everything fits together. This isn't for individuals searching for a completely robotized order to raise a Kubernetes group. The guide utilizes the Programming interface worker authentication for etcd as it utilizes a stacked etcd design. We will create separate endorsements and keys for etcd as we are running an outer etcd arrangement.
We will put the etcd group behind a heap balancer that gives us numerous benefits.
The etcd hubs can have transient IPs.
You can add and eliminate etcd hubs as indicated by your prerequisites.
NGINX gives an auto wellbeing check of its back-end individuals, and it would not send traffic to an unfortunate etcd occasion staying away from runtime issues.
You don't have to refresh the control plane setup on the off chance that you make changes to the etcd bunch, (for example, adding or eliminating etcd hubs).
We will permit just the ideal traffic and square the remainder of it. That is needed to shield our bunch from unapproved access. We will encode privileged insights very still on the etcd group as proposed in the first guide.
0 notes
Link
The primary pieces of an oneinfra installation are "hypervisors", cluster abstractions, and components. A hypervisor machine must be running a Container Runtime Interface (CRI) implementation. A cluster abstraction represents a Kubernetes cluster, including the control plane and its ingresses. There are other components - belonging to the control plane and control plane ingress - that run on top of these. The control plane components include typical Kubernetes master node pieces - etcd, API server, Scheduler etc, whereas the ingress components include haproxy and a VPN endpoint. oneinfra can create different clusters with different versions in a declarative way, allowing one to use different Kubernetes versions at the same time. It is similar to an open source GKE or EKS.
InfoQ got in touch with Rafael Fernández López, Software Architect and author of oneinfra, to find out more about this project.
According to López, the main gap that oneinfra fills is "to provide a very simple system to set up, that allows you to create and destroy isolated Kubernetes control planes at will, without the need of creating dedicated infrastructure for them". oneinfra can use underlying infrastructure and machines from various cloud providers, including bare metal instances, to create the control plane instances. López explains some best practices around this:
You can use different cloud providers for creating your control plane instances. However, there are operational challenges when it comes to splitting a single control plane across different public clouds or service providers, and so the recommendation is to place all components for a control plane on the same service provider, but nothing stops you from being able to create different control planes on different service providers.

Image courtesy - https://github.com/oneinfra/oneinfra (used with permission)
A hypervisor in oneinfra parlance is a "physical or virtual machine where oneinfra will create the control plane components". A hypervisor node in oneinfra has to have a Container Runtime Interface (CRI) implementation running. A hypervisor can be "public" and run the ingress components, or be "private" and run the control plane components. A service wrapper over the CRI implementation is required on a hypervisor node to connect to oneinfra. López explains that this process will become easier in future versions:
It is part of the roadmap to ease the way you create new hypervisors -- something like a `oi hypervisor join` command will be added, akin to the current `oi node join` command. The latter talks to a managed cluster in order to join it, whereas the former will talk to the management cluster and join as an hypervisor.
The system has a "reconciler" module - which is a set of controllers that does a number of things. It schedules control plane components on hypervisors, and creates ones that are defined but missing. It also deletes control plane components that were deleted by the user - thus bringing the system to the desired state. The reconciler handles worker node join requests against managed clusters and ensures that RBAC rules are correctly set up.
The current architecture has each control plane instance isolated - so Kubernetes master node software like etcd cannot be shared, or replaced by another persistence layer. Performance aspects like benchmarking how many control planes can fit in one hypervisor also need to be worked out, says López. Another future improvement is the ability for worker nodes to be on heterogenous networks.
The oneinfra source code is available on GitHub.
0 notes
Text
Grab the bull by the horns: Rancher 2.3a
Rancher have long been a peripheral player in the container space for me. There has not been any crossroads where we’d meet and share war stories or joint opportunities. Recently I’ve become an indirect fan boi by admiring their two recent projects K3s and Submariner. I’ve known a while the that their homegrown orchestrator (Cattle) was getting an makeover in favor of Kubernetes. So, what is this Rancher thing about and what can it do besides moo I've started asking myself?
Rancher
Based on what I’ve read and seen up to prior to installing (I’ve attended a few webinars) is that Rancher 2.x itself is an application that manages not only the cluster it runs in but also provisions and manages other clusters, including managed Kubernetes services such as GKE, AKS and EKS. It’s also light on the requirements side of things, all it needs is a supported version of Docker. All the way back to Docker 1.13.1 for vendor supported Docker from Red Hat which I have installed in my lab.
Given the minuscule host requirements, Rancher also has it’s own purposed built Linux distribution called RancherOS (Not to be confused with Huevos Rancheros). I have not had a chance to take RancherOS for a spin yet as my POC is based on Red Hat. Rancher recently launched another Kubernetes project that tangents to RancherOS called k3OS, which promises a running k3s cluster up and running in under 10 seconds (mind blown...). This I definitely want to take for a spin!
Gunning for RKE
Now, the task at hand here is to deploy Rancher in an HA configration and have Rancher deploy another cluster for my applications. I didn’t have a compatible IaaS provider in my lab so I just provisioned a handful of KVM VMs and installed a supported version of Docker on them (from the Red Hat extras repo). Installing with the HA option cobbles together a Kubernetes cluster based on the Rancher Kubernetes Engine (RKE). RKE has a simple CLI utility where you simply declare your cluster in a YAML file and run rke up. Thats. It. For reference:
--- nodes: - address: tme-lnx7-taco user: mmattsson role: [controlplane,worker,etcd] - address: tme-lnx8-taco user: mmattsson role: [controlplane,worker,etcd] - address: tme-lnx9-taco user: mmattsson role: [controlplane,worker,etcd] services: etcd: snapshot: true creation: 6h retention: 24h
What you might squint at here is the fact that I’m squishing control plane, workers and the etcd cluster on the same set of nodes. That’s perfectly fine in this case as I won’t run any workloads on this cluster besides Rancher. Very modestly configured VMs with 8 vCPU, 120GB of disk and 8GB of RAM.
The RKE installer will spit out a kubeconfig in your current directory and you can immediately start using the cluster.
$ kubectl get nodes NAME STATUS ROLES AGE VERSION tme-lnx7-taco Ready controlplane,etcd,worker 15m v1.14.3 tme-lnx8-taco Ready controlplane,etcd,worker 15m v1.14.3 tme-lnx9-taco Ready controlplane,etcd,worker 15m v1.14.3
The next steps include installing Helm and Tiller. I’d refer to the minutia in the official docs but one thing I wanted point out here is if you wanted to run the 2.3 alpha, you need to specify the specific version when deploying the chart.
$ helm install rancher-alpha/rancher \ --name rancher \ --namespace cattle-system \ --set hostname=rancher.tacos.datamattsson.io \ --version=2.3.0-alpha5
My hostname points to a L4 load-balancer that in turn points to my nodes (port 80 and 443) in the initial Rancher cluster. This can also be achieved with round-robin DNS for lab setups.
Once the chart is deployed, you’ll be able to login to the Rancher UI via the hostname provided (your view will differ as the "first login” dance require you to set a password):

Day 2 cluster
Quickly riffing through the tabs I immediately found the “Add Cluster” button. Since I’m installing BYOD-style I simply selected “custom” and Rancher generates a docker command-line to paste into your nodes, simply by selecting the role it'll add the appropriate flags to the command-line text blob you conveniently copy out of the UI.

As nodes start to come online they immediately become available in the UI. So you get immediate feedback what you're doing is working. Once completed, the cluster will show up as a drop-down upper left tab. This is the landing page a few minutes later:

Conveniently enough you immediately have access to a kube-cuddle terminal in the browser window. I’m always sceptic against these sort of things but I could inspect my nodes and deploy workloads from external resources right off the bat. And, drum roll, scrolling, selecting text, copying and pasting, WORKS!

The Grand Tour
Baffled by how simple it was getting to where I am, I wasn’t very surprised finding very elaborate and visually pleasing configuration for apps, monitoring, logging, notifications & alerts, user management & RBAC and persistent storage. Each of these topics warrant their own blog post so I will save these for a rainy day.
Watch this space. Moo!
0 notes
Text
Kubernetes
Kubernetes 를 공부하면서 했던 메모.
Kubernetes
今こそ始めよう!Kubernetes 入門
History
Google 사내에서 이용하던 Container Cluster Manager “Borg” 에 착안하여 만들어진 Open Source Software (OSS)
2014년 6월 런칭
2015년 7월 version 1.0.
version 1.0 이후 Linux Foundation 의 Could Native Computing Foundation (CNCF) 로 이관되어 중립적 입장에서 개발
version 1.7 Production-Ready
De facto standard
2014년 11월 Google Cloud Platform (GCP) 가 Google Container Engine (GKE, 후에 Google Kuebernetes Engine) 제공 시작
2017년 2월 Microsoft Azure 가 Azure Container Service (AKS) 릴리즈
2017년 11월 Amazon Web Service (AWS) 가 Amazon Elastic Container Service for Kubernetese (Amazon EKS) 릴리즈
Kubernetes 로 가능한 일
Docker 를 Product 레벨에서 이용하기 위해서 고려해야 했던 점들
복수의 Docker Host 관리
Container 의 Scheduling
Rolling-Update
Scaling / Auto Scaling
Monitoring Container Live/Dead
Self Healing
Service Discovery
Load Balancing
Manage Data
Manage Workload
Manage Log
Infrastructure as Code
그 외 Ecosystem과의 연계와 확장
위 문제들을 해결하기 위해 Kubernetes 가 탄생
Kubernetes 에서는 YAML 형식 manifesto 사용
apiVersion: extensions/v1beta1 kind: Deployment metadata: name: sample-deployment spec: replicas: 3 selector: matchLabels: app: sample-app template: metadata: labels: app: sample-app spec: containers: - name: nginx-container image: nginx:latest ports: - containerPort: 80 ` **Kubernets 는,**
복수의 Docker Host 를 관리해서 container cluster 를 구축
같은 container 의 replica 로 실행하여 부하 분산과 장애에 대비 가능
부하에 따라 container 의 replica 수를 조절 (auto scaling) 가능
Disk I/O, Network 통신량 등의 workload 나 ssd, cpu 등의 Docker Host spec에 따라서 Container 배치가 가능
GCP / AWS / OpenStack 등에서 구축할 경우, availability zone 등의 부가 정보로 간단히 multi region 에 container 배치 가능
기본적으로 CPU, Memory 등의 자원 상황에 따라 scaling
자원 부족 등의 경우 Kubernetes cluster auto scaling 이용 가능
container process 감시
container process 가 멈추면 self healing
HTTP/TCP, Shell Script 등을 이용한 Health Check 도 가능
특정 Container 군에 대해 Load Balancing 적용 가능
기능별로 세분화된 micro service architecture 에 필요한 service discovery 가능
Container 와 Service 의 데이터는 Backend 의 etcd 에 보존
Container 에서 공통적으로 설정이나 Application 에서 사용하는 데이터베이스의 암호 등의 정보를 Kubernetes Cluster 에서 중앙 관리 가능
Kubernetes 를 지원
Ansible : Deploy container to Kubernetes
Apache Ignite : Kubernetes 의 Service Discovery 기능을 이용한 자동 cluster 구성과 scaling
Fluentd : Kubernetes 상의 Container Log 를 전송
Jenkins : Deploy container to Kubernetes
OpenStack : Cloud 와 연계된 Kubernetes 구축
Prometheus : Kubernetes 감시
Spark : job 을 Kubernetes 상에서 Native 실행 (YARN 대체)
Spinnaker : Deploy container to Kubernetes
etc…
Kubernetes 에는 기능 확장이 가능하도록 되어 있어 독자적인 기능을 구현하는 것도 가능
Kubernetes 구축 환경 선택
개인 Windows / Mac 상에 로컬 Kubernetes 환경을 구축
구축 툴을 사용한 cluster 구축
public cloud 의 managed Kubernetes 를 이용
환경에 따라서 일부 이용 불가한 기능도 있으나 기본적으로 어떤 환경에서도 동일한 동작이 가능하도록 CNCF 가 Conformance Program 을 제공
Local Kubernetes
Minikube
VirtualBox 필요 (xhyve, VMware Fusion 도 이용 가능)
Homebrew 등을 이용한 설치 가능
Install
`$ brew update $ brew install kubectl $ brew cask install virtualbox $ brew install minikube `
Run
minikube 기동 시, 필요에 따라 kubernetes 버전을 지정 가능 --kubernetes-version
`$ minikube start —kubernetes-version v1.8.0 `
Minikube 용으로 VirtualBox 상에 VM 가 기동될 것이고 kubectl 로 Minikube 의 클러스터를 조작하는 것이 가능
상태 확인
`$ minikube status `
Minikube cluster 삭제
`$ minikube delete `
Docker for Mac
DockerCon EU 17 에 Docker 사에서 Kubernetes support 발표
Kubernetes 의 CLI 등에서 Docker Swarm 을 조작하는 등의 연계 기능 강화
17.12 CE Edge 버전부터 로컬에 Kubernetes 를 기동하는 것이 가능
Kubernetes 버전 지정은 불가
Docker for Mac 설정에서 Enable Kubernetes 지정
이후 kubectl 로 cluster 조작 가능
`$ kubectl config use-context docker-for-desktop `
kubectl 상에선 Docker Host 가 node로 인식
`$ kubectl get nodes `
Kubernetes 관련 component가 container 로서 기동
`$ docker ps --format 'table {{.Image}}\t{{.Command}}' | grep -v pause `
Kubernetes 구축 Tool
kubeadm
Kubernetes 가 공식적으로 제공하는 구축 도구
여기서는 Ubuntu 16.04 기준으로 기록 (환경 및 필요 버전에 따라 일부 변경 필요함)
준비
`apt-get update && apt-get install -y apt-transport-https curl -s https://package.cloud.google.com/apt/doc/apt-key.gpg | apt-key add - cat /etc/aptsources.list.d/kubernetes.list deb http://apt.kubernetes.io/ kubernetes-xenial main EOF apt-get update apt-get install -y kubelet=1.8.5-00 kubeadm=1.8.5-00 kubectl=1.8.5-00 docker.io sysctl net.bridge.bridge-nf-call-iptables=1 `
Master node 를 위한 설정
--pod-network-cidr은 cluster 내 network (pod network) 용으로 Flannel을 이용하기 위한 설정
`$ kubeadm init --pod-network-cidr=10.244.0.0/16 `
위 설정 명령으로 마지막에 Kubernetes node 를 실행하기 위한 명령어가 출력되며 이후 node 추가시에 실행한다.
`$ kubeadm join --token ... 10.240.0.7:6443 --discovery-token-ca-cert-hash sha256:... `
kubectl 에서 사용할 인증 파일 준비
`$ mkdir -p $HOME/.kube $ sudo cp -i /etc/kubernetes/admin.conf $HOME/.kube/config $ sudo chown $(id -u):$(id -g) $HOME/.kube/config `
Flannel deamon container 기동
`$ kubectl apply -f https://raw.githubusercontent.com/coreos/flannel/v0.9.1/Documentation/kube-flannel.yml `
Flannel 이 외에도 다른 선택이 가능 Installing a pod network add-on
Rancher
Rancher Labs 사
Open Source Container Platform
version 1.0 에서는 Kubernetes 도 서포트 하는 형식
version 2.0 부터는 Kubernetes 를 메인으로
Kubernetes cluster 를 다양한 플랫폼에서 가능 (AWS, OpenStack, VMware etc..)
기존의 Kubernetes cluster 를 Rancher 관리로 전환 가능
중앙집중적인 인증, 모니터링, WebUI 등의 기능을 제공
풍부한 Application Catalog
Rancher Server 기동
`docker run -d --restart=unless-stopped -p 8080:8080 rancher/server:v2.0.0-alpha10 `
이 Rancher Server 에서 각 Kubernetes cluster 의 관리와 cloud provider 연계 등을 수행
etc
Techtonic (CoreOS)
Kubespray
kops
OpenStack Magnum
Public Cloud managed Kubernetes
GKE (Google Kubernetes Engine)
많은 편리한 기능을 제공
GCP (Google Cloud Platform) 와 Integration.
HTTP LoadBalancer (Ingress) 사용 가능
NodePool
GUI or gcloud 명령어 사용
cluster version 간단 update
GCE (Google Compute Engine) 를 사용한 cluster 구축 가능
Container 를 사용하여 Kubernetes 노드가 재생성되어도 서비스에 영향을 미치지 않게 설계 가능
Kubernetes cluster 내부의 node 에 label 을 붙여 Group 화 가능
Group 화 하여 Scheduling 에 이용 가능
cloud 명령어로 cluster 구축
`$ gcloud container clusters create example-cluster `
인증 정보 저장
`$ gcloud container clusters get-credentials example-cluster `
etc
Google Kubernetes Engine
AKS (Azure Container Service)
Azure Container Service
EKS (Elastic Container Service for Kubernetes)
Amazon EKS
Kubernetes 기초
Kubernetes 는 실제로 Docker 이외의 container runtime 을 이용한 host 도 관리할 수 있도록 되어 있다. Kubernetes = Kubernetes Master + Kubernetes Node
Kubernetes Master
Kubernetes Node
API endpoint 제공
container scheduling
container scaling
Docker Host 처럼 실제로 container 가 동작하는 host
Kubernetes cluster 를 조작할 땐, CLI tool 인 kubectl 과 YAML 형식 manifest file 을 사용하여 Kubernetes Master 에 resource 등록 kubectl 도 내부적으로는 Kubernetes Master API 를 사용 = Library, curl 등을 이용한 조작도 가능
Kubernetes & Resource
resource 를 등록하면 비동기로 container 실행과 load balancer 작성된다. Resource 종류에 따라 YAML manifest 에 사용되는 parameter 가 상이
Kubernetes API Reference Docs
Kubernetes Resource
Workloads : container 실행에 관련
Discovery & LB : container 외부 공개 같은 endpoint를 제공
Config & Storage : 설정, 기밀정보, Persistent volume 등에 관련
Cluster : security & quota 등에 관련
Metadata : resource 조작
Workloads
cluster 상의 container 를 기동하기 위해 이용 내부적으로 이용하는 것을 제외한 이용자가 직접 이용하는 것으로는 다음과 같은 종류
Pod
ReplicationController
ReplicaSet
Deployment
DaemonSet
StatefulSet
Job
CronJob
Discovery & LB
container 의 service discovery, endpoint 등을 제공 내부적으로 이용하는 것을 제외한 이용자가 직접 이용하는 것으로는 다음과 같은 종류
Service : endpoint 의 제공방식에 따라 복수의 타입이 존재
Ingress
ClusterIP
NodePort
LoadBalancer
ExternalIP
ExternalName
Haedless
Config & Storage
설정이나 기밀 데이터 등을 container 에 넣거나 Persistent volume을 제공
Secret
ConfigMap
PersistentVolumeClaim Secret 과 ConfigMap 은 key-value 형식의 데이터 구조
Cluster
cluster 의 동작을 정의
Namespace
ServiceAccount
Role
ClusterRole
RoleBinding
ClusterRoleBinding
NetworkPolicy
ResourceQuota
PersistentVolume
Node
Metadata
cluster 내부의 다른 resource 동작을 제어
CustomResourceDefinition
LimitRange
HorizontalPodAutoscaler
Namespace 에 따른 가상 cluster 의 분리
Kubernetes 가상 cluster 분리 기능 (완전 분리는 아님) 하나의 Kubernetes cluster 를 복수 팀에서 이용 가능하게 함 Kubernetes cluster 는 RBAC (Role-Based Access Control) 이 기본 설정으로 Namesapce 를 대상으로 권한 설정을 할 수 있어 분리성을 높이는 것이 가능
초기 상태의 3가지 Namespace
default
kube-system : Kubernetes cluster 의 component와 addon 관련
kube-public : 모두가 사용 가능한 ConfigMap 등을 배치
CLI tool kubectl & 인증 정보
kubectl 이 Kubernetes Master 와 통신하기 위해 접속 서버의 정보와 인증 정보 등이 필요. 기본으로는 `~/.kube/config` 에 기록된 정보를 이용 `~/.kube/config` 도 YAML Manifest `~/.kube/config` example <pre>`apiVersion: v1 kind: Config preferences: {} clusters: - name: sample-cluster cluster: server: https://localhost:6443 users: - name: sample-user user: client-certificate-data: agllk5ksdgls2... client-key-data: aglk14l1t1ok15... contexts: - name: sample-context context: cluster: sample-cluster namespace: default user: sample-user current-context: sample-context `</pre>
`~/.kube/config` 에는 기본적으로 cluster, user, context 3가지를 정의 cluster : 접속하기 위한 cluster 정보 user : 인증 정보 context : cluster 와 user 페어에 namespace 지정 kubectl 를 사용한 설정 <pre>`# 클러스터 정의 $ kubectl config set-cluster prd-cluster --server=https://localhost:6443 # 인증정보 정의 $ kubectl config set-credentials admin-user \ --client-certificate \ --client-key=./sample.key \ --embed-certs=true # context(cluster, 인증정보, Namespace 정의) $ kubectl config --set-context prd-admin \ --cluster=prd-cluster \ --user=admin-user \ --namespace=default `</pre>
context 를 전환하는 것으로 복수의 cluster 와 user 를 사용하는 것이 가능
`# context 전환 $ kubectx prd-admin Switched to context "prd-admin". # namespace 전환 $ kubens kube-system Context "prd-admin" is modified. Active Namespace is "kube-system". `
## kubectl & YAML Manifest YAML Manifest 를 사용한 container 기동
pod 작성
`# sample-pod.yml apiVersion: vi kind: Pod metadata: name: sample-pod spec: containers: - name: nginx-container image: nginx:1.12 `
resource 작성
`# create resource $ kubectl create -f sample-pod.yml `
resource ���제
`# delete resource $ kubectl delete -f sample-pod.yml `
resource update
`# apply 외 set, replace, edit 등도 사용 가능 $ kubectl apply -f sample-pod.yml `
## kubectl 사용법
resource 목록 획득 (get)
`$ kubectl get pods # 획득한 목록 상세 출력 $ kubectl get pods -o wide `
-o, —output 옵션을 사용하여 JSON / YAML / custom-columns / Go Template 등 다양한 형식으로 출력하는 것이 가능. 그리고 상세한 정보까지 확인 가능. pods 를 all 로 바꾸면 모든 리소스 일람 획득
resource 상세 정보 확인 (describe)
`$ kubectl describe pods sample-pod $ kubectl describe node k15l1 `
get 명령어 보다 resource 에 관련한 이벤트나 더 상세한 정보를 확인 가능
로그 확인 (logs)
`# Pod 내 container 의 로그 출력 $ kubectl logs sample-pod # 복수 container 가 포함된 Pod 에서 특정 container 의 로그 출력 $ kubectl logs sample-pod -c nginx-container # log follow option -f $ kubectl logs -f sample-pod # 최근 1시간, 10건, timestamp 표시 $ kubectl logs --since=1h --tail=10 --timestamp=true sample-pod `
Pod 상의 특정 명령 실행 (exec)
`# Pod 내 container 에서 /bin/sh $ kubectl exec -it sample-pod /bin/sh # 복수 container 가 포함된 Pod 의 특정 container 에서 /bin/sh $ kubectl exec -it sample-pod -c nginx-container /bin/sh # 인수가 있는 명령어의 경우, -- 이후에 기재 $ kubectl exec -it sample-pod -- /bin/ls -l / `
port-forward
`# localhost:8888 로 들어오는 데이터를 Pod의 80 포트로 전송 $ kubectl port-forward sample-pod 8888:80 # 이후 localhost:8888 을 통해 Pod의 80 포트로 접근 가능 $ curl localhost:8888 `
shell completion
`# bash $ source
## Kubernetes Workloads Resource ## Workloads Resource
cluster 상에서 container 를 기동하기 위해 이용
8 종류의 resource 존재
Pod
ReplicationController
ReplicaSet
Deployment
DaemonSet
StatefulSet
Job
CronJob
디버그, 확인 용도로 주로 이용
ReplicaSet 사용 추천
Pod 을 scale 관리
scale 관리할 workload 에서 기본적으로 사용 추천
각 노드에 1 Pod 씩 배치
Persistent Data 나 stateful 한 workload 의 경우 사용
work queue & task 등의 container 종료가 필요한 workload 에 사용
정기적으로 Job을 수행
Pod
Kubernetes Workloads Resource 의 최소단위
1개 이상의 container 로 구성
Pod 단위로 IP Address 가 할당
대부분의 경우 하나의 Pod은 하나의 container 를 포함하는 경우가 대부분
proxy, local cache, dynamic configure, ssh 등의 보조 역할을 하는 container 를 같이 포함 하는 경우도 있다.
같은 Pod 에 속한 container 들은 같은 IP Address
container 들은 localhost 로 서로 통신 가능
Network Namespace 는 Pod 내에서 공유
보조하는 sub container 를 side car 라고 부르기도 한다.
Pod 작성
sample pod 을 작성하는 pod_sample.ymlapiVersion: v1 kind: Pod metadata: name: sample-pod spec: containers: - name: nginx-container image: nginx:1.12 ports: - containerPort: 80
nginx:1.12 image를 사용한 container 가 하나에 80 포트를 개방
설정 파일을 기반으로 Pod 작성
`$ kubectl apply -f ./pod_sample.yml `
기동한 Pod 확인
`$ kubectl get pods # 보다 자세한 정보 출력 $ kubectl get pods --output wide `
**2 개의 container 를 포함한 Pod 작성**
2pod_sample.yml
`apiVersion: v1 kind: Pod metadata: name: sample-2pod spec: containers: - name: nginx-container-112 image: nginx:1.12 ports: - containerPort: 80 - name: nginx-container-113 image: nginx:1.13 ports: - containerPort: 8080 `
**container 내부 진입**
container 의 bash 등을 실행하여 진입
`$ kubectl exec -it sample-pod /bin/bash `
-t : 모의 단말 생성
-i : 표준입력 pass through
ReplicaSet / ReplicationController
Pod 의 replica 를 생성하여 지정한 수의 Pod을 유지하는 resource
초창기 ReplicationController 였으나 ReplicaSet 으로 후에 변경됨
ReplicationController 는 equality-based selector 이용. 폐지 예정.
ReplicaSet 은 set-based selector 이용. 기본적으로 이를 이용할 것.
ReplicaSet 작성
sample ReplicaSet 작성 (rs_sample.yml)
`apiVersion: apps/v1 kind: ReplicaSet metadata: name: sample-rs spec: replicas: 3 selector: matchLabels: app: sample-app template: metadata: labels: app: sample-app spec: containers: - name: nginx-container image: nginx:1.12 ports: - containerPort: 80 `
ReplicaSet 작성
`$ kubectl apply -f ./rs_sample.yml `
ReplicaSet 확인
`$ kubectl get rs -o wide `
Label 지정하여 Pod 확인
`$ kubectl get pod -l app=sample-app -o wide `
**Pod 정지 & auto healing**
auto healing = ReplicaSet 은 node 나 pod 에 장애가 발생해도 pod 수를 지정한 수만큼 유지되도록 별도의 node 에 container 를 기동해주기에 장애에 대비하여 영향을 최소화할 수 있도록 가능하다.
Pod 삭제
`$ kubectl delete pod sample-rs-7r6sr `
Pod 삭제 후 다시 Pod 확인 하면 ReplicaSet 이 새로 Pod 이 생성된 것을 확인 가능
ReplicaSet 의 Pod 증감은 kubectl describe rs 명령어로 이력을 확인 가능
Label & ReplicaSet
ReplicaSet 은 Kubernetes 가 Pod 을 감시하여 수를 조정
감시하기 위한 Pod Label 은 spec.selector 에서 지정
특정 라벨이 붙은 Pod 의 수를 세는 것으로 감시
부족하면 생성, 초과하면 삭제
`selector: matchLabels: app: sample-app `
생성되는 Pod Label 은 labels 에 정의.
spec.template.metadata.labels 의 부분에도 app:sample-app 식으로 설정이 들어가서 Label 가 부여된 상태로 Pod 이 생성됨.
`labels: app: sample-app `
spec.selector 와 spec.template.metadata.labels 가 일치하지 않으면 Pod 이 끝없이 생성되다가 에러가 발생하게 될 것…
ReplicaSet 을 이용하지 않고 외부에서 별도로 동일한 label 을 사용하는 Pod 을 띄우면 초과한 수만큼의 Pod 을 삭제하게 된다. 이 때, 어느 Pod 이 지워지게 될지는 알 수 없으므로 주의가 필요
하나의 container 에 복수 label 을 부여하는 것도 가능
`labels: env: dev codename: system_a role: web-front `
**Pod scaling**
yaml config 을 수정하여 kubectl apply -f FILENAME 을 실행하여 변경된 설정 적용
kubectl scale 명령어로 scale 처리
scale 명령어로 처리 가능한 대상은
Deployment
Job
ReplicaSet
ReplicationController
`$ kubectl scale rs sample-rs --replicas 5 `
## Deployment
복수의 ReplicaSet 을 관리하여 rolling update 와 roll-back 등을 실행 가능
방식
전환 방식
Kubernetes 에서 가장 추천하는 container 의 기동 방법
새로운 ReplicaSet 을 작성
새로운 ReplicaSet 상의 Replica count 를 증가시킴
오래된 ReplicaSet 상의 Replica count 를 감소시킴
2, 3 을 반복
새로운 ReplicaSet 상에서 container 가 기동하는지, health check를 통과하는지 확인하면서
ReplicaSet 을 이행할 때의 Pod 수의 상세 지정이 가능
Deployment 작성
deployment_sample.yml
`apiVersion: apps/v1 kind: Deployment metadata: name: sample-deployment spec: replicas: 3 selector: matchLabels: app: sample-app template: metadata: labels: app: sample-app spec: containers: - name: nginx-container image: nginx:1.12 ports: - containerPort: 80 `
deployment 작성
`# record 옵션을 사용하여 update 시 이력을 보존 가능 $ kubectl apply -f ./deployment_sample.yml --record `
이력은 metadata.annotations.kubernetes.io/change-cause에 보존
현재 ReplicaSet 의 Revision 번호는 metadata.annotations.deployment.kubernetes.io/revision에서 확인 가능
`$ kubectl get rs -o yaml | head `
kubectl run 으로 거의 같은 deployment 를 생성하는 것도 가능
다만 default label run:sample-deployment 가 부여되는 차이 정도
`$ kubectl run sample-deployment --image nginx:1.12 --replicas 3 --port 80 `
deployment 확인
`$ kubectl get deployment $ kubectl get rs $ kubectl get pods `
container update
`# nginx container iamge 버전을 변경 $ kubectl set image deployment sample-deployment nginx-container=nginx:1.13 `
**Deployment update condition**
Deployment 에서 변경이 있으면 ReplicaSet 이 생성된다.
replica 수는 변경 사항 대상에 포함되지 않는다
생성되는 Pod 의 내용 변경이 대상
spec.template 의 변경이 있으면 ReplicaSet 을 신규 생성하여 rolling update 수행
spec.template이하의 구조체 해쉬값을 계산하여 그것을 이용해 label 을 붙이고 관리를 한다.
`# Deployment using hash value $ kubectl get rs sample-deployment-xxx -o yaml `
**Roll-back**
ReplicaSet 은 기본적으로 이력으로서 형태가 남고 replica 수를 0으로 하고 있다.
변경 이력 확인 kubectl rollout history
`$ kubectl rollout history deployment sample-deployment `
deployment 작성 시 —record 를 사용하면 CHANGE_CAUSE 부분의 값도 존재
roll-back 시 revision 값 지정 가능. 미지정시 하나 전 revision 사용.
`# 한 단계 전 revision (default --to-revision = 0) $ kubectl rollout undo deployment sample-deployment # revision 지정 $ kubectl rollout undo deployment sample-deployment --to-revision 1 `
roll-back 기능보다 이전 YAML 파일을 kubectl apply로 적용하는게 더 편할 수 있음.
spec.template을 같은 걸로 돌리면 Template Hash 도 동일하여 kubectl rollout 과 동일한 동작을 수행하게 된다.
Deployment Scaling
ReplicaSets 와 동일한 방법으로 kubectl scale or kubectl apply -f을 사용하여 scaling 가능
보다 고급진 update 방법
recreate 라는 방식이 존재
DaemonSet
ReplicaSet 의 특수한 형식
모든 Node 에 1 pod 씩 배치
모든 Node 에서 반드시 실행되어야 하는 process 를 위해 이용
replica 수 지정 불가
2 pod 씩 배치 불가
ReplicaSet 은 각 Kubernetes Node 상에 상황에 따라 Pod 을 배치하는 것이기에 균등하게 배포된다는 보장이 없다.
DaemonSet 작성
ds_sample.yml
`apiVersion: apps/v1 kind: DaemonSet metadata: name: sample-ds spec: selector: matchLabels: app: sample-app template: metadata: labels: app: sample-app spec: containers: - name: nginx-container image: nginx:1.12 ports: - containerPort: 80 `
DaemonSet 작성
`$ kubectl apply -f ./ds_sample.yml `
확인
`$ kubectl get pods -o wide `
## StatefulSet
ReplicaSet 의 특수한 형태
database 처럼 stateful 한 workloads 에 대응하기 위함
생성되는 Pod 명이 숫자로 indexing
persistent 성
sample-statefulset-1, sample-statefulset-2, …
PersistentVolume을 사용하는 경우 같은 disk 를 이용하여 재작성
Pod 명이 바뀌지 않음
StatefulSet 작성
spec.volumeClaimTemplates 지정 가능
statefulset-sample.yml
persistent data 영역을 재사용하여 pod 이 복귀했을 때 동일 데이터를 사용하여 container 가 작성되도록 가능
`apiVersion: apps/v1 kind: StatefulSet metadata: name: sample-statefulset spec: replicas: 3 selector: matchLabels: app: sample-app template: metadata: labels: app: sample-app spec: containers: - name: nginx-container image: nginx:1.12 ports: - containerPort: 80 volumeMounts: - name: www mountPath: /usr/share/nginx/html volumeClaimTemplates: - metadata: name: www spec: accessModes: - ReadWriteOnce resources: requests: storage: 1Gi `
StatefulSet 작성
`$ kubectl apply -f ./statefulset_sample.yml `
확인 (ReplicaSet 과 거의 동일한 정보)
`$ kubectl get statefulset # Pod 이름에 ��속된 수로 index 가 suffix 된 것을 확인 $ kubectl get pods -o wide `
scale out 시 0, 1, 2 의 순으로 만들어짐
scale in 시 2, 1, 0 의 순으로 삭제
StatefulSet Scaling
ReplicaSets 와 동일 kubectl scale or kubectl apply -f
Persistent 영역 data 보존 확인
`$ kubectl exec -it sample-statefulset-0 ls /usr/share/nginx/html/sample.html ls: cannot access /usr/share/nginx/html/sample.html: No such file or directory $ kubectl exec -it sample-statefulset-0 touch /usr/share/nginx/html/sample.html $ kubectl exec -it sample-statefulset-0 ls /usr/share/nginx/html/sample.html /usr/share/nginx/html/sample.html `
kubectl 로 Pod 삭제를 하던지 container 내부에서 Exception 등이 발생하는 등으로 container 가 정지해도 file 이 사라지지 않는다.
Pod 명이 바뀌지 않아도 IP Address 는 바뀔 수 있다.
Life Cycle
ReplicaSet 과 다르게 복수의 Pod 을 병렬로 생성하지 않고 1개씩 생성하여 Ready 상태가 되면 다음 Pod 을 작성한다.
삭제 시, index 가 가능 큰 (최신) container 부터 삭제
index:0 이 Master 가 되도록 구성을 짤 수 있다.
Job
container 를 이용하여 일회성 처리를 수행
병렬 실행이 가능하면서 지정한 횟수만큼 container 를 실행 (정상종료) 하는 것을 보장
Job 을 이용 가능한 경우와 Pod 과의 차이
Pod 이 정지하는 것을 전제로 만들어져 있는가?
Pod, ReplicaSets 에서 정지=예상치 못한 에러
Job 은 정지=정상종료
patch 등의 처리에 적합
Job 작성
job_sample.yml : 60초 sleep
ReplicaSets 와 동일하게 label 과 selector 를 지정가능하지만 kubernetes 에서 자동으로 충돌하지 않도록 uuid 를 자동 생성함으로 굳이 지정할 필요 없다.
`apiVersion: batch/v1 kind: Job metadata: name: sample-job spec: completions: 1 parallelism: 1 backoffLimit: 10 template: spec: containers: - name: sleep-container image: centos:latest command: ["sleep"] args: ["60"] restartPolicy: Never `
Job 작성
`$ kubectl apply -f job_sample.yml `
Job 확인
`$ kubectl get jobs $ kubectl get pods `
**restartPolicy**
spec.template.spec.restartPolicy 에는 OnFailure or Never 지정 가능
Never : 장애 시 신규 Pod 작성
OnFailure : 장애 시 동일 Pod 이용하여 Job 재개 (restart count 가 올라간다)
Parallel Job & work queue
completions : 실행 횟수
parallelism : 병렬수
backoffLimit : 실패 허용 횟수. 미지정 시 6
1개씩 work queue 형태로 실행할 경우 completions 를 미지정
parallelism만 지정하면 Persistent 하게 Job을 계속 실행
deployment 등과 동일하게 kubectl scale job… 명령으로 나중에 제어 하는 것도 가능
CronJob
ScheduledJob -> CronJob 으로 명칭 변경됨
Cron 처럼 scheduling 된 시간에 Job 을 생성
create CronJob
cronjob_sample.yml : 60초 마다 30초 sleep
`apiVersion: batch/v1beta1 kind: CronJob metadata: name: sample-cronjob spec: schedule: "*/1 * * * *" concurrencyPolicy: Forbid startingDeadlineSeconds: 30 successfulJobHistoryLimit: 5 failedJobsHistoryLimit: 5 jobTemplate: spec: template: spec: containers: - name: sleep-container image: centos:latest command: ["sleep"] args: ["30"] restartPolicy: Never `
create
`$ kubectl apply -f cronjob_sample.yml `
별도 설정없이 kubectl run —schedule 로 create 가능
`$ kubectl run sample-cronjob --schedule = "*/1 * * *" --restart Never --image centos:latest -- sleep 30 `
확인
`$ kubectl get cronjob $ kubectl get job `
**일시 정지**
spec.suspend 가 true 로 설정되어 있으면 schedule 대상에서 제외됨
YAML 을 변경한 후 kubectl apply
kubectl patch 명령어로도 가능
`$ kubectl patch cronjob sample-cronjob -p '{"spec":{"suspend":true}}' `
kubectl patch에서는 내부적으로 HTTP PATCH method 를 사용하여 Kubernetes 독자적인 Strategic Merge Patch 가 수행된다.
실제로 수행되는 request 를 확인하고 싶으면 -v (Verbose) 옵션 사용
`$ kubectl -v=10 patch cronjob sample-cronjob -p '{"spec":{"suspend":true}}' `
kubectl get cronjob 에서 SUSPEND 항목이 True 로 된 것을 확인
다시 scheduling 대상에 넣고 싶으면 spec.suspend 를 false 로 설정
동시 실행 제어
spec.concurrencyPolicy
spec.startingDeadlineSeconds : Kubernetes Master 가 일시적으로 동작 불가한 경우 등 Job 개시 시간이 늦어졌을 때 Job 을 개시 허용할 수 있는 시간(초)를 지정
spec.successfulJobsHistoryLimit : 보존하는 성공 Job 수.
spec.failedJobsHistoryLimit : 보존하는 실패 Job 수.
Allow (default) : 동시 실행과 관련 제어 하지 않음
Forbid : 이전 Job 이 종료되지 않았으면 새로운 Job 을 실행하지 않음.
Replace : 이전 Job 을 취소하고 새로운 Job 을 실행
300 의 경우, 지정된 시간 보다 5분 늦어도 실행 가능
기본으론 늦어진 시간과 관계없이 Job 생성 가능
default 3.
0 은 바로 삭제.
default 3.
0 은 바로 삭제
Discovery & LB resource
cluster 상의 container 에 접근할 수 있는 endpoint 제공과 label 이 일치하는 container 를 찾을 수 있게 해줌
2 종류가 존재
Service : Endpoint 의 제공방법이 다른 type 이 몇가지 존재
Ingress
ClusterIP
NodePort
LoadBalancer
ExternalIP
ExternalName
Headless (None)
Cluster 내 Network 와 Service
Kubernetes 에서 cluster 를 구축하면 Pod 을 위한 Internal 네트워크가 구성된다.
Internal Network 의 구성은 CNI (Common Network Interface) 라는 pluggable 한 module 에 따라 다르지만, 기본적으로는 Node 별로 상이한 network segment 를 가지게 되고, Node 간의 traffic 은 VXLAN 이나 L2 Routing 을 이용하여 전송된다.
Kubernetes cluster 에 할당된 Internal network segment 는 자동적으로 분할되어 node 별로 network segment 를 할당하기 때문에 의식할 필요 없이 공통의 internal network 를 이용 가능하다.
이러한 특징으로 기본적으로 container 간 통신이 가능하지만 Service 기능을 이용함으로써 얻을 수 있는 이점이 있다.
Pod 에 발생하는 traffic 의 load balancing
Service discovery & internal dns
위 2가지 이점은 모든 Service Type 에서 이용 가능
Pod Traffic 의 load balancing
Service 는 수신한 traffic을 복수의 Pod 에 load balancing 하는 기능을 제공
Endpoint 의 종류에는 cluster 내부에서 이용 가능한 VIP (Virtual IP Address) 와 외부의 load balancer 의 VIP 등 다양한 종류가 제공된다
example) deployment_sample.yml
Deployment 로 복수 Pod 이 생성되면 제각각 다른 IP Address 를 가지게 되는데 이대로는 부하분산을 이용할 수 없지만 Service 가 복수의 Pod 을 대상으로 load balancing 가능한 endpoint 를 제공한다.
`apiVersion: apps/v1 kind: Deployment metadata: name: sample-deployment spec: replicas: 3 selector: matchLabels: app: sample-app template: metadata: labels: app: sample-app spec: containers: - name: nginx-container image: nginx:1.12 ports: - containerPort: 80 `
`$ kubectl apply -f deployment_sample.yml `
Deployment 로 생성된 Pod 의 label 과 pod-template-hash 라벨을 사용한다.
`$ kubectl get pods sample-deployment-5d.. -o jsonpath='{.metadata.labels}' map[app:sample-app pod-template-hash:...]% `
전송할 Pod 은 spec.selector 를 사용하여 설정 (clusterip_sample.yml)
`apiVersion: v1 kind: Service metadata: name: sample-clusterip spec: type: ClusterIP ports: - name: "http-port" protocol: "TCP" port: 8080 targetPort: 80 selector: app: sample-app `
`$ kubectl apply -f clusterip_sample.yml `
Service 를 만들면 상세정보의 Endpoint 부분에 복수의 IP Address 와 Port 가 표시된다. 이는 selector 에 지정된 조건에 매칭된 Pod 의 IP Address 와 Port.
`$ kubectl describe svc sample-clusterip `
Pod 의 IP 를 비교하기 위해 특정 JSON path 를 column 으로 출력
`$ kubectl get pods -l app=sample-app -o custom-columns="NAME:{metadata.name},IP:{status.podIP}" `
load balancing 확인을 쉽게 위해 테스트로 각 pod 상의 index.html 을 변경.
Pod 의 이름을 획득하고 각각의 pod 의 hostname 을 획득한 것을 index.html 에 기록
`for PODNAME in `kubectl get pods -l app=sample-app -o jsonpath='{.items[*].metadata.name}'`; do kubectl exec -it ${PODNAME} -- sh -c "hostname > /usr/share/nginx/html/index.html"; done `
일시적으로 Pod 을 기동하여 Service 의 endpoint 로 request
`$ kubectl run --image=centos:7 --restart=Never --rm -i testpod -- curl -s http://[load balancer ip]:[port] `
**Service Discovery 와 Internal DNS**
Service Discovery
Service Discovery 방법
Service 가 제공
특정 조건의 대상이 되는 member 를 열거하거나, 이름으로 endpoint 를 판별
Service 에 속하는 Pod 을 열거하거나 Service 이름으로 endpoint 정보를 반환
A record 를 이용
SRV record 를 이용
환경변수를 이용
A record 를 이용한 Service Discovery
Service 를 만들면 DNS record 가 자동적으로 등록된다
내부적으로는 kube-dns 라는 system component가 endpoint 를 대상으로 DNS record를 생성
Service 를 이용하여 DNS 명을 사용할 수 있으면 IP Address 관련한 관리나 설정을 신경쓰지 않아도 되기 때문에 이를 사용하는 것이 편리
`# IP 대신에 sample-clusterip 라는 Service 명을 이용 가능 $ kubectl run --image=centos:7 --restart=Never --rm -i testpod -- curl -s http://sample-clusterip:8080 `
실제로 kube-dns 에 등록되는 정식 FQDN 은 [Service name].[Namespace name].svc.[ClusterDomain name]
`# container 내부에서 sample-clusterip.default.svc.cluster.local 를 조회 $ kubectl run --image=centos:6 --restart=Never --rm -i testpod -- dig sample-clusterip.default.svc.cluster.local `
FQDN 에서는 Service 충돌을 방지하기 위해 Namespace 등이 포함되어 있으나 container 내부의 /etc/resolv.conf 에 간략한 domain 이 지정되어 있어 실제로는 sample-clusterip.default 나 sample-clusterip 만으로도 조회가 가능하다.
IP 로도 FQDN 을 반대로 조회하는 것도 가능
`$ kubectl run --image=centos:6 --restart=Never --rm -i testpod -- dig -x 10.11.245.11 `
**SRV record 를 이용한 Service Discovery**
[_Service Port name].[_Protocol].[Service name].[Namespace name].svc.[ClusterDomain name]의 형식으로도 확인 가능
`$ kubectl run --image=centos:6 --restart=Never --rm -i testpod -- dig _http-port._tcp.sample-clusterip.default.svc.cluster.local SRV `
**환경변수를 이용한 Service Discovery**
Pod 내부에서는 환경변수로도 같은 Namespace 의 서비스가 확인 가능하도록 되어 있다.
‘-‘ 가 포함된 서비스 이름은 ‘_’ 로, 그리고 대문자로 변환된다.
docker --links ...와 같은 형식으로 환경변수가 보존
container 기동 후에 Service 추가나 삭제에 따라 환경변수가 갱신되는 것은 아니라서 예상 못한 사고가 발생할 가능성도 있다.
Service 보다 Pod 이 먼저 생성된 경우에는 환경변수가 등록되어 있지 않기에 Pod 을 재생성해야 한다.
Docker 만으로 이용하던 환경에서 이식할 때에도 편리
`$ kubectl exec -it sample-deployment-... env | grep -i sample_clusterip `
**복수 port 를 사용하는 Service 와 Service Discovery**
clusterip_multi_sample.yml
`apiVersion: v1 kind: Service metadata: name: sample-clusterip spec: type: ClusterIP ports: - name: "http-port" protocol: "TCP" port: 8080 targetPort: 80 - name: "https-port" protocol: "TCP" port: 8443 targetPort: 443 selector: app: sample-app `
## ClusterIP
가장 기본
Kubernetes cluster 내부에서만 접근 가능한 Internal Network 의 VIP 가 할당된다
ClusterIP 로의 통신은 node 상에서 동작하는 system component 인 kube-proxy가 Pod을 대상으로 전송한다. (Proxy-mode 에 따라 상이)
Kubernetes cluster 외부에서의 접근이 필요없는 곳에 이용한다
기본으로는 Kubernetes API 에 접속하기 위한 Service 가 만들어져 있고 ClusterIP 가 를 사용한다.
`# TYPE 의 ClusterIP 확인 $ kubectl get svc `
**create ClusterIP Service**
clusterip_sample.yml
`apiVersion: v1 kind: Service metadata: name: sample-clusterip spec: type: ClusterIP ports: - name: "http-port" protocol: "TCP" port: 8080 targetPort: 80 selector: app: sample-app `
type: ClusterIP 지정
spec.ports[x].port 에는 ClusterIP로 수신하는 Port 번호
spec.ports[x].targetPort 는 전달할 container 의 Port 번호
Static ClusterIP VIP 지정
database 를 이용하는 등 기본적으로는 Kubernetes Service에 등록된 내부 DNS record를 이용하여 host 지정하는 것을 추천
수동으로 지정할 경우 spec.clusterIP를 지정 (clusterip_vip_sample.yml)
`apiVersion: v1 kind: Service metadata: name: sample-clusterip spec: type: ClusterIP clusterIP: 10.11.111.11 ports: - name: "http-port" protocol: "TCP" port: 8080 targetPort: 80 selector: app: sample-app `
이미 ClusterIP Service가 생성되어 있는 상태에서는 ClusterIP 를 변경할 수 없다.
kubectl apply 로도 불가능
먼저 생성된 Service 를 삭제해야 한다.
ExternalIP
특정 Kubernetes Node 의 IP:Port 로 수신한 traffic 을 container 로 전달하는 방식으로 외부와 연결
create ExternalIP Service
externalip_sample.yml
`apiVersion: v1 kind: Service metadata: name: sample-externalip spec: type: ClusterIP externalIPs: - 10.1.0.7 - 10.1.0.8 ports: - name: "http-port" protocol: "TCP" port: 8080 targetPort: 80 selector: app: sample-app `
type: ExternalIP 가 아닌 type: ClusterIP 인 것에 주의
spec.ports[x].port 는 ClusterIP 로 수신하는 Port
spec.ports[x].targetPort 는 전달할 container 의 Port
모든 Kubernetes Node 를 지정할 필요는 없음
ExternalIP 에 이용 가능한 IP Address 는 node 정보에서 확인
GKE 는 OS 상에서는 global IP Address가 인식되어 있지 않아서 이용 불가
`# IP address 확인 $ kubectl get node -o custom-columns="NAME:{metadata.name},IP:{status.addresses[].address}" `
ExternalIP Service 를 생성해도 container 내부에서 사용할 ClusterIP 도 자동적으로 할당된다.
container 안에서 DNS로 ExternalIP Service 확인
`$ kubectl run --image=centos:6 --restart=Never --rm -i testpod -- dig sample-externalip.default.svc.cluster.local `
ExternalIP 를 이용하는 node 의 port 상태
`$ ss -napt | grep 8080 `
ExternalIP 를 사용하면 Kubernetes cluster 밖에서도 접근이 가능하고 또한 Pod 에 분산된다.
NodePort
모든 Kubernetes Node 의 IP:Port 에서 수신한 traffic 을 container 에 전송
ExternalIP Service 의 모든 Node 버전 비슷한 느낌
Docker Swarm 의 Service 를 Expose 한 경우와 비슷
create NodePort Service
nodeport_sample.yml
`apiVersion: v1 kind: Service metadata: name: sample-nodeport spec: type: NodePort ports: - name: "http-port" protocol: "TCP" port: 8080 targetPort: 80 nodePort: 30080 selector: app: sample-app `
spec.ports[x].port 는 ClusterIP 로 수신하는 Port
spec.ports[x].targetPort 는 전달할 container Port
spec.ports[x].nodePort 는 모든 Kubernetes Node 에서 수신할 Port
container 안에서 통신에 사용할 ClusterIP 도 자동적으로 할당된다
지정하지 않으면 자동으로 비어있는 번호를 사용
Kubernetes 기본으로는 이용할 수 있는 번호가 30000~32767
복수의 NodePort 가 동일 Port 사용 불가
Kubernetes Master 설정에서 변경 가능
`$ kubectl get svc `
container 안에서 확인하면 내부 DNS 가 반환하는 IP Address 는 External IP 가 아닌 Cluster IP
`$ kubectl run --image=centos:6 --restart=Never --rm -i testpod -- dig sample-nodeport.default.svc.cluster.local `
Kubernetes Node 상에서 Port 상태를 확인하면 nodePort 에 지정한 값으로 Listen
`$ ss -napt | grep 30080 `
ExternalIP 와 다르게 모든 Node 의 IP Address 로 Kubernetes Cluster 외부에서 접근 가능하며 Pod 으로의 request 도 분산된다.
GKE 도 GCE에 할당된 global IP Address 로 접근 가능
Node 간 통신의 배제 (Node 를 건넌 load balancing 배제)
NodePort 에서는 Node 상의 NodePort 에 도달한 packet 은 Node 를 건너서도 load balancing 이 이루어진다
DaemonSet 등을 사용하면 각 Node에 1 Pod 이 존재하기에 같은 Node 상의 Pod 에만 전달하고 싶을 때 사용
spec.externalTrafficPolicy 를 사용하여 실현 가능
externalTrafficPolicy 를 Cluster 에서 Local 로 변경하기 위해선 YAML 이용 (nodeport_local_sample.yml)
Cluster (Default)
Local
Node 에 도달한 후 각 Node 에 load balancing
실제로는 kube-proxy 설정으로 iptables 의 proxy mode를 사용할 경우, 자신의 Node 에 좀 더 많이 전달되도록 되는 것으로 보여짐 (iptables-save 등으로 statistics 부분을 확인)
도달한 Node 에 속한 Pod 에 전달 (no load balancing)
만약 Pod 이 존재하지 않으면 Response 불가
만일 Pod 이 복수 존재한다면 균등하게 분배
`apiVersion: v1 kind: Service metadata: name: sample-nodeport-local spec: type: NodePort externalTrafficPolicy: Local ports: - name: "http-port" protocol: "TCP" port: 8080 targetPort: 80 nodePort: 30081 selector: app: sample-app `
## LoadBalancer
가장 사용성이 좋고 실용적
Kubernetes Cluster 외부의 LoadBalancer 에 VIP 를 할당 가능
NodePort 등에선 결국 Node 에 할당된 IP Address 에 endpoint 역할까지 담당시키는 것이라 SPoF (Single Point of Failure) 로 Node 장애에 약하다
외부의 load balancer 를 이용하는 것으로 Kubernetes Node 장애에 강하다
단 외부 LoadBalancer 와 연계 가능한 환경으로 GCP, AWS, Azure, OpenStack 등의 CloudProvider 에 한정된다 (이는 추후에 점차 확대될 수 있다)
NodePort Service 를 만들어서 Cluster 외부의 Load Balancer 에서 Kubernetes Node 에 balancing 한다는 느낌
create LoadBalancer Service
lb_sample.yml
`apiVersion: v1 kind: Service metadata: name: sample-lb spec: type: LoadBalancer ports: - name: "http-port" protocol: "TCP" port: 8080 targetPort: 80 nodePort: 30082 selector: app: sample-app `
spec.ports[x].port 는 LoadBalancer VIP 와 ClusterIP 로 수신하는 Port
spec.ports[x].targetPort 는 전달할 container Port
NodePort 도 자동적으로 할당됨으로 spec.ports[x].nodePort 의 지정도 가능
확인
`$ kubectl get svc sample-lb `
EXTERNAL-IP 가 pending 상태인 경우 LoadBalancer 가 준비되는데 시간이 필요한 경우
Container 내부 통신에는 Cluster IP 를 사용하기에 ClusterIP 도 자동할당
NodePort 도 생성
VIP 는 Kubernetes Node 에 분산되기 때문에 Kubernetes Node 의 scaling 시 변경할 것이 없다
Node 간 통신 배제 (Node 를 건넌 load balancing 배제)
NodePort 와 동일하게 externalTrafficPolicy 를 이용 가능
LoadBalancer VIP 지정
spec.LoadBalancerIP 로 외부의 LoadBalancer IP Address 지정 가능
`# lb_fixip_sample.yml apiVersion: v1 kind: Service metadata: name: sample-lb-fixip spec: type: LoadBalancer loadBalancerIP: xxx.xxx.xxx.xxx ports: - name: "http-port" protocol: "TCP" port: 8080 targetPort: 80 nodePort: 30083 selector: app: sample-app `
미지정 시 자동 할당
GKE 등의 cloud provider 의 경우 주의
GKE 에서는 LoadBalancer service 를 생성하면 GCLB 가 생성된다.
GCP LoadBalancer 등으로 비용이 증가 되지 않도록 주의
IP Address 중복이 허용되거나 deploy flow 상 문제가 없으면 가급적 Service 를 정리할 것
Service 를 만든 상태에서 GKE cluster 를 삭제하면 GCLB 가 과금 되는 상태로 남아버리므로 주의
Headless Service
Pod 의 IP Address 가 반환되는 Service
보통 Pod 의 IP Address 는 자주 변동될 수 있기 때문에 Persistent 한 StatefulSet 한정하여 사용 가능
IP endpoint 를 제공하는 것이 아닌 DNS Round Robin (DNS RR) 을 사용한 endpoint 제공
DNS RR 은 전달할 Pod 의 IP Address 가 cluster 안의 DNS 에서 반환되는 형태로 부하분산이 이루어지기에 client 쪽 cache 에 주의할 필요가 있다.
기본적으로 Kubernetes 는 Pod 의 IP Address 를 의식할 필요가 없도록 되어 있어서 Pod 의 IP Address 를 discovery 하기 위해서는 API 를 사용해야만 한다
Headless Service 를 이용하여 StatefulSet 한정으로 Service 경유로 IP Address 를 discovery 하는 것이 가능하다
create Headless Service
3가지 조건이 충족되어야 한다
Service 의 spec.type 이 ClusterIP
Service 의 metadata.name 이 StatefulSet 의 spec.serviceName 과 같을 것
Service 의 spec.clusterIP 가 None 일것
위 조건들이 충족되지 않으면 그냥 Service 로만 동작하고 Pod 이름을 얻는 등이 불가능하다.
`# headless_sample.yml apiVersion: v1 kind: Service metadata: name: sample-svc spec: type: ClusterIP clusterIP: None ports: - name: "http-port" protocol: "TCP" port: 80 targetPort: 80 selector: app: sample-app `
**Headless Service 를 이용한 Pod 이름 조회**
보통 Service 를 만들면 복수 Pod 에 대응하는 endpoint 가 만들어져 해당 endpoint. 에 대응하여 이름을 조회하는 것이 가능하지만 각각의 Pod 의 이름 조회는 불가능하다
보통 Service 의 이름 조회는 [Service name].[Namespace name].svc.[domain name] 로 조회가 가능하도록 되어 있지만 Headless Service 로 그대로 조회하면 DNS Round Robin 으로 Pod 중의 IP 가 반환되기에 부하 분산에는 적합��지 않다
StatefulSet 의 경우에만, [Pod name].[Service name].[Namespace name].svc.[domain name] 형식으로 Pod 이름 조회가 가능하다
container 의 resolv.conf 등에 search 로 entry 가 들어가 있다면 [Pod name].[Service name] 혹은 [Pod name].[Service name].[Namespace] 등으로 조회 가능
ReplicaSet 등의 Resource 에서도 가능
ExternalName
다른 Service 들과 다르게 Service 이름 조회에 대응하여 CNAME 을 반환하는 Service
주로 다른 이름을 설정하고 싶거나 cluster 안에서 endpoint 를 전환하기 쉽게 하고 싶을 때 사용
create ExternalName service
`# externalname_sample.yml apiVersion: v1 kind: Service metadata: name: sample-externalname namespace: default spec: type: ExternalName externalName: external.example.com `
`$ kubectl get svc `
EXTERNAL-IP 부분에 CNAME 용의 DNS 가 표시된다
container 내부에서 [Service name] 이나 [Service name].[Namespace name].svc.[domain name] 으로 조회하면 CNAME 가 돌아오는 것을 확인 가능
`$ dig sample-externalname.default.svc.cluster.local CNAME `
**Loosely Coupled with External Service**
Cluster 내부에서는 Pod 로의 통신에 Service 이름 조회를 사용하는 것으로 서비스 간의 Loosely Coupled 를 가지는 것이 가능했지만, SaaS 나 IaaS 등의 외부 서비스를 이용하는 경우에도 필요가 있다.
Application 등에서 외부 endpoint를 설정하면 전환할 때 Application 쪽 설정 변경이 필요해지는데 ExternalName을 이용하여 DNS 의 전환은 ExternalName Service 의 변경만으로 가능하여 Kubernetes 상에서 가능해지고 외부와 Kubernetes Cluster 사이의 Loosely Coupled 상태도 유지 가능하다.
외부 서비스와 내부 서비스 간의 전환
ExternalName 이용으로 외부 서비스와의 Loosely Coupled 확보하고 외부 서비스와 Kubernetes 상의 Cluster 내부 서비스의 전환도 유연하게 가능하다
Ingress
L7 LoadBalancer 를 제공하는 Resource
Kubernetes 의 Network Policy resource 에 Ingress/Egress 설정항목과 관련 없음
Ingress 종류
아직 Beta Service 일 가능성
크게 구분하여 2가지
Cluster 외부의 Load Balancer를 이용한 Ingress
Cluster 내부에 Ingress 용의 Pod 을 생성하여 이용하는 Ingress
GKE
Nginx Ingress
Nghttpx Ingress
Cluster 외부의 Load Balancer 를 이용한 Ingress
GKE 같은 Cluster 외부의 Load Balancer를 이용한 Ingress 의 경우, Ingress rosource 를 만드는 것만으로 LoadBalancer 의 VIP 가 만들어져 이용하는 것이 가능
GCP의 GCLB (Google Cloud Load Balancer) 에서 수신한 traffic을 GCLB 에서 HTTPS 종단이나 path base routing 등을 수행하여 NodePort에 traffic을 전송하는 것으로 대상 Pod 에 도달
Cluster 내부에 Ingress 용의 Pod 을 생성하여 이용하는 Ingress
L7 역할을 할 Pod을 Cluster 내부에 생성하는 형태로 실현
Cluster 외부에서 접근 가능하도록 별도 Ingress 용 Pod에 LoadBalancer Service를 작성하는 등의 준비가 필요하다
Ingress 용의 Pod 이 HTTPS 종단이나 path base routing 등의 L7 역할을 하기 위해 Pod 의 replica 수의 auto scale 등도 고려할 필요가 있다.
LB와 일단 Nginx Pod 에 전송하여 Nginx 가 L7 역할을 하여 처리한 후 대상 Pod 에 전송한다.
NodePort 경유하지 않고 직접 Pod IP 로 전송
create Ingress resource
사전 준비가 필요
사전에 만들어진 Service를 Back-end로서 활용하여 전송을 하는 형태
Back-end 로 이용할 Service 는 NodePort 를 지정
`# sample-ingress-apps apiVersion: apps/v1 kind: Deployment metadata: name: sample-ingress-apps spec: replicas: 1 selector: matchLabels: ingress-app: sample template: metadata: labels: ingress-app: sample spec: containers: - name: nginx-container image: zembutsu/docker-sample-nginx:1.0 ports: - containerPort: 80 `
`# ingress service sample apiVersion: v1 kind: Service metadata: name: svc1 spec: type: NodePort ports: - name: "http-port" protocol: "TCP" port: 8888 targetPort: 80 selector: ingress-app: sample `
Ingress 로 HTTPS 를 이용하는 경우에는 인증서는 사전에 Secret 으로 등록해둘 필요가 있다.
Secret 은 인증서의 정보를 바탕으로 YAML 파일을 직접 만들거나 인증서 파일을 지정하여 만든다.
`# 인증서 작성 $ openssl req -x509 -nodes -days 365 -newkey rsa:2048 -keyout /tmp/tls.key -out /tmp/tls.crt -subj "/CN=sample.example.com" # Secret 작성 (인증서 파일을 지정하는 경우) $ kubectl create secret tls tls-sample --key /tmp/tls.key --cert /tmp/tls.crt `
Ingress resource 는 L7 Load Balancer 이기에 특정 host 명에 대해 request path > Service back-end 의 pair 로 전송 rule 을 설정한다.
하나의 IP Address 로 복수의 Host 명을 가지는 것이 가능하다.
spec.rules[].http.paths[].backend.servicePort 에 설정하는 Port 는 Service 의 spec.ports[].port 를 지정
`# ingress_sample.yml apiVersion: extensions/v1beta1 kind: Ingress metadata: name: sample-ingress annotations: ingress.kubernetes.io/rewrite-target: / spec: rules: - host: sample.example.com http: paths: - path: /path1 backend: serviceName: svc1 servicePort: 8888 backend: serviceName: svc1 servicePort: 8888 tls: - hosts: - sample.example.com secretName: tls-sample `
**Ingress resource & Ingress Controller**
Ingress resource = YAML file 에 등록된 API resource
Ingress Controller = Ingress resource 가 Kubernetes 에 등록되었을 때, 어떠한 처리를 수행하는 것
GCP 의 GCLB 를 조작하여 L7 LoadBalancer 설정을 하는 것이나,
Nginx 의 Config 를 변경하여 reload 하는 등
GKE 의 경우
GKE 의 경우, 기본으로 GKE 용 Ingress Controller 가 deploy 되어 있어 딱히 의식할 필요 없이 Ingress resource 마다 자동으로 IP endpoint 가 만들어진다.
Nginx Ingress 의 경우
Nginx Ingress 를 이용하는 경우에는 Nginx Ingress Controller 를 작성해야 한다.
Ingress Controller 자체가 L7 역할을 하는 Pod 이 되기도 하기에 Controller 라는 이름이지만 실제 처리도 수행한다.
GKE 와 같이 cluster 외부에서도 접근을 허용하기 위해서는 Nginx Ingress Controller 으로의 LoadBalancer Service (NodePort 등도 가능) 를 작성할 필요가 있다.
개별적으로 Service 를 만드는 것이기에 kubectl get ingress 등으로 endpoint IP Address 를 확인 불가 하기에 주의가 필요하다.
rule 에 매칭되지 않을 경우의 default 로 전송할 곳을 작성할 필요가 있으니 주의
실제로는 RBAC, resource 제한, health check 간격 등 세세한 설정해 둬야 할 수 있다.
nginx ingress 추천 설정
`# Nginx ingress를 이용하는 YAML sample apiVersion: apps/v1 kind: Deployment metadata: name: default-http-backend labels: app: default-http-backend spec: replicas: 1 selector: matchLabels: app: default-http-backend template: metadata: labels: app: default-http-backend spec: containers: - name: default-http-backend image: gcr.io/google_containers/defaultbackend:1.4 livenessProbe: httpGet: path: /healthz port: 8080 scheme: HTTP ports: - containerPort: 8080 --- apiVersion: v1 kind: Service metadata: name: default-http-backend labels: app: default-http-backend spec: ports: - port: 80 targetPort: 8080 selector: app: default-http-backend --- apiVersion: apps/v1 kind: Deployment metadata: name: nginx-ingress-controller spec: replicas: 1 selector: matchLabels: app: ingress-nginx template: metadata: labels: app: ingress-nginx spec: containers: - name: nginx-ingress-controller image: quay.io/kubernetes-ingress-controller/nginx-ingress-controller:0.14.0 args: - /nginx-ingress-controller - --default-backend-service=$(POD_NAMESPACE)/default-http-backend env: - name: POD_NAME valueFrom: fieldRef: fieldPath: metadata.name - name: POD_NAMESPACE valueFrom: fieldRef: fieldPath: metadata.namespace ports: - name: http containerPort: 80 - name: https containerPort: 443 livenessProbe: httpGet: path: /healthz port: 10254 scheme: HTTP readinessProbe: httpGet: path: /healthz port: 10254 scheme: HTTP --- apiVersion: v1 kind: Service metadata: name: ingress-endpoint labels: app: ingress-nginx spec: type: LoadBalancer ports: - port: 80 targetPort: 8080 selector: app: ingress-nginx `
default back-end pod 이나 L7 처리할 Nginx Ingress Controller Pod 의 replica 수가 고정이면 traffic 이 늘었을 때 감당하지 못할 가능성도 있으니 Pod auto scaling 을 수행하는 Horizontal Pod Autoscaler (HPA) 의 이용도 검토해야 할 수 있음
deploy 한 Ingress Controller 는 cluster 상의 모든 Ingress resource 를 봐 버리기에 충돌할 가능성이 있다.
상세 사양
Ingress Class 를 이용하여 처리하는 대상 Ingress resource 를 분리하는 것이 가능
Ingress resource 에 Ingress Class Annotation 을 부여하여 Nginx Ingress Controller 에 대상으로 하는 Ingress Class를 설정하는 것으로 대상 분리 가능
Nginx Ingress Controller 의 기동 시 --ingress-class 옵션 부여
Ingress resource Annotation
/nginx-ingress-controller --ingress-class=system_a ...
kubernetes.io/ingress.class: "system_a"
정리
Kubernetes Service & Ingress
Service
Ingress
L4 Load Balancing
Cluster 내부 DNS 로 lookup
label 을 이용한 Pod Service Discovery
L7 Load Balancing
HTTPS 종단
path base routing
Kubernetes Service
ClusterIP : Kubernetes Cluster 내부 한정으로 통신 가능한 VIP
ExternalIP : 특정 Kubernetes Node 의 IP
NodePort : 모든 Kubernetes Node 의 모든 IP (0.0.0.0)
LoadBalancer : Cluster 외부에 제공되는 Load Balancer의 VIP
ExternalName : CNAME 을 사용한 Loosely Coupled
Headless : Pod 의 IP 를 사용한 DNS Round Robin
Kubernetes Ingress
Cluster 외부의 Load Balancer 를 이용한 Ingress : GKE
Cluster 내부의 Ingress 용 Pod 을 이용한 Ingress : Nginx Ingress, Nghttpx Ingress
Kubernetes Config & Storage resource
container 에 대한 설정 파일, 암호 등의 기밀 정보나 Persistent Volume 등에 관한 resource
3 종류
Secret
ConfigMap
PersistentVolumeClaim
환경변수 이용
Kubernetes 에서는 개별 container에 대한 설정의 내용은 환경변수나 파일이 포함된 영역을 mount 해서 넘기는 것이 일반적이다
환경변수를 넘기려면 pod template 에 env 혹은 envFrom 을 지정
5개의 정보 source로부터 환경변수를 심는 것이 가능
정적설정
Pod 정보
Container 정보
Secret resource 의 기밀 정보
ConfigMap resource 의 Key-Value 값
정적설정
spec.containers[].env 에 정적 값을 정의
`apiVersion: v1 kind: Pod metadata: name: sample-env labels: app: sample-app spec: containers: - name: nginx-container image: nginx:1.12 env: - name: MAX_CONNECTION value: "100" `
Pod 정보
Pod 이 속한 Node 나, Pod 의 IP Address, 기동시간 등의 Pod 에 관련된 정보는 fieldRef를 사용하여 참조할 수 있다.
참조 가능한 값은 kubectl get pods -o yaml 등으로 확인할 수 있다.
등록한 YAML file 의 정보와 별도로 IP, host 정도 등도 추가되었다.
`# 동작 중인 Pod 의 정보 확인 $ kubectl get pod nginx-pod -o yaml ... spec: nodeName: gke-k8s-... ... `
`# env-pod-sample.yml # set Kubernetes Node's name to env K8S_NODE apiVersion: v1 kind: Pod metadata: name: sample-env-pod labels: app: sample-app spec: containers: - name: nginx-container image: nginx:1.12 env: - name: K8S_NODE valueFrom: fieldRef: fieldPath: spec.nodeName `
**Container 정보**
Container 에 관련한 정보는 resourceFieldRef를 사용하여 참조할 수 있다.
Pod 에는 복수 container 의 정보가 포함되어 있어서 각 container에 설정 가능한 값에 대해서는 fieldRef로는 참조할 수 없는 것에 주의.
참조 가능한 값에 관해선 kubectl get pods -o yaml 등오로 확인 가능
`# env-container-sample.yml #set CPU Requests/Limits to ENV apiVersion: v1 kind: Pod metadata: name: sample-env-container labels: app: sample-app spec: containers: - name: nginx-container image: nginx:1.12 env: - name: CPU_REQUEST valueFrom: resourceFieldRef: containerName: nginx-container resource: requests.cpu - name: CPU_LIMIT valueFrom: resourceFieldRef: containerName: nginx-container resource: limits.cpu `
**Secret resource 기밀 정보**
기밀 정보는 별도 Secret resource 를 만들어 환경변수로 참조 시키는 것을 추천
ConfigMap resource 에서 Key-Value 값
단순한 Key-Value 값이나 설정 파일 등은 ConfigMap 으로 관리하는 것이 가능
일괄 변경이나 중복이 많이 많은 경우 ConfigMap 을 사용하는 것이 유용할 수 있음
환경변수 이용 시 주의점
`# env fail sample apiVersion: v1 kind: Pod metadata: name: sample-fail-env labels: app: sample-app spec: containers: - name: nginx-container image: nginx:1.12 command: ["echo"] args: ["${TESTENV}", "${HOSTNAME}"] env: - name: TESTENV value: "100" `
command 나 args 에 환경변수를 이용하기 위해선 ${} 가 아닌 $()를 사용해야 한다
command 나 args 에서 참조가능한 환경 변수는 해당 Pod template 내부에서 정의된 환경 변수에 제한된다. (위 예제에서는 TESTENV 값만 참조 가능)
OS 등에서만 참조할 수 있는 환경 변수를 이용하기 위해서는 script 등을 이용하여 실행하도록 해야 한다.
Secret
DataBase 등을 사용할 때 필요한 유저, 암호 등의 인증에 필요한 경우 이용할 수 있는 방식
유저명과 암호를 별도 resource 로 정의해두고 Pod 에서 이를 불러들여 사용하기 위한 resource
Secret이 정의된 YAML Manifest를 암호화하는 ::kubesec:: 이란 OSS 존재
gpg, Google Cloud KMS, AWS KMS 등을 이용하여 간단하게 data.* 부분만 암호화할 수 있어 외부로 공개되어도 문제 소지가 적다.
Docker build 시 Container Image 에 첨부
환경변수나 실행 인수 등에 포함시켜 Container Image 를 build.
기밀 정보를 포함하고 있는 만큼 해당 Image 를 외부에 공개하거나 배포하기 곤란하며 인증 정보가 변경된다면 Image 를 다시 build 해야 하는 등 불편
Pod 이나 Deployment YAML Manifest 에 첨부
이 역시 YAML 이 외부에 알려져서는 안되고 복수 Application 에서 동일한 정보를 사용하게 된다면 여기저기 퍼지게 되는 것이라 이 역시 문제
Secret 분류
Generic (type: Opaque)
TLS (type: kubernetes.io/tls)
Docker Registry (type: kubernetes.io/dockerconfigjson)
Service Account (type: kubernetes.io/service-account-token)
Generic (type: Opaque)
보통 사용하는 암호 등에 이용
작성 방법
file 을 이용 (--from-file)
yaml
kubectl 이용하어 직접 생성 (--from-literal)
envfile
Secret 에서는 복수의 Key-Value 값이 보존된다.
db-auth 라는 이름의 Secret 에는 username, password 라는 Key가 있고 그에 해당하는 Value 값이 존재할 수 있다.
복수의 DB를 사용하는 경우, Secret 이름이 겹치지 않게 정의하거나 시스템별로 Namespace를 분할하는 등의 작업이 필요
from File
--from-file 옵션을 사용하여 파일을 지정하여 사용한다
파일명이 곧 Key 가 되기에 파일명에 포함된 확장자 등은 제거하는게 좋을 수 있다.
확장자를 제거하기 싫다면, --from-file=username=username.txt 처럼 사용할 수도 있다.
파일에 개행문자(\n)가 들어가지 않도록 echo -n 을 사용하는 등으로 주의해야 한다.
`# source 파일 생성 $ echo -n "user" > ./username $ echo -n "password" > ./password # Secret 생성 $ kubectl create secret generic sample-db-auth --from-file=./username --from-file=./password # json 형식으로 base64 형식으로 encode 된 Secret data 부분을 확인 $ kubectl get secret sample-db-auth -o json | jq .data # base64 형식으로 encode 된 내용을 평문으로 확인 $ kubectl get secret sample-db-auth -o json | jq -r .data.username | base64 -d `
from yaml
`apiVersion: v1 kind: Secret metadata: name: sample-db-auth type: Opaque data: username: dXNlcgo= password: cGFzc3dvcmQK `
using kubectl (--from-literal)
—from-literal 옵션 사용
`$ kubectl create secret generic sample-db-auth --from-literal=username=user --from-literal=password=password `
from envfile
일괄적으로 처리할 때 이용가능하며 Docker 에서 —env-file 옵션을 사용하여 container를 사용하고 있었다면 그대로 Secret 에 이식하는 것도 가능하다.
`username=user password=password $ kubectl create secret generic sample-db-auth --from-env-file ./env_secret `
TLS (type: kubernetes.io/tls)
Ingress 등에서 참조 가능한 TLS 용 Secret
주로 인증서 등을 이용하기 위해 사용하며 일반적으로 파일을 이용하여 이용한다.
--key 와 —cert 로 비밀키와 인증서를 지정한다.
`# create certificate $ openssl req -x509 -nodes -days 365 -newkey rsa:2048 -keyout /tmp/tls.key -out /tmp/tls.crt - subj "/CN=sample1.example.com" # create TLS Secret $ kubectl create secret tls tls-sample --key /tmp/tls.key --cert /tmp/tls.crt `
Docker Registry (type: kubernetes.io/dockerconfigjson)
Docker Registry 인증 정보용
using kubectl
kubectl 을 이용할 경우 Registry 서버와 인증정보를 인수로 지정한다.
`$ kubectl create secret docker-registry sample-registry-auth \ --docker-server=REGISTRY_SERVER \ --docker-username=REGISTRY_USER \ --docker-password=REGISTRY_USER_PASSWORD \ --docker-email=REGISTRY_USER_EMAIL # get $ kubectl get secret -o json sample-registry-auth | jq .data `
Secret 을 이용한 image 획득
인증이 필요한 Docker Registry 나 Docker Hub 의 Private repository 의 Image 를 가져오기 위해서 Secret 을 사전에 만들어놓고 Pod 의 spec.imagePullSecrets 에 docker-registry 타입의 Secret 을 지정한다.
`# secret-pull_sample.yml apiVersion: v1 kind: Pod metadata: name: sample-pod spec: containers: - name: secret-image-container image: REGISTRY_NAME/secret-image:latest imagePullSecrets: - name: sample-registry-auth `
Service Account
수동으로 만드는 것은 아니지만 Pod 에 Service Account 의 Token 을 mount 하기 위함
Secret 이용
Secret 을 container에서 이용할 경우, 크게 나눠서 2가지 패턴
환경변수
Volume으로 mount
Secret 의 특정 Key 한정
Secret 의 모든 Key
Secret의 특정 Key 한정
Secret 의 모든 키
환경변수
환경변수로 넘길 경우, 특정 Key만을 넘기 던가, Secret 전체를 넘기던가.
특정 key 만을 넘길 경우, spec.containers[].env 의 valueFrom.secretKeyRef 를 사용하여 넘길 키를 지정
`# secret_single_env_sample.yml apiVersion: v1 kind: Pod metadata: name: sample-secret-single-env spec: containers: - name: secret-container image: nginx:1.12 env: - name: DB_USERNAME valueFrom: secretKeyRef: name: sample-db-auth key: username `
env 로 1개씩 정의가 가능하여 환경변수 명을 지정 가능하다.
Secret 전체를 넘길 경우
`# secret_multi_env_sample.yml apiVersion: v1 kind: Pod metadata: name: sample-secret-multi-env spec: containers: - name: secret-container image: nginx:1.12 envFrom: - secretRef: name: sample-db-auth `
Key 를 일일이 지정하지 않아도 되어 간결하지만 Secret 에 저장되어 있는 값을 Pod Template 로는 파악하기 힘들다. **Volume Mount**
특정 Key 만을 넘길 경우, spec.volumes[] 의 secret.item[] 을 사용하여 지정한다.
`# secret_single_volume_sample.yml apiVersion: v1 kind: Pod metadata: name: sample-secret-single-volume spec: containers: - name: secret-container image: nginx:1.12 volumeMounts: - name: config-volume mountPath: /config volumes: - name: config-volume secret: secretName: sample-db-auth items: - key: username path: username.txt `
mount 할 파일을 1개씩 정의할 수 있어 파일명을 지정 가능하다. <pre>`$ kubectl exec -it sample-secret-single-volume cat /config/username.txt `</pre>
Secret 전체를 변수로 넘길 경우
`# secret_multi_volume_sample.yml apiVersion: v1 kind: Pod metadata: name: sample-secret-multi-volume spec: containers: - name: secret-container image: nginx:1.12 volumeMounts: - name: config-volume mountPath: /config volumes: - name: config-volume secret: secretName: sample-db-auth `
`$ kubectl exec -it sample-secret-multi-volume ls /config `
**동적 Secret 갱신** Volume Mount 으로 Secret 을 이용할 경우 일정 기간 주기 (kubelet 의 Sync Loop 의 타이밍) 로 kube-apiserver 에 변경을 확인해서 변경이 있을 경우 갱신한다. 기본적으로 SyncLoop의 간격은 60초로 설정되어 있으나 kuebelet 의 옵션 `—sync-frequency` 로 변경 가능하다. (이는 환경변수를 이요하는 경우에는 이용 불가 하다.) 이 경우 Volume 에 마운트 된 파일의 값이 바뀌어도 Pod 이 재생성 되는 것이 아니어서 끊기는 것을 걱정할 필요도 없다. Secret 에서 삭제된 것 역시 같이 삭제된다. ## ConfigMap ConfigMap 은 설정 정보 등을 Key-Value 로 보존할 수 있는 데이터를 저장하기 위한 resource. Key-Value 라고 해도 nginx.conf 나 httpd.conf 와 같은 설정 파일 그 자체도 보존가능하다. **create ConfigMap** Generic type Secret 과 거의 동일한 방법.
3가지 방법
파일을 사용 (—from-file)
yaml 파일을 사용
kubectl로 직접 생성 (—from-literal)
ConfigMap 에는 복수의 Key-Value 값이 들어간다. nginx.conf 전체를 ConfigMap 안에 넣거나 nginx.conf 의 설정 parameter만 넣어도 된다.
파일을 사용
파일을 사용할 경우. —from-file 을 지정한다. 보통 파일명이 그대로 Key 로 사용되며 Key명을 변경하고 싶을 경우, —from-file=nginx.conf=sample-nginx.conf 와 같은 형식으로 지정한다.
`# create ConfigMap $ kubectl create configmap sample-configmap --from-file=./nginx.conf # 확인 $ kubectl get configmap sample-configmap -o json | jq .data # describe $ kubectl describe configmap sample-configmap `
YAML 파일을 사용
Value 값이 길 경우, Key: | 처럼 정의
`apiVersion: v1 kind: ConfigMap metadata: name: sample-configmap data: thread: "16" connection.max: "100" connection.min: "10" sample.properties: | property.1=value-1 property.2=value-2 property.3=value-3 nginx.conf: | user nginx; worker_processes auto; error_log /var/log/nginx/error.log; pid /run/nginx.pid; ... `
kubectl 을 사용 (—from-literal)
`$ kubectl create configmap web-config \ --from-literal=connection.max=100 \ --from-literal=connection.min=10 `
ConfigMap 이용
환경변수
Volume mount
특정 Key
모든 Key
특정 Key
모든 Key
환경변수
특정 Key만 넘길 경우, spec.containers[].env 의 valueFrom.configMapKeyRef 를 사용
`# configmap_single_env_sample.yml apiVersion: v1 kind: Pod metadata: name: sample-configmap-single-env spec: containers: - name: configmap-container image: nginx:1.12 env: - name: CONNECTION_MAX valueFrom: configMapKeyRef: name: sample-configmap key: connection.max `
env 한개씩 정의가 가능해서 환경변수명을 지정 가능
모든 Key를 넘길 경우, 한개씩 정의할 필요가 없어 YAML 이 간략해지지만 YAML 만으로는 어떤 값이 있는지 판단하긴 힘들다
`# configmap_multi_env_sample.yml apiVersion: v1 kind: Pod metadata: name: sample-configmap-multi-env spec: containers: - name: configmap-container imgae: nginx:1.12 envFrom: - configMapRef: name: sample-configmap `
환경변수를 이용하는 경우, 다음과 같은 패턴은 표현할 수 없어 전달되지 않는다.
. 이 포함되는 경우
개행이 포함되는 경우. (Key. | 로 정의된 경우)
Volume Mount
특정 Key 만 넘길 경우, spec.volumes[] 의 configMap.items[] 를 사용한다.
`# configmap_single_volume_sample.yml apiVersion: v1 kind: Pod metadata: name: sample-configmap-single-volume spec: containers: - name: configmap-container image: nginx:1.12 volumeMounts: - name: config-volume mountPath: /config volumes: - name: config-volume configMap: name: sample-configmap items: - key: nginx.conf path: nginx-sample.conf `
mount 할 파일을 하나씩 정의하므로 파일명을 지정 가능하다. <pre>`$ kubectl exec -it sample-configmap-single-volume cat /config/nginx-sample.conf `</pre>
모든 Key 를 넘길 경우, YAML 이 간결해지지만 YAML 만으로는 어떤 값이 있는지 판단하기 힘들다.
`# configmap_multi_volume_sample.yml apiVersion: v1 kind: Pod metadata: name: sample-configmap-multi-volume spec: containers: - name: configmap-container image: nginx:1.12 volumeMounts: - name: config-volume mountPath: /config volumes: - name: config-volume configMap: name: sample-configmap `
`$ kubectl exec -it sample-configmap-multi-volume ls /config `
**동적 ConfigMap 갱신** volume mount 를 이용하는 경우, 일정시간 주기 (kubelet 의 Sync Loop 타이밍)로 kube-apiserver 에 변경을 확인해서, 변경이 있으면 갱신한다. SyncLoop 의 기본값은 60초로 설정되어 있으나 이를 변경하고 싶을 경우, kubelet 의 `—sync-frequency` 를 사용하여 설정한다. (환경 변수의 경우 동적 갱신이 불가) ## Volume 과 PersistentVolume, PersistentVolumeClaim 의 차이 Volume 은 기존의 Volume (host 영역, NFS, Ceph, GCP Volume) 등을 YAML Manifest 에 직접 지정하여 이용 가능하게 하는 것이다. 그래서 이용자가 신규로 Volume 을 작성하거나, 기존의 Volume 을 삭제하는 등의 조작이 불가능하다. 그리고 YAML Manifest 로 Volume resource 를 만드는 등의 처리도 불가능하다. PersistentVolume은 외부의 Persistent 한 Volume을 제공하는 시스템과 연계하여 신규 Volume 을 만들거나 기존의 Volume 을 삭제하는 것이 가능하다. 구체적으로는 YAML Manifest 등을 통해 Persistent Volume resource 를 별도 만드는 형식이다. PersistentVolume 의 plug-in 에서는 Volume 의 생성과 삭제와 같은 life cycle 을 처리하는 것이 가능하지만 Volume 의 plug-in 의 경우, 이미 있는 Volume 을 사용하는 것만 가능하다. PersistentVolumeClaim 은 PersistentVolume resource 에서 assign 하기 위한 resource. PersistentVolume은 cluster에 volume 을 등록하기만 하는거라, 실제로 Pod 에서 이용하기 위해서는 PersistentVolumeClaim 을 정의해야 한다. Dynamic Provisioning 기능을 이용할 경우, PersistentVolumeClaim을 이용하는 시점에 Persistent Volume 을 동적으로 생성하는 것이 가능해서 순서가 반대가 될 수 있다. ## Volume [Volume Plug-in](https://kubernetes.io/docs/concepts/storage/volumes/) PersistentVolume과 달리 Pod 에 대해 정적으로 영역을 지정하기 위한 형태가 되기 때문에 충돌(경쟁)에 주의 **EmptyDir**
Pod 의 일시적인 디스크 영역으로 이용 가능
Pod 이 Terminate 되면 삭제됨
`# emptydir-sample.yml apiVersion: v1 kind: Pod metadata: name: sample-emptydir spec: containers: - image: nginx:1.12 name: nginx-container volumeMounts: - mountPath: /cache name: cache-volume volumes: - name: cache-volume emptyDir: {} `
**HostPath**
Kubernetes Node 상의 영역을 container 에 mapping 하기 위한 plug-in.
type
Directory
DirectoryOrCreate
File
Socket
BlockDevice
`# hostpath-sample.yml apiVersion: v1 kind: Pod metadata: name: sample-hostpath spec: containers: - image: nginx:1.12 name: nginx-container volumeMounts: - mountPath: /srv name: hostpath-sample volumes: - name: hostpath-sample hostPath: path: /data type: DirectoryOrCreate `
## PersistentVolume (PV)
Volume 이 Pod 정의에 포함되었다면 PersistentVolume은 resource 로 별도로 작성
엄밀히 말하면 Config&Storage resource 보다 Cluster resource.
PersistentVolume 종류
기본적으로 network 를 이용해 disk attach 한다.
Persistent Volumes - Kubernetes
GCE Persistent Disk
AWS Elastic Block Store
NFS
iSCSI
Ceph
OpenStack Cinder
GlusterFS
create PersistentVolume
label
용량
access mode
reclaim policy
mount option
storage class
setting for each PersistentVolume
`# pv_sample.yml apiVersion: v1 kind: PersistentVolume metadata: name: sample-pv labels: type: nfs envrionment: stg spec: capacity: storage: 10G accessModes: - ReadWriteMany persistentVolumeReclaimPolicy: Retain storageClassName: slow mountOptions: - hard nfs: server: xxx.xxx.xxx.xxx path: /nfs/sample `
`$ kubectl get pv `
**Label** Dynamic Provisioining 을 사용하지 않고 PersistentVolume을 사용하는 경우, 종류가 알 수 없게 되기 쉬우니 type, environment, speed 등의 label 을 붙이는걸 추천한다. Label 을 붙이면 PersistentVolumeClaim 에서 Volume 의 Label 을 지정가능하여 scheduling 을 유난하게 수행할 수 있다. **용량** Dynamic Provisioning 을 이용할 수 없을 경우, 무작정 용량을 크게 잡아선 안 된다. 요구한 용량과 가장 가까운 용량을 가진 storage 가 사용되기 때문. **access mode**
ReadWriteOnce (RWO) : 단일 node 에서 Read / Write
ReadOnlyMany (ROX) : 단일 node 에서 Write, 복수 노드에서 Read
ReadWriteMany (RWX) : 복수 node 에서 Read / Write
Persistent Volumes - Kubernetes
Reclaim Policy
Persistent Volume 사용이 끝난 후 처리방법
Retain
Recycle
Delete
data 를 삭제하지 않고 보존
다른 PersistentVolumeClaim 으로 재 mount 되는 일은 없다
data 삭제 (rm -rf ./*), 재이용가능한 상태로
다른 PersistentVolumeClaim 에서 재 mount 가능
PersistentVolume 삭제
주로 외부 volume 을 사용할 때 사용
Mount Options
PersistentVolume 의 종류에 따라 상이. 확인.
Storage Class
Dynamic Provisioning 의 경우 사용자가 PersistentVolumeClaim 을 사용하여 PersistentVolume 을 요구할 때 원하는 디스크를 지정하기 위해 사용.
Storage Class 선택 = 외부 Volume 종류 선택
`#storageclass_sample.yml apiVersion: storage.k8s.io/v1 kind: StorageClass metadata: name: sample-storageclass parameters: availability: test-zone-la type: scaleio provisioner: kubernetes.io/cinder `
PersistentVolume plug-in 별 설정
실제로는 종류에 따라 제각가이라 확인 필요
PersistentVolumeClaim (PVC)
PersistemtVolumeClaim 에 지정된 조건을 가지고 요구하여 Scheduler 는 현재 보유하고 있는 PersistentVolume 에서 적합한 Volume 을 할당
PersistentVolumeClaim 설정
label selector
capacity
access mode
Storage Class
PVC 에서 요구하는 용량이 PV 용량보다 작으면 할당된다. 8기가를 요구 했는데 딱 맞는게 없고 그 보다 큰 20 기가가 있으면 20기가 를 할당.
NFS 의 경우 Quota 가 걸려 있지 않아 PV 의 용량이 사실상 무시된다.
create PersistentVolumeClaim
`# pvc_sample.yml apiVersion: v1 kind: PersistentVolumeClaim metadata: name: sample-pvc spec: selector: matchLabels: type: "nfs" matchExpressions: - {key: environment, operator: In, values: [stg]} accessModes: - ReadWriteOnce resources: requests: storage: 4Gi `
`$ kubectl get pvc $ kubectl get pv `
PVC 가 PV 확보에 실패하면 pending 상태가 유지된다.
Retain Policy 를 사용하고 있을 경우, Pod 이 종료되면 Bound 상태에서 Released 상태로 바뀐다. 이 Released 상태가 된 PV 는 PVC 가 재할당하지 않는다.
use in Pod
spec.volumes 의 persistentVolumeClaim.claimName 을 사용
`# pvc_pod_sample.yml apiVersion: v1 kind: Pod metadata: name: sample-pvc-pod spec: containers: - name: nginx-container image: nginx ports: - containerPort: 80 name: "http" volumeMounts: - mountPath: "/usr/share/nginx/html" name: nginx-pvc volumes: - name: nginx-pvc persistentVolumeClaim: className: sample-pvc `
Dynamic Provisioning
동적으로 PV 를 만들기 때문에 용량을 효율적으로 사용하는 것이 가능하고 사전에 PV 를 만들어 둘 필요가 없다.
많은 Provisioner 가 ReadWriteOnce 밖에 지원하지 않는 경우가 많다.
`# Storage Class # storageclass_sample.yml apiVersion: storage.k8s.io/v1 kind: StorageClass metadata: name: sample-storageclass parameters: type: pd-standard provisioner: kubernetes.io/gce-pd reclaimPolicy: Delete `
`# PVC # pvc_provisioner_sample.yml apiVersion: v1 kind: PersistentVolumeClaim metadata: name: sample-pvc-provisioner annotations: volume.beta.kubernetes.io/storage-class: sample-storageclass spec: accessModes: - ReadWriteOnce resources: requests: storage: 3Gi `
`# Pod # pvc_provisioner_pod_sample.yml apiVersion: v1 kind: Pod metadata: name: sample-pvc-provisioner-pod spec: containers: - name: nginx-container image: nginx prots: - containerPort: 80 name: "http" volumeMounts: - mountPath: "/usr/share/nginx/html" name: nginx-pvc volumes: - name: nginx-pvc persistentVolumeClaim: claimName: sample-pvc-provisioner `
`$ kubectl get pv `
PersistentVolumeClaim in StatefulSet
StatefulSet 에서는 PersistentVolumeClaim 을 이용할 경우가 많고spec.volumeClaimTemplate 을 이용하면 별도로 PVC 를 정의할 필요 없다.
`apiVersion: apps/v1beta1 kind: StatefulSet metadata: ... spec: template: spec: containers: - name: sample-pvct image: nginx:1.12 volumeMounts: - name: pvc-template-volume mountPath: /tmp volumeClaimTemplates: - matadata: name: pvc-template-volume spec: accessModes: - ReadWriteOnce resources: requests: storage: 10Gi storageClassName: "sample-storageclass"
0 notes
Text
Getting Started with Alfresco and Kubernetes: The Beginning
There are several deployment methods to install Alfresco. Apart from the supported war-based deployments, Alfresco is moving towards a containerized deployment pattern. Alfresco supports Kubernetes based container deployments for production. There are also other recommended containerized deployment methods for non-production use. In this article series, we will look at using both dev and production-based deployment methods.
What is Kubernetes
Why use Kubernetes
How to use Kubernetes
The core problem solved by Kubernetes is desired state management of clustered software deployments. For example, we can configure what images to use, the number of instances to run, network, disk resources and other aspects that are needed to maintain the application in the desired state.
Kubernetes provides services like:
Service Discovery
Load Balancing
Automated Rollout and Rollback
Automatic Bin packing
Automatic healing
Secret and app config management
In short, Kubernetes allows us to declare how our application should be run. Using this definition, Kubernetes uses its services to maintain the desired state as defined. Kubernetes allows system administrators to manage both on-prem and cloud resources efficiently.
Kubernetes Components
Source: Kubernetes
There are 2 main components.
Kubernetes Master
Kubernetes Node
The Kubernetes Master component is responsible for managing all of the Kubernetes resources in the nodes. Typically, there are multiple clustered masters. In development we may run with a single master. The Kubernetes master has the following components:
kube-apiserver – exposes the k8s API and is the interface for the k8s master
etcd – is a key value store that distributes data between cluster nodes
kube-scheduler – assigns pods (more on this in a bit) to nodes
kube-controller-manager – uses the replication controller, endpoints controller, namespace controller and serviceaccounts controller to maintain the desired state of the cluster
cloud-controller-manager – beta component that was extract from k8s core, interacts with cloud provider when cluster components are delivered by a cloud provider
Kubernetes Nodes have the following components:
kubelet – runs on every node and registers the node with the kube-apiserver
kube-proxy – is a network proxy that runs on every node
Container Runtime – runs containers in pods
Kubernetes Node
Source: Kubernetes
A Kubernetes Node contains pods. Pods are the smallest objects that Kubernetes controls. Kubernetes manages pods and it does not directly manage the contents of the pods. As shown in the figure above, a pod can use multiple containers and volumes.
A container is a packaging mechanism that allows an application and its dependencies to be packaged into a digitally sealed image that can be run consistently in multiple environments.
A Kubernetes volume is a named storage location that allows data to be shared between multiple containers inside a pod. The lifetime of a container and a volume inside a pod is determined by the lifetime of the pod.
K8s Desired State
In this section, I show how you define the desired state of a Kubernetes Cluster using YAML. More details on this format can be found here: https://yaml.org/spec/1.2/spec.html. Kubernetes allows us to use either YAML or JSON format. It is recommended to use YAML over JSON.
Using these YAML files to configure the desired state helps us track changes using source control and gives us the flexibility to add complex structures that are not possible from the command line. YAML is made up of key-value pairs (Maps) and Lists. Never use tabs when editing the YAML files.
This example shows the desired state for the example cluster I describe below.
—
kind: Deployment
apiVersion: extensions/v1beta1
metadata:
name: k8s-client
labels:
release: test
app: client
spec:
replicas: 3
selector:
matchLabels:
release: test
app: client
template:
metadata:
labels:
release: test
app: client
spec:
containers:
- name: k8s-client-container
image: vprince/k8s-client-image:latest
ports:
- containerPort: 8080
---
kind: Service
apiVersion: v1
metadata:
name: k8s-client-service
spec:
type: NodePort
selector:
app: client
release: test
ports:
- nodePort: 30164
port: 8080
To deploy a Kubernetes application, there are 3 main pieces that are needed. They are:
Pod – references containers and volumes
ReplicaSet – describes how many pod instances should be maintained
Service – is used to expose the application over the network to external requests
In the example above, you will notice we use 2 types of Kubernetes objects, a Deployment and a Service.
A Deployment provides the necessary details for Pods and ReplicaSets. When a Pod with a unique IP dies, Kubernetes creates a new Pod with a different IP. To allow uninterrupted service, we need a way to abstract this functionality. A Kubernetes Service is used to abstract the access to the pods.
In the example, we have a Service called k8s-client-service and Deployment called k8s-client. The deployment configuration specifies that we need 3 pods running with the container loaded from the vprince/k8s-client-image:latest image. These containers will expose the application on port 8080. This port is exposed internally in the cluster. The service configuration maps the internal port 8080 to an external port 30164. An external user will only be able to access the Kubernetes application using port 30164.
K8s Deployment – Rolling
The people using an application will want to have availability at all times. At the same time, the business would like to update the application functionality regularly. To allow for these use cases, Kubernetes allows us to release regular application updates without affecting the users. In this section, we talk about one type of deployment called Rolling Deployment.
Kubernetes
One of the advantages of Kubernetes is the ease of managing an upgrade. In this diagram, I show how a rolling deployment is done.
When we are ready to deploy a new version (V2), we make the necessary changes in the Deployment definition and tell Kubernetes to apply the changes. The deployment will now create a 4th replica of the application with version V2.
When the container is up and it passes the liveness and readiness tests, it is added to the service. A liveness test shows if a container is unable to make progress due to deadlocks or other reasons. A readiness test shows if a container is ready to receive traffic. On slow starting containers, we can use startup probes. This disables the liveness and readiness test at startup. After startup, the liveness probe (mechanism to recreate a non-responsive container) starts monitoring the service.
After a V2 container is up, one of the old V1 containers can be killed. This container is first removed from the service and then killed after waiting for the default or configured pod grace period. This allows existing processing to be completed.
The above three steps are repeated for all the other replicas till all of the replicas are running version V2 of the application.
The other most used deployment methods are:
Blue/Green Deployment: In this deployment approach, a new set of containers with version V2 are spun up. When the health checks have passed, the load balancer is updated to point to V2 containers and the V1 containers are killed after the pod grace period.
Canary Deployment: In this deployment approach, a small number of V2 containers are released to be used by a subset of users in production. This reduces risk by allowing only a small number of users to be affected if any major issue is found that would result in a rollback.
Kubernetes is changing the way we build, deploy and manage our applications. Alfresco has started using Kubernetes to deploy their software. In my next article, I will be showing how to run Alfresco Content Services on a developers laptop using Docker for Desktop.[Source]-https://www.ziaconsulting.com/developer-help/kubernetes/
Basic & Advanced Kubernetes Certification using cloud computing, AWS, Docker etc. in Mumbai. Advanced Containers Domain is used for 25 hours Kubernetes Training.
0 notes
Text
Kubernetes Training
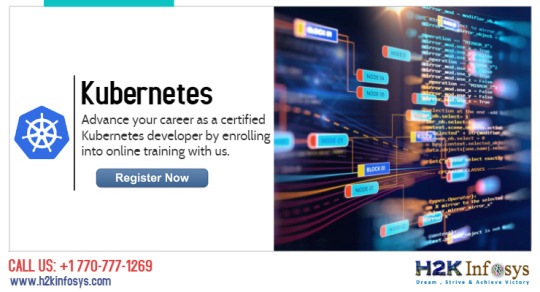
About kubernetes training course
Kubernetes is a portable, extensible open-source platform for managing containerized workloads and services that facilitates both declarative configuration and automation. It has a large, rapidly growing ecosystem. Google open-sourced the Kubernetes project in 2014. Kubernetes builds upon a decade and a half of experience that Google has with running production workloads at scale, combined with best-of-breed ideas.
In our kubernetes Training you will learn:
Various components of k8s cluster on AWS cloud using ubuntu 18.04 linux images.
Setting up AWS cloud environment manually.
Installation and setting up kubernetes cluster on AWS manually from scratch.
Installation and Setting up etcd cluster ( key-value ) datastore
Provisioning the CA and Generating TLS Certificates for k8s cluster and etcd server.
Installation of Docker.
Configuring and CNI plugins to wire docker containers for networking.
Creating IAM roles for the kubernetes cloud setup.
Kubernetes deployments, statefulsets, Network policy etc.
Why consider a kubernetes career path in IT industry?
Kubernetes demand has exploded and its adoption is increasing many folds every quarter.
As more and more companies moving towards the automation and embracing open source technologies. Kubernetes slack-user has more 65,000 users and counting.
Who is eligible for the kubernetes course?
Beginner to intermediate level with elementary knowledge of Linux and docker.
Enroll Today for our Kubernetes Training!
Contact Us:
https://www.h2kinfosys.com/courses/kubernetes-training
Call: USA: +1- 770-777-1269.
Email: [email protected]
https://www.youtube.com/watch?v=Fa9JfWmqR2k
0 notes
Text
After a successful installation and configuration of OpenShift Container Platform, the updates are providedover-the-air by OpenShift Update Service (OSUS). The operator responsible for checking valid updates available for your cluster with the OpenShift Update Service is called Cluster Version Operator (CVO). When you request an update, the CVO uses the release image for that update to upgrade your cluster. All the release artifacts are stored as container images in the Quay registry. It is important to note that the OpenShift Update Service displays all valid updates for your Cluster version. It is highly recommended that you do not force an update to a version that the OpenShift Update Service does not display. This is because a suitability check is performed to guarantee functional cluster after the upgrade. During the upgrade process, the Machine Config Operator (MCO) applies the new configuration to your cluster machines. Before you start a minot upgrade to your OpenShift Cluster, check the current cluster version using oc command line tool if configured or from a web console. You should have the cluster admin rolebinding to use these functions. We have the following OpenShift / OKD installation guides on our website: How To Deploy OpenShift Container Platform 4.x on KVM How To Install OKD OpenShift 4.x Cluster on OpenStack Setup Local OpenShift 4.x Cluster with CodeReady Containers 1) Confirm current OpenShift Cluster version Check the current version and ensure your cluster is available: $ oc get clusterversion NAME VERSION AVAILABLE PROGRESSING SINCE STATUS version 4.8.5 True False 24d Cluster version is 4.8.5 The current version of OpenShift Container Platform installed can also be checked from the web console – Administration → Cluster Settings > Details Also check available Cluster nodes and their current status. Ensure they are all in Ready State before you can initiate an upgrade. $ oc get nodes NAME STATUS ROLES AGE VERSION master01.ocp4.computingpost.com Ready master 24d v1.21.1+9807387 master02.ocp4.computingpost.com Ready master 24d v1.21.1+9807387 master03.ocp4.computingpost.com Ready master 24d v1.21.1+9807387 worker01.ocp4.computingpost.com Ready worker 24d v1.21.1+9807387 worker02.ocp4.computingpost.com Ready worker 24d v1.21.1+9807387 worker03.ocp4.computingpost.com Ready worker 24d v1.21.1+9807387 2) Backup Etcd database data Access one of the control plane nodes(master node) using oc debug command to start a debug session: $ oc debug node/ Here is an example with expected output: $ oc debug node/master01.ocp4.example.com Starting pod/master01ocp4examplecom-debug ... To use host binaries, run `chroot /host` Pod IP: 192.168.100.11 If you don't see a command prompt, try pressing enter. sh-4.4# Change your root directory to the host: sh-4.4# chroot /host Then initiate backup of etcd data using provided script namedcluster-backup.sh: sh-4.4# which cluster-backup.sh /usr/local/bin/cluster-backup.sh The cluster-backup.sh script is part of etcd Cluster Operator and it is just a wrapper around the etcdctl snapshot save command. Execute the script while passing the backups directory: sh-4.4# /usr/local/bin/cluster-backup.sh /home/core/assets/backup Here is the output as captured from my backup process found latest kube-apiserver: /etc/kubernetes/static-pod-resources/kube-apiserver-pod-19 found latest kube-controller-manager: /etc/kubernetes/static-pod-resources/kube-controller-manager-pod-8 found latest kube-scheduler: /etc/kubernetes/static-pod-resources/kube-scheduler-pod-9 found latest etcd: /etc/kubernetes/static-pod-resources/etcd-pod-3 3f8cc62fb9dd794113201bfabd8af4be0fdaa523987051cdb358438ad4e8aca6 etcdctl version: 3.4.14 API version: 3.4 "level":"info","ts":1631392412.4503953,"caller":"snapshot/v3_snapshot.go:119","msg":"created
temporary db file","path":"/home/core/assets/backup/snapshot_2021-09-11_203329.db.part" "level":"info","ts":"2021-09-11T20:33:32.461Z","caller":"clientv3/maintenance.go:200","msg":"opened snapshot stream; downloading" "level":"info","ts":1631392412.4615548,"caller":"snapshot/v3_snapshot.go:127","msg":"fetching snapshot","endpoint":"https://157.90.142.231:2379" "level":"info","ts":"2021-09-11T20:33:33.712Z","caller":"clientv3/maintenance.go:208","msg":"completed snapshot read; closing" "level":"info","ts":1631392413.9274824,"caller":"snapshot/v3_snapshot.go:142","msg":"fetched snapshot","endpoint":"https://157.90.142.231:2379","size":"102 MB","took":1.477013816 "level":"info","ts":1631392413.9344463,"caller":"snapshot/v3_snapshot.go:152","msg":"saved","path":"/home/core/assets/backup/snapshot_2021-09-11_203329.db" Snapshot saved at /home/core/assets/backup/snapshot_2021-09-11_203329.db "hash":3708394880,"revision":12317584,"totalKey":7946,"totalSize":102191104 snapshot db and kube resources are successfully saved to /home/core/assets/backup Check if the backup files are available in our backups directory: sh-4.4# ls -lh /home/core/assets/backup/ total 98M -rw-------. 1 root root 98M Sep 11 20:33 snapshot_2021-09-11_203329.db -rw-------. 1 root root 92K Sep 11 20:33 static_kuberesources_2021-09-11_203329.tar.gz The files as seen are: snapshot_.db: The etcd snapshot file. static_kuberesources_.tar.gz: File that contains the resources for the static pods. When etcd encryption is enabled, the encryption keys for the etcd snapshot will be contained in this file. You can copy the backup files to a separate system or location outside the server for better security if the node becomes unavailable during upgrade. 3) Changing Updates Channel (Optional) The OpenShift Container Platform offers the following upgrade channels: candidate fast stable Review the current update channel information and confirm that your channel is set to stable-4.8: $ oc get clusterversion -o json|jq ".items[0].spec" "channel": "fast-4.8", "clusterID": "f3dc42b3-aeec-4f4c-980f-8a04d6951585" You can decide to change an upgrade channel before the actual upgrade of the cluster. From Command Line Interface Switch Update channel from CLI using patch: oc patch clusterversion version --type json -p '["op": "add", "path": "/spec/channel", "value": "”]' # Example $ oc patch clusterversion version --type json -p '["op": "add", "path": "/spec/channel", "value": "stable-4.8"]' clusterversion.config.openshift.io/version patched $ oc get clusterversion -o json|jq ".items[0].spec" "channel": "stable-4.8", "clusterID": "f3dc42b3-aeec-4f4c-980f-8a04d6951585" From Web Console NOTE:For production clusters, you must subscribe to a stable-* or fast-* channel. Your cluster is fully supported by Red Hat subscription if you change from stable to fast channel. In my example below I’ve set the channel to fast-4.8. 4) Perform Minor Upgrade on OpenShift / OKD Cluster You can choose to perform a cluster upgrade from: Bastion Server / Workstation oc command line From OpenShift web console Upgrade your OpenShift Container Platform from CLI Check available upgrades $ oc adm upgrade Cluster version is 4.8.5 Updates: VERSION IMAGE 4.8.9 quay.io/openshift-release-dev/ocp-release@sha256:5fb4b4225498912357294785b96cde6b185eaed20bbf7a4d008c462134a4edfd 4.8.10 quay.io/openshift-release-dev/ocp-release@sha256:53576e4df71a5f00f77718f25aec6ac7946eaaab998d99d3e3f03fcb403364db As seen we have two minor upgrades that can be performed: To version 4.8.9 To version 4.8.10 The easiest way to upgrade is to the latest version: $ oc adm upgrade --to-latest=true Updating to latest version 4.8.10 To update to a specific version: $ oc adm upgrade --to= #e.g 4.8.9, I'll run: $ oc adm upgrade --to=4.8.9 You can easily review Cluster Version Operator status with the following command:
$ oc get clusterversion -o json|jq ".items[0].spec" "channel": "stable-4.8", "clusterID": "f3dc42b3-aeec-4f4c-980f-8a04d6951585", "desiredUpdate": "force": false, "image": "quay.io/openshift-release-dev/ocp-release@sha256:53576e4df71a5f00f77718f25aec6ac7946eaaab998d99d3e3f03fcb403364db", "version": "4.8.10" The oc adm upgrade command will give progress update with the steps: $ oc adm upgrade info: An upgrade is in progress. Working towards 4.8.10: 69 of 678 done (10% complete) Updates: VERSION IMAGE 4.8.9 quay.io/openshift-release-dev/ocp-release@sha256:5fb4b4225498912357294785b96cde6b185eaed20bbf7a4d008c462134a4edfd 4.8.10 quay.io/openshift-release-dev/ocp-release@sha256:53576e4df71a5f00f77718f25aec6ac7946eaaab998d99d3e3f03fcb403364db Upgrade OpenShift Container Platform from UI Administration → Cluster Settings→ Details→ Select channel→ Select a version to update to, and click Save. The Input channel Update status changes to Update to in progress. All cluster operators will be upgraded one after the other until all are in the minor version selected during upgrade: $ oc get co NAME VERSION AVAILABLE PROGRESSING DEGRADED SINCE authentication 4.8.5 True False False 119m baremetal 4.8.5 True False False 24d cloud-credential 4.8.5 True False False 24d cluster-autoscaler 4.8.5 True False False 24d config-operator 4.8.5 True False False 24d console 4.8.5 True False False 36h csi-snapshot-controller 4.8.5 True False False 24d dns 4.8.5 True False False 24d etcd 4.8.10 True False False 24d image-registry 4.8.5 True False False 24d ingress 4.8.5 True False False 24d insights 4.8.5 True False False 24d kube-apiserver 4.8.5 True False False 24d kube-controller-manager 4.8.5 True False False 24d kube-scheduler 4.8.5 True False False 24d kube-storage-version-migrator 4.8.5 True False False 4d16h machine-api 4.8.5 True False False 24d machine-approver 4.8.5 True False False 24d machine-config 4.8.5 True False False 24d marketplace 4.8.5 True False False 24d monitoring 4.8.5 True False False network 4.8.5 True False False 24d node-tuning 4.8.5 True False False 24d openshift-apiserver 4.8.5 True False False 32h openshift-controller-manager 4.8.5 True False False 23d openshift-samples 4.8.5 True False False 24d operator-lifecycle-manager 4.8.5 True False False 24d operator-lifecycle-manager-catalog 4.8.5 True False False 24d operator-lifecycle-manager-packageserver 4.8.5 True False False 7d11h
service-ca 4.8.5 True False False 24d storage 4.8.5 True False False 24d 5) Validate OpenShift CLuster Upgrade Wait for the upgrade process to complete then confirm that the cluster version has updated to the new version: $ oc get clusterversion NAME VERSION AVAILABLE PROGRESSING SINCE STATUS version 4.8.10 True False 37h Cluster version is 4.8.10 Checking cluster version from the web console To obtain more detailed information about the cluster status run the command: $ oc describe clusterversion If you try running the command oc adm upgrade immediately after upgrade to the latest release you should get a message similar to below: $ oc adm upgrade Cluster version is 4.8.10 No updates available. You may force an upgrade to a specific release image, but doing so may not be supported and result in downtime or data loss. Conclusion In this short guide we’ve shown how one can easily perform minor upgrade of OpenShift container cluster version. The process can be initiated from a web console or from the command line, it all depends on your preference. In our articles to follow we’ll cover steps required to perform Major versions upgrade in anOpenShift container cluster.
0 notes