#javascript do while loop
Explore tagged Tumblr posts
Visit Tumblr Blog
Explore Tumblr blogs with no restrictions, modern design and the best experience.
Last Seen Tumblr Blogs


Fun Fact
The average Tumblr user visits about 67 pages every month.
Text
✨LOOP CRITTER SHIMEJI!✨
IT'S FINALLY DONE!!!
Finally, you can have a critter of your very own! Or 50 of them! Your call!
Looplet features a couple more traits than your standard shimeji, including some interactions, a hotspot (so you can pet them) and adjusted chances for various animations to play. Ultimately, they'll make doing anything on your computer 5x harder by running around and distracting you constantly :)
This shimeji contains vague spoilers for lategame In Stars and Time, but you can probably get away with using them if u haven't finished the game, since they are so so vague. Still, be mindful of this if you care about spoilers!
To use the shimeji simply download, unzip, make sure you have Javascript 8 installed, and doubleclick the jar file inside the folder! If you have any other issues running the shimeji, please consult the readme txt inside the folder.
ALSO! If you encounter any bugs while using the shimeji, please let me know! Editing the code was a bit nightmarish (there's so little documentation online) so it's a bit held together with duct tape and I wouldn't be surprised if anything went wrong. As a side note, yes the 'dragging' animation will delete one of the looplets if cloning is disabled, unfortunately there's nothing I can do about that one 😔
In any case… have fun, everyone!
------------------------------------------ ✨GOOGLEDRIVE LINK TO THE DOWNLOAD (CLICK HERE)✨ ------------------------------------------

5K notes
·
View notes
Text
Tips for understanding complex topics
I've struggled with this but I'm adapting, you know? So here are some of my tips I use for this :)
If you can't understand it at once, do not think that it is hard
Many times, the topic itself if simple but the way the textbook has described it is complex so go and search for related videos and Google about it until you've got a hint about what it is.
If it's complicated, divide the sentence.
When you find yourself getting completely lost in a topic while banging your head against the wall because it's so confusing.... separate each part of the sentence while you write each part as you say it out loud. It'll help you to atleast get a short idea about the subject.
Read! Read! Read!
Read it over and over again and underline the words you think are important, write them down, explain it to yourself, draw small diagrams around your notes, connect them through visual representation. The more you use different types of senses, the better you understand it.
Give yourself time.
Let yourself grasp what the whole topic is about, do not under any circumstances have a time limit for difficult topics. I took days just to understand how Javascript loops work and I'm still not fully clear about it but i can explain the general, very basic purpose of it.
Explain it to someone or yourself
The best way to learn is to teach, this actually does work. It helps you to put your understanding in words and clear any underlying questions. And lastly...
Handwritten notes!
I cannot stress this enough but things that you've written down generally stay in your memory for longer durations. I also prefer handwritten notes to digital ones cause personally it works better.
Hope this helps! :D
#school#studyblr#exam season#exams#high school#study notes#study motivation#study blog#studyspo#study aesthetic#study with me#studying#student#study rant#study techniques#study tips#studying tips#studyblr community#studybrl#study productivity#study plan#study progress#studyinspo#study inspiration#study session#studyspiration#studying inspiration#studying inspo#Study#100 days of productivity
179 notes
·
View notes
Note
genuine question, where are you getting the gifs of the diamond/pearl sprites? usually when i see people reference sprites from gen 4 they use the updated ones from platinum, it’s kinda neat seeing the original ones
I get the sprites and official art from Bulbapedia! Their archive has been a huuuge help. ^^
They use JavaScript to animate the sprites, though, so I’ve been converting them to gif’s since tumblr doesn’t really take js or apng’s.
This is also why the ones I post don’t loop while theirs do; I made them non-looping to match what happens in d/p! (and the rest of gen 4 really)
#not a poll#the elder beato#ive been getting the 3d model images from serebii#I hope this is comprehensive it’s about 3 am here
20 notes
·
View notes
Note
hi there! sorry if you've gotten a similar ask before. do you write wayfarer directly into twine or do you keep it in a separate doc? do you just have really clearly labeled sections in a word doc or something or is there a specific program you use to keep track of every story path? basically, with something as expansive and w/ as many routes as wayfarer, how do you keep all your writing organized?
I have answered this before, but I can't seem to find my posts on the subject (you may want to peruse my coding in twine tag, the masterpost has a bunch of different resources for this kind of thing!).
But in short, no, I do not write Wayfarer directly into Twine. This could functionally work for a very small game, but I would still advise against it as Twine doesn't really work as a word processor. You can't proof-read in it.
My process has three main steps:
Outlining
Writing
Coding
Compiling
Outside of my big beat chart (which spans the whole game), I break each episode down into their own outlines, and then break the routes of each episode down into their own outlines. Sometimes specific sections end up with their own outlines too. My system probably doesn't make much sense to anyone other than me, but as long as I know what the divisions are, then it's all good.
I write in MS Word. Each episode has its own folder (sometimes with subfolders) and every section of the game gets its own document.

Here's the main folders, each episode goes into its own thing.
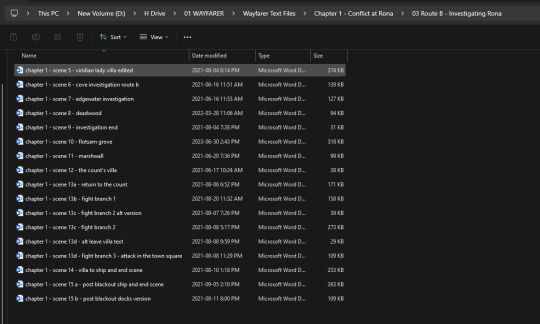
This is an subfolder for Episode 1, specifically Route B.
Within my word documents themselves, I use a colour-coding system for separating out branches and sections. This is extremely useful for writing dialogue loops, like this:

I also add in any coding notes (variables, true/false states, stat checks) while I am writing so I know what I need to do when I sit down to code 4+ months later. I usually throw a X or XX on choices after I have written them as a note to myself that I have finished it (this is just personal shorthand - X means I've done the pass version of a check, XX means I've done the pass and fail states).
I use about 8-10 colours in my documents; I have a set of MS Word macros set up so I can easily switch between them.
I share my word documents with my editor via OneDrive, which makes it easy for her to got through and proofread.
I use MS Word because I've been using it to write since the 2000s and it's what I prefer to use. I have also been writing professionally for over a decade now, so I have systems and strategies in place that work for me that I've developed for myself over time. But if you're new to writing and you're looking for a word processor that can also help you with outlining and keeping your story straight, something like Scrivener may be helpful.
One the text is ready to be coded, it's a lot of copy/pasting from Word into Twine. When I'm coding I will typically be running multiple programs at once:
MS Word
MS Excel (for my variable sheets)
Twine
Notepad++ (which has some regularly used code stored in it; I also use it to edit CSS and Javascript, as well as any really code-heavy sections since it's easier to do that in Notepad++ than it is in the Twine editor)
Notepad (just the regular version - I use it for writing notes to myself while I'm coding)
a web browser to launch tests in as I code
Once I am done coding and I have tested things, it's time to compile. The Twine editor can only handle so many passages and text in one file (around 500-700 passages before you hit massive lag), so I break Wayfarer into multiple story files. Having multiple story files also makes it really easy for me to cross-reference events (if I need to grab a passage title to reference it later) because I don't have to look through one big file. If I know the event happens in Episode 2's first scene, then I know I need to open Chapter_2.1.
My Twine library looks like this at the moment:
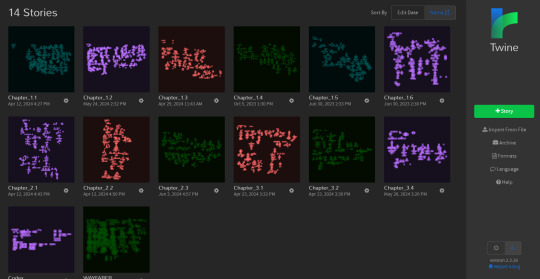
I am using an old version of the editor (with an up-to-date version of SugarCube) since I didn't like the new one. I don't necessarily recommend using the Twine editor when you can easily make your game with Twee extensions in Visual Studio Code and have better support and functionality, but this is what I like and it really comes down to personal preference.
But because everything is in separate files, I have to merge them altogether. I have Tweego installed on my PC; it's run through the command prompt and outputs multiple story files into one HTML file. I've talked about this process here and here.
And that's basically it! I don't think there's a one-size-fits-all solution to keeping track of your IF. You need to figure out what works for you, based on your writing and outlining habits, how big your story is, and how much you intend to keep track of.
Hope this helps!
#wayfarer#wayfarer if#coding in twine#twine#twine game#interactive fiction#interactive novel#answered
46 notes
·
View notes
Text
Javascript help please!
I'm working through the different kinds of loops in javascript today… ❄️ for ❄️ do while ❄️ while ❄️ nested loops…. Trying to figure out exactly what each one does is a little tricky, so if anyone has any good infographics I would be so very grateful! ❄️
10 notes
·
View notes
Text
advent of code 2023 day 1
so for the record i'm being pretty casual about this, i have stuff going on this month + my health is wonky as usual so i may not actually be doing this everyday, might do puzzles late, etc
anyway! i'm still a bit of a novice i think, but i decided i would try out this advent of code thing, seemed fun. i'm using html/javascript since that's what i have any experience in right now.
my solutions below the cut so you aren't spoiled if you want to do it yourself!
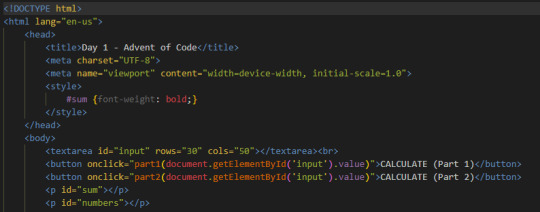
i decided to keep my part 1 and part 2 solutions separated, they're on the same document. i have some really basic HTML that looks like this:

and this was my solution for part 1 before words got involved:

for the record i have taught myself basic RegEx multiple times, and every time i forget nearly everything, so most of my time spent on this solution was refreshing myself on a little bit of RegEx. i think this is pretty straightforward - split the input by line, then loop through each line and remove anything that isn't a number, then take the first and last digit in each of the remaining strings, add them all together for the result.
the solution for part 2 on the other hand:
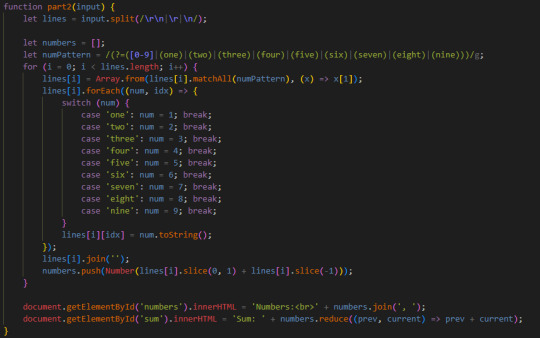
i actually found this somewhat frustrating because the problem itself didn't clearly explain whether something like "eightwothree" in the provided example should be "8 2 3" or "8 3"... my original solution disregarded overlapping words like that. this caused issues because if you had something like... i don't know, threeeightwo, my program would make the resulting two digit number 38 instead of 32, resulting in a wrong sum when adding all of them together.
once i realized the issue i was a bit stumped on how to deal with this and get the overlapping words to be included. i knew that i could manually loop through each position in the string, looking for any of the nine digits in either their letter or numeric form, and when it finds a result, push it to an array of results or whatever, but i really didn't want to do that because it would be unnecessarily bulky in my opinion. and i wanted to keep experimenting with RegEx instead. so after some googling i landed on amending the numPattern and changing
lines[i] = lines[i].match(numPattern);
to
lines[i] = Array.from(lines[i].matchAll(numPattern), (x) => x[1]);
and while it works great, i admittedly don't fully understand it. like, conceptually i get its intention and the end result it spits out, but i wish i understood what was happening under the hood with .matchAll() better. i tried to wrap my brain around it, but i'm too hungry and too sick feeling to properly teach myself right now, so i've decided to drop it and if it's still itching at me later, i'll come back when i feel better to understand it.
anyway, after that, still pretty straightforward - once it's taken out all of the numbers in both numeric and written format, it loops through the results and converts the words to digits, then joins all the digits together, then does the same thing as before with slicing off the first and last digit to make two digit numbers and adding them all together at the end with .reduce().
15 notes
·
View notes
Text
Morning python study log 03-11-2023
So these days I have started to stream my code study.
So today morning I learnt:
How to take absolute value. Found some anomaly in the system lol. Basically it was not taking abs() but fabs() however my python was the latest version
I studied how to sort three numbers in python, although I have done this in other language since the syntax of python is still foreign to me I had difficulty sorting them in ascending order and also descending order using the built in function sorted() and also making my own implementation
I understood what is range function and how to use it with for loops, had a bit of hit and miss while understanding how it really worked but google's bard helped, I also learnt about reverse sorting
I learnt what is interning while trying to understand the difference between identity operators and equality operators. Found some anomaly in my system again, that my computer's range of interning is much larger than what is documented ?
I learnt what is keyword argument when with using reverse built in sort, yeah so I was amazed that the order of arguments didn't mattered for keyword argument.
I was also confusing syntax of python with javascript since that is what is what recently code in.
Learnt about what does len() function does, like properly rather than just guessing about what it does.
understood about control statements such as if, else and elif
learnt about break and continue in loops in python which is same as java script.
learnt about how to check the divisibility of a number. I didn't knew that it was separate topic in my syllabus I just thought it was something people would knew.
Learnt the basics about on how to make a READ , EVAL PRINT LOOP, REPL
Learnt about stupid pattern program in python, I don't know why the heck they still teach these things and put it in syllabus. There is no real world use of it as far as I can see. I still have to post the notes about it in my blogs and store it my cloud drive.
Learnt how to do a summation of series, using and not using numpy.
figured out how to do a factorial of a number
was trying to make an short algorithm on how to do the fibonacci series but well, I was so sleepy that my mind didn't worked as it should, I took the hint from bard then felt bad that I was directly looking at the solution when rather I should sleep and approach the problem from afresh in next study stream. So stopped my study stream.
youtube
#programmer#studyblr#learning to code#python#coding#progblr#codeblr#programming#code log#study log#studying#Youtube
9 notes
·
View notes
Text
Dicas e Recomendações p/ iniciantes em Programação
Tenho me deparado constantemente com os questionamento, de colegas e amigos, sobre: como começar a programar ou para alguns, "codar" ?
Apesar de não ser a minha especialização e muito longe área de interesse, pensei em uma maneira de construir um fluxograma de processo e recomendação de conteúdo para estudar e aprender a programar.
Mas de antemão, deixarei um adendo e recorte de um comentário que li num vídeo do YouTube, tratando justamente sobre o assunto, de Waldeck Vieira.
"Sou desenvolvedor com anos de experiência e vou dar as minhas dicas, principalmente com tantas promessas absurdas que tem hoje de cursos que fazem você virar desenvolvedor em um mês!
Curso é importante sim, mas não vai te fazer virar um desenvolvedor bom em poucos meses!
Estudar é importante sim, mas o que vai fazer você ficar bom, é o treino! Treinar, treinar e treinar muito todos os itens que vou destacar abaixo. É igual aprender a tocar um piano bem, vc nunca vai ser um bom pianista em poucos meses e só estudando teoria, o que vai fazer vc ficar bom é o treino diário!
Não se preocupe em decorar nada, o importante é treinar e entender! Decorar só serve para fazer prova de colégio ou prova de emprego. Mas não mede sua capacidade! Os comandos vc decora praticando!
Já vi muito youtuber bom dizendo que precisa decorar as coisas! Isso é um absurdo, ainda mais hoje que tudo muda toda hora! E cada linguagem vc tem uma forma de escrever os comandos(sintaxe), então não precisa decorar tudo! Ninguém, nem o melhor dev do mundo sabe tudo decorado! O que ele sabe é resolver e entende muita coisa, quando esquece a sintaxe de algo, ele simplesmente consulta na documentação ou na net!
Você só começa a ser um bom desenvolvedor a partir de pelo menos, no mínimo, uns 6 meses de muita prática! Agora ser um dos melhores só fazendo projetos reais e tendo um emprego! Então, mesmo que vc pense em trabalhar com a programação, tenha um emprego, por pelo menos 1 ano! Vc vai ver como vc vai evoluir!
Não precisa começar a estudar só no caderno, escolha uma linguagem, como Python ou JavaScript e pratique nela todos os conceitos!
Itens mais importante para começar e eu iria nessa sequencia. Pratique por pelo menos duas semanas cada item, e tente entender muito bem, e já use uma linguagem, tipo Python ou JavaScript:
Variáveis e seus tipos, case sensitive, constantes, identação do código, condicionais (o famoso if), loops (os famosos for e while), procedures, funções, algoritmos para tratamento de strings, arrays, estrutura de dados aplicada na linguagem escolhida(Essa realmente é uma parte muito importante), conceitos de orientação a objeto. Esse para mim é o básico.
Treine pelo menos uns 5 meses tudo isso! Depois você precisa estudar e praticar, HTML, CSS combinado com JavaScript, mesmo que vc não vá desenvolver para a web, mas vc pode precisar criar um serviço na web para um sistema que vc desenvolveu! Depois estude linguagem SQL para banco de dados, usando uma IDE de desenvolvimento para banco (SQL Server ou MySQL), eu indico!
E uma dica, banco de dados é um mundo a parte, e vc precisa dominar muito a linguagem SQL, dos bancos relacionais (SQL Server, MySQL, Oracle e etc), que é comum em todos os bancos de dados, pois é com ela que vc manipulas os dados, e corrige erros, aumenta a performance de uma consulta e etc!
Então depois de pelo menos mais de 6 meses a 1 ano, estudando e praticando muito tudo isso que coloquei. Desenvolva projetos reais, usando uma linguagem e um banco de dados. E a partir dai, se possível arrume um emprego, e sempre estude e pratique muito em qualquer linguagem e nas novidades do mercado! É isso!".
Portanto, repassado todos os alertas que já venho feito, passarei indicações de conteúdo e ferramentas.
Começaremos pela IDE, mas o que é isso? é um Ambiente de Desenvolvimento no qual utilizamos para programar ou codificar.
Vale ressaltar que a IDE pode variar de linguagem para linguagem no qual ira programar. Citarei alguns a seguir, gratuitos:
JavaScript, recomendo o Visual Studio Code. Pois o VS Code, é uma ferramenta simples, esta sendo constantemente tendo correção de bugs, disponível em diversos idiomas, inclusive PT-Br, compatível com os sistemas: Windows, Linux e Mac. E é possível compilar nas mais diversas linguagens de programação, além de muitas outras funcionalidades, que deixarei vocês conhecerem por si mesmos;
Python, indico o PyCharm e Jupyter Notebook. O VS Code também é uma boa, porém um pouco mais trabalhoso para desenvolver. Mas porque, o python se utiliza de uma IDE especifica ? Por causa, da necessidade de invocar Bibliotecas (coleção de subprogramas usados no desenvolvimento de softwares). Quando trabalhamos com o VS Code por exemplo, toda biblioteca que for utilizar, ira ter que realizar a instalação através do Prompt de comando, ou Terminal, se seu sistema for Linux. Já se vc utilizar IDEs como: Pycharm e Jupyter Notebook, não terá a dor de cabeça de pensar nesse aspecto. E o fato de que não tem a necessidade de criar ou ajustar um venv e outros;
SQL, destaco o MySQL Workbench, Oracle SQL e SQL Server Management Studio (SSMS). O SQL, é uma linguagem que geralmente se organiza em planilha ou tabelas de larga escala, que para quem deseja programar nesta linguagem se faz necessário uma ferramenta que trabalhe especificamente com isso e proporcione uma visualização clara e precisa dos dados, para assim poder fazer a estruturação.
Por se tratar de guia para programadores iniciantes, ficaremos apenas nesses linguagens.
Acrescento que ao contrário do que muitos pensam, HTML e CSS, NÃO SÃO LINGUAGENS DE PROGRAMAÇÃO!
São apenas Linguagens de Marcação e Formatação de Texto e Estilo.
HTML: linguagem de marcação utilizada para estruturar os elementos da página, como parágrafos, links, títulos, tabelas, imagens e até vídeos.
CSS: linguagem de estilos utilizada para definir cores, fontes, tamanhos, posicionamento e qualquer outro valor estético para os elementos da página.
JavaScript: linguagem de programação utilizada para deixar a página com mais movimento, podendo atualizar elementos dinamicamente e lidar melhor com dados enviados e recebidos na página.
Exemplo dessa combinação:
Explicação simples e didática que emprestei da Alura.
Já recomendado IDEs, esclarecido algumas confusões que ocorrem, darei prosseguimento para a indicação de conteúdos para estudo.
Eu particularmente, comecei a ter noção de lógica de programação e a saber a programar jogando os APPs, que foram desenvolvidos especificamente para isso:
Grasshopper, é o aplicativo desenvolvido pela Google, que tem o objetivo de ensinar a linguagem JavaScript, Recursos: quebra-cabeças visuais desenvolvem suas habilidades de resolução de problemas e solidificam os conceitos de programação; feedback em tempo real te orienta como um professor; coleciona conquistas à medida que aprende novas habilidades e ganha certificado.
O aplicativo está disponível para Android e iOS.
Mimo, o aplicativo te instruí a desenvolver em: HTML, JavaScript, CSS, Python e SQL. Além do que já destaquei no app anterior e a possibilidade de dialogar e competir com outra pessoas que também o utilizam para aprender a programar.
O aplicativo está disponível para Android e iOS.
Meoweb: Jogo de programação, a ideia do jogo é que você precisa ajudar Agatha a resgatar os gatinhos perdidos. Você precisa resolver os quebra-cabeças que estão nas plataformas para ajudá-la. Você receberá diferentes desafios que precisa resolver para chegar ao próximo nível. Que consiste em comandos em CSS, é muito fofo e divertido.
Disponível apenas para Android.
Code Combat, é jogo apenas na versão web, onde vocês podem aprender a desenvolver em Python, JavaScript, CoffeeScript e Lua. A curva de aprendizado é bastante suave, começando com comandos básicos de lógica em um universo agradável e colorido. Tudo isso é possível graças à ação de colaboradores do mundo todo, em um projeto aberto, com página no Github.
Disponível em diversos idiomas, incluindo português.
E a vídeos aulas:
Canal Curso em Vídeo :
Algoritmos e Lógica de Programação;
Banco de Dados com MySQL;
HTML5 + CSS3 + JavaScript;
HTML + CSS (módulo 1);
HTML + CSS (módulo 2);
HTML + CSS (módulo 3);
HTML + CSS (módulo 4);
JavaScript e ECMAScript;
Python 1 (princípios básicos);
Python 2 (Estrutura de Controle);
Python 3 (Estrutura Composta).
Vale ressaltar que uma coisa importantíssima é tornar disponível e visível os seus trabalhos, e uma ótima plataforma para isso, com uma ampla comunidade é o GitHub.
Mas o que é o GitHub ?
É uma plataforma de hospedagem de código-fonte e arquivos com controle de versão usando o Git. Ele permite que programadores, utilitários ou qualquer usuário cadastrado na plataforma contribuam em projetos privados e/ou Open Source de qualquer lugar do mundo. - Wikipédia.
Por ser uma plataforma que será importante para o desenvolvimento de seus projetos e trabalhos, e portfólio futuro, deixarei vídeos que te auxiliaram a adquirir o conhecimento pleno das funcionalidades da plataforma.
Curso de Git e GitHub.
Como personalizar o seu perfil no GitHub.
Ademais, acredito que isso é tudo pessoal, o vídeo que me inspirou em escrever esse post na tentativa de auxiliar, desfazer desentendidos e indica conteúdo, foi o casal do canal Código Fonte TV: O MÍNIMO QUE VOCÊ PRECISA SABER ANTES DE PROGRAMAR!.
No qual desmitifica e apoia toda a argumentação e pontos que destaquei até aqui e é claro recomenda mais conteúdo teórico, além do que já escrevi.
Espero ter ajudado em alguma coisa ou mesmo tirado a dúvida de vocês, sintam-se a vontade de curtir, compartilhar e comentar nestes post e outros.
Desde já agradeço pelo seu tempo e atenção, e até um próximo post.
Referências Bibliográficas do que foi abordado:
HTML, CSS e Javascript, quais as diferenças? ;
IDE PARA PYTHON: O QUE É, COMO ESCOLHER E LISTA DAS MELHORES;
Link das IDEs:
Jupyter Notebook;
MySQL Workbench;
Oracle SQL;
PyCharm;
SQL Server Management Studio (SSMS);
Visual Studio Code.
Vídeo Aulas recomendadas:
Algoritmos e Lógica de Programação;
Banco de Dados com MySQL;
Curso de Git e GitHub.
Como personalizar o seu perfil no GitHub.
HTML5 + CSS3 + JavaScript;
HTML + CSS (módulo 1);
HTML + CSS (módulo 2);
HTML + CSS (módulo 3);
HTML + CSS (módulo 4);
JavaScript e ECMAScript;
Python 1 (princípios básicos);
Python 2 (Estrutura de Controle);
Python 3 (Estrutura Composta).
O MÍNIMO QUE VOCÊ PRECISA SABER ANTES DE PROGRAMAR!
Aplicativos recomendados:
Code Combat;
Grasshopper;
Meoweb: Jogo de programação;
Mimo.
13 notes
·
View notes
Text
JavaScript Frameworks
Step 1) Polyfill
Most JS frameworks started from a need to create polyfills. A Polyfill is a js script that add features to JavaScript that you expect to be standard across all web browsers. Before the modern era; browsers lacked standardization for many different features between HTML/JS/and CSS (and still do a bit if you're on the bleeding edge of the W3 standards)
Polyfill was how you ensured certain functions were available AND worked the same between browsers.
JQuery is an early Polyfill tool with a lot of extra features added that makes JS quicker and easier to type, and is still in use in most every website to date. This is the core standard of frameworks these days, but many are unhappy with it due to performance reasons AND because plain JS has incorporated many features that were once unique to JQuery.
JQuery still edges out, because of the very small amount of typing used to write a JQuery app vs plain JS; which saves on time and bandwidth for small-scale applications.
Many other frameworks even use JQuery as a base library.
Step 2) Encapsulated DOM
Storing data on an element Node starts becoming an issue when you're dealing with multiple elements simultaneously, and need to store data as close as possible to the DOMNode you just grabbed from your HTML, and probably don't want to have to search for it again.
Encapsulation allows you to store your data in an object right next to your element so they're not so far apart.
HTML added the "data-attributes" feature, but that's more of "loading off the hard drive instead of the Memory" situation, where it's convenient, but slow if you need to do it multiple times.
Encapsulation also allows for promise style coding, and functional coding. I forgot the exact terminology used,but it's where your scripting is designed around calling many different functions back-to-back instead of manipulating variables and doing loops manually.
Step 3) Optimization
Many frameworks do a lot of heavy lifting when it comes to caching frequently used DOM calls, among other data tools, DOM traversal, and provides standardization for commonly used programming patterns so that you don't have to learn a new one Everytime you join a new project. (you will still have to learn a new one if you join a new project.)
These optimizations are to reduce reflowing/redrawing the page, and to reduce the plain JS calls that are performance reductive. A lot of these optimatizations done, however, I would suspect should just be built into the core JS engine.
(Yes I know it's vanilla JS, I don't know why plain is synonymous with Vanilla, but it feels weird to use vanilla instead of plain.)
Step 4) Custom Element and component development
This was a tool to put XML tags or custom HTML tags on Page that used specific rules to create controls that weren't inherent to the HTML standard. It also helped linked multiple input and other data components together so that the data is centrally located and easy to send from page to page or page to server.
Step 5) Back-end development
This actually started with frameworks like PHP, ASP, JSP, and eventually resulted in Node.JS. these were ways to dynamically generate a webpage on the server in order to host it to the user. (I have not seen a truly dynamic webpage to this day, however, and I suspect a lot of the optimization work is actually being lost simply by programmers being over reliant on frameworks doing the work for them. I have made this mistake. That's how I know.)
The backend then becomes disjointed from front-end development because of the multitude of different languages, hence Node.JS. which creates a way to do server-side scripting in the same JavaScript that front-end developers were more familiar with.
React.JS and Angular 2.0 are more of back end frameworks used to generate dynamic web-page without relying on the User environment to perform secure transactions.
Step 6) use "Framework" as a catch-all while meaning none of these;
Polyfill isn't really needed as much anymore unless your target demographic is an impoverished nation using hack-ware and windows 95 PCs. (And even then, they could possible install Linux which can use modern lightweight browsers...)
Encapsulation is still needed, as well as libraries that perform commonly used calculations and tasks, I would argue that libraries aren't going anywhere. I would also argue that some frameworks are just bloat ware.
One Framework I was researching ( I won't name names here) was simply a remapping of commands from a Canvas Context to an encapsulated element, and nothing more. There was literally more comments than code. And by more comments, I mean several pages of documentation per 3 lines of code.
Custom Components go hand in hand with encapsulation, but I suspect that there's a bit more than is necessary with these pieces of frameworks, especially on the front end. Tho... If it saves a lot of repetition, who am I to complain?
Back-end development is where things get hairy, everything communicates through HTTP and on the front end the AJAX interface. On the back end? There's two ways data is given, either through a non-html returning web call, *or* through functions that do a lot of heavy lifting for you already.
Which obfuscates how the data is used.
But I haven't really found a bad use of either method. But again; I suspect many things about performance impacts that I can't prove. Specifically because the tools in use are already widely accepted and used.
But since I'm a lightweight reductionist when it comes to coding. (Except when I'm not because use-cases exist) I can't help but think most every framework work, both front-end and Back-end suffers from a lot of bloat.
And that bloat makes it hard to select which framework would be the match for the project you're working on. And because of that; you could find yourself at the tail end of a development cycle realizing; You're going to have to maintain this as is, in the exact wrong solution that does not fit the scope of the project in anyway.
Well. That's what junior developers are for anyway...
2 notes
·
View notes
Text
Is selenium a testing tool?
Yes, Selenium is a powerful and open-source testing tool specifically designed for web application testing. It helps the tester and developer to automate the repetitive tasks with the help of a real browser simulating real user interaction such as clicking on any web elements, entering text in a textbox, and navigating across different pages, unlike other automation testing tools, It also supports different programming languages like Java, Python, C#, JavaScript and Ruby, etc. Selenium allows testers or developers to write tests in different programming languages they are comfortable with. Selenium is platform independent and can run across different operating systems like Windows, macOS, and Linux and also it supports cross-browser testing in which you can test your web application on different browsers It works seamlessly on different browsers and supports Chrome, Safari, Firefox , Internet Explorer and edge. This feature of selenium makes it ideal for teams working in different developing environments.
Initially selenium launched in 2004 by Jason Huggins, from there it considerably grown in IT industries and widely used tool. Currently it is maintained by a large community of contributors, which ensuring it will remain up to date with the latest browser features and standard. Selenium framework mostly support a large range of testing needs through its component, including selenium Webdriver, selenium grid and Selenium IDE.
Selenium Webdriver: It is the most important and core component of selenium which allows browser automation, it interacts with browser control and enables precise interactions of users with web applications. With the help of Selenium Webdriver, one can create robust end-to-end tests for web applications. This feature makes it more popular and useful for continuous integration and deployment. Nowadays it’s the first choice of tester when it comes to functional and regression testing.
Selenium Grid: This will support parallel test execution. Selenium grid allows users to run multiple test cases simultaneously on different machines and browsers, which will reduce the total execution time to test the application across different configurations. These features of the selenium grid are really helpful when it comes to testing large-scale project that requires extensive cross-browser testing as it supports efficient use of resources and accelerates feedback loops in the development procedure.
Selenium IDE: Selenium IDE is a browser extension that helps us to record and play the test case as per our needs, this is also known as a record and play tool, it enables a quick and accessible way to create simple test cases without needing to write any code. It helps beginners in automation testing who do not have more knowledge in automation testing. It allows the user to automate their action on the application replay it and verify the functionality which needs to be done.
As we know selenium is more flexible as compared to other tools, also supports various programming languages, supports different browses, and is compatible with CI/CD tools making it a more foundational tool while automating a web application, However, it also comes with different challenges, particularly handling dynamic elements and synchronization issue in highly interactive web applications. To overcome these challenges tester cab, use explicit wait and custom code to stabilize the test cases. The biggest challenge for selenium is that it does not support desktop applications and mobile applications which limits its scope.
In summary, selenium is more than just a testing tool, as we know that it is more flexible, supports different operating systems, with different programming languages, and provides a cross-browser testing feature with a scalable framework this feature allows the tester to write and automate browser action effectively and allow the tester to test their web application efficiently. Seleniums robust system and adaptability make it valuable for maintaining high quality standards across different environments.
0 notes
Text
Compiling CSS With Vite and Lightning CSS
New Post has been published on https://thedigitalinsider.com/compiling-css-with-vite-and-lightning-css/
Compiling CSS With Vite and Lightning CSS
Suppose you follow CSS feature development as closely as we do here at CSS-Tricks. In that case, you may be like me and eager to use many of these amazing tools but find browser support sometimes lagging behind what might be considered “modern” CSS (whatever that means).
Even if browser vendors all have a certain feature released, users might not have the latest versions!
We can certainly plan for this a number of ways:
feature detection with @supports
progressively enhanced designs
polyfills
For even extra help, we turn to build tools. Chances are, you’re already using some sort of build tool in your projects today. CSS developers are most likely familiar with CSS pre-processors (such as Sass or Less), but if you don’t know, these are tools capable of compiling many CSS files into one stylesheet. CSS pre-processors help make organizing CSS a lot easier, as you can move parts of CSS into related folders and import things as needed.
Pre-processors do not just provide organizational superpowers, though. Sass gave us a crazy list of features to work with, including:
extends
functions
loops
mixins
nesting
variables
…more, probably!
For a while, this big feature set provided a means of filling gaps missing from CSS, making Sass (or whatever preprocessor you fancy) feel like a necessity when starting a new project. CSS has evolved a lot since the release of Sass — we have so many of those features in CSS today — so it doesn’t quite feel that way anymore, especially now that we have native CSS nesting and custom properties.
Along with CSS pre-processors, there’s also the concept of post-processing. This type of tool usually helps transform compiled CSS in different ways, like auto-prefixing properties for different browser vendors, code minification, and more. PostCSS is the big one here, giving you tons of ways to manipulate and optimize your code, another step in the build pipeline.
In many implementations I’ve seen, the build pipeline typically runs roughly like this:
Generate static assets
Build application files
Bundle for deployment
CSS is usually handled in that first part, which includes running CSS pre- and post-processors (though post-processing might also happen after Step 2). As mentioned, the continued evolution of CSS makes it less necessary for a tool such as Sass, so we might have an opportunity to save some time.
Vite for CSS
Awarded “Most Adopted Technology” and “Most Loved Library” from the State of JavaScript 2024 survey, Vite certainly seems to be one of the more popular build tools available. Vite is mainly used to build reactive JavaScript front-end frameworks, such as Angular, React, Svelte, and Vue (made by the same developer, of course). As the name implies, Vite is crazy fast and can be as simple or complex as you need it, and has become one of my favorite tools to work with.
Vite is mostly thought of as a JavaScript tool for JavaScript projects, but you can use it without writing any JavaScript at all. Vite works with Sass, though you still need to install Sass as a dependency to include it in the build pipeline. On the other hand, Vite also automatically supports compiling CSS with no extra steps. We can organize our CSS code how we see fit, with no or very minimal configuration necessary. Let’s check that out.
We will be using Node and npm to install Node packages, like Vite, as well as commands to run and build the project. If you do not have node or npm installed, please check out the download page on their website.
Navigate a terminal to a safe place to create a new project, then run:
npm create vite@latest
The command line interface will ask a few questions, you can keep it as simple as possible by choosing Vanilla and JavaScript which will provide you with a starter template including some no-frameworks-attached HTML, CSS, and JavaScript files to help get you started.
Before running other commands, open the folder in your IDE (integrated development environment, such as VSCode) of choice so that we can inspect the project files and folders.
If you would like to follow along with me, delete the following files that are unnecessary for demonstration:
assets/
public/
src/
.gitignore
We should only have the following files left in out project folder:
index.html
package.json
Let’s also replace the contents of index.html with an empty HTML template:
<!doctype html> <html lang="en"> <head> <meta charset="UTF-8" /> <meta name="viewport" content="width=device-width, initial-scale=1.0" /> <title>CSS Only Vite Project</title> </head> <body> <!-- empty for now --> </body> </html>
One last piece to set up is Vite’s dependencies, so let’s run the npm installation command:
npm install
A short sequence will occur in the terminal. Then we’ll see a new folder called node_modules/ and a package-lock.json file added in our file viewer.
node_modules is used to house all package files installed through node package manager, and allows us to import and use installed packages throughout our applications.
package-lock.json is a file usually used to make sure a development team is all using the same versions of packages and dependencies.
We most likely won’t need to touch these things, but they are necessary for Node and Vite to process our code during the build. Inside the project’s root folder, we can create a styles/ folder to contain the CSS we will write. Let’s create one file to begin with, main.css, which we can use to test out Vite.
├── public/ ├── styles/ | └── main.css └──index.html
In our index.html file, inside the <head> section, we can include a <link> tag pointing to the CSS file:
<head> <meta charset="UTF-8" /> <link rel="icon" type="image/svg+xml" href="/vite.svg" /> <meta name="viewport" content="width=device-width, initial-scale=1.0" /> <title>CSS Only Vite Project</title> <!-- Main CSS --> <link rel="stylesheet" href="styles/main.css"> </head>
Let’s add a bit of CSS to main.css:
body background: green;
It’s not much, but it’s all we’ll need at the moment! In our terminal, we can now run the Vite build command using npm:
npm run build
With everything linked up properly, Vite will build things based on what is available within the index.html file, including our linked CSS files. The build will be very fast, and you’ll be returned to your terminal prompt.
Vite will provide a brief report, showcasing the file sizes of the compiled project.
The newly generated dist/ folder is Vite’s default output directory, which we can open and see our processed files. Checking out assets/index.css (the filename will include a unique hash for cache busting), and you’ll see the code we wrote, minified here.
Now that we know how to make Vite aware of our CSS, we will probably want to start writing more CSS for it to compile.
As quick as Vite is with our code, constantly re-running the build command would still get very tedious. Luckily, Vite provides its own development server, which includes a live environment with hot module reloading, making changes appear instantly in the browser. We can start the Vite development server by running the following terminal command:
npm run dev
Vite uses the default network port 5173 for the development server. Opening the http://localhost:5137/ address in your browser will display a blank screen with a green background.
Adding any HTML to the index.html or CSS to main.css, Vite will reload the page to display changes. To stop the development server, use the keyboard shortcut CTRL+C or close the terminal to kill the process.
At this point, you pretty much know all you need to know about how to compile CSS files with Vite. Any CSS file you link up will be included in the built file.
Organizing CSS into Cascade Layers
One of the items on my 2025 CSS Wishlist is the ability to apply a cascade layer to a link tag. To me, this might be helpful to organize CSS in a meaningful ways, as well as fine control over the cascade, with the benefits cascade layers provide. Unfortunately, this is a rather difficult ask when considering the way browsers paint styles in the viewport. This type of functionality is being discussed between the CSS Working Group and TAG, but it’s unclear if it’ll move forward.
With Vite as our build tool, we can replicate the concept as a way to organize our built CSS. Inside the main.css file, let’s add the @layer at-rule to set the cascade order of our layers. I’ll use a couple of layers here for this demo, but feel free to customize this setup to your needs.
/* styles/main.css */ @layer reset, layouts;
This is all we’ll need inside our main.css, let’s create another file for our reset. I’m a fan of my friend Mayank‘s modern CSS reset, which is available as a Node package. We can install the reset by running the following terminal command:
npm install @acab/reset.css
Now, we can import Mayank’s reset into our newly created reset.css file, as a cascade layer:
/* styles/reset.css */ @import '@acab/reset.css' layer(reset);
If there are any other reset layer stylings we want to include, we can open up another @layer reset block inside this file as well.
/* styles/reset.css */ @import '@acab/reset.css' layer(reset); @layer reset /* custom reset styles */
This @import statement is used to pull packages from the node_modules folder. This folder is not generally available in the built, public version of a website or application, so referencing this might cause problems if not handled properly.
Now that we have two files (main.css and reset.css), let’s link them up in our index.html file. Inside the <head> tag, let’s add them after <title>:
<head> <meta charset="UTF-8" /> <link rel="icon" type="image/svg+xml" href="/vite.svg" /> <meta name="viewport" content="width=device-width, initial-scale=1.0" /> <title>CSS Only Vite Project</title> <link rel="stylesheet" href="styles/main.css"> <link rel="stylesheet" href="styles/reset.css"> </head>
The idea here is we can add each CSS file, in the order we need them parsed. In this case, I’m planning to pull in each file named after the cascade layers setup in the main.css file. This may not work for every setup, but it is a helpful way to keep in mind the precedence of how cascade layers affect computed styles when rendered in a browser, as well as grouping similarly relevant files.
Since we’re in the index.html file, we’ll add a third CSS <link> for styles/layouts.css.
<head> <meta charset="UTF-8" /> <link rel="icon" type="image/svg+xml" href="/vite.svg" /> <meta name="viewport" content="width=device-width, initial-scale=1.0" /> <title>CSS Only Vite Project</title> <link rel="stylesheet" href="styles/main.css"> <link rel="stylesheet" href="styles/reset.css"> <link rel="stylesheet" href="styles/layouts.css"> </head>
Create the styles/layouts.css file with the new @layer layouts declaration block, where we can add layout-specific stylings.
/* styles/layouts.css */ @layer layouts /* layouts styles */
For some quick, easy, and awesome CSS snippets, I tend to refer to Stephanie Eckles‘ SmolCSS project. Let’s grab the “Smol intrinsic container” code and include it within the layouts cascade layer:
/* styles/layouts.css */ @layer layouts .smol-container width: min(100% - 3rem, var(--container-max, 60ch)); margin-inline: auto;
This powerful little, two-line container uses the CSS min() function to provide a responsive width, with margin-inline: auto; set to horizontally center itself and contain its child elements. We can also dynamically adjust the width using the --container-max custom property.
Now if we re-run the build command npm run build and check the dist/ folder, our compiled CSS file should contain:
Our cascade layer declarations from main.css
Mayank’s CSS reset fully imported from reset.css
The .smol-container class added from layouts.csss
As you can see, we can get quite far with Vite as our build tool without writing any JavaScript. However, if we choose to, we can extend our build’s capabilities even further by writing just a little bit of JavaScript.
Post-processing with LightningCSS
Lightning CSS is a CSS parser and post-processing tool that has a lot of nice features baked into it to help with cross-compatibility among browsers and browser versions. Lightning CSS can transform a lot of modern CSS into backward-compatible styles for you.
We can install Lightning CSS in our project with npm:
npm install --save-dev lightningcss
The --save-dev flag means the package will be installed as a development dependency, as it won’t be included with our built project. We can include it within our Vite build process, but first, we will need to write a tiny bit of JavaScript, a configuration file for Vite. Create a new file called: vite.config.mjs and inside add the following code:
// vite.config.mjs export default css: transformer: 'lightningcss' , build: cssMinify: 'lightningcss' ;
Vite will now use LightningCSS to transform and minify CSS files. Now, let’s give it a test run using an oklch color. Inside main.css let’s add the following code:
/* main.css */ body background-color: oklch(51.98% 0.1768 142.5);
Then re-running the Vite build command, we can see the background-color property added in the compiled CSS:
/* dist/index.css */ body background-color: green; background-color: color(display-p3 0.216141 0.494224 0.131781); background-color: lab(46.2829% -47.5413 48.5542);
Lightning CSS converts the color white providing fallbacks available for browsers which might not support newer color types. Following the Lightning CSS documentation for using it with Vite, we can also specify browser versions to target by installing the browserslist package.
Browserslist will give us a way to specify browsers by matching certain conditions (try it out online!)
npm install -D browserslist
Inside our vite.config.mjs file, we can configure Lightning CSS further. Let’s import the browserslist package into the Vite configuration, as well as a module from the Lightning CSS package to help us use browserlist in our config:
// vite.config.mjs import browserslist from 'browserslist'; import browserslistToTargets from 'lightningcss';
We can add configuration settings for lightningcss, containing the browser targets based on specified browser versions to Vite’s css configuration:
// vite.config.mjs import browserslist from 'browserslist'; import browserslistToTargets from 'lightningcss'; export default css: transformer: 'lightningcss', lightningcss: targets: browserslistToTargets(browserslist('>= 0.25%')), , build: cssMinify: 'lightningcss' ;
There are lots of ways to extend Lightning CSS with Vite, such as enabling specific features, excluding features we won’t need, or writing our own custom transforms.
// vite.config.mjs import browserslist from 'browserslist'; import browserslistToTargets, Features from 'lightningcss'; export default css: transformer: 'lightningcss', lightningcss: targets: browserslistToTargets(browserslist('>= 0.25%')), // Including `light-dark()` and `colors()` functions include: Features.LightDark , build: cssMinify: 'lightningcss' ;
For a full list of the Lightning CSS features, check out their documentation on feature flags.
Is any of this necessary?
Reading through all this, you may be asking yourself if all of this is really necessary. The answer: absolutely not! But I think you can see the benefits of having access to partialized files that we can compile into unified stylesheets.
I doubt I’d go to these lengths for smaller projects, however, if building something with more complexity, such as a design system, I might reach for these tools for organizing code, cross-browser compatibility, and thoroughly optimizing compiled CSS.
#2024#2025#ADD#amazing#Angular#applications#Articles#assets#background#browser#Building#bundle#cache#cascade#cascade layers#code#Color#colors#command#command line#complexity#container#content#course#cross-browser#CSS#CSS Snippets#css-tricks#custom properties#Dark
0 notes
Text
web developer roadmap
This web developer roadmap Article help to achieve your goal as web developer in 60 days, It is an aggressive yet attainable goal. Accordingly, with a type of plan like this, you are supported throughout your journey to enable you to become an able web developer from a complete beginner. Also, Continuous dedication and commitment towards your plan and the use of appropriate resources can put you on a well-laid path towards a promising career in web development. Also , check our recent blog about the new sensation Deepseek AI and beginner level basic programs for java.
To ensure that a website is user-friendly and functional, web developers will test it by determining its performance errors and debugging them while at the same time optimizing speed, security, and browser compatibility. But, They familiarize themselves with developments in the industry and emerging technologies to create modern, scalable, and efficient web solutions that suit the needs of clients or organizations.
This means you must need more skills to become good web developer, but you know how check this article that guides you essential skills to become web developer
What exactly is web development?
Although it promotes the creation of websites or web applications, web development is the name given to its overarching process. It involves myriad tasks and technologies that ensure a website is functional, user-friendly, visually appealing. Web development can be divided into three main areas:
check out more about becoming webdeveloper in 2025 in easy way.
mastering
Week 1: Building a Strong Foundation
Accordingly, In the first week, focus on understanding the core technologies that form the backbone of web development. But, Begin with Hypertext Markup Language (HTML), which structures the content on the web. Next, delve into Cascading Style Sheets (CSS) to learn how to style and layout web pages. Certainly, These two technologies are essential for creating visually appealing and well-structured websites week 1 consist of only strong foundation to make yourself clear in web developer roadmap.
To gain practical experience, consider engaging with interactive platforms like freeCodeCamp, which offers hands-on exercises and projects to reinforce your learning. Additionally, The Odin Project provides a comprehensive curriculum that guides beginners through the fundamentals of web development.
week2: Diving into JavaScript
JavaScript is a powerful programming language that enables interactivity on web pages. Spend this month learning the basics of JavaScript, including variables, functions, loops, and event handling. Understanding these concepts will allow you to create dynamic and responsive user experiences web developer roadmap attribute.
Interactive tutorials and coding challenges on platforms like can help solidify your understanding. Building small projects, such as a to-do list or a simple calculator, can provide practical experience and boost your confidence.to know more check here
0 notes
Text
5 Key Features of a Great Website Designer in Pune
Intoday’s digital age, having a compelling online presence is non-negotiable for businesses looking to thrive.
Whether you’re a small startup or a large corporation, the role of a proficient website designer cannot be overstated. Pune, with its burgeoning tech scene and creative professionals, is home to some exceptional talents in web design. But how do you identify a great website designer in Pune? Here are five key features to look for, ensuring your online presence is impactful and effective.

1. Creative and User-Centric Design Approach:
A great website designer prioritizes creativity without compromising functionality. They understand that websites are not just about aesthetics but also about offering an intuitive user experience. The hallmark of a professional website designer in Pune is their ability to design interfaces that resonate with your audience while aligning with your brand identity. From typography and color schemes to navigation and layout, every design choice should reflect thoughtful planning.
For instance, if you’re a local business, the designer might incorporate elements that highlight Pune’s culture to establish a deeper connection with your audience. This blend of creativity and strategy ensures that users not only visit your site but stay engaged.
2. Strong Technical Expertise:
Behind every visually appealing website lies robust technical expertise. Website designers need to be proficient in various coding languages like HTML, CSS, and JavaScript. Moreover, familiarity with platforms such as WordPress and WooCommerce adds significant value, as these are among the most popular tools for website development today.
A leading web design company Pune will also ensure that their designers are up-to-date with the latest technologies, including responsive design and mobile optimization. With an increasing number of users accessing websites via smartphones, it’s critical that your site is fast, responsive, and user-friendly across all devices.
3. SEO and Performance Optimization Skills:
A visually stunning website is meaningless if it doesn’t rank on search engines. The best website designer in Pune incorporate SEO best practices into the design and development process. This includes optimizing website speed, ensuring mobile-friendliness, and structuring content for readability.
Performance optimization is another essential feature. Slow-loading websites can deter users and harm your search engine rankings. Designers should use tools to compress images, minify code, and enhance server performance. When your site is optimized for both users and search engines, it becomes a powerful tool for driving traffic and conversions.
4. Clear Communication and Collaborative Approach:
A professional designer understands the importance of collaboration. They work closely with clients to understand their vision, business goals, and target audience. This ensures that the end product aligns with your expectations and delivers measurable results.
The top web design companies in Pune prioritize transparent communication throughout the design process. From initial consultations to final revisions, they keep you in the loop, providing regular updates and welcoming your input. This collaborative approach not only ensures satisfaction but also builds trust, paving the way for long-term partnerships.
5. Portfolio and Client Testimonials:
The portfolio of a website designer speaks volumes about their expertise and versatility. Before hiring, review their previous work to evaluate the quality and diversity of their designs. A strong portfolio will showcase projects across various industries, reflecting the designer’s ability to adapt to different business needs.
Client testimonials are equally important. Positive feedback from previous clients provides insights into the designer’s professionalism, work ethic, and ability to meet deadlines. Many web design companies in Pune feature these on their websites, making it easier for potential clients to make informed decisions.
Why Choose Webtechnoz for Web Design in Pune?
At Webtechnoz, we embody all the qualities of an exceptional web design company Pune. With years of experience and a team of skilled professionals, we specialize in creating websites that not only look great but also deliver results. Here’s why businesses trust us:
Customized Solutions: Every business is unique, and so are our designs. We tailor websites to align with your brand identity and goals.
Cutting-Edge Technology: From responsive design to SEO integration, we stay ahead of industry trends to offer the best solutions.
Proven Track Record: Our extensive portfolio and glowing client testimonials speak for themselves.
Explore our services today and take the first step toward transforming your online presence.
The Importance of Hiring the Right Designer:
Investing in the right website designer in Pune that can be a game-changer for your business. A well-designed website not only attracts and retains customers but also establishes credibility and sets you apart from competitors.
By focusing on the five key features outlined above, you can ensure that your website becomes a powerful asset for your brand.
When searching for a website designer in Pune, remember to evaluate their creativity, technical expertise, SEO knowledge, communication skills, and portfolio. With the right partner, your website can elevate your business to new heights.
Pune is a hub of talented website designers and companies, but finding the right fit for your business requires careful consideration. Whether you’re launching a new website or revamping an existing one, the expertise of a skilled designer can make all the difference. At Webtechnoz, we pride ourselves on delivering exceptional web design services tailored to your needs. Contact us today to learn more about how we can help you create a website that stands out in Pune’s competitive digital landscape.
Summary:
Webtechnoz is a leading web design company Pune, offering a wide range of services including website design, development, and SEO. With a team of skilled professionals and a customer-centric approach, we help businesses create impactful online presences that drive results.
A sleek and modern web design workspace featuring a laptop, notepad, and creative sketches, symbolizing the process of website creation.
#Website Designer In Pune#Web Design Company Pune#Web Design Company#Website Designer#Web Design Agency#webtechnoz
1 note
·
View note
Text
How Can You Learn JavaScript Fast?

One of the most common programming languages nowadays, JavaScript is crucial for web development. With the correct strategy and tools, learn JavaScript quickly is possible for both novice and expert developers wishing to brush up on their knowledge. This post will discuss practical methods for increasing your learning process and how Scribbler can support you during that process.
1. Start with the Basics
Before diving into advanced concepts, make sure you have a solid understanding of the fundamentals. Here's what you should cover:
Variables & Data Types: Learn how to store and manipulate data with variables and various data types such as strings, numbers, and arrays.
Operators & Expressions: Understand operators (e.g., arithmetic, comparison) and how they work in JavaScript expressions.
Control Flow: Study conditionals (if-else) and loops (for, while) to control the flow of your programs.
Functions: Learn how to create and call functions, as they are the building blocks of JavaScript code.
Familiarizing yourself with these core concepts will help you form a strong foundation for more advanced topics.
2. Set Realistic Goals
Learning JavaScript quickly requires focused effort. Set specific, measurable goals to keep yourself on track. For example, aim to:
Complete an introductory tutorial or course in one week.
Build your first basic interactive web page after a few days of study.
Master asynchronous programming (promises, async/await) within two weeks.
By setting realistic milestones, you stay motivated and gain a sense of accomplishment as you progress.
3. Practice Coding Every Day
The most effective way to learn JavaScript fast is by writing code every day. Consistent practice strengthens your skills and helps you remember concepts. Here are a few ways to practice:
Build Small Projects: Start by creating simple projects, such as a calculator or to-do list. Gradually increase the complexity of your projects as you learn more.
Solve Coding Challenges: Platforms like LeetCode, Codewars, and HackerRank offer coding challenges that help you think critically and apply JavaScript concepts in various scenarios.
At Scribbler, we encourage consistent practice through hands-on projects, which can help you master JavaScript faster.
4. Learn from Tutorials & Courses
There are a multitude of free and paid resources to learn JavaScript quickly. Here are some options:
YouTube Tutorials: Many developers and educators offer in-depth tutorials for beginners and advanced learners alike. Look for tutorials with practical examples and clear explanations.
Online Courses: Websites like Codecademy, freeCodeCamp, and Udemy provide structured, interactive JavaScript courses. These platforms often include exercises that reinforce your learning.
Books: Books like "Eloquent JavaScript" and "You Don’t Know JS" offer comprehensive insights into JavaScript. They are excellent resources for those who prefer self-paced study.
At Scribbler, we also offer tailored courses designed to help you grasp JavaScript concepts quickly and effectively.
5. Join Developer Communities
Joining a JavaScript community will help you learn faster. Here’s why:
Get Support: If you're stuck, you can ask questions and get help from other learners and experienced developers. Communities like Stack Overflow, Reddit (r/learnjavascript), and the freeCodeCamp forums are great places to seek guidance.
Learn from Others: Reading through others’ questions and answers helps reinforce your understanding and exposes you to new ideas or techniques.
Accountability: Being part of a group will encourage you to stick with your learning goals and stay motivated.
At Scribbler, we foster a collaborative environment where learners can come together to exchange ideas, solve problems, and grow.
6. Understand Advanced Topics Gradually
Once you’ve mastered the basics, you can start exploring advanced JavaScript concepts. These topics will enhance your ability to write more efficient and powerful code:
Asynchronous Programming: Learn about promises, async/await, and how to handle asynchronous operations in JavaScript.
Object-Oriented Programming (OOP): Understand the principles of OOP, such as classes, objects, inheritance, and polymorphism.
JavaScript Frameworks: Once you're comfortable with JavaScript, dive into popular frameworks and libraries like React, Angular, or Vue.js to build more dynamic web applications.
At Scribbler, we believe in taking a gradual approach to mastering these advanced topics, ensuring that you truly understand each concept before moving on to the next.
7. Learn by Teaching
One of the best ways to solidify your knowledge of JavaScript is by teaching others. Explaining concepts to others helps reinforce your own understanding and identify gaps in your knowledge. You can:
Write blog posts explaining JavaScript concepts.
Create video tutorials or podcasts.
Participate in coding meetups or workshops.
At Scribbler, we encourage learners to share their knowledge and insights, building a community where teaching others also contributes to your own growth.
8. Use Developer Tools
Familiarize yourself with developer tools like the browser console and debugging tools. These tools allow you to test and troubleshoot your JavaScript code more efficiently. The ability to debug and optimize your code will greatly speed up your learning process and enhance your problem-solving skills.
Conclusion
It's important to practice regularly, understand the fundamentals, and apply them in real-world applications if you want to learn JavaScript fast. You can learn coding faster and easily become an expert web developer by following the methods mentioned in this article: starting with the principles, setting objectives, practicing every day, using a variety of resources, and becoming part of developer communities.
We at Scribbler are focused on providing you the tools, direction, and community support you need to advance your JavaScript education. Keep in mind that patience and training are essential, and with the correct strategy, you'll quickly become an expert in JavaScript!
0 notes
Text
New Post has been published on RANA Rajasthan Alliance of North America
New Post has been published on https://ranabayarea.org/how-to-code-coding-for-beginners-and-how-to-learn/
How to Code Coding for Beginners and How to Learn Programming for Free
It depends on your project complexity, which features you need to build first. Initially, you will be making a lot of mistakes and you will face a lot of problems but that’s how you will learn to build and handle the complex projects. Below are some useful tips you should follow while making a project. Learning to program for beginners can be challenging, but with determination, you can do it. In general, when figuring out how to learn to code, try to stick to a language that you’re excited to use.
Ruby, also called Ruby on Rails, is a simple language that’s useful for creating automation tools, desktop applications, and rapid prototypes. It’s gratifying to know you can build programs that, until now, you’ve never fully understood. Plus, projects are essential to the learning and job-seeking process. This will help you determine which programming language you decide https://deveducation.com/en/courses/ to learn first, what sorts of projects you want to complete, and ultimately what you want to make of your skills. One of the most popular package managers is npm, the Node Package Manager, which manages packages for Node.js applications. This provides a command-line interface to install packages, manage dependencies, and even create and publish your own packages.
You’re all set!
It is by far the most popular VCS in use by government, commercial, and open-source communities worldwide. For example, an error would be thrown if our program tried to store a character value inside a variable that was declared to be an integer. We can’t assign the character ‘S’ to the integer variable x in the previous example. For beginner Pythonistas, I recommend taking a peek at the Zen of Python, which is a list of 20 rules-of-thumb for writing Pythonic code. That is because Python actually uses the white space and newline characters to identify the end of statements and code blocks. This will load in the JavaScript code from the file, which will execute when the web page is displayed in the browser.
This service should not be used for emergency or urgent care needs. In an emergency, call 911 or go to the nearest emergency room. The information provided through this service is for informational purposes only. The nurses cannot diagnose problems or recommend treatment and are not a substitute for your doctor’s care. Your health information is kept confidential in accordance with the law.
Connect with other programmers.
The reason why Python is in demand is because of its applicability in each area, from web development to data science and machine learning. It is useful in evry domain, as it not only eases out the tasks but having this skill opens many career options and job opportunities. In today’s time, there is no limit to educating oneself as there are many options to learn programming online. A common mistake beginners do while learning programming is just reading a book or looking at the sample code on their desktop without practicing it. It’s easy to read about the loops, and variables, and get all the things in your head but actual programming doesn’t work in this way. You really need to get your hands dirty in coding and keep practicing it regularly.
It is a Javascript framework used to develop web applications. It builds very smooth and highly testable websites and applications. It also makes use of its features and helps to dissolve any leakages by debugging. The growth for Angular Developers is predicted to grow by 31% by the year 2026.
Inspiration & career
Unlike a graphical user interface (GUI), which uses icons and windows to interact with the operating system. Most mainstream flavors of Linux ship with a built-in package manager. Advanced Package Tool (APT) is the native package manager for Debian and Ubuntu-based Linux distributions. Yellowdog Updater, Modified (YUM) is the native package manager for the RedHat Linux distribution. The SELECT keyword tells the database that we want to retrieve data.
Learning to code has changed a lot of lives as it can give you the skills to get a great job and earn your financial freedom. And there are tons of employment opportunities out there right now. You can read more about the distinction between programming and coding here. Examples of coding languages include HTML, GitHub Markdown, CSS, JavaScript, and Python, among many others. Follow these steps to embark on a journey in the growing field of programming.
youtube
Redux and React are two major areas that any app developer should put emphasis on. If you are someone who wants to make your own app or want to work for a company and build an app, then make Redux and React your friends. Teachers can also teach their students how to code to develop their problem-solving skills and to teach them important skills for their future. Engineering is another field where programming can help you to succeed. Being able to write your own computer programs can make your work much more efficient.
And we are only starting to talk about programming languages.
There are certain hard skills required to be a computer programmer such as the knowledge of data structures, SQL, Web Development, Cloud Computing, OOPs languages, etc.
Upon these instructions, the machine performs certain operations that reflect upon business functionalities.
Learning to code and mastering it can take years for a beginner.
0 notes
Text
Technical SEO Guide: 11 Essential Redirect Types for Implementing SEO Best Practices

Redirects are one of the key elements of technical SEO since they relate to what search engines can eventually crawl and index on your site while ensuring optimal user experience. Redirects are important for everything from better website performance to link equity preservation. This article explains 11 common types of redirects every SEO pro should know so you can minimize your site and maintain optimal SEO practices.
How Do Redirects Improve SEO?
Redirects tell search engines and users to go somewhere else, important for both site structure and user experience. If used effectively, redirects can keep you from broken links, low user engagement, and even SEO penalties. Redirects also become more important if, say, you have a website redesign, you're updating content or moving domains.
1. 301 Redirect: The Fully-Riped-Off Band-Aid
There are different types of redirects, but the most used and important one is a 301 redirect, which communicates that a URL has permanently moved to another location. This redirect passes almost all of the link equity from an old URL to a new one and preserves SEO value. When merging content, changing domains, or taking down old pages, a fundamental part is 301 redirects.
One of the small things that seem insignificant but will definitely fall under an SEO best practice is to use a 301 redirect checker to check if these permanent redirects are set up correctly so search engines and users hit the intended pages.
2. 301 Moved Permanently: The Permanent Redirect
A 301 is a permanent redirect, while a 302 is only temporary. Example: For a maintenance page, A 302 redirect can tell users to open another page without affecting the SEO value of the original URL.
3. Meta Refresh Redirects
This type of redirect is common on pages that are set to refresh automatically after a time interval. Simple to set up, yet not SEO friendly as they redirect slower or impact the user experience negatively. Remember that meta refresh redirects should not be used on key pages since this is bad for SEO.
4. JavaScript Redirects
Redirects in JavaScript are client-side and are typically executed via scripts on the page. Search engines do not always like JavaScript redirects, even though they are flexible. It is vital that you also test these redirects at a minimum to ensure search engines understand them properly.
5. HTTP to HTTPS Redirects
One of the best things to do is to change from HTTP to HTTPS, so this thing is an SEO tip as well as a website security tip. HTTPS indicates a safer site, which is what search engines like to see. Make sure you use 301 redirects so that all your HTTP URLs lead to HTTPS versions of the website—this allows for all user information being sent and received to be secure, as well as improving SEO.
6. Redirect Chains and Loops
SEO-wise, redirect chains (a sequence of redirects) and loops (circular redirects) can slow down load time, not to mention confuse search engines. The SEO audit must be performed regularly to spot & eliminate chains and loops for better ranking of the site.
7. Canonical Redirects
Canonical redirects tell search engines which version is the main one when duplicate content comes up under different URLs. As a result, this method resolves the duplicate content problem because search engines are forced to treat one URL and not spread link equity over many URLs.
8. Wildcard Redirects
That means all the traffic in a domain or similar URL structure is redirected to others. This is a helpful type when you need to do some large-scale migrations or restructure. It needs to be used very carefully, though, as it could end up forwarding other pages as well.
9. Single-Page Redirects
This provides a scalable solution for content that will only change during the lifecycle of multiple pages; when individual pages become irrelevant or require an update, a one-page redirect directs users and search engines alike to relevant material. Single-page redirects are great for seasonal or old content management, where discontinuing the original content will hinder a seamless user journey from search results to your site.
10. Geo-Targeted Redirects
Geo-targeted redirects help navigate users to the corresponding regional version based on their geographic region when running a global website. Geo-targeting is useful for improving the experience of users, but it can be a problem if not done correctly since it may prevent search engines from crawling content between regions.
11. Language-Based Redirects
Language-based redirects lead users directly to the site language, and relevant browser settings. An optimum usage will help you to do international SEO, as it will ensure that your content is matched with user language interest, making it easier for users to find and get oriented on your site.
An On-Page SEO Checklist for Creating a This-Redirects-Here Strategy
So if you want to design your site’s SEO strategy around the redirects, a complete on-page SEO checklist is a must. Routine checks of current redirects, ensuring there are no broken or looping redirects and none that have become deprecated, are part of this checklist. Finally, utilize redirect checker tools to ensure the redirects are working perfectly.
You can also invest in Professional SEO services or reach out to an SEO expert who may be able to assist with more complicated cases of redirects. Even when you do the redirects in-house, the best SEO tools will help speed up the process as they will allow you to test all redirects; keeping it one click away, tracking its performance, and analyzing it for optimum management.
To learn more about using redirects to further your SEO goals, read this guide that will elevate your content strategy with these 11 tools for SEOs and dive into local SEO tools that work.
Conclusion
Redirects are an essential part of technical SEO to grasp. Every redirect serves a different purpose, from 301 redirects for permanent URL changes to geo-targeted redirects for users in other countries. By ensuring that you audit your redirects regularly and capture them as part of your SEO checklist, you ensure they are helping rather than hurting in terms of SEO performance for your site.
An effective redirect strategy is crucial in the long term to ensure that link equity, usability, and SEO value are preserved. Regardless of whether you do SEO in-house or rely on an SEO consultant, the key takeaway about redirect types will only help you succeed with your overall strategy for SEO success. For an in-depth overview, check out this guide to conducting a complete SEO audit.
0 notes