#in fact they convert gifs to videos when processed
Explore tagged Tumblr posts
Visit Tumblr Blog
Explore Tumblr blogs with no restrictions, modern design and the best experience.
Last Seen Tumblr Blogs


Fun Fact
69% of Tumblr users are millennials.
Text
gif tutorial
i was asked to make a tutorial for this set i made, so let's get right into it!

first things first, i downloaded the music videos from youtube in 1080p using 4k video downloader. unfortunately, the quality of youtube videos always seems... not great, to put it simply. plus these music videos are from the 90s, so they've been upscaled to 1080p after the fact. all of this works against us, but i've definitely worked with videos of lesser quality than these, so at least there's that!
when i gif, i import video frames to layers rather than screencapping. this comes down to personal preference. after everything has loaded, i group all my layers together and set the frame delay to 0.05. i then cropped my gif to 540x500.
the next step in my process is sharpening. i did play around with my settings a bit given the quality of the footage and the dimensions of the gif. i compared both @hellboys low-quality video gif tutorial to my regular sharpening action and my vivid sharpening action and in this case, i preferred my normal vivid sharpening action. i used this tutorial to create the action for myself, and you can find other sharpening tutorials here. this action converts my frames to video timeline and applies sharpening.
once my gif is sharpened and i'm in timeline, i begin coloring. i wanted to simplify the amount of colors used in these gifs, again because of the video quality -- i knew it wasn't going to have the crispness i would normally like for my gifs. here are my coloring adjustment layers and their settings (not pictured: my first layer is a brightness/contrast layer set to screen) (explanation in alt text):


all of these layers and their settings will vary depending on your footage and its coloring (and obviously, feel free to make the gradient map whatever colors you like if you aren't going for this exact look).
pretty basic coloring, especially with just slapping a gradient map on top (my beloved), but at this point, i still didn't like the quality of the gif, so i added a couple textures/overlays.


i put the left one down first and set the blending mode to soft light and the opacity to 8%. depending on what look you're going for, you could increase or decrease the opacity or play around with different blending modes. i like using this texture with lower quality footage because even when it's sized up a bit, it adds some crispness and makes things feel more defined. for the second texture, i set it to overlay and 75% opacity. we love and respect film grain in this house.
now for the typography! sometimes i really enjoy typography and other times it's the bane of my existence for the sole reason of just how many fonts i have installed. anyway, here are the settings i used for this set:

make sure the color of your font is white and then set the blending mode to either difference or exclusion. i can almost never see a difference between the two, but for this set, i used exclusion. below are the blending options (double click on your text layer to bring up this menu or right click and select blending options).


now we have to add the warp effect. with your text tool still selected, click this icon at the top of your screen:

from the dropdown menu, select twist. these were my settings, but feel free to play around with different warp options and their settings. the ones i use most often are flag, fish, and twist.

this last step is completely optional, but it's an effect i use in most of my sets with typography. duplicate your text layer (select the layer and ctrl+j), turn off the layer effects (click the eye icon next to effects), and set the blending mode to normal. right click on the layer and select rasterize type. right click on the layer icon itself and choose select pixels.

at this point, you should see the moving black and white dotted line showing that only your text is selected. then go to edit > stroke. here are the settings i almost exclusively use.

this is what your text should look like now:

using ctrl+T, move the layer off the canvas so you can't see any of the text anymore. you should be left with only your outline. click anywhere on your canvas to de-select the text we just moved. use ctrl+T again as well as your arrow keys to nudge the outline over to the left 2px and up 2px. this is personal preference as far as the positioning, but i almost never move it any other way. you can leave it like this, which i sometimes do, or you can set the blending mode to soft light like i did for a more subtle effect.
and that's it! rinse and repeat for each gif in your set or use a different warp effect on each gif to switch it up! if you have any questions about this tutorial or would like me to make one for anything else, please feel free to ask any time!

#gif tutorial#my tutorials#gifmakerresource#completeresources#dailyresources#chaoticresources#userdavid#coloring tutorial#typography tutorial#tutorial#photoshop tutorial
252 notes
·
View notes
Text
Check-in for October 25th, 2023
Welp, The Present is a Gift has officially broken 8,000 words and is rapidly approaching the 10k mark! Also, fun fact: according to the outline, I haven't even finished writing the first chapter. This terrifies me when I consider the later chapters which have way more plot packed into them.

Despite me writing out a very detailed plan for the project, it feels like I'm learning new things about the characters with every sentence I write. Twig is apparently a big fan of learning weird, obscure words and is sad that her old hobby of reading dictionaries has been dampened by her struggling to learn how to read footprint runes. You think you know a gal...
I spent most of today working on programming assignments and even got a nice comment on a past submission I sent in. In it, I mentioned single vs. double equals signs always tripping me up and causing bugs in my code--- turns out they used to baffle my instructor too! He's able to use them in their proper places without thinking now, which is encouraging. Regardless, I have never felt this audio more keenly than today:
youtube
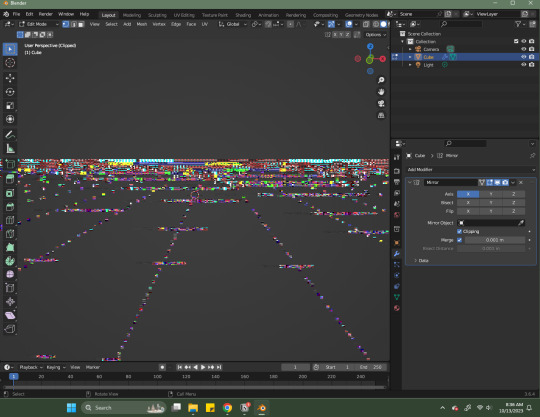
I had planned on getting some practice with 3D modeling for low-poly V-tuber of my persona I've been jokingly working on, but that didn't work out as anticipated. I did spend a while admiring how I went from a giant gray cube to this, though:
Ahhh. Look at that beautiful skeleton. So few polygons. So few worries. If only I could figure out how make the pupils move or make a bow.
I also spent a while reminiscing about how Blender lit up in flames at one point and I didn't understand why it happened or how I got it to stop. That was a fun seven minutes of unadulterated terror.
I'm tempted to get back into Blockbench for its simple UI, but after learning the basics of Blender, I know it'd be unbearable to return to the rigidity of working in a program that's pretty much built for Minecraft modders. I just need to stick with Blender and find a few more tutorials to keep me going.
I will miss the fact that Blockbench automatically puts your model on a turntable and offers to pixelate it for you, though. It makes low poly modeling so cool so fast.

Just look at these things! They're so cool! I made them yet they look like something out of my fave childhood video games!
I tried to figure out Super Mario Paint this morning and ended up with my first finished song from that program. Tried importing a few soundfonts from other sources but had no luck getting them to work, and the song was definitely rough around the edges--- but I'm still really proud of myself for making a quick tune! It was a battle to figure out how to export the finished product, and I ended up just recording my desktop with OBS to get it to capture the sound and video together, then converted that video into an MP3 file. It was a very roundabout process, but still!!! I made a thing!
The Shy Guy and Boo instruments, as their flawless character designs may have you suspect, are vastly superior to everything else contained in the program. You can't change my mind.
Also, I was tinkering around with Chrome Extensions and found the most heartbreaking note in the description for one of them.
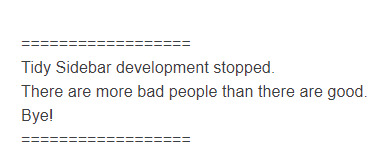
Tiny Sidebar developer, whoever you are, wherever you are--- I want to give you a hug and a slice of cake or two. Reading this activated my inner anime protagonist and I want you to know that there are so many good people out there, but they're quiet about their goodness. Bad people are just loud as heck and make scenes wherever they go.
With that sudden sappiness, I'm signing off on this check-in. Take a parting teaser for a future joke animatic as a palette cleanser. Depressed Friend will be Twig, Emotionally Stable Friend will be Celebi.
Sincerely, Sofie
#sofie checks in#3D model#3d modeling#blender3d#low poly#low poly art#mario paint#super mario paint#preptober#nanowrimo rebel#nano rebel#The Present is a Gift AU Update
7 notes
·
View notes
Text
AN IMPOSTER AMONG US...
Does everyone has some or the other kind of sadistic teacher who pretends to be good among the other students and in front of the whole school and help some " teacher ke chamche" who wants to get away with some mischief. ( ones who continuously assist teachers and butter them with unwanted loyalty) I know that I was never been able to accomplish the 'teacher ke chamche' kind of stuff, even if I try that will be the weirdest version of myself that upon contemplation will be a vision of horror which will taunt me in my dreams.
Today we had Digital marketing event in which we had some thing called 'e-sports' In which we were allowed to play Among Us, Free Fire and PUBG (I am still in the dillemma that why can't they call it as video game event probably insisting on the fact that it was considered as a part of learning process by naming an event as e-sports, or maybe to satisfy the higher authorities of the fact that they are not promoting such video games in school) To be honest people will be sacked out of their job in our school of some higher authorities will find out what kind of shitty event they conduct in our college. I don't know why I ended up joining this wierd school who has no management and values and call themselves as a business school (can't mention name for privacy reasons) they can't even communicate things on time, people will ask you to bring your own sheets to write your exam that too on the day of the exam. Since they had poor communication skills I wasn't aware of the fact that today was the event day... I was so lucky that I bought my phone along with me..i wanted to participate in the so called 'e-sports' event so desperate and on top of that my phone was having some nervous strokes and my mobile data was busted all of a sudden( why this all happens to me on weirdest and important stances) maybe because of the weather or my fate. So I went to ask my vice principal for the WiFi password of the college ( as you are not aware that our college has this werid fantasy of not sharing their passwords to students in their mobile phones even I was aware of that fact I tried to get lucky) but returned upon failing on my instinct. Disappointed, i tried to fix the issue of my phone as if I was a pro at it. My fortunate so called forced friend (for which I shall make another post for it, its a sort of tragedic epic which ever happened to me) she digged on her luck and she so happens to be teachers favourite and he gave her the password, soon after she got it i was literally on fire and was determined to put up a fight, but my friend busted me totally and prevented me to ask for my own rights...at once i felt the fire that every freedom fighter has upon depriving of his rights. I regretted for having a lean body structure thus I was dominated by my friend and physically suppressed my raging fire within. I completely gave up my hopes on playing the game today and decided to submit my phone in the lobby (we are not supposed to carry our phones to our classroom)
And to conclude I participated in a content marketing event which has nothing to do with marketing stuff we were just given some random topics and it was too dependent on our fate as you all know I have got a brilliant fate and I got a shitty topic which I wrote clumsily in a period of 15 minutes and submitted. I still don't know the reason behind why it's called content marketing when they ask us to write on a topic without the tags and without posting it(that could have been done in Microsoft Word. Literally they were just converting a composition into the name of content writing), it just doesn't feel right, maybe this confusion and foolishness of others will gradually consume me day by day and i will completely turn into lunatic and submit to depression again till my parents realise the fact. My friend got the first prize and a junior dude got the runner up who had not even participated in the event.
So long! Let's meet in another interesting and weirdest blogs that I hopefully write (let's be optimistic) thank you for bearing my shit till now, hope it is relatable (its mostly relatable to Indians I suppose)... BYE
#school#school life#soft sadist#911 fox#the winchesters#mcr#the mandalorian#shadow and bone#the last of us#artists on tumblr#school drama#school days#school daze#school discipline#among us#creative#blog post#weirder Times
2 notes
·
View notes
Note
I was wondering if you could do a tutorial on this gifset that you did i really like ittt
Thank you for sending this in, anon! I’m glad you liked it and wondered how it was made :) Fun fact: the day before you sent this, I had just started working on my next set in that “Select Filmography” series. I hope you like that one too when it’s ready!
I think I should start by saying I’m pretty new to giffing myself and there might be more efficient ways of getting to the same result. However, the point here is to show you the process I went through to make this gifset and hopefully help you understand how to make a similar one.
To follow this tutorial, you will need some version of Photoshop and some giffing knowledge. I know there are multiple ways of making gifs so I’m just letting you know I’m using the timeline and the “Convert for Smart Filters” option (I don’t really know how else to call it).
Now let’s get started!
STEP 1 - CHOOSE THE SCENES
It might sound obvious but, in my opinion, this is the most crucial step. It’s also the one that takes the longest (along with step 7, aka the coloring).
At this stage, you need to have a general idea on how you want your set to look like so you can choose the scenes accordingly. In my case, I knew I needed two types of shots for each movie: one close-up for the main gif and one mid shot for the shape. I also needed to take two other criteria into consideration: the movement (because of the shape) and the lighting (because darker scenes are such a pain to color). Last but not least, I didn’t want the characters to be talking (but that’s just a personal preference).
With all of that in mind, you can start saving a few screenshots of scenes that meet your criteria (or at least some of them). In the end, there won’t be that many to choose from so be prepared to make compromises.
STEP 2 - MAKE A DRAFT
Now that you’ve preselected a few scenes, you can make a first draft. This will help you turn your general idea into something more concrete.
Basically, this is your opportunity to organize your thoughts. What size do you want your gifs to be? What shape are you going to use? On which side do you want the close-ups to be? Do you want all of them to be on the same side or do you want to alternate from one gif to the other? Do the scenes you chose work together (gif-wise but also set-wise)? Are you happy with the way it looks, overall?
By answering all of the questions you might have now, you’ll save yourself a lot of time, trust me. Of course, you can totally skip this step if you already know exactly which scenes you’re going to use and how you’re going to present them together.
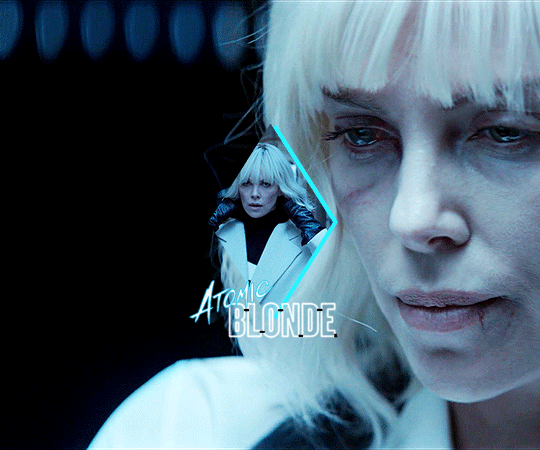
To give you an idea, this is what my draft looked like for Atomic Blonde.
STEP 3 - PREPARE YOUR GIFS
Once you have a clearer view on how you want your set to look like, you can finally start giffing like you usually would (i.e. importing, cropping, resizing, etc.).
It should then look something like this.
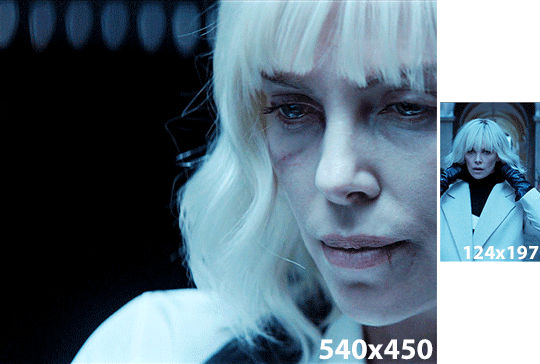
The important thing to mention here is that you want both of your gifs to be the same number of frames (32, in my case).
Ideally, you should also aim for the ~same~ coloring (especially for the skin tone, since both gifs will be so close to each other). This bit is particularly difficult when you chose scenes which have opposite lighting (see my two uncolored gifs below). Remember how I insisted on steps 1 and 2? It was to help you avoid this. So my advice would be not to choose these types of contrasted scenes, unless you can’t do otherwise and you’re ready to suffer!
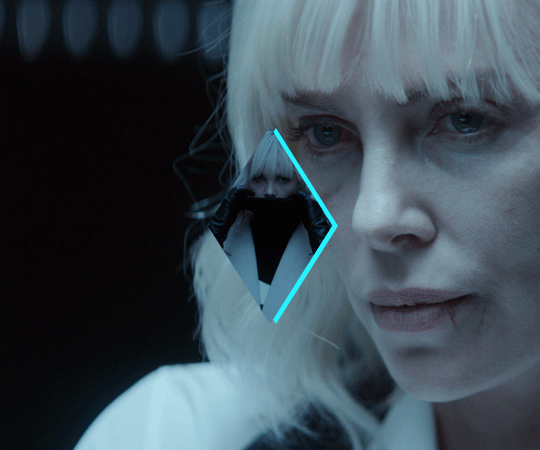
STEP 4 - MAKE YOUR SHAPE
To make your shape, you can click right on the Shape Tool (U) and select the last one, Custom Shape Tool. From the Shape menu appearing on top, you will be able to choose the shape you want from the drop down list and start drawing on your gif.
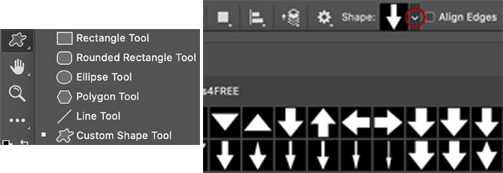
To be more precise with the dimensions, you can manually adapt the length and height from the Shape menu itself. I decided to go with the same ones as my gif.
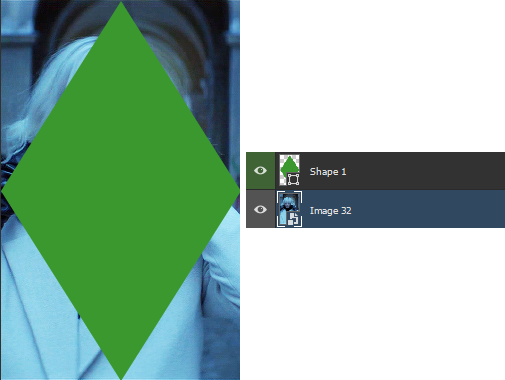
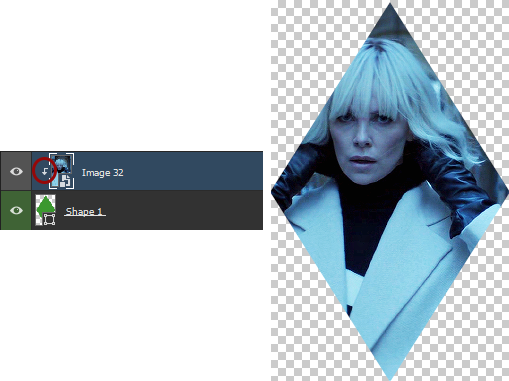
Once your shape is positioned like you want it to be, you can drag and drop the shape layer under your gif. Next, you will have to click right on the gif layer/smart filter and select Create Clipping Mask. The result is as below. Note that if the size of your shape was smaller than your gif, you would still be able to reposition your gif with the Move Tool (V).
You can now export your shape gif, reopen it in Photoshop and convert it again to the video timeline and to a smart filter. This is where I’m not sure it’s the most efficient way of doing things but it’s the only way I found to keep the coloring of each gif separate. I also find it easier to work with a smart filter.
STEP 5 - COMBINE YOUR GIFS
To add your shape gif to your main gif, you can simply click right on the shape gif you just reopened and select Duplicate Layer. You can then choose the project which contains your main gif to duplicate it in there. Now go to your main gif and reposition your shape gif where you want it to be (how many times did I say gif here?). Finally, you can draw a new shape, using the same dimensions as in step 4, reposition it and choose any color you want from the Shape menu.
Since you will be repeating this process with your following gifs, I suggest you add a few guides so you know exactly where you should place everything to make all of your final gifs look the same.
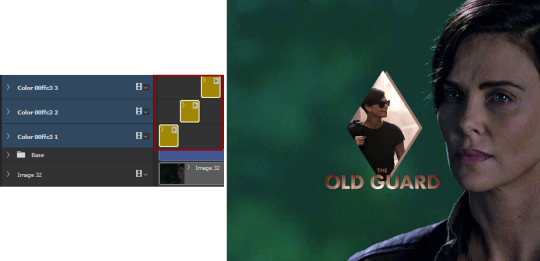
(In case you’re wondering, the “Base” folder contains my adjustment layers/basic coloring for the main gif.)
STEP 6 - ADD THE TITLE
This step is pretty simple: go on the web and type “[name of the movie] title”. Download the png you like most, open it in Photoshop and resize it to a length of about 150-200 pixels. Next, duplicate the layer to your main gif and reposition it. In case you need to resize it again, select the title layer and go to Edit > Free Transform (Ctrl+T).
This is optional but in case you want to change the way it looks, know you can always duplicate the title layer and play with the blending options (see below). The good thing with a png is that you can also add some effects by clicking on the “fx” button.
STEP 7 - ADD COLORING (OPTIONAL)
To be honest, I had not planned on coloring my gifs. But I had already spent so much time on them and I was still unhappy with the way they looked. I mean, see how grey-ish they are? Not great...
So the only thing left for me to do was to add some colors. Now, since coloring is worth a tutorial on its own and it already exists, I suggest you read through becca’s mega coloring tutorial (and especially steps 3 & 5). Seriously, shoutout to her for making this incredibly useful tutorial. She is so talented and I love everything she makes!
My Atomic Blonde gif barely even needed coloring so I’ll show you what I did for my Tully and The Old Guard gifs.
For the first one, once I had found which colors to use with which blending option and opacity level, I only had to remove the colors from the left side of the gif because there was barely any movement in that scene (phew!). For the second one, on the other hand, I decided to color frame by frame because there was way more movement, in comparison. This is quite a tedious process, which is why you want to limit yourself to a certain amount of frames.
I’ll conclude by saying there are so many things you can do with coloring and what works with one scene might not work with another. So experiment with it: try different colors, play with the blending options and opacity levels, add some gradients and/or gradient maps, etc. Just know it will take some time to get to a somewhat satisfying result!
And that’s it... I hope this tutorial made sense and was somehow helpful. Of course, don’t hesitate if you have any questions! Also, if you do end up making a similar edit, pleeease send me the link or tag me in the replies or something ‘cause I would definitely love to see it!!
#asks#anonymous#tutorials#resources#completeresources#allresources#itsphotoshop#putting all of this process into words took so long i really hope it makes sense#also i can't help but wonder if it was my before/after post which prompted this ask...#gifs#gifs: tutorials
372 notes
·
View notes
Text
Let’s Play: CAoS→romaster→gif
I’ve spoken before (here) about my process of remastering the de-hanced footage of caos that we all have to strain at (because of love/hyperfixation), but now I thought I’d say a bit about how I take it a step further, and make my gifs.
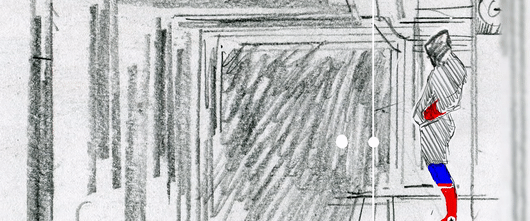
I just finished creating a gifset for the scene outside the Putnam house, in An Exorcism in Greendale, so I’ll use a couple of those for my example. I was really quite worried about working on this scene, as you can imagine from looking at the original still below, because it’s outside at night, and while some shots make it clear there’s a reasonable amount of moonlight, the patina of grimdark that gets painted over the footage somewhat negates that fact.

So when I worked on this scene for the remastered eps, I did of course want to keep the gloom of night, hence nice thick black shadows, but also with the diffused lunar lighting (and boy howdy would you look at that theatrical mood smoke). I loved how otherworldly green the foliage is out here, particularly in contrast to the witches and their pocket of shadows.

For the gif, though? A lot of that loyalty-to-lighting stuff goes out the window, because what we want from gifs is an emotional narrative experience, and colour is part of the feeling. For that reason, I ramp up the colour curves/ levels to an unlikely level, and that turned the shadows kinda navy blue, which I dig.
Also, since the ro-master is 1080p and tumblr gifs are preferably 540 wide, I both zoomed and crop, on the bits I most care about obviously, and also add a sharpening effect on top, which would look weird if you were trying to watch a full ep that way, but which is just what you want for a gif experience.

Note: Unlike most gif-makers, I don’t work in Photoshop (for my art I do, but I have a version that doesn’t support gif-making due to its advanced age), all this work is done in Sony Vegas: Resize the video dimensions, use the pan/crop tool, and manipulate video effect packages. Then I import the chunks of video file (10 seconds or less per rendered clip) into a video-to-gif converter, at which point the only adjustment I might make is reducing frames for size reasons.
Here’s another set because Lilith is sending me into outer space for comparison:


There’s unfortunately quite a bit of graininess that happens with gifs in this sort of lighting, so I won’t pretend these are amazing (See my HilCee work for something a lot prettier), but they do make the point fairly well, I think. ^_^
#caos edits#caosedit#Ro's caos remastering adventures#Lilith caos#Sabrina Spellman#An Exorcism in Greendale
27 notes
·
View notes
Photo

Vincent Cavalier shares our delusions. They are an unknown age, a Horsemen (Pestilence) who looks just like Grant Gustin. They are a sponsor. While they might be enthusiastic, sometimes they get obsessive. They are a switch in bed, and pansexual. They are into voyeurism and temperature play, and want a dom/sub/switch partner
There has always been confusion over what mantle he's carried, Conquest or Pestilence, but the answer is both. In the beginning Conquest wasn't the same person but playing games in the mortal world has a way of changing people. There was a realization along the way, a deep wound, and something shifted. From that point who they first were was gone, and so was most of the lust for power he used to feel. He stopped caring about the things that used to matter and resolved to no longer let the unpredictability of mortals simply pass rather than indulge it.
Having spent more time ducking in and out of the mortal realm than his siblings, he's seen humanity take its' stumbles along the way. He might have more empathy for mortals but the more popular opinion among the family is that too much time directly in the company of them has left him legitimately insane. It’s not an unfair assumption.
He's certainly felt rough spots dealing with the living, his sister Izzy refuses to let him keep any of the various connections he's made with the living over time as mortals do have to die and Vince never wants to let them go. The two have it out occasionally when a friend or lover he's overly fond of dies, usually ends in a shouting match and cold shoulders for a while before he forgives her for doing her job.
Being the 'oldest' of the Horsemen does absolutely nothing to instill reasonable maturity in him. It does make him intensely protective of his siblings though, knowing they can look after themselves doesn't stop him from being the annoying big brother every chance possible. The type of big brother who nags, bothers and basically makes a point of being in their business. Out of love, of course.It's generally one of the few things he does take that seriously and it's not a great idea to test his tolerance of people bothering his family.
Vince fully understand and accepts that his siblings are equally off-centered and messed up in their own special ways. It’s a fact he adores them for; their jobs would wear anyone down over time and it is just trying to cope with the burdens. While he does enjoy teasing them over their quirks, Liam often the target of choice because annoying his ‘little’ brother to the point of shouting matches is something he finds hilarious, he’s the first one to defend them as well, even against each other.
His own habits are hardly what most people see as typical at times. He absolutely has converted the basement of their shared home into his own little mad scientist lab of sorts where he toys with all sorts of diseases and works to invent new ones to keep humanity on its’ toes. It’s a hazard to anyone who wanders down there because things are often broken, out of place and there’s no telling what he’s busy with but, thankfully, none of the siblings aren’t human enough to be affected by anything he creates.
He very often fights over control of the TV with Dev because he gets tired of her watching wrestling shows when he would much rather binge watch Martha Stuart or a dozen other crafting shows that he clearly has an addiction to. But really they should all appreciate it more than they do because the house looks much better because of it, thanks. Or Bill Nye, the old kids’ show is still a favorite he has every episode saved on the DVR and even the thought of erasing it carries the threat of terrible consequences.
Entirely overly indulgent in practically everything, Vince gets carried away in most things he does. It makes him a very interesting person to drink with, yes. But he also fixates on ideas and will get stuck in the pattern over it until someone manages to shake him out of it. He’s very much a details person and if he does get focused he’s brilliant at solving problems, or creating them. It’s just the getting him to break that focus that proves to be difficult.
Since he is Conquest/Pestilence, he is, surprisingly, a good archer. The old tombs and scrolls that mention the objects each Horseman carries are true, and Vince has always carried the bow. Said weapon doesn’t seem all that dangerous compared to something like Dev’s sword until you consider the fact that the the arrows are very, very toxic with all sorts of infection-causing bacteria. Not something you’d want to deal with.
His two pet rats, Typhoid and Salmonella, or Ty and Sal for short, are adorable really. They’re are infected with a few stray diseases but nothing contagious or dangerous to the fuzzballs. He loves them and often wanders the house with at least one of them perched on his head. Ty is an red-eyed albino and Sal is a black Norwegian roof rat and both are rather large, curious and excessively friendly. Sal drools a lot too but just ignore that.
Vince has an affinity for glitter, shiny things and sparkle. He gets excited over the most random things and has, on several occasions, tried to tape a horn to his horse because of his affection for unicorns. All of this translates into his owning a craft supply store in town where he’s seen roaming around often enough, though like his siblings he has no real grasp of time so the place has no consistent hours.
He also very much enjoys technology, a real nerd in fact, and has been trying to figure out a way for decades to extend his power to the area of computer viruses as well. He finds random gadgets very interesting and spends far too much time on Youtube or medical forums, he processes new information very quickly but just as often he’s just there to entertain himself and will sit and watch videos of people making home decor out of cardboard or whatever other strange DIY weirdness that has his interest. He has a more impressive account on site than just about any Pintrest mom out there.
In spite of the gravity of his purpose in the world he’s a fairly cheerful, clumsy and at times downright awkward guy who is painfully optimistic. Sure, the world is probably going to end sooner or later but at least he’s going to know about it beforehand since he has to start that nonsense, right? Until that point life is so much better than wallowing in misery. The real darkness is lingering out in the world now, which does worry him since even he hasn’t encountered anything like that before, but so long as his siblings are safe inside the town he doesn’t really see much point in being down about it.
//Powers//
He’s Pestilence, by design that means diseases, illness and wasting away. He’s responsible for crafting new sicknesses over time and allowing them into the world, as well as controlling somewhat the spread and direction of diseases. While it seems like a dismal job it has a very important purpose; humanity has always feared death and sickness and from fear comes change. Mortals have grown and progressed as a whole as a direct result of trying to survive so his role isn’t so much to destroy the world anymore than it is any of his siblings, people don’t see it however that the real point in what they do is to keep mortals moving forward and evolving with each new challenge the Horsemen throw at them. It’s a job he enjoys, finding a great deal of pride in and respect of mortals for their intense determination; he really is very fond of them.
There are limits to what he can do directly to a person. It requires contact and willful intent so he doesn’t really cause harm without purposely doing so. He is also limited to sicknesses that a person has, in fact suffered before in their lifetime or already has the predisposition for; he cannot infect someone with an illness or condition that might not have already been in their genetics; he basically just speeds it along. So if a person has ever had the flu, for instance, he can cause them to suffer it again with his touch. Or even if they’ve never shown any signs of it but somewhere in their genes there is the marker for something like cancer he can bring that to the surface and cause it to rapidly develop. He couldn’t do something like infect someone with the Bubonic plague, however, unless he actually had the virus with him at the time because it’s not something people inherit.His power runs the range from physical sickness to mental illness as well, the latter is, however, harder to ignite in a person.
While his powers are basically useless against his siblings because there is some built-in clause to the idea of the Horsemen not harming each other, plus he wouldn’t want to harm them, his powers have erratic effects on other inhuman races. Sometimes they work, sometimes they don’t, there seems to be no logic as to why or how or even what the end result might be when he tries to cause sickness in the inhuman.
That power does work on himself though, and he’s often experimenting with it to experience what mortals do in regards to various diseases or conditions. Sometimes the end result is a sickness or disorder that will stick around a while before it finally fades away. Narcolepsy is the current issue and he does at times fall asleep without meaning to.
Along with his work directly with sickness in mortals he also can extend his powers to other natural things; plants, animals, most anything really. Animals in particular are an area of interest for the simple ability he has of being able to control ones that suffer very dangerous diseases. With that control he can direct them to do as he wishes or can gather limited information from them through sight and other senses. Rats are his favorite in that regard, he very often uses them to keep an eye on areas of the world where he cannot physically be at the time but needs to know the details of how his work is playing out.
Along those lines, he is very acutely aware of the world. He knows where sickness dwells and at any given time can focus and track the progression of it anywhere in the world. He keeps nearly endless records in the basement, keeps track of epidemics and the state of mortality with them. He’s incredibly well organized in keeping up with his work and how it is effecting things, and that nearly constant devotion of part of his attention to the idea always in the back of his mind is part of the reason he lacks the ability to keep his attention trained too well otherwise. He is nearly always aware and distracted by his power because his is one that is consistently out there changing things day to day and requires very close supervision to keep in check.
2 notes
·
View notes
Photo


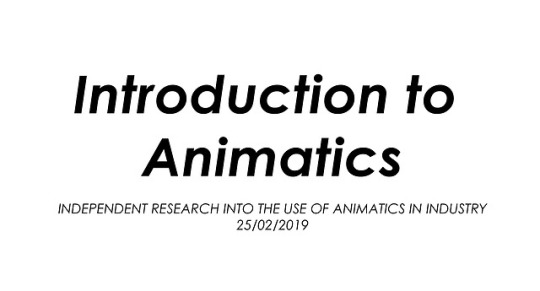


Mystery Box: An Introduction to Animatics
In this week’s animatic masterclass, we were introduced to the idea of an animatic as a way to plan our animations. Whilst we had the opportunity to create our own animatic, I first wanted to delve into the use of animatics in the industry of animation, looking at a few examples and the purpose they serve in the production of an animated sequence. This isn’t in response to any points from Helen herself, who simply gave us the task and how to produce it in the given software, but instead, this post is an opportunity for me to develop my own independent research into the use of animatics in animation.
What is an Animatic? Last week, we explored the idea of storyboards, and how these hand-drawn frames can show the stages of a scene in rough camera placements. Here, issues with the story can be fixed easily, and allow the director/s to tell if the story is clear and works as a visual narrative. However, storyboards cannot tell us the timing or pacing of the sequence. To do that, editors and artists take the storyboard panels and translate them into an animatic.
In its most basic form, an animatic is a collection of static storyboards edited together into a sequence. Using an editing package, we are able to put the storyboards into a timeline and see how the timing works for the animation, even adding cuts and camera movements which are often timed to any dialogue or music that will be used in the final product.
Similar to storyboards, animatics are used to bridge the gap between an idea and a finished animation. We need to see how it might feel, and ‘get more of a grasp’ of the scene. In contrast to storyboards, animatics are very particular to animation. They are a way to layout the timing, pacing and the visuals of the entire thing without having to create it in animation. Animatics are used to get the flow of camera work, pacing and characters interactions. Typically, the sketches in animatics are rough and instead focus on timing and pacing, rather than appealing illustrations.
Industry Practices In an illuminating video revealing the entire CG animation pipeline at Dreamworks Studios, lead editor Nick Fletcher explains the process in a way better than I ever could, simply because it’s his job to create animatics for Dreamworks’ feature films.
‘We take the storyboard panels and build a sequence out of those. Some times, we don’t have any dialogue, so we record ourselves doing the voices. We add a little music, sound effects and whatever is needed to fully tell the story. Try to make it as polished as possible so that the storyboard reel [or animatic] becomes a sort of foundation for the movie.’
Nick Fletcher, Editor and Animatic Creator for Dreamworks
In this early stage, the actors haven’t yet recorded their performances, so the editors effectively produce a rough pass as a way to present a preliminary vision of the film to directors, producers and executives, who will then green light the project to the next stage if they like what they see.
Interestingly, the inclusion of sound is a characteristic of almost every animatic I’ve come across, whether it be for a feature film animation or fan-made short on Youtube. Sound is a key part of producing an exciting and engaging animated film, and it’s not something that I want to disregard for this project either. When filming my own reference, I had the opportunity to verbally act out the performance and as such, I’ve essentially already got a rough audio track for my animatic, if I choose to include it. Despite the fact that sound isn’t mentioned in the brief, I feel like it could only be a good idea to include this aspect as a way to again push the limitations of this assignment and produce a piece of work that is of an industry standard: this is something that I want to consider when creating my own animatic.
With animatics, the drawings are often loose and sketchy: the focus is on telling the story and simply working out the timing and pacing of the sequence. A common industry practice of both storyboards and animatics is the use of spot colours or shading to simply separate the background and foreground, rendering the main characters in a shade of grey different to the background and foreground elements to direct the eye to the most important information and focal points of the shot. In my own animatic, I plan to produce a sketched version using simple line work and develop upon this by adding a grey tonal value to each of the elements as a way to evidence an understanding of key industry practices.
One final aspect to consider when creating an animatic is the program itself. After doing a little bit of digging online, I’ve found that the industry standard for animatic production is a combination of Adobe Photoshop to draw the frames and to sequence them using After Effects or Premiere Pro, both of which allow us to add cinematic touches and camera movements in this early stage. Already, I’ve had the opportunity to explore the use of virtual cameras within After Effects, and I can see the potential for more complex shot types and camera movements to be created simply using this technique of changing 2D illustrations into 3D flat objects that a virtual camera can then move around to give the illusion of depth.
Into the Spider-Verse: A Cinematic Approach This idea of a cinematic approach to animatics, making use of more complex shots even at this early stage in production, can be seen in Alberto Mielgo’s initial animatics for the massively successful Spider-Man: Into the Spider-Verse. Mielgo created the tests using the Adobe Creative Cloud suite, drawing with pencil and digitally in Photoshop, and compositing the sketches in After Effects before doing any final editing in Premiere.
The shots are intensely cinematic, presenting a new vision of a hand-drawn, 3D world. This example represents a more complex approach to an animatic, as Mielgo presents an inherently cinematic, hand-drawn 3D world. Through panning virtual cameras and zooms through converted 2D illustrations, the audience is able to get a sense of the scale of the film and the city of Brooklyn. Looking at these animatics, there’s a clear understanding of editing and cinematography here, with a mix of blurred lenses, fades and cuts that outline the overall look and feel of the final film.
Here, Mielgo was creating key moments and shot compositions that the final film still adheres to, with his initial animatics playing a key role in establishing the film’s stylistic visual language and a new, snappy approach to animation. The idea to use comic book panels, illustrated onomatopoeia and an experimental approach to composition was the work of Mielgo’s early development in the project, and within these, we can see how an animatic can be used to plan out the action not only in terms of layout and timing, but also the visual language of the film and even more editing elements such as how to cut a shot.
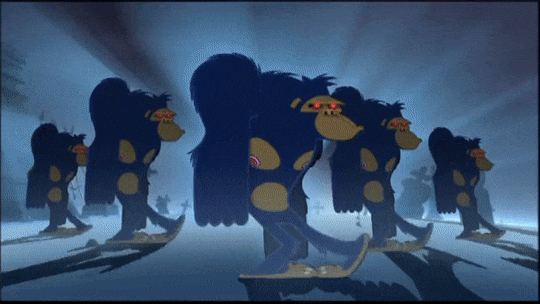
Gorilliaz: Animatics in Music Videos Animatics can also be found outside of the realm of animated feature films, however. For example, we can take a look at an animatic from the legendary animated band Gorillaz, an experiment blending animation and a genre-bending array of musical tastes that has become a world-wide hit since they first dropped their debut single in 2001, with ‘Clint Eastwood’. The song and music video are one and the same, each working to build off the other, and exemplifies the band’s use of mixing musical styles: combining hip hop, electronic and dubstep influences to defy musical genre, and instead embrace storytelling.
In the animatic for ‘Clint Eastwood’, we can see how the creators were able to pre-visualise their sequence by moving the camera around the 2D illustrations, which instantly gives the flat designs a sense of depth and cinematic charm. The slow arcing motion of each of the band members is shown clearly in the animatic, a shot that is now iconic to the band itself. It’s important to note that for the more complex moves, still images of the characters are used to act as visual place holders for the animation. With this example, the focus is on getting that smooth arcing camera movement, and focusing on each singular band member, and as such are represented with still frames. This is a common industry practice, and as such, animatics typically have little actual animation. Rather than a series of frames to create the illusion of movement, an animatic presents the action across a series of storyboarded panels that convey the motion through rough drawings.
Something interesting to note about this particular animatic is the varied use of mediums that creates a very tactical effect that hammers home to the audience that these sequences are created by hand. In a music video, one important element is the use of lip-synching early on - and as such, the animatic presents a nearly fully-animated lip-sync, animated traditionally on paper. This allows the animators a more considered and polished visualisation of the sequence to work from, and since it is a focal point of the video, it seems natural to want to develop upon this early on in the project.
Looking at the animatic, we can see how the creators have used a mix of near-fully animated sequences and moving still images to convey the story of the video. With more complex shots including detailed landscapes and multiple characters, only a handful of frames are shown - but it’s enough for the directors and creators to work from. In these more dynamic compositions, the characters are rendered with simple stick-figure bodies, taking the focus away from staying on model and more on sketching the shot and timing correct.
Additionally, the animatic also uses a range of camera effects to give the illusion of depth to these 2D characters, using a shaky cam to demonstrate a character jumping and slamming down onto the ground or arcing pan-up movements that evoke a real sense of cinematic composition and camera work - going beyond the traditional animation approach. It was quite interesting to see how the editors would recycle animations and shots for the video, allowing creators to save time using cycle animations for certain shots. Comparing these animatics to the final shots demonstrates how crucial and helpful the animatic is to a project like this: despite the colours, final polish and smooth animation, the sequence has effectively stayed to the initial compositions and camera movements outlined in the animatic.
Summary In this post, I’ve been able to explore the use of animatics in the animation industry, taking the time to delve into some examples that I personally find inspiring and exciting, and how these ultimately outline the final feature. As an animator, creating an animatic is interestingly something that I’ve never actually done before. However, I can really see a benefit and the purpose of doing so - and with this, my next move is to take the ideas that I’ve found here and apply them in my own creative practice: developing my own animatic based on my final storyboard.
References
Into the Spider-Verse Storyboards. (2019). Alberto Mielgo. https://vimeo.com/311716775.
Clint Eastwood (Animatic). (2010). Gorillaz. https://www.youtube.com/watch?v=JPC0n_ml4kc Clint Eastwood. (2001). Gorillaz. https://www.youtube.com/watch?v=1V_xRb0x9aw
What is an Animatic? (2014). Pluralsight Creative. https://www.youtube.com/watch?v=3sE5ox9kkUg
CGI Dreamworks Animation Studio Pipeline. (2016). CGMeetup. https://www.youtube.com/watch?v=ru0tQRJ4qKs&t=249s
2 notes
·
View notes
Text
7 Eye-Opening Reasons Why Your Website Doesn’t Convert [ INFOGRAPHIC ]

Most clients come to us because their marketing doesn’t perform as well as it should, yet, they often are reluctant to make changes on their website as they like it as it is. Customer satisfaction is important for us and taking in consideration the client’s taste is part of the job. But guess what? The clients and the designer tastes should be irrelevant when designing a website. The focus needs to be on the target audience. Which brings us to the topic of this article: the reasons why your website doesn’t convert. Let’s explore the possible barriers that you are encountering to a high-converting website.
If you are asking yourself these questions, you are in the right place:
“Why do I have so much traffic but nobody contacts me?”
“Why someone interested in my services didn’t call me back after searching my business online?”
“Why is my paid advertising campaign bringing useless traffic?”
1. Wrong Target Audience
All your marketing efforts won’t yield results if it reaches the wrong audience. There is no meaning of aiming in the dark. You will waste your arrow resulting in zero conversions. And you will be shocked to know that 80% of content marketing efforts is targeted at the wrong audience. This alone could be the reason why your website doesn’t convert. That’s why any marketing process starts with audience research. It is the most critical process because it encircles your marketing efforts. Whether it is social media marketing, Google Ads, or SEO, defining the right target audience is essential. Looking to find out if you’re reaching the right audience? Google Analytics can answer it.
2. Website Loading Speed
Nearly 70% of consumers admit that page speed impacts their willingness to buy from an online retailer.
It is nearly 2023. And people want to make a purchase more easily than ever. Slow loading speed is one of the critical factors that influence decision-making. Furthermore, most cart abandonments are either due to poor user experience or a lack of security. And it is crucial for mobile devices.
Want to measure your website’s loading speed? Google has developed PageSpeed Insights tool to help you out. You can also check what is hindering your website’s speed.
3. Engagement
Content engagement is a common cause of poor website experience. The goal of your content is to engage the visitor, address their pain points and motivate them to contact you!
Is your content interesting?
Does it address the challenges of your audience and bring them value?
If not, you should review your content strategy, as lack of engagement is often why your website doesn’t convert.
Your content should be the perfect blend of text, images, and rich media like videos or animations. Furthermore, it should also resolve users’ problems in an interesting way.
It needs to display what you want the visitors to think about your business: your desired brand image.
As Don Draper, notorious Ad Men character of Mad Men said:
4. Mobile Optimisation
Everyone has a smartphone. In fact, 63% of internet traffic is on mobile devices. Optimising your website for mobile devices is an essential step for successful marketing campaigns. Don’t want to spend time on mobile optimisation? Get optimised mobile website for your business from us!
Mobile-friendliness impacts user experience. Hence, poor UX leads to lower engagement and conversion rates. Poor UX on mobile devices also impacts brand reputation.
At Sydney Digital Agency, we also develop mobile-first designs if your primary audience is on mobile devices.
5. Differentiation & Creativity
If your website is not different from your competitors, it will be forgotten. To be memorable, your website must STAND FROM THE DIGITAL CHAOS. A creative and unique online experience is a must as a website is the front face of the brand’s online experience.
Furthermore, your website should be built around the brand’s core message and identity. A website’s interface should also resonate with the brand’s message and target audience.
While developing a website, focus on target audience, technology, content, and brand’s unique value proposition. It will help you get a better conversion rate.
6. Logical Website Structure
Website visitors want to solve their problems within no time. Website structure built according to your visitors improves website’s engagement and conversion rate. Good UI is not enough; it should be designed with logic. Additionally, we should A/B test it on a frequent basis.
Do you have an eCommerce store? This blog offers website architecture tips to improve conversion rates.
Logical structure includes UI/UX, content frame, web elements, web page hierarchy, navigation, and accessibility. Make sure you’ve optimised all.
7. Too Many CTAs
Confusion leads to nothing! That being said, your website should have a clear call to action. Your website structure guides users to take specific actions. Too many CTAs confuses users and leads to lower engagement and conversion rate. Having one or two CTA is enough for most websites.
Make sure your CTA sounds interesting and effective. It should also capture the user’s attention. Experiment enough to get the best result from your CTA.
Use actionable anchor text for your CTA. Make sure you’re consistent with your brand’s identity. Before placing CTA, ensure that your website has a good UX.
In Conclusion: Reasons for Low-Converting Website
Did you find out why your website doesn’t convert? Website conversion rate gets affected due to the above reasons. Testing and improving these 7 factors are keys to having a successful landing page or website.Hope that we have answered all of your queries. Need a high-converting website? Reach out to us via [email protected].
Content source https://sydneydigitalagency.com.au/why-your-website-doesnt-convert/
0 notes
Text
Prof Tuners Sound Cards & Media Devices Driver Download For Windows 10

Jan 01, 2021 A sound card is a valuable upgrade for your PC if you are a dedicated gamer, audiophile, or a creative who produce audio on your computer. Here are the best sound cards with advice on which one.
Prof Tuners Sound Cards & Media Devices Driver Download For Windows 10 64-bit
Prof Tuners Sound Cards Amazon
The sound card was working properly. But I still can't hear any sound when I try to watch TV on my computer. The cable to share my speaker to the TV tuner card is plugged on the right places, which are the line-in and audio-out. I can only hear sound from my TV tuner card if I directly plug the speaker cable to the audio-out area of my TV tuner. Professional Sound Card of an Unusual Design, with Professional and Consumer Jacks ESI presented its new sound card called Juli@ at the world-famous exhibition Musikmesse (March 31 – April 3, 2004) in Frankfurt, Germany. The card is shipped in a nice box made as a book with a transparent inner side. The box for ESI Juli@ is nice and functional.
Professional Sound Card of an Unusual Design, with Professional and Consumer Jacks
ESI presented its new sound card called Juli@ at the world-famous exhibition Musikmesse (March 31 – April 3, 2004) in Frankfurt, Germany.
The card is shipped in a nice box made as a book with a transparent inner side.
Bundle
The bundle of our sample card contained the following items:

PCI-card ESI Juli@
breakout cable for the S/PDIF and MIDI interfaces
really useful user's manual in English and in German printed in A5 format
CD with drivers
CD with special version of Ableton Live (list of limitations)
50% discount coupon for a full version of Ableton Live
Colorful advertisement of all ESI products
Card-transformer
The unique feature of this card is the opportunity to transform it to user's needs: you can choose which jacks to use – professional 1/4' balanced jacks (1/4' TRS) or consumer RCA jacks.
ESI Juli@ sound card: Professional 1/4' balanced TRS jacks are active Disassembled ESI Juli@ sound card: The upper part turns 180 degrees ESI Juli@ sound card: consumer RCA jacks are active
Innards
The main DSP chip labeled with the ESI logo is VIA Envy24HT-S (24-bit, 192 kHz; interfaces: three output I2S/AC-links, two input I2S/AC-links). Digital transceiver – AKM AK4114 (8 inputs, 2 outputs).
The main DSP chip: 24-bit, 192 kHz VIA Envy24HT-S
The card uses an 8-channel multibit 24-bit 192 kHz DAC AKM AK4358 with reduced sensitivity to jitter, positioned by AKM for professional equipment as well as for consumer DVD-Audio and SACD (by the way, I wrote about the release of this DAC in our news a year ago). Dynamic range: 112 dB. THD+noise: -94 dB. 8 times 24-bit digital filter with an slow roll-off option (in this case this option is disabled to provide ideally even frequency response). DAC is not a top class, but quite good enough for a sound card in this price range.
You can see on the ESI Juli@ block diagram that the 8-channel AKM 4358 DAC (marked as 4õ DAC) is used in this sound card on purpose — it monitors digital I/O with an absolute zero delay.
ADC – dual bit delta-sigma stereo 24-bit 192 kHz AKM AK5385A has a little better characteristics; it is positioned by AKM for professional equipment to record audio in high definition formats, including DVD-Audio. Dynamic range: 114 dB. Signal/(noise+distortions): 103 dB. High-quality digital antialiasing filter with a linear phase, passband (Fs=48 kHz): 0~21.768 kHz, ripple: 0.005 dB, stopband: 100 dB.
ESI Juli@ converters: AKM 4358 DAC and AKM 5385A ADC
Prof Tuners Sound Cards & Media Devices Driver Download For Windows 10 64-bit
Some comments. Though DAC and ADC are of the same class in this sound card, ADCs are still a tad better than DACs. Perhaps, as it was with Waveterminal 192X, the engineers considered the digitization quality (ADC) to be more important in home/project studio than the slightly reduced quality of signal monitoring, other things being equal. But hi-end audio PC users (RCA jacks are a curtsy to them), who use their computers solely for high quality playback and who do not care about ADC, have a reason to pause – is the DAC comparable with the level of the rest of the sound playback section? If the rest of the sound section is much more expensive than the card (approximately over $600), so that the bottleneck is in the DAC quality as well, then they should pay attention to the mastering level sound cards.
In general, it should be noted that in the price range up to $200 Juli@ demonstrates better DAC/ADC quality in comparison with similar old cards based on ENVY24 – various M-Audio Audiophile 2496, Echo MIA, etc. According to our measurements (using the same reference sound card) Juli@ is even better than the more expensive ESI Waveterminal 192Õ, which has better (according to the specification) ADCs. So in our opinion only EMU 1212M (with converters of a higher level) can be a serious competitor to the undoubtedly successful in price/quality Juli@.
Drivers sahara. Despite this fact, many users of middle end sound sections will quite possibly prefer Juli@, because this ESI card is easier to control, it does not have problems with the MME/WDM interface support in high formats, it has a smoother frequency response of line outs, and it offers several useful proprietary features, which will be described later. Besides, EMU is very difficult to find on our shelves and this situation has not changed for half a year already.
E-WDM technology
E-WDM technology (Enhanced Audio MIDI Driver) is a proprietary project of ESI, which enhances the original architectural concept of Microsoft WDM-drivers.
Aside from standard features, E-WDM offers functions required for professional sound processing:
Aside from Win XP/2000, it also supports Win Me/98 SE Based on the WDM architecture, E-WDM drivers work fine under all WDM compatible Windows operating systems, while WDM drivers of other sound cards often work only in W2K and XP, offering VxD drivers for Win98SE and ME.
GIGAStudio 2000 support From the very beginning E-WDM drivers were developed for professional applications. The popular software sampler GIGAStudio from Tascam is fully supported with the extremely low latency of 1.5 ms.
ASIO 2.0 support ASIO 2.0 is the de facto standard, and E-WDM supports it with just a 3.0 ms latency.
Independent support for MME applications Several MME applications can be used simultaneously, and the drivers will not complain that the device is busy. This is also useful for old applications, which are not supported by WDM drivers.
Multi-client support An unlimited number of audio applications can be accessed simultaneously with the multi-client support. You can use SONAR and WinAmp via a single sound device.
Multi-channel support It supports 5.1 output format for software DVD-Video players, such as WinDVD and Power DVD. This function is also useful for WDM applications, such as SONAR, especially in terms of the input/output channel synchronization.
DirectMUSIC MIDI ports WDM-based multi-channel MIDI-driver from ESI offers a more stable timing than the built-in MIDI-timing in NT4 or Windows 9X.
DirectSound support E-WDM offers support for several DirectSound channels for multi-channel output in such applications as PCDJ (DJ software).
No signal attenuation at -6 dB Unlike the situation with several other drivers, E-WDM guarantees the signal level exactly according to the existing standard.
Ultra-low latency, less than 1.5 ms E-WDM drivers provide comfortable work due to the minimal latency. Buffer size can be set in drivers.
DirectWIRE: audio stream visual routing technology
DirectWIRE is a technology for visual software routing of signals, which is currently available in most ESI products. Signals are routed on the level of drivers, bit-to-bit, without quality loss.
DirectWIRE 1.0 technology appeared in ESI Waveterminal 2496/192 when the Gigastudio sampler was still widely popular and initially it served to convert MIDI-tracks to WAV from Gigastudio (GSIF interface) into Cubase (ASIO) or into Cakewalk/SONAR1 (MME). Drivers resmed port devices replacement.
DirectWIRE 1.0 panel in ESI Waveterminal 192X
DirectWIRE 2.0 supports 32 channels, it has a new control panel, and an option to mute monitoring of selected output channels. You can switch inputs and outputs of the MME, WDM, ASIO, GSI/F program interfaces, even if they work simultaneously. You can connect inputs and outputs of different applications with virtual cables and record signals without quality loss. Using DirectWIRE you can also record multi-channel audio from DVD or another source (even protected from copying) in formats up to 24-bit 192 kHz in real time in completely digital form.
DirectWIRE 3.0 was enhanced with hardware inputs. In Juli@ Virtual Inputs 1 and 2 are the left and the right hardware analog inputs, 3 and 4 – the left and right hardware digital S/PDIF input.
Interface names mean the following applications:
MME: WinAmp, CoolEdit, Cakewalk, Vegas, etc.
WDM: SONAR (WDM/KS), PowerDVD, WinDVD, etc.
ASIO: Cubase, Nuendo, Logic, Reason, SONAR (ASIO), etc.
GSIF: GigaStudio 2.42 or higher.
You can read this Audiotrak tutorial to learn how to use DirectWIRE 3.0 with detailed examples.
Digital and MIDI Interfaces
Juli@ stands out against other ESI products with its MIDI I/O, digital RCA I/O, and a digital optical output. You had to buy a separate MI/ODI/O module to get these features in Audiotrak MAYA44MKII and ESI Waveterminal 192X/L. Though there are also modifications with MI/ODI/O module in a box now, it occupies an additional bracket among PCI slots.
Sound Quality
https://hunterlist346.tumblr.com/post/655921485763035136/nsc-sicherheitstechnik-usb-devices-driver-download-for-w. Juli@ vs. Audigy2 ZS Platinum Pro
These two cards can be compared due to similar prices ($185 for the ESI product and $240 for the Creative product) and professional attributes (external block with a full set of connectors) in Audigy, which is essentially a gaming card. Functionality of Juli@ and Platinum Pro in terms of a microphone preamplifier and phone-in can be leveled up by adding an inexpensive external analog mixer (about $50) to Juli@, but it's quite possible that an external mixer is already available in home/project studio.
Before the comparative audition I had no subjective preferences – the cards have converters of the same class, and thus I didn't expect considerable differences in sound quality. Nevertheless, the difference between the cards can be clearly heard even using the active speakers JetBalance JB-381 (by the way, very good speakers at a moderate price at last, less than $200).
In the 16 bit 44 kHz mode A2 is traditionally weak at playing via the MME interface, and it's much better at playing via the professional packaged 'SB Audigy2 ZS ASIO' driver with enabled SSRC high quality resampling to 48 kHz. But Juli@ produces crisper and more detailed sounds, and thus it's more suitable for a professional. Though this can be heard only when you instantly switch between the cards playing the same music fragment. If you increase the time between the auditions to a couple of minutes, you won't be able to distinguish the cards even with the same music fragment. One way or another, I clearly hear the difference, for example at Alex Reece, 1996 album 'So Far' (hits: Feel The Sunshine, Pulp Friction) and some other test compositions with clear compressed mastering and timbre-catchy high frequency range.
Juli@ vs. EMU 1820
Despite the high price ($400) and the increased number of channels in EMU1820, Juli@ can compete with it head-to-head, because the Creative/EMU product has converters of the same level (CS4392).
Prof Tuners Sound Cards Amazon
Both cards, Juli@ and 1280, were tested in balanced mode, high signal level (+4 dBu) to increase the dynamic range and to demonstrate sound cards' features at maximum. The auditions were also carried out on EVENT 20/20 bas monitors, allowing the balanced connection.
Thorough audition in the same conditions, using the same cable and instantly switching between the cards did not reveal any difference in their sounding. However, considering the high price of EMU1820, it cannot be called a successful sound card – it's an economic modification of the elder 1820M. 1820 is of lower quality than even the younger 1212M model. Forestalling your questions: we don't have an opportunity to compare it with EMU 1212M or 1820M, because these cards cannot be found on sale in Russia. US EMU office promised to send us a press-sample, but we lost contact with it. If we still have an opportunity, we'll update this article.
Juli@ vs. LynxTwo
Comparison with LynxTwo (price >$1000, stereo-modification is Lynx L22, >$800) in our tests is traditional, it serves to reveal the degree and character of sound differences between a sound card under review and a reference sound source.
We hasten to say, LynxTwo sounds better. The difference is not so large but it still makes itself felt. Nevertheless, Juli@ demonstrates professional sound quality in comparison with the reference. Multimedia cards (for example, Audigy2/ZS) are usually infamous for timbre distortions, various tones and harmonics at high frequencies. So despite their rather high quality converters, such cards cannot be used for professional work. Juli@ is free from these drawbacks, it sounds true and clear. The only difference from Lynx is in a tad lesser detail, which will hardly influence its professional capability, except for the mastering.
Headphones
Despite the fact that this card does not have a separate output to headphones, they can be connected using the 2RCA-minijack adapter. Using Sennheiser HD600 (400 ohm impedance) via the adapter caused no problems with sound. Besides, we carried out the following interesting experiment: we connected a variable resistor to the output, and applied a maximum amplitude sinusoid to the output of the card. On the digital oscillograph EZ Digital OS-310M we monitored how the amplitude changed and at what resistance there would be a limitation. In comparison with the pure linear output in MAYA44MKII with the limitation at ~100 ohm and lower, Juli@ was OK. Operational amplifiers JRC 4580 hold well the low impedance load, though the Juli@ specification requires the load impedance of not less than 100 ohm. By the way, MAYA44MKII has an output for headphones, which is also OK.
Working in Professional Applications
No surprises here. As any sound card based on the ENVY24 series chip, Juli@ demonstrated excellent results in ASIO-applications CubaseSX 2.0.1 and WaveLab 5.0a.
Besides, InterVideo WinDVD 6.0 works correctly with the card as well. When playing DVD-Audio discs, they are downsampled to 16/48.
RMAA 5.4 Tests
Many users ask us to test not only the quality of linear output, but that of the linear input as well. Silicon image hard disk controller driver download for windows 10. It is especially important for professional equipment, so we tested the card in three modes: when the output and the input of the card are connected, input and output are connected separately using LynxTwo – a reference card of a higher quality.
16 bit 44 kHz, +4dBu, balanced 1m cablesESI Juli@ loopbackESI Juli@ -> LynxTwo Frequency response (from 40 Hz to 15 kHz), dB:+0.05, -0.03+0.02, -0.16+0.04, -0.03Noise level, dB (A):-96.1-96.1-96.4Dynamic range, dB (A):95.795.995.8THD, %:0.00060.00230.0006IMD, %:0.00460.0150.0045Stereo crosstalk, dB:-96.7-97.9-98.1
When the linear input is tested in the balanced mode using LynxTwo, the frequency response gets worse in this test as well as in all the other ones. In the loopback mode (when the output and the input of the card are connected) there is no such drawback, thus we have some disalignment in the operation of balance interfaces in this specific device combo. This is another reason not to use balance connection needlessly.
24 bit 44 kHz, +4dBu, balanced 1m cablesESI Juli@ loopbackESI Juli@ -> LynxTwoFrequency response (from 40 Hz to 15 kHz), dB:+0.05, -0.03+0.02, -0.16+0.04, -0.03Noise level, dB (A):-103.6-109.3-108.0Dynamic range, dB (A):103.4109.2107.9THD, %:0.00050.00230.0005IMD, %:0.00200.0140.0019Stereo crosstalk, dB:-103.9-109.3-107.2
Note the ideally steady frequency response graph and the ideally clear noise spectrum in the 24-bit mode. The noise level measured is close to the claimed figures in the converter specifications. Engineers made the most of the existing converters.

24 bit 96 kHz, +4dBu, balanced 1m cablesESI Juli@ loopbackESI Juli@ -> LynxTwoFrequency response (from 40 Hz to 15 kHz), dB:+0.03, -0.02+0.01, -0.17+0.02, -0.04Noise level, dB (A):-103.9-109.8-107.9Dynamic range, dB (A):103.9109.4107.7THD, %:0.00050.00230.0005IMD, %:0.00190.0140.0019Stereo crosstalk, dB:-101.6-106.8-106.7
In the 96 kHz mode the spectrum is reproduced completely, as it should be. I'll remind you that EMU cards have problems with frequency response in DAC, which is -0.7 dB for 20 kHz.
24 bit 44 kHz, S/PDIF all tests comparison Test file 24/44LynxTwo S/PDIF loopbackESI Juli@ -> LynxTwoFrequency response (from 40 Hz to 15 kHz), dB:+0.00, -0.00+0.00, -0.00+0.00, -0.00+0.00, -0.00Noise level, dB (A):-147.7-144.4-144.5-144.5Dynamic range, dB (A):133.4133.2133.2133.2THD, %:0.00000.00000.00000.0000IMD, %:0.00020.00020.00020.0002Stereo crosstalk, dB:-149.7-146.3-145.1-145.0
In digital output tests Juli@ is equal to LynxTwo.
24 bit 96 kHz, S/PDIF all tests comparison
Test file 24/96LynxTwo S/PDIF loopbackESI Juli@ S/PDIF -> LynxTwoESI Juli@ S/PDIF loopbackFrequency response (from 40 Hz to 15 kHz), dB:+0.00, -0.00+0.00, -0.00+0.00, -0.00+0.00, -0.00Noise level, dB (A):-151.1-147.8-147.9-147.8Dynamic range, dB (A):133.3133.2133.2133.2THD, %:0.00000.00000.00000.0000IMD, %:0.00020.00020.00020.0002Stereo crosstalk, dB:-151.3-146.2-146.4-145.9
In the 24/96 mode the ideal is even farther from our contenders. The reason is most likely not in the lack of bit-to-bit transfer precision, but in the PLL influence in the transceivers or in dithering reformation. One way or another, it's impossible to hear the difference between the original and the received sound – the differences are below the thermal noise threshold in semiconductors, and any digital-analog conversion will guarantee much more audible inaccuracies – the native level of noise in modern DAC is hardly over 120 dB A.
RightMark 3DSound 1.20 Tests
We test DirectSound functions of the card, because we have such an opportunity. RM 3DS tests demonstrate DirectSound compatibility but also the lack of any algorithms of software 3D sound. Just for information.
Device: Juli@ Ch12 (JulaWdm.sys)
Features: Device has not enough hardware 3D buffers Device has not enough hardware 2D buffers EAX1: N/A EAX2: N/A EAX3: N/A EAX4 Advanced HD: N/A
Rates: dwMinSecondarySampleRate 22050 dwMaxSecondarySampleRate 192000
Free buffers stats: dwFreeHw3DAllBuffers 0 dwFreeHw3DStaticBuffers 0 dwFreeHw3DStreamingBuffers 0 dwFreeHwMixingAllBuffers 0 dwFreeHwMixingStaticBuffers 0 dwFreeHwMixingStreamingBuffers 0
Max buffers stats: dwMaxHwMixingAllBuffers 1 dwMaxHwMixingStaticBuffers 1 dwMaxHwMixingStreamingBuffers 1 dwMaxHw3DAllBuffers 0 dwMaxHw3DStaticBuffers 0 dwMaxHw3DStreamingBuffers 0
Misc stats: dwFreeHwMemBytes 0 dwTotalHwMemBytes 0 dwMaxContigFreeHwMemBytes 0 dwUnlockTransferRateHwBuffers 0 dwPlayCpuOverheadSwBuffers 0
Audio transfer speed (software): 3.289 Mb/sec.
Exclusive iXBT.com interview with the ESI R&D team!
iXBT.com:How did you come up with the idea to produce such an unusual sound card with a unique design as Juli@? Is it an attempt to stand out against similar sound cards and to attract attention? What was the reason to break away from the multichannel solution, which we saw in Waveterminal 192L/X (Waveterminal 2496 descendant)?
ESI: Our main goal of developing Juli@ was making a reference model card in terms of audio quality. We did research the market and the already available products. We found that users would need either balanced or unbalanced I/O connections, preferably with the same number of input and output channels, but all products are supporting only one of each connector type. We came up with Juli@ with such a unique design with the user's needs in mind so that the I/O connections will be swappable between balanced and un-balanced. ESI plans to release new multi-channel solutions in the near future. iXBT.com:What was the criterion to select the certain ADC and DAC models (AKM 5385A and 4358)? Why did you choose the 8-channel DAC (AKM4358)?
ESI: We have been using the AKM4358 in development of other products such as the upcoming Audiotrak MAYA1010. We really liked the quality of AKM4358 so it was our conclusion to use it also for Juli@ despite the number of channels. This made it possible to use the additional channels to provide real-time monitoring for all S/PDIF and analog I/O signals, providing more functionality. As for the ADC, we always try to use the best available components, as recording is more important than playback for most professional users. iXBT.com:Did you choose during development a certain price/quality threshold, in order to reach a predetermined price (MSRP), or do your engineers preach some principle of reasonable sufficiency in the area of quality?
ESI: Of course reaching a specific price is always a concern during development. In case of Juli@, functionality and audio quality have been the highest priority. We are very glad that the final product is now available with a very competitive MSRP. iXBT.com:How do you feel, at what rates do the high sampling audio formats evolve in the area of music production and their demand by listeners/customers? ESI: When we started to sell 24bit audio cards several years ago, most of our professional users started immediately work with 24bit/44.1kHz. The higher resolution compared to previous 16bit products was a huge increase in audio quality useful for music production, even if the final product was just a 16bit/44.1kHz audio CD. Now, professionals are slowly starting to work with higher sample-rates in the production process, not only with the higher bit-rate. New formats such as DVD (audio or video) or SACD even require higher sample-rates in the production process; so many professionals are working with 96kHz or even 192kHz already. ESI supports these professionals not only with soundcards but also with exciting new concepts, such as our M-Fire M9600 24bit/96kHz DVD Master Recorder. These days, when we talk to the members of our professional user community, we can see that the demand for a higher recording quality standard is getting more and more important, although we have to admit, that this is a considerably slow process. Many professionals are also buying higher spec hardware because they understand that higher spec hardware also works better even when working with lower samplerates. For example, our 24bit/192kHz Juli@ will produce better results when used with 24bit/44.1kHz compare to other 24bit/96kHz devices, simply because of the much better ADC and DAC. For consumer products, the need to support 96kHz, or even 192kHz, is growing at the same time, mostly because of the necessity to playback already available consumer media. Windows Media Audio Professional supporting 24bit/96kHz is already a standard for PC audio. As more and more professionals are producing music and media content for higher bit and sample rates, the actual demand for consumer products that support these features is also growing. Still, it is not growing that fast, probably because of the reluctance of large media corporate to invest into better audio quality without having working Digital Rights Management solutions market ready.
iXBT.com:Can you tell us anything about the upcoming new generation of built-in sound named High Definition Audio replacing AC'97? Does it threaten high-quality soundcards supporting high sampling formats, or on the contrary will it draw attention to the high quality sound and promote high-quality sound devices?
ESI: We are aware of the HD Audio which sounds promising. But, from our experience in the past, we suspect that there always will be some limitations of on-board sound card. Most main board manufacturers will have to make compromises which will possibly lower the audio quality. We have evaluated the Azalia (former codename for HD Audio) demonstrated at the recent COMPUTEX Taipei 2004. There was certainly improvement on specification over the outdated AC97. However, we thought that it was not that impressive quality and not superior than AC97. We are confident that optional soundcards will be available in the future, probably mostly for audio enthusiast and of course for professionals. Audio still faces huge competition from leading companies and still doesn't provide a full substitute solution for high performance 3D audio and popular gaming surround sound standards such as EAX, Dolby Digital surround, and features like Advanced NSP, the ESI's solution to the native CPU processing for PC Audio. iXBT.com:What is your opinion of the E-MU revival in the sector of sound cards (especially the 1212M and 0404 models)? How you do evaluate DSP features and the quality of converters in these sound cards taking into account their prices? Will ESI respond with a solution featuring top-end converters at an affordable price?
ESI: We generally believe that onboard DSP solutions on audiocards will soon be history. Solutions like VST plugins or DirectX effects are providing excellent results for professional and even ultra high end professional effects, based on native CPU processing. Modern PCs are easily fast enough to provide better sounding effects and software synthesizer sounds compared to current DSP solutions. Right now, we are just at the beginning of this development - in the future, there will be less and less DSP based products in the audio market and native processing solutions will get even more important. In today's native processing environment, it is obvious that the value of a powerful driver providing low CPU load and low latency is considered much more valuable by professionals, compared to onboard DSP hardware. We also believe that we have developed a great value for audio professionals and audio enthusiasts with Juli@ - currently one of the best solution on the market for digital recording because of its exceptional circuitry design. The excellent frequency response is unmatched by any other products in this and even in higher price ranges. Yet, Singapore based Creative Labs has - with some of their E-MU brand products - achieved high dynamic range values on the input section - it is up to the customer if he prefers a good frequency response or a slightly higher dynamic range, just depending on his specific needs. Of course, ESI will provide even better AD and DA conversion quality for future professional audio products, e.g. with our upcoming multi-channel solutions. ESI was one of the first companies to introduce 192kHz and 7.1 channel sound cards and we will continue to introduce new standards and features first. Other examples are the unmatched features like our universal E-WDM drivers and of course DirectWIRE, a virtual digital routing solution with zero latency, exclusively available for users of ESI and Audiotrak products.
iXBT.com:How is ESI getting on? Should we expect new interesting products, such as Juli@, in future from ESI engineers? Can you share some of your plans with us?
ESI: Actually, ESI is currently mostly focusing on developing products that are more market-friendly. For consumer products, Audiotrak brand will release LP (Low Profile) type products which will inherit all the available features in a half sized PCI board and which will fit nicely in a small form factor PC cases. We have the new MAYA 1010 waiting to be released behind the corner but these might not be as special as Juli@. We do plan to design a variety of rack casings to give our users more connection possibilities, both for the consumer and professional music markets. Our drivers and control panels will always have ESI exclusive original features like E-WDM and DirectWIRE which have been as interesting to many people as Juli@'s brilliant swappable hardware design.
iXBT.com: We thank the entire ESI R&D team and personally Nikki Kichan Kang for the interview!
Conclusions
Professional sound card ESI Juli@ has an unusual design, it features both professional and consumer connectors, full MIDI and digital interfaces, high quality playback, excellent drivers, quite a reasonable price, and it is available on sale. Taking into account its price and professional orientation, we found no drawbacks in this card. ESI engineers did a good job, but one can never stop at what has been accomplished – we are looking forward to new sound cards from ESI/Audiotrak with higher quality DACs, which will compete with EMU products of the same price range.
ESI Juli@ gets the 'Original Design' award according to the test results.
We thank ESI for the kindly provided sound card ESI Juli@.
Write a comment below. Download nokia usb devices driver. No registration needed!
0 notes
Photo
Lately, I have received several messages here on tumblr asking: How do you do it? How do you colour gifs? What? How? Whaaat? So… I decided to share some of my deepest secrets and commonly used technics with you. Be my guest.
I would like to stress that this is not a step-by-step tutorial. There are tons of there on tumblr already, I don’t think there’s a need for another one. What you are about to read is a list of my personal tips. Having said that, please note that there are million ways how to make gifs. Everybody has their own unique style and that is amazing; that is how it should be. Maybe you will find here something useful, maybe you will not.
To be honest, I can’t colour properly. I can’t make bright, vibrant, high contrast gifs. Whenever I aim for them (and I really do that from time to time), it’s a disaster. That is why I use all those below listed hacks; to cover the fact that I can’t colour the way everybody else colours. Welcome to my personal Photoshop hell.
Oh, and one more thing, before we really start. It is vital to acknowledge that everybody has a different monitor with different settings. You might spend hours colouring a gifset and be really proud and satisfied with it and then you look at it at your friend’s computer and just go FUCK! Suddenly, your perfectly coloured and balanced gifs are too yellow or blurry and everything is runied. Well, you must count with it, although there is nothing to be done about it, I guess.
~~~
Let’s start with the most important rule ever. The golden rule. Number one rule. It has been said many, many times, but I must repeat again. Are you ready? NEVER use one colouring on two different scenes. This barely ever works. If you make a nice PSD, of course, save it, but be careful about using it on different scenes. Every scene is very individual – the lightning is different; the basic colours are different too. I recommend everyone to colour every gif from a scratch, it does pay off. You asked for a proof? Here it is.
I coloured this lovely scene from the The Rings of Akhaten.

Then I thought that I might use the same PSD on a different scene. Let’s say I’d like to colour a scene from Dark Water; the one when Clara stole they keys. Both are orange-based, right? What could go wrong? Here is the result without prior editing.

Ewww, ugly, so ugly.

Even though I made it brighter and did not touch the actual colours, it doesn’t do the scene justice.
~~~
Technical background
To extract frames, I use KM Player. For the actual giffing, I work with Adobe Photoshop.
The better the quality of the video you extract is, the better your gifs will look. That’s quite a simple, yet important fact. I usually use 1080p, sometimes 720p, but never 480p. Working with original DVDs is, of course, the best way, if you have a disc drive.
When extracting the frames in KM Player, I extract every or every other frame. Both are fine, but don’t forget to change the speed of the gif accordingly. I use 0,9/0,1 for gifs with every extracted frame, 0,12 for the other options. Oh yes, I like my gifs to move slooowly.
Rescaling
This way of rescaling might be caused by the fact that I can’t do it properly; so I came up with my own way. When I was younger, in the old and dark days of my Photoshop adventures, I used Image Size to make my gifs smaller. But it didn’t quite work out. Years have passed and I discovered that using Canvas Size + Manual Scale is much better. How do I do it?
In Canvas Size I choose the dimensions I want and then rescale the gifs manually by Edit > Transform > Scale. Do not forget to hold Shift to contain the proportions! FIRST rescale your gif, THEN convert it into timeline and smart objects. If you do it this way, the gif will be neat looking. Why do I do it anyway?


The first gif is was rescaled my way. The other one was not. Can you spot the difference? I think that the first one is neater and cleaner.
Oh, and one more thing. When I rescale my gifs, I always make sure that it is one or two pixels bigger than the canvas itself. When you sharpen the gif later in the process, you will not have to put up with those ugly oversharpen edges.

Sharpening
Here’s how I do it. Enough said.

Colouring
Now this is the tricky part. It always depends on the scene you are colouring, but I don’t use many tools to colour a gif. Six or seven layers and I am done.
I always start with Curves/Brightness and Contrast. I think it makes sense to first adjust the brightness and play with the colours afterward.
I never use Vibrance. Why? Vibrance works with all colours at once and that is the main problem. I think that the best way is to work with the colours separately.
If you want to make a certain colour brighter and more vibrant, use Colour balance and Selective colour instead.
Work with Colour fills. They can do miracles! And I’m not even exaggerating. Work with different opacity settings and opacity fill. My most favourites are:
Lighten/Screen

Multiply/Darken


Soft light


Black and white gifs
That is impossible to colour, damn it! What do I do, I tried everything, but it still looks so crappy! The other gifs are fine, but this one looks horrible? What do I do???
Yeah, what do you do? What do I do? I make it black and white. ¯\_(ツ)_/¯
Yes, it might be considered lazy, but it, is fact, lifesaving. And I do think that taking this risk or whatever you people call it, can make you gifset more interesting. Again, try to play with colour fill to make the gifs look softer.


Using a texture
Textures are my best friends. And I really mean it! They can help you hide those ugly visible pixels in dark gifs.

If you want to use a texture on a gif (as I often always do), applying it should be the first thing you do. The texture will always be present and you must adjust the rest of layers to it. I usually use Lighten or Screen setting. And don’t forget to play with opacity! It can make a big difference. But always make sure that the texture is the TOP layer.


Saving
When I save my gifs, I use the following settings. I think that almost everybody uses them. In case you need them anyway, here you go.
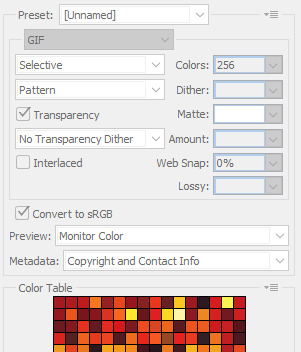
Putting a gifset together
To be honest, this, after all what has been said above, is the most important thing to me in the whole giffing experience. I can’t just sit, open my laptop and think: Hmmm, today I might gif something from… let’s say The Name of the Doctor, pick up eight random scenes, colour them separately, put them together and click publish. I just can’t do it. I must plan every gifset to every single detail. I think about the colour scheme, proportions. I combinate, experiment, put a gifset together one by one until I am fully satisfied; until it is perfectly balanced in every aspect. If you think that it takes a lot of time, you are right! But in the end, it is worth it, because the results will be… well, not bad. Example one / two / three.
~~~
And that’s it, my friends. Don’t forget – don’t be afraid to experiment! Look at me; I started with this. And look where I am now. Everybody can make an improvement. Make special gifs, look for new ideas and methods, look for interesting parallels and, most importantly, have fun! :)
(So… what do you think? Was it OK? Helpful? Interesting? Share your thoughts and comments!)
230 notes
·
View notes
Text
Top features of Publishing Advertising Software act as a boon for AdTech

Did you know!
As per TechCrunch, internet advertising is expected to reach $121 billion by the end of 2021.
eMarketer says that digital ad spending accounts for 30% of total United States ad spending.
According to Business Insider, mobile video ad revenues are to grow at a compound annual growth rate of 73%
AdTech is ruling the world with its stunning advantages. With advanced publishing advertising software AdTech is gaining even higher popularity among non-technical users.
The immense benefits and advanced features of advertising software have made them an indispensable tool for marketing agencies and an integral part of the AdTech industry. However, before we explore how publishing advertising software proves a boon for the AdTech industry, let us clear some basic concepts.
What is publishing software?

Publishing software may also get referred to as digital publishing software or online publishing software. The ultimate function of publishing software is to digitally publish e-books, online magazines, online ads, etc., and facilitate online library creation.
Digital publishing software usually consists of an editorial section where the user can edit the digital content with great ease and comfort. In addition, publishing advertising software offers an intuitive user interface, making it convenient for people to perform otherwise complex technical tasks with ease and comfort.
Have a quick look at the top benefits of publishing software:
It lowers the marketing cost of publishing as it minimizes the direct human labor involved in the process.
Facilitates a higher level of customization to the digital content, which suits the target audience.
Availability of professional layout templates and designs helps the content creation team.
Updating the digital content with the latest offers and revised strategy is convenient with a publishing software company
What is AdTech?

AdTech stands for Advertising Technology and is defined as a combination of all the software and software tools necessary for an advertising agency to effectively strategize & carry out the activities related to advertising. So, advertising software for AdTech enterprise is an integral part of the company.
While learning about the features of publishing software, you will come across few technical terms like RTB, programmatic direct, etc. So let's have a quick look at them too.
Programmatic Ad Buying: The practical uses of software in the advertising industry to automate and streamline the transaction processes are termed programmatic ad buying.
As simple as ABC, programmatic ad buying eliminates the need for agencies to sit and negotiate a deal with the clients as the process gets automated. As per Software Development Stats, the programmatic ad spend is to reach 150 billion by 2021.
Programmatic Direct: It is simply a manner of purchasing the programmatic media. Under programmatic direct, clients and digital agencies communicate with each other to make a deal for displaying ads at an agreed Cost per Mille pricing.
RTB: It is an abbreviation that stands for real-time bidding and is simply another method of programmatic ad buying. However, unlike programmatic ad buying, RTB is way more flexible and scalable in approach.
As the name suggests, the process gets carried out in real-time. RTB allows advertising agencies to bid the unsold ad inventory to interested clients through an ad exchange.
Top 7 features of Publishing Advertising Software
1. High Accessibility with Cloud-based platform
With your digital publishing software on Cloud, you can ensure zero worries of accessibility. Cloud allows you to store the digital content on a virtual space which you can access from anywhere and anytime, be it your office, cafeteria, home, etc.
The anytime-anywhere accessibility of Clouds also keeps your digital ad content safe and secured from device-based issues. When you feel the device is causing a problem due to a technical glitch or virus, you can switch to a new device to access software.
Thus, Cloud storage for any enterprise, be it a magazine or a Newspaper Publishing Software, offers the investors business continuity, enhanced flexibility, a high level of scalability, etc.
2. Creating roles and designations

Allowing each employee with complete access to the software is not preferable for advertising agencies. When you have the same level of permission for employees with little technical skills, it leads to blunders in the projects. Custom Application Development allows you to go for role creation for the employees.
Offering particular sections of the publishing advertising software allows you to have complete command over the project and minimizes human errors to a significant extent.
3. PDF convertor
When your publishing advertising software deals win magazines, e-books, newspapers, etc., PDF converter plays a significant role. A Magazine Publishing Software with PDF converter facilitates the conversion of content into compatible formats with zero hassles.
Renowned formats for eBooks include Adobe InDesign, Google Slides, Microsoft PowerPoint, etc., which offers feature-rich designs for content creation to the designing team.
4. Highly secured platform for publishing
Theft of digital content is prevalent in the publishing industry. Losing hours of hard work due to a non-secured publishing platform leads to severe setbacks for the advertising agencies. The importance of publishing software lies in the fact that it offers a highly secure medium for launching ads.
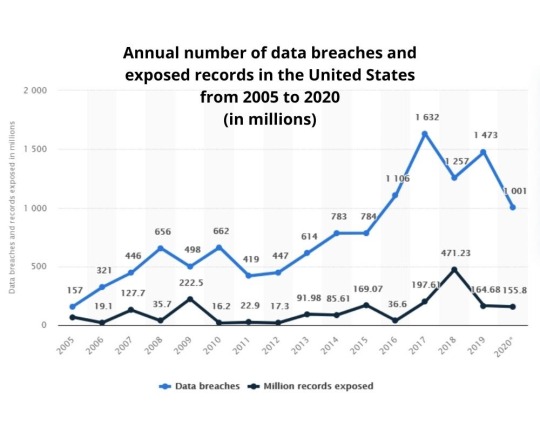
Source: Statista
With 1001 million cases of data breaches in 2020 in the United States alone, data security plays an important role. Offshore Outsourcing of the software ensures the optimum level of security with data encryption, SQL injections, implementing trusted access control, transport layer protection, etc.
5. Real-Time Measurement
Access to real-time data plays a pivotal role in building a successful strategy for ad agencies. With programmatic advertising as a critical feature in AdTech, you get access to real-time data that helps you analyze the strategy's success in real-time. In addition, it helps to come up with new and innovative ideas in the project without having to wait till the end.
6. Advance Table of Content
Table of Content helps to produce a good impression by systematically classifying information. The use of TOC is prevalent in diverse industries, and the notable ones include IT advertising, hardware materials advertising, etc. Automated TOC in publishing advertising software enhances the user interface of the software.
7. Analytics Reports

Keeping track of performance becomes convenient with publishing advertising software. A detailed analytics report gives you information on diverse aspects related to advertising. For example, you can view the number of users who saw the advertisement, the number of users who clicked on the advertisement leading to conversions, etc.
As we have covered the top features of the publishing advertising software, let's look at the ones trending now.
Here are some of the trending advertising agency software
Adzooma
It is a Cloud-based solution and aims at managing campaigns as well as pay per click solution. The software utilizes the latest disruptive technologies, including Artificial Intelligence & Machine Learning, to monitor marketing campaigns over Google Ads and Facebook Ads.
Adzooma comes with multiple vital features necessary for monitoring digital marketing strategy effectively, and the primary ones include keyword tracking, multi-campaigns, etc. In addition, allowing convenient modification in the plan for digital marketing campaigns is also available in Adzooma.
It also offers convenient report generation with an advanced dashboard for the users.
Pros of Adzooma:
It automates the ad campaigns of Google.
It offers easy and convenient report creation.
Provides insightful tips aimed at improving the performance of campaigns.
Cons of Adzooma:
The software tool suffers from glitches.
It requires improvement in the onboarding section.
Asana Software
Asana software is also a Cloud-based solution but is quite different from Adzooma. It is more of a project management software that has found immense popularity among digital advertising agencies. The Asana Software is compatible with both short- and long-term projects and facilitates users in handling tasks in multiple ways.
It comes for free, which facilitates startups and entrepreneurs. A high level of security ensures that the uploaded data gets accessed by the authorized users of the enterprise only. It also offers a significant level of customization for the Dashboard.
The availability of the Gantt Chart facilitates digital marketing agencies with better visualization of the activities. However, on the downside, Asana Software does not come with a time tracking feature.
Pros of Asana Software
It allows users to allocate resources with specific tasks and activities.
Tracking the sound progress of the project is convenient and easy.
Dashboard Customization, Gantt chart, High level of security are noticeable aspects of Asana Software.
Cons of Asana Software:
It does not offer the option of time tracking.
Integration with Office 365 is not smooth.
Over to You
That was all about the publishing advertising software and how they are aiding the AdTech industry. Publishing software development company creates innovative solutions with AI & ML integration.
Such solutions aim at bringing innovations to help publishing industries across the globe.
#PublishingSoftwareCompany#offshore outsourcing#NewspaperPublishingSoftware#MagazinePublishingSoftware#customapplicationdevelopment
0 notes