#ba1b:mysterybox
Explore tagged Tumblr posts
Visit Tumblr Blog
Explore Tumblr blogs with no restrictions, modern design and the best experience.
Last Seen Tumblr Blogs


Fun Fact
The total number of visits Tumblr.com received during January 2021 is 327 million.
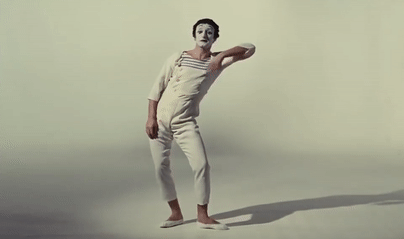
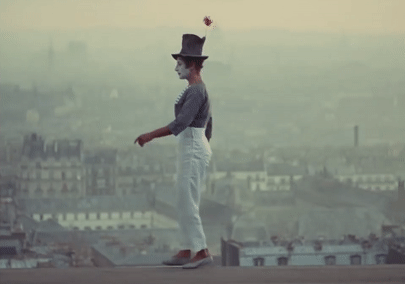
Photo
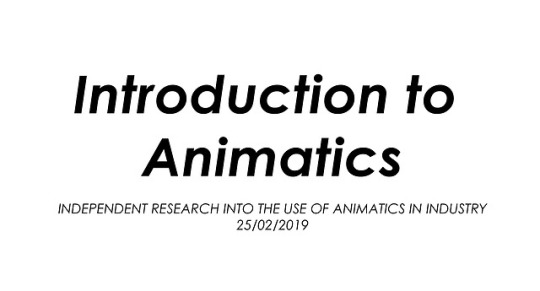


Mystery Box: An Introduction to Animatics
In this week’s animatic masterclass, we were introduced to the idea of an animatic as a way to plan our animations. Whilst we had the opportunity to create our own animatic, I first wanted to delve into the use of animatics in the industry of animation, looking at a few examples and the purpose they serve in the production of an animated sequence. This isn’t in response to any points from Helen herself, who simply gave us the task and how to produce it in the given software, but instead, this post is an opportunity for me to develop my own independent research into the use of animatics in animation.
What is an Animatic? Last week, we explored the idea of storyboards, and how these hand-drawn frames can show the stages of a scene in rough camera placements. Here, issues with the story can be fixed easily, and allow the director/s to tell if the story is clear and works as a visual narrative. However, storyboards cannot tell us the timing or pacing of the sequence. To do that, editors and artists take the storyboard panels and translate them into an animatic.
In its most basic form, an animatic is a collection of static storyboards edited together into a sequence. Using an editing package, we are able to put the storyboards into a timeline and see how the timing works for the animation, even adding cuts and camera movements which are often timed to any dialogue or music that will be used in the final product.
Similar to storyboards, animatics are used to bridge the gap between an idea and a finished animation. We need to see how it might feel, and ‘get more of a grasp’ of the scene. In contrast to storyboards, animatics are very particular to animation. They are a way to layout the timing, pacing and the visuals of the entire thing without having to create it in animation. Animatics are used to get the flow of camera work, pacing and characters interactions. Typically, the sketches in animatics are rough and instead focus on timing and pacing, rather than appealing illustrations.
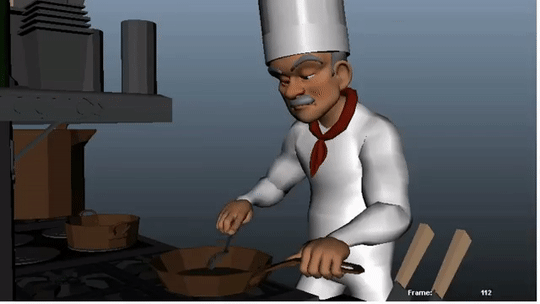
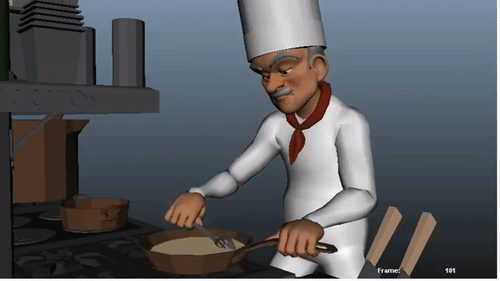
Industry Practices In an illuminating video revealing the entire CG animation pipeline at Dreamworks Studios, lead editor Nick Fletcher explains the process in a way better than I ever could, simply because it’s his job to create animatics for Dreamworks’ feature films.
‘We take the storyboard panels and build a sequence out of those. Some times, we don’t have any dialogue, so we record ourselves doing the voices. We add a little music, sound effects and whatever is needed to fully tell the story. Try to make it as polished as possible so that the storyboard reel [or animatic] becomes a sort of foundation for the movie.’
Nick Fletcher, Editor and Animatic Creator for Dreamworks
In this early stage, the actors haven’t yet recorded their performances, so the editors effectively produce a rough pass as a way to present a preliminary vision of the film to directors, producers and executives, who will then green light the project to the next stage if they like what they see.
Interestingly, the inclusion of sound is a characteristic of almost every animatic I’ve come across, whether it be for a feature film animation or fan-made short on Youtube. Sound is a key part of producing an exciting and engaging animated film, and it’s not something that I want to disregard for this project either. When filming my own reference, I had the opportunity to verbally act out the performance and as such, I’ve essentially already got a rough audio track for my animatic, if I choose to include it. Despite the fact that sound isn’t mentioned in the brief, I feel like it could only be a good idea to include this aspect as a way to again push the limitations of this assignment and produce a piece of work that is of an industry standard: this is something that I want to consider when creating my own animatic.
With animatics, the drawings are often loose and sketchy: the focus is on telling the story and simply working out the timing and pacing of the sequence. A common industry practice of both storyboards and animatics is the use of spot colours or shading to simply separate the background and foreground, rendering the main characters in a shade of grey different to the background and foreground elements to direct the eye to the most important information and focal points of the shot. In my own animatic, I plan to produce a sketched version using simple line work and develop upon this by adding a grey tonal value to each of the elements as a way to evidence an understanding of key industry practices.
One final aspect to consider when creating an animatic is the program itself. After doing a little bit of digging online, I’ve found that the industry standard for animatic production is a combination of Adobe Photoshop to draw the frames and to sequence them using After Effects or Premiere Pro, both of which allow us to add cinematic touches and camera movements in this early stage. Already, I’ve had the opportunity to explore the use of virtual cameras within After Effects, and I can see the potential for more complex shot types and camera movements to be created simply using this technique of changing 2D illustrations into 3D flat objects that a virtual camera can then move around to give the illusion of depth.
Into the Spider-Verse: A Cinematic Approach This idea of a cinematic approach to animatics, making use of more complex shots even at this early stage in production, can be seen in Alberto Mielgo’s initial animatics for the massively successful Spider-Man: Into the Spider-Verse. Mielgo created the tests using the Adobe Creative Cloud suite, drawing with pencil and digitally in Photoshop, and compositing the sketches in After Effects before doing any final editing in Premiere.
The shots are intensely cinematic, presenting a new vision of a hand-drawn, 3D world. This example represents a more complex approach to an animatic, as Mielgo presents an inherently cinematic, hand-drawn 3D world. Through panning virtual cameras and zooms through converted 2D illustrations, the audience is able to get a sense of the scale of the film and the city of Brooklyn. Looking at these animatics, there’s a clear understanding of editing and cinematography here, with a mix of blurred lenses, fades and cuts that outline the overall look and feel of the final film.
Here, Mielgo was creating key moments and shot compositions that the final film still adheres to, with his initial animatics playing a key role in establishing the film’s stylistic visual language and a new, snappy approach to animation. The idea to use comic book panels, illustrated onomatopoeia and an experimental approach to composition was the work of Mielgo’s early development in the project, and within these, we can see how an animatic can be used to plan out the action not only in terms of layout and timing, but also the visual language of the film and even more editing elements such as how to cut a shot.
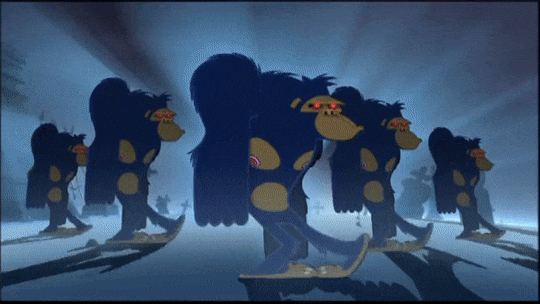
Gorilliaz: Animatics in Music Videos Animatics can also be found outside of the realm of animated feature films, however. For example, we can take a look at an animatic from the legendary animated band Gorillaz, an experiment blending animation and a genre-bending array of musical tastes that has become a world-wide hit since they first dropped their debut single in 2001, with ‘Clint Eastwood’. The song and music video are one and the same, each working to build off the other, and exemplifies the band’s use of mixing musical styles: combining hip hop, electronic and dubstep influences to defy musical genre, and instead embrace storytelling.
In the animatic for ‘Clint Eastwood’, we can see how the creators were able to pre-visualise their sequence by moving the camera around the 2D illustrations, which instantly gives the flat designs a sense of depth and cinematic charm. The slow arcing motion of each of the band members is shown clearly in the animatic, a shot that is now iconic to the band itself. It’s important to note that for the more complex moves, still images of the characters are used to act as visual place holders for the animation. With this example, the focus is on getting that smooth arcing camera movement, and focusing on each singular band member, and as such are represented with still frames. This is a common industry practice, and as such, animatics typically have little actual animation. Rather than a series of frames to create the illusion of movement, an animatic presents the action across a series of storyboarded panels that convey the motion through rough drawings.
Something interesting to note about this particular animatic is the varied use of mediums that creates a very tactical effect that hammers home to the audience that these sequences are created by hand. In a music video, one important element is the use of lip-synching early on - and as such, the animatic presents a nearly fully-animated lip-sync, animated traditionally on paper. This allows the animators a more considered and polished visualisation of the sequence to work from, and since it is a focal point of the video, it seems natural to want to develop upon this early on in the project.
Looking at the animatic, we can see how the creators have used a mix of near-fully animated sequences and moving still images to convey the story of the video. With more complex shots including detailed landscapes and multiple characters, only a handful of frames are shown - but it’s enough for the directors and creators to work from. In these more dynamic compositions, the characters are rendered with simple stick-figure bodies, taking the focus away from staying on model and more on sketching the shot and timing correct.
Additionally, the animatic also uses a range of camera effects to give the illusion of depth to these 2D characters, using a shaky cam to demonstrate a character jumping and slamming down onto the ground or arcing pan-up movements that evoke a real sense of cinematic composition and camera work - going beyond the traditional animation approach. It was quite interesting to see how the editors would recycle animations and shots for the video, allowing creators to save time using cycle animations for certain shots. Comparing these animatics to the final shots demonstrates how crucial and helpful the animatic is to a project like this: despite the colours, final polish and smooth animation, the sequence has effectively stayed to the initial compositions and camera movements outlined in the animatic.
Summary In this post, I’ve been able to explore the use of animatics in the animation industry, taking the time to delve into some examples that I personally find inspiring and exciting, and how these ultimately outline the final feature. As an animator, creating an animatic is interestingly something that I’ve never actually done before. However, I can really see a benefit and the purpose of doing so - and with this, my next move is to take the ideas that I’ve found here and apply them in my own creative practice: developing my own animatic based on my final storyboard.
References
Into the Spider-Verse Storyboards. (2019). Alberto Mielgo. https://vimeo.com/311716775.
Clint Eastwood (Animatic). (2010). Gorillaz. https://www.youtube.com/watch?v=JPC0n_ml4kc Clint Eastwood. (2001). Gorillaz. https://www.youtube.com/watch?v=1V_xRb0x9aw
What is an Animatic? (2014). Pluralsight Creative. https://www.youtube.com/watch?v=3sE5ox9kkUg
CGI Dreamworks Animation Studio Pipeline. (2016). CGMeetup. https://www.youtube.com/watch?v=ru0tQRJ4qKs&t=249s
2 notes
·
View notes
Photo
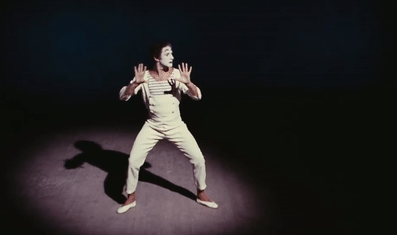
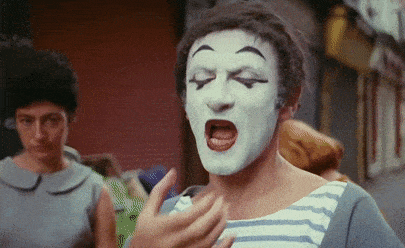

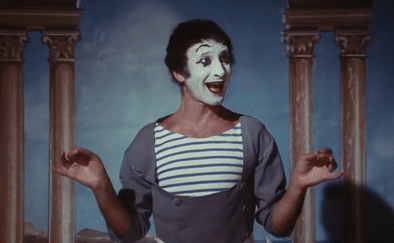
Marcel Marceu: The Art of Silence
In the first in a series of blog posts, I’m exploring the art of exaggerated performance through mime. This will be across a range of art forms and influences and allows me to delve into the ideas of performance and acting in my own time - and apply what I’m learning here to my own work within the Mystery Box brief. To begin, I’m looking at a mime artist and how the art form is actually fairly similar to that of animation.
A French actor and mime artist, Marcel Marceau was massively popular for over sixty years from the creation of his character ‘Bip the Clown’, the appeal of his performances came from the exaggerated poses and emotions Marceu was able to create, quickly becoming a world recognised mime icon. ‘Bip’ was inspired by fellow mime artist Charlie Chaplin, who also used the silent acting technique in his films, and brought key elements of pantomime into his mime performances. This influence gave his misadventures as ‘Bip the Clown’ a sense of mad excitement and grandiose fun - watching Marceau was an experience of its own.
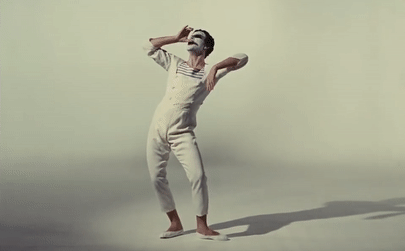
Marceau's arguably defining feature was his use of body gestures and posing to clearly communicate an idea. In this compilation of sequences Le Mime Marceau, we can see this idea in action. ‘The art of silence’, mime performance is the theatrical technique of suggesting action, character, and emotion without the use of words or sound: only gesture, expression, and movement. It is about exaggerating each gesture and movement through the use of posture, movement, and facial expression so it is absolutely clear to the audience.
This idea of exaggerated performance is at the core of traditional animation - it’s one of the basic principles of the craft as outlined by Disney, and allows the audience to read a scene without dialogue or music. Most auditory tracks with classic animation are simply instrumentals, which don’t aid the visual storytelling in any real way. The characters tell the story simply through clear posing which communicates the feeling and emotion of that specific scene.
Honestly, I’m surprised at how similar both art forms are. As animators, we are trying to create a convincing idea through clear character performance alone: without the use of dialogue or music. Mime artists set out to achieve the same effect: as such, we are essentially creating a mime performance when working strictly with animation. It’s an interesting idea, one that I haven’t really considered before this. The only difference is the vehicle for this mime performance: whilst mime artists like Marceau use their body, as animators, we instead channel this performance through the use of puppets (whether stop motion or CG), or drawings.
With clear, easy-to-read silhouettes, Marceau’s mime performances embody this idea: using considered, precise choreography to present an idea to the audience. Interestingly, however, mime performances have more in common with interpretive dance than traditional acting. Where live-action actors tell the story through expressions and dialogue, Marceau's mime performances are works of dance.
In this, the movement becomes the language: the written words on the page. The story emerges from the body, invoking a certain authenticity and truth that can only come from the human body. It is not something that can be spoken, only felt by an audience watching in awe. Marceau’s work is evocative and communicates a story and idea in a way not possible in any other medium: purely through the movement and timing of his body.
Additionally to clear visual gesture and extreme poses to communicate a story, Marcaeu is able to time his movements in such a way that allows the audience to understand each emotive beat of the sequence, before moving to the next. Despite the fact that the movement is constant and flows seamlessly between each pose, there is sufficient breathing time for the viewer to process what is happening. Marceau uses clear lines of action - each silhouette is presenting only what is necessary to communicate that specific idea - and holds each pose. The movement doesn’t stop, however, only continues to exaggerate before easing into the next motion.
From this independent research, I hope to incorporate the ideas found in Marceau’s mime performances into my own animation and reference: using a clarity of exaggerated gesture and posing to communicate an idea or emotion, and to hold each pose whilst easing into the next one - concentrating on timing and posing within my animation to tell the story.
Having identified Marceau as an influence on my work, my next move is to explore some more contemporary examples of exaggerated performance: looking at Rowan Atkinson’s character of Mr Bean and a more modern application of these ideas in the work of Bo Burnham.
References
Le Mime Marceau. (2017). Marcel Marceau. https://www.youtube.com/watch?v=XEsfpRrfXf4
2 notes
·
View notes
Video
vimeo
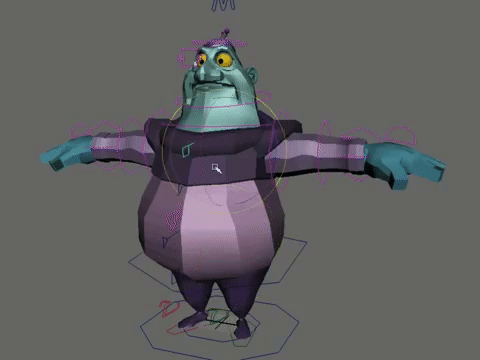
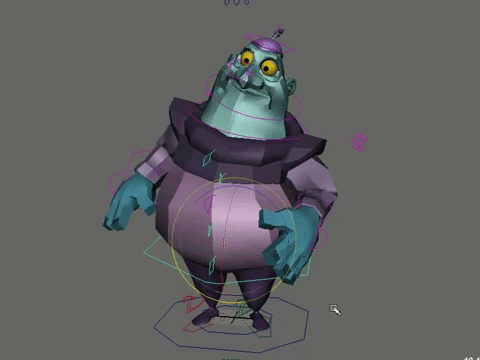
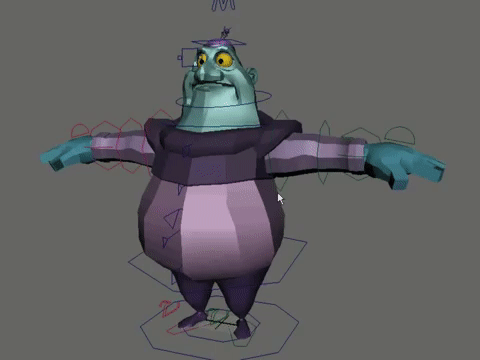
Mystery Box: Final Spline Review
This week, I wanted to revisit my Mystery Box animated sequence and continue the process: this time, changing my sequence from a stepped animation to a spline animation. This allows Maya to interpolate between my established keyframes, creating a smooth animation. Whilst I found posing the rigged character rather simple and engaging, this process proved to be more challenging than I had previously expected.
The process was relatively easy, selecting all of the frames in the timeline using the graph editor, and hitting ‘spline’. The problem, then, came from the sheer amount of keyframes I had created on the rigged puppet and the bizarre interpolation movements from Maya. This was a problem that I had showed my tutors earlier on, and we spoke about how adding keyframes would solve the problem. The main issue was that Maya wouldn’t interpolate between my key poses properly, meaning that limbs and arms moved in bizarre directions. This is something native to the program, and not my own doing - as a result, I found it rather challenging to salvage the project.


Despite this, I persevered and gave my best attempt to complete the animation. With this, I worked heavily with the graph editor, adjusting curves and moving entire sets of keyframes around to ‘fix’ the animation.
The final sequence, as presented here, looks clunky, I feel. This was an extensive process of editing the animation with the graph editor, and I think it shows. Using the editor was something we briefly spoke about in class, and I was essentially ‘learning as I went’, experimenting and trying new things with varying results. It was actually quite a taxing process: having never really used the graph editor before in my own animations, I was suddenly thrown in the deep end and tried to salvage the animation as best as I could.
Due to my heavily keyframed step animation, Maya was unable to spline the animation properly and instead of transitioning between poses smoothly, resulted in waving and jolting body parts and limbs. The developed sequence, however, is much more successful than my first iteration and does represent my own challenges and solutions with Maya. It’s not perfect by any means, but there has been a noticeable improvement in the animation that I am happy with.
Despite the problems with the final sequence, it’s important to understand and appreciate the value in this exercise, and what it represents as a learning opportunity for me. Something that we are being kept reminded to do, especially as first years, is simply ‘try everything’. To keep an open mind, and experiment and challenge ourselves with new processes and techniques. The focus should always be on learning the process, rather than worrying about a refined, professional final outcome. Whilst I always place a focus on refining a final piece for each assignment, I feel like this project holds more value as a learning exercise.
Firstly, looking back at my Mystery Box sequence, I can see that it is too ambitious for my current skillset. This project represents my first real foray into CG animation: it’s a complex set of new principles, tools, and ideas to get my head around, and I need to recognize that the successful animations of my peers are a result of personal experience, simply animating within Maya or a similar program.
The sequence lacks any sense of weight and effort, and the exaggerated cartoon-style creep up to the box lacks any exaggeration due to the placement of the keyframes. My main area of improvement would be to simply keep challenging myself to learn Maya, to attempt the sequence again and develop my skills within CG animation through an iterative process. Simply starting from scratch was an idea that I’ve already practiced during this assignment, and I’ve found it to be an effective way of learning a skill quickly. This sequence is definitely something that I want to develop upon in my own time.
Particularly, the first part of the sequence, where the character is lunging and playing ‘peek-a-boo’ is the most successful. In comparison to my reference footage and animatic, this really works and the timing in this part works to convey the sense of enthusiastic play between the father and son. My plan is to render this short sequence to place in my First Year showreel, as this piece of animation alone does represent a successful shot.
There’s a steep learning curve within CG animation, and it’s something that I don’t think I fully appreciated at first. My plan was to produce an exciting animation, and whilst the stepping and blocking process of CG came quite natural to me, jumping into the actual animation and splining the sequence proved to be surprisingly difficult.
As it stands, this is my Mystery Box sequence. Although it isn’t successful, rendered or polished, it does represent my exploration and experimentation within CG animation and a new technique. With several other projects needed to be completed, my focus will be on completing all of my other assignments for submission. This was an entertaining project, and although it hasn’t resulted in a successful final outcome, I have produced an extensive body of work for this assignment and engaged with the process of CG animation.
As a whole, I do find CG animation to be an interesting and fun technique to explore further, but I need to put a focus on my other assignments first. If I do have time, I would like to take the opportunity to simply have another attempt at this Mystery Box task and start completely from scratch, using the same lighting set up and camera angle.
0 notes
Photo

Keith Lango: Posing Principles in Maya
As a way to delve into the animation process in Maya, I took the opportunity to explore animator Keith Lango’s video tutorial series, which was a monthly subscription service for paying subscribers. However, Lango stopped making the videos after he realised he was simply repeating himself and has since made them freely available on Youtube and his own website. These videos were animation training: teaching the basics of CG animation in particular, exploring balance, posing and other fundamental principles of the craft.
Lango himself is an established animator and teacher, with over fifteen years in the industry. His work ranges from Academy Award nominated short films, video games and commercial advertising. He’s got plenty of experience, and to begin my research into his library of tutorial videos I wanted to look at a core principle of CG animation in particular, in close reference to my own practical developments in Maya.
‘Posing is the most important thing you can do in animation. Everything else is gravy.’ - Keith Lango, professional animator and filmmaker.
This is a big statement to open the tutorial with, but across the period of an hour, he makes a compelling case for this argument. One of the nine old men, Ham Luske, revealed that this was true even with traditional animation: ‘animation is only as good as your poses.’ We can have good timing, successful overlapping action, and follow-through but if the poses are not strong and to the point, ‘you do not have good animation’.
As a professional himself, Lango has noticed that with animation today, there is a focus one polish and ‘making things look nice’. What is lacking is a sense of good posing: and understanding what communicates a character. Ultimately, good poses have the ability to instantly communicate character: each pose should have the ability to work as a single frame illustration to communicate your character’s personality and identity. In every instant, a pose needs to be correctly read right away. But why is this? It’s because posing ‘is the gateway to character’: good posing allows the audience to see inside a character’s soul. And because of this, posing is also the gateway to telling the story.
It has been argued that ‘story is king’ - but here Lango challenges even this basic notion. Story isn’t necessarily king; there are plenty of great animated (or otherwise) moves with relatively simple or even weak stories. The only reason ‘story means anything to us is because we care about the characters’. With that, characters are king. If we don’t care about the characters, then we don’t care about what happens to them and thus the story is meaningless.
This is an idea that I’ve felt for a while: that the entire reason an animated film works isn’t because of a particularly original story, it’s because of the engaging characters. As people, we relate most to characters on screen - we can access and relate to these animated beings more than a convoluted or experimental plot.
It is crucial for the audience to understand a character just by looking at them, and these ideas are found in the pose: appeal and emotion. Working on the basic principle of animation, a pose has to be appealing, allowing the audience to easily access the soul of the character for a quick understanding of what the character is feeling. As always, appealing doesn’t mean cuddly kittens - appeal simply means something that people respond to, immediately identify who they are, and understand what that character is thinking.
Obviously, good character design is also a very important part of this. We need to be able to tell the difference between when they are sad, and when they are happy. This is a core reason why animated characters tend to have a simplified design and visual style: to add audience readability and to push appeal in the posing and facial expressions. Appeal is the gateway to emotion, which describes showing who they are as a character. Emotion clearly expresses the character’s true feelings in the heart of a character for that given moment.
Lango reveals that ‘the character is in the pose’. Pose reveals the character and is not simply a symptom of a movement. Movement, instead, is a symptom of the character’s emotional state, and thus the pose is the primary mechanism for telling the story. Characters hold themselves different to others, and a single image should be able to communicate the entire idea: it’s all in the appeal of the poses, and using this to communicate the emotion of that character.
Good Posing The next segment of the video dived into what makes up good posing, and presented an entirely new way of looking at CG animation. We all know Pixar is successful, but this is ultimately down to their admirable ability to understand character, and know that they ‘mean a lot’ to the creators. If poses reveal character, and characters reveal story, then the better we are at creating poses that are appealing, show personality and give a window into their emotional state, then the better we are at telling stories. With this, Lango suggested that our storytelling is only really as good as our ability to express our characters, through still frame illustrations that capture the story and ‘what the character is about’.
Firstly, Lango reminds us that ‘99.999% of all CG animation is not 3D’. It’s two-dimensional images, on a two-dimensional plane, which are communicating to us the concept of character. Ultimately, we need to understand this and look at our poses from this flat viewpoint. Shapes on the screen tell a story, and poses are the ‘meaningful arrangement of two-dimensional shapes to tell that story’. Great poses, even though they are still, have motion within them.
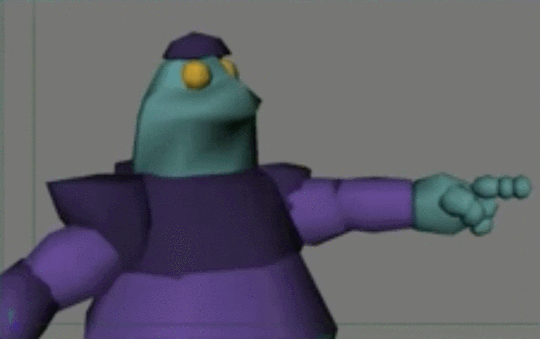
Now Look Here, You As a way to demonstrate this idea, Lango then presented us with the first visual example: a purple and green character saying the line ‘now look here, you!’. Naturally, this is a rather accusing and aggressive move. Despite this, the first example is very static, dull and lifeless. There isn’t a line of action in the first example, with no flow. There’s a ‘lack of direction and force: there’s no leading lines to direct the eye or any cinematic tension.’ This a neutral and boring pose.
The later iteration, however, represents a more successful storytelling pose. With this, there is a clear line of action, and the entire pose has a visually appealing and clear flow, moving to the right through the arc of the body and through the arm. Everything works together, from the offside hands to the hips. There is a very strong angle that guides the viewer’s eye, and a flow to the image with a clear force and sense of motion.
Despite this, I would actually argue that the pose still feels somewhat ‘cookie cutter’ and a simplistic, layout pose in comparison to a fully developed storytelling pose. To me, the right arm feels robotic and stiff. It’s a powerful statement and I can’t help but feel like the composition should be more intimidating and the left arm straight to the point. Having this character face the camera would convey this idea in a more clear way, I feel. Though, for this purpose of this tutorial, there is a clear improvement in the posing.
We were reminded that ‘even though poses aren’t moving, they should have a sense of motion in them’. This is something that arises through flow, and a clear line of action. This is an imaginary line throughout the character’s body that shows the primary force of a pose, indicating direction and energy of the character’s pose.
Good Posing Techniques
Varying your Poses An important principles of good posing is variety: within a single scene, we need to vary the intensity of our poses and lines of action. For every scene, choose one pose which is the key: a single pose that is of greater importance than the rest. This should be the pose the entire sequence hinges on, and use all other poses in concert to lead in to this key pose.
As a way to demonstrate this idea, Lango presented his own animated sequence that fell guilty of this issue. An animated sequence following a character being furious at the ‘colonel’, from the fast food chain KFC. Despite it being an entertaining sequence, the main problems with the animation are that all the poses are the same size: everything begins ‘really loud and intensive’. It’s important to give the viewer only one thing to look at.
Mickey Mouse: Reversing the Line of Action This builds contrast into our poses; creating a sense of movement, a build up and release of energy to move that character and thus the story forward. In this example from Lango, he presents the character of Mickey with a definite line of action, as the mouse holds his hand out to his dog. In the next pose, Mickey then takes a step back: there’s a strong reversal of the line of action. With our posing, we should build energy with a strong one of action with a pose, and then release that energy by reversing it.
Vertical lines of action, whilst lifeless on their own, can actually be great for emphasis. These are useful for adding a point of surprise and emphasis to the scene. The contrast is what pulls the viewer’s eye, and any time we want to emphasise a particular attitude or moment, we should explore a vertical line of action. This emphasizes the pose because it’s simply not natural, and we should consider the use of vertical lines of action to be similar to an exclamation point in grammar: they are useful to make a strong point stand out from the rest.
Flow Lines The next posing principle Lango introduces is the idea of flow lines within the character’s body. This moves beyond the line of action, and describes how all the parts of a character are creating a flow for the viewer’s eye to follow. Audiences ‘tend to focus on the character’s face, and feel the body language’. A good pose should underline this idea, leading the viewer’s eye where they should be focusing for a given scene. With this, Lango suggests that we shouldn’t look solely at the line of action: consider how we can use the arms, legs torso and props etc to lead the viewer to what they need to see.
This idea of flow is something that I want to apply to my own posing within my Mystery Box assignment. Having completed an animatic and video reference, I’ve got the basics of the posing down but it is in Maya where I will be able to properly expertise these posing principles. Looking at my animatics, there are clear storytelling poses but I ultimately want to develop upon these in the Maya workspace, developing key poses that flow to the face and hands.
With this, it is important to plan and understand what is important in your scene, and not to force animation principles onto any singular shot. Apparently, ‘this is a common industry practice’ with students having a good pose ultimately ruined by legs and arms sticking out in unnatural places in a forced attempt to present a strong silhouette. Lango reminds us that ‘it’s important to have strong silhouettes, but not to force them. If we do this, we will begin breaking the lines of action and flow of the pose. It’s more important and useful to have the posing clean, and the lines flowing towards the face or focal point of the performance. As I expected, this is typically the face and where the audience will look first to resonate with the character. As a result of this practice, the story is better told, your ideas are more clearly stated and have an appealing visual flow.
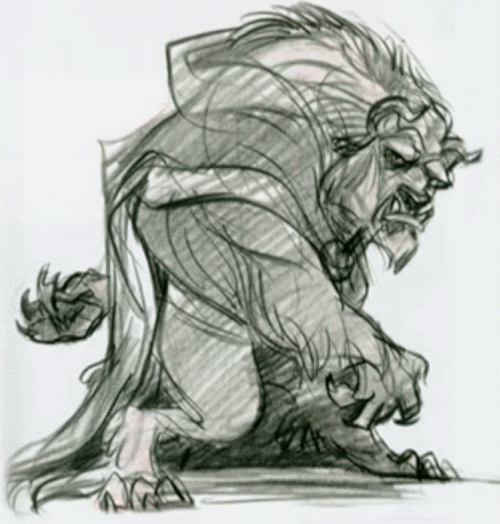
As a way to exercise this idea, Lango then moves onto analysing a few examples of successful posing. Here, I’ve presented three of these examples and why each one is considered to be a powerful, successful storytelling pose.
Beast With this test pose by animator and artist Glen Keane, we are instantly presented with a powerful character. Just from the design, we can tell that this is a hulking, surly brute. When we begin to see the flow lines, however, Lango remarks on how ‘genius this illustration really is’. The hand flows up around the shoulder, and everything is working all to lead our eye to the face. As mentioned earlier, this is the key performance area that audiences look to, and in this example, it tells you everything you need to know about the character. It’s an example of a successful storytelling pose within an illustration.
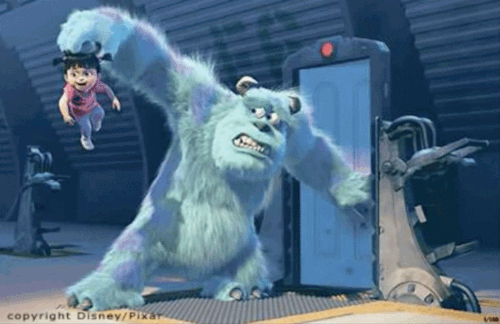
Monsters Inc The second example he discusses is this image from Monsters Inc, in which Sully has just discovered human child Boo, and is still terrified of children. He’s holding up the child like a rotten egg, and we can see that al the flow lines work to direct the eye to the little kid at the end of the arm: his wide stretched arms, legs and facial expression all lead us to Boo. Interestingly, all of these lines also flow through the character’s face. This reminds us that a good pose will lead the viewer’s eye through multiple points of information along the way to the main focal point.
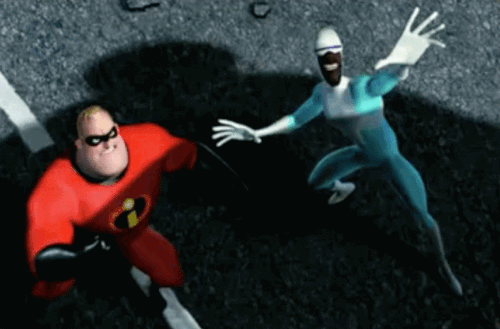
The Incredibles Finally, Lango presents a posing analysis of this sequence from The Incredibles, in which we can see how the animators have used these posing principles to ‘great success’. As Lango points out, there’s a flowing acton to Frozone’s head, the focus of his performance with a great appeal. If we compare this to Bob’s character, we can see how ‘he presents a more aggressive, conflictive shape’ demonstrating his readiness for a fight than Frozone. He is leaning back, presenting a quick, nimble and evasive personality. Bob, on the other hand, will simply want to punch the threat in the head. Repeatedly.
As a final point of note, Lango explains how the combination of these character’s poses also works to illustrate their friendship. Something not yet discussed was the important of combining poses with other character poses to demonstrate what the relationship is like between these two individuals. If we follow a single line of action up through Bob’s fist, it moves past his face and runs across into Frozone’s arm. From this single image and flowing poses, the audience is able to get ‘a quick read of what’s going on’: who the characters are and what the story is. This is beyond using the line of action, and allows us to instead use the entire character in concert with the line of action to direct the viewer's eye.
More Posing Tips Before concluding the video tutorial, Lango presented a few more posing tips whilst demonstrating the process himself using a rigged character in Maya. These explore how to further add life and ‘push a pose’ by tilting the head, adding a twist to the torso and playing around with the weight placement to vary and loosen up the rig.
Tilt the head Something that I hadn’t really considered before with my own posing was the placement of the head: Lango reminds us that people typically don’t hold their head up straight very often. Tilting the head, even to a small degree, adds a weight to pose, and can accentuate a character’s line of action. Our heads are always leaning from one side to another: this adds personality, character and weight. We slouch, and this allows us to tail the line of action off in a different direction in an appealing ‘s curve’. It adds a bit of life, and makes the character accessible and allows the audience to relate: tilting the head is a small detail and a useful indicator of attitude and emotion.
Torque / Twist Adding torque means adding a sense of energy and a twist in the torso: simply offsetting the rotation of the upper torso and lower body can allow the character to loosen up a little bit. Lango stresses that we ‘shouldn’t have a straight up line of action’, we should play around with these poses. On a more practical level, the waist x-axis should be pointing toward a different direction than the upper body. Adding twist is another little detail that helps give a sense of life to the posing. ‘A big problem with CG puppets is that they tend to be very stiff inside of the torso’. This is something that I will be looking for in my own poses within Maya, to make sure the character isn’t posed in a robotic, still manner.
Even Weight Distribution Finally, the last posing technique Lango offers is the use of uneven weight distribution. When a character has an even weight, spread across both legs, it’s visually boring and accidentally demonstrates the weightless nature of the rig. Something that I’ve actually been told is to ‘push that pose’ by my tutor, and Lango explains as to what this means. To ‘push a pose’ is to exaggerate and make the posing clearer - ‘one way to do this is to change and shift the weight off both feet’ and distribute a little unevenly. Instantly, this allows the pose to be more interesting to the viewer and adds another sense of life to the character.
Summary With this post, I’ve been able to learn an extensive amount on character posing principles, both within drawing and posing a rig in Maya. The most important idea I can take away from this independent research, though, is simply the importance of posing within animation. It’s something that I paid interest to but never considered how intrinsic and essential good posing is to communicate the character.
In the taught workshops, we have been introduced to a few of these posing principles, but here I’ve been able to go into depth in a way that’s really not possible within the sessions. Having taken the time to research posing principles in relation to Maya independently, I now have a much more solid and clear understanding of how to create a successful and engaging pose in my own animations. The little techniques here, such as the weight distribution and even tilting the head allow poses to become so much more alive and successful, and I will be applying these principles into my own work moving forward.
These video tutorial sessions, however, represent an extremely helpful research source for me to return to throughout the project, and my time on the course. There is an incredible wealth of knowledge in Lango’s library of animation training videos, and I will take the opportunity to explore more of these in my own time. Having created some poses already, I would love to go back and analyse these in relation to the principles outlined here. However, my time remaining on this mystery box assignment is short, and so I need to place my focus on developing a first blocking pass of my own sequence. Inspired by the principles here, and the reflective practice of the eCritique sessions from 11 Second Club, I plan to present a visual analysis of my initial developments within Maya, analysing my posing as two dimensional images that attempt to convey the idea of a father, playing peek-a-boo which quickly turns into a game hide and seek with his son.
0 notes
Photo
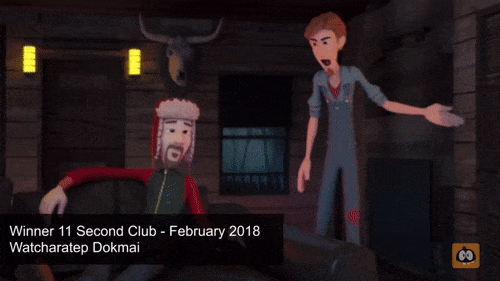
11 Second Club: Animation Critiques & CG Resources
In this post, I’m going to be discussing the online animation resource ‘11 Second Club’, and how this will be a key resource to return to throughout my time on this course. This week, we were able to be introduced to the site, which presents the opportunity to receive critical feedback on our animations and offers a range of rigged characters too.
The ‘11 Second Club’ is a monthly character animation competition: it’s open to everyone, and animators all over the world participate, animating a character speaking a line of dialogue provided by the club. Throughout the competitions, animators can share their progress with each other and critique other’s work. The winner of the competition is decided by a vote from everyone in the club, as to whose submission is the best for that specific month. The site’s main purpose is to give animators ‘a chance to practice their skills in a fun, challenging environment’.
Each monthly winner receives critical feedback in the form of an animation mentor eCritiqe, from a professional animator working within the industry. These feedback sessions are published online for all students to learn from and gives the creator the opportunity to consider ideas of body mechanics, principle application and character movement that they simply haven’t done before, learning how to develop their animation further.
So far, I’m really enjoying the CG process and it’s something that I actually hadn’t considered in the past. This will be a beneficial tool for me to return to in this project and as a whole. Taking the time to develop a response using these provided voice snippet would be a fun independent challenge working outside of the brief, but I could also use the site as an opportunity to receive genuine feedback and critique on my own work from fellow animators in the various forums found on the site.
Ideally, I would love to take the time to develop my skills with CG lip sync and character performance outside of the brief and produce a piece for one of the site’s monthly competitions. However, given my work-load for this course and the focus and dedication I’m putting into each submission, it is more likely this will have to be developed upon outside of term time, exploring this potential in the summer or winter holidays when the workload is comparatively smaller.
Making Use of the Max Rig For this Mystery Box assignment, I will be downloading and using the ‘Max’ character rig, a humanoid figure with articulated limbs and facial features as a free tool to allow newbies and students to learn the CG animation process, using software such as Maya.
This is what I will be animating with throughout the Mystery Box assignment, and represents a standard rig that the entire class will be using. This allows all of us to have the same basic starting point: having all of us use the same base model and rig allows the critique to be solely placed on the actual animated performance, and our skills within the animation department rather than rigging or modelling. As someone who has found their initial experiments into CG modelling to be difficult, this was a relief. Whilst we are limited solely to using the ‘Max’ rig for this assignment, the site boasts a few different rigged characters available to download and play with: and I plan to explore these resources in my own time, developing my skills within a CG animation workspace and moving beyond the limitations of the ‘Max’ rig.
The actual rig itself is a standard character with a fairly slim body and standard male body, with no real defining personality or design. My focus will be on presenting the audience with an engaging and original performance using this generic rig, moving past generic movements and instead placing a focus on character acting. To put it simply, we’ve been given a blank canvas. It’s important that I actually take the time to develop a character and personality to the performance: despite the use of a standardised rig, its important to create a performance unique to my sequence. Having all of the students using this same base model will allow us to easily compare and contrast between animations to see which sequence presents an actual character performance with a personality. This is ultimately the focus and end goal of the project, to create an engaging and original character performance using the base model ‘Max’ rig.
Developing my own Critiques The 11 Second Club represents a key resource that I want to return to, exploring how animators breakdown the process and pipeline of their own sequences as a way to inspire my own reflective practices. Watching these online eCrtiques not only allows me to see the mechanics of a successful animation, but it also presents a blueprint for how to properly analyse an animated sequence. Watching these reflections will allow my own written critiques to be of much more value, as I begin to delve into the details of the process. Something that I’ve noted already is the use of hand-drawn overlays to identify key areas of improvement and demonstrate another way to animate. Not only does this present the feedback visually in the video, but it’s also a technique that I’m actually very interested in applying myself: to take my animated sequences or rough passes and using a digital package like After Effects or even Photoshop, begin to breakdown my own work in this detailed manner.
With this, I may begin to cut down on the lengthily written reflections on each session and instead present a more concise, summarised analysis of each sequence - letting my own visual notes present the core ideas of improvement and feedback. Already, I’ve been able to use this contextual research source as a way to develop my own working and reflective practice, and I feel as if this would take my own reflections and critiques to another level of professionalism, and move closer to what is expected at an industry standard.
Summary As a whole, the 11 Second Club is a brilliant resource for me to return to throughout my time on the course: having found a passion for CG animation, the site presents an opportunity to develop my understanding of animation principles and the CG pipeline, receive critical feedback from both other animation students and professionals alike and represents a helpful resource for rigs and characters that I am able to use, free of charge. This will act as a key resource for my studies in animation and is something that I will be returning to throughout the course. Ultimately, the concept of having an animation professional take a look at my work is very inspiring to me, and eventually, I do plan to submit an animation piece for one of the website’s monthly competitions.
Here, I simply wanted to evidence a discussion of the 11 Second club on this blog. It will be a key part of my developments in my mystery box assignment, and I will continue to return to the site to explore how animators present their own process in developing a CG animated sequence whilst I do the same. Next, I will be exploring the afore-mentioned ‘Max’ character rig within Maya, being introduced to the basic fundamentals of character animation within a Digital 3D workspace in the upcoming workshop.
References
"Mystery Science Theater 3000: The Movie" Animation Feedback. (2018) 11 Second Club. https://www.youtube.com/watch?v=7TN4T9iOpjE&t=3s ‘11 Second Club Progression - March 2012’. (2012). Kyle Kenworhy. https://www.youtube.com/watch?v=U8C4kUA2bI8
http://www.11secondclub.com/home/FAQ
0 notes
Photo


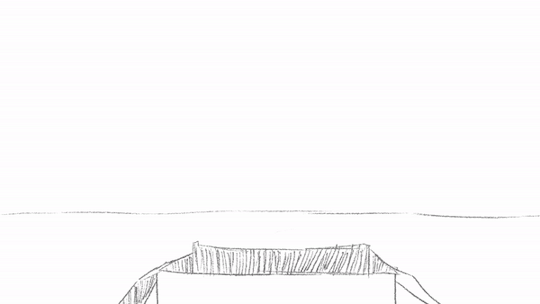
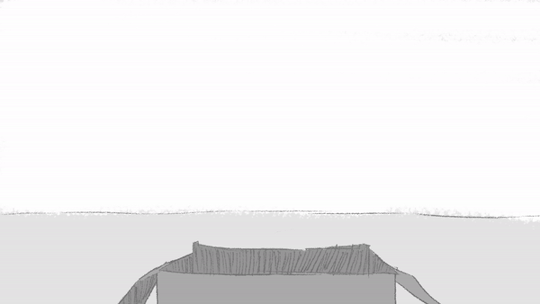
Mystery Box: Final Animatic Review
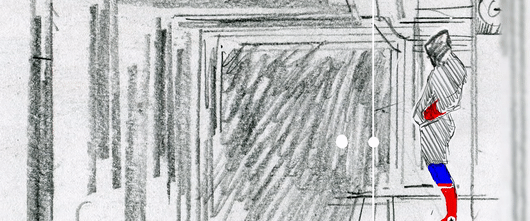
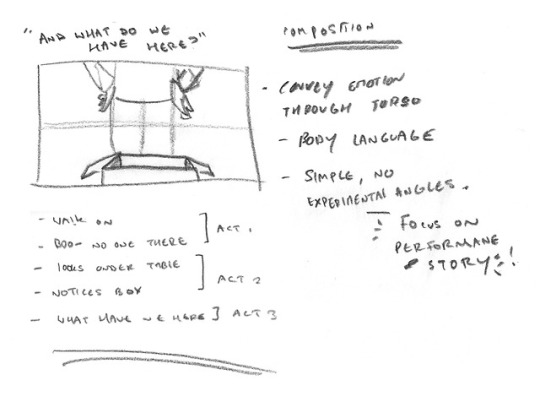
In this week’s animatic masterclass, we were able to develop our own animatic for the Mystery Box project. Working off my own video reference for timing and posing, I took the opportunity to develop a refined animatic using the principles outlined in my own independent research and applied these to my own work, producing a simple lined animatic before adding grey tones in Photoshop, inspired by industry practice. This use of block shades separates the background and foreground elements and works to direct the viewer’s eye to the important and focal point of the shot: in this example, the main performance.
With my animatic, I wanted to compose the shot a little differently to the reference video to present a more visually clear and appealing shot, composing the character with a pleasing framing centrality and balance to the shot. Admittedly, this is an ambitious sequence and so my focus was on creating a more intensive and refined animatic, working past the still-image nature of a few of the shots analysed in the previous post and instead of working to hone in and refine the timing and flow of the sequence in preparation for animation.
In terms of composition, the sequence was inspired by cinematography choices by auteur directors such as Wes Anderson and Sam Esmail, wanting to go for a central framing technique to present my performance. This gives the shot a pleasing visual composition, whilst also placing our focus on the father’s actions. There’s a clear line of sight, and the sequence itself has been designed to make use of the space in an original way that highlights the three-dimensional nature of the shot.
One of Helen’s feedback points to me, after I questioned how to make an interesting sequence using a locked camera was to ‘use the space’. Instead of having the character walk directly to the box, I wanted to begin my sequence with an already-playing narrative: a father playing peek a boo with his son. This is happening without the inclusion of the box, and this makes the shot feel like a window into the character’s life rather than a simulation. When I began work on this project, I knew I wanted to place a focus on character performance and tell a story beyond the simple ‘reacting to box’ plot that the brief describes - meeting the brief’s requirements but also adding a sense of character and story to the scene.
Looking back, I feel as if I have managed to capture the key moments from my own live-action reference, in a way that exaggerates the poses outlined in my own performance and highlights the silhouettes to better tell the story. This can be seen in my developed, greyed iteration of the animatic, which draws attention to clear staging and an understanding of posing principles to communicate the character’s emotions.
From this, I feel like I have been able to create successful storytelling poses that clearly communicate the narrative beats of the sequence. This is a key part of the storyboarding and animatic process, and looking back, this has been inspired by my own performance in the reference video - something which has effectively outlined my entire creative direction since.
Despite this, the most important element of a successful animatic would be the use of timing: does my animatic present the sequence in a visually interesting way, with a sense of flow and movement that captures my action? In a word, yes. My focus with this was to make sure the initial walk has enough time to convey the lunging nature of the movement, and to add enough processing time for the audience to understand that the character is thinking, and changes emotion.
For an assignment such as this one, the use of processing time to communicate a change of emotion is a key element to the project. Looking at my own reference, I can see that a change in expression isn’t instant or seamless: with real, human emotion there is a certain sense of pause before any change in emotion, as we need time to process and understand the news or information that we have just received, which causes the change in mood. It’s not an instant change, and that idea was something that I feel I have managed to successfully include in this animatic.
With an example such as mine, it was important to have considered timing: having the father look from right to left and move very quickly would instantly create a sense of serious urgency, and make the light-hearted response somewhat out of place. The entire idea of the sequence is how the father is playing a game with his son, who has simply hidden from his sight. Admittedly, this was expected - but not quite like this. There’s a slow quality to the movements in my animatic that represents my vision for the shot better than my video reference does, and the pause when the father finally notices the box is clearer here, I feel. There’s a stronger sense of him thinking about his actions before he does them, which was my intention for the scene.
Despite this, there are some potential improvements to be made on this animatic. Firstly, whilst the use of grey tones is a good start, I’m tempted to explore the use of highlights in my animatic: this isn’t present in all animatics, but it was something that Helen mentioned in the workshop. Adding this would allow the character to stand out from simply being a grey silhouette, and act as an initial vision for the lighting of the shot, too. Finally, something that I consistently found in my animatic research was the use of sound in the animatic. This helps pre-visualise the sequence and ‘polish’ the animatic. Although the brief doesn’t mention audio, I would like to go back and include my original audio created for the video reference, as an initial experiment into this idea.
Finally, I was able to show my finished animatic to a tutor, who gave me some feedback on the sequence. Firstly, it’s a good idea to use the space in such a way, and to ‘challenge the brief’ a little bit. Interestingly, I found out that this approach has ‘never been done before’ in response to this mystery box, and represents an original approach to the task beyond the expectations of the brief. The main questions I need to consider will be how can I communicate a strong emotion simply through body language, and to convey a change in emotion through just the character’s torso.
As a whole, the feedback suggested that it was an interesting, original approach to the brief evidencing me working ‘outside the box’. The idea to play around with camera placement and space was one that really resonated with him, and I was encouraged to pursue this idea further. I was assured it will be ‘a challenge’, but I feel like I can handle such a task. At the very least, I will be able to begin blocking out the sequence - and take the opportunity to ask for more feedback on the posing, and whether or not I should cut any elements.
As it stands though, I’m very happy with my animatic: it’s a successful piece that conveys the action of my sequence, with an accurate representation of timing and posing. The idea itself represents an interesting and engaging challenge to the brief’s expectations and allows me to really develop a character performance and narrative storyline.
Summary With this, I’ve been able to create a refined ‘story reel’ or animatic that successfully conveys my sequence through rough illustrations that communicate my initial vision for the project, with a clear understanding of timing and posing principles being applied to the piece. Inspired by my own research, I’m tempted to add my own sound and voice acting to the animatic as a way to explore an extremely common industry practice - but I’m now at a place where I’m happy with my idea for the mystery box, have planned it out extensively through storyboarding, an animatic and video referencing iterations and am now ready to move onto the animation process.
Next, I will be delving back into digital 3D animation software Maya, being introduced to the basics of character animation within the program, making use of a predefined rig. With the timing and posing outlined here, I will soon begin blocking out the sequence using the key poses described in my animatic.
0 notes
Photo
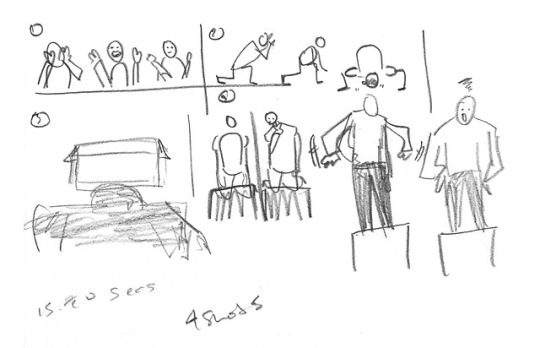
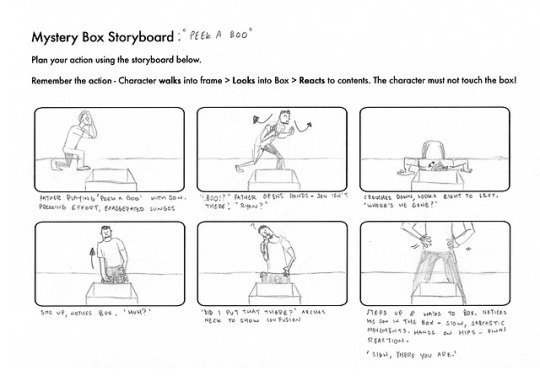

Mystery Box: Final Storyboards Review Today, I took the opportunity to develop two refined storyboards for my Mystery Box sequence: working from my live-action reference and breaking this down into six key images that work to convey the overall action of the scene. Additionally to this, I wanted to take the ideas of the previous storyboarding workshop and produce a storyboard using a few different shot types to further communicate the narrative and emotional beats of the story. Ultimately, this was simply an exercise in storyboarding due to the locked, one-shot camera nature of the mystery box brief - but in this experiment, I have explored some interesting visual ideas.
Before I began work on the final storyboard, I wanted to take the time to develop upon the ideas of the storyboarding masterclass: to present our story using a range of camera angles, working beyond the limitations of the brief. Whilst beginning to sketch out ideas, I couldn’t help but see the potential in the use of multiple shots to convey this sequence.
Storyboarding Masterclass Development Whilst having all of our action take place in a single shot can be an effective technique to present our character performance, it’s not exactly an industry practice. Typically, artists tell the story over a series of different shots which work to communicate the story. As Helen established in the masterclass, having different type shots and camera angles can really influence the emotional impact of a story. Utilising different shots can ultimately allow the story to be conveyed in a way that heightens the themes and ideas of the narrative itself, from long shots to indicate a character’s isolated emotional state, to compositional techniques demonstrating the balance of power in the scene.
These concepts that I’m discussing here are initially pulled from film theory and cinematographic techniques, something ingrained in modern storytelling animation. As industry professional Helen said, ‘we don’t tend to use a locked camera, it’s quite difficult to tell an interesting story’ with such a limitation. Although we are given a locked camera for the mystery box, this is an unlikely industry practice, and this is the main reason why we have been asked to explore the possibility of multiple shot types to tell our story. Typically, the camera moves with the action of the narrative as a further way to tell the story. Taking this away from us effectively forces us to focus on communicating a single action in a visually clear way, rather than an actual story.
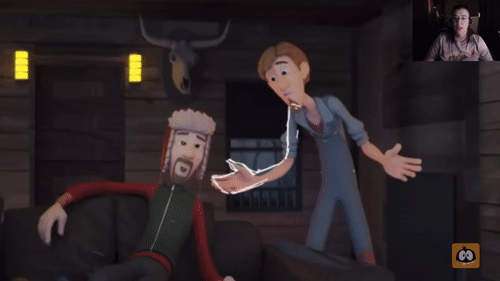
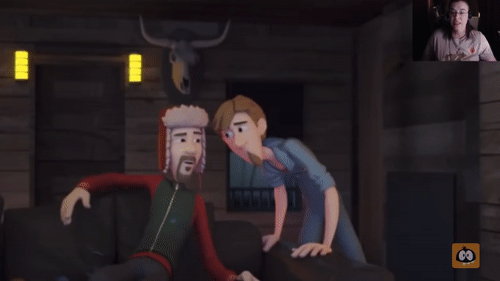
My initial storyboard begins with a close up on the father: we can see he’s got his hands over his face, playing ‘peek-a-boo’ with this son. He opens up his arms, ready to surprise his son and suddenly - he’s not there. The main focus of this section of the story is highlighting the character’s facial acting - and so I’ve opted for a close up here. The reveal is conveyed through a reverse shot: we see the father’s point of view, and can easily see his son isn’t there. This idea of shifting to the character’s perspective is the easiest and clearest way of demonstrating the surprise to the audience, which then cuts to a long shot of the father looking from right to left, before dropping his arms in disappointment: ‘where has my son gotten off to now?’.
After crouching down to look under two (unseen) tables, the angle then changes to an over-the-shoulder shot - as we see the box when the father does. This was a key shot in my initial vision for the sequence, something that isn’t possible with the locked, one-shot camera description of the brief. We have to present the box already on screen, and so the reaction isn’t in-line with the main characters. Whilst this is perfectly fine, and there’s room for some exciting ideas within this restriction, it does place a separation between the viewer and audience.
Within the feature film animation industry, there is a heavy focus on character - and getting the audience to resonate with the protagonist is the main goal of the entire film. This is achieved through an interesting character and design, but also how the director chooses to tell the story - and if it can make the audience truly feel what the main character is going through. Whilst the majority of this is created through an engaging, affecting performance - it is also achieved through purposeful shot composition to tell the story through visuals.
Looking at my first storyboard here, I feel like this series of shots present a more exciting and engaging sequence. The array of shot types allow the audience a window into the father’s character in a way that a single locked camera simply cannot. Whilst I’m ultimately going to follow the final, single-shot storyboard, I’m very tempted to work on this sequence in my own time beyond the requirements of the brief: creating a sequence using these multiple shots and comparing how this conveys the story in comparison to my one-shot iteration.
Despite this, there are a few reasons to use a locked, one-shot composition: firstly, it places the focus on a convincing character performance. With film, this would mean the pressure is placed entirely on the actor to tell the story. With animation, this effectively puts the entire success of the piece on the character’s performance and challenges us to convey a character through the acting and how the character moves than a series of exciting compositions.
Lastly, using a one-shot camera removes any potential for distracting editing and cutting, allowing the actual animation to speak for itself. This is the main reason for the limitation, and it’s one that I honestly understand and resonate with. The success and focus of our sequences should be the character’s performance and how we can use acting to convey a personality and emotion, rather than distracting cutting to obnoxious camera angles.
Final Storyboard Review With this in mind, I began work on my final, refined storyboard for the Mystery Box assignment. Using my own live action footage as reference, I was able to break the sequence down into six key panels, each one working to tell the story through simple pencil illustrations. With both of these storyboards, I placed a focus on clear, legible drawing and storytelling - to put it simply, we can easily read what is happening within these sketches. This is something core to the storyboarding medium, and is a skill I hope to develop over the course of the project.
Looking at my storyboard, it was a challenge to simplify my shot into six storyboard panels, however I feel as if it successfully tells my intended story simply through visuals, conveying the motion and action of the sequence nicely. Given the ambitious nature of my sequence, I had to note down longer elements such as the ‘character steps up and walks to box’ and how the arms drop in reaction to the box, though this storyboard does cover all my narrative beats successfully.
A common storyboarding practice found in the industry, the use of arrows in my panels allows me a guide on the travelling paths of various parts of the character: the hands, head, and torso. Given the restriction of six panels, we have to break our sequence down into the bare essentials of the narrative and use storyboarding techniques such as arrows, notes and motion lines to further represent what’s happening on screen.
With this, however, comes my main gripe with the storyboard. Given my ambitious sequence, I feel as if this storyboard doesn’t reflect my idea as well as my video reference does, which allowed me to explore ideas and principles crucial to the actual animation process such as posing, staging, and timing firsthand. Whilst a viewer could understand what is happening, the six-panel nature of this assignment’s storyboard feels a little restrictive and I was not able to illustrate all of the actions in this single board. I can’t help but feel that my own drawing skills will hold future storyboards back from further representing the story, and as a result, I want to focus on developing my skills within the actual animation process instead.
Despite this, my final storyboard is a large improvement upon my initial iteration - which spanned two boards and was ultimately too cinematic and ambitious for this project. Here, I’ve been able to develop an idea that I personally find to be really interesting engaging, and allows me the opportunity to pursue an original response to this mystery box task - instead of presenting two shots with moving the camera, I’m moving the character instead.
Something that I found to be quite helpful whilst physically acting out the performance was to verbally say what my character is thinking aloud, whilst I’m moving. This idea has translated to the storyboard, acting as a way to further develop the character beyond the brief’s expectations and allow me to properly understand how this character would think and move. Ultimately, this practice would only allow me to create a more convincing and engaging performance in my animation.
Here, I’ve been able to develop two final storyboards for the mystery box project: exploring the potential of telling my story through multiple shots to further convey the emotional beats of the narrative, and producing a final, refined storyboard which I can return to when animating. Having produced a developed storyboard that I’m happy with, I will now be turning my focus towards creating an animatic.
0 notes
Photo

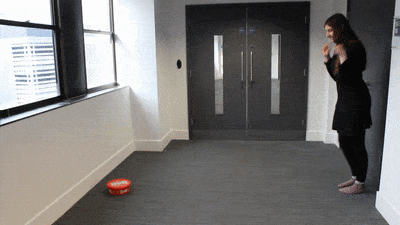
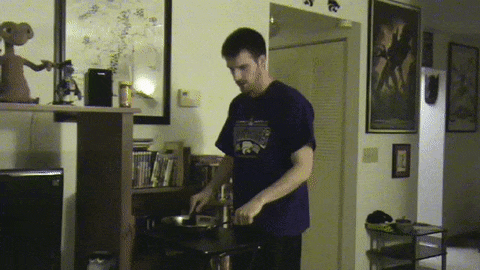
Initial Performance Analysis / Peer Comparison
In this post, I’m applying the principles of performance analysis to my initial live-action reference videos for the ‘mystery box’ task, exploring how I used varying efforts and shape to convey ideas of character and a dynamic change to the audience.
Firstly, I want to establish what I’m going to look at for the purpose of this analysis. How do I use my body, and what body part is the dominant leading force? This will affect the locomotion style and communicate ideas of personality and character to the audience.
The second idea to consider would be the character’s effort: how are they moving? Is the motion slow, or quick? Working on Laban’s Eight Efforts, I will be considering the time, weight and directions of the action and how these work to convey an emotional state.
The way in which a character makes use of space suggests a lot about them: how do they make use of their own ‘kinosphere’ and why. Does the character use far-reach space to communicate a cocky, arrogant or extravagant personality? Or is the posing more introverted, with a small range utilising near-reach space. Each of these options is an opportunity to delve deeper into the character and communicate something about them to the viewer.
Finally, I will be considering the use of shape in posing and performance: looking at my use of the five fundamental still-shape forms with regards to non-verbal communication. Silhouettes and key storytelling poses should be able to convey the emotion and narrative beat of the sequence simply through considered body language.
As an overall review of the reference, I feel like it’s a successful piece demonstrating a clear dynamic change and a convincing sense of struggle in harsh conditions. The simple framing allows the audience to follow the motion with ease, and there is a successful feeling of weight to my movements as I struggle along the path. The sequence follows a tired, desperate character who’s walking against a snowy blizzard. Exhausted, he falls to his knees and collapses in the snow before noticing the mystery box.
In the box is his salvation: my initial idea for the contents was the character’s missing car keys - he no longer has to walk in the snow! This, however, was a result of me thinking quickly on the spot. Watching it back, I feel like there’s no indication about what the contents of the box are - and as such, it’s quite a generic reaction of joy and newly-found hope. As a simple narrative, it works, but I ultimately want to create a more in-depth exploration of the character.
As the character is struggling to walk, it was important of me to use a pressing effort: with heavy, direct and bound movement at a slow pace. This conveys to the audience how tired and difficult the task is. On the lift up to the box, this effort changes. Here, a dynamic change occurs: the character notices the box. Instead of a pressing effort, the action is direct, quick and light: a dabbing motion. Our character has found hope, which then gives him strength. As the emotion changes from tired to hopeful, so do the effort drives to demonstrate a clear change of emotion through performance.
With this performance, the character makes use of near-reach space during the first act: holding himself, scrunched up. The character is cold and shivering, meaning that he’ll want to conserve as much body heat as possible - and thus only use the space he absolutely needs to in order to move around. This use of minimal space also works to communicate the character’s lost and frightened demeanour: keeping himself close is also a safety protocol.
This use of space ultimately changes after looking at the box, in which the character is slightly more outstretched, taking up more space to convey an idea of surprise. Whilst this does change to mid-range space, I can’t help but feel like the change isn’t dynamic enough to register to the general audience. In this project, the focus is on exaggerated character acting: taking ideas from pantomime performance and applying it to animation. Watching this back, and applying the ideas of effort and space has revealed to me that the sequence isn’t very varied in terms of body language. It’s an interesting idea, and at the very least I do present a character reacting to a box, but I think it misses the key points of what I’m trying to create for this brief.
For example, let��s take a look at the still shape-forms in my performance. The character starts in a ball formation, hunched over to conserve heat and energy. He then stays in this ball formation to adhere to the given circumstance of a winter blizzard. By pursuing a more ambitious idea for acting, I’ve effectively limited my performance range: if a character is freezing cold in the snow, he’s not going to suddenly change his body shape - even if he’s happy, he’s still freezing cold. As a result of this, my initial reference here suffers from limited use of shape; there’s no real change.
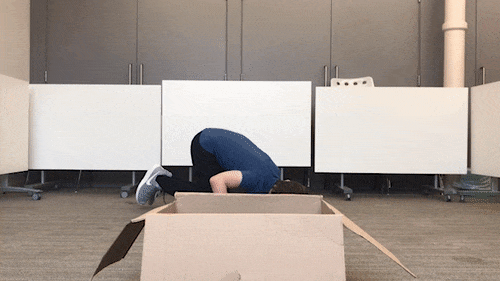
To explore this idea further, I’ve provided a visual comparison to the work of one of my peers. Here, we can see a more interesting and visually engaging approach to this sequence. The performance is able to present a dynamic change of emotion through the use of a variety of shape poses to communicate a changing emotional state. Where the child character begins the scene in a pin-like shape, excited and interested, this moves to a wall form after realising it’s the wrong toy. In a screw shape, the character quickly turns around and walks off screen holding a wall formation again that communicates the character’s furious demeanor.
This use of a variety of shape forms and efforts, which is ultimately what my performance was lacking. From this, I’ve identified some key limitations of this reference. Again, I took the opportunity to get some more feedback from industry professional Sarah on the footage: breaking my sequence down into the key shapes and efforts.
As I’ve already spoken about here, the main take away was to attempt to perform a range of still-shape forms, rather than simply sticking to one. As humans, we are constantly shifting from shape to shape in our daily lives. In order to demonstrate an understanding and readiness for the industry, I need to showcase a diverse range of these shapes and efforts where possible within a single sequence.
The core criticism was to include a variety of character performance elements: include the range of still-shape forms and a range of effort drives to clearly demonstrate a dynamic change of emotion. How can I add different efforts to a single scene as a way to communicate a range of emotions? It’s this line of inquiry that I will need to explore in my next series of reference videos to push the limitations of the brief and produce a more engaging character performance.
Whilst I find the man against tough weather conditions to be an interesting idea, I feel like there are some clear restrictions with this concept. Firstly, given the harsh blizzard, the speed and effort will remain constant and not really allow for a variety of still-shape forms. In my own time, I will begin developing ideas for alternative approaches to this task: making sure to include all of the still-shape forms where possible.
However, my primary action is to begin work on a storyboard in preparation for the upcoming storyboarding masterclass with experienced artist Helen Schroeder. For this initial storyboarding task, I plan to simply work from this initial reference concept, exploring a character reacting to a mystery box against harsh weather conditions.
0 notes
Photo


Overview This week, I placed a major focus on completing the practical assignments in preparation for submission next week. Having to juggle several projects at a time has been a challenge, though I feel like I’ve used my time wisely and efficiently in these last few weeks. Having taken the opportunity to complete my narrative research assignment ahead of time, this left me with the week before hand-in to complete any outstanding practical work. This was mainly completing my Guess the Film animated piece, and completing the sketchbook task. Additionally, to this, I took the time to produce some more reference footage for the Mystery Box project, exploring a less dramatic and more personal, character-based approach in the form of a ‘peek a boo’ game. As a whole, it’ s been a productive, intensive week for me but in the process. I have been able to create a motion design piece that I’m actually happy with and created some helpful video reference in preparation for animation.
Mystery Box This week, I took the time to produce some more reference footage for the Mystery Box project, exploring a less dramatic and more character-based approach through a father and son’s ‘peek-a-boo’ game. This allowed me to explore new, considered ideas in response to the brief and develop my understanding of key storytelling poses, appeal and timing before actually moving to the animation stage next week. With this, I’ve found an exciting and ambitious new approach to the Mystery Box project.
For this assignment, I want to challenge the preconceived standard ‘full-body shot’ of the brief and explore a more original and cinematic approach to the task, by effectively changing from a long shot to a medium shot through the character’s movements. My plan for the following week is to create a refined storyboard and animatic based on this reference and begin playing around with the animation workspace in Maya.
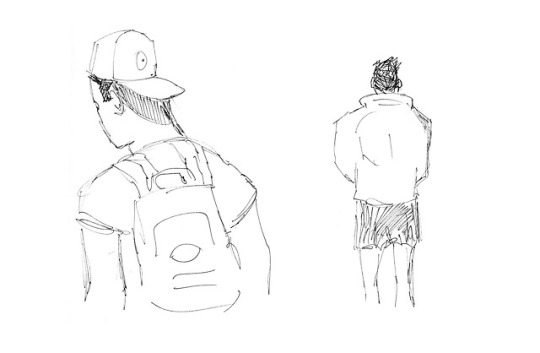
Animated Sketchbook This week, I was able to put a major focus on completing the ‘animated sketchbook’ assignment ready for submission: not only completing the sketchbook with drawings but challenging myself to create observational studies alongside my more original and fantastical sketches. This resulted in interesting, quick sketches that simply serve to explore my study subjects: presenting a series of face and figure studies.
There are some successful drawings on these pages, experimenting with both a pencil and fineliner to achieve different qualities of line. Each of my sketches possess a loose, erratic and scratchy quality and aesthetic that really lends itself to animation, I feel. Looking at my sketches, I found it exciting how I could see some interesting narratives developing, and the use of continuous line provided an exciting challenge to standard sketching. Ultimately, this drawing session reminded me why observational drawing can be useful and fun as an animator: we are drawing from life for ideas, but quickly scribbling these moments down for future reference. These sketches represent a warehouse of ideas to return to, and I actually found some value in this.
Looking back, however, I wish that I had continued and developed upon the idea of a ‘diary comic’ for this task. As a fan of comics myself, I feel like this would have made the brief more enjoyable. As a whole, though, I feel like I managed to complete the project and create some interesting character concepts in the process. I’ve been able to develop a few sketchbook ‘habits’ and will continue this practice moving forward.
Narrative Research Having completed this project last week, I spent the duration of this week focusing on my other two projects, readying each for submission.
Digital Principles This week, I placed a major focus on completing my animated sequence for the Guess the Film task. Over the course of the week, I underwent an extensive iteration process, exploring several ideas and developing off each one - spontaneously coming up with new ideas within After Effects to evidence a natural, evolving workflow. With this, I managed to produce a single sequence that I’m happy to submit for the deadline next week.
For this brief, I wanted to take my approach beyond the requirements of the project and create an animated sequence that allowed me to explore the ideas of motion design as an industry: taking the time to plan out my sequence, develop appealing vector illustrations for the sequence and consider how I can make the piece visually exciting. This is a key element in motion graphics: fluid, exciting movement but also considered, appealing visuals.
With the animation of the Alien Language, I wanted to exercise as many of the principles as I could: adding anticipation before each language forms, and follow through as the line over-shoots the swing. Before the ooze-like substance stretches out from the rings, I’ve made sure to add anticipation even in this small motion: to prepare the audience for what is going to happen. The ring itself isn’t static; it keeps squashing and stretching: this was an important idea to present to the audience, that this language isn’t a solid object and instead, a tangible, floating shape.
After showing the piece to my peers, I can see that the sequence has a visual appeal: my concentration on appealing design and aesthetic has resulted in a positive reaction from the audience. They enjoyed the simple, clean style to the illustrations and smooth movement. In particular, the geometric smoke garnered the most praise due to its ‘appealing, impressive fluidity’. There are a few particular frames that I feel are some of my most interesting design work to date, and work to not only represent my chosen film but be pleasing images and compositions of their own.
With this, I feel like I’ve been able to create an animated sequence that successfully demonstrates an understanding of the basic principles of animation, and presents a visually appealing metamorphosis sequence that is able to evoke the themes and visual imagery of my chosen film, Arrival. Whilst I have taken a more experimental, exciting approach to this task making use of virtual cameras and three-dimensional layers to add a sense of depth, I feel as if I have successfully met the requirements of the brief.
Despite this, I’m very interested in developing this piece further, beyond the limitations of the brief. After discussing with my peers and conducting my own research into the industry of motion graphics, one key element is the inclusion of texture: this adds to the visual appeal of each design and works to lend a hand-crafted warmth beyond the minimal, vector aesthetic. For elements such as the Window, and the Shell itself, I would like to explore this idea in more depth. I’ve really enjoyed this project, and as an independent development, I plan to explore the use of an animated grainy texture in my own time - further developing the piece, and embracing the practices of the industry.
#ba1b:narrativetheory#ba1b:digitalprinciples#ba1b:weeklysummary#ba1b:animatedsketchbook#ba1b:mysterybox
0 notes
Photo


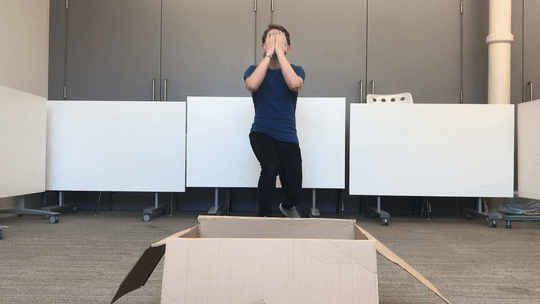
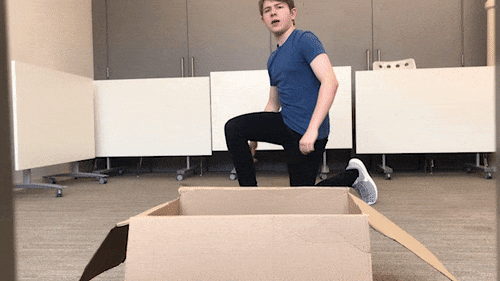
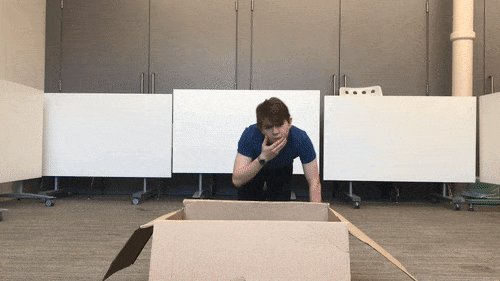

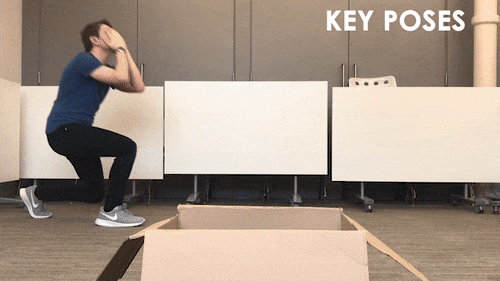
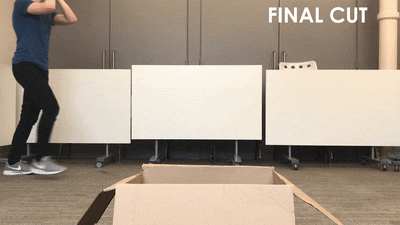

Mystery Box: Acting Reference Review In preparation for next week, I took the time to produce some more reference footage for the Mystery Box project, exploring a less dramatic and more personal, character-focused approach in the form of a ‘peek-a-boo’ game. The purpose of this independent research session was to act out a few different approaches to this idea and develop an understanding of key storytelling posing, appeal and the timing of the sequence before finalizing these ideas into a refined ‘master reference’ that I can return to for my animation. In my independent research, I found that animators in the industry often use this refined reference cut as an initial first pass to test if the performance is working, and I wanted to do the same here.
In these iterations, my main focus was to work on the core feedback points from both my acting and storyboarding masterclasses from industry professionals Sarah Perry and Helen Schroeder. These ideas were to include a range of laban movements and efforts- to explore a range of character performance opportunities whilst also making use of the space in an interesting and original manner.
Idea Iterations Over a series of iterations, I began experimenting with different reactions to the box: having the father visually call out his name, before seeing the box and jumping to it with joy, or realising his son has hidden in the box and reacts in a very sarcastic, tired manner. The main idea I was exploring here was how to move like a parent would. For this, I was working off ideas of my own dad walking around and playing hide and seek games with me as a child. In these family videos (that I obviously can’t show) he walks and moves with an exaggeration and enthusiasm: he’s playing with his son. This is an inherently happy activity, and so he’s putting all of his efforts into keeping this role of ‘fun dad’.
It was this idea of enthusiasm, and then an honest confusion that I wanted to portray in my own performance. Looking at these initial iterations, I feel like this was developing: my movements were beginning to seem more excitable and enthusiastic, whilst keeping to the ‘peek-a-boo’ formation: there’s a slow lunge to the steps, taking the luxury of simply having fun whilst moving. It’s this idea of an in-depth character that I wanted to explore in this session, and I feel it has greatly impacted the success of my performance, too.
Something evident in these iterations, however, was a lack of timing: whilst I was experimenting with different speeds, there isn’t enough ‘breathing time’ between key poses. We need to have a pose on screen be as clear and as readable as possible in order for the audience to understand what is happening. With these iterations, I feel that the actions are too quick and short for the viewer to properly grasp what is happening on screen. It’s fine to have snappy movement, but the important thing to remember is to make that snappy movement clear to understand. This idea of timing was something that I began to pick up as I produced more and more iterative performances, getting a grasp on the movements and character as I went.
These tests also represent me experimenting with a few different camera angles too - the focus here is on presenting the performance in a clear visual manner, allowing for clear silhouettes and storytelling poses. With this, I found that the character should begin walking in from the left, rather than diagonal. Whilst the diagonal iteration is interesting, the posing ultimately begins to feel ‘clunky’ and forced after the initial few steps. My character needs to walk in from the left, and present his performance to the audience in the centre of the frame, bending down before noticing the box and walking up to it.
Challenging the Brief Even with these tests, I knew I wanted to challenge the simple ‘one-shot, full body’ limitations of the brief and explore how I can use the 3D space in a visually interesting and cinematic way. This was one of my key feedback points from Helen, and my idea for this sequence was to present the audience with two different shots, using a single locked camera.
This was a challenge but allowed me to present a more cinematic and visually original approach to this project by conveying emotion purely through body language. My solution to this problem was to physically walk towards the camera: I’ve situated the box close towards the camera, and the character walks in with a full-body shot. This allows the key performance to be presented to the audience, allowing the animation to present a character and emotion using body language and facial expressions to convey emotion.
After the character crouches down to look for his son, he snaps back up again, and notices the box. After taking a brief pause to take in the scene, the father steps up and walks towards the box. In this singular motion, the shot effectively changes from a longshot to a medium close up, focusing the entire frame on the torso and legs of the character: allowing me to convey emotion simply through body language. This is a key element of the brief, and I wanted to really push that idea by having the shot be comprised just of the character’s lower torso. The hands-on-hips pose tells the audience exactly what he’s thinking, without the need for a complex facial expression.
This is a cinematography technique inspired by the auteur television series Mr Robot. Frequently, the director is able to turn a medium shot into a close-up, not through moving the camera, but having the actors move closer to the camera. This is a little cinematographic touch that is now a staple of the show and allows the shot to feel inherently cinematic and possess some real visual style, without distracting from the main performance. In these cases, this technique is used to highlight the actor’s face to convey an emotion clearly to the audience. This is the key performance area, and so the shot ends focusing on this.

Mr Robot. (2015). Sam Esmail.
With my shot, however, the key performance area would be the arms and torso, as the piece ends on the classic ‘hands-on-hips’ pose of an unapproving parent. Inspired by Mr Robot’s original approach to a one-shot sequence, I was able to effectively present two shots in one - simply using the character as he walks towards the camera and box.
Additionally, during this process, I took the opportunity to properly act out the sequence: verbally saying out loud what the character was thinking and feeling. This sense of inner dialogue and character subtext allowed me to get a better grasp on the father and his personality - allowing me to present a more successful performance in my video references.
The Final Cut With this, my final reference is an exercise in limitation: challenging myself to both presents a full body performance with multiple changes of emotion and facial acting, whilst also conveying a performance completely through body language at the end.
Having combed through all the iterations, my final task was to produce a ‘master cut’ by collecting and cutting the most interesting pieces of character performance into a single reference video that I can then use to animate from. This process of ‘cutting and pasting’ multiple live-action reference files is a key industry practice, demonstrating a professional reconsideration and development of ideas. For this, I made use of three of my iterations, and here I want to present an analysis of this final reference, exploring my use of Laban movement, character performance and how this presents personality.
Firstly, our character enters the frame in a lunging step: there’s a pressing effort with a playful bounce. This is a father who enjoys playing with his son, and demonstrating some clear enthusiasm for the game. It’s not a necessarily fast action either, he’s taking his time. In this initial walk, I wanted to add a visually appalling bounce in his steps, to further suggest his playful, lighthearted manner. The movements aren’t stilted, it’s a singular motion with a visual flow which effectively serves as anticipation for the reveal.
The character then swings his hands away from the face, snapping to the ‘boo’ pose. With this, I made sure to present my hands (key performance areas for the audience) in front of my body to allow viewers to clearly see the movement, and further add to that sense of ‘peek-a-boo’ game playing. With this, there’s a pleasing bounce to the step, it’s easing into the pose, and giving a bit of breathing room for the audience. The head movements work to demonstrate the character’s confused state, in an almost comedic tone.
After realising his son isn’t there, his arms and body language visually drop to show a bit of disappointment and begins looking for his son. My idea for his movements was to show some effort into the motions: this father character has a little bit of weight to him, and I wanted to show this in the performance. The body language is visually sadder than the initial walk, demonstrating a clear change in emotion and expression: the given circumstances have changed, and thus the character is reacting accordingly. After looking right and left for the child, he sits back up on his knees in a faster, snappy motion. This was to show a change in energy, as the father begins to worry where his kid has gotten to.
With a clear movement of the head, the character notices the mystery box and pauses. This wasn’t there before. Curious, his head tilts to convey ideas of intrigue and he gently strokes his beard as a way to visually demonstrate his own thinking process. Through several iterations, I found that this was a clear and visually clean way to demonstrate this emotion and further works to reinforce the idea that this is a fatherly figure. Having shown this to a few of my peers, I can see that this is an example of ‘successful’ storytelling posing, as they all could understand exactly what was taking place in my sequence.
This entire performance has been presented to the audience in a full-body shot, allowing the viewer to see the character’s entire body and facial expressions to convey the feelings of the sequence. After noticing the box, however, the father stands up and walks towards it, resulting in the shot becoming more of a close-up than before. The focus now is conveying an emotive performance entirely through the body language of the lower torso and arms, something that I feel I’ve been able to do successfully here.
The character stands up to look in the box, and after looking at the contents, visibly changes pace. The speed and sense of intrigue shifts to one of tired parenting, as the arms drop to the waist in a light-hearted sense of disappointment once more: his son is hidden in the box! Having found his son, and annoyed at the situation, the father adopts a hands-on-hips pose to close the sequence. With this final pose and the change of speed and purpose, I’ve been able to communicate a performance with a clear change of emotion described through body language - meeting the requirements of the ‘mystery box’ brief.
Summary As a whole, though, I’m happy with the character performance here as it allows me to include a variety of Laban movement and challenge the ‘full body, one-shot’ nature of the brief through a playful and original use of space. There is a real opportunity to develop an engaging, successful animated sequence here demonstrating a clear understanding of character acting and performance, I just hope my own skills with Maya don’t hold this potential back.
With this, I have created a successful video reference for my project. Having taken the time to reconsider my initial ideas, I have been able to develop a more interesting, refined idea and performance. In comparison to my initial attempt, I have vastly ‘downsized’ my first idea: placing the focus on exaggerated character performance rather than an ‘epic’ cinematic narrative.
Despite this, I’ve still challenged myself to focus on character: presenting the audience with a short, emotional narrative beyond ‘character looks into a box, reacts to contents of the box’ and presented a personality through successful performance. Using this as a reference, my next step is to develop a new storyboard using this concept of a ‘peek-a-boo’ game and taking the main feedback points from the storyboarding workshop with Helen into consideration, in order to produce a sketched out visual representation of the sequence outlined here.
0 notes
Photo
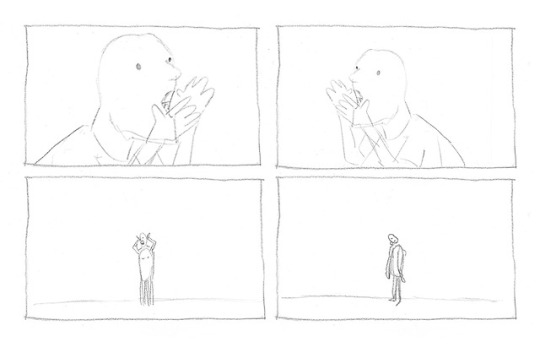
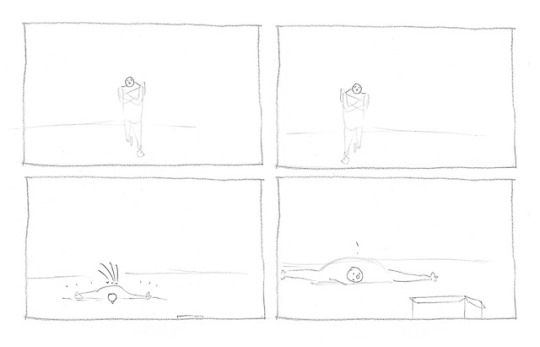

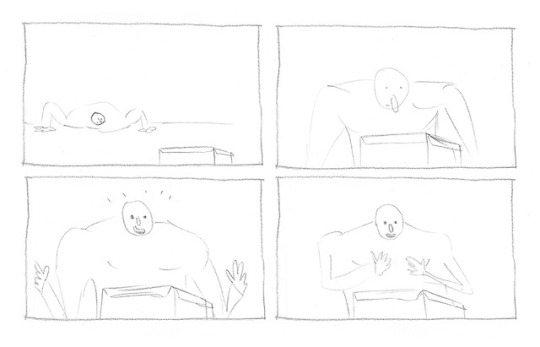
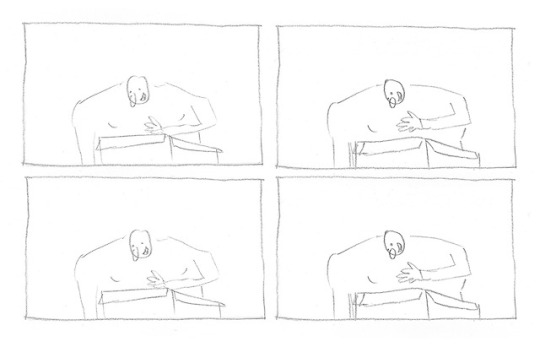
Storyboarding Masterclass: Initial Task Review
With this new understanding of storyboarding, we were set the task: to create a rough storyboard for our Mystery Box idea. The focus was on keeping our sketches loose, using post-it notes to try out different angles and types of shots. This was essentially an opportunity to move beyond the brief’s limitations: although our animation will only make use of a single shot, in this class we were asked to use a range of shots to create a visually engaging sequence. Interestingly, Helen herself noted that our brief is ‘challenging and limiting’ due to it being a ‘locked shot’. This is something I know my peers and I have felt, and it was quite refreshing to break free of this restriction and explore more exciting, cinematic approaches to composition and visual storytelling.
My initial attempt at this task wasn’t successful, I felt. Not only were the sketches rough and illegible, I felt that the sequence wasn’t interesting or exciting. When I was looking through my original storyboard, and discussing my ideas with Helen herself, it dawned upon me just how complex my sketched out sequence was. These initial post-it note sketches didn’t have a clear focus or narrative flow, and although some of the compositions were interesting and conveyed the ideas of isolation that I was going for, I didn’t see any real value in these drawn frames.
Personally, I enjoyed the workshop and the opportunity to break out of the ‘one-shot’ restrictions of the project - sketching out more dynamic storytelling shots was a fun exercise, but I also came to the realisation of how ambitious and complex my original outlined idea for the Mystery Box really was.
Having the opportunity to look at the class’ storyboards, I was able to compare their approaches to my own: demonstrating clear visual storytelling through simple stick men. Each student was able to stick to the six-panel requirement, following a fairly simple response to the Mystery Box task. These were all able to indicate the intended emotion and character direction, in a simple visual story that conveys the narrative well. Comparing this to my own, I saw a lack of focus and essentially lost myself with such an in-depth narrative approach.
As an independent development upon these storyboards, I wanted to explore an early attempt at timing through a rough animatic. This was simply created by creating a frame animation from my storyboard sketches, however, I feel as if these do outline the correct sense of comedic timing and relief that I was initially going for.
Whilst these initial storyboards and reference footage ideas are interesting, I have found that these attempts are inherently too ‘cinematic’ and narrative-driven - too ambitious, considering the restrictions outlined in the project brief. The duration of the scene is only fifteen seconds, and it is a single shot. What I’ve learned from this class workshop is to ‘take my ideas down a notch’: instead of exploring the story of a father who’s lost his son in a winter blizzard, why don’t we take the stakes down a bit? I’m interested in exploring the potential of a character who’s searching for something and finds that desired ‘thing’ in the box.
Ultimately, I want to push the limits of this brief: instead of following a simple ‘character walks in, sees box, reacts’ storyline, my focus will be on presenting an actual character and narrative to the audience. In a recent discussion with my tutor, we spoke about how I should challenge myself to create something exciting and push the limits of the brief. Industry professionals are looking for interesting, exciting and original sequences in animator showreels, and I want to take this into consideration even at this early stage.
Perhaps it is an innocent game of ‘hide and seek’ between a father and son? In our next academic week, after independent study, we will be picking this up again and creating an animatic for our final animation. In preparation for this, I will be taking the time to film myself acting out potential approaches to the task: to simply get a feel and idea for the character and action, before settling on a final idea. My plan is to take a morning to develop a series of video reference clips: establish a new idea for the Mystery Box task, create a series of iterative tests before filming a refined, completed video to use as a reference for my animation. This will be a refined performance that presents a clear and successful understanding of posing to communicate emotion, appeal, and timing.
Instead of creating a rich narrative and world, my main focus for this task should be creating and crafting a successful and ambitious character performance: one that uses the ideas of exaggerated performance and mime to convey ideas and emotions to the audience in a clear, understandable manner. After completing some refined reference, I will then need to produce sketches based on this, and complete a revised storyboard ready for the animatic masterclass.
0 notes
Photo
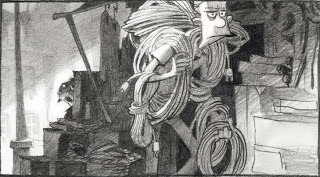
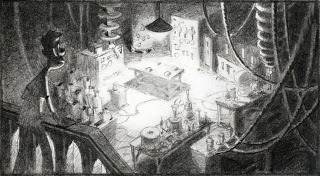
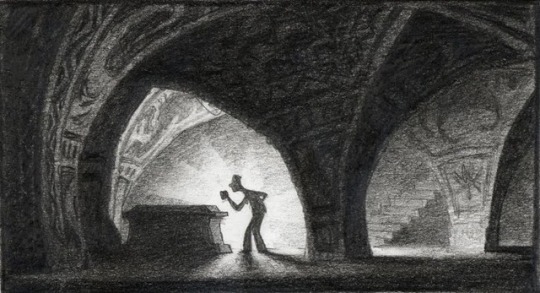
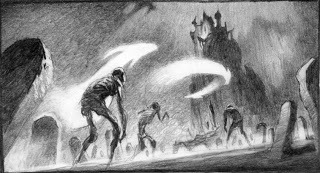
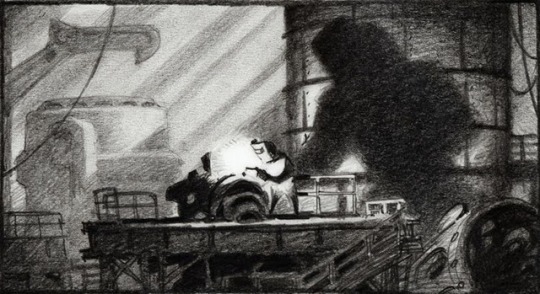
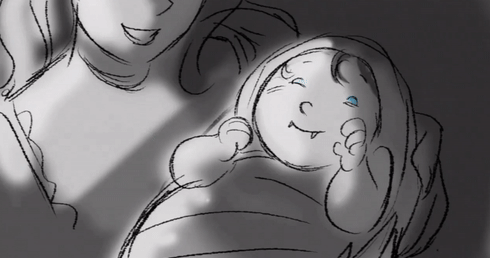
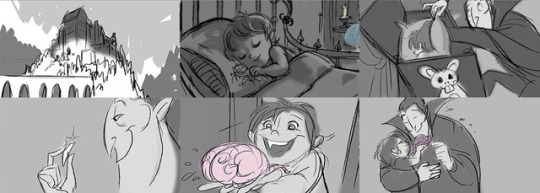
Storyboarding Masterclass: Introduction to Storyboarding (1/3) This week, we were introduced to the idea of storyboarding and its various uses through a guest lecture by animator and storyboard artist Helen Schroeder. This was in the form of a ‘storyboarding masterclass’, which introduced us to the concept of storyboarding, various industry practices and how we can use storyboarding to challenge the ‘one-shot’ nature of the brief. This was an intensive lecture, introducing us to a range of concepts that I want to discuss in detail here.
Initially, Helen specialised in stop motion animation - but decided to develop a second leg and skill within the industry, which came in the form of storyboarding. With a natural flair for drawing, this was a natural progression and allows to work at a desk ‘from home’, utilising digital communication. This idea of working from home does have an appeal to me, and although I’m not planning on becoming a storyboard artist, this practice is very relevant to freelancers - a path I am very much considering.
A ‘feature storyboarder’, Helen has worked on both long-form animated works and television episodes and has a breadth of knowledge in both storyboarding and animation, working on the recent Watership Down computer-generated animated feature and Arthur Christmas from Aardman Animations.
What is storyboarding? In an article on his blog, Pixar story artist said storyboarding is ‘doing everyone else’s job before they do it.’ A planning tool developed by Disney during the early 1930s, storyboarding is the process of editing a film before it is made, in which artists draw the first vision of a scene from the script. In this, storyboard artists need to consider the characters’ performances: what are they saying, and how are they saying it? At this early stage, the storyboard allows the director to see a visual representation of the film through sketches which tell the story in a simple, clear manner.
Storyboarding considers art direction, and even elements such as cinematography - as these initial story sketches give the first say on where the camera is shooting from, where the characters are in the scene, and even elements such as pacing, lighting and editing. Helen established to us that storyboards effectively represent a first draft of the film itself: outlining the key narrative beats, describing the scene and ultimately, playing a larger role in the production of a piece than I initially thought. From this, it seems like storyboarding grants artists a great amount of creative control over the property.
We briefly established why we ‘should learn about storyboarding’, which came down to making us ‘better animators’, understandably offer more job opportunities and it is a requirement for this course. Storyboarding, after all, is an essential tool in animation production and learning the craft develops our abilities in drawing, staging and visual storytelling; these can all be key to a successful animation.
Storyboards are a production tool used to work out the core idea and structure of a project; to visualise the action described in a script and work out the character performance needed for the shot. Storyboards portray visual and physical gags that simply cannot be written in a traditional script and outline the timing of action in an animatic. Storyboards are an industry-wide practice that allows artists to visualise and explore ideas before taking it to the production phase, allowing us to determine the costs and production time of a project, but also aid in communication. Storyboards are often used to sell the idea to other people, in the same way a pitch would, and ensures cohesion across departments and production phases, guide animators and asset creators.
Storyboarding in Mystery Box For our Mystery Box task, we need to create a storyboard and animatic of our final sequence, creating a pre-visualisation of our ideas before jumping into the animation process. Unlike traditional storyboards, however, we are given a one-shot, locked camera scenario. Whilst this is obviously a restrictive challenge, we can still play around with a few variables: the camera height, character movement and negative space in order to stage the shot for maximum effect. One idea that I want to explore is the use of depth of space, to show it is a three-dimensional plane rather than a simple flat image.
Here, I’ve been able to present an initial introduction to the idea of a storyboard, and in my next post I will be diving further into some of the industry practices outlined in Helen’s masterclass.
References
Early Storyboards and Beatboards for Hotel Transylvania by Luc Desmarcelier. http://livlily.blogspot.com/2012/12/hotel-transylvania-2012-storyboards.html
0 notes
Photo
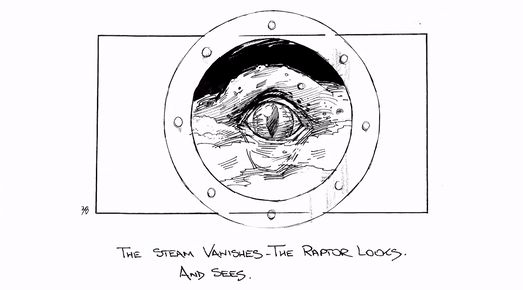
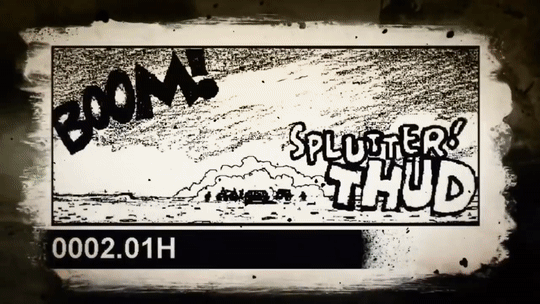
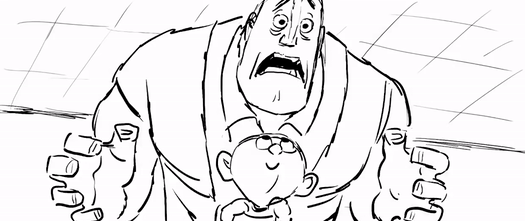
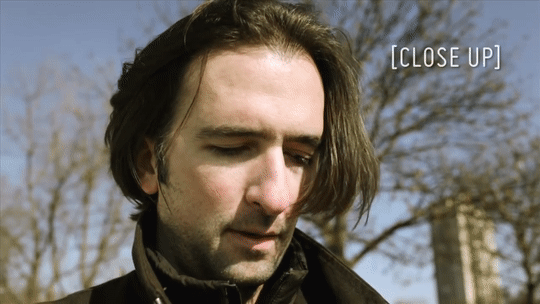
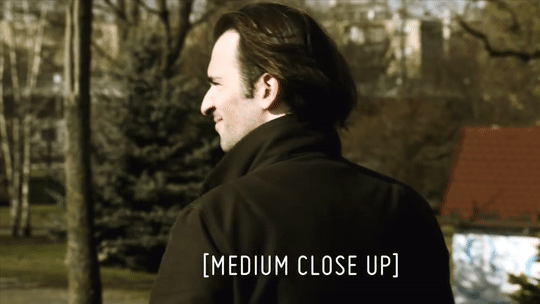
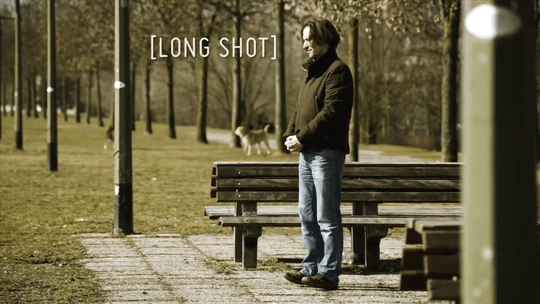
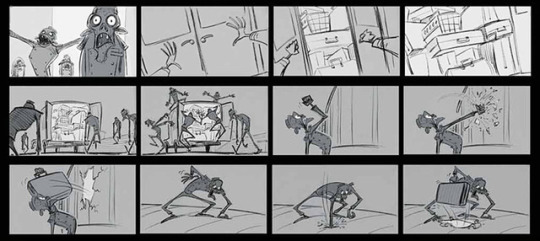
Storyboarding Masterclass: Industry Practice (2/3) In this post, I’m discussing the various storyboarding practices found in the industry, exploring the different types and uses for storyboards, and how different types of shots can impact visual storytelling.
Types of Storyboards There are several types of storyboards, but they always follow the same structure: a collected series of single pictures, which tell the story of the project. There are two main types of board, and within these two specifications, there are many options and subcategories.
Firstly, there is a presentation or pitching board. These are used for advertising and commercial projects, to achieve funding from potential investors to create the animation. These are usually clean, polished and seductive: giving a good idea of the look and feel of the project, acting as proof of concept and usually illustrated by a panel per scene.
Lastly, there is the shooting board: these are less polished illustrated sequences that tell the story ready for animators and filmmakers to develop upon. The focus is less on seduction and polish and more on clearly telling a story through visuals. Within this, there is a range of storyboard uses:
TV Series These storyboards are always clean, on-model and are often used as layout and animation keyframes in 2D animation. These typically include a detailed breakdown of action and character performance, as well as the beginning and end of each scene. Instead of working across artists like features, there is usually only one board artist per episode.
Animated Features These are the storyboards we most likely think of: rough, expressive and highly detailed action. These storyboards detail the camera and character performance with less focus and emphasis on being perfect, polished illustrations or having the character remain ‘on model’. Panels must be ‘read’ quickly, and artists do not have to stick to a particular ‘house style’ as they do with tv series storyboards: artists use their own visual style and are cast to their own personal strengths. These focus on character acting and composition, not worrying about staying on model and generally possessing a loose drawing style.
Finally, live action films are also storyboarded. These are normally used as a tool to plan out complex action and FX sequences before spending money on expensive visual effects: a tool to communicate what the director wants from a specific shot.
To put it simply, storyboards are used because drawings are cheap. This allows the director and artists to visualise a scene before spending the time and money to create visual effects and the final animation. Throughout pre-production, there are frequent stages to the script. It’s a constantly evolving process, and storyboarding helps iron out any confusions or ideas in the script.
Elements of a Storyboard When structuring our narrative (meaning deciding on the sequence of panels), I need to consider what information I want to give to the viewer at what point in time, and what emotion do I want the audience to feel? Helen established that the same images, when cut in a different sequence, can create suspense, interest, humour etc. What we leave out of the frame is actually as important as what we show.
The basic units of visual storytelling in film are: a single panel, a shot, a sequence and an act (a structural element formed by a group of sequences within a longer narrative). A beat board is a shorter version of a storyboard, covering the narrative ‘beats’ or steps of a single sequence or even entire film.
Cutting the Fat Every shot has to serve a purpose: cutting is used to shift the audience’s focus to important aspects of the story. It’s important to make sure that the viewer will be able to follow ‘the flow of the shots’ and scenes without getting confused or taken out of the film for experimental, exciting shot composition. In traditional films and animations, the focus has to be on storytelling.
With these types of storyboards, drawings can be loose: making use of shading or spot colours only to separate out background and foreground, and most importantly, to direct the eye to the most important information and focal point of the shot.
During the session, we were also reminded of core compositional ideas and principles: such as the rule of thirds. This is an extremely common framing tool, as artists place the focal point where imaginary lines intersect - this helps give the sequence a sense of focus and placement. This can be seen in almost every film, episode, and visual advertisement.
Storyboarding also allows us to exercise a key principle of animation: staging. How we stage a shot can drastically impact how the audience resonates with a specific scene. This requires us to make a choice about where to ‘put the camera’ and what angle the viewer will see the shot from. In order to do this, the first thing we need to establish is our message of the shot: what are we trying to say? This is our compass to follow as we try to figure out the most effective way to present your idea. We need to consider what the message is, and what is the best way to convey this message.
In this, storyboard artists often explore a range of potential compositions and angles before deciding on a final shot to develop into a more refined story illustration. Animators and directors then use this as a starting point.
Finally, we explored the ideas of shot types in a storyboard: and how we can vary these to evoke different emotions and responses in the viewer. Close-ups, medium, and wide shots create visual rhythm and help to convey the atmosphere and emotional content of a story. Close-ups, in particular, are usually used to draw attention to a detail that might otherwise go overlooked, or to demonstrate an emotional reaction in a character: focusing on small features that convey a specific feeling or emotion.
In comparison, wide shots can establish our character and situation, without the need for lots of lengthy explanations or narrative exposition. An up-shot can make a character look threatening, whilst a down-shot (the audience is looking down at the character) gives the impression of isolation, weakness and sadness. There are several types of shots and angles, and should only be used with good reason. These shots can add variety and drama to the sequence, and make a shot more visually interesting to the audience.
Finally, Helen presented us with a series of tips and ‘pearls of wisdom’ from herself and her team at Locksmith animations. This was the final part of the lecture, and represents a series of tips from industry professionals that I wanted to include here:
‘Make sure you know the intention behind each scene. Work out how best to serve the story. To ground your ideas, connect them to your personal experience.’
‘Don’t wing it. Make it a plan. Do research. Set yourself little rules and stick to them.’
‘Don’t go for cool compositions and extreme perspective. Keep it clear and simple. Immerse the audience. They should forget they’re looking at a cartoon, not stop and say ‘wow, cool shot’.
‘Be open to changes. Get the first pass out of your system, then look again and see how you can make your board better / clearer / more interesting. Learn to draw loose but clear.’
And never forget to have fun.’
With this, I’ve been able to cover the main lecture points of the workshop. Here, I’ve been able to delve into these ideas in more detail and will apply this new understanding to my storyboarding practice moving forward in the course. Helen was able to discuss the fundamentals of the art form, and her own experience when working in the industry. This was an invaluable experience, and although my initial storyboard was ultimately too complex, I found some real value in this workshop.
Next, I’m going to explore my initial response to the task set in this workshop, exploring the use of alternative shots and angles for effect in my mystery box sequence.
References
Introduction to Storyboarding. Rocket Jump Film School. https://www.youtube.com/watch?v=RQsvhq28sOI
Basic Shot Types. Little Film School. https://www.youtube.com/watch?v=laU2MI6X48I
The Incredibles 2 - Deleted Scene Clip “Edna’s Fashion Show”. https://www.youtube.com/watch?v=bUWZzy2h6Jo&t=28s
Early Storyboards and Beatboards for Hotel Transylvania by Luc Desmarcelier. http://livlily.blogspot.com/2012/12/hotel-transylvania-2012-storyboards.html
1 note
·
View note
Photo
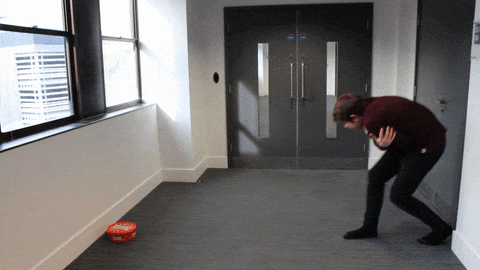
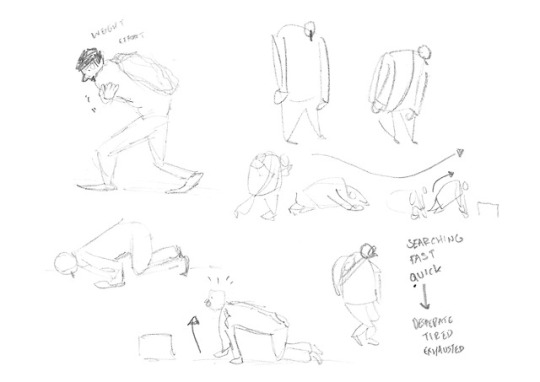

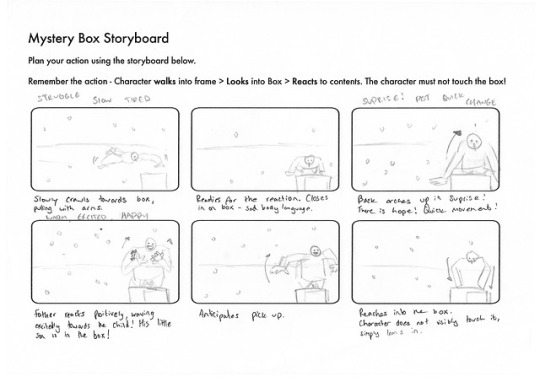
Storyboarding Masterclass Preparation: Initial Rough
In preparation for our ‘storyboarding masterclass’ this week, we were set the task of completing an initial storyboard, outlining the key narrative beats across a series of drawn panels. With this, I sketched out ideas for posing and figures in my sketchbook first, as a way to evidence a range of ideas before settling on a single concept.
The sequence must follow a single shot of a character walking into frame, looking into the box and reacting to its contents. Within this, we can follow our own creative ideas - but the narrative should include this core set of actions. Looking at my initial reference footage, I began to develop this simple sequence into a fully-fledged narrative. Although I’m not likely to actually follow this plan, I felt it was useful to further flesh out the narrative. Developing on the harsh terrain idea, I wanted to add an innately human element: a father looking for his child. This acts as a potential development on my reference but would allow my piece to have an actual narrative and emotionally resonate with the audience.
Ultimately, I want to push the limits of each brief to allow me to create animations worthy of a showreel, in preparation for the industry. With this particular task, I want to present an actual character and narrative to the audience, beyond a simple ‘character walks in, sees box’ storyline. We are encouraged to challenge ourselves and the limitations of the brief, and I want to develop upon this idea during the Mystery Box project.
The focus in this independent development session was to use clear lines of action to communicate the feeling and direction of the scene, using minimal lines to convey emotion. With this, I was exploring a few alternative ideas, evidencing an iterative process. These simply represent an opportunity to work through ideas and concepts, but I was intrigued by this idea of a father wandering around in the snow, looking for his lost son. The main addition I wanted to add was a sense of situation and context to my sequence; I wanted to build a narrative.
Watching my reference, my main focus of the storyboard was to include a range of shape formations to suggest a changing mood, and to challenge myself to include several different efforts. This idea of performance variety was my main feedback point from industry professional Sarah when she looked at my work, and I wanted to develop upon this idea in my initial storyboard pass. This represents a rough first draft at a storyboard, and whilst it’s not the final plan, I feel like this does present some interesting character performance opportunities.
Our character is walking amongst a snow blizzard, having lost his son in a storm. He’s lost the one thing that mattered, tired and exhausted after the terrible night he’s had. It’s early morning, around five o’clock and the character is stumbling over his own feet. Directionless, he finds himself stumbling around in the snow, despairingly.
In the struggle, the character unknowingly drops a beloved photograph in the snow. This use of visual storytelling tells the audience that he is a single father, with a love for his kid who shares his love of mountaineering. Having lost his only hope, the farther stumbles around and eventually collapses in the snow.
But wait - what’s this? He notices the box and drags himself towards it using his arms. He peers into the box, and instantly perks up. Hope comes back, as the character sees his son in the box, miraculously safe from harm! This is a key emotional beat to the narrative, and it would be an interesting acting challenge to explore such a heavy idea; how would a father react to being reunited with his lost child? This sequence would be able to hit the emotional beats of an engaging story which emotively resonates with its audience, additionally allowing me to showcase a range of shapes and efforts in the process.
There are some successes to this storyboard: I feel like I’ve managed to convey the emotion and describe what is happening on screen through simple pencil drawings, and outlined a somewhat ‘out-of-the-box’ response to this task. This also acted as an opportunity for me to note down the emotions and feelings of each panel, and where I can add the basic principles. With this, I’ve presented a rough storyboard that fulfills its purpose, and I like this new cinematic approach to narrative: evidencing a range of emotions, efforts and body shapes in an effort to act on previous feedback.
However, my sequence spanned two pages, which begins to suggest that my ambitions may be too high for this project. A challenge I consistently find is the ability to break my ideas down into narrative chunks - story beats - and as such, often produce storyboards that exceed the recommended six panels. Looking at my storyboard, I can’t help but feel like I’ve included too much here: it would actually be difficult to condense the story into merely six panels because there is simply so much going on. It’s helpful to develop this sort of detail and plot when creating a short film or longer sequence, but for an assignment such as this, I need to learn to ‘dial it down’ a bit in terms of ambition. This will be something I will consider when producing my storyboards moving forward - however, as a rough draft, this has some value.
Summary Here, I’ve taken the ideas outlined in my initial live-action reference footage and developed them into a storyboard, exploring a more ambitious and exciting narrative, taking ideas from cinema. Having made some exploratory sketches and produced an initial pass for my storyboard, I feel ready for the storyboarding masterclass later on during this week. The main idea was to present a simple rough idea of the action, which we will develop later into an actual refined storyboard.
0 notes
Photo
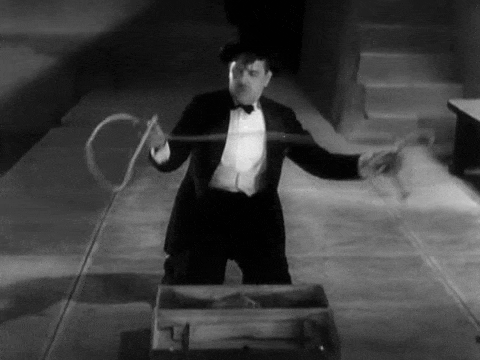
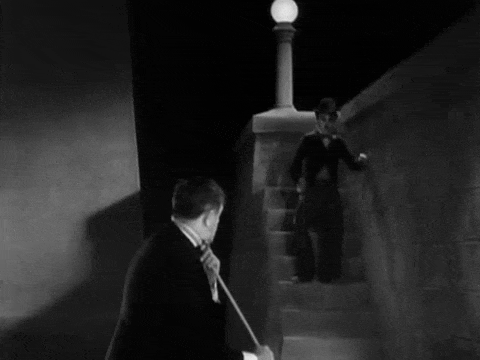
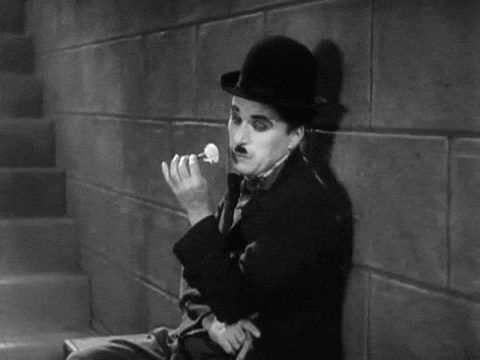
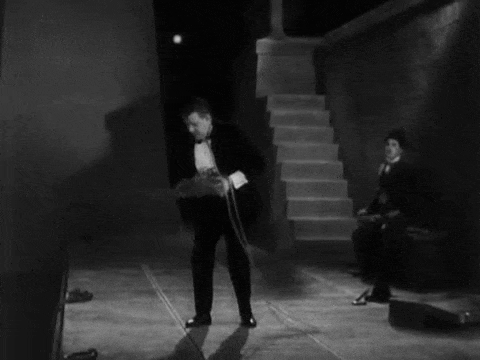
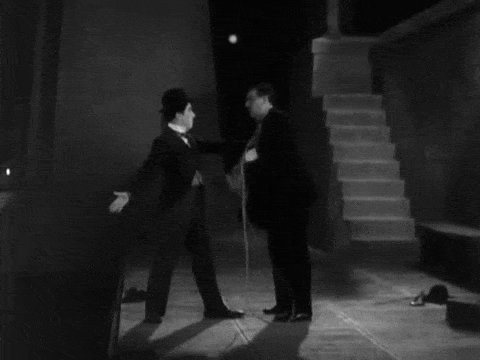
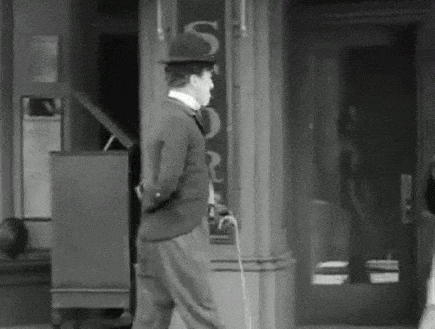
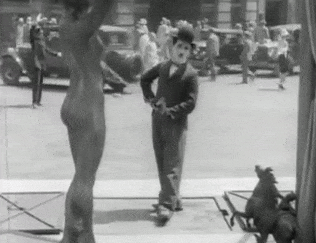
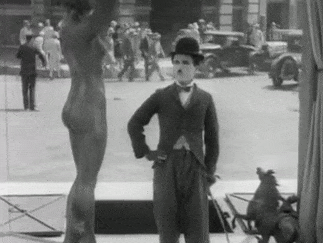
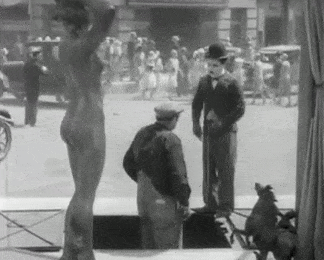
Charlie Chaplin: The Master of Silent Performance
In this post, I’m analysing the work of the iconic Charlie Chaplin and how he uses clear body language and performance to communicate an idea to the audience, through the use of exaggerated posing and contrast of timed movements.
In the last workshopped session, I was able to get an introduction to the core theories and concepts needed to construct a critical analysis of performance: considering effort drives, shapes and how the character uses pace. Here, I want to apply these principles to an analysis of Charlie Chaplin’s performance, looking at an example of successful character acting before looking at my own approach.
An English comic actor, filmmaker, and composer, Sir Charles ‘Charlie’ Chaplin became a worldwide icon and is considered to be one of the most important figures in the history of cinema for his approach to character performance and filmmaking. In this post, I’m going to be analysing sequences from his film City Lights, each scene presenting a dynamic change in character.
In the first sequence, the character is admiring a statue of a naked woman, and this distraction creates some real tension when the floor from beneath him moves away. The statue holds the character’s gaze and absolute attention, as the humour and tension from the piece arise from the potential danger of Chaplin falling down the hole.
It’s a fairly simple concept, but one executed beautifully by Chaplin’s performance. A silent film with no dialogue, this narrative is conveyed entirely through the movement and acting of the characters: an example of visual storytelling at it’s best. Chaplin enters the frame in a very uptight, pin shape. The arms and head lead the body, ensuring there are clean lines of action to direct the viewer through the motion.
In our first attempts at reference videos, our performances were somewhat dashed and chaotic. In comparison, Chaplin uses clearly defined body language to convey a specific emotion to the sequence: his head turns are quick, purposeful and direct. When the character observes the statue, the posing changes to allow a weight shift: from moving to a standstill. It’s a relatively quick stop of movement, an abrupt motion that conveys the feeling of surprise.
A Hands-on Approach The entire performance is carried by the movement of Chaplin’s hands, this is the focus of all movement and a key area of emotional acting for the audience to observe. Through this, we can see a dynamic change of action. This describes how situations and movements change depending on the given circumstance: when an internal narrative beat changes, there is a level change - we expect a difference within the performance if the context of the performance has changed. Low-level movement can suggest fear, whilst high-level movement can suggest confidence and a surge of power over other characters.
Through demonstration, we observed the use of clear, organized movements to convey a clear idea versus creating messy lines of motion to communicate a rushed daze and chaotic performance. Whilst this can also be appealing, for our ‘Mystery Box’ was we need to focus on clear visual storytelling poses and a pantomime-esque performance.
In this first sequence, Chaplin also uses a shift in timing to convey a change within the narrative. What begins as a slow, eased motion quickly changes to fast, rapid movements evoking a sense of chaos and worry. His arms swing out in surprise, moving from near-reach space to far-reach space - as the level also decreases: caught off-guard and distracted, Chaplin accidentally begins to fall down the hole and reacts in concern.
With this, the arms and feet lead the performance. It is common to find the most body language and gestures that are communicated through the extremities, often using hands to convey an idea: we talk with our hands very often. This visual aid not only helps us work through the idea we are discussing but to convey the emotion of the conversation to the audience. Interestingly, after he stands up again, Chaplin doesn’t ever reach the same original height: his confidence has taken a hit. With this, a major change would be time: moving from a slow, relaxed walk to a quick panic. Chaplin starts out the sequence with a sustained movement, before changing into dramatic, quick-time energy.
In the final sequence from City Lights, we are presented with Chaplin sitting down to relax and simply smell a flower, but after he witnesses a man attempting suicide intervenes and takes the man back for a cup of coffee.
Here, we can see the difference between a light character and someone with a strong, heavy effort. The contrast of these elements is what allows each effort to be presented in a successful manner: evidencing the difference between the two characters physically and internally. With this analysis, I’m making reference to the questions outlined by Stanislavsky, and how these thoughts are manifesting themselves externally through the performance.
Chaplin’s character exhibits a direct, considered effort, making use of near-range space. Whilst his actions are relatively fast, these are still rather relaxed and sustained motions. After realising the other character’s intentions, however, time speeds up to show Charlie snapping into action. As storytellers, we can play with this idea of slow to quick time movement to communicate meaning. Then, after the rock is dropped on Chaplin’s foot, the movements are quicker, direct and free to convey the idea of intense pain.
Chaplin’s character is initially under spoken, using near-reach space and keeping himself to himself. He acknowledges the other character’s existence but sits down to smell a flower in peace. However, when the given circumstances change, the character’s subtext will change - resulting in a dynamic change of movement and body language too.
The other character, however, has far-reach space and clearly needs help, in a desperate act of suicide. Once Chaplin realises, his space expands to encompass our friend in need: a physical manifestation of his helping nature through Chaplin’s use of space. In this, Chaplin uses clean lines of action to clearly convey an idea to the audience: to achieve a precision of choreography. His quick, light and direct movements are made even more so when visually compared to the other character: a heavy, slow and sluggish individual with indirect and boundless movement.
Summary Here, I’ve identified how actor and filmmaker Charlie Chaplin uses an exaggeration to communicate personality clearly to an audience, to convey internal thoughts through an external performance - through the primary use of hands and precise, clean lines of action. As animators, we want to show and highlight these shifts in the internal headspace of our character through performance. Once again, we are reminded to go big and go bold - to ‘turn up the volume’. Bold choices of performance allow this genre of exaggerative artists (Marceau, Chaplin and Atkinson) to use bold, exaggerated movements to cover the narrative beats outlined in the story. It is easier to embody the idea, then filter it to the desired level of subtlety and nuance.
Aside from this, this post also represents an opportunity for me to apply my new understanding of a few of the performance review principles to construct a more critical analysis of character acting. Next, I want to continue this with my own live-action reference - discussing my use of effort, character subtext and still-shape forms to communicate ideas of personality and struggle.
0 notes
Photo
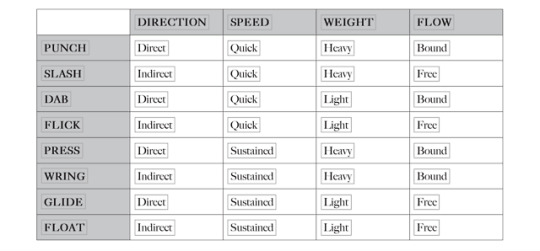
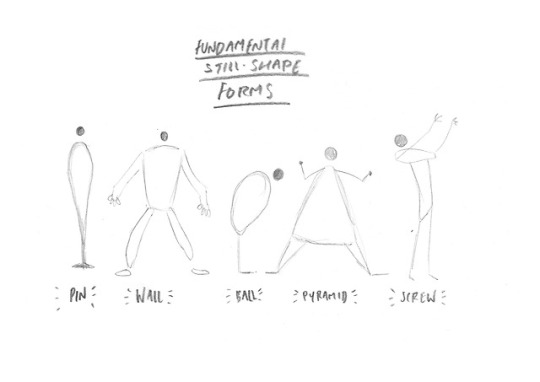
Introduction to Performance: How to Analyse Movement
In the second performance workshop with movement director Sarah Perry, we received an introduction to performance analysis: covering the key concepts and theories that allow us to construct an academic and critical review of our live action reference videos. This was working on the Effort Drives as described by Rudoph Laban, and the five fundamental still-shape forms. With this, we are able to discuss the performances in more detail and allows us to critique acting and movement in any animated sequence.
As humans, we are constantly shifting between different shape forms with effort. There are five fundamental still-shape forms, which are as follows.
The Five Fundamental Shape Forms
The Pin This shape is straight, linear and dynamic: characters stand in a pin-like formation, to attention. This normally encompasses characters such as waiters, public speakers and politicians: people with an air of elegance, and even prestige tend to stand up straight. Interestingly, my peers noted that I often stand and walk in this position, with little arm swing movement.
The Screw Characters demonstrating a screw shape are folding in on themselves, evidencing a sense of confusion or need for protection. The line of action would be twisted, and ‘women tend to adopt a screw-like’ movement.
The Wall Just as the name implies, characters with this shape take up space on both the x and y axis - presenting a confident, intimidating character. This can be in protection of another character, but often used to demonstrate one’s readiness for a fight.
The Ball A rounded line of action, character with a ball shape stand with a natural curve. This is normally found in shy, anxious characters who don’t possess the same confidence as pin or even wall characters.
The Pyramid Characters in a traditional pyramid form tend to be those with powerful lines of action, ready for a fight and possessing a sense of visually pleasing balance.
These are ultimately the basics of still-shape forms, but make up the entirety of performance at a very simple level. With an understanding of these preliminary shapes, we can begin to explore silhouettes and even more complexities: what happens when the bottom half of the body is doing something else than the top? What does this show?
Adding complexities such as this takes away the exaggerated nature of a cartoon pose and grounds it more in reality: adding a human depth to the performance that moves past simple caricature. As humans, we don’t simply feel one singular emotion in the midst of a crisis: there are several other thoughts running around our head at the same time, and having the body parts communicate different ideas is one way to do this.
Laban Movement Having explored the shape forms of performance, we then moved onto Laban movement. Although we covered this in a previous unit, it was still extremely helpful to get a refresher on the main ideas of the concept.
Named after Rudolph Laban, a movement theorist and dancer, laban movement categorises human movement into four separate parts. This was primarily used for dancers and choreography to discover new ways to move but has since been used to help actors improve their performances. As it details the way characters can move, this is extremely helpful to consider as an animator too.
These four separate parts cover the direction, weight, speed, and flow of the body. Each of these parts has two elements; direction is either direct or indirect, weight is either heavy or light, speed is either quick or sustained and flow is either bound or free. A child is always running aimlessly, meaning this would be free, indirect and quick. Laban combined these elements together to create The Eight Efforts. For each effort, Laban identified which component parts were used. We can see a clear example of this in the table shown above, provided by The Drama Teacher Academy.
This understanding of the Eight Efforts allows us to explore a character in the body: to identify both physically and emotionally how to play characters who are different from ourselves. This helps actors (and animators) in understanding internal ideas and thoughts of the character that can then make clean, precise choices to convey a personality different from our own.
Stanislavsky's Questions Consider by many to be the ‘father of modern acting’, Constantin Stanislavski presents seven questions that, when answered, provide an essential foundation upon which we can build a character. Like the efforts before this, these principles were originally applied to acting and performance - however, they are extremely relevant and helpful to animators: as a way of exploring and developing our understanding and grasp on a specific character.
1. Who am I? The first question starts with the basics: establish who the character is: their name, age, appearance, beliefs and how other characters would describe them etc. We need to consider the character’s past and any significant events or people that have influenced them. This is a basic start, but marks a good foundation for character building.
2. Where am I? We have to consider the location our character finds themselves in. This creates the given circumstance, and results in a performance specific to that scenario. Consider how the character feels about the place they are in, are they in public or in private? The space our characters occupy can determine how they behave during a scene.
3. What time is it? In a performance, we should consider all of the relevant contextual information: the year, month and time of day should all be thought of. These factors can, and should, change the performance of a character’s action.
4. What do I want? All characters have a motivation. This is the reason they do everything in a scene, and all of their actions should be executed with the goal of getting what you want. This is the character’s objective, and the driving force of the narrative.
5. Why do I want it? Why does the character want this objective? There has to be a driving force behind the motivation, the justification for our actions. We all have reasons (no matter how little, non-sensical or selfish) for doing what we do, and characters are no different. If we give our characters a convincing reason to act, we also generate high stakes in the story.
6. How will I get what I want? How does the character achieve this goal? We should use our movements and gestures to demonstrate a consistent goal in our character: to accomplish the objective. This is often called a character’s tactic.
7. What must I overcome to get what I want? Without conflict, there is no story. In a narrative, there will always be something preventing our character from achieving their goal: someone or something in the outside world who is stopping them from their dreams. This could be a psychical character, or an internal conflict. It’s important to identify what this is in the scene, called a character’s obstacle.
Whilst these questions apply to long-form narrative character performance, I can also apply these questions to my work within the ‘mystery box’ project: who is my character, and where are they when they find the box? As mentioned already, these greatly influence the movement and performance of the character.
Finally, the last principle of performance analysis would be the character’s use of space within the scene. How the character uses their own ‘kinosphere’ (the space around them) suggests a great deal of information about their personality and what type of character they are. Characters with a far-reach use of space would be more confident, outgoing and extroverted: not paying attention to those around them, with exaggerated poses and extended, swinging limbs in something like a walk.
Characters with mid-reach space are more average, naturalistic individuals. This is the amount of space that the general public takes up: a neutral and standard movement. Finally, there is near-reach space which represents a more introverted, quiet anxious character afraid to open up those around them. Body language is more closed in, hunched and focus on keeping themselves to themselves.
Putting it all together With these principles, I have been introduced to a key set of ideas and concepts that give me the ability to analyse character performance and movement within an animated and live action context. Having discussed these concepts here as a form of further research into animated performance, my next move is to apply these ideas to an analysis of work by Charlie Chaplin: exploring a successful example of exaggerated mime character performance to convey ideas of personality and emotion to the audience.
0 notes