#i hope that helps HAHA
Explore tagged Tumblr posts
Visit Tumblr Blog
Explore Tumblr blogs with no restrictions, modern design and the best experience.
Last Seen Tumblr Blogs


Fun Fact
The Tumblr app for Google Glass was released on May 16, 2013.
Text

aight chill man no one is gonna take him from you fr
#my art#doodle#sketch#sonadow#shadonic#sonic the hedgehog#shadow the hedgehog#sonic x shadow#shadow x sonic#sonic and shadow#sonadow fanart#sonic#shadow#sth#sth fanart#sth fandom#kinda zesty??#uhh#suggestive#i hope that helps HAHA
4K notes
·
View notes
Text
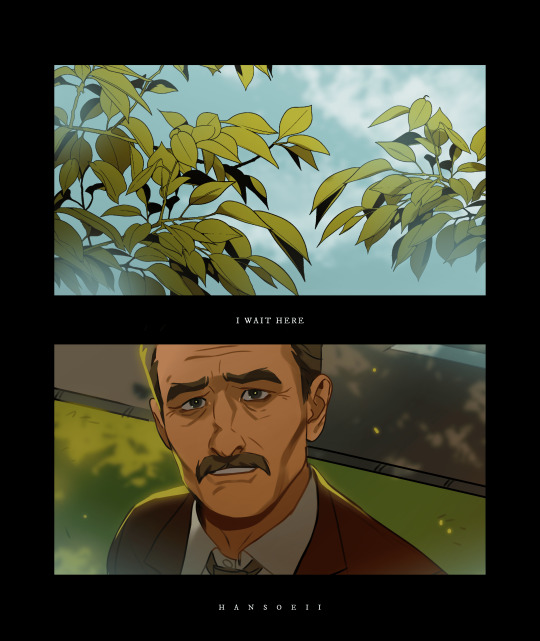
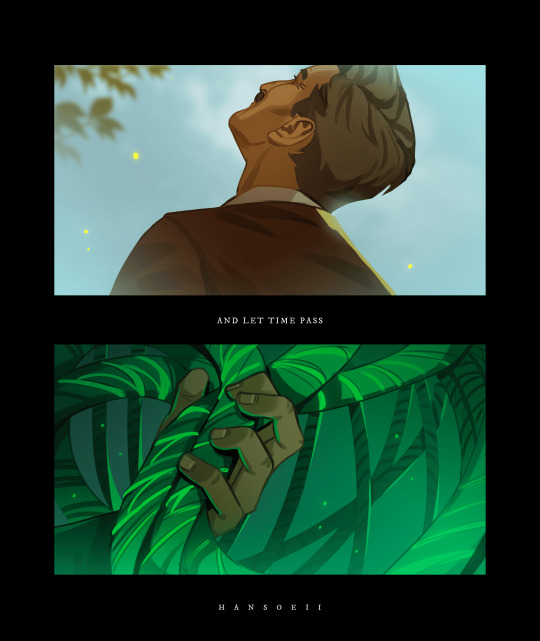
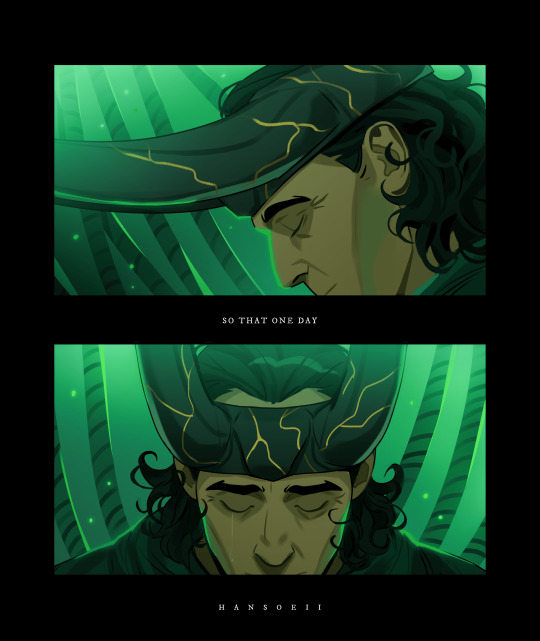

let time pass.
#and the tears come streaming down your face#when you lose something you can't replace#when you love someone but it goes to waste#could it be worse?#Light will guide you home and ignite your bones#and I will try to fix you#thank you tom hiddleston for making fix you the lokius anthem#I'm still in mourning over the loki finale and I had to make something to make myself feel a little better#I hope this can help you a little too#or make it worse#haha#wanted to try something new#loki#lokius#lokius fanart#loki fanart#loki and mobius#loki season 2#loki season 2 fanart#loki mobius#loki laufeyson#loki god of stories#mobius m. mobius#owen wilson#tom hiddleston#my art#fanart#digital art#lokius comic#loki comic
12K notes
·
View notes
Text
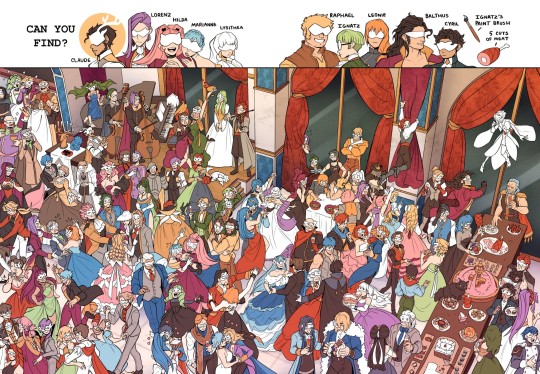
Here's a big old Fire Emblem Search & Find I did for the FE3H Masquerade Zine! Find the Golden Deer, but see if you can't find the rest of the students as well! For the ultimate challenge, see if you can't name every character! (Disclaimer two characters are NPCs with no names)
#double bonus can you identify the 2 or 3 fe3h characters that AREN'T in the scene?#i say 2 or 3 but i probably forgot more :( im using you people to check my work#fe3h#carrying over my posts from twitter choo chooooo#fireemblem#im not going to tag everyone but you're welcome too! good luck!!#instead let me tell you about the mini narratives i came up with while drawing this#soren is waiting for Ike to get back with food#seteth just noticed flayn dancing WITH A BOY from afar#rhea was supposed to sing but got superseded (she's okay with it actually)#monica and ferdinand are trying to start a dance off with edelgard and hubert (its not working)#Ashe stepped on Annette's toes and is freaking out. Lorenz is trying to give pointers but it's only sort of helping#balthus absolutely stole some of the betting pool money. i think i forgot to ink the coins falling out of his hands! dang#metody and shahid are going to become great friends and have a wirlwind romance before one betrays the other in a cutthroat fashion#Lysithea left a single cake slice on the table and Miklan is just happy to have gotten his before she showed up#ike and leopold had a flex off#Gilbert is stuck between young lovers this isn't a narrative i just think it's funny#oh and of course Sylvain managing to piss off Sera Charlotte and Maribelle while Felix ignored him and Ingrid looks on#that's supposed to be roy not eliwood btw i forgot to color his headband so it's basically eliwood#that's all i can think of rn but if you played#thank you!!! i hope you had fun#this was SO much fun to make thank you to the mods for facilitating me#haha this post has been up for 20 minutes and people are already pointing out so many characters I forgot. ur keeping me humble
741 notes
·
View notes
Text
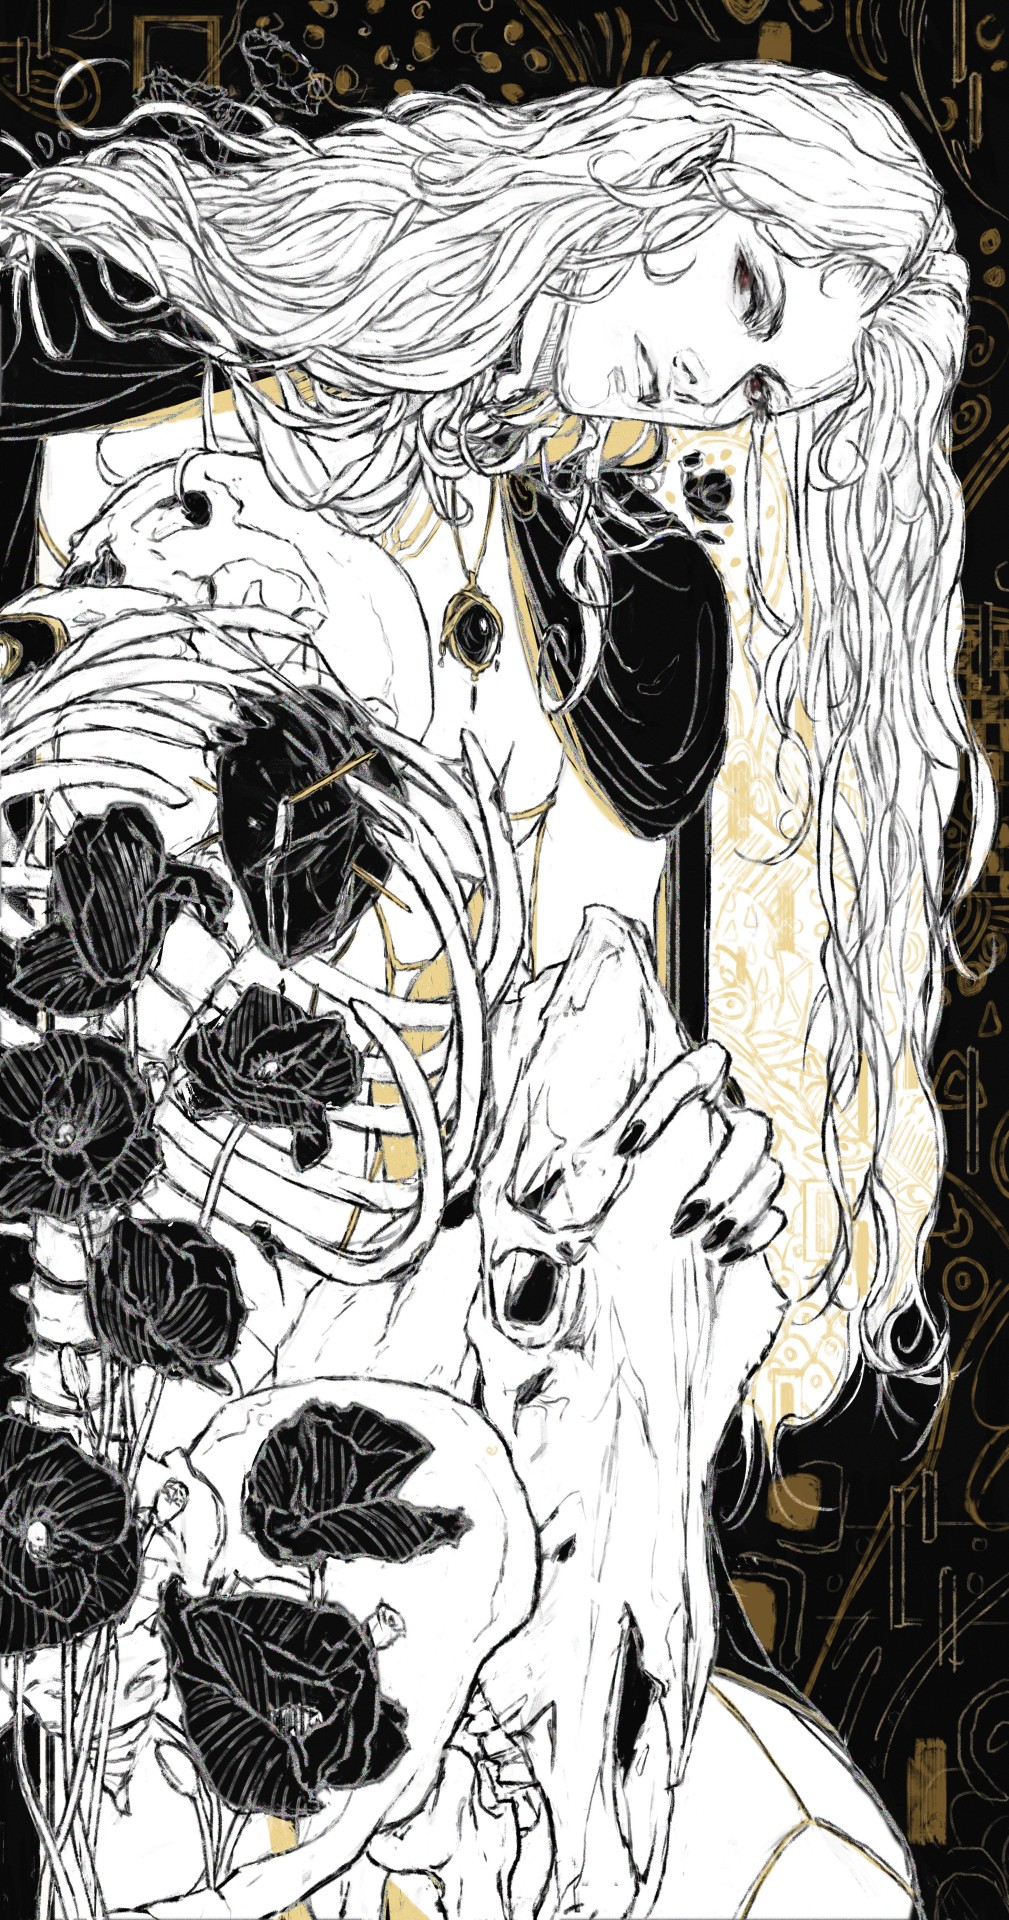
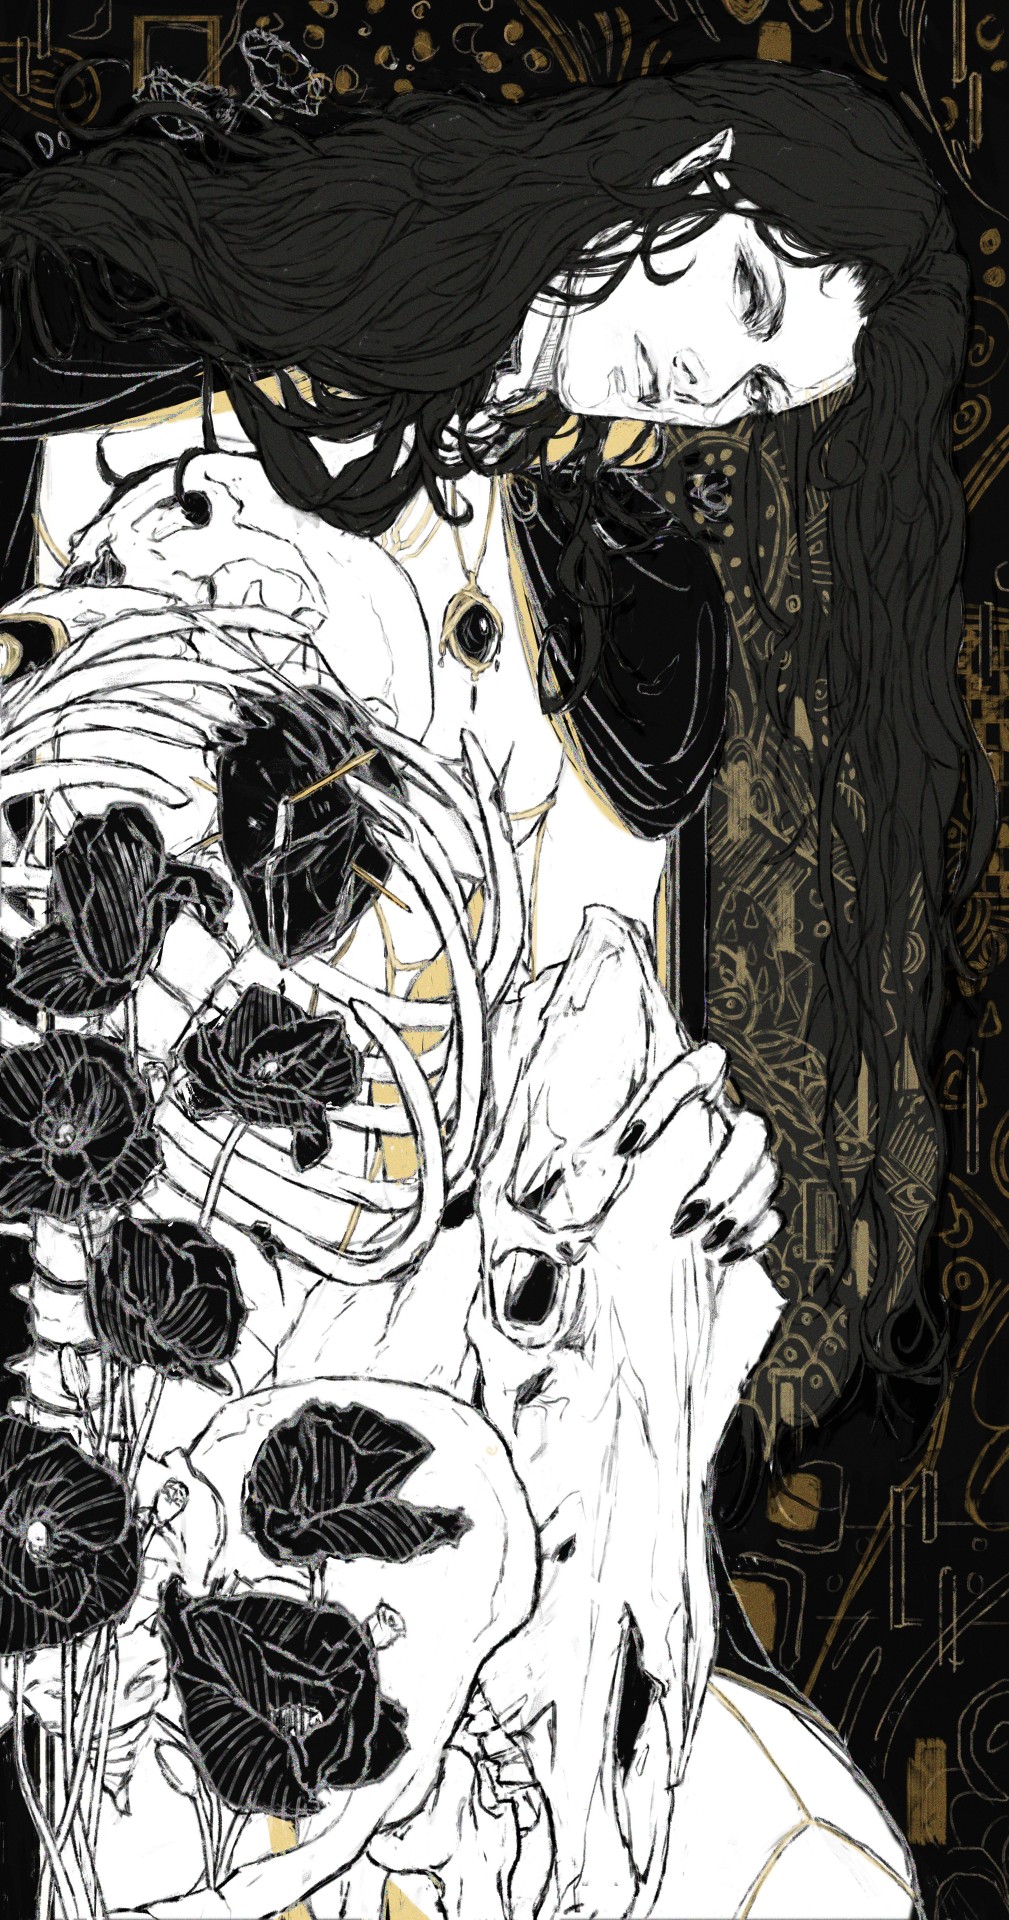
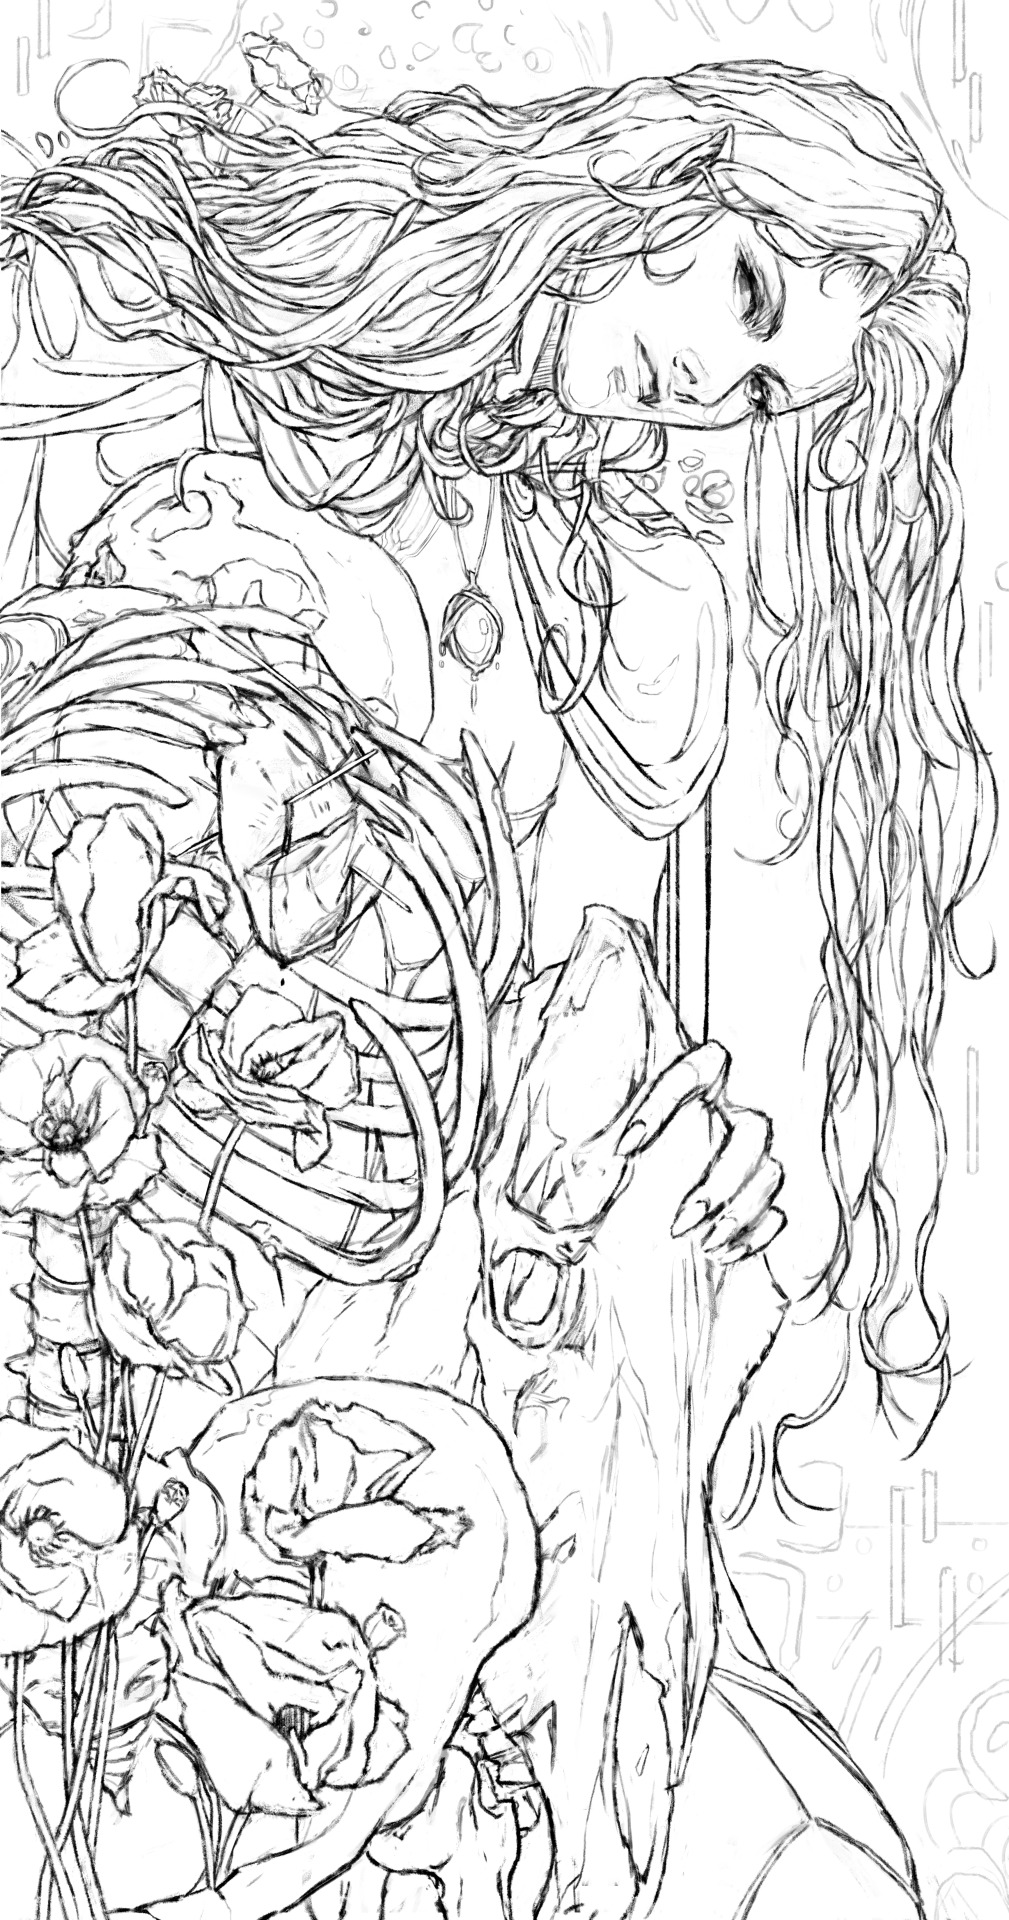
#vampire hunter d#vhd#art#D the horseman of death (〃‿〃♡)#Hello Hello I hope you're all doing well 🥹🥹#Sorry that I only draw D haha I can't help it (❀ •̀ᴗ•́ )♡#I started Tyrant Stars recently and I finished gold fiend about a week ago?#Honestly I miss the stories where D would stay in one town in the entire story and be a little detective#since pale fallen angel it's been a lot of traveling ....🥲#and it will never not be funny to me that D has pockets full of dirt 😭 D take a shower man.... or wash your clothes please💀#2 versions because as much as I like white hair D he looks like alucard here because of the gold accents ( •_•)#I've never actually watched or played any of his games idk it does interest me? but not enough to sit down and watch it yet#I wanted to experiment with a black out style ( I tried incorporating red but I got too annoyed.#I intend to render it at some point!#so it might end up looking completely different#well...If I get myself to complete this and I like how it looks in the end I think I might make a little bookmark out of it for myself (〃‿〃#I think it would be neat...#....you see me drawing poppies a lot forgive me 💀They're just my favorite flowers💀 The symbolism works out for this drawing....
543 notes
·
View notes
Text
Johnny stealing one of Simon’s balaclavas for Halloween - he’s sure Simon knows, but the Brit hasn’t come looking for him. Johnny has a good laugh, grabbing one of his black gym hoodies and a pair of jeans. it gets a good laugh out of you too, a little surprised when Johnny comes out of your room donning Ghost’s signature mask. he tries to walk a little slower than usual, poorly mimicking how Simon stalks around
Johnny who fakes a British accent, it doesn’t sound like Simon’s at all - Simon’s Mancunian accent, rough and deep, is probably turning in its grave at Johnny’s impression. you both giggle over it, cupping his masked cheeks and smiling up at him. he can’t help it, leaning down to kiss you through the balaclava, snorting when you laugh mid kiss. it’s silly, the way his eyes sparkle with mischief when you’re used to seeing Simon’s dark, cold gaze behind that mask

CW: something possessed me to write this, Johnny fucking you in Ghost’s mask, ambiguous relationship dynamic - up to your interpretation
“Think Simon could fuck you this good?”, panting against your neck as he ruts into you, Johnny can’t help but smirk behind the black fabric. he didn’t really know where the question came from, a possessive bite to his words as he snaps his hips forwards, “He wishes— he could be me.”. moaning when you squeeze around him, he can’t be bothered to tug the balaclava up, drool seeping into the fabric as you cry out beneath him, hiccuping as he pulls out
too much, his cock being bullied back into you with a harsh thrust, “Nah, m’better than ‘im, aren’t I?”, he huffs, tears glossing over his pretty blue eyes as he shifts to look down at you. “C’mon, say it, mo ghaol.”, pretty blue eyes, but as you look up at Johnny there’s something unmistakable looking back at you, the way Simon looks at you - a gut wrenching devotion that has your heart thrumming. “What’s wrong? Cannae answer me? Or do you jus’ want Simon to ruin you too?”
#HELP??#consider it a late Halloween fic? I hope you enjoy it haha#soap#john soap mactavish#john mactavish#soap cod#soap call of duty#soap headcanons#soap x you#soap x reader#john mactavish x you#john mactavish x reader#cod#cod thoughts#call of duty#cod smut#hit post
391 notes
·
View notes
Note
Hello! Many people have said this but ill say it too, I LOVE YOUR COMIC SO MUCH ( ´ ▽ ` ).。o♡
I really wanted to ask you about how you do the backgrounds? (Something i struggle with) whats the process? Like from start to finish, also, to do the rise backgrounds do you use reference from the show and generally real photo of ny? Or do you come up with them? And last question- The shadow and light on the background- Like HOW
i know it’s a lot of questions but i’m just so curious qwq and wanna learn to be better, thank you again in case you read this and respond, in case you don’t, i hope you have a nice day and a wonderful life uwu keep up the great work! (≧◡≦) ♡
Backgrounds are a really broad subject and I'm always a little overwhelmed when asked this question. Just like drawing the human body, backgrounds take time, repetition, and practice!
My answer got a bit long, so it's going under a read more :) but if you digest info better in video format I found this on youtube
youtube
It pretty much goes over everything I wanted to say, but in a much better way. I wish I had found it before writing all this out lol
ok, first of all, I'm not a teacher nor was I built to be one of those cool helpful art tutorial people who do a full coloured tutorial filled with illustrations. This is just going to be a messy "how I do backgrounds / environment layouts from start to finish." kinda thing.
... lets start with a sight tangent.
Sketch from Life!!!
If you want to get better at backgrounds I recommend doing some sketching out in the real world!
When I was first getting into doing backgrounds I went to cafes and parks to just sketch the buildings and objects. Sketch rocks, flowers, clumps of grass, garbage cans, bottles, tables, street signs, etc. If you are drawing a tree observe how the trunks twist, how the bark flows, or how the leaves are bunched.
If you can't leave the house the same still applies! Sketch the interiors of your house, the walls, or common objects like chairs and bookshelves. How are objects stacked? items on the floor?
If you aren't comfortable with drawing outside or in public you can take some photos to draw from! They are good for practice and you can use them again as references later. Alternatively you can find pictures online of buildings and objects to sketch as practice.
All spaces have objects in them, it becomes easier to draw those kinds of spaces when you already have spent time observing and sketching them.
ALSO! They don't have to be good sketches! It's just to build out your mental catalogue and strengthen your perception of perspective.
now the actual thing...
BACKGROUNDS
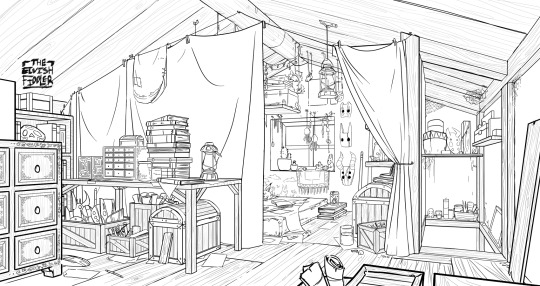
(the pictures used for this are my own. I dug them out of my 2022 folder)
Backgrounds have slightly different rules based on what you are making them for. Videogame Environment Concept Art vs Animation Layouts vs Comic Backgrounds vs Illustration backgrounds.
They all follow the same basics, which I will go over here, but the intention and function of those designs are going to be different. It's all about how you set up the scene and what it's purpose is!
Brainstorming and Thumbnailing
I like to think about a location as though it is a character. An abandoned old house with creaky sagging floorboards is very different from a futuristic space ship with sharp metal floor panels. A gas station has a very different feeling from a library.
I usually start by asking what is this location's story? Why was it built and for what purpose? What kinds of things does this room need to fulfill that purpose? You don’t need solid answers, but its good to be thinking about it while you are working.
Next, sketch some ideas for how this place is going to look. For me, this usually involves drawing the idea from multiple angles and then making lists & small sketches of the objects I think should be filling the space.
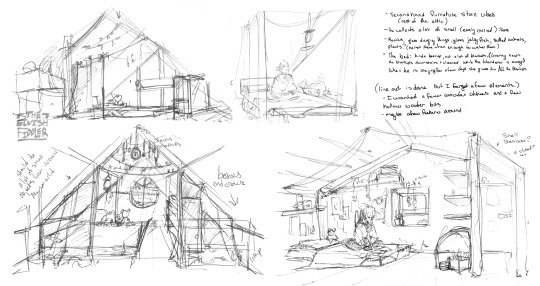
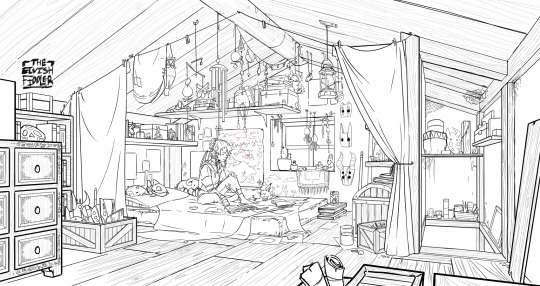
Example: The main character of my original work is a Wanderer. They collect a lot of things on their travels, but those items have to be small enough to be easily carried in a backpack. I wanted his room to be in the corner of an attic, walled off by curtains, and filled with trinkets. You can see some of my brainstorming above.
References
I only look for references after I've done some sketching and planning; this is to solidify my idea first so that I don't accidentally copy anyone else's work. I will make a moodboard with pictures of lighting, colours, items, rooms with specific ceiling beams, old chairs, etc. basically whatever I feel fits the vibe.
Honestly, I don't use references as much as I should. For ROTTMNT fanart I look at backgrounds and screenshots from the series to study the style. I also reference actual photos of NYC to get a feel for how Rise condenses the visual information.
In general, it's good to have references of real life objects/locations, because there are so many details like cracks in pavement, stickers on polls, crowning on buildings, fancy fencing, weird chair legs, etc. that you might not think of. It's the imperfect details that can make a location feel more alive.
Perspective
Once you have your chosen sketch we move to.... the infamous perspective boxes. Doing backgrounds is just learning to be comfortable drawing So Many boxes and carving items out of them.
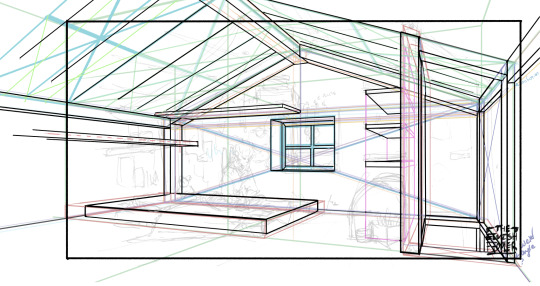
Many better artists than myself have made videos on perspective, vanishing points, and all the technical bits. Videos like THIS ONE and THIS ONE are helpful (this post is great too!!). There are probably a lot of classes to be found on Skillshare or Schoolism. I learned a lot of this in my college art course, so I can't give you a specific video which helped me.
You can get by and be a good artist without learning this stuff. There are quite a few successful artists who have admitted they never bothered to learn perspective (one of these people even made a whole graphic novel series).
I personally avoided properly learning this stuff until I was in my 20s because I thought it would be boring and difficult to do. tbh I really wish I had learned it earlier because it's so much fun to make those silly little boxes imo. It looks scary and complicated but, just like drawing humans, it just takes time, repetition, and practice to develop the knowledge and skills.
Cleanup
You have your boxes and lines! Cool! Now to make a scene out of it. Fill in the details, get everything placed were you want it! Generally, the lines of each item will point back towards the horizon line, but they can have different perspective points.
Generally you would want to clean it up and get your room completely sketched before doing the lineart. I tend to combine the steps (not recommended)
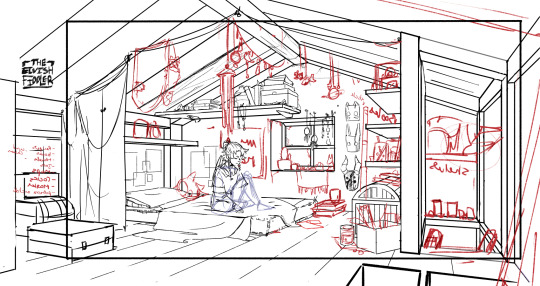
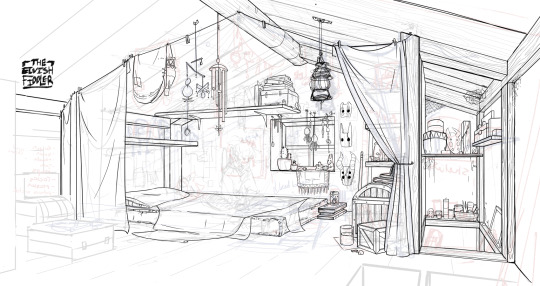
Lineart
I've mentioned how I do this before. Closer objects have thicker lines and more detailed inside. Further objects have thinner lines and less detail. I didn't quite achieve that balance with the image below, but it's close enough.
Colours and Shading will have to be a separate post. In the meantime, I highly recommend the book "Color and Light" by James Gurney. I used to borrow it from my local library and a good chunk of my knowledge was learned from it :)
#Artist's Comic Rambles#asks#art related asks#thank you for the ask!! I'm glad to hear you enjoy the comc :D#i hope this was somewhat helpful...#i get overwhelmed by broad questions very easily haha#if you would me to elaborate on something specific I mentioned feel free to ask#i wrote this all out weeks ago and then forgot about it... I just added a link or two but yeah here it is
307 notes
·
View notes
Text
the mourn watch background gives you such a GIFT in having other characters notice and call out on-screen that rook code switches like a motherfucker. the whiplash of hearing my snarky 'heeey I'm just a little guy! :>' funnyman rook speak the heightened ritualized phrases of the mourn watch with perfect seriousness and gravity completely naturally and/or break into an academic tone that can keep up with emmrich at the drop of a hat never stops giving me such endless delight. truly their real mind is a riddle wrapped in a mystery inside some hideous mourn watch casual wear
#that last one was just for comedic purposes rye would NEVER wear the mourn watch casual wear willingly#he hated the new livery so much he hoarded every pair of the older watcher robes he could hunt down so they'd tide him over#in the hopes that the next uniform design would be less awful. he is a fancyboy at heart. he should be wearing so many earrings#dragon age#dragon age: the veilguard#dragon age: the veilguard spoilers#dragon age spoilers#oc: Ellaryen Ingellvar#A Watcher's work is never done#rye's whole deal is half built on the feeling of 'we've had a lot of fun here today folks. but at the end of the day I have given my oath#and I mean to fulfil it. so either help me do that or get out of my fucking way' that sort of naturally rises out of this contrast#and everyone who has for a moment doubted his complete seriousness and sincerity about it so far has ended up much deeper#than six feet under by the end of it all haha#I've found I've actually been able to build a really good sense of character here (with some reloading to see different options#to be sure lol I am a control freak) -- mixing in a stoic response in certain situations for example can inform so much with so little#and the contrast works out to be so much greater.#just this sense of a layer of levity and awkwardness on top of an immense and unflinching seriousness#that sometimes shines through. it's uh. it's been really good for me
283 notes
·
View notes
Text
based on prev tumblr post, flustered robotnik and annoyed stone
Enjoy! <3


BONUS>>>

They made up 😚😚
#sorry haven’t been posting lately#schoolwork is haunting me literally i have 4 assignments due in the next 5 days pls send help#hope yall enjoy this though#stobotnik’s round head keeps making me laugh#hope it isn’t ooc too haha..#stobotnik#ivo robotnik#sonic the hedgehog 3#agent stone#have a good day people#my art
162 notes
·
View notes
Text
There are more things in the Parable than Stanley knows about. [Blank Scripts AU]
#hoh boy i was going to make a comic to introduce these monsters but#i couldnt help myself and made an animation instead#because i just think they're so neat and cool okay#listen i cant for the life of me just infofump about my AU and OCs#because i just think that making actual content about my lore and stuff will not only raise the chances of people being interested#but also it will also raise my motivation to actually produce more content other than the same old recycled front-facing-profile drawings#i need to get creative with my stuff or I'll also loose interest and I DONT want that#in order to be happy with what i have i cant just think about it and expect to be given something new NOOOO i need to MAKE it ughh#i cant believe in order to get more content out of my own au i would need to draw it and feed myself ugh ugh ugh unbelievable (kidding)#but also#i wanna make a little music video or animation again for youtube#its been a hot while since ive uploaded anything in there at all#maybe an animation reel will do for now?#i hope so :(#because ive been working on expanding the Black Scripts AU#and honestly i dont regret it#i had a lot of fun making up scenarios and comics for Stanley and the Narrator (Black)#but yeah!#apart from this little video#you wont be getting an explanation on what these things are supposed to be#and why theyre there#actually i was originally gonna make this into a full fledge animation with sound effect/music/frame-by-frame movement/etc.#but i got lazy HAHA#tsp blank scripts au#tsp au#the stanley parable#the stanley parable ultra deluxe#tsp
822 notes
·
View notes
Note
I love this game so much!! as a Jamie girlie I kind of feel bad for liking him, cause I feel like I'm just feeding in the narrative and being one of the rest by that saying of the "Campus boyfriend". It worries me that he thinks we aren't any different from everyone and get disappointed/uncomfortable D: so, am I crazy or just overreacting?? overall this game is amazing, keep up the awesome work <3
The Jamie likers who are vocal about this situation have my heart honestly
Like ahh yes— what a conundrum it is!
So what *are* you gonna do about it in the game hmm?
#keyframes asks#I genuinely hope more people have this kind of reaction when it comes to all three of our LIs#like I know some of yall are worried— but to me it reads a genuine respect for the character#can’t help how they are written and can’t help how you like them either#but you still wish the best for them anyway even if it might not mean it has you in it#haha I could be misinterpreting this myself but thank you for having a genuine interest in him and his comfort
143 notes
·
View notes
Text
Risetober day twelve: Flowers
I somehow was able to do this in five hours. I’m not sure why I chose to make an entire animation instead of a drawing but here we are
#Help I’m so tired#I nearly died making this#Anyway hope you enjoy haha#risetober2024#risetober#bright animates#rottmnt#rottmnt animation#rise of the tmnt#tmnt#rise mikey#rise raph#their all good don’t worry#risetober 2024#rise movie#rottmnt movie
220 notes
·
View notes
Text


Friendly reminder that your art makes someone happy, even if it’s just for yourself.
It is ok to make “messy” art, what matters is you got to have fun creating something and that in itself is wonderful!
#I’m not the best with words but wanted to try and portray this#sometimes I feel like I can’t draw because I hold my art to a certain standard#and i feel like if I don’t have the time to illustrate it to that standard then what’s the point in drawing it#it is important to want to improve and make art that your proud of but it is also important to just draw to make you happy#hope I’m wording this right haha#a lot of this is self reflection but I hope this helps anyone else that feels like they can only make and post (clean) art#this is a fantastic community and I wish all artists a very spectacular day/night!#crunch art#sb daycare attendant#sb sundrop#sb sun#sb moondrop#sb moon#sb eclipse#dca community#dca fandom#dca fanart
1K notes
·
View notes
Note
Hullo! I’ve been watching a bunch of your Timelapses and I was wondering how do you always come up with the colours for your pieces? They’re always so cohesive and pleasing to look at (I almost exclusively work in greyscale so if I’m using colour it’s always a lucky guess and it never looks quite right)
Hey there!
I have to be honest that most of the time I don't actually know what I'm doing and that I have no idea how most of my pieces are gonna turn out. My work process is usually based on "Fuck around and find out", haha. I'm happy to know that it apparently doesn't come across that way, though.
A lot of it comes very naturally to me simply because I've been drawing non-stop for so long, but I can give you some small tips that really help me:
1. Have as many references as possible!
Here's what my reference sheet looked like for the Jayvik piece:

It helped me a lot to understand the overall color scheme I wanted to convey. Lots of very cold tones, pinks and very light blues and greens. These colours sorround Jayce and Viktor throughout all of season 2 and I wanted to keep them, especially since in my piece they are lying in the glowing hexcore.
Don't shy away from using references, get as many as you possibly can! Look at other poeple's art too and try to understand how they work with colours.
2. Work with complementary colours!
Since I paint a lot of romantic illustrations I want them to look pleasing and comforting, which I can accomplish by using complementary colours! You see this a lot with couples that are blue and red coded, for example. And I wanted to do the same thing in the Jayvik piece! For that I used the highlights in their hair!


Viktor's highlights are a soft pink hue.


While Jayce's are a soft blue hue.
The colour wheel works perfect for figuring out if two colors compliment each other because they are literally right across from one another!
3. It doesn't have to be true to life.
Pretty self-explanatory, but I thought I'd add it in here anyways. It's important to understand how colour and light works, but you don't always have to follow the rules. Does the rim light look cool but it makes zero sense? Who cares! Keep the cool rim light! Just have fun and fuck around.
4. A little trick to make your life easier!
I'm not excatly the best at colour theory, I still struggle with it quite a bit, but here's a little trick I like to use from time to time:
If you want all your colours to look coherent, take one specific color as your flat colour. Choose a hue that you would like your piece to have. Like this:

Now you choose whatever colours your characters have and paint them in. For example, here are the skin colours I chose for Jayce and Viktor:

Looks off, right? These colours don't fit the overall piece at all. So what do we do?
Turn down the opacity! It's that easy, wahoo!

I went from 100 Opacity to 72 for this specific illustration. And look at that!

It's so much nicer already! Now you know what colours to use as your actual flats! Just repeat this with every other part of your illustration and you'll have a great starting point. :)
I really hope this was helpful! I'm not an actual teacher and I don't have a proper illustration degree, so some things might not be completely accurate, but I thought I'd try my hand at this anyways!
#teacher han is at it again#if I talked bullshit forgive me#I just hope I was able to help at least a little bit haha#I'm always happy to give some tips!#art process#art tutorial#color tutorial#colouring#illustration#tips#my art#arcane#jayvik#tutorial#anon#ask
752 notes
·
View notes
Text
LOUIS record: 04/09/1973 [...] [...] [...] XX.XX.198? - Water Tower Place, Chicago (ORD)
O Favorito do Demônio (03/20)
#thanks for your feedback#i'll try to include text in a separate image from now on -- and maybe later - once finished - in english --#AS im experimenting with styles i'll have to redo pg 01 and 02 -- haha i'm in trouble --- send help#btw this is not the full HQ-- it's just a visual aid for the chapter#cool thing: the amulet is based on indian lantern -- maybe i'll post the full design sheet for this one bc i put so much reference#hope you like the amulet#next page coming soon#o favorito do demonio#armandaniel#hazeilus#portuguese#yes#amandiel#armand x daniel#hq: this is a visual aid for the chapter#iwtv season 2#amc iwtv#interview with the vampire#brazilian artist#digital drawing#fanart#vampire armand#gay vampires#love boys#young daniel molloy#daniel molloy fanart#armandiel fanart#armandaniel fanart#the devils minion#iwtv season 2 fanart
148 notes
·
View notes
Note
okay first of all im gonna fangirl rn bc the way you draw the marauders is literally my favorite and your art style is so beautiful it makes me squeal. your remus might make me straight.. your art is so creative and whenever i see it on my pinterest feed i go crazy 🩷 your art is just so KAJSJDJDJEJ
second of all, i really love how you depict and draw dorcas!! do you have any tips or tricks on drawing braids to share ? :)
that’s all, i hope you have a great day or night!!
Thank you so much! You’re very sweet🤍
So this is kind of how i draw braids, or at least the structure of them:

Of course it’s important to keep in mind the angle that you are drawing them. But by moving the middle guide line you should be able to draw the braids from different angles.
I also recommend just looking at braided hairstyles. Pay attention to how they are divided on the scalp and keep gravity in mind!
#i hope that helps a bit haha#art tips#ask box#also i’m so sorry for my terrible handwriting omg haha
98 notes
·
View notes
Text
No matter how special it is, a kid's lunch is still just a kid's lunch.
I dunno, I liked "The Genius Restaurant" (Episode 1,089).
Happy (belated) birthday, Jimjam.
[Song link] [YouTube link]
#detective conan#case closed#amv#my amvs#video#eye strain#conan edogawa#shinichi kudo#song is#nosedive#by#flor#ahahahaha i thought this would just be a chill edit and was like#'i did my last vid in 30 hours so i can do this one in less because it's shorter right? and because i'm mostly using one ep?'#wrong lol this took about 40-ish hours? nooooo idea how i did 'if you kill me' in 30...#aside from the audio i think that's a more complicated edit too ^^;#way late for jimjam's bday but i guess it's not *that* birthday related anyway... but it was my first thought for a bday edit haha#been meaning to do an amv for the ep for a while! special thanks to marivanilla05 for inspiring me to watch it with their great art#i'm so behind that i don't watch new eps much but i'm glad i skipped ahead and watched this one#special thanks to astravis for helping me with the beginning and to hex for the liveblog too!#i know it was a long time ago but that liveblog definitely inspired some choices here#that said i'm glad i waited because i think i'm a much better editor than i was last july (well hope so anyway!)#and this song only released a couple of weeks ago!#had tons of trouble picking a song (usually my amvs are song first but this was idea first) but i think i really like how this one fits#sources are mostly#episode 1089#but also episodes 1 14 52 and 192 and tv special 6 (episode one: the great detective turned small) and movies 13 and 16 and ova 9
267 notes
·
View notes