#how to apply makeup for beginners
Text
one reason why makeup never came naturally to me is bc instructions are always so unclear
#‘apply to your face :)’ girl how.#also tutorials are NOT beginner friendly at all#like yt tutorials in 2016 were pretty much advertisement for inaccessible products#if u don’t know anything abt makeup brushes and application processes sorry ur on ur own !!#it was such a struggle learning how to do basic makeup at seventeen especially as someone whose mom never taught them#anyways.txt
13 notes
·
View notes
Text
youtube
Ways To Use Highlighter In Your Makeup Routine | Beauty Basics | HT Lifestyle
Did you know that your makeup is just incomplete if you are not using a highlighter? Yes, Highlighter instantly lifts up our face, enhances the key areas, and gives a beautiful shine. Today we are going to show you some different ways in which a highlighter can be used.
#highlighter makeup#highlighter#how to apply highlighter#makeup#how to use highlighter#highlighter makeup tutorial#makeup tutorial#highlight makeup#how to use highlighter makeup#highlighter makeup tips#makeup revolution highlighter#highlighter eye makeup#highlighter tutorial makeup#how to use a liquid highlighter makeup#highlighter makeup challenge#liquid highlighter makeup tutorial#highlight makeup tutorial#makeup for beginners#ht lifestyle#beauty basics#Youtube
0 notes
Text

skincare practices
skincare refers to the practice of maintaining and improving the health and appearance of your skin. this post is a guide on where to start!
having a routine (starting with simple practices)
cleanser: begin and end your day by washing your face with a gentle, sulphate-free cleanser. even if your skin feels clean, this step removes any impurities.
moisturizer: apply a fragrance-free moisturizer twice a day. hydration is crucial for maintaining a healthy skin barrier.
sunscreen: protect your skin from uv damage by using a mineral- or chemical-based sunscreen with at least spf 30. apply it in the morning.
skin types
there are 5 primary skin types, each with unique characteristics and needs.
normal skin is balanced and not too oily or dry. it's like the goldilocks of skin types! maintain it with a gentle routine. if your skin is generally normal, opt for a lotion. as you age, consider switching to a cream-based moisturizer for added hydration.
dry skin lacks hydration, feels tight, and may have flakiness. opt for richer moisturizers with ingredients like hyaluronic acid and ceramides. for dry skin, skip lotions and go for creams or ointments. these provide more moisture and help preserve water in the skin.
oily skin produces excess oil, especially in the t-zone (forehead, nose, and chin). use lightweight, oil-free products and consider salicylic acid for acne-prone areas. if you’re prone to oiliness, choose a light gel-based moisturizer to avoid clogging pores.
combination skin is a mix of oily and dry areas. focus on balancing - light moisturizers for oily zones and richer ones for dry areas. treat your face as two zones. moisturize the dry areas and skip the oily ones. remember to look for spf 30 or higher for sun protection!
sensitive skin is prone to redness, irritation, and reaction. choose fragrance-free, hypoallergenic products and patch-test any new products.
common skincare mistakes
skipping sunscreen. sunscreen is non-negotiable! protect your skin from uv damage by using spf 30 or higher daily. if you live in a sunny environment, make sure to reapply before you go outside!
not cleansing before bed: properly cleanse your face before sleeping. it removes dirt, makeup, excess oil, and pollution remnants, preventing breakouts and maintaining healthy skin.
sleeping with makeup on. gross! no! remove your makeup before you go to bed to prevent clogged pores and skin irritation.
using too many products. overloading with products can overwhelm your skin, so learn how to simplify your routine. additionally, using products that are not right for your skin may have negative effects - creating more issues instead of solving them.
overusing acne products. be gentle with acne treatments. overuse can lead to dryness and irritation.
using harsh products. avoid aggressive ingredients that strip your skin. opt for gentle formulations.
remember - healthy skin starts with mindful habits.
further reading
understanding skin - skin types and conditions | eucerin
what are skin types? | verywellhealth
↑
this link has a 'determining your skin type' section
how to pick the right moisturizer for your skin | american academy of dermatology association
combination skin care (youtube video) | dr. aanchal md
how to build a skincare routine for beginners | arizona dermatology
skin care: 5 tups for healthy skin | mayo clinic
end notes
thank you for reading! i get a lot of skincare practice asks, so i figured it was about time i had a good response.
as always - if you're troubled by your skin take yourself to see a professional. they are specially trained to help you with your problems. this post will only be able to share with you what i have researched. definitely have a look into some of the 'further reading' links - it's so important to learn about (and determine your skin type).
if you'd like to have a look at more of my skincare posts, check out 'how to reduce acne - and what is acne?' and 'how to properly wash your face'. feel free to send any questions to my ask box!
❤️nene
#nenelonomh#that girl#becoming that girl#student#productivity#student life#chaotic academia#academia#study blog#health#healthcare#health and wellness#healthy life#healthy lifestyle#wellness and health#mental health#healthylifestyle#wellness#prevention#skincare#glowingskin#skincare routine#skin treatment#it girl#it girl aesthetic#it girl energy#dream girl#pretty girl#clean girl#hot girl walk
53 notes
·
View notes
Note
hey, how'd you learn how to do your makeup? i'm kind of a novice over here
Hey!! So I learned via a lot of methods - tips from friends, videos, googling. It's hard for me to remember a lot of my sources over the years. That being said, I'm going to try to link the ones I know help the most.
The Pretty Fix - this channel hasn't updated in a while but has a lot of tutorials designed to be trans-inclusive and beginner friendly. It's a great resource for just starting out and for understanding a lot of basic techniques and things to keep in mind without it being overwhelming or throwing too many product types at you.
How to Apply Eyeshadow PERFECTLY (beginner friendly hacks) by AlexandrasGirlyTalk - This video is short and simple and yet probably the most effective one I've seen when it comes to breaking down eyeshadow. I still haven't fully 100% mastered doing eyeshadow, but I feel a lot more confident with it after watching this a few times.
Dude, eyeliner changes your whole face by Alexandra Anele - Another good technique and theory video that helps a lot when trying to figure out eyeliner, which IMO is the hardest part of trying to do eye make up and something I'm only starting to feel good with as of this year
NEW Updated 2021 E-Girl Makeup Tutorial! by hannah owo - This one might seem silly at first glance because, y'know, E-girl, but honestly this is one of the most helpful makeup tutorials I've found and has drastically affected how I've done my makeup. What makes this one so good and helpful IMO is that unlike a lot of other makeup tutorials you can find, this one uses a lot of drugstore and bargain brands (at one point it recommends using a Crayola marker to create freckles) and shows the ways one can make a super elaborate look using a surprisingly small amount of products.
FACE BASICS: Hide Facial Hair (using Makeup!) Part 2: Makeup by David K Davey - I don't really do a lot of this anymore (I used to go way overboard on covering that area early in transition lol) but for those worried about beard shadow or discoloration in that area, this helps teach how to be cover that up and the colour theory behind it. Mastering this can be a godsend.
Those are the main links I can think of right now! For someone still getting in, my best advice is to get the basic tools you'll need - primer, concealer, foundation, eyeliner, mascara, blush - as well as a sponge or brush kit and play around with them, using tutorials and googling every time you think you come into an issue. Then you can start looking at more advanced things like contours and eye shadows, and the good thing about eye shadows is that most palettes have a bunch of videos online of people doing various looks and tutorials with them, meaning if you find yourself stuck, you're almost always guaranteed to find something you can use as a reference.
Makeup is hard and I still don't feel like I have a perfect understanding of it, but it can be quite fun once you find a set up you like and start getting comfortable enough to experiment with new looks and products! I hope this could help at all and I wish you the best of luck going forward!
972 notes
·
View notes
Note
Ok from a transfemme to a trans woman - how do you makeup? I've been wanting to get into it for so long but the first time I tried was an absolute disaster, and I can't find any tutorials that go through the absolute beginner basics
tbh, you have to just keep on doing it even though it’s a complete disaster. i started my transition in 2020 but i was doing makeup and “cross dressing” for nearly 8 years before i considered myself to be trans. and it was years before i was able to do makeup to the point where i felt good about the way that i looked every time i did it.
that being said, there’s no guide that’s gonna be able to tell you everything you need to know but i’ll try to give as many tips and jumping points i can in order for you to try out things and figure out what to look up.
- make up is different for everyone - everyone has a different face shape, eye shape, cheekbones, jawline, complexion, etc. and the way to do makeup that looks good for you specifically is going to vary a shit ton based on those things. when you look up stuff, look up how to do makeup for a certain set of features. figure out what face shape you have, skin types for foundation, etc.
- there’s no one right way to do it - i do a bunch of things that are “technically incorrect” because i’ve tried it the “right” way and it just didn’t work for me. so i figured out something that i liked instead and make that a technique i used regularly. also even though people will say you’re supposed to do certain things, a different technique might yield a different result. as an example, conventional wisdom will say use primer, foundation, then a translucent or setting powder, then a setting spray. recently a very popular technique has been using moisturizer, then setting powder, then setting spray, THEN putting on all your other makeup and supposedly it lasts longer. there’s literally no “correct” way, it’s just whatever works.
- blend the shit out of everything. this is the one technique which pretty much applies for everyone. blend blend blend blend. i like using a beauty sponge. run it under the tap for a second (literally a second, you want it moist not wet) to wet the sponge and then use dabbing motions to blend your makeup.
- asking for help at makeup stores helps A LOT. i’ve had really really good experiences asking for help at makeup stores even though i was super uncomfortable with the idea at first. i found that a lot of people were judgement free and even very gender affirming even when i was presenting masc. and i live in the south!
okay now to more granular stuff - here’s the basics of what i would consider to go into a “full face” makeup routine - primer, foundation, concealer, highlight/contour, setting. eye makeup would add additional things - eyeliner, mascara/lashes, eyeshadow. lips add additional things as well - lipstick, lipliner. ill try to go through the entire process and add my fav products or two. (i should probably make this into a video series tbh)
1) primer - it protects your skin and makes your makeup stay longer and look better. use it.
- my fav: the ordinary - high fluidity primer
2) color correcting concealer - an optional step for transfemmes like me with darker colored facial hair. using a reddish or orangish color correcting concealer or lipstick over the areas where your facial hair shows through the skin will neutralize the shadow that shows through foundation. add a little bit, sparingly, blend with a sponge.
- my fav: la girl color correcting concealer orange
(the best one of these is made by dragun beauty who is a trans woman…but who did blackface…so don’t buy her shit)
3) foundation - figuring out your color is hard. look up a guide, ask in store, try a bunch of different ones. there’s a difference in coverages. full coverage means its made to cover everything. buildable means you need to apply and blend a few times and is good for if you don’t want heavy coverage everywhere. don’t use too much otherwise you’ll look like a plastic doll. unless you want to look like that then go nuts. blend the shit out of it so that it doesn’t cake up.
- my fav: juvias place bc it’s full coverage and actually has my skin tone as an asian person
4) concealer - this is different from color corrector and i usually do this after foundation. this is just a touch up for any blemishes, dark spots under eyes, pimples, shit like that. just use a tiny tiny dab and blend. this is also hard to get your color right so get help if you can.
- my fav: colourpop concealer, or nars concealer if you’re a fancy bitch
5) blush - i don’t really use blush much but blush is one of those things where you should look up a guide for how your face is shaped. positioning blush in different ways will help shape your face in different ways.
6) contouring - okay this is the hard one. i can’t tell you how to contour your face because this is one that varies a shit ton from person to person. the basic gist of it tho is that you are using a contouring stick, bronzer, or palette to add shadows to your face. when you put on foundation it makes everything an even color and makes you look flat, so contouring is basically drawing those shadows back in to contour your face. you can do this in so many ways even for your own face so imo, you experiment and see how you like it. typical places for contour to go will be under my cheekbones, on my nose bridge, sometimes under my jaw to slim the face.
- my fav: i can’t remember i’ll come back to this one
also i drew this diagram a long time ago to help myself get the idea of where i wanted to put it on my own face and i went from there. the brown was contour and the other color was highlight. i don’t do it like this at all anymore but it helped to get the basic idea at first.
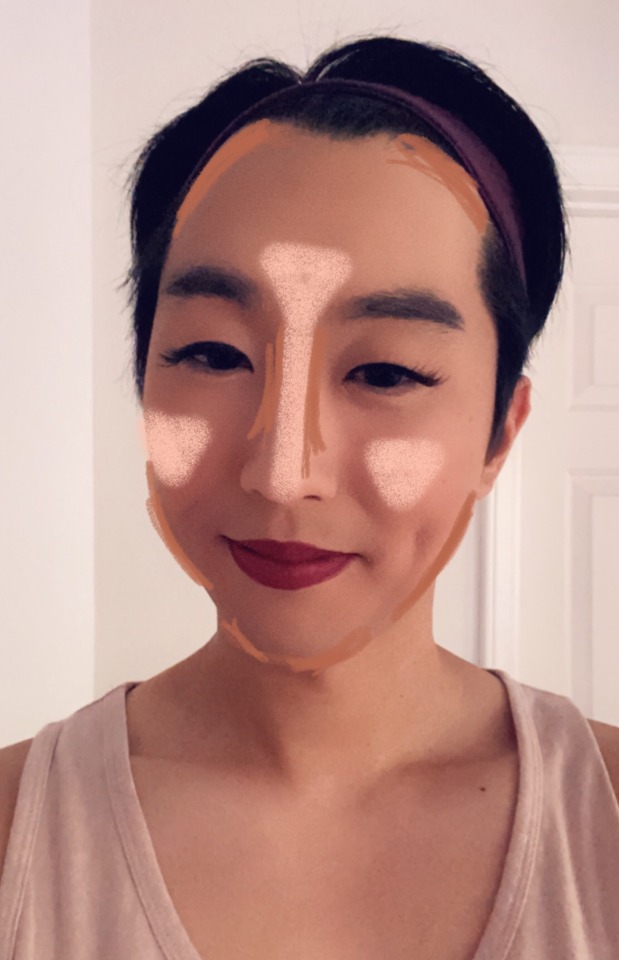
7) highlight - the opposite of contour where you’re making certain parts of your face brighter to contrast the darker parts. typically goes on your cheekbones and nose.
- my fav: watts up by benefit
8) translucent powder/setting powder - okay so this one can either go after foundation, before blush, contour, highlighter, or here. basically it’s a powder that goes evenly over your whole face to help your makeup stay where it is. personally i usually do it after foundation instead of here but either works. basically you take a powder brush (the big floofy ones) and then put it all over lightly.
- my fav: nyx hd finishing powder
9) setting spray - it’s a spray that you put on last to help your makeup stay where it is. shake up the bottle real good and just mist it all over.
- my fav: tarte shape tape stay spray
okay i’m tired now and that’s plenty for now. i’ll update with lip and eye stuff later.
338 notes
·
View notes
Text

How To Have The Smoothest Makeup Base
Are you a beginner at makeup? Are the different brands and products stressing you out? Don't worry, I totally get it. That's why I'm here to help you!
First, let me explain what a "makeup base" is. The base makeup is the layer that comes first to cover skin imperfections and leave a smooth surface for other products. Your makeup base can include but is not limited to foundation, concealer, liquid blush, and setting powder. After finishing your base makeup, you can start on other things like your eye makeup.
When starting your face makeup, you should always ensure your face is properly prepped. To prep my face, I always start by cleansing it. Makeup looks best on a clean face. Then, I do my skincare.
Here is a list of everything I use:
Toner
Niacinamide Serum
Moisturizer
Sunscreen (SPF)
It is super important to wear SPF on your face during the day as well as under your makeup. According to Kim, Min Ah, "Layering sunscreen with makeup may compensate for insufficient sunscreen application in real‐life conditions by providing an additional source of UV protection and improving the homogeneity of coverage" (126). Sunscreen should be essential to your skin prep routine before you start your makeup.
Once your face is prepped, it's time to prime. "Primer—which goes on after your moisturizer and before foundation—it's worth the extra step for a perfect makeup application" (Fields, 126).
Primer is a makeup product that aids in helping your makeup stay on your face all day. Things like weather, skin type, and more can play a factor in whether your makeup stays fresh all day, but primer helps with that no matter the factor.
Primer can be either water-based or silicone-based. Whichever you choose to use is based on your skin type and foundation type. Water-based primer works for most skin types from sensitive to oily skin. Meanwhile, silicone-based primer is best for oily skin only. That doesn't mean other skin types can't use silicone-based primers though.
Primer should be applied on all areas of your face where makeup will go.
You can start applying your makeup after your face is prepped and primed!
Personally, I don't wear foundation for my base makeup, I use concealer only, but the same rules apply for both concealer and foundation.
Like primer, concealer and foundation can be either water-based or silicone-based. Water-based works for pretty much every skin type whilst silicone-based works best for oily skin. Keeping this in mind, the bases of your primer and foundation/ concealer should match. Silicone-based primer with silicone-based foundation or concealer, and water-based primer with water-based foundation or concealer.
The exception to this rule is: water-based primer and silicone-based foundation or concealer can work well together but not vice versa.
I have oily skin, but I use a water-based primer. I have found that water-based concealers and foundations don't mix well with my skin, so I use silicone-based concealer, and the primer and concealer mix well without any issues.
So to start, I apply a concealer that is about the same color as my skin all over my face (forehead, cheeks, nose, chin). The same can be done for foundation as well. After, I blend all the concealer (or foundation) out with a foundation brush. Once that's done, I apply a lighter color concealer on areas I want to be brighter (under eyes, eyelids, between my eyebrows, next to my nostrils, and chin). Then, I blend that concealer out with a beauty sponge. Next, I do liquid blush but not everyone does it, it's based on preference. I feel that applying liquid blush before applying powder makes your blush stand out more. If you do want to apply liquid blush, I apply mine on the apples on my cheeks and blend it out with a brush.
For your liquid products, I recommend the brand Elf. It is a very affordable makeup line and all the liquid products I use (concealer and blush) are from Elf.
Now, we can move on to powder. Setting powder is what locks in your liquid products and keeps them in place. There are two types of setting powder: pressed powder and loose powder. The names are kind of self-explanatory but here is what they look like.
They are basically the same, but the difference between them is in their name. Pressed powder is packed tightly into a container while loose powder is not.
I use both pressed powder as well as loose powder when I do my makeup because I have found that by using two different powders, my face is less likely to get oily throughout the day. For dry skin, I recommend only using one powder, because too much powder on that skin type can dry out the skin. For normal skin, you can do whatever feels best. I apply my pressed powder with a medium-sized makeup brush all over my face. Then I go in with loose powder all over my face and I apply that with a powder puff.
Here are some powder recommendations!
Loose:
Kimchi Chic Puff Puff Pass Set & Bake Powder
Maybelline Fit Me! Loose Finishing Powder
One/Size Ultimate Blurring Setting Powder
Pressed:
Charlotte Tilbury Airbrush Flawless Finish
Maybelline Fit Me! Pressed Powder
NYX Professional Makeup Pressed Powder
Now that you're all done with powder, you are just one step away from a perfect makeup base! All you need is a setting spray. Setting spray is the final step to locking in your base makeup so it lasts all day. To apply it properly, hold the spray a couple of inches away from your face and spray everywhere.
Here are some setting spray recommendations!
Elf Stay All Night Blue Light Micro-Setting Mist
Milani Make It Last Matte Finish Charcoal Setting Spray
Charlotte Tilbury Airbrush Flawless Setting Spray
One/Size On 'Til Dawn Setting Spray
Look at you! Your base looks absolutely flawless. I hope this blog was of great help to you.
Works Cited
Kim, Min Ah, et al. “Layering Sunscreen with Facial Makeup Enhances Its Sun Protection Factor under Real‐use Conditions.” Skin Research & Technology, vol. 27, no. 5, Sept. 2021, pp. 751–57.
Fields, Jackie, and Andrea Lavinthal. “20 Makeup Tips That Really Work.” People, vol. 97, no. 19, May 2022, pp. 126–29.
4 notes
·
View notes
Note
sorry for bad english want to know how you do your eye make like this can please tell
you’re so sweet! and honey, don’t worry about your english! i understood just fine! if it’s easier for you to use your native language, that’s perfectly fine! i can just use a translator <3
i’ll try to explain my process very clearly and detailed!
so i’m going to describe just a basic eye look for me, not something very difficult or complicated.


1. primer
first, you want to prime your eyelids to make your eyeshadow last longer, prevent creasing, and show up more vibrant.
this can be whatever concealer you use for your face, that works just fine :)
after you blend out a little bit of concealer on your eyelids, lightly set it with some setting powder.
2. eyeshadow
i would start with neutral shades if you’re a beginner as they’re less intimidating and easier to work with.
i’m going to use a screenshot of a palette that i have, and then circle shades that i use in order to show examples of what shades you should use :)
this is anastasia beverly hills soft glam palette.

3. eyeshadow application
what you want to do is start with a small amount of a dark matte brown, on a pencil brush. i know that might sound weird but just trust me. it’ll place the color down in a concentrated area for you before you blend it.
here’s the shade of brown.

and here is where you wanna place it.

then blend that with a fluffy brush, with no product on it.

then use that same fluffy brush and blend it with a lighter matte brown
here’s the brown shade.

after you’ve blended it out, keep on blending. blend until there’s a gradient between the lighter brown and your skin tone.
if need be, go back in with that pencil brush from earlier and dip into the darker brown just a little bit. you can use that to deepen the color. if you do that, blend a little bit with the fluffy brush.
what i usually do is go in with a glitter, so i take a liquid glitter/shimmer eyeshadow (i think elf makes good ones, but there’s a lot of others if you don’t like that brand) and apply that to my eyelid.
here’s where it’s applied. it’s really just on my lid, and into my crease, but not really touching the brown eyeshadow. it’s pretty much mimicking a cut crease. then i go in and tap some of the lighter brown onto the outer edge of the liquid eyeshadow to make it melt together.

i added liner but that’s optional! i’ve had years of experience for makeup in general, but especially eyeliner so if you want an additional tutorial (?) let me know!
also, if you (or anyone really) want a tutorial (?) on my more graphic, colorful looks (or my base routine) pls let me know!
LOVE YOU MWAH <333 let me know if you need anything else!
edit: my sweet anon dropped by to add this bit of advice that is SO TRUE. while i was making this post, my sister was talking to me about family drama so i was distracted and it must’ve slipped my mind. “depending on your skin color, you’d wanna change up what colors of brown you use, cus like if you have lighter skin, that’s gonna look more dramatic with those colors, and if you have darker skin, it’ll look a little more natural or possibly barely even be visible. it would probably be helpful to play around with the tones and shades to see what looks best and what you like most on yourself!!”
so please please explore different brands, palettes, etc to find shades that will best suit your skin tone! hugs <33
11 notes
·
View notes
Text
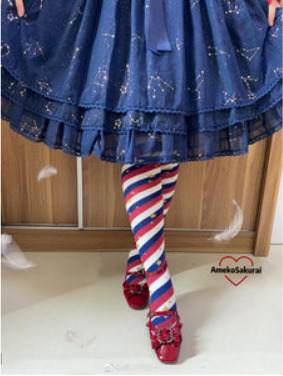
Where to start as a (plus size) lolita (Part 5)
Anatomy of a proper Lolita Coordinate
What is a coordinate?
A coordinate (usually shortened to coord) is what your whole outfit is. This applies to every fashion of course, but we’ll be focusing specifically on lolita fashion specifically. This includes everything from your dress to shoes to petticoat to even your accessories and hair and makeup. Making a coordinate can seem a bit daunting, especially for a beginner who may not know where to start. Since lolita is a bit of a strict fashion on what applies and what doesn’t, I’m making this guide to give newbies a general idea of how to make proper coordinates (which can give you an idea on what you’ll be needing to acquire).
For this guide, I will be using a sweet lolita coord as an example, but this information applies to every sub style.
Note: Not every single piece I list is 100% needed or required, of course, you should take note of the weather and other conditions you will be facing when wearing lolita.
1. Petticoat

This is the foundation of your coord and a good portion of what makes lolita fashion, lolita fashion! A good solid petticoat should be about the length of your dress which is usually around 45cm. Most lolita dresses/skirts will be around that length, especially brand dresses but keep an eye on measurements. You don’t want a petticoat too deflated, too long, or too short of the silhouette of the dress/skirt will NOT look right.
2. Main Piece
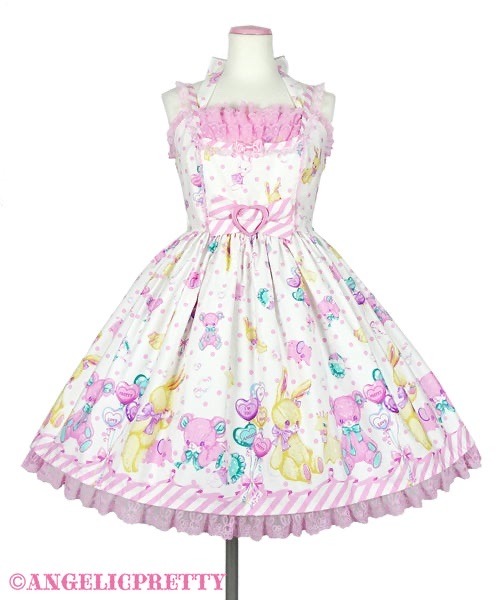
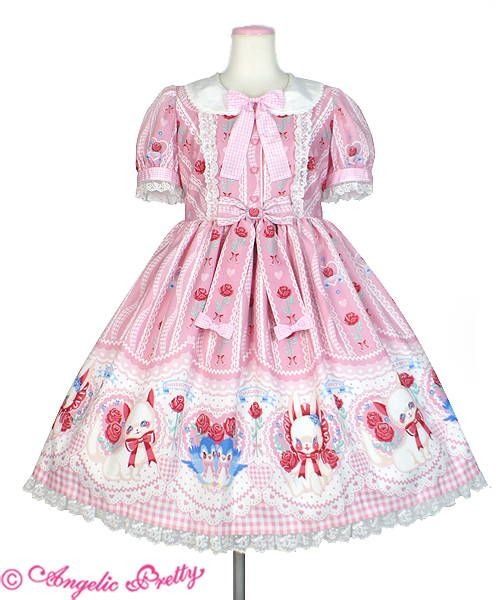
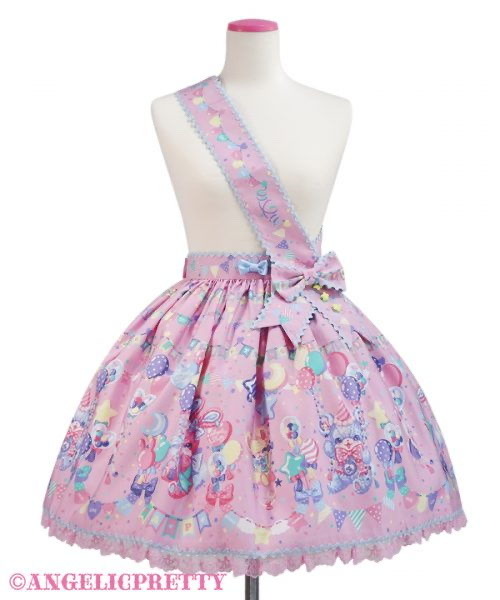
This is your main piece! And most likely your focal point! This is the other part of what makes Lolita fashion, Lolita fashion! There are a few types of main pieces and depending on what you choose to wear can determine what other pieces you add to your coordinate. With an OP (one piece) you don’t need to add a blouse (but some people do, especially as a trend quite a few years back). However, with a JSK and a skirt, you’ll be needing a blouse under the dress/skirt. This also determines the type of blouse you might wear under these items which is extremely important as well. I recommend looking at the colors you choose for your main piece and using that color palette to help you make decisions on the other colors you want to add to your coordinate. (Sounds complex, but just make sure the colors match/or are the same color palette).
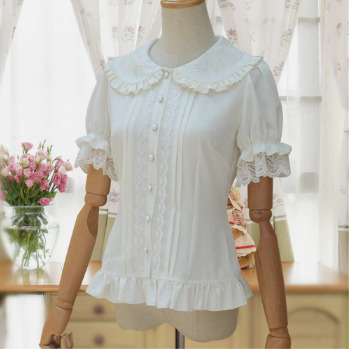
3. Blouse
You can't get very far without a good blouse! You wear these under your main piece and they again, vary in style and length. There's not much to say other than they're essential and without one, you'll be floundering around. The main color people wear for a blouse is white since it goes with most pieces. However, depending on your style other colors would suit a coord better like pink, black, or even brown! The sky is the limit with blouse types, it's just a difficult decision to pick your favorites suited for the wardrobe you want.

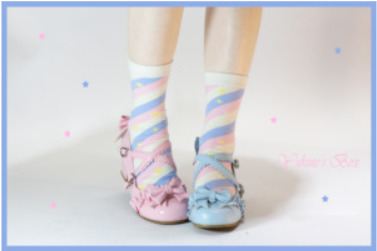
4. Legwear
What's a good coord without a cute pair of socks? Socks come in 3 different lengths, not including tights. There are ankle socks, under-the-knee socks (UTKs), and over-the-knee socks (OTKs).
5. Shoes
Who could forget the other essential, shoes? Lolita shoes come in several heights and styles, many working very well with lolita! As long as they are not sneakers (especially dirty or ruined ones), nice looking dressy shoes are key to pulling off a cohesive nice coord. There are TONS of different shoe types, the hard part is finding the right one that suits you! Custom options are available as well!


Final Note:
As always, I could go on, but these pieces are what give you a basic lolita coordinate. A more versatile wardrobe will allow your pieces to be stretched further in your coordinates. As long as your coordinates have these basic steps and features, you are a lolita. When you master the basics, then you can experiment with your coords as well!
Part 1 Part 2 Part 3 Part 4 Part 5 Part 6
#sweet lolita#sweet ollie tag#where to start as a lolita#where to start as a plus size lolita#plus size sweet lolita#beginner lolita
28 notes
·
View notes
Note
Do you have any tips for beginners on how to apply false eyelashes? (I'm literally so bad at it lol)
Oh my god so actually I do!! I had such trouble with this when I first started using fake lashes. So my NUMBER ONE TIP is wait for them to dry then wait a little more, don’t apply them right away! That was my number one mistake that would just make my hands so sticky and have the lashes slipping and sliding off my eyes. When they’re ready, they should just stick without any trouble. Apply them to the lash line, and if you can, use an eyelash curler (though this can be tricky) to blend the natural lash with the fake lash. Use kiss white lash glue, it’s the one I love most. And I personally don’t have this problem, but if it’s more comfortable for you, you can cut the lash to the size of your liking if it keeps poking your inner corner! Good luck! 🩷 If you’re still having trouble, I’ve been told many times to do a makeup tutorial so I might have one on the way! 🤭
6 notes
·
View notes
Text
To elaborate on the previous post, makeup is unlike other skills that I've picked up. There's so much noise in search results and very few good absolute beginner resources. So many tutorials assume you already have a fair degree of background knowledge of how to apply the product and surrounding skin care routines like moisturizing and exfoliating, which guys are just.... never taught. And like, the feedback loop is so long because I'll do techniques that look good in the mirror but then melt or look cakey in other environments. Plus, some things just don't work because of beard stubble and such (oh goddess how many cotton rounds have been destroyed on my neck hair).
So at least for now, ya girl is basic af. But they're trying
3 notes
·
View notes
Text
How start skin care as a beginner

Here's a simple guide to starting a skincare routine for beginners:
Identify Your Skin Type:
Normal: No or few imperfections, no severe sensitivity, barely visible pores, a radiant complexion.
Dry: Almost invisible pores, dull and rough complexion, red patches, less elasticity, more visible lines.
Oily: Enlarged pores, dull or shiny, thick complexion, blackheads, pimples, or other blemishes.
Combination: Can be dry or normal in some areas and oily in others, such as the T-zone (nose, forehead, and chin).
Sensitive: Redness, itching, burning, and dryness.
Establish a Basic Skin Care Routine:
Cleanse: Choose a cleanser that does not leave your skin tight after washing. Clean your face no more than twice a day, or just once, if you have dry skin and don't wear makeup.
Moisturize: Apply a moisturizer immediately after washing your face to keep your skin hydrated.
Apply Sunscreen: Use a broad-spectrum sunscreen with an SPF of at least 30. Sunscreen is the easiest way to prevent premature aging of the skin.
Introduce Additional Skin Care Products:
Serums: Use serums that address specific concerns, such as anti-aging serums with antioxidants like vitamin C or hydrating serums with hyaluronic acid.
Exfoliants: Depending on your skin type, incorporate an exfoliant into your routine to help remove dead skin cells. Use gentle exfoliants if you have sensitive skin.
Masks: Face masks can be used occasionally to deep cleanse or hydrate your skin.
By following these steps, you can establish a skincare routine that suits your skin type and addresses your specific skin concerns.
2 notes
·
View notes
Text
a little ethubs fic. they experiment with eyeshadow. enjoy!
fic under the cut, or you can read it on ao3
reblogs appreciated! <3
CW: none! this is pure fluff :)
---------------------
"Hey, Etho," Bdubs called, practically tumbling into the room with armfuls of brightly coloured products, "Which one do you want?"
Etho looked up. "Uh, do you have any turquoise?" he asked.
Bdubs wrinkled his eyebrows, in thought. "I should have? Let's have a look!"
And with that, Bdubs dumped all of the sparkly products onto the bed, alongside the various brushes needed to apply the makeup.
Bdubs had never given someone a makeover before. It was a similar sort of passion to when he'd opened a barbershop back in season seven; he loved making things pretty, and wanted to extend that philosophy to people too.
He'd always wanted to experiment with makeup, like how he'd experimented with hair, but trying to teach himself on his own face was very difficult. Luckily, Etho had volunteered to be his test subject- uh, he means, his canvas.
"Hmm," Etho hummed to himself, looking at all of the different colours availible. "That one," he stated, jabbing a finger towards a glittery teal colour.
"A fine choice, good sir, a fine choice," Bdubs nodded, trying to act professional (which earned a raised eyebrow from Etho, and an answering glare from Bdubs). The professional character soon returned, as Bdubs branished his utensils and proclaimed: "Step into my salon."
Etho looked around him. "What salon..?"
Bdubs narrowed his eyes, "Very funny. I guess the bed is the salon for now, but just you wait! Once I'm done with you people will be begging to have me work my makeover magic on them, I'll practically be forced to build a salon!"
"Yeah, riiiiiiiiiiiight," Etho rolled his eyes, "More like they'll see what you've done to me and ban you from ever using makeup again."
"HEY! Just remember that I'm the one with the makeup here, wise guy. So you better be careful!"
Etho chuckled. "Okay, okay, sorry! Just get this over with."
Bdubs stared at Etho, thinking through his process. "Close your eyes."
Etho obliged. Bdubs dabbed the small, spongy brush into the sparkly powder, before applying it as gently as he could to Etho's eyelids, being sure not to get it everywhere.
Etho huffed. "Feels weird," he mumbled, "Like you're pressing on my eyeballs."
"I'm being as gentle as I can," Bdubs whispered in reply, too concentrated on what he was doing to make any form of snappy remark.
Bdubs worked dilligently, ensuring that the touch of the brush was as light as it could be, while still concentrating on staying within where eyeshadow usually goes.
After Bdubs was done, he brandished a small mirror. "You can look now."
Etho cracked his eyes open one by one, and nervously looked at his reflection. He hummed. "Well done, Bdubs, this is actually decent."
Bdubs practically lit up. "HA! YES! SEE? I TOLD YOU!"
Etho just nodded along, accustomed to Bdubs's bragging by now. "Can I have a turn now?"
Bdubs's face suddenly contorted into an expression of confusion. "You..? Huh?"
"I want a go with the sparkly stuff. May I?"
Hesitantly, Bdubs shuffled a little closer and handed Etho the brush. "Okay... you can take your pick of the colour, I dont mind."
Closing his eyes, Bdubs was beginning to regret giving Etho so much control - but he couldn't find it in his heart to tell Etho to stop, not when he was humming a little tune as he worked.
Etho took a little longer than Bdubs did to finish the eye shadow, and from the amount of pauses that he was making, he seemed to be struggling a little bit. That's okay, Etho was only a beginner, no way he could match up to Bdubs's prowess right away. That would take years of training, at least.
"Hmm, okay. You can open your eyes now," Etho said, sounding a little timid.
Oh, no. What had he done.
Bdubs nervously opened his eyes and looked at his reflection in the mirror, before spluttering in indignation.
It was... beautiful???
Green glitter blended into the gold glitter effortlessly, the sparkles swirling together in a soft gradient that melted into his skin.
"H- how did you... What? Etho?"
Etho simply giggled. "I dunno, beginner's luck?"
Bdubs gasped dramatically. "BEGINNER'S LUCK?? OH, YOU-"
"Hey, dont worry Dubs!" Etho grinned, "You'll still be able to have that salon someday, just a little more practice!"
Bdubs pouted (and Etho found it hilarious). "You're a freaking jerk."
Etho smiled softly. "I know."
22 notes
·
View notes
Text
i've been wanting to get into makeup for funsies but every time i look up "makeup guide for beginners" or "guide to makeup products" these guides only show me how to *apply* the products and these "beginner makeup looks" expect me to put on a full face of makeup.
like… i'm sorry, but when i'm looking for a "beginner's makeup guide" i'm expecting a guide for someone who has never put on a makeup product in their life, does not know the names of any type of product, and is very anxious to be putting on a full face of makeup right away.
in expecting all girls to be familiar with makeup and be comfortable putting on a full face every single day, y'all've created extremely unhelpful guides. thanks. i just wanted to see how minimalist i can go with makeup so that i can ease into it, and also so that my disabled ass can actually feel compelled to put anything on, but i guess every girl in the world is also able-bodied now? hell.
#darling says#ok to rb#random rant i guess#not opposed to guides or suggestions that aren't poisoned by makeup culture. i just haven't been able to find any so far
2 notes
·
View notes
Text
"You can't compare yourself to other people."
This is sometimes a good sentiment. A beginner violinist will not sound as good as a professional concertmaster. In the same vein, due to the nature of the human body, two people with the same injury will have different recoveries.
It doesn't apply when the design of an everyday requirement excludes or restricts me, but not others.
Other people set expectations that they can meet. I am required to meet them as well, regardless of my actual ability. It's how society works.
I take the bus. My coworkers drive. I have to walk over a mile to the bus stop, with a cane, rain or shine, and if I miss the bus there might not be another one for an hour. I might arrive at work soaked and exhausted with a ten hour day and another two hour bus ride ahead of me. My coworkers' makeup is still perfect. We are expected to do the same job in the same amount of time.
I'm not just jealous. I'm annoyed and exhausted.
35 notes
·
View notes
Text
I need me like. The dumbfuck beginner's guide to makeup. What does any makeup product do. Why and when would you use it. How do you apply it. Wtf is BB cream and concealer and foundation.
All the guides assume I have some sort of baseline knowledge, but I sure don't.
This is for cosplay/costume purposes and getting effects I want, not to "cover my blemishes" or whatever the fuck. I refuse to endorse or opt-in to the culture of wearing a face full of makeup every day.
#ramblings of a bystander#a bystander makes cosplay#walked into a makeup store whike out and about a few months ago.#walked out after like 3 minutes because I was overwhelmed by everything.
5 notes
·
View notes
Text
Facepaint cosplay makeup tips from someone who’s been doing it for 7 years because fuck it why not:
(Keep in mind I work with primarily water based facepaints because they operate best with my skin type)
You will be blowing out (whatever color) facepaint snot out of your nose for 48 hours after wearing the facepaint. Do not be alarmed, happens to all of us, don’t ask me how.
Please do not do more then 2-3 layers the facepaint will begin cracking (far more then usual!) Depending on what brand, that number may vary slightly but not by much. Better a thin and patchy layer then a thick and crackly one. I usually do 2 coats max
If by the time you’ve done two layers there’s still a mistake, just leave it. Leave it alone. You will regret trying to add more paint to fix it, just trust me on that one.(If you really can’t help but fix the error then let the rest of the paint on your face dry before you do it, it’ll still result in a cracky finish but it’ll be less severe.)
Mehron paradise paints are excellent once you learn how to use them, but they’re a bit finicky and not as beginner friendly as people say they are imo. Try snazzaroo if it’s your first time working with facepaint ever! I’ve heard oil based facepaints work excellent on the right skin types, unfortunately mine is not, I have very oily skin, and the paint melted right off me within 30 minutes. It was great when it was first applied though! If you have average-to-dry skin, oil based paint might be an excellent option for you! Check it out, I can’t speak on it.
Facial hair, regardless how thick or thin it is, might make your facepaint do weird things in your jaw area. It reaaaallly varies person to person, for me its something I have to/want to shave.
Setting powder is a MUST after you’ve applied your even base layer before you start contouring. My life changed when I figured that out, and my facepaint started looking “professional” and actually lasting more then 2 hours. I can’t express how much I recommend mehron setting powder.
When you’re contouring or using any powder do not expect it to blend on water-based facepaint like it would on skin. The powder sticks very quickly to the paint and doesn’t want to budge, so it’s better to do thin layers until you’re satisfied, and blend quickly.
Expect it to be uncomfortable, especially your first time wearing it. Your entire face, neck, and maybe more are covered in paint, it’s gonna suck lmao. The good news is, once you’re used to it, you’re USED to it. I wore facepaint for 3 days straight 11 hours a day the other weekend, and forgot it was there almost immediately. However, if it burns or hurts, remove it immediately, that’s not the facepaint for you!
Don’t be afraid to make expressions! If your facepaint isn’t applied too thickly, it should move with you for a good amount of time before expressions begin to crack into it. (And even when it begins to inevitably wear down, your fun is more important then your facepaint.)
Your teeth might look yellow as fuck! Like gold yellow! It’s ok! First and foremost, yellow teeth are natural, secondly, the contrast between tooth color and the different colors of facepaint tend to make your tooth color appear differently then you’re used to.!
Put your contacts in BEFORE you paint your face and thank me later. :)
If you get paint stuck in your eyelashes, dampen your finger tips and gently strain it out of the lash between your thumb and index finger.
To avoid chapped lips, either find a lipstick in a color you can use, or mix a bit of eyeshadow and chapstick.
There’s no easy way to eat in facepaint, but the best advice I got for you is do not be afraid of eating weird. If you have to unhinge your jaw and clamp into a sandwhich to avoid fucking up your paint, just do it. I stopped caring what people thought of my facepaint eating ritual a long time ago. However, if you can opt for it, popcorn, m&ms, grapes, walnuts, and stuff like that are good to just throw in your mouth. (And of course, touch up paint is never bad to have on hand.)
Drink stuff through a straw! I repeat! If you can! Drink stuff through a straw!
And to conclude: Facepaint. Looks. Bad. Inherently. Facepaint will never look like skin up close. It will look like skin to someone over 5 feet away, and on a camera, but it will never look like actual skin. Expect small cracks even if you did your damndest with the base coat, expect your sweat to create a ring around your nose and eyelid. ESPECIALLY if you plan on wearing the paint for more then a couple hours. It’s inevitable, and it’s perfectly ok!! Even those of us who have been facepainting for years still have our sweat stain and forehead cracking days, it’s just in the business. Don’t let the internet fool you with filters!
Facepaint unfortunately takes a good couple attempts to get the hang of. Your first couple attempts might suck! They might! But please don’t let that stop you from filming videos or going to a convention. It’s a part of the learning curve, and before perfection, cosplay is SUPPOSED to be about fun, and any facepaint is good enough to have fun in.❤️
And ahhh don’t forget to take it off before bed!
Happy cosplaying!
#cosplay#Walt talks#Walt cosplays#cosplay tips#I don’t know if anyone on tumblr particularly cares about this but I’m posting it anyway because I might reference back to it if I ever fil#any facepaint tutorial videos
9 notes
·
View notes
Last Seen Blogs

shelbania
Bedsnail

88micci
micci
LocationManager

uniquehumanoidmongerbakery-blog
Untitled

magnificentalpacamoon
Untitled

castielsfeather-blog
castielsfeather